
Download our recovery and repair disk for Microsoft Windows 7 (also available for Windows 8, Vista, XP or Server editions) that can be used to access system restore tools.
It comes with our exclusive Automated Repair feature, option to access System Restore, tools to backup and recover your most important files, a built-in antivirus scanner and a command-line for advanced recovery options.
Download recovery disk for Windows 7
Looking for recovery disks for other Windows versions?
- Download Windows Vista recovery disk
- Download Windows 8 (and 8.1) recovery disk
- Download Windows XP recovery disk
Contents
- What is a recovery and repair disk
- Download recovery disk for Windows 7
- Burn to CD, DVD or USB
- Compatible with PC manufacturers
- Dell, HP
- Asus, Acer
- Lenovo, Toshiba, Samsung
- IBM, Compaq, Gateway, eMachines
- Disk for Windows 8, Vista, XP or Server editions
- Support
Our recovery disk supports x86 and x64 platforms and all Microsoft Windows 7 editions, including 32-bit and 64-bit editions: Ultimate, Enterprise, Professional, Home Premium, Home Basic and Starter.
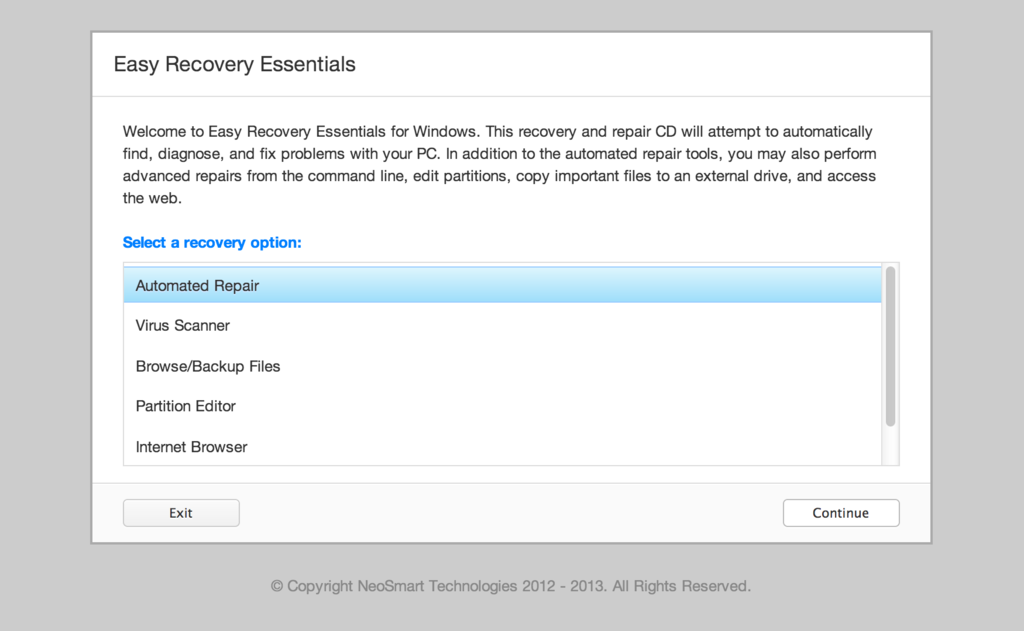
Easy Recovery Essentials (or EasyRE), is a 55 to 135 MiB ISO image ready to be downloaded.
You can burn this ISO image to any CDs, DVDs or USB drives and boot from it to recover or repair your broken computer. We provided instructions on how to do this below, see Burn to CD, DVD or USB.
With the Easy Recovery Essentials you can (see list of features here):
- Automatically find and fix errors using Automated Repair
- Recover your PC from infections using its built-in antivirus
- Restore your PC to a working state
- Access and backup your most important data (like documents, pictures, music, videos and so on)
Easy Recovery Essentials comes with powerful tools that computer technicians or IT experts can use straight away:
- Fully-featured visual partition editor
- Scriptable command line
- Advanced recovery options
- Web browser
You can read more about EasyRE for computer repair professionals here.
What is a recovery and repair disk
Major PC manufacturers no longer give customers a real Windows 7 installation DVD along with their purchase of a computer.
A Windows 7 installation DVD can be used to recover your PC, not just install a Windows 7 copy. The DVD has a “recovery center” that gives you options to Automated Recovery (attempts to fix automatically any errors found), System Restore (restores your computer to the last working state) or you can access a command-line for advanced recovery options.
Instead, customers are expected to create a recovery media themselves – on a CD, DVD or USB drive.
Your computer’s hard drive might have a recovery partition added by the manufacturer, but what happens when your PC or Windows isn’t working or you’ve lost the disks you had?
If you can’t boot into Windows or your PC isn’t working, only a bootable recovery and repair CD/DVD/USB can save you.
Easy Recovery Essentials, our recovery and repair disk, uses a non-destructive repair process that can recover your PC without formatting your hard drive or reinstalling Windows.
It comes with our powerful Automated Repair feature, an antivirus scanner built-in, the ability to access System Restore, tools to browse the Internet (a web browser) and back-up your most important files (documents, videos, pictures, music and so on), memory diagnostics and a command-line tools for advanced options.
Some of its features include (see list of features here):
- One-click Windows repair
- System Restore
- Web browser
- File backup
- Antivirus scanner
- Partition editor
Update: Please note that this disk is no longer free, due to licensing restrictions imposed upon us.
Download Easy Recovery Essentials for Windows 7
Our recovery disk supports x86 and x64 platforms and all Microsoft Windows 7 editions:
- Windows 7 Ultimate (32-bit and 64-bit editions)
- Windows 7 Enterprise (32-bit and 64-bit editions)
- Windows 7 Professional (32-bit and 64-bit editions)
- Windows 7 Home Premium (32-bit and 64-bit editions)
- Windows 7 Home Basic (32-bit and 64-bit editions)
- Windows 7 Starter (32-bit edition) (Starter is available only in 32-bit)
It works with any Windows 7 that has Service Packs installed:
- Windows 7 Service Pack 1 (SP1)
The disk is in ISO image format that you can burn to any CDs, DVDs or USB sticks and then use it as a bootable recovery CD/DVD/USB. We provided step-by-step instructions how to burn the ISO image below.
It’s a 120 MiB download file.
You cannot use a recovery or repair disk to install or reinstall Windows 7.
Burn to CD, DVD or USB
NeoSmart Technologies has published a guide on how to burn an ISO image to CD or DVD. This ISO image can be burnt to any CDs or DVDs and even USB drives.
You can burn the ISO with your favorite burning program. We published step-by-step instructions and guides on how to do this:
- Burn with ActiveISO
- Burn with ImgBurn
- Burn with Alcohol 120%
If you prefer to have a recovery USB instead, follow our guide on how to make a EasyRE recovery USB drive here.
Compatible with PC manufacturers
Our recovery and repair disk works with any desktop computers, workstations, laptops, notebooks, ultrabooks, netbooks or servers computers from all major PC manufacturers, Dell, Asus, IBM and more.
It works with older or no longer on the market PC brands, such as Gateway Computers or eMachines PCs.
Dell, HP
Dell recovery disk
This disk is compatible with Dell PCs and its manufactured series:
- Adamo
- Inspiron
- Studio
- Vostro
- XPS
- Latitude
Do you have a Dell computer running Windows 7? Read our recovery and restore guide for Dell.
HP recovery disk
Easy Recovery Essentials works with your HP computer, including any of these series and models:
- ENVY
- EliteBook
- Essential Home
- Pavilion
- x2 models
Do you have a HP computer running Windows 7? Read our recovery and restore guide for HP.
Asus, Acer
Asus recovery disk
It works with any Asus computer model that runs any of the following Windows versions:
- Windows 8
- Windows 7
- Windows Vista
- Windows XP
- Windows Server 2003, Server 2008 and Server 2012
Do you have an Asus computer running Windows 7? Read our recovery and restore guide for Asus.
Acer recovery disk
Acer users can download our disk. It’s compatible with all Acer models:
- Desktops models: Aspire M and T, Aspire X and Predator G
- Notebooks models: Aspire R, Aspire V3 and Aspire E
- Netbooks and ultra-thin computer models: Aspire S7, Aspire S5, Aspire S3, Aspire P, Aspire M, Aspire V7, Aspire V5
- Netbooks models: Aspire One
Do you have an Acer computer running Windows 7? Read our recovery and restore guide for Acer.
Lenovo, Toshiba, Samsung
Lenovo
Lenovo computers are supported by our disk, including any of the following series:
- Laptops models: ThinkPad and IdeaPad
- Desktops models: Thinkcentre and Ideacentre
Essentials series for laptops and desktop PCs are also supported.
Do you have a Lenovo computer running Windows 7? Read our recovery and restore guide for Lenovo.
Toshiba
The disk is compatible with any Toshiba computer model: Satellite, Qosmio, Portege, Tecra, Kira family series and All-in-One desktop series.
Do you have a Toshiba computer running Windows 7? Read our recovery and restore guide for Toshiba.
Samsung
Samsung users can download our disk. It is compatible with any Samsung laptops or desktops:
- ATIV Book, Gaming and Business PC series for laptops
- ATIV One for All-in-One desktops
IBM, Compaq, Gateway, eMachines
IBM
Lenovo acquired IBM’s personal computer division in 2005. You can download Easy Recovery Essentials if you own a IBM computer.
It is compatible with IBM desktops and laptops models, like the ThinkPad series.
Compaq
The Compaq company was acquired by HP in 2002.
It is compatible with Compaq notebooks and desktops, including the Compaq Presario series.
Gateway and eMachines
Gateway Computers was acquired by Acer in 2007. If you happen to have a Gateway computer, you can download our disk. It is compatible with its manufactured series:
- Series SX, DX and One ZX for desktop systems
- NE and NV series for notebooks
- LT series for netbooks
Do you have a Gateway computer running Windows 7? Read our recovery and restore guide for Gateway.
eMachines computers were available on sale until 2004 when Gateway Computers (above) brought the company. Gateway was acquired in 2007, but the eMachines brand was used until 2012.
If you own a computer from eMachines, you can download our disk as it is compatible with eMachines PCs.
Disk for Windows 8, Vista, XP or Server editions
Easy Recovery Essentials is compatible with other Windows versions, not just 7.
Windows 8
Read more about our recovery disk for Windows 8. It supports Windows 8 and its update, Windows 8.1.
Download for Windows 8.
Windows Vista
Read more about our recovery disk for Windows Vista. Easy Recovery Essentials supports all Windows Vista editions, from Vista Starter to Vista Ultimate, and the 32-bit and 64-bit versions.
Download for Windows Vista.
Windows XP and Server 2003, 2008 and 2012
Windows XP is supported by Easy Recovery Essentials. This includes Service Packs of XP too: SP1, SP2, SP3.
Easy Recovery Essentials supports all Windows Server editions, such as Server 2003, Server 2008 and Server 2012 and the updated versions: Server 2003 R2, Server 2008 R2, Server 2012 R2.
Support
Easy Recovery Essentials supports all Service Packs (SP) of your Windows:
- Windows XP SP1, XP SP2, XP SP3
- Windows Vista SP1, Vista SP2
- Windows 7 SP1, 7 SP2
- Windows 8, 8.1
- Windows Server 2003 R2, Server 2008 R2, Server 2012 R2
Download Easy Recovery Essentials from here.
Please don’t ask for help below, it’ll get real cluttered real soon!
Open a support thread at https://neosmart.net/forums/ and we’ll help you resolve your problem ASAP.
If your Windows 7 won’t start or start with significant problems, you may need to use the System Repair Disc to fix problems with Windows 7. When computer came with a Windows 7 DVD, you can use that DVD to repair your system. But what if you don’t have one? It is necessary to create a System Repair Disk at once. Spend a few minutes to read this passage, which tells 2 ways to create Windows 7 64/32 bit repair disc and how to use it to repair your computer.
2 Methods to Create a System Repair Disk for Windows 7 64/32 Bit
Situation 1: When Your Windows 7 PC is Unable to Start Normally
If your computer has failed to boot normally, you can take use of a professional Windows 7 repair disk creator, also known as Windows Boot Genius. To start with, you should prepare a workable computer and a blank disk, such as CD/DVD/USB flash drive. And then you can follow the instructions below.
- 1) Download and install Windows Boot Genius on the workable computer you have prepared.
- 2). Insert the CD/DVD or USB into the computer and launch the program. Then, just click «Burn» to start creating a Windows 7 system repair disk.
- 3). Then you can insert the newly burnt disk into the PC which has run into a problem, and start to fix your computer. You just do the following:
Reboot the computer and set its BIOS settings to let the PC boot from the disk.
After entering the Windows system, launch Windows Boot Genius again. Choose «Windows Rescue» on the top tab. It shows «Crash before Loading Bar» by default. Choose the right error type, and try the provided solutions to fix the problem your computer has run into.
Situation 2: When Your Windows 7 Computer can Boot up Normally
If your computer can work properly, and you want to create a Windows 7 repair disk for further use, then you can try this way. Please do as the following:
- 1) Open the Start menu and type Backup. Choose «Backup and Restore». Click «Create a system repair disc».
- 2) Click the Create a System Repair Disc link.
- 3) Insert a blank DVD into your DVD drive. Click the Create Disc button, and Windows will copy over the appropriate files. Once it’s finished, the autorun window will appear, showing that the disc is named «Repair Disc Windows 7 64-bit» (or «32-bit», if you are using that version of the OS).
Take disc out and put it in some place where you will be able to find in an emergency.
You can choose either of the 2 ways to create a system repair disk for Windows 7, according to your own situation. You can also take use of the same methods to create repair disk for Windows 8, Windows 10 and etc.
Создание диска восстановления системы
Создание диска восстановления системы в Windows 7 не слишком сложное занятие, это я понял, но может я создаю его неправильно? Дело в том, что бэкап созданный с помощью Архивирования данных компьютера, я случайно удалил, но есть ещё один, скопированный предварительно на флешку, она у меня 32 Гб, но флешку, Восстановление образа системы воспринимать не хочет, как мне быть?
Денис.
Создание диска восстановления системы
В нашей статье мы расскажем, как создать Диск восстановления операционной системы Windows, а затем покажем как им воспользоваться. Но сначала короткий совет нашему читателю.
- Папка с резервной копией WindowsImageBackup на вашей флешке, НЕ должна быть вложена в другую папку, если с этим всё нормально, значит самое простое решение для Вас Денис, воспользоваться любым Live CD, загрузиться с него и скопировать ваш архив с образом Windows 7, с флешки на жёсткий диск вашего компьютера, с которого вы не можете загрузиться, но только на раздел, где не установлена Windows 7. Далее загружайте ваш компьютер с Диска восстановления системы и ваш бэкап обязательно найдётся. Ну и я надеюсь, вы знаете, что восстановление будет полным и вся ваша информация с дисков, которые вы включили в бэкап удалится.
- Друзья, недавно я написал статью — Как создать резервный образ Windows 8 на дисках DVD, на флешке, на переносном жёстком диске USB, а самое главное — как с помощью этого образа восстановиться. Всё что написано в той статье, подойдёт и для Windows 7.
Ну а теперь создание диска восстановления системы, который нужно использовать для загрузки компьютера, он будет содержать в себе средства восстановления Windows 7, при помощи них можно восстановить неисправности загрузки операционной системы или восстановить её из архивной копии, что мы и сделаем.
- Примечание: Предварительно у вас должен быть создан бэкап Windows 7, это очень просто. Как это сделать? Можете почитать у нас->Как восстановить систему Windows 7, это статья о том как восстановить Windows 7 с помощью разнообразных средств восстановления встроенных в саму операционную систему, если у вас проблема с запуском или работой Windows, прочитайте сначала её, может быть всё обойдётся и без диска восстановления.
Так же нужно знать, что для диска восстановления важна архитектура системы, у вас получиться использовать 32-битный диск восстановления для любой 32-битной Windows 7, а 64-битный диск восстановления для любой 64-битной Windows 7.
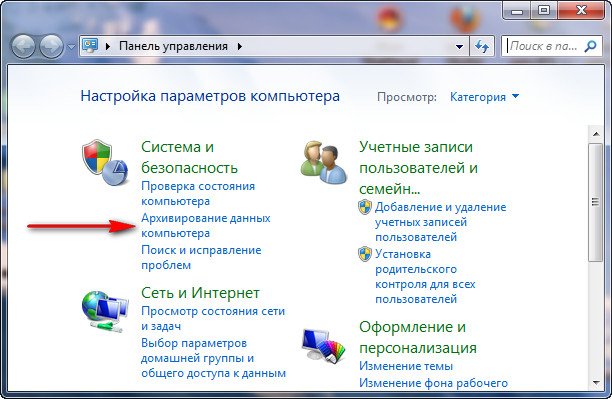
Создаём диск восстановления системы, идём в Пуск->Панель управления->Архивирование данных компьютера,
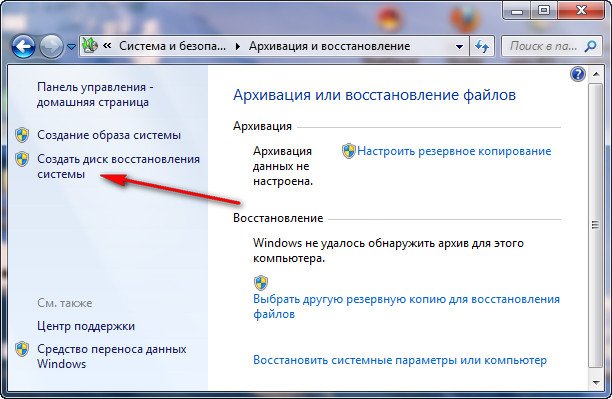
выбираем Создать диск восстановления системы.
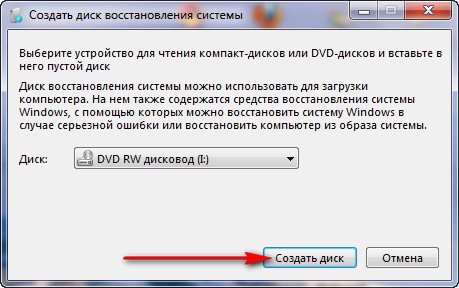
Вставляем в дисковод DVD-диск, нажимаем кнопку Создать диск
Происходит недолгий процесс создания диска восстановления системы. Теперь о том, как им воспользоваться.
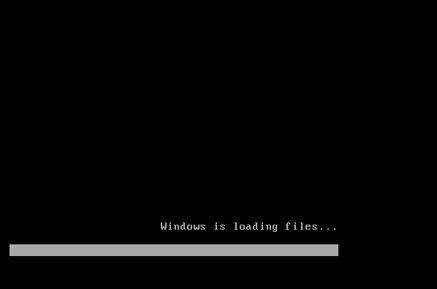
Допустим у вас на компьютере тяжёлый сбой и вы совсем не можете загрузить Windows 7. Нажимаете F-8 на клавиатуре, сразу же после запуска компьютера, с намерением попасть в меню Устранение неполадок компьютера, но кроме чёрного экрана ничего.
Для восстановления работоспособности Windows 7 с Диска восстановления, вам нужно сменить в BIOS, приоритет загрузки на дисковод, затем вставить в него диск восстановления и восстановить с помощью бэкапа вашу Windows 7. Как сменить приоритет загрузки в BIOS, читайте наши статьи BIOS: Загрузка с диска и НОУТБУК: Загрузка с диска в BIOS.
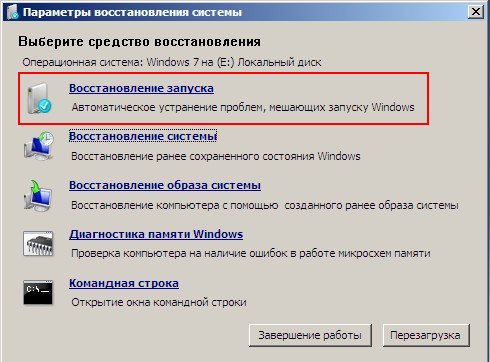
Вставили Диск восстановления в дисковод, затем перезагрузились, запускается программа Параметры восстановления системы.
Нажимаем Enter или предложение загрузиться с диска пропадёт.

Происходит загрузка компьютера с Диска восстановления
Средство восстановленияработающее с диска, может попытаться по вашему желанию восстановить запуск Windows 7, нажмите «Далее».
В первую очередь, примените Восстановление запуска (Автоматическое устанение проблем, мешающих запуску Windows)
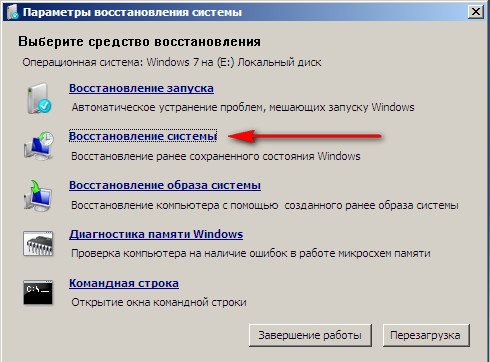
Во вторую, очередь можно применить «Восстановление системы»
Если ничего не помогает, то можем выбрать, Восстановление образа системы, но образ системы должен быть сделан вами предварительно (смотри начало статьи).
Восстановление компьютера из образа находит последний доступный образ системы, нажимаем далее или указываем другой образ, если он у нас есть.
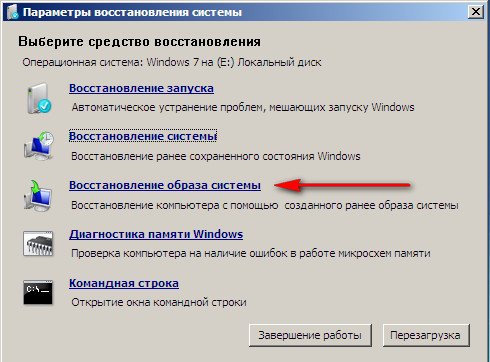
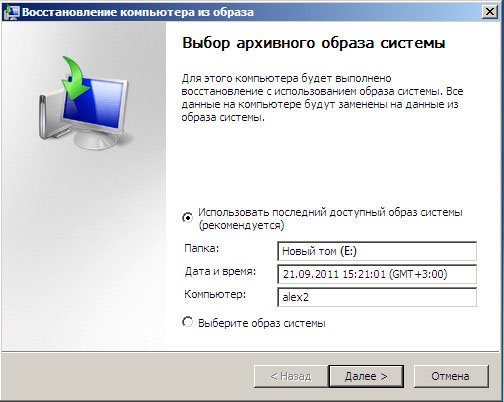
Далее и Windows 7, восстанавливается из резервной копии.

Windows 7 Recovery Discs (32bit & 64bit)
на флешку с Загрузчиком Grub4Dos
Что делает Windows 7 Recovery Discs:
он может использоваться,
чтобы получить доступ к меню восстановления системы,
давая Вам, варианты использования: Восстанавение Системы,
Резервное копирование PC, автоматизированный ремонт системы,
командная строка для быстрого восстановления в ручную.
Что не делает Windows 7 Recovery Discs:
Вы не можете использовать Windows 7 Recovery Disc,
чтобы повторно установить Windows — он только ремонтирует Windows.
Windows 7 Recovery Discs это:
— 143 MB загрузки для 32 битовой версии Windows 7
— 165 MB загрузки для 64-битовой версии Windows 7
в стандартном формате ISO.
Почитать подробней можно здесь:
http://neosmart.net/blog/2009/windows-7-system-repair-discs/
1.)Скачать эти файлы:
http://neosmart.net/downloa….torrent
http://neosmart.net/downloa….torrent
2.)Переименовать эти файлы:
Windows 7 32-bit Repair Disc (в) Windows7-32-bit-RepairDisc
Windows 7 64-bit Repair Disc (в) Windows7-64-bit-RepairDisc
3.)И помещаем их на флешку, в папку BOOT.
4.)В файле Menu.lst добавляем строки
title Windows7-32-bit-RepairDisc
find —set-root /BOOT/Windows7-32-bit-RepairDisc.iso
map —mem /BOOT/Windows7-32-bit-RepairDisc.iso (hd32)
map —hook
chainloader (hd32)
boot
title Windows7-64-bit-RepairDisc
find —set-root /BOOT/Windows7-64-bit-RepairDisc.iso
map —mem /BOOT/Windows7-64-bit-RepairDisc.iso (hd32)
map —hook
chainloader (hd32)
boot
5.)Установка Windows 7 Recovery Discs (32bit & 64bit)
завершена.
When your copy of Windows 7 won’t start up, you can create a Windows 7 Recovery Disk on another computer and use it to restore an image of the system onto the troubled machine.
Page Content
Windows 7 Recovery Disk Explained
Can I Create a Windows 7 Recovery Disk from Another Computer?
How to Create a Recovery Disk for Windows 7 from Another Computer
Restore Windows 7 Operating System Files with the Repair Disc/USB on a Non-Bootable Computer
Windows 7 Recovery Disk Explained
What can I do with a Windows 7 Recovery Disc?
System recovery options can help you fix Windows if there’s a serious problem. — Microsoft
Windows 7 includes a built-in tool to create a System Repair Disc that gives you access to advanced troubleshooting options. This could be a lifesaver if your Windows 7 installation is having problems or won’t start up. A Windows 7 Recovery Disc is a bootable CD or DVD that contains Windows recovery tools. These tools can automatically fix or diagnose a variety of issues, including startup problems and malware infections. Additionally, the recovery disc can restore your Windows 7 system to a previous state, allowing you to undo any changes that may have caused the issues. While a Windows 7 Repair Disc is not a substitute for a full backup, it’s an invaluable tool to get your system running again.
Sounds like a great way to prevent meltdowns, except that most users don’t take the time to make a repair disc while their computer is still working.
Can I create a Windows 7 Recovery Disk from another computer?
“I can’t start Windows 7, and Acer Recovery Management won’t run. Can I make a recovery disc from another computer?” – Microsoft
The answer is yes, you < strong >can</strong> – but only on another computer running Windows 7, not on Windows 8.1 or any later version of Windows. This means you can create a System Repair Disc on a healthy computer running the same version of Windows 7 (either 32-bit or 64-bit).
Read on to learn how to create a system repair disc in Windows 7 using built-in Windows tools and a third-party data backup and recovery program.
How to Create a Windows 7 Recovery Disk from Another Computer
Here, you will learn two ways to create a Windows 7 recovery disc. We compare their levels of difficulty and effectiveness.
| Method | Effect | Difficulty |
|---|---|---|
|
Backup and Restore (Windows 7) |
High — Create a repair disc using built-in Windows 7 tools on a CD/DVD | ⭐⭐ |
| ISO File | Moderate — Requires downloading the Windows 7 ISO file and then installing it on a USB | ⭐⭐⭐⭐ |
#1. Create a System Repair Disk using Backup and Restore in Windows 7
Create a Windows 7 Recovery Disk/Disc:
| ⏰ Duration | 5-10 minutes |
| ? What You Need |
|
Step 1: Find a PC with Windows 7. Insert a blank CD or DVD into its optical drive.
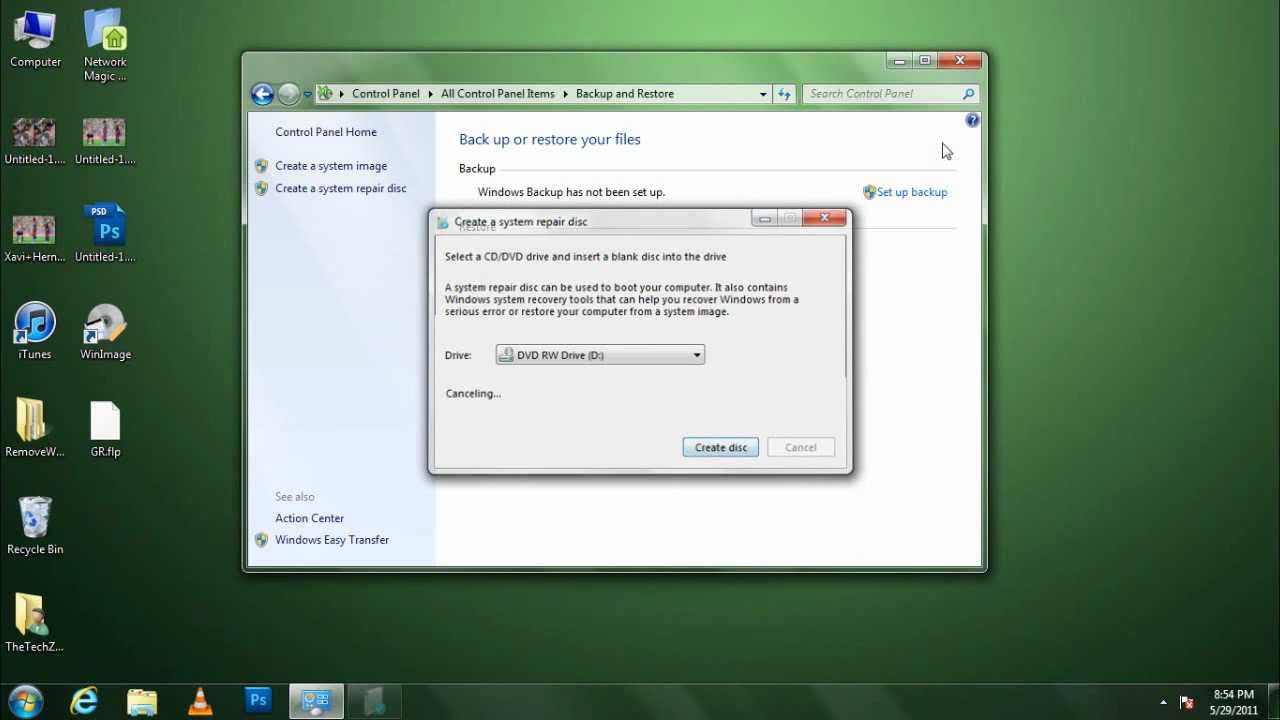
Step 2: Type «Control Panel» in the search box and open it. Then click on Backup and Restore (Windows 7).
Step 3: On the left, click Create a system repair disc.
Step 4: Select your CD/DVD, and click Burn to Disc.
Create System Repair Disc

When it’s done, you can eject the CD/DVD.
Without a CD/DVD, you can use a standard USB drive with the Windows 7 ISO file to create a Windows 7 System Repair USB.
#2. Create a Windows 7 Recovery USB using an ISO File
Please insert a USB drive with at least 8GB of space into your computer, and follow the steps below to create it.
How to create a Windows 7 Recovery USB:
| ⏰ Duration | 10-20 minutes |
| ? Preparation |
|
Step 1: Download the 32-bit or 64-bit Windows 7 ISO file.
Step 2: Download and run the Windows 7 USB/DVD Download Tool (2.6MB).
- Click Browse and select the ISO file you downloaded.

- Click USB device.

- Click Start Copying.

And then wait for the copy to complete.
Video: How to Create a System Repair Disc in Windows 7
This video tutorial shows how to create a repair disk using the Backup and Restore feature in Windows 7.
Start creating the System Repair Disc — 0:39
I’m sorry, it seems like you have entered an empty message. Please provide the English content you would like translated, and I’ll be glad to assist you.
Create a Windows 7 Recovery Disk on Another Computer
Repairing Windows 7 operating system files on a non-bootable PC using a recovery disc/USB
After creating a Windows 7 recovery disc or USB, you can use a Windows 7 repair tool — Todo Backup to perform the recovery. It has an intelligent «Backup & Restore» feature that can save your operating system even if your computer fails to boot.
The recovery feature in Todo Backup, which installs the backup image as a virtual hard drive, provides the easiest method for retrieving backed-up files. — Lifewire.com
Create bootable media, and then restore Windows 7 on a different computer by following the steps.
Try to boot the unbootable computer with Todo Backup WinPE bootable disk for system recovery.
Step 1: Click “Browse to recover” to launch the Todo Backup tool.
Click “Browse” to restore
Step 2. Browse to the location of your system backup, then select the system backup file you need. (A system backup file created by Todo Backup is a .pbd file.)

Step 3: Select the recovery disk. Verify that the partition style of both the source and recovery disks is the same.

Step 4: Adjust the disk layout as needed. To begin the system restore, click Continue.

READ NEXT: If you run into trouble with your new operating system, learn how to create a Windows 11 recovery USB from another computer.
How do I create a Windows 7 recovery disk?
If you need to create a Windows 7 recovery disc, you can do so from another computer. This is helpful if your computer isn’t working properly and can’t create the recovery disc on its own. To make a recovery disc, you’ll need a blank DVD or a USB drive with at least 8 GB of storage space. You’ll also need access to another computer that can run Windows 7.
Now you have a Windows 7 recovery disk that you can use with the Todo Backup tool if your computer has problems.
If the tutorial was useful, please share it with your friends and followers to help them create a Windows 7 Recovery Drive as well.
Apologies, it seems like you have entered an empty message. Please provide the English content you would like translated, and I’ll be glad to assist you with the translation into Chinese.
Frequently Asked Questions about Creating a Windows 7 Recovery Disk for Another Computer
Can I create a recovery drive for another PC?
Yes, you can. You must use the same version of the operating system on the other computer to create the recovery drive. Otherwise, the creation will fail.
How do I create a Windows 7 recovery drive from a USB?
The Windows 7 USB/DVD Download Tool can help you make a USB recovery drive. Alternatively, Rufus is a useful tool for the job.