
The network icon appears on your Windows taskbar and in the notification panel, even when there’s no internet connection or any activity. Nevertheless, the icon can be hidden for a variety of reasons. To restore the network icon to your taskbar, follow these steps. First, open the Control Panel. Go to the Notification Area Icons tab. Click “Network” and then click the dropdown menu next to “Network icon.”
You can find the network icon by clicking on the hidden panel, which is usually indicated by a triangular arrow. Next, you can either drag the icon back to its original position on your taskbar or restart Windows Explorer. Alternatively, you can perform a system reconfiguration. You can also try a third-party tool to reposition the network icon. If the problem persists, you can run registry easy.
Once you’ve accessed the Network and Sharing Center, you can check the status of your network connection. Click on the blue network icon to see if your computer is connected to a wireless network. If it’s not, you can try manually connecting to the network. You can also use the Network and Sharing Center, which allows you to connect to other computers. After you’ve successfully connected to a network, you’ll be able to browse the internet.
Where is the Network Connection Icon?
If you are wondering where to find the Network Connection Icon on your Windows 7 desktop, this article will show you where to look for it. In most cases, it will be located in the hidden panel, which is normally indicated by a triangular arrow. To reposition the icon, you can either drag it back to its original position in the taskbar or manually click it and drag it to a new location. If you are having trouble finding the icon, you can try performing system reconfiguration. You can do this yourself or get a third-party to help you with this.
After restarting your PC, you may notice that the network icon is not appearing. To get it back, you may need to delete two subkeys in the registry. These two keys are used for networking. If the icon does not appear, try the second method. The next time you try the networking connection, you can try to start the process from the beginning. Hopefully, the second method will work for you.
Why is Network Icon Not Showing Connected?
If you’re having a problem with your network connection, you may notice that the network icon is missing from your desktop. Normally, it’s located on the taskbar or notification panel. However, there are a few reasons why the network icon may disappear from your desktop, even if you’re connected to the internet. To resolve the issue, follow these steps.
First, open the Control Panel and click on the network icon. If you don’t see the network icon, check the Network Connections section of the desktop. Select My Network Places. Ensure the Network Connections checkbox is selected. Now click OK and apply to make the changes. If you’ve tried this and it still doesn’t work, you’ll need to re-enable your network.
If you’re still having a problem with the network icon, try unchecking the box under “Disable network connections” in the Notification area. Double-click the network icon to open the Properties window. Select the Network entry in the Icons tab. Make sure to select “Show icon and notifications” in the Behaviors section. Click OK to close the dialog box.
How Do I Make My Wifi Icon Visible?
Depending on the settings of your computer, Windows 7 can hide the WiFi icon from the taskbar. It is possible to enable the Wi-Fi icon in the Taskbar through Group Policy Editor. In general, the Taskbar shows a few icons at a time. If your WiFi icon is hidden, there is probably nothing wrong with your system. It may be a simple setting problem, or you may have a network issue deeper in the system.
To change the setting of your wireless network, open your Taskbar and click the icon located there. Click the “Network” tab, double-click the icon, and click the “Change” button. You should now see your wireless icon in the notification area and the taskbar. Toggling the icon back to its original position will revert you to the default setting. If you wish, you can turn the icon on and off as desired.
What is the Network Icon Look Like?
If you’re wondering: “What does the Network Icon on Windows 7 desktop look like?” you’ve come to the right place. The network icon on Windows 7 desktop indicates the status of your computer’s network connection. If the icon is gray, your computer is not connected to the network, and if it’s white, your connection is active. There are some other possible causes of this icon appearing gray, however.
The Network icon is usually located on your taskbar or notification panel. Sometimes, it goes missing for no apparent reason, even though your internet connection is working. This problem has been reported by a number of Windows users. To fix this problem, you can either click the icon or drag it to the hidden panel. Alternatively, you can click the Windows icon on your desktop and open the Settings menu. Next, click the Settings gear icon. Select the System option. Now, under Notifications & actions, click Add/Remove Quick Actions.
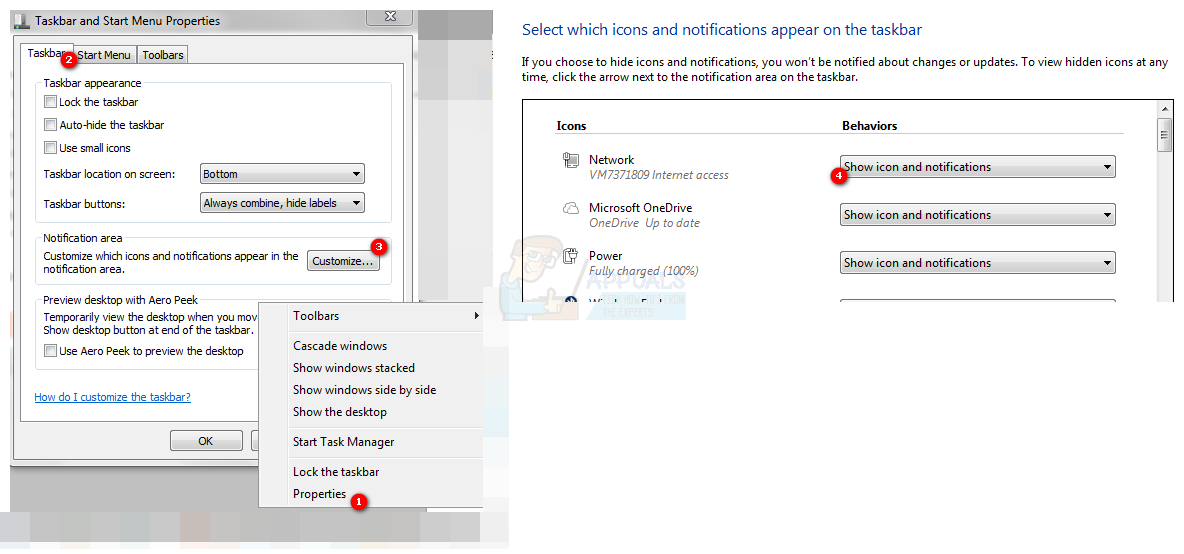
Normally, the network icon is available in the notification panel or taskbar, but sometimes it doesn’t appear. This can occur for several reasons. Sometimes the icon is missing completely even if your internet connection is working. If this is happening to you, here are some ways to fix the problem. Firstly, right-click the taskbar and choose “Properties”. From there, select the Customize button. Then, select the Network icon from the Behaviors drop-down list and click OK.
If you are unable to see the network icon on the desktop, you can try running the command “netsh -reset” as administrator. This will reappear the network icon on your desktop. Once this step is complete, you can reboot your computer to see if it is working again. You can also try deleting the registry subkeys and restarting your computer to see if the problem persists.
How Do I Put an Internet Icon on My Desktop?
If you want to put an Internet icon on your Windows 7 desktop, you can either add it manually or use one of the available methods. Most of these methods will work for desktop icons that are located in the lower-left quadrant of the Start menu. However, most of them will not work for the right-hand column. To find the correct icon, you have to locate its file. The search command will help you with this. The files are stored in the C:-Program Files folder.
To change the location of the network icon, double-click it. This will drag it to the system tray. The same procedure will work for Windows 10 and Windows 7. Once you have located the network icon, click the Start menu and select the Settings gear icon. Click the System option and select Notifications & actions. To add a quick action, click Add or remove an icon. Click the OK button when you are done.
Why is My Ethernet Icon Not Showing Up?
Your network icon may be missing on your desktop. To get it back, follow these steps. First, open the Network Connections window in the Control Panel. If it doesn’t show up, click the Network icon to see it. Right-click the icon and click “Properties”. Follow the on-screen directions to restore the network icon to the taskbar. Now you can connect to the internet.
If your network connection is a wireless one, you’ll see a radio wave icon. If you’re on a wired network, you’ll see a small globe icon. The same goes for WiFi. But if your network isn’t wireless, it will look like a small globe. If your Ethernet connection isn’t shown in the System Tray, try rebooting your computer.
Learn More Here:
1.) Windows Help Center
2.) Windows – Wikipedia
3.) Windows Blog
4.) Windows Central
by: Tiffany Isabelle
2010-05-04
Other Icon
0 Comments
Gallery Type
Welcome back graphic designing lover, are you searching for Windows 7 Show Network Icon? We take a month to select these worthy icon pictures from any public sources. Something great can be found in internet connection windows 7 network icon, wireless icon system tray windows 7 and windows 7 network connection icon, it can inspire to make our own graphic design.
Also see these windows 7 network icon, windows control panel desktop icon and windows 7 system tray network icon to get more graphic file about icon. It’s possible to put anything we like, change the details and make our corrections. We hope that our collection here can bring you more creativity and useful for more creation.
We only show you pictures in jpg or png type. If you would like to use the element of each pictures, you must search them on the source link. We hope you like and want to share, let’s hit share button that you like, so more people can see this Windows 7 Show Network Icon too.
Designing Tips:
Windows 7 Network Icon via
Internet Connection Windows 7 Network Icon via
Windows 7 System Tray Network Icon via
Windows Control Panel Desktop Icon via
Wireless Icon System Tray Windows 7 via
Windows 7 Network Connection Icon via
Windows 7 Network Connection Icon via
Windows Network Connection Icon via
Windows 7 Network Connection Icon via
Internet Connection Icon Windows 7 via
Windows 7 Network Icon via
Control Panel Settings Windows 7 Network Icon via
Wireless Network Icon Windows 7 via
Wireless Icon System Tray Windows 7 via
Windows 7 Start Menu Icon via
Wireless Network Icon Windows 7 via
Windows 7 Network Connection Icon via
System Tray Icons Windows 7 via
Images mentioned are the property of their respective owners
How to Show the Network Icon on the Taskbar in Windows 10 & 7
The network icon on your taskbar is one of the key indicators of your computer’s connection status to the internet and the local network. It not only lets you know whether you’re connected but also provides access to various network-related settings. For both Windows 10 and Windows 7, you might encounter situations where the network icon is missing from your taskbar. This comprehensive guide will explain how to show the network icon, troubleshoot issues, and ensure it’s displayed correctly.
Understanding the Taskbar and its Icons
Before delving into how to show the network icon, it’s important to understand what the taskbar is and why certain icons, like the network icon, are essential.
The taskbar is a critical component of the Windows interface, providing quick access to essential functions and applications. The right side of the taskbar typically houses the notification area (also known as the system tray). This area displays icons for various background apps and system functionalities, including the clock, volume, battery status, and, crucially, network connectivity.
Why the Network Icon Might Be Missing
- System Settings: The settings within Windows may not be configured to show the network icon.
- Network Issues: If there are problems with your network adapter or connections, the icon may not appear.
- Corrupted Files: System files can sometimes become corrupted, leading to missing icons and features.
- User Account Issues: In some instances, the user account you are using may restrict access to the network icon.
- Windows Updates: Occasionally, Windows updates may reset or modify certain settings, causing icons to disappear.
Step-by-Step Guide to Show the Network Icon
For Windows 10
1. Verify Network Connection Settings
Ensure that your network connection is active and functioning correctly.
- Right-click on the Start Menu and choose “Settings.”
- Click on “Network & Internet.”
- Check the status of your current network. If you have no internet access, it might affect the visibility of the network icon.
2. Customize Taskbar Settings
Sometimes, the taskbar settings need to be adjusted to show the network icon.
- Right-click on the taskbar and select “Taskbar Settings.”
- Scroll down and find “Notification area.”
- Click on “Select which icons appear on the taskbar.”
- Toggle the switch for “Network” to ensure it is turned on. If this option is grayed out, ensure that the location is not set to show icons with limited functionality.
3. Restart Windows Explorer
Restarting Windows Explorer can refresh the taskbar.
- Press
Ctrl + Shift + Escto open Task Manager. - Locate “Windows Explorer” in the Processes tab.
- Right-click on Windows Explorer and select “Restart.” This refresh should restore missing icons, including the network icon.
4. Check for Windows Updates
Ensure your system is up to date, as updates can resolve many issues.
- Go to “Settings” > “Update & Security” > “Windows Update.”
- Click on “Check for updates” and install any that are available.
5. Restore Missing Icons using Command Prompt
If the network icon is still absent, using Command Prompt to reset network settings can help.
- Press
Win + Xand select “Command Prompt (Admin).” -
Enter the following commands one by one, pressing Enter after each command:
ipconfig /release
ipconfig /renew
ipconfig /flushdns
This series of commands will clear caches and refresh network settings, potentially restoring the network icon.
6. Create a New User Account
Creating a new user account can be a workaround if the icon is not showing due to user profile issues.
- Go to “Settings” > “Accounts” > “Family & other users.”
- Click on “Add someone else to this PC.”
- Follow the prompts to set up a new user account and switch to that account to see if the network icon appears.
For Windows 7
1. Check Network Adapter Settings
Your network adapter can play a significant role in whether the network icon is displayed or not. Start by checking its status.
- Click on the Start Button and type “Network and Sharing Center” in the search bar, then press Enter.
- In the Network and Sharing Center, check the status of your network connections. If there are any problems, they may need to be resolved first.
2. Taskbar Properties
Sometimes the icon may just be hidden among other icons.
- Right-click on the taskbar and select “Properties.”
- In the Taskbar and Start Menu Properties window, ensure that the box next to “Hide inactive icons” is unchecked.
- Click on “Customize” under the Notification area section and ensure that the network icon is set to «Show icon and notifications.»
3. Restart the Explorer.exe Process
This simple fix often solves minor issues.
- Open the Task Manager by pressing
Ctrl + Shift + Esc. - Find “explorer.exe” under the Processes tab.
- Right-click and select “Restart.” This refreshes the taskbar, and the network icon may reappear.
4. Enable Network Icon via Group Policy Editor
If you’re using Windows 7 Professional, Ultimate, or Enterprise, you can use the Group Policy editor.
- Press
Win + R, typegpedit.msc, and press Enter. - Navigate to User Configuration → Administrative Templates → Start Menu and Taskbar.
- Find “Remove the Network icon” and make sure it is set to “Not Configured” or “Disabled.”
5. Restore System Files
Corrupted system files may lead to problems with icons. Running the System File Checker can fix this.
- Open Command Prompt as Administrator.
- Type
sfc /scannowand press Enter. - The system will scan and attempt to repair any damaged files.
6. Check for Updates
Just like in Windows 10, ensuring your system is up to date in Windows 7 is crucial.
- Click on the Start Button, type “Windows Update” in the search bar, and press Enter.
- Click “Check for updates” and install any that are available.
Additional Solutions
Network Troubleshooter
If the above steps do not resolve the missing icon issue, utilizing the built-in network troubleshooter may yield results.
- In Windows 10: Go to «Settings» > «Update & Security» > «Troubleshoot» > “Network Adapter.”
- In Windows 7: Go to “Control Panel” > “Troubleshooting” > “Network and Internet” > “Network Adapter.”
The troubleshooter will guide you through steps to diagnose and resolve network issues.
Conclusion
Having the network icon visible on your taskbar is essential for easy access to your network status and settings. For both Windows 10 and Windows 7, several methods can help you restore this important icon when it goes missing. Understanding the tasks and steps required, checking through settings, and applying fixes can usually resolve the issue without significant hassle.
If problems persist despite following this guide, it may be worthwhile to perform a full system health check or get in touch with technical support. With these strategies and techniques, you can ensure that your taskbar remains fully functional, keeping you connected to the networks that matter most.
You might wonder where the network connection icon in your notifications tray went. When this happens, you usually have an internet connection but can’t see the Wi-Fi signal bar, Ethernet icon, or connection status icon. Sometimes, you can’t access the internet, and there’s no icon to access the Network and Sharing Center.
This can be caused by several reasons: the network connection status icon is missing, the network service isn’t running, or an issue with Windows Explorer. In most cases, the missing icon can be brought back by enabling it in the notification tray settings. If that doesn’t work, try the other methods in this guide.
Method 1: Enabling the Networking Icon in the Notifications Area
Windows 7:
- Right-click on the taskbar and choose Properties.
- In the Taskbar tab, find the Notification Area section and click on Customize.
- Select Turn system icons on or off.
Make sure the Network option under Icons and Behaviors is set to Show icon and notifications. - Find Network under System Icons and choose On from the Behaviors drop-down menu.
- Click OK to finish.

Windows 8 / 8.1 / 10:
- Right-click on the taskbar and choose Settings.
- Scroll down until you find the Notification area section. Click on ‘Turn system icons on or off’.
- Locate the option for Network and toggle the switch next to it to on.

Method 2: Restarting the Network Services
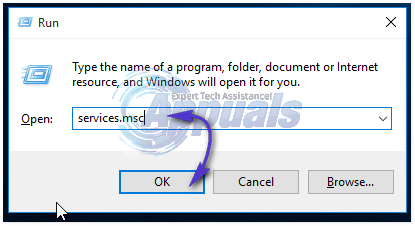
- Press Windows + R, type ‘services.msc’ and hit Enter

- Look for the following services:
Remote procedure call - This service must be started for other services to work.
Network Connections - This service depends on RPC to work
Plug and Play
Com+ Event System - This service depends on RPC to work
Remote Access Connection Manager - This service depends on Telephony to work
Telephony - This service depends on RPC and the PnP services to work
- Ensure these services are started by right-clicking the service name and clicking Start.
Method 3: Restarting Windows Explorer
- Open Windows Task Manager by pressing Ctrl + Shift + Esc on your keyboard, or by right-clicking the taskbar and selecting ‘Task Manager’.
- Go to the ‘Processes’ or ‘Details’ tab and look for ‘Explorer’ or ‘explorer.exe’.
- Right-click on ‘Windows Explorer’ or ‘explorer.exe’, then click on Restart. (For Windows 7, click on ‘End Process’ instead).
- In Task Manager, click on File > Create New Task or New Task.
- Type “explorer.exe” into the field and press Enter.
Method 4: Resetting the Icon Cache
- Right-click on an empty space on your desktop.
- Select Display Properties from the menu.
- In the Display Properties window, locate the option for Color Quality.
- Change the Color Quality setting from 32 bit to 16 bit.
- Click the Apply button to save the changes.
- Now, change the Color Quality setting back to 32 bit.
- Click Apply again.
- Restart your computer to apply the changes.
Method 5: Using the Registry
Proceed with this step only if you’ve tried the earlier methods or you’re conversant with the Windows registry.
- Press Windows + R to open the Run dialog box, type ‘regedit‘, and then press Enter. This will open the registry editor.
- In the registry editor, navigate to the following registry key:
HKEY_LOCAL-MACHINE\SYSTEM\CurrentControlSet\Control\Network
- Under this key, locate the Config entry, right-click on it and delete it. Don’t panic if you don’t see this entry; it’s perfectly fine.
- Restart your computer. When your computer reboots, the Config entry will be automatically re-created.
If you don’t see Config, ignore this method because it is for those who have their settings customized manually or by a third-party program.
Method 6: Forcefully Restarting Explorer.exe and Changing Registry
If none of the above methods work, as a last resort, try deleting some registry keys and force restarting Explorer.exe from the command prompt.
- Press Windows + R to open the Run dialog box.
- Type ‘command’ and press Enter.
- In the search results, right-click on “Command Prompt” and select ‘Run as administrator’.
- Execute the following commands one by one in the Command Prompt window:
REG DELETE "HKCU\Software\Microsoft\Windows\CurrentVersion\Policies\Explorer" /V HideSCANetwork /F

REG DELETE "HKLM\SOFTWARE\Microsoft\Windows\CurrentVersion\Policies\Explorer" /V HideSCANetwork /F

taskkill /f /im explorer.exe

start explorer.exe
- Check if you can now access the network icon to see if the issue is resolved.
Kevin Arrows
Kevin Arrows is a highly experienced and knowledgeable technology specialist with over a decade of industry experience. He holds a Microsoft Certified Technology Specialist (MCTS) certification and has a deep passion for staying up-to-date on the latest tech developments. Kevin has written extensively on a wide range of tech-related topics, showcasing his expertise and knowledge in areas such as software development, cybersecurity, and cloud computing. His contributions to the tech field have been widely recognized and respected by his peers, and he is highly regarded for his ability to explain complex technical concepts in a clear and concise manner.