
Доброго всем дня. Сегодня я поделюсь опытом установки Windows 7 на iMac 2006 года выпуска, этот iMac принесли на замену жесткого диска и профилактические работы. Да, установка на более поздние версии iMac будет проще. Такой же принцип установки на любой macintosh на платформе Intel.
После замены жесткого диска требуется его отформатировать в файловую систему Mac и соответственно установить MacOS, желательно одну из последних версий. Следующим шагом после установки MacOS будет всестороннее обновление программного обеспечения и прошивки iMac, так как последний BootCamp без этой прошивки работать не будет. Далее по пунктам:
1) Заходим в утилиту BootCamp, искомая находится в папке «Программы» — «Служебные программы». Через эту утилиту разбиваем жесткий диск на несколько областей, я делил поровну, поскольку клиент в равных долях пользовался обеими системами. Да, не забываем, что для комфортной работы Windows 7 требуется не менее 30-40 Гигабайт свободного пространства.
2) Вставляем диск с Windows 7 в дисковод и в диалоговом окне BootCamp нажимаем «Установить», после чего произойдет перезагрузка и собственно начнется установка Windows 7.
3) Устанавливаем Windows 7 в раздел BootCamp, его можно также отформатировать и разбить на разделы, но это по желанию. Далее следуем инструкциям и устанавливаем Windows.
4) После окончательной перезагрузки и ввода персональных данных в Windows, потребуется установка необходимых драйверов устройств, необходим диск с BootCamp версии от 3.0 и выше ( http://www.torrentino.ru/torrents/66149 ). Обновление можно найти на официальном сайте Apple (http://support.apple.com/kb/DL996?viewlocale=ru_RU). Без этих драйверов могут возникнуть проблемы со звуком, Wi-fi адаптерами и другими устройствами, так что очень советую установить.
5) После очередной и на этот раз окончательной перезагрузки начинаем пользоваться всеми благами совмещенной платформы и получать удовольствие!
P.s.
Для выбора типа операционной системы при включении iMac зажмите клавишу ALT, еще можно в среде Windows настроить загрузку через BootCamp. Всем спасибо за внимание и удачи!
Советы экспертов: Как правильно выбрать сервис?
Никогда раньше не обращались за ремонтом электроники?
Не знаете с чего начать? В первую очередь — не переживать! Признаки хорошего и качественного сервиса видны сразу. Мы подготовили инструкцию для тех, кто ищет мастерскую или сервисный центр по ремонту Apple

Настоящие, честные и прозрачные цены на сайте

Реальные сроки и гарантия — это уважение к вам

Репутация профессионалов Apple и опыт в несколько лет
Аренда и подмена
Предлагаем услугу аренды Macbook и iMac. Предоставляем аппарат на подмену на время ремонта.
Курьерская служба
Сохраним ваше время и силы, курьер заберёт на ремонт и доставит восстановленное устройство.
Гарантия до 12 месяцев
Уверены в качестве выполняемого ремонта и используемых комплектующих.
Компонентный и модульный ремонт
Выполняем компонентный ремонт, что дешевле. Также можем заменить целиком модуль.
Инженеры с большим опытом
У нас все прозрачно и честно
Спросите любого:
КОМАНДА MACPLUS
Sub_Class with id 5 does not exist
Услуги
-
Экспресс-ремонт
Когда срок имеет значение
-
Доставка в сервис
бесплатно (кроме iMac)
-
Бесплатная диагностика!
В любом случае!
Задать вопрос
Dec 6, 2011 8:22 AM in response to ray apple user
Okay, I asked MS support about this. After reading their reply (which said go check out the Apple support), and then reading Apple’s support threads, I attempted to update my first-generation, very first-Intel-based, early 2006 iMac. (20″, 2.0 GHz CPU, 1.5 GB RAM)
I had been waiting so all the drivers could catch up and all the issues could be ironed out. I am happy to report that everything went just perfect.
I backed up EVERYTHING. I used Windows Easy Transfer to get all my files and settings moved to the Win 7 platform.
In anticipation of problems, I downloaded all the drivers I could find (sound, display, wireless and ethernet drivers). I also downloaded all the versions of Boot Camp, except version 4.0. I did not need all the various drivers, as Win 7 seemed to recognize everything with the first Boot Camp install (3.0, from my Snow Leopard disk). And then all the Boot Camp updates installed just fine.
The only hiccups I had were getting my Magic Mouse to work. I had to revert back to the 2009-ish driver for the BlueTooth (that did it!). Win 7 was trying to give me a «Generic Bluetooth Driver» so I had to go manually find the Apple Driver. And then I had trouble getting a cranky HP Officejet to work (8500). I’ve been having that problem with this d**n printer for months and months.
I love Windows 7 (though I did not dislike Vista). Highest marks to both Microsoft and Apple. It is not hyperbole when I say that this iMac is the best Windows machine I’ve ever had!
Best of both worlds!!!
-
#1
I have an old late 2006 20-inch 2.16 GHz iMac that I’m trying to install Windows 7 Professional on using Boot Camp 4.0.4 because Lion doesn’t get 5. Trying to download the drivers from Boot Camp Assistant gives me the error «Can’t install Windows Support Software because it is not currently available from the Software Update server» (image). Downloading the drivers from Apple’s website using this link in the table and saving it onto a FAT/MBR external disk works, but when I try to install it in Windows 7, it seems to install the drivers, but it always misses the display drivers and occasionally the audio drivers, even after a restart or trying to «repair» the program. The installation shows zero errors despite not installing the drivers properly, and no error messages ever appear that would indicate a problem with the installation. The display drivers in Windows after installing the Boot Camp software is just the generic PNP one that results in either a horribly low-resolution screen or one that is so stretched out that you can’t read anything.
When I had installed Windows 7 on my early 2008 MacBook, the initial installation of Windows 7 (not the Boot Camp software) started with a stretched screen, but halfway through the installation, the screen flashed and then the display looked normal, so I guess it installed the graphics drivers during the initial installation? This is not the case with the iMac. I am using the same install DVD, which is a legitimate purchase from the Microsoft Store.
I have also tried to install the display drivers manually from the Microsoft Update Catalog and from AMD’s website, but neither work.
I have not tried to install or search for the display drivers through Windows Update, as I would have to first deregister the license key on my 2008 MacBook, and then install hundreds of updates through WSUSOffline so the computer can actually connect to the update server. But, if that is what will fix it, I am more than happy to do that as I’d rather have Windows 7 be on my iMac rather than the MacBook because the iMac actually seems to perform much better and can run Minecraft with OptiFine at normal graphics around 60 FPS whereas the MacBook can only get 20. I know Windows 7 isn’t supported, but I plan to leave the entire device offline after installing all of the Windows updates through a mobile hotspot as compared to my home network. I can just get the program installers from another PC and then copy them to the iMac.
TL;DR
Expected Behavior:
- Windows 7 support software is downloaded through Boot Camp, Windows 7 is installed, and the Boot Camp software is then installed and the display works as normal
Actual Behavior:
- Boot Camp cannot download the support software, and downloading the software from Apple’s website instead and then installing it in Windows results in the graphics drivers not installing despite not showing any errors, resulting in a horribly stretched screen
Tried:
- Downloading Boot Camp support software through the Boot Camp app — failed with «Can’t install Windows Support Software because it is not currently available from the Software Update server» (image).
- Downloading Boot Camp support software from Apple’s website using this link in the table and saving it onto a FAT/MBR external disk — works, but display drivers don’t install.
- Manually installing the graphics drivers from AMD’s website and the online Microsoft Update Catalog — installed, but didn’t fix the display issues.
- Running Apple Hardware Test 3A111 to test for hardware issues that would cause the drivers to not be installed — Showed zero issues during extended testing
- Tried installing the drivers individually from the «Drivers» folder in the BC download — Either showed an error on installation or installed but didn’t change anything.
Have not tried:
- Searching for and installing the graphics drivers through Windows Update, if this is even possible
I’d appreciate any advice on this issue.
Last edited:
-
#2
You’ve got the BootCamp4.0.4033.zip (BTW thanks for the link!)
Did you try to install the drivers individually by running the driver-setup from within the bootcamp/drivers-folder?
-
#3
You’ve got the BootCamp4.0.4033.zip (BTW thanks for the link!)
Did you try to install the drivers individually by running the driver-setup from within the bootcamp/drivers-folder?
I have tried to install them individually, but they either show an error on install or install without errors and not change anything.
Thanks for the suggestion, though. I’ll add that to the list of things I’ve tried in the OP.
-
#4
I have the 17” little brother of your iMac and have Windows 7 running on it perfectly. Though it’s an early 2006 with a 1.83GHz Core Duo, with the 32bit version of Windows 7.
It’s been installed on there for a few years, but I don’t remember doing anything weird to get hardware working. In fact I think most of it just worked out of the box. The ATI drivers from the AMD website should just install like normal.
I would just ignore bootcamp altogether and just pretend it’s a PC (because, it basically is).
What drivers are actually missing or have an error in device manager? What error are you getting when installing the ATI drivers (from the AMD website)?
Also is this 64bit or 32bit Windows 7 you’ve installed? It shouldn’t matter, just make sure the drivers you download are for the correct version. The bootcamp drivers aren’t going to target Windows 7 at all on that machine and definitely not the 64bit version (hence ignore bootcamp and pretend it’s a PC).
-
#5
Also is this 64bit or 32bit Windows 7 you’ve installed? It shouldn’t matter, just make sure the drivers you download are for the correct version. The bootcamp drivers aren’t going to target Windows 7 at all on that machine and definitely not the 64bit version (hence ignore bootcamp and pretend it’s a PC).
Yep, that’s exactly, what I’ve been also thinking about: is it Win7 x64, the OP did install?
Would 64bit cause trouble, since the white intel-iMacs came with the 32bit-EFI?
BootCamp software includes both the 32-bit and 64-bit drivers. Maybe something has gone mixed-up there…
-
#6
Yep, that’s exactly, what I’ve been also thinking about: is it Win7 x64, the OP did install?
Would 64bit cause trouble, since the white intel-iMacs came with the 32bit-EFI?
BootCamp software includes both the 32-bit and 64-bit drivers. Maybe something has gone mixed-up there…
Windows doesn’t care about the EFI. It uses a BIOS emulator anyways on early Intel. Unless OP somehow installed via EFI but I doubt it would even boot are all on this early of a Mac, it wasn’t til 2009 Macs that the EFI became somewhat compatible with other OSes and even then stuff didn’t work right.
-
#7
I have the 17” little brother of your iMac and have Windows 7 running on it perfectly. Though it’s an early 2006 with a 1.83GHz Core Duo, with the 32bit version of Windows 7.
It’s been installed on there for a few years, but I don’t remember doing anything weird to get hardware working. In fact I think most of it just worked out of the box. The ATI drivers from the AMD website should just install like normal.
I would just ignore bootcamp altogether and just pretend it’s a PC (because, it basically is).
What drivers are actually missing or have an error in device manager? What error are you getting when installing the ATI drivers (from the AMD website)?
Also is this 64bit or 32bit Windows 7 you’ve installed? It shouldn’t matter, just make sure the drivers you download are for the correct version. The bootcamp drivers aren’t going to target Windows 7 at all on that machine and definitely not the 64bit version (hence ignore bootcamp and pretend it’s a PC).
Hi, very sorry about not responding, I completely forgot about this thread and I guess MR emails go into my spam folder :/. I just kinda gave up and moved on. It is absolutely the 32-bit version and I am very sure the BC drivers are for my iMac, unless I’m somehow reading the table wrong. I haven’t checked what drivers are missing — I know for certain the graphics drivers were missing; I only have the generic PNP adapter driver showing in Device Manager. I do not receive any error when I am installing the ATI graphics drivers; they install fine, but there is no difference in the display and only the PNP adapter shows, even after a restart. Unless the website is so horribly unintuitive that I just downloaded and installed some bloatware ATI control panel, those drivers don’t work.
Would it be possible to get the drivers through Windows Update? I have one license available so I could activate Windows and try to get it through WSUS.
Also, even almost a month later, you still can’t download the drivers from Boot Camp Assistant, so I’m assuming Apple just killed it.
Yep, that’s exactly, what I’ve been also thinking about: is it Win7 x64, the OP did install?
Would 64bit cause trouble, since the white intel-iMacs came with the 32bit-EFI?
BootCamp software includes both the 32-bit and 64-bit drivers. Maybe something has gone mixed-up there…
It’s the 32-bit version.
Last edited:
-
#8
You may give BootCamp3 a try.
It’s located on the SnowLeopard-DVD.
You can access it for download, when the DVD is launched within a Windows-session.
That did help me with my early-2009 iMacs.
Good luck!
Last edited:
-
#9
I think what happens here is that the drivers are actually installed but Windows is too stupid to switch drivers. It’s what I suspected and it was a really easy problem to solve.
Device Manager>Display Adapters> Generic Monitor> Update Driver Software>Browse my computer for driver software> Let me pick from a list of device drivers on my computer. Uncheck «Show compatible hardware». A list will come up with sh#tloads of display drivers. Find one for your model (There will be many for the same one) and click Next. A warning will come up, click yes. Screen may flicker. Reboot.
Время на прочтение4 мин
Количество просмотров402K
На многих компьютера Mac сегодня отсутствует оптический привод: он просто не идет в комплекте на macbook air и mac mini, на некоторых MacBook/iMac заменен на дополнительный 2.5-дюймовый диск, а некоторых компьютерах привод может просто не работать.
Новые маки умеют загружаться с флешки, однако я обладатель не новых (2010), а также данное руководство будет полезно тем, кто хочет
быстро
ставить Windows из образа на
любой
мак.
Я перепробовал много способов — пытался установить с USB флешки/диска, все было тщетно (далеко не каждый mac загружается с флешки или внешнего диска). Refit также ничего не дал — был темный экран. Данный способ был просто спасением.
Итак, что необходимо:
- Virtual Box
- WinClone (последняя бесплатная версия)
- Windows 7/8 ISO образ, который вам нравится
Этап 1: Создание раздела Boot Camp
Создайте раздел Bootcamp используя Boot Camp Assistant. Операция достаточно простая. В 10.6 ассистент создает раздел без замечаний, в 10.7 — предупредит о том, что у вас отсутствует привод.
Этап 2: Создание образа обобщенной установки Windows 7/8
Слово «обобщенный» здесь означает, что образ не привязан к какому-то конкретному железу Mac. После его заливки на раздел Boot Camp (используя WinClone), при загрузке с него Windows 7/8 автоматически настроит всё железо, перезагрузится и вы можете работать. Однако могут понадобится дополнительные драйвера, которые вы можете поставить из комплекта Boot Camp. Данный образ вы можете использовать в будущем на любом мак для
очень
быстрой установки Windows. Однако, в первый раз его необходимо создать, эта процедура не самая простая:
Этап 2.1: Установка Windows 7/8 в VirtualBox
Создайте новую виртуальную машину в VirtualBox, назовите её win7. Важно использовать для виртуальной машины VDI образ диска обязательно
динамический
(dynamically allocated). Размера в 10 ГБ должно быть достаточно. Установите Windows, используя установочный ISO образ. Никакого софта больше не ставьте, включая вспомогающий софт от VirtualBox, т.к. это должна быть чистая система.
Этап 2.2: Удаление раздела System Reserved (Зарезервировано системой) в Windows 7/8
Проблема в том, что Windows создала еще один дополнительный раздел, в котором собственно находится загрузчик. Необходимо перенести загрузчик на основной раздел и удалить этот вспомогательный.
Update: Можно сделать проще: по старте установки Windows 7/8 при выбора раздела диска создаем новый и появляются диск System Reserved и С:\. Дальше диск С:\ удаляем, а System Reserved растягиваем до нужного размера и форматируем. После этого в него можно установить Windows и не будет раздела System Reserved. Спасибо IGHOR Либо используем этот метод (для уже установленной Windows):
- Загружаем Windows
- Заходим в Управление дисками (правый щелчок по Компьютер в Проводнике -> Управление)
- Назначаем любую букву для нашего скрытого раздела (правый щелчок мыши по разделу и выбираем пункт Изменить букву диска или путь к диску). Например назначили букву E:
- Запускаем командную строку под администратором. Поочередено, внимательно, вводим следущие команды:
-
reg unload HKLM\BCD00000000выгружает эту ветку реестра
-
robocopy e:\ c:\ bootmgrкопируем файл bootmgr
-
robocopy e:\Boot C:\Boot /sкопируем папку Boot
-
bcdedit /store c:\boot\bcd /set {bootmgr} device partition=C:прописываем загрузчик в раздел C:
По выводу команд убеждаемся, что всё прошло успешно. Теперь командную строку можно закрыть.
-
- В Управление дисками делаем активным раздел C и удаляем уже ненужный раздел System Reserved. Останется нераспределенное место (100 МБ у меня), но это не важно.
- Перезагружаемся, система должна нормально загрузится теперь с раздела C:
Этап 2.3: Делаем Windows обобщенной используя утилиту sysprep
- Запускаем командную строку под администратором. Вводим:
net stop WMPNetworkSvcточного ответа на вопрос «зачем» нет. Но этот сервис остановить необходимо
- В папке C:\Windows\System32\sysprep создаем файл unattend.xml следущего содержания:
<?xml version="1.0" encoding="utf-8"?>
<unattend xmlns="urn:schemas-microsoft-com:unattend">
     <settings pass="generalize">
          <component name="Microsoft-Windows-Security-Licensing-SLC"
processorArchitecture="x86" publicKeyToken="31bf3856ad364e35"
language="neutral" versionScope="nonSxS"
xmlns:wcm="http://schemas.microsoft.com/WMIConfig/2002/State"
xmlns:xsi="http://www.w3.org/2001/XMLSchema-instance">
                <SkipRearm>1</SkipRearm>
          </component>
      </settings>
</unattend>
Внимательно проследите за тем, чтобы расширение файла было именно «XML», так как по умолчанию Windows может добавить «TXT»: unattend.xml.txt. Я для этого в св-вах папки выставил опцию всегда показывать расширения всех файлов.
- Запускаем C:\Windows\System32\sysprep\sysprep.exe. Поставьте следущие опции:
Жмем «ОК», машина должна выключится сама.
Этап 2.4: Конвертирование образа VDI в WinClone образ
- В VirtualBox заходим в File->Media Manager. Жмем Copy нашего раздела Windows, обязательно используя опцию Fixed size. Пуская копия будет называться win7_copy. Ждем выполнения этой операции
- Заходим в Terminal, перемещаемся в папку, где вы сохранили копию и вводим:
sudo VBoxManage internalcommands converttoraw win7_copy.vdi win7.rawОпять ждем завершения
- Вводим еще одну команду в терминале:
sudo hdiutil attach -imagekey diskimage-class=CRawDiskImage win7.rawПосле этого у вас должен примонтироваться образ Untitled
- Заходим в WinClone, делаем копию этого примонитированного диска Untitled в первом табе Image
- Образ готов!
Этап 3: Заливаем образ WinClone на раздел Boot Camp
Используем второй таб Restore в программе WinClone и заливаем созданный в предыдещем этапе образ на уже физический раздел Boot Camp.
Для будущих инсталляций теперь вам нужно только этапы 1 и 3, второй необходимо проделать лишь один раз.
Я не являюсь автором данного know-how, это вольный перевод на русский (с незначительными дополнениями и улучшениями). Оригинал данной статьи доступен здесь. Метод опробован мной лично на 2 mac — iMAC MC508 2010 и Mac Mini 2011 младшая модель, работает замечтально, за что спасибо автору, который также говорил, что способ опробовали сотни людей, и он just works.
PS. Прошу строго не пинать, это мой первый пост здесь. Спасибо.
This guide will take you each and every step of the way through setting up and installing Windows 7 on your Mac using Boot Camp.
2022 Update: this is a bit more complicated now. Boot Camp no longer supports Windows 7 and only works with a 64-bit version of Windows 10 Home edition or Windows 10 Professional edition. If you’re using an older version of OS X (macOS High Sierra version 10.13 and earlier) you can still install Windows 7, anything newer means you have to use Windows 10. Fortunately, we have a guide that takes you each and every step of the way through installing Windows 10 on your Mac 
Requirements:
- All firmware updates installed on your Mac (use Apple Button -> Software Update… to check)
- A Windows 7 installation DVD
- Your OS X installation DVD
- Around 30GB of empty hard drive space on your Mac. You can probably get away allocating less than 30GB to Windows 7, but it will leave very little room to install anything in Windows.
- An hour if all goes well, up to 5 hours if not
- Though not absolutely required, it’s a VERY good idea to have a complete and up to date Time Machine backup of OS X – it really came in handy for me. Because part of the process involves partitioning your drive, there’s always the distinct chance something will go wrong and everything will be wiped out.
- Patience, possibly a great deal of it. Having a book handy will also help kill time during the partitioning, installing etc).
Installing Windows 7 via Boot Camp
- Here goes. First thing – close absolutely every open program you can. That includes those things running in the Apple Menu that you always forget about. Don’t worry about killing the Dock or Dashboard – having those running is fine.
- Now open a Finder and navigate to Applications -> Utilities and double-click Boot Camp Assistant.
- Click Continue on the initial Introduction screen. Ignore the fact that it doesn’t mention Windows 7 as a possible OS to install.
- Now you have to decide how much space you want to allocate to Windows 7. You might be able to get away with going as low as 10GB, but I would highly advise against it. You’ll have almost no space left over to install software, and your page file in Windows might cause frequent crashes. I opted for 20GB, which left me with just a bit over 16GB to use after installing Windows 7.
To change the amount of space to dedicate to Windows 7, click the small divider between Mac OS X and Windows, and drag it to the left.
- Once you’ve determined how much space you want to allocate to Windows 7, click the Partition button.
- The partitioning itself doesn’t take particularly long. If you receive an error, proceed to step 10 of the “How to install Vista with Boot Camp” tutorial. It provides all the troubleshooting info you need to resolve partitioning issues. Once you’ve cleared up any problems, or if everything just goes smoothly, proceed with the next step in this tutorial.
- Once completed you’ll notice a new BOOTCAMP drive on your desktop.
- Now insert your Windows 7 DVD and click the Start Installation button.
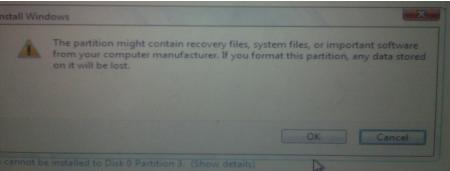
- Your Mac will restart, and Windows 7 will boot. You’ll be prompted with a window asking you which partition you want to install Windows on. Select the one with BOOTCAMP in the Name column. Selecting anything else may wipe out OS X or cause serious problems. Then select the Drive options (advanced) link.
- With the BOOTCAMP volume still selected, click the Format link.
- Click OK.
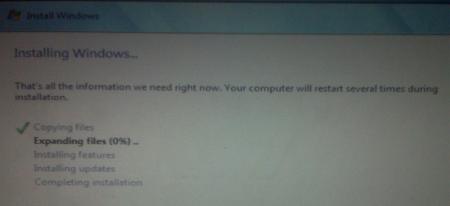
- And Windows 7 will begin to install. It’s a fairly boring process, so you may want to grab yourself a cup of coffee or your beverage of choice. But don’t go too far away, because when your system reboots, you’ll need to remove the Windows 7 DVD.
- With the Windows 7 DVD removed, your Mac will automatically boot back into Windows 7, and the installation will complete. You’ll be prompted to select your language, keyboard layout etc. The rest of the Windows 7 installation process is very straight forward.
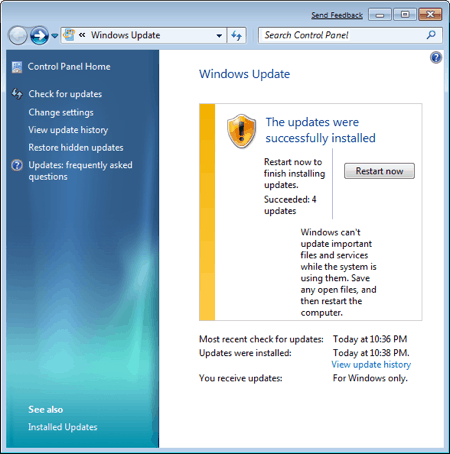
- Once the installation has completed and your Mac has restarted again, you’ll be able to use Windows 7. WiFi will work immediately (no drivers to install) so connect to the Internet. Windows 7 will then begin to download updates, including the proper video card driver. Let it do its thing.
- Once completed, you’ll be prompted to reboot yet again. Do so.
- Once Windows 7 boots back up again, you’ll notice the resolution is much better, and you can enable the advanced graphics features.
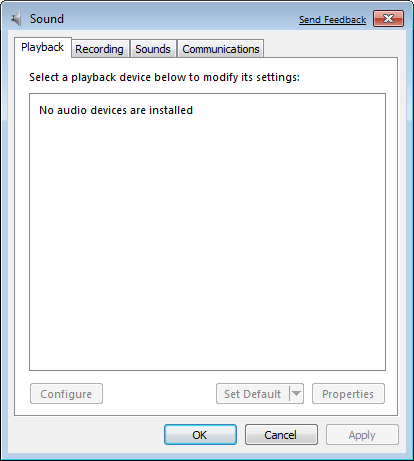
- But if you check for sound, you’ll notice there are no sound drivers installed.
- Insert your OS X DVD. When prompted, select Run setup.exe. Note: If you’re using Snow Leopard and a message pops up saying “Remote Install Mac OS X”, close that window and eject the CD. Put the CD in again and this time select “Open folder to view files”, navigate to the Bootcamp folder, and run setup.exe.
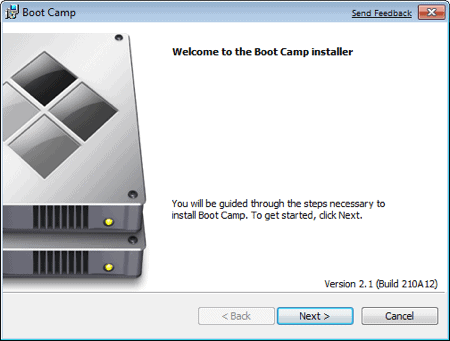
- The Boot Camp installer will launch. Click Next to begin.
- Select I accept the terms in the license agreement and then click Next again.
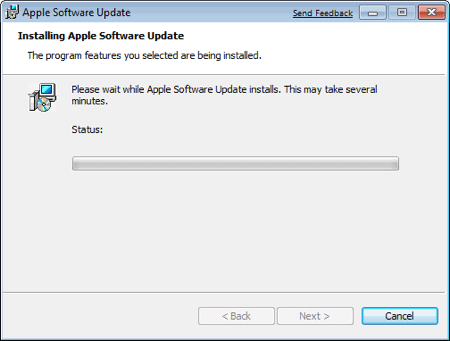
- Make sure that Apple Software Update for Windows is checked, and click Install.
- The Boot Camp installer will do its thing, and install all the required drivers.
- Notifications will pop up with each driver that gets installed.
- Once completed, click Finish.
- And yet again you’ll be prompted to reboot. Remove your OS X Leopard DVD from the drive, and click Yes to restart.
- At this point most of the hardware on your Mac should be working in Windows. However, some iMacs and MacBook Pro’s will have to update to the 3.1 version of Boot Camp for Windows. To do so, just follow the few steps in this tutorial.
- Note: If you still have problems with sound not working, you’ll need to install the Realtek drivers. This tutorial will explain what to do.
- That’s it, you’re done! When your Mac boots, hold down the Option key to select which Operating System you want to boot into.

click to enlarge

click to enlarge

click to enlarge

click to enlarge

click to enlarge

click to enlarge

click to enlarge
click to enlarge
click to enlarge
click to enlarge

click to enlarge
click to enlarge

click to enlarge

click to enlarge
click to enlarge

click to enlarge
If this article helped you, I’d be grateful if you could share it on your preferred social network — it helps me a lot. If you’re feeling particularly generous, you could buy me a coffee and I’d be super grateful