
С 15.06.2022 г. IE 11 не поддерживается
IE11 станет недоступным с 14.02.2023. Сайты, созданные для IE, можно перезапустить в режиме IE в Microsoft Edge.
Поддержка браузера Internet Explorer прекращена с 15 июня 2022 года. Если для посещения какого-либо сайта нужен Internet Explorer, в Microsoft Edge этот сайт можно перезагрузить в режиме IE. Майкрософт рекомендует использовать браузер Microsoft Edge.
Важно! Если выбрать язык ниже, содержимое страницы динамически отобразится на выбранном языке.
-
Date Published:
15.02.2023
File Name:
EIE11_RU-RU_MCM_WIN7.EXE
- Поддержка браузера Internet Explorer прекращена с 15 июня 2022 года.
- Если для посещения какого-либо сайта нужен Internet Explorer, в Microsoft Edge этот сайт можно перезагрузить в режиме IE. Майкрософт рекомендует использовать браузер Microsoft Edge.
- Начать
- Чтобы получить дополнительную информацию об Internet Explorer 11 для предприятий или ИТ-администраторов,
нажмите здесь. -
Поддерживаемые операционные системы
Windows 7 Service Pack 1
- Компьютер (процессор): компьютер с процессором с тактовой частотой 233 МГц или выше (рекомендуется процессор Pentium)
- Память: 512 МБ
- Место на жестком диске:70 МБ
- Экран: монитор с разрешением Super VGA (800×600) или выше, 256 цветов.
- Периферийные устройства: модем или подключение к Интернету; мышь Microsoft, мышь Microsoft IntelliMouse или совместимое устройство-манипулятор.
-
Чтобы установить Internet Explorer 11, нажмите кнопку Загрузить и следуйте инструкциям на экране.
This article is basically the same as my Adding Internet Explorer 10 to your Windows 7 SP1 reference image post that was published in July 2013, but obviously this one is updated for Internet Explorer 11. For those of you using Windows 8 only, don’t bother reading, just replace your Windows 8 images with Windows 8.1 images.
Anyway, as you probably know, Internet Explorer 11 was released for Windows 7 SP1 on November 7, 2013, and like the previous versions you can create a customized IE 11 application using the Internet Explorer Administration Kit (IEAK) 11. You then configure MDT 2012 Update or MDT 2013 (recommended) to install that application as part of your reference image build.
Step-by-Step Guide
Anyway, the overview steps to add IE 11 to your Windows 7 SP1 reference image are the following:
- Download the IE 11 prerequisites and add as OS packages in MDT
- Create the IE 11 package using IEAK 11, and add as an application in MDT
- Add the application to your Windows 7 SP1 task sequence
Note: If you are still using MDT 2012 Update 1, once you have created the reference image, you also need to update the Unattend.xml file for the task sequence used to deploy it. This is because the native template in MDT contains settings that are not compatible with IE 11. See the “Deploying a Windows 7 image with Internet Explorer 11” section later in this post for details. If you are using MDT 2013 you don’t need to worry about this. The MDT 2013 unattend.xml template for Windows 7 is already updated.
Download the IE 11 prerequisites and add as OS packages in MDT
In this example I have a server named MDT01 with MDT installed, and I’m preparing a IE 11 package for Windows 7 SP1 x64.
- On the MDT01 server, create a folder named D:\Setup\IE11 PreReqs
- Download the following files to the D:\Setup\IE11 PreReqs folder
- http://go.microsoft.com/fwlink/?LinkID=303935
- http://go.microsoft.com/fwlink/?LinkID=272391
- http://go.microsoft.com/fwlink/?LinkID=239722
- http://go.microsoft.com/fwlink/?LinkID=254722
- http://go.microsoft.com/fwlink/?LinkID=258387
- http://go.microsoft.com/fwlink/?LinkID=258385
- http://go.microsoft.com/fwlink/?LinkID=273751
- http://go.microsoft.com/fwlink/?LinkID=324542
- http://go.microsoft.com/fwlink/?LinkID=324541
Note: Microsoft does have a KB article listing the IE 11 prerequisites (http://support.microsoft.com/kb/2847882 ), however that article is not complete (I filed a bug, time will tell if they update the article).
- In Deployment Workbench, in the Packages node, create a folder named Windows 7 SP1 x64.
- Expand the Packages node, right-click the Windows 7 SP1 x64 folder and select Import OS Packages.
- On the Specify Directory page, in the Package source directory text box, browse to D:\Setup\IE11 PreReqs and complete the wizard.
Note: If you are deploying multiple operating systems in your MDT deployment share, use selection profiles to limit what OS packages that are injected during deployment.

The content of the D:\Setup\IE11 PreReqs folder.

Deployment Workbench after adding IE 11 prerequisites in to the packages node.
Create the Install – Microsoft IE 11 for Windows 7 SP1 – x64 Application
In these steps, I assume that you have downloaded IEAK 11 to your Windows 7 SP1 x64 machine.
Note: You need to have Internet Explorer 11 installed on your Windows 7 SP1 x64 machine to be able to install IEAK 11.
- Install IEAK 11 with the following settings:
- Choose License Type: Internal Distribution via a Corporate Intranet
- Organization name: ViaMonstra
- Start the IEAK 11 wizard (Internet Explorer Customization Wizard 11), and use the following settings:
- Destination Folder: C:\Setup\IE11 – ViaMonstra Build

- Target Platform: Windows 7 Service Pack 1 Systems (x64-Based)
- Target Language: English (United States)
- Package Type: Full Installation Package
- Feature Selection:
Note: The Internal Install option is new in this release and allows you to control the setup behavior (like restart) without additional command line switches.
- Automatic Version Synchronization: Click Synchronize
Note: The synchronize option may display the “Run” dialog box behind the window, so watch the taskbar.
- Custom Components:
- Internal Install:
- User Experience: Completely Silent Installation and No Restart.
The new options in IEAK 11 for setup behavior.
- Browser User Interface:
- Search Providers: Click Import to add any search providers from your local machine.
- Important URLs – Home page and Support
- Remove the default home page, and add http://www.viamonstra.com.
- Clear the Retain previous Home Page (Upgrade) check box.
- Accelerators:
- Favorites, Favorites Bar and Feeds:
- Browsing Options:
- First Run Wizard and Welcome Page Options: clear the Use Internet Explorer 11 First Run Wizard (recommended) check box
Disabling the Internet Explorer 11 First Run Wizard (recommended) option.
- Compatibility View:
- Connection Manager:
- Connection Settings:
- Automatic Configuration:
- Proxy Settings:
- Security and Privacy Settings:
- Programs:
- Additional Settings:
- Destination Folder: C:\Setup\IE11 – ViaMonstra Build
- Navigate to the C:\Setup\IE11 – ViaMonstra Build\FLAT\AMD64_WIN7EN-US folder and copy the IE11-Setup-Full.exe file to your MDT server (mine is named MDT01, and I copied the package to D:\Setup\Install – Microsoft IE 11 for Windows 7 SP1 – x64.
- Add the IE 11 Package to Deployment Workbench, by completing the New Application Wizard using the following settings:
- Application with source files
- Publisher:
- Application name: Install – Microsoft IE 11 for Windows 7 SP1 – x64
- Version:
- Source Directory: D:\Setup\Install – Microsoft IE 11 for Windows 7 SP1 – x64
- Specify the name of the directory that should be created: Install – Microsoft IE 11 for Windows 7 SP1 – x64
- Command Line: IE11-Setup-Full.exe
Note: In IEAK 10 (the previous version), you needed to add the /c:»IE-REDIST.EXE /quiet /norestart /update-no» command line switch, but because of the new Internal Install option in IEAK 11 that’s no longer needed.
- Working directory:


The Install – Microsoft IE 11 for Windows 7 SP1 – x64 application added to Deployment Workbench.
Edit the Task Sequence
In these steps, you add the Install – Microsoft IE 11 for Windows 7 SP1 – x64 application to your Windows 7 SP1 x64 task sequence.
- Right-click your Windows 7 Enterprise x64 SP1 task sequence, and select Properties.
- On the Task Sequence tab, configure the task sequence with the following settings:
- State Restore. After the Tattoo action, add a new Group action with the following setting:
- Name: Windows 7 Applications
- State Restore / Windows 7 Applications. Add a new Install Application action with the following settings:
- Name: Install – Microsoft IE 11 for Windows 7 SP1 – x64
- Install a Single Application: Install – Microsoft IE 11 for Windows 7 SP1 – x64
- State Restore / Windows 7 Applications. After the Install – Microsoft IE 11 for Windows 7 SP1 – x64 action, add a Restart Computer action.
- State Restore. After the Tattoo action, add a new Group action with the following setting:
- Click OK.

The IE 11 application and Computer Restart added to the task sequence.
Done! You can now start your virtual machine, and run the build and capture task sequence.
Deploying a Windows 7 image with Internet Explorer 11
If you are still using MDT 2012 Update 1, once you have created the Windows 7 SP1 reference image with IE 11, you also need to update the Unattend.xml file for the task sequence you use to actually deploy it. If not, the deployment will fail with the infamous error: “Windows could not parse or process unattend answer file [C:\Windows\Panther\unattend.xml] for pass [specialize]. A component or setting specified in the answer file does not exist.”. This is because the native template in MDT 2012 Update 1 contains settings that are not compatible with IE 11.
Note: Again, this is not needed if you are using MDT 2013.
In these steps I assume you have created your reference image with IE 11 per the previous instructions, and imported into your production deployment share.
- Using Deployment Workbench, right-click the Windows 7 SP1 task sequence and select Properties.
- In the OS Info tab, click Edit Unattend.xml. MDT now generates a catalog file, which will take a few minutes, and then Windows System Image Manager (WSIM) starts.
- In Windows System Image Manager (WSIM), in the Answer File pane, expand the 4 specialize node, and select the amd64_Microsoft-Windows-IE-InternetExplorer_neutral entry.
- In the amd64_Microsoft-Windows-IE-InternetExplorer_neutral properties (right-hand window), right-click the IEWelcomeMessage property and select Revert Change.
Note: Depending on your Unattend.xml template, you may need to to delete the «ShowMenuBar» = «true» setting in amd64_Microsoft-Windows-IE-InternetExplorer_neutral entry as well. Thank’s Nick for pointing that one out.
- Save the Unattend.xml file, and close Windows System Image Manager.
- On the Windows 7 SP1 Properties window, click OK.

Editing the unattend.xml file.

The error you get if still using MDT 2012 Update 1, and you don’t modify the unattend.xml.
Happy deployment, Johan
Microsoft had earlier limited Internet Explorer 11 to the Windows 8.1 users only. But now they have released it for the Windows 7 users as well. Although it is going to be released in form of automatic updates, but it will take a few more weeks for the new version of Internet Explorer to arrive via automatic updates. If you do not want to wait that long, then you can always update Internet Explorer manually. Microsoft has provided setup installers for Internet Explorer 11 in more than 90 languages. You can choose any of these to start exploring what the next version of Microsoft’s browser brings to you.
You can follow these simple steps to download and install Internet Explorer 11 on your Windows 7 system:
- Visit http://windows.microsoft.com/en-us/internet-explorer/ in your web browser.
- Choose a language that you use in Windows. Most of the users use English. Then select the edition of Windows 7 – 32-bit or 64-bit. Click on the Download button to download the installer.

- Run the setup installer. It may download a few more updates from the internet which are required. After downloading updates, installing them, installing Internet Explorer and language packs, it would ask you to restart Windows.

- After restarting Windows, you can open Internet Explorer 11 from Start Menu. It would show a prompt to setup basic settings for Internet Explorer. You can choose the recommended settings or customize them. There is also option to enable Do not Track request feature.

- You can click on the gear like settings icon and select About Internet Explorer from the menu to view the version of installed Internet Explorer browser.

- That’s it. Now you can start using Internet Explorer 11 in Windows 7.


С 12 января 2016 года компания Microsoft прекращает поддержку всех версий Internet Explorer, кроме самой последней, т.е. Internet Explorer 11, поэтому всем кто пользуется браузером Internet Explorer, рекомендуется перейти на 11 версию. Сегодня в материале я покажу, как можно установить Internet Explorer 11 на операционную систему Windows 7.

По умолчанию в состав ОС Windows 7 включена версия Internet Explorer 8, в Windows 8 входит Internet Explorer 10, а 11 версия браузера Internet Explorer по умолчанию включена только в версии Windows 8.1. Поэтому если у Вас Windows 8.1, то браузер Internet Explorer 11 у Вас уже установлен, и Вам ничего не нужно делать, но если Вы обладатели версий Windows 7 или 8 то лучше, конечно же, обновить Internet Explorer до 11 версии. Как я уже сказал, начиная с 12.01.2016г. Microsoft прекращает выпуск обновлений для системы безопасности, других обновлений, а также перестает оказывать услуги по технической поддержке всех версий Internet Explorer кроме 11. Поддержка браузера Internet Explorer 11 будет длиться до окончания жизненного цикла операционной системы, на которую он устанавливается, т.е. Windows 7, Windows 8.1 и Windows 10, так как браузер Internet Explorer является компонентом Windows.
Содержание
- Требования к системе для установки браузера Internet Explorer 11
- Где скачать браузер Internet Explorer 11 для Windows 7?
- Установка браузера Internet Explorer 11 на Windows 7
Итак, для того чтобы установить Internet Explorer 11 на Windows 7 необходимо иметь операционную систему Windows 7 с установленным Service Pack 1, т.е. другими словами 11 версию Internet Explorer можно установить только она Windows 7 SP1. Если у Вас не установлен Service Pack 1 или Вы просто, не знаете, есть ли он у Вас или нет, то подробно об установке и вообще, о том, что такое Service Pack мы разговаривали в материале «Установка Service Pack 1 на Windows 7».
Для установки и запуска Internet Explorer 11 на ОС Windows 8 необходимо обновить систему до версии 8.1 или 10.
Для установки Internet Explorer 11 на ОС Windows 7 в компьютере должно быть:
- Процессор с тактовой частотой 1 ГГц;
- Минимум 512 МБ оперативной памяти;
- Минимум 70 МБ свободного места на диске;
- Монитор с разрешением 800 x 600.
Где скачать браузер Internet Explorer 11 для Windows 7?
Скачать 11 версию Internet Explorer можно, конечно же, с официального сайта Microsoft со страницы загрузки вот она http://www.microsoft.com/ru-ru/download/internet-explorer-11-for-windows-7-details.aspx
Рекомендуется всегда загружать программное обеспечение только с официальных источников (не только Microsoft).
После того как Вы перешли на страницу загрузки жмем «Скачать».
Примечание! Я скачиваю версию для 32 битной Windows 7, если у Вас 64 битная система, то кликните по ссылке «Change Systems», затем выберите пункт Internet Explorer 11 (64-Bit) и нажмите «Next».
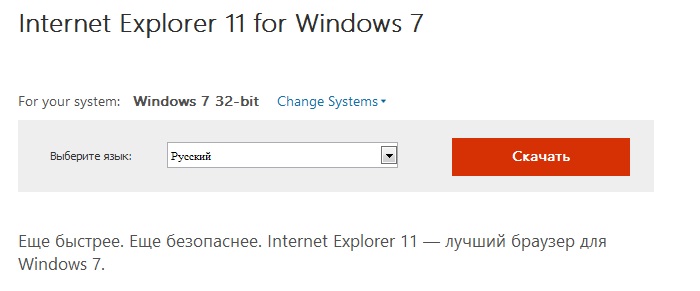
После того как Вы нажали на кнопку «Скачать» начнется загрузка браузера Internet Explorer 11 и в итоге загрузится файл IE11-Windows6.1-x86-ru-ru.exe размером 30.8 мегабайт.
Установка браузера Internet Explorer 11 на Windows 7
Итак, браузер Internet Explorer 11 мы скачали, теперь необходимо его установить, для этого запускаем скаченный файл (в данный момент все открытые браузеры лучше закрыть).
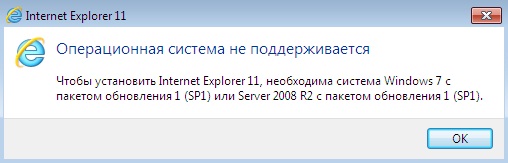
Если у Вас появится следующее сообщение, значит, у Вас не установлен Service Pack 1, чуть выше при рассмотрении требований к системе я уже отмечал то, что Internet Explorer 11 можно установить только на Windows 7 с Service Pack 1.
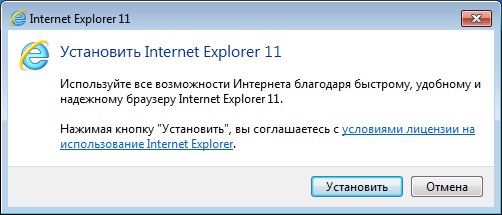
Если Service Pack 1 установлен, то откроется окно, в котором нам необходимо нажать «Установить».
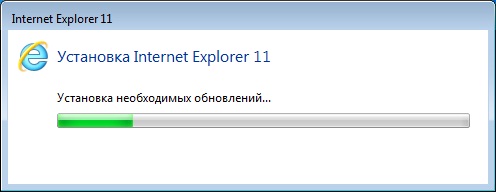
Начнется установка Internet Explorer 11.
Установка будет завершена, когда появится вот такое окно, жмем «Перезагрузить сейчас» в итоге компьютер перезагрузится.

После перезагрузки у Вас уже будет Internet Explorer 11, для его запуска можете использовать ярлыки, которыми Вы пользовались раньше. Чтобы проверить текущую версию Internet Explorer откройте браузер и нажмите «Сервис ->О программе».

Заметка! Какой браузер по Вашему мнению самый лучший?
На этом все, удачи!