
Error 809 is a VPN error that usually occurs when a firewall blocks the VPN ports between the user and the VPN server. Well if you’re facing this problem then here are the steps to fix it.
It’s very common for VPN connections to experience some problems along the road. If you’re using Windows and a VPN together, it’s possible that you will face the VPN error 809.
A common reason is that when Windows doesn’t allow you to establish a VPN connection through you’re firewall and if you don’t use a firewall but on a NAT device this error might show up.
Network Address Translation (NAT) is meant for IP address conservation. It lets private IP networks with unregistered IP addresses to connect to the internet. NAT normally operates on a router, connecting two or more networks, and alters the unregistered network into legal addresses.
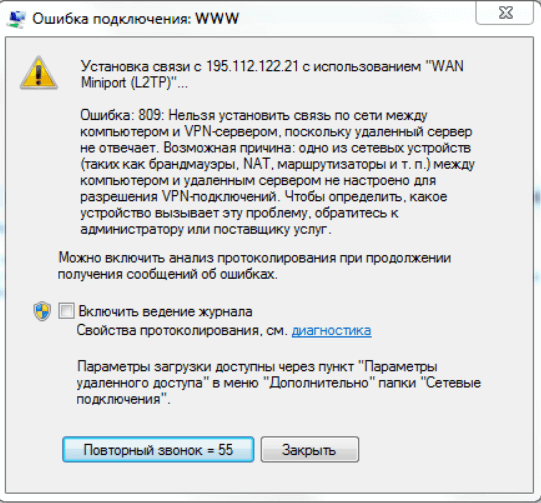
The error message looks something like this:
“The network connection between your computer and the VPN server could not be established.”

Here are the ways on how to fix the VPN error 809 on Windows:
- Enable the ports on your firewall/router
- Add value to the Windows registry
- Disable Xbox Live Networking services
- Enable IKEv2 fragmentation
1. Enable the ports on your firewall/router
Usually, the VPN error 809 is caused by the PPTP port (TCP 1723) or port L2TP or IKEv2 port (UDP ports 500 and 4500) being blocked by a firewall or router. Since our VPN runs on the IKEv2 protocol this might be a reason you will face this error. Well, the solution is pretty simple! Simply enable the ports on the firewall or your router.
2. Add value to the Windows registry
When you are trying to establish your VPN connection, if your MX is placed behind a NAT, you will have to add the “AssumeUDPEncapsulationContextOnSendRule” DWORD value to the Windows registry.
This lets Windows OS to establish a secure connection when your VPN server and the computer client are behind NAT devices. Here’s how:
- Login to Windows with admin access
- Type ‘Run’ on the search bar and click on the application
- Type “regedit” and click on ‘OK’
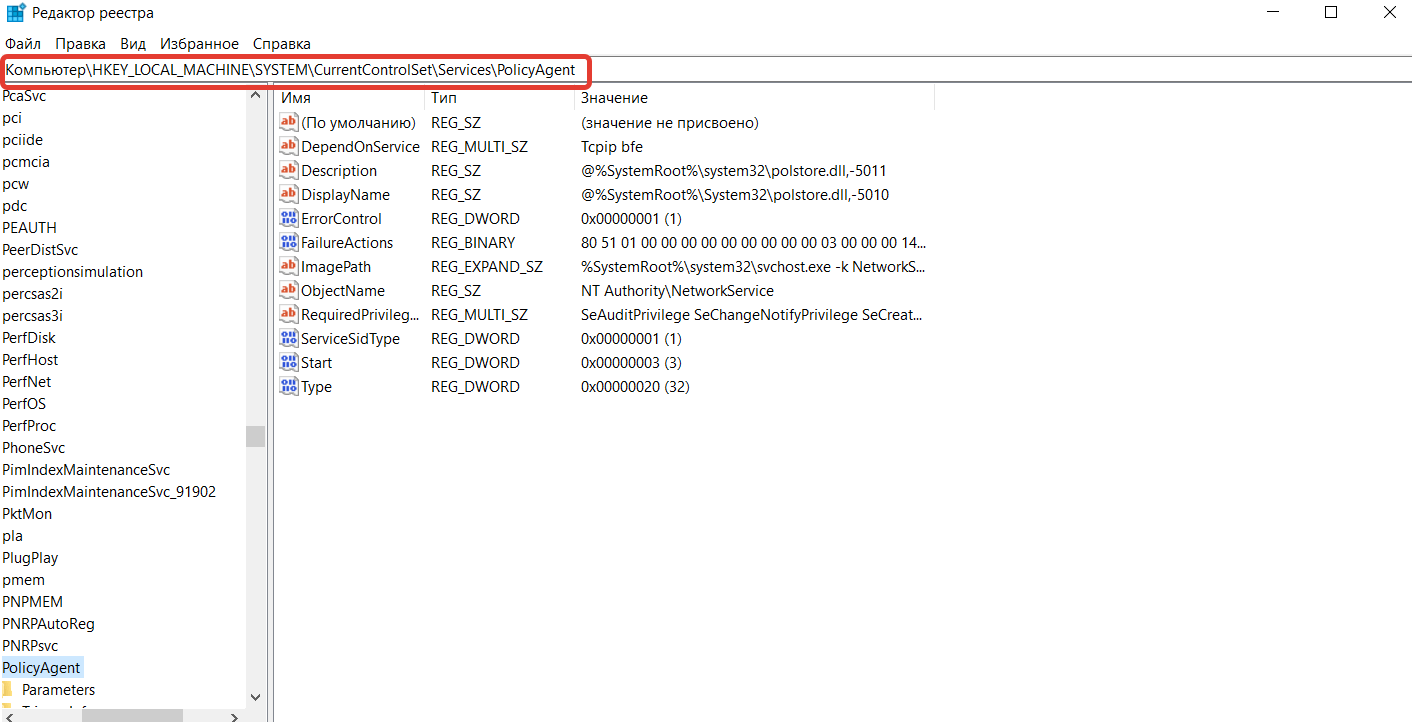
- Now in the open Window find this path: HKEY_LOCAL_MACHINE > SYSTEM > CurrentControlSet > Services > PolicyAgent
**The full path cannot be seen in the below picture
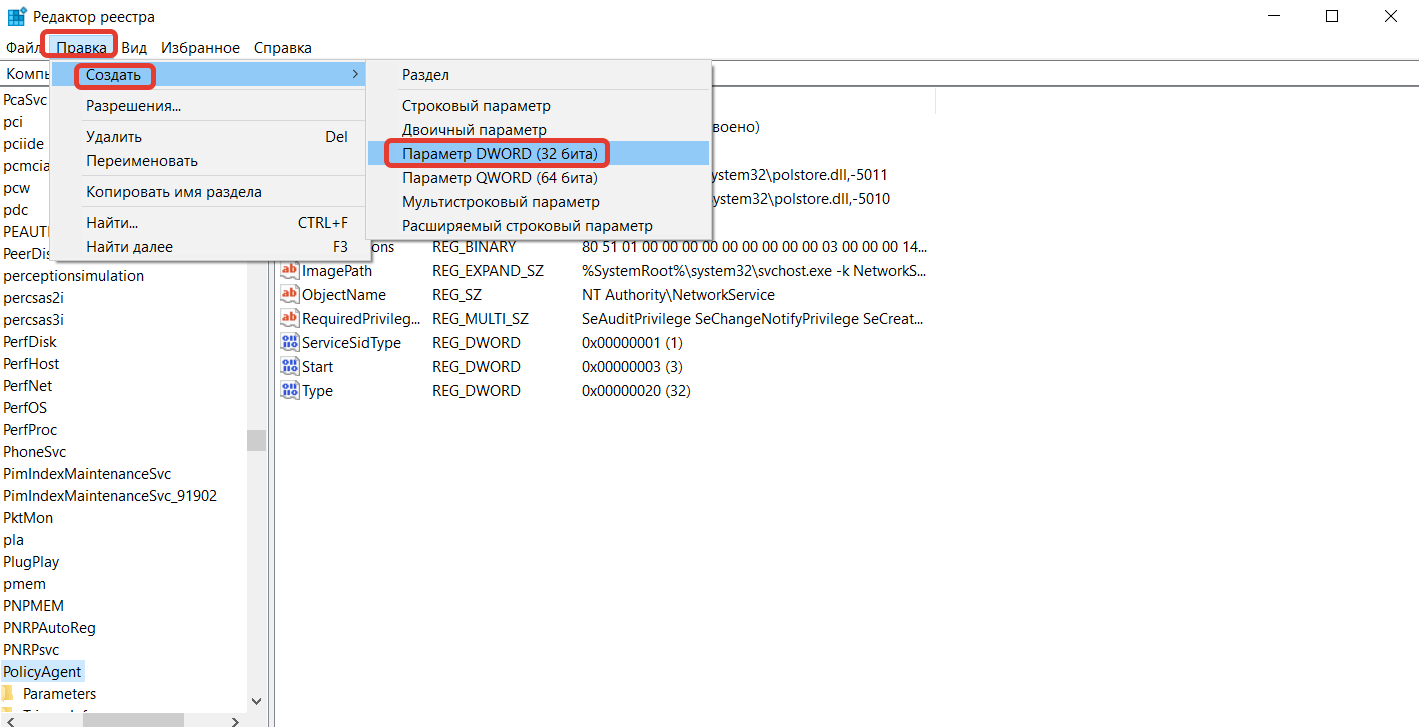
- Once you get to the path Right click and create a new ‘DWORD (32-bit) Value’
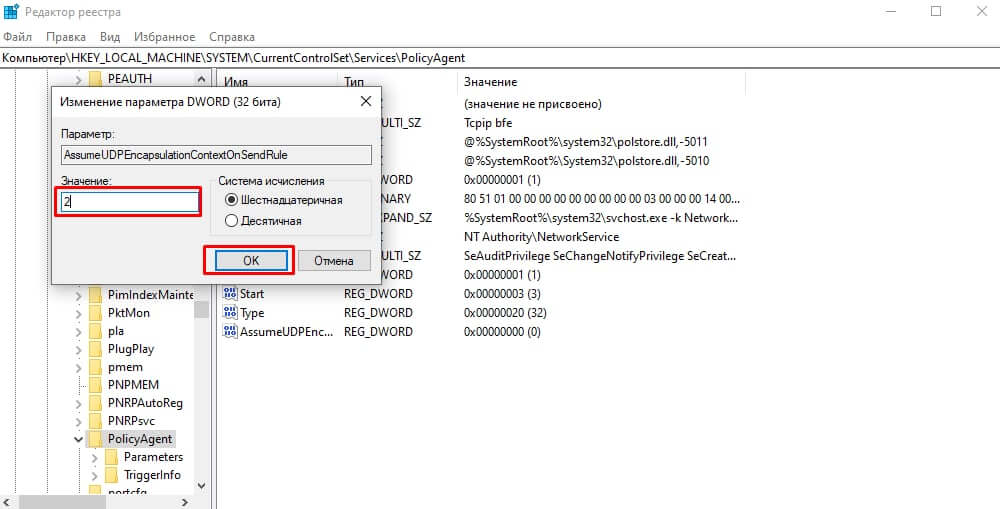
- Change the Value name to “AssumeUDPEncapsulationContextOnSendRule”
- Change the new entry and change Value Data from “0” to “2“
- Click ‘OK’
- Reboot the computer and test the connection
Note: This is a perfect solution when computer client is behind NAT devices.
3. Disable Xbox Live Networking services
A Windows 10 service may block access to the L2TP/IPsec VPN so to resolve this and prevent seeing the error 809 you can do this:
- Type “services” in the search box and click on ‘Services’
- Find ‘Xbox Live Networking Services’ and double click on it
- On the drop down menu of ‘startup type’ select “Disabled”
- Click “Apply” and click on ‘OK’
- Check if your VPN connection works!
4. Enable IKEv2 Fragmentation
VPN error 809 can occur due to the IKE fragmentation while using the IKEv2 VPN protocol. What happens is quite technical. However, let me break it down to a simple explanation.
During the IKEv2 connection between the client and the server, the packet size may exceed the IP Maximum Transmission Unit. This results in the packets being fragmented. Due to the fragmentation sometimes the intermediary devices like routers, NAT devices, or firewalls will block IP fragments.
Hence the VPN connection will not be established. Even though it sounds complicated, what you will have to do to get over this error is simple!
Solution: Update your Windows 10 devices to the latest version. IKEv2 fragmentation was introduced in Windows 10 1803 and is enabled by default.
Congratulations!
By now your VPN should work without getting any errors.
Article ID: 2197, Created: September 7, 2021 at 1:56 AM, Modified: September 7, 2021 at 2:02 AM
Have you ever encountered the VPN 809 error – the network connection between your computer and the VPN server could not be established?
Commonly faced by Free VPN users, the error occurs when the router or PC firewall blocks the VPN ports between the server and your system. Here we will explain different ways to fix it.
The regulations, geological restrictions, and internet limitations have caused the VPN revolution across the globe. This is why everyone uses it from international users to content consumers and gamers. However, a common issue – VPN 809 error is commonly encountered by VPN users. In this post, we will look at how you can resolve it. But before that, let us quickly learn more about the error and why it is caused.
What is VPN 809 Error? Why Has My VPN Stopped Working?
VPN Error 809 occurs when the VPN ports are blocked while using the internet. When you are on a Windows PC, your firewall can block any application. Sure, you can remove it from the list later, but for once, it will hamper your experience.
When you are connected to a VPN, you are trying to browse something off-limits for the basic internet in your region. It can be either due to government regulations or geological restrictions. Whenever an error occurs, your connection is interrupted; hence, if the firewall blocks your VPN, you might face the inconvenience.
The VPN Error 809 indicates the connection between the VPN server and your PC was not established. If you look at the error closely when it pops up, it indicates that the connection was not established due to either of the following reasons –
- The remote server is not responding
- Your PC firewall or the NAT (Network Address Translation) is not configured to use a VPN.
When the connection is interrupted due to VPN error 809, you should understand the issue lies on your end, not the server. Since the issue is on your PC, you can fix it yourself.
Ways to Fix VPN 809 Error on a Windows PC
Method 1 – Unlock the Ports on the Firewall
Usually, when you encounter the VPN 809 error, it is because the PPTP port (TCP 1723), port L2TP, or IKEv2 port (UDP ports 500 and 4500) are blocked on your firewall. Most VPNs use the IKEv2 port so the error might occur with any client.
To fix the error, you need to access your router’s firewall or the network and allow access to these ports for VPN use. Allowing a firewall will make it clear that you have no issues with a third-party VPN accessing your network ports. It is a security measure. However, it can be bypassed since it causes VPN error 809.
Using a VPN client that uses OpenVPN-based tunneling might be of help in such situations.
Must Read: 5 Uses of VPN You Didn’t Know About!
Method 2 – Update PC Registry Values
Adding a DWORD value on your registry can allow you to overcome VPN error 809, which does not allow you to establish a connection with the VPN server.
VPN tunneling is a crucial aspect to create a solid connection. When your MX appliance stays behind the NAT, it might require you to update your registry with “AssumeUDPEncapsulationContextOnSendRule” DWORD value. Here’s how you can do it –
Once you have done everything, restart the system and recheck the connection. Updating the registry should resolve the VPN error 809
Method 3 – Disable Any Type of Live Networking Services
Services like the Xbox live networking and others may block L2TP/IPsec VPN access, making you encounter a network connection that could not be established while using a VPN error.
Note : Since Windows has integration with Xbox, this is the most common live networking service available on a Windows PC hence we are discussing it.
To disable it, you will have to navigate to the running services. Here’s how you do it –
- Press Windows + R to open the Run.
- In Run, type services.msc and hit the Enter key.
- This will open the services on your PC.
- Here, search for Xbox Live Networking service.

- Select it and disable the service.

Restart your PC, and try to connect to the VPN. You should not face any errors.
BONUS FIX – Use a Proper VPN Client
If all three fixes above cannot fix the issue, you probably need a better VPN client. If you are using a free VPN now, change it immediately, as giving access to your firewall to any random application is not advised. Many factors, such as using the OpenVPN tunneling model and the latest version of the IKEv2 protocol, make a VPN suitable for your system.
If you are wondering where to find one such tool, your answer is Systweak VPN. The tool is designed to overcome all the possible issues that users encounter while using a VPN.
Here’s how you can use it –
- Download the application.
-
Install and register on the application using your email address.
- Click on connect and start using your VPN connection instantly!
Issues like VPN error 809, data logging, ISP throttling, and network congestion can be minimized through this client. Must try!
VPN Error 809 is No Longer a PROBLEM!
With the help of these fixes, you can quickly resolve error 809. Try them out, and let us know what worked out for you in the comments. If all these fixes seem too much work, you can opt for the Systweak VPN. It is safe, secure, and authentic.
If you have any other queries, you can drop us a line too. You can also connect with us through social media. Looking forward to your feedback. That is all for this post. Good luck, and do not forget to download Systweak VPN for the best performance.
Next Read: How to Fix VPN Server May Be Unreachable Error
When testing an Always On VPN connection, the administrator may encounter a scenario where the VPN client fails to connect to the VPN server. On the Windows 10 client the error message states the following.
“Can’t connect to [connection name]. The network connection between your computer and the VPN server could not be established because the remote server is not responding. This could be because one of the network devices (e.g. firewalls, NAT, routers, etc.) between your computer and the remote server is not configured to allow VPN connections. Please contact your Administrator or your service provider to determine which device may be causing the problem.”

In addition, the Application event log records an error message with Event ID 20227 from the RasClient source. The error message states the following.
“The User [username] dialed a connection named [connection name] with has failed. The error code returned on failure is 809.”

Connection Timeout
The error code 809 indicates a VPN timeout, meaning the VPN server failed to respond. Often this is related directly to network connectivity, but sometimes other factors can come in to play.
Troubleshooting VPN Error Code 809
When troubleshooting VPN error code 809 the following items should be carefully checked.
- Name Resolution – Ensure the VPN server’s public hostname resolves to the correct IP address.
- Firewall Configuration – Confirm the edge firewall is configured properly. Inbound TCP port 443 is required for the Secure Socket Tunneling Protocol (SSTP) and inbound UDP ports 500 and 4500 are required for the Internet Key Exchange version 2 (IKEv2) protocol. Make sure that any NAT rules are forwarding traffic to the correct server.
- Load Balancer Configuration – If VPN servers are located behind a load balancer, make certain that virtual IP address and ports are configured correctly and that health checks are passing. For IKEv2 specifically, it is crucial that UDP ports 500 and 4500 be delivered to the same backend server. This commonly requires custom configuration. For example, on the KEMP LoadMaster the administrator will configure “port following”. On the F5 BIG-IP a custom “persistence profile” must be configured. On the Citrix NetScaler a “persistency group” must be defined.
IKEv2 Fragmentation
VPN error code 809 can also be caused by IKE fragmentation when using the IKEv2 VPN protocol. During IKEv2 connection establishment, payload sizes may exceed the IP Maximum Transmission Unit (MTU) for the network path between the client and server. This causes the IP packets to be fragmented. However, it is not uncommon for intermediary devices (routers, NAT devices, or firewalls) to block IP fragments. When this occurs, a VPN connection cannot be established. However, looking at a network trace of the connection attempt, the administrator will see that the connection begins but subsequently fails.

Enable IKEv2 Fragmentation Support
The IKEv2 protocol includes support for fragmenting packets at the IKE layer. This eliminates the need for fragmenting packets at the IP layer. IKEv2 fragmentation must be configured on both the client and server.
Client
IKEv2 fragmentation was introduced in Windows 10 1803 and is enabled by default. No client-side configuration is required.
Server
IKEv2 is commonly supported on many firewall and VPN devices. Consult the vendor’s documentation for configuration guidance. For Windows Server Routing and Remote Access (RRAS) servers, IKEv2 fragmentation was introduced in Windows Server 1803 and is also supported in Windows Server 2019. It is enabled via a registry key. The following PowerShell command can be used to enable IKEv2 fragmentation on supported servers.
New-ItemProperty -Path “HKLM:\SYSTEM\CurrentControlSet\Services\RemoteAccess\Parameters\Ikev2\” -Name EnableServerFragmentation -PropertyType DWORD -Value 1 -Force
Validation
Once IKEv2 fragmentation is configured on the VPN server, a network capture will reveal the IKE_SA_INIT packet now includes the IKEV2_FRAGMENTATION_SUPPORTED notification message.

Additional Information
Windows 10 Always On VPN and IKEv2 Fragmentation
Windows 10 Always On VPN IKEv2 Security Configuration
Windows 10 Always On VPN Hands-On Training Classes
Содержание
- В чём причина ошибки 809?
- Для начала
- Порты брандмауэра
- Новое правило для реестра
- Изменение настроек шифрования через реестр
- Отключение сторонних сервисов
- Если всё ещё возвращает ошибку 809
- 1. Обновите «операционку»
- 2. Удалите VPN-приложения вместе с настройками
- 3. Очистите устройство от «файлового мусора»
Иногда случается, что пользователь, пытающийся подключиться к VPN-серверу, получает ошибку с кодом 809. Например, такая проблема может возникнуть у абонентов билайна, так как провайдер предоставляет доступ в интернет по технологии L2TP, то есть через ВПН-туннель.
Рассказываем в статье, что делать в такой ситуации.
В чём причина ошибки 809?
Чаще всего проблема на стороне пользователя: его компьютера и ОС Windows.
Сбой может быть из-за того, что один из компонентов ОС или устройство между ПК и сервером не имеет разрешения на подключение к VPN. Один из таких компонентов — NAT (Network Address Translation), отвечающий за преобразование IP-адресов во внутренние и внешние. Другая вероятная причина — настройки брандмауэра. И таких «виновников» может быть немало.
Но обо всём по порядку.
Для начала
Встроенный защитник Windows — одна из самых частых причин сбоев в работе интернета. А если учесть, что по дефолту в брандмауэре не настроена корректная работа с VPN-соединениями, то стоит начать с него.
- Запустите «Панель управления».
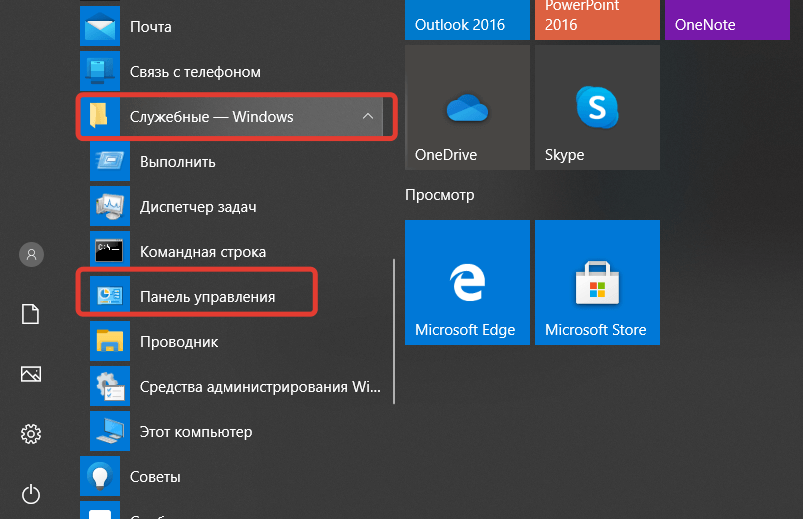
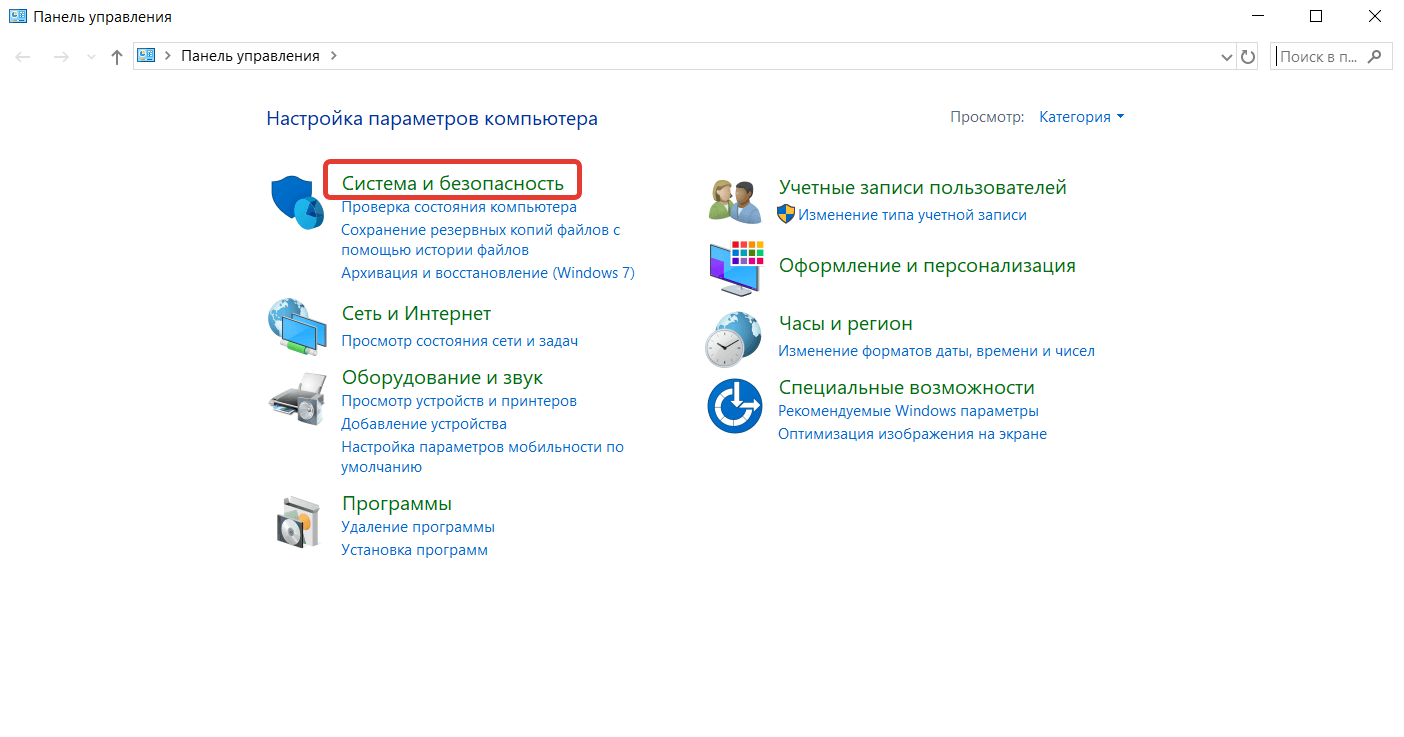
- Перейдите в раздел «Система и безопасность».
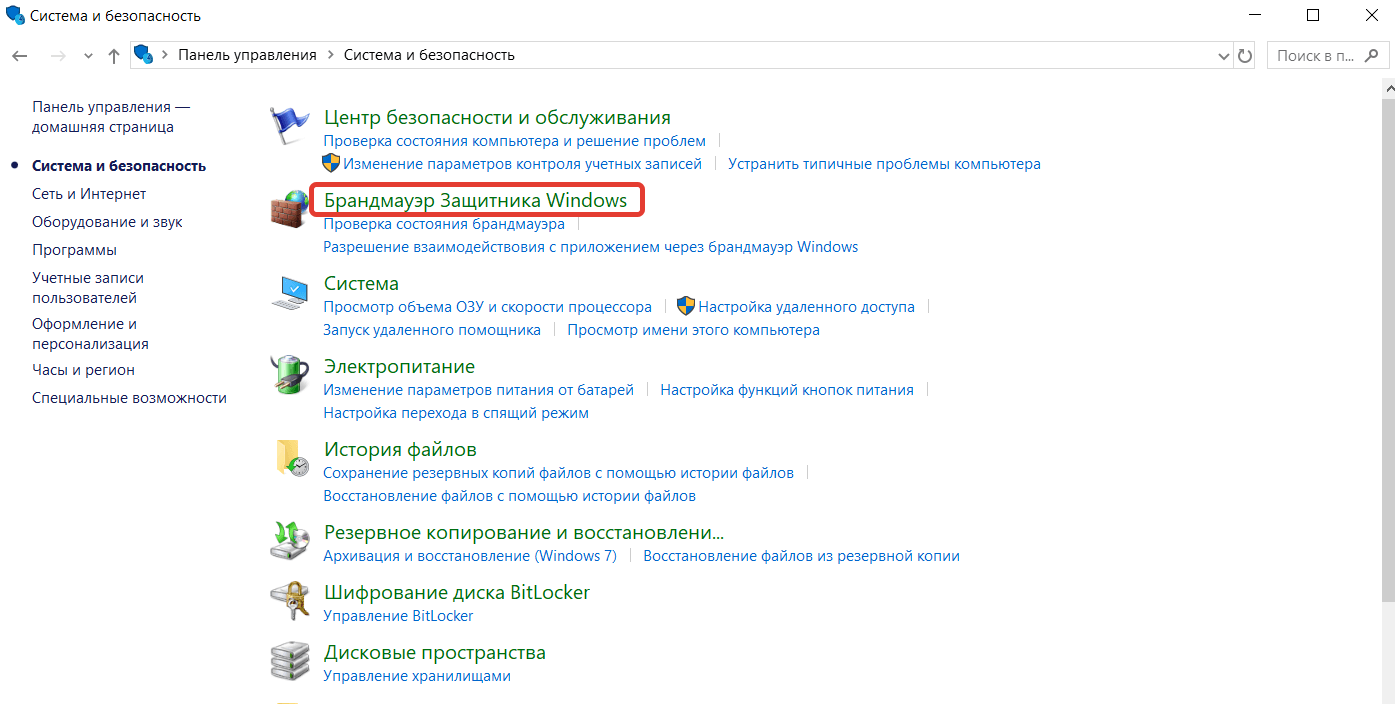
- Нажмите на строчку «Брандмауэр Защитника Windows».
- В левом меню найдите интерактивную надпись «Включение и отключение брандмауэра…» и нажмите на неё.
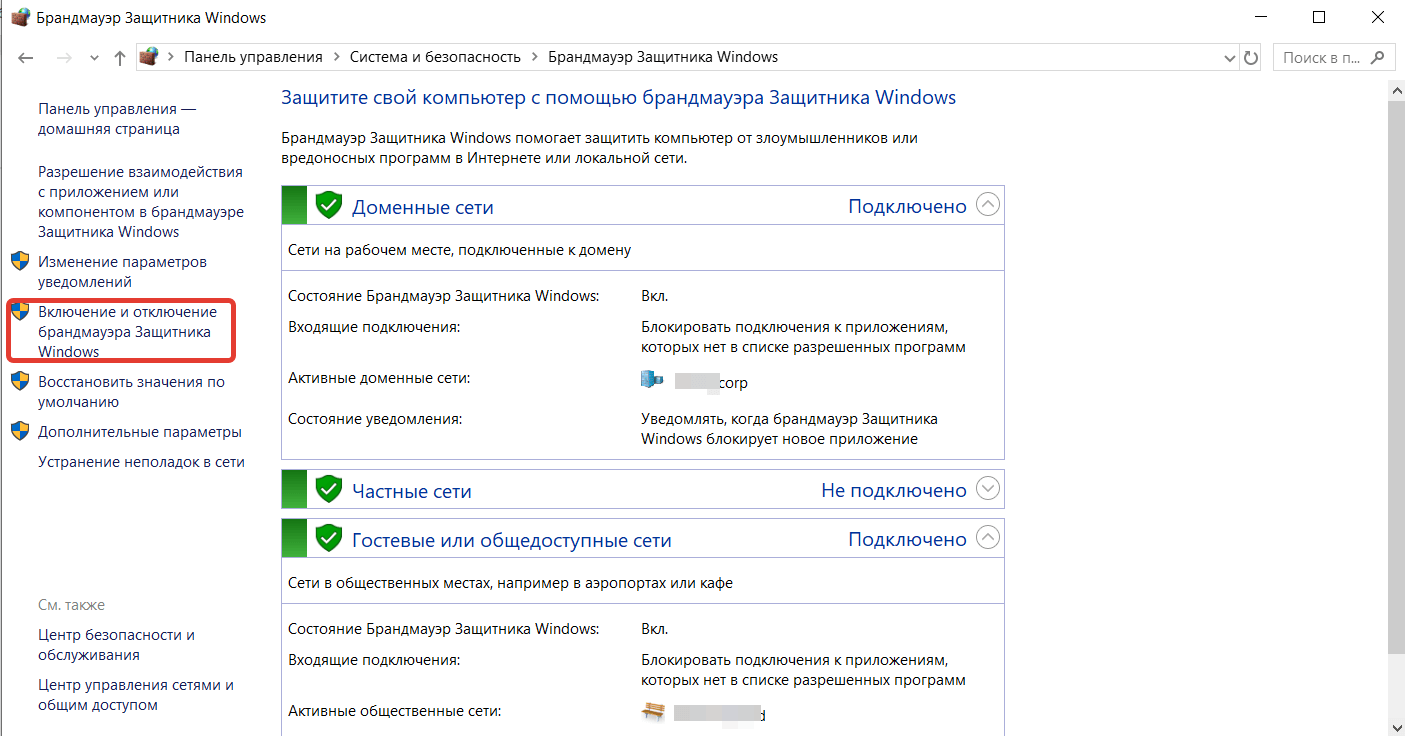
- В открывшемся окне проставьте маркеры напротив всех опций, связанных с отключением брандмауэра, и подтвердите изменения.
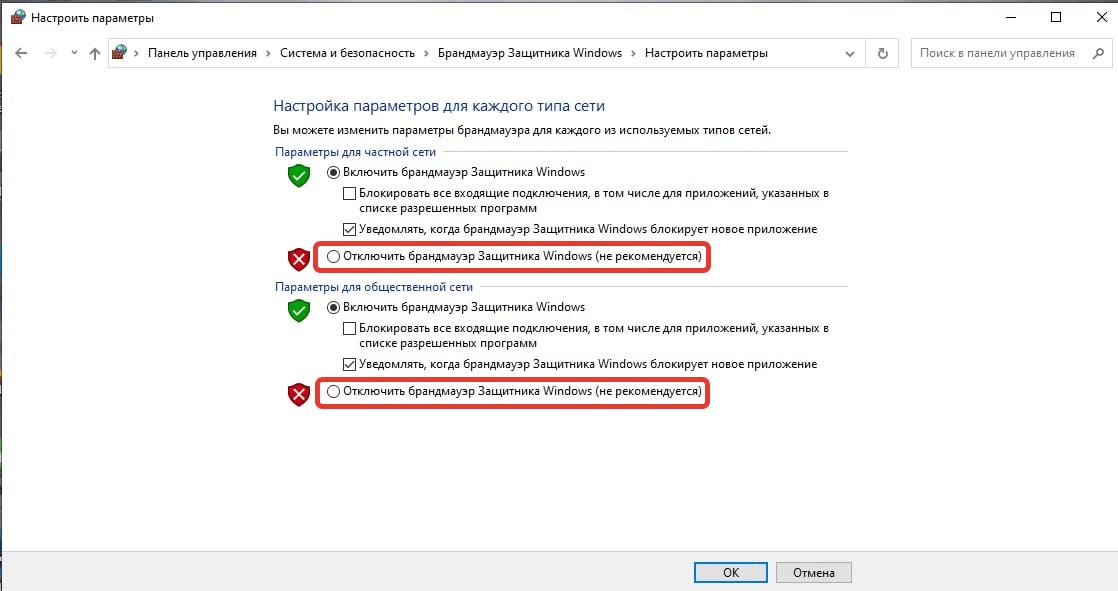
Попробуйте подключиться к интернету или VPN-серверу снова. Если соединение не заработало, то переходите к инструкции «Новое правило для реестра» и следующим. Если же доступ в интернет появился, то включите брандмауэр и следуйте гайдам в предложенной последовательности.
Примечание: инструкции актуальны для Windows 7, 8 и 10. Команды, пути, названия и т. п. вводятся без кавычек.
Порты брандмауэра
Если у вас домашний интернет билайн по протоколу L2TP, то с высокой долей вероятности открытие портов 1701, 500, 1460, 4500 решит проблему.
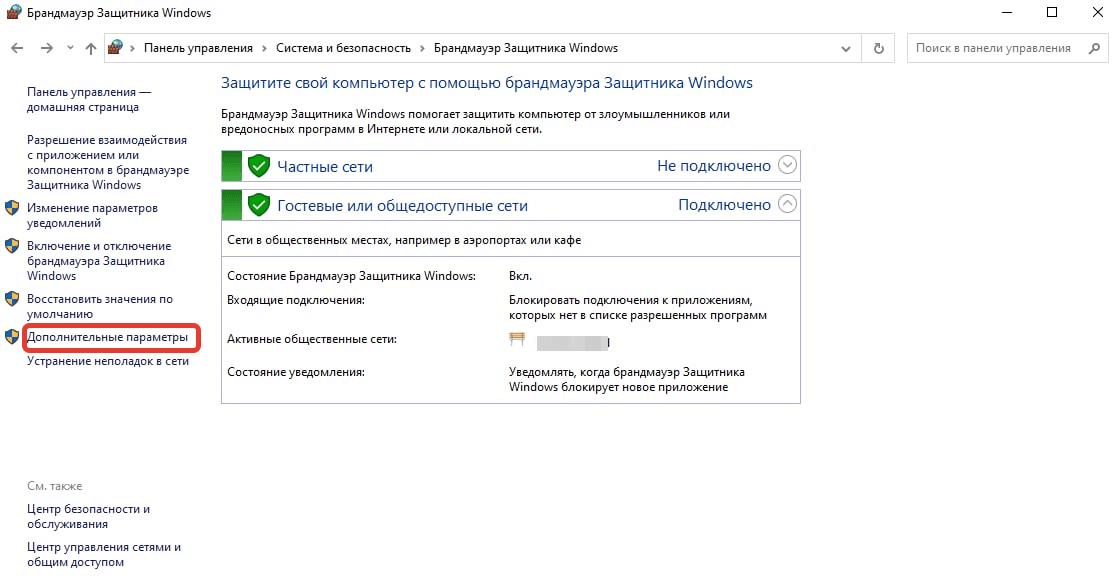
- Запустите «Панель управления».
- Перейдите в раздел «Система и безопасность».
- Перейдите в подраздел «Брандмауэр Защитника Windows».
- В левом меню кликните по интерактивной строке «Дополнительные параметры».
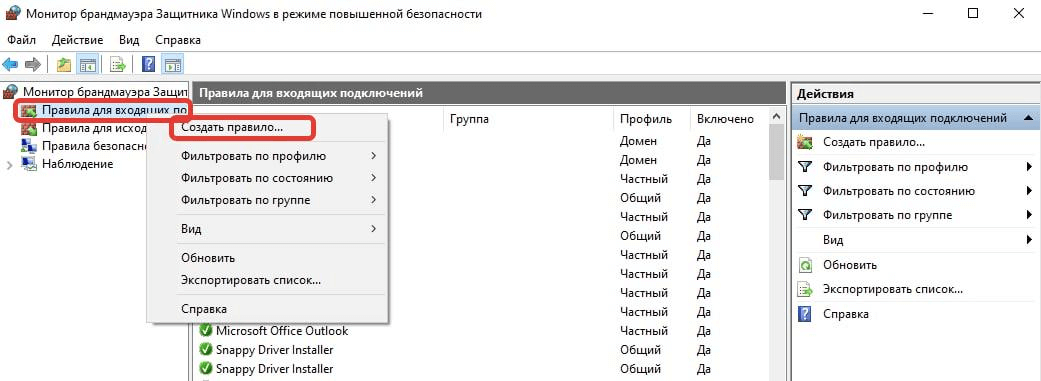
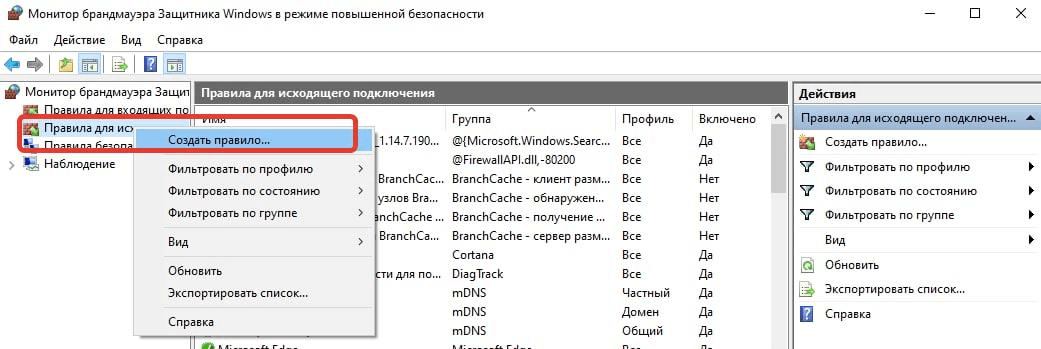
- Нажмите правой кнопкой мыши на строчку «Правила для входящих подключений».
- Нажмите ЛКМ по опции «Создать правило» в появившемся контекстном меню.
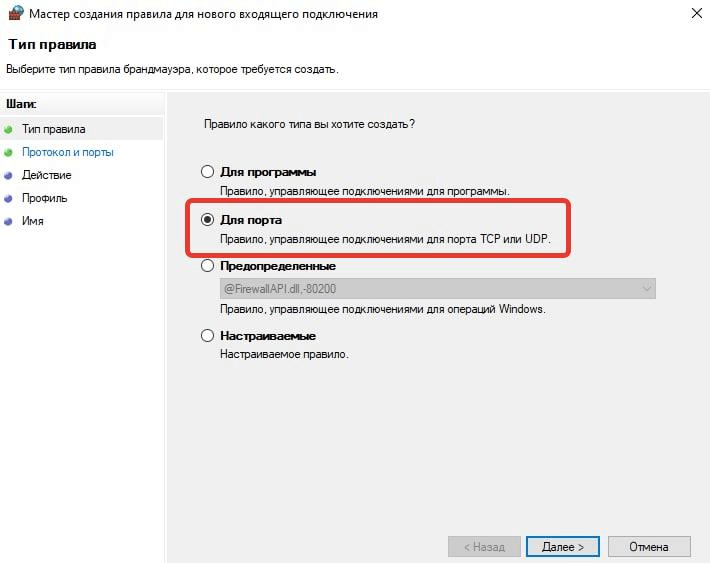
- Экран «Тип правила»: поставьте маркер напротив опции «Для порта» и нажмите «Далее».
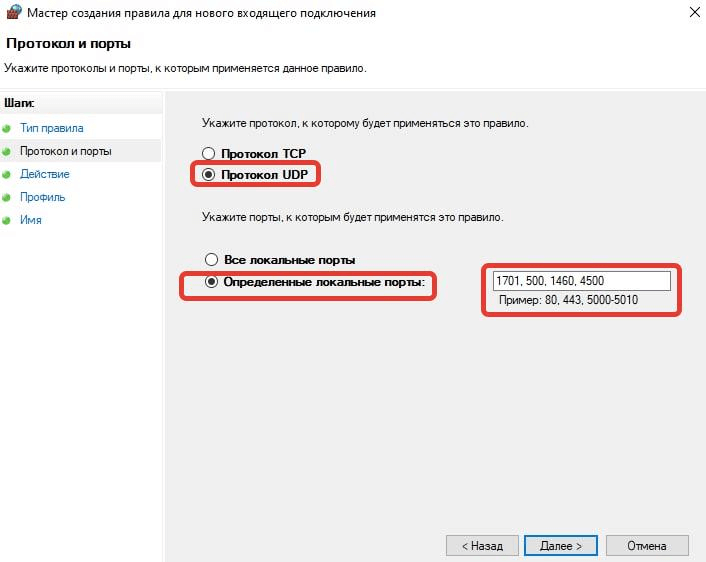
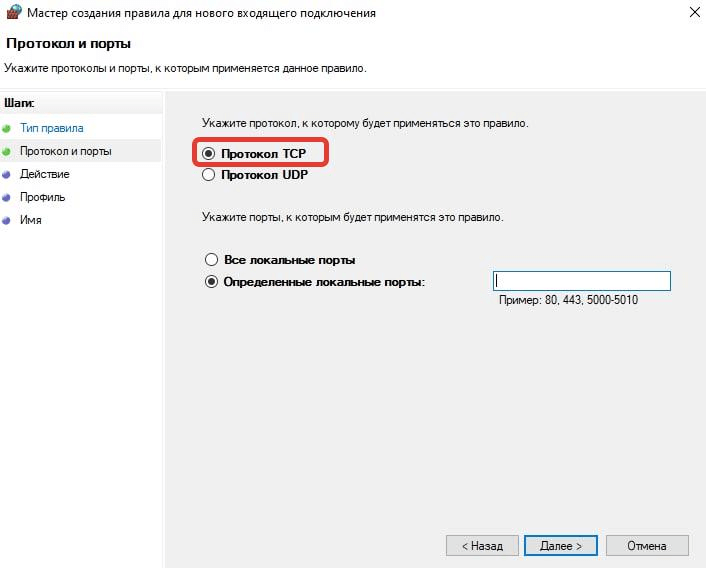
- Экран «Протоколы и порты»: поставьте маркер напротив опции «Протокол UDP» и «Определённые локальные порты». В строке введите «1701, 500, 1460, 4500», нажмите «Далее».
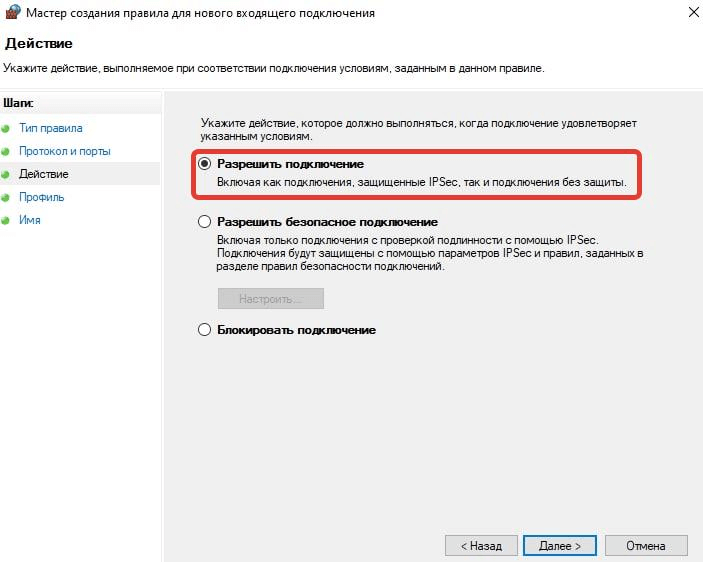
- Экран «Действие»: отметьте маркером опцию «Разрешить подключение», нажмите «Далее».
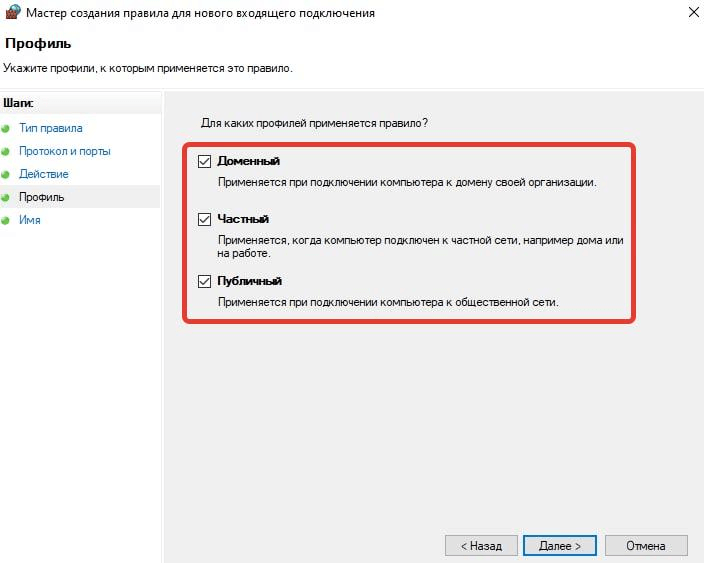
- Экран «Профиль»: отметьте галочками все опции и снова нажмите «Далее».
- Экран «Имя»: назовите правило. В качестве имени можно использовать, например, «Интернет билайн».
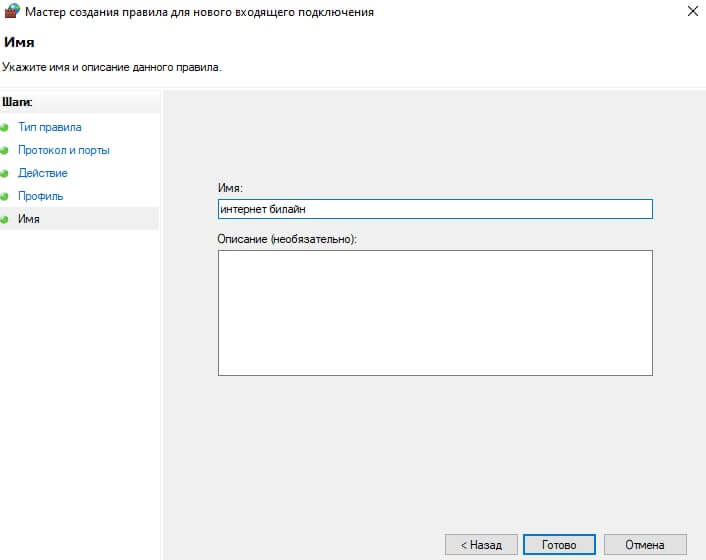
- Нажмите «Готово» и повторите шаги № 5–11, но для исходящих подключений.
Попробуйте подключиться к интернету. Если соединение работает, то всё сделано верно. Если нет, то повторите действия с одним изменением: на шаге № 8 выберите не UDP, а TCP.
Новое правило для реестра
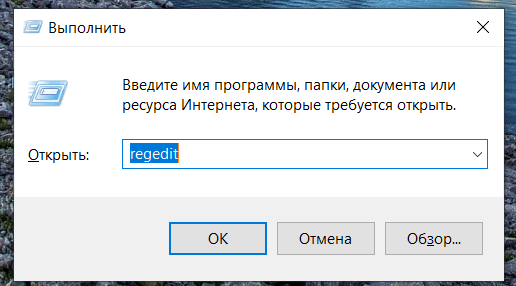
- Нажмите Win + R и в появившемся окне пропишите команду regedit.
- Вставьте в адресную строку путь HKEY_LOCAL_MACHINE\SYSTEM\CurrentControlSet\Services\PolicyAgent.
- Нажмите на кнопку «Правка».
- Поочерёдно выберите «Создать» и «Параметр DWORD (32 бита)». Созданному сеттингу присвойте название AssumeUDPEncapsulationContextOnSendRule.

- Дважды кликните по параметру левой кнопкой мыши.
- В строке «Значение» напишите цифру 2.
- Сохраните новые параметры и перезагрузите устройство.
Изменение настроек шифрования через реестр
- Повторите 1-й шаг из предыдущей инструкции.
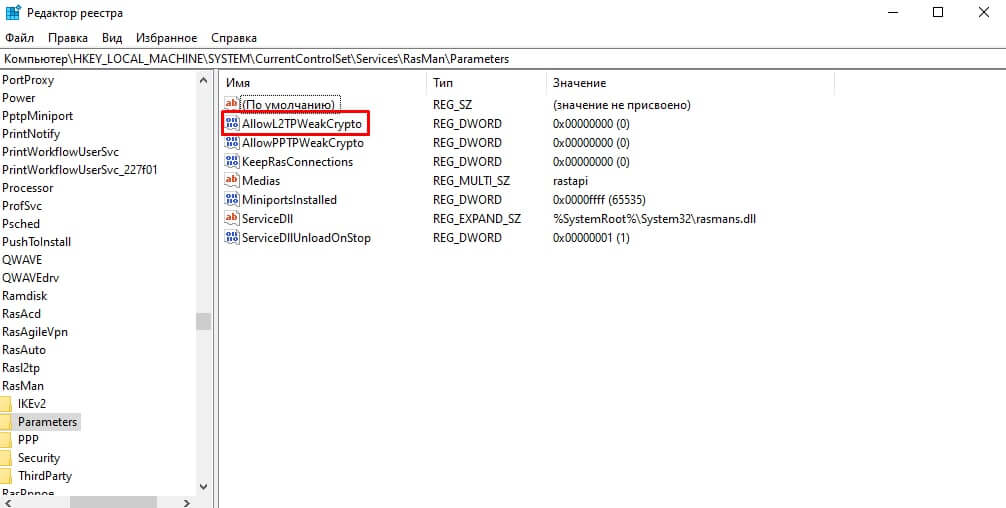
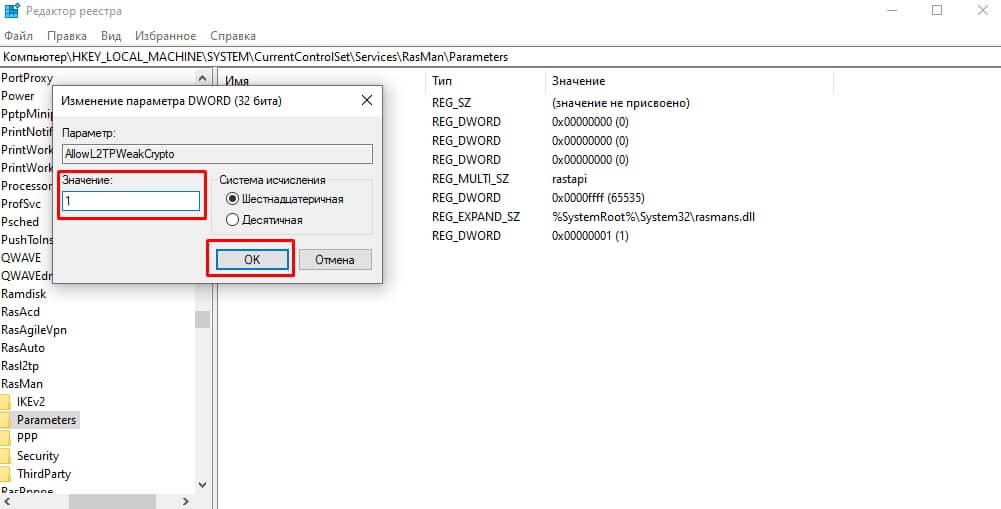
- Вставьте в адресную строку путь HKEY_LOCAL_MACHINE\SYSTEM\CurrentControlSet\Services\RasMan\Parameters.
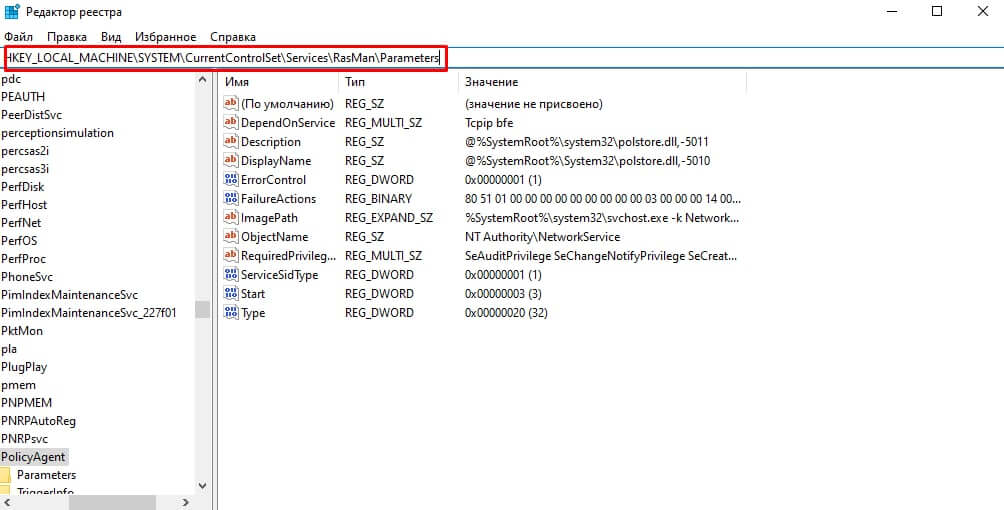
- Найдите параметр AllowL2TPWeakCrypto, дважды кликните по нему ЛКМ, пропишите в поле значение «1» и подтвердите изменения.
- Найдите строку ProhibitIPSec, дважды кликните по ней, укажите в поле значение «0» и сохраните.
- Перезагрузите компьютер.
Если сбой не был устранён, то снова откройте AllowL2TPWeakCrypto, пропишите «0» и перезапустите компьютер.
Отключение сторонних сервисов
С Windows 8 и 10 «виновником» может стать интегрированный сервис Xbox Live — стоит попробовать его отключить. Для этого:
- нажмите Win + R;
- впишите команду services.msc;
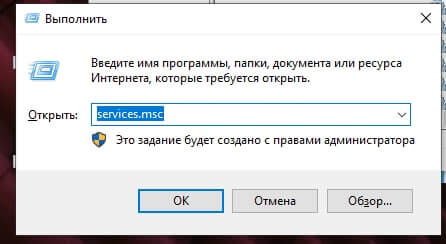
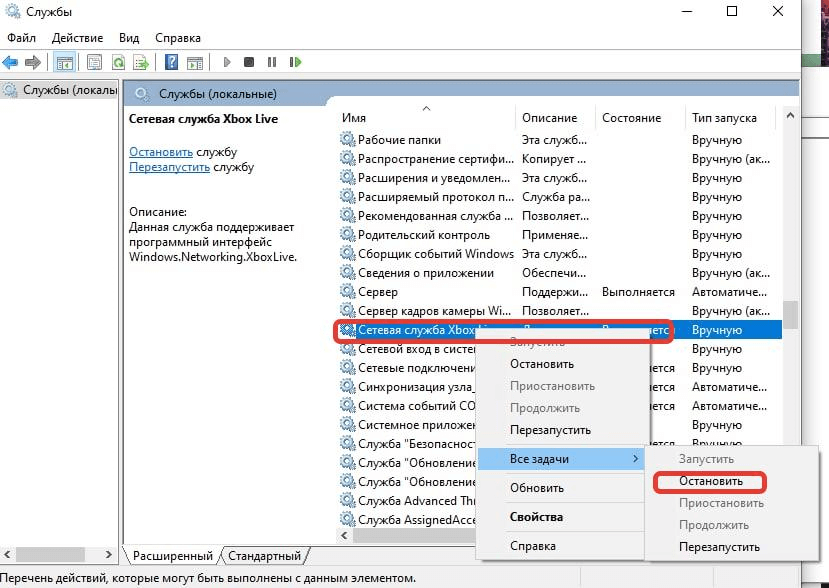
- найдите строку «Сетевая служба Xbox Live» и кликните по ней правой кнопкой мыши;
- во вкладке «Общие» найдите параметр «Тип запуска», вызовите dropdown-меню и выберите опцию «Отключена».
Если всё ещё возвращает ошибку 809
1. Обновите операционную систему
Инструкция для Windows 10
-
Откройте меню «Пуск».
- Найдите шестерёнку и нажмите на неё.
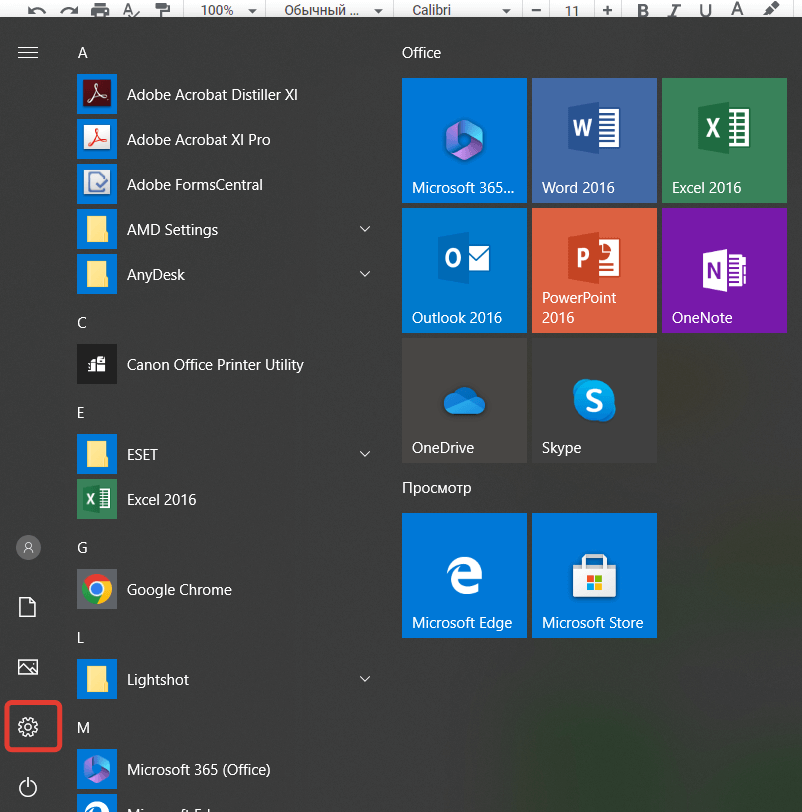
- Перейдите в подраздел «Обновление и безопасность».
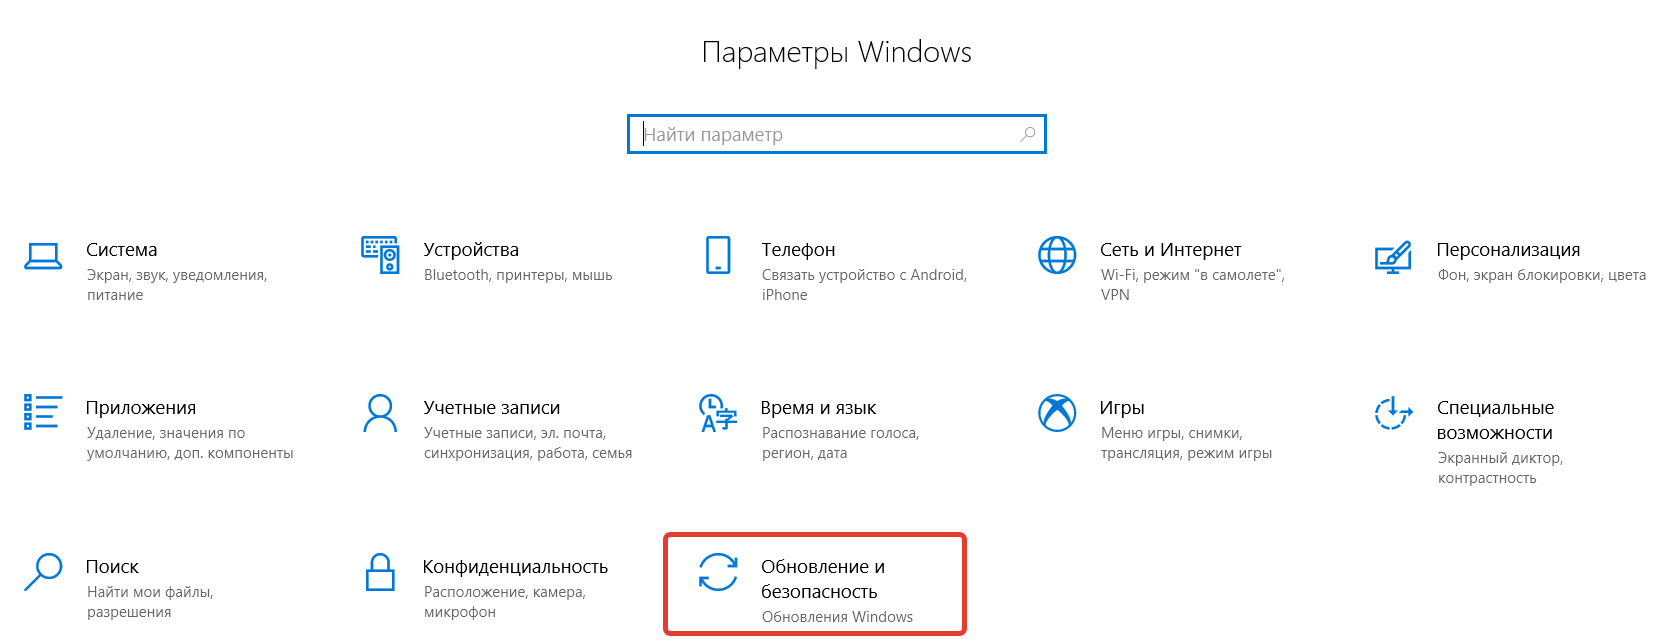
- Откроется «Центр обновления Windows» — кликните по кнопке «Проверить наличие обновлений».
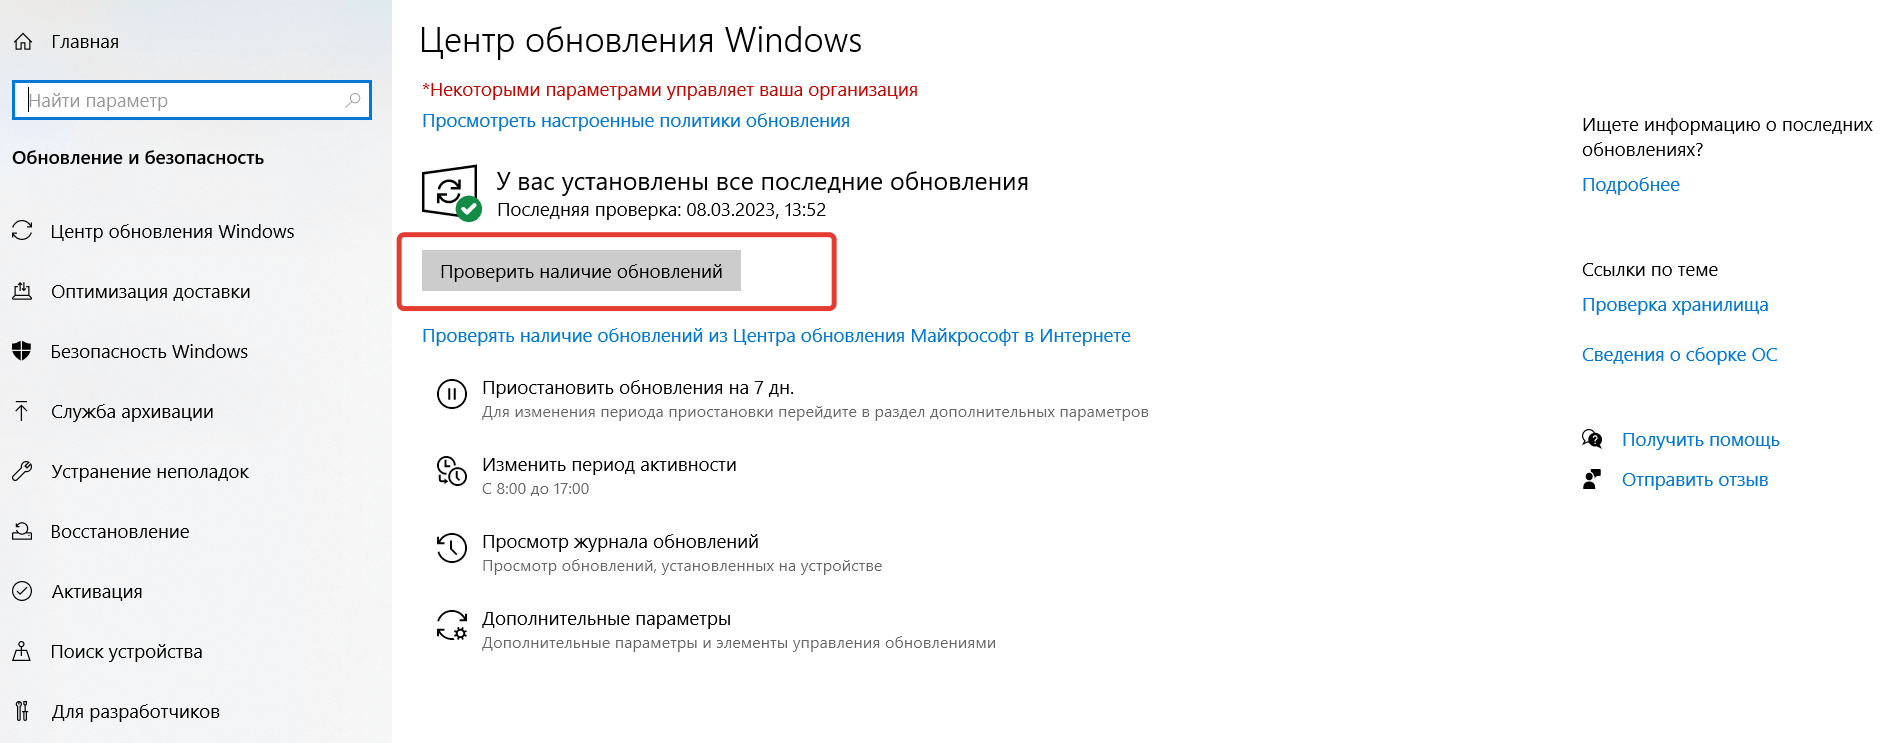
- Если система найдёт патч, то появится соответствующий блок. Нажмите на кнопку «Загрузить и установить», расположенную под ним.
Инструкция для Windows 7
- Запустите «Панель управления».
- Перейдите в подраздел «Центр обновления Windows».
- Проверьте, есть ли обновления. По умолчанию они загружаются автоматически. Если да — нажмите «Установить».
2. Удалите VPN-приложения вместе с настройками
Если вы устанавливали какие-либо приложения, работающие с VPN, то попробуйте избавиться от них. Важно провести полное удаление.
- Запустите «Панель управления».
- Откройте раздел «Программы» / «Установка и удаление программ».
- Найдите в списке программу, которую хотите деинсталлировать, и выделите её.
- В меню над блоком с приложениями станет активной кнопка «Удалить» — нажмите на неё и следуйте инструкциям. Если деинсталлятор предложит удалить настройки программы — согласитесь.
- Перезагрузите ПК.
3. Очистите устройство от «файлового мусора»
Этот способ лучше всего применять вкупе с предыдущим: «файловый мусор» может остаться даже после удаления приложения средствами ОС. Для очистки ПК от ненужных файлов воспользуйтесь специальной утилитой. Например, CCleaner.
Но рекомендуем очень внимательно отнестись к настройке параметров удаления. Иначе вместе с ненужными файлами вы можете очистить сохранённые учётные данные ПК для авторизации в различных сервисах.
Error 809 with IKEv2 ONLY in some Windows 7 machines
Resolution:
No change required
Description
Hi,
Have a working SSwan box setup for IKEv2 remote access VPN.
Both server and clients are behind NAT, so we implement NAT-T registry for Windows OSes.
Only with a handful of machines, we are having 809 errors and without exception they are all Windows 7.
For instance in the same location, two machines one W7 and one W8, W8 connects without problem but W7 fails.
Below y.y.y.y is pub ip of VPN client and x.x.x.x is priv IP of VPN server.
Sep 11 20:30:31 VPN charon: 12[NET] received packet: from y.y.y.y500 to x.x.x.x500 (792 bytes)
Sep 11 20:30:31 VPN charon: 12[ENC] parsed IKE_SA_INIT request 0 [ SA KE No N(NATD_S_IP) N(NATD_D_IP) ]
Sep 11 20:30:31 VPN charon: 12[IKE] y.y.y.y is initiating an IKE_SA
Sep 11 20:30:31 VPN charon: 12[IKE] local host is behind NAT, sending keep alives
Sep 11 20:30:31 VPN charon: 12[IKE] remote host is behind NAT
Sep 11 20:30:31 VPN charon: 12[ENC] generating IKE_SA_INIT response 0 [ SA KE No N(NATD_S_IP) N(NATD_D_IP) N(MULT_AUTH) ]
Sep 11 20:30:31 VPN charon: 12[NET] sending packet: from x.x.x.x500 to y.y.y.y500 (308 bytes)
I’d appreciate if you could direct me where I can gather more logs
History
#1
Updated by Scep CAfail over 9 years ago
I also encountered this in a Win8 just now
#2
Updated by Scep CAfail over 9 years ago
In a working VPN, following is the log from strongswan
charon: 02[ENC] parsed IKE_SA_INIT request 0 [ SA KE No N(NATD_S_IP) N(NATD_D_IP) ]
charon: 02[IKE] y.y.y.y is initiating an IKE_SA
charon: 02[IKE] local host is behind NAT, sending keep alives
charon: 02[IKE] remote host is behind NAT
generating IKE_SA_INIT response 0 [ SA KE No N(NATD_S_IP) N(NATD_D_IP) N(MULT_AUTH) ]
Below is from a VPN that is not working!
charon: 12[ENC] parsed IKE_SA_INIT request 0 [ SA KE No N(NATD_S_IP) N(NATD_D_IP) V V V V ]
charon: 12[IKE] received MS NT5 ISAKMPOAKLEY v9 vendor ID
charon: 12[IKE] received MS-Negotiation Discovery Capable vendor ID
charon: 12[IKE] received Vid-Initial-Contact vendor ID
charon: 12[ENC] received unknown vendor ID: 01:52:8b:bb:c0:06:96:12:18:49:ab:9a:1c:5b:2a:51:00:00:00:02
charon: 12[IKE] y.y.y.y is initiating an IKE_SA
charon: 12[IKE] local host is behind NAT, sending keep alives
charon: 12[IKE] remote host is behind NAT
charon: 12[ENC] generating IKE_SA_INIT response 0 [ SA KE No N(NATD_S_IP) N(NATD_D_IP) N(MULT_AUTH) ]
#3
Updated by Scep CAfail over 9 years ago
Please delete this issue as I tracked the issue down to be IKEv2 fragmentation problem.
Also available in: Atom
PDF