
An Autorun.inf file enables the automatic running of CD files on your computer. When you insert a CD/DVD into the drive, this application allows the files to run without manual prompting. They are in synchronization with the system configuration. Autorun has been popularised by Windows and it saves a lot of time and effort for the user.
Intro
This document explains how to form an autorun inf file. It also tells you how to customize the icon text and icon menu. When we insert a CD, we find that the files on it can be run automatically. This is a utility provided for users by Windows.
However, before we can use it we need to verify if it is enabled on our system. Running a file automatically saves a lot of time and effort.
This article gives us an insight into creating such file and customizing the icon text and menu.
Allowing autorun
Windows provide users with a simple utility that automatically runs applications of a CD when inserted into the CD drive.
To make use of this option, you must verify that it is enabled under your system configuration.
This procedure is due to the «Autorun.inf» (primary instruction file associated with the Autorun utility) found at the root directory of the CD.
Creating an Autorun.inf file
First, create a new (text-only) file and name it as Autorun.inf. Once created, open it with your favorite text editor and type in the following syntax:
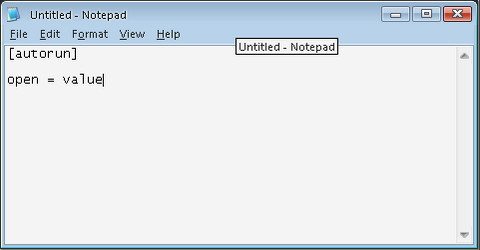
[autorun]
parameter=value
It should be like this :
[autorun]
open=myapplication.exe
Variations
If the selected application is found in a subfolder, the path must be specified:
[autorun]
open=folderA\folderA1\myapplication.exe
If an argument is passed for the application to be autoplayed:
[autorun]
open=myapplication /argument
Customizing the icon
If you want to change the default icon, add the following syntax:
icon=icon.ext
Example:
[autorun]
open=myapplication.exe
icon=myicon.jpg
The icon file should also reside in the root directory of the CD.
Customizing the icon text
Simply add the following command line:
label=My application
To edit the menu that appears when you right-click on the icon, simply add the following syntax:
shell=start shell\start\command=path/myapplication.exe
shell\start=Run Application
shell\read\command=notepad++.exe files/readme.txt
shell\read=open readme.txt
Keep in mind that the following parameters should be defined:
shell\*\command and shell\* are the keywords: firstly for defining the application to be executed and secondly for the text displayed in the menu.
Any more Windows questions? Check out our forum!
From Wikipedia, the free encyclopedia
An autorun.inf file is a text file that can be used by the AutoRun and AutoPlay components of Microsoft Windows operating systems. For the file to be discovered and used by these component, it must be located in the root directory of a volume. As Windows has a case-insensitive view of filenames, the autorun.inf file can be stored as AutoRun.inf or Autorun.INF or any other case combination.
The AutoRun component was introduced in Windows 95 as a way of reducing support costs. AutoRun enabled application CD-ROMs to automatically launch a program which could then guide the user through the installation process. By placing settings in an autorun.inf file, manufacturers could decide what actions were taken when their CD-ROM was inserted. The simplest autorun.inf files have just two settings: one specifying an icon to represent the CD in Windows Explorer (or «My Computer») and one specifying which application to run.
Extra settings have been added in successive versions of Windows to support AutoPlay and other new features.
The autorun.inf file
[edit]
autorun.inf is an ASCII text file located in the root folder of a CD-ROM or other volume device medium (See AutoPlay device types). The structure is that of a classic Windows .ini file, containing information and commands as «key=value» pairs, grouped into sections.[1] These keys specify:
- The name and the location of a program to call when the medium is inserted (the «AutoRun task»).
- The name of a file that contains an icon that represents the medium in Explorer (instead of the standard drive icon).
- Commands for the menu that appears when the user right-clicks the drive icon.
- The default command that runs when the user double-clicks the drive icon.
- Settings that alter AutoPlay detection routines or search parameters.
- Settings that indicate the presence of drivers.
Autorun.inf has been used to execute a malicious program automatically, without the user knowing.[2][3][4][5] This functionality was removed in Windows 7 and a patch for Windows XP and Vista was released on August 25, 2009 and included in Microsoft Automatic Updates on February 8, 2011.[3][5][6][7]
The mere existence of an autorun.inf file on a medium does not mean that Windows will automatically read it or use its settings. How an inf file is handled depends on the version of Windows in use, the volume drive type and certain Registry settings.
Assuming Registry settings allow AutoRun, then the following autorun.inf handling takes place:
- Windows versions prior to Windows XP
- On any drive type, the autorun.inf is read, parsed and instructions followed immediately and silently.[8]
- The «AutoRun task» is the application specified by the
openorshellexecutekeys. If an AutoRun task is specified it is executed immediately without user interaction.
- Windows XP, prior to Service Pack 2
- Introduction of AutoPlay.
- Drives of type DRIVE_CDROM invoke AutoPlay if no autorun.inf file is found.
- Drives of type DRIVE_REMOVABLE do not use the autorun.inf file.[1] Any discovered removable media are handled by AutoPlay.
- All other handling is as before.
- XP Service Pack 2 and up (includes Vista)
- Drives of type DRIVE_FIXED are now handled by AutoPlay. Any specified AutoRun task appears as an option within the AutoPlay dialog together with any text specified by the optional
actionkey.[9] - Drives of type DRIVE_REMOVABLE now use autorun.inf but continue to be handled by AutoPlay. Any specified AutoRun task needs to be paired with the mandatory
actionkey to appear as an option within the AutoPlay dialog. Otherwise the AutoRun task is omitted.[9] - All other handling is as before.
- Vista and later
- The AutoRun task is no longer automatically and silently executed on any drive type. All volumes are handled by AutoPlay which, by default, will present an appropriate dialog to the user.
- Windows 7, Windows 8, Windows 8.1, Windows 10
- For all drive types, except DRIVE_CDROM, the only keys available in the [autorun] section are
labelandicon. Any other keys in this section will be ignored. Thus only CD and DVD media types can specify an AutoRun task or affect double-click and right-click behaviour.[9][10] - There is a patch available,
KB971029for Windows XP and later, that will change AutoRun functionality to this behaviour.[11]
This simple autorun.inf file specifies setup.exe as the application to run when AutoRun is activated. The first icon stored within setup.exe itself will represent the drive in Explorer:
[autorun]
open=setup.exe
icon=setup.exe,0
label=My install CD
Following are the sections and keys allowed in a valid autorun.inf.[9] There also exist architecture specific section types for systems such as Windows NT 4 running on RISC. However these are long outdated and not described here.
The autorun section contains the default AutoRun commands. An autorun.inf file must contain this section to be valid. Keys allowed are:
action=textaction=@[filepath\]filename,-resourceID-
- Windows XP SP2 or later; drives of type DRIVE_REMOVABLE and DRIVE_FIXED
- Specifies text used in the AutoPlay dialog to represent the program specified in the
openorshellexecutekeys. The text is expressed as either text or as a resource reference. Theiconis displayed next to the text. This item is always first in the AutoPlay dialog and is always selected by default. - If the (action) key does not appear on drives of type:
- DRIVE_REMOVABLE
- the AutoPlay dialog appears but without additional menu items. Essentially, the AutoRun task is omitted. This makes the action key mandatory for drives of this type.
- DRIVE_FIXED
- default text is created and used in the AutoPlay dialog.
- On all other drive types the key is ignored.
icon=iconfilename[,index]- The name of a file resource containing an icon. This icon replaces the standard drive icon in Windows Explorer. This file must be in the same directory as the file specified by the
openkey. label=text- Specifies a text label representing the drive in Windows Explorer.
open=[exepath\]exefile [param1 [param2 ...]]- Specifies the path, file name and optional parameters to the application that AutoRun launches when a user inserts a disc in the drive. It is the
CreateProcessfunction that is called by AutoRun. Note that if the application name includes spaces the path should be enclosed in double quote, e.g. open=»»spread sheets.exe»» shellexecute=[filepath\]filename [param1 [param2 ...]]-
- Windows 2000, Windows ME or later
- Similar to open, but using file association information to run the application. The file name can therefore be an executable or a data file. It is the
ShellExecuteExfunction that is called by AutoRun. UseAutoPlay=1-
- Windows XP or later; drives of type DRIVE_CDROM
- Use AutoPlay rather than AutoRun with CD-ROMs. The action taken on CD-ROM insertion will depend on the version of Windows being used.
- On versions of Windows earlier than XP, this key has no effect and actions specified by
openorshellexecuteare performed. - On Windows XP and later, the user will be presented with the AutoPlay dialog and any actions specified by
openorshellexecuteare ignored. shell\verb\command=[exepath\]exefile [param1 [param2 ...]]- Adds a custom command to the drive’s shortcut menu. verb is a string with no embedded spaces. verb is also the text that will appear in the shortcut menu unless specifically altered to some other text. See below for an example.
shell\verb=menu text- Optionally specify the text displayed in the shortcut menu for the verb above. Use an ampersand (&) to select a hotkey for the menu. See below for an example.
shell=verb- Defines the menu command referred to by
shell\verbas the default command in the shortcut menu. The default command is the command executed when the drive icon is double-clicked. If missing, the default menu item will be «AutoPlay», which launches the application specified by theopenentry. - Example:
shell\readme\command=notepad readme.txt
shell\readme=Read & Me
shell=readme
Windows Vista or later
The Content section allows authors to communicate the type and intent of content to AutoPlay without AutoPlay having to examine the media.
Valid keys are: MusicFiles, PictureFiles, VideoFiles. Each key can be set to indicate true or false values and values are not case sensitive.
- true or (1, y, yes, t)
- display the handlers associated with that content type
- false or (0, n, no, f)
- do not display the handlers associated with that content type
Example:
[Content]
MusicFiles=Y
PictureFiles=0
VideoFiles=false
[ExclusiveContentPaths]
[edit]
Windows Vista or later
Limits AutoPlay’s content search to only those folders listed, and their subfolders. The folder names are always taken as absolute paths (a path from the root directory of the media) whether or not a leading slash is used.
Example:
[ExclusiveContentPaths]
\pictures
\music
more music\special
[IgnoreContentPaths]
[edit]
Windows Vista or later
AutoPlay’s content search system will not scan the folders listed, nor their subfolders. IgnoreContentPaths takes precedence over ExclusiveContentPaths so if a path given in a [IgnoreContentPaths] section is a subfolder of a path given in an [ExclusiveContentPaths] section it is still ignored.
Example:
[IgnoreContentPaths]
pictures
\music
more music\special
- Only Windows XP[9]
This section is used to indicate where driver files may be located. This prevents a lengthy search through the entire contents of a CD-ROM. Windows XP will fully search:
- floppy disks in drives A or B
- CD/DVD media less than 1 GB in size.
without this section present. All other media should include this section to have Windows XP autodetect any drivers stored on that media.
The section is not used with AutoRun or AutoPlay and is only referred to during a driver installation phase. The only valid key is:
DriverPath=directorypath
which lists a path Windows will search for driver files. All subdirectories of that path are also searched. Multiple key entries are allowed.
If no DriverPath entry is provided in the [DeviceInstall] section or the DriverPath entry has no value, then that drive is skipped during a search for driver files.
Example:
[DeviceInstall]
DriverPath=drivers\video
DriverPath=drivers\audio

[autorun]
open=setup.exe
icon=setup.exe,0
label=My install CD
- AutoRun
- Installation
- AutoPlay
- ^ a b «Creating an AutoRun-Enabled Application». MSDN Library. Microsoft. Archived from the original on 2009-08-25. Retrieved 2009-08-27.
- ^ Conficker § Operation
- ^ a b Bureau), Robert McMillan and IDG News Service (San Francisco. «After CERT Warning, Microsoft Delivers AutoRun Fix». Archived from the original on 2014-10-25. Retrieved 2014-10-25.
- ^ Constantin, Lucian. «Security researchers discover link between Stuxnet and Flame».
- ^ a b «AutoPlay Windows 7 behavior backported». Archived from the original on 2014-10-25. Retrieved 2014-10-25.
- ^ Gonsalves, Antone. «Security firms warn of spreading Windows AutoRun malware». Archived from the original on 2014-10-25. Retrieved 2014-10-25.
- ^ «Microsoft finally says adios to Autorun». The Register. Archived from the original on 2017-08-10. Retrieved 2017-08-10.
- ^ «How to Test autorun.inf Files». Knowledge Base. Microsoft. Archived from the original on 2009-09-07. Retrieved 2009-08-27.
- ^ a b c d e «Autorun.inf Entries». MSDN Library. Microsoft. Archived from the original on 2009-08-19. Retrieved 2009-08-27.
- ^ «Improvements to AutoPlay». Engineering Windows 7 blog. Microsoft. Archived from the original on 2009-06-08. Retrieved 2009-08-27.
- ^ «Update to the AutoPlay functionality in Windows». Knowledge Base. Microsoft. Archived from the original on 2009-08-29. Retrieved 2009-10-27.
- https://web.archive.org/web/20121220071928/http://dailycupoftech.com/usb-drive-autoruninf-tweaking/
- https://stackoverflow.com/questions/1232966/auto-run-appilication-while-plug-in-usb-drive
- http://www.samlogic.net/articles/autorun.htm
- http://www.makeuseof.com/tag/autolaunch-apps-usb-stick-windows/
- http://www.autoitscript.com/site/autoit/
- https://web.archive.org/web/20120505010938/http://go4answers.webhost4life.com/Example/launch-net-application-usb-drive-41597.aspx
Do you want that a certain program should run when you insert your USB flash drive? Or do you want to add a custom icon for your flash drive? If the answer to any of the question is yes, then you have come to the right place.
It is possible to auto run the programs and applications from your removable USB flash drive like the autorun feature in CD/DVD drives. The autorun.inf file is the key to getting your USB drive to perform certain actions automatically and customize it’s look in My Computer. The purpose of this article is to shed some light on how this can be done.
Note: Autorun feature does not work in Windows 7 any more, Microsoft has disabled it due to security reasons. But this feature works fine in Windows Vista, Windows XP, and older OS.
Basic Autorun.inf Structure
The autorun.inf file is a simple text file that can be opened up in any text editor (e.g. notepad). It always starts with a section header of:
[autorun]
Below this header is a list of different options. Each of these options is in the following format:
option=value
Setting Up AutoPlay Options
Autoplay allows you to set up what file is run when the USB drive is plugged into the computer. There are two options that work in concurrence with AutoPlay. The first is open which specifies the program that you can run automatically with AutoPlay. So, if we wanted to run a program called MyProgram.exe, you would add the this to your autorun.inf file:
open=MyProgram.exe
The second option that we add is the message the user is prompted with. To set this, we use the action option.
action=MyProgram Open Program
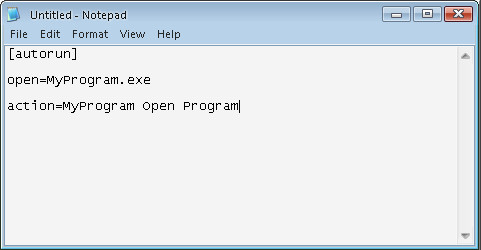
When your autorun file is done, save it as autorun.inf. Once the autorun.inf file is saved, the flash drive autoplay will look something like this:
Customize USB Flash Drive’s Icon
To create a custom icon for your USB drive, use the icon option. Set it to the name of the icon file.
For example, if you had an icon on the root of the USB drive called sun.ico and you wanted this to be the icon that showed up for the USB drive, you would enter:
icon=sun.ico
You can also use some other application’s icon by specifying
icon=Photo.exe
This is valid as long as Photo.exe is available on the root of the USB drive.
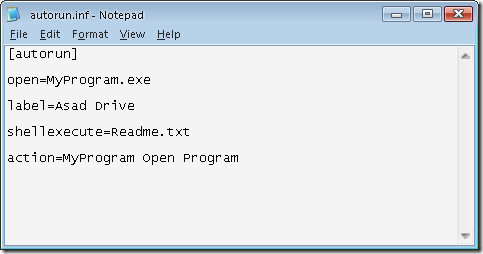
Label Your Flash Drive
If you want your USB drive to display a specific name other than the drive label created when it was formatted, then use the label option. For example, if I wanted to call my drive Asad Drive, I would add this to my autorun.inf file:
label=Asad Drive

Now, when you look at your USB drive in My Computer, it will say Asad Drive by the drive letter.
Autorun Files or Web Addresses
If you wanted to view a file on your USB drive in the default application instead of running a program on the drive, you can substitute the open option for the shellexecute option. For e.g
shellexecute=Readme.txt
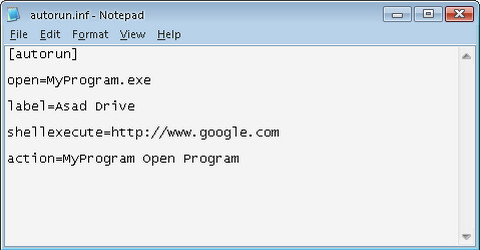
if you wanted to open up a website www.google.com in the default web browser, you could use the following:
shellexecute=https://www.google.com
Now start customizing your USB drive now. Don’t forget to leave a comment. 🙂

Autorun.inf structure and making
- Introduction to Autorun.inf
- Autorun.inf samples
- How to create Autorun.inf?
- Autorun.inf structure and commands
- Autorun.inf drawbacks
- Why Autorun.inf does not work on my or user’s computer?
- How to enable/disable Autorun.inf?
- How to test Autorun.inf?
- Autorun.inf and mixed cds
Introduction to Autorun.inf
When you insert a CD into the computer, Windows looks if AUTORUN.INF file
is located in the root folder of a CD. If AUTORUN.INF is found, then Windows
follows the instructions in this file to run a program.
If you want your program, document, presentation or web page to be open, once a
CD is inserted, then you need to create AUTORUN.INF file or just use our 1st AutoRun Express utility.
Autorun.inf samples
We’ll learn AUTORUN.INF structure in details later. Now take a look at the
following sample AUTORUN.INF file:
[autorun]
open=Setup.exe
icon=Setup.exe,1
This sample AUTORUN.INF file tells Windows to run Setup.exe program located
in the CD root folder. Also it specifies that Windows should use first icon
from Setup.exe to display this CD in Explorer.
You may create and edit AUTORUN.INF file manually (using Windows Notepad) or
you may use 1st AutoRun Express utility to
create your own autorun CDs with a few clicks!
Autorun.inf structure and commands
AUTORUN.INF is a text file that should contain an Autorun section. This
section starts with a header:
[autorun]
and should be followed with commands. There are the following commands
available:
icon=my.ico
icon=setup.exe,1
Icon command specifies an icon for the CD drive in My Computer. You may
specify an icon file directly or an exe/dll file with icons inside and specify
an index of the desired icon. Please note, that
1st AutoRun Express allows you to pick icons visually
and copies icon automatically to the burning folder if you pick an icon
outside the CD.
label=My Presentation
Label command specifies a text label that is displayed for this CD in Explorer
shell\readme\command=notepad README.TXT
shell\readme=Read &me
shell\software\command=Setup.exe
shell\software=Setup the software
Use a series of shell commands to specify one or more entries in the pop-up
menu that appears when the user right-clicks on the CD icon. (The shell entries
supplement the open command.)
This example shows how to add two entries to the menu (Read me — to display
the README.TXT file in Notepad, and Setup the software — to start the software
installation by running the «setup.exe» file.)
Any verb string (without spaces) can appear after «shell\»; «readme» and
«software» were used above.
On one line, append «\command=» followed by the command you want to run. On
the next line, append «=» and the text that appears in the menu. Put an
ampersand character (&) before the character that should be used as the
menu item short-cut key.
[DeviceInstall]
Windows XP also supports a [DeviceInstall] section in AUTORUN.INF with the
DriverPath command specifying a base directory for driver file searches.
[autorun.mips]
[autorun.alpha]
[autorun.ppc]
AUTORUN.INF may have other sections for other NT/W2000 users,
ie MIPS, DEC Alpha, and PowerPC.
Autorun.inf drawbacks
Major Autorun.inf drawback is that it only allows you to run programs, but
not documents, HTML pages etc.
If you target Windows 2000/XP only, then you may overcome this limitation
by using shellexecute command. Otherwise you can try to use the «start»
command as in the following example:
[autorun]
open=start index.html
However, if you do this, Windows displays a DOS box briefly, and «start»
command might not be available on some systems.
And in both cases, if users do not have the appropriate software installed on their system (for example to view DOC files), then
they will not be able to read your document!
Another drawback is that you can not start several documents or show a menu.
If you want to open one or several documents, web pages etc. in any Windows version
guaranteed, without flickering DOS box, ensuring that user will be able to read your documents, then you may use 1st AutoRun Express utility to create your own
autorun CDs and menus with a few clicks.
Why Autorun.inf does not work on my or user’s computer?
Your CD users may have switched off autorun. This might be because they are concerned about viruses.
Also, if they press the Shift key down while inserting the CD, AutoRun is disabled.
In Windows NT4, 2000 and XP systems, only Administrators and Power Users can use AutoRun.
There is no way to force your users to use AutoRun. It is therefore good practice to
provide instructions so that users know how to start your CD, eg tell them to
open file index.htm in their browser. These instructions are also required
if your CD might be viewed by non-Windows users.
How to disable Autorun.inf?
To test AutoRun you need to have it enabled on your computer. A registry
setting can be used to disable AutoRun. Click Start|Run then type in
regedit. Select Edit|Find and type in NoDriveTypeAutoRun. This
value should be found in this key:
HKEY_CURRENT_USER\Software\Microsoft\Windows\CurrentVersion\Policies\Explorer.
The NoDriveTypeAutoRun value should be hexadecimal 95 if AutoRun is enabled
on all CDs, or B5 if disabled for CDs. (If you want to test AutoRun on a
floppy disk, set this value to 91.) You may need to change more than one
instance of NoDriveTypeAutoRun in the registry. You usually need to reboot
for a new value to take effect.
In Windows 95/98/Me the NoDriveTypeAutoRun value is displayed as 95 00 00 00.
In Windows NT4, 2000 and XP this value is displayed as 0x00000095 or
hexadecimal 95. If you modify the NoDriveTypeAutoRun value make sure it is
still in the correct format.
There are two other — uncommon — ways of disabling AutoRun. The
NoDriveAutoRun registry value is in the same key as NoDriveTypeAutoRun. Each
bit represents each drive, so hexadecimal 01 disables AutoRun for floppy
drive A, 04 disables AutoRun for drive C, 10 disables AutoRun on E. Values can
be combined, so 19 disables AutoRun on E, D and A.
If either NoDriveTypeAutoRun or NoDriveAutoRun specify that AutoRun should
be disabled for a drive, then it is disabled for that drive.
Finally, programmers might like to know that AutoRun can also be disabled
by the program that controls the foreground window by handling the
«QueryCancelAutoPlay» Windows message. Please consult the Microsoft
documentation for more details.
How to test Autorun.inf?
If you want to preview your autorun CD without actual burning, then you may
try the SUBST command. This command allows you to create a virtual drive that
is actually a folder on your physical drive.
Copy your autorun CD contents into the specific folder on your CD. Let’s it
be «C:\My CD». Then click Start|Run and enter:
subst O: "C:\My CD"
Where O: is an unused drive name. Click OK and after this command you will find
a new drive O: in My Computer with the same contents as in C:\My CD folder. It
should display an icon specified in AUTORUN.INF and when you double-click its icon
it will autorun.
To remove substitution later please use the following command:
subst O: /d
Also, when you are using our utility 1st AutoRun Express
to create autorun cd, then you may test how autorun will run directly from inside
the program.
Autorun.inf and mixed cds
Enhanced CDs contain both music audio and computer data, so they can
be played on audio equipment and used on a computer. (Enhanced CDs are also
known as CD Extra or CD Plus CDs.) Note that the Mixed-mode CDs also contain
audio and data, but these may not be playable on audio equipment.
Note that not all Windows computers will recognise the data on an
Enhanced CD, although the audio is always seen. (Windows Me, 2000 and XP
usually seem to recognise Enhanced CD data, but it may be drive
dependent.) Therefore, do not use this format if you want to be sure that
your data is available.
If the Enhanced CD data does not have an AUTORUN.INF file, then Windows will
usually start playing the CD when it is inserted. However, if an AUTORUN.INF is
present, then Windows will follow the instructions in there rather than playing
the CD.
The data on an Enhanced CD can only use short filenames or folder names.
Long filenames will be truncated to an «8.3» form, eg «index.html» may appear
as «INDEX~1.HTM».
Загрузить PDF
Загрузить PDF
Автозапуск является функцией Windows, которая обнаруживает вставленный в оптический привод CD/DVD-диск и автоматически запускает его содержимое. Эта функция позволяет автоматически воспроизводить диски с видеороликами, установочные и другие диски.
-

Для этого нажмите «Пуск» > «Все программы» > «Стандартные» > «Блокнот». Также можно ввести «Блокнот» в строке поиска меню «Пуск», чтобы найти и запустить эту программу.
-

Это текстовый файл, который автоматически определит диск, вставленный в оптический привод. Введите в Блокноте следующее:[autorun] open=Filename.exeicon=Filename.ico
-
Вместо «Filename» введите имена ЕХЕ-файла и ICO-файла, которые собираетесь записать на диск. Теперь сохраните текстовый файл — откройте меню «Тип файла», выберите в нем «Все файлы», в строке «Имя файла» введите «Autorun.inf» и сохраните файл на рабочем столе. Если у программы, которую нужно записать на диск, нет ЕХЕ-файла, у нее должен быть MSI-файл. В этом случае вместо open=Filename.exe введите open=Filename.msi.
-
Для этого запустите программу для записи дисков и следуйте инструкциям, чтобы записать диск нужного типа (аудиодиск, видеодиск, установочный диск и так далее). Теперь запишите на диск файл Autorun.inf, который вы создали и сохранили на рабочем столе; этот файл запишите в корневой каталог диска, чтобы Windows нашла его.
- Обратите внимание на параметры записи в программе для записи дисков. Некоторые программы умеют создавать загрузочные диски. Например, если вы хотите создать установочный диск какой-нибудь операционной системы, в программе записи обязательно выберите опцию «Загрузочный диск» (или аналогичную), потому что простое копирование операционной системы на компакт-диск ничего не даст.
-
Обязательно протестируйте созданный компакт-диск, прежде чем удалять или устанавливать какие-либо программы. Если все в порядке, компакт-диск запустится автоматически.
Реклама


Советы
- Если созданный компакт-диск не запускается автоматически, откройте окно «Мой компьютер» и дважды щелкните по оптическому приводу. Если диск все еще не запускается, убедитесь, что правильно выполнили все описанные шаги. Вероятно, во время записи диска произошел сбой или имеет место опечатка в INF-файле.
- Если вам не удается устранить проблему, воспользуйтесь программой, которая сама создаст файл Autorun.inf и запишет диск. Однако многие такие программы содержат вредоносный код, который попытается «содрать» с вас деньги или будет собирать информацию о вас. Если вы все-таки решили скачать такую программу, сначала изучите ее — узнайте, кто ее разработчик, и почитайте отзывы о ней.
Реклама
Что вам понадобится
- Программа «Блокнот» (Windows)
- Чистый CD/DVD-диск
- Пишущий CD/DVD-привод и программа для записи CD/DVD-дисков
Источники
Об этой статье
Эту страницу просматривали 23 153 раза.