
Lockscreen Gif
A simple application to set your windows lockscreen to a video or a GIF image.
You cannot set a GIF as a lockscreen using the normal windows settings even when using file extension spoofing but with some Windows system image cache modifications you can trick Windows into using a GIF on your lockscreen.
Video file input demo
Video.Example.mp4
Gif file input demo
Lockscreen.Gif.demo.mp4
Notes
ONLY real .GIF files are supported.
Videos cannot work and will never work directly, please use the video option to dynamically create a gif to use.
GIFs created through the video option are created with FFMPEG and Gifski to produce high quality, video like gifs.
You are here:
Home » Windows 7 » How To Set Animated GIF As Desktop Background In Windows 7
It’s amazingly easy to set a beautiful picture as wallpaper in Windows operating system. The task can be accomplished by right-clicking on the picture file and then clicking Set as desktop background option.
Even though setting non-animated pictures as wallpaper is a simple task, Windows doesn’t support using animated picture or video as background out of the box. For Vista ultimate edition, Microsoft did release a feature called DreamScene to set a video file as desktop background but the feature isn’t officially available for Windows 7 and later versions of Windows.

Even though it’s pretty much possible to get DreamScene feature in Windows 7 with the help of third-party utilities, the feature doesn’t support animated GIFs out of the box. The DreamScene feature is compatible with only .MPG and .WMV formats.
So if you have a downloaded a cool animated GIF picture and want to set it as desktop background or wallpaper in Windows 7, there are two ways out there to set GIF file as desktop background.
The first method involves enabling DreamScene in Windows 7 and then converting GIF file to DreamScene compatible WMV file. Follow the given below instructions to enable the DreamScene feature, convert GIF to WMV and then set GIF (now WMV) as desktop background.
Use animated GIF file as wallpaper
Step 1: Download DreamScene Activator. Extract the zip file to get the DreamScene Activator.
Step 2: Run DreamScene Activator as administrator by right-clicking on it and then clicking Run as administrator option.
Step 3: Click Enable DreamScene button to enable DreamScene. The tool will automatically restart Windows Explorer to make necessary changes.
Step 4: Next, download the GIF file that you would like to use as wallpaper in Windows 7. If you already have the file, jump to the next step.
Step 5: Visit this GIF to WMV online converter, browse and upload the GIF file, convert the file to WMV format, and then download the same on to your PC. Note that you don’t need to enter anything under Optional settings.

Step 6: Finally, right-click on the downloaded WMV file and then click Set as background to use your GIF (now in WMV format) as your desktop background. You can pause the DreamScene by right-clicking on it and then clicking Pause DreamScene option.

And if you’re looking to set GIF picture file as desktop background without converting the same to WMV, you have very few free tools to choose from. Many of the tools that are available on the web are not clean from toolbars, extensions and other form of viruses. Out of the all the tools we tried and tested, BioniX Wallpaper Lite is the only free tool that doesn’t include browser toolbars and extensions.
BioniX Wallpaper Lite is a free software designed to manage desktop background in Windows. The tool comes with a tool called Wallpaper Animator to set animated GIF as desktop background. After downloading, installing and running BioniX Wallpaper Lite, navigate to Tools menu to access the Wallpaper Animator. Browse the GIF file that you would like to set as desktop background and then click on the GIF file in the added list to use it as wallpaper. The tool lets you adjust the animation speed and set the wallpaper style.
Good luck!
GIF-файлы — это веселый и динамичный способ самовыражения, и теперь вы можете использовать их в качестве обоев в Windows 11! Хотя Windows 11 изначально не поддерживает обои в формате GIF, существует несколько сторонних приложений, которые позволяют легко установить ваш любимый GIF в качестве фона рабочего стола.
В этом посте мы покажем вам, как установить GIF в качестве обоев в Windows 11 с помощью двух популярных приложений: Lively Wallpaper и BioniX. Мы также дадим несколько советов по устранению любых проблем, с которыми вы можете столкнуться.
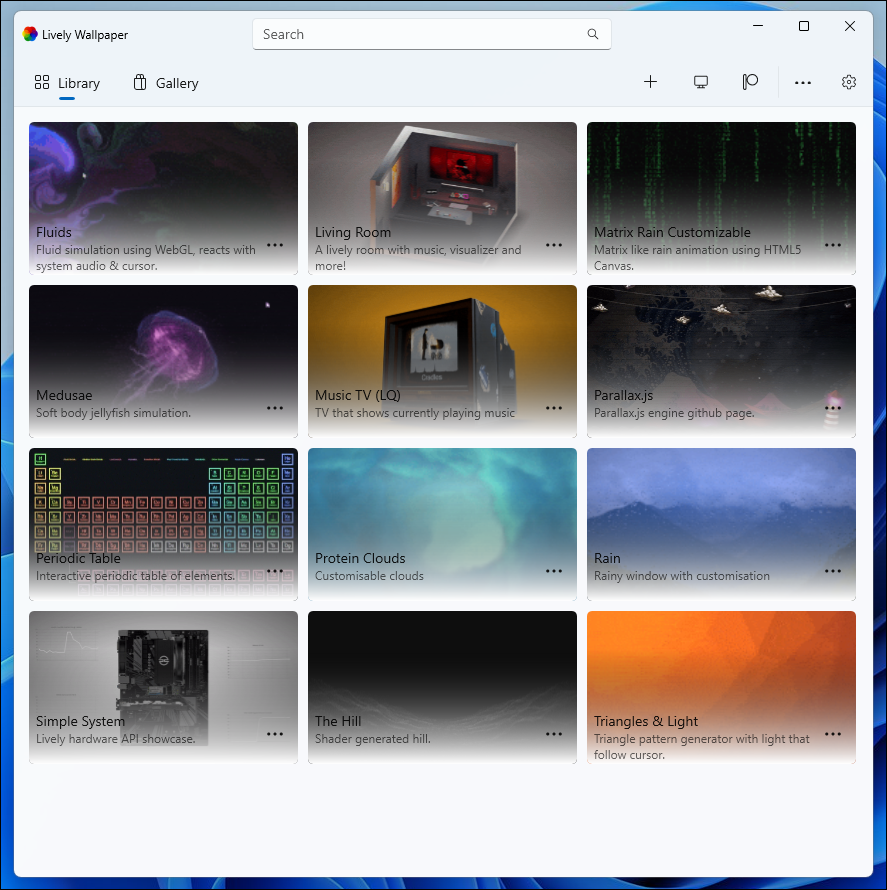
Загрузите и установите приложение «Живые обои» из Microsoft Store на свой компьютер (ссылка ниже).
После установки запустите приложение, и вы увидите кучу готовых к использованию GIF-обоев из раздела «Библиотека» приложения.
Вы можете выбрать один из GIF-файлов из библиотеки приложения или установить свой собственный GIF-файл, выбрав его из локального хранилища или добавив его URL-адрес.
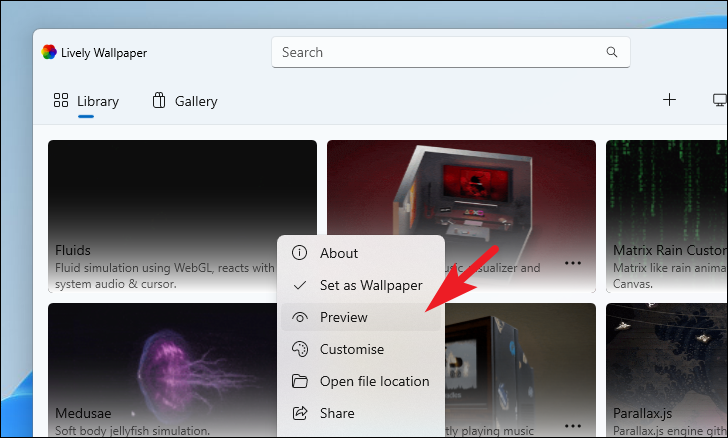
Чтобы просмотреть любой GIF-файл, наведите указатель мыши на его миниатюру и щелкните значок с многоточием (трехточечным).
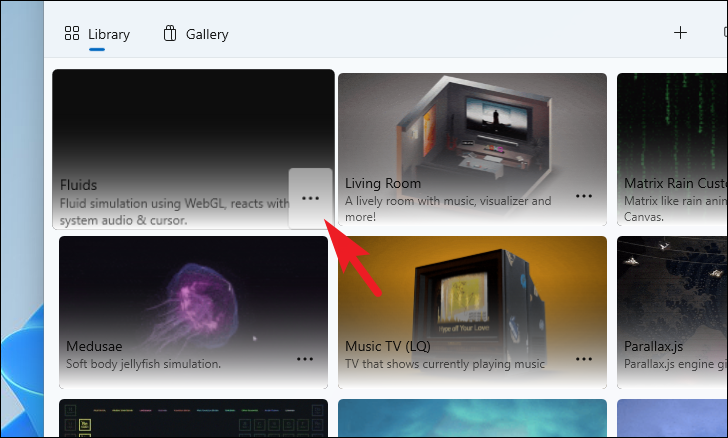
Затем выберите опцию «Предварительный просмотр».
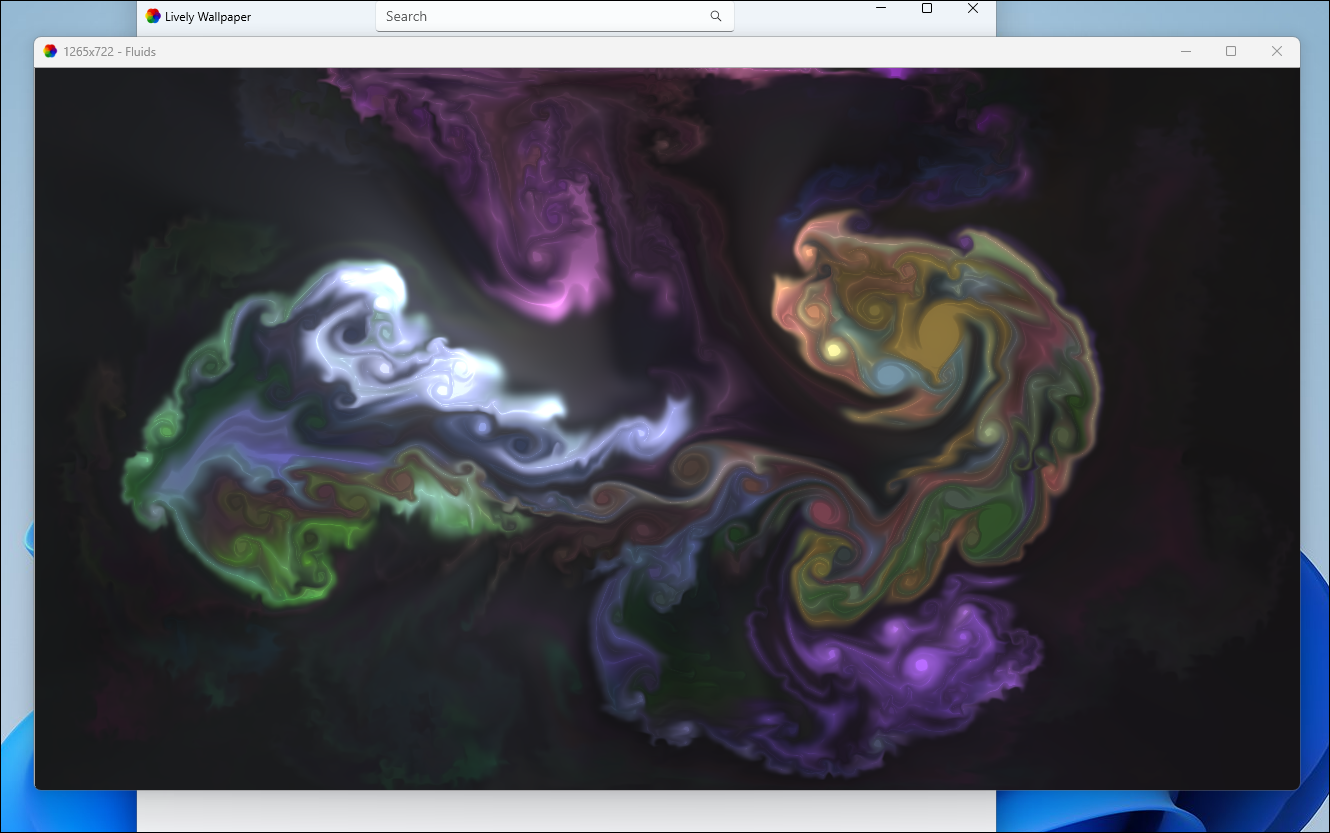
Вы сможете просмотреть обои в новом окне.
Вы можете нажать на любой из GIF-файлов, чтобы сразу установить его в качестве обоев. GIF-файл немедленно заменит ваши текущие обои.
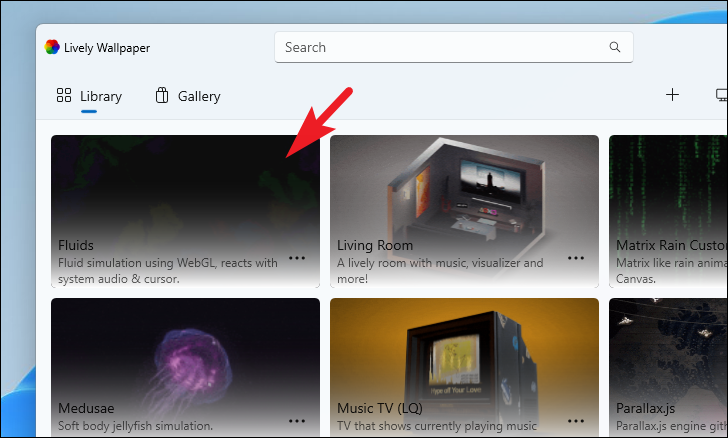
Чтобы настроить GIF, наведите указатель мыши на миниатюру и щелкните значок с многоточием (трехточечный).

Затем выберите опцию «Настроить».
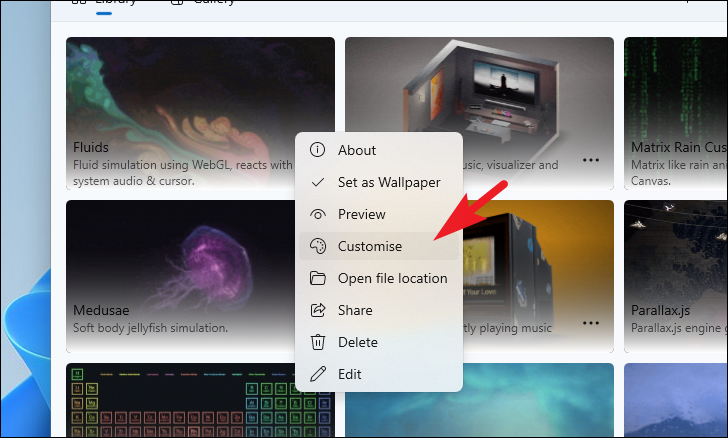
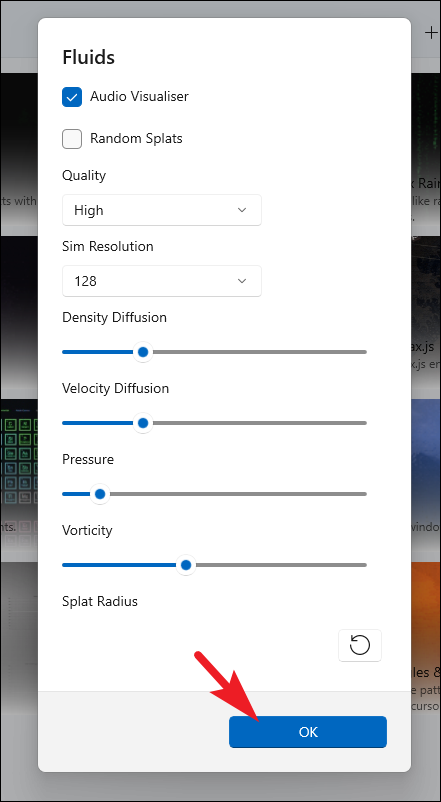
Свойства, которые вы можете настроить, будут различаться для каждого GIF. Некоторые из них предлагают исчерпывающий список, в то время как другие GIF-файлы могут иметь только одно свойство для настройки.
GIF, показанный на снимке экрана, позволяет синхронизировать GIF со звуком и изменять цвет его фона, а также плотность, радиус и скорость цветового всплеска. После настройки в соответствии с вашими потребностями нажмите «ОК», чтобы применить изменения.
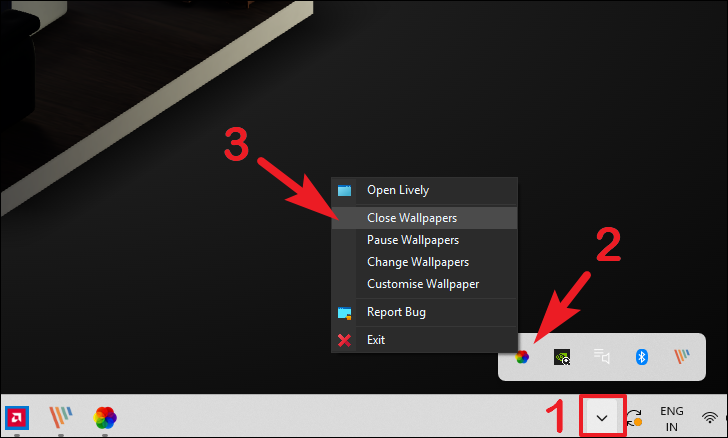
Чтобы прекратить использование GIF в качестве обоев, нажмите «Шеврон» (стрелка вниз) на панели задач, а затем щелкните правой кнопкой мыши значок «Живой». Затем выберите «Закрыть обои».
Установка собственного GIF-изображения в качестве обоев в Lively Wallpaper
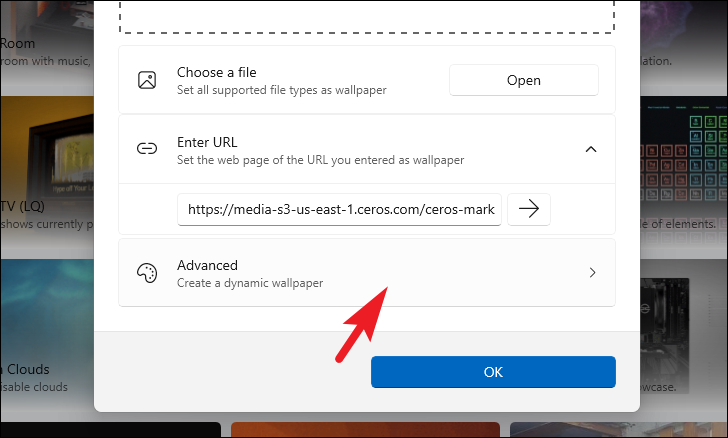
Нажмите значок «+» на панели инструментов приложения Lively Wallpaper.
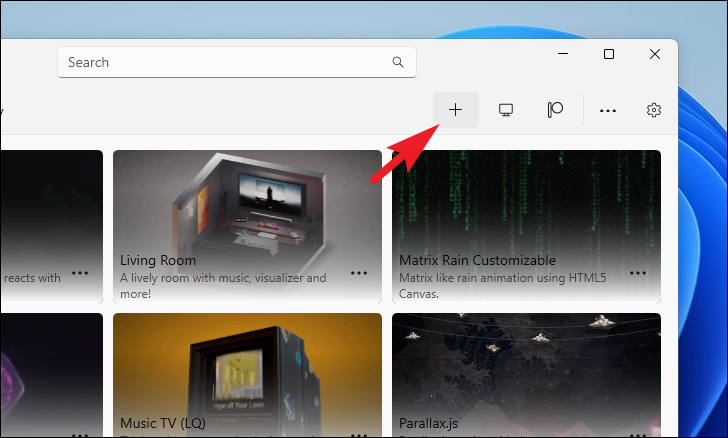
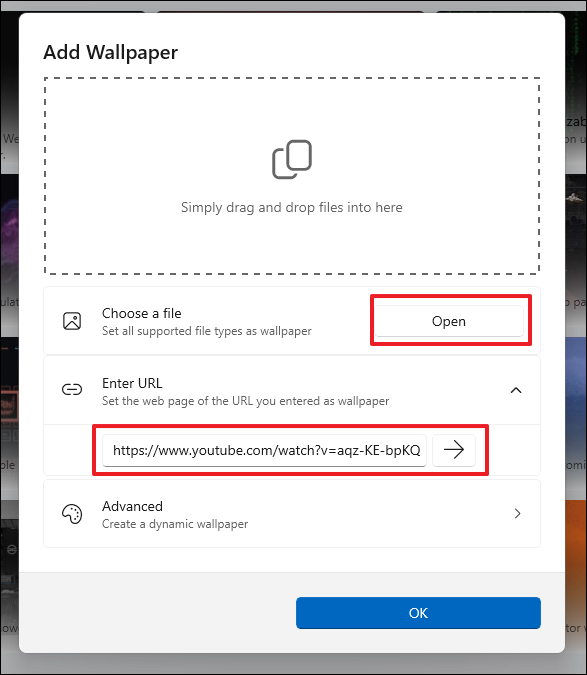
В окне наложения нажмите «Открыть», если вы хотите выбрать файл GIF из локального хранилища. Вы также можете ввести URL-адрес в поле «Введите URL-адрес» и щелкнуть значок «Стрелка вправо», чтобы установить GIF-файл в качестве обоев, который хранится в Интернете.
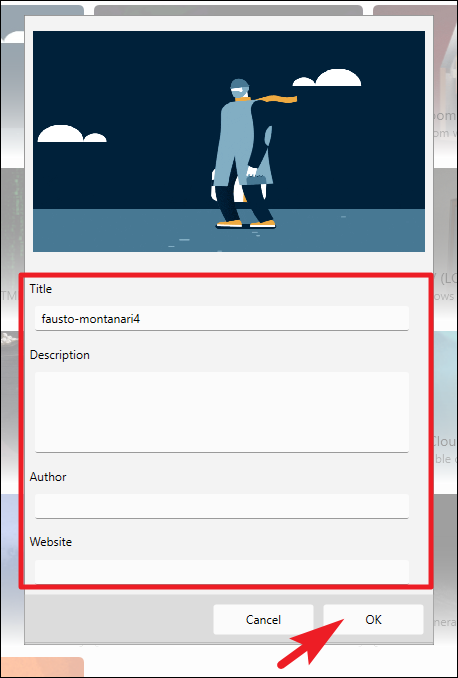
Если вы решите выбрать GIF из локального хранилища, после нажатия «Открыть» выберите файл GIF в окне проводника. Затем вы можете изменить имя, добавить описание и добавить к нему имя автора.
Нажмите «ОК» после завершения. GIF-файл будет немедленно установлен в качестве обоев, а также появится в вашей библиотеке Lively.
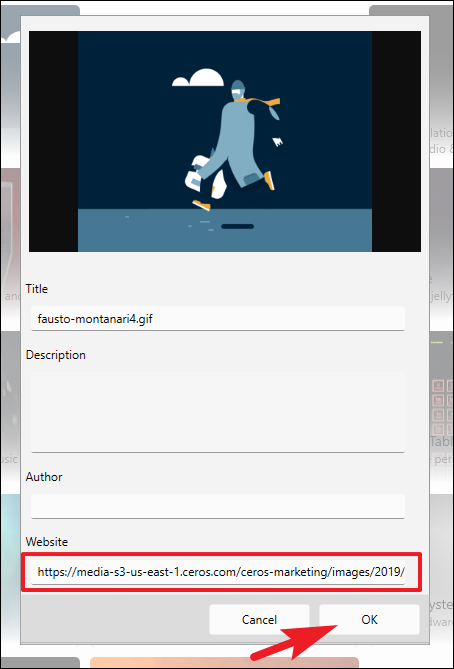
Аналогичное окно появляется, когда вы вставляете URL-адрес в поле и нажимаете значок «Стрелка вправо». Вы можете изменить название GIF, добавить описание и имя автора. Помните: если GIF-файл будет удален с веб-адреса, указанного в поле «Веб-сайт», ваши обои GIF могут перестать работать. После этого нажмите «ОК», чтобы установить его в качестве обоев.
Примечание. Обязательно вводите URL-адрес GIF-файла, а не веб-страницы.
Преобразуйте 2D-изображения в 3D и установите их в качестве обоев в Lively.
Lively также позволяет конвертировать 2D-изображения в 3D и устанавливать их в качестве обоев.
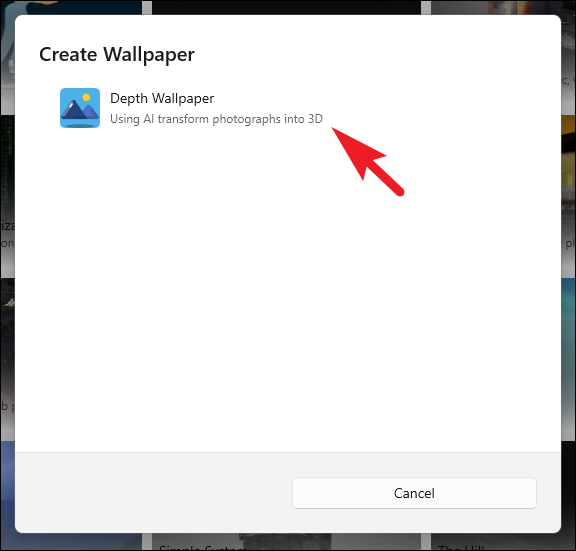
Нажмите на значок «+» в приложении «Живые обои».
Нажмите кнопку «Дополнительно» на экране «Добавить наложение обоев».
В следующем окне нажмите «Глубина обоев».
Вам может быть предложено загрузить дополнительные файлы. Нажмите «Загрузить».
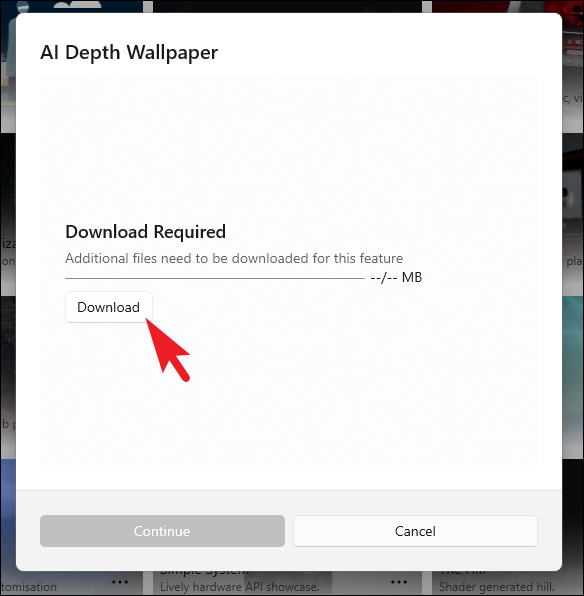
После загрузки нажмите «Продолжить».
Выберите изображение в открывшемся окне Проводника.
Выбрав изображение, нажмите «Продолжить».
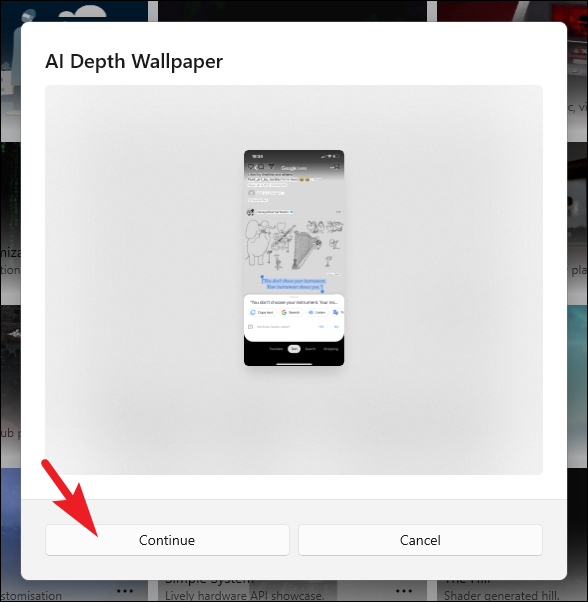
Затем Lively обработает изображение и установит его в качестве обоев. Изображение будет наклоняться и реагировать на движение курсора мыши.
Использование приложения BioniX для установки GIF в качестве обоев
BioniX — еще один инструмент, позволяющий установить GIF в качестве обоев на ПК с Windows 11. Он даже позволяет вам создать список воспроизведения GIF-файлов и установить таймер для автоматической смены обоев GIF.
Перейдите на сайт bionixwallpaper.com, используя предпочитаемый вами браузер.
Нажмите «Загрузить v13» (номер версии может измениться).
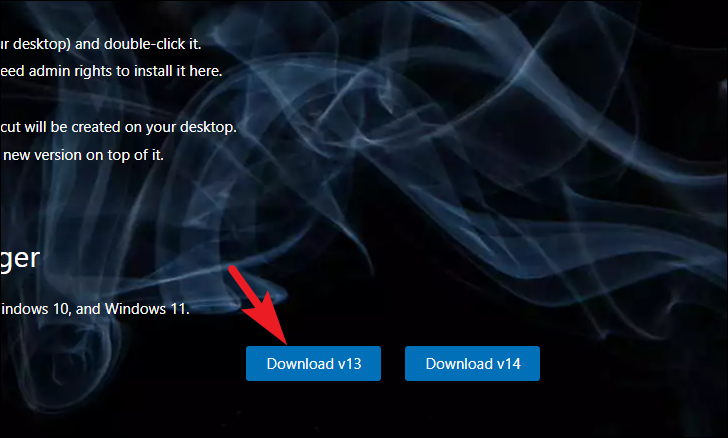
На вашем экране откроется новая вкладка и окно проводника. Нажмите «Сохранить», чтобы начать загрузку.
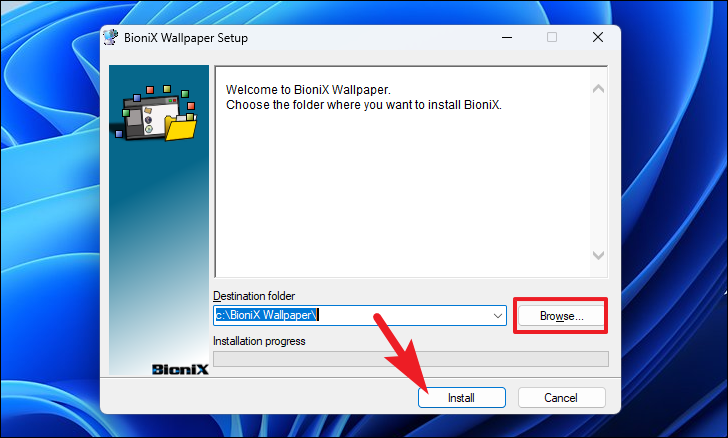
После загрузки дважды щелкните .EXEфайл, чтобы начать установку.

В окне установки нажмите «Обзор», если вы хотите изменить место установки. Чтобы продолжить, нажмите «Установить».
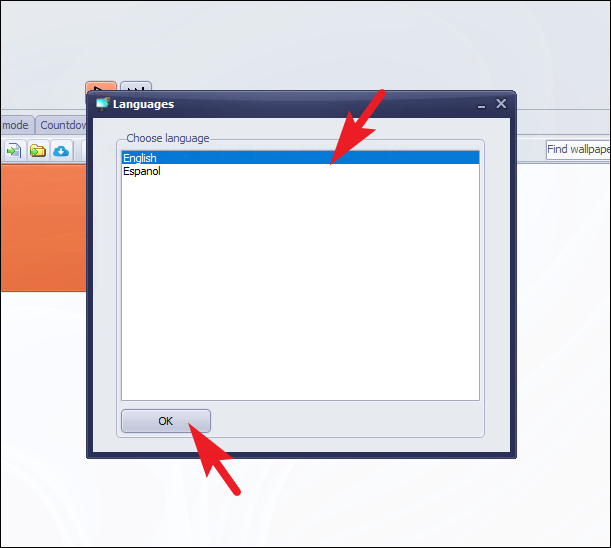
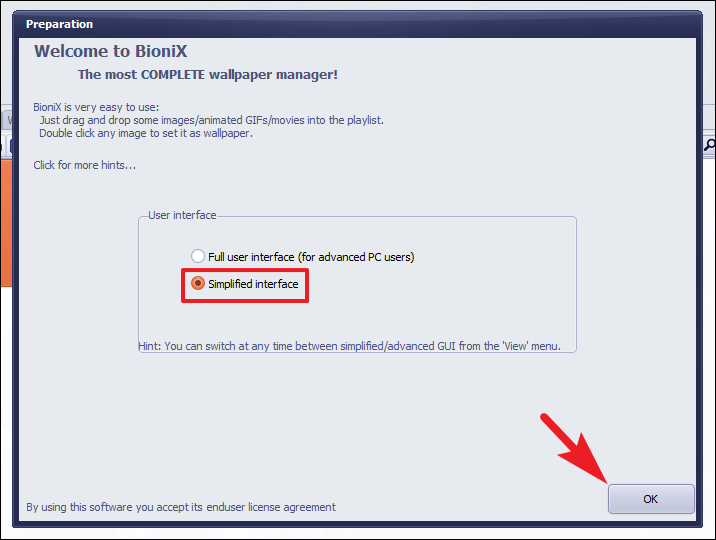
После завершения установки выберите предпочитаемый язык и нажмите «ОК», чтобы продолжить.
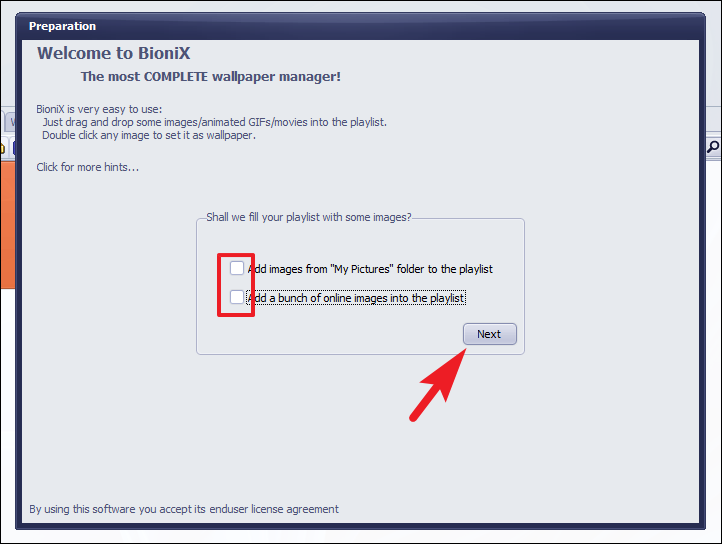
Снимите обе галочки и нажмите «Далее». Если вы хотите импортировать изображения из папки «Изображения» на вашем компьютере и в Интернете, оставьте эти параметры включенными.
Выберите «Упрощенный интерфейс».
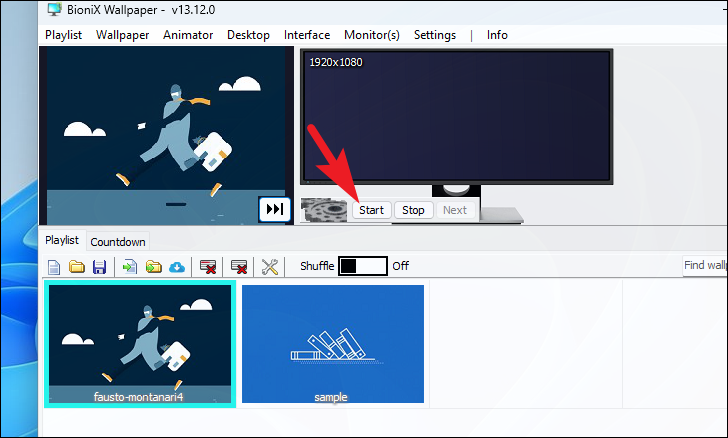
Теперь вы можете перетащить свой GIF в нижнюю часть окна. Либо нажмите значок «Добавить обои», чтобы открыть окно проводника.

Вы можете добавить несколько GIF-файлов в список воспроизведения, перетащив их в окно BioniX или используя опцию «Добавить обои».

Добавив все GIF-файлы в список воспроизведения, нажмите «Пуск», чтобы применить их в качестве обоев. Вы также можете перетасовать порядок, включив переключатель «Перемешать».
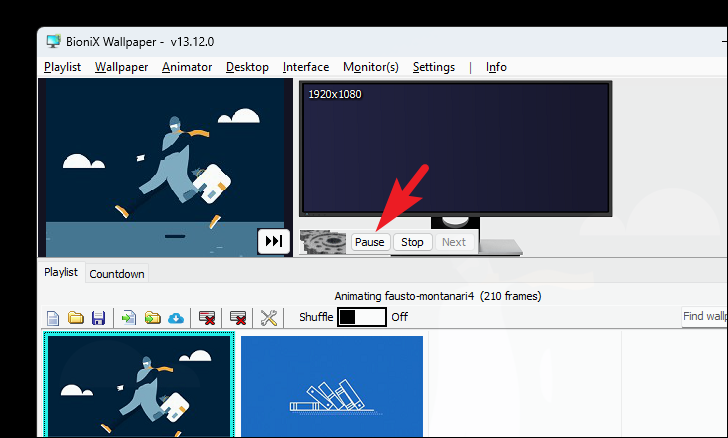
Аналогичным образом, чтобы приостановить GIF, нажмите «Пауза».
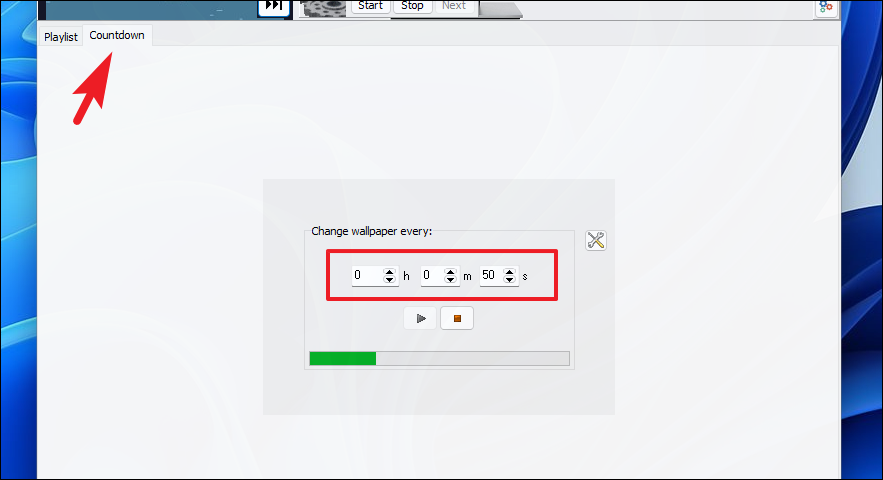
Чтобы настроить время, в течение которого BioniX должен менять GIF, нажмите «Обратный отсчет». Затем используйте таймер «Часы», «Минуты» или «Секунды», чтобы установить желаемое время. Установленное вами время вступит в силу немедленно.
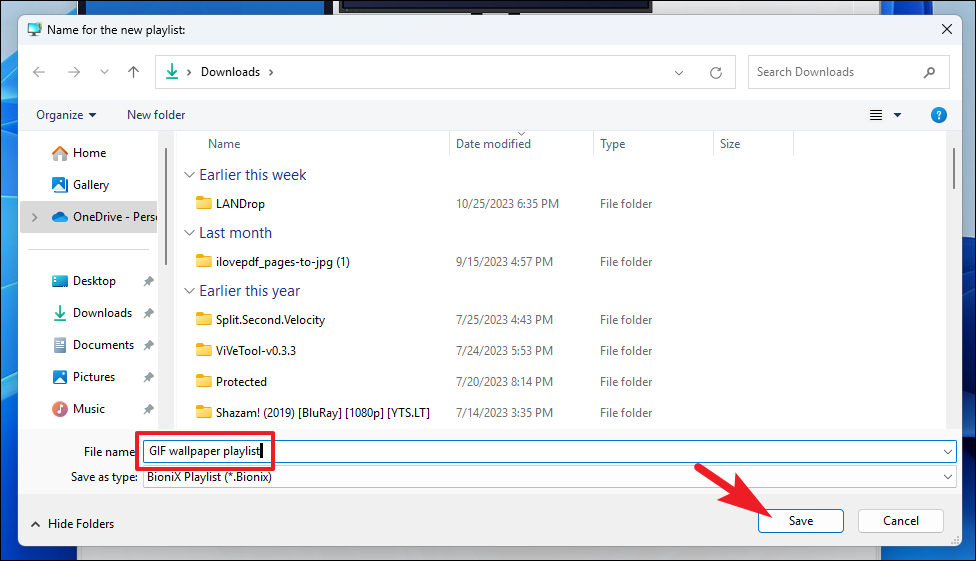
Чтобы сохранить список воспроизведения обоев GIF, нажмите значок «Сохранить список воспроизведения».
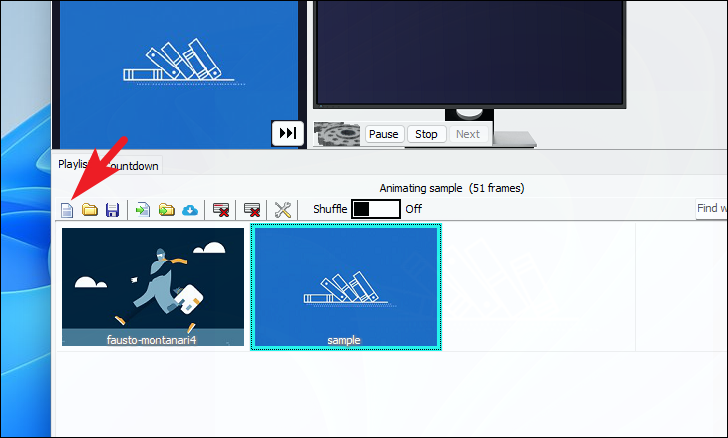
Затем укажите подходящее имя для списка воспроизведения обоев и нажмите «Сохранить».
Хотя официального способа установить GIF в качестве обоев в Windows 11 может и не быть, вышеупомянутые сторонние приложения помогут вам добиться этого.
Просмотров: 7 497
Animated backgrounds, also known as live wallpapers, have become increasingly popular over the years. Windows 11 offers the option to use live wallpapers as desktop backgrounds, which can add a touch of personality and liveliness to your workstation. To get animated background on Windows 11, you can follow these simple steps:
1. Find and download a live wallpaper that you like. There are many websites and applications that offer live wallpapers, both free and paid.
2. Right-click on your desktop and select «Personalize» from the drop-down menu.
3. In the Personalization settings, click on «Background» on the left-hand side.
4. Under «Background,» select «Browse» and navigate to the folder where you saved your downloaded live wallpaper.
5. Once your live wallpaper is selected, you can choose how you want it to be displayed. You can choose to have it fill the screen, fit the screen, or center it.
6. That’s it! Your animated background is now set.
It’s important to note that using live wallpapers can sometimes impact the performance of your device, so it’s recommended to use them sparingly and only when you have enough hardware resources to spare.
Video Tutorial:How do I get live wallpaper on my lock screen Windows 11?
How do I get animated wallpapers for Windows?
Getting animated wallpapers for Windows can provide an aesthetic and dynamic look to your desktop. One way to obtain these wallpapers is through third-party applications that offer a vast collection of animated wallpapers. Some of these applications, such as Wallpaper Engine, allow you to customize your wallpapers with sound effects, particle effects, and rain or snow effects. Other applications, such as Stardock DeskScapes, provide high-resolution and seamless looping videos as wallpapers. Additionally, you can try browsing through online repositories that offer a vast collection of animated wallpapers that you can download and apply directly to your desktop. Keep in mind that animated wallpapers require some computing power, and their performance may vary depending on your system’s hardware specifications.
How do you make a video your background on Windows 11?
Making a video your desktop background in Windows 11 is a neat customization that can give your computer a unique look. Here are the steps to do so:
1. First, you need to download and install a video player that allows you to set a video as a screensaver or desktop background. VLC Media Player is a great option for this. You can download it for free from its official website.
2. After installing VLC Media Player, launch it, and click on «Media» from the top menu to select «Open File» or «Open Folder«. Choose the video file you want to use as your desktop background.
3. Once the video starts playing, right-click on the video screen, and from the dropdown menu select «Video«. Then, click on «Set as Wallpaper» to set the video as your desktop background.
4. A new window will pop up allowing you to customize the desktop background video settings, such as resizing and positioning it. Make the necessary adjustments and click on the «Apply» button to save the changes.
Congratulations, you have successfully set up a video as your desktop background in Windows 11 using VLC Media Player.
Where are live wallpapers in Windows 11?
In Windows 11, Live Wallpapers are not integrated with the operating system out of the box. However, users can still set GIFs or live images as wallpapers by installing third-party applications like «Wallpaper Engine» from the Microsoft Store. This application allows users to browse through a vast library of live wallpapers or create their own with the built-in editor. Once the user has selected their preferred live wallpaper, they can apply it by going to Settings > Personalization > Background and selecting «Wallpaper Engine» in the drop-down menu under «Choose your background«. Live wallpapers can add a unique touch to your desktop and can be an excellent way to personalize your user experience in Windows 11.
Can you set a GIF as your Lock screen Windows 11?
Yes, you can set a GIF as your lock screen in Windows 11. Microsoft introduced dynamic wallpapers in Windows 11, which allows users to set GIFs or video files as their lock screen background. To do this, you need to access the Personalisation settings of Windows 11, click on the Lock Screen option, and then select the «Choose a dynamic lock screen» option. From there, you can browse through the available options or add your own custom GIF or video file. It’s worth noting that using dynamic wallpapers and GIFs as your lock screen background may have an impact on your device’s battery life and performance.
How do I set a video as my Lock screen Windows 11?
Setting a video as your Lock screen on Windows 11 is a great way to personalize your device and add some flair to your daily routine. To do so, you will need to follow these simple steps:
1. First, you need to open the Settings app on your Windows 11 device. You can do this by clicking on the Start button, scrolling down to the Settings icon, and clicking on it.
2. Once the Settings app is open, click on the Personalization option. It is usually located on the top of the screen or on the left-hand menu.
3. In the Personalization section, click on the Lock screen option.
4. Scroll down to the «Choose your background» section, and select the «Video» option.
5. Next, click on the «+Add» button to select the video you want to use as your lock screen.
6. Choose the video you want to use by browsing your device’s file directory.
7. After selecting the video, Windows 11 allows you to preview it to ensure it is the video you want to use.
8. Finally, save your changes, and the video will become your Lock screen video on Windows 11.
This straightforward process will enable you to set up a video as your Lock screen, and you will always be greeted with your chosen video whenever you power on or wake your Windows 11 device.
By now it should be painfully clear that Windows 11/10 does not support GIFs as wallpapers, and for some, that’s a problem. It’s a minor issue from our side since having a moving wallpaper uses up extra resources and gradually drains battery life. Now, if you’re the type of person who doesn’t care much about the negatives of having a GIF background, but rather yet the beauty, it brings to your desktop, then stay with us because we’re going to share how to make magic happen.
You can use freeware BioniX Wallpaper Changer to set an animated GIF as the desktop background on your Windows 11/10/8/7 PC.
Using BioniX Wallpaper Changer
First, you must download the installation file directly from the official website. It’s just over 16MB, so it shouldn’t take too long to download unless you’re still using ancient internet network technology.
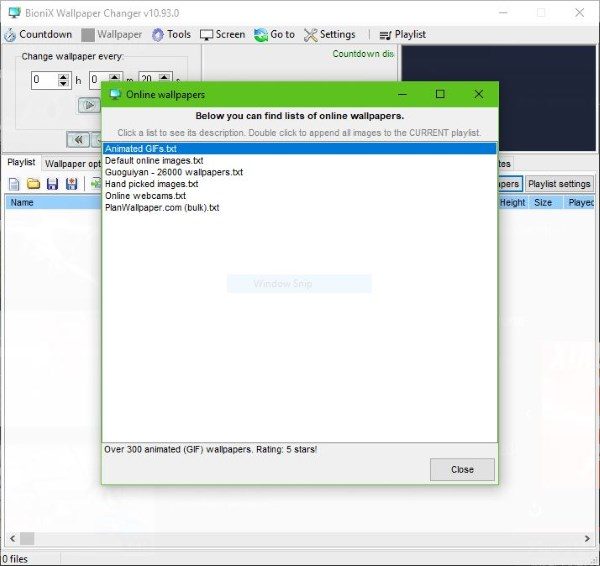
OK, so after installing, the BioniX Wallpaper folder will automatically open, along with the program itself. Additionally, the tool will show a window called Online wallpapers with a list of options to choose from.
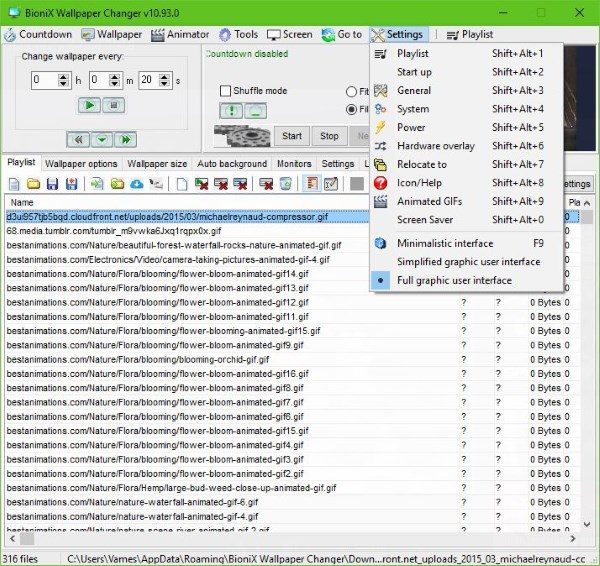
We’re not going to play around with the wallpapers just yet, so just close the window, and then select Full user interface, or Simplified user interface.
We suggest selecting the Full user interface because that’s what we’re going to be working with today.
Stop the wallpaper from changing

By default, the tool uses all the photos in your Pictures folder as wallpapers. It will cycle through them all in every 20 seconds, but that’s not what we want. So, the first thing is to stop this from happening.
Simply click on the stop button, and that’ll do the trick, no problem.
Clear the Playlist
Since all your photos have populated the Playlist, it’s time to remove them and add GIFs to the Playlist. You can simply click on the Clear playlist button, or press Shift + Delete to get the job done.
Time to add new stuff to the playlist
To the right-corner, you should see an option that says Online wallpapers. Click on it, and now you should see a list of online wallpapers that are all situated in text files. Double-click on the one you want, and watch as it populates your playlist.
Set GIF wallpaper
Once your playlist is populated with GIFs, that doesn’t mean they are ready to use. You must first click on the ones you want to use to have them downloaded. After that, click on the Start button and check your desktop.
You can easily set how long you want the system to cycle through the selected GIFs. By default, it’s 20 seconds, but you may want to have this changed to a longer time.
We should also point out that adding your animated GIFs is possible. We believe this is the best option because the GIFs we’ve gotten from BioniX are not large enough to properly fit the screen.
Overall, we have to say that BioniX is decent, but not easy to use due to the small buttons that lack a title. Most of the times you’ll have no idea what a button is capable of until you hover the mouse pointer over it, and that’s not good for novices.
At the end of the day, it’s free. Therefore, we can’t complain too much about what it has to offer. We can only hope Microsoft releases an update for Windows 11/10 that brings support for GIFs as wallpapers. You can download it right here.
For those who might not have an interest in BioniX Wallpaper Changer, when we’d like to recommend RainWallpaper, a software that brings animated wallpapers to Windows 11/10.