
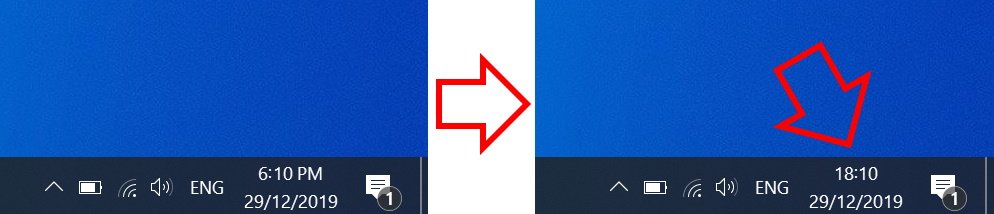
The steps below show how to change the Windows 10 clock to 24-hour format.
How to change Windows 10 time to 24-hour format
-
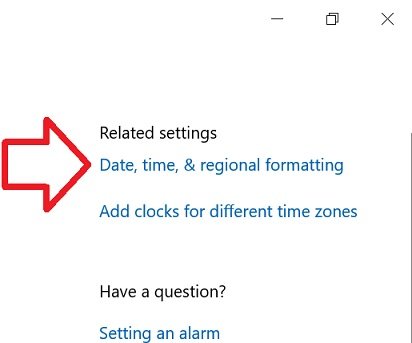
- Right-click on the clock at the bottom right of your screen then click on ‘Adjust date/time’
- In the right side of the window, click on ‘Date, time, & regional formatting’
-

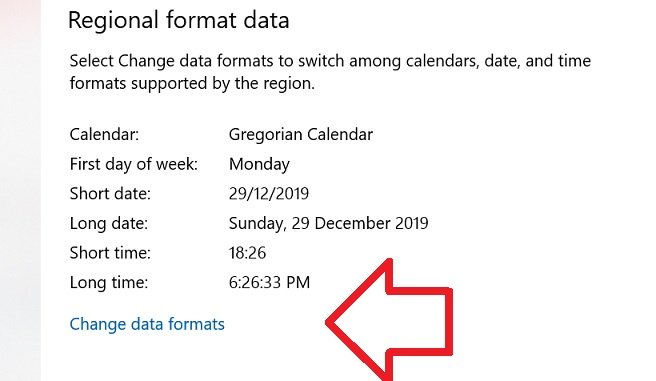
- Scroll down to the bottom of ‘Regional format data’
- Click on ‘Change data formats’
-

- Under ‘Short time’ select ‘9:40’
-

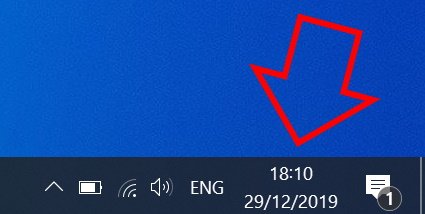
- Close the window
- Your time will now be in 24-hour format


Setting 24-hour time on Windows 11 can be a simple yet powerful way to enhance your productivity and streamline your daily routine. With just a few clicks, you can unlock the benefits of a standardized time format that is used around the world. So, why limit yourself to the AM/PM convention when you can embrace the efficiency and clarity of the 24-hour clock?
To set the 24-hour time on Windows 11, go to your system settings and click on the «Time & Language» option. From there, select «Date & Time» and scroll down until you find the «Change data formats» section. In this section, you will see a dropdown menu labeled «Short time» — click on it and choose the format that displays the time in 24-hour format, usually named «H:mm» or «HH:mm». Once you’ve made your selection, simply close the settings window, and your Windows 11 system will now display the time in the 24-hour format.
To set 24-hour time on Windows 11, follow these steps:
- Click on the Start menu and select «Settings».
- In the Settings window, click on «Time & Language».
- Under the «Date & time» section, click on «Change».
- Toggle the «Use 24-hour clock» option to enable it.
- Close the Settings window.
By following these steps, you can easily set your Windows 11 to display the time in the 24-hour format.

Understanding 24 Hour Time Format on Windows 11
Windows 11 provides a variety of customization options, including the ability to set the time format based on your preferences. By default, Windows uses the 12-hour time format with AM and PM indicators. However, if you prefer the 24-hour time format, also known as military time, you can easily switch to it. The 24-hour time format is commonly used in many countries and offers a more precise and standardized way of representing time. In this article, we will guide you through the process of setting the 24-hour time format on Windows 11.
Method 1: Using the Control Panel
The Control Panel is a central location in Windows where you can adjust various system settings. To set the 24-hour time format through the Control Panel on Windows 11, follow these steps:
- Press the Windows key + X on your keyboard to open the Power User Menu.
- Select «Control Panel» from the menu.
- In the Control Panel, click on the «Clock and Region» option.
- Under the «Region» section, click on «Change date, time, or number formats.»
- In the «Formats» tab, select «English (United States)» or your preferred language.
- Click on the «Additional settings» button.
- In the «Time» tab, find the «Time format» section.
- Select «HH:mm:ss» from the drop-down menu for the «Short time» format.
- Click «Apply» and then «OK» to save the changes.
Changing the Time Format for the Lock Screen
If you want the lock screen time to display in the 24-hour format, you also need to update the time format for the lock screen. Here’s how to do it:
- Open the Windows Settings by pressing Windows key + I on your keyboard.
- Click on «Personalization.»
- In the left sidebar, select «Lock screen.»
- Scroll down and under the «Choose an app to show detailed status» section, click on the drop-down menu.
- Select «None» to remove the detailed status.
- Close the Settings window, and the lock screen time will now be displayed in the 24-hour format.
Method 2: Using the Settings App
Windows 11 introduced a new Settings app that provides a modern and streamlined way to manage system settings. Follow these steps to set the 24-hour time format using the Settings app:
- Press Windows key + I to open the Settings app.
- Click on «Time & Language.»
- In the left sidebar, select «Date & Time.»
- Scroll down and click on «Change data formats.»
- Under the «Region» section, click on «Additional date, time, & regional settings.»
- In the Control Panel, click on the «Clock and Region» option.
- In the «Formats» tab, select «English (United States)» or your preferred language.
- Click on the «Additional settings» button.
- In the «Time» tab, find the «Time format» section.
- Select «HH:mm:ss» from the drop-down menu for the «Short time» format.
- Click «Apply» and then «OK» to save the changes.
- Close the Settings app, and the 24-hour time format will now be applied.
Changing the Time Format for the Lock Screen
To update the lock screen time format to 24-hour as well, follow these steps:
- Open the Settings app.
- Click on «Personalization.»
- In the left sidebar, select «Lock screen.»
- Scroll down and under the «Choose an app to show detailed status» section, click on the drop-down menu.
- Select «None» to remove the detailed status.
- Close the Settings app, and the lock screen time will now appear in the 24-hour format.
Method 3: Using the Command Prompt
If you prefer using the command line interface, you can also change the time format to 24-hour using the Command Prompt. Here’s how:
- Press the Windows key + X on your keyboard.
- Select «Command Prompt» (admin) or «Windows PowerShell» (admin) from the Power User Menu.
- In the Command Prompt window, type the following command and press Enter:
control.exe timedate.cpl,,/f:"HH:mm:ss" - The Date and Time control panel will open with the time format set to 24-hour.
- Click «OK» to save the changes.
Customizing Your Time Format for a Better Windows 11 Experience
In addition to setting the 24-hour time format, Windows 11 allows you to customize other aspects of your time display. Here are a few options you can explore:
Change the Date and Time Shortcuts
Windows 11 includes shortcuts to quickly access the date and time-related settings. You can customize these shortcuts by right-clicking the taskbar and selecting «News and interests.» In the News and interests menu, select «Show date and time» or «Show only the time» to configure the display according to your preference.
Adjusting the Time Zone
To ensure that Windows 11 displays the correct time for your location, you can adjust the time zone settings. Open the Settings app, go to «Time & Language,» select «Date & Time,» and click on «Change» under the «Time zone» section. Choose the appropriate time zone for your location, and Windows will automatically update the displayed time.
Using Third-Party Clock Applications
If you want even more customization options for your time display, consider using third-party clock applications. These applications offer additional features such as different clock styles, multiple time zone displays, and more. Explore reliable clock applications available for Windows 11 and choose the one that best suits your preferences and needs.
Windows 11: Your Personalized Time Format
Windows 11 provides the flexibility to set your preferred time format, allowing you to customize your Windows experience. Whether you prefer the 24-hour time format or other time-related settings, Windows 11 ensures that you can view time in a way that aligns with your habits and needs. Explore the various options discussed in this article and make Windows 11 truly personalized to your liking.
Setting the 24-hour time format on Windows 11 allows for a more precise and standardized representation of time. By following the methods outlined in this article, you can easily switch to the 24-hour format and enjoy a more efficient time display on your Windows 11 device. Whether you choose to use the Control Panel, the Settings app, or the Command Prompt, customizing your time format enhances your overall Windows 11 experience.
Setting 24 Hour Time on Windows 11
If you prefer using the 24-hour time format on your Windows 11 computer, you can easily change the settings to suit your preference. Follow these simple steps:
Step 1: Open the «Settings» menu by clicking on the Start button and selecting the gear icon.
Step 2: In the Settings menu, click on «Time & Language.»
Step 3: Under the «Date & Time» section, click on «Change» next to the «Format» option.
Step 4: From the dropdown menu, select the format that includes the 24-hour time.
Step 5: Click on the back arrow to exit the «Settings» menu. The changes will be applied immediately.
Key Takeaways — How to Set 24 Hour Time on Windows 11
- Changing the time format on Windows 11 to 24-hour can be done in the Settings app.
- Open the Settings app by clicking on the Start button and selecting «Settings.»
- In the Settings app, click on «Time & Language» and then select «Date & Time.»
- Under the «Formats» section, click on the drop-down menu next to «Short time» and choose the 24-hour format.
- Click on the drop-down menu next to «Long time» and choose the 24-hour format as well.
Frequently Asked Questions
Here are some commonly asked questions about how to set 24-hour time on Windows 11.
1. How do I change the time format to 24-hour on Windows 11?
To change the time format to 24-hour on Windows 11, follow these steps:
1. Right-click on the date and time displayed on the taskbar.
2. Select «Adjust date/time» from the context menu.
3. In the Date & Time settings, under the «Formats» section, click on the «Change» button.
4. Choose the desired 24-hour time format from the «Short time» dropdown menu.
5. Click on the «Apply» button to save the settings.
2. Can I set 24-hour time format for specific regions only?
Yes, you can set the 24-hour time format for specific regions in Windows 11. Here’s how:
1. Open the Settings app by pressing Windows Key + I.
2. Go to «Time & Language» and click on «Region & Language» in the left sidebar.
3. Under the «Region» section, click on «Additional date, time & regional settings».
4. In the Control Panel window, go to «Clock, Language, and Region».
5. Click on «Change the date, time, or number format».
6. In the Region window, go to the «Formats» tab.
7. Click on the «Additional settings» button.
8. In the Customize Format window, go to the «Time» tab.
9. Choose the desired 24-hour time format from the «Short time» dropdown menu.
10. Click on «Apply» and then «OK» to save the settings.
3. What if the 24-hour time format is not available in the settings?
If the 24-hour time format is not available in the settings, it could be due to the language or region settings of your Windows 11 installation. To change the language or region settings and enable the 24-hour time format, follow these steps:
1. Open the Settings app by pressing Windows Key + I.
2. Go to «Time & Language» and click on «Language & Region» in the left sidebar.
3. Under the «Preferred languages» section, click on «Add a language».
4. Select the desired language that supports the 24-hour time format.
5. Click on «Next» and follow the prompts to install the language pack.
6. Once installed, click on the language pack and click on «Set as default» to make it the default language.
7. Restart your computer for the changes to take effect.
4. Can I set the 24-hour time format using Command Prompt?
Yes, you can set the 24-hour time format using Command Prompt on Windows 11. Here’s how:
1. Open Command Prompt as an administrator. You can do this by typing «Command Prompt» in the search bar, right-clicking on «Command Prompt» in the results, and selecting «Run as administrator».
2. In the Command Prompt window, type the following command and press Enter:
Setting 24-hour time on Windows 11 is a simple process that allows you to view the time in a format commonly used in many countries around the world. By following the steps mentioned in this article, you can easily switch from the 12-hour time format to the 24-hour time format on your Windows 11 system.
To set 24-hour time on Windows 11, you need to go to the Settings menu, select the Time & Language section, click on the Date & Time tab, and toggle the «Use 24-hour clock» option. This will instantly switch the time display on your computer to the 24-hour format. It’s a convenient feature that allows for a more standardized and precise time representation.
Changing the time format on Windows 11 from the standard 12-hour clock to a 24-hour clock is a simple process. This guide will walk you through the steps to easily make this adjustment on your computer. By following these straightforward steps, you’ll have your system clock displaying the time in the 24-hour format in no time.
In this section, we’ll go step-by-step to change your Windows 11 clock to show time in the 24-hour format. This process will adjust your system settings so the clock shows time without the AM and PM indicators. Let’s dive in!
Step 1: Open Settings
First, click on the Start menu and then click on the gear icon to open the Settings menu.
Opening the Settings menu is your gateway to adjusting various preferences on your computer. This is where you’ll find the option to change your time format.
Step 2: Select “Time & language”
Once you’re in the Settings menu, click on “Time & language” from the list of options on the left-hand side.
The “Time & language” section is specifically designed to help you manage how time is displayed and which languages are used on your Windows 11 system.
Step 3: Go to “Date & time”
Within the “Time & language” settings, click on “Date & time.”
Here, you’ll find all the options related to setting the date and time on your computer, including the format in which it is displayed.
Step 4: Click on “Language and region”
Scroll down to the “Language and region” section and click on it.
This section allows you to manage regional settings, including the format of the date, time, and regional language preferences.
Step 5: Adjust the Regional Format
Next, click on “Regional format” to expand it, and then click on “Change formats.”
This will show you various options for date and time formats that you can customize to fit your preference.
Step 6: Change Time Format
In the “Change formats” menu, find the “Short time” and “Long time” options. Use the drop-down menus next to these options to select the 24-hour format.
Selecting the 24-hour format ensures that your computer’s clock will now display time in the military format, without AM or PM.
After completing these steps, your system clock will display the time in the 24-hour format. You should see the change immediately, both in the taskbar and in any other system areas that display the time.
Tips for Setting 24 Hour Time on Windows 11
- Ensure your Windows 11 system is up to date to avoid any potential bugs in the Settings app.
- Familiarize yourself with the 24-hour time format if you’re used to the 12-hour clock; it’s helpful to know that 13:00 is 1 PM, 14:00 is 2 PM, and so on.
- If you wish to revert back to the 12-hour format, follow the same steps and select the 12-hour options instead.
- Use the Windows Search bar to quickly access the Settings menu by typing “Settings” and hitting Enter.
- Confirm your changes by looking at the system tray clock on the taskbar after adjusting the time format.
Frequently Asked Questions
Why would I want to use the 24-hour clock format?
The 24-hour clock format is more precise and eliminates confusion between AM and PM times, making it ideal for professional and international settings.
Can I change the time format back to 12-hour if I don’t like the 24-hour format?
Yes, you can easily revert to the 12-hour format by following the same steps and selecting the 12-hour options under “Change formats.”
Will changing the time format affect my scheduled tasks or alarms?
No, changing the time format will not affect your scheduled tasks or alarms. They will still operate as programmed.
Do I need to restart my computer for changes to take effect?
No, the changes should take effect immediately after you adjust the settings.
Is the 24-hour clock format used by default in any regions?
Yes, the 24-hour clock format is commonly used in many countries around the world, including most European and Asian countries.
Summary
- Open Settings.
- Select “Time & language.”
- Go to “Date & time.”
- Click on “Language and region.”
- Adjust the Regional Format.
- Change Time Format.
Conclusion
Changing your Windows 11 system to display time in the 24-hour format is a straightforward task that can be done in just a few minutes. This small adjustment can bring about a big difference in how you manage your time, especially if you prefer the precision that comes with the 24-hour clock.
Whether you’re a professional who needs to avoid any AM/PM mix-ups or just someone who likes the military time format, these steps make it easy to customize your computer to fit your needs. Remember, you can always switch back if you change your mind. Happy time-keeping!
Matthew Burleigh has been writing tech tutorials since 2008. His writing has appeared on dozens of different websites and been read over 50 million times.
After receiving his Bachelor’s and Master’s degrees in Computer Science he spent several years working in IT management for small businesses. However, he now works full time writing content online and creating websites.
His main writing topics include iPhones, Microsoft Office, Google Apps, Android, and Photoshop, but he has also written about many other tech topics as well.
Read his full bio here.
The Windows 10 and 11 clock uses the 12-hour format by default, but you can change the time to the 24-hour format, also referred to as military time.
Click on Start > Settings or press the Windows Key + I.
Click on Time & language.
Click on Date & time.
Follow below for Windows 11 or 10:
Windows 11
Click on Language and region for Windows 11
On Windows 11, click to expand Regional format.
Click on Change formats.
Click on Short time.
Choose 9:40 AM or 9:40 for the default 12-hour clock.
Choose 09:40 AM or 09:40 for the 24-hour clock.

You will see the Clock change when you select any available options.
Windows 10
Click on Date, time & regional formatting on the right.
Click on Additional date, time, & regional settings.
The Control Panel will open.
Click on Change date, time, or number formats.
Click on Short time.
Choose h:mm tt or hh:mm tt for the default 12-hour clock.
Choose H:mm or HH:mm for the 24-hour clock.
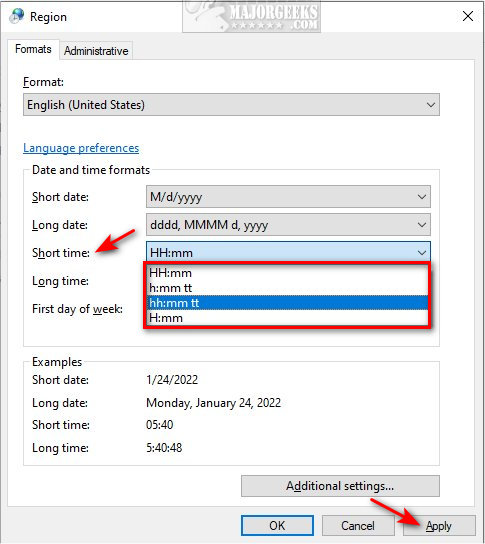
Click Apply to see the change.
Similar:
comments powered by Disqus
Understanding the 24-Hour Clock Display in Windows 10
Windows 10, one of Microsoft’s most widely used operating systems, offers a plethora of features designed for both productivity and user preference. One such feature is the ability to switch between the 12-hour and 24-hour time formats, also known as military time. The 24-hour clock system is widely used in various sectors, especially in the military, aviation, computing, and many countries across the globe. Understanding how to set and use the 24-hour clock in Windows 10 can enhance your time management and improve clarity for international communications. In this article, we’ll explore the nuances of the 24-hour clock display in Windows 10, see why it’s beneficial, and provide a comprehensive guide on how to set it up.
The Significance of the 24-Hour Clock
The 24-hour clock system runs from 0:00 to 23:59, where midnight is represented by 0:00, and the last minute of the day is 23:59. This time format eliminates confusion over AM and PM distinctions, which can be particularly crucial in industries like aviation and military, where precision is vital.
Clarity and Precision
One of the main advantages of using the 24-hour clock is clarity. For instance, instead of stating 2 PM or 2 AM, one can simply say 14:00 or 02:00. This delivery method enhances precision, thus reducing errors in scheduling and planning. In scenarios where time management is critical, such as in travel itineraries or military operations, using the 24-hour format drastically decreases the chances of misinterpretation.
Global Use
While the 12-hour clock is popular in the United States and a few other countries, many nations around the world, particularly in Europe and Asia, utilize the 24-hour format as the standard. This global preference makes the 24-hour clock a valuable tool for individuals who frequently travel internationally or communicate with people in different time zones.
How to Change to the 24-Hour Format in Windows 10
Setting up your Windows 10 clock to display the 24-hour format is a straightforward process. This can be beneficial for users who prefer clear time indications, especially those from regions where 24-hour formats are common. Below are step-by-step instructions on how to switch from a 12-hour clock to a 24-hour clock display in Windows 10.
Step 1: Access the Settings Menu
- Open the Start Menu: Click on the Windows icon located at the bottom-left corner of your screen.
- Select Settings: Look for the gear icon, which symbolizes settings, and click on it. This will open the Settings window.
Step 2: Navigate to Time & Language
- Find Time & Language: In the Settings window, locate and click on «Time & Language». This option will allow you to manage various time-related settings.
Step 3: Modify Date and Time Settings
- Click on Date & Time: Once inside the Time & Language section, you’ll see options on the left-hand side. Click on «Date & Time».
- Adjust Formats: Scroll down until you find the section labeled «Format». Here, you’ll notice options for changing your Date and Time formats.
Step 4: Change Time Format to 24-Hour
-
Set to 24-hour Format: To switch to the 24-hour clock, look for the dropdown menu under “Short time” and “Long time”. By default, it usually shows options in the 12-hour format (h:mm tt). Change these to the 24-hour format (HH:mm).
- Short Time Format: Select «HH:mm» (for hours and minutes).
- Long Time Format: If you want to display seconds as well, select «HH:mm:ss».
-
Close Settings: Once you’ve made these selections, you can close the Settings window. The system should immediately reflect these changes, and your clock will now display time in the 24-hour format.
Additional Customizations for the Clock
Beyond merely switching to a 24-hour format, Windows 10 also allows users to make several other customizations to the date and time display settings.
Changing the Date Format
You can also change the way the date is displayed. This is particularly useful if you prefer to see the date formatted in a specific way (e.g., DD/MM/YYYY or MM/DD/YYYY).
- Navigate Back to Date & Time: Follow the steps to access the Date & Time settings.
- Change Date Formats: Under the same «Format» section, look for the options to adjust the “Short date” and “Long date” formats and choose the one that aligns with your preference.
Using a Different Locale
If you want the clock and date display to match the format used in a different country or region, you can also change your system locale settings.
- Return to Time & Language Settings: In the Time & Language section, click on “Region”.
- Select Your Country or Region: From the dropdown menu, select your desired country or region. The date, time, and other display formats will automatically adjust accordingly.
Troubleshooting Common Issues
While changing the time format in Windows 10 is usually a smooth process, some users may encounter difficulties or unexpected behavior. Below are common issues and troubleshooting steps.
Time Not Updating Correctly
If your system clock seems to be stuck or does not update, it might be due to issues with the Windows Time Service.
-
Restart the Time Service: Press
Windows key + R, type “services.msc”, and hit Enter. In the Services window, find «Windows Time», right-click, and select “Restart”. -
Sync Your Clock: You can also sync your clock with an internet time server. Go back to the Date & Time settings, scroll down, and click on «Sync now» under “Synchronize your clock”.
Missing the Time Format Options
If you don’t see the time format options you want, your system might be set to a language or region where 24-hour format is not supported.
- Check Language Settings: Navigate to the Region & Language settings and ensure that the language and region are correctly set.
- Install Additional Language Packs: If necessary, you might want to install additional language packs that include 24-hour format support.
Enhancing Productivity with Time Management Tools
Apart from setting the system clock to 24-hour format, Windows 10 features several other tools that can enhance time management. Understanding and utilizing these features can further increase overall productivity.
Windows Clock App
The built-in Clock app in Windows 10 allows users to access various time-related features like alarms, timers, and a stopwatch. Here’s a quick overview:
- Open Clock App: Simply type “Clock” in the Start Menu and open the app.
- Using Alarms: You can set multiple alarms for different purposes (wake up, reminders, etc.).
- Timers: This feature is invaluable for pomodoro techniques or timed tasks.
- World Clock: Add multiple time zones if you frequently communicate with teams or family members in various regions.
Calendar App
Alongside the Clock app, Windows 10 comes with a Calendar app that integrates seamlessly. Here’s how to effectively use it:
- Access Calendar: Type “Calendar” in the search bar to find the app.
- Adding Events: You can organize events by setting them in the calendar and receiving reminders.
- Integration with Apps: The Calendar app can sync with your Outlook or Google Calendar, making it even easier to manage appointments.
User Control Over Time Settings
One of the strengths of Windows 10 is its flexibility in allowing users to control their settings. Users can cycle through various time formats according to personal preferences, workplace standards, or local customs.
Expressions of Time in Different Cultures
Being aware of different representations of time in various cultures enhances global communication. While the 24-hour format is standard in many countries, there are places where local customs dictate alternatives.
- 12-Hour Clock Usage: In countries like the United States and Canada, the 12-hour clock is predominant, with AM and PM distinguishing morning from evening.
- Regional Influences: Some cultures might incorporate unique ways of expressing time through idioms or phrases, reflecting their relational approach to time.
Conclusion
The ability to shift to a 24-hour clock format in Windows 10 is a small yet significant feature that can promote clarity and efficiency in time management. Whether you are working in a global environment, serving in the military, or simply want to avoid confusion, utilizing the 24-hour format can be beneficial.
Moreover, further enhancing your experience by custom-tailoring date formats and utilizing the tools Windows 10 offers can profoundly impact both personal productivity and overall time management. By understanding the significance of the 24-hour clock and how to configure your settings, you’re not just adapting your display—you’re enhancing your day-to-day communication and organizational skills. Embrace the shift to the 24-hour clock display in Windows 10 and observe how it transforms your time management practices.