
В Windows Server 2016 существует возможность апгрейта (обновления) до Windows Server 2019, все настройки и файлы при этом сохраняются. Установка Windows Server 2019 возможна так же к примеру из под Windows 10, но в этом случае сохранить личные файлы при данном способе обновления будет невозможно.
1) Прежде чем приступить к обновлению убедитесь в следующих важных аспектах:
1. Не обслуживает ли сторонняя компания данный сервер? У них могут быть свои ньюансы, уточните пожалуйста, если Вы не главный администратор данного сервера.
2. Не защищены ли диски данного сервера шифрованием BitLocker? Иначе при обновлении необходимо будет их расшифрование.
3. Не является ли сервер одной частью отказоустойчивого кластера?
4. Есть ли свободное место на жестком диске для обновления (Минимум 8гб HDD).
5. Обязательно сделайте резервное копирование данного сервера.
6. Убедитесь, что сервер полностью исправлен. Настоятельно рекомендуется, что бы на данном сервере как железо, так и с софтверной частью все корректно работало.
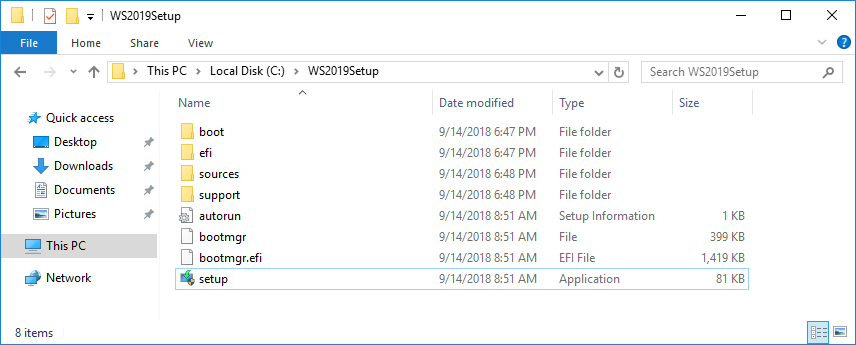
2) Скачайте и запустите установочный файл Windows Server 2019. Скачать можете на следующей странице.
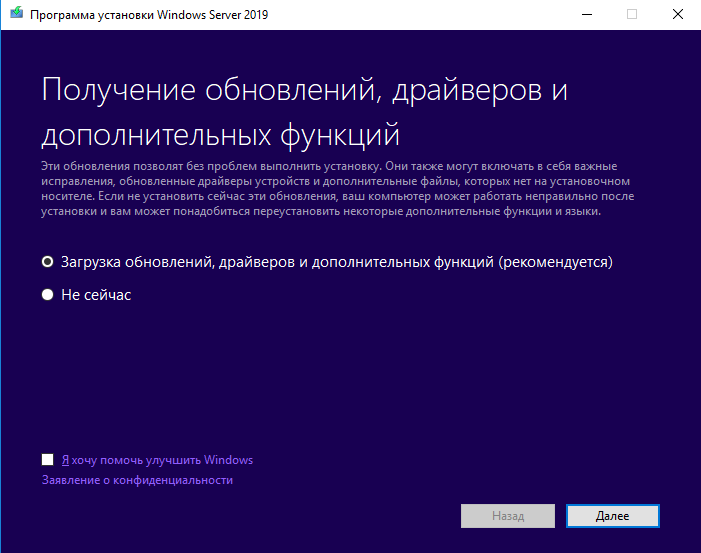
3) Рекомендуется загрузить обновления сразу, так же загрузятся автоматически драйверы и дополнительные функции.
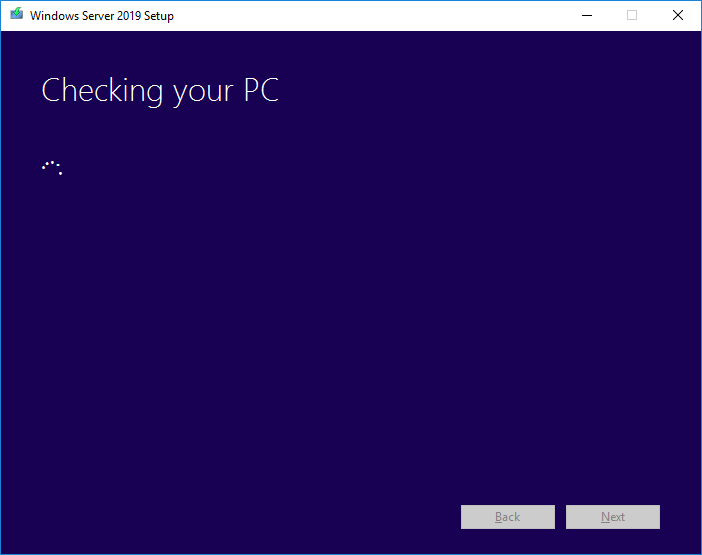
4) Программа установки проверит конфигурацию Вашего компьютера (сервера).
5) На следующем этапе в зависимости от Вашей исходной операционной системы у Вас может запросить лицензионный ключ активации для Windows Server 2019, что бы продолжить дальше.
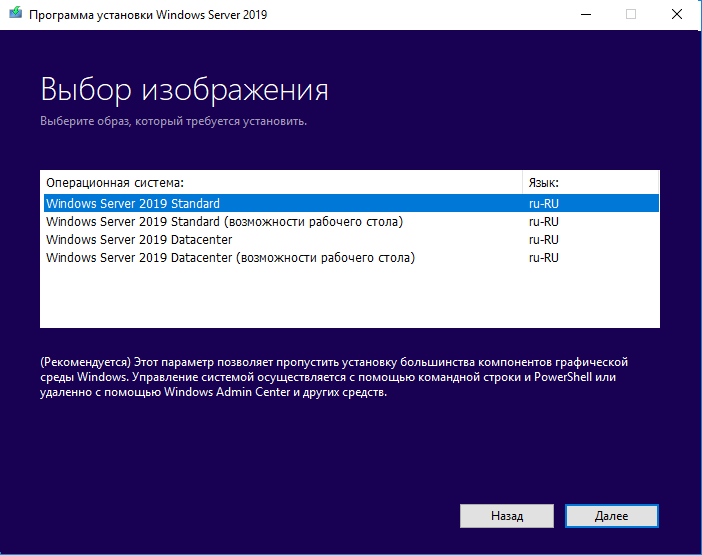
6) На данном этапе Вам предложат выбрать нужную Вам редакцию Windows Server 2019.
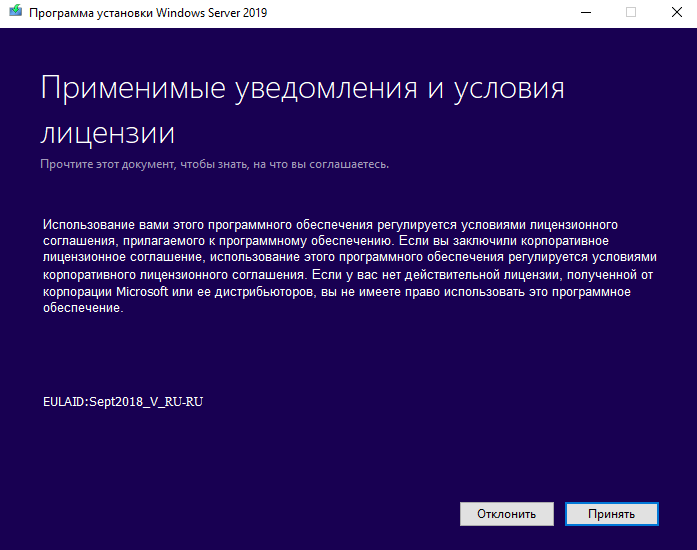
7) Принимаете лицензионное соглашение.
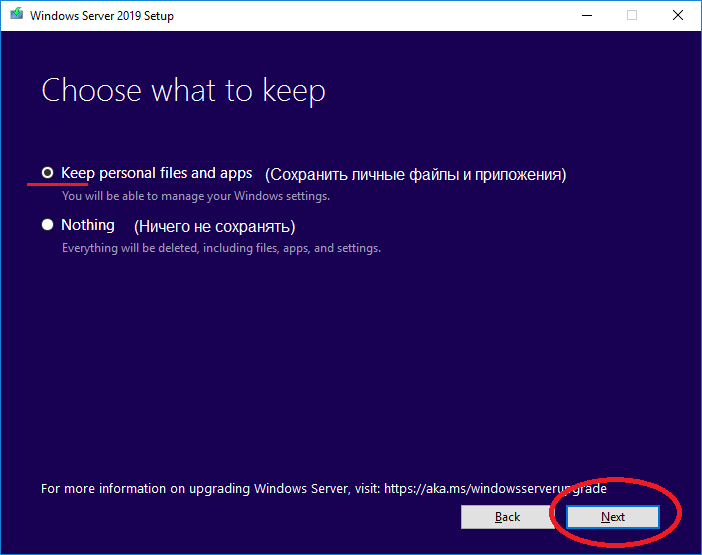
 Выбираете первый вариант для сохранения личных файлов и приложений при обновлении.
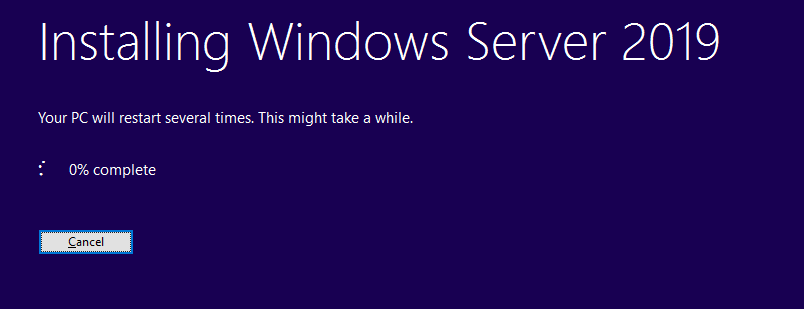
9) Устанавливаем обновление. Сервер несколько раз перезагрузится до завершения обновления.

После установки и завершения обновления, зайдите в свойства системы и убедитесь, что обновление произведено до Windows Server 2019.
Лицензионный ключ активации Windows Server 2019 от
Задача: Проработать обновление Windows Server 2016 до Windows Server 2019
Как по мне использовать обновление серверной операционной системы Windows с одного релиза на другой с установленными сервисами – это обрекать себя на получение дополнительных проблем и порой не понимания, а почему сервисы перестали работать. Уж лучше развернуть их заново с нуля по своим наработкам, да долго и время, но так Вы будете уверены, что работает как нужно. Я хочу в тестовых условиях под Debian 10 + Proxmox 6 проработать процедуру обновления виртуальной машины Windows Server 2016 Standard установленной из образа: SW_DVD9_Win_Server_STD_CORE_2016_64Bit_English_-4_DC_STD_MLF_X21-70526.ISO. Возможно и буду использовать данную заметку, а возможно и нет, все решит случай.
Требования:
RAM: не менее 4GbHDD: на логическом диске C: должно быть свободно не менее 40GbEth: потребуется выход в интернет или доступ к WSUS сервису для выкачивания обновлений.Права локального администратора в системеСлужба Windows Updates должна быть включена
Шаг №1: Запускаю VM srv-s2016 под Debian 10 + Proxmox 6
Шаг №2: Копирую дистрибутив Windows Server 2019 в систему.
У меня в моей локальной сети есть ресурс где лежат книги, программы, образа. С этого ресурса копирую образ Windows Server 2019 Std (SW_DVD9_Win_Server_STD_CORE_2019_1809.18_64Bit_English_DC_STD_MLF_X22-74330.ISO)
Шаг №3: Проверяю, что VM той редакции, которая нужна:
C:\Windows\system32>reg query "HKLM\SOFTWARE\Microsoft\Windows NT\CurrentVersion" /v EditionID
HKEY_LOCAL_MACHINE\SOFTWARE\Microsoft\Windows NT\CurrentVersion
    EditionID    REG_SZ    ServerStandard
C:\Windows\system32>systeminfo | findstr /I "OS Name"
Host Name:                 WIN-AAURVT4CB0C
OS Name:                   Microsoft Windows Server 2016 Standard
OS Version:                10.0.14393 N/A Build 14393
OS Manufacturer:           Microsoft Corporation
OS Configuration:          Standalone Server
OS Build Type:             Multiprocessor Free
BIOS Version:              SeaBIOS rel-1.14.0-0-g155821a1990b-prebuilt.qemu.org, 4/1/2014
Time Zone:                 (UTC+03:00) Moscow, St. Petersburg, Volgograd
                                 Connection Name: Ethernet
Все правильно.
Шаг №4: Распаковываю образ Windows Server 2019 Std, понадобится архиватор 7zip и запускаю процедуру обновления:
Запускаю C:\Soft\SW_DVD9_Win_Server_STD_CORE_2019_1809.18_64Bit_English_DC_STD_MLF_X22-74330\setup.exe – Run as Administrator — выбираю вариант "Download updates, drivers and optional features (recommended) / Скачать обновления, драйверы и дополнительные компоненты (рекомендуется)"
I want to help make the installation for Windows better Privacy statement: снимаю галочку
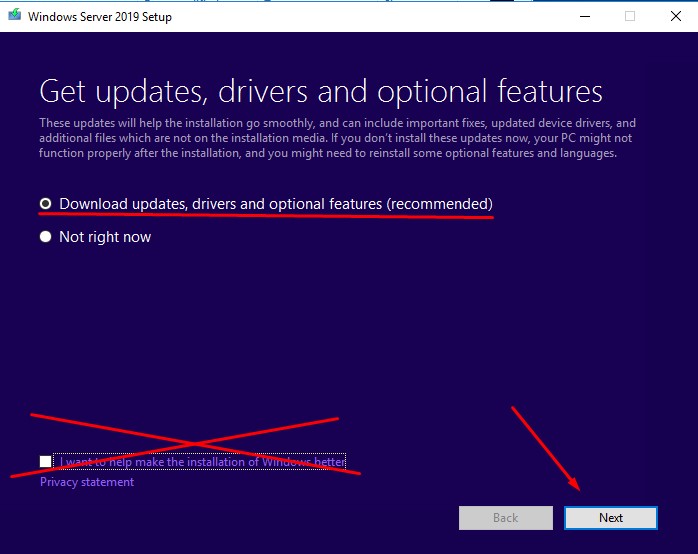
И нажимаю Next
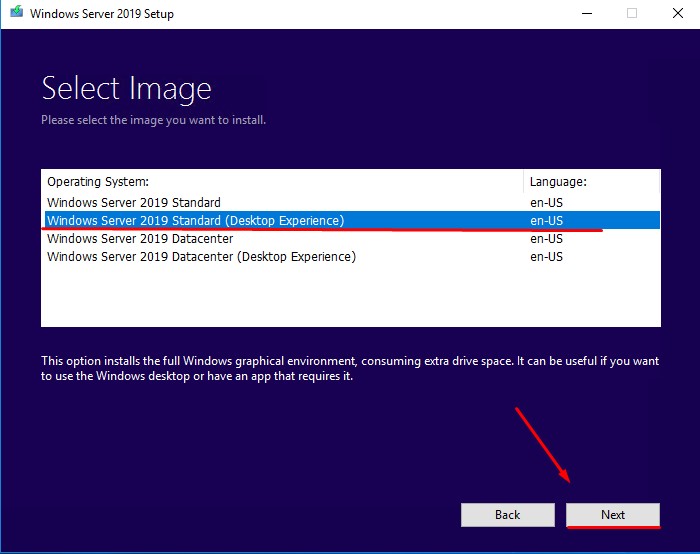
Выбираю выпуск Windows Server 2019 который в итоге будет, для меня это Windows Server 2019 Standard (Desktop Experience) и нажимаю Next
Нажимаю Accept
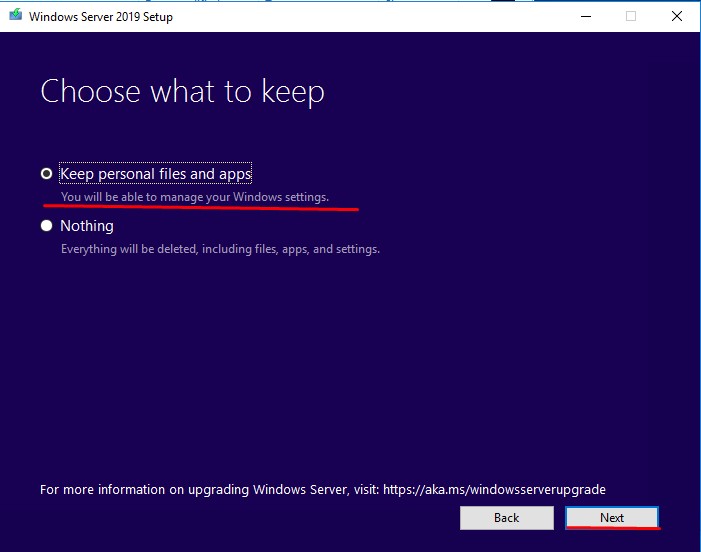
Choose what to keep: выбираю Keep personal files and apps (Сохранить личные файлы и приложения)
И нажимаю Next
Ожидаю, идет проверка
Getting updates
This may take a few minutes.
В итоге проверка завершается успешно, и установщик готов приступить
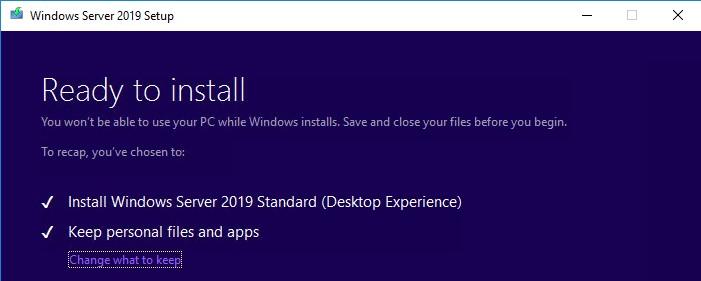
Ready to install
You won’t be able to use your PC while Windows installs. Save and close your files before you begin.
To recap, you’ve chosen to:
И нажимаю Install
Система по завершении самостоятельно отправится в перезагрузку
Вот что я получил в консоли Proxmox по этой VM, когда наблюдал за процессом обновления, но после снова продолжился процесс обновления как ни в чем не бывало.
Шаг №5: Система загрузилась, и я проверяю какая сейчас редакция:
C:\Users\Administrator>systeminfo | findstr /I "OS Name"
Host Name:                 WIN-AAURVT4CB0C
OS Name:                   Microsoft Windows Server 2019 Standard
OS Version:                10.0.17763 N/A Build 17763
OS Manufacturer:           Microsoft Corporation
OS Configuration:          Standalone Server
OS Build Type:             Multiprocessor Free
BIOS Version:              SeaBIOS rel-1.14.0-0-g155821a1990b-prebuilt.qemu.org, 4/1/2014
Time Zone:                 (UTC+03:00) Moscow, St. Petersburg
                                 Connection Name: Ethernet
Отлично в тестовых условиях процесс обновления прошел успешно, а что до боевого, ну знаете я, пожалуй, пасс. Лучше работающий сервис чем после обновления не работающий вовсе. На этом заметка завершена, с уважением автор блога Олло Александр aka ekzorchik.
Users are allowed to upgrade Windows Server 2016 to 2019 to get a better user experience. However, during this process, how to make sure your data is intact and secured? This post on the MiniTool Website will give you an ultimate guide for Windows Server upgrades and additional tips for data security.
If you are still struggling with whether or not to upgrade Windows Server 2016 to 2019, we recommend you do that. Windows Server 2019 can provide more services than Windows Server 2016 and boasts many advantages that are worth trying. The features it offers include:
- Increased number of users and devices
- Virtualization enhancements
- Better protection for your data and system
- High scalability with superior performance
- Seamless integration with the cloud
- Simplified server management
- Increased efficiency and productivity
- Azure Stack HCI is supported with the Azure-like cloud environment available
- CPU and memory usage is monitored in real-time
With its better design and advanced features, we recommend you start the Windows Server upgrade from 2016 to 2019. Luckily, you can directly perform this upgrade via the easy steps we introduced later, but there is something you need to notice here.
What Should You Know Before Windows Server 2016 Upgrade to 2019?
Before you upgrade Windows Server 2016 to Windows Server 2019, you need to make sure you are qualified to finish this task. To do this task, there are some requirements.
1. System Requirements
The requirements of Windows Server 2019 are quite similar to Windows 10 because Windows Server 2016 was the first server OS to be built on the Windows 10 kernel.
- Processor – 1.4 GHz 64-bit processor; NX and DEP support; with secondary address translation (EPT or NPT) supported
- RAM – 512 MB
- Disk Space – at least 32 GB for a fresh installation; at least 60 GB of free disk space for an in-place upgrade
- Network – Gigabit (10/100/1000 based) Ethernet adapter and compliant with PCI Express Architecture Specification
- Optical Storage – DVD drive (when installing the operating system from DVD media)
- Video – Super VGA (1024 x 768) or higher resolution
- Input Devices – Keyboard and mouse
- Internet – Broadband access
You can compare these indicators to your qualifications and adjust the deviation for your device.
2. Windows Server doesn’t have the option of in-place upgrade but Server 2019 has Cluster OS Rolling Upgrade, which allows users to upgrade the OS of your Server from Server 2012 R2 and Server 2016 without stopping easily.
However, during this process, you still need to notice that the upgrade will fail with very minimal chances. Apart from the basic requirements you need to check, the following tips and tricks require your attention.
- Prepare an installation media ready for use and make sure the source of Windows Server 2019 installation files is reliable; You can perform the upgrade from DVD, from a mounted ISO, or from files extracted from an ISO image.
- Make sure you have a valid product key and the activation method is available. Don’t discard the product box casually and the product key will be on a label of the card inside the product box. Since it is a long string of numbers, you should be careful when inputting them.
- Make sure you have enough time to wait for the upgrade to finish. When the upgrade starts, don’t casually abort the process. Your data can get lost for the move. You can set a target time frame for the upgrade, which can give you the estimated time you need to wait for the upgrade to be complete.
- Avoid the scheduled maintenance window. Just don’t apply the in-place upgrade during the same period as the maintenance window.
- Complete the latest updates to your Windows Server 2016.
- Ensure that you have backed up your data so that a quick recovery is useful when data loss happens.
After checking these tips, now you can start the next part to make the Windows Server 2016 upgrade to 2019 without losing data.
How to Upgrade Windows Server 2016 to 2019?
Part 1: Protect Your Data
The first step in a safe Windows Server upgrade from 2016 to 2019 is to back up data. To make a full-fledged protection plan, you can create a system image so that you can quickly restore your system once something bad happens. Just in case, we advise you to save this image on an external hard drive.
System backup is easy to perform if you use this recommended backup software – MiniTool ShadowMaker. As Server backup software, it allows users to backup files & folders, partitions & disks, and your system.
Besides, many users would like to use automatic backup options with different backup schemes to save their time and disk space.
With high flexibility and compatibility, MiniTool ShadowMaker is available to install on most systems, including Windows 11/10/8.1/8/7 all editions, and Windows Server 2008/2012/2016/2019/2022.
Please download this software and install it on your Windows Server 2016 for this 30-day free trial.
MiniTool ShadowMaker TrialClick to Download100%Clean & Safe
Step 1: Launch the program and click Keep Trial to enter MiniTool ShadowMaker.
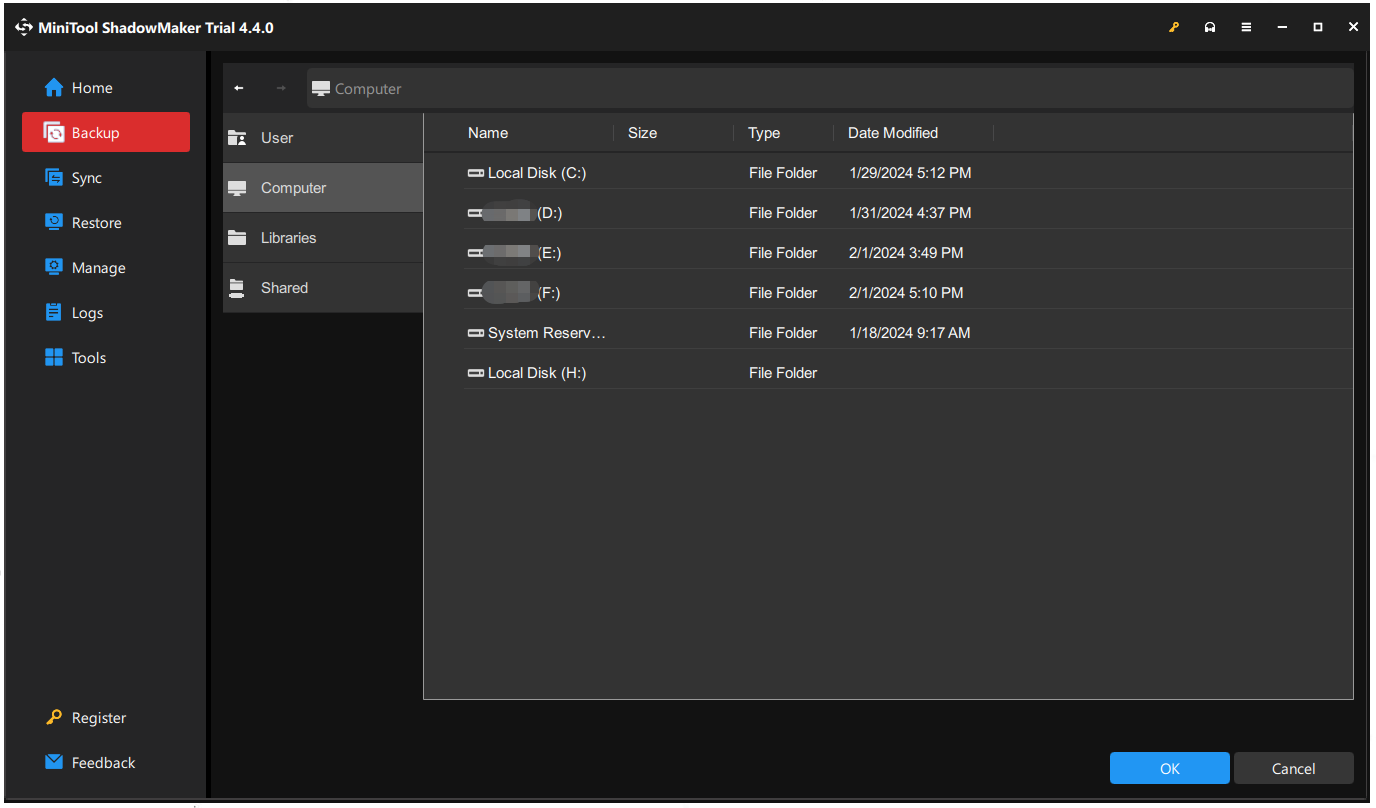
Step 2: Go to the Backup tab and you can see all the partitions related to the system have been selected in the SOURCE section by default so you don’t need to change that.
Step 3: Click the DESTINATION section where you can choose internal/external hard drives, USB drives, or shared folders as your destination. Please locate your external hard drive and click OK to confirm the choice.
Tips:
After that, you can click Options to configure your backup settings, such as image creation mode, file size, compression, backup schemes, and schedule settings. These features will give you a more advanced backup experience.
Step 4: When you have checked all the needed options, you can click Back Up Now to start the backup task immediately.
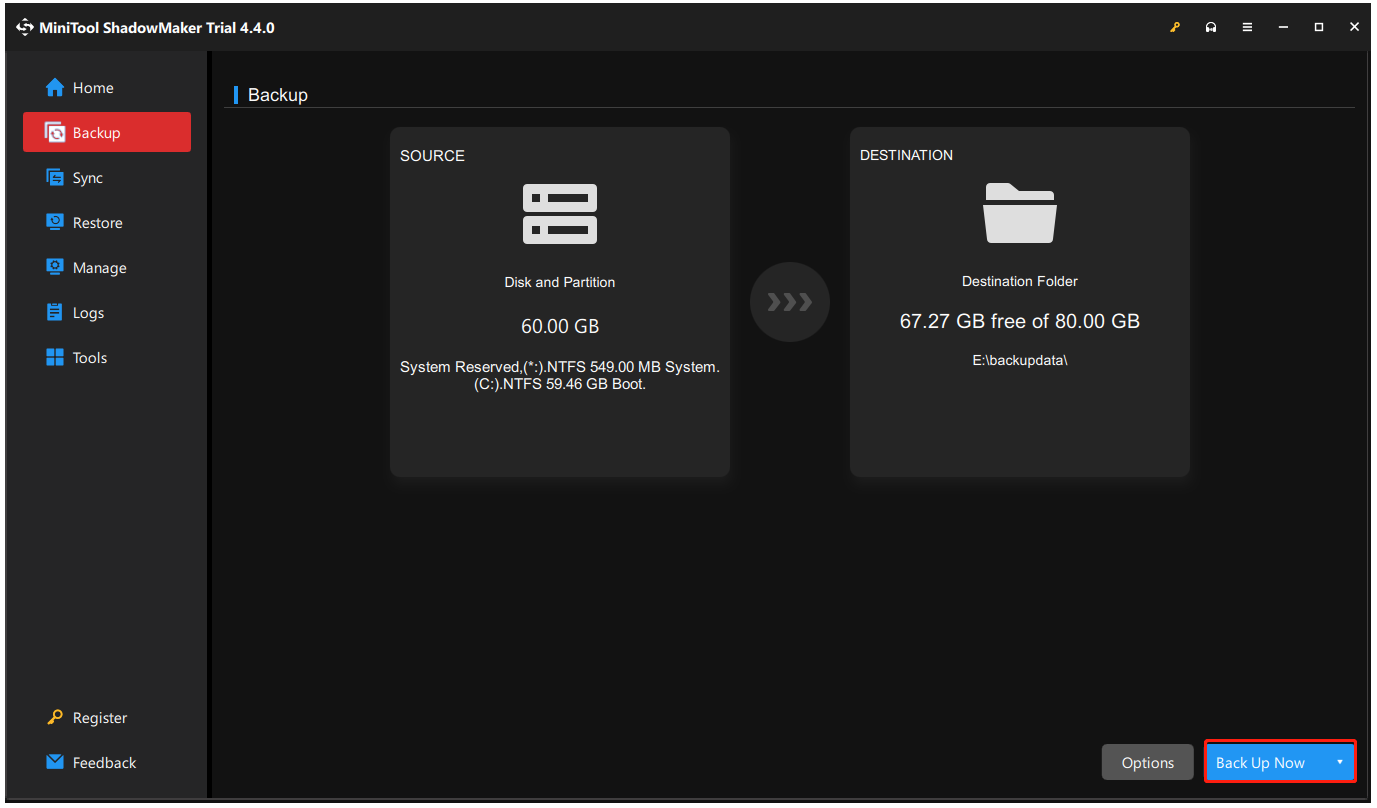
Alternatively, choose Back Up Later from the arrow menu and check this task in the Manage tab.
Tips:
Another useful feature in MiniTool ShadowMaker is Media Builder in Tools. You can create a bootable USB flash drive ready for use and it will be helpful if your PC can’t boot normally after the upgrade.
Part 2: Upgrade Windows Server 2016 to Windows Server 2019
Here, you come to the second step which is the Windows Server 2016 upgrade to 2019. After you get your data protected and make sure of the qualifications, the upgrade process will become smoother and quicker. Here is a detailed guide for every step required in your upgrade.
Step 1: Make sure you have connected or installed the Windows Server 2019 installation media, and you need to log in to the server as an administrator.
Step 2: Locate the Windows Server 2019 setup media and run the setup.exe file. If you see a prompt to ask for your confirmation, please click Yes to confirm the setup process.
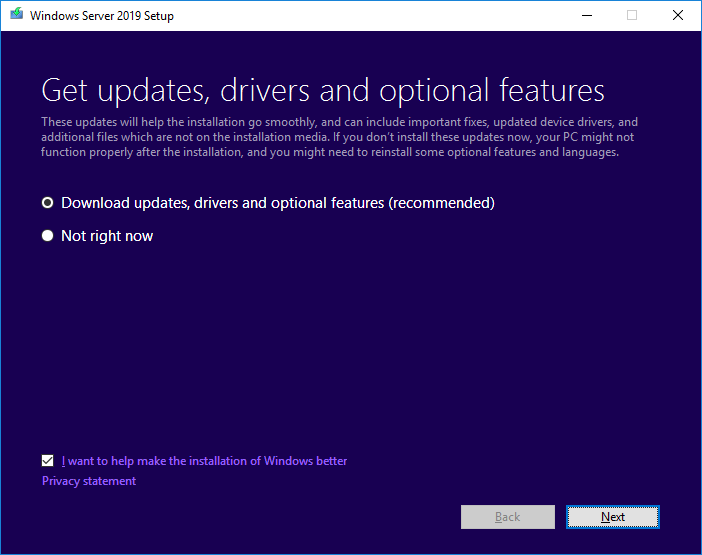
Step 3: When the Windows Server 2019 Setup window appears, please check the option of Download updates, drivers, and optional features (recommended) and click Next to continue the steps.
Step 4: Now, your PC will start checking the device configuration and this process will take some moment. When the configuration is finished, click Next to go on.
Step 5: Then you will be prompted to enter your product key. According to its instructions on the screen, make sure you input the right codes and click Next for the next steps.
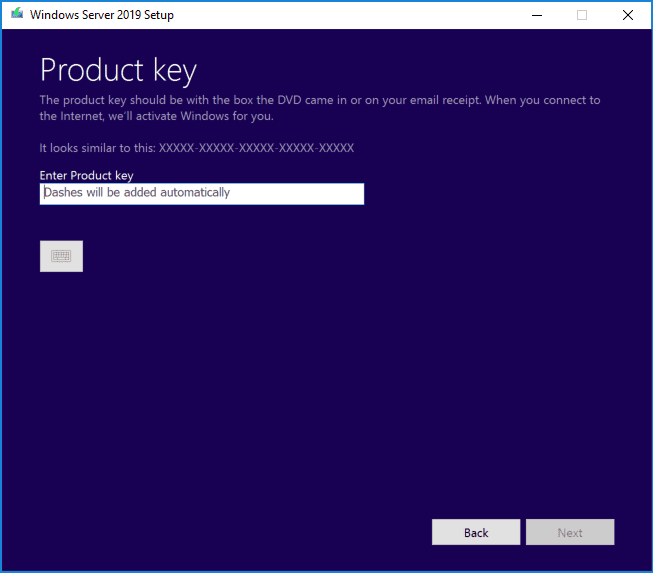
If you don’t know where to find your product key, you can check your official Microsoft account where the key will be digitally stored if you have purchased the system from the Microsoft Store. Of course, the product box and email receipt are also the key to finding your product key.
Step 6: In this procedure, it’s time to select the image of the edition you want to install. The upgrade will recognize the system you are coming from and give you the correct options for upgrade. You can choose the edition and click Next.
Step 7: Then you will receive a piece of applicable notices and license terms from Microsoft. Sometimes, depending on the distribution channel of Windows Server media, the information may vary among users. Clicking Accept will prompt you to the following procedure.
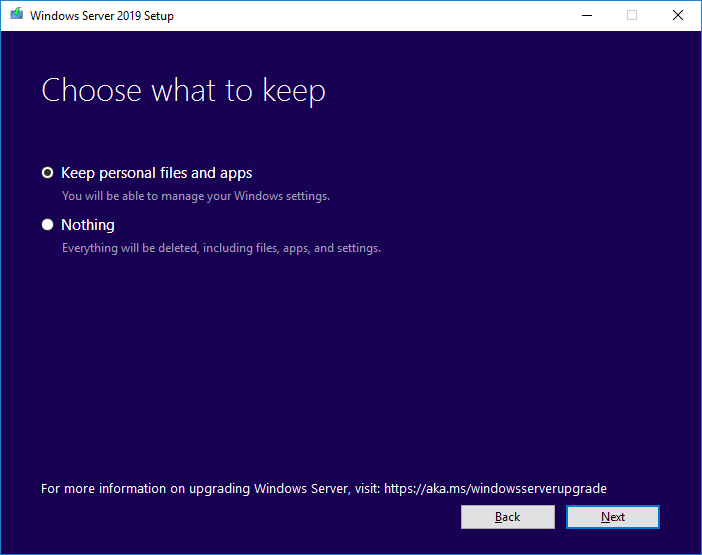
Step 8: In the Choose what to keep window, there are two options you can choose – Keep personal files and apps and Nothing. When you choose Nothing, all your data, apps, and settings will be erased, so think twice before you select this one. Then click Next.
Step 9: Another analysis will start and when it is completed, you will be prompted to confirm your image and upgrade selection. Please click Install to start the upgrade process and your server will automatically restart after the installation finishes.
Bonus Tip: Windows Server 2019 Essentials vs Standard vs Datacenter
In step 6 in the prior part where you need to choose an edition of your Windows Server 2019, some users will be provided with three options – Essential, Standard, and Datacenter. If you don’t know how to choose, there is a brief introduction to them.
- Windows Server 2019 Essentials – This edition, with limited memory, offers easy-to-use and affordable server services for small businesses with up to 25 employees and 50 devices for use.
- Windows Server 2019 Standard – This edition has a relatively higher price compared to the Essential edition and better flexibility with more than 25 users being allowed. It also allows more than 1 server to separate server roles.
- Windows Server 2019 Datacenter – This edition is the most complete edition with the new Datacenter-specific features, which is better suited for large-scale virtualization.
If you need more details about Windows Server 2019 Essentials vs Standard vs Datacenter, this article will be useful: Windows Server 2019 Essentials vs Standard vs Datacenter.
Bottom Line:
To upgrade Windows Server 2016 to 2019, you need to do some preparations and the most important is to make sure your data is secured. This full guide has made every single step clear and you can follow them one by one to finish the task.
Furthermore, don’t omit the step for backup because it can make a big difference once some operations slip up. MiniTool ShadowMaker can make the process easier and more functions and features can satisfy your demands.
MiniTool ShadowMaker TrialClick to Download100%Clean & Safe
If you have any problem when using this software, you can contact our professional support team for help via [email protected].
Upgrade Windows Server 2016 to 2019 FAQ
How long will Server 2016 last?
According to the Windows Server Lifecycle Policy, Windows Server 2016 is set to end on Jan. 12, 2027, and after that moment, Windows Server 2016 will stop receiving any improvements or bug fixes.
Is Windows Server upgrade free?
Windows Server 2022 is free for those who have purchased a license for Windows Server 2019. Those users don’t need to pay any additional fees. Some users who don’t meet the freeware standard are required to purchase a new license.
Related post: How to Install, Set up, and Configure Windows Server 2022?
Can you upgrade from Windows Server 2016 Standard Edition to Windows Server 2016 Datacenter?
Yes, you can upgrade Windows Server Standard edition to Datacenter edition. You can upgrade or repair the installation by running setup.exe from the installation media.
Can you upgrade Windows Server 2008 to 2022?
To upgrade Server 2008 to 2022, you need to upgrade to Windows Server 2012 and then proceed with another upgrade to Windows Server 2016. Furthermore, it will be a success when you start the upgrade to Server 2022. It is quite complicated to perform and no shortcuts can lead.
How to upgrade windows server 2016 to windows server 2019
Windows Server 2019 is a new server in Microsoft family. you can easily upgrade your windows server 2016 in windows server 2019 keeping your settings, server roles, and data intact. If you want to upgrade your windows server 2016 to server 2019 on the same hardware with all the server roles without formatting use the following steps.
Before you start to upgrade your Windows Server, collect all information from your server 2016, for diagnostic and troubleshooting purposes. This information is required for use only if your upgrade fails, you must make sure that you store this information of another device.
Windows Server 2019 features.
Windows Admin Center
Desktop experience
System Insights
Server Core app compatibility feature on demand
Windows Defender Advanced Threat Protection (ATP)
Security with Software Defined Networking (SDN)
HTTP/2 for a faster and safer Web
Storage Spaces Direct
Storage Replica
Failover Clustering
Collect Server information
1. Open a command prompt go to c:\Windows\system32, and then type systeminfo.exe and press enter.
2. Copy all resulting system information and store somewhere on another device.
3. Open a command prompt, type ipconfig /all and then Copy all resulting system information and store somewhere on another device.
4. Open the Registry Editor, Navigate to HKEY_LOCAL_MACHINE\SOFTWARE\Microsoft\WindowsNT\CurrentVersion hive, and then copy and paste the Windows Server BuildLabEx (version) and EditionID (edition) into the same location as above.
After collected the all data of your Windows Server-related information, take the backup of your operating system, apps, and virtual machines. You must also Shut down, Quick migrate, or Live migrate any virtual machines currently running on the server.
1. Extract Windows Server 2019 Setup ISO file and double click on setup.exe.
2. Click on Yes to start the setup process.

3. Internet Access requires download updates, drivers, and optional features (recommended) option and click on Next.

4. Setup will check your server configuration, you must wait some time to finish the step and click on Next.
5. Enter your server licensing key to continue.
6. Select the Windows Server 2019 edition what you want to install, and click on Next.

7. Click on Accept to accept the terms of your licensing agreement.

8. Setup will recommend that you Remove antivirus using Add/Remove programs.
9. Select Keep personal files and apps to choose to do an in-place upgrade and click on Next.

10. After Setup analyzes completed click on Install.

11. Once the server upgrades start, it’s showing you the Upgrading Windows screen with its progress. After the upgrade finishes, your server will restart.

12 After your upgrade is done make sure the upgrade to Windows Server 2019 was successful.
13. Click on start and search Regedit
14, When registry editor opens, navigate to HKEY_LOCAL_MACHINE\SOFTWARE\Microsoft\Windows NT\CurrentVersion key, and view the ProductName. You should see your Windows Server 2019 edition.
Windows Server 2016 is reaching the end of its extended support window in 2027. Upgrading to a newer version, like Windows Server 2019/2022, ensures continued security updates, bug fixes, and improved performance. This guide outlines the best practices for navigating the upgrade process, offering both in-place and fresh installation options.
In this article
Choosing the Right Path to Windows Server 2016:
- In-place Upgrade: Fast and convenient, preserves settings and data (limited to two versions at a time). Requires compatibility checks and poses potential risks.
- Fresh Installation: Offers a clean slate and greater flexibility, but necessitates manual data and application migration. More time-consuming and requires downtime.
Best Practices for Both Options:
1. Compatibility Checks:
- Hardware: Ensure your hardware meets the system requirements for your chosen upgrade path. Refer to Microsoft’s official documentation for details.
- Software: Verify compatibility of your applications and third-party software with the newer version. Consult vendor websites or perform test installations.
2. Backups & Snapshots:
- Create complete backups of your entire system, data, and applications before proceeding. Consider cloud-based or offsite backup solutions for added security.
- For virtual machines, create snapshots in case of rollback needs.
3. Thorough Planning & Documentation:
- Plan the upgrade process meticulously, considering downtime impact, rollback procedures, and post-upgrade configuration changes.
- Document every step, including compatibility checks, chosen upgrade path, specific commands, and potential roadblocks encountered.
4. Test Environments:
- If possible, set up a test environment to simulate the upgrade process and identify potential issues before proceeding on your production server.
5. Upgrade During Off-Peak Hours:
- Minimize disruption by scheduling the upgrade during off-peak hours or low-traffic periods. Notify affected users beforehand.
6. Post-Upgrade Monitoring:
- Closely monitor your server’s performance, resource usage, and event logs after the upgrade to identify any unexpected issues.
In-place Upgrade Step by Step to 2019
- Download the Windows Server 2019 ISO file / Windows Server 2022 ISO file from Microsoft.
- Before start installation check current windows version
- Locate the Windows Server 2019 setup media, run setup.exe directly.
- Select Download updates, drives and optional features (recommended) and click Next.
- Setup checks your device configuration, you must wait for it to finish, and then select Next.
- Select the version of Windows Server 2019 you want to install and click Next.
- the license agreements often appear different. Click Accept
- Accept the terms and then select Keep personal files and apps to choose to do an in-place upgrade, and then select Next.
- After Setup analyzes your device, it will prompt you to proceed with your upgrade by selecting Install.
- Then upgrade Windows Server 2016 to 2019 for will begin. After the upgrade is complete, your server will restart.
Conclusion:
Upgrading Windows Server 2016 requires careful planning and execution. By following these best practices, you can minimize risks and ensure a smooth transition to a more secure, performant, and feature-rich server environment. Remember, the chosen path (in-place or fresh installation) depends on your specific needs and resources. Weigh the pros and cons of each option carefully before making a decision. For additional resources and detailed instructions, refer to Microsoft’s official documentation linked within this guide.
Helpful Resources:
- Upgrade and conversion options for Windows Server
- Perform an in-place upgrade of Windows Server
- Windows Server 2019 Lifecycle
- Windows Server 2022 Lifecycle
- Hardware requirements for Windows Server
I hope this information helps you decide on the best approach for upgrading from Windows Server 2016.
Back to top button