
Introduction:
Windows Server 2012, although primarily designed for server operations, can also be utilized as a workstation for various tasks. However, one common challenge users encounter is the default Internet Explorer (IE) browser that comes pre-installed with the operating system. While IE has its merits, many users prefer alternative browsers like Google Chrome, Mozilla Firefox, or Microsoft Edge for enhanced security, features, and compatibility. In this guide, we’ll walk through the process of changing the default browser from Internet Explorer to another preferred option in Windows Server 2012.
Step-by-Step Guide:
1. Download and Install Your Preferred Browser:
Begin by downloading the browser you wish to set as the default. Navigate to the official website of the browser (e.g., chrome.com for Google Chrome, mozilla.org for Mozilla Firefox) and download the installer.
2. Install the Browser:
Once the installer is downloaded, run it and follow the on-screen instructions to install the browser on your Windows Server 2012 system. Make sure to complete the installation process.
3. Open Default Programs:
After the installation is complete, go to the Start menu and search for “Default Programs” and click on it to open.
4. Set Your Preferred Browser as Default:
Within the Default Programs window, select “Set your default programs.”
5. Choose Your Browser:
From the list of programs displayed, choose the browser you installed (e.g., Google Chrome, Mozilla Firefox).
6. Set this Program as Default:
Once your preferred browser is selected, click on the “Set this program as default” option on the right-hand side of the window.
7. Confirm Changes:
After clicking on the option, you should see a message confirming that the program is now set as the default browser. Close the Default Programs window.
8. Verify Default Browser:
To ensure that the changes have taken effect, open any hyperlink or HTML file. It should now automatically open in your newly set default browser.
Conclusion:
Changing the default browser in Windows Server 2012 from Internet Explorer to another preferred option is a straightforward process. By following the steps outlined in this guide, users can seamlessly transition to a browser that better suits their needs, whether it’s for improved security, enhanced features, or better compatibility with modern websites and applications. Embracing alternative browsers can enhance productivity and user experience on Windows Server 2012, making it a more versatile platform for both server and workstation tasks.

If you are running Windows 8 or Windows Server 2012 then Internet Explorer (IE) 10 is your default browser. If at some point you set a different browser as your default browser, you can switch back to IE 10 as your default browser. However, the process of making IE 10 your default browser is different than the previous versions of IE and most users won’t find it very intuitive. I am sure Microsoft will change this behavior in future versions of IE to make it as simple and intuitive as it is in Firefox. Until then, here’s how you can configure your default browser.
1. Open IE 10.
2. Go to Tools, Internet Options.
3. Click on Programs tab.
4. Click Set programs in the Internet programs section.
5. Click Set your default programs.
6. Select your browser, such as Internet Explorer, and then click Set this program as default.
7. Click OK and then close the Default Programs window.
8. If you want to make Firefox your default browser, start Firefox and go to Tools, Options.
9. On the general tab, select Make Firefox the default browser.
10. You will see the Default Programs window shown in step 5. Click Set your default programs.
11. Select Firefox on the left side of the window and then click Set this program as default.
12. You can also click Choose defaults for this program (see step 6) and select the options you want, or you can select all the options as shown below.
This div height required for enabling the sticky sidebar
We use cookies on our website to give you the most relevant experience by remembering your preferences and repeat visits. By clicking “Accept”, you consent to the use of ALL the cookies.
Администратору может потребоваться настроить Chrome как браузер по умолчанию на компьютерах своего домена. Ниже описывается, как сделать Chrome браузером по умолчанию на компьютерах с Microsoft Windows 10 и более поздней версии, присоединенных к домену. Кроме того, недавно в Windows были внесены некоторые изменения, и теперь для использования Chrome в качестве браузера по умолчанию для ссылок, отображаемых в Outlook и Teams, нужно настроить дополнительную политику.
Как сделать Chrome браузером по умолчанию
Шаг 1. Создайте XML-файл сопоставления приложений по умолчанию (образцы файлов приведены ниже)
Файл сопоставления приложений по умолчанию – это XML-файл, который связывает тип файла с приложением. Например, если сопоставить файлы HTML или HTM с приложением Chrome, то по умолчанию оно будет запускаться каждый раз, когда пользователь откроет один из таких файлов.
Для компьютеров, присоединенных к домену, достаточно создать один общий XML-файл, который автоматически сделает Chrome браузером по умолчанию. Этот файл нужно поместить в общую папку на сервере, доступную для всех компьютеров в домене.
Примечание. Если браузер Chrome не установлен на целевом компьютере, то сопоставления файлов не применяются. Когда пользователь нажмет на ссылку (http или https) либо откроет файл (HTML или HTM), ему нужно будет выбрать приложение.
Download the default application association file
В среде Windows можно установить несколько версий Chrome одновременно. Ниже приведены образцы XML-файлов, позволяющие задать определенную версию Chrome в качестве браузера по умолчанию, в котором будут открываться файлы HTML и HTM и ссылки (http, https).
Образец файла для стабильной версии Chrome (chromedefault.xml):
<?xml version="1.0" encoding="UTF-8"?>

      <DefaultAssociations>

        <Association Identifier=".htm" ProgId="ChromeHTML" ApplicationName="Google Chrome" />

        <Association Identifier=".html" ProgId="ChromeHTML" ApplicationName="Google Chrome" />

        <Association Identifier="http" ProgId="ChromeHTML" ApplicationName="Google Chrome" />

        <Association Identifier="https" ProgId="ChromeHTML" ApplicationName="Google Chrome" />

      </DefaultAssociations>
Образец файла для бета-версии Chrome (chromedefault.xml):
<?xml version="1.0" encoding="UTF-8"?>

      <DefaultAssociations>

        <Association Identifier=".htm" ProgId="ChromeBHTML" ApplicationName="Google Chrome Beta" />

        <Association Identifier=".html" ProgId="ChromeBHTML" ApplicationName="Google Chrome Beta" />

        <Association Identifier="http" ProgId="ChromeBHTML" ApplicationName="Google Chrome Beta" />

        <Association Identifier="https" ProgId="ChromeBHTML" ApplicationName="Google Chrome Beta" />

      </DefaultAssociations>
Образец файла для версии Chrome для разработчиков (chromedefault.xml):
<?xml version="1.0" encoding="UTF-8"?>

      <DefaultAssociations>

        <Association Identifier=".htm" ProgId="ChromeDHTML" ApplicationName="Google Chrome Dev" />

        <Association Identifier=".html" ProgId="ChromeDHTML" ApplicationName="Google Chrome Dev" />

        <Association Identifier="http" ProgId="ChromeDHTML" ApplicationName="Google Chrome Dev" />

        <Association Identifier="https" ProgId="ChromeDHTML" ApplicationName="Google Chrome Dev" />

      </DefaultAssociations>
Примечание. Правило сопоставления по умолчанию задается при каждом входе. Выполнив вход, пользователь может изменить сопоставление, но оно будет применяться только до окончания текущего сеанса. При следующем входе сопоставление снова будет установлено согласно заданному правилу.
Шаг 2. Создайте объект групповой политики
С помощью консоли управления групповыми политиками можно создавать и настраивать объекты групповой политики для домена. Они задают правила (политики), которые применяются ко всем компьютерам в домене. Сначала нужно создать объект групповой политики, а затем с помощью фильтров безопасности применить его к компьютерам в домене.
В следующем примере вы создаете объект групповой политики (Сделать Chrome браузером по умолчанию) и применяете его к компьютерам в домене chromeforwork.com.
- Откройте консоль управления групповыми политиками. Выберите Пуск > Все программы > Администрирование > Управление групповой политикой.
- На панели навигации выберите Управление групповой политикой > Домены >chromeforwork.com.
- Нажмите правой кнопкой мыши на доменное имя (в нашем примере этоchromeforwork.com). Выберете Создать объект групповой политики в этом домене и связать его.
- Введите название нового объекта групповой политики (в нашем примере это Сделать Chrome браузером по умолчанию) и нажмите ОК.

- На панели навигации нажмите Управление групповой политикой > Домены > chromeforwork.com > Объекты групповой политики и выберите Сделать Chrome браузером по умолчанию.
- На панели Фильтры безопасности нажмите Добавить.
- В окне Выберите пользователя, компьютер или группу введите название объекта, который хотите добавить, нажмите Проверить имена (чтобы проверить введенное название), а затем нажмите ОК.
Вы можете ввести параметр Domain Computers (Компьютеры домена), чтобы добавить все рабочие станции и серверы, присоединенные к домену (как в этом примере), или указать другую группу компьютеров.

- Теперь объект групповой политики применяется ко всем компьютерам, связанным с доменом.


Шаг 3. Задайте файл конфигурации сопоставлений по умолчанию
Чтобы задать файл конфигурации сопоставлений по умолчанию для компьютеров в домене, измените объект групповой политики на сервере Windows. Используйте те же объекты групповой политики и доменные имена, как на шаге 2 (в нашем примере это chromeforwork.com).
- Откройте консоль управления групповыми политиками.
Выберите Пуск > Все программы > Администрирование > Управление групповой политикой.
- На панели навигации выберите Управление групповой политикой > Домены > chromeforwork.com.
- Откройте вкладку Связанные объекты групповой политики, чтобы посмотреть все объекты групповой политики для этого домена.
- Нажмите правой кнопкой мыши на объект групповой политики, который нужно выбрать, а затем нажмите «Изменить». Откроется редактор управления групповыми политиками.
В этом примере вам нужно нажать правой кнопкой мыши на объект групповой политики Сделать Chrome браузером по умолчанию.
- В редакторе управления групповыми политиками выберите Конфигурация компьютера > Политики > Административный шаблон > Компоненты Windows > Проводник и нажмите дважды на настройку Задать файл конфигурации сопоставлений по умолчанию.
- В окне Задать файл конфигурации сопоставлений по умолчанию выберите вариант Включено.
- В поле Параметры укажите путь к XML-файлу сопоставления приложений по умолчанию.
Он связывает типы файлов (HTM и HTML) и ссылки (http и https) с приложением Chrome. Используйте образец файла, предоставленный Google, или создайте свой вариант.


Примечание. Поместите файл в общую папку на сервере, чтобы он был доступен каждому компьютеру в домене.
Шаг 4. Проверьте конфигурацию
Убедитесь, что объект групповой политики применяется на целевых компьютерах под управлением Windows 10 или более поздней версии в домене Active Directory и Chrome используется как браузер по умолчанию.
Объект групповой политики начнет применяться автоматически, как только клиент Windows обновит политику. Также вы можете в любой момент запустить обновление вручную с помощью команды GPUpdate.exe /force.
Примечание. После того как политика была скачана и применена, необходимо перезагрузить компьютер, чтобы она вступила в силу.
- На клиенте Windows выберите Windows > System32. Нажмите правой кнопкой мыши на файл rsop.msc и выберите команду Запустить от имени администратора.
- Войдите в систему с учетными данными администратора и нажмите Да.
- Выберите Конфигурация компьютера > Административные шаблоны > Компоненты Windows > Проводник, чтобы убедиться, что настройка Задать файл конфигурации сопоставлений по умолчанию доступна.
- Откройте настройку Задать файл конфигурации сопоставлений по умолчанию и убедитесь, что она включена, а путь к XML-файлу указан правильно.
- Если Chrome используется как браузер по умолчанию, все файлы с расширением HTM и HTML помечаются значком Chrome.

Как сделать Chrome браузером по умолчанию для ссылок в Microsoft Outlook и Teams
Корпорация Microsoft внесла в Windows некоторые изменения, и теперь ссылки в Outlook и Teams по умолчанию открываются в Microsoft Edge. Чтобы операционная система Windows открывала ссылки в Chrome, выберите один из следующих вариантов.
Вариант 1. Настройте правила облачных сервисов
- Откройте Microsoft 365 Apps admin center (Центр администрирования приложений Microsoft 365).
- Перейдите в раздел Customization (Настройка) > Policy Management (Управление политиками).
- Нажмите Create (Создать).
- На странице Start with the basics (Основные сведения) введите название и, при необходимост, описание, а затем нажмите кнопку Next (Далее).
- На странице Choose the scope (Выбор области действия) выберите область действия и нажмите кнопку Next (Далее).
- На странице Configure Settings (Настройка параметров) в окне поиска введите browser и нажмите Ввод.
- В результатах поиска выберите вариант Choose which browser opens web links (Выберите, какой браузер открывает ссылки).
- В поле Choose which browser opens web links (Выберите, какой браузер открывает ссылки) выберите в списке вариант Default Browser (Браузер по умолчанию).
- Нажмите кнопку Apply (Применить).
- На странице Configuration Settings (Параметры конфигурации) нажмите кнопку Next (Далее).
- Проверьте конфигурацию, а затем нажмите кнопки Create (Создать) и Done (Готово).
Вариант 2. Создайте объект групповой политики
В консоли «Управление групповыми политиками» мжно создавать объекты групповой политики для своего домена и управлять ими. Эти объекты определяют правила, которые применяются ко всем компьютерам в домене. Сначала нужно создать объект групповой политики, а затем с помощью фильтров безопасности применить его к компьютерам в домене.
В следующем примере вы создаете объект групповой политики и применяете его к компьютерам в домене chromeforwork.com.
- Выберите Пуск > Все программы > Администрирование > Управление групповой политикой.
- На панели слева выберите Управление групповой политикой > Домены.
- Нажмите правой кнопкой мыши домен chromeforwork.com и выберите команду Создать объект групповой политики в этом домене и связать его.
- В поле Название введите название нового объекта групповой политики (в нашем примере это Сделать Chrome браузером по умолчанию) и нажмите ОК.
- На панели слева нажмите Управление групповой политикой > Домены > chromeforwork.com > Объекты групповой политики и выберите Сделать Chrome браузером по умолчанию.
- В разделе Фильтры безопасности нажмите Добавить.
- В поле Введите имена выбираемых объектов введите имя объекта, который хотите добавить.
- Нажмите Проверить имена, чтобы проверить введенное имя, и нажмите OK.
- Вы можете ввести Domain Computers (Компьютеры домена), чтобы добавить все рабочие станции и серверы, присоединенные к домену (как в этом примере), или указать другую группу компьютеров.
Теперь объект групповой политики применяется ко всем компьютерам, связанным с доменом.
Статьи по теме
Дополнительная информация из Microsoft TechNet:
- Экспорт или импорт сопоставлений приложений по умолчанию
- Установка браузера по умолчанию с использованием групповой политики
Google, а также другие связанные знаки и логотипы являются товарными знаками компании Google LLC. Все другие названия компаний и продуктов являются товарными знаками соответствующих компаний.
Эта информация оказалась полезной?
Как можно улучшить эту статью?
In this guide, I’m going to show you how to make Google Chrome the default browser using Group Policy (GPO). This guide applies to Windows Server 2012,2016,2019, 2022 as well as Windows 8/10/11.
To do this, there are several steps you’ll need to do. It’s not as simple as just creating a GPO and applying it to a target computer.
This guide assumes you’ve already implemented Google Chrome Enterprise and are already managing Google Chrome browsers at an enterprise level. If not, follow step 1 first.
Step 1: (Optional) Import Google Chrome .ADMX Template Files
Before you begin to manage settings and policies for your Google Chrome browser, you first need to download the .admx and .adml files from here: https://chromeenterprise.google/browser/for-your-enterprise/
Extract it once download and expand the subfolder Configuration.
- In the “adm” folder, find your language (en-US) and copy the chrome.adm file to your desktop.
- In the admx folder, find your language again (en-US), and copy the chrome.adml file to your desktop.
Next, RDP to your Domain Controller. Copy those two extracted files to the desktop of your DC.
- Browse to
C:\Windows\PolicyDefinitionsand drag the chrome.admx. - In C:\Windows\PolicyDefinitions\en-US\folder, drag the chrome.adml file.
Now that you’ve copied in the necessary Group Policy files to manage your Google Chrome browsers, install Chrome Enterprise from here.
I used PDQ Deploy to push this out to all computers, but for testing you can simply install it on your PC.
Step 2: Create a new Group Policy Object
Log into your Domain Controller and open Group Policy Management. Right-click Group Policy Objects > New. Give it a helpful name like “Chrome Default Browser”.
Right-click the new policy > Edit. Then expand Computer Configuration > Policies > Administrative Templates > Google > Google Chrome. Double-click that and switch to Enabled.
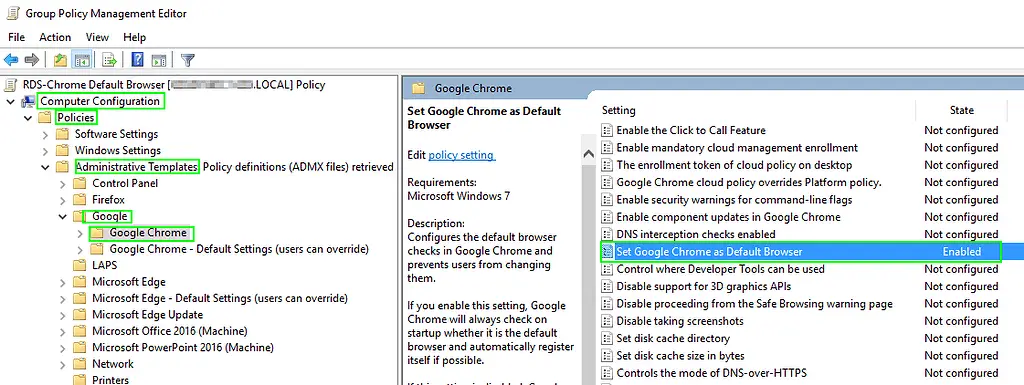
You’ll notice in the Help section of the GPO that this will only work for Windows 7. For Windows 8-10, you will need to define a file associates XML file.

Step 3: Deploy File Associations File
The next step is to download a “default file associations” sample file, place it on a network share, and then configure another group policy.
Download the sample file from here: https://smarthomepursuits.com/download/5801/
You can either place the file in a network share available by everyone. Or, you could also use Powershell or PDQ Deploy/SCCM to push this file to a certain location on everyone’s computer.
For this example, I put the file in a network share like this: \\server01\fileshare01\chromedefault.xml
Step 4: Edit Chrome Browser GPO to include path to XML
Next, open up Group Policy Management from your DC again. Edit your new “Chrome Default Browser” policy.
Navigate to Computer Configuration > Policies > Administrative Templates > Windows Components > File Explorer.
Locate the “Set a default associations configuration file” policy. Edit it, and use the path from step 3.

Click Apply and OK once complete.
Step 5: Update GPO and Test
Next, you need to apply this GPO to a target OU or computer. I always recommend moving a test computer from Active Directory Users & Computers into a test OU to prevent breaking any production systems.
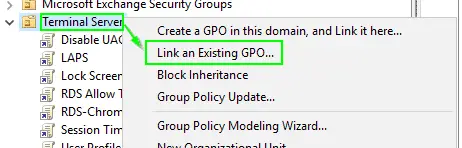
Locate the OU > right-click > Link an existing GPO > Choose the new “Chrome Default Browser” GPO.
Once the computer has been moved into the test OU, and you’ve applied the policy to that same OU, run the following command on the command to update the policy:
gpupdate /forceThen, sign out. The default browser will not be switched until after you log out.
To confirm it’s working properly, search Windows for “Default Apps” on your computer and switch it to Edge. Then, sign out and sign back in. If all goes well – you can open Default Apps again and successfully see that it has switched your default web browser to Google Chrome!

Wrapping Up
Hopefully this guide helped you force change the default web browser to Google Chrome for your company!
In this tutorial, we will demonstrate how you can set Microsoft Edge as default browser using GPO on your Windows devices. On Active Directory domain joined computers, you can change the default browser to Edge by configuring Set a default associations configuration file via group policy.
When you buy a PC or laptop with Windows 11, the default browser is Microsoft Edge. The default browser is changed after you install other browsers such as Google Chrome, Firefox, and so on. In most organisations, employees are only allowed to use software programs approved by the business, and this is where a GPO can be used to enforce the default browser.
If you want to set Microsoft Edge as default browser on domain-joined computers, you can do so using a GPO or Microsoft Intune. Group Policy is preferred approach when you don’t have an MDM solution such as Intune. In this article, we will configure the Group Policy setting, Set a default associations configuration file, to set the default browser for your company devices running Windows 11 and Windows 10.

Note: Internet Explorer 11 has gone out of support on June 15, 2022. The product will not receive any updates from Microsoft once it goes out of support. Microsoft recommends switching from IE 11 to Microsoft Edge stable browser. To prevent using the IE11, you can disable it using group policy.
Create default associations configuration XML File for Edge
To set Microsoft Edge as default browser for HTML files, http/https links, and PDF files, use the following application association file example. On your domain controller, create a new application association file (.xml) that contains the below code.
<?xml version="1.0" encoding="UTF-8"?>
<DefaultAssociations>
  <Association ApplicationName="Microsoft Edge" ProgId="MSEdgeHTM" Identifier=".html"/>
  <Association ApplicationName="Microsoft Edge" ProgId="MSEdgeHTM" Identifier=".htm"/>
  <Association ApplicationName="Microsoft Edge" ProgId="MSEdgeHTM" Identifier="http"/>
  <Association ApplicationName="Microsoft Edge" ProgId="MSEdgeHTM" Identifier="https"/>
  <Association ApplicationName="Microsoft Edge" ProgId="MSEdgePDF" Identifier=".pdf"/>
</DefaultAssociations>
Copy the XML association file to a shared folder on your domain controller. This path should be accessible to the client computers.

Set Microsoft Edge as default browser using GPO
In this step, we will create a new group policy object and configure the settings that set Microsoft Edge as the default browser. Once the GPO is ready, we will link it to the domain or OU and test the policy.
When you deploy a new group policy, you either do it at the domain level or at the organizational unit level. I suggest making a new group policy object, linking it to a test OU that contains the pilot computers, and then deploying it to a larger group of computers.
To create a GPO, you can either log in to a domain controller or a member server installed with GPMC. You can also install the GPMC on Windows 11 and configure the group policies. Launch the Server Manager from start and click Tools > Group Policy Management console. In the Group Policy Management console, expand the domain and right-click Group Policy Objects and select New.

Enter the name for the new group policy. For example, you can specify the GPO name as “Set Microsoft Edge as default browser” and click OK. The new GPO is created and is visible under the list of Group Policy Objects in the console.

Right-click the GPO that you just created and select Edit.

In the GPMC editor, browse to Computer Configuration > Administrative Templates > Windows Components > File Explorer. Double click Set a default associations configuration file policy setting.

Select Enabled to enable the policy setting. Optionally, you can also add a comment. Next, enter the network path of the Default Associations Configuration File. Click OK.

We see that the GPO setting “Set a default associations configuration file policy” now shows as Enabled.

After the group policy object is configured, you need to link the GPO to an OU if you haven’t already. You can also link it to the domain, but doing so will make the GPO applicable to every computer in the domain, so it is not advised. The best approach is to choose a test OU, connect your GPO, and test the policy settings.
Perform Group Policy Update
On the client computers, it’s time to perform the group policy update and test if the GPO has set Microsoft Edge as default browser. You can use multiple ways to perform the group policy update on remote computers. On a test client machine, you can manually perform the group policy update by running gpupdate /force command.

Verify if the Default Browser is Microsoft Edge
Once the group policy settings are updated on the client computers, you can verify if Microsoft Edge is the default browser using the following steps:
- Log in to Windows 11 computer.
- Go to Settings > Apps > Default Apps.
- Under Web Browser, we see Microsoft Edge is listed as the default browser.

This confirms that the GPO we applied to set Microsoft Edge as default browser worked on domain joined computers.
Use ConfigMgr to find the default browser
If you manage your Windows devices using Configuration Manager, you can use the below SQL query to determine the default browser on the device. Run the below SQL query against the Configuration Manager database to find the default browser of devices.
select SMS_R_System.Name, SMS_G_System_DEFAULT_BROWSER.BrowserProgID from SMS_R_System inner join SMS_G_System_DEFAULT_BROWSER on SMS_G_System_DEFAULT_BROWSER.ResourceID = SMS_R_System.ResourceId order by SMS_R_System.Name
In the Configuration Manager console, we see the devices with the default browser program ID, which represents the Microsoft Edge app.

Read Next
- How to Rename Administrator Account using GPO (Group Policy)
- Hide the Task View Button using Group Policy
- 4 Ways to Enable Spell Check in Microsoft Edge Browser
- Create Desktop Shortcut using Group Policy (GPO)
- Disable Windows Hello Using Group Policy
Still Need Help?
If you need further assistance on the above article or want to discuss other technical issues, check out some of these options.