
Здравствуйте, господа! Это инструкция по установке Windows 10 на iMac 2011 года. Ввиду окончания поддержки, актуальность этих моноблоков сходит на нет. А это значит, что свежие программы не поставить, а скоро так вообще — никакие 🤨
Статья основана на опыте наших инженеров с iMac 21.5″ 2011, а инструкция рассчитана на уверенного пользователя. Скорее всего точная модель iMac роли не играет, главное 2011 год выпуска.
Главные проблемы
- Продать его выгодно уже не выйдет. Ок! Сделаем Upgrade и он снова будет в строю. Хорошо, но какой смысл в быстрой работе без программ?
- Свежую macOS официально не поставишь. Ок! Пропатчим установщик macOS и установим систему насильно, но драйверов на видеокарты (у нас 6700M) AMD Radeon этих лет нет и, видимо, не предвидится. Вывод: через костыли ставить macOS смысла нет;
- Windows 10 официально не поддерживается (только iMac с 2012 года). Ок! Установить таки винду можно, но BootCamp (драйвера Apple) не существует для десятки, но через командную строку можно поставить «родной» BootCamp;
- Нет звука в Windows 10. Никакие драйвера ситуацию не выправляют, так как звуковое устройство неправильно определяется в системе, либо вообще отсутствует в списках. Эта печаль вытекает из проблемы совместимости в режиме EFI (UEFI на обычных ПК). Беда оказалась одна из самых сложных и с ней борются владельцы iMac 2011 года по всему миру, а на GitHub даже есть отдельная ветка! Адекватного лекарства не было, пока наши мастера не разгадали загадку! 😎
P.S. Скорее всего мы не первые, но внятной инструкции не нашли.
Как мы побороли гадость со звуком
Собака оказалась зарыта в инициализации устройств прошивкой EFI (BIOS iMac). iMac умеет грузиться в обычный и режим совместимости. Кстати, для Windows 10 «родной» режим тоже EFI\UEFI и загрузка с диска с таблицей GPT. Но так как в обычном режиме устройства определяются неправильно, надо заставить iMac установить Windows в режиме совместимости на диск с MBR. А iMac упорно грузится через EFI.
Мы прошли первый этап установки десятки на виртуальной машине c простым BIOS и MBR-диском. Не дав начаться после перезагрузки второму этапу (установка основных устройств), сняли образ с виртуалки и вуаля — осталось лишь продолжить установку на реальном iMac 🤓
Upgrade
Чтобы iMac не тупил на Windows 10, как последняя скотина, мы заменили старый и медленный HDD диск на новый SanDisk SSD Plus на 480 Гб. Также расширили оперативную память до 16 гигов. Мини-апгрейд 😊
А как же Windows 7?
Возможность официально установить Windows 7 есть, но её поддержка закончилась в начале 2020 года, а это значит тихо-мирно кончатся и программы, как это было с Windows XP. Ставить хорошую, но заведомо устаревшую систему 2009 года рождения, не хотелось бы.
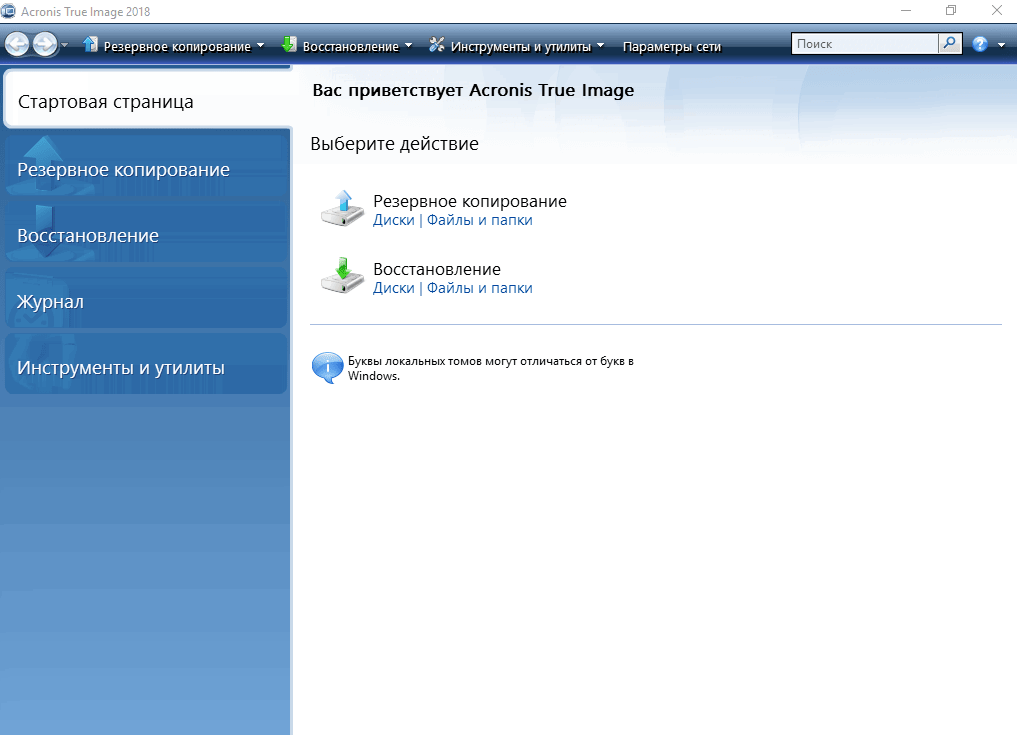
Установка Windows 10
Стандартно Windows 10 ставится с флешки, но это не наш случай.
Простой метод
Установка Windows 10 с DVD-диска. Загрузка с болванки заставит iMac использовать Legacy BIOS Boot Mode. К сожалению, по каким-то причинам работает 50 на 50. Если у вас таки получился этот трюк, то переходите сразу к установке BootCamp 😏
Второй метод. Как делали мы
Мы подготовили готовый образ с Windows 10 Home для iMac 2011. Система чистая неломаная с сайта Microsoft с обновлениями по 2020 год.
Качаем с нашего яндекс-google диска:
- Образ Windows 10 для iMac 2011
- BootCamp для iMac 2011
Образ необходимо распаковать на диск iMac через прогу Acronis True Image (образ создан в версии 2018 года). Проще всего это сделать, загрузившись в какой-нибудь LiveCD\LiveUSB. К примеру, WinPE 10-8 Sergei Strelec содержит всё необходимое и грузится с флешки.
Если вы тоже делаете апгрейд и ставите SSD, то образ можно залить заранее (при наличии ПК) и пропустить часть с LiveCD 😉
Важно!
После запуска LiveCD на iMac, в диспетчере дисков убедитесь, что диск со схемой разделов MBR, а не GPT. Заходим в свойства диска -> Тома -> Стиль раздела. Если тут GPT, то жмём правой кнопкой на диск и конвертируем его в MBR. Можно использовать любую другую прогу для работы с дисками.
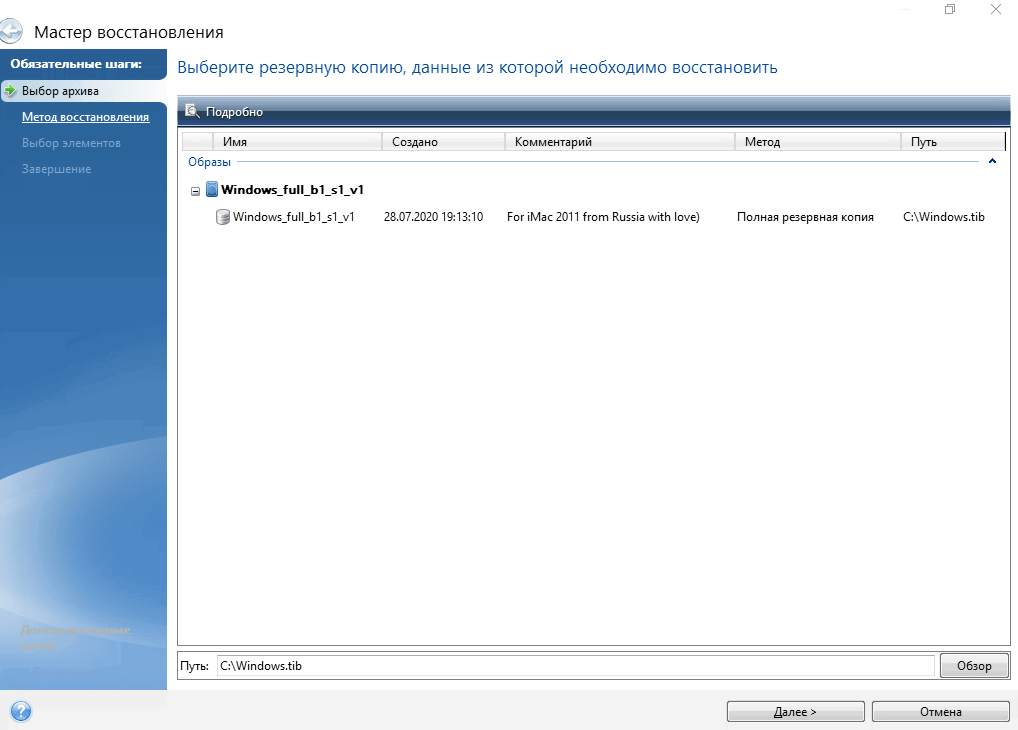
Инструкция по развёртыванию образа
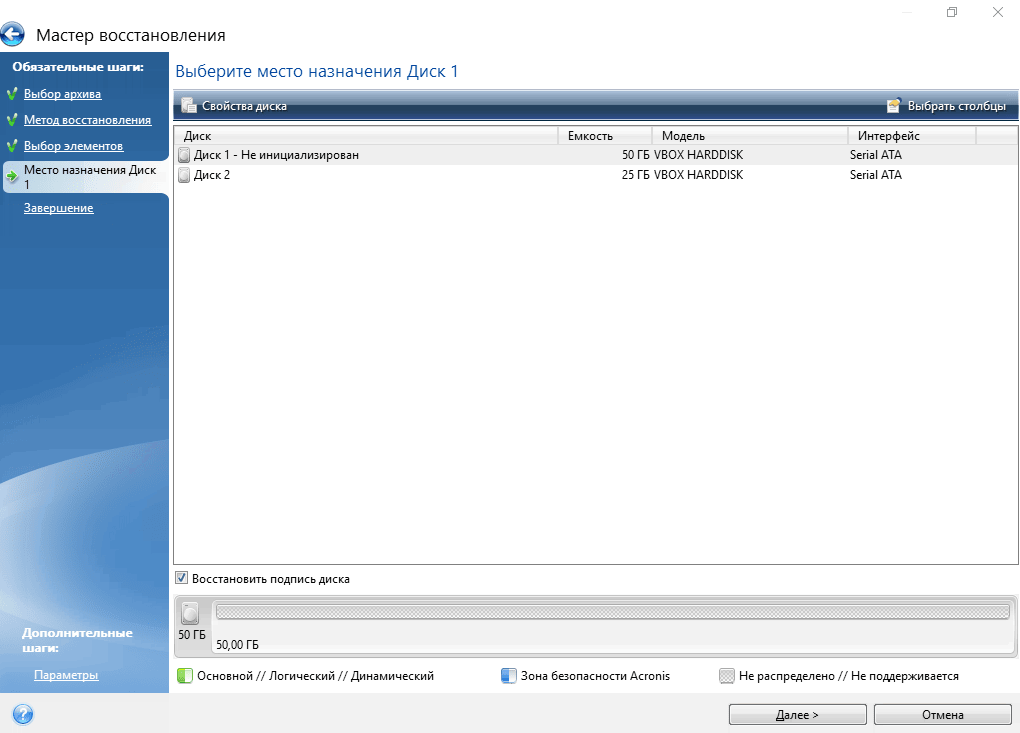
- В Acronis True Image выбираем действие «Восстановление -> Диски»

- Выбираем наш образ-архив
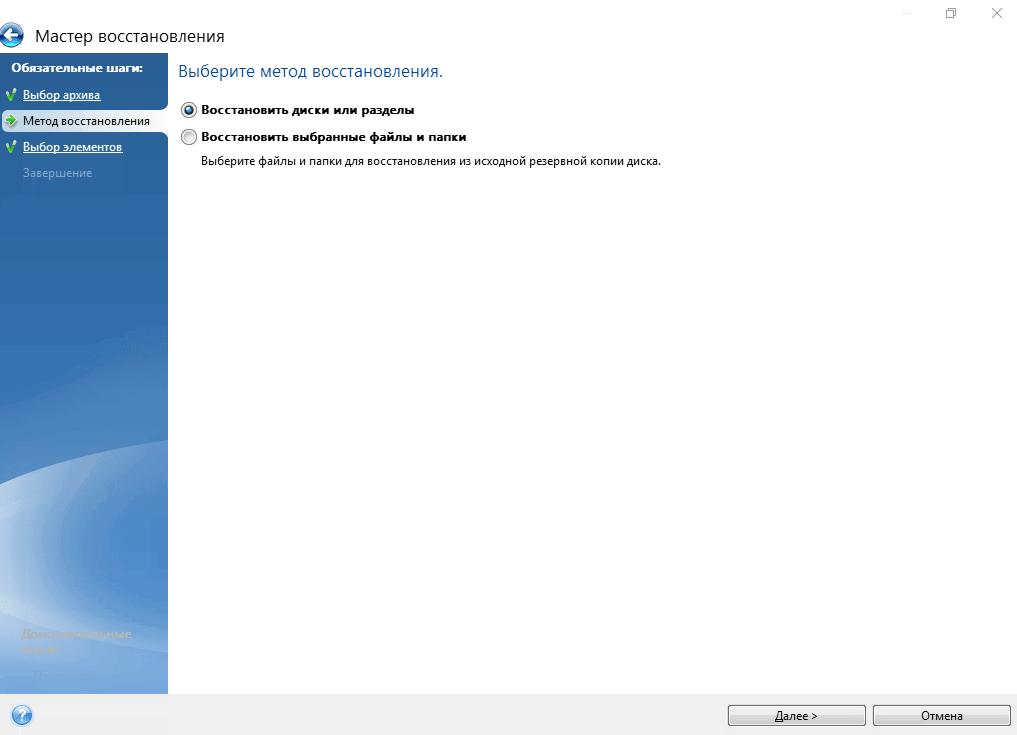
- Метод восстановления «Восстановить диски и разделы»
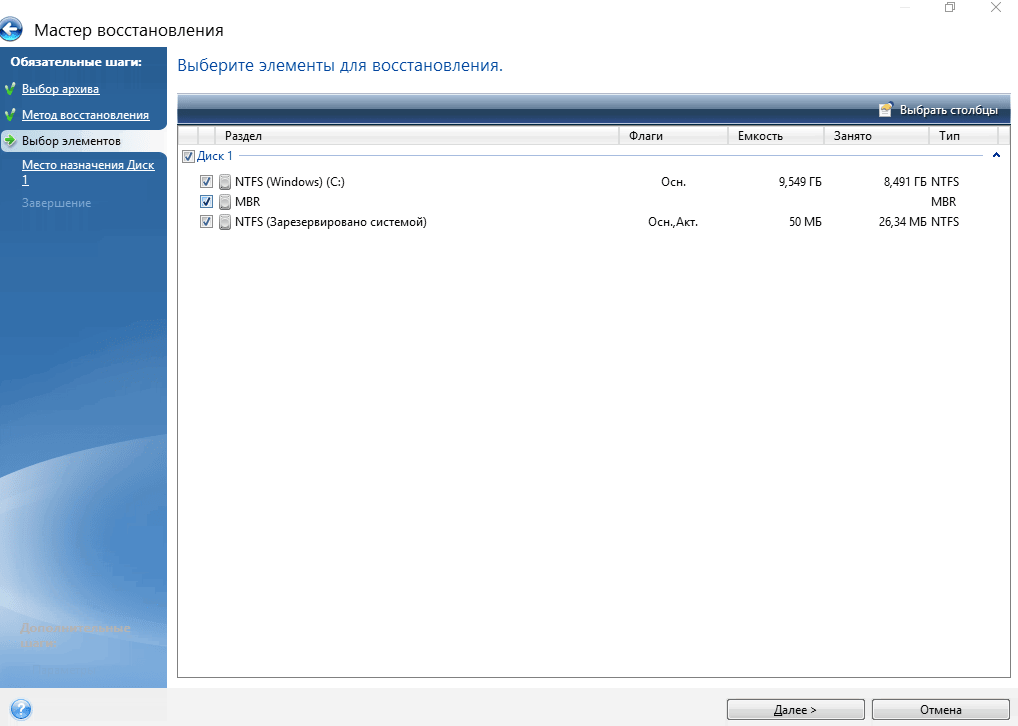
- Ставим галочку на «Диск 1», чтобы выбрались все галочки
- Выбираем целевой диск iMac. В нашем случае это SSD. Скриншот для примера
- Проверяем, всё ли правильно выбрали и жмём «Приступить»
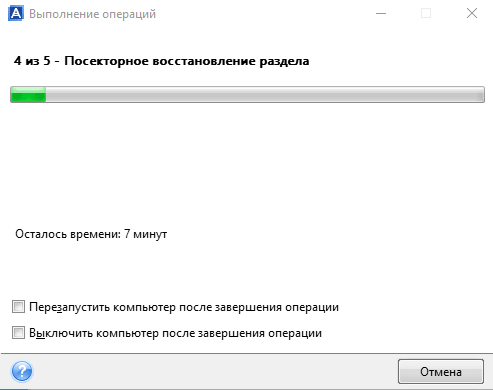
- Ждём окончания операции. Обычно 5-10 минут 🤓

Далее убеждаемся в диспетчере дисков, что диск не изменился на GPT, должен быть MBR! Объединяем диск С и свободное пространство через пункт меню «Расширить том…»

В правой колонке выбираем всё свободное пространство и жмём далее
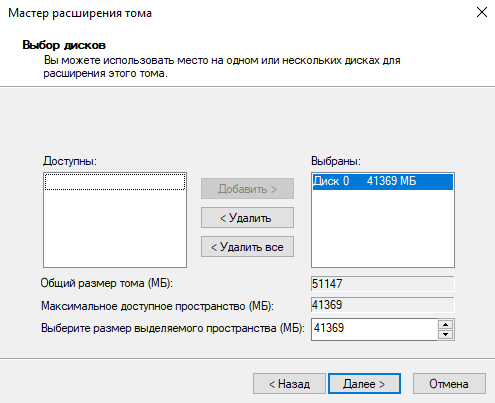
На диске должно остаться два раздела, как на картинке:

Выключаем iMac и отключаем его от электросети на 30 секунд. Отключаем все носители. Включаем iMac. Должна начаться (продолжиться) установка Windows 10.
Дожидаемся окончания установки Windows, всё как обычно.
Важное дополнение о разделе GPT
Многие столкнулись с проблемой, когда после перезагрузки диск превращается формат GPT и установка проходит неправильно. Один из посетителей блога поборол эту гадость и скинул нам видео в группу ВК, за что ему огромная благодарность 😘
Установка BootCamp
BootCamp устанавливается через командную строку. Распаковываем архив в удобное место, к примеру на диск С. Запускаем командную строку от имени администратора и стартуем файл по пути:
C:\BootCamp\Drivers\Apple\BootCamp.msi
Далее последует обычная установка драйверов и предложение перезагрузить iMac. Первый запуск может быть долгим! Если в течение 5 минут красуется чёрный экран, то выключите-включите iMac. Такое может быть.
Подробная инструкция по установке BootCamp
При успешном исходе, звук, регулировка яркости и горячие клавиши на клавиатуре должны работать.
В видео присутствует мат, а ещё оно вертикальное, простите 😳
Wi-Fi и звук! BlueTooth мышь и клавиатура, горячие клавиши и регулировка яркости
Косяки
- При первом обновлении Windows скорее всего обновит драйвера на видеоадаптер, в итоге экран может потемнеть и не вернуться обратно.
Подождите 10 минут. Если iMac не отдуплится, то жёcтко выключите-включите его. В дальнейшем таких траблов замечено не было 😋
- Если у вас беспроводные мышь и клавиатура от Apple, то Bluetooth выключать нельзя! Отвалятся и придётся искать проводную мышь, чтобы включить Bluetooth). Изредка мышь и клава глючат. Как вылечить мы не нашли, с чем связано непонятно, происходит редко и жить не мешает
Нюансы
- Не только Apple, но и Microsoft нормально не поддерживают устройства, выпущенные в 2011 году. Это касается не только iMac, но и обычных компов и ноутбуков. На них можно встретить отвал тачпада или USB портов, отсутствие звука, глюки видеокарты и т.п. неприятности. Это связано с переходом на новый тип прошивки в 2012 году — UEFI;
- Microsoft может в любой момент выпустить обновление и всё обгадить весь мёд;
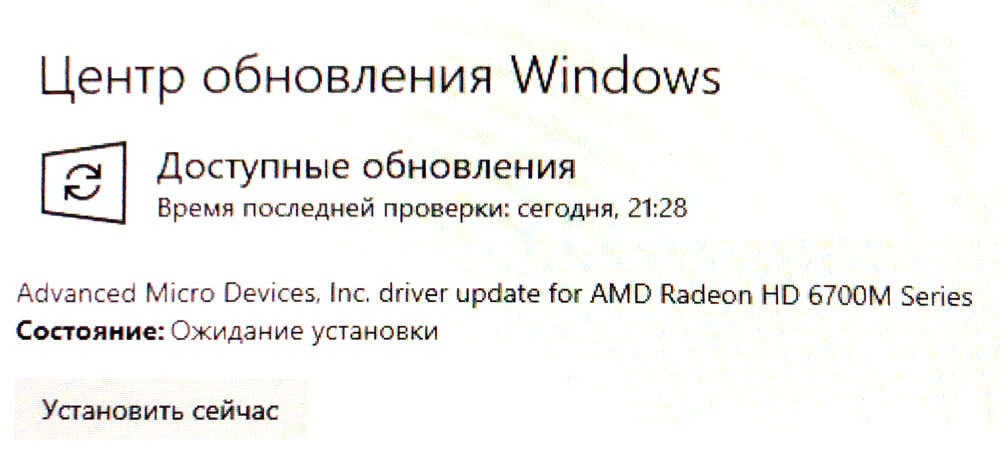
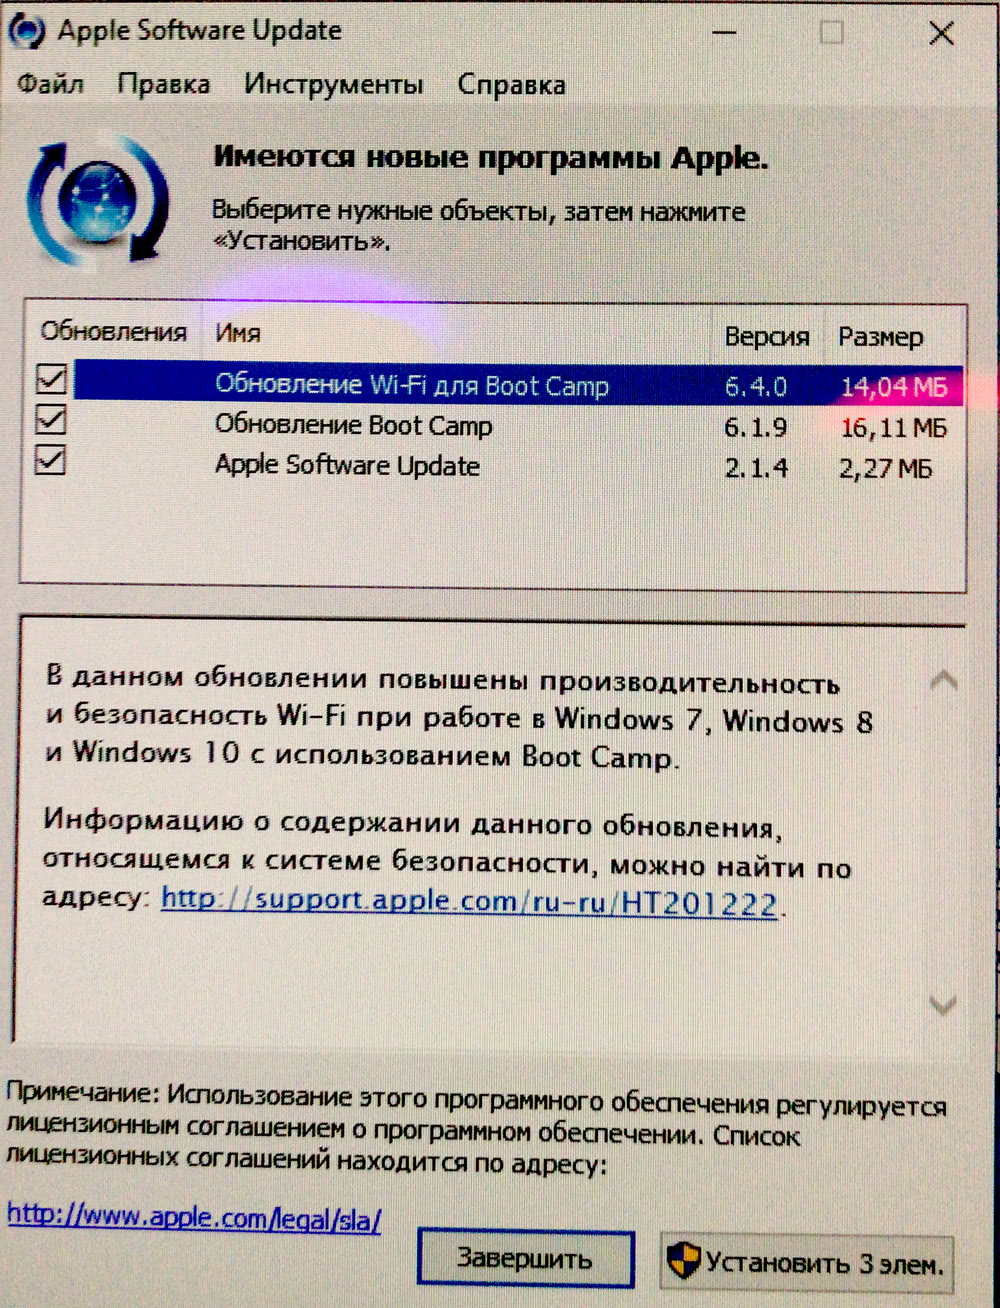
- В состав BootCamp входит утилита Apple Software Update. Через неё обновляются ПО и драйвера от Apple. Прога нашла обновления, но мы не рискнули 🙄
Итого
Считаем, что Upgrade и установка свежей Windows 10 — единственно верное решение, если хотите продлить жизнь iMac ещё на 3-5 лет. Да, это не новый iMac, но работает шустро и не тупит, а цена затеи несоизмеримо меньше 😊
Можем всё сделать за вас! 😎 Выезд на дом или в сервисе -> Установка Windows на Mac
Опубликовано: Рубрика: Windows
Как за 10 минут установить чистый Windows 11 23H2 Pro на старый Macbook Air A1370 2011 года с 2 ГБ RAM, чтобы все работало без тормозов, включая звук и видео? Четкий пошаговый план, который позволит избежать всех ошибок и проблем, описанных ранее в подробной статье: Как установить современный Windows 10 или 11 на старый Macbook?
Также рекомендую использовать актуальную версию Windows 11 24H2 Pro с файлом autounattend: Как быстро установить чистую Windows 11 Pro 24H2 на неподдерживаемом железе?
Пошаговое руководство установки Windows 11 23H2 Pro на древние Macbook Air или Pro 2009 — 2013 годов
- Готовим Tiny Windows 11 23H2 Pro с помощью Rufus, выбираем MBR, далее в настройках выбираем все галочки, указываем локальную уч.запись, докидываем на флешку драйвера для Macbook Air, вставляем готовую флешку в USB Macbook Air. Вынимаем все остальные флешки (кроме мышки). Почему выбираем MBR, а также все остальные инструкции по операциям с Макбук вы найдете в этой статье Как установить современный Windows 10 или 11 на старый Macbook?
- Сбрасываем SMC и NVRAM по инструкции. После сброса SMC сразу выключаем компьютер, не давая загрузиться с EFI
- После сброса NVRAM (компьютер несколько раз делал нечто похожее на перезагрузку) и отпускании всех клавиш сразу жмем на alt (option) и держим ее (так мы загружаем меню выбора загрузочного раздела или устройства).
- Внимание! Если в промежутке между сбросами произошла загрузка ОС с EFI, рекомендую сразу повторить сброс сначала
- После удерживания alt (option) возникает загрузочное меню, выбираем usb флешку с подписью Windows
- Начинается быстрая установка Tiny Windows 11 23H2 Pro. На этапе выбора раздела я удаляю все разделы и ставлю Windows в свободное пространство. Компьютер несколько раз перезагрузится. На этом экране выбора оставляю выбор по умолчанию
- Выбираю раскладку US и добавляю свою раскладку RU, пропускаю подключение к интернету (I don’t have the internet / Continue with limited setup). Все обновления и подключения к уч.записи Microsoft можно сделать позднее.
- Далее в настройках Privacy оставляю только Location, все остальные пункты отключаю
- Итого — всего через 10 минут на древний Macbook Air A1370 mid-2011 установлен новый, чистый, быстрый Windows 11 Pro 23H2, занимающий 0,8 — 0,9 Гб оперативной памяти в простое.
- (ОПЦИОНАЛЬНО) Далее щелкаем правой кнопкой по Панели задач и выбираем Taskbar settings.
Отключаем Search — Hide, отключаем Task view и Widgets. Прокручиваем ниже и включаем Tray icons. - После установки заходим в Диспетчер Устройств и видим неустановленные драйвера.
Я захожу в папку с драйверами MacNewDrv, захожу в папки по очереди и по правой кнопки мыши на файле INF, ставлю
sandybridge
heci 1
heci 2
applebtbc
appleenu - Также можно ставить драйвера с восклицательным знаком по правой кнопке мыши (Update driver) с заранее подготовленного места (Browse files…).
- Итак, у нас остаются неустановленными только видео и звук.
Видео я ставлю из папки MacVid3000x64, отключаю галку на первом экране (что-то Aero) и дальше все ставится на автомате, включая звук. Видеодрайверы ставятся, экран несколько раз моргает… Звуковое устройство появляется и … не работает ) Ничего страшного, перезагружаем. - После перезагрузки ставим драйвер звука CirrusAudioCS4206x64. Перезагружаемся и звук работает!
- Итого еще около 5-10 минут, и получаем полностью настроенный Win11 Pro на MacAir 2011. Кстати, все очень шустро работает, не считая некоторой задержки при включении компьютера.
- (ОПЦИОНАЛЬНО) Далее, если Ваш компьютер уже был активирован ранее с Windows 10 или 11 Pro, и данные о цифровой лицензии хранятся в аккаунте Microsoft, то переходим в Edge, заходим на сайт microsoft.com, и заходим в свою учетную запись. После этого проверяем, что Активация активна.
- Важное замечание — все ссылки на все программы и все загрузки, а также пояснения, почему именно MBR а не EFI/UEFI и прочие инструкции приведены в этой статье: Как установить современный Windows 10 или 11 на старый Macbook?
- В конце запускаем Windows Update и обновляем Windows 11 23H2 Pro до актуального состояния.
- Теперь можно поставить CPU-Z и посмотреть параметры оборудования и производительность CPU:
Драйвера на мак, использованные в данной статье
- п.11: https://disk.yandex.ru/d/zBp2zHmBMqgwkw MacNewDrv
- п.14: https://disk.yandex.ru/d/l8hGdprOGanSkQ CirrusAudioCS4206x64
- п.13: https://disk.yandex.ru/d/AcP64N3mf42VMw MacVid3000x64
Параметры драйвера видеокарты MacVid3000x64
Version: 15.28.24.64.4459 Release Date: May 19, 2016
In today’s interconnected world, the ability to access and synchronize your files across multiple devices is crucial for productivity and convenience. With the proliferation of cloud computing and file-sharing applications, users need tools that simplify this process. One such solution is Windows Live Mesh 2011, a program designed to make file syncing and sharing seamless across various platforms, including Mac.
Windows Live Mesh is part of the larger Microsoft Live suite, aimed at offering a range of web-based services. While primarily associated with Windows, it also provides functionality for Mac users. This article will delve into the features, installation, and usage of Windows Live Mesh 2011 for Mac, giving you a comprehensive guide to getting started.
What is Windows Live Mesh?
Windows Live Mesh is a cloud-based syncing service that allows users to synchronize files and folders across multiple devices. Initially launched as a beta product in 2008, it evolved into a robust tool by 2011 with the inclusion of additional features like remote access to files and the ability to share folders with others.
The primary functionalities of Windows Live Mesh 2011 include:
-
File Synchronization: Automatically sync files and folders across a range of devices.
-
Remote Access: Connect to your computer remotely and access files from anywhere with an internet connection.
-
File Sharing: Easily share folders and files with friends or co-workers.
-
Multi-Platform Support: While havily used on Windows, it also supports Mac OS, making it versatile for users with both operating systems.
System Requirements
Before diving into installation and setup, you should be aware of the system requirements for Windows Live Mesh 2011 on Mac:
- Operating System: Mac OS X 10.6 or later.
- Internet Connection: A stable internet connection is essential for syncing and accessing remote files.
- Windows Live ID: A valid Microsoft account for using the service.
Make sure your Mac meets these requirements to ensure a smooth experience with Windows Live Mesh.
Installation Process
The installation process for Windows Live Mesh 2011 on Mac is straightforward. Follow these steps to set up the application:
-
Download the Application: Go to the official Microsoft website or search for «Windows Live Mesh 2011 download» in your preferred search engine. Look for a reliable source to download the dedicated package for Mac.
-
Run the Installer: Locate the downloaded .dmg file in your Downloads folder and double-click to mount the disk image. You will see the Windows Live Mesh installer icon.
-
Follow the Setup Wizard: Double-click the installer icon to start the installation wizard. Follow the on-screen prompts, agreeing to the terms and conditions, and choose the destination folder for installation (the default is usually fine).
-
Sign in with Windows Live ID: Once installed, launch Windows Live Mesh from your Applications folder. You must sign in with your Windows Live ID. If you don’t have one, you can create a new account during this step.
Setting Up Your First Sync
After installation and account setup, it’s time to set up your first synchronization:
-
Choose Folders to Sync: Windows Live Mesh allows you to select specific folders to sync. Click on the “Sync” icon on the main dashboard and then select «Add Folder.” You can then browse your Mac’s directory to select the folders you want to be continuously synchronized.
-
Synchronization Options: Choose whether you want to keep a copy in the cloud, sync with other devices, or both. You can sync files with up to 10 devices, including PCs, Macs, and other compatible devices.
-
Setting Sync Preferences: Navigate to “Preferences” to configure how sync works for your account. You can choose options such as automatic sync frequency, excluding specific files, or prioritizing upload/download speeds.
How to Use Remote Access
One of the standout features of Windows Live Mesh 2011 is the ability to access your Mac remotely. This is particularly useful for users who need to retrieve files when away from their main computer. Here’s how to enable and use this feature:
-
Enable Remote Access: In the Windows Live Mesh dashboard, navigate to the “Remote Access” section. Here, you will find options to enable remote access for your Mac.
-
Accessing Your Mac from Another Device: To access your Mac remotely, go to Windows Live Mesh from another device (like another computer or a mobile device) and log in with your Windows Live ID. Locate your Mac from the list of connected devices.
-
Security Features: Windows Live Mesh employs secure protocols to ensure your connection is safe. You will need to authenticate your session with a security code sent to your email or via SMS to maintain the integrity of your remote connection.
-
Using the Remote Desktop Session: Once connected, you can view files and run applications just as if you were sitting in front of your Mac. You can drag and drop files between devices, run applications, and view your desktop screen in real-time.
File Sharing Made Easy
File sharing is an integral part of collaboration, and Windows Live Mesh facilitates this process. Here’s how to share files or folders with others:
-
Select the Folder: In the Windows Live Mesh dashboard, locate the folder you wish to share.
-
Sharing Options: Click on the “Share” button next to the folder name. You will then have the option to enter the email addresses of people you want to share the folder with.
-
Set Permissions: Decide whether the people you invite can only view the files or also edit them. Fine-tuning these permissions ensures control over your shared content.
-
Send an Invitation: Once permissions are set, send the invitation. The recipients will receive an email with a link to access the shared folder, depending on the permissions you established.
Managing Your Sync Settings
As you begin using Windows Live Mesh, you might need to revisit your sync settings as your needs change. Here are some tips on managing them effectively:
-
Adjust Synchronization Frequency: Depending on your internet speed and storage requirements, you can adjust how often files are synced. Frequent syncing is essential for ensuring that you have the latest files, but it can take a toll on bandwidth.
-
Exclude Large Files: If you have large files that you don’t need immediate access to, consider excluding them from sync. This will save time and storage space.
-
Monitoring Sync Status: Keep an eye on your sync status from the dashboard. Windows Live Mesh provides alerts if there are any issues with syncing, allowing you to troubleshoot quickly.
-
Deleting Unused Syncs: If you no longer require a connected device or a specific synced folder, you can review and remove outdated syncs from your dashboard. This cleaner approach prevents unnecessary clutter.
Troubleshooting Common Issues
While Windows Live Mesh simplifies file syncing and sharing, you might encounter some common issues. Following these troubleshooting tips will help ensure smooth operation:
-
Sync Failures: If a file fails to sync, check your internet connection, and ensure that the file is not locked or being used by another application.
-
File Conflicts: When changes are made to the same file from multiple devices, conflicts can arise. Windows Live Mesh usually generates copies of the file, allowing you to resolve conflicts manually.
-
Login Difficulties: If you face difficulties logging in, check your Windows Live ID credentials. Ensure that you are connected to the internet, and try resetting your password if necessary.
-
Outdated Software: Occasionally, updating the macOS or Windows Live Mesh may fix compatibility issues. Always keep your software updated to the latest version for optimal performance.
Advantages of Windows Live Mesh
Understanding the benefits of Windows Live Mesh can help you make the most of this service:
-
Cross-Platform Compatibility: Supports both Mac and Windows users seamlessly, allowing collaboration between different operating systems.
-
User-Friendly Interface: The simple dashboard helps even non-technical users navigate through options effortlessly.
-
Secure Access: Redundant security measures protect your data both in transit and at rest.
-
Scalability: Whether you have two devices or ten, Windows Live Mesh can accommodate your syncing needs easily.
Conclusion
Windows Live Mesh 2011 for Mac is a powerful tool that enables users to sync files, access data remotely, and collaborate with others efficiently. By following the steps outlined above, you can quickly set up, configure, and optimize your experience with this application.
In a world where data access and collaboration are crucial, having reliable syncing solutions is essential. Windows Live Mesh serves as a bridge for Mac users, helping them integrate seamlessly into environments where mixed operating systems are prevalent. Take advantage of this tool to enhance your productivity and ensure you never lose access to important files, wherever you may be. Whether for personal use, educational pursuits, or professional endeavors, Windows Live Mesh can provide significant advantages. Embrace it as part of your digital toolkit and enjoy the flexibility it offers.
Install Windows 10 Legacy on 2009-2011 iMac with upgraded GPU
Apple has released UEFI based support for BootCamp only for 2012+ machines. While it is possible to install UEFI Windows 10 OS in pre 2012 iMacs, these installations are sometimes met with hardware level incompatibilities due mainly to the early nature of EFI implementation in these machines. Here I present a way to install Windows 10 OS in LEGACY mode with full compatibility and reliability for all vbios upgraded Nvidia and AMD video cards.
Compatibility list:
- iMac mid-2011 (iMac12,2 & iMac12,1)
- iMac mid-2010 (iMac11,3 & iMac11,2)
- iMac late-2009 (iMac11,1)
Requirements:
- A 2009-2011 iMac running MacOS High Sierra and above (as my base system, I am starting with Catalina 10.5.7 — Dosdude1 patched)
- A Metal-GPU capable video card, Nvidia or AMD will work (Native or Upgraded)
- An 8GB or larger USB drive (only for the BootCamp support software you will need to download)
- An ISO file containing Windows 10. I used Windows 10 Home Edition
- An functional OEM 8X DL «SuperDrive» slot-loading DVD reader in your iMac 2011.
- 45GB+ free disk space for Windows OS.
Step 1: Disable MacOS System Integrity Protection (SIP)
High Sierra and Catalina ship with System Integrity Protection (SIP), also known as «rootless» mode.
- Check to see if you have it enabled:
csrtuil status. If already disabled skip Step 1. - Restart your Mac.
- Hold down Command ⌘-R and keep it held down until you see an Apple logo & progress bar. This boots you into Recovery mode.
- From the Utilities menu, select Terminal.
- At the prompt type exactly the following and then press Return:
csrutil disable - Terminal should display a message that SIP was disabled.
- From the top menu, select Restart.
- For Catalina, you will need Hackintool V3.05, go to tools menu and select the ‘house’ icon at the bottom to ‘Disable Gatekeeper’ and mount the disk in read/write mode.
- To re-enable SIP protection, repeat steps above but instead type:
csrutil enable
Step 2: Download the Bootcamp Windows Support Software
This download will contain the Windows drivers you will need to run Windows on your Mac. Allow the computer to do this for you via the Boot Camp Assistant application:
- Open Boot Camp Assistant from Applications -> Utilities
- Click continue at the introduction, you may see 2 or 3 options, unclick these options, we will not use them:
- Instead, from the Action menu select Download Windows Support Software
- Select your Macs Desktop or Downloads folder as the destination for the download
- Press Quit once you are done. The download is 1.35GB, drag it to a USB drive to use later when we’ve booted into the newly installed Win10 Desktop


Step 3: Obtain a bootable Windows 10 Legacy DVD .iso
Premable: The .iso needs to be <4.7GB in total size to fit on the DVD. The .iso images have grown over the years as they incorporate more and more updates. Furthermore, the install.wim file must be <4Gb to fit in a FAT partition for copying. In another segment I will show you how to reduce the size of the install.wim to only carry the actual version of Windows that you want and therefore adhere to the <4Gb file limitation size of FAT.
- I used Win10_1803_English_x64.iso. The download is slow, but it will complete successfully.
- This .iso represents the absolute latest one that can perfectly fit on a 4.7GB DVD-R disc without a hastle.
- In MacOS, you can right click the .iso file and choose «Burn to Disc…»
Step 4: Create the Win10 MS-DOS FAT partition (in MacOS)
- Launch Disk Utility; On the Internal drive, under the ‘View’ drop down, make sure ‘Show All Devices’ is selected.
- Click the Partition button, and then the «+» sign, adjust the size of the partition you want to dedicate for Windows.
- Select MS-DOS (FAT) for the Format and name it «win10», click Apply. It will format it under the GUID scheme.
- Now you have a Windows FAT/GUID partition.
- Note: you may get a final partition name of «10» instead of «win10», this is a known bug of Disk Utility, ignore it, the name won’t matter.

Step 5: Create the Hybrid MBR (in MacOS)
Premable: A conventional GPT disk contains a protective MBR with a single partition, of type 0xEE (EFI GPT). This can span the entire size of the disk. Our Legacy Windows 10 will not install on a GPT formated partition. In operating systems that support GPT-based boot through BIOS services rather than EFI, the first sector may also still be used to store the first stage of the bootloader code, but modified to recognize GPT partitions. This is a little dangerous because Hybrid MBRs are not part of Intel’s EFI GPT standard. In fact, beginning with Windows 8, Microsoft’s OS installs on most Intel-based Macs in EFI mode, so a hybrid MBR is not required. Unfortunately if you try to install Windows 10 in EFI mode in a 2011 iMac, you will face random reboots, Cirrus Logic Audio not working (internal speakers) and possibly video problems involving igdkmd64.sys (Intel HD3000 internal GPU incompatibilities). As I’ve stated, these issues were sorted out with the introduction of proper efi drivers starting in 2012. So for us, Windows 10 will never have full Protected MBR status like a normal PC; it will have to exist in a hybrid MBR environment.
If this step is not completed you will get this error when installing Windows 10:
Let’s begin:
This gets us to a Hybrid MBR (see below) which Windows 10 will use to format over to NTFS, and finally install windows 10 in.

Step 6: Install Windows 10 Legacy using the DVD ROM Drive:
- Reboot your Mac with the bootable Windows 10 Installer DVD inserted in the SuperDrive.
- Press and hold down the Option (⌥ alt) until you see the boot selection options.
- You should see an option with 2 DVD icons, one is a Windows and the other is EFI Boot, choose the «Windows» one.
- The Windows 10 installation will now start, follow the steps, selecting Custom Installation.
- «Press any key to boot from CD or DVD…..» make sure to press a key!
- At the «Windows Setup» screen select Next, then Install now
- Put in your product code or select «I don’t have a product key»
- Select the version of Windows you want to install, I selected «Windows 10 Home»
- Select Custom: Install Windows only (advanced)
- Select your partition but be careful, and ensure you select the «win10» («W10») partition created earlier before proceeding:
- You will see a warning: «⚠ Windows can’t be installed on drive 0 partition 2. (Show details)«. This is expected because up to this point, you only have a FAT-32 partition present.
- Select Format, and the installer will format the partition to NTFS file system:
- The error message is now cleared and the Next button will now be highlighted. Press it:
- Windows will restart ~4 times during installation. Be ready to hold down the Option (⌥ alt) key after each reboot, but instead of selecting the DVD device 📀 named «Windows» select the newly created Hard Disk 🖴 named «Windows» instead to ensure the installation continues
- This time, ignore: «Press any key to boot from CD or DVD…..» since you want to continue the installation from within the hard disk now.
- Finish installing Windows until you get to the desktop.

Step 7: Install ‘Bootcamp Windows Support Software’ (in Windows 10)
These drivers are installed as part of the Bootcamp Windows Support Software and will allow Windows 10 to work with the Mac specific devices: WiFi, Graphics, External Monitors, Webcam, Bluetooth and Audio. The Bootcamp Windows Support Software should be on the Windows 10 installer USB you created earlier.
- Insert your USB drive
- Open WindowsSupport -> Bootcamp -> setup.exe.
- This will install all the required drivers and the bootcamp utility for Windows.
- Reboot the system, and get back into Windows.
- This is a good time to go into Windows Update and allow multiple security and feature installs to bring you up to Version 21H2
- You may wish to allow ‘other device updates’ in Win10, as this will ensure you are using the latest video drivers as well
Step 8: ‘Regedit’ patches to allow for brightness control (Upgraded Nvidia Metal video cards)
- run the Registry Editor, regedit
- navigate to: HKEY_LOCAL_MACHINE\SYSTEM\CurrentControlSet\Control\Video\{**UUID**}\0002
- The UUID identifier may be different for your video card. Check each entry for the HardwareInformation.AdapterString that matches your hardware.
- The entries will be clustered in groups of 4 numbers, eg: 0000, 0001, 0002, 0003, 0004.
- Right click, Add a REG_DWORD labelled
EnableBrightnessControland set it to1 - Right click, Add a REG_DWORD labelled
RMBrightnessControlFlagsand set it to400in Hex, or1024in Decimal.
- Reboot, you should now have a slider for brightness control back.

Step 9: Verify «Legacy» Installation
- run msinfo32 via the Windows panel, you should see verification of your install:
Step 10: Re-Enable SIP protection
see Step 1, type: csrutil enable, reboot
Issues:
Separate SSD for Windows 10
If you want to install Windows 10 on separate SSD, it can be done. The SSD needs to be part of the internal SATA chain and not a USB device. You will need to create an MS-DOS FAT, GUID formatting as we did with our partitioned drive; You will need to also transform the PMBR to Hybrid MBR. The rest of the procedure is similar.
Opencore (OCLP)
Opencore does not yet allow for MBR or Hybrid-MBR bootup recognition as far as I know. If you are using OpenCore (>Catalina OS), you will need to subload the rEFInd manager from within Opencore to finally see the Windows icon and load it. I use an SD card with Opencore on it to achieve this for my computers that have higher than Catalina Os installs.
In the evolving landscape of digital communication and data management, cloud services have become synonymous with convenience and efficiency. For Mac users, one noteworthy service is Windows Live Mesh 2011. Although primarily designed for Windows users, it brought remarkable functionality to Mac computers as well. In this comprehensive guide, we will explore the features, installation process, and practical uses of Windows Live Mesh 2011 for Mac, equipping you with the knowledge to harness the full potential of this cloud-based platform for your needs.
Understanding Windows Live Mesh 2011
Windows Live Mesh was part of the larger Windows Live suite, aimed at providing users a seamless way to synchronize files and folders across multiple devices, share files with others, and access remote computers. Launched in 2011, Live Mesh enabled users to store content in the cloud, making it accessible from anywhere with an internet connection. While Windows users were the primary focus of this software, it extended its capabilities to Mac users, showcasing Microsoft’s commitment to cross-platform compatibility.
Key Features of Windows Live Mesh 2011
-
File Synchronization: With Live Mesh, users can synchronize files and folders across devices. This ensures that any modification made on one device is reflected on all others that are connected to the same Mesh.
-
Remote Access: Live Mesh allows users to remotely access their computers from anywhere, enabling you to work on files even when you are not in front of your desktop or laptop.
-
File Sharing: Sharing files with other users is straightforward—inviting others to join your Mesh lets them access specific folders or files without the need for email attachments.
-
Cross-Platform Support: Although primarily a Windows application, Live Mesh’s compatibility with Mac OS ensured that Mac users could enjoy its benefits.
-
Automatic Updates: Live Mesh provides automatic updates to keep your software current, enhancing security and performance without requiring manual intervention.
System Requirements
Before diving into installation, verifying that your Mac meets the minimum system requirements for Windows Live Mesh 2011 is essential:
- Operating System: Mac OS X 10.5 (Leopard) or higher.
- Processor: Intel processor recommended for optimal performance.
- RAM: A minimum of 1 GB of RAM is required.
- Internet Connection: A reliable broadband internet connection is essential for accessing and synchronizing files.
Installation Process
Step 1: Downloading Windows Live Mesh 2011
To begin with, you need to download the installation package for Windows Live Mesh 2011.
- Navigate to the official Microsoft website or a reputable software download site.
- Search for “Windows Live Mesh 2011 for Mac” in the search bar.
- Click on the download link and save the installation file (usually in your “Downloads” folder).
Step 2: Installing the Application
Once the download is complete, proceed to install the application on your Mac:
- Open your “Downloads” folder and locate the downloaded Windows Live Mesh file.
- Double-click on the installation file to start the setup.
- Follow the on-screen prompts, which will guide you through the installation process. It may involve accepting the end-user license agreement or choosing the installation directory.
- When the installation is complete, you will see a prompt indicating that it has been successfully installed.
Step 3: Configuring Windows Live Mesh
After installation, configuring your Live Mesh account is the next step:
- Launch Windows Live Mesh from the Applications folder.
- You will be prompted to sign in with a Windows Live ID. If you do not have one, you can create a free account.
- After logging in, the application will ask for permission to create a Mesh. Opt to create a new Mesh so you can begin managing your files.
- You’ll then need to specify which folders you want to synchronize. You can select existing folders or create new ones specifically for syncing.
Step 4: Familiarizing Yourself with the Interface
Upon successful configuration, take a moment to familiarize yourself with the Windows Live Mesh interface:
- Sync Status: Displays the synchronization status of your folders and files.
- Remote Access: A section that allows you to establish remote connections to other devices in your Mesh.
- Shared Folders: A tab where you can manage folders shared with other users.
- Settings: Access settings to customize the application’s behavior and appearance according to your preferences.
Using Windows Live Mesh 2011
After installation and configuration, you are now ready to use Windows Live Mesh 2011. Here are various operations you can perform:
File Synchronization
This is the core function of Live Mesh. To synchronize files:
- Place files in the folders you designated for syncing during the setup.
- Changes made to these files will automatically sync across all your devices in the Mesh.
- You can also add new files to the synchronized folders; they will be uploaded to the cloud and available on your other devices.
Remote Access
This feature enables you to control your Mac remotely, which can be useful in various scenarios:
- Open the Windows Live Mesh application on the device you want to access remotely.
- Navigate to the “Remote Access” section and select the computer you wish to connect to.
- You will be prompted to log in again for security verification.
- Once logged in, you can view and interact with your Mac remotely.
This is particularly handy when you forget a file on your home computer or need to access an application that is only available on that machine.
File Sharing
Sharing files with other users is simple and efficient:
- Inside the Live Mesh application, go to the “Shared Folders” tab.
- Click on “Share” next to the folder you want to share with someone else.
- Enter the email address of the person you want to share the folder with; they will receive an invitation to join your Mesh.
- Once they accept the invitation, they will have access to the shared folder, and any changes made will be synchronized for all parties involved.
Managing Synchronization Settings
You can customize how Windows Live Mesh synchronizes your files:
- Access the “Settings” section within the application.
- Here, you can adjust settings related to bandwidth usage, automatic updates, and selective synchronization.
- You can choose to pause synchronization temporarily, adjust which folders sync or stop syncing entirely.
Troubleshooting Common Issues
While using Windows Live Mesh 2011 for Mac, you may encounter some common issues. Here are a few troubleshooting tips:
-
Slow Synchronization: This can be due to a slow internet connection. Ensure you are connected to a reliable broadband network. You may also want to check if there are any large files that might be causing delays in the sync process.
-
File Not Syncing: If a file is not syncing, check to ensure it is in a designated synchronized folder. Additionally, verify that you have sufficient storage space in your Live Mesh account.
-
Remote Access Problems: If you experience difficulties with remote access, ensure that both devices are online and that you are using the correct login credentials. Sometimes firewall settings can block remote access, so check your firewall configurations.
-
Account Issues: If you encounter issues with your Windows Live ID, such as being unable to log in, try resetting your password or accessing your account through the Windows Live website.
Advantages of Using Windows Live Mesh 2011 for Mac
-
Cloud Integration: Accessing your files from anywhere in the world adds a level of convenience that traditional file storage cannot match.
-
Collaboration Made Easy: The ability to share files effortlessly allows for improved collaboration among teams, making it an excellent choice for businesses.
-
Simplicity: The interface is user-friendly, making it accessible even for those who may not be tech-savvy.
-
Cross-Platform Advantage: Offering support for both Mac and Windows users increases flexibility and allows for a more cohesive working environment across diverse operating systems.
-
Cost-Effective: Windows Live Mesh is free to use, providing powerful features without the financial burden typical of other software solutions.
Conclusion
Windows Live Mesh 2011 for Mac is a versatile and powerful tool for users looking to manage their data seamlessly across multiple devices. With its array of features—file synchronization, remote access, and easy sharing—Live Mesh proves to be an invaluable asset for both personal and professional use.
Whether you’re a student needing to access lecture notes, a professional collaborating with colleagues across different locations, or a casual user wanting to store and share precious memories, Windows Live Mesh can facilitate these tasks effectively. By following this guide, you should now feel confident in downloading, installing, and utilizing Windows Live Mesh 2011 on your Mac to elevate your digital experience. Embracing such technology not only streamlines your workflow but also empowers you to make the most of the digital age.