
| Previous | Table of Contents | Next |
| Auditing Windows Server 2008 R2 File and Folder Access | Building a Windows Server 2008 R2 Network Load Balancing Cluster |
<google>BUY_WINSERV_2008R2</google>
Windows Server 2008 R2 Volume Shadow Copy is a mechanism whereby the contents of shared folders can be automatically backed up at pre-determined intervals to a shadow volume. Once implemented, shadow copy will backup the previous 64 versions of each file in the shadowed volume and provide users with the ability to restore files from any of the previous 64 versions without administrator intervention, enabling users to independently restore deleted, damaged or overwritten files. In addition to restoring individual files to a previous version, shadow copy also provides the ability to restore an entire volume.
Another use for shadow copy is to enable the backup of locked or open files. Ordinarily, if a file is currently open or locked by an application, tools such as Windows Backup will fail to backup the file. Shadow copy aware backup tools are, however, able to avoid this problem by using the Volume Shadow Copy Service API.
Contents
Contents
|
||
Shadow Copy Considerations
There are a number of issues that need to be considered when implementing shadow copy for shared folders. First and foremost the shared folders which are to be shadowed need to be identified. Secondly, a location for the shadow to be stored must be allocated. This can reside either on the same volume as the shared folders, or on a completely different volume or disk drive. Even before any data is shadowed, the shadow copy system requires 300MB of available space. The total amount of space required will depend on the size of the shared folder which is to be shadowed and the frequency and extent to which the files are likely to change (since shadow copy will only take new snapshots of files which have changed since the last snapshot). Finally, the time and frequency of the volume snapshots needs to be defined. By default, Shadow Copy performs a snapshot twice a day at 7:00am and 12:00pm.
Once the Shadow Copy system has been configured the shadow copy client needs to be set up on the systems of any users that are likely to need to be able to restore files in shared folders.
Using Computer Management to Enable and Configure Volume Shadow Copies
Shadow Copy is enabled on a per volume basis. Once configured on a volume, all shared folders residing on that volume will automatically be shadowed. Shadow Copy can be configured either graphically using the Computer Management tool or via the command prompt. Command-line configuration of Shadow Copy will be covered in a later section of this chapter. This section will focus on Computer Management configuration.
The first step is to launch the Computer Management configuration tool (Start -> All Programs -> Administrative Tools -> Computer Management). Once invoked, select Storage -> Disk Management from the tree in the left panel to display the disk and volume information for the local system. In the graphical view, right click on a volume and select on Properties to launch the properties dialog. In the properties dialog, select the Shadow Copy tab to display the Shadow Copy properties as illustrated in the following figure:
A useful shortcut to access the Shadow Copy property panel is to run vssuirun from a command prompt with elevated privileges.
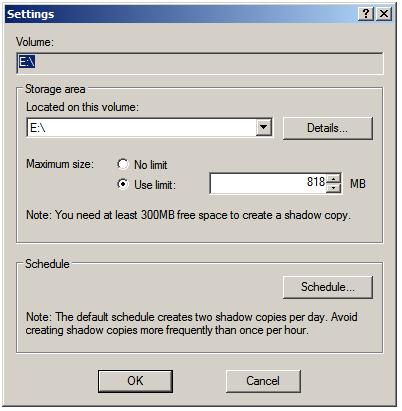
The Select a volume section of the properties dialog lists the volumes present on the local system. Select the volume in this list for which Shadow Copy is to be enabled. With the volume selected click on the Settings button to display the following Shadow Copy Settings dialog box:
<google>WIN28BOX</google>
In the Located on this volume specify the volume on which the shadow copies are to be stored. This can be either the current volume or a different volume on the system. The Details button displays free and total disk space information for the currently specified volume. Once a suitable volume for the shadow copies has been selected the maximum size to be made available for the shadow copies may be defined. This can either be set to Maximum size which will use all available space on the specified volume, or capped to a specific size (keeping in mind that a minimum of 300MB is required for the shadow storage volume even before any snapshots are taken). Shadow Copy uses a differential approach to backing up files in that only files that have changed since the last snapshot are copied. For certain files, Shadow Copy also only copies the part of the file that has changed, rather than the entire file. As such, it is not necessary to reserve 64 times the size of the volume to be copied since only parts of the volume will be copied with each snapshot.
Schedule the shadow copy snapshots by clicking on the Schedule… button. By default, Windows configures two snapshots each day (at 7:00am and 12:00pm respectively). To remove a currently defined snapshot, select it from the drop down list and click on Delete. To modify a run, select it from the drop down list, modify the settings in the lower section of the dialog and click on OK.
To specify additional schedules, click on the New button and specify the days and time of the snapshot. Note that snapshots can also be configured to occur at user logon, system startup and even when the system is idle. In fact, Windows Server 2008 provides considerable flexibility in terms of scheduling shadow copies. It is important to keep in mind, however, that there are disadvantages to running a shadow copy too frequently. Firstly, shadow copies are resource intensive tasks, especially on large volumes where many files are subject to frequent changes. Repeated snapshots during periods when the server is heavily utilized may well degrade overall system performance. Secondly, it is important to keep in mind that Shadow Copy retains the last 64 versions of a file. Therefore, if a snapshot is run every hour, the oldest restore point available to a user will be approximately two and half days in the past. If, on the other hand, snapshots are taken twice a day, the user will have the luxury of restoring a file from a point as much as 32 days ago. It is important, therefore, to strike a balance between longevity and frequency.
The following screenshot illustrates the Shadow Copy scheduling dialog:

Once the schedules have been configured, click on OK to dismiss the scheduling dialog. Click OK once again in the Settings dialog to return to the Shadow Copy properties panel. At this point, the volume for which a schedule has been defined will have a small clock image superimposed over the volume icon and will indicate that 0 bytes of shadow copy storage have been used. The next step is to enable shadow copies on the volume by selecting the volume from the list and clicking on the Enable button. The volume in the list will update to display the date and time of the next scheduled copy and provide a summary of the current level of storage space used for the shadow copies.
To initiate a manual shadow copy now, or at any other time, simply select the volume to be copied from the list in the Shadow Copy properties panel and click on the Create Now button.
Restoring an Entire Volume
To restore an entire volume, access the Shadow Copy property panel either from Computer Management as outline above, or by running vssuirun from a command prompt with elevated privileges. Once loaded, select the desired volume followed by a snapshot from which to restore from the Shadow copies of selected volume list and click on the Revert Now… button. This will revert all shared folders on the selected volume to their state at the point that the selected shadow copy was made.
It is important to note that restoration of entire volumes is not possible on system volumes since this would, in all probability, severely interfere with the current system state.
Configuring and Enabling Shadow Copy from the Command Line
A significant amount of Shadow Copy functionality can be accessed via the command line using the vssadmin tool, which is the focus of this section.
In order to obtain information about shadow copies configured on a system, use vssadmin list shadows:
C:\Windows\system32>vssadmin list shadows
vssadmin 1.1 - Volume Shadow Copy Service administrative command-line tool
(C) Copyright 2001-2005 Microsoft Corp.

Contents of shadow copy set ID: {67f25a62-12f1-4e34-b14a-3b57cb03f4f8}
   Contained 1 shadow copies at creation time: 8/22/2008 12:29:56 PM
      Shadow Copy ID: {bee54c7f-22a4-4bd0-b6c4-20bc51a8cded}
         Original Volume: (E:)\\?\Volume{9fa5f191-6554-11dd-9ce6-000c295707db}\
         Shadow Copy Volume: \\?\GLOBALROOT\Device\HarddiskVolumeShadowCopy2
         Originating Machine: winserver-2
         Service Machine: winserver-2
         Provider: 'Microsoft Software Shadow Copy provider 1.0'
         Type: ClientAccessible
         Attributes: Persistent, Client-accessible, No auto release, No writers,
 Differential

Contents of shadow copy set ID: {24c56736-d082-4fa5-ac97-961bd708b4d2}
   Contained 1 shadow copies at creation time: 8/22/2008 1:00:04 PM
      Shadow Copy ID: {e5a5d032-5449-4375-b4c2-5adf12fedc5d}
         Original Volume: (E:)\\?\Volume{9fa5f191-6554-11dd-9ce6-000c295707db}\
         Shadow Copy Volume: \\?\GLOBALROOT\Device\HarddiskVolumeShadowCopy3
         Originating Machine: winserver-2
         Service Machine: winserver-2
         Provider: 'Microsoft Software Shadow Copy provider 1.0'
         Type: ClientAccessible
         Attributes: Persistent, Client-accessible, No auto release, No writers,
 Differential

Contents of shadow copy set ID: {95618a5e-b9f2-4d5c-9654-7fcab5be2c5d}
   Contained 1 shadow copies at creation time: 8/23/2008 7:00:03 AM
      Shadow Copy ID: {012d8105-ab39-4b17-89c9-bb7dfbeeb1f8}
         Original Volume: (E:)\\?\Volume{9fa5f191-6554-11dd-9ce6-000c295707db}\
         Shadow Copy Volume: \\?\GLOBALROOT\Device\HarddiskVolumeShadowCopy4
         Originating Machine: winserver-2
         Service Machine: winserver-2
         Provider: 'Microsoft Software Shadow Copy provider 1.0'
         Type: ClientAccessible
         Attributes: Persistent, Client-accessible, No auto release, No writers,
 Differential
To obtain information about how shadow copy storage is allocated to shadow copies, use the vssadmin list shadowstorage:
C:\Windows\system32>vssadmin list shadowstorage
vssadmin 1.1 - Volume Shadow Copy Service administrative command-line tool
(C) Copyright 2001-2005 Microsoft Corp.

Shadow Copy Storage association
   For volume: (E:)\\?\Volume{9fa5f191-6554-11dd-9ce6-000c295707db}\
   Shadow Copy Storage volume: (C:)\\?\Volume{f0c004b0-58c1-11dd-a1fe-000c295707
db}\
   Used Shadow Copy Storage space: 1.344 MB
   Allocated Shadow Copy Storage space: 301.078 MB
   Maximum Shadow Copy Storage space: 818 MB
The above command is particularly useful for comparing used and available space for shadow copy storage.
Shadow Copy for a volume may also be enabled from the command-line using vssadmin, the syntax for which is:
vssadmin add shadowstorage /for=volume /on=storevolume
where volume represents the volume on which shadow copy is to be enabled and storevolume is the volume on which the shadow copies are to be stored, for example:
vssadmin add shadowstorage /for=d: /on=e:
The maximum storage size may also be specified using the /maxsize= command-line option:
vssadmin add shadowstorage /for=d: /on=e: /maxsize=8GB
A manual shadow copy of an enabled volume may be triggered from the command prompt at any time by running vssadmin as follows:
C:\Windows\system32>vssadmin create shadow /for=e:
vssadmin 1.1 - Volume Shadow Copy Service administrative command-line tool
(C) Copyright 2001-2005 Microsoft Corp.

Successfully created shadow copy for 'e:\'
    Shadow Copy ID: {c9235d96-4ea3-4bc2-b2ee-77397a124914}
    Shadow Copy Volume Name: \\?\GLOBALROOT\Device\HarddiskVolumeShadowCopy7
Specific shadow copies may also be deleted from the command line either by specifying that the oldest snapshot is to be deleted or by referencing the specific snapshot by its Shadow Copy Id (which can be obtained from the vssadmin list shadows command). For example, to delete the oldest shadow snapshot:
C:\Windows\system32>vssadmin delete shadows /for=e: /oldest
vssadmin 1.1 - Volume Shadow Copy Service administrative command-line tool
(C) Copyright 2001-2005 Microsoft Corp.

Do you really want to delete 1 shadow copies (Y/N): [N]? y

Successfully deleted 1 shadow copies.
Similarly, to delete a specific snapshot from a volume:
C:\Windows\system32>vssadmin delete shadows /shadow={879318ea-2f28-4d0c-b58b-5df5cd761984}
vssadmin 1.1 - Volume Shadow Copy Service administrative command-line tool
(C) Copyright 2001-2005 Microsoft Corp.

Do you really want to delete 1 shadow copies (Y/N): [N]? y

Successfully deleted 1 shadow copies.
The restoration of a shadow from a specific snapshot can be achieved from the command line using the vssadmin revert command combined with the Shadow Copy ID of the required snapshot. Note that the revert cannot be performed if open file handles exist on the volume (the /ForceDismount parameter is available but its use is not recommended since it can result in lost data:
C:\Windows\system32>vssadmin revert shadow /shadow={bf7e3df8-b4f9-4068-b208-3c67
8bc85053}
vssadmin 1.1 - Volume Shadow Copy Service administrative command-line tool
(C) Copyright 2001-2005 Microsoft Corp.

Do you really want to revert to this shadow copy (Y/N): [N]? y
Finally, Shadow Copying on a volume may be disabled via the command prompt using the vssadmin delete shadowstorage command, although the command will only work once all snapshots associated with the volume have been deleted from the shadow storage. Assuming there are no existing shapshots, the following example will disable shadow copy on the volume represented as the e: drive:
vssadmin delete shadowstorage /for=e:
Restoring Shadow Copy Snapshots from Clients
Once shadow copy has been configured for volumes on the server, the next step is to learn how to access the previous version of files from client systems. This is achieved using a feature of Windows Server 2008 R2 and Windows Vista called Previous Versions.
To access previous versions of a file on a client, navigate to the shared folder (or subfolder of a shared folder) or network drive using Start -> Network. Once the desired network drive or shared folder is visible, right click on it and select Restore Previous Versions (or just Previous Versions on Windows Vista). Once selected, the Properties dialog box will appear with the Previous Versions tab pre-selected as illustrated in the following figure:
As shown in the previous figure, the Previous Versions property page lists the previous versions of the shared folder that are available for restoration. A number of options are available for each shadow copy snapshot listed in the properties dialog. Open will open the folder in Windows Explorer so that individual files and sub-folders can be viewed and copied. The Copy… button allows the snapshot of the folder and its contents to be copied to a different location. Finally, Restore… restores the folder and files to its state at the time of the currently selected shadow copy snapshot. As outlined in the warning dialog, this action cannot be undone once performed.
<google>BUY_WINSERV_2008R2_BOTTOM</google>
Большинство решений для резервного копирования данных под Windows в том или ином виде используют возможности службы теневых копий (VSS — Volume Shadow Copy Service) для создания копий данных приложений или сервисов. В некоторых случаях, служба VSS или один из ее модулей записей начинают работать некорректно, в результате чего не удается выполнить нормальную процедуру резервное копирования данных. Я сталкивался с такой ошибкой на Exchange, MSSQL и Hyper-V серверах. Для быстрого восстановления службы VSS и ее компонентов я использую следующую инструкцию.
Чтобы определить сбойный модуль VSS, выведем список зарегистрированных в системе модулей записи VSS (Writers) с помощью команды vssadmin.
vssadmin list writers
В списке компонентов ищем те, которые находятся в состоянии Failed (для нормально работающих компонентов статус должен быть State: [1] Stable)
Writer name: 'Microsoft Exchange Writer'
Writer Id: {76fe1ac4-6ded-4f4b-8f17-fd23f8ddcfb7}
Writer Instance Id: {31b56ab0-9588-412f-ae7b-cdc375347158}
State: [7] Failed
Last error: Retryable error
![vssadmin list writers State: [7] Failed Last error: Retryable error](https://winitpro.ru/wp-content/uploads/2017/12/vssadmin-list-writers-state-7-failed-last.png)
Как вы видите, в нашем случае модуль записи Microsoft Exchange Writer находится в сбойном состоянии (State: [8] Failed), поэтому резервное копирование Exchange выполнить не удастся. Как правило, чтобы исправить состояние такого компонента, достаточно перезагрузить сервер (что не всегда возможно по производственным причинам).
Чтобы починить модуль записи, нужно попробовать перезапустить связанную с ним службу (в таблице ниже содержится список соответствия типовых VSS Writer и связанных с ними служб Windows). Помимо остановки службы, иногда приходится руками завершать процесс зависшей службы.
| VSS Writer | Имя службы | Полное имя службы |
| ASR Writer | VSS | Volume Shadow Copy |
| BITS Writer | BITS | Background Intelligent Transfer Service |
| Certificate Authority | CertSvc | Active Directory Certificate Services |
| COM+ REGDB Writer | VSS | Volume Shadow Copy |
| DFS Replication service writer | DFSR | DFS Replication |
| DHCP Jet Writer | DHCPServer | DHCP Server |
| FRS Writer | NtFrs | File Replication |
| FSRM writer | srmsvc | File Server Resource Manager |
| IIS Config Writer | AppHostSvc | Application Host Helper Service |
| IIS Metabase Writer | IISADMIN | IIS Admin Service |
| Microsoft Exchange Replica Writer | MSExchangeRepl | Microsoft Exchange Replication Service |
| Microsoft Exchange Writer | MSExchangeIS | Microsoft Exchange Information Store |
| Microsoft Hyper-V VSS Writer | vmms | Hyper-V Virtual Machine Management |
| MSMQ Writer (MSMQ) | MSMQ | Message Queuing |
| MSSearch Service Writer | WSearch | Windows Search |
| NPS VSS Writer | EventSystem | COM+ Event System |
| NTDS | NTDS | Active Directory Domain Services |
| OSearch VSS Writer | OSearch | Office SharePoint Server Search |
| OSearch14 VSS Writer | OSearch14 | SharePoint Server Search 14 |
| Registry Writer | VSS | Volume Shadow Copy |
| Shadow Copy Optimization Writer | VSS | Volume Shadow Copy |
| SMS Writer | SMS_SITE_VSS_WRITER | SMS_SITE_VSS_WRITER |
| SPSearch VSS Writer | SPSearch | Windows SharePoint Services Search |
| SPSearch4 VSS Writer | SPSearch4 | SharePoint Foundation Search V4 |
| SqlServerWriter | SQLWriter | SQL Server VSS Writer |
| System Writer | CryptSvc | Cryptographic Services |
| TermServLicensing | TermServLicensing | Remote Desktop Licensing |
| WDS VSS Writer | WDSServer | Windows Deployment Services Server |
| WIDWriter | WIDWriter | Windows Internal Database VSS Writer |
| WINS Jet Writer | WINS | Windows Internet Name Service (WINS) |
| WMI Writer | Winmgmt | Windows Management Instrumentation |
Еще раз выполните команду
vssadmin list writers
Проверьте статус проблемного модуля записи. Если он не изменился на Stable и проблема не исправлена, можно попробовать перерегистрировать компоненты и библиотеки службы VSS.
Перейдите в каталог:
cd c:\windows\system32
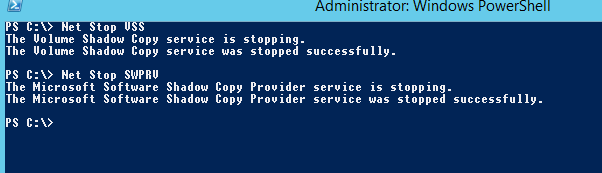
Остановите службы Volume Shadow Copy и Microsoft Software Shadow Copy Provider
Net Stop VSS
Net Stop SWPRV
Перерегистрируйте компоненты VSS:
regsvr32 /s ole32.dll
regsvr32 /s oleaut32.dll
regsvr32 /s vss_ps.dll
vssvc /register
regsvr32 /s /i swprv.dll
regsvr32 /s /i eventcls.dll
regsvr32 /s es.dll
regsvr32 /s stdprov.dll
regsvr32 /s vssui.dll
regsvr32 /s msxml.dll
regsvr32 /s msxml3.dll
regsvr32 /s msxml4.dll
vssvc /register
Теперь осталось запустить остановленные службы:
Net Start SWPRV
Net Start VSS
Проверьте, пропала ли ошибка у проблемного модуля записи VSS.
Данный метод перезапуска и перерегистрации компонентов VSS эффективен, как на Windows Server 2008 / 2012/ R2, так и на Windows Server 2016.
Windows 7 / Networking
The Windows Server 2008 R2 Volume Shadow Copy Service (VSS) is a feature available for
NTFS volumes. VSS is used to perform a point-in-time backup of an entire volume to the
local disk. This backup can be used to quickly restore data that was deleted from the
volume locally or through a network-mapped drive or network file share. VSS is also used
by Windows Server Backup and by compatible third-party backup applications to back up local and shared NTFS volumes.
VSS can make a point-in-time backup of a volume, including backing up open files. This
entire process is completed in a very short period of time but is powerful enough to be
used to restore an entire volume, if necessary. VSS can be scheduled to automatically back
up a volume once, twice, or several times a day. This service can be enabled on a volume
that contains DFS targets and standard Windows Server 2008 R2 file shares.
Using VSS and Windows Server Backup
When the Windows Server Backup program runs a backup of a local NTFS volume, VSS is
used by default to create a snapshot or shadow copy of the volume’s current data. This
data is saved to the same or another local volume or disk. The Backup program then uses
the shadow copy to back up data, leaving the disk free to support users and the operating
system. When the backup is complete, the shadow copy is automatically deleted from the
local disk. One important point is that in order for VSS
backups to work properly, shadow copies should be enabled on every volume and enough
free space should exist to store the shadow copies. Even if the schedule is set to once a
year, enabling shadow copies on the volume defines the shadow copies with the Volume
Shadow Copy provider and reduces VSS errors on backups.
Configuring Shadow Copies
Enabling shadow copies for a volume can be very simple. Administrators have more
options when it comes to recovering lost or deleted data and, in many cases, can entirely
avoid restoring data to disk from a backup tape device or tape library. In addition, select
users can be given the necessary rights to restore files that they’ve accidentally deleted.
The Volume Shadow Copy Service is already installed and is automatically available using NTFS-formatted volumes.
To enable and configure shadow copies, follow these steps:
- Log on to the Windows Server 2008 R2 system with an account with administrator privileges.
- Click Start, click All Programs, click Administrative Tools, and select Server Manager.
- In the tree pane, double-click the Storage node, and select Disk Management.
- In the tasks pane, scroll down to locate the desired volume, right-click the volume, and select Properties.
- Select the Shadow Copies tab, and in the Select a Volume section, click on the desired volume, and click the Settings button.
- The Settings page allows you to choose an alternate volume to store the shadow
copies. Select another volume to store the shadow copies in line with best practices
and set the storage space limit for the shadow copies. The default is usually set to
10% of the volume size; accepting the defaults is recommended. - After the location and maximum size are configured, click the Schedule button and
define the schedule. The defaults create a shadow copy at 7:00 a.m. and 12:00 p.m.,
but for this example, set up an additional shadow copy to run at 5:00 p.m. - Click OK to close the Schedule window and click OK again to close the Volume
Shadow Copy Settings window. The shadow copy for the originally selected volume is now enabled. - If necessary, select the next volume and enable shadow copying; otherwise, click the
Create Now button to create the initial shadow copy. - If necessary, select the next volume and immediately create a shadow copy by clicking the Create Now button.
- After the shadow copies are created, click OK to close the Disk Volume window, close Server Manager, and log off the server.
Recovering Data Using Shadow Copies
The server administrator or a standard user who has been granted permissions can recover
data using previously created shadow copies. The files stored in the shadow copy cannot
be accessed directly, but they can be accessed by connecting the volume that has had a shadow copy created.
To recover data from a file share, follow these steps:
- Log on to a Windows Server 2008 R2 system, Windows XP SP1, or later workstation
with either administrator rights or with a user account that has permissions to restore the files from the shadow copy. - Click Start and select Run or type in the server and share name in the Search pane.
- At the Run prompt or Search pane, type \\servername\sharename, where servername
represents the NetBIOS or fully qualified domain name of the server hosting
the file share. The share must exist on a volume in which a shadow copy has already been created. - When the folder opens, right-click on the folder that contains the data that will be restored and select Properties.
- When the window opens, if necessary, select the Previous Versions tab, select the
desired folder version, and click the Open button. - An Explorer window then opens, displaying the contents of the folder when the
shadow copy was made. If you want to restore only a single file, locate the file, rightclick it, and select Copy. - Open the server share location in which the restored file will be placed, right-click,
and choose Paste. Overwrite the file as required and close all the windows as desired.
Прочитано: 9 136
Порой сталкиваешься на рабочем месте, что к тебе как к системному администратору обращается пользователь с просьбой восстановить файл который он редактировал весь день, а потом вернулся к рабочему месту, но весь его труд утерян. Да, на его совести тот момент если он отошел от своего компьютера и не заблокировал вручную экран (приучаю нажимать сочетание клавиш: Win + L), а таймаут выставленный групповой политикой еще не активировался. Использовать такую отговорку, что можно восстановить файл(ы) только из вчерашнего бекапа — ну это не профессионализм. Вот в этом случае каждый системный администратор должен совершенствоваться и знать, что система Windows имеет такую важную настройку как использование «Теневых копий».
За основу функции/настройки теневого копирования отвечает служба теневого копирования (Volume Shadow Copies, VSS). Служба VSS применяется ко всему логическому диску и создаем снимок всех находящихся на нем файлов. После через запланированные промежутки времени отслеживает изменения и снова создает снимок.
Покажу на примере, как такая настройка «Теневые копии» включается и что она дает обычному пользователю.
Есть файловый сервер под управлением Windows Server 2016 Standard (на заметку: настройка «Теневые копии» работает и на Server 2008 R2,Server 2012/R2).
На заметку: логический диск с общими папками должен располагаться не на системном диске и не на диске с бекапами — это мое мнение.
На заметку: при использовании настройки «Теневые копии» следует под общие папки (файловый ресурс) заложить большой логический диск для хранения снимков. Если используется система виртуализации Hyper-V или ESXi то проблем с его расширением быть не должно и отрепетирована процедура его расширения.
На логическом диске D: создана папка с именем fileserver и настроена как общая с отключенным наследованием.
Запускаю оснастку «Управление компьютером»:
Win + R → control.exe — Просмотр: Категория — Мелкие значки — «Администрирование» – «Управление компьютером» – «Служебные программы» – и на «Общие папки» через правый клик мышью выбираю «Все задачи» – «Настроить теневые копии», выделяю том, в моем случае том D:\ и нажимаю «Настроить».
В данных настройках задается максимальный размер использования теневой копии, но не менее 300 МБ. По умолчанию хранилище теневых копий занимает 10 % от размера диска, а в снимках хранятся только изменения, а не сами изменившиеся файлы. Если места не достаточно, то при создании нового снимка старые снимки удаляют.
Как выбрать какой размер задать, прикинем, всего файлов под файловый ресурс 50 Gb, то я бы выбрал 50% от размера диска или: Максимальный размер: => не ограничен.
После нажимаю «Расписание» чтобы указать как часто будут делаться теневые копии. Если обратить внимание на рекомендацию, то не следует указывать создание одной теневой копии в час, вот только здесь уже каждый системный администратор должен все правильно взвесить как отразится потеря данных на продуктивной работе организации. Т.к. у меня жесткий диск под 2Tb, а данных всего 500Gb, то я делаю под себя следующее расписание:
Нажимаю «Дополнительно…»
- Дата начала: текущая дата
- Повторять задание: отмечаю галочкой
- Каждые: 2 часа
- Выполнять: в течение: 10 час
и получается расписание: Каждые 2 часа с 09.00 по 10 час начиная с текущей даты и каждый день.
В процессе эксплуатации я подкорректирую данное расписание.
и нажимаю кнопку Ok окна настройки расписания для тома D:\ – кнопку OK окна «Параметры» и выделив том D:\ нажимаю «Создать» тем самым создаю теневую копию текущего диска.
Из представленного выше скриншота видно, что текущий снимок занимаем целых 2.5G, так что об выделяемом размере под теневые копии каждый должен смотреть самостоятельно.
Также функцию теневые копии можно включить если перейти из оснастки «Управление компьютером» – «Запоминающие устройства» – «Управление дисками» – через правый клик по тому D: вызвать «Свойства» и перейдя во вкладку «Теневые копии».
Если сымитировать добавление файлов и последующее нажатие создания снимка можно будет видеть как изменяется размер и количество теневые копий в оснастке тома:
Итак копии имеются, объясняю пользователю что он может сделать сам на своем рабочем месте если что-то у него пропало.
Под Windows 10 Pro:
Шаг №1: Перейти на файловый ресурс
Шаг №2: По каталогу (или по файлу) внутри которого располагаются его файлы нажать на нем через правый клик мышью перейти на меню «Восстановить прежнюю версию» после чего на вкладку «Предыдущие версии».
Шаг №3: Тут он увидит сделанные снимки и открывая последний ориентируясь на дату и время будут открываться экраны с файлами/или файл за указанный временной промежуток при нажатии на кнопку «Открыть» или через правый клик мышью по нему «Изменить» ту версию где результаты его работы самые последние.
Шаг №4: После чтобы его восстановить нужно либо когда файл найден и открыт сделать «Файл» – «Сохранить как» и сохранить в ту директорию где он был затерев не актуальный или же нажать кнопку «Восстановить» и воспользоваться мастером восстановления:
Нажимаю «Восстановить» и получаю сообщение «Файл был успешно переведен в предыдущее состояние».
Шаг №5: Пользователь возвращается к редактированию на том месте файл(ы) которого были восстановлены.
Шаг №6: После этого момента пользователь становится чуть счастливее от того что теперь он сам может это делать и ему не надо писать заявку на helpdesk или подходить к Вам лично.
На заметку: Не советую включать теневые копии на системном диске, т. к. обновления, логирование и многое другое будет все заполоняется никому не нужными снимками и расходуемым местом. Возьмите за правило, один логический диск под систему, другой под данные.
На заметку: если выключить «Теневое копирование тома» в свойства диска, то все снимки будут удалены, а файлы будут оставлены как есть.
На заметку: Теневые копии — это не то же самое что и резервная копия, так что не советую полностью на них надеяться, ведь это всего лишь дельта изменения от первого и последующих снимков, а бекап — это наше все.
Итого, я для себя оформил те моменты с которыми сталкиваешься когда задействуешь «Теневые копии» для тома и что пользователь может сам сделать в случае проблемы с потерей файла(ов).
На этом я прощаюсь, если что будет интересного я дополню данную заметку, а пока собственно и всё, с уважением автор блога Олло Александр aka ekzorchik.
Здесь я описывал установку Windows гостя в Proxmox, теперь дошли руки до решения давних проблем, с которыми встретился.
Преамбула следующая:
Я настраивал кластер, количество виртуалок росло, настраивал репликацию между нодами и паралельно с этим накапливались маленькие проблемы.
Одной из них были проблемы со службой теневого копирования томов VSS
Проявлялось следующим образом:
- Bacula — резервное копирование начало себя вести достаточно непредсказуемо:
После перезагрузки сервера бэкапы вполне себе нормально работали, ровно до тех пор, пока сервером не начинали активно пользоваться, после этого задание висло и логи выглядели так:Покалякал, но смысл понятен - Другие Windows машины, тоже вели себя не вполне адекватно:
В журнале событий сыпались ошибки VSS:следующего содержания:
Как и с бакулой помогала перезагрузка
- Примечание
- Одна из попыток разобраться описывалась здесь.
Анализ проблемы показал, что она вызывается одновременным запуском двух провайдеров службы теневого копирования во время репликации виртуальной машины
- Службы Microsoft
- И службы Qemu
На скринах они в нормальном состоянии
Первым делом я начал с обновления гостевого агента до последней стабильной версии (virtio-win-0.1.141 -> virtio-win-0.1.171 ), после чего зависание служб прекратилось, но ошибки в журнале продолжали сыпаться
В итоге помогло следующее решение:
- Запускаем редактор реестра (Win-R, regedit)
- Идем в ветку реестра HKEY_LOCAL_MASHINE\SYSTEM\CurentControlSet\Servises\VSS\Providers\
и находим раздел QEMU Guest Agent VSS Provider - Делаем резервную копию этого раздела для ввосстановления в случае необходимости
Экспотрировать Называем интуитивно понятно - После чего удаляем ее
- Перезагружаемся и ждем
- 2 дня — в журнале чисто!
- P.S.
- Не считаю себя гуру Windows администрирования и возможно мой способ неверный, но главное, что работает!
Результат достигнут.