
As you know the Windows Server 2008 and Windows Server 2008 R2 are out of support on January 14th, 2020. Customer will need to upgrade their Windows Server 2008 and Windows Server 2008 R2 to a newer version of Windows Server or migrate these servers to Microsoft Azure and get three years of extended security support for free, which will give you more time to upgrade your servers, redeploy your apps or rearchitect your applications. If you want to have more information about how to migrate your servers to Azure, check out the Azure migration center. There are many ways you can migrate your server applications to a newer version of Windows Server. This blog post covers how you in-place upgrade Windows Server 2008 R2 to Windows Server 2019. You can find more information about Windows Server 2019 installations and upgrades on Microsoft Docs.
To help you with Windows Server upgrades, the Windows Server team created Windows Server Upgrade Center, which gives you step-by-step guidance for modernizing your datacenter.
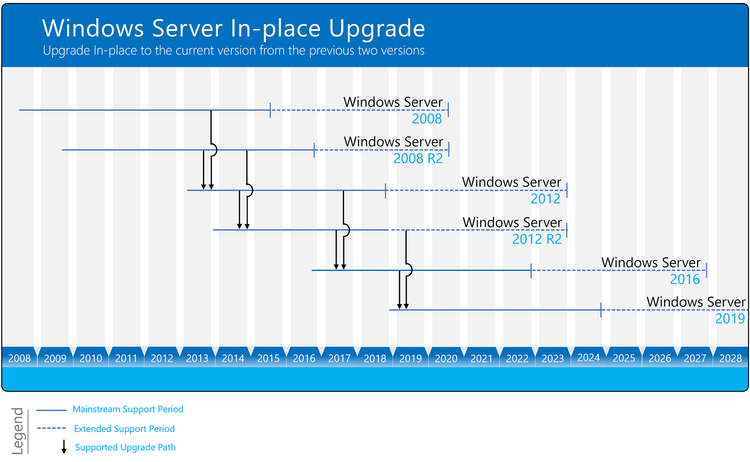
You can directly do an in-place upgrade to Windows Server 2019 from Windows Server 2016 and Windows Server 2012 R2. This means, to upgrade from Windows Server 2008 R2 to Windows Server 2019, you will have two consecutive upgrade processes.
- First, you upgrade Windows Server 2008 R2 to Windows Server 2012 R2
- Secondly, you will upgrade Windows Server 2012 R2 to Windows Server 2019
Windows Server Upgrade Paths Diagram
Not all server roles and applications are supported to be migrated in older versions of Windows Server. Read the specific documentation for your operating system scenario, for example upgrading roles to Windows Server 2016. As an alternative, you can also redeploy the applications on a fresh installation of Windows Server 2019.
Before you start in-place upgrade your servers, make sure you plan your upgrade and make sure you have all the information, to avoid surprises at the end of the migration. The Windows Server Upgrade Center helps you with a checklist which includes, for example, the following:
- What software and roles are installed on the server and are they supported and working with newer versions of Windows Server. I recommend doing a software inventory and check if the applications and roles are supported.
- Have some tests ready to check if the application still works after the upgrade. It is a good thing to run through these tests before the upgrade as well, so you can confirm everything is working correctly.
- If it is a physical server, do you have drivers and firmware updates for the new Windows Server version available?
- Think about backup software and antivirus, you might need to uninstall these during the update process and reinstall it after the upgrade is done.
- Make sure your server is up-to-date and fully patched before doing an in-place upgrade.
- Planning the timeframe for the upgrade. In-place upgrades take some time, make sure you have a long enough maintenance window planned. Also make sure you communicate the maintenance window, so users know that the application or service is not available.
- Make sure you have a backup of the server before you start the upgrade process, and make sure you can also restore from that specific backup.
- If possible, test the upgrade process with a non-production server.
- Make sure you have enough disk space for the upgrade.
- Gather your system information before the upgrade.
Before you start the upgrade process you should also collect the following system information. You can use the following to commands. Please save the output on another location.
mkdir C:\info
systeminfo > C:\info\systeminfo.txt
ipconfig /all > C:\info\ipconfig.txt
Please copy and save the systeminfo.txt and ipconfig.txt file on another system.
Windows Server Systeminfo
I know I have mentioned it before, make sure you have a backup you can restore of the server you are performing the in-place upgrade. Also, make sure that you are aware that the following upgrade processes cause downtime.
Insert the setup media for Windows Server 2012 R2 and start the setup.exe.
Click Install now.
If your server is connected to the internet, make sure you click on Go online to install updates now (recommended). This will download the latest updates to the installer.
Enter the Windows Server License Key for Windows Server 2012 R2 if needed. If you are not asked for the license key, you can skip that step.
Select the right Windows Server edition you want to install. Also make sure you select Server with a GUI or Server Core Installation, depending on your needs.
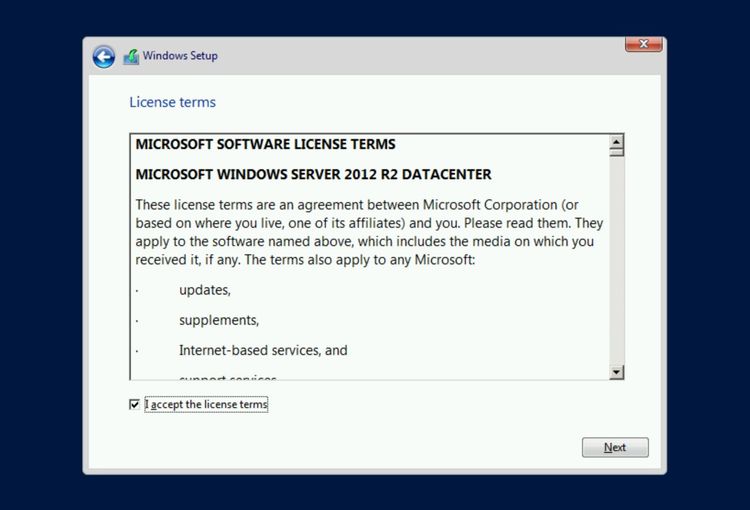
Read and accept the license terms. Select I accept the license terms.
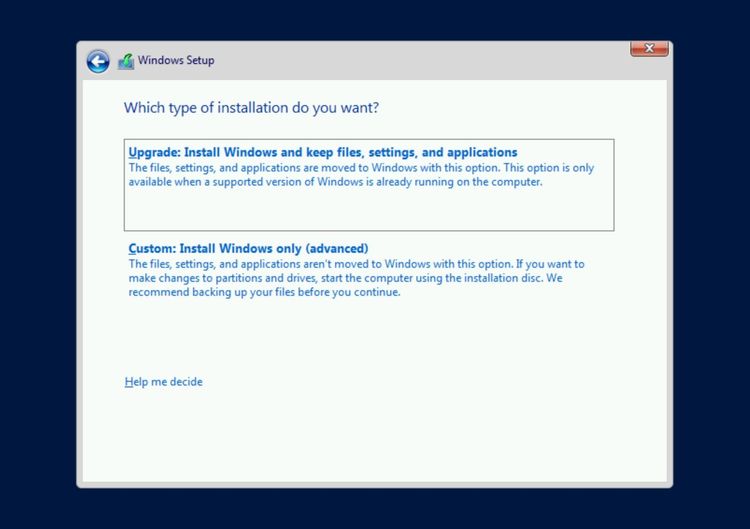
For an in-place upgrade select Upgrade: Install Windows and keep files, settings, and applications.
The setup will check the application compatibility and create a compatibility report.
Next, press Confirm to start upgrading Windows.
The setup will complete and automatically reboot. When the upgrade is done, you will see the Windows Server 2012 R2 logon screen.
After the upgrade to Windows Server 2012, log in and check if the server has been successfully upgraded. Make sure you test if the applications are running like expected and if users can access the application. Make sure that the IP and firewall configuration of your server still allows clients to access your system.
You can run the following command to see that you successfully upgraded to Windows Server 2012:
systeminfo
Windows Server 2012 Systeminfo
If there has been an issue with the upgrade, make a copy and zip the %SystemRoot%\Panther (usually C:\Windows\Panther) directory and contact support.
If everything works as expected, you can install the latest Windows Server 2012 R2 updates, and make sure your server is fully patched. Before you move to the Windows Server 2012 R2 to Windows Server 2019 upgrade, I also recommend that you create a backup of the server, in that case, you don’t lose the work you did from 2008 R2 to 2012 R2.
Insert the setup media for Windows Server 2019 and start the setup.exe.
Click Install now.
If your server is connected to the internet, make sure you click Download and install updates, drivers and optional features (recommended). This will download the latest updates to the installer.
Windows Server 2019 Update Installer
Enter the Windows Server License Key for Windows Server 2019 if needed. If you are not asked for the license key, you can skip that step.
Windows Server 2019 Product Key
Select the right Windows Server edition you want to install. Also make sure you select Windows Server 2019 Datacenter (Desktop Experience) or Windows Server 2019 Datacenter (Core), depending on your needs.
Windows Server 2019 select image edition
Read and accept the license terms. Select I accept the license terms.
Windows Server 2019 license terms
For an in-place upgrade, select Keep personal files and app and click Next.
Windows Server 2019 in-place upgrade
The setup will check the application compatibility and create a compatibility report.
Next, press Install to start upgrading Windows.
Windows Server 2019 in-place upgrade install
The setup will complete and automatically reboot. When the upgrade is done, you will see the Windows Server 2019 logon screen.
Windows Server 2019 Logon Screen 2
After the upgrade to Windows Server 2019, log in and check if the server has been successfully upgraded. Make sure you test if the applications are running like expected and if users can access the application. Make sure that the IP and firewall configuration of your server still allows clients to access your system.
You can run the following command to see that you successfully upgraded to Windows Server 2019:
systeminfo
If there has been an issue with the upgrade, make a copy and zip the %SystemRoot%\Panther (usually C:\Windows\Panther) directory and contact support.
If everything works as expected, you can install the latest Windows Server 2019 updates, and make sure your server is fully patched. I also recommend that you create a backup of the server; in that case, you don’t lose the work you did.
I also highly recommend that you have a look at Windows Containers to modernize your applications. Check out our full video here on Microsoft Channel 9:
There are many ways you can upgrade or migrate your applications, in-place upgrade is just one of them, and might not always fit. However, in some scenarios, it is the easiest way to get to a newer version of Windows Server. I hope this gives you an overview about how you can do in-place upgrades from Windows Server 2008 R2 to Windows Server 2019. If you have any questions or tips for the upgrades, leave a comment below.
Время на прочтение9 мин
Количество просмотров39K

Windows Server уже 27 лет и с каждым новым обновлением компания Microsoft всё больше совершенствует свое детище. С момента выхода Windows Server 2016 прошло уже 4 года, но с этим обновлением — компанией был выбран новый курс обновления, разделенный на 2 канала.
1. Знакомство с Windows Server 2019, нововведения и обновления

LTSC (Long-term servicing channel) — это первый канал обновлений и выхода релизов от Microsoft. Релизы, выпущенные в LTSC — выходят каждые 2-3 года и поддерживаются эти релизы достаточно долго. Если быть точнее, то LTSC-релизы поддерживаются компанией на протяжении 5 лет после выхода. Вы можете обзавестись и расширенной поддержкой релиза сроком еще на 5 лет после истечения срока действия основной.
Semi-Annual Channel — это промежуточные релизы, выходящие в свет каждые полгода. Такие релизы поддерживаются компанией на протяжении 6 месяцев, по истечению срока действия основной поддержки пользователь может обзавестись расширенной поддержкой еще на полтора года.
Спустя 3 года после релиза Windows Server 2016 и принятия решения о новой системе обновлений — на свет появился новый релиз — Windows Server 2019. Направления, в которых работали сотрудники компании Microsoft создавая этот продукт были следующими:
- Гибридное облако — целью было связать новый релиз с облачным хранилищем компании Microsoft Azure. Такое решения было принято из-за проблемы утери данных на физических носителях пользователей. Гибридное облако сделало возможным backup информации с серверов Microsoft с целью последующего восстановления.
- Безопасность системы и информации — одним из главных плюсов нового релиза стала обновленная система безопасности, с встроенными службами — затрудняющими проникновение и внедрение вредоносного ПО.
- Развитие контейнеров и поддержка Linux — контейнеры Microsoft пользовались популярностью после выхода Windows Server 2016, благодаря их использованию осуществлялась доставка приложений в различные системы. С релизом Windows Server 2019 компания не только усовершенствовала привычные пользователю контейнеры, но и добавила поддержку контейнеров Linux и подсистему Windows для Linux (WSL).
- Гиперконвергентная инфраструктура — благодаря такой инфраструктуре пользователь может собрать на одной архитектуре и вычисления и хранилище данных — без потерь в производительности. Такой подход обходится пользователю дешевле и не требует увеличения производительности для корректной работы.
Система управления так же получила дополнение в виде Windows Admin Center.
Это средство администрирования загружается локально и вносится в вашу инфраструктуру, благодаря чему у пользователя есть возможность управлять не только локальными и облачными версиями Windows Server, но и компьютерами под управлением Windows 10, а также кластерами и гиперконвергентными инфраструктурами.
2. Отличия между релизами Windows Server 2008 и Windows Server 2019

В течение жизненного цикла Windows Server обзавелась несколькими версиями. Самыми популярными релизами компании Microsoft признаны версии 2008 и 2019 года. Ниже представлена таблица, где собраны различия между этими двумя версиями:
Подводя итоги, можно с уверенностью сказать — Windows Server 2008 не может составить конкуренцию обновленному продукту Microsoft. Релиз 2008 года чересчур устарел, а из-за потери поддержки со стороны компании-создателя, старая версия в скором времени станет крайне нестабильной системой и, следовательно, не самым лучшим вариантом при выборе ОС для создания сервера.
Кстати, наша компания предлагает виртуальные серверы на Windows Server. Для автоматической установки доступны Windows Server 2012, 2016 или 2019, лицензия уже входит в стоимость!
3. Как выиграть время перед переходом на новую версию Windows Server

Период основной поддержки релиза Windows Server 2008 компания Microsoft прекратила еще в 2015 году. Единственным выходом для компаний, чья работа была завязана на этом релизе системы — стала расширенная программа поддержки, предполагающая под собой лишь обновления системы безопасности. Расширенная программа поддержки функционировала на протяжении 3-х лет и по окончанию ее работы у пользователей возник вопрос, как выиграть время перед переходом на новую версию ПО?
Есть несколько возможностей отсрочить переход, но самым безопасным способом “отсрочки” является предложенный самой компанией Microsoft вариант.
4. Облачное размещение данных в Azure для последующего переноса

Microsoft с окончанием периода поддержки WS 2008 получала сотни писем с вопросом, как же оттянуть переход системы на новую версию ПО, без риска для данных.
Компания не заставила пользователей долго ждать ответа и анонсировала переход на облачное хранилище Azure. Такой вариант подойдет, если в данный момент у вас нет возможности перейти на новое ПО — а деятельность завязана именно на WS 2008.
Вы можете перенести все данные на виртуальную систему и продолжить работу. Если хостинг уже оплачивается — компания предоставит все обновления системы безопасности бесплатно, ну а если нет — обновления системы придется докупить.
Перейдя на облачное хранилище Azure, можно оттянуть переход на обновленную систему. Таким образом будет достаточно времени собрать всю необходимую информацию для переноса данных на новую версию Windows Server.
5. Решения Veeam как один из вариантов для безопасного переноса данных

Еще один помощник для плавного перехода на новую версию ПО — это Veeam Backup & Replication.
Данная утилита способна копировать информацию любых объемов для последующего восстановления системы или переноса файлов в облако Azure. Помимо облака Azure есть также возможность воспользоваться облачным хранилищем компании Veeam.
Еще одним плюсом данного софта является то, что Veeam Backup & Replication поддерживает восстановление данных. Эта функция будет крайне полезна если вы часто сталкиваетесь со сбоями в системах. Моментальное восстановление данных в Veeam Backup & Replication стало возможным благодаря фирменной технологии компании- vPower.
6. Сравнение софта для копирования данных

Помимо Veeam Backup & Replication на рынке есть еще несколько программ для переноса данных. Для упрощения выбора подходящего ПО — мы собрали в таблице сходства и различия.
Vmware Data Recovery + vCenter —удобный пакет, обладающий сравнительно урезанным функционалом в сравнении со своими оппонентами, тем не менее, главным плюсом данного софта является возможность ввода Data Recovery в систему на любом этапе работы.
Veeam BackUp& Replication — один из лидеров среди программ для создания backup в VSphere. Данный софт обладает огромным потенциалом благодаря наличию различного рода дополнительных опций, которые пользователь может приобрести отдельно. Veeam BackUp& Replication способен похвастаться самым полным пакетом функций.
В Veeam BackUp& Replication имеется крайне удобная функция репликации данных. Эта функция будет полезна, если вы хотите не просто обезопасить свои данные от утери, но и проводить тесты на стрессоустойчивость системы с разными параметрами и в разных ситуациях — без риска для данных.
Большим преимуществом данного софта является возможность мгновенного восстановления системы в случае непредвиденных обстоятельств. Такая возможность станет очень полезна после перехода на новую ОС Windows Server 2019 и возобновления работы на новой операционной системе.
Symantec Backup Exec System Recovery — сильными сторонами данного софта можно назвать возможность восстановления системы c использованием другой аппаратной среды, наличие функции преобразования виртуальной среды в физическую, а также возможность интеллектуального копирования на USB носитель.
Для создания копии с файл-сервера необходима лишь одна лицензия — SSR, но для использования данного софта в полной мере и работы с разными базами и структурами пользователю потребуются агенты — которых необходимо будет приобрести отдельно.
Еще одна сильная сторона данного софта — и одно из его главных отличий — это способность агентов Symantec распознавать все типы серверов, в том числе и те, что созданы для определенных ОС. Благодаря этому программа копирует данные, с учетом особенностей каждого сервера.
Acronis Backup & Recovery 10 — данный софт использует технологии, схожие с технологиями Veeam BackUp& Replication. Продукт компании Acronis также способен на мгновенное восстановление системы в случае технических ошибок или неисправностей. Еще одним плюсом данного софта смело можно назвать цену — стоимость пакета Acronis Backup & Recovery 10 держится на средней отметке среди своих конкурентов и при этом предлагает схожий пакет функций. Благодаря своей стоимости и функционалу этот софт способен составить конкуренцию Veeam BackUp& Replication, ввиду схожих возможностей.
7. Порядок перехода на новую ОС

Microsoft предлагает несколько вариантов обновления операционной системы Windows Server.
Первый и, пожалуй, самый безопасный метод — “чистая установка”.
Под чистой установкой подразумевается создание новой среды на основе обновленной WS 2019. Пользователям придется перекодировать имеющиеся данные согласно требованиям операционной системы и продолжить работу уже на обновленной ОС. Это самый безопасный метод, но с точки зрения затраты времени, это несколько проблематично, а если у пользователя имеются обязательства перед сервисом или же организацией — такой метод не подойдет.
Второй вариант миграции на обновленную ОС — плавный переход от версии к версии. Для этого необходимо скопировать все данные и постепенно сменить версии ОС, начиная с WS 2012 и вплоть до относительно недавно вышедшей WS 2019.
Такой метод рекомендует сама Microsoft с целью минимизировать риски потери данных, а также, как выход для компаний, у которых в данный момент нет возможности перейти сразу на последнюю версию ОС.
Для копирования данных и последующего их хранения вы можете воспользоваться утилитами от лидеров ниши и впоследствии перенести их на облачное хранилище Azure.
Третий путь — небольшая хитрость, оставленная Microsoft на радость пользователям.
Для ускоренного перехода первоначально необходимо перейти на версию WS 2012 R2. Перенеся систему на W S2012 R2, можно без труда обновиться до последней доступной версии Windows Server 2019.
8. Безопасность каждого из вариантов миграции, положительные и отрицательные стороны

Миграция с одной ОС на другую — всегда ответственный шаг. Важно выбрать подходящий метод перехода. Ниже перечень сильных и слабых сторон каждого из методов:
Если разобраться детально и взвесить все факторы, можно смело сказать, что нет единого — самого безопасного и удобного метода перехода на новую ОС. Ввиду определенных параметров и обязательств каждого пользователя — выбор подходящего метода миграции остается за вами.

- Upgrade path
- Planning the Upgrade
- Collect system information
- Before proceeding with the In-place Upgrade
- Upgrade Windows Server 2008 R2 to Windows Server 2012 R2
- Post Upgrade to Windows Server 2012 R2
- Upgrade Windows Server 2012 R2 to Windows Server 2019
- Post Upgrade to Windows Server 2019
- Conclusion
As you know the Windows Server 2008 and Windows Server 2008 R2 are out of support on January 14th, 2020. Customer will need to upgrade their Windows Server 2008 and Windows Server 2008 R2 to a newer version of Windows Server or migrate these servers to Microsoft Azure and get three years of extended security support for free, which will give you more time to upgrade your servers, redeploy your apps or rearchitect your applications. If you want to have more information about how to migrate your servers to Azure, check out the Azure migration center. There are many ways you can migrate your server applications to a newer version of Windows Server. This blog post covers how you in-place upgrade Windows Server 2008 R2 to Windows Server 2019. You can find more information about Windows Server 2019 installations and upgrades on Microsoft Docs.
To help you with Windows Server upgrades, the Windows Server team created Windows Server Upgrade Center, which gives you step-by-step guidance for modernizing your datacenter.
You can directly do an in-place upgrade to Windows Server 2019 from Windows Server 2016 and Windows Server 2012 R2. This means, to upgrade from Windows Server 2008 R2 to Windows Server 2019, you will have two consecutive upgrade processes.
- First, you upgrade Windows Server 2008 R2 to Windows Server 2012 R2
- Secondly, you will upgrade Windows Server 2012 R2 to Windows Server 2019
Windows Server Upgrade Paths Diagram
Not all server roles and applications are supported to be migrated in older versions of Windows Server. Read the specific documentation for your operating system scenario, for example upgrading roles to Windows Server 2016. As an alternative, you can also redeploy the applications on a fresh installation of Windows Server 2019.
Before you start in-place upgrade your servers, make sure you plan your upgrade and make sure you have all the information, to avoid surprises at the end of the migration. The Windows Server Upgrade Center helps you with a checklist which includes, for example, the following:
- What software and roles are installed on the server and are they supported and working with newer versions of Windows Server. I recommend doing a software inventory and check if the applications and roles are supported.
- Have some tests ready to check if the application still works after the upgrade. It is a good thing to run through these tests before the upgrade as well, so you can confirm everything is working correctly.
- If it is a physical server, do you have drivers and firmware updates for the new Windows Server version available?
- Think about backup software and antivirus, you might need to uninstall these during the update process and reinstall it after the upgrade is done.
- Make sure your server is up-to-date and fully patched before doing an in-place upgrade.
- Planning the timeframe for the upgrade. In-place upgrades take some time, make sure you have a long enough maintenance window planned. Also make sure you communicate the maintenance window, so users know that the application or service is not available.
- Make sure you have a backup of the server before you start the upgrade process, and make sure you can also restore from that specific backup.
- If possible, test the upgrade process with a non-production server.
- Make sure you have enough disk space for the upgrade.
- Gather your system information before the upgrade.
Before you start the upgrade process you should also collect the following system information. You can use the following to commands. Please save the output on another location.
mkdir C:\info
systeminfo > C:\info\systeminfo.txt
ipconfig /all > C:\info\ipconfig.txt
Please copy and save the systeminfo.txt and ipconfig.txt file on another system.

Windows Server Systeminfo
I know I have mentioned it before, make sure you have a backup you can restore of the server you are performing the in-place upgrade. Also, make sure that you are aware that the following upgrade processes cause downtime.
Insert the setup media for Windows Server 2012 R2 and start the setup.exe.
Click Install now.

If your server is connected to the internet, make sure you click on Go online to install updates now (recommended). This will download the latest updates to the installer.

Enter the Windows Server License Key for Windows Server 2012 R2 if needed. If you are not asked for the license key, you can skip that step.

Select the right Windows Server edition you want to install. Also make sure you select Server with a GUI or Server Core Installation, depending on your needs.

Read and accept the license terms. Select I accept the license terms.
For an in-place upgrade select Upgrade: Install Windows and keep files, settings, and applications.
The setup will check the application compatibility and create a compatibility report.

Next, press Confirm to start upgrading Windows.

The setup will complete and automatically reboot. When the upgrade is done, you will see the Windows Server 2012 R2 logon screen.

After the upgrade to Windows Server 2012, log in and check if the server has been successfully upgraded. Make sure you test if the applications are running like expected and if users can access the application. Make sure that the IP and firewall configuration of your server still allows clients to access your system.
You can run the following command to see that you successfully upgraded to Windows Server 2012:
systeminfo

Windows Server 2012 Systeminfo
If there has been an issue with the upgrade, make a copy and zip the %SystemRoot%\Panther (usually C:\Windows\Panther) directory and contact support.
If everything works as expected, you can install the latest Windows Server 2012 R2 updates, and make sure your server is fully patched. Before you move to the Windows Server 2012 R2 to Windows Server 2019 upgrade, I also recommend that you create a backup of the server, in that case, you don’t lose the work you did from 2008 R2 to 2012 R2.
Insert the setup media for Windows Server 2019 and start the setup.exe.
Click Install now.
If your server is connected to the internet, make sure you click Download and install updates, drivers and optional features (recommended). This will download the latest updates to the installer.

Windows Server 2019 Update Installer
Enter the Windows Server License Key for Windows Server 2019 if needed. If you are not asked for the license key, you can skip that step.
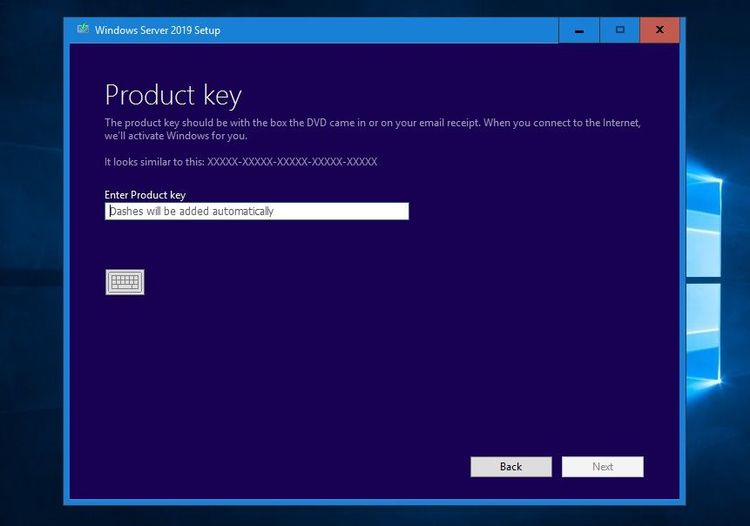
Windows Server 2019 Product Key
Select the right Windows Server edition you want to install. Also make sure you select Windows Server 2019 Datacenter (Desktop Experience) or Windows Server 2019 Datacenter (Core), depending on your needs.

Windows Server 2019 select image edition
Read and accept the license terms. Select I accept the license terms.

Windows Server 2019 license terms
For an in-place upgrade, select Keep personal files and app and click Next.

Windows Server 2019 in-place upgrade
The setup will check the application compatibility and create a compatibility report.
Next, press Install to start upgrading Windows.

Windows Server 2019 in-place upgrade install
The setup will complete and automatically reboot. When the upgrade is done, you will see the Windows Server 2019 logon screen.

Windows Server 2019 Logon Screen 2
After the upgrade to Windows Server 2019, log in and check if the server has been successfully upgraded. Make sure you test if the applications are running like expected and if users can access the application. Make sure that the IP and firewall configuration of your server still allows clients to access your system.
You can run the following command to see that you successfully upgraded to Windows Server 2019:
systeminfo
If there has been an issue with the upgrade, make a copy and zip the %SystemRoot%\Panther (usually C:\Windows\Panther) directory and contact support.
If everything works as expected, you can install the latest Windows Server 2019 updates, and make sure your server is fully patched. I also recommend that you create a backup of the server; in that case, you don’t lose the work you did.
I also highly recommend that you have a look at Windows Containers to modernize your applications. Check out our full video here on Microsoft Channel 9:
There are many ways you can upgrade or migrate your applications, in-place upgrade is just one of them, and might not always fit. However, in some scenarios, it is the easiest way to get to a newer version of Windows Server. I hope this gives you an overview about how you can do in-place upgrades from Windows Server 2008 R2 to Windows Server 2019. If you have any questions or tips for the upgrades, leave a comment below.
Related Posts
With the January 14, 2020 deadline rapidly approaching, getting off Windows Server 2008 and 2008 R2 should be a priority. The End of Life designation will now mean no more security updates or official support from Microsoft.
You can migrate to Azure to receive three more years of extended security updates, however, that may not be aligned with your business needs. What if you simply have a Windows Server 2008 or 2008 R2 member server that you want to “upgrade” to Windows Server 2019? Maybe it is simply a file server hosting some business-critical file shares and you need to retain the hostname, shares, and make sure all the permissions are intact?
Let’s take a look at how to Migrate Windows Server 2008 to 2019 with Storage Migration which is a great way to accomplish this task with Microsoft’s new Storage Migration Service. This is a great tool to use for this purpose as it will help you get up and running on the latest Windows Server 2019 platform in no time.
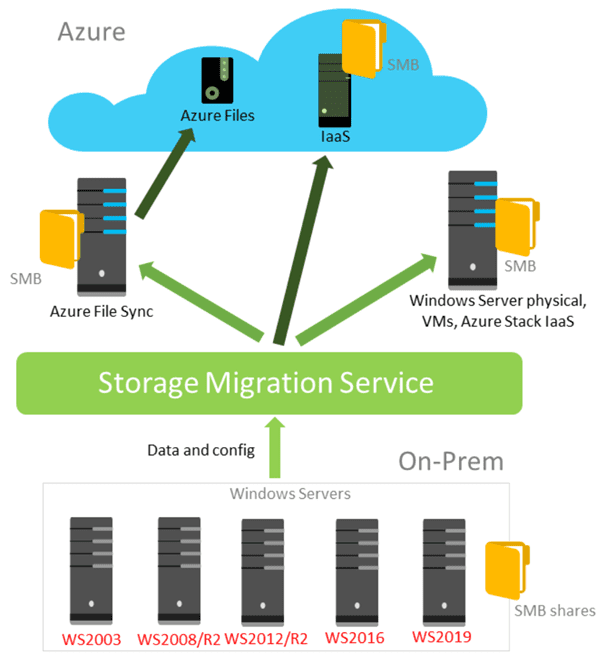
What is the Storage Migration Service?
The Storage Migration Service in case you have not heard about it makes it extremely easy to migrate from legacy versions of Windows Server to newer versions of the Windows Server and even Linux. It provides a graphical tool that steps you through all the heavy lifting of a server migration.
The great thing about the Storage Migration Service is that it inventories data on Windows and Linux servers and then transfers the data to a newer server or even up to Azure VMs. You can even use the Storage Migration Service to transfer the identity of your server so users can access data without any change to login scripts, mapped drives, links, paths, and so on.
You will notice below that Microsoft is supporting migrations all the way back to Server 2003! And, of course, Server 2008 and R2 are supported as a source for the Storage Migration Service process as well.
Storage Migration Service Requirements
Straight from Microsoft – to use Storage Migration Service, you need the following:
- A source server or failover cluster to migrate files and data from
- A destination server running Windows Server 2019 (clustered or standalone) to migrate to. Windows Server 2016 and Windows Server 2012 R2 work as well but are around 50% slower
- An orchestrator server running Windows Server 2019 to manage the migration
If you’re migrating only a few servers and one of the servers is running Windows Server 2019, you can use that as the orchestrator. If you’re migrating more servers, we recommend using a separate orchestrator server. - A PC or server running Windows Admin Center to run the Storage Migration Service user interface, unless you prefer using PowerShell to manage the migration. The Windows Admin Center and Windows Server 2019 version must both be at least version 1809.
To get started, you will need to meet the prerequisites above. I have already got a Windows 2008 R2 Server test box up and running as well as a Windows Server 2019 server that will become the target for the migration using Storage Migration.
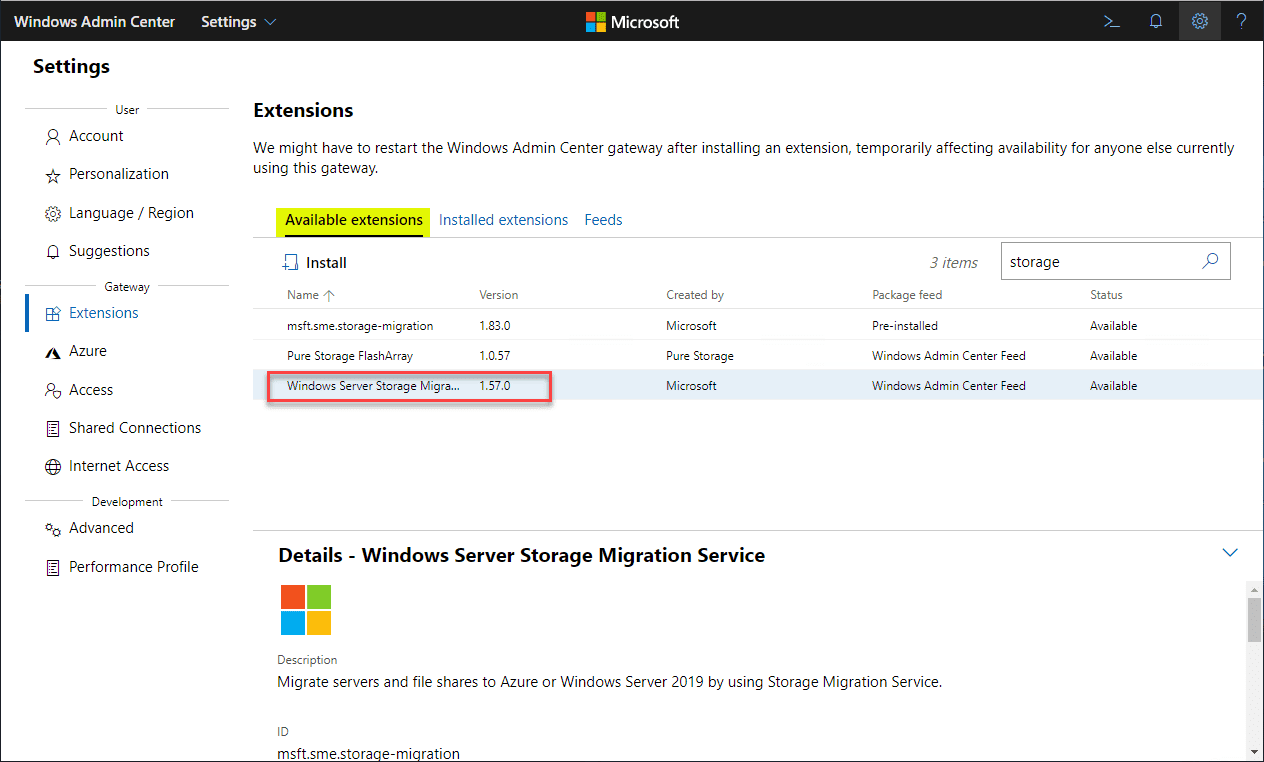
I am using an intermediary Windows Server 2019 box that is running Windows Admin Center 1910 with the Windows Server Storage Migration Service extension installed.
Highlight the service in Available Extensions and then click Install.
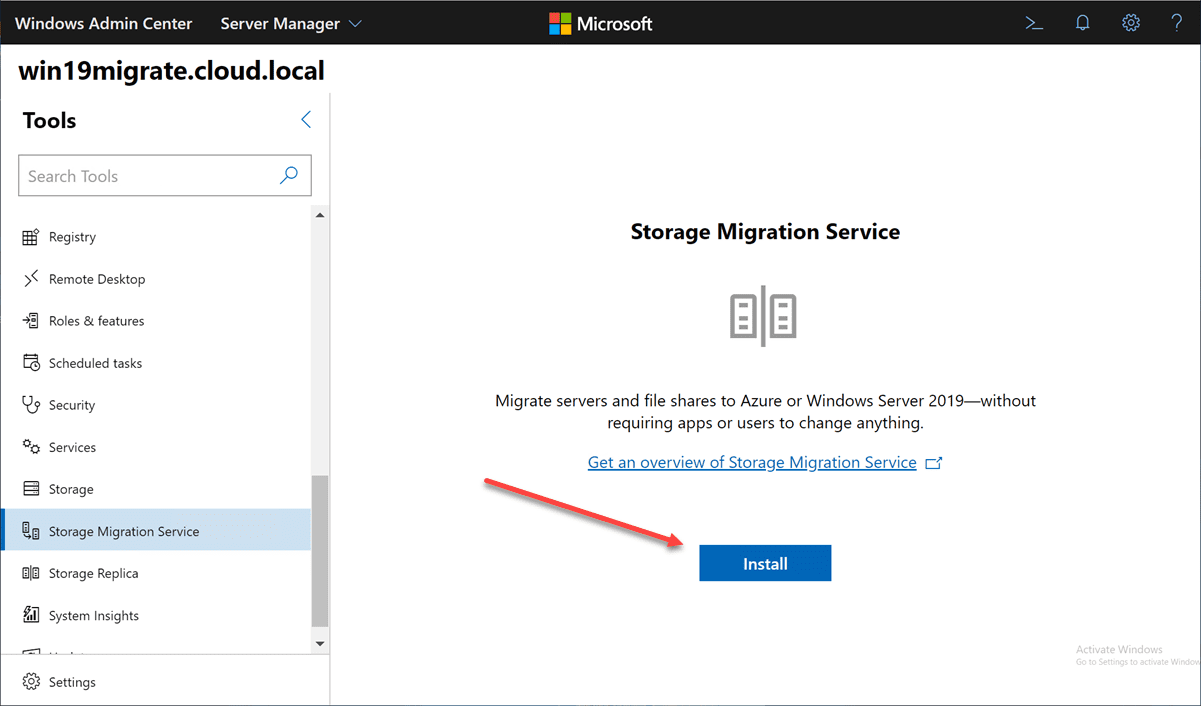
Once you have the extension installed, you navigate to Storage Migration Service and click Install.
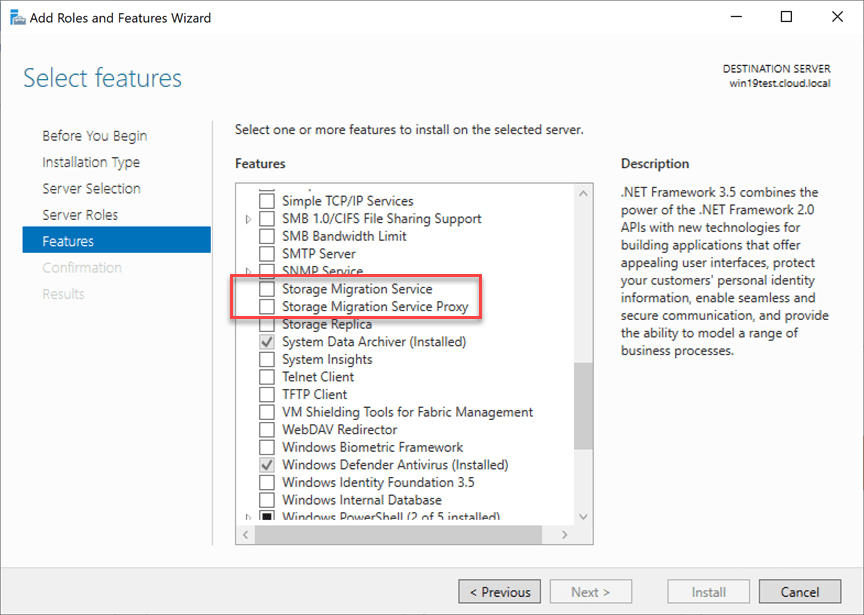
When you click the Install button, the services that get installed behind the scenes are the following:
- Storage Migration Service
- Storage Migration Service Proxy
Windows Admin Center begins setting up Storage Migration Service (installing the Windows features needed).
After it is installed, you get a nice overview Window detailing the steps in the Storage Migration Service process.
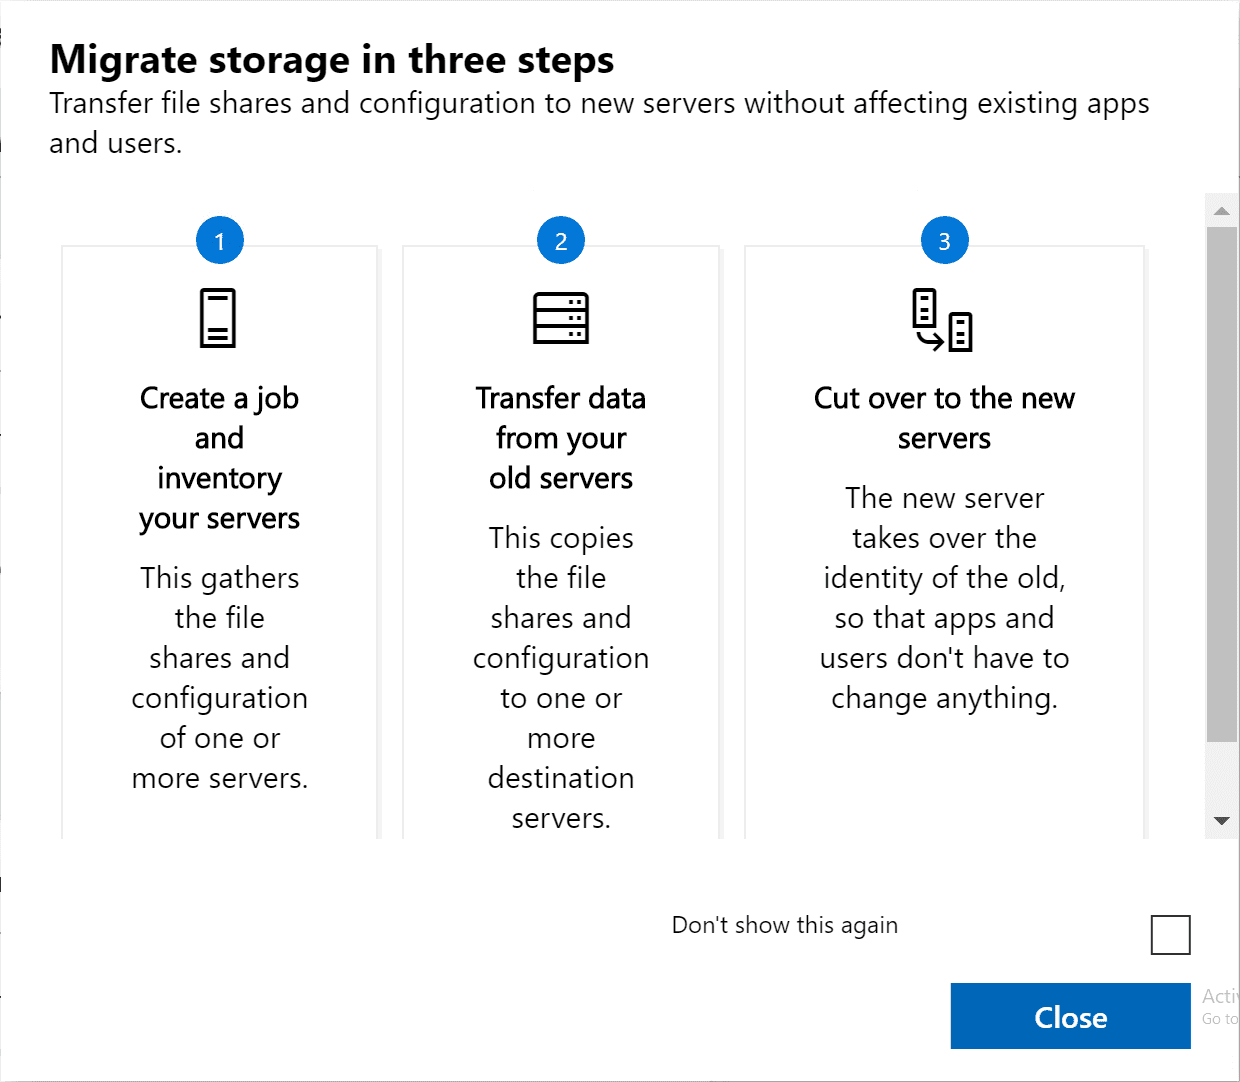
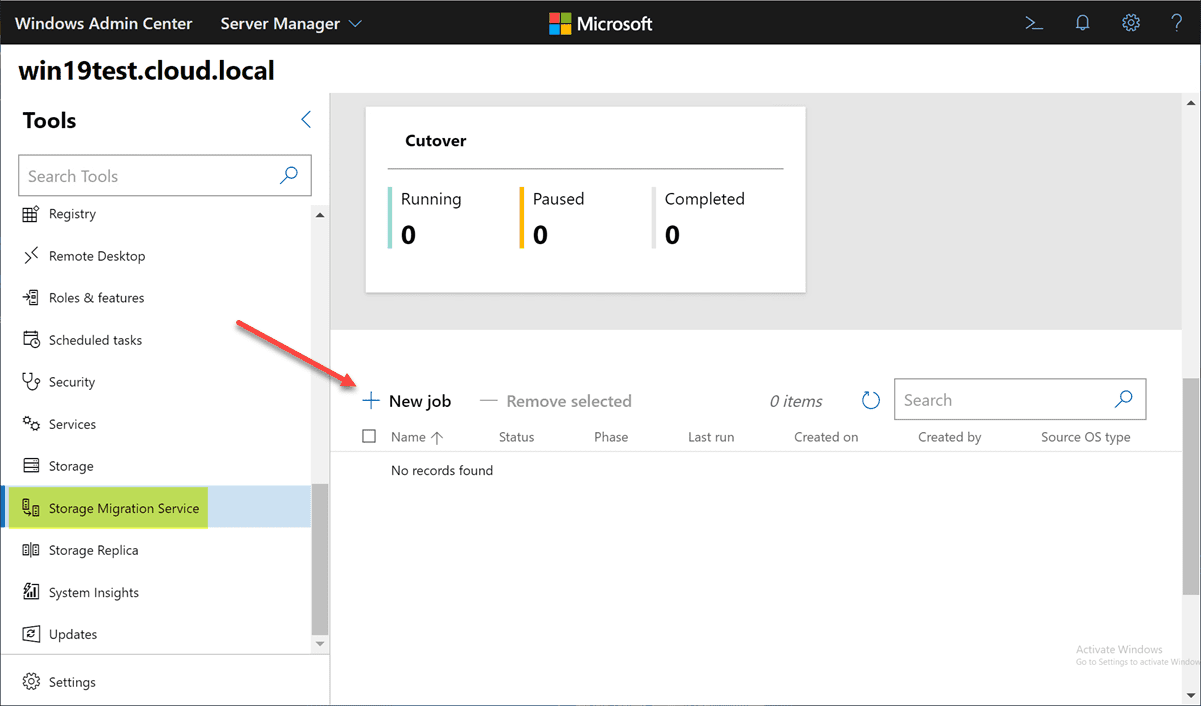
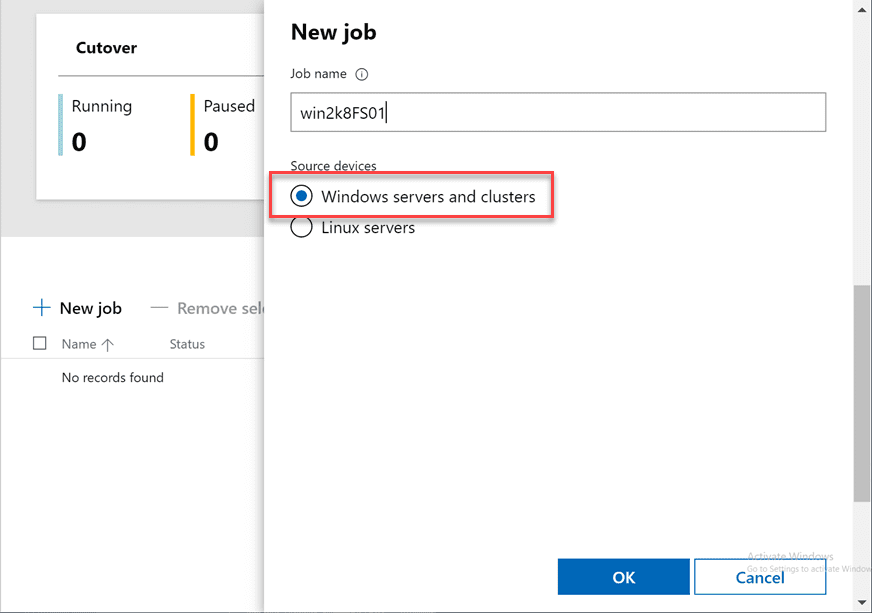
Beginning the Storage Migration of Windows Server 2008 to 2019 by clicking the New Job button.
Select the type of server you are going to migrate. Here I am choosing Windows servers and clusters.
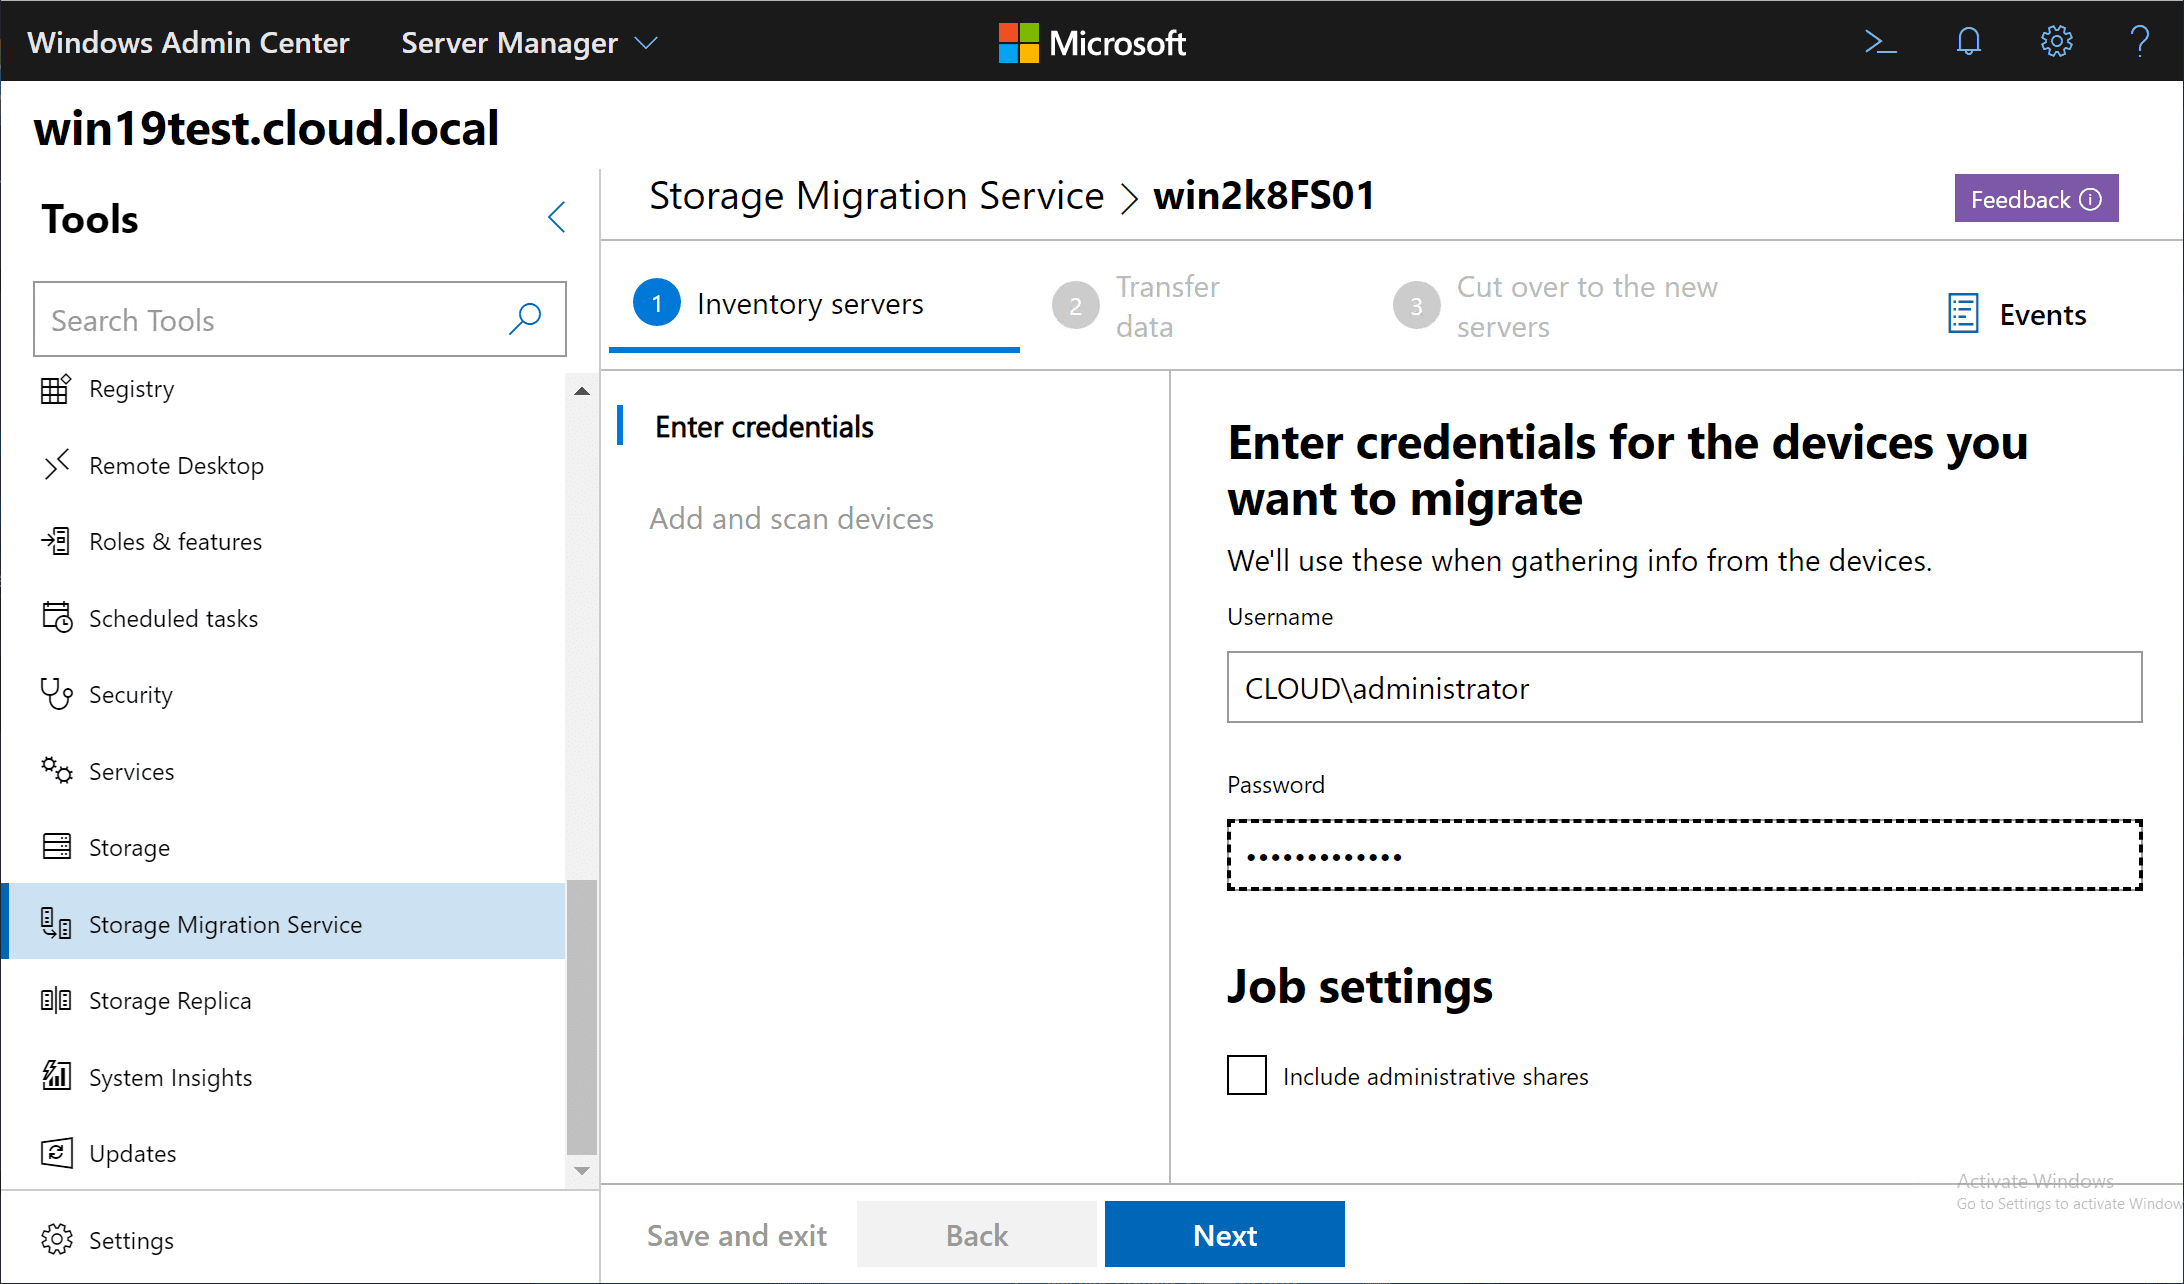
Enter the credentials for the devices you want to migrate.
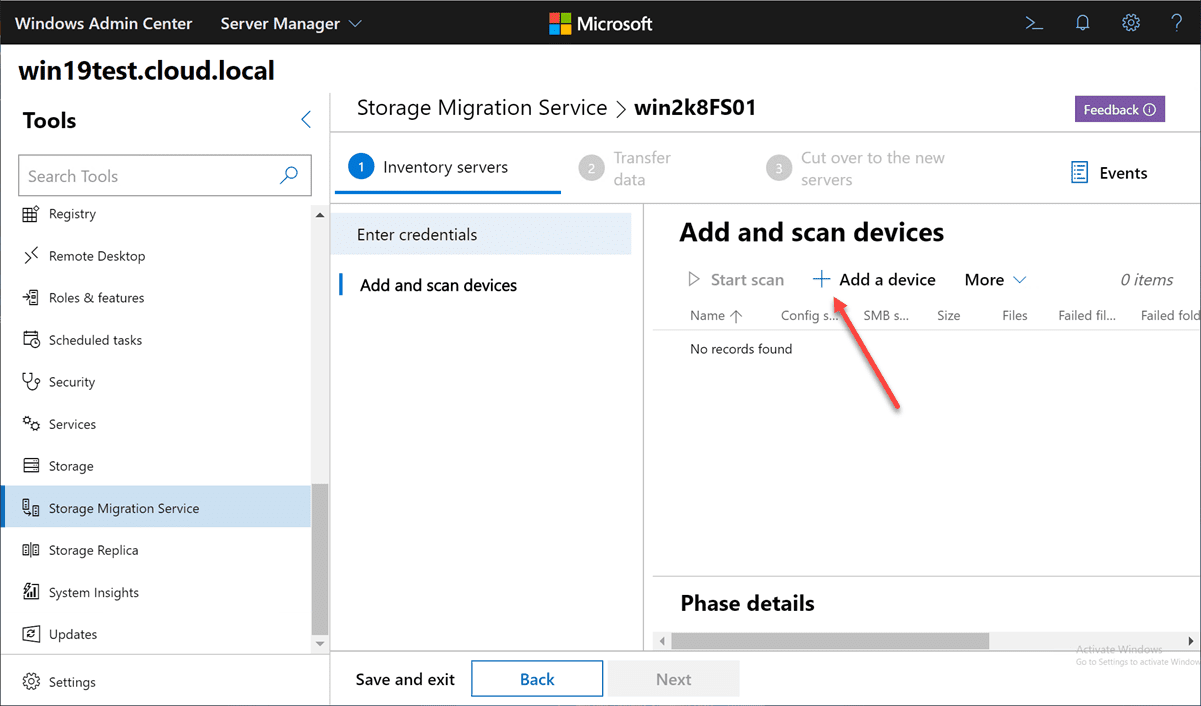
Next, we need to Add a device which equates to entering the name of the Windows Server 2008 R2 server.
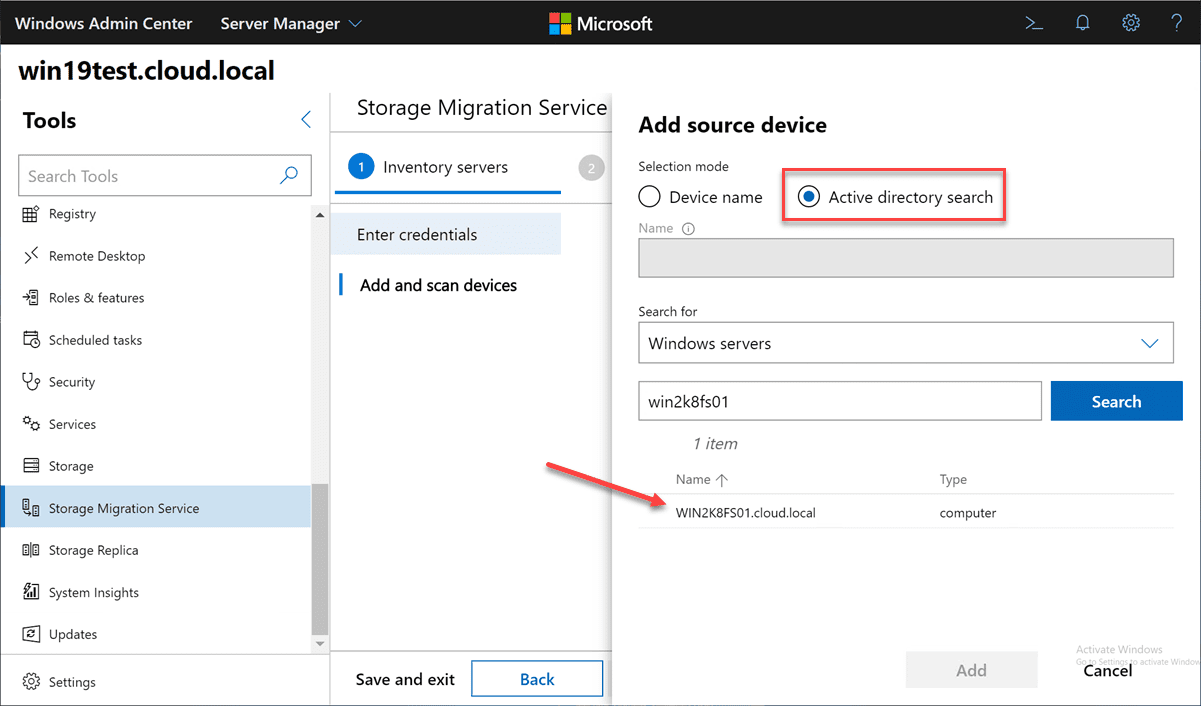
You can also do the Active directory search option. Fill in the NETBIOS name and just click Search. Click the server name returned and then Add.
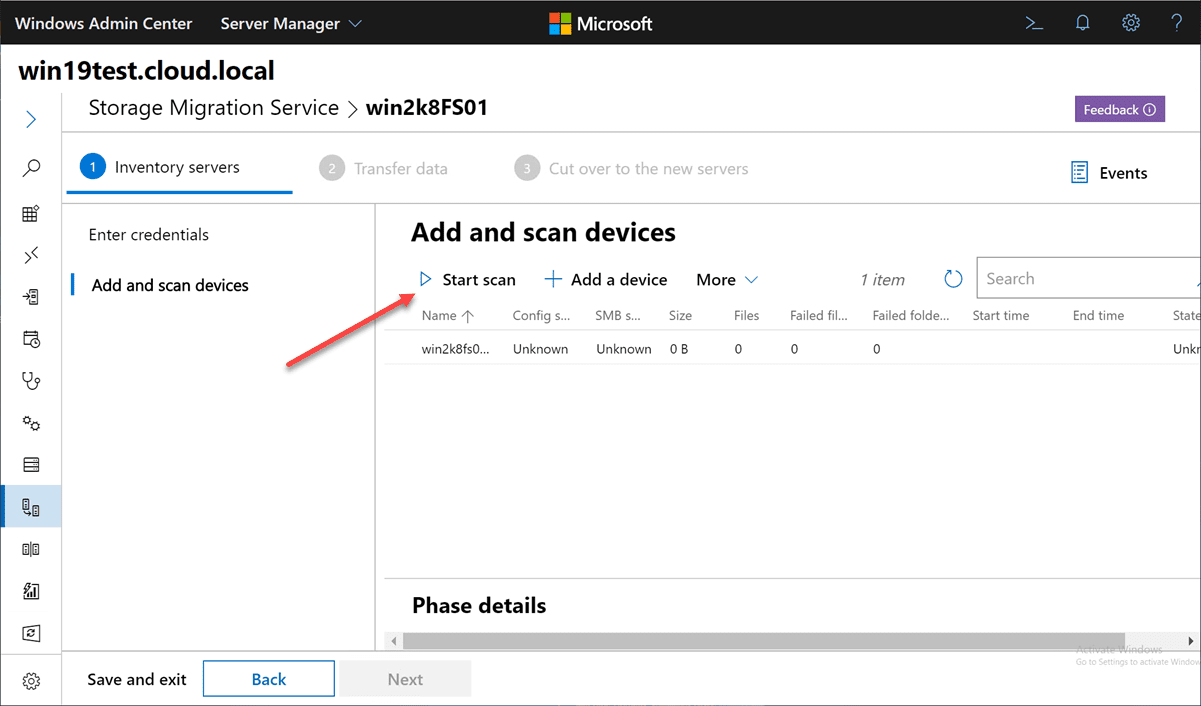
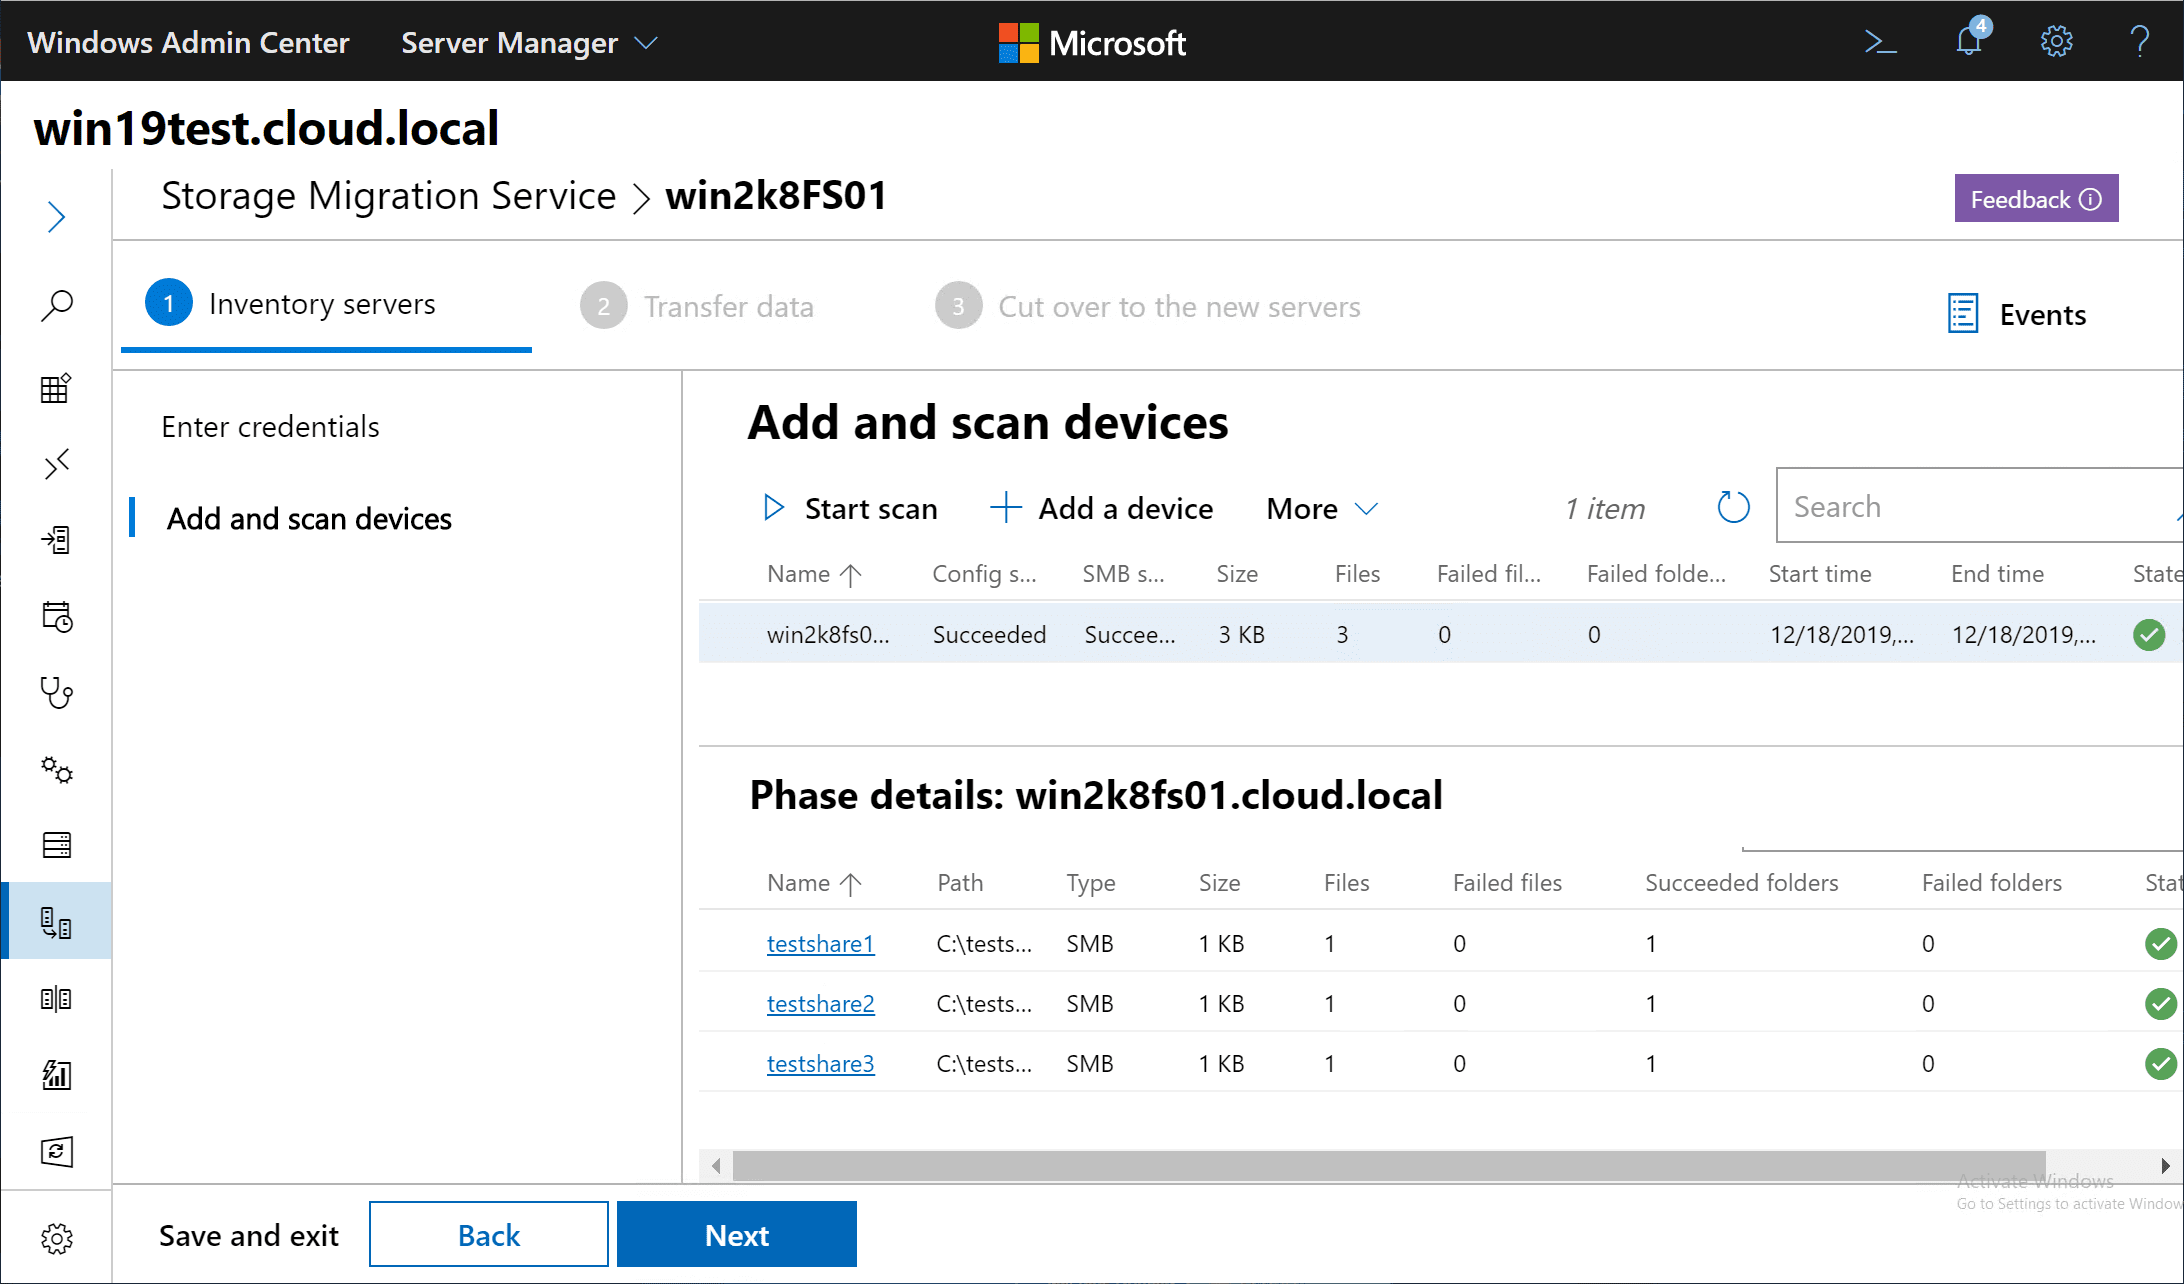
Start a scan of the source Windows Server 2008 server.
The scan returns the shares and files that were found.
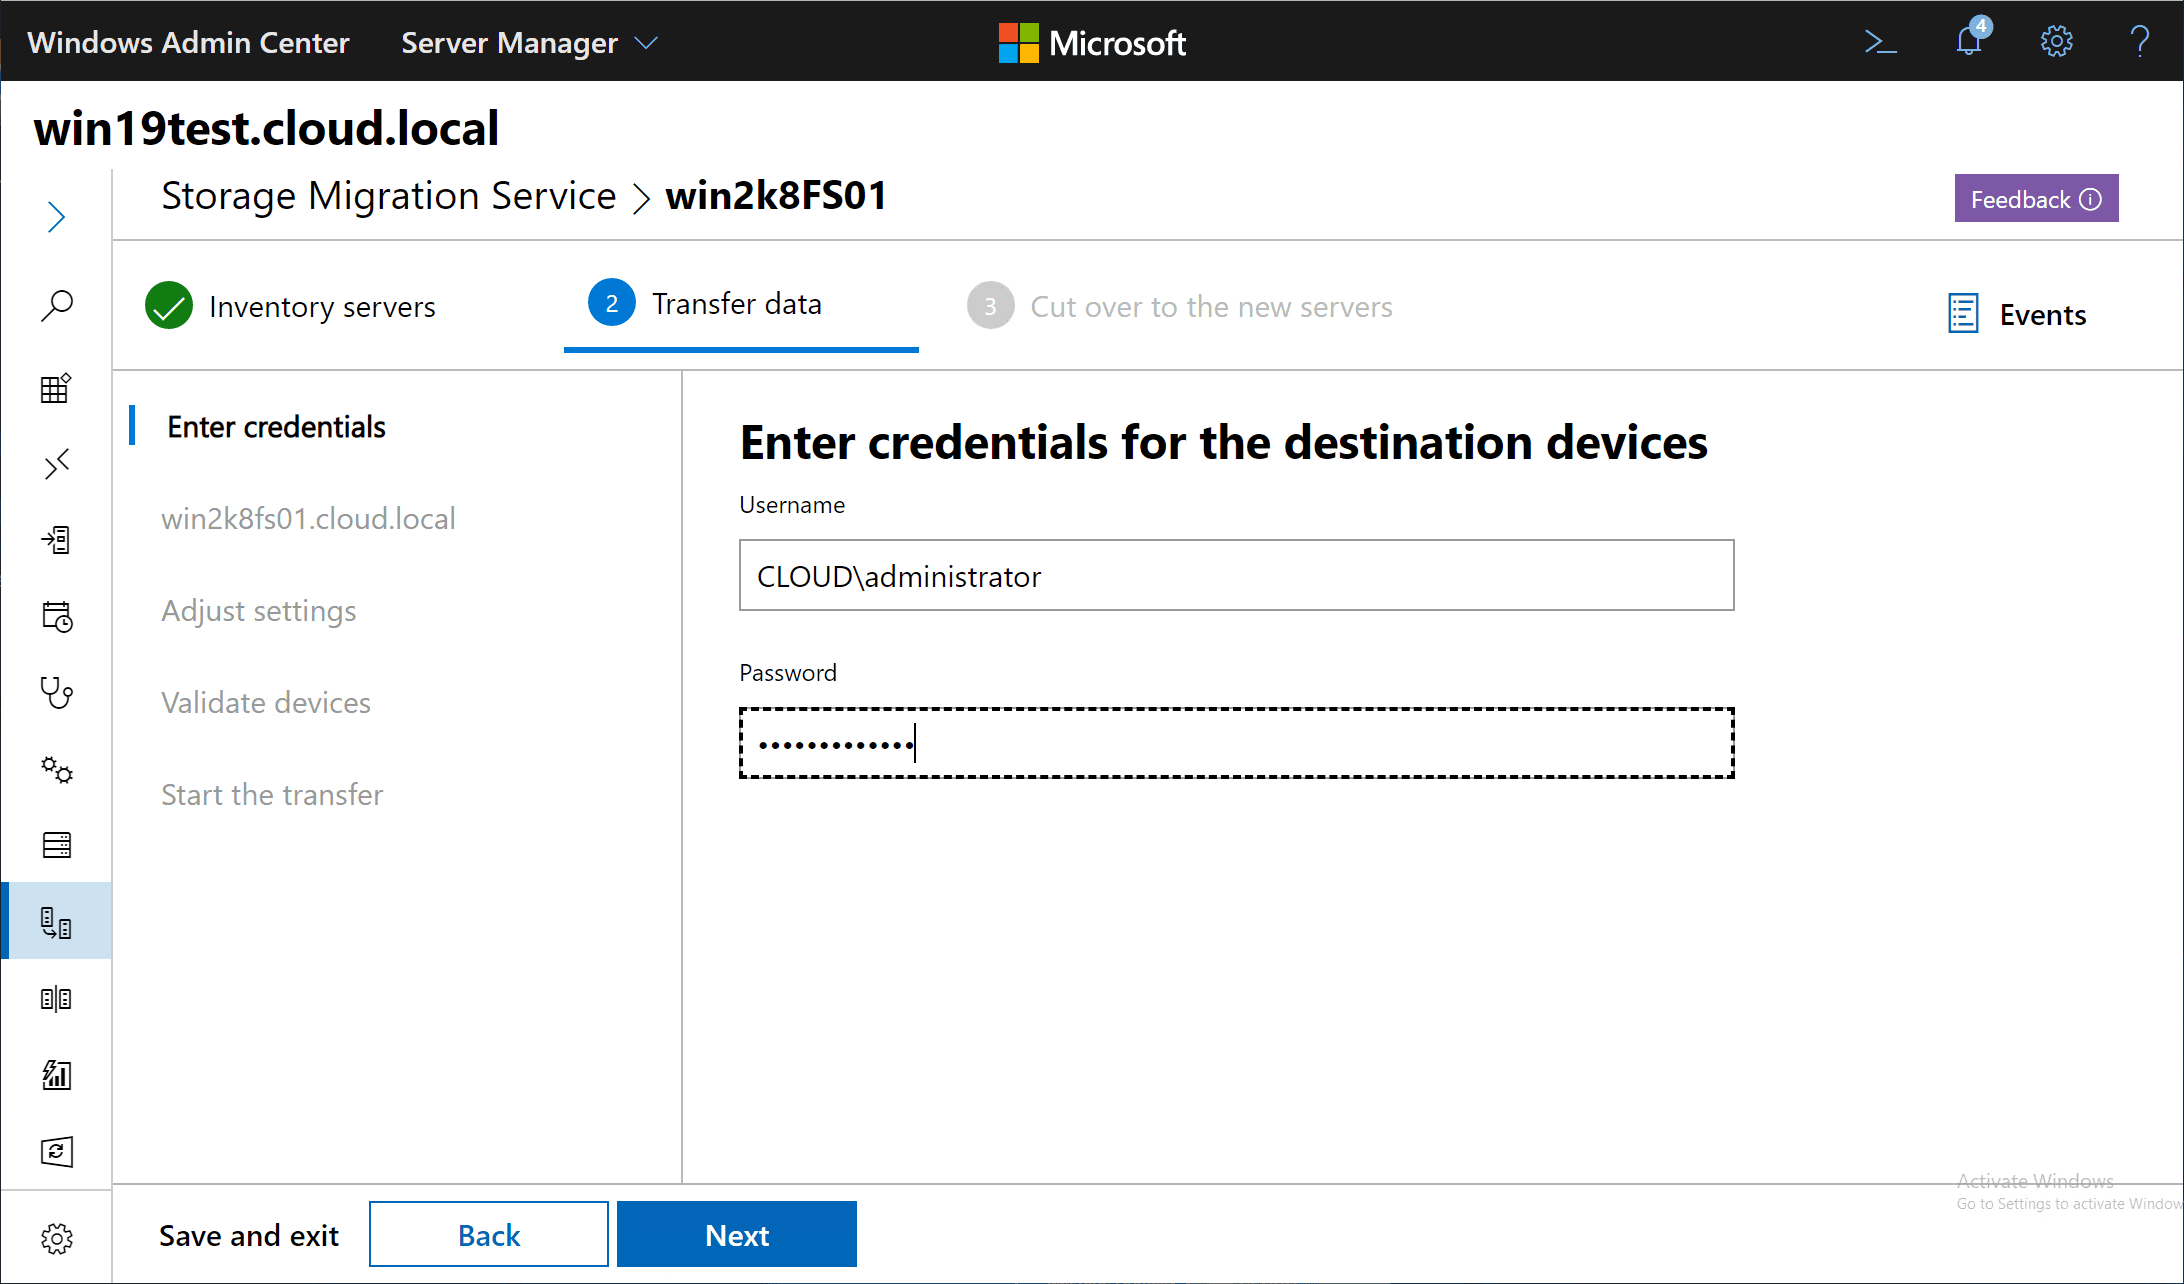
This takes us to the Transfer Data phase. Enter the credentials for the destination devices. Click Next.
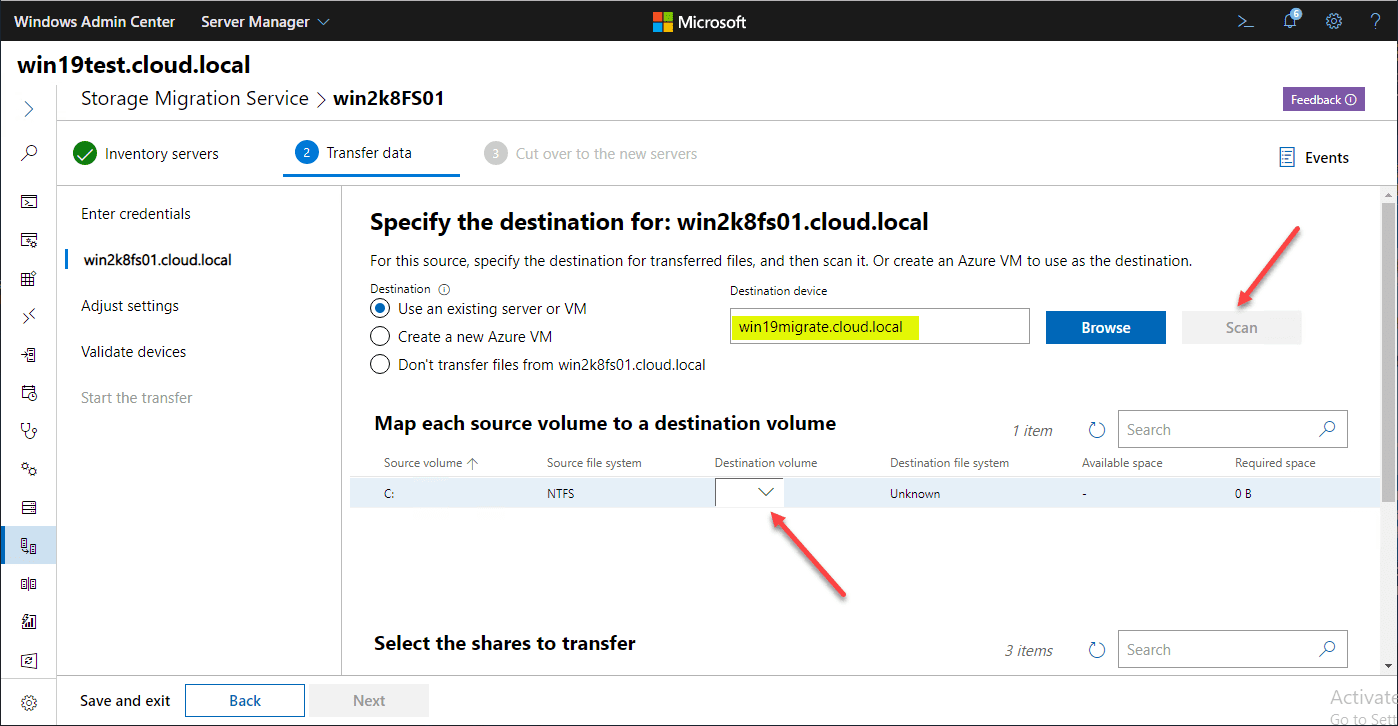
Specify the destination server name. Even though this is going to assume the identity of the Windows Server 2008 machine, you need to give the name of the server as it is currently. Click Scan once you enter the name.
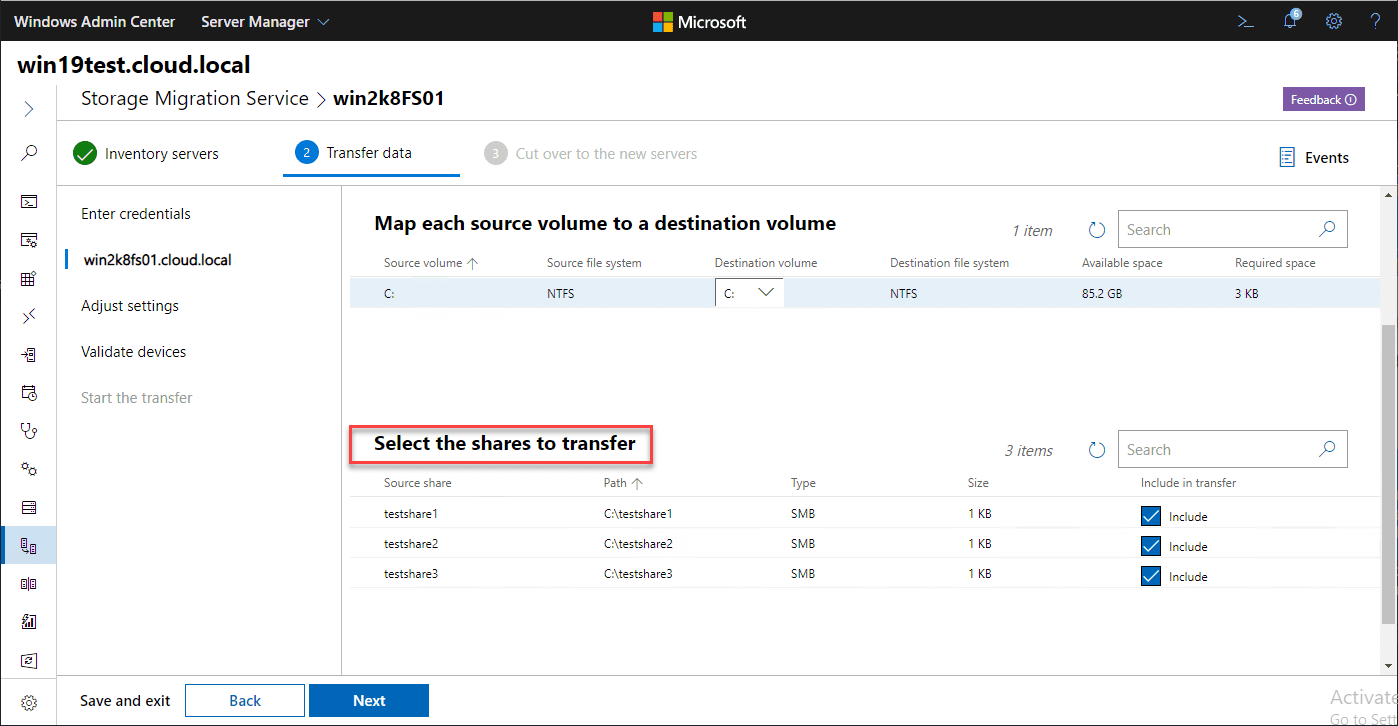
Select or deselect the shares you want to migrate or not migrate.
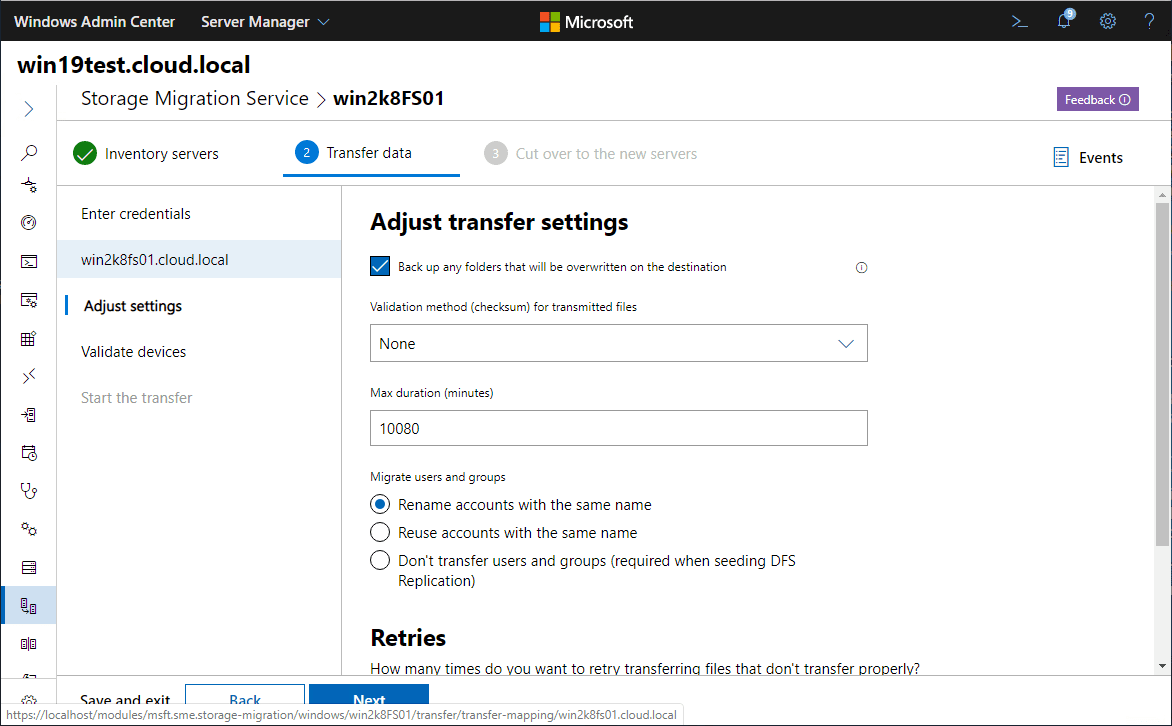
Adjust the transfer settings as needed. You can choose the validation method, duration of transfer, as well as the number of retries you want to tolerate.
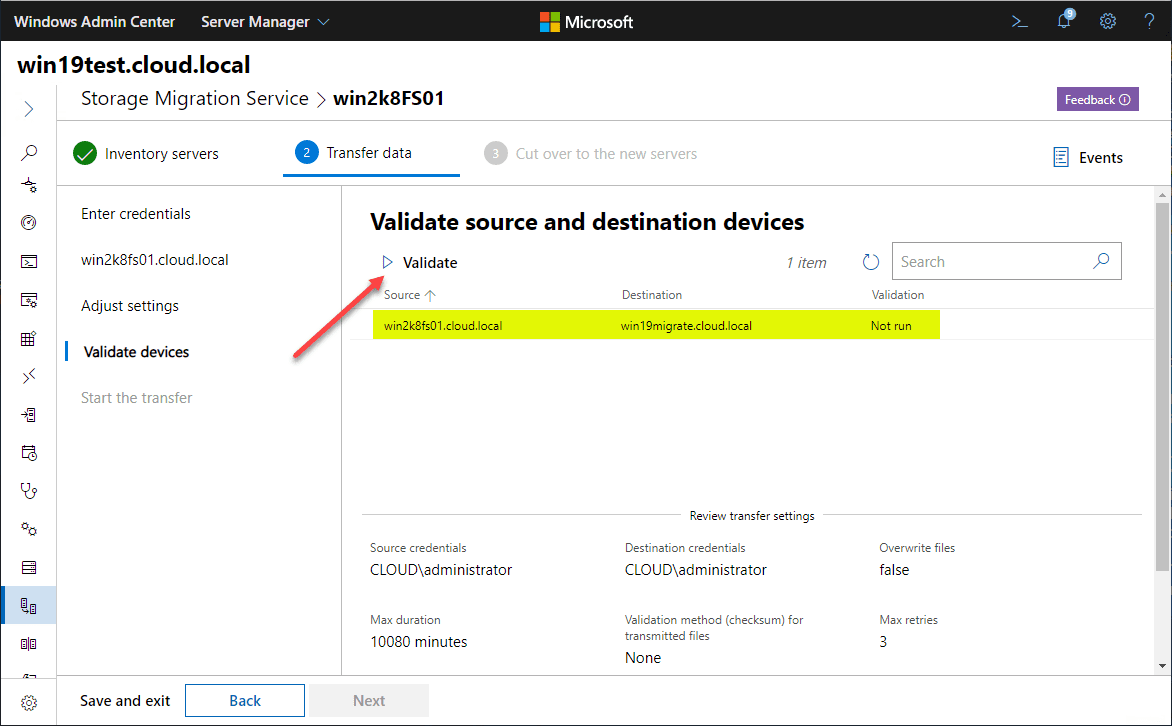
Next, click the Validate button.
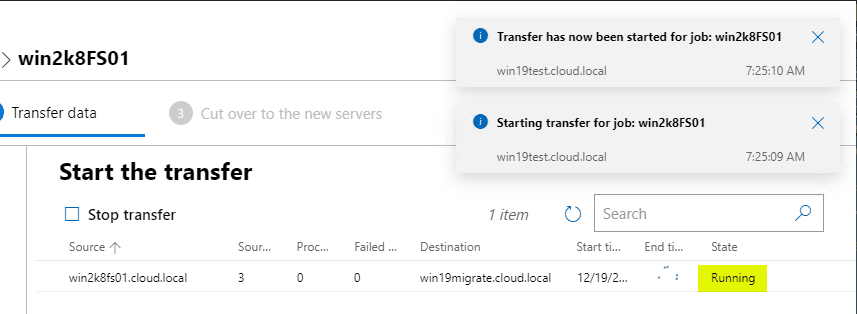
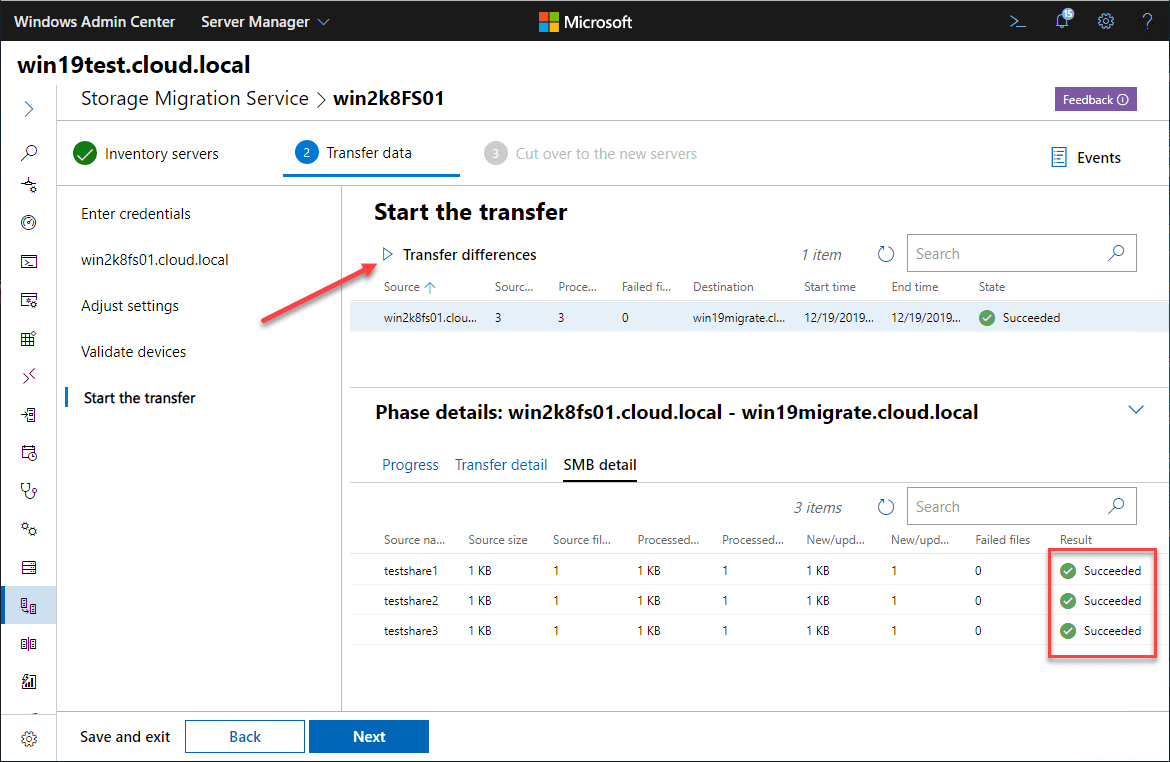
Begin the transfer by clicking the Start transfer button.
I ran into an error similar to what I saw with Windows Server 2003 where files had no size once transferred and the transfer finished with errors.
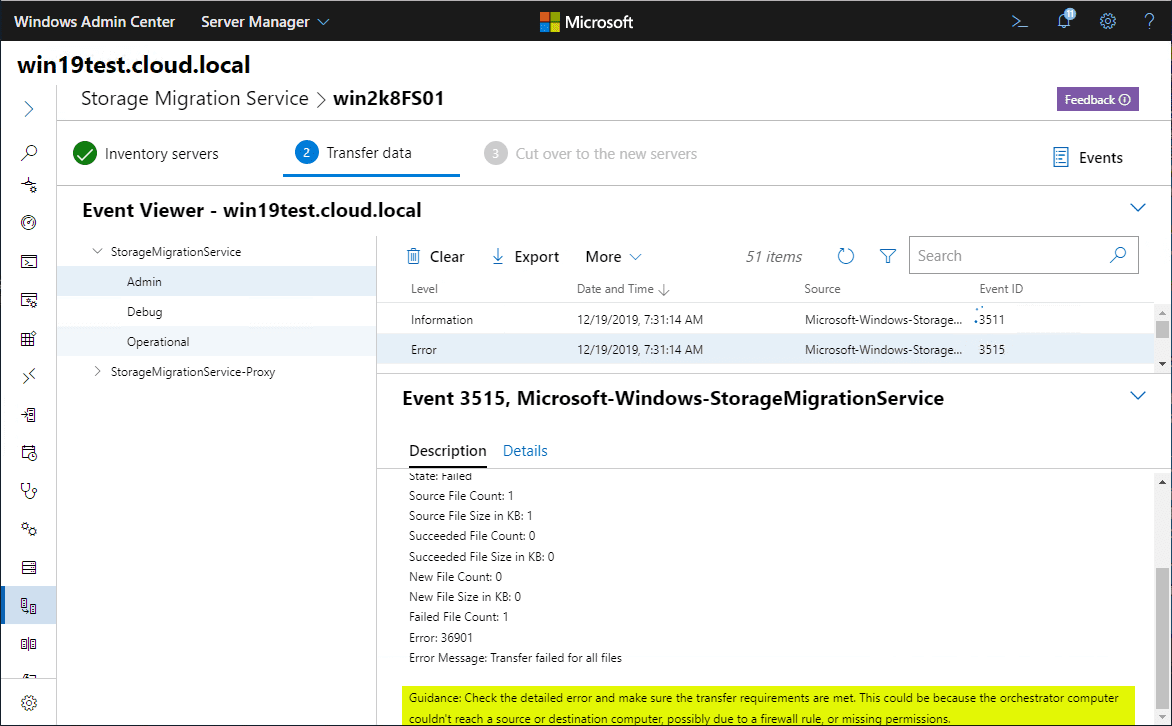
After getting the error, I found the following documented in the Storage Migration Service troubleshooting KB found here: https://docs.microsoft.com/en-us/windows-server/storage/storage-migration-service/known-issues
Error “Couldn’t transfer storage on any of the endpoints” when transferring from Windows Server 2008 R2
When attempting to transfer data from a Windows Server 2008 R2 source computer, no data transfers and you receive error:
Couldn’t transfer storage on any of the endpoints. 0x9044
This error is expected if your Windows Server 2008 R2 computer isn’t fully patched with all Critical and Important updates from Windows Update. Irrespective of Storage Migration Service, we always recommend patching a Windows Server 2008 R2 computer for security purposes, as that operating system doesn’t contain the security improvements of newer versions of Windows Server.
So, I ran all the available updates, which were quite a few.

Once you have ran the transfer once, the button changes to Transfer differences. I clicked this button to transfer again. This time it Succeeded!
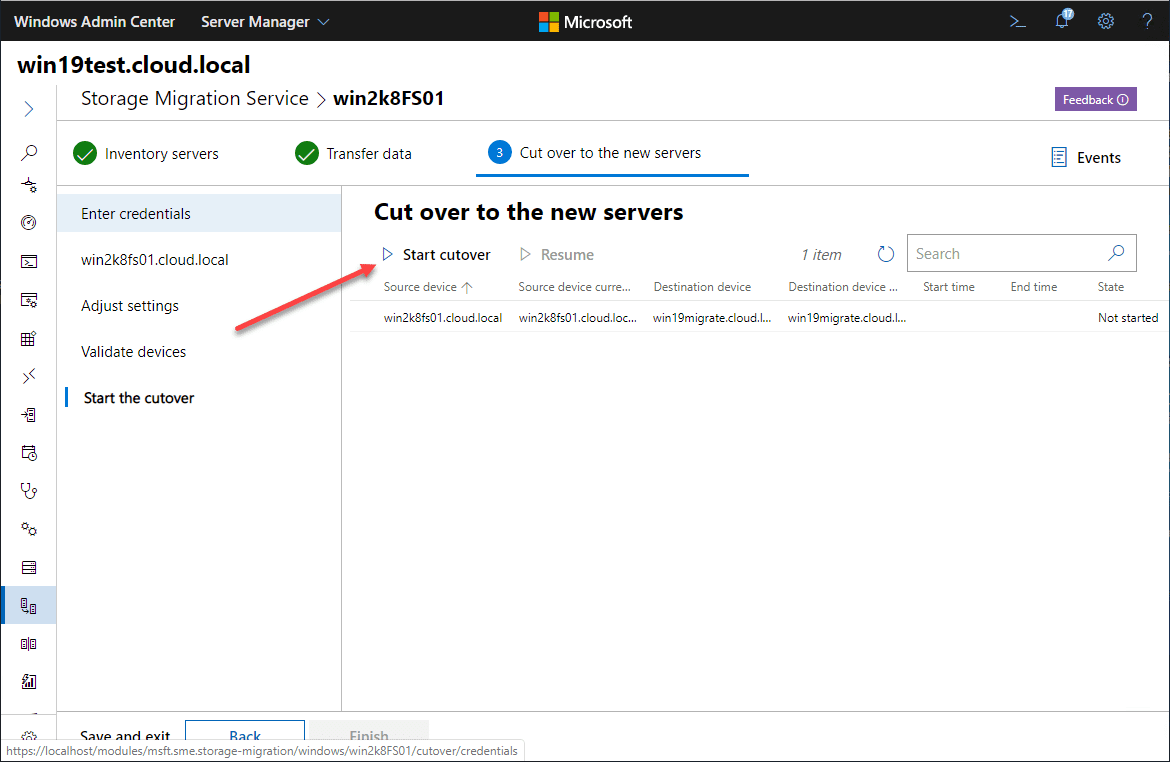
Now that the data is transferred over, it is just a matter of performing the cutover. This is the process that assumes identity.
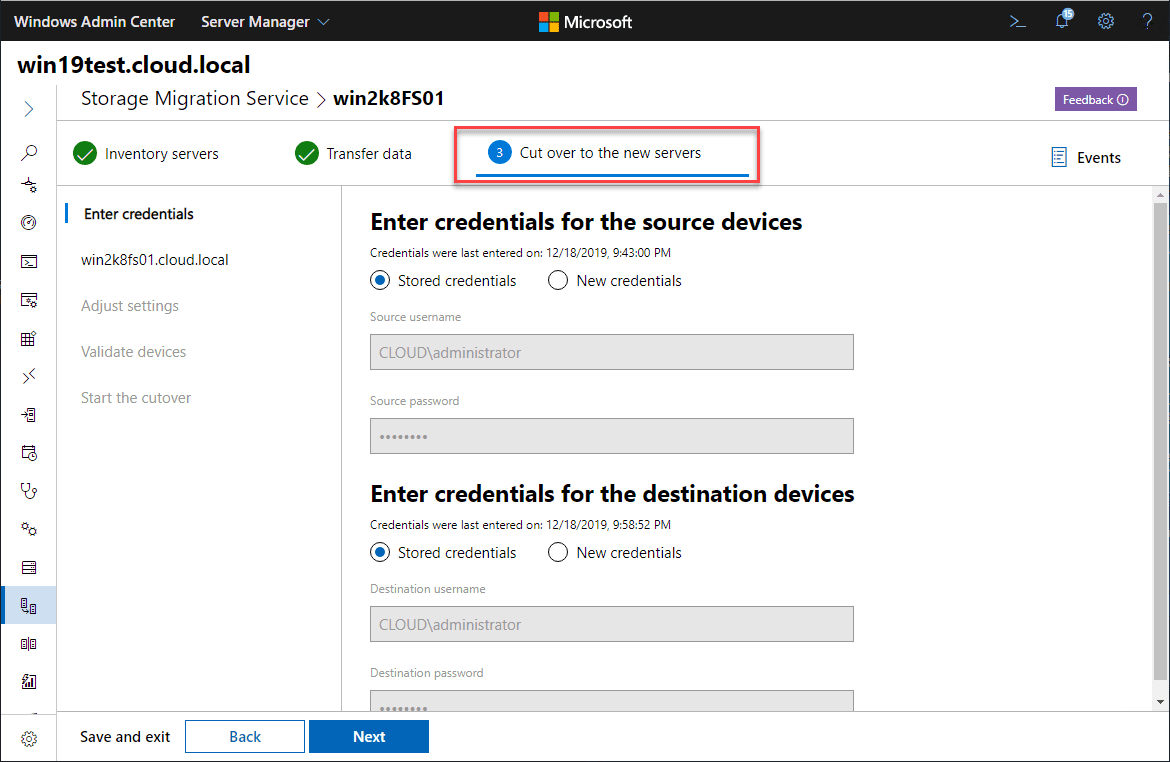
Choose the source and destination network settings as well as how you want the rename of the source Windows Server 2008 R2 server to happen.

You can adjust timeout settings as well as AD credentials.

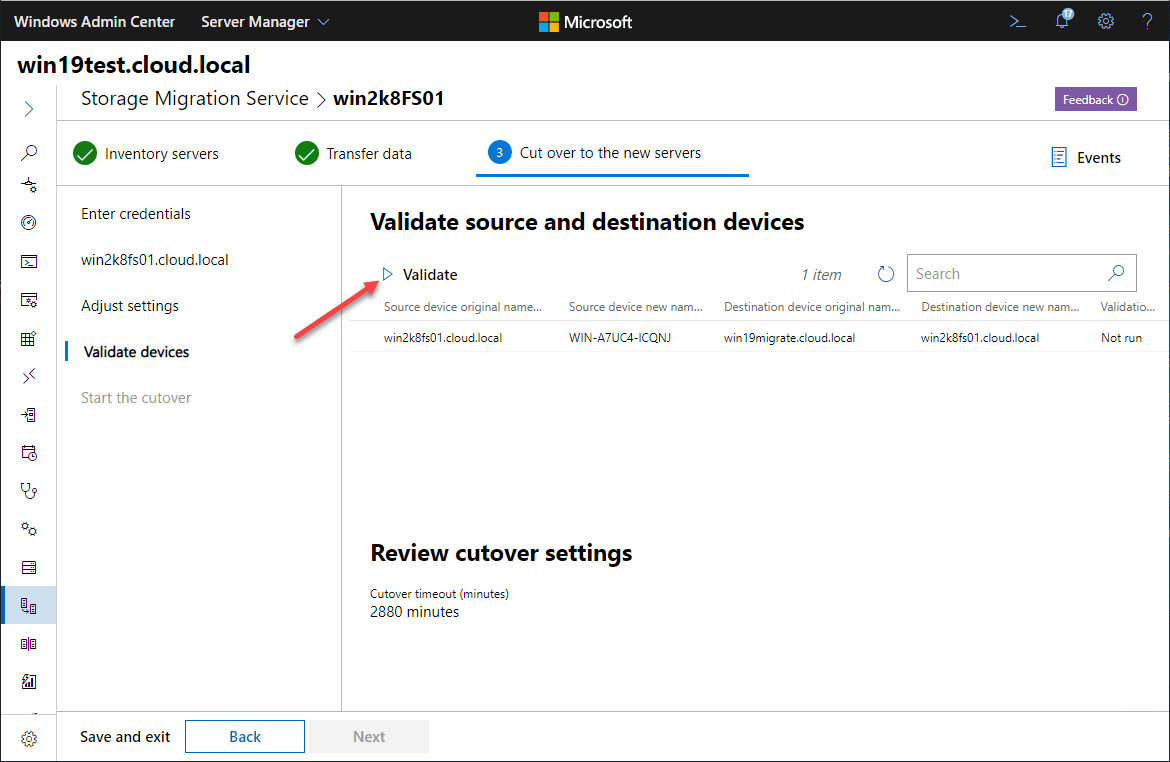
Validate the source and destination computers which in our case is going to migrate Windows Server 2008 R2 to 2019.
Validation passed, ready to perform the cutover.
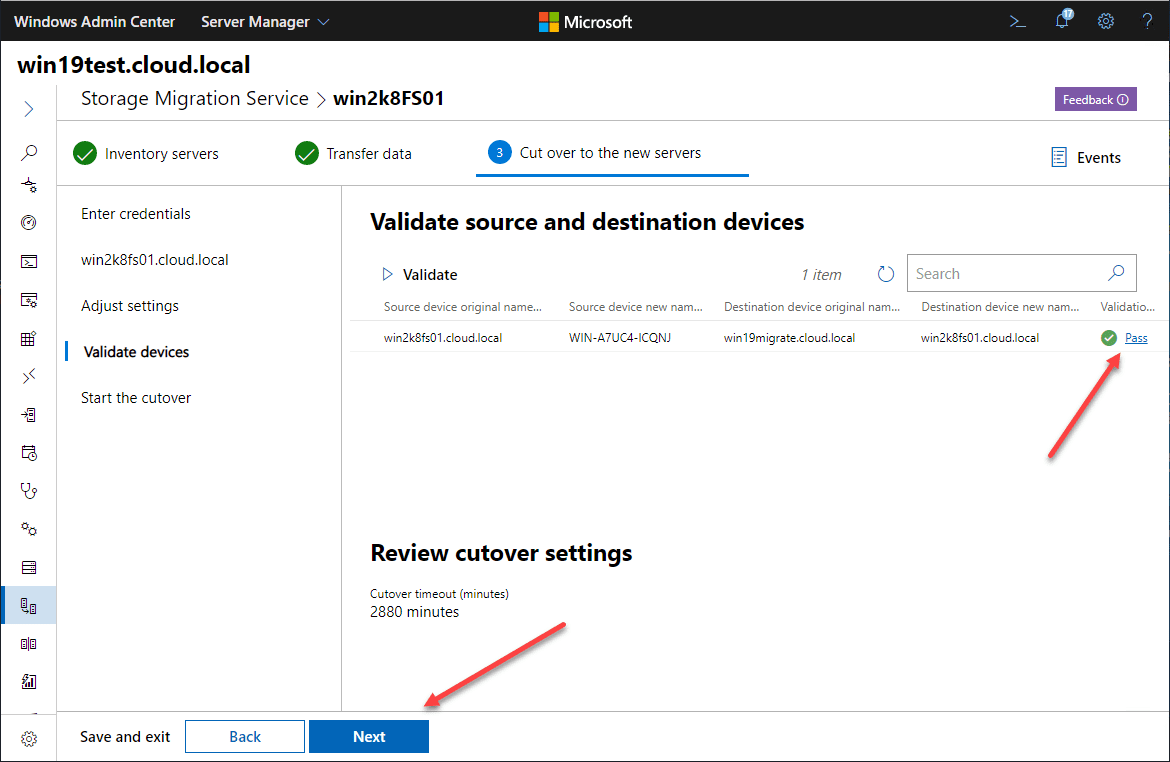
Click the Start cutover button to begin the cutover process.
The cutover is successful.
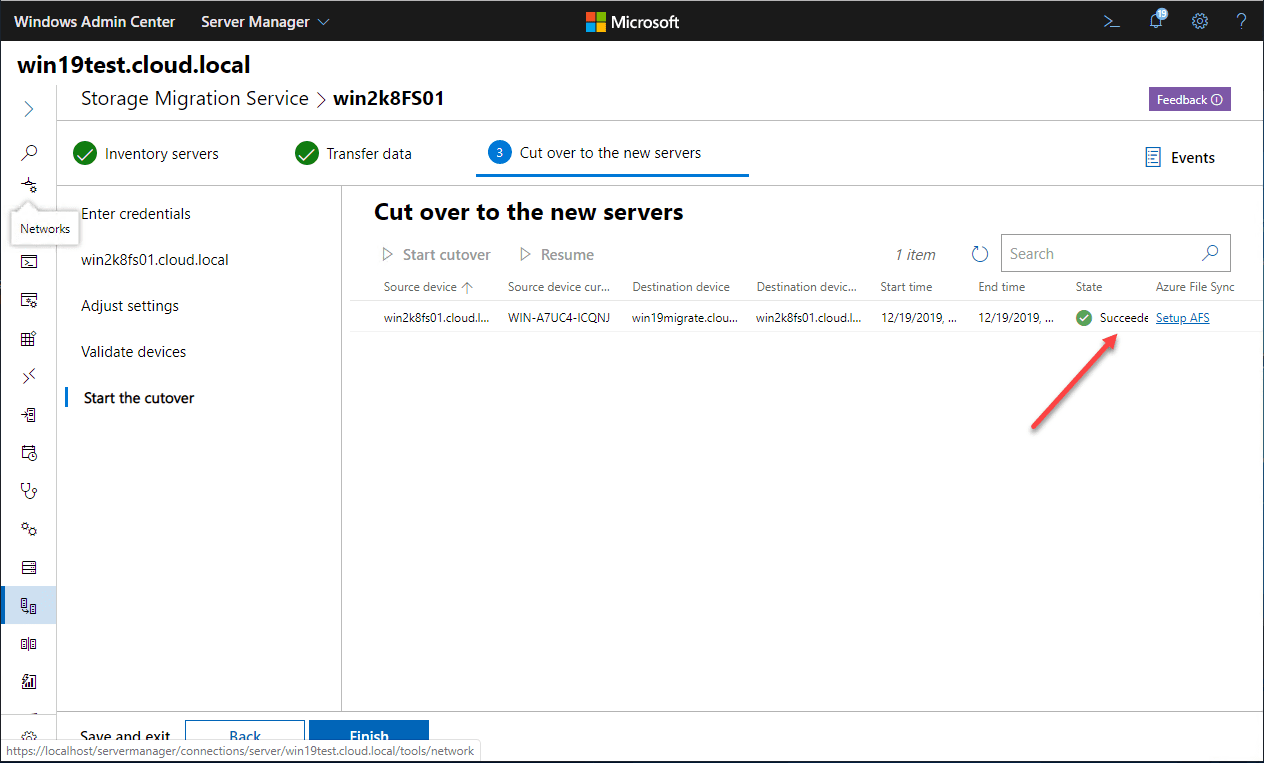
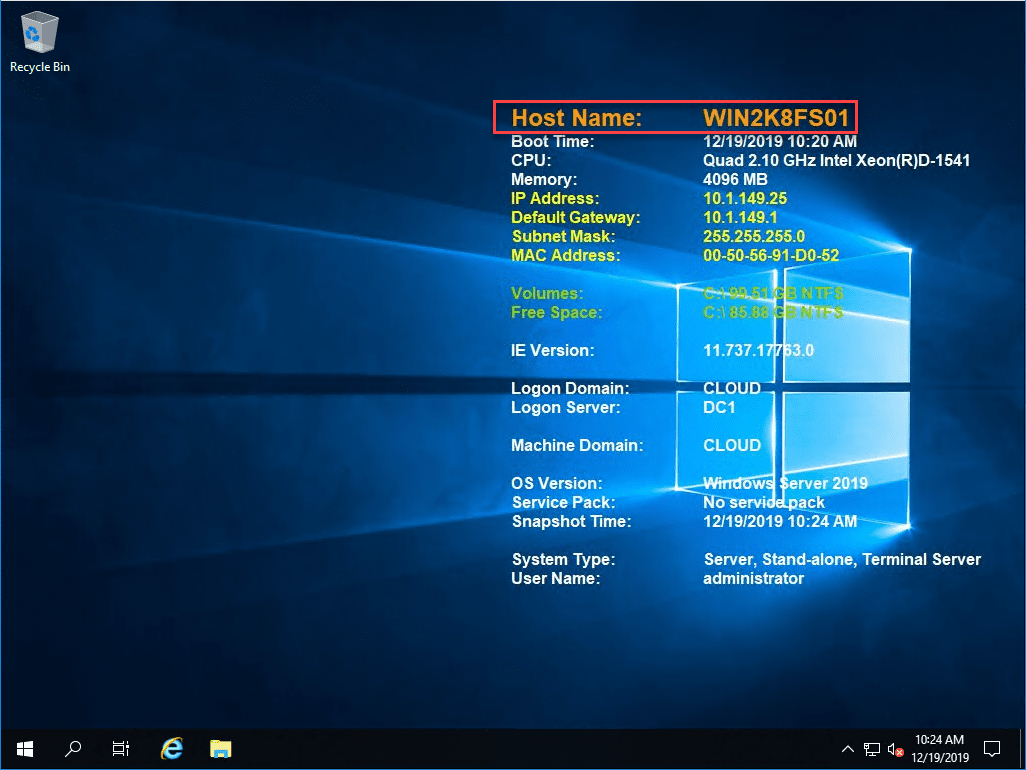
As you can see, we have been able to successfully migration Windows Server 2008 R2 to 2019 using Storage Migration. The name transferred over along with the network settings.
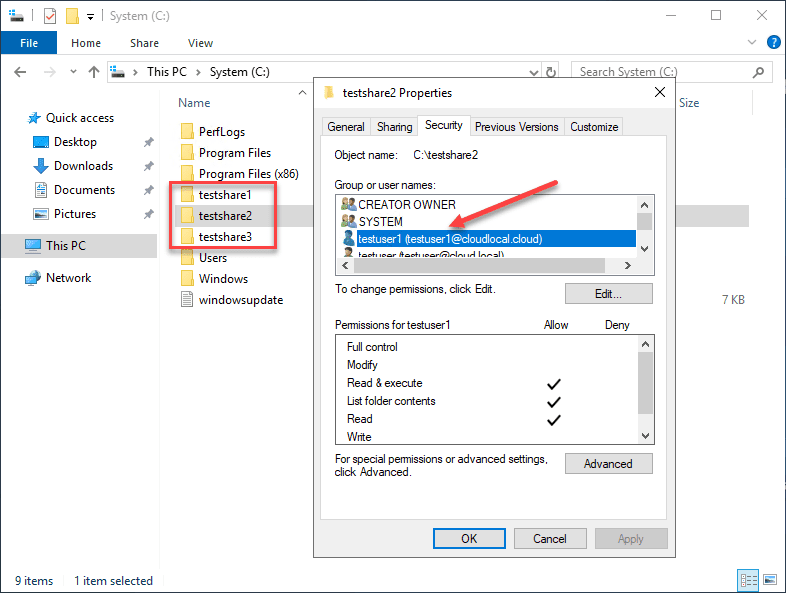
Additionally, I checked the shares and they are intact along with data as well as customized permissions.
Wrapping Up
If you are looking for an easy way to migrate Windows Server 2008 R2 to 2019, Storage Migration Service is a great way to do it. It makes the process as painless as it can be and does all the heavy lifting in the background.
Make sure you have your Windows Server 2008 R2 server updated with the latest updates available before running the migration as this will hopefully prevent you from seeing any errors as I saw before updating.
As January 14, 2020 rapidly approaches, leveraging great tools like the Storage Migration Service found in Windows Admin Center definitely helps to take the pressure off the process of a Windows Server 2008 migration or upgrade.
In this tutorial, we’ll explain clearly how you can upgrade your server from Windows Server 2008 to Windows Server 2019.
Extended support for Windows Server 2008 and Windows Server 2008 R2 ended in January 2020. As a result, it is now very important to remove any servers that you might have that are running these operating systems.
The fact that they no longer receive support means they will no longer receive continuous updates for services, roles, etc. This includes security updates, so clearly the risks will only increase as online threats continue to grow.
All this means it’s vital that you upgrade your server to a more recent operating system, or at least one whose «end of life» or «end of support» date is as far away as possible.
At Jotelulu, we recommend jumping straight to the penultimate version of Windows Server, Windows Server 2019. Whilst this might sound odd, it is actually very common for IT technicians to opt for the penultimate version to guarantee a certain level of stability. While the most recent version of an operating system might have some great features, the previous version is more likely to have had any problems identified and addressed and the system is likely to be more stable.
Windows Server 2019 also has a good life ahead of it yet. It will receive initial support until 2025 and extended support until 2029 and it’s possible that this might also be extended. So, you can be sure of at least 7 years of service with continuous updates, security patches, etc.
The problem is that it isn’t actually possible to jump straight from Windows Server 2008 to Windows Server 2019. First, you’ll need to upgrade to an intermediate version and then jump to the 2019 edition.
If you’re starting from Windows Server 2008, you can upgrade to Windows Server 2012, then Windows Server 2016 and then finally to Windows Server 2019.
On the other hand, if you’re starting from Windows Server 2008 R2, you can upgrade to Windows Server 2012 R2 and then straight to Windows Server 2019.
Below you’ll see an illustration of the different options based on documentation from Microsoft.

NOTE: Before we move on to the next section, I’m just going to take the opportunity to say that we recommend, wherever possible, migrating to a new server instead of upgrading your existing server. This way, you should avoid any potential compatibility issues and avoid any loss of service as we’ll perform all the necessary tests beforehand. Furthermore, you’ll only turn the old server off once the new server has been put into production. This method will also mean that the upgrade process won’t leave any residual files or other junk in your file system.
Before you begin
To successfully complete this tutorial and upgrade your server from Windows Server 2008 to Windows Server 2019, you will need:
- A server running Windows Server 2008 or Windows Server 2008 R2.
- A licence for the operating systems being used.
- CD/DVD images for the versions you wish to install.
- Backups of the server that you are going to upgrade in case there are any issues.
Part 1 – Preparing the Upgrade
Although the installation process is actually quite simple, like any IT task, it’s definitely worth spending a bit of time doing some prior planning if you want to avoid any potential problems later.
First, it’s a good idea to check whether you’re likely to have any compatibility issues with the applications and services that you use. You can do this by checking the manufacturer’s documentation, but we always recommend running a pilot test on a development or pre-production server to be sure.
You’ll also need to review the specification requirements for your new operating system to check that your hardware has enough CPU, RAM and disk space to run your new system.
Next, you should make sure you have some recent backup copies. In fact, I would have at least two – one from a few days ago and another made just before you perform the upgrade. After all, prevention is better than cure.
Lastly, you should extract your current system information, including the current version, network settings, etc. All of this will be very useful if something goes wrong and you need to re-configure your system.
In any case, knowing which current version you have will tell you which upgrades you need to perform.
There are various ways to find out your current system information, but I prefer to use the command prompt by running the «systeminfo» command (1).
As you can see in the screenshot below, this command returns the OS Name» (2), which in this example is “Windows Server 2008 R2 Standard”.

Part 1 – Check the version of your current operating system
Once you have this information, it’s time to save your system configuration and network settings as a text file.
In this part of the tutorial, we’re going to use the command prompt. Then, in the next part, we’ll use PowerShell so that you can see how both processes work.
To compile all your configuration information, run the following commands (3):
mkdir c:info
systeminfo > c:infosysteminfo.txt
ipconfig /all > c:infoipconfig.txt
Once you’ve done this, browse to the C:info folder (4) to check the files have been created successfully. Then, open them to check the content of the files (5).

Part 1- Compiling information about the current operating system and network settings
I also personally recommend keeping a copy of this information on another server in order to have an external copy.
Part 2 – Upgrading from Windows Server 2008 R2 to Windows Server 2012 R2
We are now ready to begin the process to upgrade from Windows Server 2008 R2 to Windows Server 2012 R2.
First, you will need to mount the image for the installer or insert your CD/DVD, whichever you are using. Click on the image to launch the installer manually (6) and click on «Install Now» (7).

Part 2 – Launch the Windows Server 2012 R2 installer
The program will then load an image for the installation and copy the necessary temporary files. This process can take a while depending on your server specifications (RAM, CPU, disk, etc.).

Part 2 – Wait for temporary files to be copied
The installer will then show a window asking whether you want to get important updates.
In this window, you will also be asked whether you want to help make the Windows installation better (8). Personally, I like to tick these checkboxes as it allows Microsoft to gather data on systems, installations, errors, etc. and use them to make improvements.
Next, we recommend clicking on «Go online to install updates now (recommended)» (9).

Part 2 – Choose «Go online to install updates now»
If you have chosen to install updates, the program will now connect to the Microsoft network and download any available updates. If you did not choose this option, the program will move on to the next stage of the installation process.
NOTE: If you choose to install updates, you might find that the system fails to connect and ends up skipping this step. Don’t worry, you will still be able to apply updates later on.
The next window will ask you to select the operating system you wish to install, which for this example will be «Windows Server 2012 R2 Standard (Server with a GUI)» (10).
In this tutorial, we have chosen this operating system because we are starting with Windows Server 2008 R2 Standard. However, if you are starting from the Datacenter version, you should select Datacenter Edition.
Another important point to bear in mind is that Windows Server 2012 also offers an option called «Server Core», which does not have a graphic user interface. This is designed for people who want to work using the command line. Be careful not to choose this version by mistake as it will be much more complicated to use. However, there is a solution should you choose this version by accident.
Once you have done this, click on «Next».

Part 2 – Select the version of Windows 2012 R2 that you wish to install.
The next window will show you the License Terms. Here, they have been heavily summarised, so there’s no excuse for not reading them. At last, you’ll be able to say that you actually read an EULA and dispel the myth that no one ever reads the license terms!
Accept the license terms by ticking the checkbox and click on «Next» (11).

Part 2 – Review and accept the licence terms for Windows Server 2012 R2
The next window will ask you which type of installation you want, and there are only two options:
- Upgrade: Install Windows and keep files, settings and applications.
- Custom: Install Windows only (Advanced).
Since we’re upgrading Windows Server 2008 to Windows Server 2012 R2, you should choose «Upgrade: Install Windows and keep files, settings and applications» (12).

Part 2 – Choose the Upgrade option to install WS2012R2
At this point, you will see a brief warning about the compatibility report, which is saved to your desktop.
The program will also recommend visiting the page titled “Install, Upgrade, or Migrate to Windows Server”, where you’ll find additional information about migration. Since we did a fair bit of preparation at the beginning of the tutorial, this step isn’t strictly necessary.
Simply click on «Next» (13) to continue with the installation.

Part 2 – Read the warning about the compatibility of applications on WS2012R2
The upgrade process will now start and the window shows the five stages of the process:
- Copying Windows files.
- Collecting files, settings and applications
- Getting files ready for installation.
- Installing features and updates.
- Almost done moving files, settings and applications.
It might seem an odd way to describe the process, but Microsoft can be like that sometimes.
As it moves through these steps, the system will restart several times. You should not do anything during this time. Simply leave it to run without interrupting it or loading the CD/DVD drive. Otherwise, the installation will start again from the beginning.

Part 2 – Wait while the server upgrades to WD2012R2
After the system has restarted several times, you will finally see Windows Server 2012 R2 start screen. Log in to the OS and get ready to upgrade to WS2019.
At this point, it’s a good idea to check that there aren’t any issues, that everything has been configured correctly, that services run properly, etc. If everything is fine, you can rest assured that everything should work correctly in the next step.

Part 2 – The Windows Server 2012 R2 start screen
Once you’re satisfied that everything is OK, it’s time to move on to the next stage: upgrading from Windows Server 2012 R2 to Windows Server 2019.
Part 3 – Upgrading from Windows Server 2012 R2 to Windows Server 2019
NOTE: Don’t forget to change the map the image for Windows Server 2019.
Just like the beginning of the previous stage, it’s a good idea to save your system configuration before you do anything. While you can probably skip this step in principle, it’s still a good habit to get into.
In this section, we are going to do everything using PowerShell to give you an example of how to do this. Once you’ve loaded PowerShell, simply type in the following commands (15):
Set-Location c:info
Get-ChilItem
systeminfo > c:infosysteminfo.txt
ipconfig /all > c:infoipconfig.txt
get-Content .ipconfig.txt
Here is a quick explanation of what these commands do:
- “Set-Location” is the same as the «cd» command in CMD and changes the working directory.
- “Get-ChildItem” is the same as the «dir» command in CMD and makes a list of the directory.
- “Get-Content” is the same as the «cat» command in CMD and shows the contents of a file.

Part 3 – Extract the configuration information on WS12R2 before upgrading
Once you’ve done this, launch the Windows Server 2019 upgrade by browsing to the drive where you mapped the image and double-click on it (16).

Part 3 – Launch the Windows Server 2019 installer
The Windows Server 2019 installer is quite a bit different from Windows Server 2016. Firstly, it is much quicker. This is because the binaries are copied while still compressed, then decompressed on the target machine and then configured. The previous version copied a large number of small files which greatly slowed things down.
At this point, simply wait for the packages to be copied.

Part 3 – Wait while the installer starts
As with the previous upgrade, you’ll be asked whether you want to get updates, drivers and optional features. Once again, I prefer to choose the option «Download updates, drivers and optional features» (17). If you decide to opt for the second option, there will be no great impact on the upgrade. You’ll just have to spend time downloading updates afterwards.
You’ll also be asked again whether you want to help make the installation of Windows better. We’re quite fond of helping, as this could have an impact on the user experience for future versions. So, we’ll mark the checkbox «I want to help make the installation of Windows better» (18) and click on «Next».

Part 3 – Choose the option to download updates
Next, you need to choose the image to be deployed on the server, which should be consistent with your previous choice. For this tutorial, we’ll select «Windows Server 2019 Standard (Desktop Experience)» (19) and click on «Next».
Careful! Remember that there is a version called «Server Core» which does not have a graphic user interface and is operated using command line. It is the default option, so don’t get caught out!

Part 3 – Select the version of Windows Server 2019 that you wish to install
At this point, you will be presented with the Applicable notices and license terms. Simply click «Accept» (20) to continue.

Part 3 – Check the WS2019 license terms and click Accept
The next step is a critical point in the process because you will be asked whether you wish to keep your personal files and apps (21). If you make a mistake and select the second option, you will lose everything because the system will be completely formatted. You will have to use a backup to restore everything you have lost and start the whole process again.
Select the first option, and click on «Next».

Part 3 – Select the option to keep existing files
The program will now start downloading updates. Just sit patiently and wait for the process to finish.

Part 3 – Wait while the program downloads updates for WS2019
Once all updates have been downloaded, you’re ready to install Windows Server 2019. The installer will show a window listing your installation choices.
Here, there are just two things to check (22):
- The version of Windows that you wish to upgrade to: Remember that there are two versions, Standard and Datacenter, and that each one is available as a Desktop Experience or as Server Core.
- Keep personal files and apps: Whether you wish to keep any of the files currently on the system. Since this is an upgrade, this is very important.
Once you’re satisfied that your choices are correct, click on «Install» (23). If you’ve made a mistake, click on «Back» to make the necessary changes.

Part 3 – Review your chosen options before proceeding to install WS2019
The system will now begin installing WS2019 and the screen will show you the installation progress. There are various different screens shown during this process, but we won’t go into them in this tutorial for the sake of brevity.
The system will also restart several times. If you want to keep track of all the changes and restarts, it might be a good idea to connect to the server console, but personally, we recommend that you take the opportunity to sit down with a nice, hot cup of coffee and wait.

Part 3 – Wait while WS2019 is installed on the server
Once the installation is complete, you will see the server login screen. Simply use your administrator login to sign in with the necessary privileges.

Part 3 – Finally, you can enjoy your new Windows Server 2019
Now that the entire process is complete, all that’s left to do is check that everything works properly and there are no issues with any of your apps, roles or services.
It might also be a good idea to search for any updates and check the firewall and security settings.
Conclusion
Windows Server 2008 and Windows Server 2008 R2 stopped receiving extended support in January 2020. That means it’s time to start retiring all these machines.
In this article, we’ve explained how to upgrade from Windows Server 2008 to Windows Server 2012 (or Windows Server 2008 R2 to Windows Server 2012 R2) and then to Windows Server 2019. We’ve also included plenty of recommendations and things to watch out for.
As you can see, the process is actually pretty straightforward, as long as you follow instructions correctly.
Thanks for choosing Jotelulu!