
Ping — утилита командной строки для проверки соединений в сетях TCP/IP. Она является одним из основных средств диагностики сети и входит в состав всех современных сетевых операционных систем. Принцип ее работы заключается в том, что она отправляет запросы (ICMP Echo-Request) протокола ICMP указаному узлу и фиксирует поступающие ответы (ICMP Echo-Reply).
Время между отправкой запроса и получением ответа позволяет определить задержки при передаче и частоту потери пакетов, а также оценить загруженность канала передачи данных. Полное отсутствие ICMP-ответов может означать, что удалённый узел неисправен.
В серверных ОС начиная с Windows Server 2008 входящие эхо-запросы по умолчанию запрещены и блокируются брандмауэром Windows. Сделано это скорее всего с целью предотвратить сетевые атаки типа ICMP Flooding (затопление атакуемого узла пакетами ICMP), которые могут вызвать отказ в обслуживании (Denial of Service, DoS). Безопасность конечно важна, однако в результате при попытке проверить доступность сервера мы получаем ошибку.
Для разрешения входящих эхо-запросов необходимо активировать соответствующее правило брандмауэра Windows. Вот несколько вариантов того, как это сделать.
Оснастка Windows Firewall with Adwanced Security
Самый простой способ разрешить ping — воспользоваться оснасткой «Windows Firewall with Adwanced Security». Для ее запуска нажимаем клавиши Win+R и вводим команду wf.msc.
Заходим в раздел входящих правил (Inbound Rules). Здесь нас интересует предопределенное правило для IPV4 — ″File and Printer Sharing (Echo Request — ICMPv4-In)″. Обратите внимание, что в таблице присутствуют два правила с одинаковым названием. На самом деле это одно и то же правило, просто настроенное для разных профилей — одно для доменного профиля, второе для общего и частного.

Активируем правило, отметив галочкой чекбокс Enabled и проверяем, чтобы в поле Action был выбран пункт ″Allow the connection″.

Переходим на вкладку Advanced и выбираем профили, для которых это правило будет действовать. Сохраняем правило и жмем OK. Теперь сервер можно пинговать.

При необходимости в дополнительных мерах безопасности произведем еще несколько настроек, которые защитят сервер от атак и позволят вам спокойно пользоваться Ping-ом.
Переходим на вкладку Scope и в поле Remote IP address указываем, с каких адресов разрешено принимать входящие запросы. Здесь можно указать один адрес, диапазон адресов либо целиком подсеть.

На вкладке Local Principals указываем локальных пользователей или группы, которым разрешается пинговать данный сервер. Как вариант, можно дать разрешение только группе локальных администраторов.

Групповые политики
В доменной среде разрешить Ping можно централизованно, через групповые политики. Открываем в редакторе групповых политик соответствующую GPO и переходим в раздел Computer Configuration–Policies–Windows Settings–Windows Firewall with Adwanced Security. Раскрываем дерево поддразделов и переходим на вкладку Inbound Rule. Кликаем правой клавишей мыши и в контекстном меню выбираем New Rule.

Выбираем Predefined (предопределенные правила) и находим в списке группу правил «File and Printer Sharing».

Находим правило ICMPv4-In и убираем выделение с остальных.

Выбираем для правила действие Allow the connection (разрешить подключениe) и жмем Finish, сохраняя правило.

После того как правило создано, его можно открыть и отредактировать, точно так же как и в локальной оснастке брандмауэра.
Утилита Netsh
Кроме графических средств для управления правилами можно воспользоваться утилитой командной строки netsh. В качестве примера активируем правило ICMPv4-In для всех профилей брандмауэра и ограничим удаленные IP подсетью 192.168.1.0/24:
netsh adwfirewall firewall set rule name= ″File and Printer Sharing (Echo Request — ICMPv4-In)″ new enable= yes action= allow profile= any remoteip= 192.168.1.0/24

Если вы используете Windows Server 2008 (не R2), то команда будет выглядеть немного по другому. Для включения правила:
netsh firewall set icmpsetting 8
И для отключения:
netsh firewall set icmpsetting 8 disable
PowerShell
Также разрешить эхо-запросы можно с помощью PowerShell. Правда воспользоваться этим способом можно только в Windows Server 2012, в остальных ОС отсутствует соответствующий PowerShell модуль. Для активации правила воспользуемся следующей командой:
Set-NetFirewallRule -Name FPS-ICMP-ERQ-In -Enabled True -Profile Any -Action Allow

Вроде бы все. Хотя нет, вспомнил еще один интересный момент. Для нормальной работы службы каталогов Active Directory необходимо, чтобы брандмауэр пропускал ICMP пакеты от клиентских компьютеров к контроллеру домена. Это нужно для получения клиентами сведений групповой политики. Поэтому на контроллерах домена есть отдельное правило брандмауэра, разрешающее входящий ping — ″Active Directory Domain Controller — Echo Request (ICMPv4-In)″. Это правило активно по умолчанию.
Skip to content
Ping работает по протоколу ICMP. По умолчанию в Windows 7, 2008, 2008 R2 протокол заблокирован (выключен) в firewall. Скорее всего это сделано с целью повысить безопасность сервера и предотвратить возможность сетевых атак Ping Flooding или POD (Ping of Death).
Быстрее всего включать/выключать протокол ICMP можно из командной строки.
Для Windows 2008 и Windows 7

Включить - netsh firewall set icmpsetting 8

Отключить - netsh firewall set icmpsetting 8 disable

Для Windows Server 2008 R2

Включить - netsh advfirewall firewall add rule name="ICMPv4" protocol=icmpv4:8,any dir=in action=allow (здесь название правила может быть любым, у меня такое, чтобы меньше набирать)
Можно это делать через графический интерфейс. Запустить Administrative
Tools — Windows Firewall with Advanced Security. В дереве выбрать Inbound Rules. В списке правил найти File and Printer Sharing (Echo Request – ICMPv4-In). Кликнуть правой мышью по правилу и выбрать Enable Rule.

Windows · September 28, 2024
Configuring a firewall to allow ping requests on Windows Server 2008 is essential for network diagnostics and monitoring. The ping command is a useful tool for checking the reachability of a host on an Internet Protocol (IP) network. However, by default, Windows Firewall blocks ICMP (Internet Control Message Protocol) packets, which are used by the ping command. This article will guide you through the steps to configure the Windows Firewall to allow ping requests.
Understanding ICMP and Ping
ICMP is a network layer protocol used by network devices to send error messages and operational information. The ping command utilizes ICMP Echo Request and Echo Reply messages to determine if a host is reachable. When a ping is sent, the target host responds with an Echo Reply if it is reachable. If the firewall blocks these messages, the ping will fail, leading to confusion during network troubleshooting.
Steps to Allow Ping on Windows Server 2008
To allow ping requests through the Windows Firewall on a Windows Server 2008 machine, follow these steps:
Step 1: Open Windows Firewall
- Click on the Start button.
- Navigate to Control Panel.
- Select System and Security.
- Click on Windows Firewall.
Step 2: Access Advanced Settings
- In the left pane, click on Advanced settings.
Step 3: Create a New Inbound Rule
- In the Windows Firewall with Advanced Security window, click on Inbound Rules in the left pane.
- In the right pane, click on New Rule….
Step 4: Select Rule Type
- Choose Custom and click Next.
Step 5: Specify Protocol and Ports
- In the Protocol type dropdown, select ICMPv4.
- Click on Next.
Step 6: Configure ICMP Settings
- Click on Customize… under the ICMP settings.
- Select Specific ICMP types.
- Check the box for Echo Request and click OK.
- Click Next.
Step 7: Specify Action
- Select Allow the connection and click Next.
Step 8: Specify Profile
- Select the profiles where you want the rule to apply (Domain, Private, Public) and click Next.
Step 9: Name the Rule
- Provide a name for the rule, such as Allow Ping, and click Finish.
Testing the Configuration
After configuring the firewall, it is essential to test whether the ping requests are now allowed. You can do this by opening the Command Prompt and typing:
ping [IP Address or Hostname]If the configuration is successful, you should receive replies from the target host. If not, double-check the firewall settings to ensure that the rule was created correctly.
Conclusion
Configuring the Windows Firewall to allow ping requests is a straightforward process that can significantly aid in network diagnostics. By following the steps outlined above, administrators can ensure that their servers are reachable for troubleshooting and monitoring purposes. Proper firewall configuration is crucial for maintaining network security while allowing necessary communication protocols.
For those looking for reliable USA VPS Hosting solutions, understanding firewall configurations is just one aspect of managing a secure and efficient server environment. Explore more about how to optimize your server settings with USAVPS.
I had no idea that I would writing this article till now, but I came across a very peculiar problem where in my lab I was able access my virtual machines through RDP. But surprisingly I was not able to receive any ping responses back from the hosts.
On further analysis, I found that the default setting in Windows Server 2008 R2 and other new operating systems from Microsoft have this value set to not respond by default.
So my ping responses used to always end with Request timeout error.
In this example, I am trying to ping one of my VM’s with the IP address 192.168.0.205.
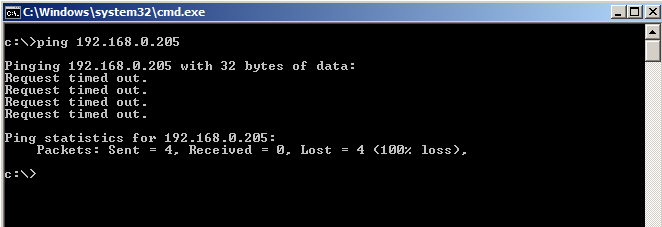
As you can see above that the request timed out. But there is an easy resolution to this.
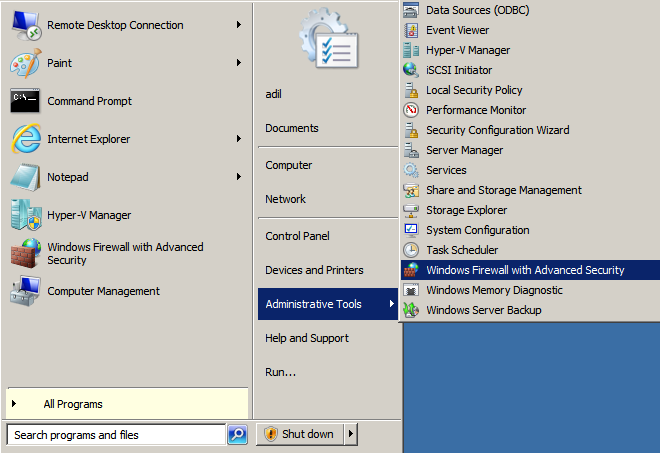
First, log in to the server that is not responding to ping requests.
After logging, select Windows Firewall with advanced security from the Administrative Tools.
Click on Inbound rules and search for File and Print Sharing(Echo Request-ICMPv4 In) rule.
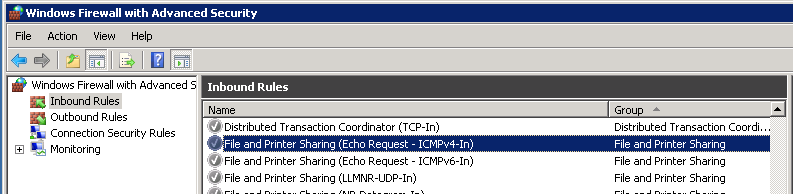
Right click on the rule and select Enable Rule.

Now you will see the green colour check mark on the Firewall rule. If you use IPv6 in your environment, you might want to enable the rule below the one shown above as well.
That’s it! You have successfully enabled the ping on the server in question in few easy steps.

Now you can see that I am receiving successful ping responses from the machine.
Enable with Powershell
Well, I love doing things with Powershell, as there is so much ease and flexibility in the ways that I can accomplish tasks.
In this particular example, you will need to have a Windows Server 2012 / 2012R2 Operating Systems. The reason behind this is that Powershell 3.0 comes with certain modules that are present only on these OS’s. The module that I am talking about is NetSecurity.
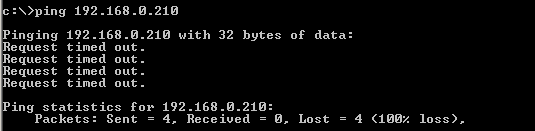
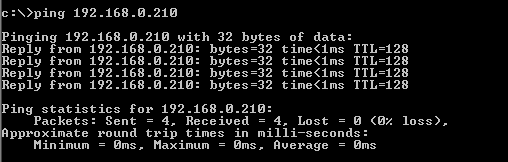
So I have a VM built with a copy of Windows Server 2012 R2. And the IP address that I have assigned is 192.168.0.210
The way that we are going to enable is shown below:
First, you need to Import the Powershell module NetSecurity
Then Set the value for File an Print sharing rule for ICMPv4 in Inbound Rules of Windows Firewall to true.
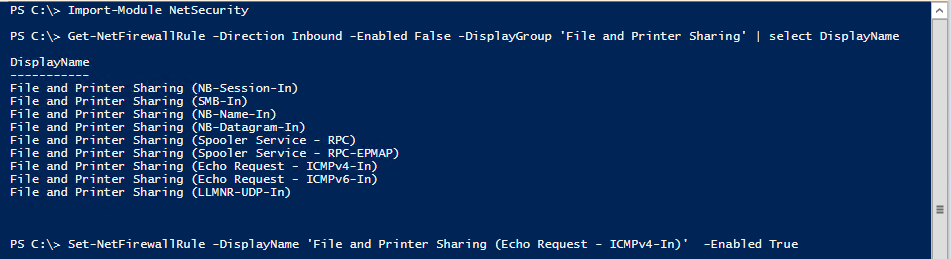
So first I made to query to list the rules belonging to the RuleGroup of File and Print Sharing using Get-NetFirewallRule and by select method I chose to display only the DisplayName.
Then, I chose the rule specific to IPv4 and set it to enable by Set-NetFirewallRule command.
You can verify the same from the GUI of Windows Firewall as well.
Now, you can see that I do get proper ping response back from the server.
I hope that this will help you if you ever come across such issues in future. Thank you for reading!
About Author
I am Adil Arif, working as a Senior Technical Support Engineer at Rubrik as well as an independent blogger and founder of Enterprise Daddy. In my current role, I am supporting infrastructure related to Windows and VMware datacenters.
When setting up new servers, one of the first things to do is to make sure other machines can connect to. The easiest way to do that has typically been to use the ping command, which sends an Internet Control Message Protocol (ICMP) or Echo message to the remote machine. Due to security concerns, however, the Windows Firewall on Windows Server 2008 and Windows Server 2008 R2 is configured to disallow responses to these requests. Here is how to enable responses to these requests.
Windows Firewall Control Panel
Display the Windows Firewall control panel and click the Advanced settings link on the left.
Inbound Rules
Click on the Inbound Rules entry below the Windows Firewall with Advanced Settings entry in the left pane.
Echo Request Rules
There are two rules for echo requests, one called File and Printer Sharing (Echo Request – ICMPv4-In) and File and Printer Sharing (Echo Request – ICMPv6-In). You’ll find these in the contents pane on the right.
Enable the Rules
Right click on a rule and click on Enable.
Once the rule has been enabled, the icon will turn green and the value in the Enabled column will change from No to Yes.
Command Line Control
Note that Windows Server Core does not have any UI. You can use the following commands from a command prompt window to enable and disable the IPv4 rule:
netsh firewall set icmpsetting 8
netsh firewall set icmpsetting 8 disable
Note that these commands have been deprecated and you’ll see this message when you execute them on Windows Server 2008 R2:
IMPORTANT: Command executed successfully.
However, “netsh firewall” is deprecated;
use “netsh advfirewall firewall” instead.
For more information on using “netsh advfirewall firewall” commands
instead of “netsh firewall”, see KB article 947709
at http://go.microsoft.com/fwlink/?linkid=121488 .
I haven’t found the syntax for simply enabling and disabling the existing rules. All the examples I’ve seen have you create a new rule, like this:
netsh advfirewall firewall add rule name=”ICMP Allow incoming V4 echo request” protocol=icmpv4:8,any dir=in action=allow
If anyone can find the syntax for simply enabling and disabling the existing rules, please let me know.
About Linux Conquering Cloud
A guy who want to try out every thing …
This entry was posted in WINDOWS. Bookmark the permalink.