
Аббревиатура DFS расшифровывается как Distributed File System (распределенная файловая система), данная служба реализовывает достаточно важные функции для крупных организаций, распределенных территориально и состоящих из нескольких сетей WAN или сайтов, предоставляя услуги простого хранения, репликации и поиска файлов по всей сети предприятия.
Первое преимущество службы DFS — предоставление единого сетевого пространства имен (Namespace), которое все пользователи сети могут использовать для доступа к общим файлам и папкам, в не зависимости от своего местонахождения.
Вторая важная функция DFS – возможность настройки службы репликации, которая осуществляет синхронизацию папок и файлов по всей организации, предоставляя пользователям доступ к последним и актуальным версиям файлов.
Давайте подробнее рассмотрим эти две функции DFS.
DFS NameSpace – каждое пространство имен (namespace) представляет собой сетевую папку с подпапками внутри нее. Главное преимущество использования такого пространства имен заключается в том, что пользователи могут обращаться к своим общим папкам и файлам через корень пространства имен, не задумываясь, на каком сервер в действительности они хранятся. Т.е. namespace это своеобразная логическая структура, упрощающая доступом к файлам.
DFS Replication – служба репликации DFS позволяет иметь множество синхронизованных копий одного и того же файла или папки. Репликация позволяет внутри каждой подсети или сайта организации иметь копию файлов, например, центрального офиса. Т.е. когда пользователи обращаются к некой общей папке, они попадают не на сам сервер центрального офиса, а на ближайшую реплику DFS, тем самым существенно уменьшая загрузку слабого меж-сайтового канала передачи. И в том случае, если пользователь вносит изменения в любой из файлов, изменения реплицируются по всему пространству DFS, в результате все пользователи сети получают доступ к актуальной и свежей копии файла.
В Windows Server 2008 служба Distributed File System получила ряд усовершенствований, и стала более стабильной, были решены многие проблемы, наблюдающиеся в ранних версиях службы DFS.
Для того, чтобы воспользоваться всеми преимуществами новой DFS на Windows Server 2008, необходимо соблюсти ряд требований: все сервера участники DFS должны быть не ниже Windows Server 2008, и уровень домена AD должен быть не ниже Windows 2008.
В DFS появились следующие изменения:
Access-based Enumeration – пользователям разрешено видеть только те файлы и папки, которые разрешено. По умолчанию данная функция отключена, чтобы включить ее, нужно набрать следующую команду: dfsutil property abde enable \‹namespace_root›
Улучшенные инструменты командной строки – в Windows Server 2008 DFS NameSpaces появилась новая версия утилиты dfsUtil, кроме того, для диагностики и поиска неисправностей в службах DFS можно воспользоваться командой dfsdiag.
Поиск внутри пространства имен DFS– в Windows Server 2008 появилась возможность поиска внутри всего пространство имен DFS по всем файлам и папкам.
Улучшения в службе репликации Replication:
Улучшение производительности– значительно улучшена репликация больших и маленьких файлов, синхронизация теперь выполняется быстрее, а нагрузка на сеть меньше.
Улучшена служба обработки неожиданных перезагрузок серверов – в ранних версиях DFS, при неожиданной перезагрузке сервера часто возникало повреждение базы NameSpace или нарушение процесса репликации. В результате запускался длительный процесс ребилда базы и репликации, вызывающий большую нагрузку на сервера и сеть. DFS в Windows Server 2008 выполняется лишь частичный ребилд базы данных в случаях перезагрузки сервера, в результате процесс восстановления выполняется заметно быстрее.
Принудительная репликация– администратор теперь может вручную запустить процесс немедленной репликации, игнорируя настроенное расписание.
Поддержка Read Only Domain Controllers (RODC) – любые изменения на контроллере домена RODC могут быть отменены службой репликации DFS Replication.
Репликация SYSVOL– в Windows Server 2008 репликация Active Directory посредством FRS (File Replication Service) заменена на репликацию DFS.
Отчеты– теперь можно создавать диагностические отчеты о работе DFS
Установка роли DFS на Windows Server 2008
Итак, мы познакомились с основными возможностями службы DFS NameSpaces в Windows Server 2008 DFS NameSpace, теперь познакомимся с процедурой установки роли DFS на сервер.
В данном примере используется контроллер домена Windows Server 2008, уровень домена (functional level) тоже 2008. Как узнать версию схемы Active Directory.
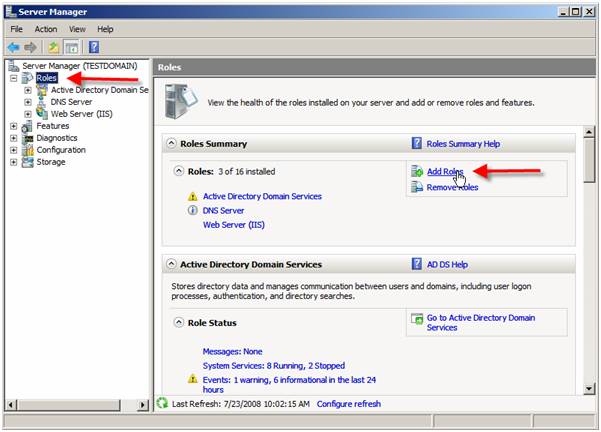
1. Откройте оснастку Server Manager.
2. Перейдите в раздел Roles и выберите Add Roles.
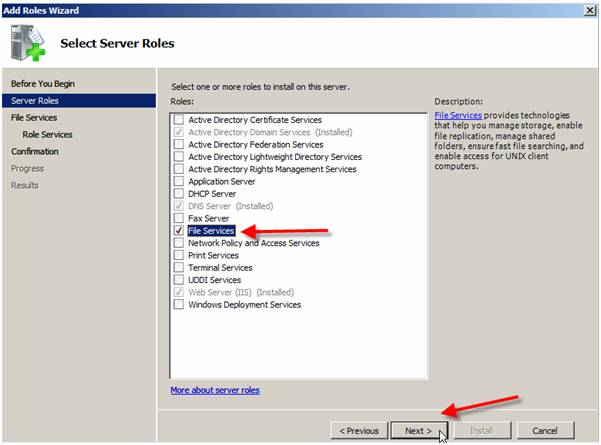
3. Из списка ролей выберите File Services.
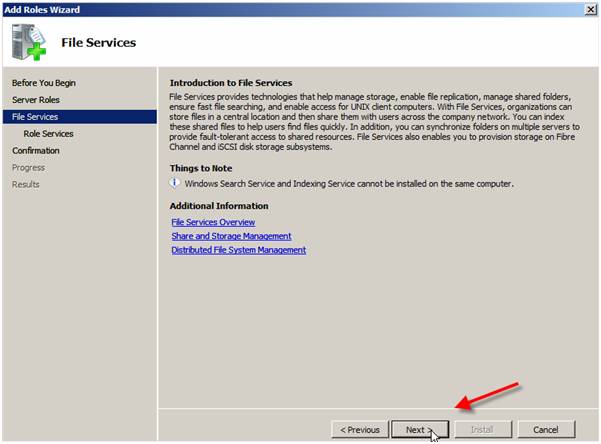
4. Появится информационной окно (Introduction to File Services), перейдите далее, нажав Next.
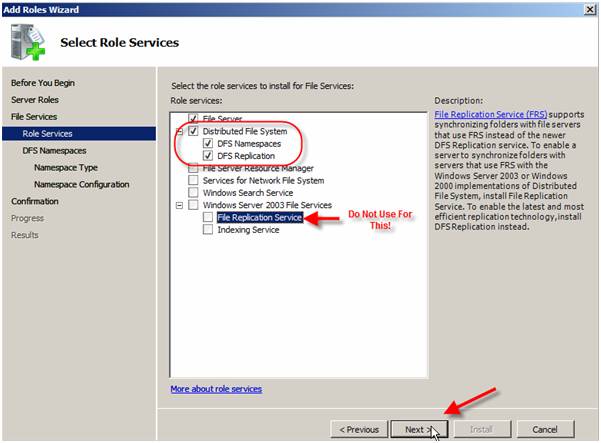
5. В списке ролей выберите Distributed File System , а также DFS Namespaces и DFS Replication; после чего нажмите Next.
Примечание:
Среди ролей вы увидите «Windows Server 2003 File Services»и «File Replication Service». Данные опции стоит использовать только в том случае, если необходимо синхронизировать сервер Windows 2008 с устаревшими службами FRS.
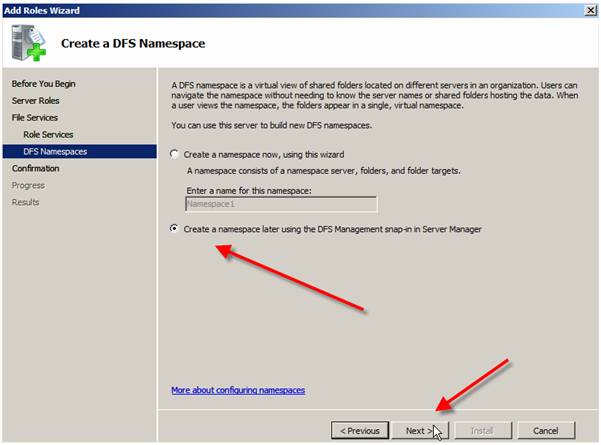
6. На экране «Create a DFS Namespace», вы можете указать хотите ли вы создать пространство имен немедленно, или позднее.
В данном примере, я не буду создавать корень пространства имен. Поэтому, я выбрал «Create a namespace later using the DFS Management snap-in in Server Manager» и нажал Next.
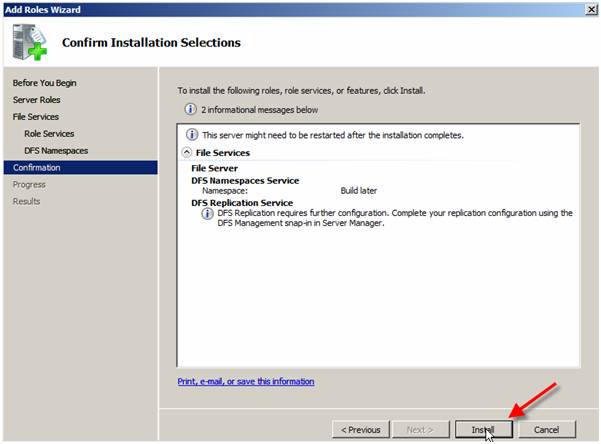
7. На следующем экране, нажав Install, мы запустим процесс установки службы DFS.
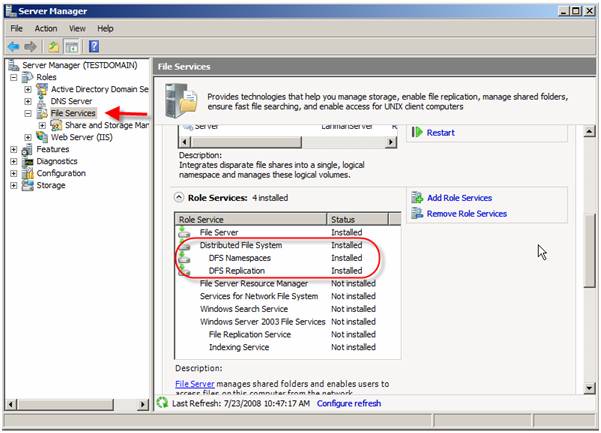
8. После установки DFS, в консоли Server Manager появится новая роль File Services со следующим списком установленных компонентов:
Distributed File System
DFS Namespaces
DFS Replication
Итак, мы установили DFS, далее мы должны создать корень пространства имен и настроить репликацию DFS. Обо все этом я буду писать в последующих статьях.
First published on TECHNET on May 14, 2008
This article explains how to install the DFS Replication Service on various flavors/editions of Windows Server 2008. It also explains how to install the DFS Replication service on Windows Server 2008 Core editions. First, let’s take a quick look at which editions of Windows Server 2008 ship the DFS Replication service.
Editions on which DFS Replication ships
As is evident from the above table, the DFS Replication service ships on all editions of Windows Server except for the edition for Itanium based systems. However, the DFS Replication service is not exposed via the File Services role on Windows Server 2008 Web Server Edition.
Installing DFS Replication using Server Manager
The DFS Replication service can be installed on Windows Server 2008 editions which expose the File Services role (except Web Edition) using the Server Manager. The Server Manager quick launch icon is usually present near the Start button on Windows Server 2008. Server Manager can also be launched by typing
‘Server Manager’
in the Start menu.
The
‘File Services’
role can be installed on the server by selecting it in the
‘Add Roles Wizard’
that is launched from Server Manager. This wizard can be launched by selecting
‘Roles’
and selecting the
‘Add Roles’
option in the right click menu.
In the dialog that follows, the Role Services that can be installed as part of the
‘File Services’
role are displayed. Select
‘DFS Replication’
from this list and follow the on screen instructions to install the DFS Replication service on the server.
Installing DFS Replication from the command prompt
On Windows Server 2008 web edition and on Server Core installations, the DFS Replication service cannot be installed using the Server Manager, either because the Server Manager UI is not available (eg. Server Core Editions) or because the File Services role that exposes ‘DFS Replication’ as an available role service is not available (eg. Web Edition). In such cases, the command prompt can be used to install the DFS Replication service. This can be done by typing the following command in a command window.
OCSetup DFSR-Infrastructure-ServerEdition
Another option is to use the Server Manager command line utility called ServerManagerCmd.exe. This utility can be used to install roles from the command prompt. More information about this utility can be obtained
here
. For example, the DFS Replication service can be installed using the following command:
ServerManagerCmd -install FS-DFS-Replication
Installing the DFS Management Console
The DFS Management Console (dfsmgmt.msc) is an MMC snap-in which can be used to configure DFS Replication. This snap-in is installed as part of the
‘Remote Server Administration Tools’
feature on Windows Server 2008. This feature can be installed using Server Manager by selecting
‘Add Features’
and then choosing
‘Remote Server Administration Tools’
in the list of available features. It is possible to install either the entire feature or expand the list of available administration Tools and specify the option
‘Distributed File System Tools’
so as to install only the DFS Management Console.
This feature can also be installed from the command line using ServerManagerCmd.exe by specifying:
ServerManagerCmd –install RSAT
In order to install only the DFS Management Console, the following command can be executed.
ServerManagerCmd -install RSAT-DFS-Mgmt-Con
——-
Mahesh Unnikrishnan

ou can install the DFS components by using the following procedures.
Installing Windows Server 2008 and DFS

During Setup, follow the on-screen prompts to install Windows Server 2008. Refer to the section “Lab Requirements” earlier in this guide for details about which servers must run Windows Server 2008 and which servers can run Windows Server 2003 R2 or Windows Server 2003 SP1.
After Windows Server 2008 is installed, you can install the DFS components and open the DFS Management snap-in by using the following procedures.
|
Note |
|
The method below using the Server Manager tool enables you to install DFS as a part of the file server role. This method also installs other file server tools, such as File Server Resource Manager and File Server Management. |
To install DFS as part of the file server role

- Click Start, point to All Programs, point to Administrative Tools, and then click Server Manager.
- In the console tree of Server Manager, right-click the Roles node, and then click Add Roles.
- Follow the steps in the Add Roles Wizard, and supply the information described in the following table.
| Add Roles Wizard page |
What to enter |
| Before You Begin |
Click Next after you verify that the requirements listed on the page have been met. |
| Select Server Roles |
Select the File Services check box. |
| File Services |
Click Next. |
| Select Roles Services |
Select the Distributed File System check box to install both DFS Namespaces and DFS Replication. To install DFS Namespaces or DFS Replication individually, select the check box that corresponds to the part of DFS that you want to install. |
| Create a DFS Namespace |
Select the Create a namespace later using the DFS Management snap-in in Server Manager check box. |
| Confirmation |
Click Install to install the file server role and DFS. |
| Installation Progress |
This page is automatically replaced by the Installation Results page when installation is completed. |
| Installation Results |
Note any errors, and then click Close to close the wizard. |
Use the following procedure if the file server role has already been added.
To install DFS if the file server role has already been added

- Click Start, point to All Programs, point to Administrative Tools, and then click Server Manager.
- In the console tree of Server Manager, right-click the Files Services node, and then click Add Role Services.
- Follow the steps in the Add Roles Services Wizard, and supply the information described in the following table.
|
Add Role Services Wizard page |
What to enter |
|
Select Role Services |
Select the Distributed File System check box to install both DFS Namespaces and DFS Replication. To install DFS Namespaces or DFS Replication individually, select the check box that corresponds to the part of DFS that you want to install. |
|
Create a DFS Namespace |
Click Create a namespace later using the DFS Management snap-in in Server Manager check box. |
|
Confirmation |
Click Install to install the file server role and DFS. |
|
Installation Progress |
This page is automatically replaced by the Installation Results page when installation is completed. |
|
Installation Results |
Note any errors, and then click Close to close the wizard. |
|
Note |
|
Installing DFS Management also installs Microsoft .NET Framework 2.0, which is required to run the DFS Management snap-in. |
To open the DFS Management snap-in

- Click Start, point to All Programs, point to Administrative Tools, and then click DFS Management.
You can also use the DFS Management snap-in hosted by Server Manager to manage DFS Namespaces and DFS Replication.
Overview of the DFS Management Snap-in

The DFS Management snap-in is the graphical user interface (GUI) tool for managing DFS Namespaces and DFS Replication. This snap-in is new and differs from the Distributed File System snap-in in Windows Server 2003. Therefore, before you begin using DFS Namespaces and DFS Replication, you might want to review the components of this snap-in, which are shown in the following figure and described in the sections that follow.

If you are trying to make data accessible, you have
lots of options such as creating shared folders and using offline files.
If you want to extend the availability of your files and folders, you
might consider building more than one server to house the same data and
then copying or replicating that data between the various servers so
that it stays consistent. Replicating data to multiple servers increases
data availability and gives users in remote sites fast, reliable access
to files. Replication is configured via Distributed File System (DFS)
namespaces. DFS namespaces allow you to group shared folders located on
different servers by transparently connecting them to one or more
namespaces. A namespace
is a virtual view of shared folders in an organization. When you create
a namespace, you select which shared folders to add to the namespace,
design the hierarchy in which those folders appear, and determine the
names that the shared folders show in the namespace. When a user views
the namespace, the folders appear to reside on a single, high-capacity
hard disk. Users can navigate the namespace without needing to know the
server names or shared folders hosting the data.
The path to a namespace is similar to a universal naming convention (UNC) path of a shared folder, such as \\server1\shares\test.
If you are familiar with UNC paths, you know that, in this example, the
shared folder, Shares, and its subfolder, Test, are all hosted on the
server called server1. Now, assume you want to give users a single place
to locate data, but you want to host data on different servers for
availability and performance purposes. To do this, you can deploy a
namespace.
To build a namespace, you
will need a namespace server. A namespace server hosts a namespace. The
namespace server can be a member server or a domain controller.
To install DFS, you will need to add the DFS role located under File Services in Server Manager:
-
Open Server Manager.
-
Right-click Roles.
-
Choose Add Roles.
-
Select File Services.
-
Click Next.
-
Check the box to add the Distributed File System.
This will add both the DFS Namespaces and DFS Replication role services.
-
Click Next.
-
Click Create A Namespace Later Using The DFS Management snap-in in Server Manager.
-
Click Next.
-
Click Install.
-
Click Close.
1. Configure a DFS Namespace
After you have installed the
DFS role service, you can begin the process of creating the DFS
namespace and configuring the DFS root:
-
Open Server Manager.
-
Expand Roles.
-
Expand File Services.
-
Select the DFS Management snap-in.
-
Click New Namespace.
-
Type the name of the server, or click Browse to select it from a list (see Figure 1).
-
Click Next.
-
Type
a name for the namespace. This is what the users will see after the
server name in the UNC path. If you want to edit the settings of this
share, you can click the Edit Settings button to change those settings. -
Click Next.
Figure 1. Creating a new namespace

At this point, you are
prompted to choose the type of namespace. You can choose either a
domain-based namespace or a stand-alone namespace. The domain-based
namespace begins with a domain name, and its metadata is stored in
Active Directory. A domain-based namespace can be hosted on multiple
namespace servers. A stand-alone namespace is stored only on the
namespace server, but it can be hosted on a server cluster. The path
begins with the namespace server name. A dedicated namespace server
should be used to host a namespace that contains more than 5,000
replicated folders. Figure 2 summarizes the settings and creates the namespace.
Figure 2. Reviewing the DFS settings and creating the namespace

You have just successfully created your first DFS namespace. This namespace is called the DFS root.
When you expand the DFS Management tool in the Server Manager and then
expand Namespaces, you will see the existing namespaces. The namespace
is really just the location that will be used to hold targets that will
point to the location of resources located elsewhere on the network. A
folder may have one or more folder targets that may be added using the
Add Folder Tool displayed in Figure 3.
This is where you start to
see the real potential of DFS. If you have more than one target location
that hosts shared data, you can configure multiple targets for the same
folder in your DFS namespace. The namespace will route requests from
users to the appropriate folder target based on the site information for
that user. This way, you can maintain multiple shared folders
containing the same data and maximize referrals to users using DFS
namespaces. We know what you are thinking here. What happens if a user
changes the contents of one of the shares? How will the other targets be
updated? Not to worry, there is a built-in replication system in DFS
called Distributed File System Replication (DFSR).
Figure 3. Adding a new folder to DFS
DFSR uses something
called Remote Differential Compression (RDC), which replicates only the
changes in files. In Windows Server 2008 R2, DFSR can even replicate
SYSVOL using RDC, resulting in a dramatic reduction in bandwidth
consumption while maintaining the integrity of your folder targets.
Skip to content
When you’re planning to deploy a (new) file server infrastructure, you’ve the choice to deploy the full version of Windows 2008 R2, or you can deploy the Core version of Windows 2008 R2. In this blogpost I’m going to show you a deployment of Windows 2008 R2 Core version with the File Services, DFS and DFSR roles enabled. Cool stuff!!
1.) Install Microsoft Windows 2008 R2 Core edition
2.) Change the name, IP adres, subnet mask, gateway and DNS. You can easy do this with sconfig
3.) Enable remote management settings. You can also use sconfig for this actions.
4.) Open the System Manager from a different server in the same domain
5.) Right click on local computer and select “Connect to another computer”
6.) Type the name of the Windows 2008 R2 Core server
7.) Now you can perform remote actions on the Core server
8.) Create the partitions on your Core server.
9.) Open the “Share and Storage Management” console and connect to the Core server
10.) Now you can create shares on the Core file server
If you want to enable Distributed File System (DFS) on your Core server, you can enter the following commands.
1.) Connect to the Core server with the Remote Desktop Protocol (RDP)
2.) Open the command prompt
3.) To enable the Distributed File System Service, you can type the following command:
Dism /online /enable-feature /featurename:DFSN-Server
4.) To enable also Destribution File System Replication, you can type the following command:
Dism /online /enable-feature /featurename:DFSR-Infrastructure-ServerEdition
5.) To manage the DFS environment, you can install the following Windows Feature: Distributed File System Tools
6.) Open the “DFS Management console”
7.) Create a new Namespace for your DFS environment
8.) Enter the server that will host the namespace. Most of the time this will be one or more domain controllers
9.) Type the name of the new namespace. In my environment it is DFS
10.) Select the type of namespace. In my environment it is a Domain-based namespace.(\\testlab.local\DFS\)
11.) Select create to finish
Now you’re able to create some folder within your DFS namespace. Lets add the previous created shares to our DFS namespace.
1.) Right click on your namespace and select “New Folder”
2.) Type in the Name
3.) Select a new Folder target of targets. You can simply use the UNC path to the share on the right server
4.) When you’re browsing to \\domainname\namespace, you’re seeing the folderstructure.
\\testlab.local\DFS\Groups
5.) Create some folder and connect back to your Core server
6.) Open the command prompt and navigate to your Data partition. In my environment it is E:\Groups
7.) As you can see, there’re the same folder! 😉
In the next post I’m going to at the replication, so DFS-R. Hopefully this blogpost helps you out!