As a part of preparation for monitoring our WIndows Server 2008 R2 using SNMP and Nagios we had to add SNMP Services to few systems which didn’t have it yet. So, based on that fact I thought it might be nice to capture all steps involved in adding SNMP to Windows Server machine. Here you can see steps, screenshots and short description how to achieve that.
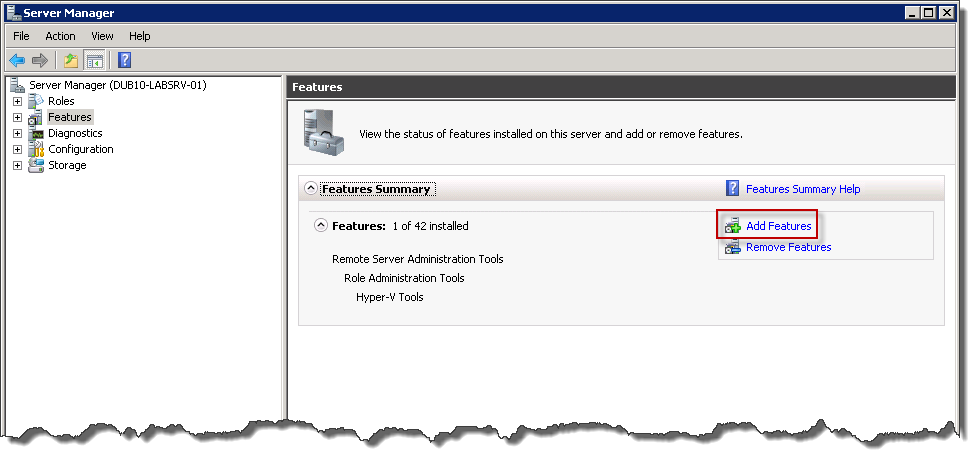
Start Server Manager and go to Features and then click Add Feature
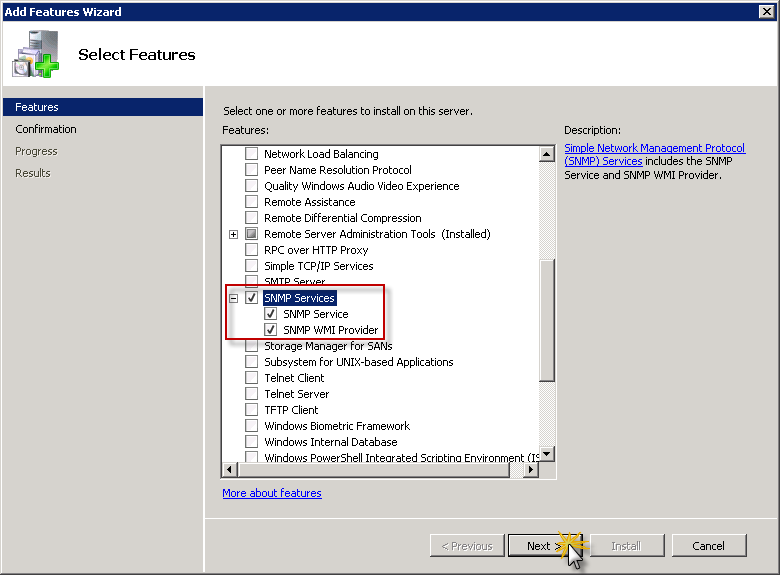
After Add Features Wizard will appear on the screen locate SNMP Services section and add this feature to installation list by ticking checkboxes next to appropriate services on the list as shown on screen below. Then click Next to proceed.
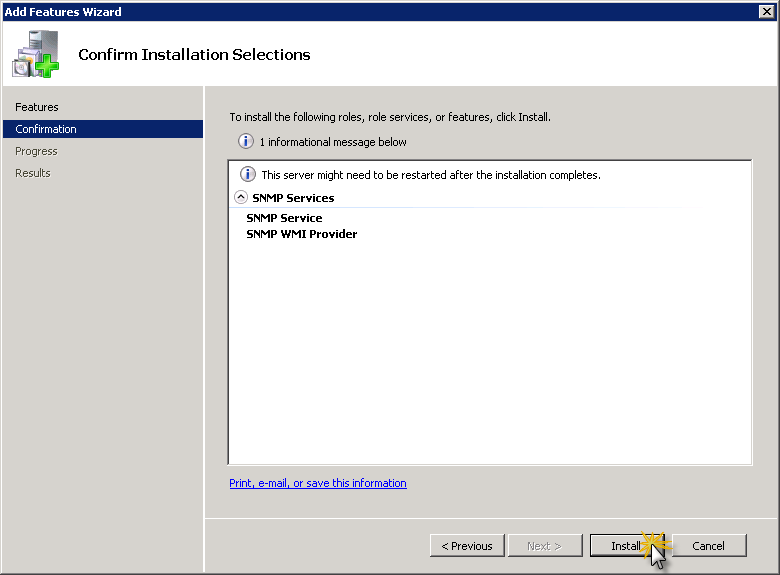
Summary screen will show what services will be installed. Click Install to proceed with installation.
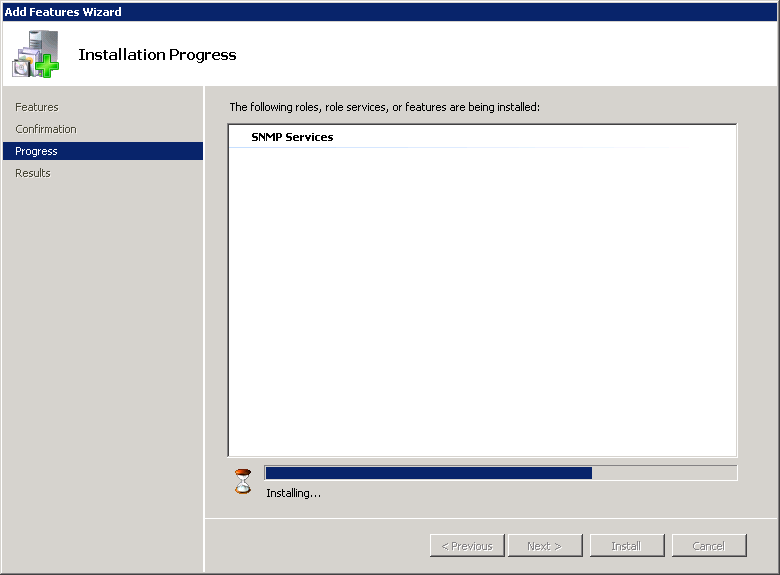
Installation progress will appear once server will be adding desired features to system configuration.
Once additional components will be installed, summary windows will show what features were installed and if installation was successful. Click Close to to finalize Add Feature Wizard.
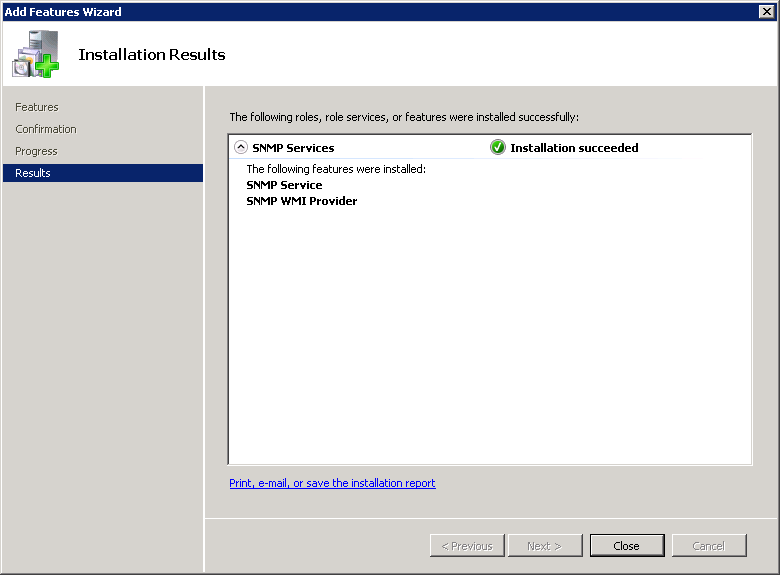
Now in Server Manager in Features section you can see that SNMP Services are listed as installed components.
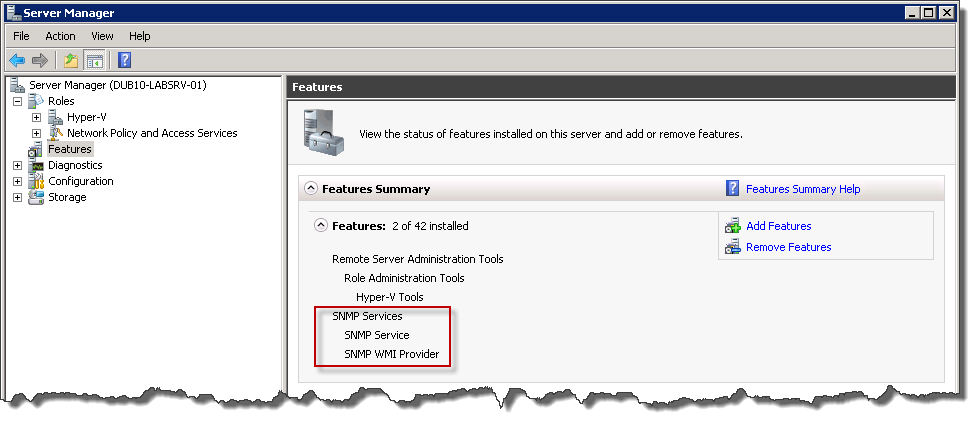
It’s time to configure SNMP for serving information to monitoring system, which in our case is Nagios. In order to set parameters on SNMP go to Start / Administrative Tools / Services and then locate SNMP Service on the list. Double click on it.
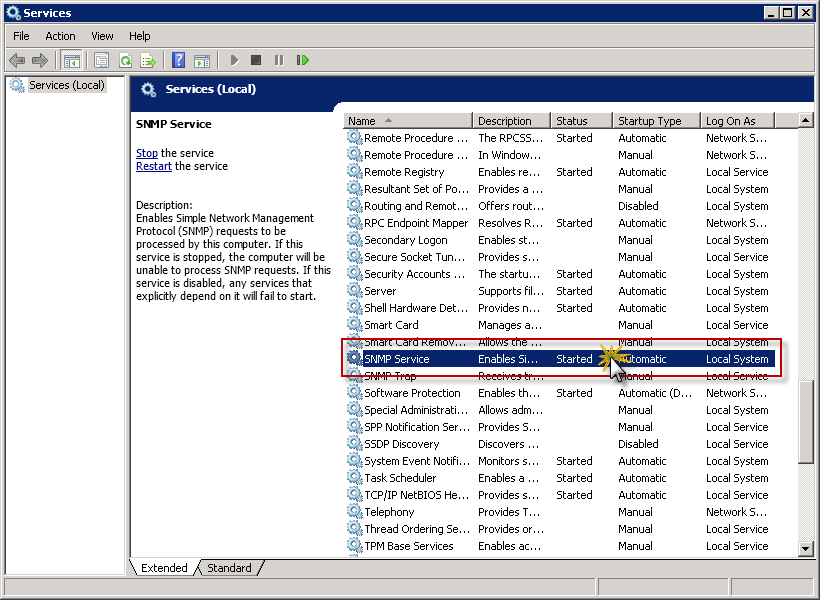
In SNMP Service Properties (Local Computer) window go to Security tab.
This is place where we can define parameters of SNMP Service:
- Community string – unique keyword which will be presented by monitoring system when accessing information on server via SNMP
- IP address of monitoring system – to narrow down computers which can poll information remotely from server
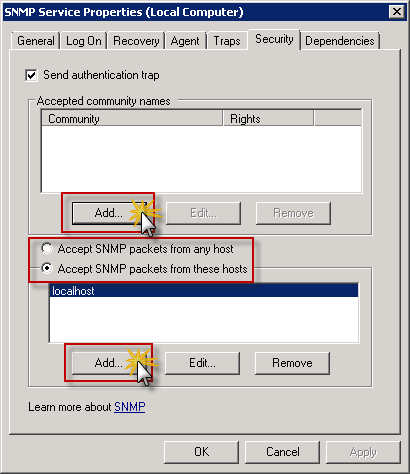
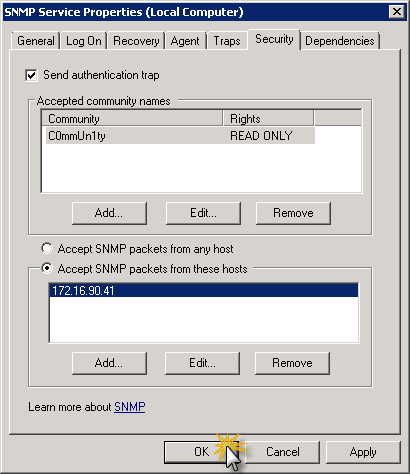
When you click Add in Accepted community names section you can enter Community Name and define Community rights. For us READ ONLY is required as we want to poll information from server only.
Available rights for community strings:
- NONE: Prevents this host from processing any SNMP requests.
- NOTIFY: Allows this host to send only SNMP traps to the community.
- READ ONLY: Prevents this host from processing SNMP SET requests. SNMP managed objects have default values specified by the agent. Some applications may request to modify these values with the SNMP SET command.
- READ WRITE: Allows this host to process SNMP SET requests.
- READ CREATE: Allows this host to create new entries in the SNMP tables.
NOTE: Make sure that Community Name parameter will NOT be any easy dictionary word. Think of it as a password to protect access to information about system.
Once Community Name is define click Add in Accept SNMP packets from these hosts. That will allow you to add IP address of the server with monitoring system, which is Nagios in our case. It is highly recommended to narrow down list of IP addresses from which SNMP communication can be received by the server for security reasons.
IP address on the screenshot above is example IP address and you should replace it with IP of your monitoring system.
Once all parameters are configured you can see them in SNMP Service Properties (Local Computer) dialog windows and if everything is fine and according to expectations click OK to approve changes and apply those to SNMP Service.
From now on you can poll information using SNMP from certain IP addresses using Community Strings defined in SNMP Service configuration.
Протокол Simple Network Management Protocol (SNMP) используется для получения данных как из самой операционной системы так и из Программного обеспечения если оно поддерживает передачу по SNMP. Так же данные можно не только читать — запрашивать в режиме READ чтение, но так же и изменять их если предоставлен доступ WRITER запись.
Так же у нас есть SNMP TRAP — отличие просто от SNMP в том что trap он сам передает данные, а просто в snmp мы их сами запрашиваем и устройство нам их отдает.
Например на устройстве настроено при определенном значении/отметке отправить данные такого то трапа.
Более подробно о работе SNMP можно посмотреть тут Пример работы SNMP запрос данных и SNMP Traps пример работы, что такое MIB их зависимости как правильно дать имя MIB файлу где их брать и тд.
Так же стоит отметить SNMP может быть реализован по обоим протоколам через локальную сеть. Хотя SNMP через порт TCP возможен, пакеты SNMP обычно отправляются через UDP.
SNMP — 161, SNMP Trap — 162, при использовании TLS или DTLS запросы получаются по порту 10161, а ловушки отправляются на порт 10162.
Переходим к установке службы SNMP
Для Windows 7 , 8 , 8.1 , 10
Панель управления\Все элементы панели управления\Программы и компоненты
Включение или отключение компонентов Windows
Находим и Выбираем (ставим галочки)
SNMP-протокол
Поставщик WMI для SNMP
И жмем OK ждем завершения установки.
- Установка SNMP на Windiws 7 8 10
Так же можно проверить и установить при помощи PowerShell
Проверка
или
Установка
Код: Выделить всё
Enable-WindowsOptionalFeature -online -FeatureName SNMPили
Код: Выделить всё
Install-WindowsFeature SNMP-Service,SNMP-WMI-Provider -IncludeManagementToolsЕсли в Windows 10 нет такого пункта
- Установка SNMP на Windiws10 нет такого пункта
Добавление Службы SNMP на Windows Server
После заходим в Диспетчер сервера > Компоненты > Добавления компонентов. Выбираем Службы SNMP и SNMP WMI Providers
C помощью Server Manager -> Выберите Add roles and features -> Features. Выберите SNMP Service и SNMP WMI Providers
- Windows Server 2008 Диспетчер сервера добавление компонентов SNMP
SNMP WMI Providers — Поставщик WMI для SNMP (обеспечивает доступ к информации SNMP через интерфейсы Windows Management Instrumentation) Можно запрашивать данные из самой операционной системы Windows.
Установка службы SNMP в Windows 10/11
вынесена в отдельный компонент Feature On Demand (как RSAT и OpenSSH).
Параметры -> Приложения -> Приложения и возможности -> Дополнительные компоненты -> Добавить компонент -> Пишем SNMP ставим галки и жмем -> Установить
Apps -> Optional features -> Add an optional feature -> View features
- Установка SNMP на Windiws10 Параметры приложения
- Установка SNMP на Windiws10 Приложения и возможности Дополнительные компоненты
- Установка SNMP на Windiws10 Дополнительные компоненты Добавить компонент
После установки Переходим в Службы / Services ( Win + R и services.msc)
Через диспетчер задач, панель управления , Параметры или поиск кому как удобнее
- Службы в Диспетчере задач
В списке службы должны появится две новые службы:
SNMP Service – это основная служба SNMP агента, которая отслеживают активность и отправляет информацию;
SNMP Trap — получает сообщения ловушки (trap messages) от локальных или удаленных агентов SNMP, и пересылает сообщения в управляющие программы SNMP, которые работают на этом компьютере.
Откройте свойства службы SNMP. Если она остановлена, запустите ее, нажав кнопку Start и измените тип запуска (Startup type) на автоматический.
Переходим к настройке служб SNMP
Вкладки:
Agent / Агент SNMP — указывается базовая информация об устройстве (контакты администратора, местоположение). Здесь же можно указать тип информации, который может отправлять данное устройство при SNMP опросе.
Доступны следующие типы сервисов:
Physical Физическая
Applications Приложения
Internet Интернет
End-to-end Узел-узел
Datalink and subnetwork Канал данных и подсети
- Агент SNMP
Traps / Ловушки — указываются адрес серверов, на который SNMP агент должен отправлять SNMP-ловушка (SNMP trap).
SNMP Trap это широковещательный USP пакет, используемый для асинхронного уведомления менеджера (например, сообщение о критическом событии).
- SNMP Ловушки
Не забудьте открыть в Windows Defender Firewall правила, разрешающие входящий и исходящий трафик для SNMP запросов и ловушек (TRAP). Нужные правила фаейрвола можно включить с помощью PowerShell.
В Windows Firewall есть несколько готовых правил для SNMP трафика:
Код: Выделить всё
Get-NetFirewallrule -DisplayName *snmp* |ftSNMPTRAP-In-UDP
SNMPTRAP-In-UDP-NoScope
SNMP-Out-UDP
SNMP-In-UDP-NoScope
SNMP-Out-UDP-NoScope
SNMP-In-UDP
Можно включить все правила, или только определенное:
Код: Выделить всё
Get-NetFirewallrule -DisplayName *snmp* | Enable-NetFirewallRuleКод: Выделить всё
Get-NetFirewallrule SNMP-Out-UDP | Disable-NetFirewallRuleSecurity / Безопасность — можно создать несколько строк подключения, так же настроить различные параметры безопасности для различных серверов SNMP.
- SNMP Безопасность
Можно выбрать один из пяти уровней доступа для сообщества:
READ ONLY — позволяет получать данные с устройства;
READ WRITE — позволяет получать данные и изменять конфигурацию устройства;
NOTIFY — позволяет получать SNMP ловушки;
READ CREATE – позволяет читать данные, изменять и создавать объекты;
NONE
Вы можете создать несколько community string. Для этого нужно задать имя и выбрать права/ Для мониторинга состояние сервера достаточно выбрать READ ONLY.
В списке Accept SNMP packets from these hosts можно указать имена/IP адреса серверов, которым разрешено опрашивать данное устройство. Если вы не хотите ограничивать список разрешенных устройств, оставьте здесь Accept SNMP packets from any hosts.
В списке Accepted community names перечислены имена сообществ, чьи SNMP узлы проходят аутентификацию для отправки SNMP-запросов на этот компьютер.
Community — это имя, которое обладает такими же функциями, как логин и пароль.
Нажмите кнопку Добавить и укажите имя Community и один из пяти уровней доступа (None, Notify, READ ONLY, READ WRITE, READ CREATE). READ WRITE – это максимальный уровень доступа, при которых сервер управления SNMP может вносить изменения в систему. В системах мониторинга обычно достаточно выбрать READ ONLY, при этом сервер мониторинга может только опрашивать систему, но не вносить изменения.
В нашем примере мы добавили комьюнити public с разрешениями READ ONLY.
Далее добавьте список серверов системы мониторинга (по DNS имени или по IP адресам), от которых вы хотите разрешить получать SNMP пакеты.
Можно выбрать опцию ‘Принимать пакеты SNMP от любого узла’/Accept SNMP packages from these hosts, но это не безопасно.
Сохраните изменения и перезапустите службу SNMP.
В списке служб Windows есть еще одна служба SNMP Trap.
Она используется для получения сообщений от других SNMP агентов и пересылки на SNMP сервера (обычно это система мониторинга, опрашивающая устройства по SNMP, Zabbix).
Примеры:
ПО для передачи по SNMP через стандартную службу SNMP Windows
Dell-OpenManage snmpv2 RUS Состояние серверов Dell на основе ПО OPEN MANAGE SERVER ADMINISTRATOR
Kraftway PMC-Sierra Adaptec 5805 raid массива при помощи ПО Adaptec Storage Manager
ПО не использует стандартную службу SNMP Windows так как указывается другой порт для snmp
Для ИБП марки APC
APC Smart UPS 2200 через ПО PowerChute Business Edition
Далее переходим Мониторинг Windows OS при помощи SNMP
Шаблон ОС Windows SNMPv2
- Home
- nullServices
- Offshoring
- Software Outsourcing Services
- Technical Expertise
- Mobile Application
- Mobile Application Development
- Mobile Testing
- Augmented Reality
- iBeacon
- Web Solutions
- Web Development
- E-learning
- Learning Management Systems
- NetSupport Solutions
- NetSupport Education Solutions
- E-Learning Projects
Offshoring
Mobile Application
Web Solutions
E-learning
- Offshoring
- nullProducts
- NetSupport
- About NetSupport
- NetSupport Manager
- NetSupport School
- NetSupport DNA (corp)
- NetSupport ServiceDesk
- NetSupport DNA (edu)
- NetSupport Notify
- WhatsUp Gold
- About WhatsUp Gold
- Modules and Capabilities
- WhatsUp Gold Editions
- WhatsUp Gold 2021 version
- Reports
- Orchtech HR
- Purple Bureau
- Purple Bureau SMEs
- Purple Bureau
Netsupport Corperate
WhatsUp Gold
Purple Bureau
- NetSupport
- Projects
- About Us
- About Orchtech
- Memberships
- Distributors/Partners
- Funding Bodies
- Our Clients
- Awards
- Contact Us
- Contact Us
- Request a Meeting
Edit
About Us
Orchtech is a software development company working in multiple countries worldwide and our experience spans over multiple services/products such as Offshoring/Outsourcing software development, Mobile applications development services, Web development and HR mobile applications for internal employees management.
Contact Info
-
Orman Tower, Floor 12, Apt. 123, 48 Giza Street, Dokki, Giza, Postal code: 12612. -
+20 2 37622752 -
Week Days: 09.00 to 18.00 Saturday & Friday: Closed
Home
> Monitoring, Windows > Monitoring Windows Server 2008 R2 with SNMP and Cacti
So you have a new Windows Server 2008 R2 installed and now you’d like to start gathering statistics about how it’s performing. The SNMP protocol is a great way to get started. In this tutorial I will install the SNMP agent service on a Windows server and configure it to allow queries from a SNMP based management server. On the management server I will use a tool named Cacti that can collect this SNMP information and generate graphs from it in a fairly easy way. I will assume that you have a server with Cacti already set up. If not, details on how to set up an instance of Cacti on a CentOS Linux server can be found here.
Install and Configure Windows SNMP Agent
Okay first of all let’s install the Windows SNMP agent service.
Start Server Manager.

Scroll down to the Features Summary section and click Add Features.

Under Features open up SNMP Services and check SNMP Service. Click Next.

Click Install at the confirmation screen, then click Close when the install is complete.

Now it is time to configure the SNMP Service. Back in the Server Manager in the left pane open up Configuration and select Services. In the middle Services pane scroll down and double click the SNMP Service.
Click the Agent tab and enter your Contact and Location information. Click Apply.
For now we’ll skip any configuration in the Traps tab. This should only be necessary if you want to configure the SNMP agent to notify our monitoring server of any events without the monitor soliciting the information.
In the Security tab under Accepted Community Names click Add.
We’ll only be reading information (and not setting parameters) on the SNMP agent so keep Read Only and type a Community Name. Using a name other than “public” will help keep unauthorized clients from reading SNMP information from the agent but this is still not completely secure. Click OK.
Now click the second Add button under Accept SNMP Packets.
Type the IP address or hostname of the Cacti management server and click Add.
Make sure that “Accept SNMP packets from these hosts” is still selected, then click OK.
Pages: 1 2
This post includes description of the entire process as well as a working example. The post is big, but I hope it is worth to read.
1. What We Need to Do
There are three major parts of remote installation of any software: files to install, command line to run and how to run it remotely. There will be also one additional step for SNMP to run it properly: configuration. The installation parts are the same for Windows 2000 and Windows 2003. It is completely different and way easier for Windows 2008. The configuration part is the same for all of them
2. Command to Run
Let’s start with the second part, with command to run on a remote server. As you know SNMP is a part of Windows optional components and can be installed with sysocmgr.exe. The command looks like this:
“%windir%\system32\sysocmgr.exe” /r /q /i:”%windir%\inf\sysoc.inf” /u:”c:\temp\snmp.inf”
The snmp.inf file pretends to be a part of sysoc.inf. It contains the lines saying what to install, so for SNMP installation the file is pretty simple
[Components]
NetOC=ON
[NetOptionalComponents]
SNMP=1
It seems to be simple to run, but it is not
3. Files to Install
If you have ever installed SNMP via the Add/Remove Programs applet, you remember that the installer needs some additional files from Windows installation CD. During the user-led installation it is pretty easy to click on the Browse button and select the proper location. How to do so in the command line installation?
3.1. Path to Installation CD
If sysocmgr.exe cannot find the necessary files it reads a registry key to find the location of installation files. Actually, there are two registry keys:
- HKLM\SOFTWARE\Microsoft\Windows\CurrentVersion\Setup\SourcePath
- HKLM\SOFTWARE\Microsoft\Windows\CurrentVersion\Setup\ServicePackSourcePath
Let’s say we have all installation files copied to the \\SERVER\WINDOWS_CD folder. In this case the path for these registry keys will look like
[HKEY_LOCAL_MACHINE\SOFTWARE\Microsoft\Windows\CurrentVersion\Setup]
“SourcePath”=”\\\\SERVER\\Windows_CD “
“ServicePackSourcePath”=”\\\\SERVER\\Windows_CD “
Note:
The Windows installer will add I386 or/and AMD64 to this path automatically, so we do not need to add them here.
3.2. Registry Change
Now we have two more commands to run before calling sysocmgr.exe. This one to make a copy of the registry settings…
reg save “HKLM\SOFTWARE\Microsoft\Windows\CurrentVersion\Setup” “C:\TEMP\Original.reg”
…and this one to change them to what we want to have for the installation
reg import “C:\TEMP\InstallationSource.reg”
One more command is required after the installation…
reg restore “HKLM\SOFTWARE\Microsoft\Windows\CurrentVersion\Setup” “c:\TEMP\Original.reg”
…to return everything back
3.3. What Files Are Used?
Not always is it possible to use a shared folder for the installation files. In such a case all necessary files can be copied locally to the server, where we want to install SNMP. Those files are:
For Windows 2000 and 2003 32-bit edition
- i386\*.mi_
- i386\evnt*.*
- i386\hostmib.*
- i386\lmmib2.*
- i386\snmp*.*
For Windows 2003 64-bit edition
- i386\wsnmp*.*
- amd64\*.mi_
- amd64\evnt*.*
- amd64\hostmib.*
- amd64\lmmib2.*
- amd64\snmp*.*
- amd64\wsnmp32.dl_
4. How to Run It Remotely
Let’s combine all the commands we want to run on the remote server into one batch file, called snmpinstall.bat. There are a lot of ways to run our batch file on the remote machine. Let’s copy all the files to the server and try psexec from sysinternals (http://technet.microsoft.com/en-us/sysinternals ).
4.1. PSExec
PSExec \\RemoteComputer SNMPInstall.bat
When it runs sysocmgr.exe, it gives the error
401.339.0: 0x80070002 (WIN32: 2)
Error code is 2; we will return to its meaning a bit later. Now let’s try to run it with admin account
PSExec \\RemoteComputer -u “Domain\Account” -p “Password” SNMPInstall.bat
Now it even does not want to start. Maybe my copy of PSExec is corrupted, but it just did not work
Logon failure: unknown user name or bad password.
OK, Let’s try schtasks.exe
4.2. SCHTASKS
Create a scheduled task on a server…
SCHTASKS /CREATE /S RemoteComputer /SC ONCE /RU “Domain\Account” /RP “Password” /TN TaskName /TR SNMPInstall.bat /ST 00:00:01
WARNING: The Scheduled task “TaskName” has been created, but may not run because the account information could not be set.
Oops… SCHTASKS cannot pass the password to the remote machine to create a scheduled task. OK, we can run this scheduled task under SYSTEM account
SCHTASKS /CREATE /S RemoteComputer /SC ONCE /RU “SYSTEM” /TN TaskName /TR SNMPInstall.bat /ST 00:00:01
SCHTASKS /RUN /S RemoteComputer /TN TaskName
Now it runs suspiciously quickly. If we check out the scheduled tasks log file, we will see the reason:
“TaskName.job” (SNMPInstall.bat)
Started 6/13/2011 3:43:51 PM
“TaskName.job” (SNMPInstall.bat)
Finished 6/13/2011 3:44:01 PM
Result: The task completed with an exit code of (2).
Error code 2 means “No such folder”
The NT ATHORITY\SYSTEM account, which we used this time, is a local account and it does not have any privileges to go to the network. The same error happened to PSExec and the reason is the same: PSExec runs through a service on a remote machine and this service uses local SYSTEM account
Now we see that we have to copy all necessary files to the remote server and run the installation batch file under system account. It will do the job. Both PSExec and SCHTASKS will work. The only difference is that PSExec has to install a service on a remote machine, SCHTASKS uses Windows Task Scheduler and does not install anything.
Note:
Windows 2008 has very simple way to install any components from the command line. This single command will install SNMP on Windows 2008
Servermanagercmd –install “SNMP-Services”
5. Configuration
All the SNMP settings are stored in registry, which makes this task a bit easier. The settings we need to configure are shown below
- HKLM\SYSTEM\CurrentControlSet\Services\SNMP\Parameters\EnableAuthenticationTraps
- HKLM\SYSTEM\CurrentControlSet\Services\SNMP\Parameters\NameResolutionRetries
- HKLM\SYSTEM\CurrentControlSet\Services\SNMP\Parameters\PermittedManagers
- HKLM\SYSTEM\CurrentControlSet\Services\SNMP\Parameters\TrapConfiguration
- HKLM\SYSTEM\CurrentControlSet\Services\SNMP\Parameters\ValidCommunities
- HKLM\SYSTEM\CurrentControlSet\Services\SNMP\Parameters\RFC1156Agent\sysContact
- HKLM\SYSTEM\CurrentControlSet\Services\SNMP\Parameters\RFC1156Agent\sysLocation
EnableAuthenticationTraps, NameResolutionRetries, sysContact, and sysLocation are just registry values. We can leave them untouched. ValidCommunities, PermittedManagers, and TrapConfiguration are way more important. They define what systems can communicate to the host via SNMP
5.1. ValidCommunities
The ValidCommunities key contains the list of SNMP communities and permissions. It looks like
“<Community Name>”=dword:<Access Rights>
The access rights have the following values:
- NONE – 0x0001
- NOTIFY – 0x0002
- READ ONLY – 0x0004
- READ/WRITE – 0x0008
- READ/CREATE – 0x0010
For example:
“public”=dword:00000004
“private”=dword:00000008
5.2. PermittedManagers
The PermittedManagers key contains the list of hosts, which can query or update a host via SNMP. It is a numbered list of names or IP addresses. For example:
“1”=”10.10.10.1″
“2”=”MonitoringServer.doamin.com”
5.3. TrapConfiguration
The TrapConfiguration key is a list of subkeys, one per community names. In turn every subkey contains a list of hosts, to which the traps will be sent. For example:
TrapConfiguration\public
“1”=”10.10.10.1″
“2”=”MonitoringServer.doamin.com”
Note:
Community names are case-sensitive
6. Real Example
This example has been tested and works.
Very important note:
Since sysocmgr.exe is used to install any optional Windows components, it stops all services it can potentially change and then starts them again. Not a big deal? One of these services is MS DTC, so if we use sysocmgr.exe on a SQL cluster, the cluster loses the DTC cluster resource and fails over. No way to prevent that, just use sysocmgr.exe on a passive node and fail it over manually when it is possible.
6.1. Assumptions
Our workstation name: WKS1
Remote server name: SRV1
Installation files location: \\SOFTWARE\WIN2K3\
SNMP Community name: CommNAME
SNMP access rights: Read-only
Monitoring server IP address: 10.10.10.1
All the commands run off of WKS1; SRV1 is Windows 2003 32-bit server
6.2. Create Installation Folder
Create a batch file, call it SNMPTempFolder.bat and add the following lines to it
C:
CD\
MD TEMP
CD TEMP
MD SNMP
CD SNMP
MD I386
Run these commands:
Copy SNMPTempFolder.bat \\SRV1\C$\
SCHTASKS /CREATE /S SRV1 /SC ONCE /RU “SYSTEM” /TN SNMP_Remote_Install /TR C:\SNMPTempFolder.bat /ST 00:00:01
SCHTASKS /RUN /S SRV1 /TN SNMP_Remote_Install
6.3. Create Files for Remote Installation
Create the InstallationSource.reg file with the following content
Windows Registry Editor Version 5.00
[HKEY_LOCAL_MACHINE\SOFTWARE\Microsoft\Windows\CurrentVersion\Setup]
“SourcePath”=”C:\\TEMP\\SNMP”
“ServicePackSourcePath”=”C:\\TEMP\\SNMP”
Create the SNMPConfig.reg file with the following content
Windows Registry Editor Version 5.00
[HKEY_LOCAL_MACHINE\SYSTEM\CurrentControlSet\Services\SNMP\Parameters]
“EnableAuthenticationTraps”=dword:00000000
[HKEY_LOCAL_MACHINE\SYSTEM\CurrentControlSet\Services\SNMP\Parameters\PermittedManagers]
“1”=”10.10.10.1″
[-HKEY_LOCAL_MACHINE\SYSTEM\CurrentControlSet\Services\SNMP\Parameters\TrapConfiguration\public]
[HKEY_LOCAL_MACHINE\SYSTEM\CurrentControlSet\Services\SNMP\Parameters\TrapConfiguration\CommNAME]
“1”=”10.10.10.1″
[-HKEY_LOCAL_MACHINE\SYSTEM\CurrentControlSet\Services\SNMP\Parameters\ValidCommunities]
[HKEY_LOCAL_MACHINE\SYSTEM\CurrentControlSet\Services\SNMP\Parameters\ValidCommunities]
“CommNAME”=dword:00000004
Create the SNMP.inf file with the following content
[Components]
NetOC=ON
[NetOptionalComponents]
SNMP=1
Create the SNMPInstall.bat file with the following content
DEL “c:\TEMP\SNMP\Original.reg” /q
REG Save “HKLM\SOFTWARE\Microsoft\Windows\CurrentVersion\Setup” “C:\TEMP\SNMP\Original.reg”
REG Import “C:\TEMP\SNMP\InstallationSource.reg”
“%windir%\system32\sysocmgr.exe” /r /i:”%windir%\inf\sysoc.inf” /u:”C:\TEMP\SNMP\SNMP.inf”
NET STOP snmptrap
NET STOP snmp
REG Import “C:\TEMP\SNMP\SNMPConfig.reg”
NET START snmp
REG Restore “HKLM\SOFTWARE\Microsoft\Windows\CurrentVersion\Setup” “C:\TEMP\SNMP\Original.reg”
Copy files for remote installation
Copy InstallationSource.reg \\SRV1\C$\TEMP\SNMP
Copy SNMPConfig.reg \\SRV1\C$\TEMP\SNMP
Copy SNMP.inf \\SRV1\C$\TEMP\SNMP
Copy SNMPInstall.bat \\SRV1\C$\TEMP\SNMP
Copy SNMP installation files
Copy \\SOFTWARE\WIN2K3\i386\*.mi_ \\SRV1\C$\TEMP\SNMP\I386
Copy \\SOFTWARE\WIN2K3\i386\evnt*.* \\SRV1\C$\TEMP\SNMP\I386
Copy \\SOFTWARE\WIN2K3\i386\hostmib.* \\SRV1\C$\TEMP\SNMP\I386
Copy \\SOFTWARE\WIN2K3\i386\lmmib2.* \\SRV1\C$\TEMP\SNMP\I386
Copy \\SOFTWARE\WIN2K3\i386\snmp*.* \\SRV1\C$\TEMP\SNMP\I386
6.4. Install!
Run the following commands:
SCHTASKS /CREATE /S SRV1 /SC ONCE /RU “SYSTEM” /TN SNMP_Remote_Install /TR C:\TEMP\SNMP\SNMPInstall.bat /ST 00:00:01
SCHTASKS /RUN /S SRV1 /TN SNMP_Remote_Install
We can monitor the process by running
SCHTASKS /QUERY /S SRV1
SNMP has been installed, configured and should be accessible now.
The job is done, thank you!
This entry was posted on Thursday, July 28th, 2011 at 9:50 pm and is filed under Monitoring, Scripts, Windows Server. You can follow any responses to this entry through the RSS 2.0 feed.
You can leave a response, or trackback from your own site.
