Creating a New User on Windows Server 2003
Preface:
Even if you will not be using Terminal Services or have any
other users using your server it is ALWAYS recommended to create an additional
two (2) users, apart from Administrator. These two users are — another
member of the «Administrators» group (to avoid actually logging on with the
Administrator account, but you have the same privileges) AND a regular user, who
is part of the «Users» group. It is recommended to only log on with the
regular user, and use the «runas» command when you need to run a program as an
Administrator, and to only log on with the secondary Administrator user when it
is absolutely needed. This will show you how to create a secondary
Administrator.
Method:
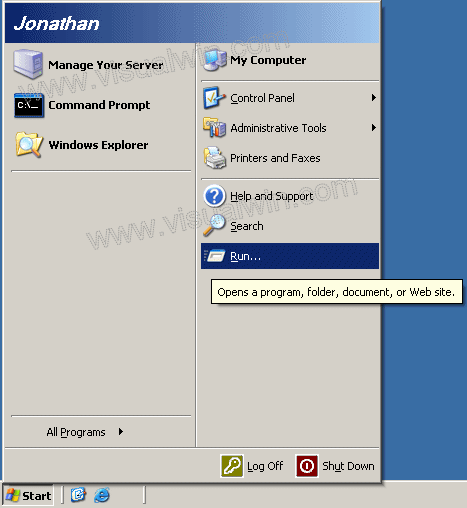
Click the Start button, then Run…
Then type «lusrmgr.msc» without the quotes
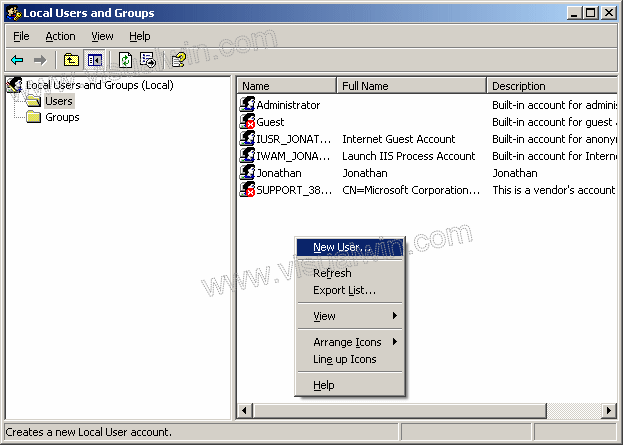
In the window that opens, right click in the right panel and
click «New User»
In the New User dialog, type in your preferences for a new user
name and password (this will be our secondary Administrator account).
Uncheck User must change password, and check Password never expires
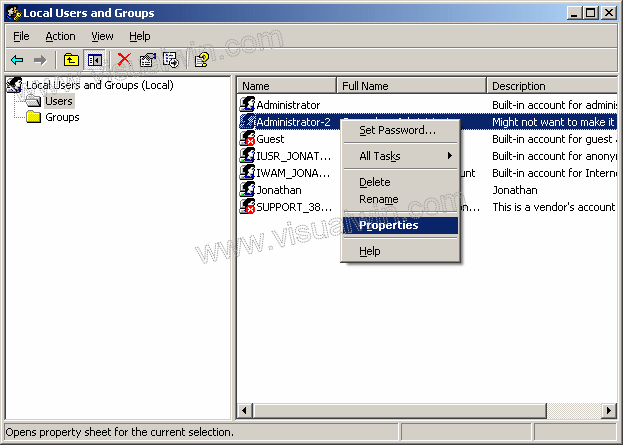
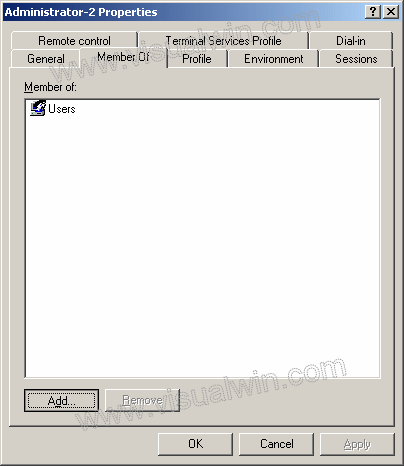
Now, right click the new user and click Properties in the pop up
menu
Go to the «Member of» tab and
press the Add button
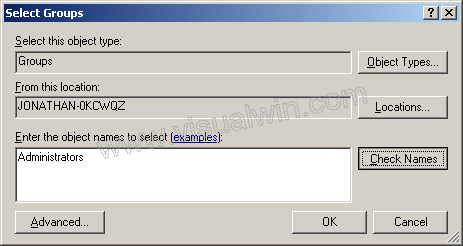
Type «Administrators» without the quotes, then press the Check
Names button (to complete the name, it will add the name of your computer) and
press OK when it is done, then press OK on the Local Users and Groups dialog
We now have a secondary Administrator account! To have a regular
user (highly recommended) do the same as above, until the User properties.
My reasoning
Q: If I already made a new Administrator account why do I have
to make a user account?
A: You don’t have to, you never have to, but it is recommended
in case you stay logged on, and someone gains control of the desktop (locally or
remotely).
Q: Should I stay logged in with the Administrator account or the
plain user account?
A: You should log out when you are not doing work on the server
directly, however, if you have a program that requires you to be logged in for
it to work (a good example is the bandwidth monitoring program, DU Meter) then
you should stay logged in with the ordinary user account.
<— Go back to the main tutorial page
Copyright © 2002-2025 Jonathan Maltz. For trademark/copyright information,
click here. About me.
Main page. Contact me.
In a Windows server environment, it is very important that only authenticated users are allowed to log in for security reasons. To fulfill this requirement the creation of User accounts and Groups is essential.
User Accounts
In Windows Server 2003 computers there are two types of user accounts. These types are local and domain user accounts. The local user accounts are the single user accounts that are locally created on a Windows Server 2003 computer to allow a user to log on to a local computer. The local user accounts are stored in Security Accounts Manager (SAM) database locally on the hard disk. The local user accounts allow you to access local resources on a computer
On the other hand the domain user accounts are created on domain controllers and are saved in Active Directory. These accounts allow to you access resources anywhere on the network. On a Windows Server 2003 computer, which is a member of a domain, you need a local user account to log in locally on the computer and a domain user account to log in to the domain. Although you can have a same login and password for both the accounts, they are still entirely different account types.
You become a local administrator on your computer automatically because local computer account is created when a server is created. A domain administrator can be local administrator on all the member computers of the domain because by default the domain administrators are added to the local administrators group of the computers that belong to the domain.
This article discusses about creating local as well as domain user accounts, creating groups and then adding members to groups.
Creating a Local User Account
To create a local user account, you need to:
1. Log on as Administrator, or as a user of local administrator group or Account Operators local group in the domain.
2. Open Administrative Tools in the Control Panel and then click Computer Management, as shown in Figure 1.
Figure 1
3. Click Users folder under Local Users and Groups node, as shown in Figure 2.
Figure 2
4. Right-click Users and then click New User in the menu that appears, as shown in Figure 3:
Figure 3
The New User dialog box appears as shown below in Figure 4.
5. Provide the User name and the Password for the user in their respective fields.
6. Select the desired password settings requirement.
Select User must change password at next logon option if you want the user to change the password when the user first logs into computer. Select User cannot change password option if you do not want the user to change the password. Select Password never expires option if you do not want the password to become obsolete after a number of days. Select Account is disabled to disable this user account.
7. Click Create , and then click Close:
Figure 4
The user account will appear on clicking Users node under Local Users and Groups on the right panel of the window.
You can now associate the user to a group. To associate the user to a group, you need to:
8. Click Users folder under Local Users and Groups node.
9. Right-click the user and then select Properties from the menu that appears, as shown in Figure 5:
Figure 5
The Properties dialog box of the user account appears, as shown in Figure 6:
10. Click Member of tab.
The group(s) with which the user is currently associated appears.
11. Click Add.
Figure 6
The Select Groups dialog box appears, as shown in Figure 7.
12. Select the name of the group/object that you want the user to associate with from the Enter the object names to select field.
If the group/object names do not appear, you can click Advanced button to find them. Also if you want to choose different locations from the network or choose check the users available, then click Locations or Check Names buttons.
13. Click OK .
Figure 7
The selected group will be associated with the user and will appear in the Properties window of the user, as shown in Figure 8:
Figure 8
Creating a Domain User Account
The process of creating a domain user account is more or less similar to the process of creating a local user account. The only difference is a few different options in the same type of screens and a few steps more in between.
For example you need Active Directory Users and Computers MMC (Microsoft Management Console) to create domain account users instead of Local Users and Computers MMC. Also when you create a user in domain then a domain is associated with the user by default. However, you can change the domain if you want.
Besides all this, although, a domain user account can be created in the Users container, it is always better to create it in the desired Organization Unit (OU).
To create a domain user account follow the steps given below:
1. Log on as Administrator and open Active Directory Users and Computers MMC from the Administrative Tools in Control Panel, as shown in Figure 9.
2. Expand the OU in which you want to create a user, right-click the OU and select New->User from the menu that appears.
Figure 9
3. Alternatively, you can click on Action menu and select New->User from the menu that appears.
The New Object –User dialog box appears, as shown in Figure 10.
4. Provide the First name, Last name, and Full name in their respective fields.
5. Provide a unique logon name in User logon name field and then select a domain from the dropdown next to User logon name field if you want to change the domain name.
The domain and the user name that you have provided will appear in the User logon name (pre-Windows 2000) fields to ensure that user is allowed to log on to domain computers that are using earlier versions of Windows such as Windows NT.
Figure 10
6. Click Next.
The second screen of New Object –User dialog box appears similar to Figure 4.
7. Provide the User name and the Password in their respective fields.
8. Select the desired password settings requirement:
Select User must change password at next logon option if you want the user to change the password when the user first logs into computer. Select User cannot change password option if you do not want the user to change the password. Select Password never expires option if you do not want the password to become obsolete after a number of days. Select Account is disabled to disable this user account.
9. Click Next.
10. Verify the user details that you had provided and click Finish on the third screen of New Object –User dialog box.
11. Follow the steps 9-13 mentioned in Creating a Local User Account section to associate a user to a group.
Creating Groups
Just like user accounts, the groups on a Windows Server 2003 are also of two types, the built in local groups and built in domain groups. The example of certain built in domain groups are: Account Operators, Administrators, Backup Operators, Network Configuration Operators, Performance Monitor Users, and Users. Similarly certain built in local groups are: Administrators, Users, Guests, and Backup operators.
The built-in groups are created automatically when the operating system is installed and become a part of a domain. However, sometimes you need to create your own groups to meet your business requirements. The custom groups allow you limit the access of resources on a network to users as per your business requirements. To create custom groups in domain, you need to:
1. Log on as Administrator and open Active Directory Users and Computers MMC from the Administrative Tools in Control Panel, as shown in Figure 9.
2. Right-click the OU and select New->Group from the menu that appears.
The New Object –Group dialog box appears, as shown in Figure 10.
3. Provide the name of the group in the Group name field.
The group name that you have provided will appear in the Group name (pre-Windows 2000) field to ensure that group is functional on domain computers that are using earlier versions of Windows such as Windows NT.
4. Select the desired group scope of the group from the Group scope options.
If the Domain Local Scope is selected the members can come from any domain but the members can access resources only from the local domain.
If Global scope is selected then members can come only from local domain but can access resources in any domain.
If Universal scope is selected then members can come from any domain and members can access resources from any domain.
5. Select the group type from the Group Type options.
The group type can be Security or Distribution . The Security groups are only used to assign and gain permissions to access resources and Distribution groups are used for no-security related tasks such as sending emails to all the group members.
Figure 11
6. Click OK.
You can add members to group just as you add groups to members. Just right-click the group in Active Directory Users and Computers node in the Active Directory Users and Computers snap-in, select Properties, click Members tab from the Properties window of the group and then follow the steps from 11-13 from Creating Local User Accounts section.
Article Summary
Dealing with User & Group accounts in a Windows Server environment is a very important everyday task for any Administrator. This article covered basic administration of user and group accounts at both local and domain environments.
В сети Windows существует два типа аккаунтов: локальные и регистрация в домене. Локальные аккаунты позволяет воспользоваться только ресурсами конкретного компьютера. Доменная же регистрация позволяет работать в сети с любого компьютера. Для администрирования сети, необходимо чтобы на каждом локальном компьютере также была запись для администратора системы.
Идентификация пользователей в сети
Для идентификации пользователей в сети, Windows использует несколько взаимозаменяемых способов. Каждый способ однозначно идентифицирует пользователя сети и может быть как относительным, так и абсолютным, включающим в себя имя домена.
Если пользователя зовут, скажем, John Brown и он зарегистрирован в домене «company.com», то к нему можно обратиться одним из следующих способов:
Способы идентификации пользователя
| Тип имени | Пример использования | Комментарий |
|---|---|---|
| Login name | john | Относительный в рамках текущего домена |
| NetBIOS | company\john | Используется в версиях до Windows 2000 |
| UPN (общий формат) | john@company.com | Используется как основной в Active Directory в версиях после Windows 2000 |
| LDAP (absolute) | CN=John Brown, ou=sales, dc=company, dc=com | Для идентификации в каталогах, работающих по протоколу LDAP |
| LDAP (relative) | CN=John Brown | Для идентификации в каталогах, работающих по протоколу LDAP |
Для логина пользователя, который непосредственно регистрируется в домене, действуют следующие правила:
- Логин должен быть уникальным в пределах своего домена
- Логин может содержать до 20 символов (можно и больше, но проверяться будут только первые 20 символов)
- Логин пользователя может содержать: латинские буквы, цифры и спецсмволы, за исключением следующих: » / [ ] : ; | = , + * ? < >
- Логин пользователя не чувствителен к регистру
Требования к паролям пользователей по умолчанию:
- Длина не менее 7 символов
- Пароль не может совпадать с логином полностью или частично
- Пароль должен удовлетворять как минимум трем из четырех правил:
- Включать в себя латинские символы в верхнем регистре (A-Z)
- Включать в себя латинские символы в нижнем регистре (a-z)
- Использовать цифры от 0 до 10
- Использовать спецсимволы (например: !, $, #, %)
Windows хранит для каждого зарегистрированного пользователя все пять вышеописанных имен и можно использовать любое из них для идентификации пользователя при администрировании сети.
Регистрация посредством MMC
Данный способ является основным при регистрации в домене и подразумевает использование оснастки «Active Directory Users and Computers» в консоли MMC.

Для добавления нового пользователя необходимо выбрать данную оснастку, затем нужную папку и вызвав контекстное меню выбрать в нем пункт «New->User». Откроется диалоговое окно, показанное выше, в котором и нужно будет заполнить все необходимые поля, включая домен и имя NetBIOS.
После заполнения общей информации о пользователя, необходимо будет дважды ввести его пароль. При этом обратите внимание на требованию к паролю, которые были перечислены выше.
Добавление пользователей из командной строки
Также можно добавлять новых пользователей, используя консольные команды dsadd user и net user. В первом случае мы добавляем новый объект в каталог Active Directory и команда добавления должна выглядеть следующим образом:
 dsadd user "cn=John F. Brown, cn=users, dc=company, dc=com", samid john,
  -upn john@company.com -fn John -ln Brown -display "John F. Brown" -pwd Qwerty1234
Т.е. при регистрации мы указываем все формы имени пользователя. Вторая команда более простая и позволяет завести пользователя, передав в командной строке его логин и пароль:
net user john Qwerty1234 /add
В этом случае, пользователь будет размещен по умолчанию в контейнере «Users» и создается только NetBIOS имя. Остальные параметры пользователя необходимо будет затем изменять, используя диалоговое окно MMC.
Смотри также
- Администрирование Windows Server 2003
DSadd a New Way to Create Users in Windows 2003
DSadd a New Way to Create Users in Windows 2003
Introduction to DSadd
DSadd is the most important member of this DS scripting family. The primary use of DSadd is to quickly add user accounts to Windows Server 2003 Active Directory. However, you can also use this method to create OUs computers, groups, or even contacts.
Creating an OU – DSadd ou….
Let us create an OU (organizational unit) to hold the rest of the test objects. Edit the dc=cp and dc =com to the fully qualified name of your Windows 2003 domain. As ever, pay close attention to the syntax, for instance the DN «ou=guyds, dc=cp, dc=com» is enclosed in double speech marks. Single ‘speech marks’ will not work. Also remember that DS is new in Window 2003, so will not work in Windows 2000.
Example 1 Using DSadd to Create an Organizational Unit in Windows 2003
Preparation:
Logon to your domain controller.
Examine the script below. Edit ou= or dc= to reflect YOUR domain.
Run, CMD then copy your script and paste into the command window. Alternatively type it starting with dsadd ou ………
dsadd ou «ou=guyds, dc=cp, dc=com»
Note 1: dsadd ou. This command tells Active Directory which object to create, in this case an OU (not a user).
Note 2: You only really need speech marks if there is a space in any of your names. So ou=guyds, dc=cp, dc=com would work fine, but ou=GUY Space DS, dc=cp, dc=com fails because of the spaces in the GUY Space DS, name. In this second example you would type: «ou=GUY Space DS, dc=cp, dc=com»
°
Example 2 Employing DSadd to Create a User. (Assumes you have completed Example 1)
The purpose of this example is to create a new user in an OU called guyds.
Preparation:
Logon to your domain controller.
Examine the script below. Decide if cn= or ou= or dc= need editing.
Run, CMD then copy your script and paste into the command window. Alternatively type it starting with dsadd user ………
Creating a User – DSadd user….
dsadd user «cn=guyt, ou=guyds, dc=cp, dc=com»
Note: DSadd requires the complete distinguished name. Note also that the distinguished name is encased in double «speech marks». I expect you spotted that the user will be created in the guyds organizational unit that was created in the first example. Change «cn=guyt to a different user name if you wish.
Guy Recommends: SolarWinds’ Free Bulk Import Tool
Import users from a spreadsheet. Just provide a list of the users with their fields in the top row, and save as .csv file. Then launch this FREE utility and match your fields with AD’s attributes, click and import the users.
Optionally, you can provide the name of the OU where the new accounts will be born. Download your FREE bulk import tool.
If you need more comprehensive software, download a free trial of SAM (Server & Application Monitor)
DS Error Messages
DS has its own family of error messages. I found that they are specific and varied, just remember to pay attention to detail. READ ERROR MESSAGES SLOWLY.
See Also
- DS Commands
- WSH – Create a user
- Sample VBScript – General scripting principles
- LDIFDE Export
- LDIFDE Import
- CSVDE Export
- CSVDE Import
About The Author
Guy Thomas
The following article describes the steps to create a new user for your server. New Users can be used to log into your server through Terminal Services, added as FrontPage users or configured as FTP users.
To create a new User, please follow these steps:
- Log into your server through Terminal Services or Remote Desktop Connection.
- Open Computer Management using either method below:
- Right-click on the My Computer Icon and select Manage.
- Click Start, Programs, Administrative Tools, and Computer Management.
- Expand Local Users and Groups.
- Click on Users. In the right window you will see a list of the current users on the server.

- Right-click Users and select New User.
- Enter the following information:
- User Name (required): all usernames must be unique.
- Full Name (optional): the full name of the user
- Description (optional): a description of the user
- Password (required): we strongly recommend you use at least 6 characters and mixture of uppercase letters, lowercase letters and numbers for your passwords. For example, ft5yH7.
- Confirm Password (required): this entry must be identical to the Password field.
- Set the options that suit your needs:
- User must change password at next login: if checked, the user must change their password the next time they login. We recommend you uncheck this so that you have full control over the password.
- User cannot change password: if the first option is unchecked you will be able to set this option. We recommend you check this option so that only the administrator of the machine can modify the users password.
- Password never expires: controls if the password will expire 30 days. Once the password expires you will need to reset it manually.
- Account is disabled: when checked, the User will no longer be valid.
- Click Create to add the new user.
By default, new users are added to the Users group. This will allow the user to later be configured as an FTP user through IIS or as a FrontPage User. If you wish for this user to have access to the server through Terminal Services or Remote Desktop Connection you will need to add the user to the Administrators group. We do not recommend adding additional Administrative users as this gives more people direct access to your machine.
To add a user to the Administrators group, please follow these steps:
- Right-click the username and select Properties.
- Select the Members Of Tab. You will see a list of groups the User is assigned to.
- Click Add.
- Type in the name of the group, Administrators.
- Click OK. You will now see the Administrators group in the list.
- Click OK.