
Map Your Next Move at VMware Explore
Join peers and leaders at the essential cloud event for IT professionals.
Learn More
Map Your Next Move at VMware Explore
Join peers and leaders at the essential cloud event for IT professionals.
Learn More
Community Search
Welcome to the Broadcom Community
Find Your Communities
Our communities are designed by division, as you can see below. Visit each division’s homepage for a list of product communities under each division. From there, click on the communities you’re interested in, choose «Join Community,» and select your notification settings. It’s that simple. Join as many as you’d like.
Register Here
Please note: Your first post to any of our communities will be placed in a moderation queue for review to help us prevent spammers from posting unwanted content. Our community managers closely monitor this moderation queue, and once your first post is approved, your posts will no longer go through moderation. Please do not submit the same post multiple times.
Check Out Our Events
Looking for product roadmap webcasts, technical sessions, user group meetings, conferences, and workshops? Check out our events calendars:
- Application Networking and Security
- Carbon Black — Symantec
- VeloCloud
- Carbon Black
- Tanzu
- VMware Cloud Foundation
- Enterprise Software Events
- Mainframe Software Events
- Symantec Enterprise Events
- VMware Events
Latest Discussions
-
This solution does not work for me. I tried all of the steps above and I still get an error message.
-
Posted in:
OPS/MVS
Hello all,
Three existing endpoints are updated to introduce the auto-enable setting into the REST API. Two endpoints return the auto-enable setting for each listed or specified rule, AOF Rule list endpoint (/api/v1/rules) and AOF Rule retrieval endpoint …
Recent Blogs
-
Auto Scaling of Kubernetes Workloads using Custom Application …
-
Posted in:
Bitnami
Model Context Protocol (MCP) has taken the world …
Upcoming Events
Engagement Leaderboard
Topic: Looking for a SVGA driver for Windows 2000 for VMWARE (Read 1242 times)
0 Members and 1 Guest are viewing this topic.
This is not quite «vintage» but probably old enough Going back 20 years.
I am trying to get a win2k VMWARE VM going, to run a particular VisBas app which stopped working when winXP came along.
I installed win2k in the VM by using the «ISO image» option. That all worked fine and it runs, but it sits there at 640×480 only. Win2k needs a «SVGA» driver to go above that.
And I can’t find one. Apparently VMWARE do a thing called VMWARE tools, installed in the guest OS, and v10 of that or earlier contains that driver. I did find various versions of these tools but they don’t seem to install, probably because this VM was created by installing win2k inside it from a DVD. There are many google hits on this exact thing but nothing leads to anything that is real.
VMWARE emulates a particular kind of video card, probably Nvidia, so this is a «win2000 svga driver for VMWARE» specifically.
I also need networking drivers (again VMWARE will be emulating something) but this is not 100% essential. The video is more important; 640×480 is completely useless in this case.
Thank you in advance for anything
Logged
Z80 Z180 Z280 Z8 S8 8031 8051 H8/300 H8/500 80×86 90S1200 32F417
Update, in case somebody finds this in 25 years’ time
You have to apply win2000 SP4. This can still be found «out there». Then you have to apply
windows2000-kb891861-v2-x86-enu_f118bd276f4211929719961a2e929b620c1a2234.exe (31MB) which is also online.
Also according to some posts there is
windows2000-kb891861-v2-x86-express-enu_00c3d36e8f12ad204a1cd7d168f3288f6f47d66a.exe
but this very small stub just tries to access some files online on a now-dead M$ URL. But fortunately this update is not needed.
Then VMWARE Tools installs fine and you get all the video resolution! It also installs a ton of other drivers.
« Last Edit: November 01, 2024, 12:16:21 pm by peter-h »
Logged
Z80 Z180 Z280 Z8 S8 8031 8051 H8/300 H8/500 80×86 90S1200 32F417
Interesting! I already use the Simplix route to update a load of win7-64 machines to the latest «contract customer» M$ updates, which are practically everything that win10/win11 contains in terms of security.
I am yet again trying to get networking working between win2k and win10 (the VMware guest and the host, respectively). Nothing seems to work. Of course I have shares set up, and win10 / win7-64 works fine. There are some registry entries in win2k to make it work but so far no luck. VMWARE provides what it calls shared folders and sure enough that works, but the performance is quite poor.
Logged
Z80 Z180 Z280 Z8 S8 8031 8051 H8/300 H8/500 80×86 90S1200 32F417
I seem to recall that there is some registry setting you need to change (or add) in Windows 7 and newer to allow it to talk to file shares on other machines using the older, insecure versions of SMB/CIFS protocol.
Wouldn’t surprise me if they’d removed that option in Windows 10 and 11, though.
Logged
…. using the older, insecure versions of SMB/CIFS protocol. …
I had to enable SMB 1.0 protocol to share files with «Popcorn Hour A-110 Networked Media Tank (NMT)» and «D-Link ShareCenter DNS-325».
That all worked fine and it runs, but it sits there at 640×480 only.
Driver:
http://www.win3x.org/win3board/viewtopic.php?t=2462
…. Thank you in advance for anything
Nothing to be thankful for.
« Last Edit: November 01, 2024, 05:58:20 pm by Postal2 »
Logged
yes msoft in his good wisdom changed smb versions, that caused some turmoil for thoses who had external devices such as nas, or software nas …
Logged
Yes I sorted the video, as per post above, SP4 etc.
The LAN issue remains. I did do one registry change which previously worked. But that was winXP to all the later ones. win2000 is just ancient
« Last Edit: November 01, 2024, 09:58:16 pm by peter-h »
Logged
Z80 Z180 Z280 Z8 S8 8031 8051 H8/300 H8/500 80×86 90S1200 32F417
In today’s technological environment, running legacy operating systems on modern hardware is challenging. However, it can be a rewarding experience. Additionally, virtualization software such as VMware Workstation 17 Pro offers solutions. This software helps those who want to rediscover Windows 2000.
In this article, I will explain how to install Windows 2000 Professional SP4 using VMware Workstation 17 Pro. Also, I will show you how to run it on Windows 10 & 11 64-bit. Whether you want to delve into computer history or want to use legacy applications, this VM guide will help you.
How to Set Up Windows 2000 Professional SP4 on Windows 10 using VMware Workstation 17
Microsoft released the Windows 2000 operating system on February 17, 2020, for personal, laptop, and server computers.
Originally, Windows 2000 was called NT 5.0, but this name was changed to 2000 on October 27, 1998. Another common name is Windows 2K. The Windows 2000 system, which was the predecessor of NT 4.0, was fundamentally reliable but received a lot of criticism for having more than 63,000 flaws in this system.
The development of Windows 2000 was more geared towards corporate business computers and offered a more secure Internet connection compared to Windows 95 and 98.
Key features of the Windows 2000 operating system include FAT16, FAT32, NTFS file system, EFS, directory service, DFS, ASR, and RAID. In addition, services such as RAS, VPN, RADIUS, IIS, Active Directory, and RIS have been developed for data communication.
Additionally, Windows 2000 is the first Microsoft system to include the Guest account, which provides for user accounts and restrictions on accessing the system for other users.
Users who want to use the Win200 system, whose support was terminated on July 13, 2010, can now install it on a computer with old hardware. If this is not possible, they can run this old operating system on their physical computers using virtualization software such as VMware Workstation.
How to Create a New Virtual Machine for Windows 2000
If you want to experience using the Windows 2000 system, you don’t need an old PC. After installing the VMware program on your computer with the virtualization feature, you can create a new virtual machine and use this operating system on your host virtually.
In order to install Windows 2000 with VMware, you must have the system’s ISO image file. Or, if you have a physical CD/DVD installation media, you can also install it. However, download the image file from your computer, as installing the ISO file on the virtual computer will provide more performance.
Step 1
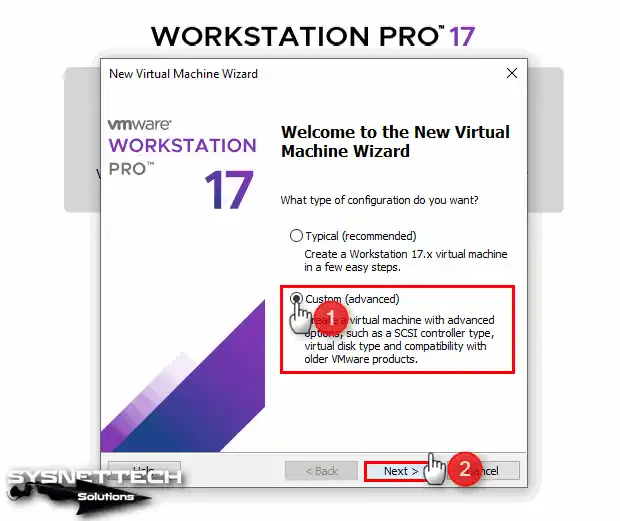
After installing the VMware 17 Pro software on your computer, run it and click Create a New Virtual Machine from the options on the program’s homepage.
Then, when the VM wizard opens, as in the image below, select the Custom (Advanced) option and click the Next button.
Step 2
By default, Workstation 17.x is selected in the VMware hardware compatibility window because the latest version of the virtualization program is installed on your system. If you are using an old VMware version, you will see the hardware version of that version here.
Change the hardware version to Workstation 10.x so that you can run the Windows 200 system entirely correctly, and then click Next.

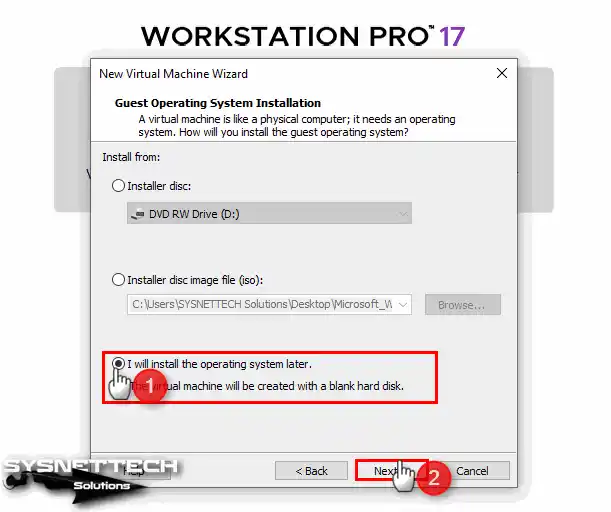
Step 3
If you have a CD/DVD installation media, as we mentioned above, you should continue with the Installer Disc option in this window. However, since you downloaded the ISO file to your computer, please select I will install the operating system later in this step and click Next.
Step 4
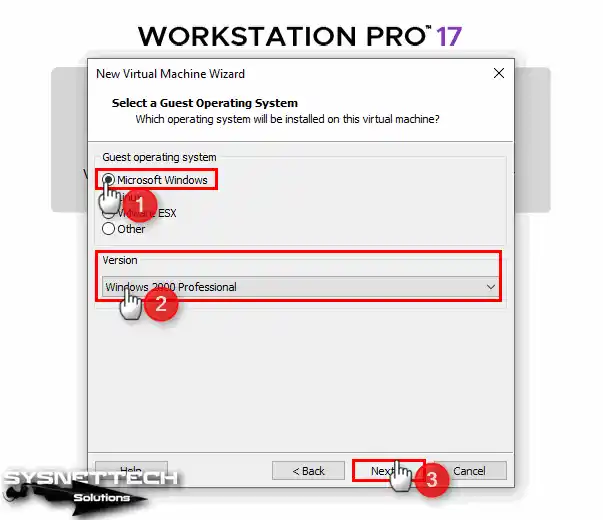
In the Guest operating system selection window, you must first select the manufacturer and then the version of the system you will install. Therefore, tick Microsoft in Guest Operating System and select Windows 2000 Professional version in Version.
Step 5
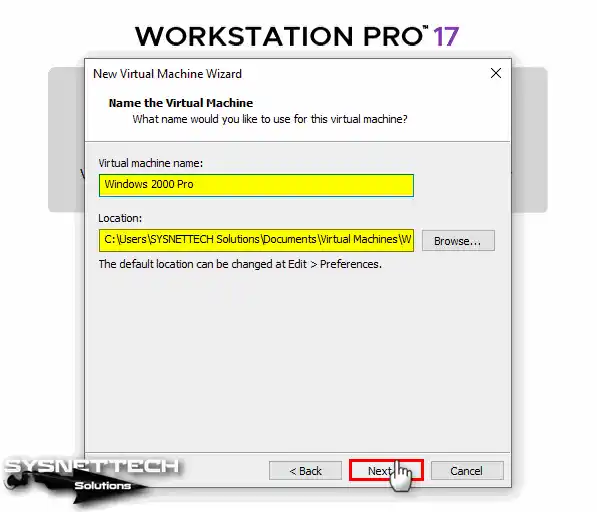
In this window, you can change the name of the virtual machine you will install, and you can also select the location to install it via the Browse button. If you have an old computer, since installing the VM on an external SSD disk will be convenient for both performance and data security, change the location and click Next to continue.
Or, if you have a more recent computer and your disk is SSD or NVMe, you can choose to install your virtual system on the host disk.
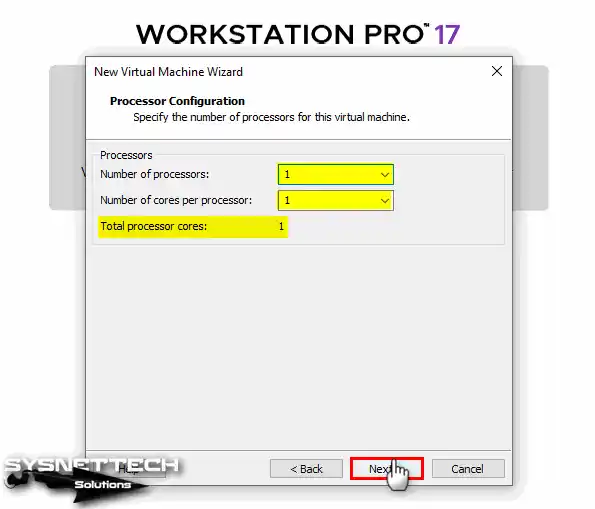
Step 6
In the processor configuration window, configure 1 processor and 1 core number for the Windows 2000 system. If you configure more CPU/Core values, the VM may not run properly.
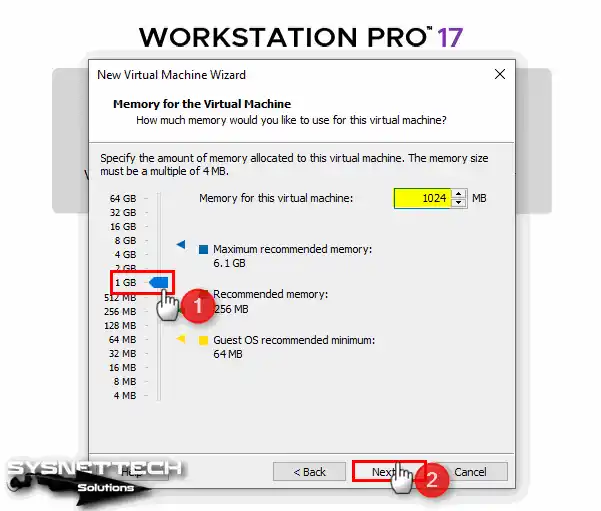
Step 7
Configure 1 GB RAM size in the memory setting window for the virtual machine and click Next.
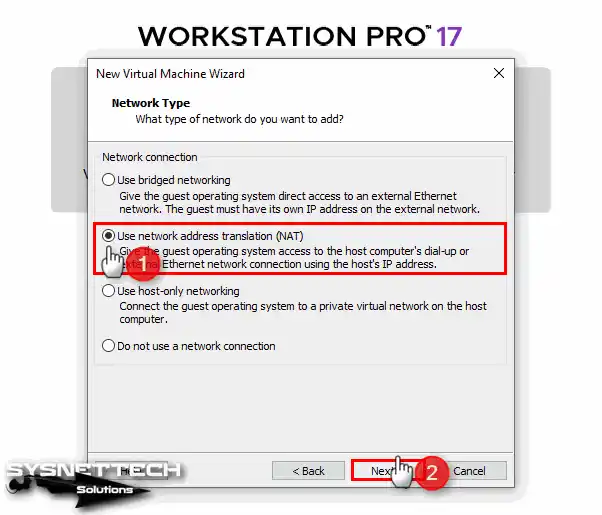
Step 8
Select NAT for the network adapter of the virtual PC on Workstation Pro and click Next.
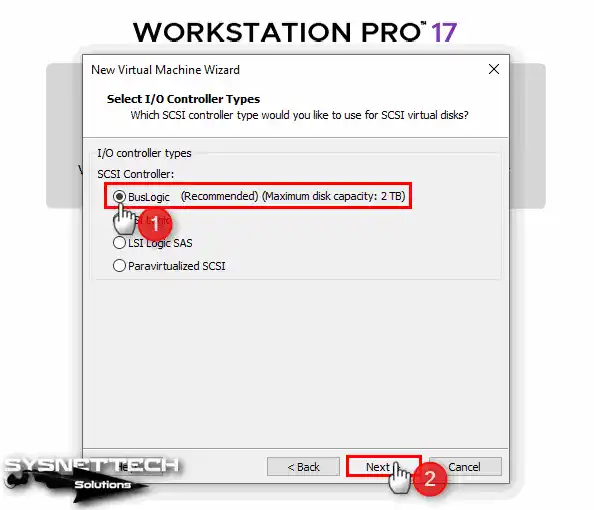
Step 9
In the I/O Controller types window, select BusLogic to operate the virtual disk more efficiently and click Next.
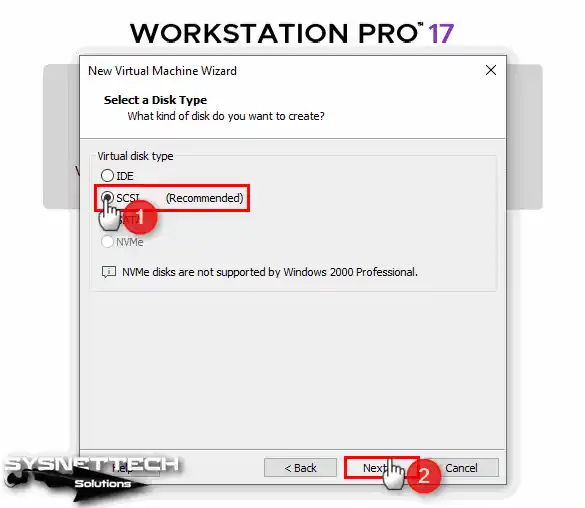
Step 10
Select the type of virtual disk as SCSI and continue with Next.
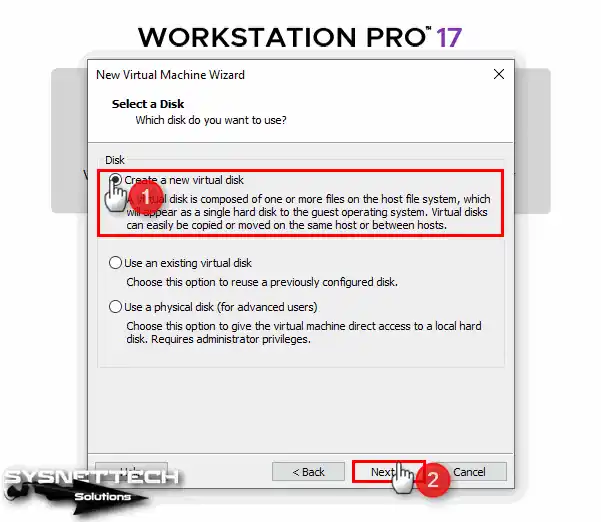
Step 11
Since you will be installing a clean Windows 2000 system, select the Create a New Virtual Disk option in the Select a Disk window. If you have a disk backup that you have installed before, you can add an existing disk in this window.
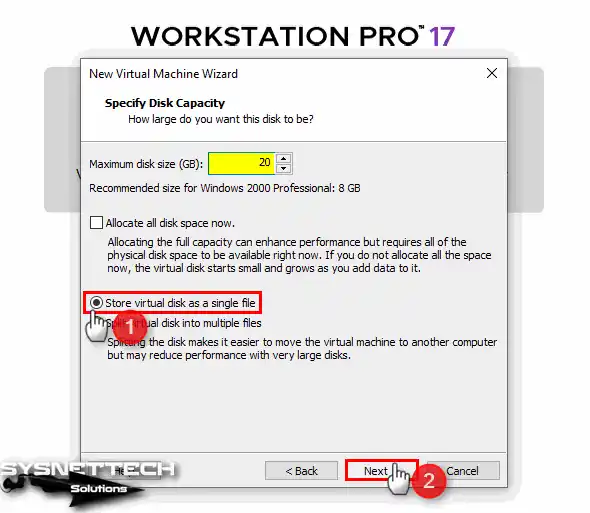
Step 12
Adjust the capacity of the virtual disk according to the operations you will perform on the system and the applications you will use. Here, you can choose the recommended disk size for Windows 2000, 8GB, or specify a higher size. Also, store the virtual disk as a single file on your host or external HDD.
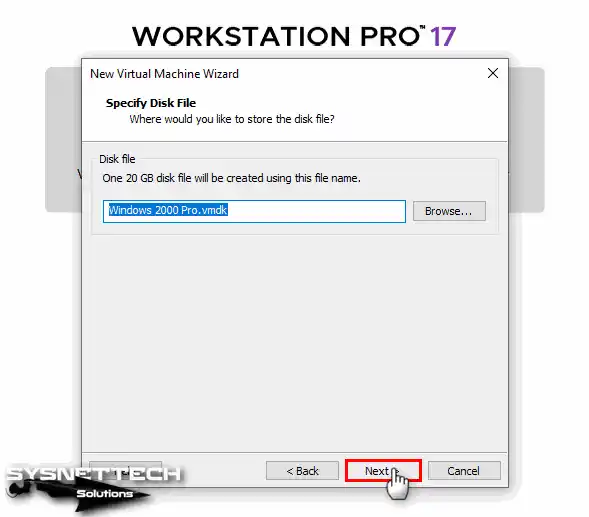
Step 13
In the “specify disk file” window, you can change the name and location of your virtual disk but continue with the default configuration.
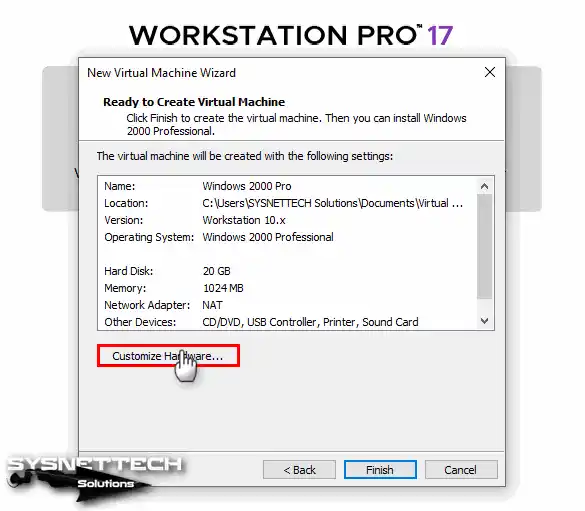
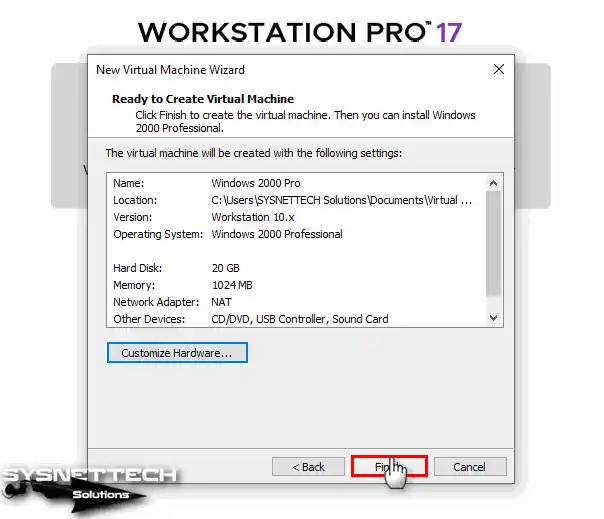
Step 14
Click the Customize Hardware button in the window containing the summary information of the settings you have configured for the virtual machine.
Step 15
After clicking on the Processor device, enable the virtualization feature by ticking all the options in the Virtualization Engine section.
- Virtualize Intel VT-x/EPT or AMD-V/RVI
- Virtualize CPU Performance Counters

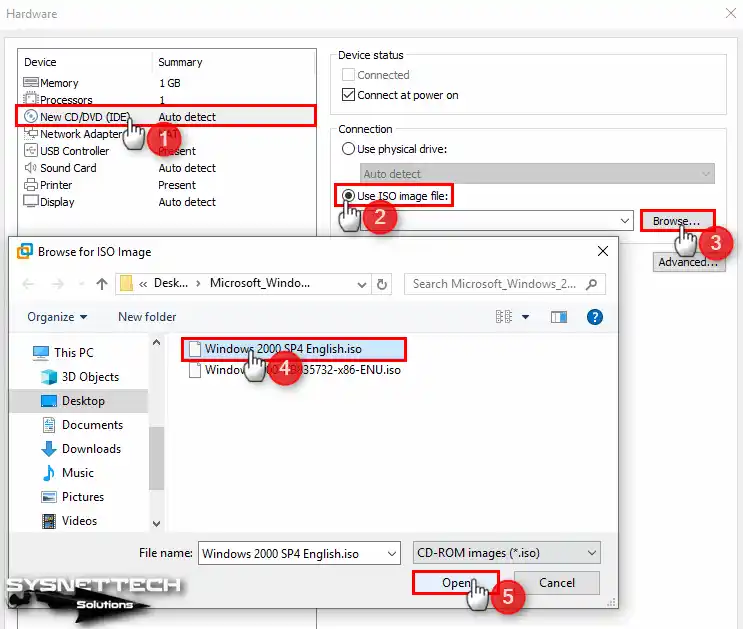
Step 16
To add the Windows 2000 ISO file to the CD/DVD device, click the Browse button after enabling the Use ISO Image File option. Select the ISO image file you downloaded to your computer and click the Open button.
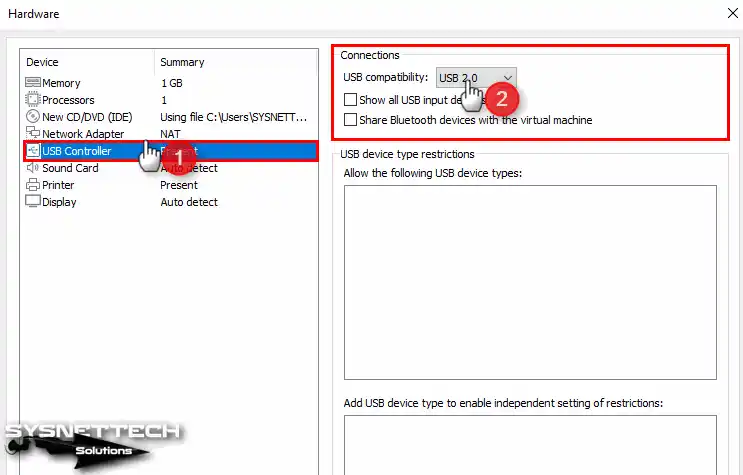
Step 17
In order to use your USB devices in your virtual system, select the 2.0 compatibility type from the USB Controller device settings.
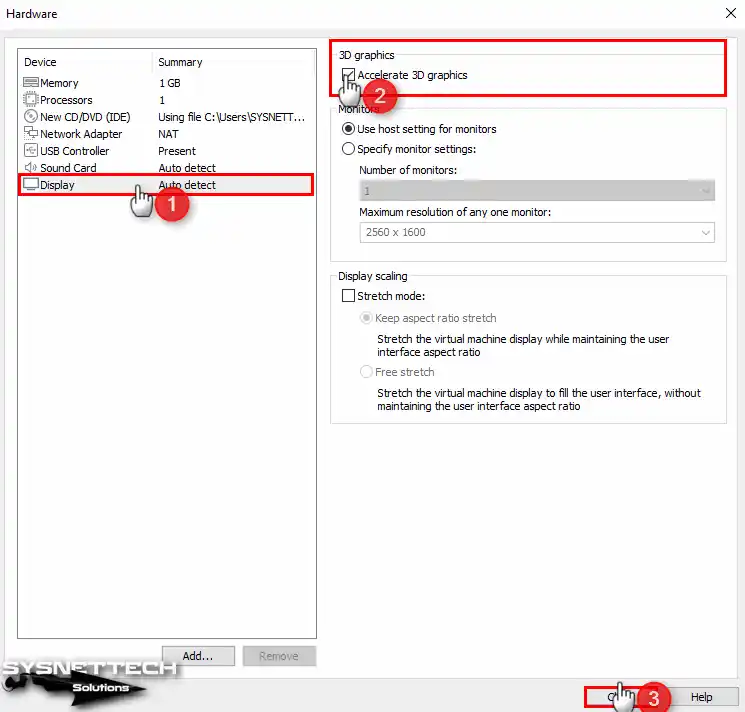
Step 18
For the Display setting, enable the 3D Graphics feature and do not change the display scaling setting.
Step 19
After preparing the virtual machine, close the summary window and proceed to the installation steps.
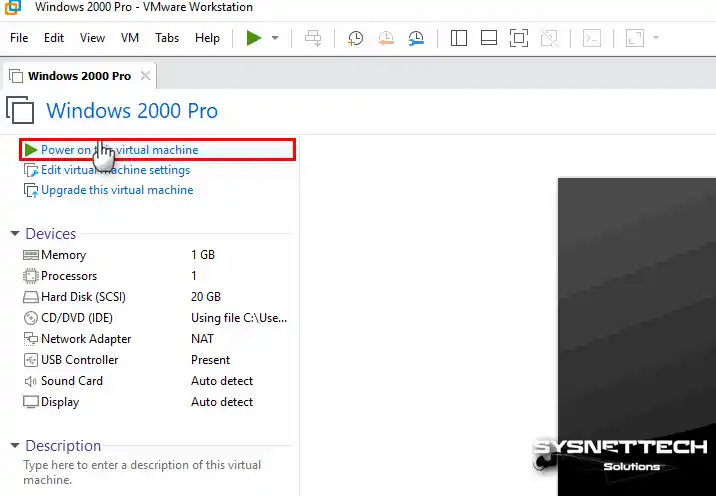
Step 20
Click Power on this virtual machine to run the Windows 2000 Professional virtual machine.
How to Install Windows 2000
After you prepare the Windows 2000 virtual machine, when you run it, the system will boot from the ISO image file you added to the VM. When you see the installation wizard, you can now start the installation without any problems.
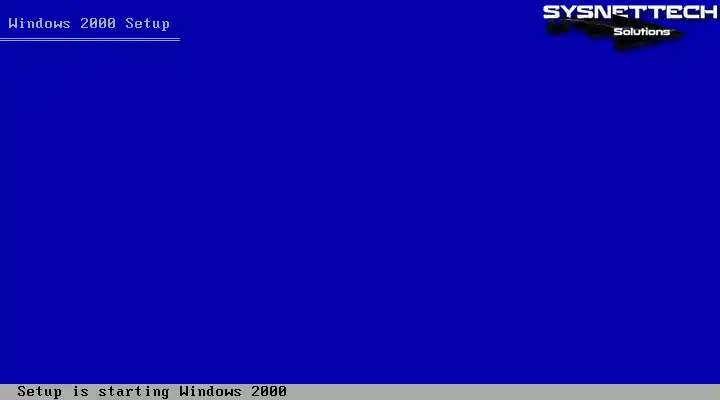
Step 1
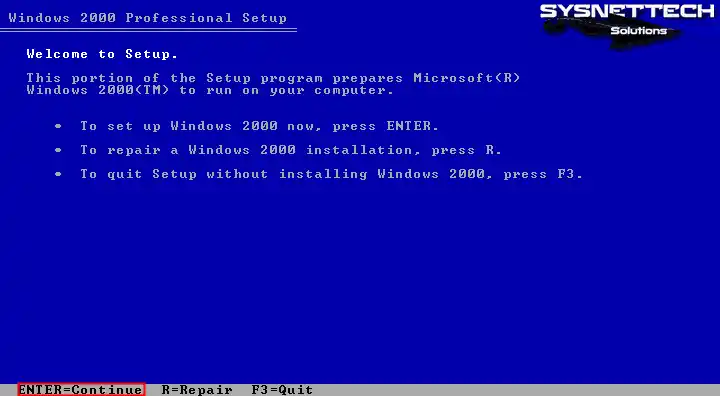
Wait for a while when the Windows 2000 Setup screen opens, as in the image below.
Step 2
On the Welcome screen, you can switch to the relevant screen by pressing the R key to repair your system. In this article, press the Enter key as we will install the Win2000 system from scratch.
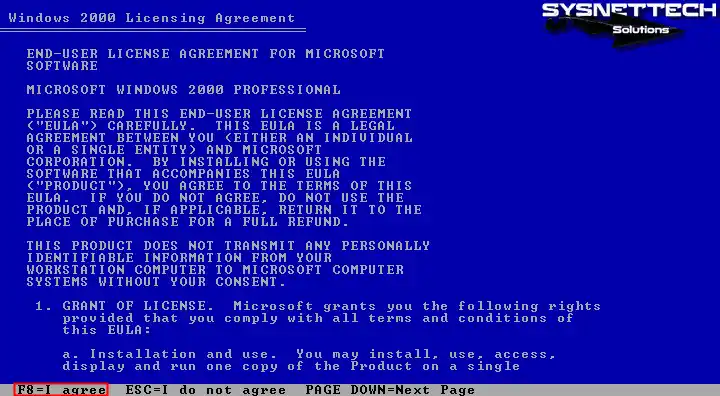
Step 3
Accept the Microsoft Windows 2000 Professional license agreement on your virtual computer.
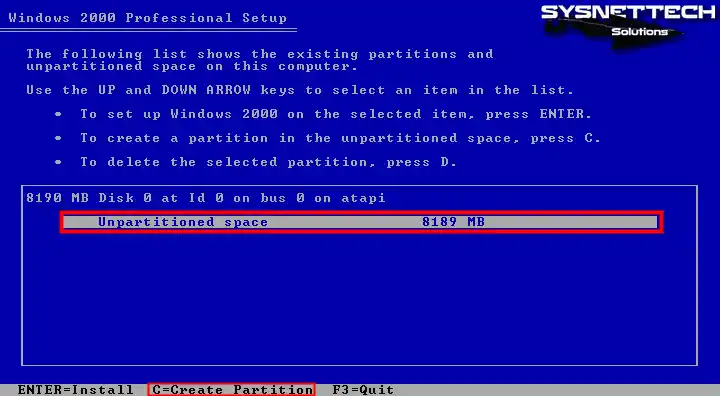
Step 4
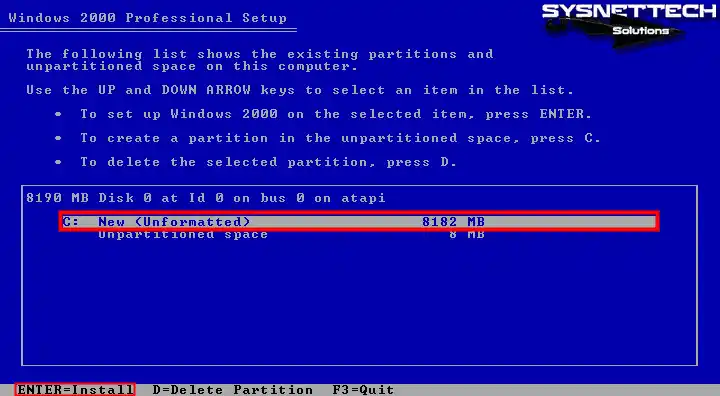
Here, you can see the size you assigned to the virtual disk in the steps to prepare the virtual PC. Press C to create a new Partition on the disk.
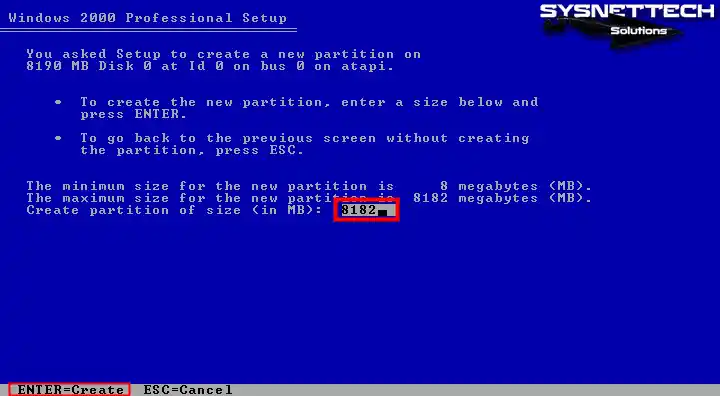
Step 5
Press Enter to accept the automatically set value for the virtual disk.
Step 6
After creating the C partition on the disk, press Enter to start the installation.
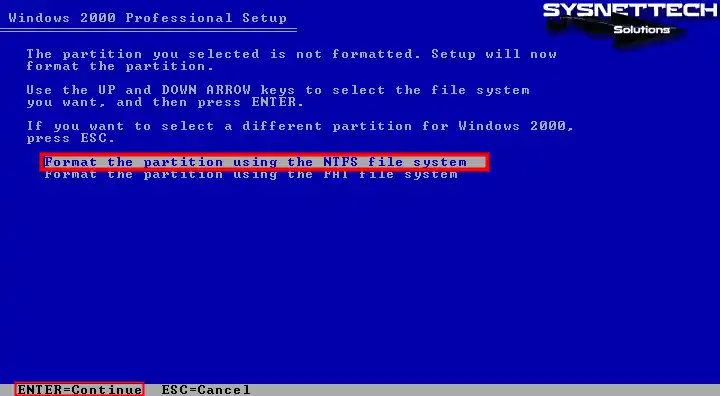
Step 7
Press Enter on the “Format the partition using NTFS file system” option to configure and format the disk file format as NTFS.
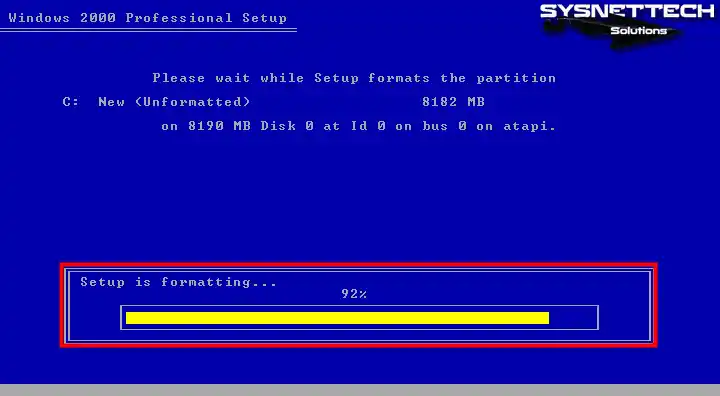
Step 8
Wait while the setup wizard formats the disk. This will take very little time on the VM, but on a physical computer, it may take some time.
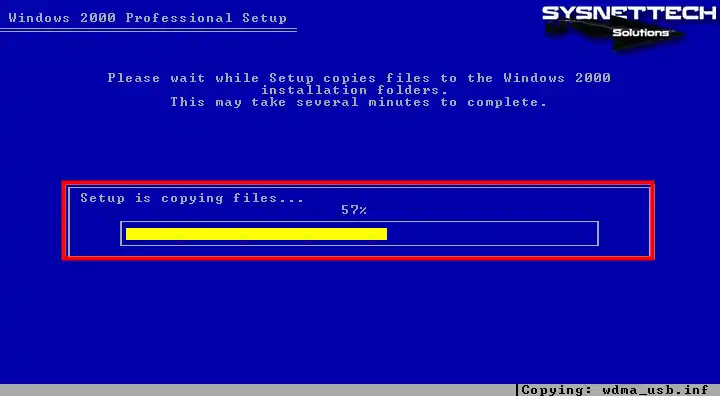
Step 9
Wait while the setup wizard copies the Windows 2K system files to disk.
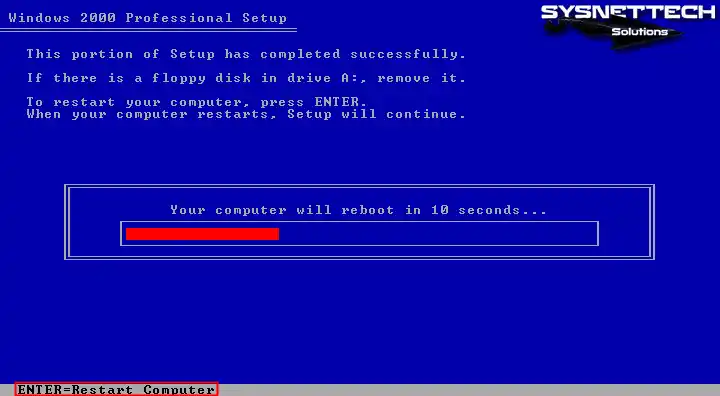
Step 10
Your virtual computer will restart after the time specified by the timer has elapsed, but press Enter to reboot your system manually.
Step 11
Wait while your Windows 2K virtual system boots up.

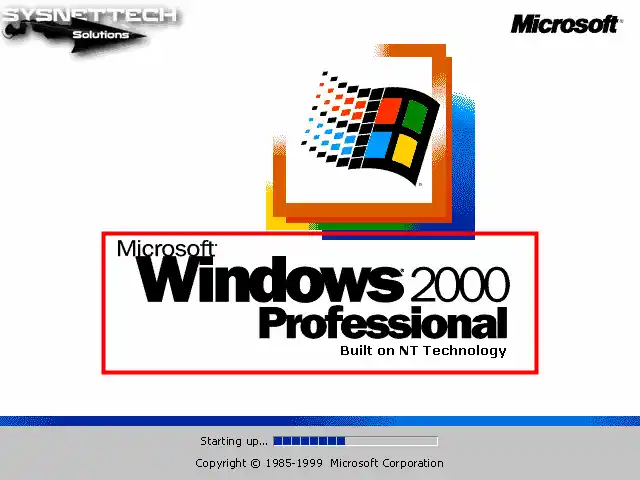
Step 12
Wait while Microsoft Windows 2000 Professional (Built on NT Technology) starts up.
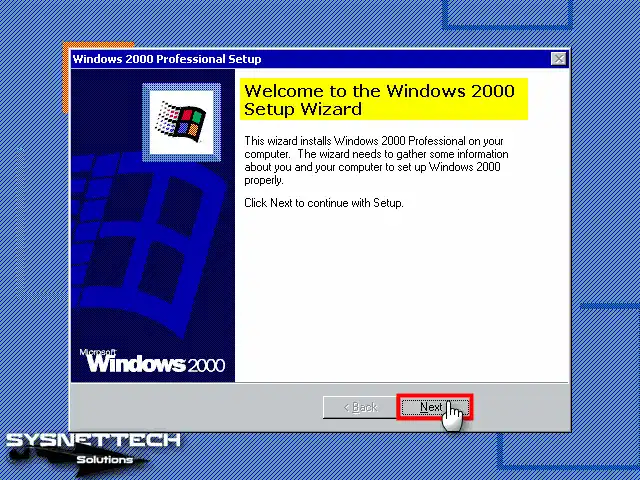
Step 13
It is reported that some information about your virtual computer will be collected for installation when the Win2K setup wizard opens, so click Next to continue.
Step 14
Wait while the setup wizard installs the drivers for your virtual PC devices, such as the keyboard and mouse. At this step, the screen of your virtual PC may flicker, so do not turn off your system.

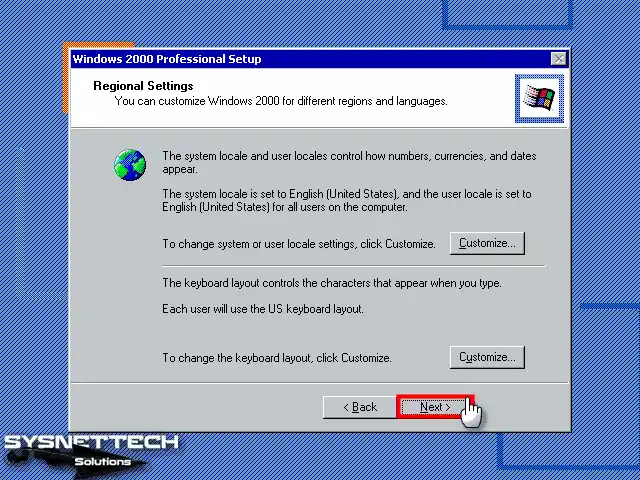
Step 15
Configure the region and location of your system according to where you live and click Next.
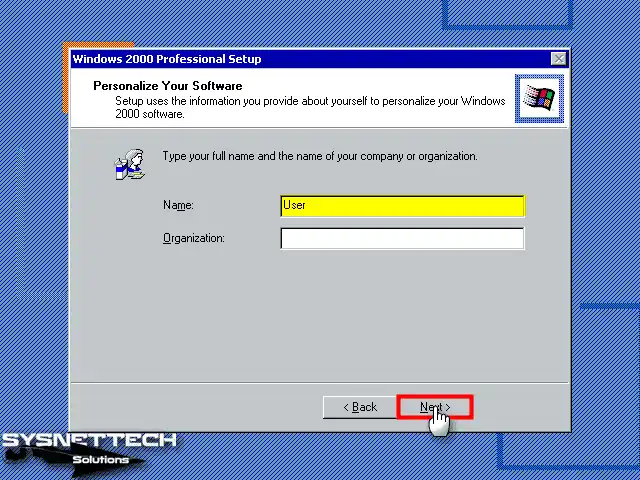
Step 16
Type a user account name for your virtual system and continue.
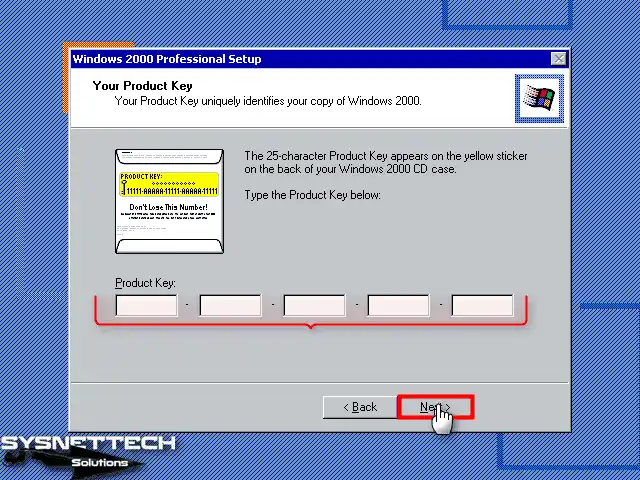
Step 17
Enter the product key of the Windows 2000 Professional operating system correctly and click Next.
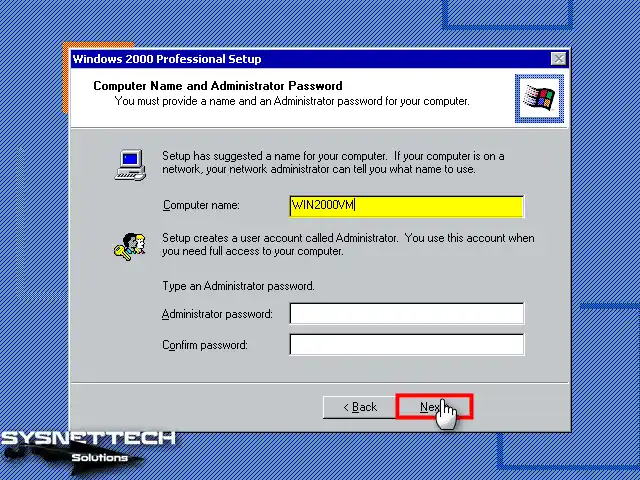
Step 18
In this window, type a computer name and also set an administrator password for your system.
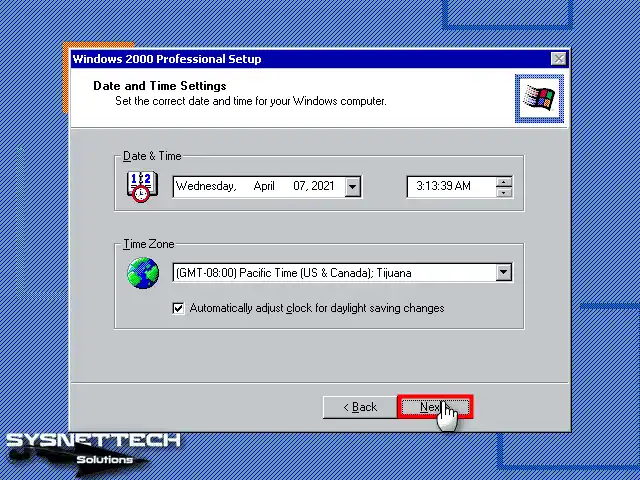
Step 19
Configure the date and time settings of your virtual system according to the country and location you live in.
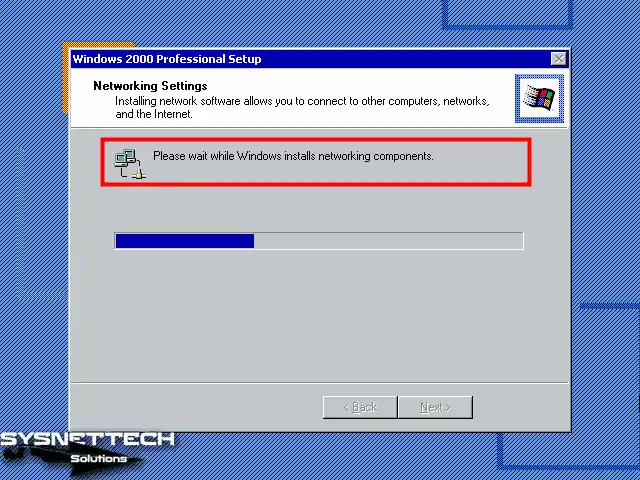
Step 20
Wait while Windows installs the system and network components.
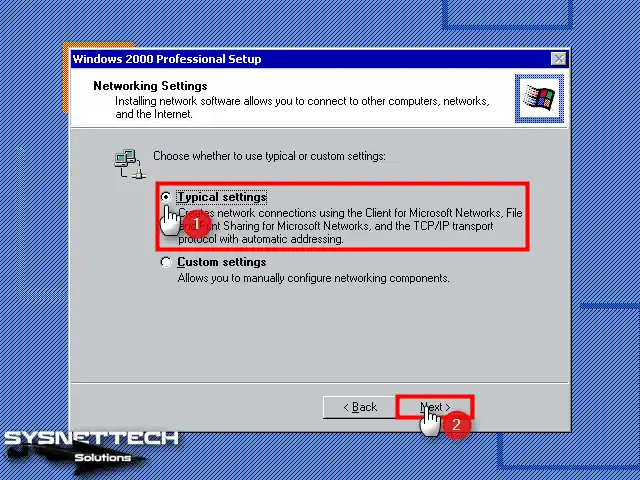
Step 21
Configure the network settings to Typical for Windows 2000 and continue.
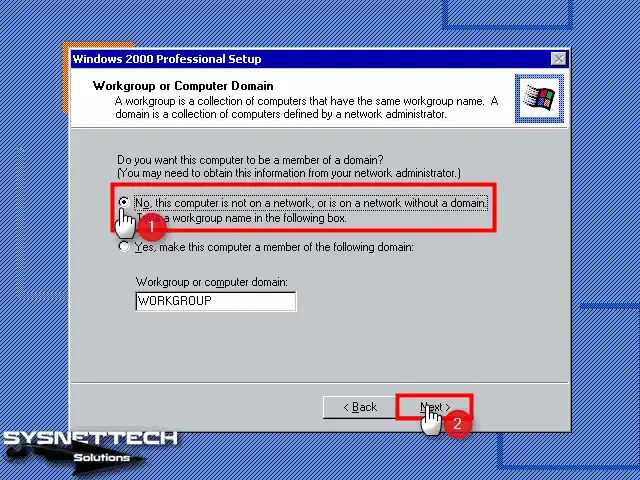
Step 22
If you are using the Active Directory service on a server in your network structure, you can add your virtual system to the domain environment. Otherwise, configure WORKGROUP for default local network settings.
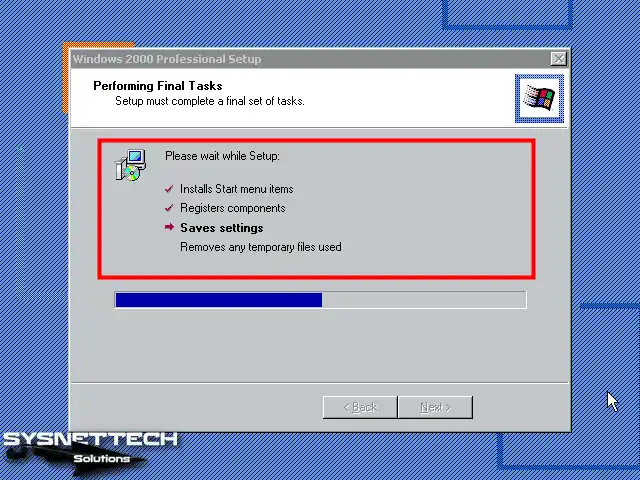
Step 23
Wait while the setup wizard configures your system’s start menu items, registry components, and other settings.
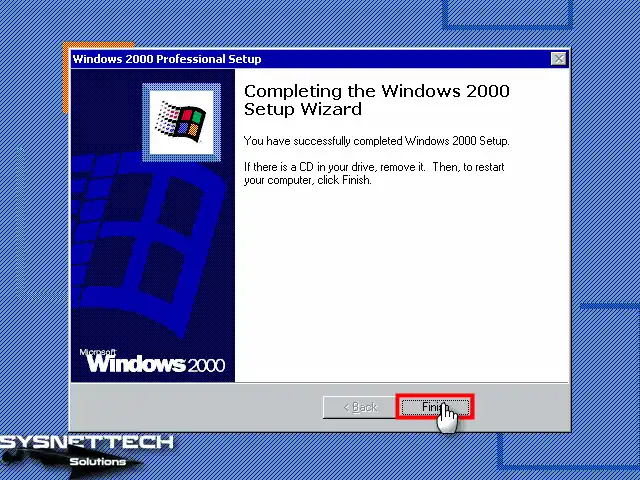
Step 24
After successfully installing the Windows system, click Finish to close the window. In this step, your virtual PC will restart.
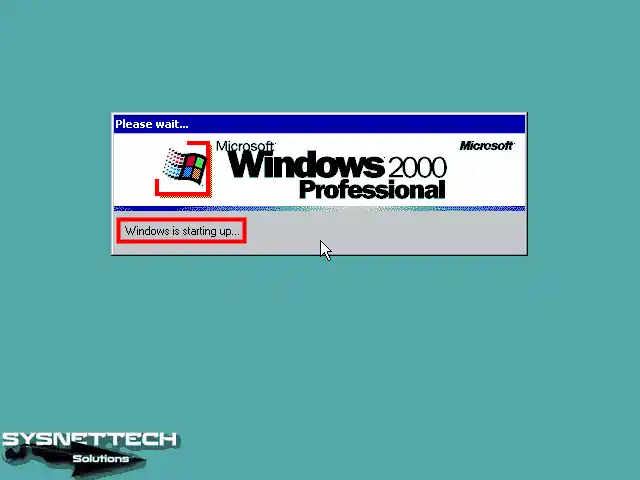
Step 25
Wait while Win2000 Pro starts up.
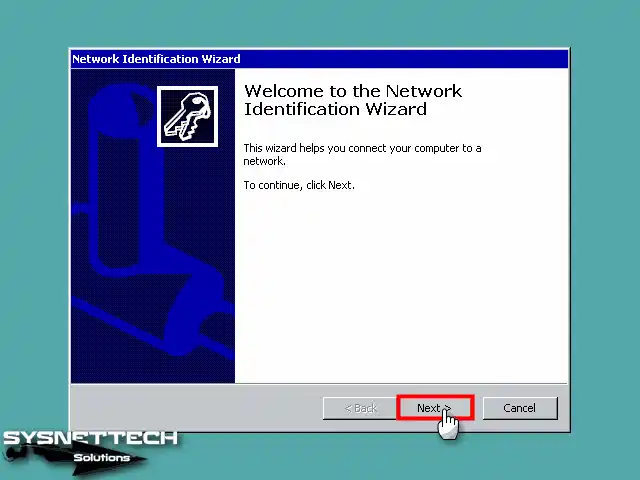
Step 26
Click Next when the Network Identification wizard opens.
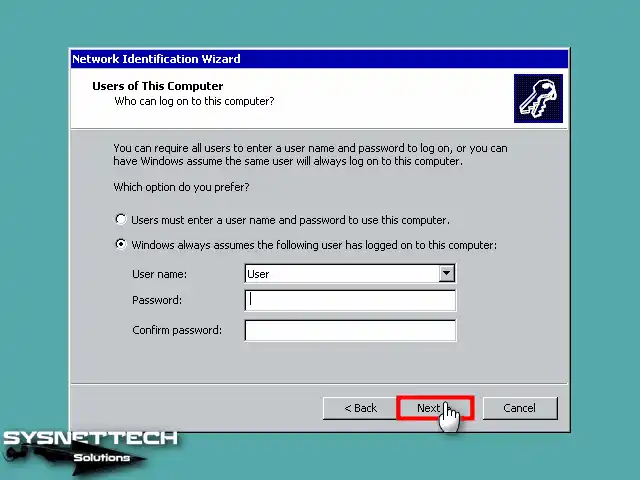
Step 27
If you are going to use only one user account on your system by default, you can assign a password to your user account in this window. You can also set password enforcement at user login to restrict use by unauthorized persons.
Step 28
After configuring the network and login settings, click Finish.

Step 29
When your Windows 2K operating system starts, you will see the first desktop screen, as in the image below.
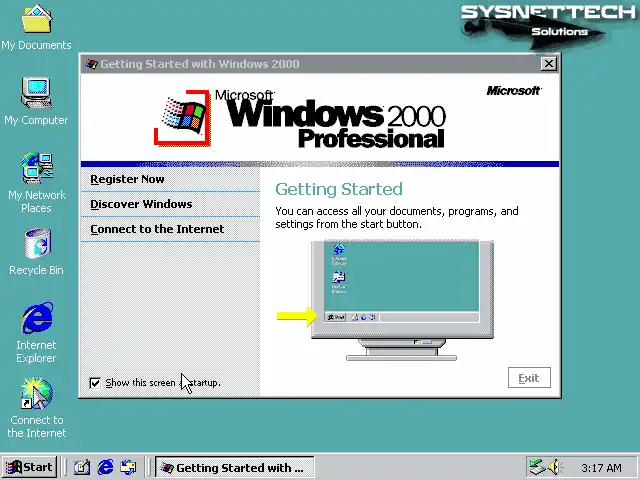
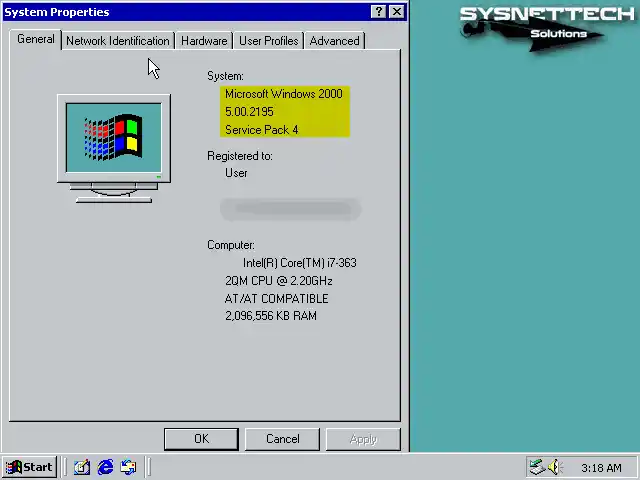
Step 30
After right-clicking on My Computer, click Properties from the listed options and check the system information.
How to Install VMware Tools
After successfully installing the Windows 2K system on a new virtual machine until this step, you need to install VMware Tools to fix problems such as screen resolution.
Thanks to VMware Tools, you can use your virtual system running in your VM more efficiently and efficiently.
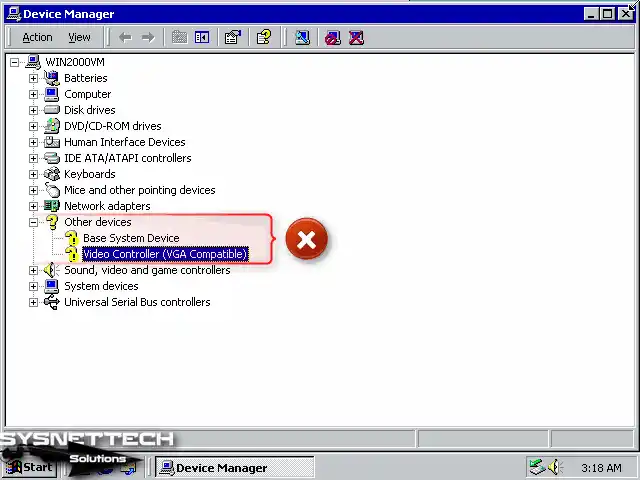
Step 1
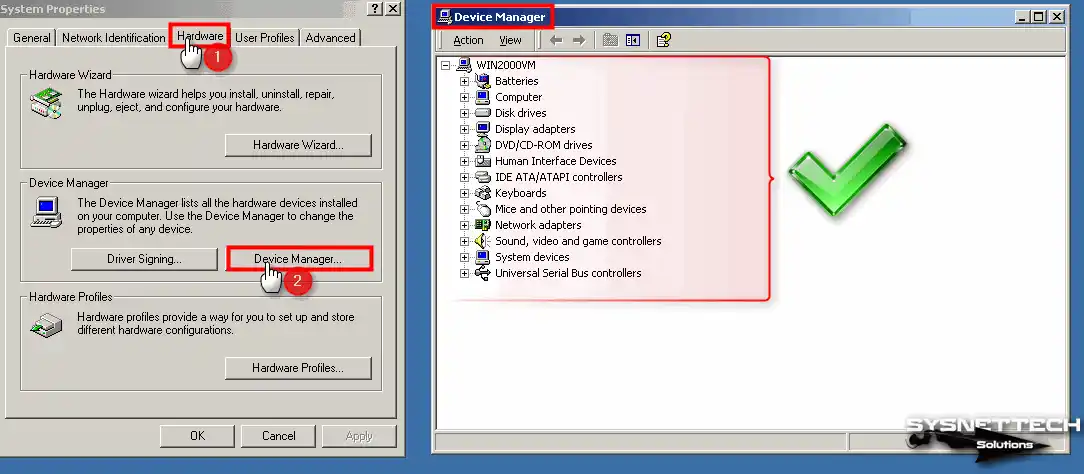
First, right-click on My Computer, then open Properties / Hardware / Device Manager and check for drivers not installed on your VM.
Step 2
Click VM / Install VMware Tools in Workstation Pro’s menu.

Step 3
If you get the following error while trying to open the VMware Tools wizard, you need to install the KB835732 update on your system. You can find the KB835732 update in the Win2K ISO file you downloaded to your computer.
Microsoft Runtime DLLs cannot be installed on this operating system.
Please see Microsoft KB835732 for details.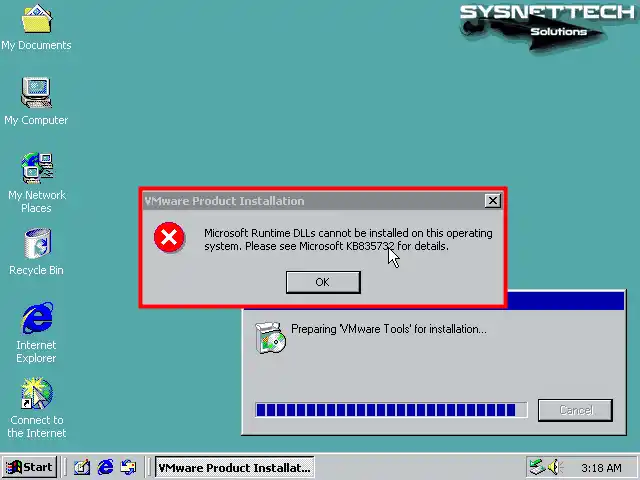
Step 4
Add the KB835732 ISO file to the virtual machine’s CD/DVD device.
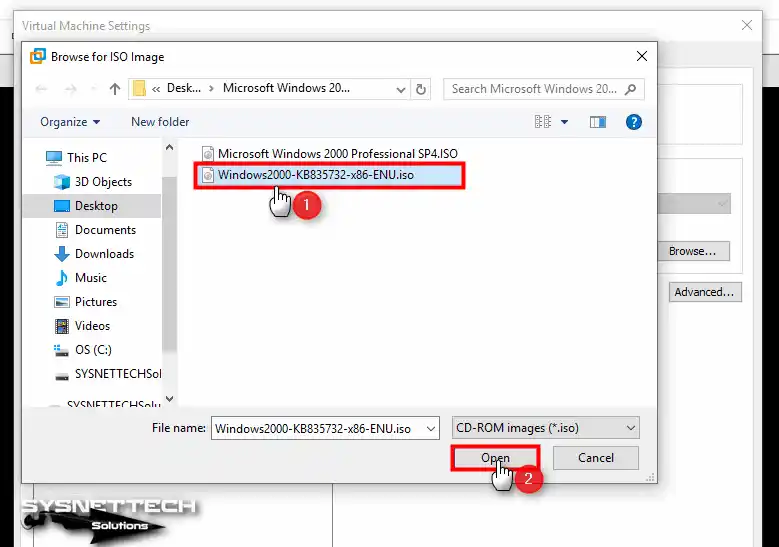
Step 5
Open My Computer and copy the EXE file in the image file to the desktop location.
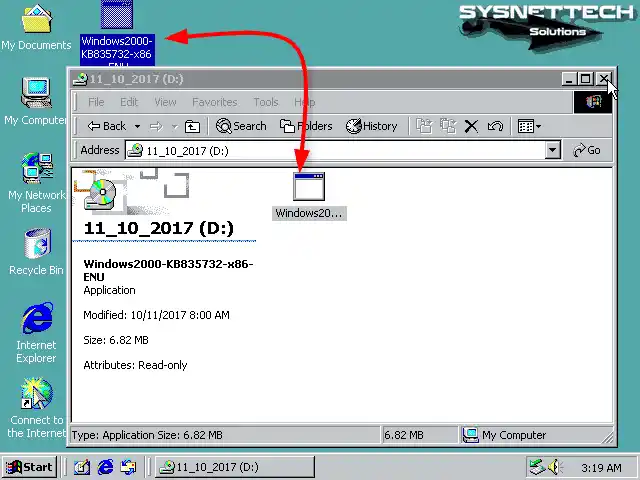
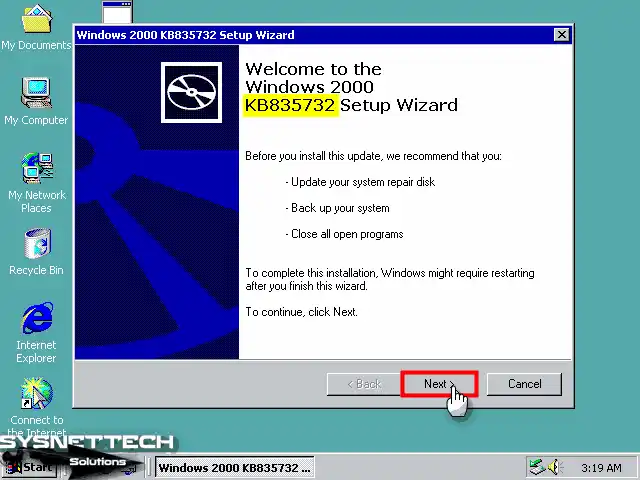
Step 6
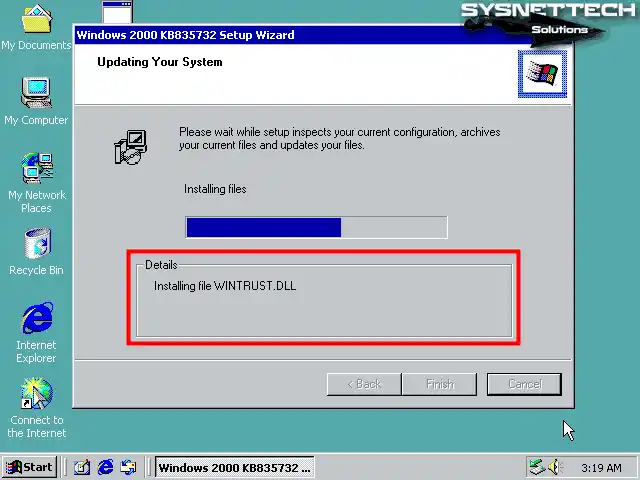
To install the Win2000 KB835732 update, open the setup file and click Next in the setup wizard.
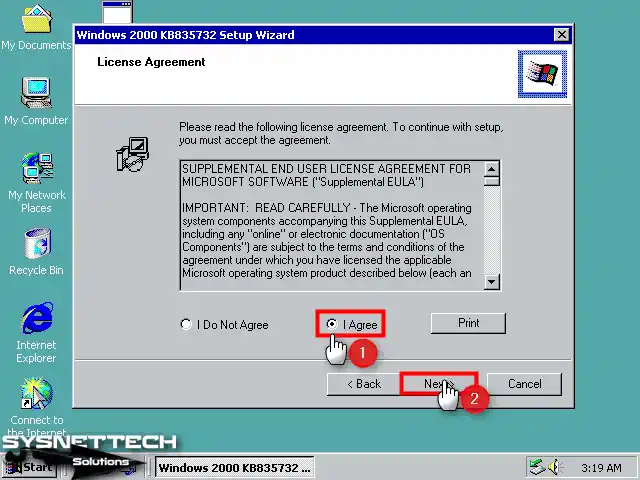
Step 7
Accept the license agreement of the Windows KB835732 update and click Next.
Step 8
Wait while the setup wizard is updating your system, and do not turn off your system.
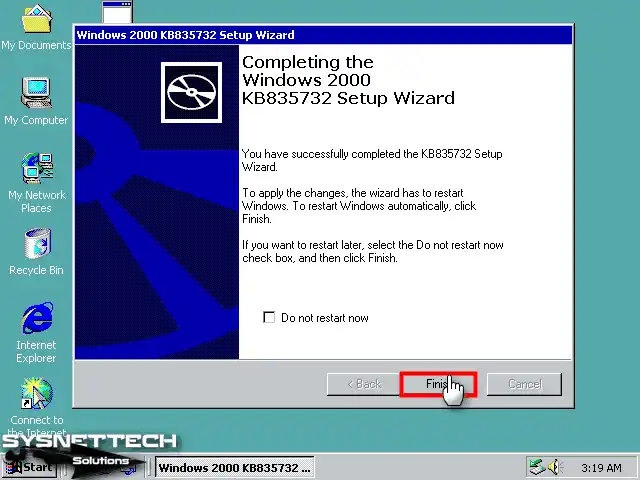
Step 9
After completing the installation, click Finish and restart your system.
Step 10
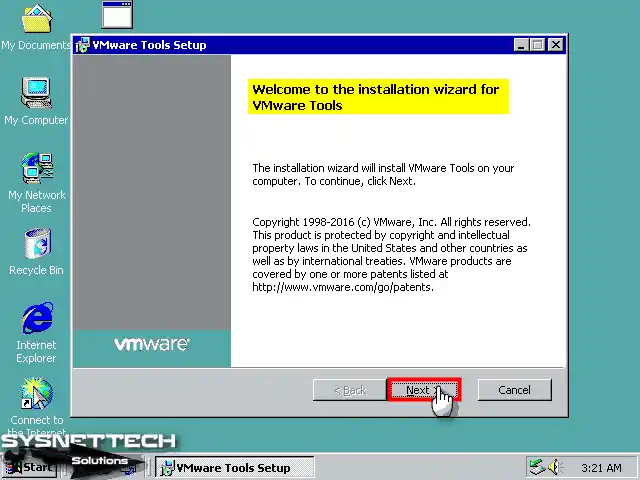
When you start the VMware Tools installation again, continue with Next when the installation wizard opens.
Step 11
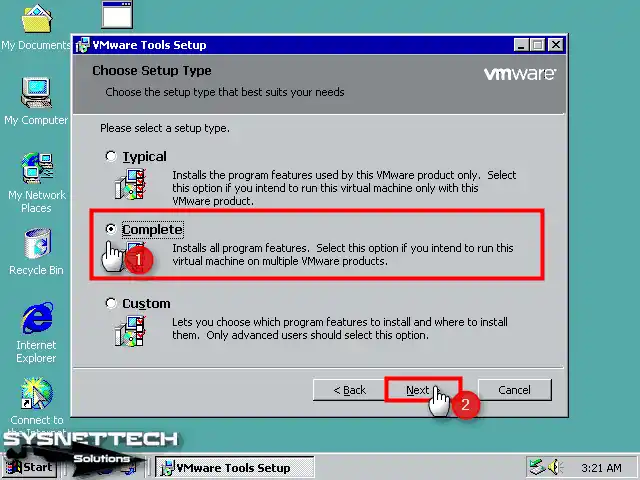
Select Complete as the installation type and continue.
Step 12
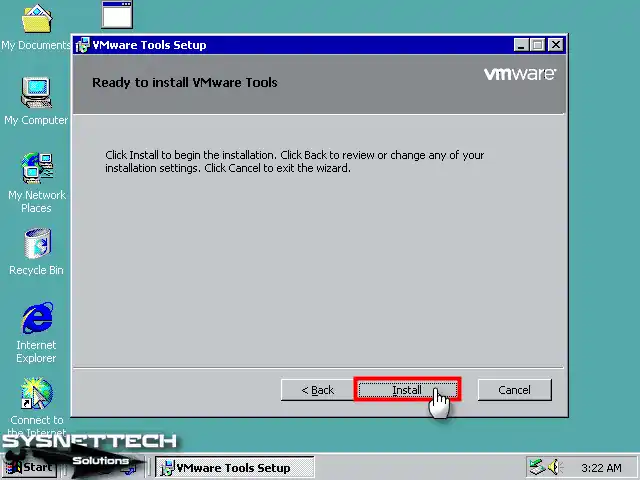
Finally, click the Install button to start the installation of the virtual machine tools.
Step 13
Finally, click the Install button to start the installation of the virtual machine tools.
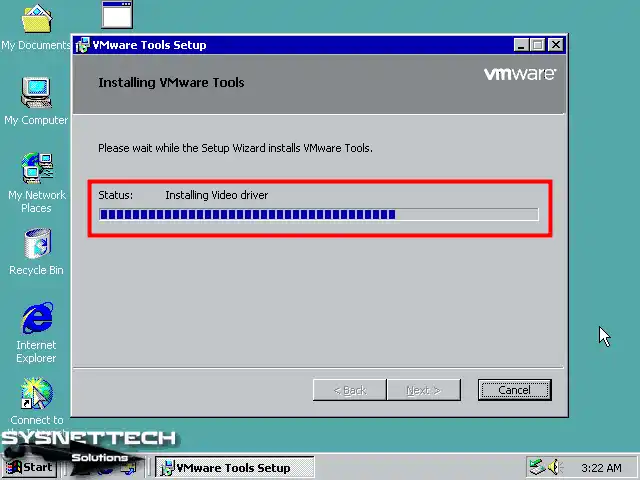
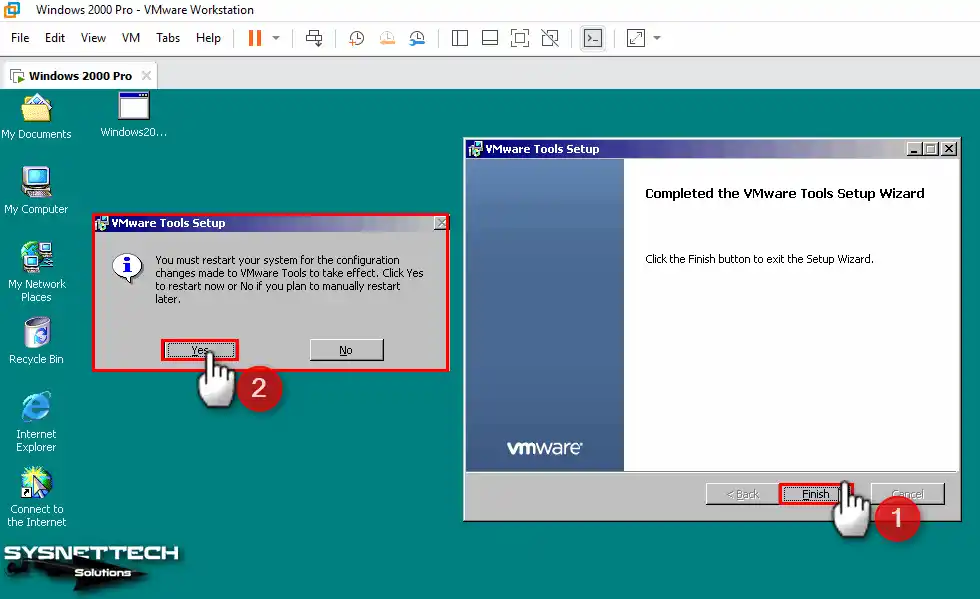
Step 14
After completing the VM Tools installation, click Finish, and after closing the window, restart your virtual system and ensure the settings are active.
Step 15
When you view Device Manager again after your system boots up, you can see that all drivers are installed.
Step 16
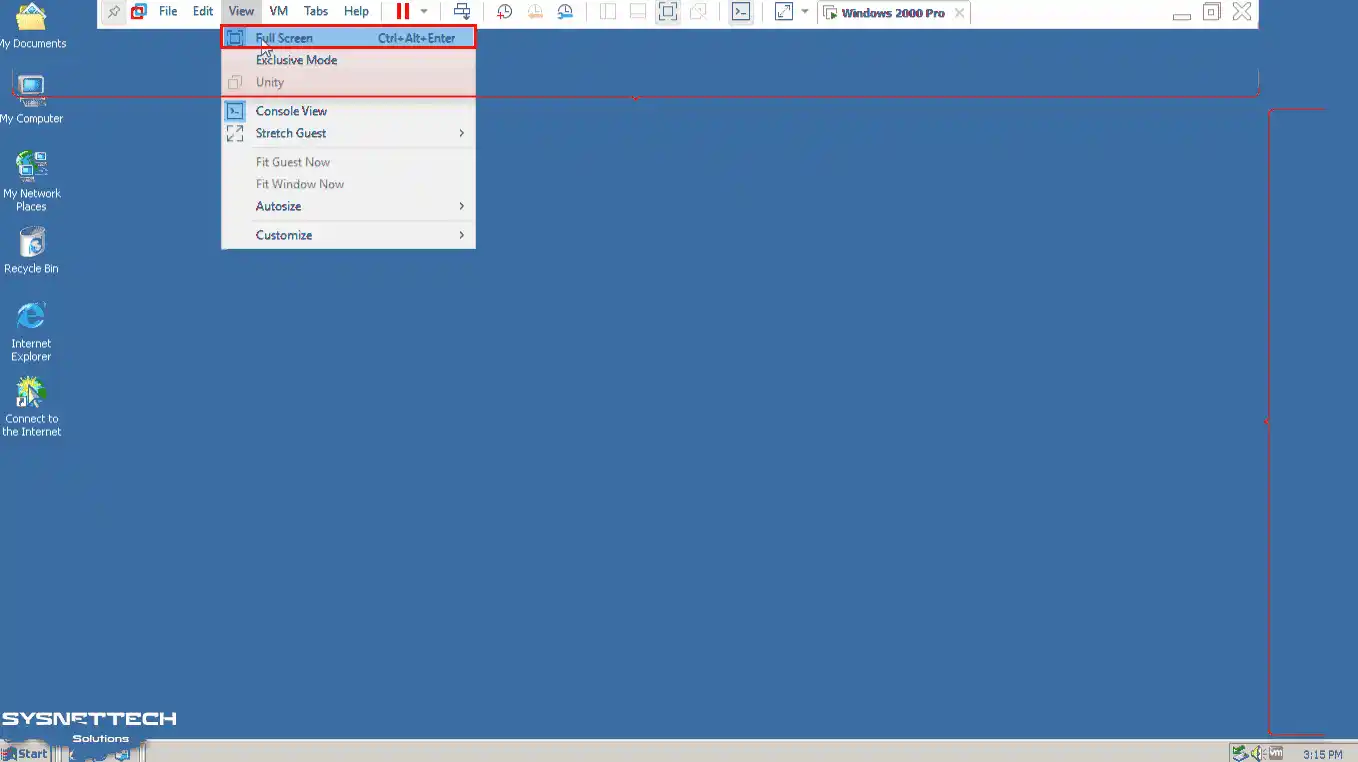
When you want to use your Windows guest machine in full-screen mode, click View / Full Screen from the tool menu and check that the resolution of the VM is adapted to the screen of your host PC.
Step 17
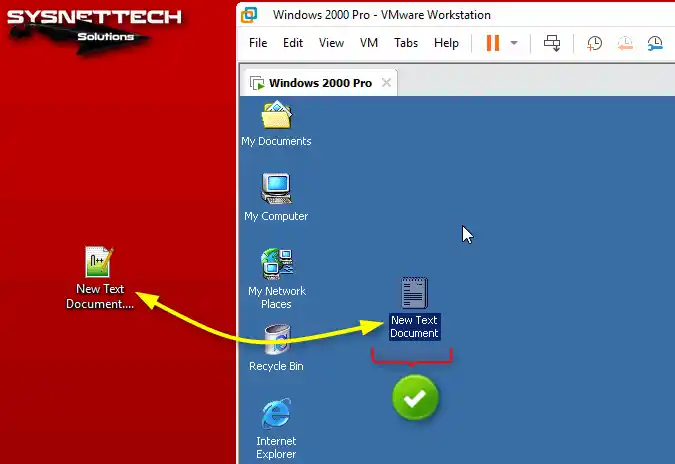
At the same time, drag and drop any of your files to quickly transfer files from your host system to your guest’s virtual system.
How to Configure the Internet Connection
Another thing you will do on your virtual computer is to check the network and Internet connection. After you set the internet connection settings, you can easily access services such as Google.
Step 1
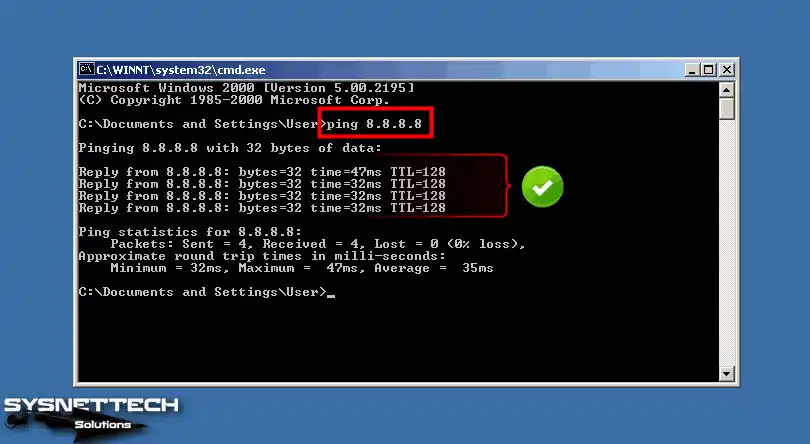
First, open the Run agent from the Start Menu, type CMD in the text box, and press Enter. After opening the CMD command prompt, check that you can access Google servers with the ping 8.8.8.8 command.
Step 2
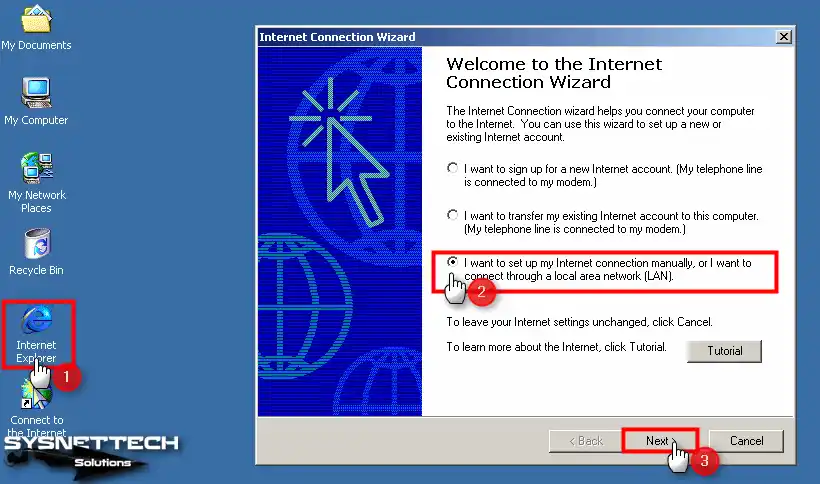
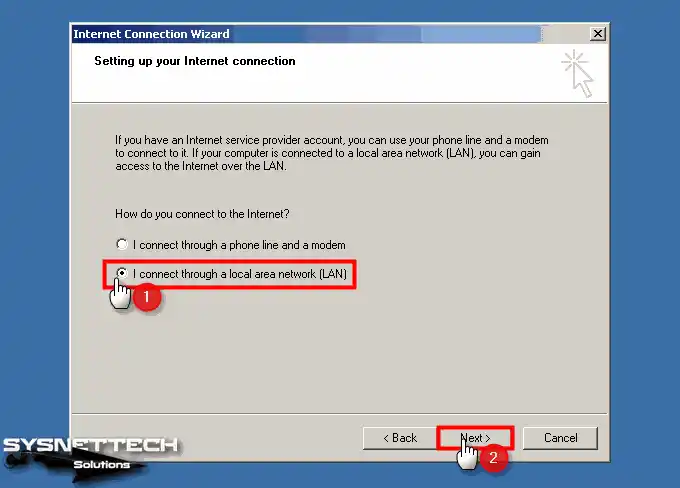
If your internet connection is working, when you click on the Internet Explorer browser, the Internet Connection Wizard will open. In this window, select I connect to the Internet via LAN option and click Next.
Step 3
Select the LAN connection setting again and click Next.
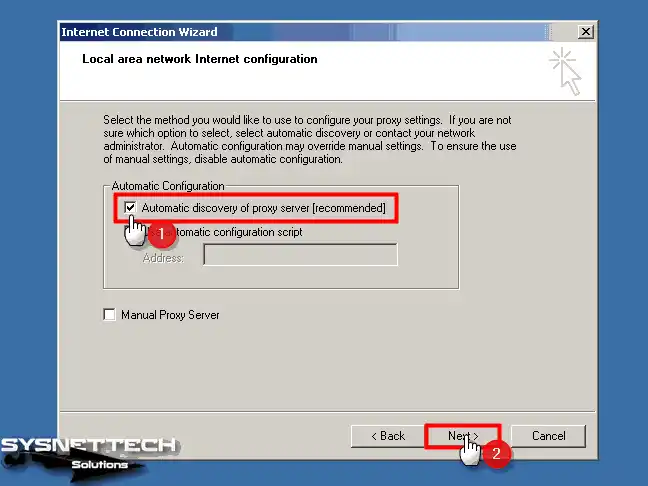
Step 4
Enable automatic discovery of proxy servers and continue.
Step 5
If you want to set up an Internet Mail account, you can select Yes and make the necessary settings. Here, select No to configure the mail account later and click Next.

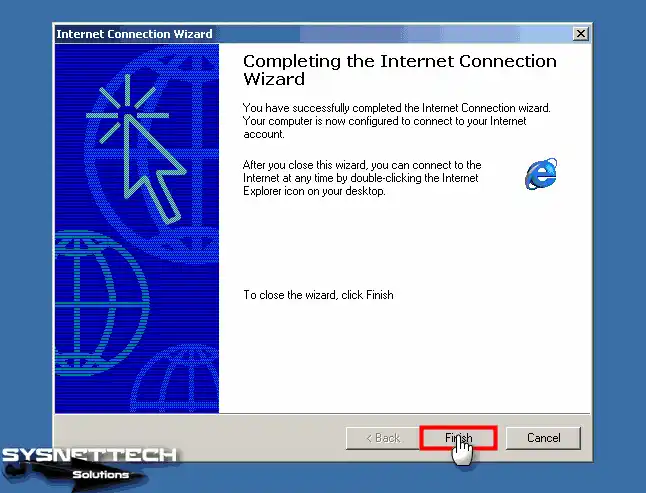
Step 6
After configuring the Internet connection settings, click Finish to close the window.
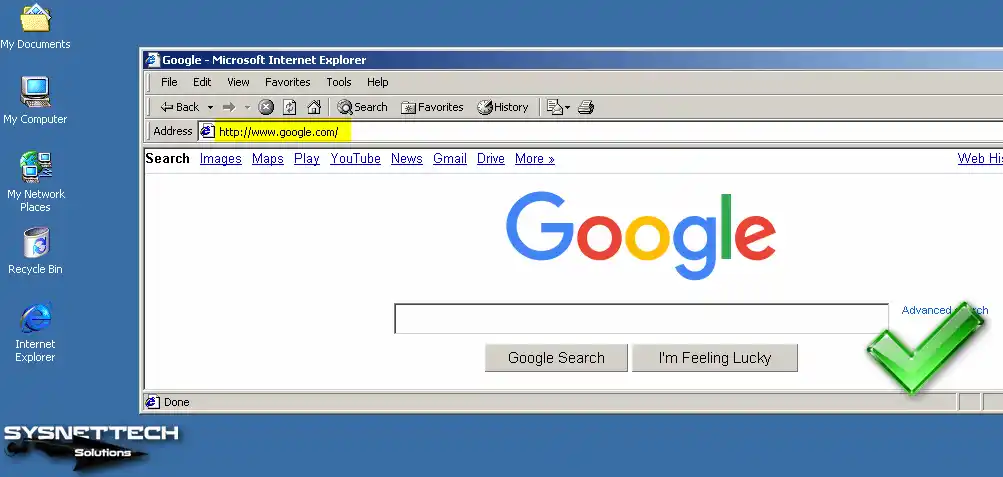
Step 7
When the Internet Explorer browser automatically opens, visit the Google website and check your connection.
How to Configure Shared Folder
By activating the Shared Folder feature on your virtual computer, you can transfer files between the host and the VM more easily.
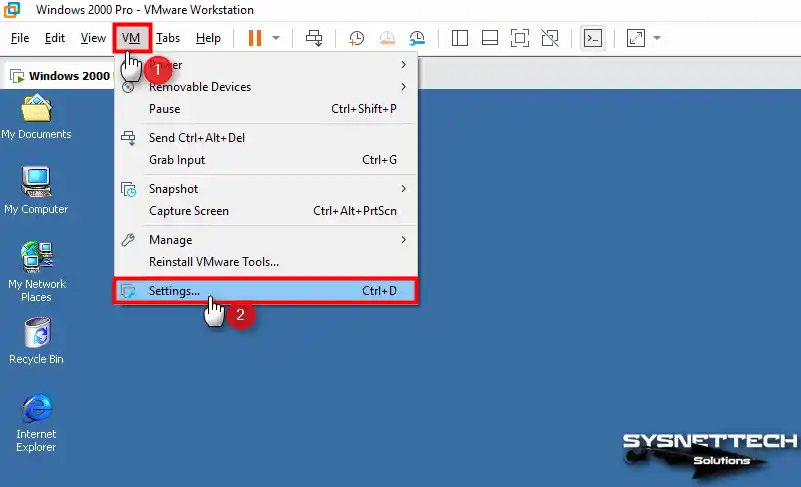
Step 1
Click VM / Settings to enable Shared Folder on Win2000 VM.
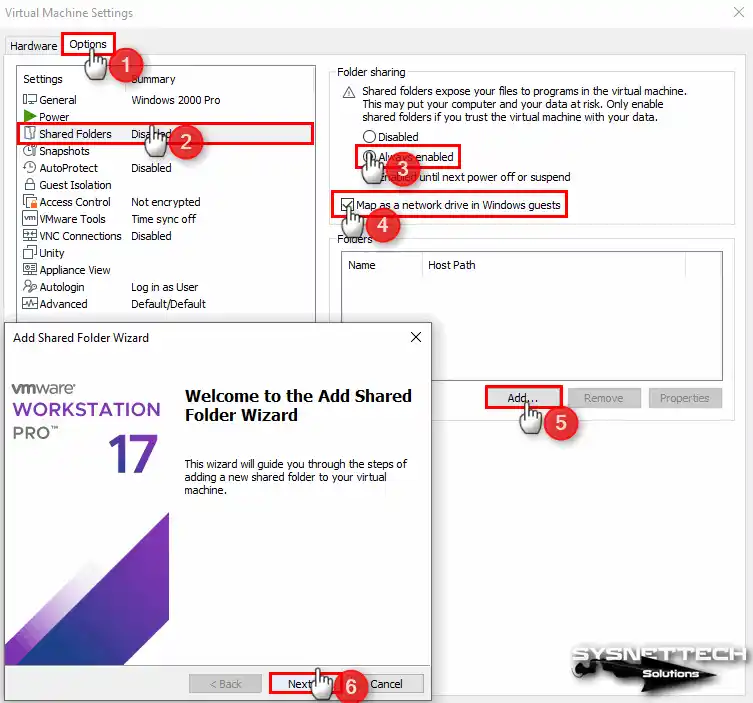
Step 2
In the Virtual Machine Settings window, click Options and then select the Shared Folders feature.
Enable the Folder Sharing setting on the right, check the relevant option to use the shared folder as a network drive, and click the Add button to select a shared folder on the host.
When the Shared Folder wizard opens, click Next to continue.
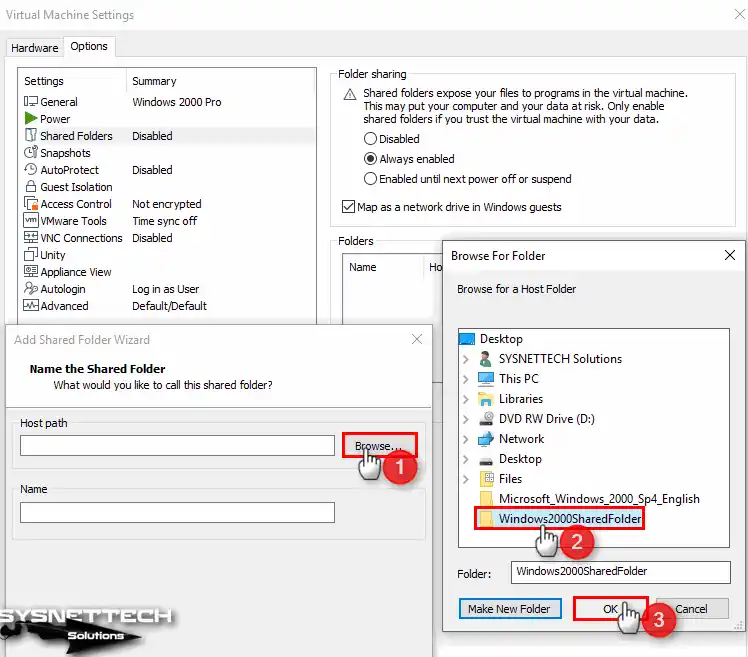
Step 3
Select a folder on your host via the Browse button.
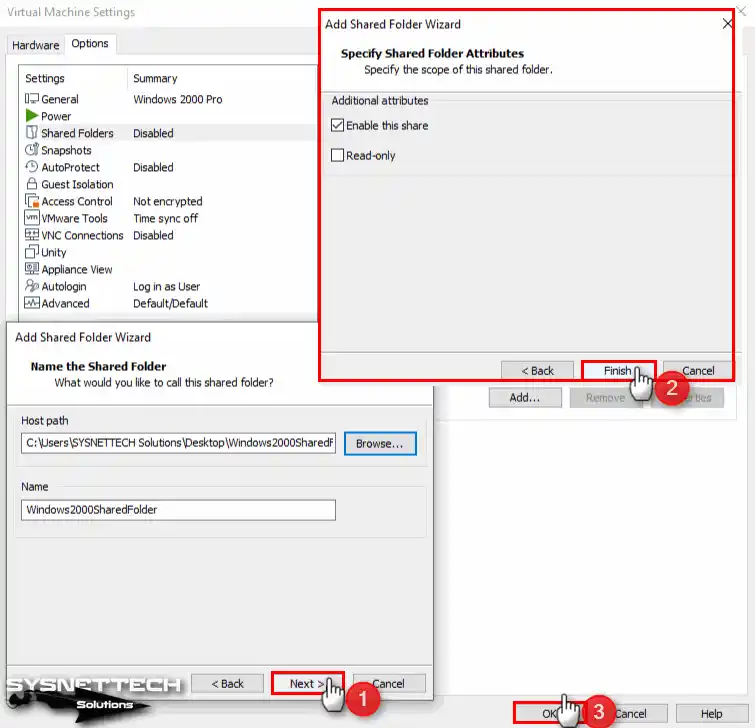
Step 4
Enable public folder sharing in this window and click Finish.
Step 5
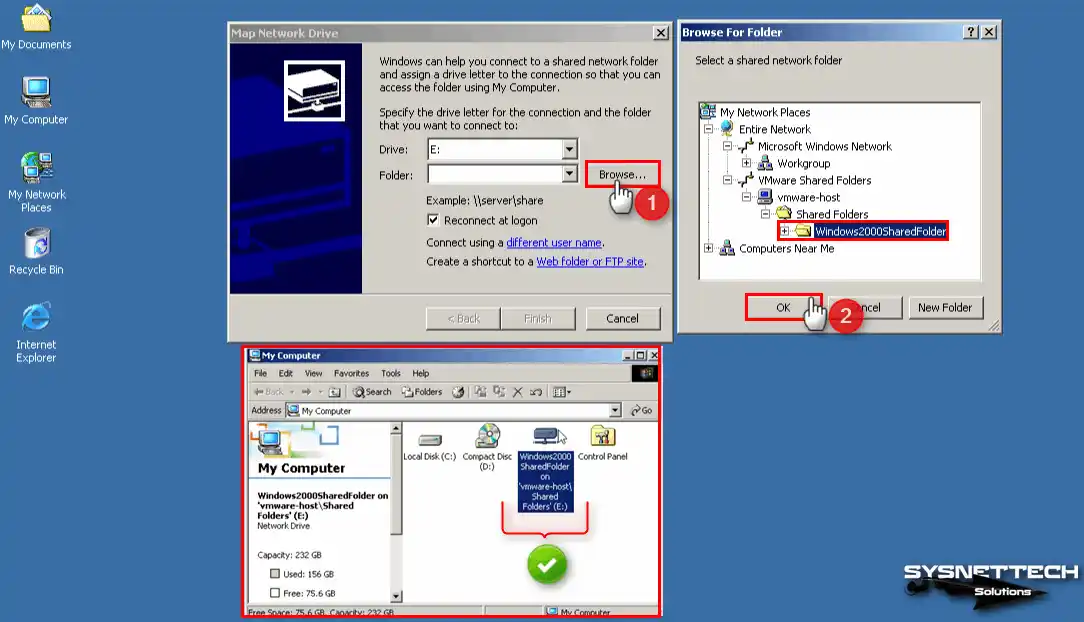
Click My Network Places, and you can see that the operation is successful when you try to access the shared folder on the host, as in the image below.

Step 6
Also, to use the public folder as a network drive, click Map Network Drive on My Computer, and then add the Shared Folder location via Browse to the Folder section.
How to Use USB Flash Memory
Using a Flash Memory or Portable Hard Disk using the USB connection port on Windows 2000 is possible without driver installation.
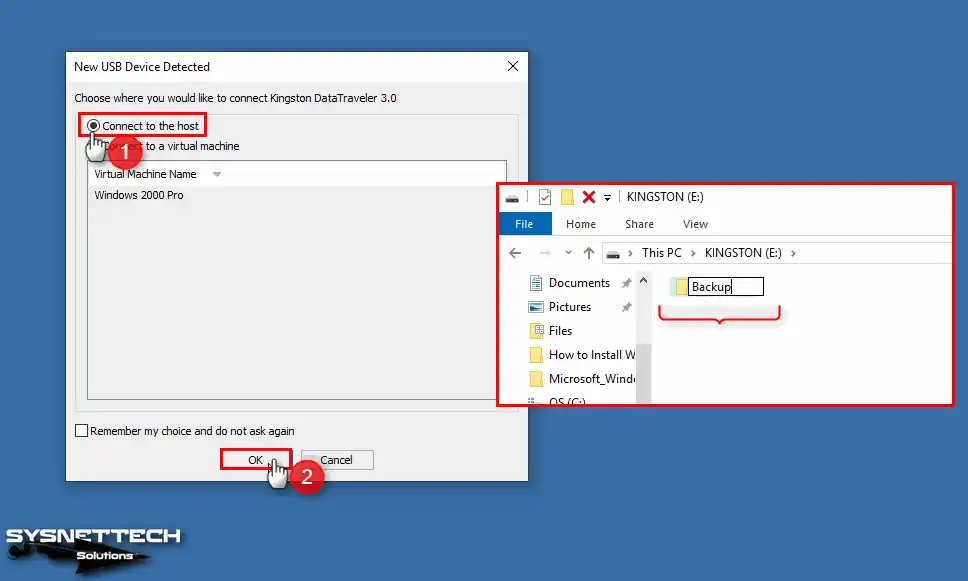
Step 1
After plugging your USB flash drive into the host’s USB port, the New USB Device Detected window will open on VMware. In this window, first, enable the Connect to the Host option and click OK.
Create a folder called Backup in your USB memory on your host system.
Step 2
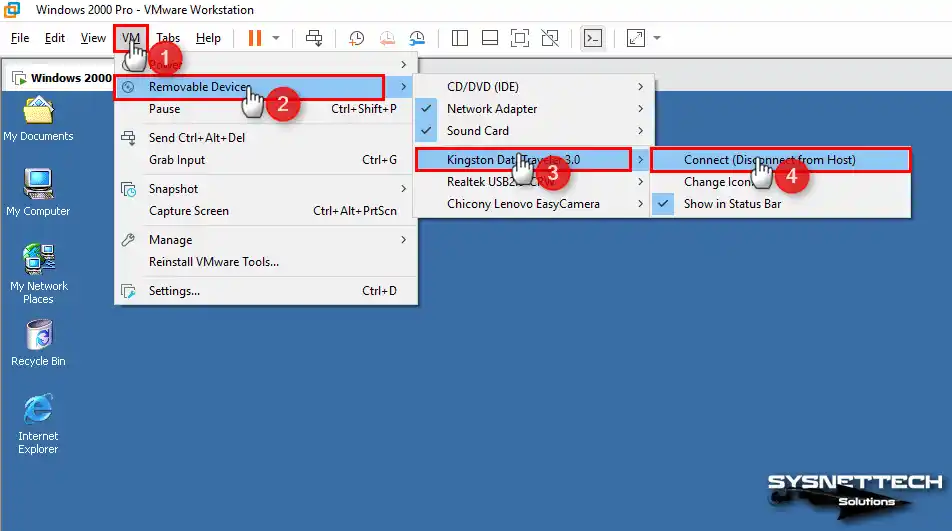
To connect your USB disk to the VM, click VM / Removable Devices / Name of your USB / Connect from the Workstation tool menu.
Step 3
The system will automatically install the drivers for your USB flash memory. When you check Device Manager, you can see that KINGSTON DataTraveler 3.0 USB Device is active.

How to Check Direct3D
After installing your Win2K system on the virtual PC, you should be able to play games outside of your work or use applications that require 3D acceleration.
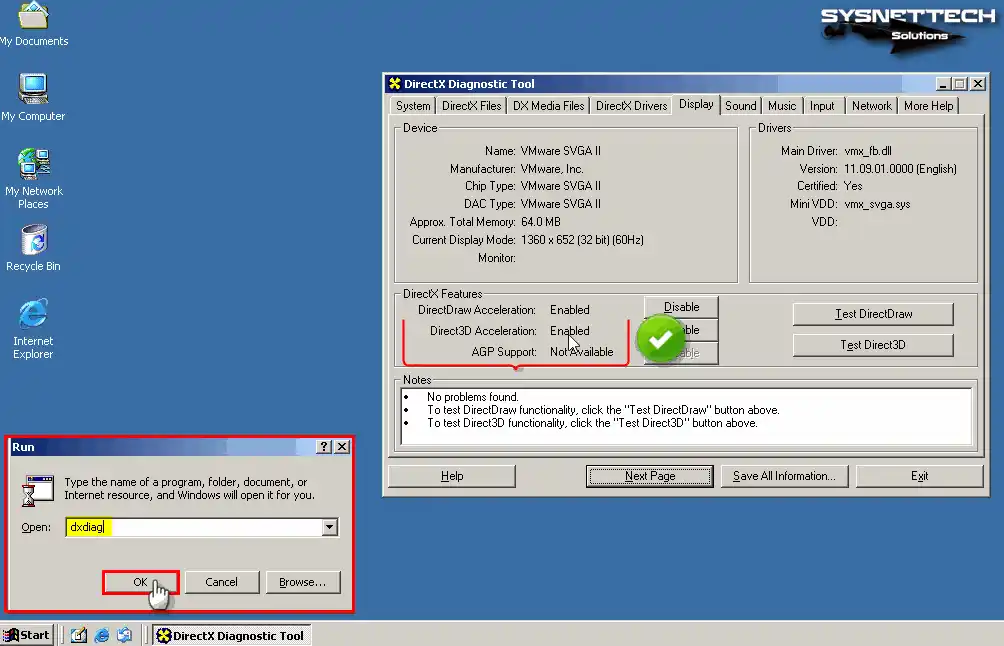
If you had selected a higher virtual hardware compatibility value instead of 10.x when creating the VM, Direct3D Acceleration would not be enabled on your virtual system and would appear Disabled.
To check if the Direct3D feature is enabled on your system, press the Windows + R keys together, and then type and run the “dxdiag” command in the window that opens.
To check if the Direct3D feature is enabled on your system, press the Windows + R keys together, and then type and run the “dxdiag” command in the window that opens.
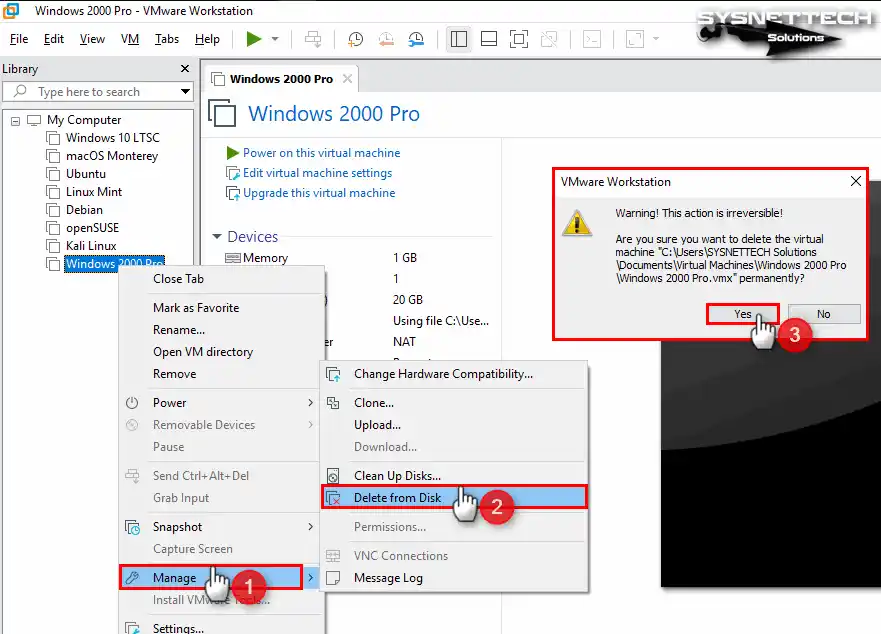
How to Delete the VM
If you no longer want to run your Win2K guest machine on your host PC, we recommend deleting all VM files completely to save disk space.
Right-click on your guest machine from the left panel of Workstation Pro and click Manage / Delete From Disk. In the warning window that opens, click Yes to confirm the deletion of all your virtual system files.
Video
Installing Old Versions
| Workstation Version | Youtube Video | Slide |
|---|---|---|
| 14 Pro | Watch | – |
| 16 Pro | Watch | View |
| 17 Pro (NEW) | Watch | – |
Conclusion
As a result, it is possible to run Windows 2000 on a virtual machine with VMware Workstation 17 Pro. This gives you the way to experience the classic operating system on modern hardware.
With the steps I outline in this article, you can create a new virtual machine. Additionally, you can easily install Windows 2000. Whether for nostalgic purposes or custom software compatibility, this method is functional.
Virtualization of Windows 2000 opens up new possibilities. In today’s computing environment, it is effective for interacting with the legacy system. This helps users interact with the legacy system.
Windows 2000 build 2000 видео драйвер?????
Windows 2000 build 2000 видео драйвер?????
Здраствуйте я устанавливал Windows 2000 билд 2000 на VMware и хочу установить драйвер видео адаптера потому что VMware Tools выдаёт ошибку скажите пожалуйста есть альтернативные видео драйвера для Windows 2000 build 2000?
Последний раз редактировалось FLUPPI 30 сен 2023, 23:40, всего редактировалось 1 раз.
- FLUPPI
- Новичок
- Сообщения: 2
- Зарегистрирован: 19 май 2022, 16:29
- Откуда: Usa
-
- ICQ
- YIM
Re: Windows 2000 build 2000 видео драйвер?????
uav » 19 май 2022, 23:27
Ну, как минимум есть вот этот проект (VBEMP):
https://bearwindows.zcm.com.au/vbemp.htm
Последняя версия не качается, но предпоследнюю можно скачать. Там же есть ссылка и на некий драйвер для VirtualBox.
Ну и интересно, что за ошибку выдаёт установщик VMWare Tools.
Вообще, последняя версия (10.0.12), поддерживающая W2k, лежит вот тут:
https://customerconnect.vmware.com/en/d … ductId=491
Однако там нужна регистрация (хоть и свободная), так что я сюда перевыложил:
http://depositfiles.com/files/pfjwfzae4
http://downgradefiles.pdp-11.ru/downloa … 67f73a6a86
Последний раз редактировалось uav 30 сен 2023, 23:40, всего редактировалось 1 раз.
-
uav - Мастер Даунгрейда
- Сообщения: 2444
- Зарегистрирован: 22 дек 2008, 14:21
-
- Сайт
Re: Windows 2000 build 2000 видео драйвер?????
APTEMK » 20 май 2022, 11:16
Не совсем понимаю, зачем выкладывать файлы на Depositfiles?! Никогда не любил этот файлообменник из-за медленной скорости скачивания и из-за пресловутого платного Gold-режима!
Последний раз редактировалось APTEMK 30 сен 2023, 23:40, всего редактировалось 1 раз.
-
APTEMK - Мастер Даунгрейда
- Сообщения: 909
- Зарегистрирован: 28 сен 2019, 10:54
- Откуда: 10.12.2004 Приморский Край, Надеждинский р-н
- Железо: 10.12.04компьютер Fujitsu (Pentium lll 550, 128 мб Озу, видеокарта ,Ati Rage Xl,Hdd 10 Гб, Windows98
Re: Windows 2000 build 2000 видео драйвер?????
uav » 20 май 2022, 11:53
Мне он тоже особо не нравится, но для подстраховки обычно выкладываю на минимум 2 разных файлообменника.
А на Яндекс.Диске у меня место закончилось, лень новый аккаунт создавать. Есть ещё, скажем, my-files.su, но он тоже как-то работает нестабильно…
Вообще, эти VMware Tools можно и сюда, на сайт, загрузить, куда-нибудь в раздел для эмуляторов.
Последний раз редактировалось uav 30 сен 2023, 23:40, всего редактировалось 3 раз(а).
-
uav - Мастер Даунгрейда
- Сообщения: 2444
- Зарегистрирован: 22 дек 2008, 14:21
-
- Сайт
Re: Windows 2000 build 2000 видео драйвер?????
Vladislav » 20 май 2022, 17:50
FLUPPI писал(а):Здраствуйте я устанавливал Windows 2000 билд 2000 на VMware и хочу установить драйвер видео адаптера потому что VMware Tools выдаёт ошибку скажите пожалуйста есть альтернативные видео драйвера для Windows 2000 build 2000?
Для установки VMware Tools нужно на Win2000 (при условии, что у нас уже есть SP4) поставить патч безопасности KB835732.
Найти его можно тут:
https://www.catalog.update.microsoft.co … q=KB835732
На всякий случай прикладываю ISOшник с русской версией патча.
Достаточно примонтировать его, запустить файлик. перезагрузиться и ставить VMware Tools. Ошибок после этого быть не должно.
P.S.: Не сразу заметил что build 2000 это бета версия. Так что там это может не сработать.
- Вложения
-
- W2kP.iso
- (6.87 Мб) Скачиваний: 246
Последний раз редактировалось Vladislav 30 сен 2023, 23:40, всего редактировалось 2 раз(а).
Pentium это вам не Celeron!
Но и Celeron никогда Pentium-ом не был
-
Vladislav - Мастер Даунгрейда
- Сообщения: 148
- Зарегистрирован: 24 ноя 2016, 19:09
- Откуда: Поселок городского типа XD
- Железо: Socket 370, Celeron 633 (Coppermine), I815E, GF2 MX-400 64Mb, PC133 512Mb
-
- Сайт
Вернуться в Операционные системы
Кто сейчас на конференции
Сейчас этот форум просматривают: нет зарегистрированных пользователей и гости: 3
Краткий Обзор Материнских Плат из Новой Линейки Asus ROG Z270
Чем ближе официальный релиз семейства ЦП Intel Kaby Lake, тем больше деталей просачивается о продуктах, поддерживающих новые чипы. Так, компания Asus готовится в скором времени представить линейку материнских плат с чипсетом Z270 под сокет LGA1151. В чем отличие новинок от решений предыдущих поколений? Представляем краткий обзор пяти моделей серии Z270.
Asus ROG Maximus IX Formula Z270
Игровая системная плата Asus ROG Maximus IX Formula Z270 разработана в форм-факторе ATX и традиционном для семейства Republic of Gamers красно-черном дизайне. Печатная плата оснащена подсветкой Aura RGB LED, …
Новая Игровая Видеокарта GTX 1080 Strix A8G от Asus
Компания Asus выпустила в свет очередную игровую видеокарту, которая получила название GeForce GTX 1080 Strix A8G. Новинка основывается на адаптере Nvidia GeForce GTX 1080 и представляет собой вариацию модели Asus Strix OC O8G, но с более низкими таковыми частотами. Базовая частота графического ядра равна 1670 МГц, а при активации технологии GPU Boost она повышается до 1809 МГц.
Показатели эталонного адаптера от Nvidia немного скромнее: 1607 МГц и 1733 МГц соответственно. Видеокарта Asus GeForce GTX 1080 Strix A8G поддерживает технологию GPU Tweak II, которая разгоняет ядро до 1695 МГц и 1835 МГц в режиме …
Видеокарта GIGABYTE GeForce GTX 1080 Mini ITX 8G для малогабаритных систем
У желающих соорудить компактную, однако производительную игровую систему теперь есть возможность применить в ее составе видеокарту линейки NVIDIA GeForce GTX 1080 от фирмы GIGABYTE. Говорится о презентованной версии GIGABYTE GeForce GTX 1080 Mini ITX 8G (GV-N1080IX-8GD). Параметры корпуса равны 169 х 131 х 37 мм, следовательно, она прекрасно впишется в состав сборки типа Mini-ITX.
Основывается новинка на графическом процессоре NVIDIA GP104-400 при поддержке 2560 CUDA-ядер. В режиме «Gaming» его частотная формула отвечает эталонным значениям 1607 / 1733 МГц, а при переходе к профилю «OC» получаем …
VMware SVGA II для
Windows 2000, Windows XP, Windows 2003,
| Название драйвера | VMware SVGA II |
| Имя файла | devid-driver-208168.exe |
| Производитель | VMware, Inc. |
| Тип устройства | DISPLAY |
| Размер | 6.19 Mb |
| Версия драйвера | 11.09.01.0000 |
| Дата драйвера | 2012-02-17 |
| Операционная система |
Windows 2000, Windows XP, Windows 2003, Windows Vista, Windows 7, Windows 8, Windows 8.1, Windows 10 |
| Дата загрузки | 2015-12-01 |
|
Or click to install driver manually |
|

Скачать драйвер бесплатно для VMware SVGA II Windows 2000, Windows XP, Windows 2003, Windows Vista, Windows 7, Windows 8, Windows 8.1, Windows 10
Если Вам не удается найти необходимый драйвер для вашей операционной системы, вы можете задать свой вопрос пользователям сервиса в нашем разделе вопросов и ответов или обратиться в нашу службу поддержки по адресу http://www.facebook.com/devid.info.