
It is very annoying to meet the stop error 0x0000007b when you boot your computer, and this error is often accompanied by Blue Screen of Death. But luckily, this post offered by MiniTool Solution has gathered multiple efficient methods to fix the error.
When you use the Windows operating system, it is very common to meet different Windows update errors such as 0x80240017 and BSOD such as MACHINE CHECK EXCEPTION. So what will you do if you meet the BSOD 0x0000007B at Windows startup? Keep reading, and then you can know how to fix error 0x0000007B.
What Causes the BSOD 0x0000007B?
The STOP 0x0000007B error often occurs on Blue Screen of Death. So what causes the BSOD 0x0000007B? The causes are shown below:
- Missing or corrupted bootloader files.
- Incorrect BIOS configuration.
- Boot sector virus.
- Damaged Registry.
- Corrupted EFI bootloader.
- Hard drive failure.
And this error may appear on any of Microsoft’s Windows operating system such as Windows 10, Windows 8, Windows 7, Windows Vista, Windows XP, Windows 2000, and Windows NT.
How to Fix the BSOD 0x0000007B?
Since there are multiple causes of the stop error 0x0000007B, there are also many possible methods to fix the error.
Method 1: Restart Your PC
When you encounter the stop error code 0x0000007B, there is a message showing on the screen: “If this is the first time you’ve seen this Stop error screen, restart your computer.” Therefore, restarting your computer may help you to get rid of the error.
Sometimes, the error 0x0000007B may be just a fluke so that your computer failed to boot correctly. Thus, you give the chance to your PC to boot correctly by rebooting your PC. But if this doesn’t work, then you can try the following methods.
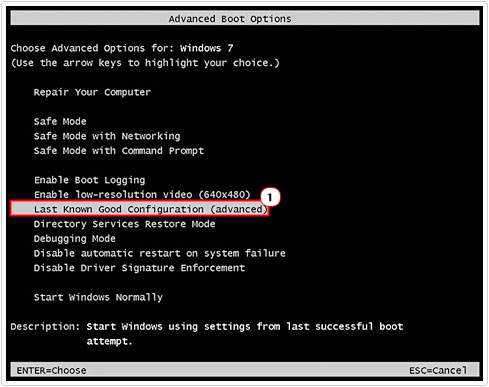
Method 2: Boot Your Computer to Last Known Good Configuration (Advanced)
If you meet the BSOD 0x0000007B on Windows 7 or Windows Vista, then you can boot your computer to Last Known Good Configuration (advanced). Here is the tutorial:
Step 1: Restart your computer and then wait for the screen with the logo of the manufacturer to pass.
Step 2: Repeatedly press F8 (or another button/button combination) as soon as the logo disappears.
Step 3: Choose the Last Known Good Configuration (advanced) option in the Advanced Boot Options window.
Step 4: Press Enter and wait for the process to complete.
After you have booted your computer to Last Known Good Configuration, then the 0x0000007B error should be fixed.
Method 3: Run a Full Virus Scan
You may encounter the BSOD 0x0000007B when your computer is infected with a boot-sector virus, so you can run a virus scan on your computer to get rid of the error. Here is a quick guide on how to do that:
Step 1: Boot your computer into Safe Mode and then launch your third-party antivirus software. And you should make sure that your antivirus software is up to date.
Tip: If there is no third-party antivirus tool on your computer, then it is recommended to boot your computer into Safe Mode with the Internet so that you can download antivirus software.
Step 2: Run a complete virus scan on your entire computer. And if there is any virus on your computer, remove them using your third-party antivirus tool.
Step 3: Restart your computer to check if the error 0x0000007B disappears.
Method 4: Run the System File Checker Tool
Sometimes, missing or corrupted system files could be the culprit of the 0x0000007B error, therefore, you are supposed to run the System File Checker tool. Here is the tutorial:
Step 1: Boot your computer into Safe Mode. Type cmd in the Search bar and then right-click Command Prompt to choose Run as administrator.
Step 2: Type sfc /scannow in the popped up window and then press the Enter key.
Tip: You can also do this by using a Windows recovery disk. To access Command Prompt, go to the path Repair your computer > Troubleshoot > Advanced options > Command Prompt.
Step 3: Let the System File Checker finish and then restart your computer to see if the 0x0000007B error is gone.
Method 5: Run the CHKDSK Tool
If running the SFC tool doesn’t work, then you should try to use the built-in Windows CHKDSK tool to scan the disk. Here is the instruction to run the CHKDSK tool:
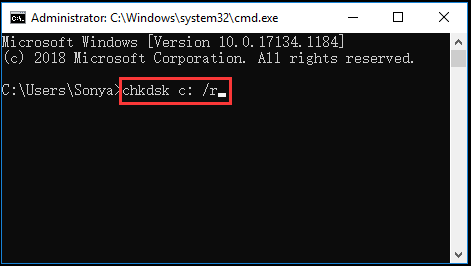
Step 1: In Windows Safe Mode, run Command Prompt as an administrator.
Step 2: Type chkdsk c: /r in the window and then press the Enter key. (c is the letter of the drive where you save your system).
Note: If you receive a message saying that “Chkdsk cannot run because the volume is in use by another process. Would you like to schedule this volume to be checked the next time the system restarts” in the Command Prompt window, then type Y on the keyboard.
Step 3: Restart your computer to make the command take effect and then check if the error happens again.
Method 6: Change the Hard Disk Controller Option from the BIOS
If you suffered hard drive controller errors, then the stop code 0x0000007B will appear, therefore, you can change the hard disk controller option from the BIOS.
After entering BIOS, you should change the option from AHCI Mode to IDR Mode or vice versa.
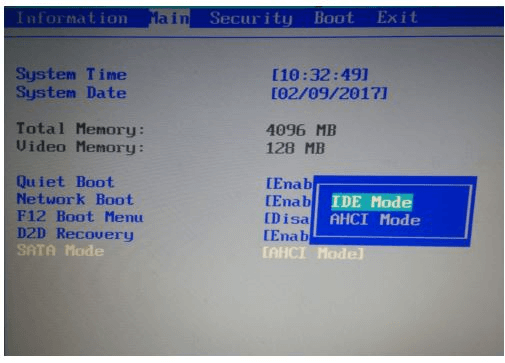
After changing the hard disk controller option, the 0x0000007B error should disappear.
Method 7: Run the System Restore
If you have created a system restore point, then you can run System Restore to get rid of the 0x0000007B error. System Restore is a powerful utility for Windows that allows you to undo certain changes to your computer and revert to a previous normal state.
If you want to get detailed instructions to run the System Restore, then it is recommended to read this post – What Is System Restore Point and How to Create It? Look Here!
Method 8: Fix the MBR
If there is a corrupted master boot record, then it is possible for you to meet the 0x0000007B error. MBR plays an important role when you boot your computer and once MBR is damaged or corrupted, your computer may suffer different serious problems.
Hence, if you meet the stop code, what you should do is to fix the MBR. Then how to fix the MBR? Simple instructions are here.
Step 1: Boot your computer to Windows RE, and then navigate to Troubleshoot > Advanced options > Command Prompt.
Step 2: Type the following commands one by one if you are using Windows 8/10:
- bootrec /fixmbr
- bootrec /fixboot
- bootrec /scanos
- bootrec /rebuildbcd
You can get detailed information from this post – Step-by-Step Guide to Repair and Fix MBR Windows 7/8/8.1/10.
Method 9: Clear the CMOS
You may meet the error code 0x0000007B due to the BIOS memory issue, therefore, you can clear the CMOS to get rid of the error. And if this method still cannot solve the problem, then you should try the following methods.
Method 10: Run Start-up/Automatic Repair
You can also perform the Start-up Repair to deal with the stop error code 0x0000007B. Here is the tutorial:
Step 1: Boot your computer to Windows RE, click Troubleshoot and then click Advanced options.
Step 2: On the Advanced options screen, click Automatic Repair or Start-up Repair.
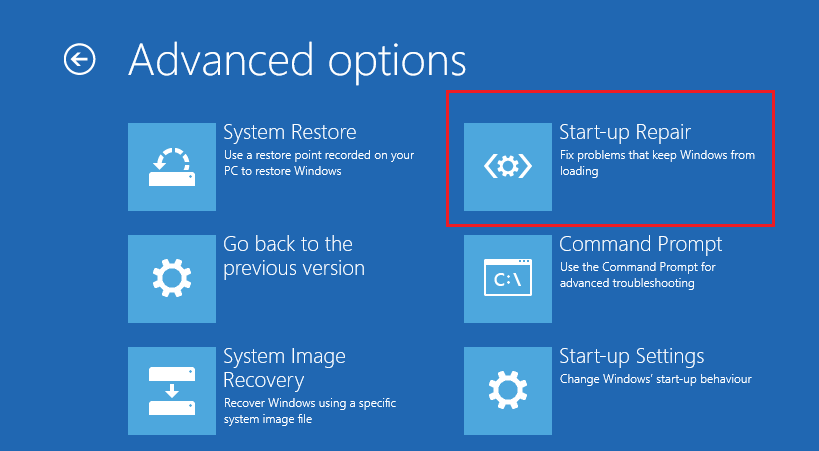
Step 3: Let the process finish and then reboot your computer to check if the error is fixed.
Method 11: Perform a Clean Installation of Windows
If all the methods above cannot help you get rid of the error 0x0000007B, then you can only try to perform a clean installation of Windows. But you should know that you will lose all the files, folders and settings related to your system on your computer if you perform this method.
Therefore, backing up your important data is very necessary before you adopt this method.
Back up Your Important Files
How to back up data quickly and safely? You should use MiniTool ShadowMaker to do it. It is a piece of effective and professional backup and restore software.
MiniTool ShadowMaker is capable of backing up files and folders, disks and partitions, and even the system to different locations. And it is easy to restore backup image files using the Restore feature.
In addition to the Backup feature, the Sync feature is also very convenient when you want to sync files and folders to different locations. And the Clone Disk can help you to make a bootable external hard drive. What’s more, this software allows you to try it for free within 30 days, so why don’t you download it and have a try?
MiniTool ShadowMaker TrialClick to Download100%Clean & Safe
Here are the steps to back up your data:
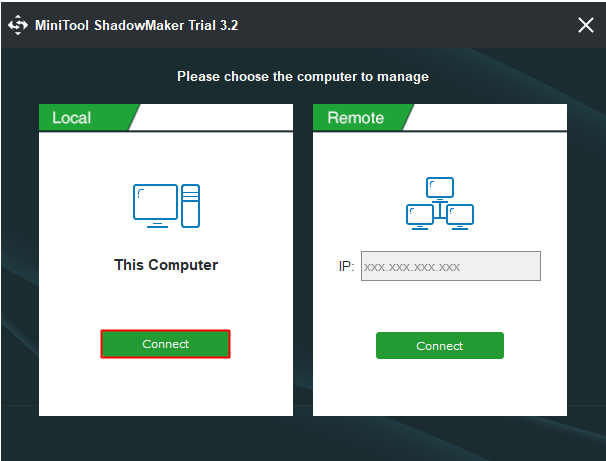
Step 1: Install and launch MiniTool ShadowMaker, then click Keep Trial on another normal computer.
Step 2: Choose Connect under This Computer to enter the main interface.
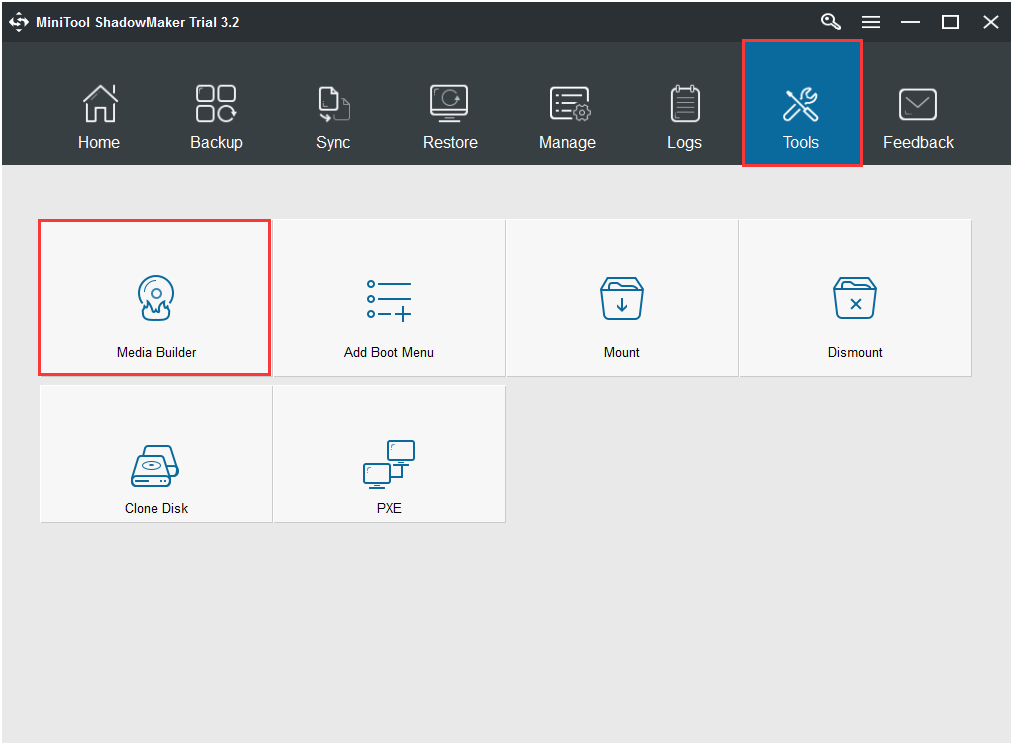
Step 3: Go to the Tools page, and then click Media Builder to create bootable media.
Step 4: Use the bootable media to launch your computer, and then go to the Backup page.
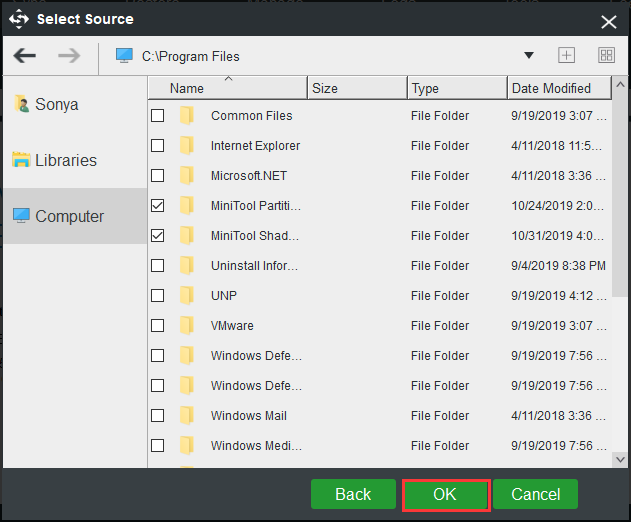
Step 5: Click Source and then select Folders and Files. Check all the files and folders that you need and then click OK.
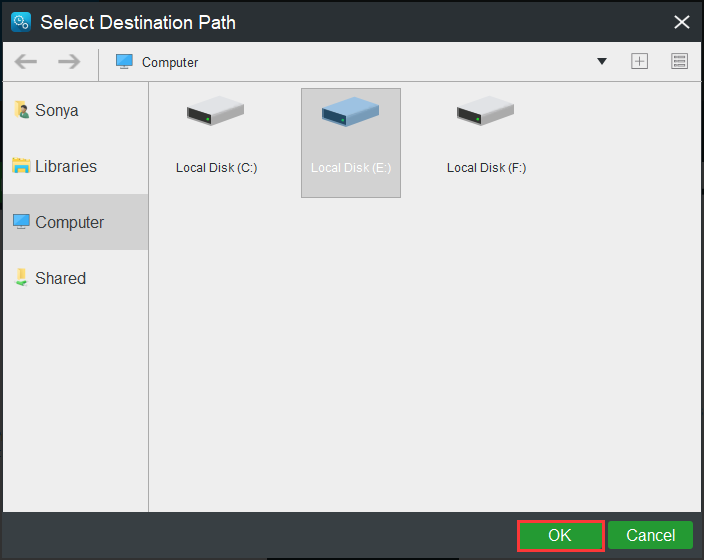
Step 6: Click Destination and then choose the external hard drive as a destination to save the backup image. Click OK to save changes.
Note: You can save your backup image to four different locations: Administrator, Libraries, Computer, and Shared.
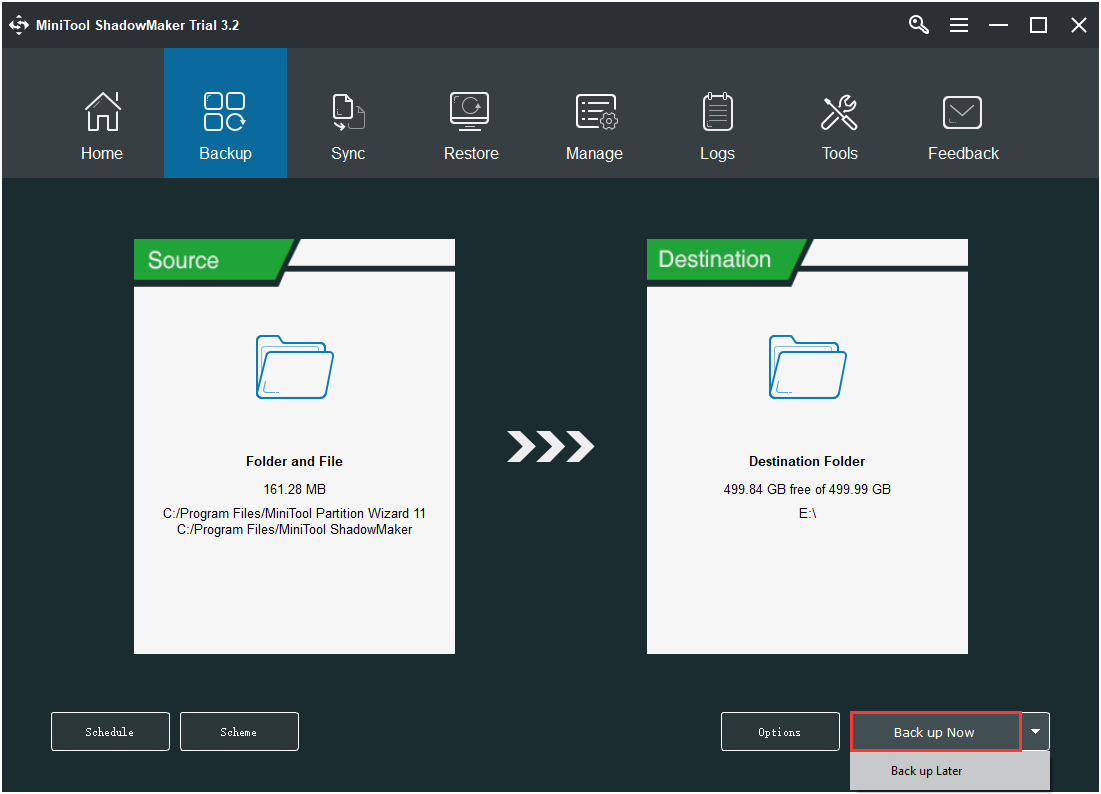
Step 7: After you have chosen the backup source and destination, then click Back up Now to start to back up files and folders. You need to start the task on the Manage page if you click Back up Later.
Step 8: Wait for MiniTool ShadowMaker to finish backing up files and folders.
Reinstall Your System
After backing up all the important data on your computer, then you can try to reinstall your operating system. Now follow the instructions below to do that:
Step 1: Download the Media Creation Tool from Microsoft on a USB flash drive with at least 8 GB storage space and then create a USB bootable drive using this tool.
Note: All the data on the USB flash drive will be removed.
Step 2: Insert the USB bootable drive to your computer and then boot your computer from the USB (change the boot order).
Step 3: Click Install Now and then follow the onscreen instructions to perform a clean installation.
You can read this post – How to Install Windows 10 on a New Hard Drive (with Pictures) to get detailed instructions.
After you reinstall your system, the 0x0000007B should have disappeared.
It is very disappointing to meet the stop code 0x0000007B when I boot my computer, but luckily, I have found some useful solutions to solve the problem in this post.Click to Tweet
Bottom Line
Although it is frustrating to meet the stop error code 0x0000007B when you boot your computer, you don’t need to worry about it too much because this pot has offered 11methods for you. And if you have any confusion about the methods or have better advice, then you can leave a comment below or send an email to [email protected].
0x0000007B FAQ
How do I fix error 0x000000b?
- Restart your PC.
- Revert to Last Known Good Configuration.
- Run a virus scan.
- Run SFC.
- Run CHKDSK.
- Change the hard disk controller option.
- Run System Restore.
- Fix the MBR.
- Clear CMOS.
- Run Start-up Repair.
- Reinstall System.
How do I fix inaccessible boot device?
What does error code 0xC000000E mean?
Error code 0xC000000E means that your computer needs to be repaired, and there is a hardware failure or an incorrect drive configuration, so if you want to fix the error, then you should read this post – How Can You Fix Error Code 0xc000000e in Windows 10?
Attention Before you read this post, I highly recommend you check out my resources page for access to the tools and services I use to not only maintain my system but also fix all my computer errors, by clicking here!
Did you recently turn on your computer, only to be greeted with the infamous blue screen 0x0000007b error? Are you wondering why it occurred? Would you like to know what you can do to combat it? If you answered yes to any of those questions, then you’ve come to the right post.
In this post, I will take you through a number of verifiable solutions that you can use to rectify issues associated with error 0x0000007b. Blue screen errors are very common, which is why you will find a plethora of repair guides on this site, for errors such as DNS_PROBE_FINISHED_BAD_CONFIG, CRITICAL_STRUCTURE_CORRUPTION, KERNEL_SECURITY_CHECK_FAILURE and more.
Error Overview
STOP error 0x0000007b is generally, but not exclusively caused by hard drive and other storage device issues. Other possible causes include viruses, hardware failure and data corruption.
A STOP error, is simply another term to describe a Blue Screen of Death (BSOD) error, and refers to the “stop” nature of the error; as it halts access to the system.
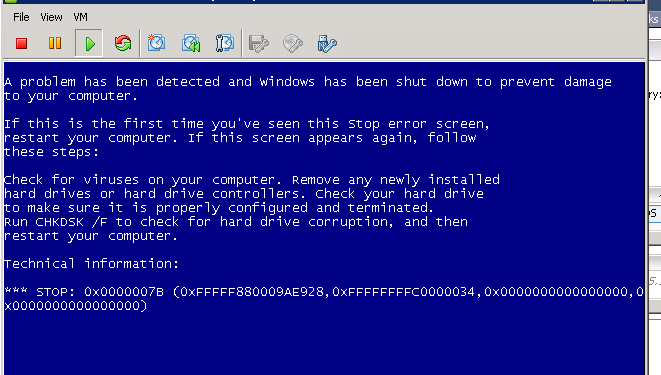
When you encounter this error, it usually resembles something like the following:
STOP: 0x0000007B
INACCESSIBLE_BOOT_DEVICE
It’s not uncommon for STOP 0x0000007b to be abbreviated to STOP 0x7B, however, you should always expect the full STOP code to be displayed on the actual error screen.
If after restarting the computer (following the BSOD error message), it’s able to successfully boot up, you may be prompted with the recovery message:
Problem Event Name: BlueScreen
BCCode: 7b
This error occurs on all Microsoft Windows based systems. Which includes Windows NT, Windows 2000, Windows XP, Windows Vista, Windows 7, Windows 8 and Windows 10.
What Causes Error 0x0000007b
Error 0x0000007b is known to occur in one of the following situations:
- Restoring an operating system from another personal computer or with a backup.
- When attempting to migrate another system using an image file.
- After changing the SATA controller mode from AHCI to IDE (or vice versa) in the BIOS.
- When installing a brand new motherboard.
As I previously noted, error 0x0000007b or INACCESSIBLE_BOOT_DEVICE error, is caused by driver-related issues. Essentially it means, your computer is unable to access the boot records stored on your hard drive. However, you should never rule out other known issues as being the culprit.
How to Fix It
The first thing you should do, before anything else, is restart your system. There are many instances where a BSOD error is just temporary. Thus, by restarting your system, you give your system the ideal opportunity to properly start up. However, if the problem continues to persist, even after a restart, only then should you resort to other solution.
If you recently made changes to your systems configuration, whether that be a hardware installation or uninstallation, then you can try starting your computer using the Last Known Good Configuration option. To access this, simply press F8, after the POST (Power on Self-Test).
If the computer boots up, but error 0x0000007b continues to occur, sparingly, then I recommend you attempt the many solutions below.
Run a Registry Scan to Fix Error 0x0000007b
BSOD errors, like error 0x0000007b are known to occur due to corruption of the Windows registry. This can happen, right after a disk read/write error has occurred. In this particular case, you’ll need to repair the registry.
Fortunately, it is possible to repair this area of your system, without having to do anything drastic. Simply run a full scan of your system using Advanced System Repair Pro, and it will detect and repair every registry infraction on your system.
You can learn more about this powerful tool and how it can help you, from the link below:
CLICK HERE TO CHECK OUT ADVANCED SYSTEM REPAIR PRO
Rebuild Boot Files
If a registry scan is unable to fix error 0x0000007b, then you may want to consider something a little more drastic. Such as a rebuild of the boot records. However, to do this, it’ll typically require you, either to reinstall your operating system, or run a series of complex command codes. Either way, the risks are there.
Thus, as a viable workaround, I recommend you use Reimage. Which is a Windows repair tool, capable of reinstalling any and all missing and/or corrupted Windows files. This, should make the entire process of restoring the corrupted area of your system, relatively simple.
You can find out more about this tool from the link below:
CLICK HERE TO CHECK OUT REIMAGE
Change BIOS Settings
If you recently made changes to the BIOS, then there’s a strong possibility that those changes were not compatible with your hard drive. The UEFI/Legacy BOOT mode setting, is a major culprit for this issue. So it’s important you take precautions when making any changes in the BIOS.
Another culprit for error 0x0000007b is when the wrong Work Mode is selected for the SATA controller in the BIOS. For any computer system, with a SATA controller, there are three work modes that you can choose from:
- IDE: This is more of a compatibility mode or basic mode, which treats your SATA controller, as if it were a legacy IDE controller. This mode is likely to give you the most consistent, but slowest performance if chosen.
- AHCI: This is the most advanced mode that comes with a number of hardware-level optimisations for both read/write caching and logic. The end result is a considerable speed improvement over the IDE mode.
- RAID: This mode allows the end user to combine the storage space of multiple physical hard drives. For improved performance and redundancy.
If the hard drive installed in your system, doesn’t support any of these modes. Or if Windows was installed and configured with a specific mode, but a different mode was selected in the BIOS, then it can result in error 0x0000007b.
Another possible cause is an incorrect memory setting in your BIOS. If you attempted to tweak your memory settings, then I’d recommend setting them back. Alternatively you could clear the CMOS.
Note: For step-by-step instructions on how to clear the CMOS, consult your motherboard manual.
Check Hard Disk Corruption
If your hard drive has a considerable amount of corrupted files in it, then it could be the root cause of error 0x0000007b. To fix it, you can run the Chkdsk tool. This tool, when run, will scan, detect and repair (where possible), corrupted sectors on the hard drive.
To run this tool, simply do the following:
1. First, boot into your system as an administrator.
2. Then Press + R, type … and click on OK.
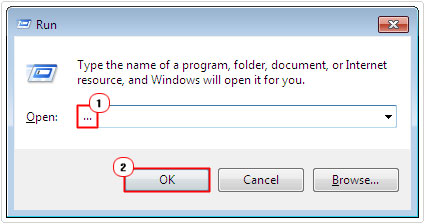
3. When File Explorer loads up, right click on your Primary (C:\) drive and select Properties.
4. When the (C:) Properties applet appears, click on the Tools Tab, then click on Check now and follow the onscreen instructions.
Note: Alternatively, you can run Chkdsk by following the instructions on my post on fixing error 0x80070091.
Use System Restore to Fix Error 0x0000007b
Lastly, if all the solutions above have failed, then you may want to try the system restore tool. System restore uses restore points, to set your system back to a previous state, before you made a particular change or installed a component.
However, in order for this method to work, system restore must already be enabled on your computer. That way, you will have restore points available for you to use.
With that said, you can learn more about this excellent tool, from my post on how to use Windows system restore.
Are you looking for a way to repair all the errors on your computer?
If the answer is Yes, then I highly recommend you check out Advanced System Repair Pro.
Which is the leading registry cleaner program online that is able to cure your system from a number of different ailments such as Windows Installer Errors, Runtime Errors, Malicious Software, Spyware, System Freezing, Active Malware, Blue Screen of Death Errors, Rundll Errors, Slow Erratic Computer Performance, ActiveX Errors and much more. Click here to check it out NOW!
Ошибка 0x0000007B (INACCESSABLE_BOOT_DEVICE) при загрузке компьютеру указывает на то, что Windows не может получить доступ к загрузочному диску из-за отсутствия необходимого драйвера или повреждения носителя.
Администратор может столкнуться с ошибкой 0x0000007B в следующих случаях:
- При восстановлении Windows из бэкапа на другой физический компьютер или виртуальную машину Hyper-V, VMware или VirtualBox (как частный случай восстановление из Bare Metal Recovery на другое железо);
- После переносе (клонировании) Windows на новый диск или новый компьютер;
- При миграции физической системы с помощью создании образа компьютера (например, с помощью disk2vhd) и разворачивании из этого vhd образа новой виртуальной машины;
- При переключении режима работы SATA контроллера в BIOS с AHCI на IDE/RAID, или наоборот (в этом случае достаточно открыть настройки BIOS и вернуть исходный режим SATA);
- При замене материнской платы и / или контроллера жесткого диска;
- После обновления BIOS/UEFI или смене настроек.
Чаще всего я сталкивался с ошибкой 0x7b после конвертации физического компьютера с Windows Server 2008 R2/ Windows 7 в виртуальную машину с помощью VMware vCenter Converter. После окончания конвертации Windows на новой ВМ не загружается и на экране появляется BSOD со стоп-кодом:
STOP: 0x0000007B (0xFFFFF880009A9928, 0xFFFFFFFFC0000034, 0x0000000000000000, 0x0000000000000000).
Ошибка INACCESSABLE_BOOT_DEVICE в этом случае вызвана тем, что контроллер жесткого диска нового сервера (компьютера или виртуальной машины) отличается от исходного оборудования. Например, в большинстве гипервизоров для подключения дисков по умолчанию используется SCSI или SAS контроллер, который обычно отключен в исходном образе Windows. Т.е. драйвер lsi_sas.sys установлен, но служба, которая его запускает – отключена. В результате операционная системе не может загрузить необходимый драйвер и загрузка Windows прерывается с BSOD.
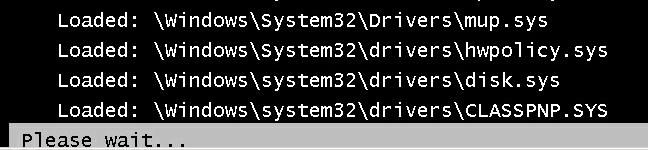
В режиме отладки видно, что загрузка Windows останавливается на этапе загрузки драйвера CLASSPNP.SYS.
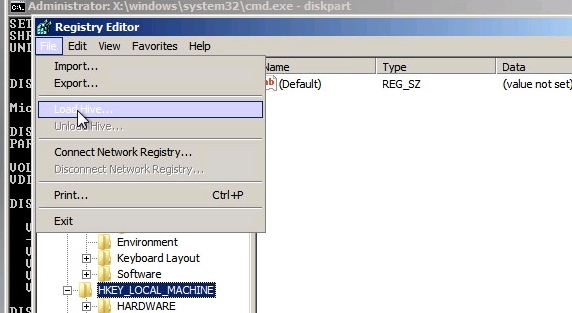
Для исправления проблемы, нужно загрузиться с установочного диска/ USB флешки с Windows или загрузочного диска (например, MsDaRT). Если вы загрузили компьютер с установочного диска, нужно на первом экране начала установки (выбор языка и раскладки клавиатуры) нажать сочетание клавиш Shift+F10. Должно открыться окно командной строки, в котором нужно выполнить команду:
Regedit.exe
В открывшемся окне редактора реестра выберите на раздел HKEY_LOCAL_MACHINE и нажмите меню File -> Load Hive. На локально диске сервера (не перепутайте его с диском со средой WinPE) выберите файл \Windows\System32\config\SYSTEM. В этом файле хранится системная часть реестра вашей Windows.
Эти действия смонтируют в редактор реестра куст реестра вашей системы с жесткого диска. Укажите временное имя новой ветки (например, local_hkey).
В загруженной ветке перейдите в раздел HKEY_LOCAL_MACHINE\local_hkey\ControlSet001\services\.
Найдите следующие ключи реестра:
- Atapi
- Intelide
- LSI_SAS
В каждом из этих ключей найдите параметр типа REG_DWORD с именем Start и измените его значение на 0 (0x00000000).
Примечание. Значение Start=0, означает что данная служба (и соответвующий драввер) будут загружаться при загрузке Windows. Start=3 – ручной запуск службы.
Если перед возникновением проблемы вы переключили режим работы SATA контроллера на AHCI, нужно также в разделе msahci установить Start=0 (см. статью Как включить AHCI в Windows без переустановки).

Для сохранения изменений в файле реестра на диске нужно выбрать ваш HKEY_LOCAL_MACHINE\local_hkey и в меню выбрать Unload Hive.
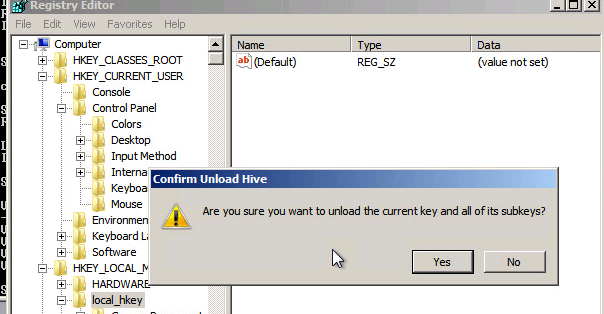
Теперь можете перезагрузить сервер в обычном режиме. Windows должна загрузится нормально, при загрузке будет выполнен автоматический поиск и установка драйверов для нового контроллера диска.
Если после данных изменений ваша Windows так и не загрузилась с той же ошибкой INACCESSABLE_BOOT_DEVICE, значит у вас используются какой-то другой тип контроллера. Попробуйте в ветке HKEY_LOCAL_MACHINE\local_hkey\ControlSet001\services изменить значение параметра Start в соответствии с таблицей.
| Служба Windows | Виртуальная машина VMWare или HyperV | Физический ПК с Windows x64 с нативным SATA адаптером | Физический ПК с RAID контроллером |
| aliide | 3 | 3 | 3 |
| amdide | 3 | 3 | 3 |
| atapi | 0 | 0 | 0 |
| cmdide | 3 | 3 | 3 |
| iastorv | 3 | 3 | 3 |
| intelide | 0 | 3 | 3 |
| msahci | 3 | 0 | 0 |
| pciide | 3 | 0 | 3 |
| viaide | 3 | 3 | 3 |
| LSI_SAS | 0 | 3 | 3 |
Ручная установка драйвера при возникновении ошибки INACCESSABLE_BOOT_DEVICE
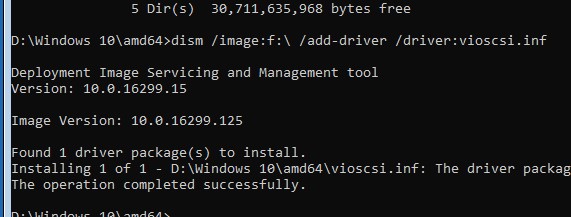
Вы можете вручную установить драйверы в ваш офлайн образ Windows. Например, после выполнения миграции хоста через P2V вы можете установить в офлайн образ драйвер для VMware SCSI Disk Controller или драйвер VirtIO (для KVM виртуализации). Для этого скопируйте необходимые драйвера на загрузочную USB флешку и загрузитесь с нее.
Для установки драйвера в офлайн образ Windows (в этом примере он находитмя на диске F:), выполните команду:
dism /image:f:\ /add-driver /driver:vioscsi.inf
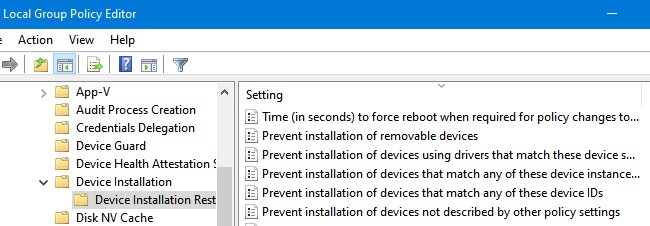
В некоторых организациях настроены групповые политики, которые ограничивают установку сторонних драйверов в Windows. Например, с помощью следующих параметров в разделе Computer Configuration -> Administrative Templates -> System -> Device Installation -> Device Installation Restrictions:
- Prevent installation of devices that match any of these device IDs
- Prevent installation of devices using drivers that match these device setup classes
- Prevent installation of removable devices
- Prevent installation of devices not described by other policy settings.
Если эти политики включены, Windows не сможет выполнить автоматическую установки драйвера контроллера. В этом случае нужно
- Загрузить с диска ветку реестра \Windows\System32\config\SYSTEM (как описано выше);
- Затем перейдите в ветку
HKEY_LOCAL_MACHINE\local_hkey\System\ControlSet001\Control\PnP - Измените значения параметров реестра DisableCDDB и DontStartRawDevices на 0
- Выгрузите куст реестра и перезагрузите компьютер.
При начале работы ОС произошла потеря доступа к системному разделу. Подобную ошибку следует отнести к категории одной из наиболее распространенных. Сбой возникает исключительно в процессе загрузки системы.
Причины появления
Скорее всего, возникла проблема отказа устройства начальной загрузки. Существуют и другие вероятные причины:
- Произошло заражение вирусом. Негативное воздействие вредоносной программы затронуло загрузочный сектор.
- Возникла проблема несовместимости дисковых аппаратных средств.
- Драйвер, требуемый контроллеру загрузки для работы, имеет дефект. В результате этого он не имеет возможности быть запущен на конкретном компьютере.
- Сведения в реестре о драйверах имеют повреждения различной степени тяжести.
- Когда сбой возникает в ходе чтения 2й дискеты установки Windows NT, есть вероятность того, что в BIOS устройства установлен параметр Drive Swapping.
- Когда через командную строку выполняется ввод winnt /b для установки ОС, подобная ошибка выдается из-за сложностей с установлением контроллера диска. Он не имеет в своем распоряжении нужного для пересылки ответа времени.
Параметры
На синем экране смерти появится текстовая информация и нас особенно интересует строка
STOP: 0x0000007B (parameter1, parameter2, parameter3, parameter4) INACCESSIBLE_BOOT_DEVICE
Если рассматривать параметры, следует сказать только о первом, который демонстрирует адрес устройства, монтаж которого так и не смог осуществиться. Все остальные параметры являются нулевыми.
Способы решения
- Провести изменение опций начальной загрузки.
- В случае несовместимости дисковых аппаратных средств следует выполнить пропуск данного этапа и установить необходимые драйвера. Не будет лишним осуществить обновление ответственных за работу устройств драйверов. Их последние версии всегда можно найти на сайте производителя.
- Если недавно происходила установка каких-либо устройств, рекомендуется отсоединить их проверить, изменится ли процесс загрузки. Если ошибки не станет возникать, проблема в конфликте IRQ или порта I/O.
- Проверить совместимость между используемыми драйверами и текущей версией операционной системы.
- Выполнить перезапуск и нажать в процессе F8. Среди доступных вариантов выбрать загрузку последней удачной конфигурации.
- Есть вероятность дефекта жесткого диска. Для проверки используются специальные программы или происходит запуск команды Chkdsk /r. Когда перезапуск невозможен, рекомендуется применение консоли восстановления.
- Когда раздел относится к файловой системе FAT, то применяемые в Windows длинные названия способны повредиться.
- Осуществить проверку на вредоносные программы. В определенных ситуациях рекомендуется использование нескольких антивирусов для увеличения эффективности поисков. Чрезвычайно важно не активировать их одновременно, иначе в работе компьютера могут начаться сбои. Когда удаление вируса и излечение системы является невозможным, следует осуществить переустановку ОС.
- Некоторые устройства оснащаются дисководами 3,5 и 5,25, которые располагаются в едином блоке. В сложившихся обстоятельствах есть вероятность появления ошибки при чтении 2й дискеты для загрузки. Требуется провести отключение в BIOS параметра Drive Swapping.
- Дефекты реестра Windows NT – невозможно осуществить запуск драйверов миниморта. Именно он требуется для контроллера загрузки. Предусматривается два основных подхода для выполнения поставленной задачи. Первый вариант предполагает загрузку устройства с применением 3х установочных дискет Windows NT, после чего происходит старт работы программы восстановления. Когда будет выдан специальный запрос, нужно осуществить замену исключительно куст SYSTEM, где имеются данные о запускаемых в ходе работы устройства драйверах и службах. Второй способ заключается в проведении параллельной установки Windows NT. Она выполняется в специальную папку. Следующим этапом заменяются методом копирования те документы, которые являются поврежденными.
Ранее указывались стандартные способы решения возникшей проблемы. Имеется ряд случаев, когда порядок действий является прописанным и указанные мероприятия станут только дополнительной тратой времени. Следует более подробно рассмотреть часто встречающиеся осложнения.
Сбой в ходе монтирования ОС Windows XP из образа Sysprep
Подобный тип осложнений характерен для ОС Windows XP версий HE и PE. Появление сбоя происходит в процессе проведения установки из образа. Причина заключается в дефекте Sysprep.inf – у него не имеется секции SysprepMassStorage. Восстановление ОС заключается в проведении простой проверки. Требуется удостовериться в том, что секция [SysprepMassStorage] равняется секции [Sysprep].
Сбой после повторной установки или удаления программы Roxio Easy CD Creator 5
Причина заключается в том, что не осуществлено удаление записи об описанной программе в реестре о драйвере Prtseqrd.sys после того, как само ПО было удалено с жёсткого диска устройства. Подобная запись вводится непосредственно приложением в процессе его установки. Таким образом, в процессе загрузки устройства возникает сбой и на экран выводится ошибка. Существует несколько способов, с применением которых допускается решать сложившуюся ситуацию.
Можно изменить тот показатель, которым обладает системный реестр. Для выполнения поставленной задачи рекомендуется применять консоль восстановления. Дополнительный момент заключается в том, что провести установленные действия можно только при обладании правами администратора.
- Выполняется процесс монтирования ОС Windows XP с диска. Для обеспечения доступа к консоли восстановления, предполагается ввод пароля администратора системы.
- Требуется прописать некоторые команды, чтобы можно было говорить о возможности установки нужных показателей. После каждой строки нужно нажимать клавишу «ВВОД»
cd C:\Windows\System32\config
ren system system.old
ren software software.old
ren SAM SAM.old
ren security security.old
ren default default.old
copy C:\windows\repair\system
copy C:\windows\repair\software
copy C:\windows\repair\SAM
copy C:\windows\repair\security
copy C:\windows\repair\default
- Когда все мероприятия, описанные выше, завершены, можно осуществить выход из консоли восстановления. Для этого, в ней требуется ввести команду exit.
- Необходимо повторно выполнить вход в систему. Как и в предыдущем случае, для осуществления поставленной задачи не обойтись без администраторских прав.
- Вызывается командная строка, где происходит прописывание regedit.
- Происходит переход непосредственно к HKEY_LOCAL_MACHINE. Требуется вызвать меню «файл» и обнаружить там пункт «Загрузить куст».
- Теперь нас интересует документ, который располагается по следующей директории: C:\Windows\System32\Config. Он имеет название System.old.
- В установленном документе следует приписать в названии раздела test.
- Происходит переход по указанному адресу: HKEY_LOCAL_MACHINE\test\ControlSet001\Control\Class\{4D36E965-E325-11CE-BFC1-08002BE10318}
- правой панели редактора реестра находятся два параметра – LowerFilters и UpperFilters. Они должны быть удалены для возможности дальнейшей работы.
- Теперь нас интересует эта ветка — HKEY_LOCAL_MACHINE\test\ControlSet001\Control\Class\{4D36E967-E325-11CE-BFC1-08002BE10318}
- Здесь нужно осуществить доступ к UpperFilters. Нас интересуют его свойства, а именно – запись PrtSeqRd в графе «Значение». Для дальнейшей работы происходит её удаление.
- Производится перемещение в HKEY_LOCAL_MACHINE\test\ControlSet001\Services
- Требуется отсоединить определенные службы. Это осуществляется довольно просто – нужно подкорректировать их показатель «Старт». Он устанавливается числом 4. Это происходит для всех служб, удовлетворяющих подразделам
Cdr4_xp
Cdralw2k
cdudf_xp
dvd_2K
mmc_2K
PrtSeqRd
pwd_2K
UdfReadr_xp
- Производится переход в HKEY_LOCAL_MACHINE\test\. Теперь нас интересуют любые разделы ControlSet00x. Для них обязательно выполнить действия, описанные в этапах с 10 по 14.
- Происходит выгрузка куста System.old.
- Можно завершить работу редактора реестра и выполнить перезапуск куста System.
- Выполняется процесс загрузки ОС Windows XP с диска. Для обеспечения доступа к консоли восстановления, предполагается ввод пароля администратора системы.
- Интересует папка Windows\System32\Config. Требуется произвести ввод chdir system32\config, располагаясь при этом в C:\Windows.
- Прописываются следующие строки:
ren system system.xxx
ren system.old system
После каждой из них обязательно нажимать клавишу «ВВОД»
- Вводится команда exit. Для устройства осуществляется рестарт системы.
Подобный подход предполагает довольно большое количество действий, но обеспечивает достаточно высокую надежность в плане устранения проблем, связанных с возникновением ошибки 0x0000007B. Существует альтернативный способ, который имеет много общего:
- Из рабочей копии операционной системы происходит запуск редактора реестра.
- Нас интересует раздел HKEY_LOCAL_MACHINE. Именно к нему и требуется выполнить переход.
- Зайдите в меню файла и укажите там пункт «загрузить куст».
- Происходит открытие папки %SystemRoot%\System32\Config. Именно в её реестр требуется задать корректировки. Ищется документ System и открывается после обнаружения.
- Непосредственно в окне загрузки куста вводится test.
- Требуется осуществить мероприятия, которые были описаны в предыдущем способе и идут под номерами с 10 по 14, включительно.
- Происходит процесс выгрузки для куста test.
- Выполняется закрытие редактора реестра с последующим перезапуском системы, подвергнутой корректировкам.
Сбой после переноса системного диска под ОС Windows XP на другой компьютер
Как можно понять из названия, ошибка будет выдаваться при запуске ОС сразу после того, как выполнен перенос системного диска под Windows XP. Причиной является недостаток определенных драйверов или контроллеров, которые должны применяться для обеспечения стабильной работы. Если рассматривать более подробные факторы, следует сказать о самой структуре контроллеров IDE. Для их производства используются микросхемы самых разных типов. Все они обладают уникальным идентификатором PnP-ID. Для успешной инициализации диска, важно установить подобные сведения до того, как произойдет загрузка операционной системы.
Предусматривается несколько способов, с использованием которых можно устранить выдачу ошибки:
- Провести замену оборудования на то, которое подходит для конкретной ситуации. Следует уточнить, какие именно устройства применялись на прошлом компьютере. Такой подход позволит устранить проблему несовместимости.
- Рекомендуется применять на новом устройстве контроллер, который является аналогичным данному изделию на старом компьютере. Это особенно важно в тех ситуациях, когда применяется системный диск SCSI.
- Для системных дисков IDE требуется осуществлять поиск аналогичной старому устройству системной платы. Предполагается, чтобы на ней использовался схожий набор микросхем.
- Самый эффективный способ это загрузившись с помощью Live CD, извлечь файлы из архива: atapi.sys, intelide.sys, pciide.sys, pciidex.sys в папку Windows\System32\Drivers, после чего запустить удаленный реестр и импортировать в него следующий файл предварительно распаковав его.
Сбой после переноса системного диска под ОС Windows 7 на другой компьютер
Для решения этой проблемы понадобится Live CD и файл реестра. Вы загружаетесь с помощью Live CD, запускаете с рабочего стола удалённый реестр и импортируете туда файл предоставленный выше, только не забудьте его распоковать. После чего перезагружаетесь и наслаждаетесь Windows 7 на новом компьютере без потери данных. После чего обновите драйвера!
Сбой в процессе загрузки после замены оборудования
Ошибка является характерной для двух версий ОС Windows XP HE и PE. Следует чуть подробнее описать, что именно предполагается в подобном случае. Причина заключается в том, что набор микросхем контроллера IDE на новой плате имеет некоторые отличительные особенности от набора на используемой ранее плате. В результате, происходит сбой в работе.
Чтобы можно было говорить о решении проблемы, следует воспользоваться одним из предложенных далее вариантов восстановления. Довольно высокую эффективность демонстрирует процесс обновления ОС Windows XP. Всегда можно найти последнюю версию непосредственно на сайте производителя или иных ресурсах. Предполагается возможность помощи в том случае, когда старый IDE и новый IDE контроллеры устанавливают одинаковый объем диска.
Второй подход предусматривает выполнение разделов и проведение процесса форматирования жесткого диска с последующей установкой Windows XP поверх имеющейся. Это требуется осуществлять тогда, когда старый IDE и новый IDE контроллеры устанавливают разный объем диска.