
If your Windows 11 or Windows 10 computer gets stuck at Lock Screen and you always need to press Ctrl+Alt+Del keys together to get the Password box and unlock your computer, you are not alone. It seems a known bug in Windows 10/11 operating system and in this article, we’ll discuss about it in details.

Table of Contents
- [PROBLEM] Windows 11 Gets Stuck at Lock Screen
- Windows 11 Suddenly Requires to Press Ctrl+Alt+Delete Keys to Unlock
- It’s a Known Issue Also Present in Windows 10
- Solutions to Fix the Stuck Lock Screen Issue in Windows 10 and Windows 11
- Solution 1: Change Lock Screen Background Image
- Solution 2: Turn On and Off “Require Users to Press Ctrl+Alt+Delete” Option
- Solution 3: Disable Ctrl+Alt+Delete Requirement Using Registry Editor
- Solution 4: Completely Disable Lock Screen in Windows 10 and Windows 11
[PROBLEM] Windows 11 Gets Stuck at Lock Screen
Since a few days, I was facing this issue in one of my Windows 11 devices. Whenever I started the device (restart as well as resume from hibernate/sleep) and Windows 11 displayed the Lock Screen with date/time and I pressed a key such as Space bar to unlock the device, the Lock Screen got stuck. Nothing happened after that and Windows 11 didn’t show round user picture, user name and password box. So I was unable to enter the password to sign into my account.
During this issue, as soon as I press a key or click using mouse button on Lock Screen, the date and time on Lock Screen disappear and it seems Windows 11 will show password box to enter the password but it never happens. The Lock Screen hangs and keeps showing the background wallpaper without password box.
Windows 11 Suddenly Requires to Press Ctrl+Alt+Delete Keys to Unlock
When this problem occurs, I noticed that pressing Ctrl+Alt+Del keys immediately fixes the issue and the password box along with username appears on Lock Screen.
I checked that “pressing CAD (Ctrl+Alt+Del) keys to unlock the device” feature is NOT enabled in the device. In fact, the Lock Screen doesn’t show any such information like I need to press the Ctrl+Alt+Del keys together.
The problem suddenly started occurring and now I always need to press Ctrl+Alt+Del keys together to get the password box and unlock the device.
It’s a Known Issue Also Present in Windows 10
When I searched about the issue on Internet, I found several Windows 10 users have also faced this issue in past.
A user “POTUS1” posted about it at official Microsoft Answers forum:
I have Windows 10 Home, and on one of the last updates, all of the sudden, I MUST go through >>> ctr+alt+del, and once that screen clears, then enter my password. I DO NOT need feature!
How do I disable the ctrl+alt+del portion of the login?
Another user “SlickRCBD” also posted about similar issue on Microsoft Answers forum:
Suddenly, without me changing any settings, the lock screen requires (invoked by pressing -) me to press DELETE before I can enter my password to resume using the computer. Before it would respond to any key, or just prompt me to enter the password. The only thing I knew of that would do this was for the Welcome screen, which is unaffected. Also, I checked the setting for that, and it is unchecked. How do I make it so that I don’t need to hit DELETE before I can enter my password?
I found a person “Teleporting Goat” at Superuser community having exact same issue in his Windows 10 device:
When I unlock my home PC, I often get in a situation like this:
- Background is the current windows lock screen image
- No text like “Press ctrl+alt+del”
- No field to type my password
If I click or press any key, I get the windows “background” sound, like when there’s a window open that has priority over the one you’re clicking. Nothing happens, the field doesn’t show up.
When this happens, I don’t know if it solves by waiting because I don’t have the patience, but if I press ctrl+alt+del the password prompt shows up and I can login. This means I have to press ctrl+alt+del almost every time I want to login even though it’s not enabled. When this “bug” happens I also don’t see the little texts on the Windows lock screen images.
And after I log in, there’s no window awaiting for my action. Today for example I just had Firefox and task manager open.
Clarification: This doesn’t happen all the time. Sometimes I get the normal behavior, which is no password field, and any key makes it appear. The bug can happen when I come back from hibernation or after a normal startup.
What could be causing this and how can I avoid it?
Here is another similar issue reported by “Isaiah_6_8” at Reddit:
Previously, all I needed to do was hit any button on my keyboard and the lock screen would prompt me for my password/pin/face recognition. Now, I have to do that extra step of CTRL + ALT + DEL to unlock. THEN punch in my password.
A few web search results pointed me to instructions on how to tick off a box to disable the ctrl + alt + del step. The thing is, that option is grayed out. I can’t (un)tick the box.
Also, the bottom left-hand corner now lists User 1 (me; my name) and Administrator. It didn’t before. I never had such an option to choose which user I want to log in as. I’d prefer not to have the Administrator listed on the login screen.
I don’t know if this has anything to do with it, but I had issues with my Bluetooth (in device manager) not showing up. I did a windows update; went through a restart; then the PC went into a restart loop. The only way I was able to get out of it was by restarting in safe mode. That’s when I saw the different login lock screen.
[Not necessarily a big deal, but I’d like for things to go back to how they were. After years of doing it one way, I’m sure it’ll take a while for me to get used to this new, extra step.]
[edit: I’ve tried going to the Computer Management screen > system tools … but there isn’t an option for ‘local users / group’]
So it seems the issue was also present in Windows 10 and now the same issue has started occurring in Windows 11 devices too.
Solutions to Fix the Stuck Lock Screen Issue in Windows 10 and Windows 11
There are many possible solutions or workarounds which can be followed to fix this annoying issue. You can try them one by one until the problem is resolved in your computer system:
Solution 1: Change Lock Screen Background Image
I found that if we change or reset Lock Screen background wallpaper to default or built-in images which came bundled with Windows, it can fix the issue.
- Press WIN+I keys together to open Settings app. You can also open Settings app using Start Menu.
- Now click on Personalization section present in left-side pane.
- In right-side pane, click on Lock Screen section.
- Now select a different image for Lock Screen background.

Now try to lock the computer by pressing WIN+L keys together and press any key to pass the Lock Screen. Now you should get the password box to enter the account password.
Solution 2: Turn On and Off “Require Users to Press Ctrl+Alt+Delete” Option
Although it’s clear that the security feature of pressing Ctrl+Alt+Delete keys is NOT enabled in any device but turning on and off the option might help in fixing this glitch.
- Press WIN+R keys together to launch RUN dialog box.
- Type netplwiz in RUN box and press Enter. It’ll open classic User Accounts window. (You can also use control userpasswords2 command to open the same window.)
- Go to Advanced tab and enable “Require Users to Press Ctrl+Alt+Delete” checkbox. Click on Apply button.
- Now uncheck/disable “Require Users to Press Ctrl+Alt+Delete” option and apply changes.
It might also help in fixing the issue on Lock Screen.
Solution 3: Disable Ctrl+Alt+Delete Requirement Using Registry Editor
We can also disable pressing Ctrl+Alt+Delete key requirement to unlock the device feature using Registry Editor:
- Press WIN+R keys together to launch RUN dialog box.
- Type regedit in RUN box and press Enter. It’ll open Registry Editor.
Now go to following key:
HKEY_LOCAL_MACHINE\SOFTWARE\Microsoft\Windows NT\CurrentVersion\Winlogon
In right-side pane, make sure the value of DisableCAD is set to 1.

If it’s set to 0, double-click on the DWORD and change its value to 1.
Restart the computer to take effects.
Solution 4: Completely Disable Lock Screen in Windows 10 and Windows 11
You can also disable the entire Lock Screen in your Windows device so that Windows will direct show the Login Screen or Sign-in Screen where you’ll be able to enter the password.
Following article will help you in disabling Lock Screen in Windows 10 and Windows 11:
[Tip] How to Disable Lock Screen in Windows 8 and Later
Also Check:
[Fix] Windows 10 Lock Screen Taking Too Much Time to Show Login Screen
[Windows 10 Fix] Keyboard Input Not Working in Microsoft Edge, Start Menu, Cortana and Lock Screen
You are here: Home » Troubleshooting Guides » [Fix] Windows 11 Stuck at Lock Screen, Now Requires Pressing Ctrl+Alt+Delete to Unlock
For all the good things that Windows 11 brings, there’s also a slew of bugs that make the ‘next-gen’ experience less than ideal. One annoying issue affecting many early adopters is a situation in which users get stuck at the login screen – The sign-in form doesn’t appear, so a restart is required to boot successfully.

This behavior is typically reported after Windows 11 is forced to return to life after being in hibernation – Most issues have reported that this problem occurs on laptops and ultrabooks after they open the lid after closing it previously.
After digging around for possible causes, we uncovered that the issue is almost always related to a Windows 11 bug brought about by build 22000.4. A few insiders have already confirmed that Microsoft is already working on an official fix that will stop this problem from appearing.
But until we get an official fix from Microsoft, there are still a few verified fixed that you can enforce in order to ensure that you don’t become stuck at the login screen on Windows 11.
Reload the login interface
If you’re looking for a quick fix that will allow you to force the login screen to appear without the need to reboot your computer, try pressing Ctrl + Alt + Delete. This will force the sign-in interface to appear, allowing you to log in with your account.
But keep in mind that this is not a permanent fix – This is merely a workaround that will allow you to get past the stuck log-in screen without the need to restart your computer.
If you’re looking for a permanent fix, move down directly to method 3 below.
Restart your PC
Another temporary workaround is to simply restart your computer forcibly, forcing your Windows 11 PC to boot normally rather than resume from a hibernation stage.
But keep in mind that you won’t be able to restart normally as the power menu won’t be visible at all. The only way to restart really at this point is to force shutdown by pressing the power button on your PC.

Note: If you’re on a laptop, you’ll need to long-press the power button until power is cut. Shortpessing the power button will only force your PC to enter hibernation again (unless you modified the default behavior of your power button).
As you can see, this is not an elegant solution, so consider enforcing one of the methods below in order to prevent this issue from occurring in the future.
Installing every pending update
Insider talk is suggesting that Microsoft is very close to resolving this issue with the next Windows 11 build available through the Dev Channel. So before you take any drastic measures that will ensure that this issue doesn’t happen, you should first ensure that you install every pending Windows Update.
Important: Fixes addressing critical system processes typically arrive through Important or Critical updates, but you should install every pending update just to be sure.
Follow the instructions below to install every pending update for your Windows 11 version and see if this fixes your sign in issues:
Note: You might not be able to access Windows Update using the GUI. If this is applicable, you’ll need to boot in safe mode. We’ve included step-by-step instructions on how to enter safe mode. In case you are able to get past the login screen and use Windows normally, start directly with step 5.
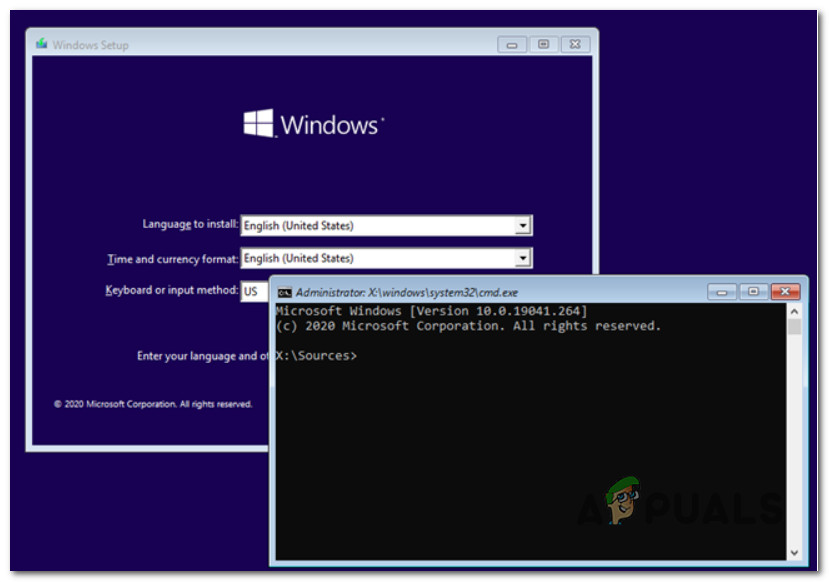
- To enter Safe Mode, start your computer normally, insert a compatible Windows 11 installation media and press any key when asked to boot from it.

Press any key to boot from the installation media - Once you’re inside the Windows Installation screen, press Shift + 10 to open up an elevated Command Prompt.

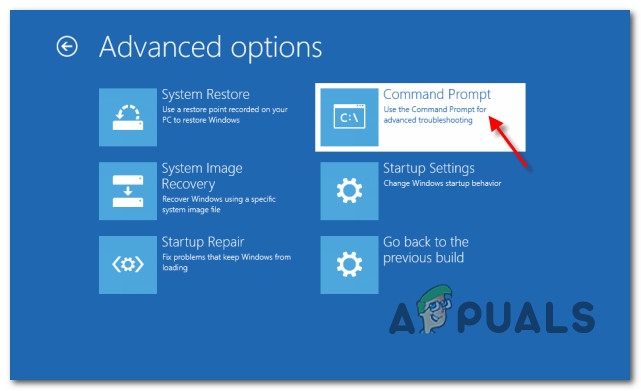
Open a CMD prompt Note: If you don’t have a compatible installation media at the ready and you don’t want to create one from scratch, you can also force the Advanced Options menu to appear by forcing 3 consecutive system interruptions during the boot sequence. From there, you can open an elevated CMD prompt and continue with the steps below.

Open up a CMD Window - Inside the elevated CMD prompt, type the following command and press Enter to configure your PC to boot in Safe Mode:
bcdedit /set {default} safeboot networkNote: This will force your Windows 11 PC to boot in Safe Mode with Networking, which will allow you to install the pending updates.
- After the command has been successfully processed, you can close the CMD prompt as well as the Windows Repair window before removing the installation media and allow your PC to boot in Safe Mode with Networking.
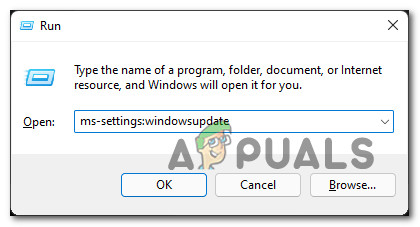
- After your Windows 11 PC boots in Safe Mode, open up a Run dialog box by pressing Windows key + R. Next, type ‘ms-settings:windowsupdate‘ inside the text vox and press Enter to open up the Windows Update window of the Settings app.

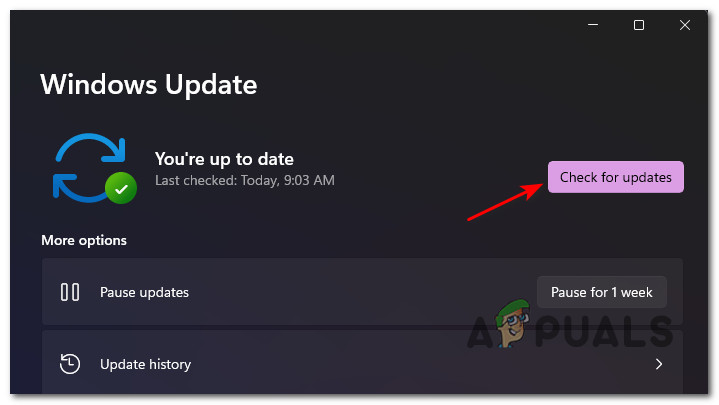
Opening the Windows Update screen - At the User Account Control, click yes to grant administrative privileges.
- Inside the Windows Update tab, move over to the right-hand section of the screen and click on the Check for Updates screen.

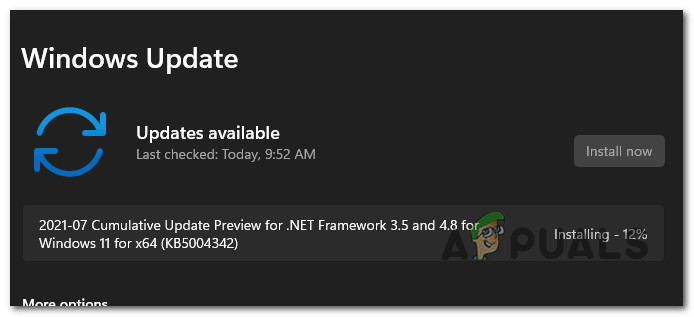
Checking for Updates - If a new update is found, Windows 11 will start to download it and install it automatically (depending on your settings). If the installation doesn’t start automatically, click on Install Now from the list of options.

Install the pending Windows 11 updates automatically - When you’re prompted to restart, do so and check if the sign-in problem is fixed once the next startup is complete.
Note: In case a lot of Windows Updates are pending, you might be prompted to restart before every pending update gets installed – If this happens, restart as instructed but return to the Windows Update screen to continue the installation of the remaining updates. - Go through the signup screen normally and see if the problem is now fixed.
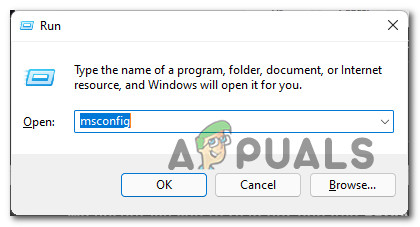
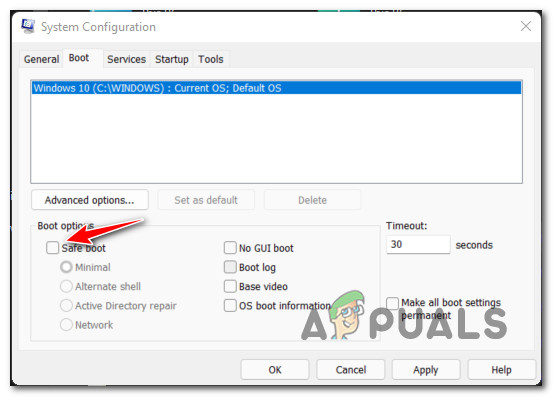
- Now to configure your PC to boot normally again, press Windows key + R to open up a Run dialog box. Next, type ‘msconfig’ and press Enter to open up the System Configuration menu.
Open up the System Configuration utility - Inside the System Configuration menu, access the Boot tab and uncheck the box associated with Safe boot and click Ok to save the changes.

Disable safe boot

In case the issue is still not resolved, move down to the next potential fix below.
Disable Lock Screen Behavior on Windows 11
If none of the potential workarounds have been effective in your case, the only thing you can do at this point in order to avoid the scenario in which your Windows 11 PC gets stuck at the login screen is to effectively disable the lock screen from the Settings menu.
This will ensure that the scenario in which this bug occurs can’t occur anymore as the lock screen doesn’t appear anymore when you return your PC from sleep or idle mode.
By default, Windows 11 is configured to automatically display the lock screen when the PC returns to life after a period of inactivity. But this behavior can be easily changed from the Settings menu.
Follow the instructions below to learn how to effectively turn off the Lock Screen feature in Windows 11:
Note: In some situations, you might be unable to get past the login screen. In this case, you’ll need to boot in safe mode. If you can get past the login screen by restarting, skip directly to step 5.
- Insert a Windows 11 compatible media and press any key to boot from it.
Press any key to boot from the installation media Note: If you don’t have installation media, you can either create one from scratch or you can purposely interrupt the booting sequence 3 times in a row to enter the Recovery menu.
- Once your PC successfully boots from the installation media, press Shift + 10 to open up an elevated Command Prompt window.
Open a CMD prompt - Inside the elevated Command Prompt, type the following command to configure your computer to boot in safe mode:
bcdedit /set {default} safeboot minimal - Reboot your computer, take out the installation media and wait until your Windows 11 PC boots in Safe Mode.
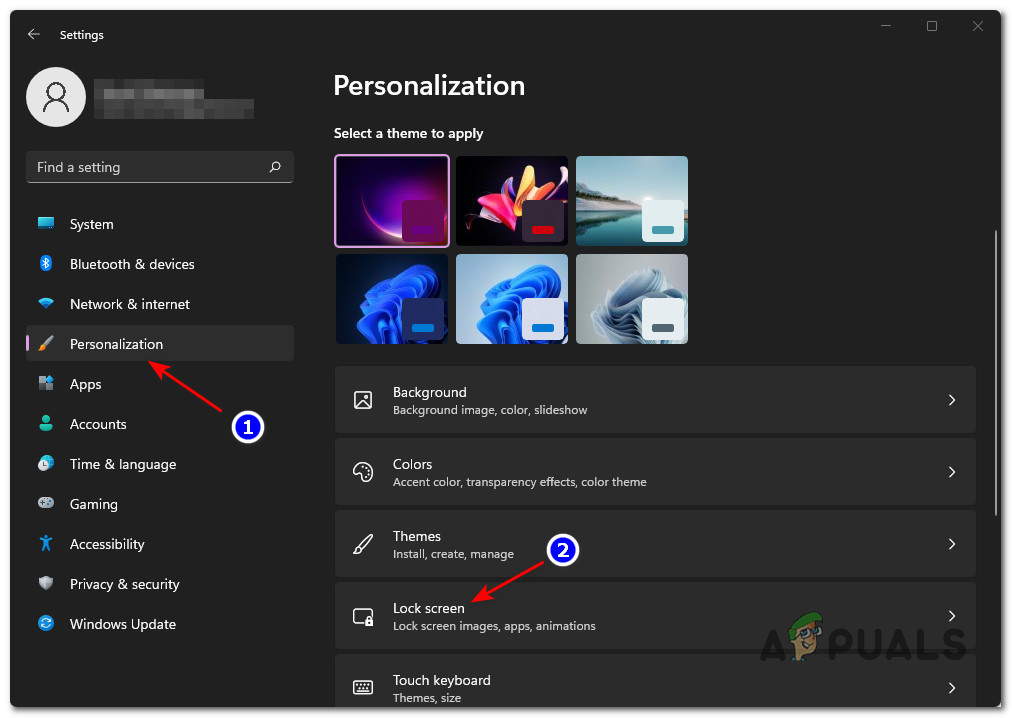
- Press Windows key + I Key to open up the Settings menu of Windows 11.
- Once you’re inside the Settings menu, select Personalization from the left-hand vertical menu.
- With the Personalization tab selected, click on Lock Screen from the menu on the right.

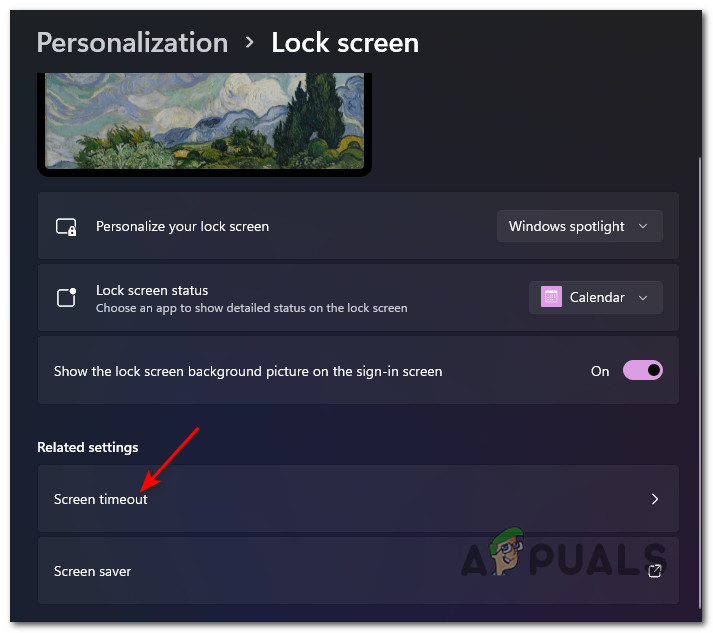
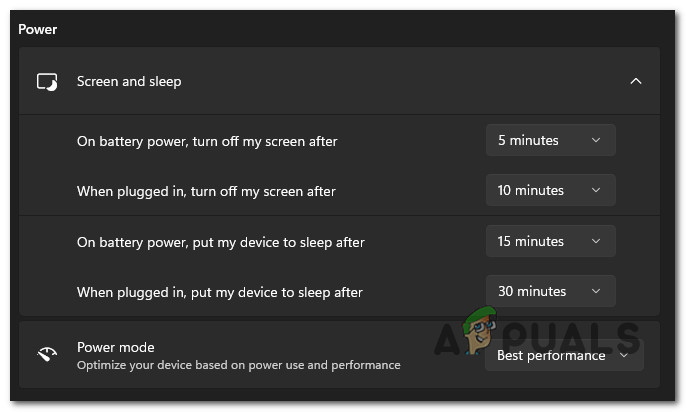
Accessing the Lock Screen settings on Windows 11 - Next, from the dedicated Lock screen settings, move over to the right-hand menu and click on Screen timeout (under Related settings).

Accessing the Screen timeout menu - Next, adjust the screen behavior to Never if you don’t want to be in a scenario where your screen turns off, forcing the login screen to appear during periods of inactivity.

Disabling the turning off of the screen
Additionally, if you want to keep the default power-saving behavior where your Windows 11 screen shuts down during long periods of inactivity, you can simply disable the sign-in process. Here’s how to do this:
- Press Windows key + I to open up the Settings menu on Windows 11.
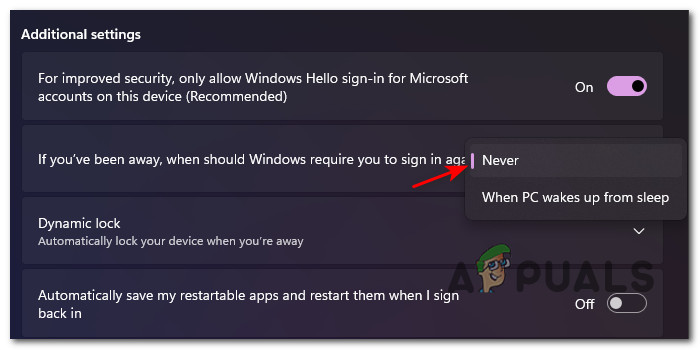
- Once inside, click on Accounts from the vertical menu on the left.
Open the Accounts menu on Windows 11 - With the Accounts tab selected, move over to the right-hand pane and scroll down to Additional Settings.
- Next, change the behavior of the If you’ve been away, when should Windows require you to sign in again? option to Never.

Disable Sign-in after hibernation or idle periods on Windows 11
Note: If you were previously able to enforce this fix by booting from safe mode, you’ll need to prevent your OS from booting in Safe Mode at every startup. To do this, press Windows key + R and type msconfig. Inside the System Configuration menu, access the Boot tab and uncheck the box associated with Safe Boot.
Kamil Anwar
Kamil is a certified MCITP, CCNA (W), CCNA (S) and a former British Computer Society Member with over 9 years of experience Configuring, Deploying and Managing Switches, Firewalls and Domain Controllers also an old-school still active on FreeNode.
If you have updated to Windows 11 and occasionally have problems with Windows 11 getting stuck at the Lock Screen or Welcome Screen. This article will guide you through several different troubleshooting steps you can take to resolve the problem. As this isn’t an entirely new issue, you’ll probably find some of the fixes familiar.
Table of Contents
Related: How to fix Windows 11 Insider build error APC_INDEX_MISMATCH (Green screen of death)
It has been a while since we’ve seen lock screen and welcome screen issues on Windows, however, it seems that we’ve come full circle. You may remember back when Windows 10 was first released these kinds of issues were quite common and were relatively easy to fix. This time around, on Windows 11, they appear as follows.
Occasionally when you turn on your computer it will boot to the login screen, then freezes, preventing you from entering your password/pin. Even if you have configured your Windows 11 computer to boot straight to Windows without a password, it may get stuck at the lock screen phase. Thankfully there are quite a few different troubleshooting steps you can run through to solve this problem so follow along as we get straight into them.
How do you fix Windows 11 stuck at the Lock Screen, Welcome Screen before login?
Before you start the more in-depth solutions shown below, make sure you have done the following:
- A full virus/malware scan on your computer
- Checked for any Windows 11 updates.
- Updated your computer’s BIOS.
Once you have checked all of those, proceed.
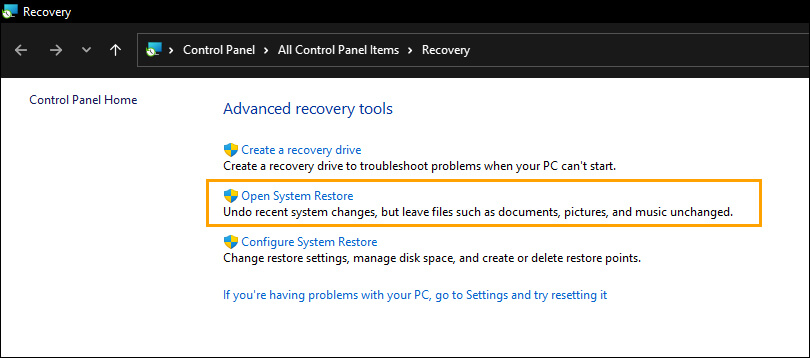
Use the System Restore tool to revert back to an earlier time.
To revert back to an earlier system checkpoint do the following:
- Open the Start menu and search Recovery. When the option appears select it.
- Next, click Open System Restore and jump through all the hoops Windows asks.
- When picking a Restore Point to use, I usually go back at least 2 weeks or to the last major update.
Run the SFC Command to fix and restore any issues.
This is standard procedure for any repair task on Windows. I’ve had to use this quite a few times over the years with a lot of success. Just be aware if you are using a custom theme (Deviant Art kinda stuff) This will require you to reinstall your theme again.
- To start, press Windows Key + X and open Command Prompt (as administrator).
- In the Command Prompt window type sfc /scannow, then press Enter. Now, wait for the process to finish. (it may take a while)
- If your computer is in full working order, without any corrupt or missing system files, the scan will show the message: Windows Resource Protection did not find any integrity violations.
Note: If sfc doesn’t find any errors proceed to the next solution, skipping the 3 dot points below.
- If there are problems the message will be: Windows Resource Protection found corrupt files but was unable to fix some of them. If this is the message you receive, continue with the next bullet point.
- Boot your computer into safe mode. If you are running Windows 7 or older, restart your computer and continuously press F8. The Advanced boot will display when it boots. Select Safe Mode with Command prompt and press Enter. If you are using Windows 8 or 10 you will need to use a different method which can be found here: Advanced Startup options for Windows 8 and 10.
- Once you are booted into Safe Mode, open Command Prompt as admin again and run the sfc /scannow command another time. This will repair corrupted Windows system files.
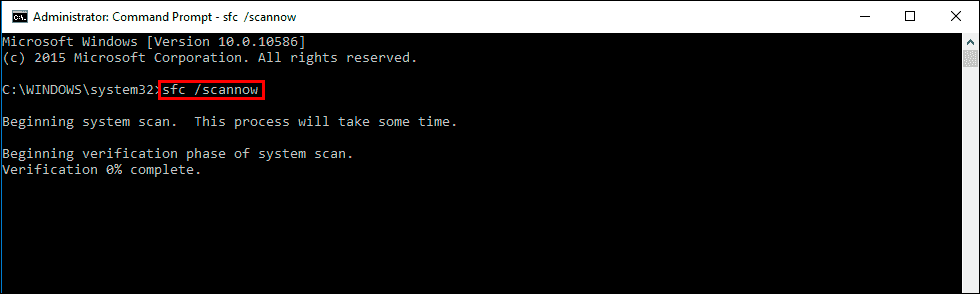
Once the commands are complete, Windows 11 shouldn’t have any more lock screen issues.
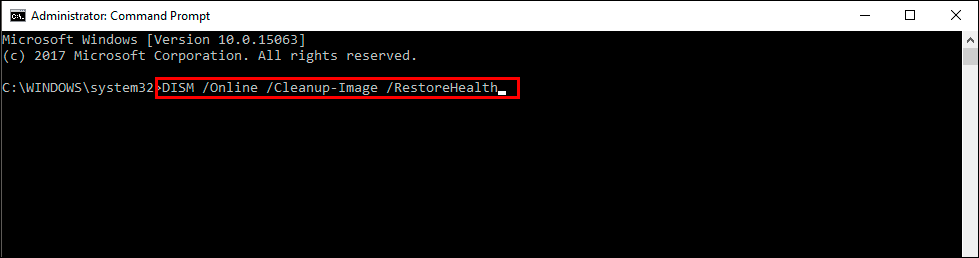
Run the DISM command to fix Windows 11 Lock Screen freezing.
If none of the above has worked so far, you can try running the DISM command to fix Windows 11 lock screen freezing.
- Open Command Prompt (as administrator).
- Type DISM /Online /Cleanup-Image /RestoreHealth into the window and press Enter.
- Wait for it to run as it takes some time.
- Once it’s finished Restart your computer.
Run the chkdsk Command to fix Windows 11 Lock Screen freezing.
The check disk command on Windows 11 will check for errors and automatically fix them. To run the tool copy and paste the following command into Command Prompt (as administrator).
chkdsk /f C:
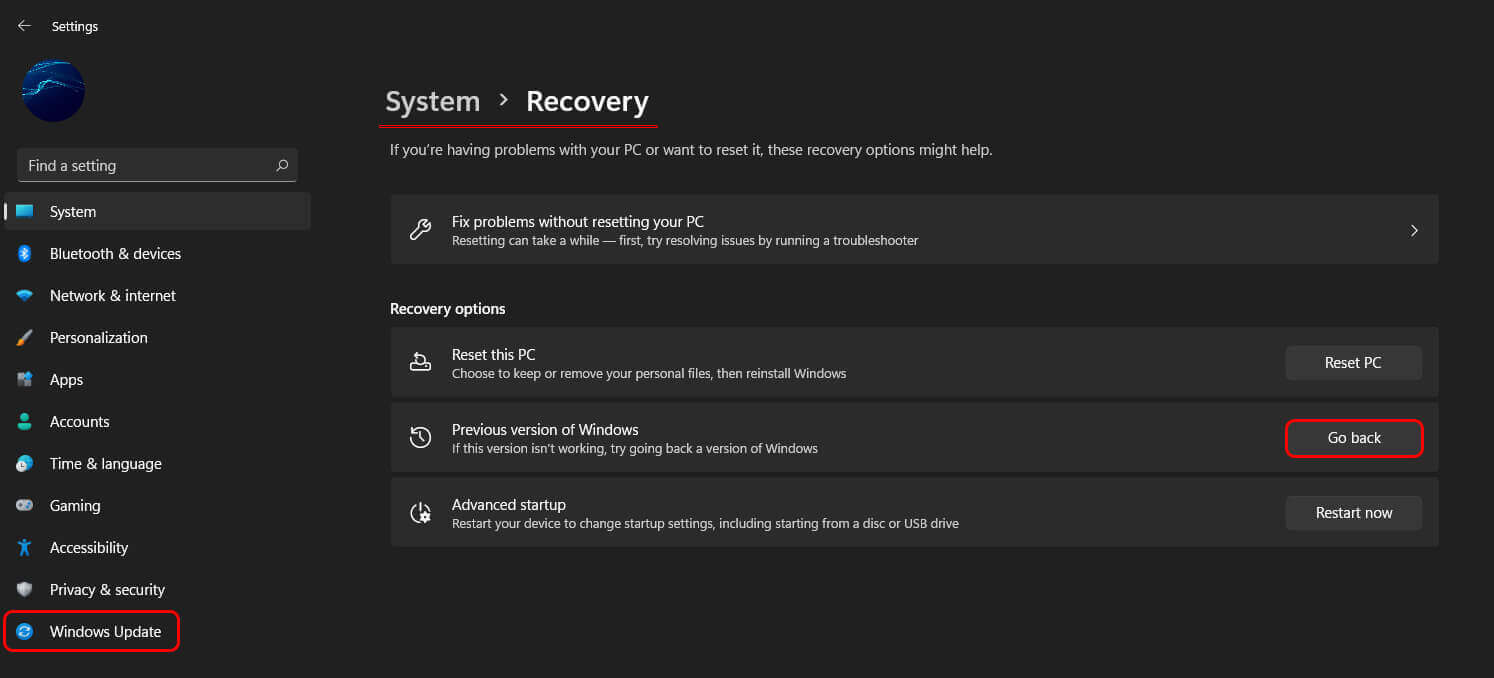
Rollback to an earlier version of Windows 11. Uninstall Windows Update.
To go back to an older version of Windows 11 you’ll need to do the following. Sadly this can only be done within 10 days of the last update. If it has been more than 10 days, the Go back option will be greyed out.
- To begin, open Settings, then change to the Windows Update option at the bottom of the list on the left-hand side of the screen.
- Next click Advanced options > Recovery, then click Go back to the right of the Previous version of Windows heading.
- This will open a new pop up that will ask why you want to go back. Enter the reason then click Next and follow the steps shown in the tool. From here on out it’s simply a process of following the tool and waiting for the process to take place.
- From my experience using this tool over the years, it will generally take longer to roll back than it initially took to update in the first place. So make sure you don’t need to be using your computer for at least an hour, two at the longest.
The phrase “Windows 11 stuck at Welcome screen” has become a common nuisance these days. If your Windows 11 PC is stuck on a black/blue screen with spinning dots on startup, you have encountered this issue as well. Sometimes, you may get the login screen but the same will eventually fail to let you enter your passkey.
In this post, we will see why this issue occurs, and seven fixes that should cater to this problem. There could be a variety of reasons why Windows 11 enters the reboot loop, but knowing them is the first step towards troubleshooting them. So, let’s have a look at the most probable cause behind it.

What causes a reboot loop in Windows 11?
There could be a number of reasons why Windows 11 is stuck at the start or welcome screen. While some issues can be resolved in a matter of minutes, others will necessitate a more comprehensive approach and will take time. Some of the most typical causes behind Windows 11 being stuck at the login screen are discussed below –
- Secure Boot has been disabled
- Presence of viruses or malware inside your PC
- Corruption inside system files or folders
- Pending Windows updates
- Obsolete or outdated device drivers
- Installed apps aren’t compatible or aren’t functioning
This post will show you how to solve the Windows 11 system that is stuck at the welcome screen.
To solve Windows 11 PC stuck at the lock screen, attempt the below fixes in the same order as provided below –
1] Remove any external devices
Windows 11 may enter a reboot loop error when you are using an incompatible external device like a printer, speakers, or Bluetooth device. These devices when malfunctioning may prevent Windows 11 OS from loading and instead cause it to stick at the Welcome screen.
A quick fix is to disconnect all such peripherals from your PC, leaving only the essential ones attached. Check to see if the Windows 11 reboot loop error has been addressed. If the problem remains, it is most likely caused by something else; thus, proceed to the next method.
2] Use Keyboard Shortcut to shut down your PC manually
If you are stuck at the Windows 11 restart screen and don’t know what to do, the first thing that you must do is use the keyboard shortcuts to power down your computer. Here’s what you need to use –
- Press and hold Windows Key + X and hit the Power button for a few seconds until the PC shuts down completely.
- Release all keys pressed in the preceding step, then wait for a while.
- Press the power button again so that your device reboots.
3] Boot into the Safe Mode
Safe Boot Mode is a built-in security feature in Windows 11 that allows you to start your computer in a secured environment. As you are not able to boot into your device normally, you may try booting into the Safe Mode next.
All third-party apps and services remain disabled in this mode. So, if the problem is because of them, Windows 11 should launch perfectly fine. Now that you are able to get past the welcome screen in Windows PC, follow these solutions next –
4] Update Windows operating system
The presence of pending updates may also cause your Windows 11 PC to behave strangely. So, if you haven’t installed the latest security/optional updates, make sure you do that by following these steps –
Note: The pending updates could be of anything including device drivers, system apps, etc.
To update Windows OS, follow the steps –
- Press “Windows Key + I” on the keyboard to open Settings.
- Select Windows Update on the left pane and then head over to the right-wing.
- Click Check for updates and let the system connect and find any pending updates from Microsoft servers.
- If it does find any pending update, the same will be downloaded and installed automatically provided you haven’t disabled this feature.
- Reboot your PC and check if the issue resolves now.
5] Uninstall recent Windows Updates
If you had installed a faulty Windows update on your computer, and the problem started afterward, you should get rid of the lately installed system updates. Downloading and Installing Windows updates while being connected to a poor network may skip certain essential files and thus make the whole operating system corrupt. The update files may also interact with the system settings or configurations in unexpected ways.
Try uninstalling the recently applied updates and see if it works –
- Press Win + X, and select Settings.
- On the left pane, select “Windows Update” and then Update history on the right pane.
- Scroll down to the bottom and click Uninstall updates.

- The system will redirect you to the Control Panel.
- Select the latest Windows 11 KB update, and hit the Uninstall button.
- When a confirmation window pops up, hit Uninstall again.
Restart your PC and check if this resolves the issue that you were struggling with.
6] Run SFC/DISM Scans
If there are missing or corrupted files/folders inside your computer, this may cause Windows 11 stuck at the Welcome screen issue. Run SFC and DISM tools to find and repair any corruption inside the system files/folders or system image. Here’s what you need to do now –
- Launch Command Prompt as administrator first.
- When the UAC window prompts, hit Yes.
- Now, copy/paste the below code and press Enter –
sfc /scannow

- Wait till the System file checker finds and repairs any missing or corrupted system files.
- Once this is over, check for corruption inside Windows 11/10 Image by running the below code –
DISM /Online /Cleanup-Image /RestoreHealth

- The code above is basically a DISM tool that can look out for any corruption inside the Windows Image and fix that.
Note: Both these tools take 15-20 minutes to analyze and resolve the underlying corruption, so wait patiently.
7] Install Optional updates in Windows 11
As stated above, obsolete or outdated device drivers may also result in Windows 11 stuck at welcome screen issue on your computer. On earlier versions of Windows 10, it was easy to open Device Manager, look for any pending driver updates, and install them.
However, with the recent changes in Windows 10 or 11 operating systems, users won’t be able to find any driver updates via Device Manager. The moment you try doing so, this will display a message – “All drivers are up to date”. Well, this is because of a new feature in Windows and that is optional updates. Download and install all optional updates on your computer and see if this resolves the Windows 11 stuck at login screen issue.