

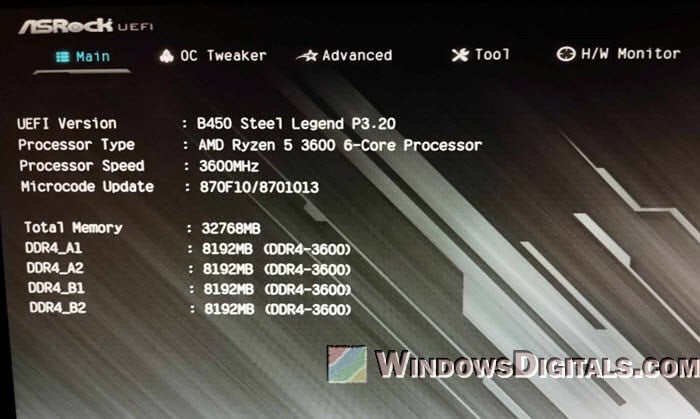
Компания ASRock также порадовала владельцев своих материнских плат, желающих перейти на Windows 11. Во-первых, она указала список совместимых моделей, в которых можно активировать поддержку TPM. Но следует помнить, что не все процессоры под эти модели соответствуют требованиям Microsoft. Вот ссылки на официальный список совместимых с Windows 11 чипов AMD и Intel.
Список совместимых материнских плат ASRock выглядит следующим образом:

Во-вторых, компания показала путь активации TPM 2.0 на уровне BIOS, ведь для установки Windows 11 не обязательно покупать аппаратный модуль. В материнских платах Intel необходимо перейти в раздел Security, найти и активировать пункт «Intel® Platform Trust Technology».


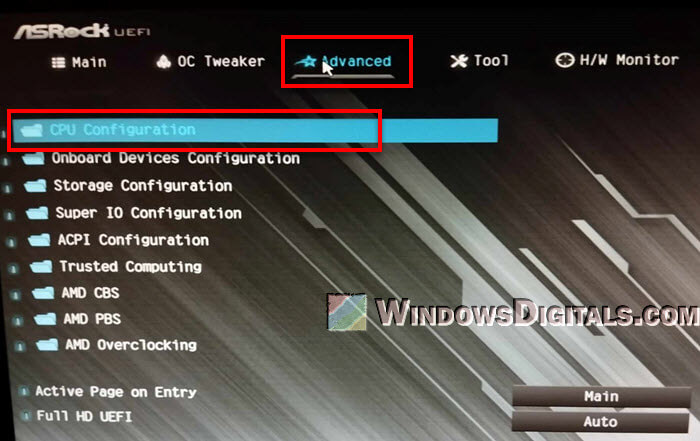
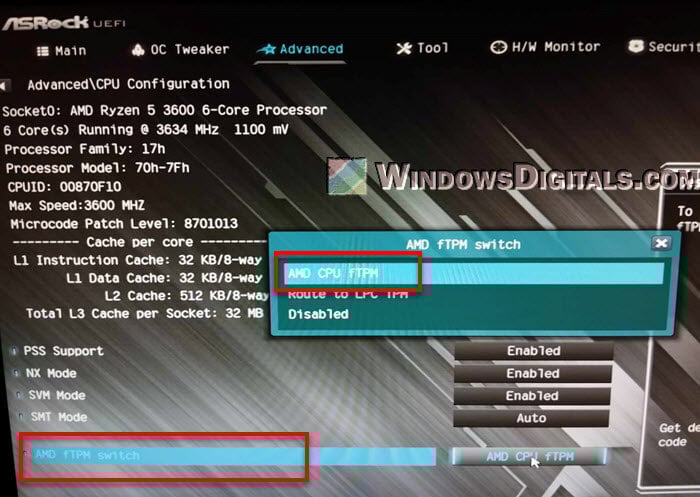
В платах AMD следует зайти в раздел «Advanced», а затем перейти в «CPU Configuration». В нем вы увидите параметр «AMD fTPM switch», который необходимо перевести в режим «AMD CPU fTPM». После этого в обоих случаях необходимо сохранить внесенные изменения.

Проверить активацию TPM 2.0 можно в среде Windows с помощью меню «Выполнить» (комбинация клавиш Win+R). В нем необходимо ввести «TPM.MSC» и нажать Enter. Если вы все выполнили правильно, то увидите окно TPM Management on Local Computer с указанием версии TPM.
With Windows 10 losing support, upgrading to Windows 11 has become essential for many PC users. The upgrade requires users to enable TPM (Trusted Platform Mode) 2.0 for enhanced security measures. Below are step-by-step instructions on how to enable TPM 2.0 and get you up and running on your shiny new operating system!
This would only apply to ASRock motherboards.
AMD ASRock Motherboard

- Enter BIOS by repeatedly tapping ‘Del’ or ‘F2’ on startup of the PC.
- Enter the ‘Advance’ Tab. Click on «CPU Configuration»:
- Click on «AMD fTPM Switch»( if you have the option to Enable, set it to Enable, skip to step 5.).
- Select ‘AMD CPU fTPM’.
- Go to the Exit tab and select «Save changes and exit». Upon reboot, press «Del» or «F2» to head back into BIOS.
- Enter the «Advanced» tab.
- Select «Trusted Computing».
- For option «Security Device Support» – Ensure it is set to ‘»Enable».

9. It will now show ‘TPM20 Device found’.
10. Go to the Exit tab and select «Save changes and exit».
ASrock Motherboard with Intel CPU:
- Enter BIOS by repeatedly tapping ‘Del’ or ‘F2’ on startup of the PC.
- Enter the ‘Advance’ Tab. Click on «CPU Configuration»:
- Click on «Security».
- Click on «Intel Platform Trust Technology».
- Set to ‘Enable’
- Go to the Exit tab and select «Save changes and exit».
Windows 11 performs best on the latest hardware. MAINGEAR allows you to bring your PC experience to the next level! Crafted for advanced performance, unlimited customization, and understated simplicity, MAINGEAR’s award-winning systems and service ensure you stay on the cutting edge of the PC space without the hassle!
Learn More
If you have questions or concerns, please contact one of our MAINGEAR Support agents: (908-620-9050) or support@maingear.com
Still need help?
Contact Us
Contact Us
Before getting into enabling TPM, are you familiar with what this term means? If not, do not sweat. TPM hardware chip is also known as the Trusted Platform Module. This chip is used for validating the artifacts of your system. Passwords, encryption keys, cookies, and certificates are to name a few.
This feature is responsible for the security of your computer. To know if a site is what it claims to be, TPM steps in. This crypto-processor acts like an alarm for hackers and malware data to enter the gates of your PC. For Microsoft’s latest update in Windows 11, this feature needs to be activated.
Such software security is an essential part of keeping sensitive information safe. On the other hand, hardware security is hardcoded unless a hacker finds a way to break the cryptographic keys. TPM ensures the upgrade of hardware security by contacting other security systems inside the system.
When you surf through the web on Chrome, Firefox, or Microsoft Outlook, several viruses and corrupted websites may invade your privacy. Your passwords, fingerprints, or card details can be stolen. So the importance of TPM is inevitable at this point.
If your computer is a very older version of Windows, it must have TPM 1.2. Microsoft does not recommend this version for Windows 11. While facing a setup to secure your data, there are few steps to be followed in order to enable it in different motherboards.
Enable TPM in Windows 11 on MSI Motherboards TPM 2.0?
MSI AMD processor:
Even if your system has TPM hardware installed, it must have a strong connection with BIOS. This way, your Windows operating system will recognize it easily.
- To enable this security feature, you need to go to the BIOS setting menu and click on delete. The system will start to reboot and a dark screen pops up with other options.
- Tap on the F7 key on your keyboard to enter Advanced mode.
- On the left, the settings menu is visible. After clicking on it, choose security.
- There will be 4 options to choose from. Tap enable in front of the device security support.
- Then set AMD fTPM for AMD fTPM switch as the 3rd option on the panel.
MSI Intel processor:
- After entering BIOS, you have to tap delete and the F2 key until the system starts to boot.
- Choose Advanced mode by tapping on the F7 key on the keyboard.
- Select settings go to security.
- Enable the device’s security support.
- Below that, set PTT as the TPM device selection.
Enable TPM in Windows 11 On ASRock
ASRock AMD processor:
The settings for the ASrock motherboard are not very different. This motherboard just has some additional steps to enable hardware security.
- Go to BIOS and click on delete along with the F2 button. Your system will start to boot after this step.
- Go to the advanced mode tab.
- There will be a popup box from where you have to click on AMD CPU fTPM.
- Click and save and reboot the system again to BIOS.
- After entering advance mode from all the tabs on the top of the screen, click on trusted computing.
- Set the switch on enable in front of Security device support.
- When you can no longer see a TPM 2.0 device, find an option, click save and reboot.
ASRock Intel Processor:
The steps for Intel CPUs of ASrock are less complicated than AMD.
- Go to BIOS and tap delete. Wait for the system to boot.
- After entering advanced mode through CPU configuration, choose security.
- Go to Intel platform trust technology and set it to enable.
- Save the changes and reboot the system.
What steps should be taken for ASUS motherboards to launch TPM 2.0 security?
ASUS AMD processor:
For quickly and easily enabling TPM, there are 2 simple ways to do it. Follow the steps below:
- Go to BIOS and click delete with the F2 button. The PC will start to boot.
- Tap F7 to enter advanced mode.
- Select AMD fTPM configuration
- Look for TPM Device Selection and change it to Firmware TPM.
Another way to do it includes:
- Choose AMD CPU fTPM and change it to enable in advance mode.
- Save the changes by exiting and reboot your system.
ASUS Intel processor:
To enable TPM 2.0 in your ASUS motherboard, these steps are for Intel based CPUs:
- Go to BIOS, click on the delete and F2 key for the system to boot.
- Tap on the F7 key for going to the advanced mode tab.
- Click on Advanced PCH-FW configuration.
- You will have an option of PTT. Click on it until another box appears with enable.
- Tap on enable and save the changes.
- Reboot the system after exiting.
Can I enable TPM 2.0 on my Gigabyte motherboards?
Gigabyte AMD processor:
You might find gigabyte settings a little different. But do not worry, besides a few changes, the rest of it is the same.
- Enter BIOS and click choose to delete until the system boots.
- Tap F7 for entering in advanced mode.
- From all the tabs above, choose the settings tab in this mode.
- Select the miscellaneous option.
- Enable the AMD CPU fTPM option.
- Save the final changes and exit the window.
Gigabyte Intel processor:
- Go to BIOS and tap on delete.
- After the system has finished booting, enter advanced mode.
- Go to settings from the tabs on the screen.
- From all the options, choose the one placed on number 3 that is Intel platform trust technology PTT. Change the disable button to enable.
- Save and exit the window.
By following these simple steps, you can modify the security system of your PC. in case your system does not have a built in TPM 2.0, you must include it in other ways. Such security can be in various shapes and forms. You can also get a TPM latest module that is compatible with Windows 11 upgrade.
Make sure your requirements are met before getting the module. If any tampering situation comes up, then this step must be useful. Windows 11 requirements can take advantage of this upgrade and make your user experience better.
Also See:
- Best Low Profile Graphics Cards
- Best GPUs For Deep Learning
- Best Graphics Card For Mining
- Best RX 6800 XT Graphics Cards
- Best RTX 3060 Graphics Cards
- Best RTX 3080 Ti Graphics Cards
- Best RTX 3070 Ti Graphics Cards
- Best RX 6900 XT Graphics Card
-
As a teenager, Paul scraped up enough money to buy a 486-powered PC with a turbo button (yes, a turbo button). Back when floppies were still popular he was already chasing after the fastest spinners for his personal computer, which led him down the long and winding storage road, covering enterprise storage. His current focus is on consumer processors, though he still keeps a close eye on the latest storage news. In his spare time, you’ll find Paul hanging out with his kids or indulging his love of the Kansas City Chiefs and Royals.
View all posts
Turning on TPM 2.0 (Trusted Platform Module) and Secure Boot on an ASRock motherboard is very important for today’s computers, especially if you like gaming or care a lot about security. TPM 2.0 provides security features built into the hardware to protect your important data. Secure Boot stops unapproved software from starting up on your computer, which makes it even safer. These security steps are getting more important, like in games such as Riot’s Valorant, which won’t start unless TPM 2.0 and Secure Boot are active.
Also see: Enabling TPM 2.0 and Secure Boot on Gigabyte Mobo

Knowing BIOS and UEFI firmware
Before we explain how to turn on TPM 2.0 and Secure Boot, you need to know about BIOS (Basic Input/Output System) and UEFI (Unified Extensible Firmware Interface) firmware. Most modern ASRock motherboards use UEFI firmware. It’s a newer version of the old BIOS and it’s generally much easier to use.
UEFI lets you use bigger hard drives, starts up your computer faster, and has better security features, including TPM and Secure Boot. We’ll use the UEFI settings to turn these features on. Next, we’ll start by showing you how to get into the UEFI settings on your ASRock motherboard.
Related resource: Can’t find TPM 2.0 and Secure Boot options in BIOS?
Step 1: Go into the UEFI settings on ASRock motherboard
The first step to enable TPM 2.0 and Secure Boot on an ASRock motherboard is to get into the UEFI (Unified Extensible Firmware Interface). The UEFI is a type of firmware that lets you adjust settings for your computer’s hardware.
- Start by restarting your computer. As it boots up, you need to enter the UEFI settings. You usually do this by pressing a certain key while the computer is starting.
- Watch the screen closely when your computer starts. Most ASRock motherboards tell you to press the F2 or Del key to get into the UEFI settings. Do this before your operating system begins to load. If you miss it, just restart your computer and try again.
- Once in the UEFI settings, you’ll see a graphical interface, which is different from the old text-based BIOS screens. Use your keyboard (and sometimes your mouse) to go through the menus.

The UEFI interface might look a bit different depending on your ASRock motherboard model and firmware version. If you meet a problem or just don’t know how to get into the interface, check your motherboard’s manual for specific instructions for your model.
Pro tip: How to Allocate More RAM to a Game in Windows 11 or 10
Step 2: Enable TPM 2.0 on ASRock motherboard
After you get into the UEFI settings, the next step is to just turn on TPM 2.0. TPM (Trusted Platform Module) is a security feature that helps with secure booting, disk encryption, and more. The following are the steps to enable TPM 2.0 on your ASRock motherboard.
- Inside the UEFI interface, go to the Advanced tab or section. Here, you’ll find different settings to configure.
- Click on the CPU Configuration settings. The exact location and name might vary, so check your motherboard’s manual if you’re not sure.

- Look for an option like AMD fTPM (Firmware TPM for AMD CPUs), TPM 2.0, TPM State, or Intel PTT (Platform Trust Technology for Intel CPUs). Choose this option and change it to “AMD CPU fTPM” or just “Enabled“.

- After turning on TPM, don’t forget to save the changes. This is usually done by pressing F10 or going to the Exit tab and choosing Save Changes and Exit. Your computer will restart for the changes to take effect.
Know that enabling TPM might need a firmware update first, especially on older motherboards. If TPM 2.0 isn’t available or working on your ASRock motherboard, check the manufacturer’s website for a firmware update that could add or fix this feature.
Useful guide: Using Onboard Graphics And Graphics Card Simultaneously
Step 3: Enable Secure Boot on ASRock motherboard
After turning on TPM 2.0, the next step is to enable Secure Boot. Secure Boot is just a UEFI feature that makes sure your PC starts up only with firmware that the manufacturer trusts. This is quite important for stopping harmful software from messing with the boot process. Below is how you can turn on Secure Boot on your ASRock motherboard.
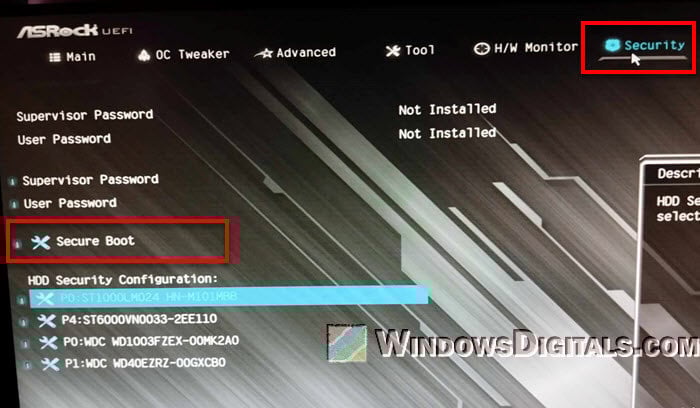
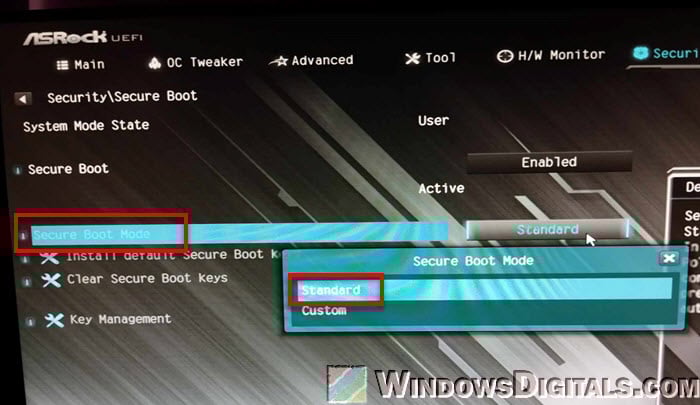
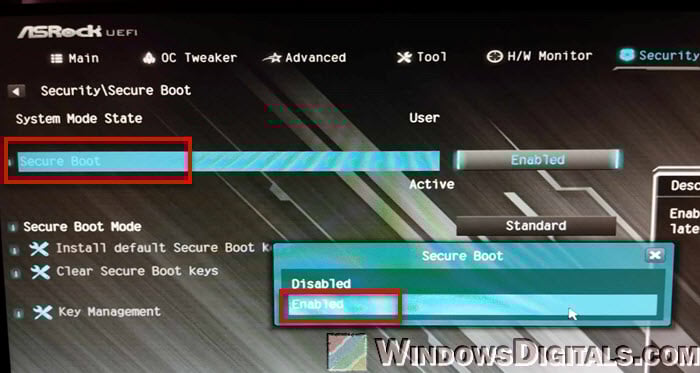
- In the UEFI settings, find the Security tab or section. This is where you’ll find Secure Boot settings.
- In the Security options, locate the Secure Boot setting and select it.

- There, before you can change the settings for “Secure Boot”, you need to set the “Secure Boot Mode” to “Standard“.

- Then, change the Secure Boot setting from “Disabled” to “Enabled“. In some rare cases, you might need to set the OS Type to Windows UEFI mode or something similar to fully turn on Secure Boot functionality.

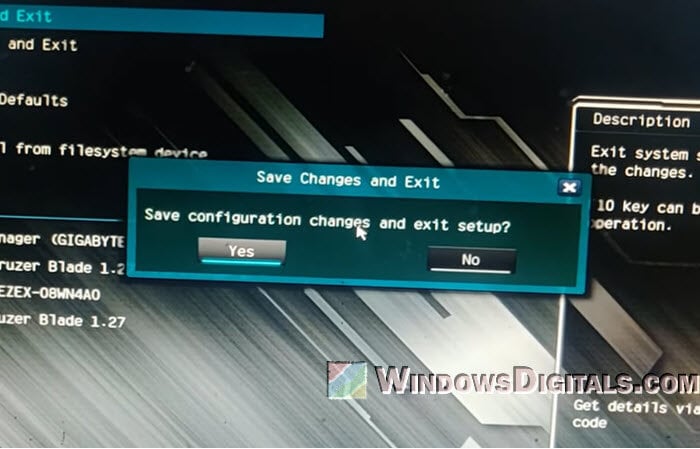
- Like with the TPM setting, make sure to save your changes. Press F10 or go to the Exit tab and pick Save Changes and Exit. Your computer will restart with Secure Boot turned on.

Please note, turning on Secure Boot might cause problems with starting operating systems that don’t follow UEFI rules or with bootloaders that aren’t seen as secure. If you have a dual-boot system or use an older operating system, make sure everything is compatible before turning on Secure Boot.
Linked issue: Windows 11 Not Activated After BIOS Update
Some common issues you might encounter
Update UEFI firmware
If you can’t see the TPM 2.0 or Secure Boot options in your UEFI settings, your motherboard’s firmware might need an update. Go to the ASRock website, find your motherboard model, and download the latest UEFI firmware. Updating can fix many compatibility issues.
Compatibility mode
Some systems might need you to switch from Legacy to UEFI boot mode to turn on Secure Boot. You usually find this option under the Boot tab in the UEFI settings.
Operating system issues
If your operating system doesn’t start after you change these settings, it might not work well with Secure Boot or UEFI mode. Windows 10 and newer versions usually work fine, but older versions or some Linux setups might have problems.
Reset UEFI settings when needed
If you can’t start your computer after making changes, most motherboards let you reset the UEFI settings to their original state by pressing a specific key combination. Check your motherboard’s manual to find out how to do this.
Might be useful: How to Clear CMOS without Removing Battery or Jumper Cap
Check the manual again
Each motherboard model has its own UEFI layout and options. Look at your motherboard’s manual for specific guidance.
Turning on TPM and Secure Boot is a big change to your system’s security settings. If you’re not sure or if you keep having problems, think about getting help from a pro or the ASRock support community.
Недавно была анонсирована Windows 11 – новая операционная система для настольных компьютеров от Майкрософта. В отличие от предыдущих версий Windows, данная ОС получила достаточно жесткие системные требования. Например, для работы Windows 11 необходим компьютер с новым процессором (до трех лет) и поддержкой технологий Secure Boot, TPM 2.0.
В этой статье мы рассмотрим TPM 2.0 и его доступность на материнских платах. Здесь вы узнаете, как включить TPM 2.0 в BIOS на ASRock, а также на каких платах ASRock данная технология поддерживается, а на каких нет.
На платах для Intel
Согласно информации на официальном сайте ASRock, на платах для процессоров Intel поддержка программной эмуляции TPM 2.0 доступна на чипсетах Intel 100, 200, 300, 400, 500 и x299. Поэтому, на компьютерах с этими чипсетами можно просто включить TPM 2.0 в BIOS, без установки отдельного TPM модуля. На платах ASRock эта функция называется «Intel Platform Trust Technology (PTT)».
Для того чтобы включить TPM 2.0 на ASRock нужно зайти в BIOS и открыть раздел «Security». Здесь нужно найти опцию «Intel® Platform Trust Technology» и перевести ее в положение «Включено».

После внесения изменений нужно сохранить настройки BIOS и перезагрузить компьютер.
На платах для AMD
На платах ASRock для процессоров AMD программная эмуляция TPM 2.0 доступна на платах с чипсетами AMD 300, 400, 500, TRX40 и называется «AMD fTPM swich»
На платах ASRock для AMD программная эмуляция TPM 2.0 включается в BIOS в разделе «Advanced – CPU Configuration». Здесь нужно найти опцию «AMD fTPM switch» и переключить ее в режим «AMD CPU fTPM».

После внесения изменений нужно сохранить настройки BIOS и перезагрузить компьютер.
В зависимости от конкретной платы, названия опций или разделов в BIOS могут отличаться. Поэтому, если вам не удается включить TPM 2.0, то ознакомьтесь с инструкцией для вашей материнской платы. Скачать такую инструкцию можно на официальном сайте ASRock в разделе «Поддержка».
Посмотрите также:
- Как проверить совместимость компьютера с Windows 11
- Как включить TPM 2.0 в BIOS
- Программа для проверки совместимости с Windows 11
- AMD CPU fTPM Switch: что это в BIOS
- TPM 2.0: как узнать если ли он на компьютере
Автор
Александр Степушин
Создатель сайта comp-security.net, автор более 2000 статей о ремонте компьютеров, работе с программами, настройке операционных систем.
Остались вопросы?
Задайте вопрос в комментариях под статьей или на странице
«Задать вопрос»
и вы обязательно получите ответ.