
Ползунок громкости — важный инструмент для регулирования вывода звука на вашем компьютере. Тем не менее, бывают случаи, когда вы можете столкнуться с проблемами. Существует несколько шагов по устранению неполадок, позволяющих решить эту проблему и восстановить функциональность ползунка громкости. Ниже мы опишем некоторые эффективные исправления, которые помогут исправить неработающий ползунок громкости в Windows 11, чтобы помочь вам решить проблему и восстановить контроль над настройками звука.
Ползунок громкости является фундаментальным компонентом управления звуком в вычислительных устройствах. Он предлагает пользователям простой и интуитивно понятный способ управления уровнями вывода звука для лучшего качества прослушивания.
Проблемы с ползунком громкости в Windows 11 могут возникать по разным причинам, в том числе
- Программные сбои или ошибки в операционной системе.
- Конфликты с другими программами или драйверами
- Поврежденные системные файлы
- Неправильные настройки или конфигурации
- Обновления или изменения в операционной системе
- Проблемы с оборудованием, такие как неисправные аудиодрайверы или неисправные звуковые карты.
- Проблемы совместимости оборудования
Ниже приведены некоторые решения для решения проблемы:
Исправление 1: перезагрузите компьютер
Перезагрузка системы может эффективно решить различные проблемы и временные ошибки, которые могут повлиять на функциональность ползунка громкости. Когда вы перезагружаете компьютер, он закрывает все запущенные программы и процессы, очищает временные файлы и сбрасывает настройки системы. Это действие может помочь обновить операционную систему и ее компоненты, потенциально устраняя любые основные проблемы, вызывающие неисправность ползунка громкости.
Исправление 2. Перезапустите проводник Windows.
1. Откройте диспетчер задач и перейдите на вкладку «Процессы».
2. Щелкните правой кнопкой мыши «Проводник Windows» и выберите «Перезагрузить».

Исправление 3: обновить Windows
1. Откройте приложение «Настройки» и перейдите в «Центр обновления Windows».
2. Нажмите «Проверить наличие обновлений».
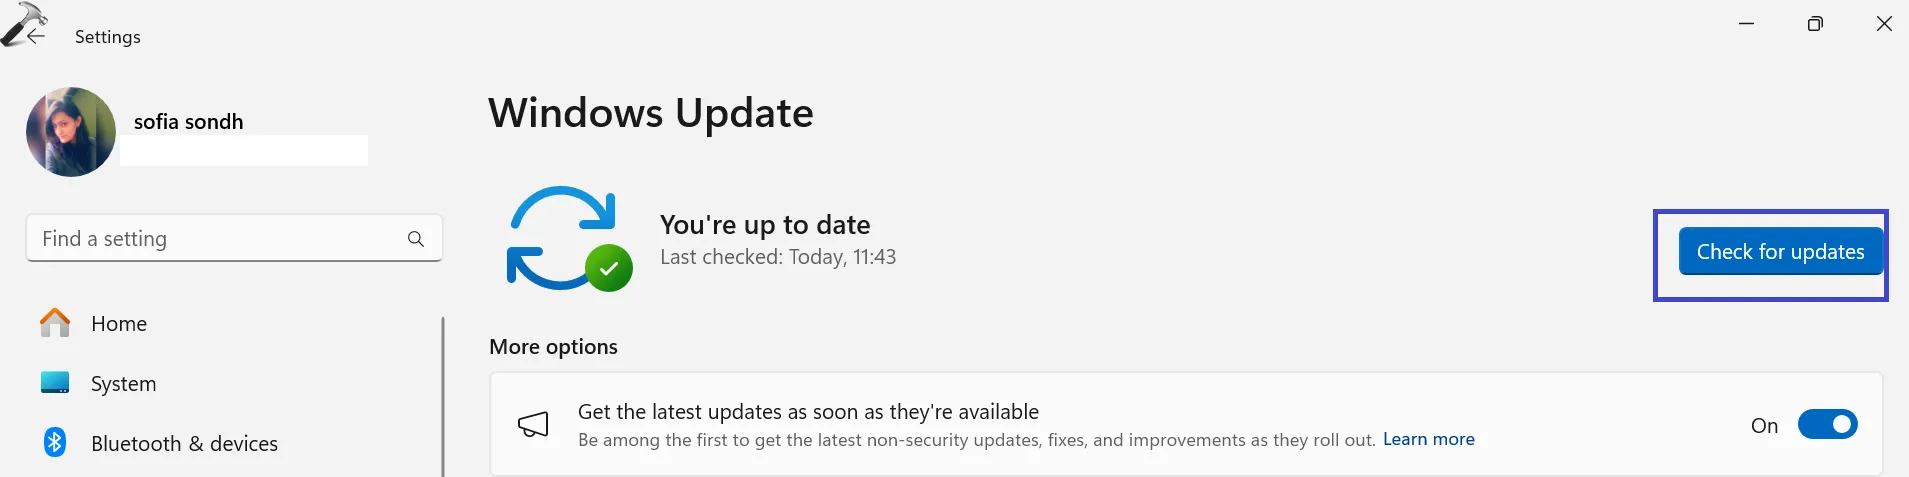
Windows проверит и установит последнее обновление.
Исправление 4. Повторно включите аудиоустройство.
1. Нажмите клавиши Windows+X. Выберите «Диспетчер устройств».
2. Разверните параметр «Звуковые, видео и игровые контроллеры».
3. Щелкните правой кнопкой мыши аудиоустройство и выберите «Отключить устройство».
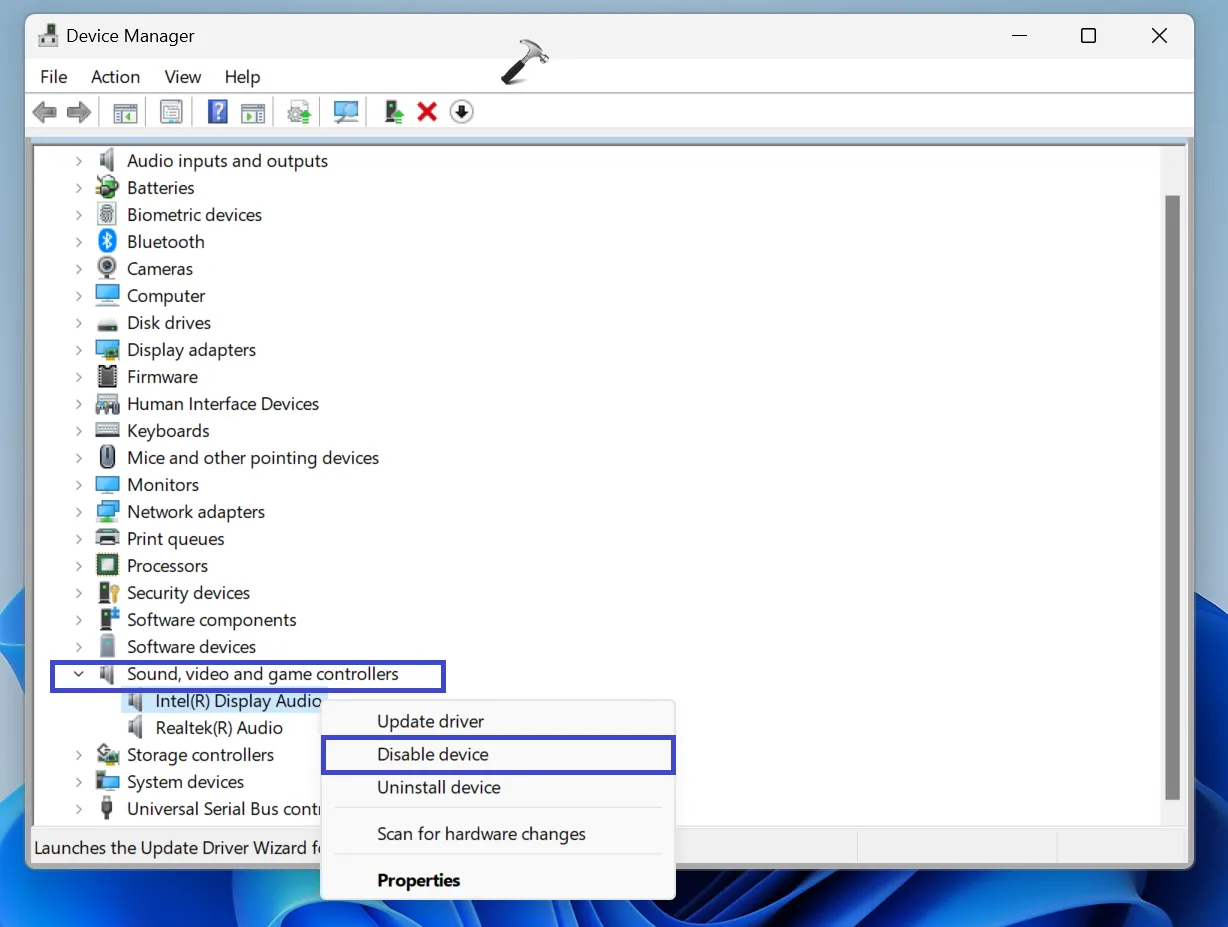
4. Появится диалоговое окно. Нажмите «Да » для подтверждения.
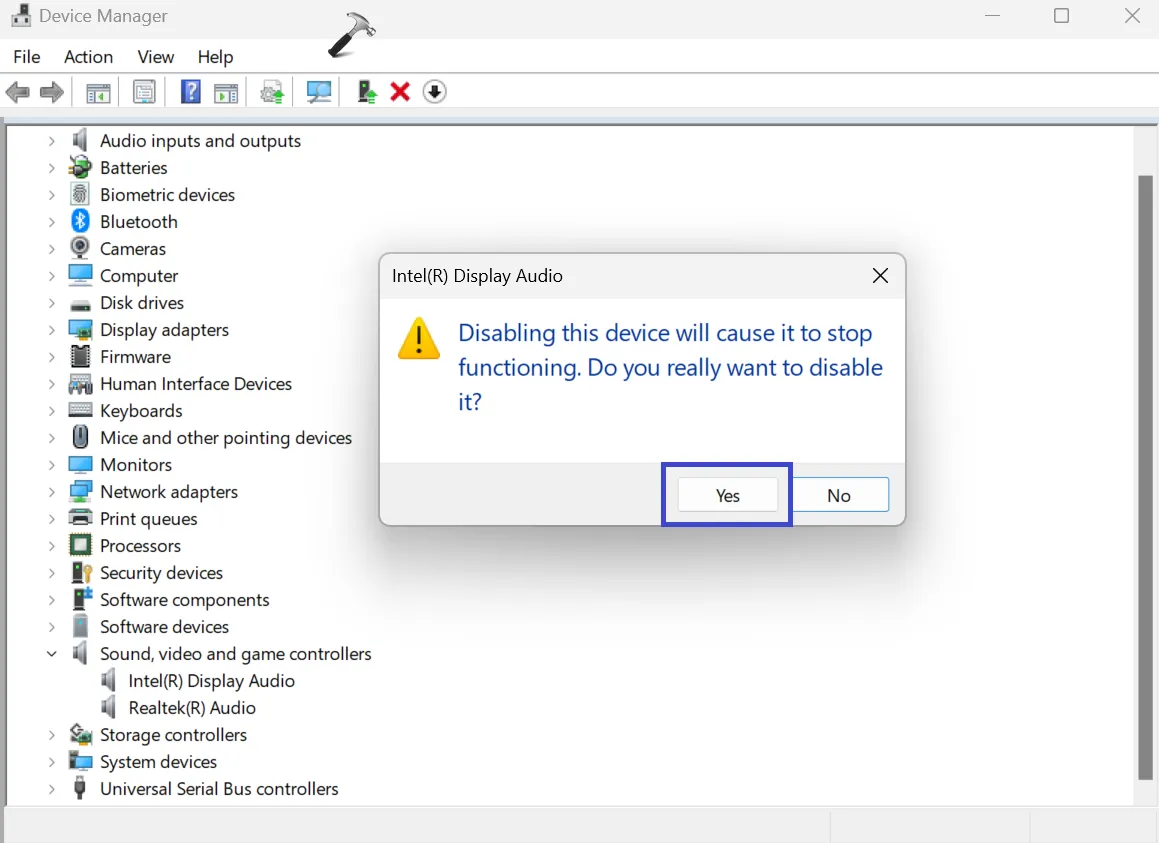
5. Снова щелкните правой кнопкой мыши по аудиоустройству и нажмите «Включить устройство».
Исправление 5: переустановить аудиоустройство
1. Нажмите клавиши Windows+X. Выберите «Диспетчер устройств».
2. Разверните параметр «Звуковые, видео и игровые контроллеры».
3. Щелкните правой кнопкой мыши аудиоустройство и выберите «Удалить устройство».
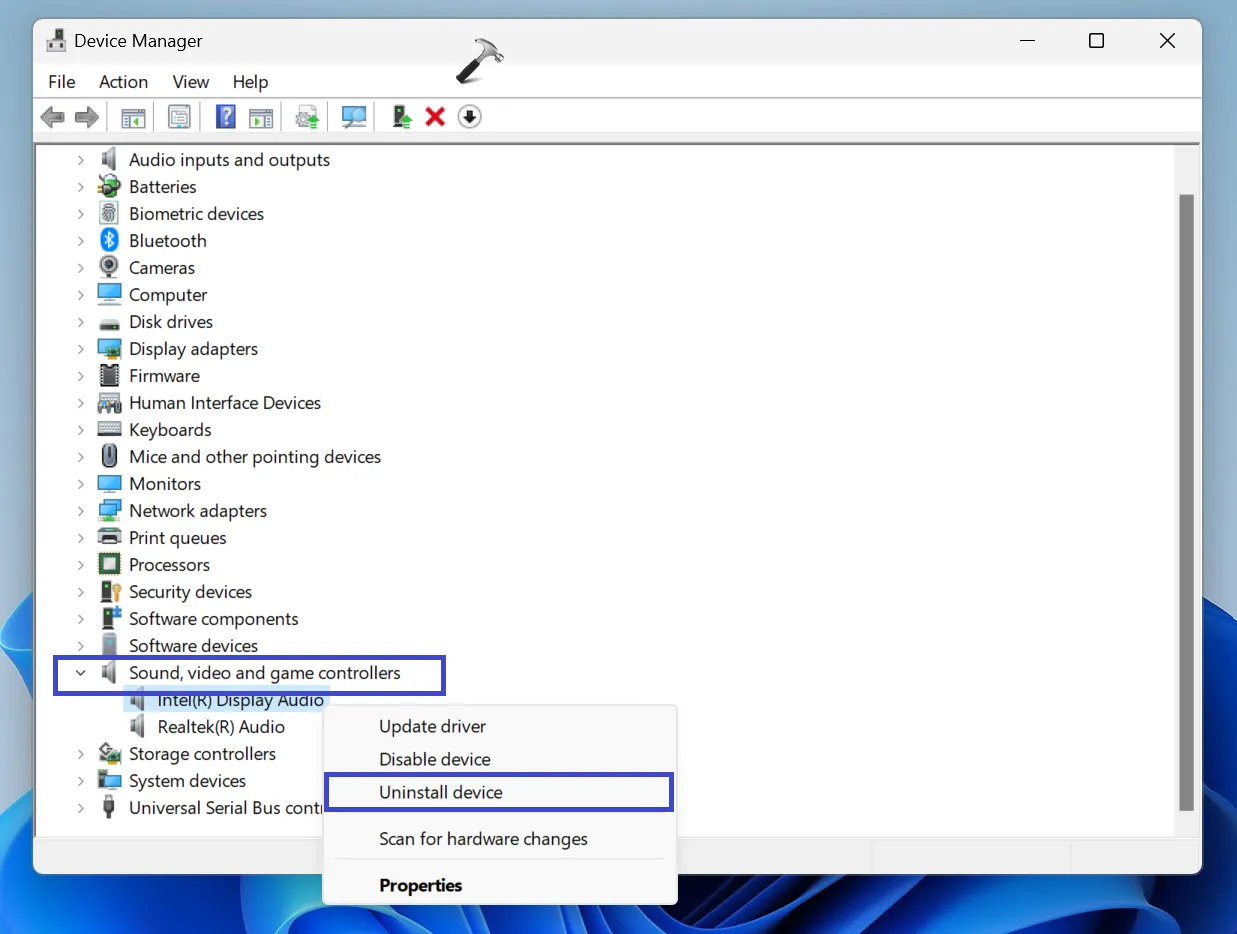
4. Появится диалоговое окно. Нажмите «Удалить» для подтверждения.
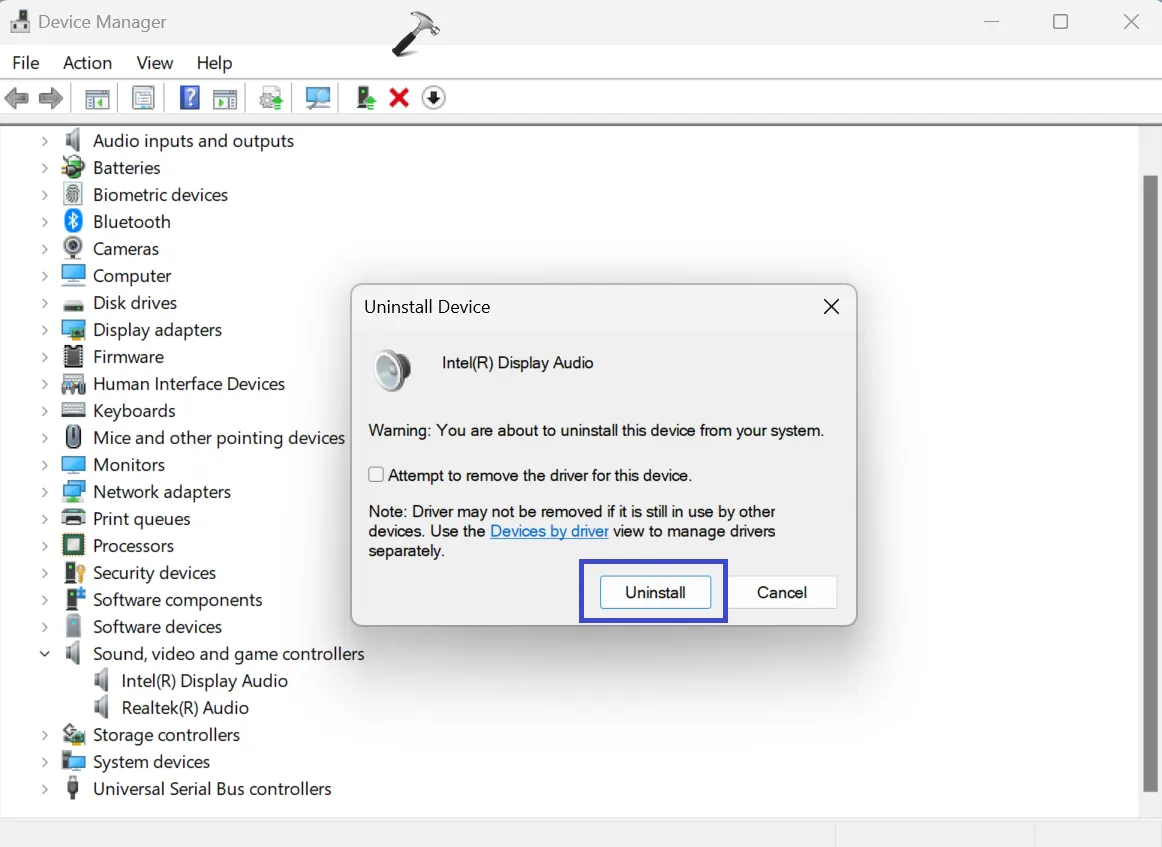
Перезагрузите компьютер, и устройство автоматически установится.
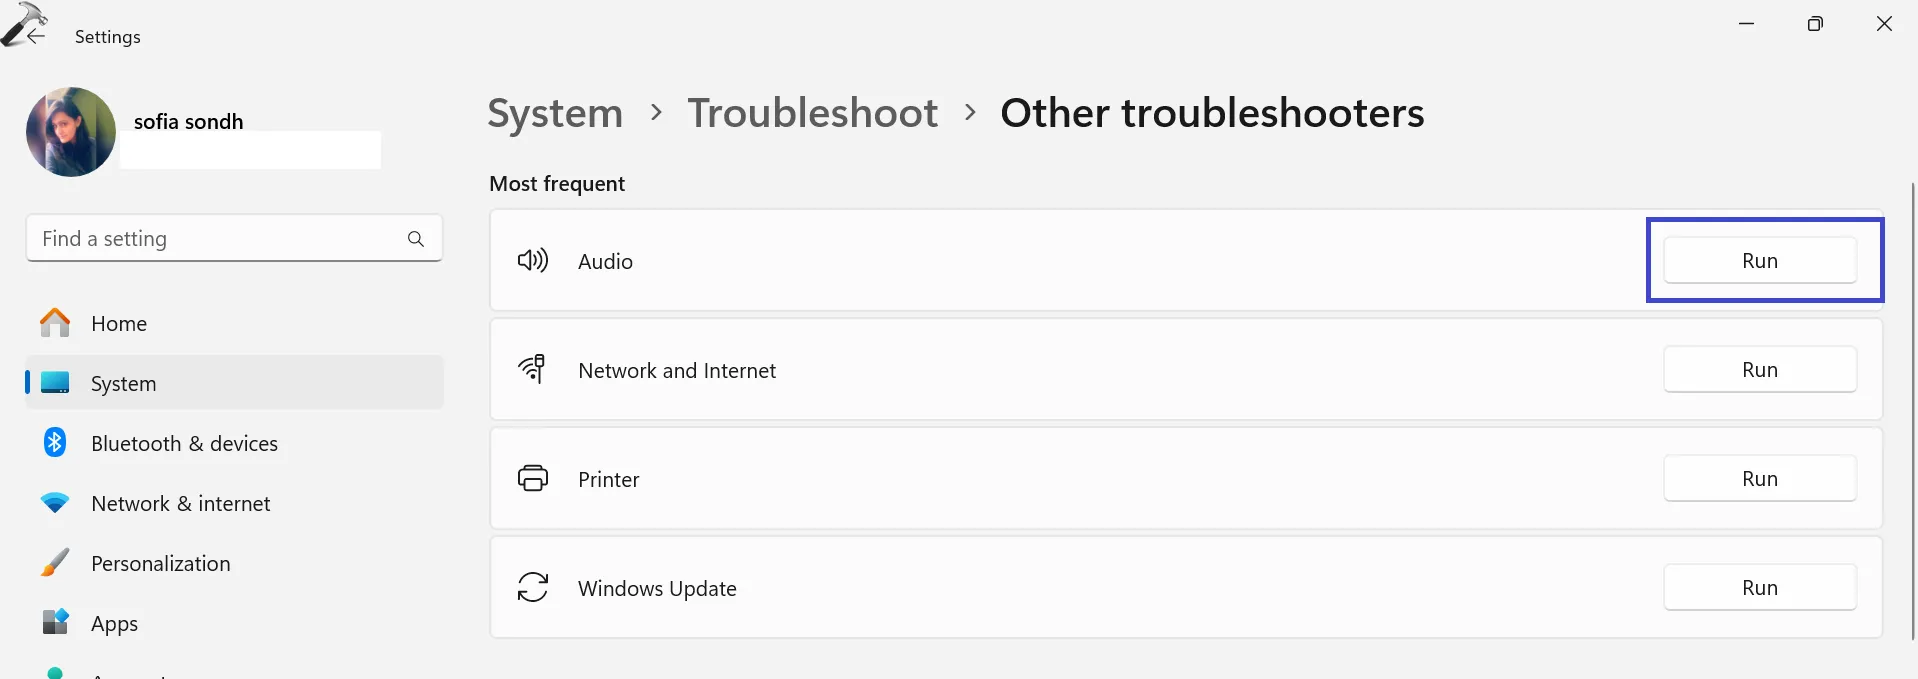
Исправление 6. Запустите средство устранения неполадок со звуком.
1. Перейдите в «Настройки => Система => Устранение неполадок».
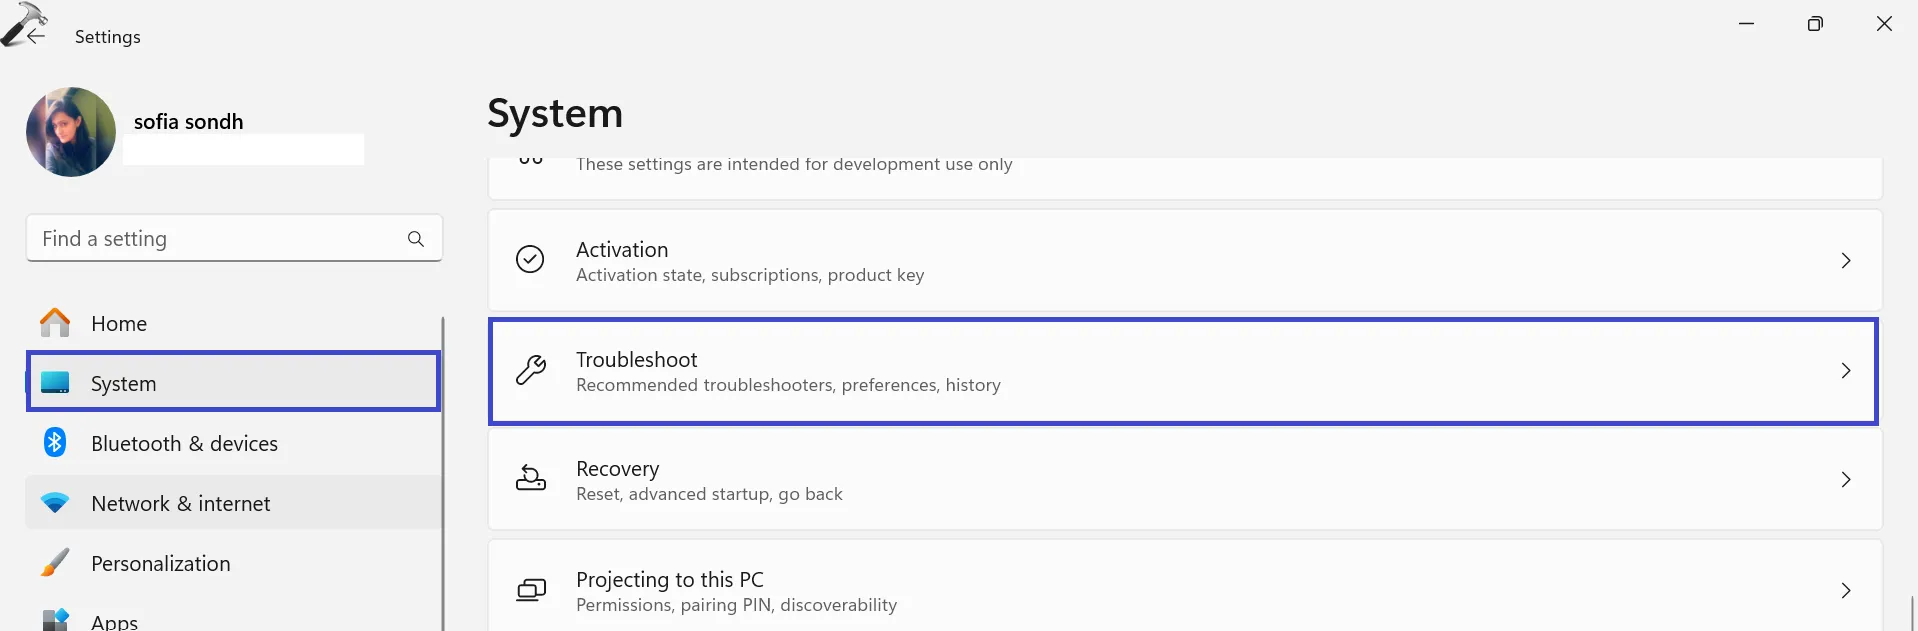
2. Нажмите «Другие средства устранения неполадок».
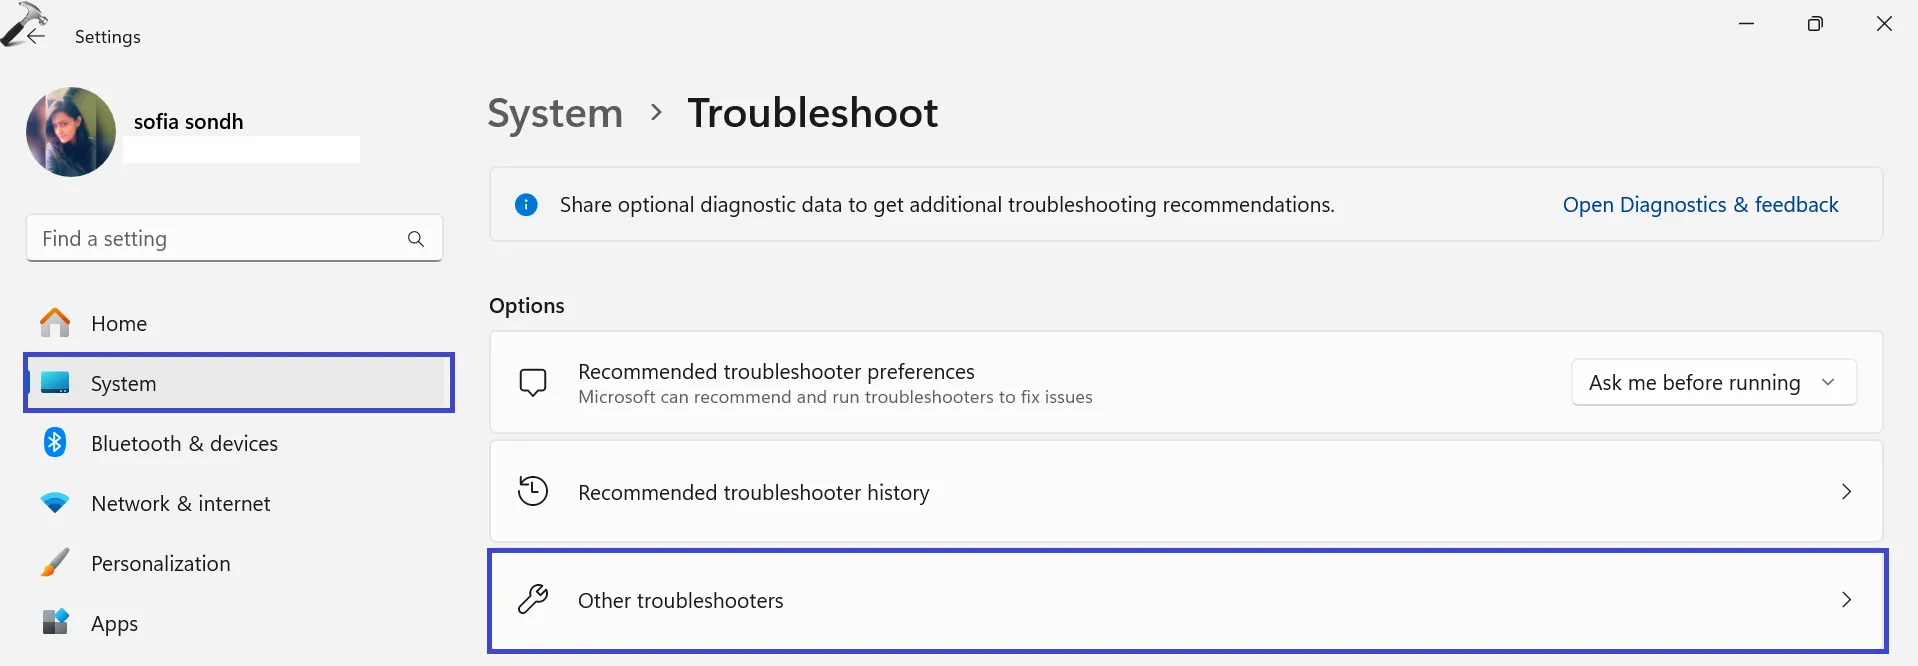
3. Теперь нажмите «Выполнить» рядом с пунктом «Аудио».
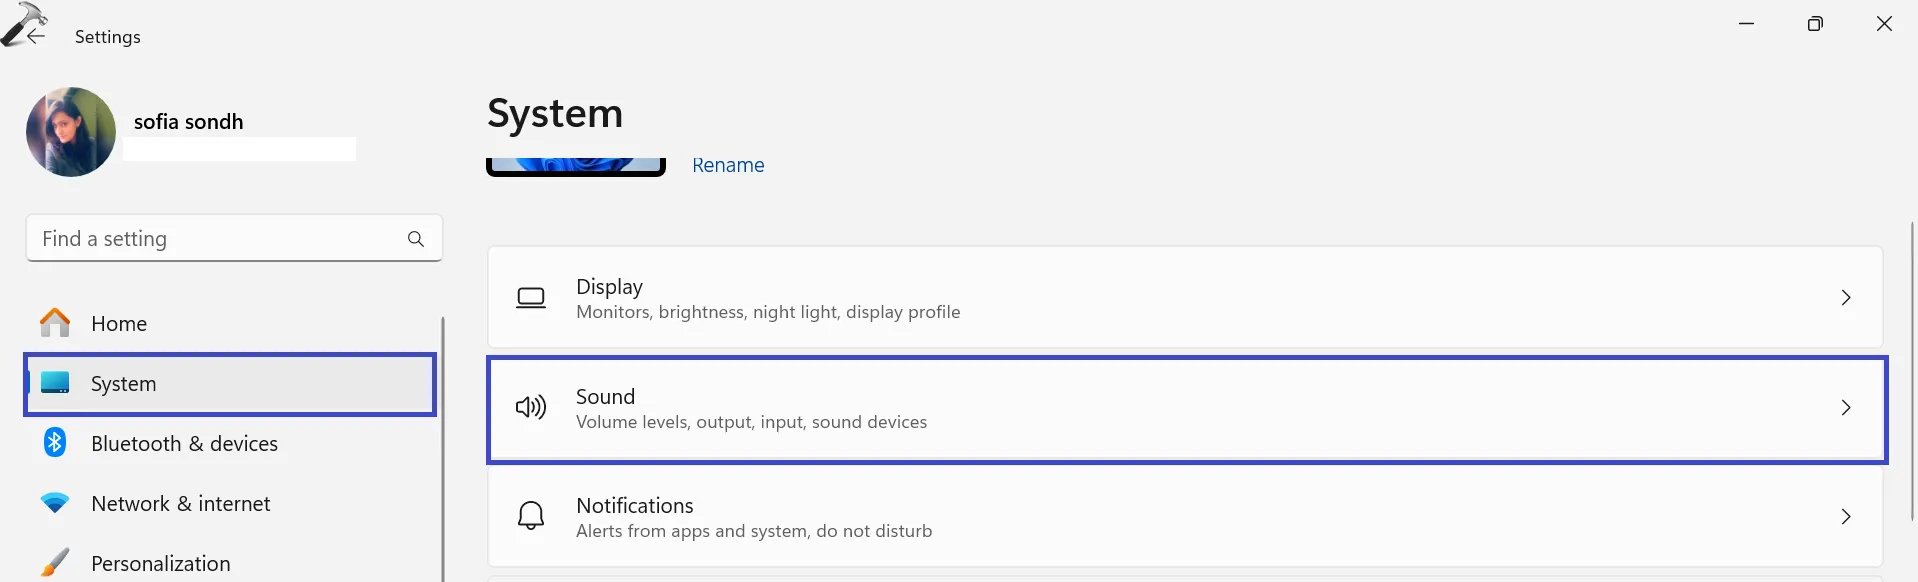
Исправление 7: сброс настроек звука до значений по умолчанию
1. Перейдите в «Настройки => Система => Звук».
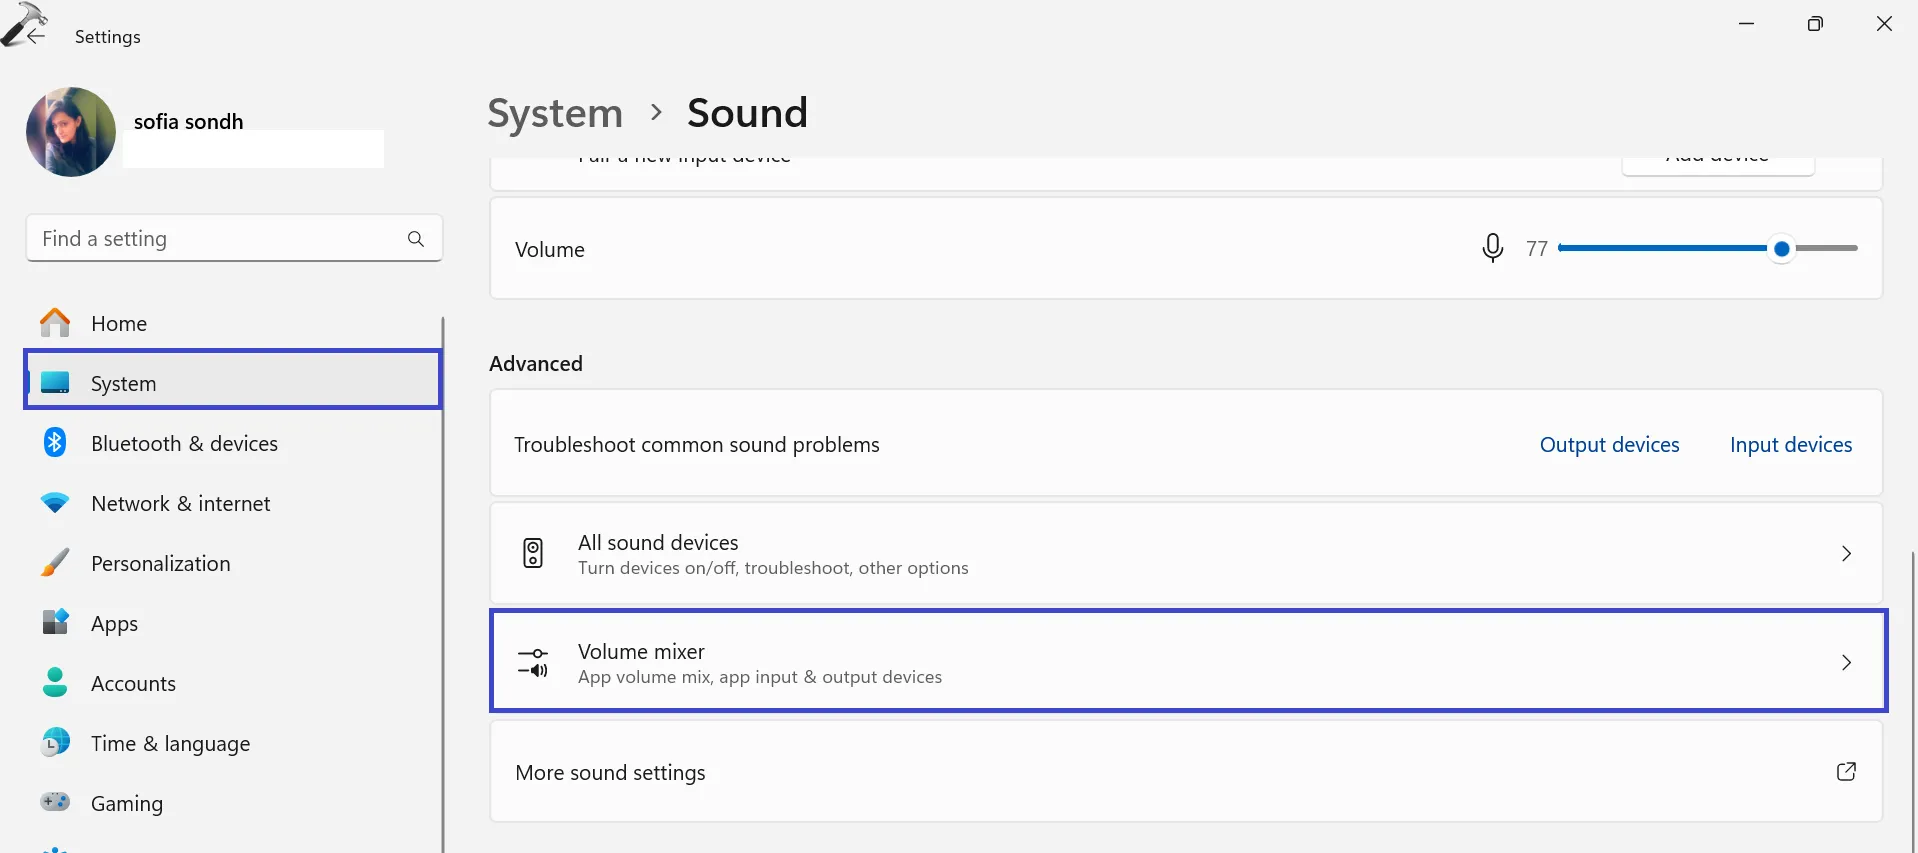
2. Прокрутите вниз до раздела «Дополнительно». Нажмите «Микшер громкости».
3. После этого нажмите кнопку «Сброс».
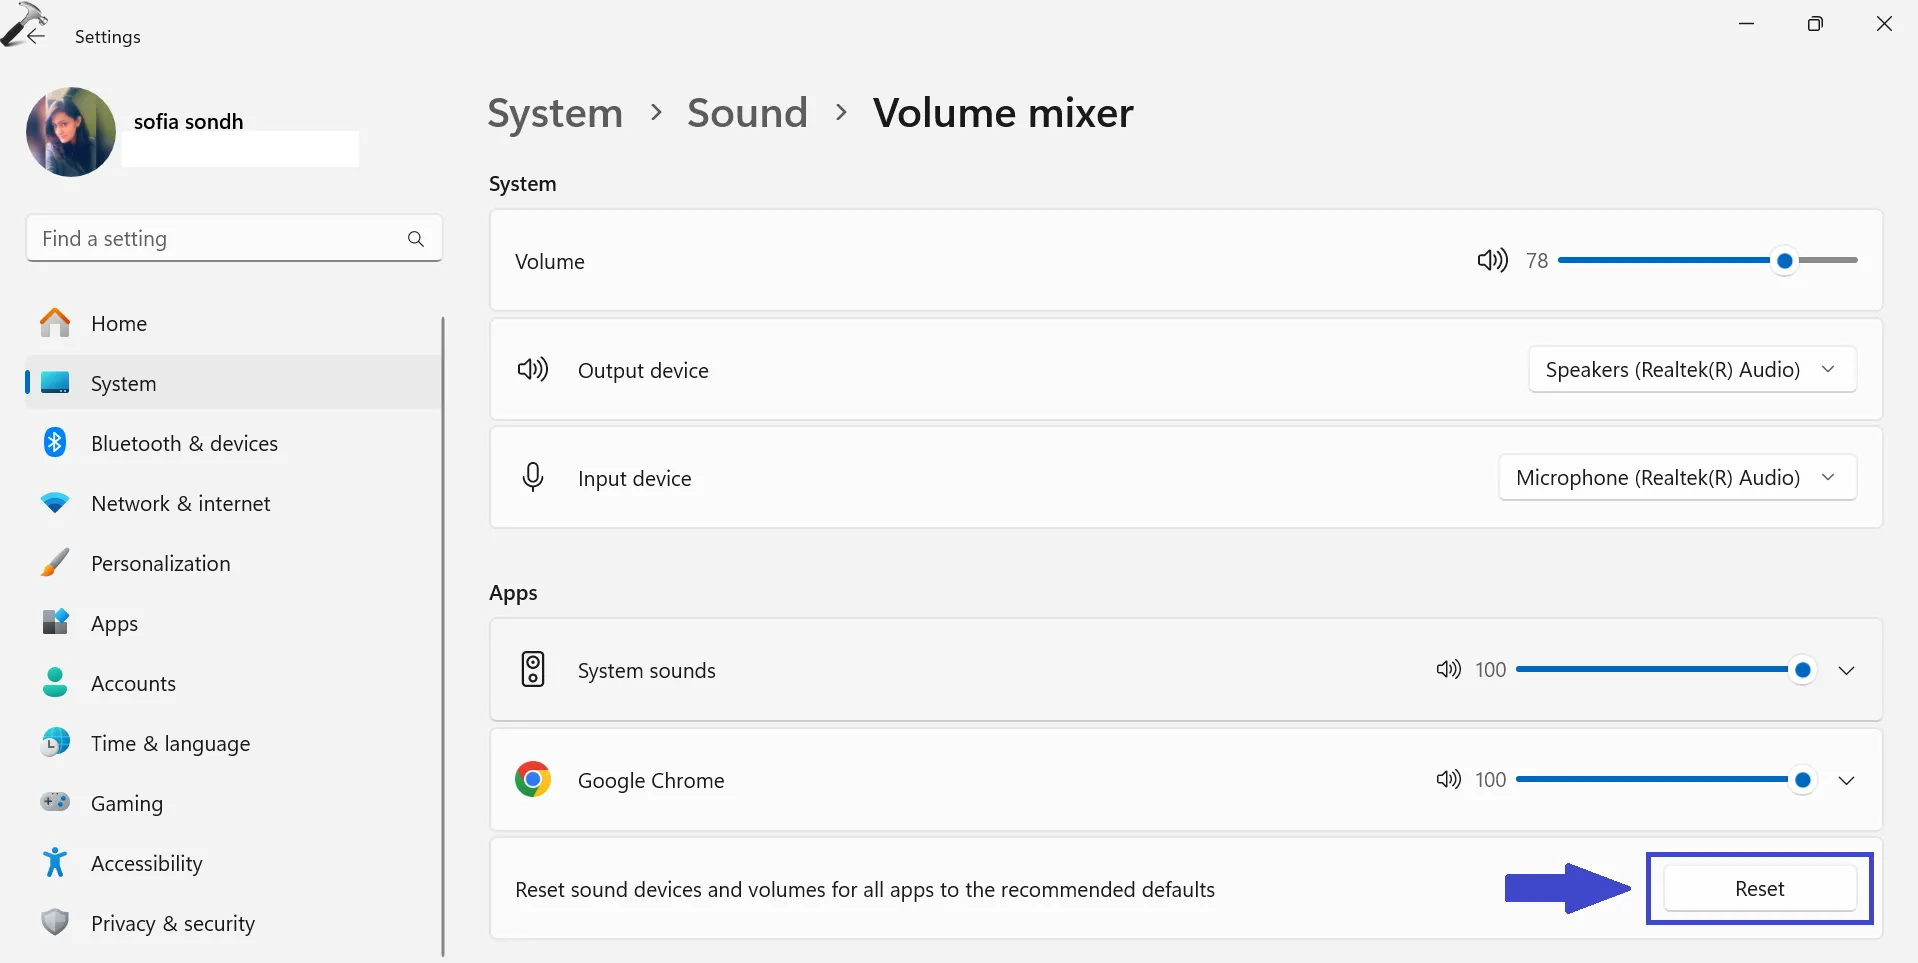
Вот и все!
Просмотров: 363
If you are a Windows 10 or Windows 11 user, you might sometimes encounter issues with your sound after updating your system (Windows Update). If you are facing this issue, you can try the following steps to fix the issue.
Check the Volume and Playback Settings
The first and most obvious step in resolving the sound issue in Windows 10 and Windows 11 is to check your volume settings. It is possible that your volume is muted or set too low. Check the sound icon in the taskbar and make sure that the volume is turned up to an audible level. If you’re using external speakers or headphones, make sure they’re properly plugged in and powered on.
If the volume is not the issue, it’s time to check your playback settings. In some cases, the Windows update may have incorrectly selected the wrong playback device or disabled your device entirely.
Select the Correct Playback Device in Sound Settings
In some cases, the Windows update may have incorrectly selected the wrong playback device or disabled your device entirely. Here’s how to check:
- Click on the speaker icon from the Taskbar.
- Select Sound. See also: How to Open The Old Advanced Sound Settings in Windows 11.
- Go to Playback tab.
- If there are multiple playback devices shown, right-click on your primary audio device and then select “Enable.”

If there is an existing enabled device, try to disable it if it’s not your primary device.
- If you have multiple devices enabled, right-click on the correct one and select “Set as default device.”
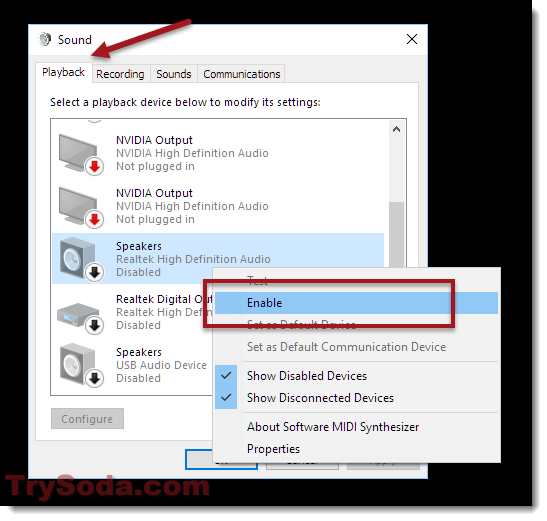
All audio playback devices connected to your computer will be listed in the Playback tab, including those in your monitor, graphics card, etc. You have to know which is the correct one that represents the speaker or headphones you want to use. If you don’t know, try to enable them one by one until the sound works.
If the playback devices tab shows “No audio device is installed“, go to the next solution.
Run the Windows Troubleshooter for Playing Audio
Windows 10 and Windows 11 come with a built-in troubleshooter that can help diagnose and fix audio problems automatically. Here’s how to use it:
- Go to Start Menu.
- Search for “Troubleshoot” and open it.
- Under Get up and running, select Playing Audio.
- Then, click on the Run the troubleshooter button.

- The process may take some time.
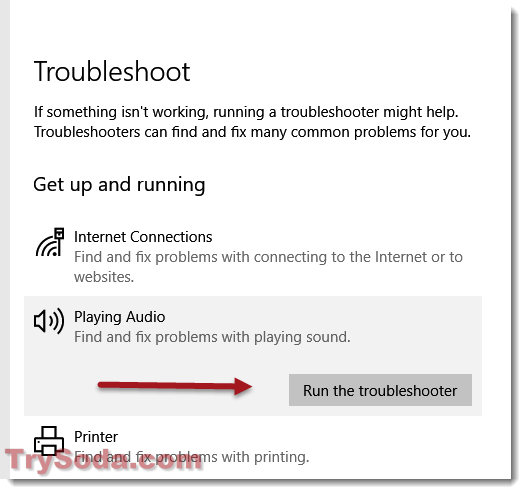
When the troubleshooting is completed, restart your computer. Play some music on YouTube to see if the no sound issue is resolved.
Update the Audio Driver
If your sound is still not working, it’s possible that your audio driver is outdated, corrupted, or incompatible with the latest Windows update. Here’s how to update your audio driver:
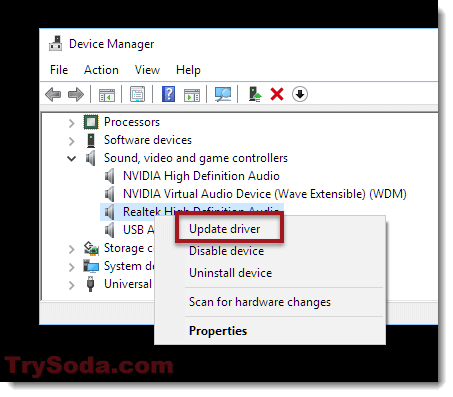
- Go to Start menu. Search for device manager and open it.
- Expand Sound, video and game controllers.
- Right click your audio device and then select Update driver.

- Select “Update automatically” to allow Windows to automatically find and install the correct audio driver for your device.
- If it can’t find a suitable driver, you will need to manually install the driver by selecting it based on its model (usually we will install the Realtek High Definition audio). Check the post here and scroll to the bottom for detailed instructions on how to do it.

So, the above are a few fixes that might help you solve the no sound problem in Windows 10 and Windows 11. It’s quite important to try these fixes one after the other to find out which one gets your sound back. Also, making sure your computer’s audio settings are set up right can stop this kind of problem from happening again.
If you’ve tried absolutely everything you can and still can’t fix the issue, the last resort would be to reset your PC. Resetting your PC means to revert it back to factory defaults, possibly resolving the issue. However, that also means you might lose some of your installed apps, files, and settings (although it lets you keep some of them). Be sure to back up the files you can’t afford to lose first before doing that.
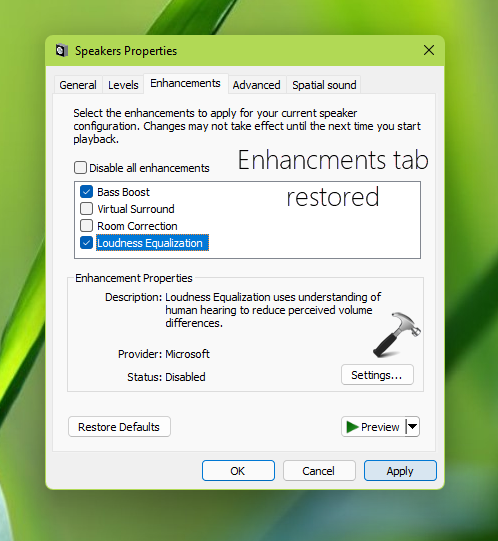
In Windows 11, audio enhancements will help you to improve sound quality from the audio device connected system. This audio device can be system built-in speaker or the external speaker you connected via USB, WiFi or Bluetooth. To improve the audio quality, you can turn on Bass Boost, Virtual Surround, Room Correction, Loudness Equalization. However, these enhancements can only be enabled if you have Enhancements tab available on the audio device property sheet. In this article, we will see how you can fix audio enhancements tab missing in Windows 11.
The audio enhancements tab can be found on the audio device property sheet. You can access this property sheet from Settings app > System > Sound > More sound settings as per latest Windows 11 build. As you can see in the below shown in screenshot, the audio enhancements tab is missing here.

Here is how you can restore the missing audio enhancements tab.
Fix: Audio enhancements tab missing in Windows 11/10/8.1
You can easily fix this problem by installing or updating your audio drivers. This fix equally works, even if you’ve Windows 10 or 8.1 system.
Follow the below mentioned steps:
1. Press + R and type devmgmt.msc in the Run, hit Enter key to open Device Manager snap-in.
2. In Device Manager, under Sound, video and game controllers, locate your audio device/driver with this issue and right click on it, select Update driver.
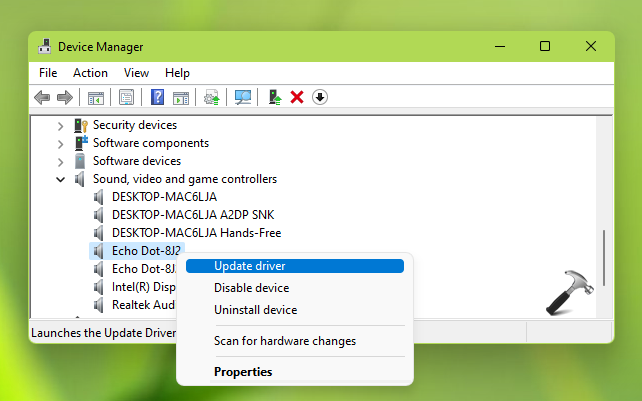
3. Follow the on-screen instructions to update the driver. Once the update driver is completed, check and you’ll get this issue resolved.
If the above steps didn’t helped, you can try uninstalling the device instead and then reinstall the audio device.
In case if you have Realtek audio driver as primary sound device, follow these steps:
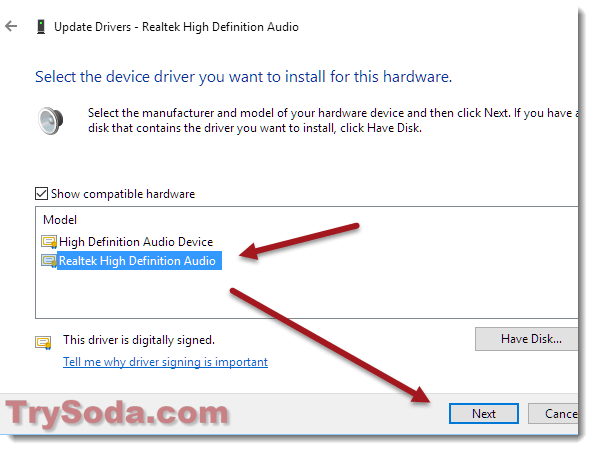
- Right click on Realtek Audio in Device Manager.
- Select Update driver.
- In the Update Drivers window, select Browse my computer for drivers.
- Then click on Let me pick from a list of device drivers on my computer.
- Tick the box next to Show compatible hardware to display all supported hardware in the list. From the list of drivers, select High Definition Audio Device and press Next.
- Click Yes in confirmation prompt.
Once this driver is updated, the issue will be fixed as shown in the below screenshot.
That’s it!
Related: How To Disable Audio Enhancements In Windows 10.
RELATED ARTICLES
Проблема с регулировкой яркости экрана – частая проблема, которая встречается как в Windows 10, так и в Windows 11. Как правило пользователи жалуются, что не удается увеличить или уменьшить яркость экрана на ноутбуке из панели управления Windows, с помощью выделенных клавиш или сочетаниями Fn+F5/F6/F11/F12.
В большинстве случае проблема с регулировкой яркости в Windows связана с драйверами монитора и видеокарты (часто проблема встречается на устройствах с видеокартами Intel Graphics и AMD Radeon). Однако есть и другие причины. Рассмотрим несколько простых способ исправить проблему с невозможностью изменить яркость на ноутбуке с Windows 10 и 11.
Содержание:
- Как изменить яркость экрана в Windows 10 и 11?
- Включите Generic Pnp Monitor
- Не работает регулировка яркости после установки TeamViewer
- Обновите драйвер видеоадаптера
- Не работают Fn клавиши регулировки яркости на ноутбуке
- Включить регулировку яркости экрана в реестре
- Не регулируется яркость дисплея на ноутбуке с интегрированной графикой Intel HD Graphics
- Проверьте настройки адаптивной регулировки яркости
Как изменить яркость экрана в Windows 10 и 11?
В первую очередь проверьте, удастся ли вам изменить яркость экрана с помощью стандартных способ регулировки яркости в Windows.
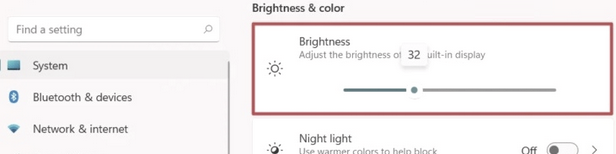
Вариант 1. Изменить яркость из панели Параметры Windows
В Windows 10 и 11 можно изменить настройку яркости дисплея из панели Параметры. Перейдите в Settings -> System -> Display (можно открыть эту панель настроек, выполнив команду быстрого доступа ms-settings:display или desk.cpl). Воспользуйтесь ползунком Brightness, чтобы изменить яркость дисплея.
Вариант 2. Изменить яркость дисплея из панели быстрого доступа Windows
В Windows 10 и 11 вы можете использовать панель быстрого доступа (quick settings) для изменения настроек яркости. Нажмите на любую системную иконку в таскбаре (Wi-Fi, звук, батарея или нажмите
Win+A
). Отрегулируйте яркость дисплея с помощью ползунка.
Если ползунок яркости отсутствовует или неактивнем:
- Возможно вы используете компьютер с внешним монитором (используйте кнопки на мониторе, чтобы изменить яркость);
- Попробуйте обновить драйвер видеоадаптера (описано ниже).
Вариант 3. Настройка яркости с помощью функциональные клавиш клавиатуры
На большинстве ноутбуков есть специальные функциональные клавиши со значками 🔆 и 🔅. Нажмите на кнопку Fn+функциональную клавишу увеличения/уменьшения яркости и убедитесь, что яркость дисплея изменилась.
На моем ноутбуке для регулировки яркости используются сочетания Fn+F11 и Fn+F12. У разных производителей устройств эти сочетания могут отличаться.
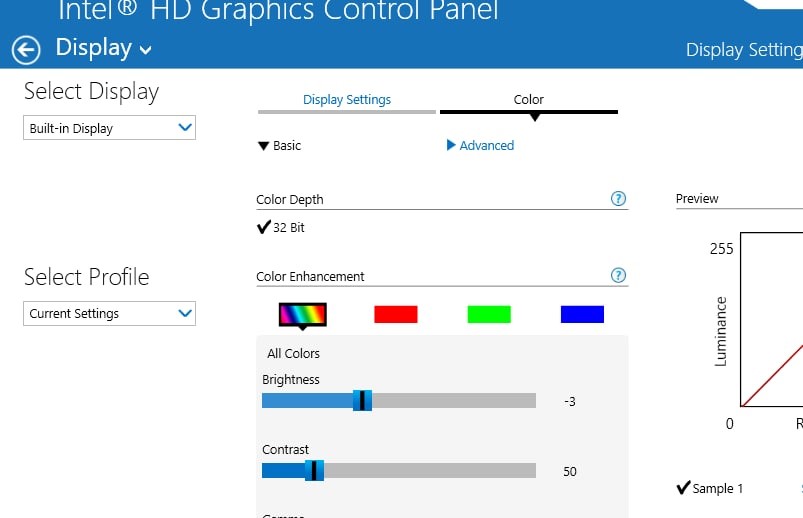
Вариант 4. Настройки яркости экрана в параметрах видеодрайвера
Вы можете изменить яркость экрана в параметрах видеокарты. В моем примере это Intel HD Graphisc Control Panel, доступная из контекстного меню рабочего стола.
Вариант 5. Задать яркость экрана с помощью PowerShell
Следующая команда PowerShell позволяет принудительно задать определенную яркость дисплея:
(Get-WmiObject -Namespace root/WMI -Class WmiMonitorBrightnessMethods).WmiSetBrightness(1,70)
Яркость задается в процентах от максимальной в диапазоне от 0 до 100. В этом примере я задал 70% яркости.
Включите Generic Pnp Monitor
Если вы не можете изменить настройки яркости Windows, проверьте не отключен ли у вас в оборудовании Универсальный монитор PnP (Generic Pnp Monitor). Это распространенная проблема на ноутбуках Lenovo и HP Pavilion.
Откройте диспетчер устройств (
devmgmt.msc
) и в разделе Monitors (Мониторы) проверьте, что устройство Generic Pnp Monitor (Универсальный монитор PnP) включено. Если это не так, щелкните по нему ПКМ и включите его (Enable / Задействовать).

Перезагрузите компьютер и проверьте возможность регулировки яркости.
В некоторых случаях нужно попробовать обновить/переустановить драйвер Generic Pnp Monitor в диспетчере оборудования через Update Driver.
Не работает регулировка яркости после установки TeamViewer
Есть известная проблема, что в Windows перестает работать регулировка яркости экрана после установки TeamViewer. Дело в том, что TeamViewer при устанавливает собственный драйвер дисплея Pnp-Montor Standard, который используется для компрессии графики и оптимизации трафика
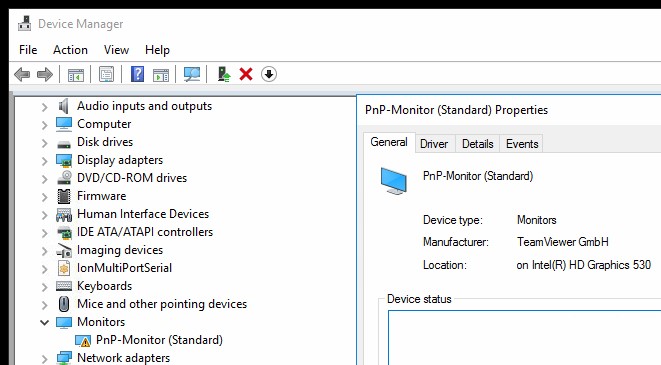
Попробуйте заменить драйвер для этого устройства на «Универсальный монитор PnP» (ПКМ -> Обновить драйверы -> Выбрать из списка уже установленных драйверов).
Обновите драйвер видеоадаптера
Возможно проблема с яркостью связана с текущим драйвером видеоадаптера. В первую очередь проверьте, что ваша видеокарта включена в диспетчере устройств (по аналогии со способом выше). Если предыдущий метод не помог, попробуйте выполнить автоматическое обновление драйвера видеоадаптера (если оно не отключено).
В диспетчере устройств (консоль
devmgmt.msc
) разверните секцию Display adapters найдите свою видеокарту, щелкните по ней ПКМ и выберите пункт Update Driver Software. Затем выберите опцию Search automatically for updated driver software и подождите пока Windows 10 найдет и установит последнюю версию драйвера (требуется подключение к интернету).
Если автоматическое обновление драйвера не исправило проблему с неработающей регулировкой яркости в Windows 10, попробуйте удалить текущий драйвер и установить с сайта производителя самую последнюю версию драйвера.
В некоторых случаях нужно наоборот, откатить версию видеоадаптера на предыдущую: Update driver -> Browse my computers for drivers -> Let me pick from a list of available drivers on my computer -> включите Show compatible hardware. Выберите предыдущую версию драйвера.
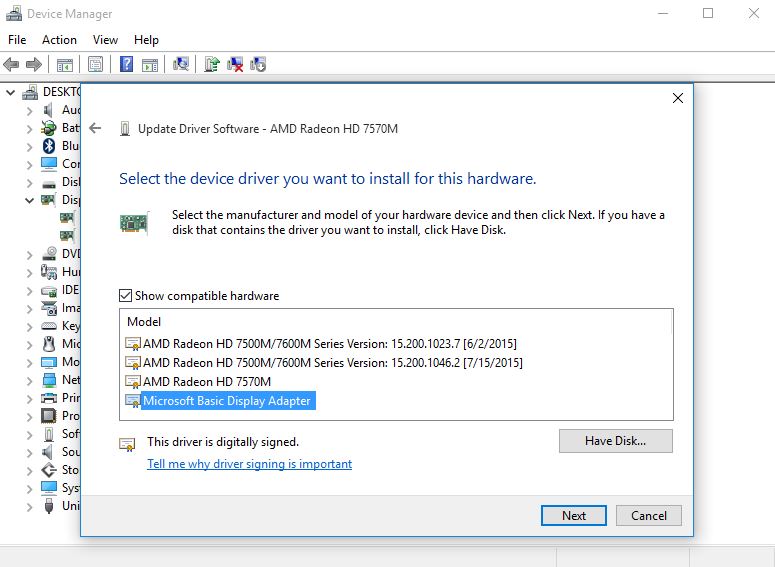
Если обновление или откат драйвера не помогли решить проблему с регулировкой яркости, попробуйте использовать для видеокарты стандартный драйвер Microsoft Basic Display Adapter.
Не работают Fn клавиши регулировки яркости на ноутбуке
Если вы обнаружили, что регулировка яркости в настройках Windows работает нормально, но не работают функциональные клавиши (
Fn
) управления яркости на клавиатуре ноутбука, скорее всего вам нужно установить дополнительно ПО от производителя ноутбука.
У каждого вендора есть своя утилита. Ниже представлены названия утилит для популярных моделей ноутбуков:
- ASUS — ATK Hotkey Utility
- Sony Vaio — Sony Notebook Utilities
- Dell – QuickSet
- HP — HP Software Framework и/или HP Hotkey Support
- Lenovo — Hotkey Features Integration for Windows 10 или AIO Hotkey Utility Driver
Скачайте программу с официального сайта производителя и установите ее. Попробуйте изменить яркость с помощью функциональный клавиш нуотбука.
Включить регулировку яркости экрана в реестре
В Windows можно разрешить регулировку яркости экрана с помощью параметра реестра KMD_EnableBrightnessInterface2 в ветке HKEY_LOCAL_MACHINE\SYSTEM\ControlSet001\Control\Class\{4d36e968-e325-11ce-bfc1-08002be10318}\0000.
Откройте редактор реестра (regedit.exe), перейдите в указанную ветку и измените значение DWORD-параметра KMD_EnableBrightnessInterface2 с 1 на 0
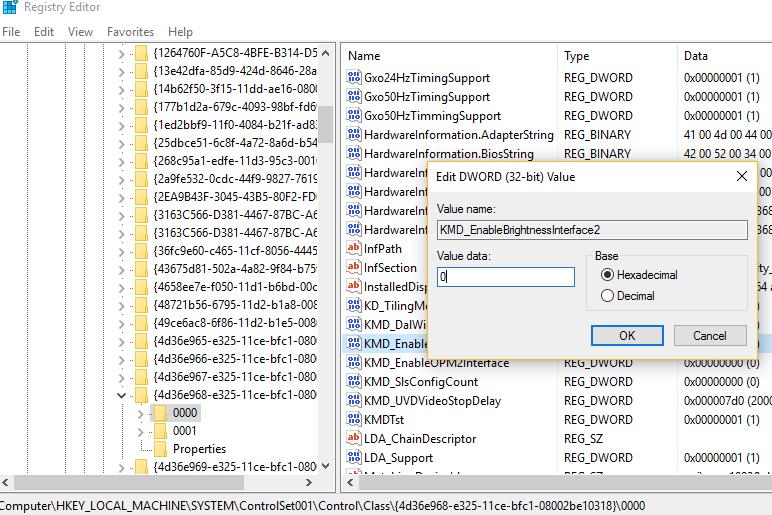
В реестре может быть несколько параметров KMD_EnableBrightnessInterface2. Поэтому, воспользуйтесь поиском (F3) и найдите все остальные параметры с именем
KMD_EnableBrightnessInterface
. Для всех найденных ключей нужно изменить значение с 1 на 0.
Перезагрузите компьютер.
Не регулируется яркость дисплея на ноутбуке с интегрированной графикой Intel HD Graphics
На ноутбуках со встроенной видеокартой Intel HD Graphics нужно отключить коррекцию яркости через реестр. Для этого перейдите в раздел реестра HKEY_LOCAL_MACHINE\SYSTEM\ControlSet001\Control\Class\{4d36e968-e325-11ce-bfc1-08002be10318}\0000 (в некоторых случаях 0001) и найдите DWORD параметр FeatureTestControl. Измените его значение c f000 на f008 и перезагрузите компьютер.
В комментариях пишут, что иногда помогает значение FeatureTestControl = fb20.
нужно внести изменения в реестр с помощью такого reg файла:
Windows Registry Editor Version 5.00
[HKEY_LOCAL_MACHINE\SYSTEM\ControlSet001\Control\Class\{4d36e968-e325-11ce-bfc1-08002be10318}\0000]
"FeatureTestControl"=dword:0000f008
"KMD_EnableBrightnessInterface2"=dword:00000000
"KMD_EnableBrightnesslf2"=dword:00000000
[HKEY_LOCAL_MACHINE\SYSTEM\ControlSet001\Control\Class\{4d36e968-e325-11ce-bfc1-08002be10318}\0001]
"FeatureTestControl"=dword:0000f008
[HKEY_LOCAL_MACHINE\SYSTEM\ControlSet001\Control\Class\{4d36e968-e325-11ce-bfc1-08002be10318}\0002]
"FeatureTestControl"=dword:0000f008
[HKEY_LOCAL_MACHINE\SYSTEM\ControlSet001\Services\intelkmd]
"FeatureTestControl"=dword:0000f008
Проверьте настройки адаптивной регулировки яркости
Windows может использовать датчики освещенности ноутбука для регулировки ярости экрана. Яркость экрана задается в зависимости от освещения помещения (Ambient Light). Это называется адаптивная яркость.
Вы можете включить/отключить адаптивную яркость дисплея из панели Settings: System -> Brightness -> Change brightness automatically when lighting changes

Здесь же есть еще одна опция – уменьшения яркости дисплея, если устройство работает от батареи (Help improve battery by optimizing the content shown and brightness). Эта функция называется CABC (Content Adaptive Brightness Control).
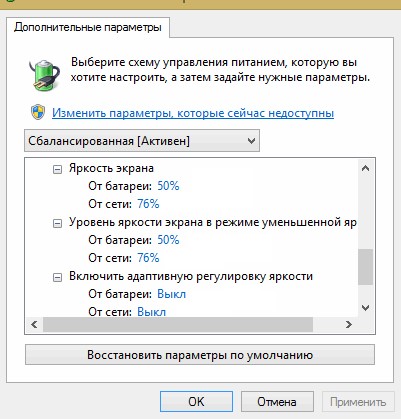
Также отключить адаптивную регулировку яркости в настройках схемы электропитания Windows: Control Panel -> Power Options (Электропитание) -> в свойствах выбранного плана электропитания, нажмите на кнопку Change advanced power settings (Настройка схемы электропитания) -> Change advanced power settings (Изменить дополнительные параметры питания) -> разверните раздел Display (Экран).
В пункте Enable adaptive brightness (Включить адаптивную регулировку яркости) нужно отключить адаптивную яркость для режима от сети и от батареи. Если адаптивная яркость включена, вы не можете значительно увеличить яркость экрана
Также попробуйте изменить настройки в пунктах:
- Dimmed display brightness (Уровень яркости экрана в режиме уменьшенной яркости)
- Display brightness (Яркость экрана)
Download Windows Speedup Tool to fix errors and make PC run faster
Windows 10 users who want to upgrade to Windows 11 via Windows Update, can simply check for updates on their device to see whether the Windows 11 update is available. However, some Windows 10 users are reporting that Windows 11 is not showing up in Windows Update settings even though the device passed the PC Health Check test for Windows 11 requirements. In this post, we offer suggestions on how to resolve this issue.
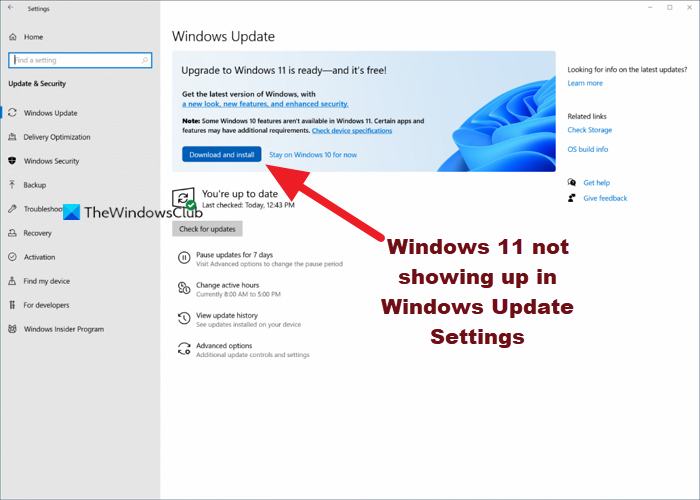
Keep in mind that this might not be an issue per se, because Microsoft doesn’t push Windows 11 to all PC users at the same time. The Windows Upgrade is usually throttled – so If your computer doesn’t receive Windows 11 in Windows Update, it usually means that your device is not ready for Windows 11 – however, you can get Windows 11 immediately if you want by any of the following ways:
- Use Windows 11 Installation Assistant to install Windows 11.
- Create Windows 11 bootable installation media for installation.
- Download Windows 11 Disk Image (ISO) file from Microsoft and then install Windows 11 on your device using the ISO file.
The following are reasons why Windows 11 might not show up in Windows Update Settings on your device:
- Damaged Temporary files.
- There is something wrong with the Windows Update service.
- You are not in the proper Channel of the Windows Insider Program.
So, if you notice Windows 11 is not showing up in Windows Update Settings on your device, you can try our recommended solutions below in no particular order and see if that helps to resolve the issue.
- Restart PC
- Run Windows Update Troubleshooter
- Check if Pause Updates is turned on
- Turn on/off VPN (if applicable)
- Modify Registry
- Change Telemetry settings
- Wait for Microsoft to roll out Windows 11 update to your PC
Let’s take a look at the description of the process involved concerning each of the listed solutions.
1] Restart PC
A quick restart of your PC and then re-run of Windows Update may help you if the Windows 11 is not showing up in Windows Update Settings. Try the next suggestion if this action didn’t work.
2] Run Windows Update Troubleshooter
This solution requires you to run the inbuilt Windows Update Troubleshooter and see if the automated wizard helps to resolve the issue.
3] Check if Pause Updates is turned on
This solution requires you to check if Pause Updates is turned on. If the option is enabled on your device you need to disable or turn it off and see if that fixes the issue at hand.
4] Turn on/off VPN (if applicable)
Usually, it’s the other way round; but some affected PC users reported that what worked for them is connecting via VPN, they were able to upgrade to Windows 11. But in the event you’re already connected via VPN and you’re faced with the Windows 11 update issue, you can turn off or try uninstalling your VPN software or remove any proxy server from your computer and see if that resolves the issue.
5] Modify Registry

This solution applies to PC users running Windows Preview Builds on their device.
Since this is a registry operation, it is recommended that you back up the registry or create a system restore point as necessary precautionary measures. Once done, you can proceed as follows:
- Press Windows key + R to invoke the Run dialog.
- In the Run dialog box, type regedit and hit Enter to open Registry Editor.
- Navigate or jump to the registry key path below:
Computer\HKEY_LOCAL_MACHINE\SOFTWARE\Microsoft\WindowsSelfHost\Applicability
- At the location, on the right pane, make sure the following registry keys are matched with the appropriate values as shown on the image above.
6] Change Telemetry settings
This solution requires you to simply change or reconfigure the current telemetry settings on your Windows PC.
7] Wait for Microsoft to roll out Windows 11 update to your PC
At this point, if Windows 11 update isn’t still available for your PC, and you don’t want to manually upgrade, there’s no cause for alarm as Microsoft is in the process of rolling out the Windows 11 update slowly to all PCs that meet the system requirements for the upgrade. In this case, all you can do is wait – the update should be available for your PC by mid-2022.
Hope you find this post informative and helpful enough!
Why can I not update to Windows 11?
To troubleshoot Windows Update Issues for Windows 11, you can try the following: Make sure you have enough free space on your C drive to install/update to Windows 11. Restart the Windows PC to make sure the previous updates are installed. Re-run the Windows updates again from Settings > Windows Updates > Check for updates.
Are there any issues with Windows 11?
There are quite a number of Windows 11 Known issues and problems, including compatibility issues with some Intel “Killer” and “SmartByte” networking software and Windows 11. Devices with the affected software might drop User Datagram Protocol (UDP) packets under certain conditions. This creates performance and other problems for protocols based on UDP.
Related post: How to install Windows 11 on unsupported hardware.
Obinna has completed B.Tech in Information & Communication Technology. He has worked as a System Support Engineer, primarily on User Endpoint Administration, as well as a Technical Analyst, primarily on Server/System Administration. He also has experience as a Network and Communications Officer. He has been a Windows Insider MVP (2020) and currently owns and runs a Computer Clinic.