
🪟 First help for setup, tweaks and ISO images
Our mission is to show that it is possible to configure Windows without using third-party programs, just learn a few simple tweakers.
This way you can forget about extraneous cleaning tools with closed source code. All our scripts are written in the standard «PS1» language and you can always check them or change them to suit your needs.
No files or programs, just console and commands!
MORE PROJECTS: https://github.com/awesome-windows11
Site: https://windows12.glitch.me
VK: https://vk.com/flighthub
Telegram: https://t.me/windows11_chat
Important
https://github.com/eksime/VDesk
Check system file: https://winbindex.m417z.com
NT/SYSTEM console: https://github.com/gerardog/gsudo
AppInstaller & MSIXbundle (WinGet) https://apps.microsoft.com/store/detail/9NBLGGH4NNS1
Microsoft Emoji: https://github.com/microsoft/fluentui-emoji
https://github.com/farag2/Utilities
HACK: Password Brute Force
Windows Defender
Defender Control
https://github.com/swagkarna/Defeat-Defender-V1.2
https://github.com/AndyFul/ConfigureDefender
https://github.com/simeononsecurity/Windows-Defender-Hardening
https://github.com/simeononsecurity/Windows-Defender-Application-Control-Hardening
Windows Update
https://github.com/DavidXanatos/wumgr
Disabling all windows update services: https://github.com/WereDev/Wu10Man
Microsoft Store Apps
https://github.com/Digressive/Remove-MS-Store-Apps
🛠 Tweaks (Win11)
Custom Context Menu: https://github.com/ikas-mc/ContextMenuForWindows11
Windows Fixer: https://github.com/99natmar99/Windows-11-Fixer
Explorer Patcher (Old TaskBar): https://github.com/valinet/ExplorerPatcher
https://github.com/undergroundwires/privacy.sexy
https://github.com/mikeroyal/Windows-11-Guide
https://github.com/xanderfrangos/twinkle-tray
Manager context menu: https://nilesoft.org
https://github.com/builtbybel/ThisIsWin11
☠ OUTDATED! https://github.com/HerMajestyDrMona/Windows11DragAndDropToTaskbarFix
☠ OUTDATED! https://github.com/hahagu/WindowsThumbnailGenerator
☠ OUTDATED! Old Start Menu: https://github.com/bbmaster123/10SM
https://github.com/Sycnex/Windows10Debloater
https://github.com/Fs00/Win10BloatRemover
https://github.com/equk/windows
https://github.com/r33int/Windows10-Postinstall
https://github.com/simeononsecurity/Windows-Optimize-Harden-Debloat
https://github.com/simeononsecurity/Windows-Optimize-Debloat
https://github.com/ChrisTitusTech/winutil
https://github.com/farag2/Sophia-Script-for-Windows
Personalization
Set Dark Theme
«`powershell
reg add «HKEY_CURRENT_USER\Software\Microsoft\Windows\CurrentVersion\Themes\Personalize» /v AppsUseLightTheme /t REG_DWORD /d 0 /f
reg add «HKEY_CURRENT_USER\Software\Microsoft\Windows\CurrentVersion\Themes\Personalize» /v SystemUsesLightTheme /t REG_DWORD /d 0 /f
reg add «HKEY_CURRENT_USER\Software\Microsoft\Windows\CurrentVersion\Themes\Personalize» /v EnableTransparency /t REG_DWORD /d 1 /f
pause
«`
Disable Change Wallpaper
reg add "HKEY_CURRENT_USER\Software\Microsoft\Windows\CurrentVersion\Policies\ActiveDesktop" /v NoChangingWallPaper /t REG_DWORD /d 1 /f
reg add "HKEY_LOCAL_MACHINE\Software\Microsoft\Windows\CurrentVersion\Policies\ActiveDesktop" /v NoChangingWallPaper /t REG_DWORD /d 1 /f
pause
Windows 11 обои скачать
Стандартно обои хранятся по пути:
C:\Windows\Web

Disable LockScreen Spotlight
«`powershell
reg add «HKEY_CURRENT_USER\SOFTWARE\Policies\Microsoft\Windows\CloudContent» /v DisableWindowsSpotlightWindowsWelcomeExperience /t REG_DWORD /d 1 /f
reg add «HKEY_LOCAL_MACHINE\SOFTWARE\Policies\Microsoft\Windows\Personalization» /v NoChangingLockScreen /t REG_DWORD /d 0 /f
reg add «HKEY_CURRENT_USER\SOFTWARE\Policies\Microsoft\Windows\CloudContent» /v DisableWindowsSpotlightFeatures /t REG_DWORD /d 1 /f
reg add «HKEY_CURRENT_USER\SOFTWARE\Policies\Microsoft\Windows\CloudContent» /v DisableWindowsSpotlightOnActionCenter /t REG_DWORD /d 1 /f
reg add «HKEY_CURRENT_USER\SOFTWARE\Policies\Microsoft\Windows\CloudContent» /v DisableWindowsSpotlightOnSettings /t REG_DWORD /d 1 /f
reg add «HKEY_CURRENT_USER\SOFTWARE\Policies\Microsoft\Windows\CloudContent» /v DisableThirdPartySuggestions /t REG_DWORD /d 1 /f
reg add «HKEY_CURRENT_USER\SOFTWARE\Policies\Microsoft\Windows\CloudContent» /v ConfigureWindowsSpotlight /t REG_DWORD /d 2 /f
reg add «HKEY_CURRENT_USER\SOFTWARE\Policies\Microsoft\Windows\CloudContent» /v IncludeEnterpriseSpotlight /t REG_DWORD /d 0 /f
reg add «HKEY_CURRENT_USER\SOFTWARE\Microsoft\Windows\CurrentVersion\ContentDeliveryManager» /v «RotatingLockScreenEnabled» /t REG_DWORD /d 0 /f
reg add «HKEY_CURRENT_USER\SOFTWARE\Microsoft\Windows\CurrentVersion\ContentDeliveryManager» /v «LRotatingLockScreenEnabled» /t REG_DWORD /d 0 /f
reg add «HKEY_CURRENT_USER\SOFTWARE\Microsoft\Windows\CurrentVersion\ContentDeliveryManager» /v «RotatingLockScreenOverlayEnabled» /t REG_DWORD /d 0 /f
pause
«`
Clean Explorer
Force File Explorer to open to This PC instead of Quick Access
reg add "HKEY_CURRENT_USER\Software\Microsoft\Windows\CurrentVersion\Explorer\Advanced" /v LaunchTo /t REG_DWORD /d 1 /f
echo 3D Objects
reg add "HKEY_LOCAL_MACHINE\SOFTWARE\Microsoft\Windows\CurrentVersion\Explorer\FolderDescriptions\{31C0DD25-9439-4F12-BF41-7FF4EDA38722}\PropertyBag" /v ThisPCPolicy /t REG_SZ /d Hide /f
reg add "HKEY_LOCAL_MACHINE\SOFTWARE\Wow6432Node\Microsoft\Windows\CurrentVersion\Explorer\FolderDescriptions\{31C0DD25-9439-4F12-BF41-7FF4EDA38722}\PropertyBag" /v ThisPCPolicy /t REG_SZ /d Hide /f
echo Videos
reg add "HKEY_LOCAL_MACHINE\SOFTWARE\Microsoft\Windows\CurrentVersion\Explorer\FolderDescriptions\{35286a68-3c57-41a1-bbb1-0eae73d76c95}\PropertyBag" /v ThisPCPolicy /t REG_SZ /d Hide /f
reg add "HKEY_LOCAL_MACHINE\SOFTWARE\Wow6432Node\Microsoft\Windows\CurrentVersion\Explorer\FolderDescriptions\{35286a68-3c57-41a1-bbb1-0eae73d76c95}\PropertyBag" /v ThisPCPolicy /t REG_SZ /d Hide /f
echo Documents
reg add "HKEY_LOCAL_MACHINE\SOFTWARE\Microsoft\Windows\CurrentVersion\Explorer\FolderDescriptions\{f42ee2d3-909f-4907-8871-4c22fc0bf756}\PropertyBag" /v ThisPCPolicy /t REG_SZ /d Hide /f
reg add "HKEY_LOCAL_MACHINE\SOFTWARE\Wow6432Node\Microsoft\Windows\CurrentVersion\Explorer\FolderDescriptions\{f42ee2d3-909f-4907-8871-4c22fc0bf756}\PropertyBag" /v ThisPCPolicy /t REG_SZ /d Hide /f
echo Downloads
reg add "HKEY_LOCAL_MACHINE\SOFTWARE\Microsoft\Windows\CurrentVersion\Explorer\FolderDescriptions\{7d83ee9b-2244-4e70-b1f5-5393042af1e4}\PropertyBag" /v ThisPCPolicy /t REG_SZ /d Hide /f
reg add "HKEY_LOCAL_MACHINE\SOFTWARE\Wow6432Node\Microsoft\Windows\CurrentVersion\Explorer\FolderDescriptions\{7d83ee9b-2244-4e70-b1f5-5393042af1e4}\PropertyBag" /v ThisPCPolicy /t REG_SZ /d Hide /f
echo Images
reg add "HKEY_LOCAL_MACHINE\SOFTWARE\Microsoft\Windows\CurrentVersion\Explorer\FolderDescriptions\{0ddd015d-b06c-45d5-8c4c-f59713854639}\PropertyBag" /v ThisPCPolicy /t REG_SZ /d Hide /f
reg add "HKEY_LOCAL_MACHINE\SOFTWARE\Wow6432Node\Microsoft\Windows\CurrentVersion\Explorer\FolderDescriptions\{0ddd015d-b06c-45d5-8c4c-f59713854639}\PropertyBag" /v ThisPCPolicy /t REG_SZ /d Hide /f
echo Music
reg add "HKEY_LOCAL_MACHINE\SOFTWARE\Microsoft\Windows\CurrentVersion\Explorer\FolderDescriptions\{a0c69a99-21c8-4671-8703-7934162fcf1d}\PropertyBag" /v ThisPCPolicy /t REG_SZ /d Hide /f
reg add "HKEY_LOCAL_MACHINE\SOFTWARE\Wow6432Node\Microsoft\Windows\CurrentVersion\Explorer\FolderDescriptions\{a0c69a99-21c8-4671-8703-7934162fcf1d}\PropertyBag" /v ThisPCPolicy /t REG_SZ /d Hide /f
echo Desktop
reg add "HKEY_LOCAL_MACHINE\SOFTWARE\Microsoft\Windows\CurrentVersion\Explorer\FolderDescriptions\{B4BFCC3A-DB2C-424C-B029-7FE99A87C641}\PropertyBag" /v ThisPCPolicy /t REG_SZ /d Hide /f
reg add "HKEY_LOCAL_MACHINE\SOFTWARE\Wow6432Node\Microsoft\Windows\CurrentVersion\Explorer\FolderDescriptions\{B4BFCC3A-DB2C-424C-B029-7FE99A87C641}\PropertyBag" /v ThisPCPolicy /t REG_SZ /d Hide /f
taskkill /F /IM explorer.exe
start explorer.exe
pause
Clean Taskbar
Edit Taskbar:
%UserProfile%\AppData\Roaming\Microsoft\Internet Explorer\Quick Launch\User Pinned\TaskBar
echo "Disable Meet Now"
reg add "HKEY_CURRENT_USER\Software\Microsoft\Windows\CurrentVersion\Policies\Explorer" /v HideSCAMeetNow /t REG_DWORD /d 1 /f
reg add "HKEY_LOCAL_MACHINE\SOFTWARE\Microsoft\Windows\CurrentVersion\Policies\Explorer" /v HideSCAMeetNow /t REG_DWORD /d 1 /f
echo "Disable People"
reg add "HKEY_LOCAL_MACHINE\SOFTWARE\Policies\Microsoft\Windows\Explorer" /v HidePeopleBar /t REG_DWORD /d 1 /f
reg add "HKEY_CURRENT_USER\Software\Policies\Microsoft\Windows\Explorer" /v HidePeopleBar /t REG_DWORD /d 1 /f
echo "Hide People"
reg add "HKEY_LOCAL_MACHINE\SOFTWARE\Microsoft\Windows\CurrentVersion\Explorer\Advanced\People" /v PeopleBand /t REG_DWORD /d 0 /f
echo "Disable Weather, News and Interests on taskbar"
reg add "HKEY_LOCAL_MACHINE\SOFTWARE\Policies\Microsoft\Windows\Windows Feeds" /v EnableFeeds /t REG_DWORD /d 0 /f
echo "Hide Weather, News and Interests on taskbar"
reg add "HKEY_LOCAL_MACHINE\SOFTWARE\Microsoft\Windows\CurrentVersion\Feeds" /v ShellFeedsTaskbarViewMode /t REG_DWORD /d 2 /f
pause
Clean Settings
reg add "HKEY_LOCAL_MACHINE\SOFTWARE\Microsoft\Windows\CurrentVersion\Policies\Explorer" /v AllowOnlineTips /t REG_DWORD /d 0 /f
pause
Edit StartMenu
StartMenu Global:
C:\ProgramData\Microsoft\Windows\Start Menu\Programs
StartMenu Local:
%UserProfile%\AppData\Roaming\Microsoft\Windows\Start Menu\Programs
Fix StartMenu (Does not open?)
Get-AppxPackage Microsoft.Windows.ShellExperienceHost | foreach {Add-AppxPackage -register "$($_. InstallLocation)\appxmanifest.xml" -DisableDevelopmentMode}
ℹ Adding App to the Context Menu
reg add "HKEY_CLASSES_ROOT\Directory\Background\shell\VScode" /ve /d "&VScode" /f
reg add "HKEY_CLASSES_ROOT\Directory\Background\shell\VScode\command" /ve /d "D:\Apps\VSCode\code.exe" /f
pause
ℹ Time Cascading Context Menu
reg add "HKEY_CURRENT_USER\Control Panel\Desktop" /v MenuShowDelay /t REG_SZ /d 101 /f
pause
⏸ Disable / enable Input Switch
Download: https://github.com/awesome-windows11/windows11/blob/main/archive/InputSwitch.zip
🎨 Icons
Пак всех иконок из Windows 11
shell32.dll — оригинальный файл из папки System32 в Windows 11
🛠 Apps
Remove and Disable Windows PC Health Check
reg add "HKEY_LOCAL_MACHINE\SOFTWARE\Microsoft\PCHC" /v PreviousUninstall /t REG_DWORD /d 1 /f
reg add "HKEY_LOCAL_MACHINE\SOFTWARE\Microsoft\PCHealthCheck" /v installed /t REG_DWORD /d 1 /f
Restore Microsoft Store Apps
WindowsStore
Get-AppXPackage *WindowsStore* -AllUsers | Foreach {Add-AppxPackage -DisableDevelopmentMode -Register “$($_.InstallLocation)\AppXManifest.xml”}
OR
AppInstaller (winget)
Get-AppXPackage *AppInstaller* -AllUsers | Foreach {Add-AppxPackage -DisableDevelopmentMode -Register “$($_.InstallLocation)\AppXManifest.xml”}
WindowsTerminal
Get-AppXPackage *WindowsTerminal* -AllUsers | Foreach {Add-AppxPackage -DisableDevelopmentMode -Register “$($_.InstallLocation)\AppXManifest.xml”}
Notepad
Get-AppXPackage *Notepad* -AllUsers | Foreach {Add-AppxPackage -DisableDevelopmentMode -Register “$($_.InstallLocation)\AppXManifest.xml”}
Gadgets
Get-AppXPackage *Windows.Client.WebExperience* -AllUsers | Foreach {Add-AppxPackage -DisableDevelopmentMode -Register “$($_.InstallLocation)\AppXManifest.xml”}
Remove Microsoft Store Apps
WindowsPhone
Get-AppxPackage *YourPhone* | Remove-AppxPackage
Get-AppxPackage -allusers *YourPhone* | Remove-AppxPackage
Get-AppxProvisionedPackage -online | where-object {$_.packagename -like "*YourPhone*"} | Remove-AppxProvisionedPackage -online
AppInstaller (winget)
Get-AppxPackage *AppInstaller* | Remove-AppxPackage
Get-AppxPackage -allusers *AppInstaller* | Remove-AppxPackage
Get-AppxProvisionedPackage -online | where-object {$_.packagename -like "*AppInstaller*"} | Remove-AppxProvisionedPackage -online
WindowsTerminal
Get-AppxPackage *WindowsTerminal* | Remove-AppxPackage
Get-AppxPackage -allusers *WindowsTerminal* | Remove-AppxPackage
Get-AppxProvisionedPackage -online | where-object {$_.packagename -like "*WindowsTerminal*"} | Remove-AppxProvisionedPackage -online
Notepad
Get-AppxPackage *Notepad* | Remove-AppxPackage
Get-AppxPackage -allusers *Notepad* | Remove-AppxPackage
Get-AppxProvisionedPackage -online | where-object {$_.packagename -like "*Notepad*"} | Remove-AppxProvisionedPackage -online
Gadgets
Get-AppxPackage *Windows.Client.WebExperience* | Remove-AppxPackage
Get-AppxPackage -allusers *Windows.Client.WebExperience* | Remove-AppxPackage
Get-AppxProvisionedPackage -online | where-object {$_.packagename -like "*Windows.Client.WebExperience*"} | Remove-AppxProvisionedPackage -online
Remove ALL Microsoft Store Apps (NOT Microsoft Store)
Get-AppxPackage -AllUsers | where-object {$_.name -notlike "*store*"} | Remove-AppxPackage
Remove ALL Microsoft Store Apps
Get-AppxPackage | Remove-AppxPackage
Remove / Disable Microsoft Edge
⚠ This tweak simply disables the ability to create an Edge profile date, which is the safest thing to do!
rm $Env:USERPROFILE/AppData/Local/Microsoft/Edge
# rm $Env:USERPROFILE/AppData/Local/Microsoft/EdgeBho
rm $Env:USERPROFILE/AppData/Local/Microsoft/EdgeUpdater
$TempInstallerPath="$Env:USERPROFILE\AppData\Local\Microsoft"
New-Item -ItemType File -Path "$TempInstallerPath\Edge"
# New-Item -ItemType File -Path "$TempInstallerPath\EdgeBho"
New-Item -ItemType File -Path "$TempInstallerPath\EdgeUpdater"
⚠ This tweak is the most secure and does not break updates
reg add "HKEY_CURRENT_USER\Software\Microsoft\Windows\CurrentVersion\Policies\Explorer\DisallowRun" /v "1" /d "msedge.exe" /f
⚠ DANGEROUS: THE TWEAK WILL BREAK NEW UPDATES AND FEATURE INSTALLATIONS!
We do not recommend deleting the browser for the correct operation of the system!
https://github.com/awesome-windows11/windows11/blob/main/archive/remove_edge.bat

Change Default Browser
The code is in the process of being written
Source: https://kolbi.cz/blog/2019/01/27/register-a-portable-browser-and-make-it-the-default/
Open tg:// Telegram Portable
reg add "HKEY_CURRENT_USER\SOFTWARE\Classes\tdesktop.tg\shell\open\command" /ve /d ""G:\Apps\Telegram\Telegram.exe" -workdir "G:/Apps/Telegram/" -- "%1"" /f
pause
VsCode Default Editor
⚠ Change the editor path to your own! (default path:
D:\Apps\Editors\VSCode)
# "Default Path: E:\VSCode"
# "https://medium.com/@fawwazyusran/create-a-portable-ide-with-visual-studio-code-fb0c6bc198ef"

reg add "HKEY_CLASSES_ROOT\*\shell\Custom\shell\VsCode" /ve /d "Edit with VSCode" /f
reg add "HKEY_CLASSES_ROOT\*\shell\Custom\shell\VsCode" /v Icon /d "D:\Apps\Editors\VSCode\Code.exe,0" /f
reg add "HKEY_CLASSES_ROOT\*\shell\Custom\shell\VsCode\command" /ve /d "\"D:\Apps\Editors\VSCode\Code.exe\" "\"%1\" /f

# "This will make it appear when you right click ON a folder"
# "The "Icon" line can be removed if you don't want the icon to appear"

reg add "HKEY_CLASSES_ROOT\Directory\shell\vscode" /ve /d "Open Folder as VS Code Project" /f
reg add "HKEY_CLASSES_ROOT\Directory\shell\vscode" /v Icon /d "D:\Apps\Editors\VSCode\Code.exe,0" /f
reg add "HKEY_CLASSES_ROOT\Directory\shell\vscode\command" /ve /d "\"D:\Apps\Editors\VSCode\Code.exe\" "\"%1\" /f

# "This will make it appear when you right click INSIDE a folder"
# "The Icon line can be removed if you don't want the icon to appear"

reg add "HKEY_CLASSES_ROOT\Directory\Background\shell\vscode" /ve /d "Open Folder in VS Code Project" /f
reg add "HKEY_CLASSES_ROOT\Directory\shell\vscode" /v Icon /d "D:\Apps\Editors\VSCode\Code.exe,0" /f
reg add "HKEY_CLASSES_ROOT\Directory\Background\shell\vscode\command" /ve /d "\"D:\Apps\Editors\VSCode\Code.exe\" "\"%V\" /f
📜 Policies
Disable Windows Defender
Source: https://admx.help/HKLM/Software/Policies
⚠ Install before use gsudo!
# "Disable Windows Defender"
reg add "HKEY_LOCAL_MACHINE\SOFTWARE\Policies\Microsoft\Windows Defender" /v DisableAntiSpyware /t REG_DWORD /d 1 /f
reg add "HKEY_LOCAL_MACHINE\SOFTWARE\Policies\Microsoft\Windows Defender" /v DisableRealtimeMonitoring /t REG_DWORD /d 1 /f
reg add "HKEY_LOCAL_MACHINE\SOFTWARE\Policies\Microsoft\Windows Defender" /v DisableAntiVirus /t REG_DWORD /d 1 /f
reg add "HKEY_LOCAL_MACHINE\SOFTWARE\Policies\Microsoft\Windows Defender" /v DisableSpecialRunningModes /t REG_DWORD /d 1 /f
reg add "HKEY_LOCAL_MACHINE\SOFTWARE\Policies\Microsoft\Windows Defender" /v DisableRoutinelyTakingAction /t REG_DWORD /d 1 /f
reg add "HKEY_LOCAL_MACHINE\SOFTWARE\Policies\Microsoft\Windows Defender" /v ServiceKeepAlive /t REG_DWORD /d 0 /f
# Turn off real-time protection (Disable VirusNotification)
reg add "HKEY_LOCAL_MACHINE\SOFTWARE\Policies\Microsoft\Windows Defender\Real-Time Protection" /v DisableRealtimeMonitoring /t REG_DWORD /d 1 /f
# "Disable RealTimeProtection"
reg add "HKEY_LOCAL_MACHINE\SOFTWARE\Policies\Microsoft\Windows Defender\Real-Time Protection" /v DisableBehaviorMonitoring /t REG_DWORD /d 1 /f
# "Disable AccessProtection"
reg add "HKEY_LOCAL_MACHINE\SOFTWARE\Policies\Microsoft\Windows Defender\Real-Time Protection" /v DisableOnAccessProtection /t REG_DWORD /d 1 /f
# "Disable ScanProcess"
reg add "HKEY_LOCAL_MACHINE\SOFTWARE\Policies\Microsoft\Windows Defender\Real-Time Protection" /v DisableScanOnRealtimeEnable /t REG_DWORD /d 1 /f
# "Disable ScanDownloadFiles"
reg add "HKEY_LOCAL_MACHINE\SOFTWARE\Policies\Microsoft\Windows Defender\Real-Time Protection" /v DisableIOAVProtection /t REG_DWORD /d 1 /f
# "Disable AppControl (Windows Store)"
reg add "HKEY_LOCAL_MACHINE\SOFTWARE\Policies\Microsoft\Windows Defender\SmartScreen" /v ConfigureAppInstallControlEnabled /t REG_DWORD /d 0 /f
reg add "HKEY_LOCAL_MACHINE\SOFTWARE\Policies\Microsoft\Windows Defender\Signature Updates" /v ForceUpdateFromMU /t REG_DWORD /d 0 /f
reg add "HKEY_LOCAL_MACHINE\SOFTWARE\Policies\Microsoft\Windows Defender\Spynet" /v DisableBlockAtFirstSeen /t REG_DWORD /d 1 /f
# "Disable automatic sample submission and Spynet community membership"
reg add "HKEY_LOCAL_MACHINE\SOFTWARE\Policies\Microsoft\Windows Defender\Spynet" /v SubmitSamplesConsent /t REG_DWORD /d 2 /f
reg add "HKEY_LOCAL_MACHINE\SOFTWARE\Policies\Microsoft\Windows Defender\Spynet" /v SpynetReporting /t REG_DWORD /d 0 /f
# "Disable TamperProtection"
reg add "HKEY_LOCAL_MACHINE\SOFTWARE\Microsoft\Windows Defender\Features" /v TamperProtection /t REG_DWORD /d 0 /f
reg add "HKEY_LOCAL_MACHINE\SOFTWARE\Microsoft\Windows Defender" /v ServiceStartStates /t REG_DWORD /d 1 /f
reg add "HKEY_LOCAL_MACHINE\SOFTWARE\Microsoft\Windows Defender" /v DisableAntiSpyware /t REG_DWORD /d 1 /f
reg add "HKEY_LOCAL_MACHINE\SOFTWARE\Microsoft\Windows Defender" /v DisableAntiVirus /t REG_DWORD /d 1 /f
pause
Optional settings:
# Windows Defender Advanced Threat Protection
sc config WinDefend start=disabled >nul && net stop WinDefend >nul
sc config SecurityHealthService start=disabled >nul
sc config Sense start=disabled >nul
sc config WdNisDrv start=disabled >nul
sc config WdNisSvc start=disabled >nul
reg delete "HKLM\SOFTWARE\Microsoft\Windows\CurrentVersion\Run" /v "SecurityHealth" /f

# Служба которая висит в трее панели задач (значок защитника), отключение убивает UI защитника
reg add "HKEY_LOCAL_MACHINE\SYSTEM\CurrentControlSet\Services\SecurityHealthService" /v Start /t REG_DWORD /d 4 /f
# Служба которая сканирует файлы и убивает HDD, само тело службы защитника
reg add "HKEY_LOCAL_MACHINE\SYSTEM\CurrentControlSet\Services\WinDefend" /v Start /t REG_DWORD /d 4 /f
reg add "HKEY_LOCAL_MACHINE\SOFTWARE\Policies\Microsoft\Windows Defender\Real-Time Protection" /v DisableRealtimeMonitoring /t REG_DWORD /d 1 /f

reg add "HKLM\SOFTWARE\Policies\Microsoft\MRT" /v DontOfferThroughWUA /t REG_DWORD /d 1 /f
reg add "HKLM\SOFTWARE\Policies\Microsoft\MRT" /v DontReportInfectionInformation /t REG_DWORD /d 1 /f
pause
Disable Windows Update
⚠ Install before use gsudo!
# Disable system upgrades to new versions (e.g. 22H2)
reg add "HKEY_LOCAL_MACHINE\SOFTWARE\Policies\Microsoft\Windows\WindowsUpdate" /v DisableOSUpgrade /t REG_DWORD /d 1 /f
# Remove access to use all Windows Update features (disable Scanning, Downloading and Installing)
reg add "HKEY_LOCAL_MACHINE\SOFTWARE\Policies\Microsoft\Windows\WindowsUpdate" /v SetDisableUXWUAccess /t REG_DWORD /d 1 /f
# Disable AutoUpdate (MAIN FUNCTION!)
reg add "HKEY_LOCAL_MACHINE\SOFTWARE\Policies\Microsoft\Windows\WindowsUpdate\AU" /v NoAutoUpdate /t REG_DWORD /d 1 /f
# Enable Notification Update (requires clarification!)
# https://learn.microsoft.com/en-us/windows/deployment/update/waas-wu-settings
reg add "HKEY_LOCAL_MACHINE\SOFTWARE\Policies\Microsoft\Windows\WindowsUpdate\AU" /v AUOptions /t REG_DWORD /d 1 /f
# Scheduled Every Day (only AUOptions = 4!)
reg add "HKEY_LOCAL_MACHINE\SOFTWARE\Policies\Microsoft\Windows\WindowsUpdate\AU" /v ScheduledInstallDay /t REG_DWORD /d 0 /f
# Scheduled Time Hour (0 -> 23)
reg add "HKEY_LOCAL_MACHINE\SOFTWARE\Policies\Microsoft\Windows\WindowsUpdate\AU" /v ScheduledInstallTime /t REG_DWORD /d 3 /f
# Disable AutoInstall Drivers
reg add "HKEY_LOCAL_MACHINE\SOFTWARE\Microsoft\Windows\CurrentVersion\DriverSearching" /v SearchOrderConfig /t REG_DWORD /d 0 /f
pause
Disable Apps Microsoft Store AutoUpdate and Force Install
# "Disable AutoUpdate Apps Microsoft Store"
reg add "HKEY_LOCAL_MACHINE\SOFTWARE\Policies\Microsoft\Windows\CloudContent" /v DisableWindowsConsumerFeatures /t REG_DWORD /d 1 /f
# "Block the automatic installation of suggested Windows 10 apps"
reg add "HKEY_CURRENT_USER\Software\Microsoft\Windows\CurrentVersion\ContentDeliveryManager" /v SilentInstalledAppsEnabled /t REG_DWORD /d 0 /f
# "Disable Showing App Suggestions in Start in Windows 10 (settings app)"
reg add "HKEY_CURRENT_USER\SOFTWARE\Microsoft\Windows\CurrentVersion\ContentDeliveryManager" /v SubscribedContent-338388Enabled /t REG_DWORD /d 0 /f
# "Disable OEM Apps"
reg add "HKEY_CURRENT_USER\SOFTWARE\Microsoft\Windows\CurrentVersion\ContentDeliveryManager" /v OemPreInstalledAppsEnabled /t REG_DWORD /d 0 /f
# "Disable Promotional Apps"
reg add "HKEY_CURRENT_USER\SOFTWARE\Microsoft\Windows\CurrentVersion\ContentDeliveryManager" /v PreInstalledAppsEnabled /t REG_DWORD /d 0 /f
pause
Disable Cortana
# "Disable Cloud Search"
reg add "HKEY_LOCAL_MACHINE\SOFTWARE\Policies\Microsoft\Windows\Windows Search" /v AllowCloudSearch /t REG_DWORD /d 0 /f
# "Disable Cortana"
reg add "HKEY_LOCAL_MACHINE\SOFTWARE\Policies\Microsoft\Windows\Windows Search" /v AllowCortana /t REG_DWORD /d 0 /f
# "Disable Cortana LockScreen"
reg add "HKEY_LOCAL_MACHINE\SOFTWARE\Policies\Microsoft\Windows\Windows Search" /v AllowCortanaAboveLock /t REG_DWORD /d 0 /f
# "Disable Cortana"
reg add "HKEY_CURRENT_USER\Software\Microsoft\Windows\CurrentVersion\Search" /v CortanaEnabled /t REG_DWORD /d 0 /f
# "Disable Cortana"
reg add "HKEY_CURRENT_USER\Software\Microsoft\Windows\CurrentVersion\Search" /v CortanaConsent /t REG_DWORD /d 0 /f
pause
Microsoft Edge Lite (NOT Sync Microsoft Account)
reg add "HKEY_LOCAL_MACHINE\SOFTWARE\Policies\Microsoft\Edge" /v SyncDisabled /t REG_DWORD /d 1 /f
reg add "HKEY_LOCAL_MACHINE\SOFTWARE\Policies\Microsoft\Edge" /v BrowserSignin /t REG_DWORD /d 0 /f
reg add "HKEY_LOCAL_MACHINE\SOFTWARE\Policies\Microsoft\Edge" /v NewSmartScreenLibraryEnabled /t REG_DWORD /d 0 /f
reg add "HKEY_LOCAL_MACHINE\SOFTWARE\Policies\Microsoft\Edge" /v SmartScreenEnabled /t REG_DWORD /d 0 /f
reg add "HKEY_LOCAL_MACHINE\SOFTWARE\Policies\Microsoft\Edge" /v SmartScreenPuaEnabled /t REG_DWORD /d 0 /f
reg add "HKEY_LOCAL_MACHINE\SOFTWARE\Policies\Microsoft\Edge" /v StartupBoostEnabled /t REG_DWORD /d 0 /f
reg add "HKEY_LOCAL_MACHINE\SOFTWARE\Policies\Microsoft\Edge" /v BingAdsSuppression /t REG_DWORD /d 1 /f
reg add "HKEY_LOCAL_MACHINE\SOFTWARE\Policies\Microsoft\Edge" /v BackgroundModeEnabled /t REG_DWORD /d 0 /f
reg add "HKEY_LOCAL_MACHINE\SOFTWARE\Policies\Microsoft\Edge" /v ComponentUpdatesEnabled /t REG_DWORD /d 0 /f
reg add "HKEY_LOCAL_MACHINE\SOFTWARE\Policies\Microsoft\Edge" /v EdgeShoppingAssistantEnabled /t REG_DWORD /d 0 /f
reg add "HKEY_LOCAL_MACHINE\SOFTWARE\Policies\Microsoft\Edge" /v ForceGoogleSafeSearch /t REG_DWORD /d 1 /f
reg add "HKEY_LOCAL_MACHINE\SOFTWARE\Policies\Microsoft\Edge" /v MAUEnabled /t REG_DWORD /d 0 /f
reg add "HKEY_LOCAL_MACHINE\SOFTWARE\Policies\Microsoft\EdgeUpdate" /v AutoUpdateCheckPeriodMinutes /t REG_DWORD /d 0 /f
reg add "HKEY_LOCAL_MACHINE\SOFTWARE\Policies\Microsoft\EdgeUpdate" /v UpdateDefault /t REG_DWORD /d 0 /f
reg add "HKEY_LOCAL_MACHINE\SOFTWARE\Policies\Microsoft\EdgeUpdate" /v UpdatePolicy /t REG_DWORD /d 0 /f
reg add "HKEY_LOCAL_MACHINE\SOFTWARE\Policies\Microsoft\EdgeUpdate" /v DoNotUpdateToEdgeWithChromium /t REG_DWORD /d 1 /f
pause
Chrome Lite (NOT Security, etc.)
https://github.com/awesome-windows11/chrome
Firefox Lite (NOT Sync Account, Pocket, etc.)
https://github.com/awesome-windows11/firefox#-policiesjson
Win11
Switch Explorer (Restore The Ribbon)
> ⚠ This feature has been [removed](https://www.winhelponline.com/blog/get-back-windows-10-ribbon-ui-windows-11/) in Windows 22H2!

New Explorer (Win11)
reg delete "HKCU\Software\Classes\CLSID\{d93ed569-3b3e-4bff-8355-3c44f6a52bb5}" /f
taskkill /F /IM explorer.exe
start explorer.exe
Old Explorer (Win10)
reg add "HKCU\Software\Classes\CLSID\{d93ed569-3b3e-4bff-8355-3c44f6a52bb5}\InprocServer32" /f /ve
taskkill /F /IM explorer.exe
start explorer.exe
Switch Context Menu (New, old)


New Menu (Win11)
reg delete "HKCU\Software\Classes\CLSID\{86ca1aa0-34aa-4e8b-a509-50c905bae2a2}" /f
taskkill /F /IM explorer.exe
start explorer.exe
Old menu (Win10)
reg add "HKCU\Software\Classes\CLSID\{86ca1aa0-34aa-4e8b-a509-50c905bae2a2}\InprocServer32" /f /ve
taskkill /F /IM explorer.exe
start explorer.exe
TaskBar Size (Small, medium, big)


Small TaskBar
reg add "HKCU\Software\Microsoft\Windows\CurrentVersion\Explorer\Advanced" /v TaskbarSi /t REG_DWORD /d 0 /f
taskkill /F /IM explorer.exe
start explorer.exe
Medium TaskBar
reg add "HKCU\Software\Microsoft\Windows\CurrentVersion\Explorer\Advanced" /v TaskbarSi /t REG_DWORD /d 1 /f
taskkill /F /IM explorer.exe
start explorer.exe
Big TaskBar
reg add "HKCU\Software\Microsoft\Windows\CurrentVersion\Explorer\Advanced" /v TaskbarSi /t REG_DWORD /d 2 /f
taskkill /F /IM explorer.exe
start explorer.exe
TaskBar Layout (Top, bottom)

Change the location of the taskbar
Up TaskBar ⬆
reg add "HKEY_CURRENT_USER\Software\Microsoft\Windows\CurrentVersion\Explorer\StuckRects3" /v Settings /t REG_BINARY /d 30000000feffffff0200000001000000300000002000000000000000c203000080070000e20300006000000001000000 /f
Down TaskBar ⬇
reg add "HKEY_CURRENT_USER\Software\Microsoft\Windows\CurrentVersion\Explorer\StuckRects3" /v Settings /t REG_BINARY /d 30000000feffffff0200000003000000300000002000000000000000c203000080070000e20300006000000001000000 /f
Left TaskBar ⬅
Warning
Causes bugs, do not use!
reg add "HKEY_CURRENT_USER\Software\Microsoft\Windows\CurrentVersion\Explorer\StuckRects3" /v Settings /t REG_BINARY /d 30000000feffffff0200000000000000300000002000000000000000c203000080070000e20300006000000001000000 /f
Right TaskBar ➡
Warning
Causes bugs, do not use!
reg add "HKEY_CURRENT_USER\Software\Microsoft\Windows\CurrentVersion\Explorer\StuckRects3" /v Settings /t REG_BINARY /d 30000000feffffff0200000002000000300000002000000000000000c203000080070000e20300006000000001000000 /f
🔗 Links
Реестр проводника:
- http://www.rusdoc.ru/material/os/win/reestr.shtml
- https://ss64.com/nt/syntax-reghacks.html
- http://centaz.narod.ru/winwork2.html
Памятка по командной строке (cmd.exe):
- https://ab57.ru/cmdlist.html
- https://renenyffenegger.ch/notes/Windows
- https://admx.help
Stats

Windows 11 Tweaks — Build 22621.1778
Disclaimer
Let’s be honest, Windows has become a mammoth of an OS that is generically geared toward everyone. My goal with this set of scripts is to put the User back in control of the OS. That said, these scripts have been heavily customized to my own personal needs, it is highly recommended that if you are to use them you review them in their entirety first.
🚧 WARNING
This repository is provided for archival/educational purposes, I am not responsible for any data loss or
damage that may ensue.
- Introduction
- Features
- Configuration
- Windows 11 Tweaks Guide
- Installation
- Windows Update
- Windows Defender (optional)
- Download Win11Tweaks
- Anti-Virus (optional)
- Running Win11Tweaks
- Microsoft Edge Removal (optional)
- Anti-Virus Removal (optional)
- Configuring Windows
- OpenShell
- Brave
- Firewall
- Chocolatey
- Everything
- CCleaner
- MSEdgeRedirect
- Further Setup
- Attribution
Introduction
This script is meant to be utilized immediately after a fresh installation of Windows 11. Before the script can be run, Windows itself needs to be installed properly. The following will walk you through setting up Windows 11 with a local user account.
Features
This set of scripts attempts to maintain a vanilla appearance while gutting most of the unneeded and/or unwanted items from the operating system. Privacy is another focus and as such any call home or telemetry functions have been disabled or out-right removed.
-
Microsoft Bloat Removed
-
Microsoft Telemetry/Tracking Stripped
-
(Optional) Microsoft Edge Completed Removed
-
(Optional) Windows Defender Completed Removed
-
Chocolatey Package Manger, manage packages like a Linux system
-
MSYS2 is used for a Linux terminal
-
Git for Windows directly integrated into MSYS2, this uses the faster native version of Git with the added benefit of being able to use the default MSYS2 package manager
pacman1 -
YubiKey Ready! 2
-
(Optional) GPG and SSH key forwarding over SSH
-
Many Visual Changes!
-
Start Menu shifted back to the left
-
Original Windows right-click menu restored
-
OpenShell is used for a customizable start menu experience
-
Configuration
While not required, in order to personalize your installation, it is recommended to edit user_settings.ps1. Use any text editor or regular old Notepad to edit the file. This step will need to be done before the script can be run on a fresh installation. However, as Win11Tweaks can be baked into an installation to be run automatically, I have added this section up near the top so it does not get skipped over.
📌 NOTE
By default this file contains all of my own personal settings. At the very least you should change the Git
Email, GPG Public Key and then review over the list of software that Chocolatey is going to be installing.

Windows 11 Tweaks Guide
Installation
While this can be used with any version of Windows 11, this guide revolves around Windows 11 Pro N. In order to bypass the Microsoft Account requirements it is advised that you pull your network cable until Windows 11 is fully installed.
❗ DO NOT SKIP ❗
If you do not plan on pulling your network cable you will be forced into logging in with a Microsoft
Account.

After installing Windows to the selected hard drive you will be prompted to reboot the computer. Upon completion, press SHIFT+F10 to bring up a command prompt window.

Run oobe\bypassnro in the command prompt window, this will reboot the machine automatically and then return you to the region selection window.

Begin by selecting a region and keyboard (and a secondary keyboard layout if necessary).

Windows will now prompt you about having no internet connection, select I don't have internet.

It will double check that you are sure about using an offline account, select Continue with limited setup.

Set your desired username.

Set and confirm your password.

Fill in the three security questions.

Finally on the privacy settings screen, make sure you deselect every single option (scroll down for more options). Only after you have turned off all of Microsoft’s tracking should you select Accept to complete the Windows 11 configuration.

Windows Update
Eventually you will be able to login and will then be presented with the desktop.
📌NOTE
Now would be an acceptable time to plug your network cable back in.
Right-click on the Start Menu icon (bottom center of screen, left most icon). From here you will want to select Settings.

Navigate to Windows Update.

From here update Windows, you need to continue to check for updates after every update until Windows tells you that You're up to date.

Don’t forget to also install optional updates as these tend to contain drivers, these have been moved inside Advanced options.

This will most likely require a reboot or a few. Once complete open the Windows Store from the taskbar (the briefcase with the Windows logo on it). Open the Library from the bottom left of the app.

Select Get updates in the upper right corner of the window.

Verify that you have performed all updates by the store telling you You're good to go.

At this point (if it has not been done already) activate Windows.
With the computer updated and activated it is now time to download the script. Download the latest version of Win11Tweaks. Extract the contents of the ZIP file to the Desktop, this should place a folder win11tweak on the Desktop.
Windows Defender (optional)
📌 NOTE
If you choose to keep Windows Defender installed, the script used to remove it 'defender.ps1' will get
flagged by Defender itself, this is normal behavior.
🚧 WARNING
Removal of Windows Defender WILL break the ability to use Windows Update!
Before the main script can be run Windows Defender needs to be disabled along with tamper protection.
Select the Security Center icon in the system tray and navigate to the security dashboard.

Navigate to Virus & threat protection and select Manage settings.

Turn off Real-time protection, Cloud-delivered protection, Automatic sample submission and Tamper Protection inside of Virus & threat protection settings.

Download Win11Tweaks
Right-click on the Start Menu icon and select Terminal (Admin). Run the following command in PowerShell.
iex ((New-Object System.Net.WebClient).DownloadString('https://github.com/kyaulabs/win11tweak/raw/master/Modules/download.ps1'))

This will download a copy of Win11Tweaks and place it on your desktop. You can then close out of Windows Terminal.
Anti-Virus (optional)
Run download_av.cmd inside of the win11tweak folder on the desktop.

This will download Adaware Antivirus to your desktop, then run the installer Adaware.exe. Select Install to install Adaware.

When asked if you want an extra layer of protection, select NO THANKS.

Once installation is finished, feel free to delete the Adaware.exe on your desktop. If by chance MSEdge pops up with incoherent text, go to the Task Manager by right-clicking on the Start Menu and selecting Task Manager. Find Microsoft Edge and expand it to find Browser, right-click on this and choose End task.

Given a bit of time Adaware should finish its initial scan and present you with a screen similar to the following.

Close out of Adaware.
📌 NOTE
Installation of a 3rd party Anti-Virus product has been added in order to get Windows Defender to disable
itself. Without this step you will be unable to completely remove Windows Defender from Windows 11.
Running Win11Tweaks
Assuming the scripts have been extracted to your Desktop… Open the start menu and search for cmd, this should bring up the listing for Command Prompt. Make sure you choose the option on the right Run as administrator.
🚧 WARNING
Do not simply run the script from Windows Explorer, this will fail and/or produce unintentional results.

Change directory into the extracted folder cd %USERPROFILE%\Desktop\win11tweak.
Finally run the script using main.cmd.

The script will take quite a while to finish.
Upon completion it will reboot automatically. After the reboot the last part of the script will run automatically after login and then remove itself (via scheduled task).
Microsoft Edge Removal (optional)
If chosen, at some point it will ask you to uninstall the two Microsoft Edge components. If this happens you will be presented with the following screen, make sure to select Uninstall for both.

❗ DO NOT SKIP ❗
It is possible that the second of which, uninstalling MSEdge itself, will popup two Internet Explorer
errors in the background. These errors will need to be cleared by ALT+TABing and selecting 'OK' before
the script can continue.
Anti-Virus Removal (optional)
Once Win11Tweaks is completely done with all of its scripts, you will be left at the Windows Desktop. If you wish to remove all anti-virus completely, right-click the Start Menu and select Installed apps. Select the three-dot menu to the right of adaware antivirus and choose Uninstall.

Make sure to select SKIP when asked if you want to reenable Windows Defender.

Go ahead and reboot to complete the uninstallation.
Post reboot, if you open Security Center and navigate to Virus & threat protection > Virus & threat protection settings you will see that Windows Defender is completely disabled.

Configuring Windows
Right-click on the desktop and choose Personalize. Navigate to Themes and set the mouse cursor theme to Snow Leopard.

Click Color, change Choose your color to Custom and then the default Windows mode to Dark and the default App mode to Light.

Set the accent color to Manual then click View colors. Selecting More will allow you to set a hex color code. Change it to #131313 (Black) and enable accent color on Start, taskbar, and action center and Title bars and window borders.

OpenShell
OpenShell, which is the continued version of ClassicShell, should be on the desktop with a settings XML file ready for import. Install OpenShell, removing the un-needed modules.
📌 NOTE
After OpenShell is installed you will find example shortcuts for SSH and RDP in the Start Menu under the
KYAU Labs section (feel free to rename to the name of your network).

After installation press the Windows key on your keyboard in order to open the settings dialog for Open-Shell. Click Backup and then Load from an XML file... choosing the provided XML file on the desktop.

📌 NOTE
OpenShell has not yet been fully updated for Windows 11, there are still quite a few bugs/glitches.
If you need to make changes to the Start Menu, enable Show all settings and then navigate to the Customize Start Menu tab.
When finished, select OK in the bottom right to save the changes. It will prompt you to Exit and reload OpenShell. Right-click the Start Menu and choose Exit (maybe twice). Then click the Start Menu and re-launch Open-Shell Menu Settings. Finally, select OK to close settings.
Brave
🚧 WARNING
Naturally this can be replaced with a browser of your choosing, I would recommend you at least give Brave
a try if you have never used it.
Next, install the Brave web browser with the BraveSetup.exe on the desktop which has been pre-downloaded for you. Once open, feel free to click Set Brave as default browser, then Skip importing settings and finally uncheck both telemetry sharing options and select Finish.
Next scroll down a little to bring up the Brave News banner and select No thanks. Then select the 3dots menu for Brave Rewards and select Hide Brave Rewards.
Navigate to the hamburger menu in the upper-right and select Extensions. In the center you should see Find extensions and themes in the Web Store, click on Web Store to continue, this should launch in a separate tab.
Extensions are typical revolve heavily around personal choice, however there are a few extensions that deal with privacy/security that I would recommend to everyone.
- Cookie AutoDelete
- Decentraleyes
- Privacy Badger
Navigate to the hamburger menu again and select Settings. Under Appearance set Brave colors to Dark to force Brave into dark mode.

Then select Always show full URLs and deselect Top sites under Show autocomplete suggestions in address bar.

Under Shields change Trackers & ad blocking to Aggressive.

Under Social media blocking deselect all platforms that you do not use.

Under Privacy and security deselect everything.

Under Search engine swap the Search engine used in the address bar for Normal Window and Private Window to the one of your choice, I recommend DuckDuckGo personally.

Under Extensions deselect WebTorrent if you use an external torrent client, and select Widevine if you plan on using streaming services with this browser.
📌 NOTE
Enabling Widevine DRM will require a restart of Brave, you will be returned to where you left off in
Settings after the restart.

Under Autofill > Passwords deselect Offer to save passwords and Auto Sign-In.

Under Autofill > Payment methods deselect Save and fill payment methods and Allow sites to check if you have payment methods saved.

Under Autofill > Addresses and more deselect Save and fill addresses.

Firewall
In the Utilities section of the Start Menu is simplewall, launch it and allow it to update if needed.

In the Settings menu enable Load on system startup, Start minimized, and Skip "User Account Control" prompt warning.

In the Blocklist menu enable Microsoft update by selecting Allow in the sub-menu.

Click Enable filters in the toolbar, making sure to uncheck Disable Windows Firewall then again clicking Enable filters in the popup dialog in order to permanently activate simplewall.

📌 NOTE
simplewall can fully replace Windows Firewall however in Windows 11 this will trip the firewall
failure inside of Windows Security (what use to be called Security Center).
Applications will popup asking for internet access, stuff that is required for Windows to function are as follows (it is safe to allow everything in this list):
dashost.exe: wired/wireless device pairingexplorer.exe: typically for SMB of NFS access (network drives)Microsoft Content: part of searchMicrosoft Store: the store uwp appmousocoreworker.exe: Windows update clientmicrosoftedgeupdate.exe: Microsoft Web Browser Updatemsedge.exe: Microsoft Web Browser (if you are using a different one feel free to block this and the update above)mstsc.exe: remote desktop connectionpwsh.exe: PowerShell v7.xsihclient.exe: Windows update background installersimplewall.exe: 3rd party firewallspoolsv.exe: network printingsppextcomobj.exe: KMS connection brokersvchost.exe: Windows service host processSystem: Windows NT kernelsystemsettings.exe: Windows update relatedtaskhostw.exe: scheduled tasks are needed for windows updateusocoreworker.exe: Windows update client
NVIDIA Graphics Cards Allow List:
nvcontainer.exe: NVIDIA display drivernvdisplay.container.exeNVIDIA display drivernvidia geforce experience.exe: NVIDIA display drivernvidia notification.exe: NVIDIA display drivernvidia share.exe: NVIDIA display drivernvidia web helper.exe: NVIDIA display driver
Default Application Allow List:
autoruns.exe: Autoruns VirusTotal scanning capabilitybrave.exe: Web browserbraveupdate.exe: Web browser auto-updaterccenhancer.exe: CCEnhancer downloaderccleaner64.exe: Utilities > CCleanerchocolateygui.exe: Chocolatey GUI is the interface for the package managerheidisql.exe: SQL clientigcmd.exe: ImageGlass image viewer update checkernextcloud.exe: Nextcloud cloud service clientsharex.exe: ShareX screenshot auto uploadingsublime_text.exe: Sublime Text 4 package manager and update checker
Things to block:
ccupdate: CCleaner update checkerdevicecensus.exe: Microsoft telemetrydxdiag.exe: DirectX diagnosticfoxitpdfreader.exe: Foxit PDF Reader (pdf’s themselves do not need internet)foxitpdfreaderupdater.exe: Foxit PDF Reader update checkerkeepassxc.exe: KeePassXC update checkermsiexec.exe: Microsoft Installer (system32 and syswow64)onedrivesetup.exe: if you are not using OneDrivewermgr.exe: Windows error reporting manager (telemetry)Windows Feature Experience Pack: Windows Start Menu ads and telemetry
Past this, things to allow are at your discretion. Generally I won’t allow any installers access to the internet unless they need to download the installation material, and then I give them timed access (only 10 minutes for example). Some things will be easy to choose to allow; like a web browser or email client.
When in doubt, choose the X instead of block and if the program fails to work, re-launch the program and you will be asked again and can this time select allow.
Chocolatey
Launch the package manager Chocolatey GUI from the Start Menu in the Utilities sub-menu. The popup is from simplewall, this is what you will receive anytime a new application tries to access the internet. For Chocolatey GUI we naturally need it to access the internet so selecting Allow is the preferred option here.

Click the settings button in the upper right of the application.

Turn off the options Default to Tile View for Local Source and Default to Tile View for Remote Source, then turn on the option Default to Dark Mode.

Scroll down near the bottom and enable the option Prevent Usage of Update All Button. Closing setting by clicking the round left arrow button to the left of the Settings title.

When updates are detected you will see a new version listed to the right of current versions highlighted with the color red. To update, simple right-click the application and choose Update.

Everything
Everything is a modern replacement for Windows Search with extended functionality. However, always running this in the background is a waste of resources. Open the System Tray and right-click on the Everything icon and select Options.

Disable the settings Start Everything on system startup and Everything Service while enabling Run as administrator and then select OK at the bottom of the window. Select Yes for the UAC popup, finally return to the Everything System Tray icon and select Exit.

CCleaner
Open CCEnhancer under Utilities in the Start Menu. Select Yes for the UAC popup, and Allow for the simplewall popup.
Select Settings at the bottom of the window.

Enable the setting Trim definition file to improve performance and then select Save and Close.

Select Download Latest, when asked to run CCleaner select Yes. Select Allow on the simplewall popup for CCleaner.

Since this is the first time CCleaner has run, select Continue and finally Start CCleaner.
Navigate down to Options and then the sub-tab Settings. Change CCleaner Home Screen to Custom Clean and disable the setting Add "Run CCleaner" option to Recycle Bin context menu.

Navigate to the Smart Cleaning sub-tab and disable all options, selecting Yes for the Are you sure? popup.

Navigate to the Privacy sub-tab and disable all options yet again.

Navigate to the Custom Clean tab and select Analyze. Upon completion of the analysis, select Run Cleaner.
📌 NOTE
You might receive a warning stating that Microsoft OneDrive or some other application needs to be closed in order for CCleaner to continue. Go ahead and select Yes to the popup.

Upon completion you should see Cleaning Complete next to a green checkbox.
Navigate to the Registry tab and select Scan for Issues. Once it has found all the issues, select Review selected Issues....

CCleaner will ask if you want to make a back up of the registry before making changes, since we just installed a fresh copy of Windows this is not necessary, select No. Once the fix window comes up select Fix All Selected Issues and then Close.

Run this process again repeatedly until you keep receiving the same few results left over or a completely clean slate (sometimes this is not possible).
Finally close out of CCleaner.
MSEdgeRedirect
Open MSEdgeRedirect under Utilities in the Start Menu. Select Allow for the simplewall popup.
Change the settings Bing Search, Bing Images and MSN News (ALPHA) to the search engine and news provider of choice, I will be using DuckDuckGo for them all. Then change the MSN Weather setting to your weather provider of choice, I will be using AccuWeather.
Enable the PDF Viewer setting then pull down the drop-down and select Custom, this will open a file dialog box, navigate to %ProgramFiles%\SumatraPDF\SumatraPDF.exe and select Open.
Close the program by selecting Save.

Hover over the weather widget in the taskbar to open the News/Weather Widget window selecting the Settings icon in the upper right (it looks like a blank avatar). Disable the setting Open Widgets board on hover, this will change the icon to require a click in order to show the widget.

Reboot the machine to continue.
Further Setup
Additional setup and software configuration can be found on the Wiki.
Attribution
Without all of the following this guide/script would not have been possible.
- Windows 10 Privacy Guide — 1903 Update
- tweaks & fixes for windows 10 — mostly powershell
- Win10 Initial Setup Script
- Windows TenForums
- Summary of AV Test Results — July 2022
- Flat-Remix Icon Theme
- agave font
- Mixed wallpaper
- openssh-sk-winhello
- Git for Windows inside MSYS2 proper
-
Install Git for Windows inside MSYS2 proper git-for-windows/git ↩
-
This assumes you followed drduh’s YubiKey Guide in order to setup your YubiKey ↩
Вот уже много лет я поддерживаю Sophia Script for Windows, крупнейшего PowerShell-м��дуля на GitHub для тонкой настройки Windows 10 и Windows 11.
После бесконечных правок мы хотим показать вам SophiApp — графический наследних Sophia Script for Windows: бесплатная и полностью опенсорная программа для тонкой настройки Windows 10 и Windows 11.
И все эти время у меня была идея сделать ее графическую версию, чтобы показать пользователям, каким должен быть современный твикер для Windows, какие функции может в себе нести, а главное — посыл программы: настроить (а не оптимизировать) ОС официальным образом, задокументированным Microsoft, ничего не сломав и не обещая мнимое увеличение производительности, чем грешат аналогичные программы, вводя целенаправленно пользователей в заблуждение.
После бесконечных правок мы хотим показать вам SophiApp — графический наследних Sophia Script for Windows: бесплатная и полностью опенсорная программа для тонкой настройки Windows 10 и Windows 11.
К сожалению, она все еще далеко не идеальна, и уже пришло понимание, что нужна версия 2.0 с более современным UI и UX, но первый блин, вроде как, не оказался комом.
Программа все это время делалась на голом энтузиазме, и мы искренне хотим, чтобы пользователи Windows перестали воспринимать так называемые твикеры как что-то по определению вредное, не несущее пользы, а узнали, как можно настроить современные Windows 10 и 11, и что они в себе таят.
И для любителей CLI: скачать всегда самую последнюю версию SophiApp, распаковать, удалить архив и открыть папку с программой автоматически. Просто вставьте команду в PowerShell (можно без прав администратора). Программа не будет автоматически запущена.
irm app.sophi.app -useb | iex
Сделали для вас Inestic и я.
- Динамически отрисовывающийся UI: все элемент НЕ захардкожены;
- Больше 130 твиков;
- SophiApp использует паттерн MVVM;
- Поддержка многопоточности;
- SophiApp проверяется статическим анализатором, лицензию на который предоставили в PVS-Studio (да, я прямо им писал:));
- Все билды компилируются в облаки с использованием GitHub Actions. Вы можете сравнить хэш-сумму архива на странице релиза с хэш-суммой в облачной консоли на шаге «Compress Files», чтобы быть уверенным, что архив не подменялся после релиза (для открытия облачных логов вы должны было залогинены в учетную запись GitHub);
- Приложение отображает текущее состояние каждой функции в UI;
- Описание к функциям;
- Имеет встроенный движок поиска по заголовкам и описанию;
- Программа поддерживает темную и светлую темы. Может менять тему мгновенно в зависимости от выставляемого режима приложений в Windows;
- Настроить конфиденциальность и телеметрию;
- Выключить заданий диагностического характера в Планировщике заданий;
- Настроить UI и персонализацию;
- Правильно и до конца удалить OneDrive, не нарушив целостность ОС;
- Удалить UWP-приложения, отображая локализированные имена пакетов. Список приложений рендерится динамически, используя локальные иконки самих приложений. Ничего не захардкожено;
- Скачать и установить расширение «HEVC Video Extensions from Device Manufacturer» из Microsoft Store с сервера Microsoft, используя парсер от https://store. rg-adguard. net, чтобы появилась возможность открывать файлы формата. heic и. heif;
- Создать задание «Windows Cleanup« по очистке неиспользуемых файлов и обновлений Windows в Планировщике заданий. Перед началом очистки всплывет нативный тост, где вы сможете выбрать отложить ли, отменить или запустить задание;
- Создать задание «SoftwareDistribution» по очистке папок %SystemRoot% \SoftwareDistribution\Download и %TEMP% в Планировщике заданий;
- Настроить безопасность Windows;
- Огромное количество твиков по кастомизации проводника и контекстного меню;
- Все настройки проводятся задокументированными возможностями ОС, что исключает шанс навредить работоспособности системе.
- Windows 10 2004/20H2/21H1/21H2 x64;
- Windows 11 21H2;
- Windows 11 Insider Preview (Beta- и Dev-каналы) (22509+).
- Чтобы запустить SophiApp, вы должны быть единственным вошедшим пользователем с права администратора на ПК
- Правильная работоспособность программы гарантируется лишь в при использовании оригинального образа ОС. SophiApp может не работать на сборках Windows. Особенно если сборка была сделана сборщиками, которые целенаправленно ломают Microsoft Defender и выключает телеметрию, удаляя с корнем системные компоненты. То же касается и сторонних твикеров.
- Необходимы сборки 1151 и 556 (и выше) для Windows 10 и Windows 11 соответственно.
- Некоторые функции зависят от доступа в интернет. При отсутствии последнего соответствующие функции будут скрыты в UI до тех пор, пока не появится доступ;
- Вы можете включить скрытые функции в UI, включив «Расширенные настройки» в Настройках программы. Скрытые функции будут помечены соответствующей шестеренкой;
- После закрытия SophiApp будет автоматически создан лог-файл, который можно прикрепить, если возникла проблема, чтобы помочь нам понять, что пошло не так. Лог-файл не содержит никакую персональную информацию.
При запуске будет проведена проверка на наличие проблем в ОС, о чем пользователь будет уведомлен.
- Некоторые функции зависят от доступа в интернет. При отсутствии последнего соответствующие функции будут скрыты в UI до тех пор, пока не появится доступ;
- Вы можете включить скрытые функции в UI, включив «Расширенные настройки» в Настройках программы. Скрытые функции будут помечены соответствующей шестеренкой;
- После закрытия SophiApp будет автоматически создан лог-файл, который можно прикрепить, если возникла проблема, чтобы помочь нам понять, что пошло не так. Лог-файл не содержит никакую персональную информацию.
Кроме русского, SophiApp переведена носителями на английский, украинский, немецкий и итальянский языки.
Если вам интересны новости ИТ и технологий из первоисточников на английском, можете подписать на мой новостной канал Sophia News, а обсудить их в чате Sophia Chat, где можно задать вопросы по SophiApp, Sophia Script, ПК, ОС, а также попросить написать код для автоматизации чего-либо на PowerShell.
Все баги и пожелания можете оставлять здесь или создать Issue на GitHub.
Windows 11 installations often come loaded with unnecessary apps, pre-set options, and features that can slow down your PC or clutter your workflow. Winhance provides a centralized, open-source solution for removing unwanted software, controlling privacy and security settings, and fine-tuning your system for better speed and usability.
Remove Unwanted Windows Apps and Features
Pre-installed applications and optional features can consume storage, slow down startup times, and introduce distractions. Winhance addresses this by offering a simple dashboard where you can select which apps and features to keep or remove.
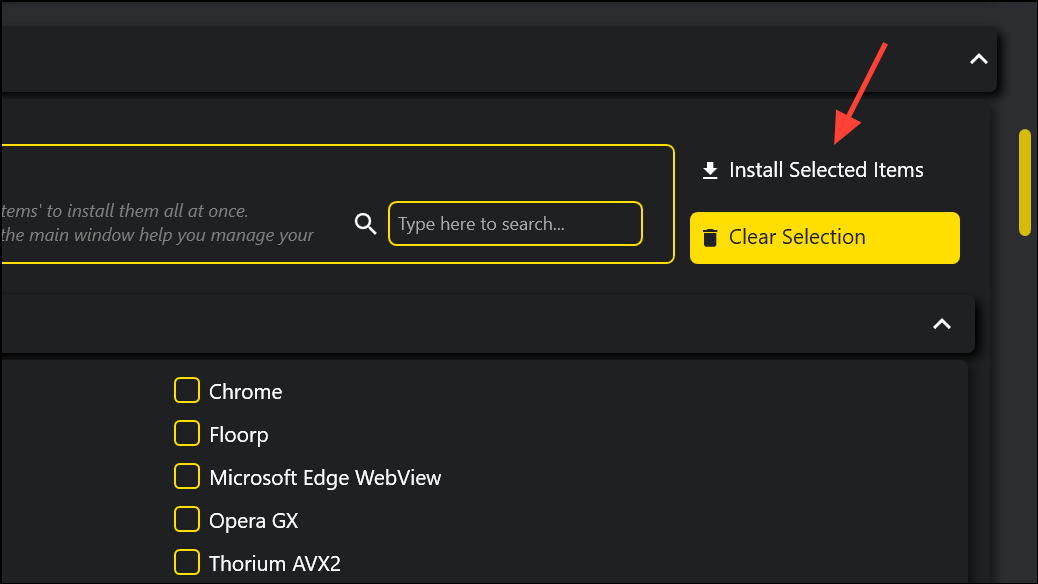
Step 1: Download Winhance from the official website or GitHub repository. Choose the installer or portable version based on your preference.
Step 2: Open Winhance and navigate to the Software & Apps section. The interface lists installed Windows apps, legacy capabilities, and optional features, each with a checkbox and status indicator.
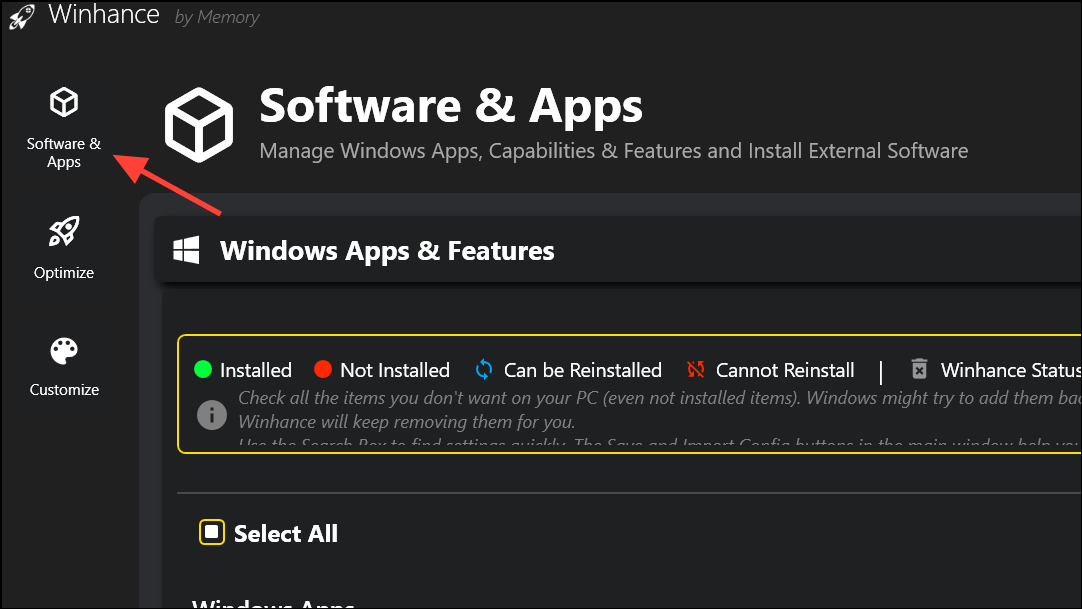
Step 3: Select the apps or features you want to remove by checking their boxes. For example, you can target Microsoft Edge, OneDrive, Copilot, Bing News, 3D Viewer, or other bundled software.
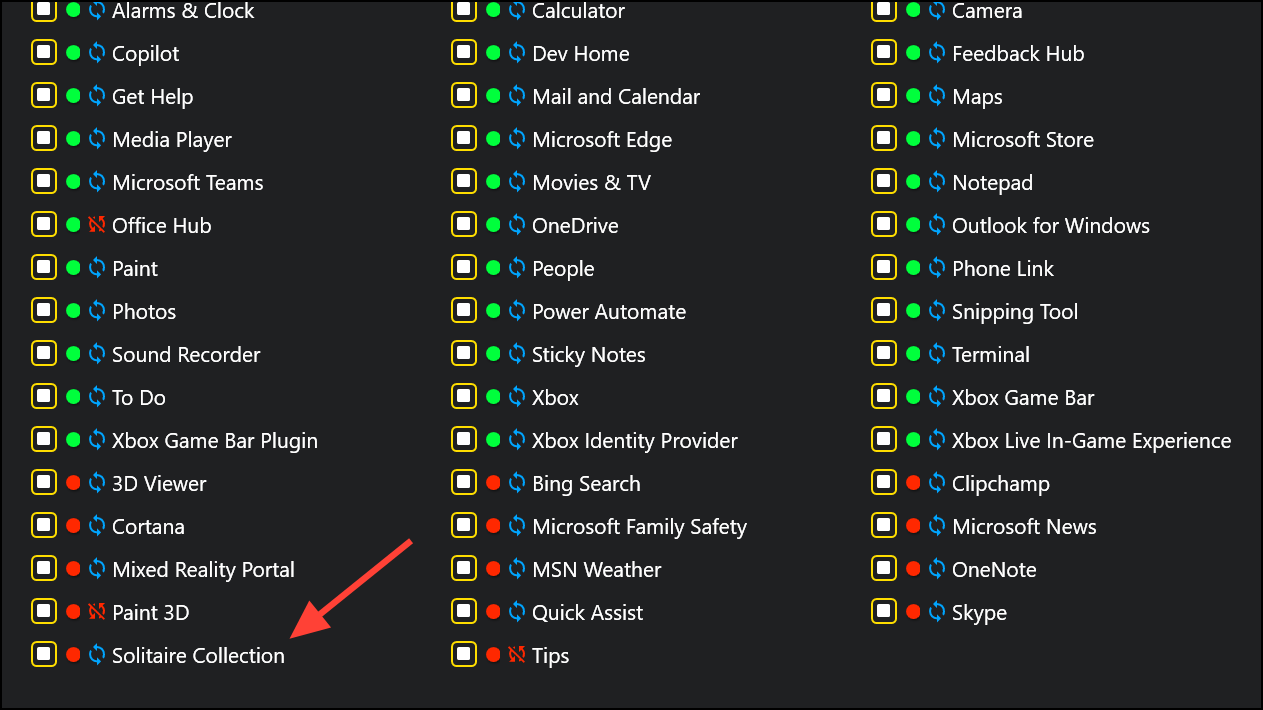
Step 4: Click Remove Selected Items at the top right. Winhance executes removal scripts and sets up scheduled tasks to prevent the reinstallation of these components during Windows Updates. This ensures that removed apps do not return after system updates or restarts.

Removing bloatware improves system responsiveness and frees up resources for applications you actually use. If you accidentally remove something needed later, Winhance allows reinstallation of most default apps through its interface.
Install Essential Third-Party Software Efficiently
Setting up a new Windows environment often involves downloading and installing multiple applications one by one. Winhance streamlines this process by providing a curated list of useful third-party tools directly within its dashboard.
Step 1: In the External Software section, browse categories such as browsers, multimedia tools, document viewers, productivity apps, and security utilities.
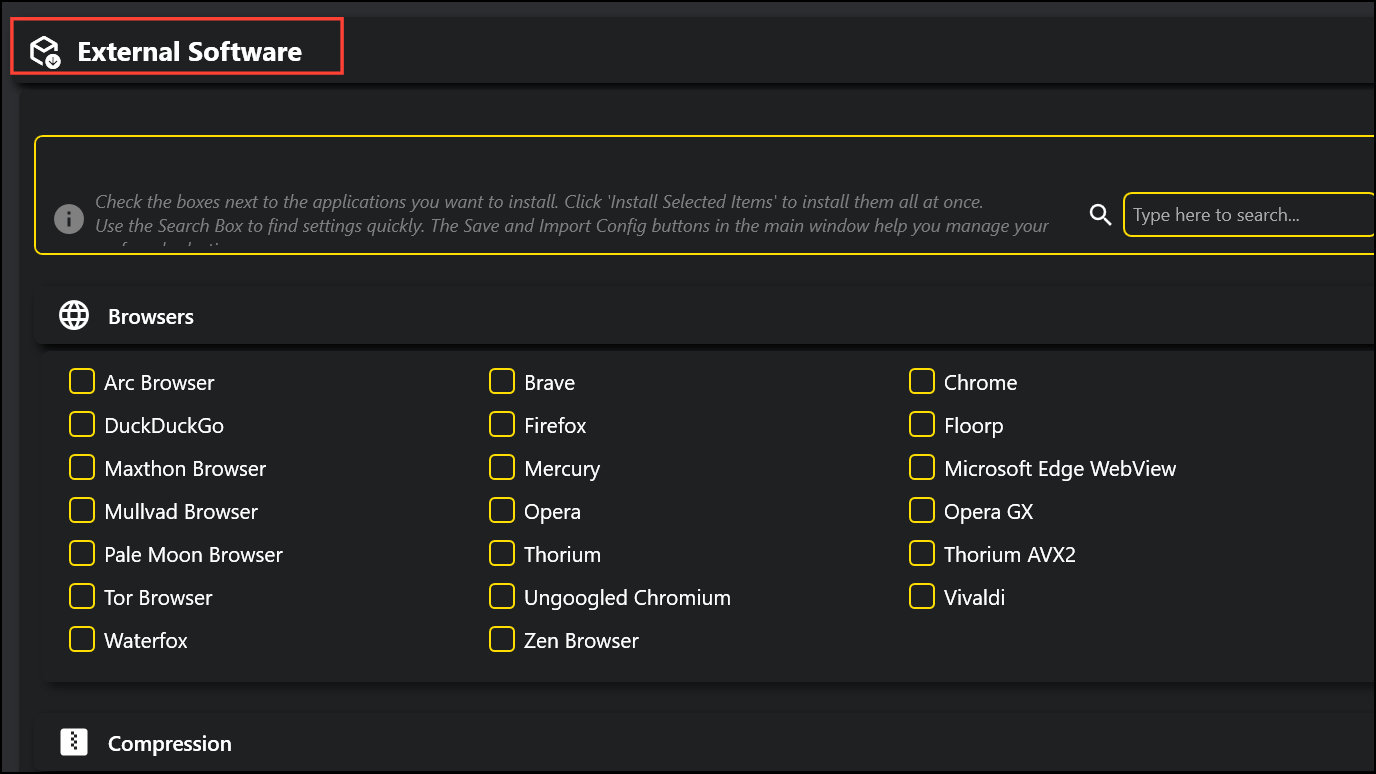
Step 2: Check the boxes for any programs you want to install, such as Brave, DuckDuckGo, VLC, Audacity, 7-Zip, or Proton VPN.
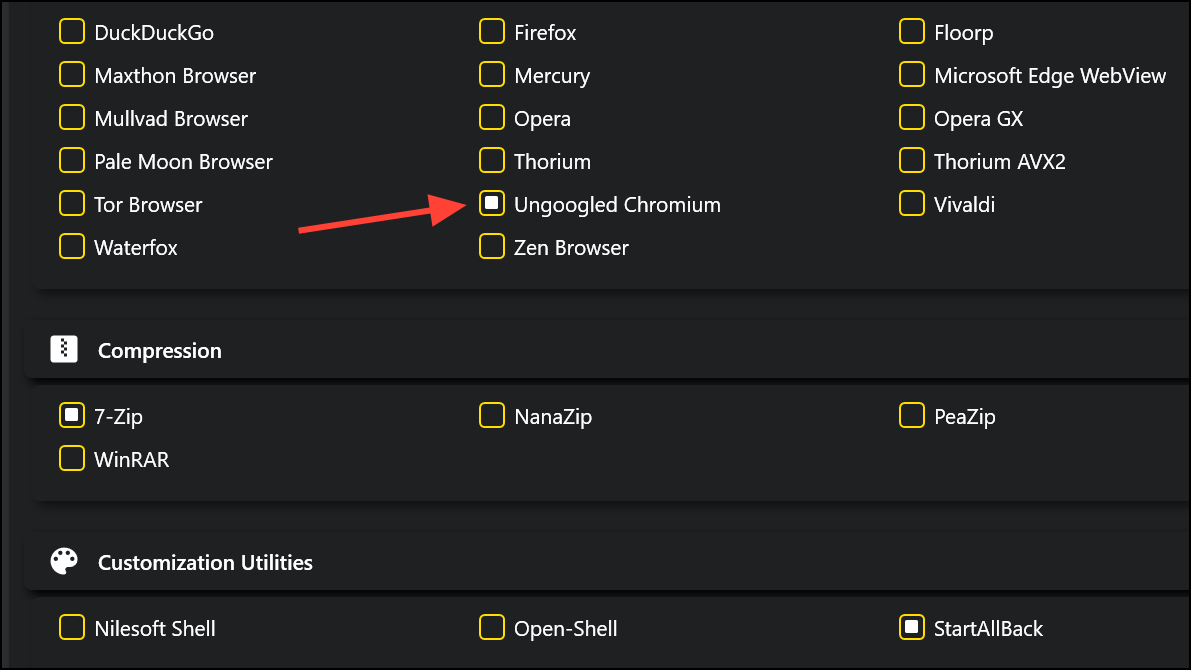
Step 3: Click Install Selected Items. Winhance automatically downloads and installs each selected app using the Windows Package Manager (WinGet), saving you time and reducing the risk of downloading from unofficial sources.
This approach is similar to tools like Ninite but with more integration into system setup and configuration. You can also save your selection as a configuration file, making it easy to replicate your preferred setup on new machines or after a fresh install.
Optimize Security, Privacy, and Performance Settings
Windows 11 includes a wide range of settings for security, privacy, gaming, power management, and updates. Navigating these options through built-in menus can be time-consuming and confusing. Winhance consolidates these controls into a single, organized dashboard for quick access and adjustment.
Step 1: Open the Optimize tab in Winhance. Here, you’ll find grouped controls for security, privacy, gaming, updates, and power settings, each with explanatory tooltips and toggle switches.
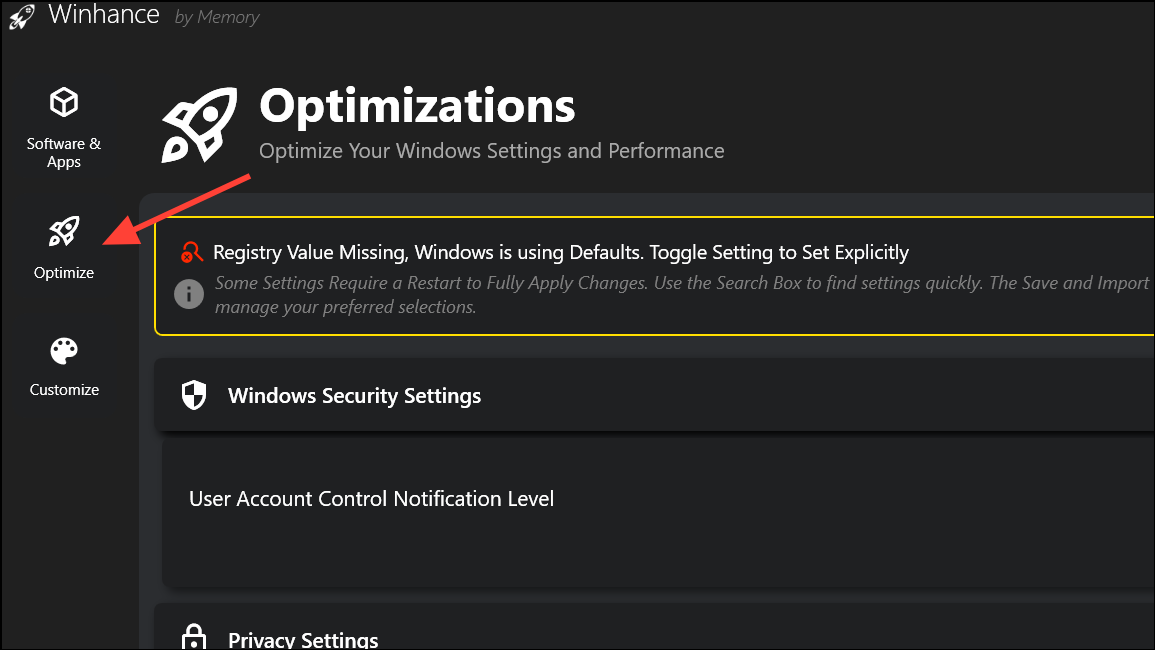
Step 2: Adjust Security Settings such as User Account Control (UAC), Windows Defender, and firewall preferences. For example, you can set the UAC notification level with a slider or toggle Defender on or off as needed.
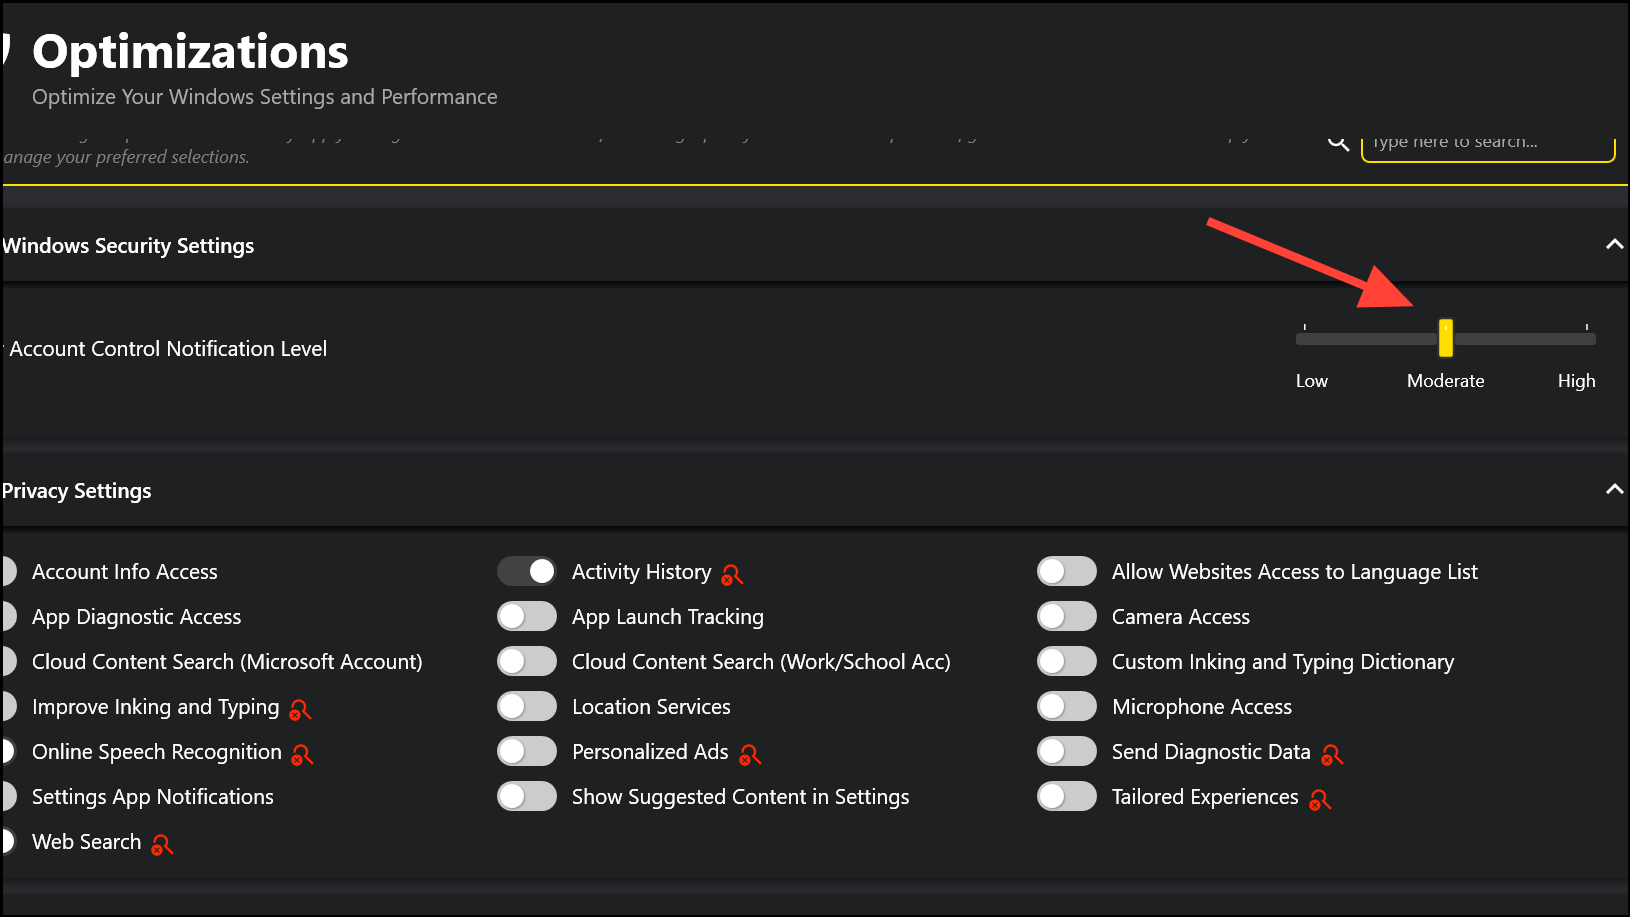
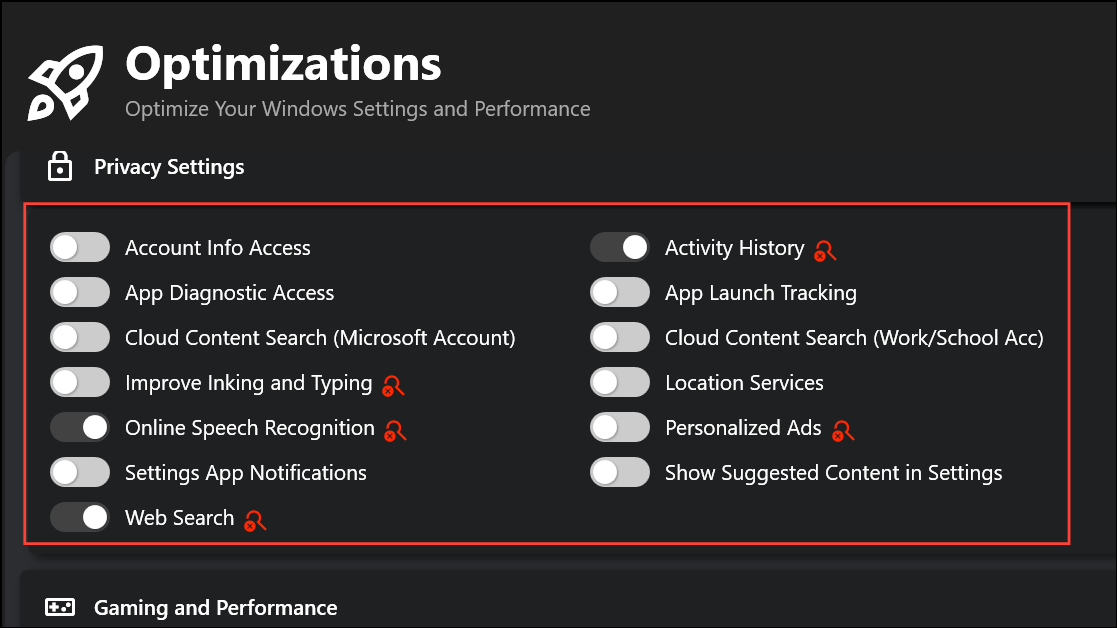
Step 3: Refine Privacy Settings by disabling features like activity history, camera access, personalized ads, and telemetry. This reduces background data collection and improves personal privacy.
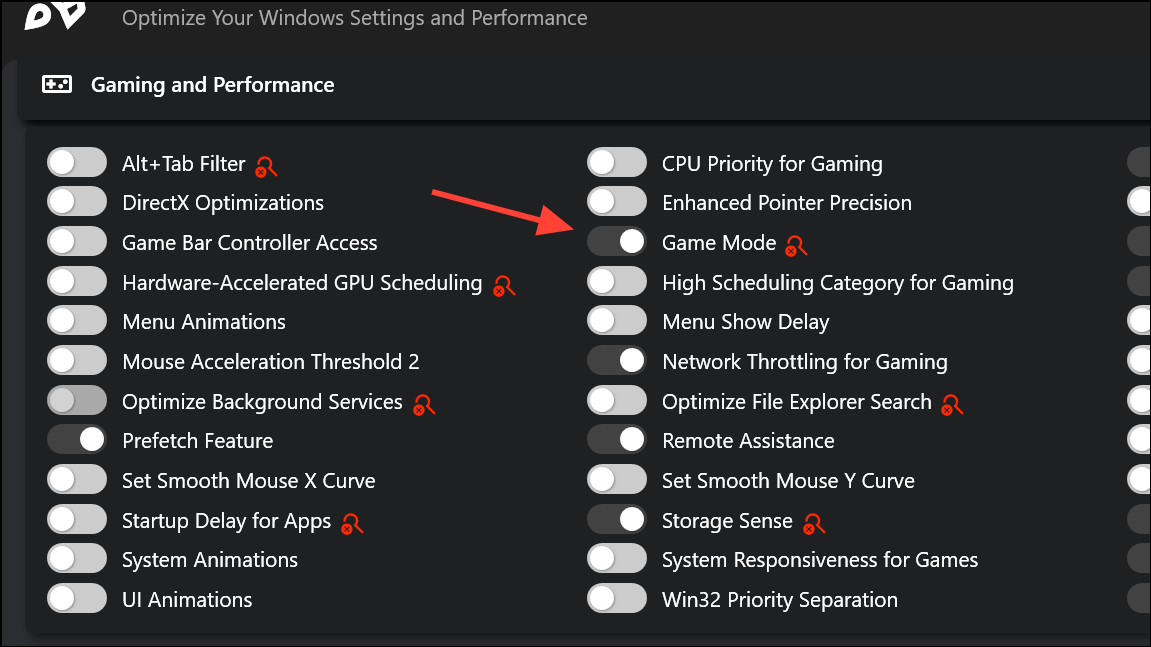
Step 4: Tweak Gaming and Performance options including CPU/GPU prioritization, network traffic shaping for games, disabling unnecessary visual effects, and optimizing File Explorer search. These changes can reduce input lag and boost frame rates for gaming sessions.
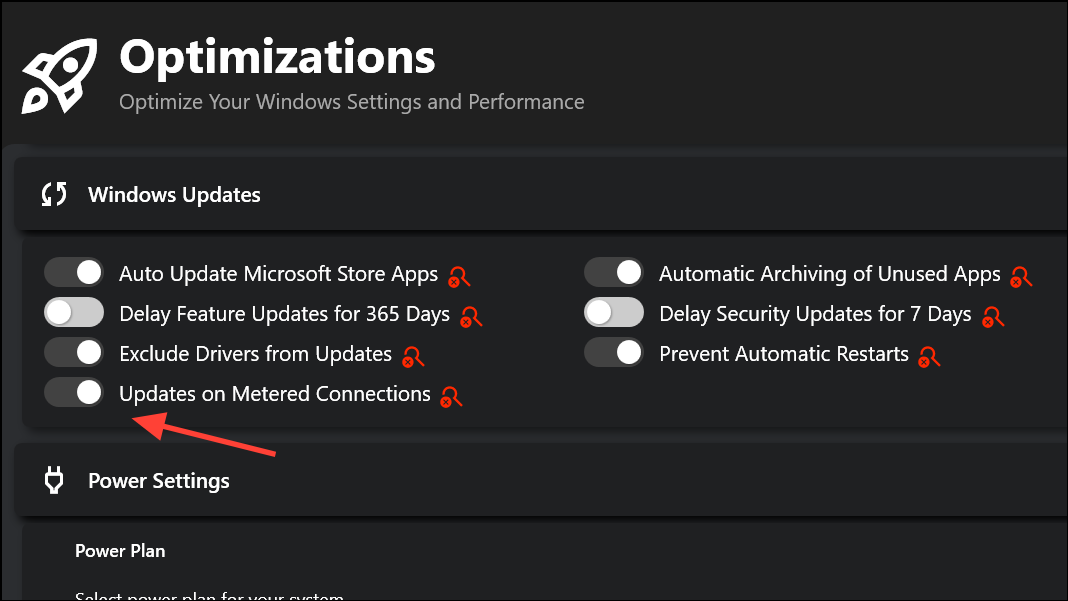
Step 5: Manage Windows Updates by disabling or delaying automatic updates, turning off forced restarts, and controlling update notifications. If you’re on a metered connection, you can prevent updates from downloading in the background.
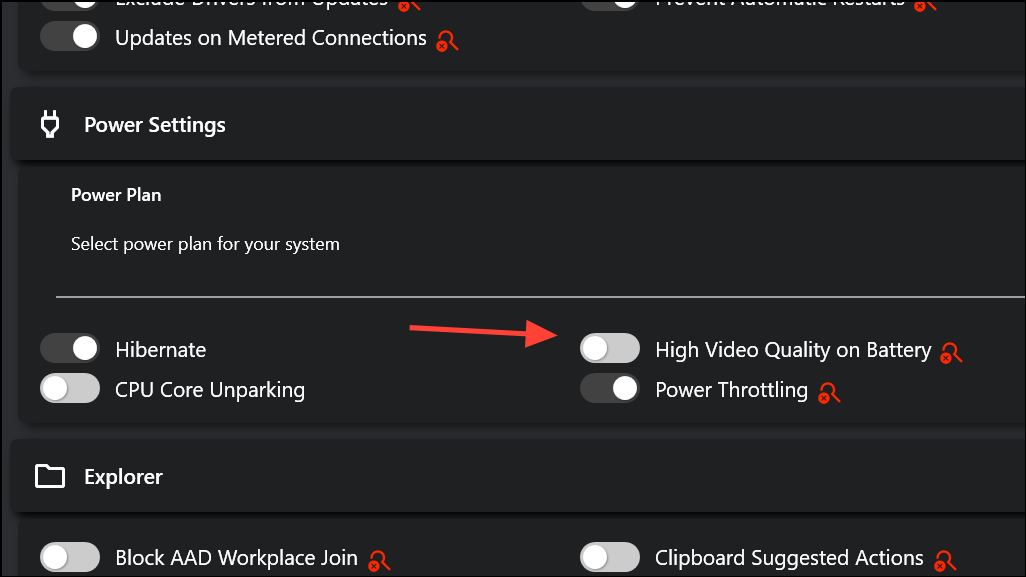
Step 6: Configure Power Settings such as hibernation, power throttling, and power plan selection to match your usage patterns—whether you prioritize performance or battery life.
Each setting has a status indicator to warn if a registry value is missing or a restart is needed to apply changes. This immediate feedback helps avoid misconfigurations and ensures your adjustments take effect as intended.
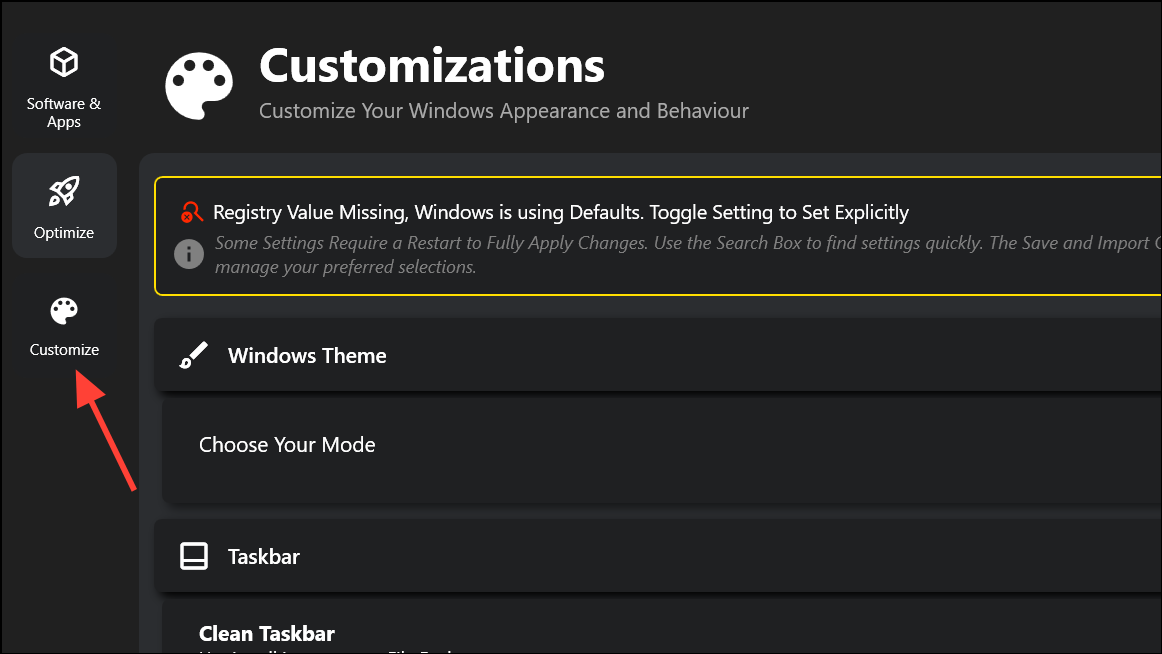
Customize the Windows Interface and Workflow
Personalizing the look and feel of Windows 11 can make daily tasks more efficient and enjoyable. Winhance centralizes customization options for themes, the taskbar, Start menu, File Explorer, and notification behaviors.
Step 1: Go to the Customize tab. Use the theme selector to switch between light and dark modes instantly.
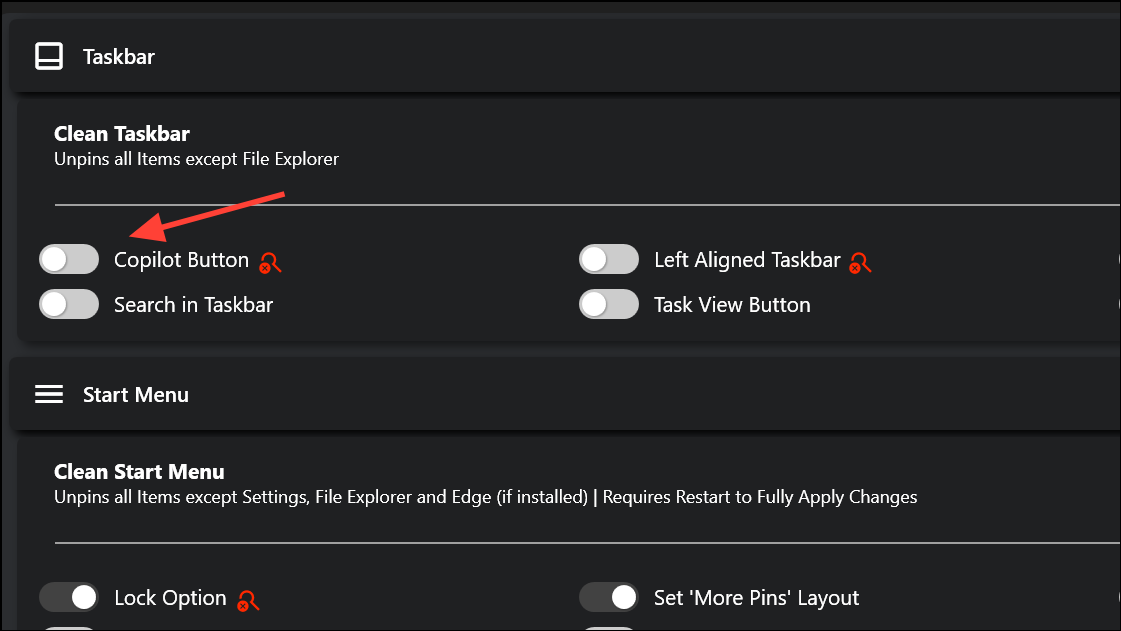
Step 2: In the Taskbar section, unpin unnecessary icons such as Copilot, Meet Now, Task View, and Windows Chat. You can also align the taskbar to the left and control which system tray icons are visible.
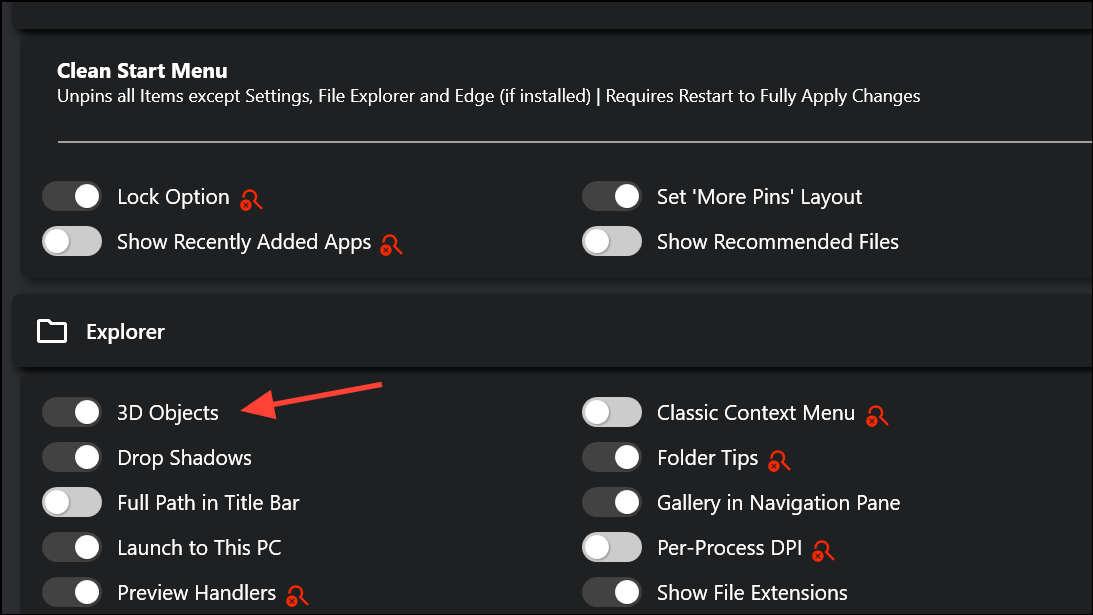
Step 3: Adjust Start Menu settings to remove recommended files, hide recently added apps, or set a More Pins layout for quicker access to your favorite programs.
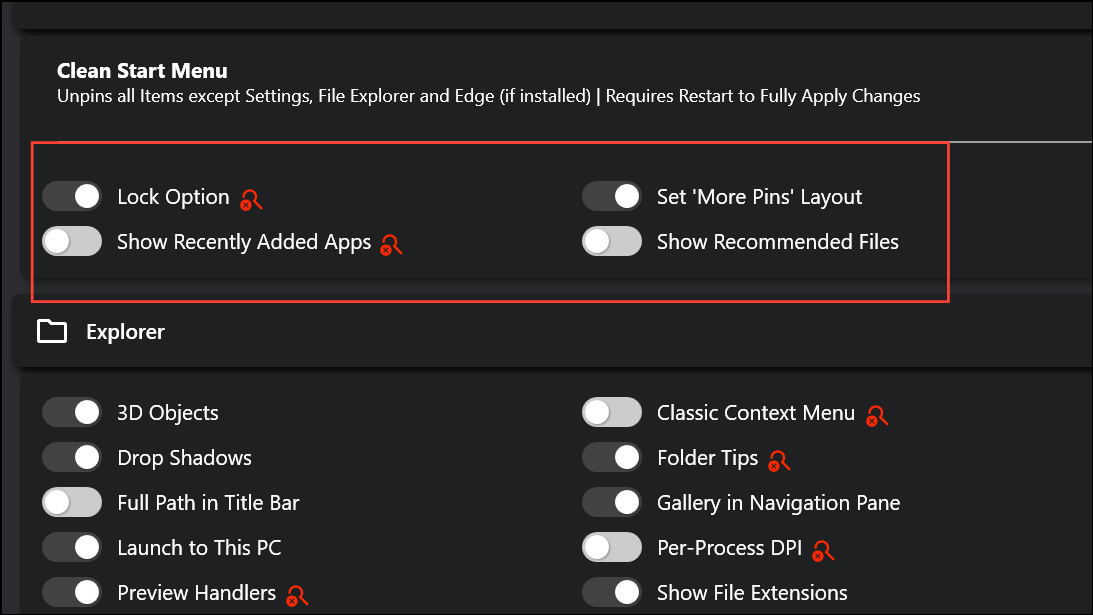
Step 4: Fine-tune File Explorer by enabling full path display, showing file extensions, forcing thumbnails, or restoring the classic context menu. These tweaks simplify file navigation and reduce accidental misclicks.
Step 5: Manage Notifications by disabling lock screen pop-ups, hiding system tips, or muting notifications during focus periods. This reduces interruptions when you’re working or gaming.

All customization changes are applied immediately, and you can save your entire configuration for easy import later. While some advanced tweaks (like automated theme switching or hiding the taskbar completely) aren’t yet included, Winhance covers the most-requested personalization settings.
Using Winhance via PowerShell
For users who prefer scripts or need automation, Winhance started as a PowerShell utility and still supports command-line execution. This is particularly useful for IT professionals deploying custom configurations across multiple machines.
Step 1: Download the Winhance.ps1 script from the GitHub repository.
Step 2: Open an elevated PowerShell session and run the following command to download and execute the latest version:
Invoke-RestMethod "https://github.com/memstechtips/Winhance/raw/main/Winhance.ps1" | Invoke-Expression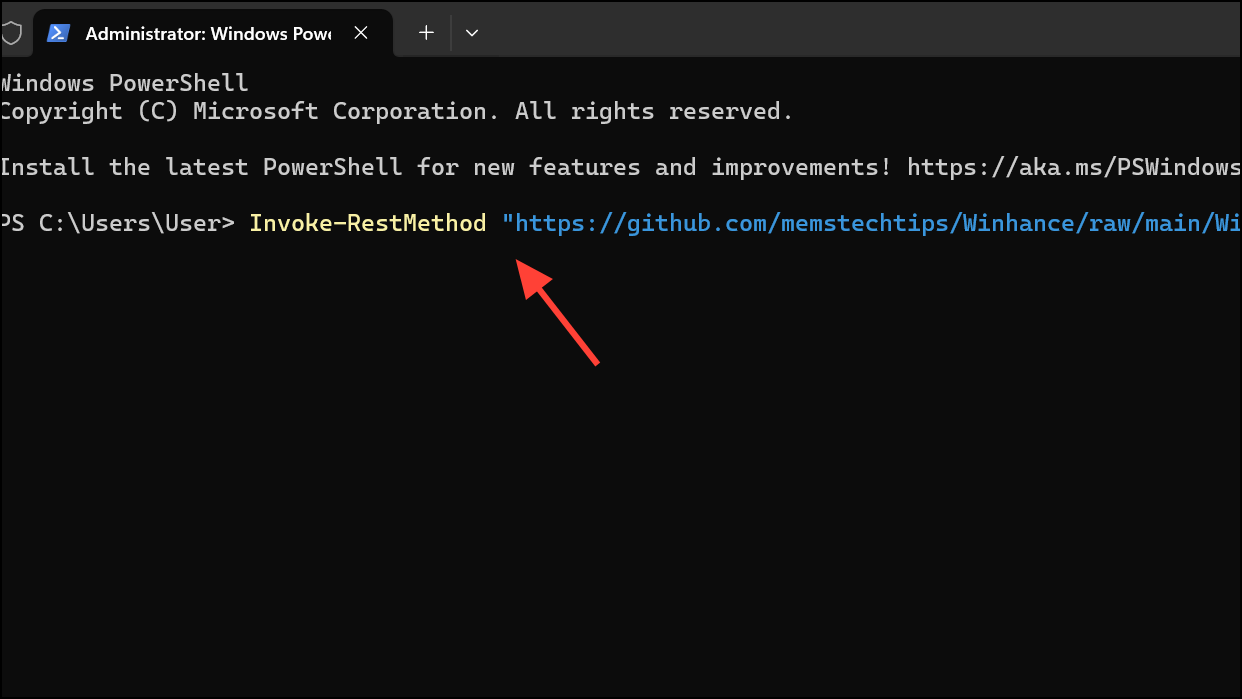
Step 3: Accept the disclaimer. Winhance will automatically back up your registry before making any changes.
Step 4: Use the script’s interactive prompts to select which apps to remove, which features to install, and which settings to adjust. The script creates scheduled tasks to maintain your chosen configuration after reboots and updates.
While the PowerShell version offers less granular control than the GUI app, it’s suitable for batch deployments or headless environments. Manual editing of the generated scripts may be required to reverse changes or exclude specific apps from future removals.
Winhance provides a practical way to streamline Windows 11 by removing clutter, installing essential tools, and centralizing system tweaks. Saving your configuration lets you quickly replicate your preferred setup across devices or after a clean install.
В этой публикации, друзья, рассмотрим бесплатную программу с GitHub – WinUtil, это твикер и установщик софта для Windows 10 и 11. Позволяет настроить работу операционной системы так, как это невозможно в её системных настройках. Предусматривает внесение каких-то системных настроек проще, чем это делается средствами самой Windows. Предусматривает подборку стороннего софта для установки и обновления средствами WinGet. Не всё годнота в этой программе, но отдельные её функции могут пригодиться опытным пользователям.
WinUtil (это сокращение от Windows Utility) – необычная программа, это скрипт PowerShell с графическим интерфейсом. WinUtil не нужно скачивать и устанавливать. Необходимо запустить PowerShell или терминал Windows 11 с правами администратора. И ввести команду:
irm "https://christitus.com/win" | iexПосле чего в окне PowerShell увидим лого разработчика программы — Chris Titus Tech. Сама же WinUtil запустится в отдельном окне.
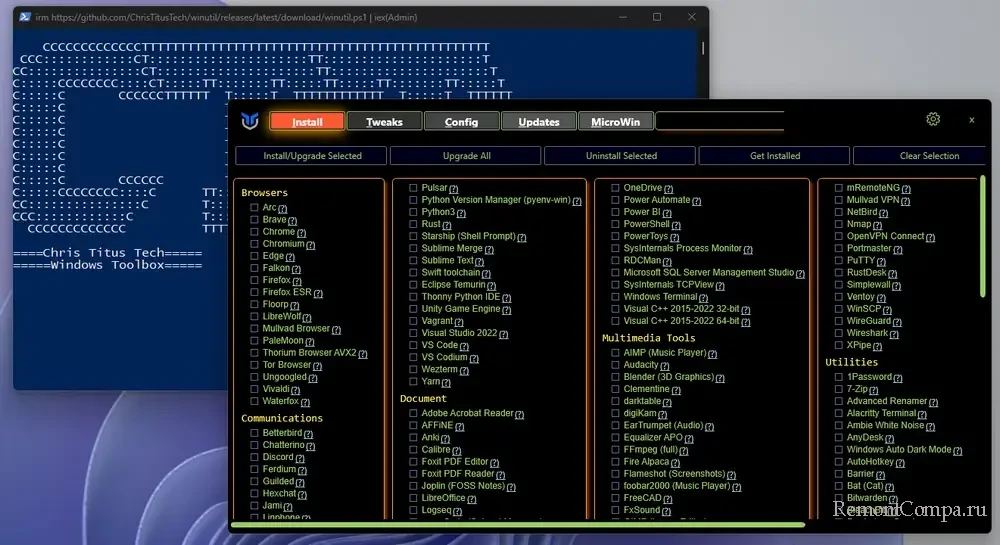
Локализация интерфейса программы – только англоязычная. Твиков и настроек довольно много, справку о них, в частности, воспользовавшись браузерным переводчиком, можем получить на страничке WinUtil на GitHub – в руководстве пользователя и техдокументации.
WinUtil позволяет пакетно (комплексно) устанавливать некоторые бесплатные сторонние программы. И, соответственно, может оказаться полезным инструментом для настройки Windows после новой установки. Установка программ осуществляется средствами WinGet, это штатный менеджер пакетов в Windows 10 и 11. В разделе WinUtil «Install» обнаружим внушительный перечень доступных для установки программ, перечень включает их порядка 360-ти. Есть и популярные, и совершенно ненужные большинству. Программы из перечня можно пакетно не только устанавливать, но также обновлять и удалять. Отмечаем галочками нужные программы. И жмём кнопку нужной функции:
- Install/Upgrade Selected — установить новые версии выбранных программ или обновить их до более новых версий;
- Upgrade All — обновить все доступные программы до их самых новых версий;
- Uninstall Selected — удалить выбранные программы.
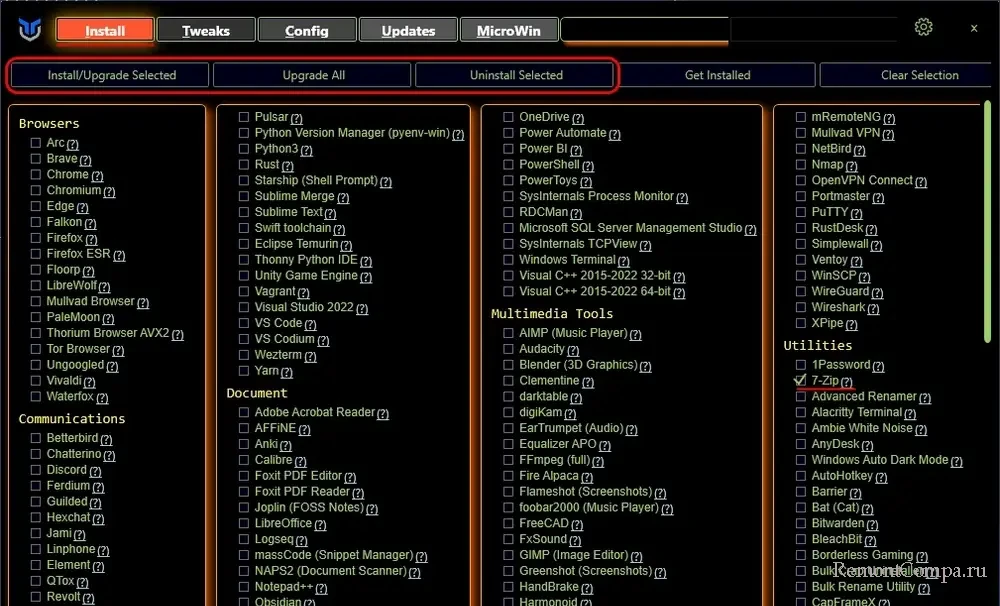
Значок вопроса рядом с каждой программой в перечне – это отсылка на её официальный сайт, где можно получить о ней дополнительную информацию, либо и вовсе узнать, что это за программа такая.
Примечание: друзья, возможно, для вас более удобным инструментом для настройки Windows после новой установки будет программа UniGetUI, являющая графический интерфейс для Winget. Она позволяет экспортировать список установленных программ в старой Windows и пакетно установить программы из этого списка в новой Windows.
Раздел WinUtil «Tweaks» — раздолье для энтузиастов. Здесь предлагаются две подборки твиков – основных (Essential Tweaks) и продвинутых (Advanced Tweaks). Что запускает, устанавливает или отключает каждый из твиков, можем узнать, кликнув на значок вопроса рядом с каждым твиком. B отправимся на страницу документации WinUtil на GitHub, где для каждого твика сможем посмотреть описание.
Из твиков, которые могут заинтересовывать большинство, отметим отключение телеметрии, режима гибернации, отслеживания местоположения, работающих в фоне приложений из Microsoft Store. На случай обеспечения конфиденциальности можно обратить внимание на твик удаления последних документов, очистки буфера обмена и истории запусков. Некоторым могут быть интересны твики настройки дисплея на производительность вместо качества изображения, удаления штатного облака OneDrive, а также удаления всех приложений Microsoft Store, кроме необходимых для работы WinGet. Обязательный твик перед применением других твиков – «Create Restore Point», это удобное создание точки восстановления Windows.
Устанавливаем галочки нужных твиков и применяем их кнопкой «Run Tweaks».
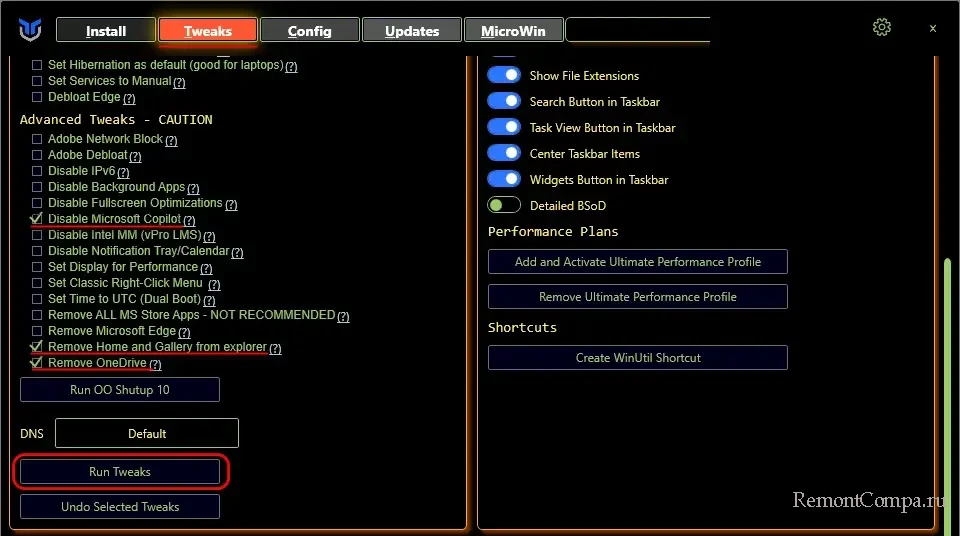
Больше твиков получим в утилите O&O Shutup 10, она интегрирована в WinUtil и запускается кнопкой в конце перечня твиков.

Примечательнейшая возможность WinUtil – установка публичных DNS с достаточно неплохим ассортиментом DNS-серверов.
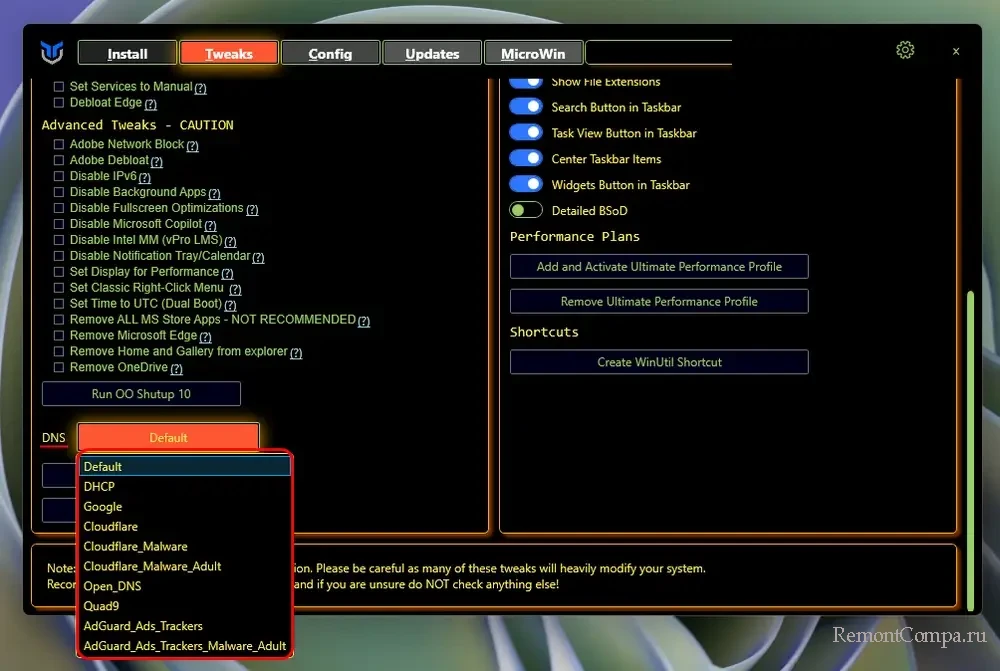
Также нам предлагаются настройки, позволяющие изменить различные аспекты интерфейса и поведения Windows. Это включатели/выключатели функций как то: привязка окон Snap Assist, ускорение мыши, отображение скрытых файлов и расширений файлов, отображение кнопок на панели задач, подробный синий экран смерти (BSoD) и пр.
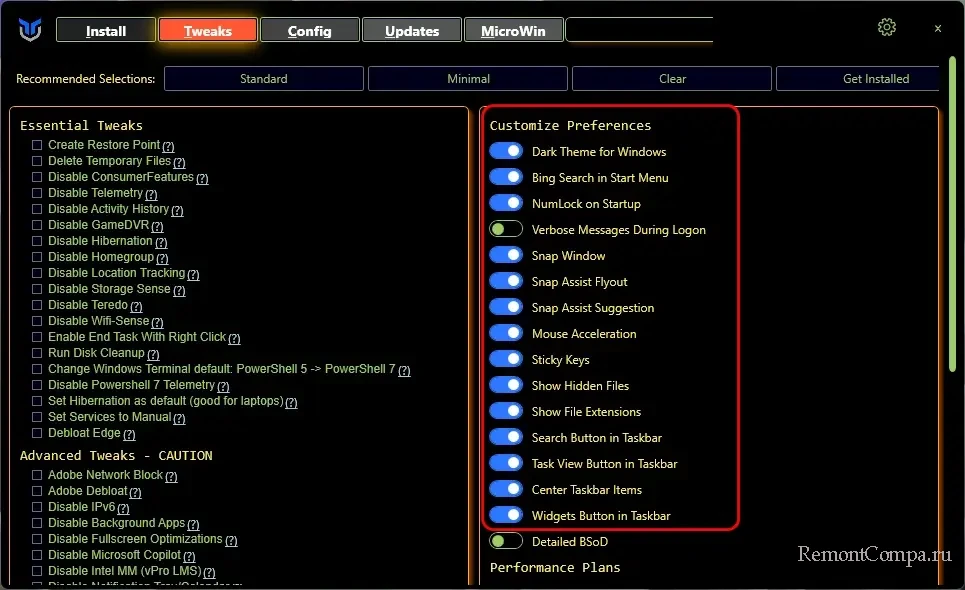
Есть также возможность включения и отключения схемы электропитания «Максимальная производительность».
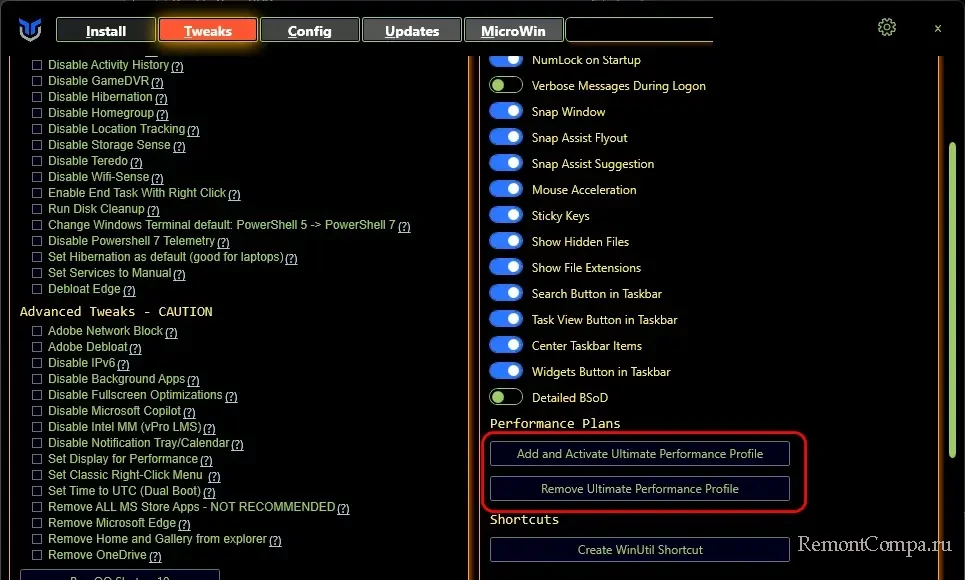
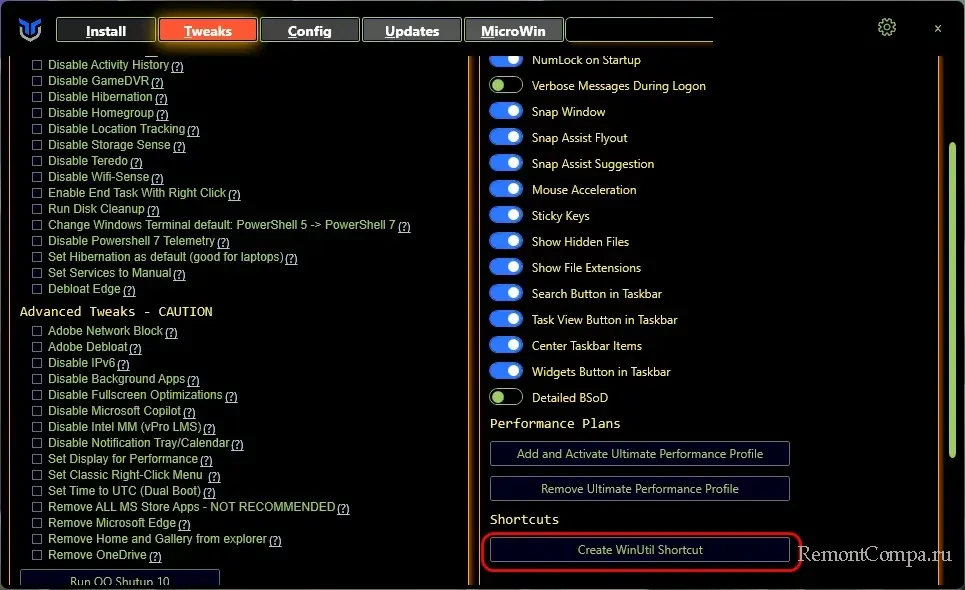
Ну и значимая для оперативного запуска самой программы WinUtil настройка – «Create WinUtil Shortcut», создание ярлыка запуска программы на рабочем столе.
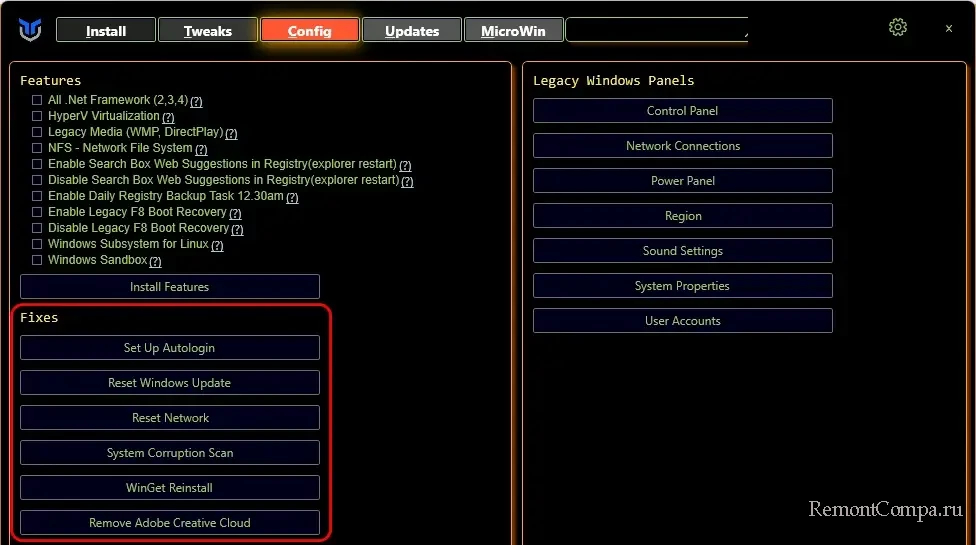
В разделе программы «Config» реализован удобный доступ к определённым системным функциям и настройкам Windows. Здесь нам предлагаются кнопки запуска некоторых классических настроек Windows. И предлагается удобное включение системных компонентов как то: разные версии .Net Framework, гипервизор Hyper-V, песочница Windows, безопасный режим Windows по клавише F8, подсистема Linux и пр. Отмечаем галочкой нужный компонент и жмём кнопку «Install Features».
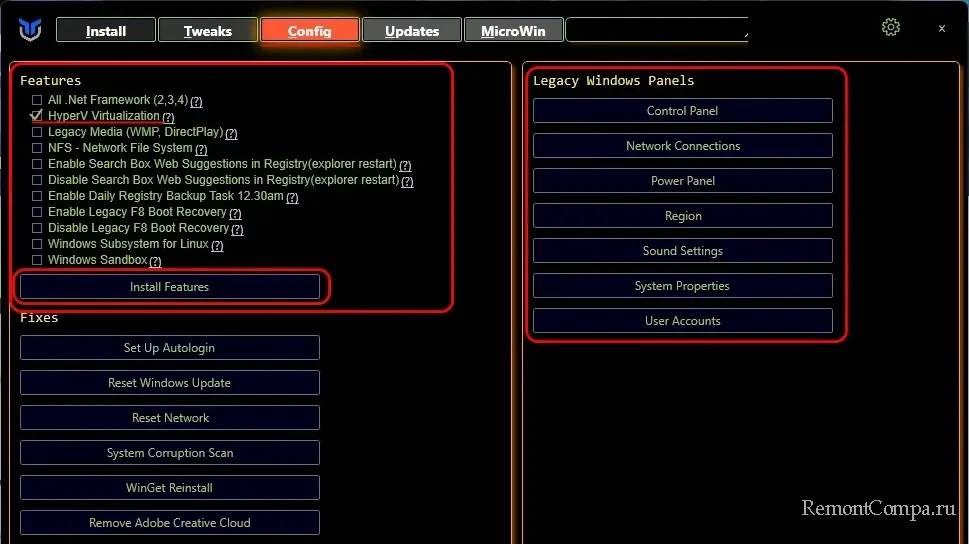
Предлагаются здесь также функции исправления, это полезнейший блок возможностей WinUtil, давайте, друзья, обратим особое внимание на ключевые его возможности:
- Set Up Autologin — настройка автоматического входа в Windows без пароля,
- Reset Windows Update — сброс обновлений Windows для устранения проблем с ними;
- Reset Network — сброс настроек сети для устранения проблем с сетью и Интернетом;
- System Corruption Scan – комплексная проверка и исправление различных типов повреждений операционной системы Windows. Включает проверку файловой системы диска С средством Chkdsk. И включает проверку целостности системных файлов Sfc, в рамках которой автоматически средством DISM выполняется проверка системного образа, откуда берутся файлы для восстановления;
- WinGet Reinstall – переустановка штатного менеджера пакетов WinGet при проблемах в его работе.
Для применения этих функций исправления просто жмём их кнопки.
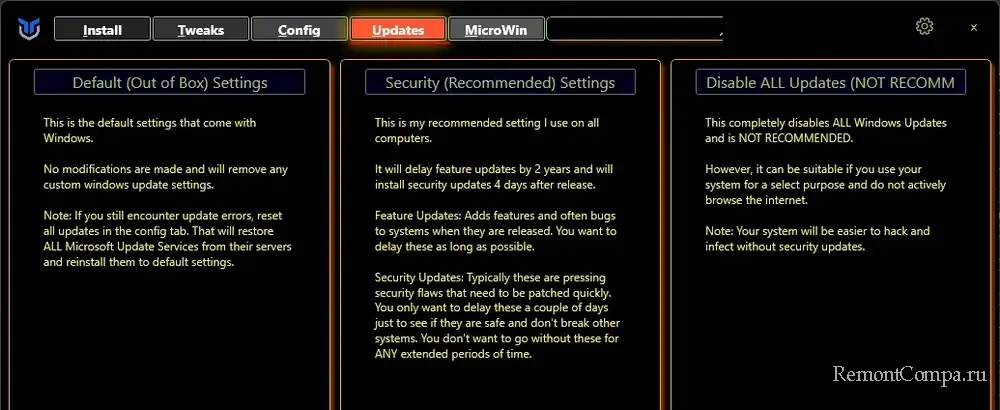
Раздел программы «Updates» — это возможность настройки системных обновлений Windows. Нам предлагаются 3 конфигурации такой настройки:
- Default (Out of Box) Settings — стандартные настройки, при которых выполняется автоматическое обновление Windows;
- Security (Recommended) Settings – настройки, при которых обновления безопасности устанавливаются через 4 дня после их выпуска во избежание проблем из-за сбойных обновлений. И откладывается установка функциональных обновлений на 2 года;
- Disable All Updates (Not Recommended) – настройки, отключающие все обновления Windows.
Для применения выбранной конфигурации жмём её кнопку.
Раздел программы «MicroWin» — это возможность редактировать установочные ISO-образы Windows 11 и, соответственно, создавать свою кастомную Windows 11. Из образа установки системы можно удалить телеметрию, предустановленные современные приложения. Можно сделать возможным создание локальной учётной записи на этапе первичной настройки Windows 11. Всё это, конечно, интересно, вот только эта функция не работает должным образом. Согласно её инструкциям, исходный ISO-образ Windows 11 нужно поместить на диск С и указать к нему путь в программе WinUtil. После чего образ должен быть обработан для возможности внесения в него изменений.

Но при попытке запуска обработки попросту возникает ошибка, связанная с отсутствием необходимого для выполнения операции файла. Пока что эта функция WinUtil – это пустая трата времени. Возможно, со временем разработчик допилит её.
Примечание: друзья, просто и без заморочек отредактировать дистрибутив Windows 11 в определённых практических целях, в частности, добавить готовую локальную учётную запись пользователя и убрать ограничения при установке на компьютеры, не отвечающие системным требованиям этой операционной системы, можно с помощью утилиты Rufus при создании установочной флешки Windows 11.