Все способы:
- Способ 1: Включение TPM 2.0 и функций безопасности
- Вариант 1: TPM 2.0
- Вариант 2: Безопасная загрузка
- Вариант 3: Включение виртуализации
- Способ 2: Активация DEP
- Способ 3: Включение «Целостности памяти»
- Способ 4: Сброс настроек безопасности
- Способ 5: Перерегистрация приложения безопасности
- Способ 6: Удаление обновлений
- Вопросы и ответы: 0
Способ 1: Включение TPM 2.0 и функций безопасности
Если вы получили сообщение «Стандартная безопасность оборудования не поддерживается», то это может значить, что ваш компьютер не соответствует минимальным требованиям к аппаратной безопасности, к которым относится TPM 2.0, виртуализация ЦП и безопасная загрузка. Если модули и функции есть в ПК, то их можно включить.
Вариант 1: TPM 2.0
Проверить, есть ли поддержка модуля TPM 2.0 на компьютере, можно через встроенное приложение «Безопасность Windows»:
- Через строку системного поиска введите запрос «Безопасность Windows» и запустите средство.
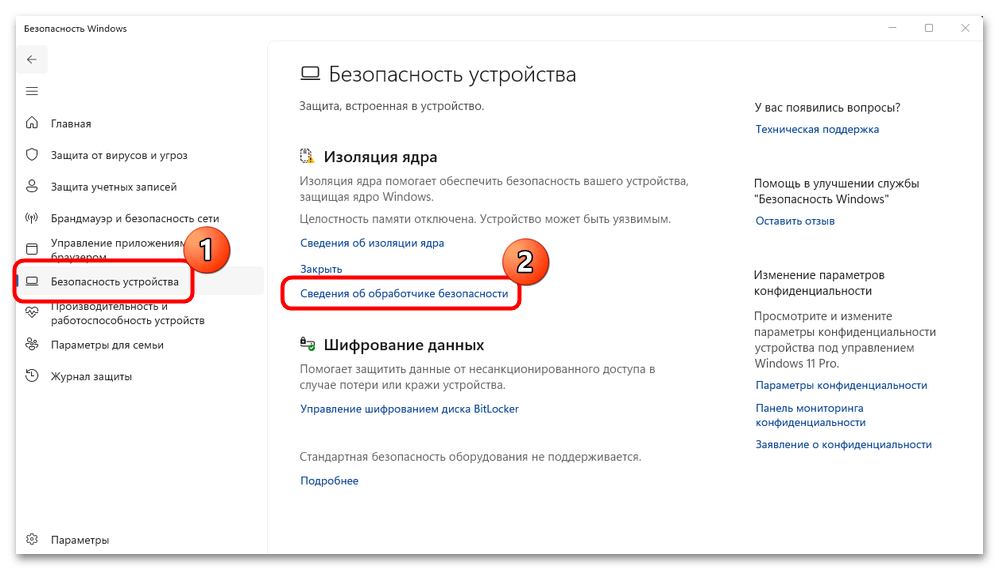
- На панели слева перейдите на вкладку «Безопасность устройства», а в центральной части окна нажмите по строке «Сведения об обработчике безопасности».
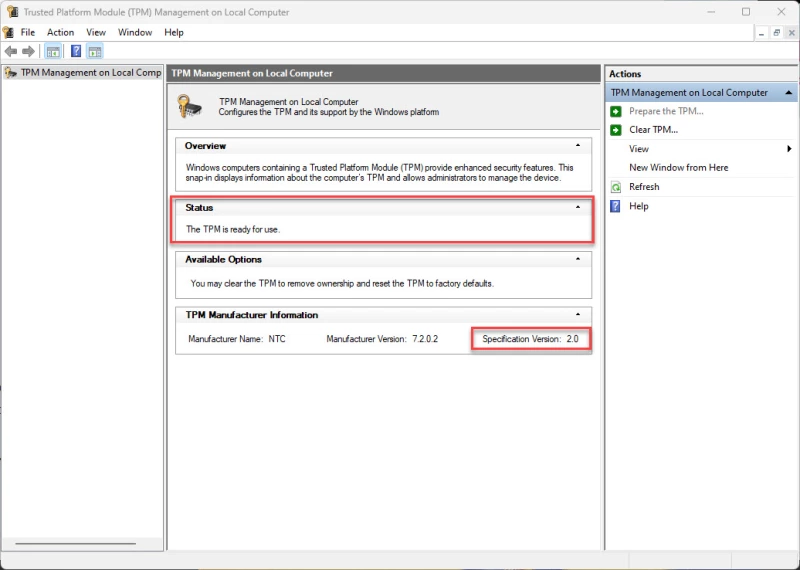
- В следующем окне обратите внимание на строку «Версия спецификации».
Также, что касается TPM 2.0, сначала можете проверить, активен ли он:
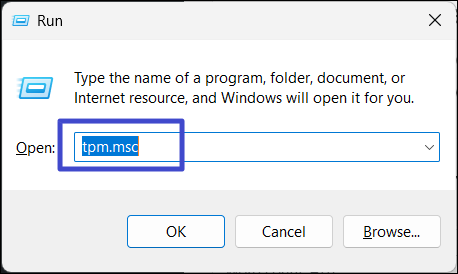
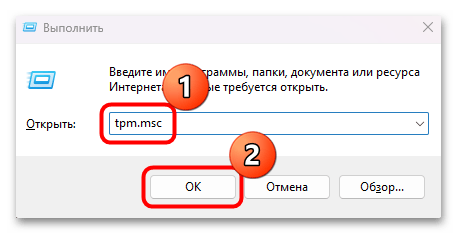
- Одновременно нажмите на клавиши «Win + R», в текстовом поле окна «Выполнить» введите команду
tpm.msc и нажмите на кнопку «ОК».
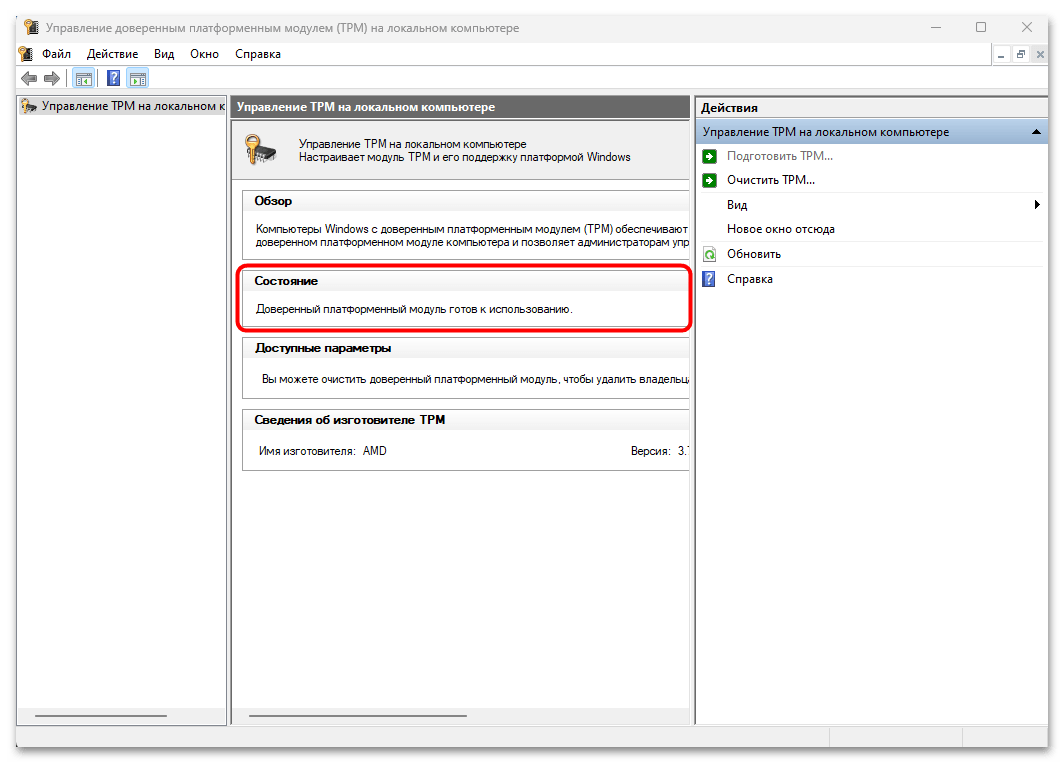
- Должно появиться окно «Управление доверенным платформенным модулем (TPM) на локальном компьютере». В блоке «Состояние» проверьте, готов ли к использованию модуль.
- Если вы увидели сообщение, что найти совместимый TPM не удается, тогда потребуется его включить. Для этого нужно запустить BIOS/UEFI. Как это делается на разных устройствах, мы писали в отдельных руководствах.
Подробнее:
Как попасть в BIOS на ноутбуке
Как попасть в BIOS на компьютере
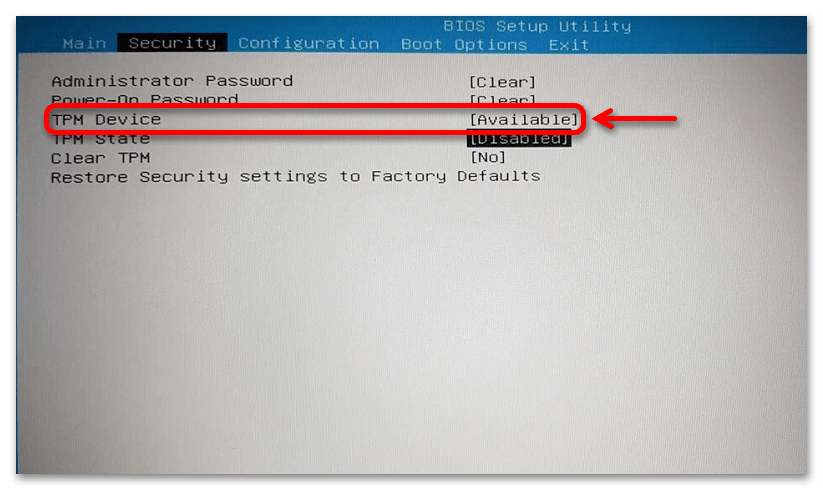
- Перейдите в BIOS в раздел безопасности. Как правило, он называется «Security». Найдите параметр, в слове которого есть «TPM», например «TPM Device», а в его значении нужно выставить «Available», то есть активен.
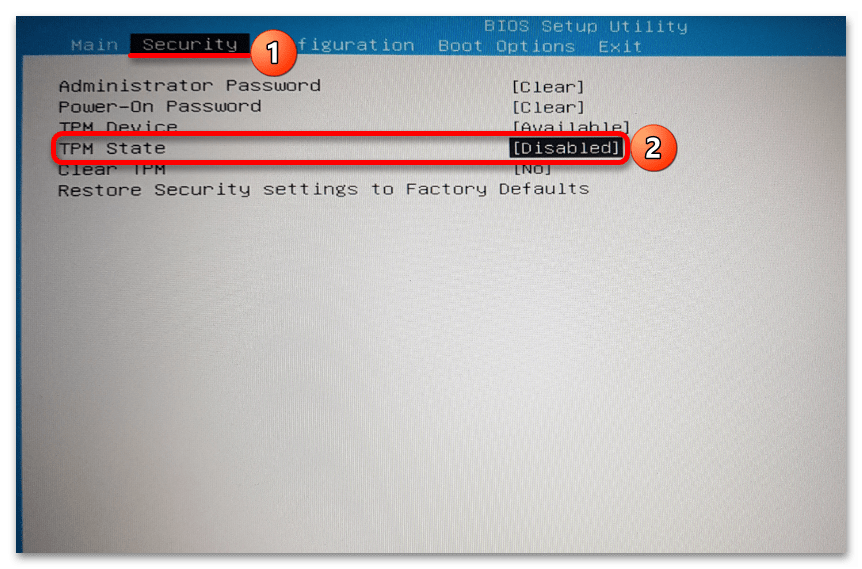
- Следующий параметр, который нужно включить, — это «TPM State». В зависимости от BIOS/UEFI он может называться по-разному, к примеру «fTPM», «Trusted Platform Module» или даже «Security Chip».
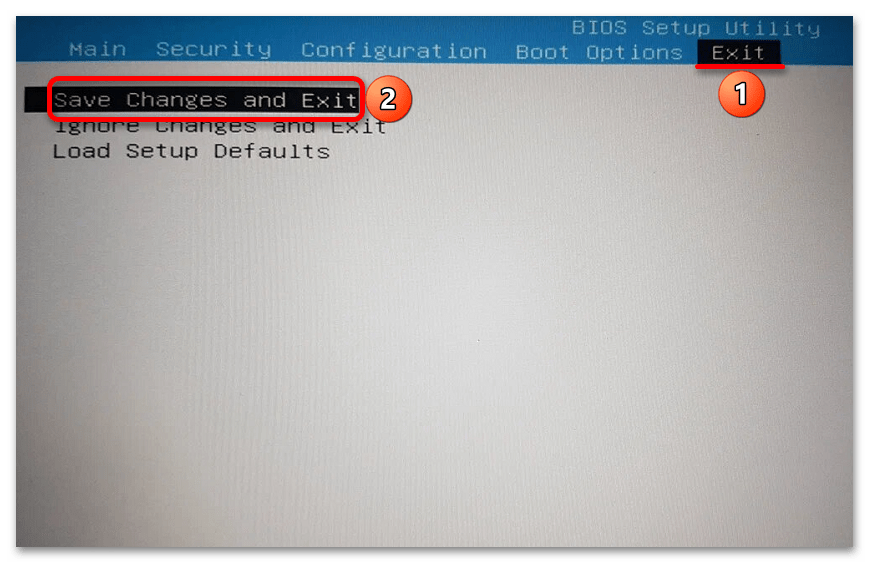
- Перейдите на вкладку «Exit» и выйдите, сохранив настройки (пункт «Save Changes and Exit»).
После перезагрузки системы вы попадете на рабочий стол Windows 11. Если сообщение не пропало, то переходите к следующим вариантам.
Вариант 2: Безопасная загрузка
Для удаления сообщения об ошибке также следует включить безопасную загрузку, которая предусматривается в Windows 11. Проверить ее состояние можно с помощью встроенных средств:
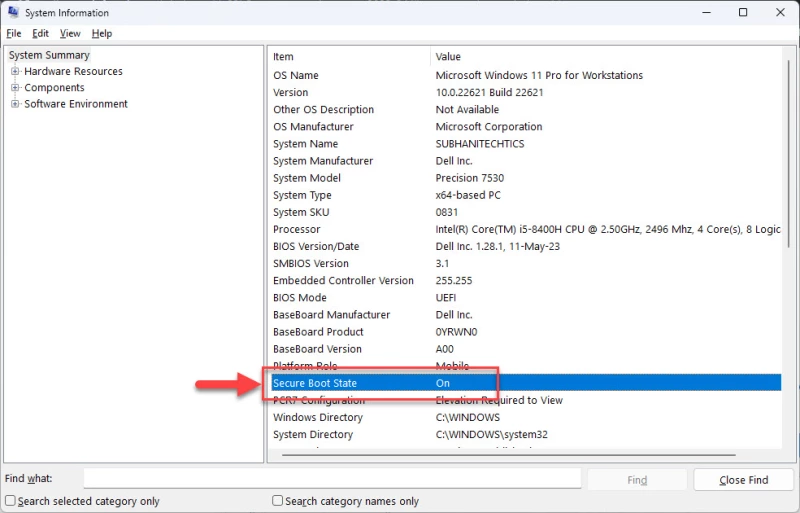
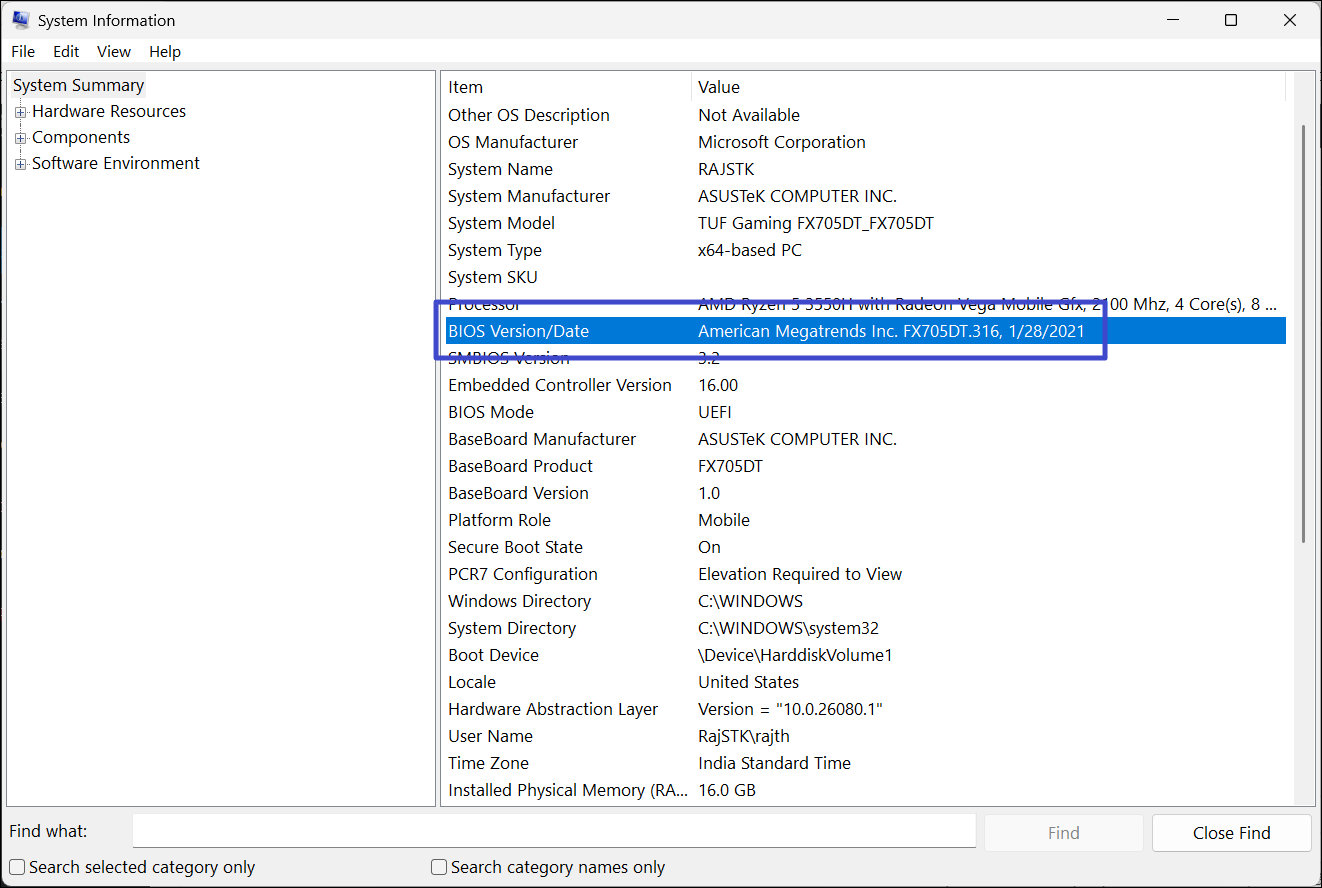
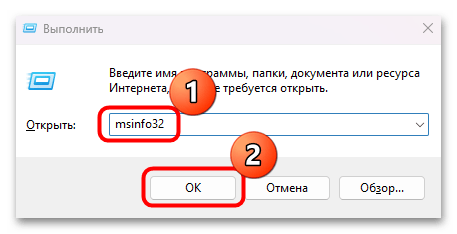
- Через диалоговое окно «Выполнить» перейдите к оснастке «Сведения о системе», выполнив команду
msinfo32.
- Находясь на вкладке «Сведения о системе», в основной части окна найдите строку «Состояние безопасной загрузки» и посмотрите значение параметра. Если он включен, то ничего делать не нужно.
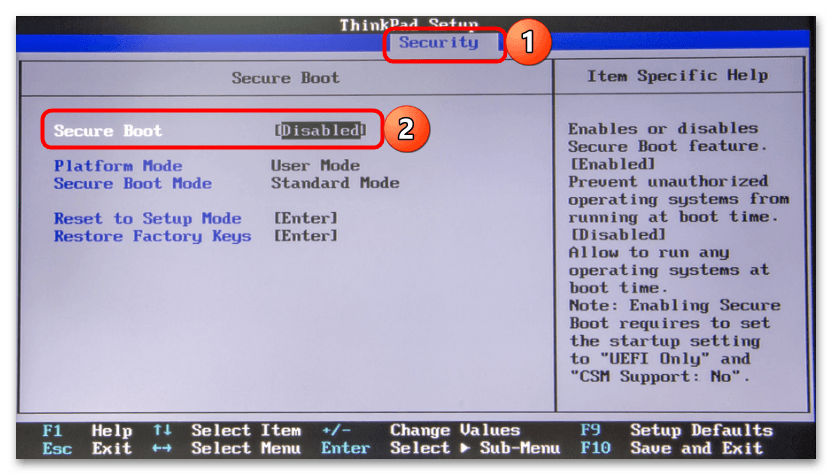
- В случае когда безопасная загрузка не активна, ее нужно включить, перейдя в BIOS/UEFI (ссылки на статьи о том, как это сделать, приведены в предыдущем варианте). Практически во всех версиях БИОС функция называется «Security Boot» и располагается на вкладке с настройками безопасности («Security»). Для включения нужно выбрать значение «Available»/«Enable».
Останется так же, как и в предыдущем Варианте, сохранить настройки и выйти из BIOS/UEFI.
Вариант 3: Включение виртуализации
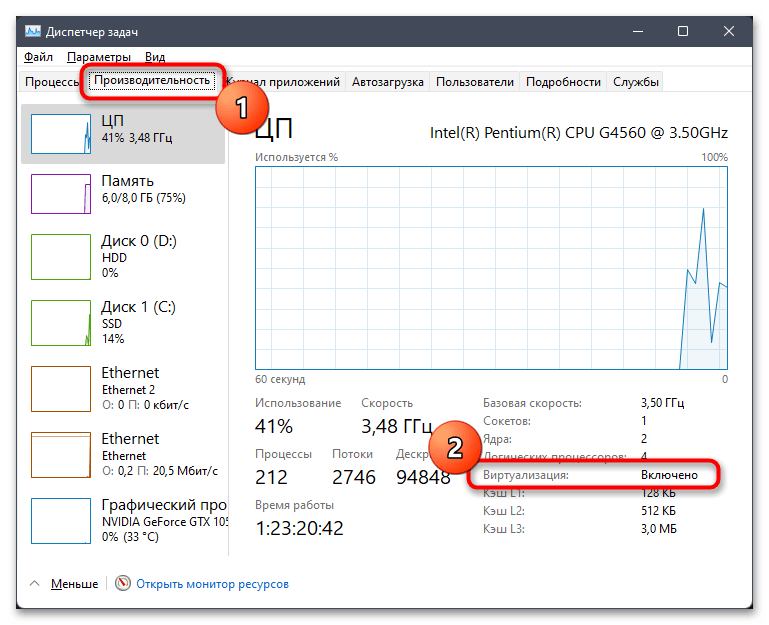
Часто рассматриваемая ошибка связана с тем, что в Windows 11 отключена виртуализация ЦП, но для начала проверьте, активна ли функция. О том, как это проверить и о способах включения наш автор писал ранее в отдельном подробном материале.
Подробнее: Как включить виртуализацию в Windows 11
Способ 2: Активация DEP
Сообщение о том, что стандартная безопасность в Windows 11 не поддерживается, бывает следствием отключенной технологии предотвращения данных (DEP). Она предназначена для того, чтобы защититься от запуска исполняемого кода из тех мест, в которых он не должен запускаться. Попробуйте активировать функцию, чтобы убрать ошибку:
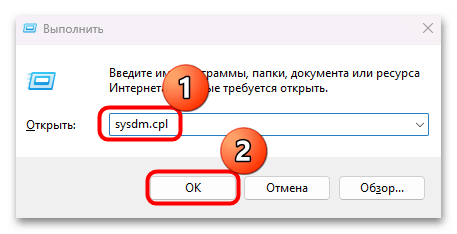
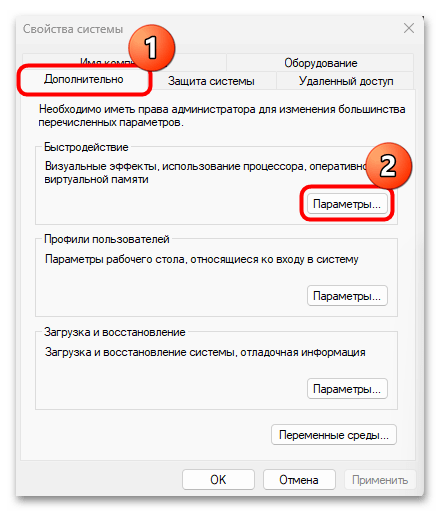
- Вызовите диалоговое окно «Выполнить», одновременно нажав на клавиши «Win + R», затем введите в поле
sysdm.cpl и нажмите на кнопку «ОК».
- В открывшемся окне «Свойства системы» перейдите на вкладку «Дополнительно». В блоке «Быстродействие» нажмите на кнопку «Параметры».
- Переключитесь на вкладку «Предотвращение выполнения данных» и отметьте пункт «Включить DEP только для основных программ и служб Windows». Сохраните настройки, нажав на кнопку «ОК».
После включения DEP откройте раздел с безопасностью системы и проверьте, пропало ли сообщение о безопасности оборудования.
Способ 3: Включение «Целостности памяти»
Обычно «Целостность памяти» у функции «Изоляция памяти» (процесса безопасности, предназначенного для защиты основных действий в системе) в Windows 11 включена по умолчанию, но если вдруг она деактивирована, то включить ее придется владельцу ОС вручную:
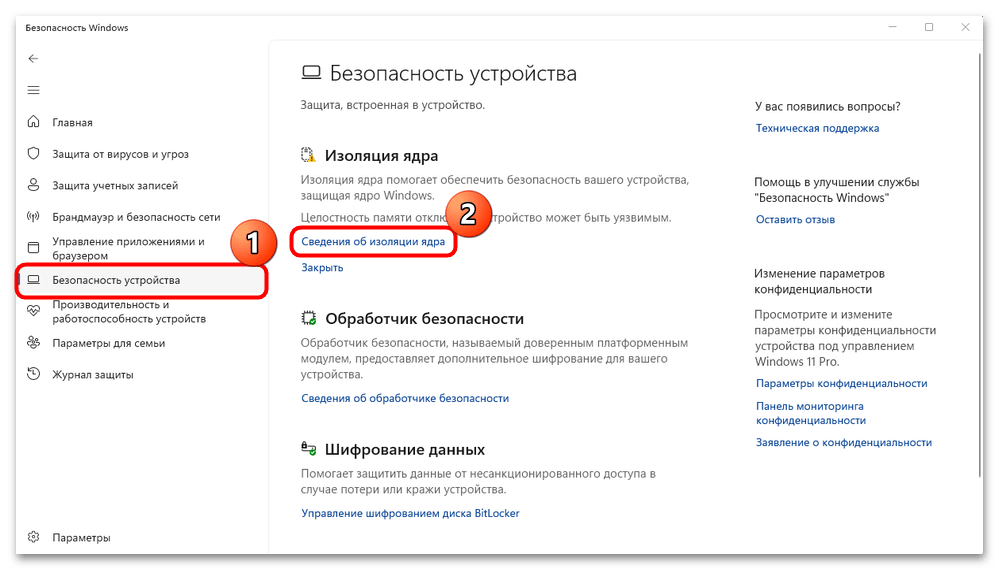
- Откройте средство «Безопасность Windows», отыскав его через строку системного поиска. Через навигационную панель слева перейдите в «Безопасность устройства» и в блоке «Изоляция ядра» кликните по строке «Сведения об изоляции ядра».
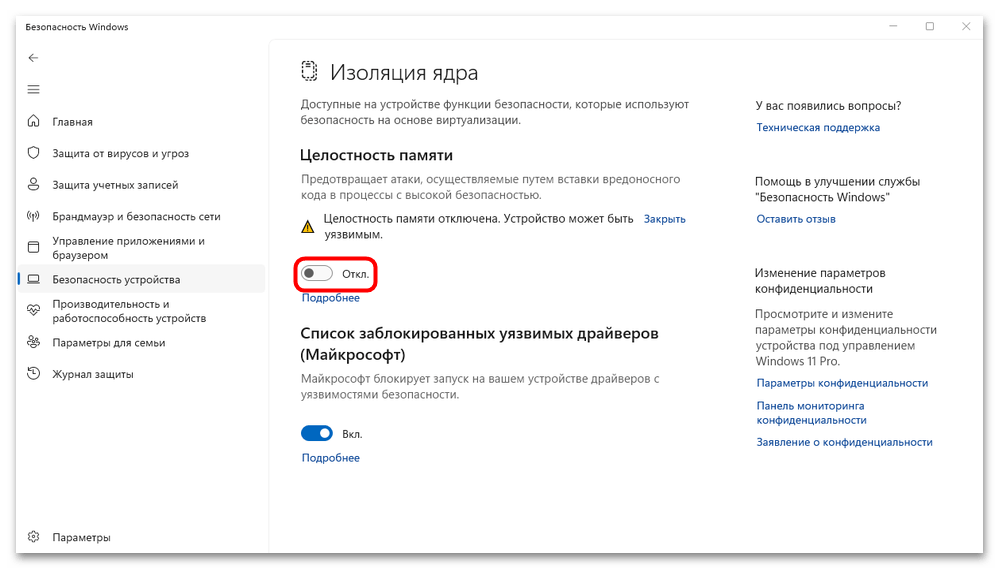
- Активируйте «Целостность памяти» с помощью переключателя.
Чтобы изменения вступили в силу, перезагрузите систему.
Способ 4: Сброс настроек безопасности
Если ни один предыдущий способ не помог, попытайтесь сбросить состояние настроек безопасности, поскольку причина может быть также в повреждении приложения, отвечающего за это.
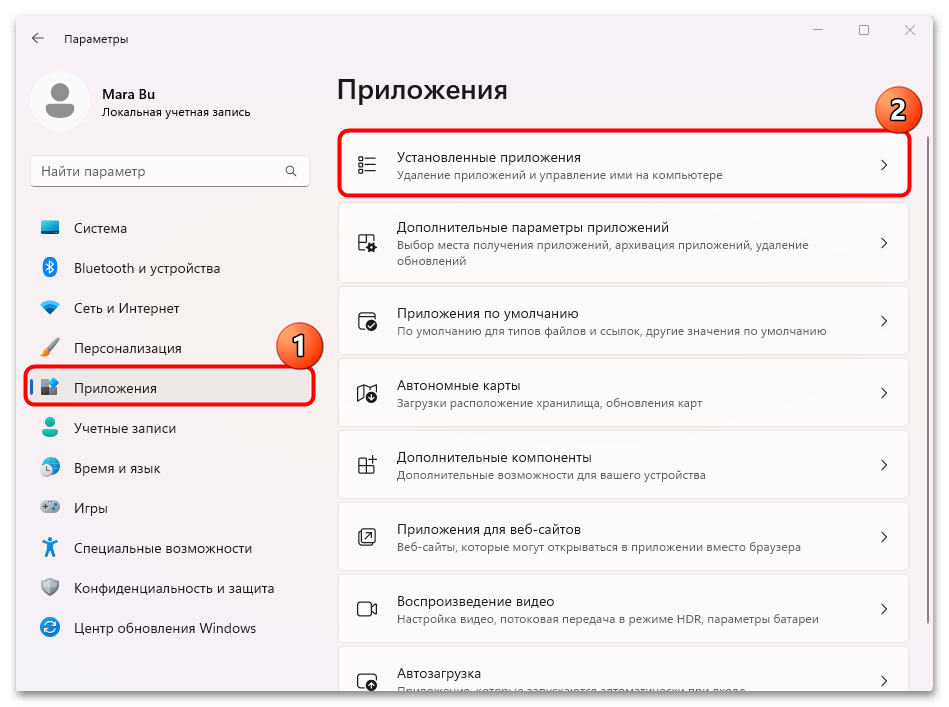
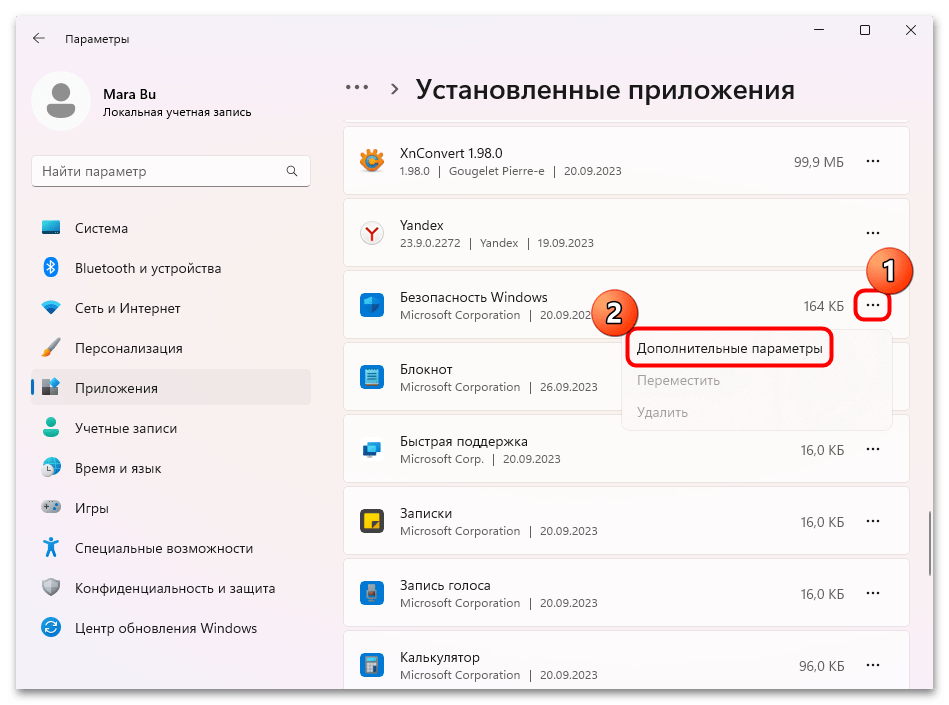
- Через штатные «Параметры» перейдите в раздел «Приложения», затем выберите строку «Установленные приложения».
- В списке программ найдите «Безопасность Windows» и нажмите на три точки справа и из появившегося меню выберите пункт «Дополнительные параметры».
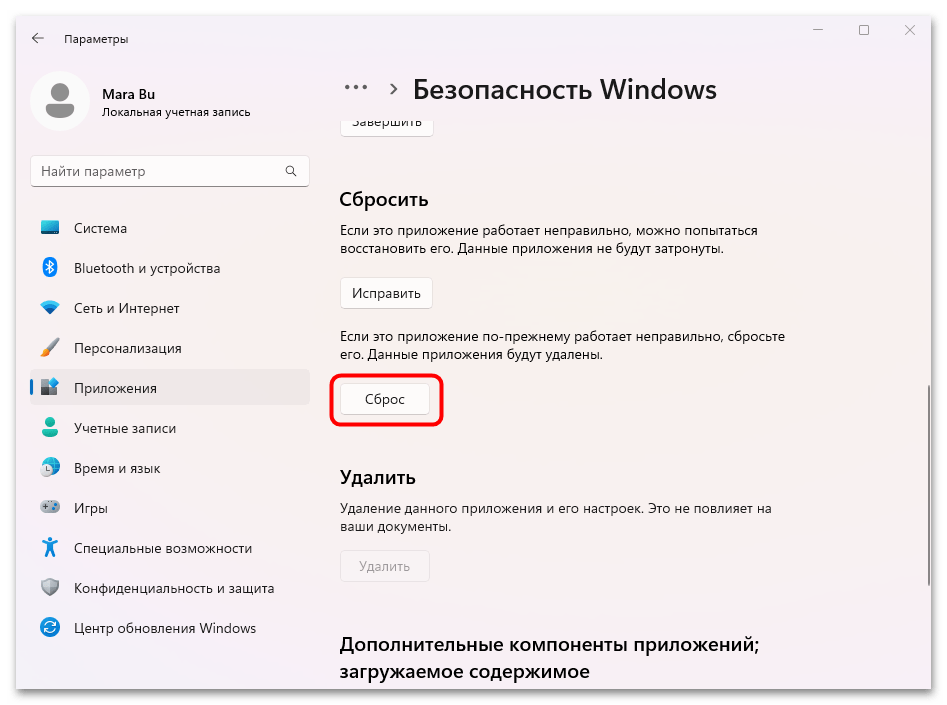
- В блоке «Сбросить» щелкните по кнопке «Сброс» и подтвердите действие.
Так вы сбросите все параметры приложения, отвечающего за безопасность, к тем, которые были установлены по умолчанию. Вероятно, это поможет решить проблему с сообщением о неподдерживаемой аппаратной безопасности.
Способ 5: Перерегистрация приложения безопасности
В случае если вам не удалось сбросить настройки приложения безопасности, можете повторно перерегистрировать его в системе, введя всего лишь одну консольную команду:
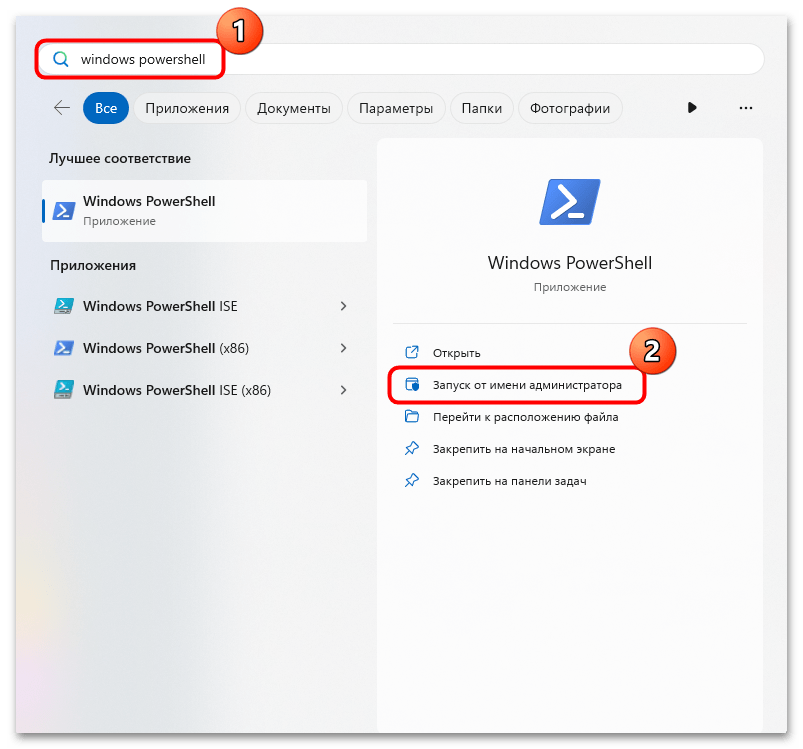
- Запустите «Windows PowerShell» от имени администратора. Найдите средство в главном меню и выберите соответствующий тип запуска.
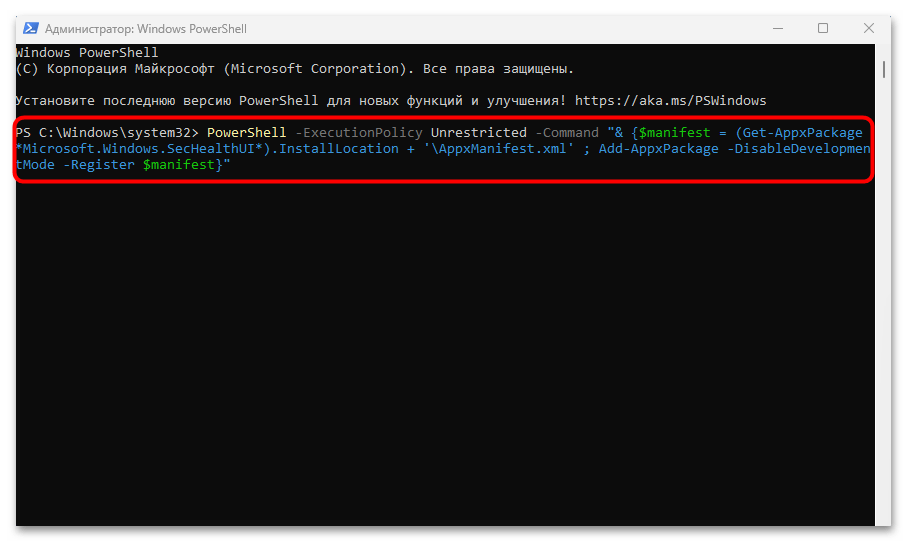
- Вставьте команду
PowerShell -ExecutionPolicy Unrestricted -Command "& {$manifest = (Get-AppxPackage *Microsoft.Windows.SecHealthUI*).InstallLocation + '\AppxManifest.xml' ; Add-AppxPackage -DisableDevelopmentMode -Register $manifest}" и выполните ее, нажав на клавишу «Enter».
Если выполнение команды завершилось успешно, перезагрузите систему и проверьте, осталось ли сообщение об ошибке.
Способ 6: Удаление обновлений
Бывает, что последние обновления нарушают стабильность работы системы и вызывают различные ошибки из-за конфликта программного обеспечения, например в результате сбоев при скачивании или установке. Если это ваш случай, попробуйте удалить недавние апдейты. Метод может помочь, если до обновления подобной ошибки не было. Есть несколько вариантов того, как удалить недавно скачанные апдейты, в том числе использование автоматизированных встроенных средств или ручной метод, о чем более детально мы писали в нашем отдельном материале.
Подробнее: Как удалить обновление в Windows 11
Наша группа в TelegramПолезные советы и помощь
Table of contents
- What Is a Trusted Platform Module (TPM)?
- How to Check if the TPM Is Working
- Method 1: Using the Command Prompt
- Method 2: Using the Run dialog box
- Method 3: Using the Windows Security app
- Method 4: Using the Device Manager
- What to Do if You Don’t Have a TPM Device?
- How to Fix the Error “TPM Device Not Detected” on Windows 10/11
- Fix 1: Check if TPM is enabled in the BIOS/UEFI
- Fix 2: Shutdown your laptop and turn it on with battery power
- Fix 3: Disconnect your laptop battery
- Fix 4: Drain all system power (PCs)
- Fix 5: Get the latest Windows updates
- Fix 6: Check for system file corruption
- Fix 7: Clear the TPM cache manually
- Fix 8: Reset the BIOS/UEFI to factory defaults
- Fix 9: Change your TPM version
- Fix 10: Update your BIOS
- Fix 11: Update the TPM driver or firmware
- Fix 12: Replace the TPM module
- Fix 13: Contact your OEM
- What Are the Causes of the Error “Alert! TPM Device Is Not Detected”?
- The “TPM Not Detected” Error: Fixed
- FAQ
It’s easy to find yourself in a fit of confusion when you see the TPM error since the device is now becoming more integral to security features. Apart from being unable to run Windows 11, systems that magically stop detecting their TPMs may also lose access to important encryption keys , saved passwords, and other security information. Thankfully, there are different ways to resolve the error on laptops and desktops and Windows 11 and 10. I’ll outline these methods and explain why the error occurs.
What Is a Trusted Platform Module (TPM)?
A Trusted Platform Module is a dedicated security chip embedded in a motherboard, available as a separate hardware module, or integrated into a CPU. A TPM can also be provided as separate firmware installed in a computer’s chipset. It provides hardware-based security functions, which means it generates and store cryptographic keys, saves passwords and digital certificates, and verify boot integrity to protect against sophisticated attacks. So, see it as a safe that holds the keys necessary to open your computer and unlock other functions and components.
Note
For example, whenever you turn on your TPM-enabled computer, the chip checks your computer status using various indicators. If everything is normal it will provide the encryption keys required to unlock your hard drive and boot your system. That way, your computer won’t boot if hackers attempt to change the startup process.
Microsoft now integrates TPM with various Windows encryption and sign-in processes, such as BitLocker and Windows Hello. However, it is more integral to Windows 11 and is used for boot verification.
Windows now loads encryption keys onto the chip instead of using the system memory. This method ensures that only the chip can provide encryption keys for features like BitLocker whenever you want to decrypt your hard drive.
How to Check if the TPM Is Working
The first step in troubleshooting the issue is confirming whether Windows is correctly reporting that you do not have a TPM. To do that, you must verify that your computer has a Trusted Platform Module and that it is working. There are different ways to confirm.
Let’s show you how.
Method 1: Using the Command Prompt
Follow the steps below:
- Open the Start menu and type CMD.
- Click Run as administrator under Command Prompt on the results page.
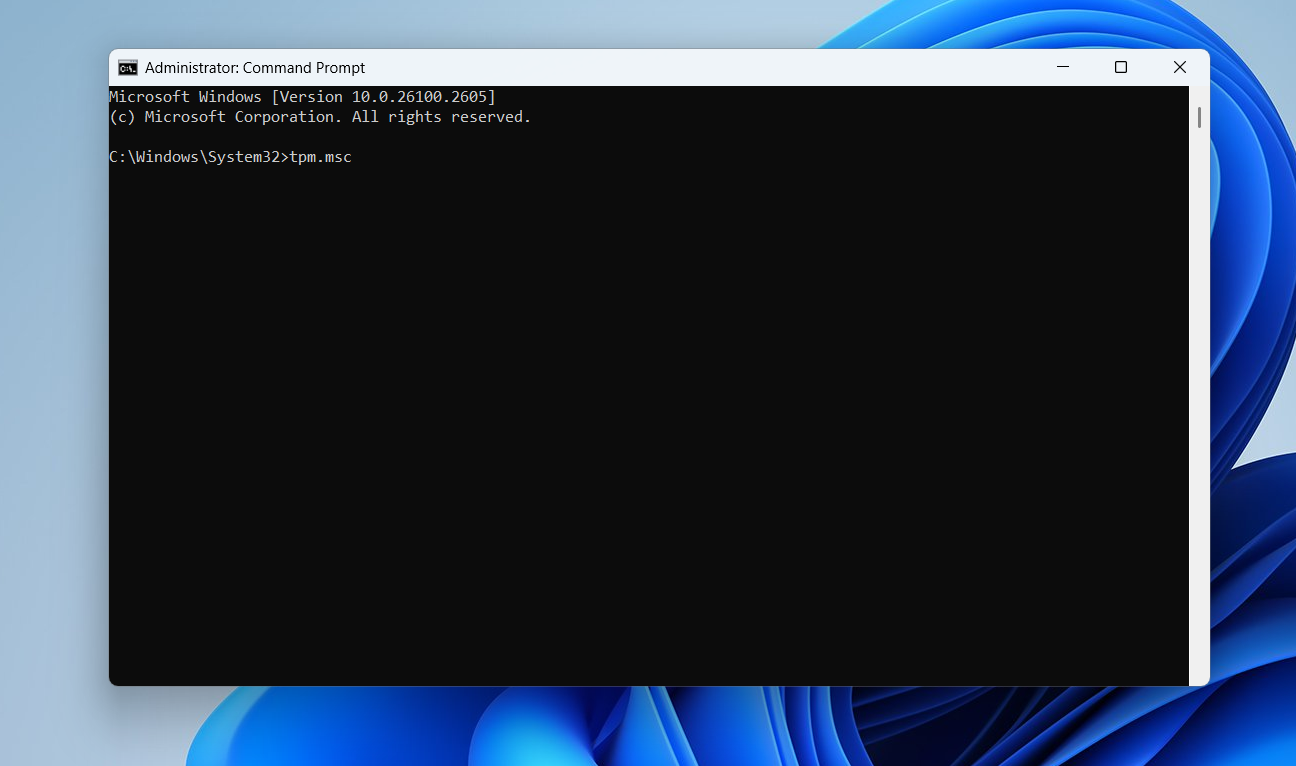
- Once the Command Prompt opens, type tpm.msc and press
Enter .
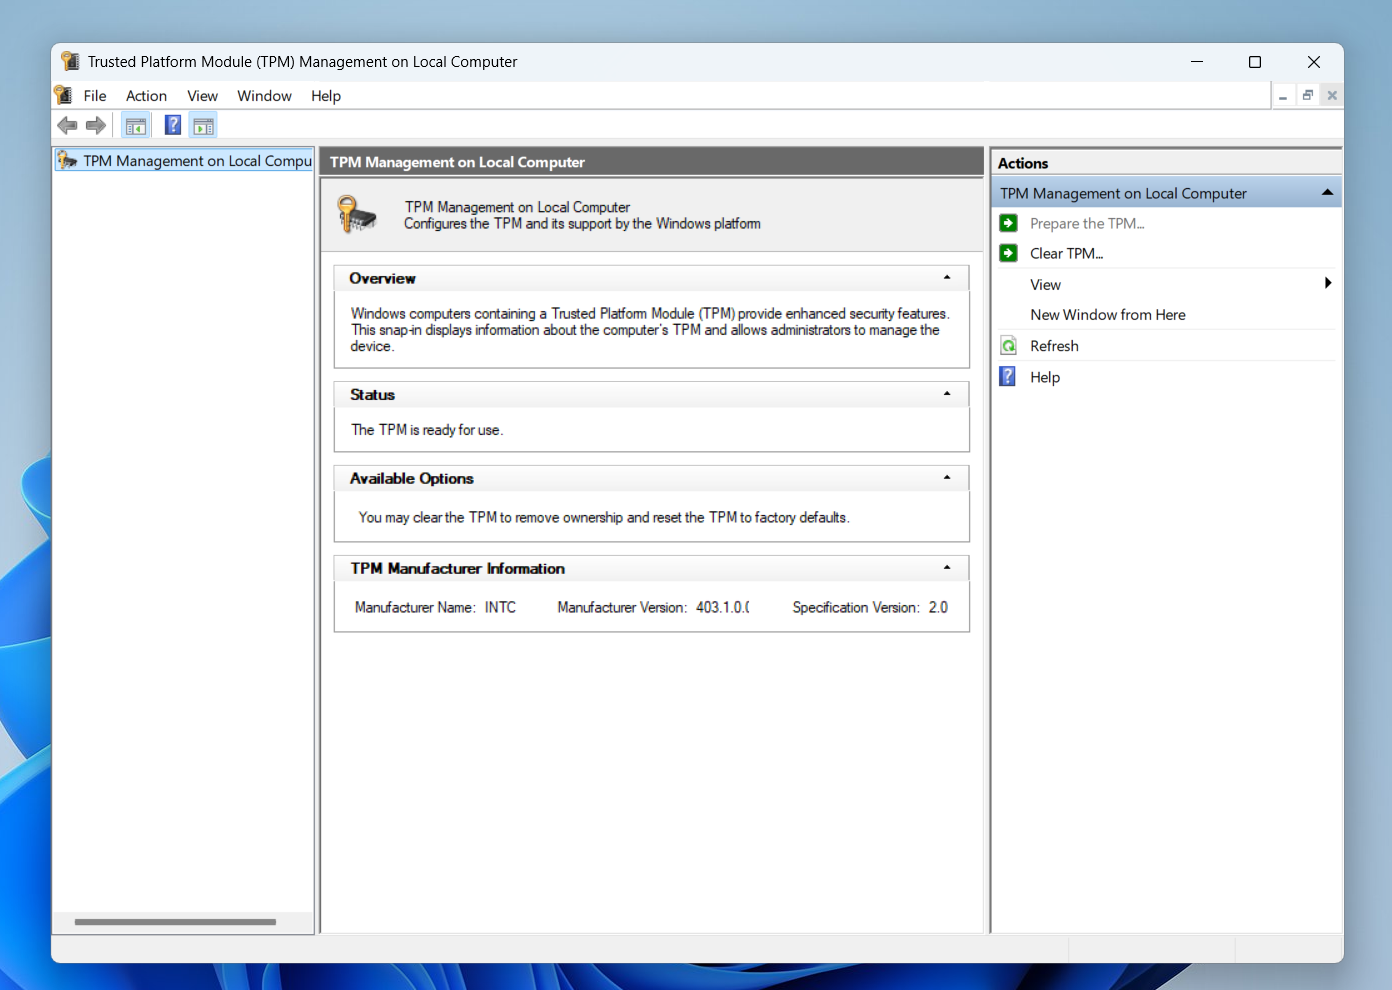
- The Trusted Platform Module (TPM) Management on Local Computer window will now show up with a message indicating whether your computer has a working TPM chip.
If your computer has a TPM, the window will show a small description under the Overview section. It’ll tell you whether the module is ready to use under Status and indicate the TPM’s manufacturer under TPM Manufacturer Information .
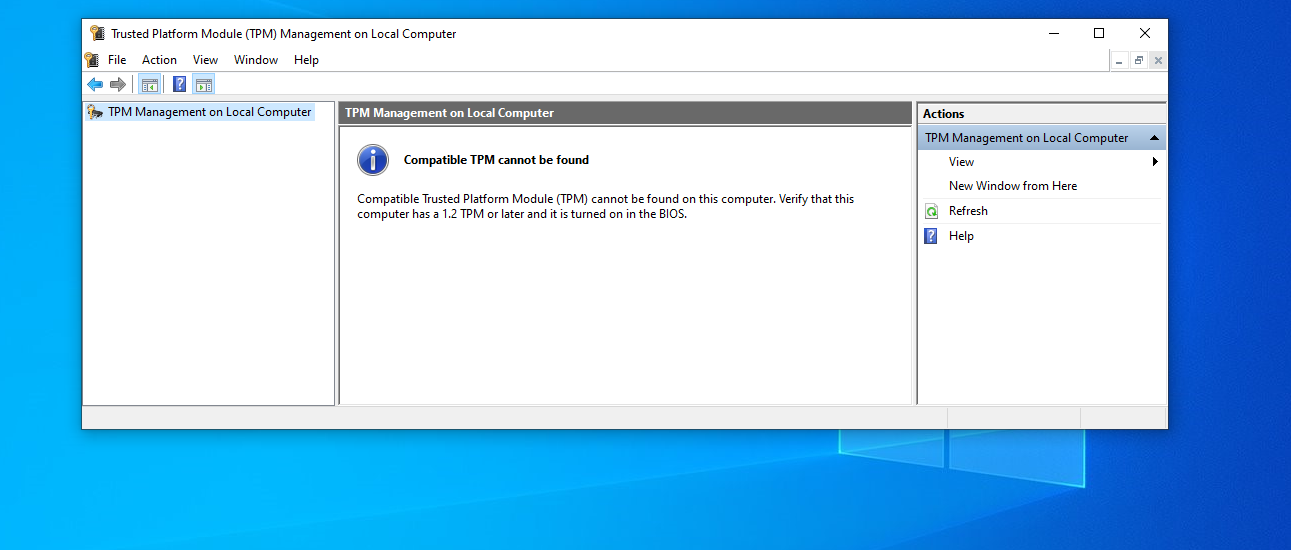
If your computer does not have a TPM chip, you should see a message that reads:
“Compatible TPM cannot be found.”
However, another detailed message offers the following advice:
“Verify that this computer has a 1.2 TPM or later and it is turned on in the BIOS.”
We’ll cover that later. Now, let’s continue with other methods for checking your TPM status.
Also read:Windows Command Prompt: Most Useful Commands
Method 2: Using the Run dialog box
Here’s how to check through the Run dialog:
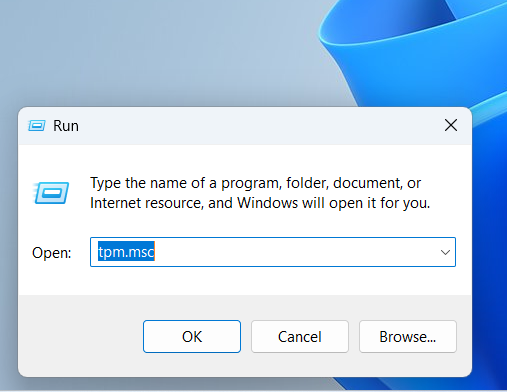
- Launch the Run dialog window. Press the
Windows + R key combo.
- Type tpm.msc into the text box and hit
Enter .
- You should see the same TPM management window.
Method 3: Using the Windows Security app
You can also check TPM details through the Windows Security application. Follow these steps:
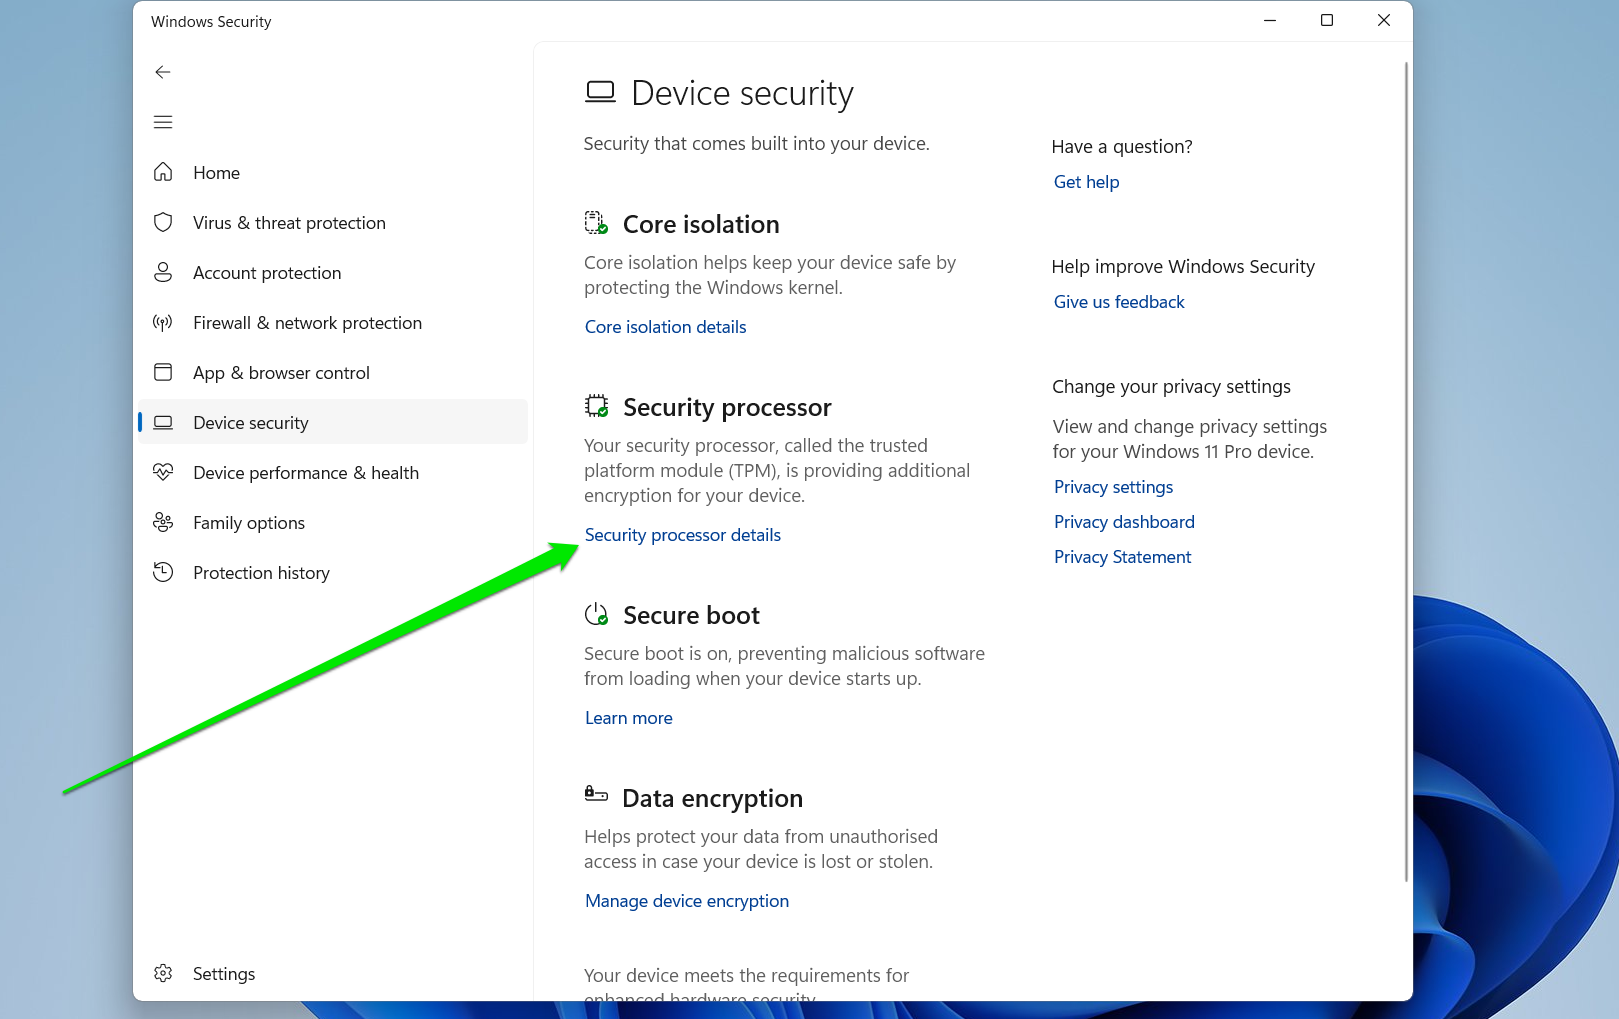
- Open the Start menu and type device security .
- Click the Device security option in the search result.
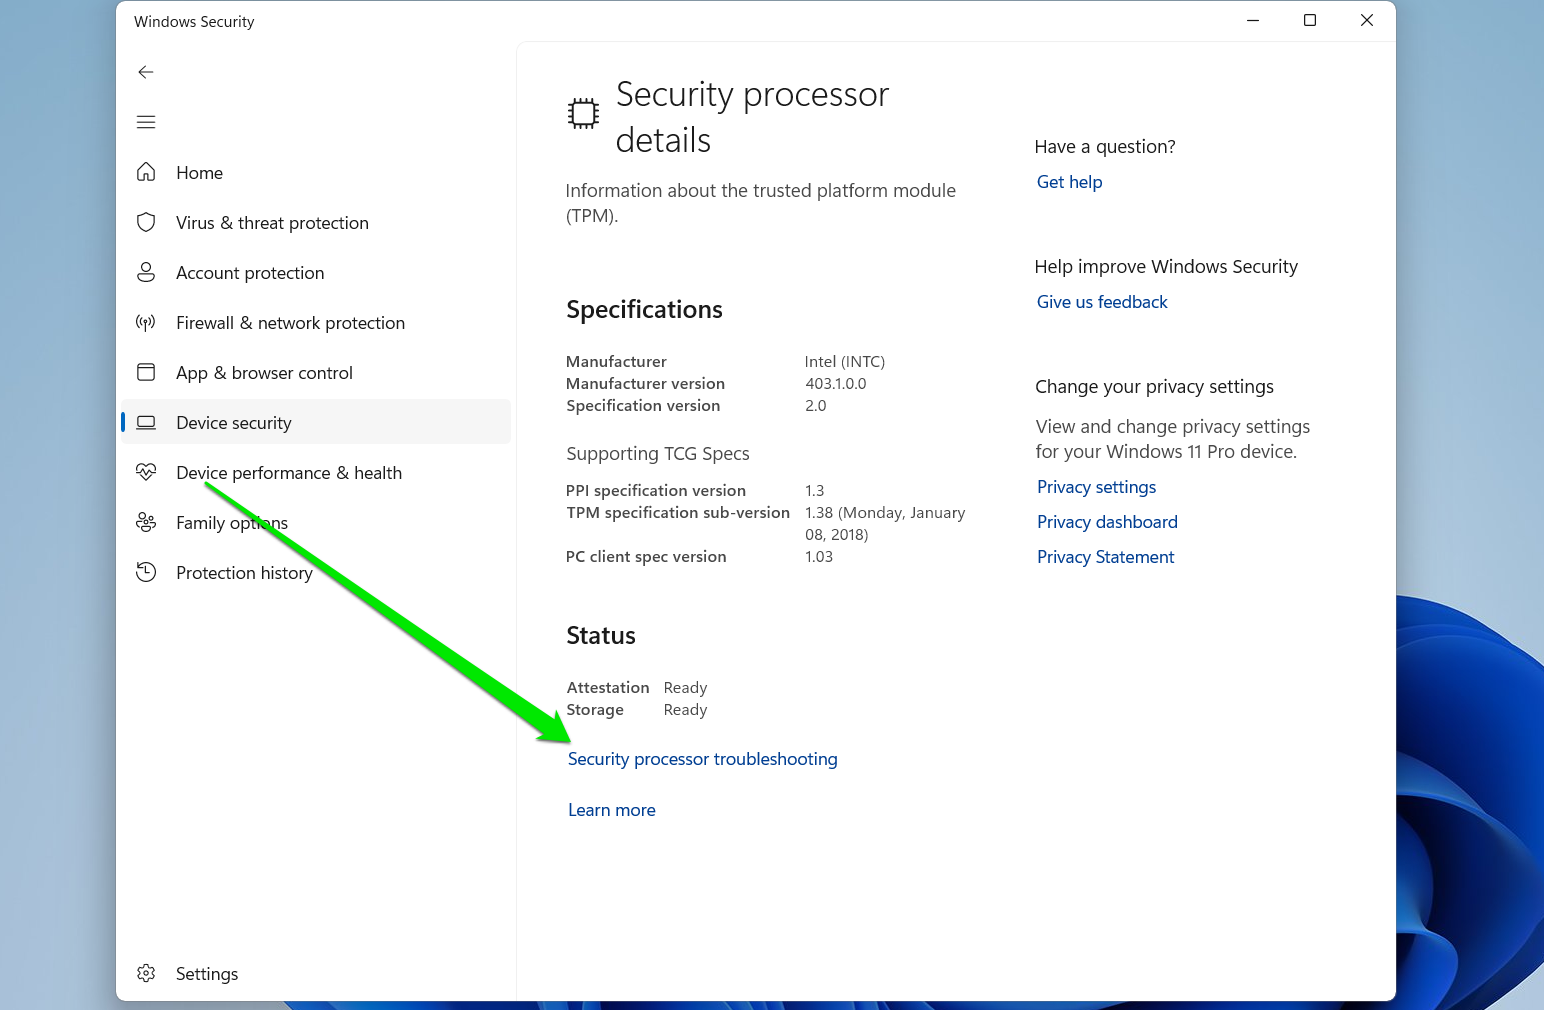
- Select Security processor details once you see the Device security page.
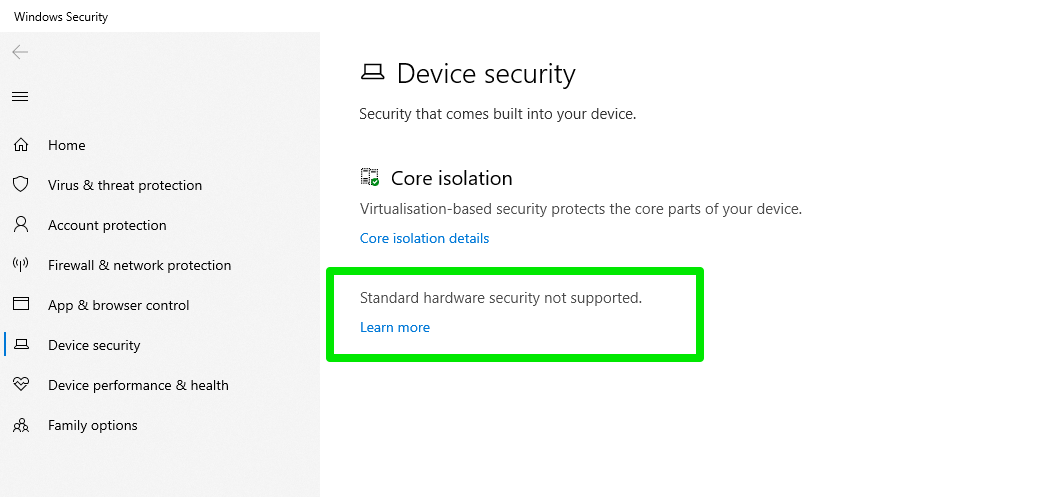
If you don’t have a TPM chip or firmware, you should see a message that says, “Standard hardware security not supported.”
- The Security processor details page displays your TPM manufacturer, specification version, status, and other information.
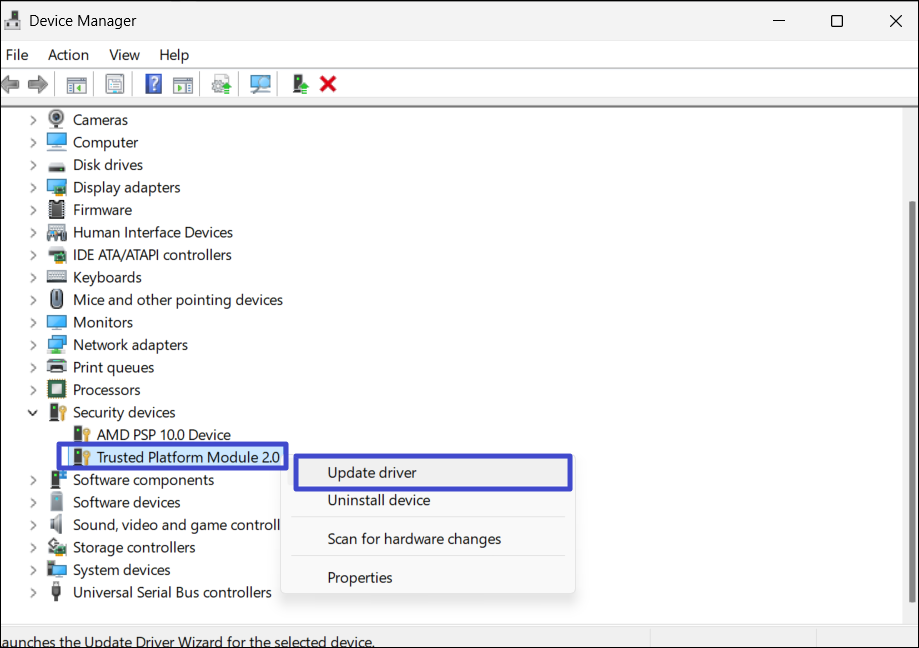
Method 4: Using the Device Manager
Additionally, the Device Manager can tell if you have a TPM chip. Here’s how to check:
- Press
Windows + X or right-click the Start button.
- Select Device Manager .
- Expand Security devices.
If you don’t have a TPM chip, you won’t see the Security devices option.
Your chip may not appear in the Device Manager if its drivers are corrupt or not installed. This may also affect your computer’s ability to report that you have a chip.
What to Do if You Don’t Have a TPM Device?
People normally see the error “TPM device not detected” in Windows 10 when they try to install Windows 11 or after running the Windows PC Health Check app. Not having the device isn’t the end of the world.
Here are your options:
- Stay on Windows 10: While support for Windows 10 ends in 2025, you can pay Microsoft a token to extend your support window for 3 years.
- Upgrade to Windows 11 anyway: You can bypass the TPM requirement and upgrade to Windows 11. However, your computer will lack critical hardware-based encryption and security features.
- Install a TPM device: If you use a desktop computer, check if your motherboard has a TPM header. If it does, you can purchase a compatible device and install it. Head to the motherboard’s manufacturer website to check the process for your specific model.
How to Fix the Error “TPM Device Not Detected” on Windows 10/11
If the methods above show that your computer is not TPM-enabled, it probably isn’t. However, if you’ve confirmed with your manual and OEM (original equipment manufacturer) that you should have a TPM, you can apply the following methods to fix the issue. They work for Windows 11 and 10 computers as well as desktops and laptops.
We’ll start with the most effective fixes and work our way down to solutions for uncommon underlying issues.
| Solution |
Description |
Who should apply |
| Enable TPM in the BIOS/UEFI |
The TPM might be turned off in the BIOS |
Users whose computers have TPM 2.0 |
| Power the laptop with battery power |
Shut down your laptop, unplug your charger, and turn it on with just the battery |
Laptop users whose computers have TPM 2.0 |
| Disconnect the laptop battery |
Disconnect and reconnect the laptop battery |
Laptop users |
| Drain system power |
Turn off the computer, unplug the power supply unit, press and hold the power button for a minute, and restart the computer |
Desktop users |
| Update Windows |
Check for and install the latest Windows components |
Windows users generally |
| Check for system file corruption |
Use the System File Checker (SFC) tool to find and replace corrupt or damaged system files |
Windows users with TPM devices |
| Clear the TPM cache manually |
Go through the Windows Security app or the BIOS to delete TPM keys and reset the module to factory defaults |
People whose computers detect the TPM but still display the error |
| Reset the BIOS/UEFI |
Apply default BIOS settings |
Users whose system can’t detect the TPM |
| Change the TPM version |
Upgrade to TPM 2.0 |
Users with TPM 1.2 systems |
| Update the BIOS |
Install the latest BIOS version |
People with older BIOS versions |
| Update the TPM driver/firmware |
Install the latest manufacturer TPM firmware or driver |
Users who haven’t installed firmware updates |
| Replace the TPM device |
Install a new and working TPM device |
Desktop users with dedicated TPM devices |
| Contact the manufacturer |
Approach the manufacturer for technical support |
Individuals with active warranties |
Fix 1: Check if TPM is enabled in the BIOS/UEFI
Many computers provide options for switching off the TPM chip within the BIOS or UEFI . As such, your computer may be reporting that it lacks the module when, in fact, it is turned off. You can go to the BIOS to confirm whether this is the case. Every Windows system has a manufacturer-specific method for entering the BIOS environment from boot. However, there’s a universal method from within Windows. Follow these steps:
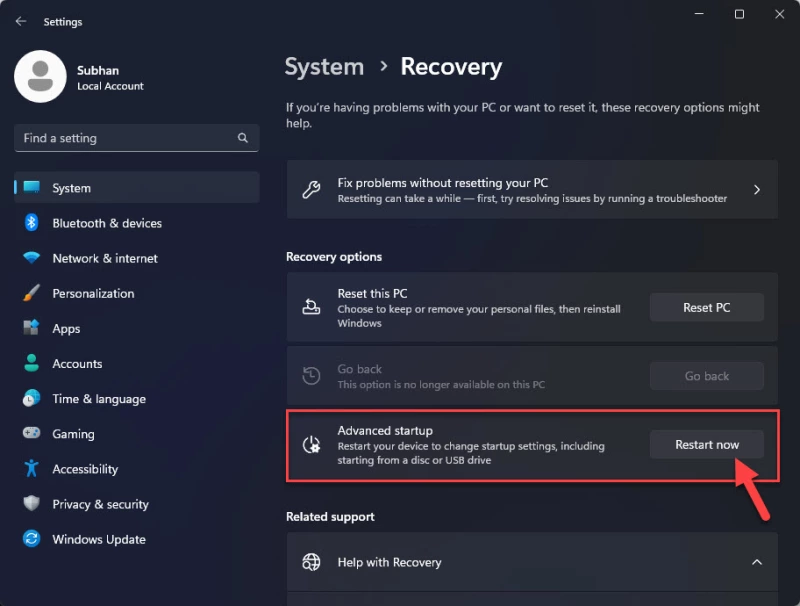
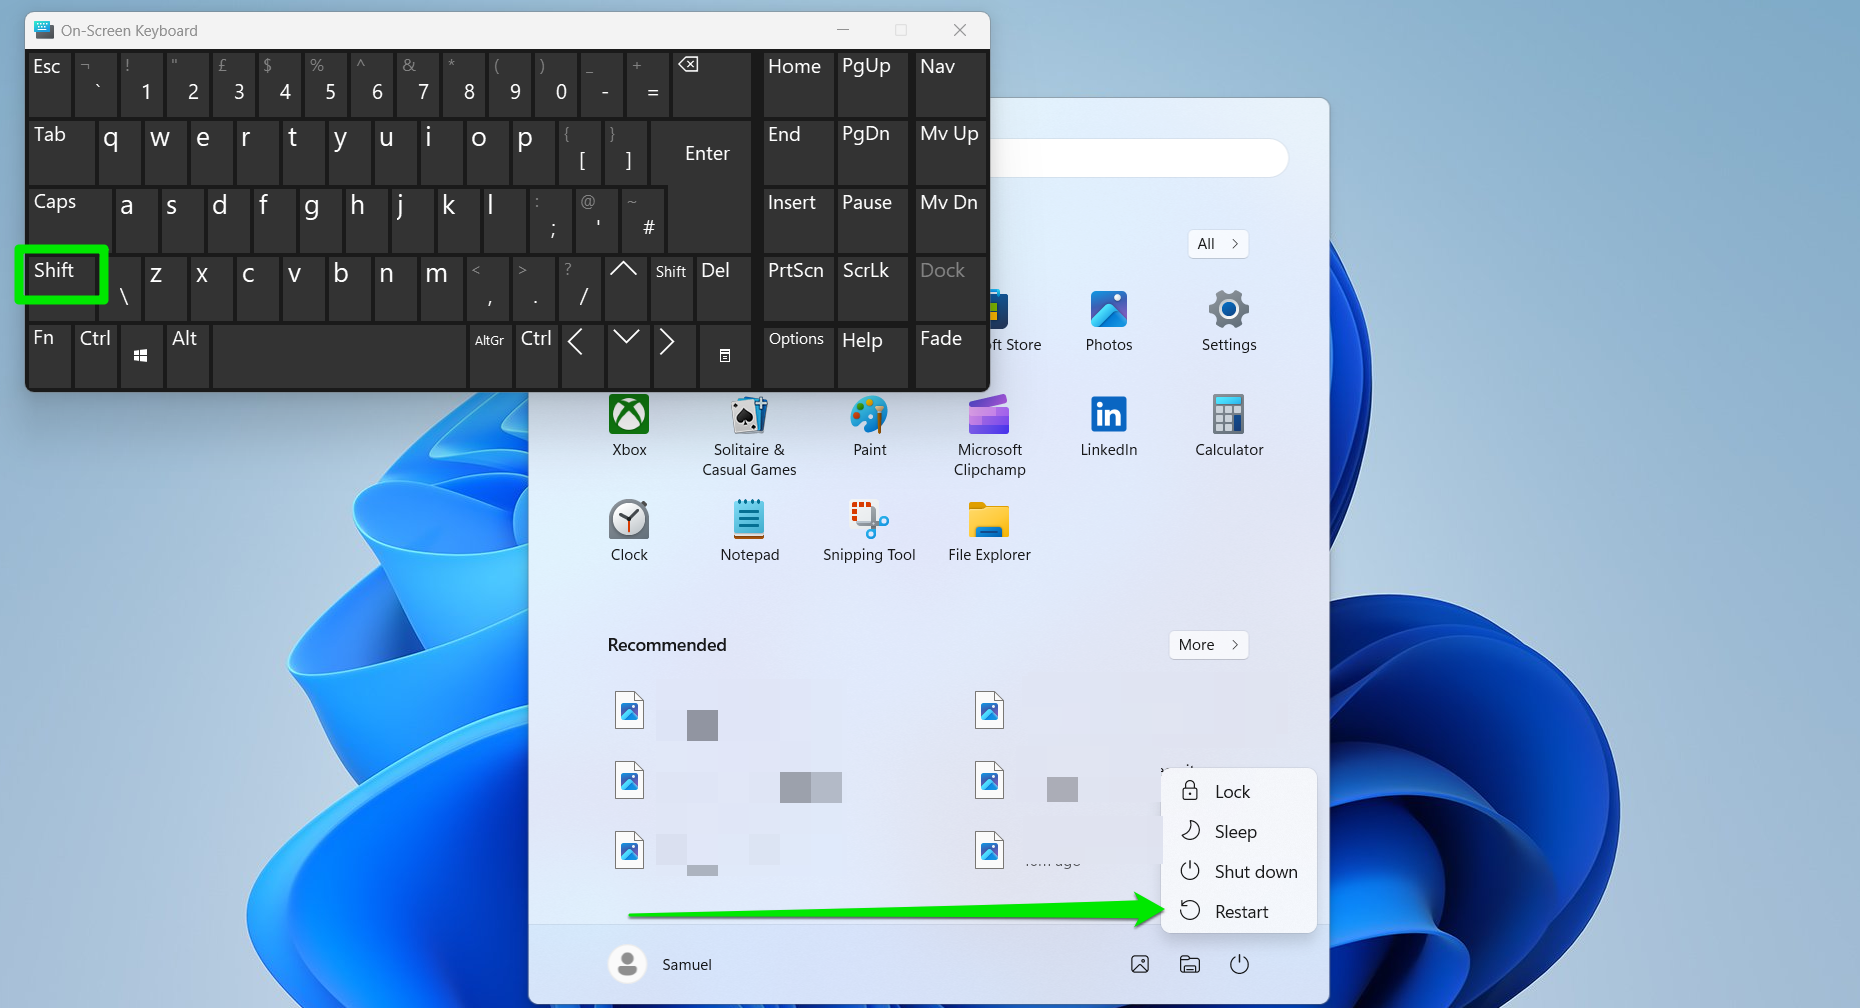
- Open the Start menu and click the power icon.
- Hold down the
Shift keyboard button and select Restart.
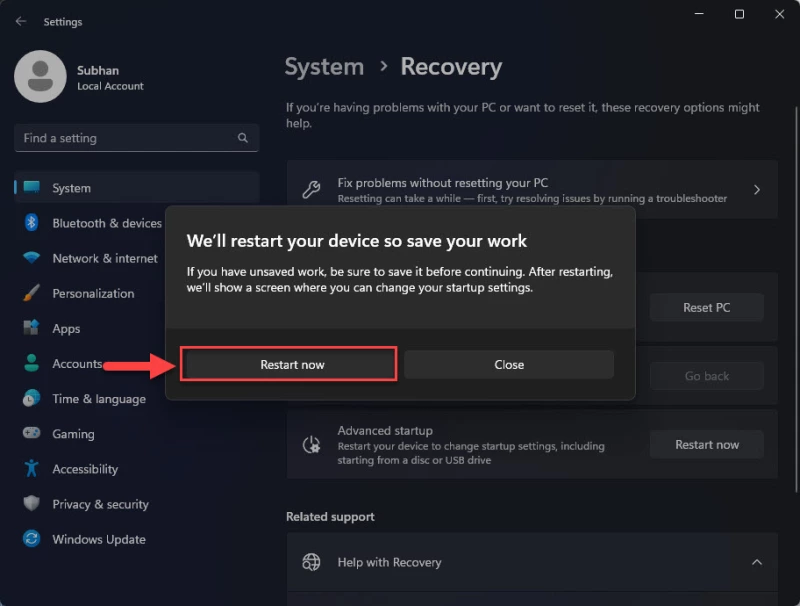
- Your computer will now reboot to the Advanced Startup Options menu.
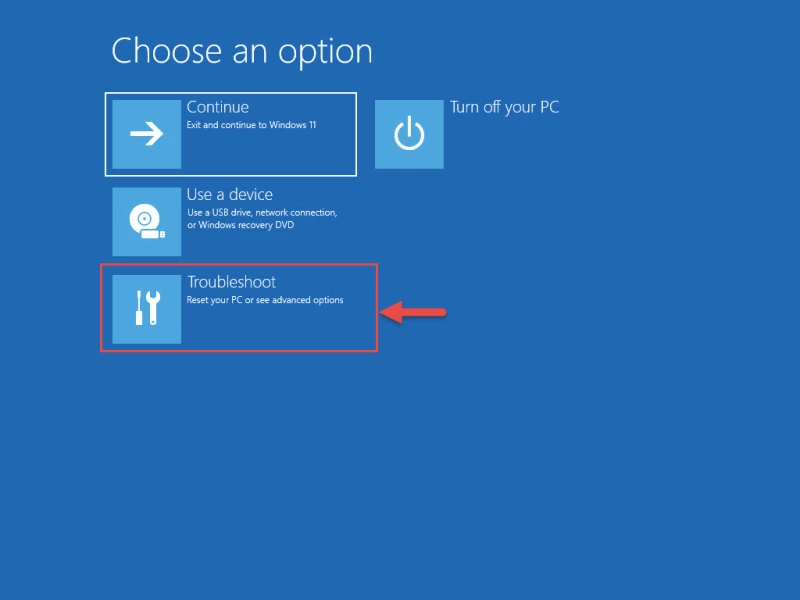
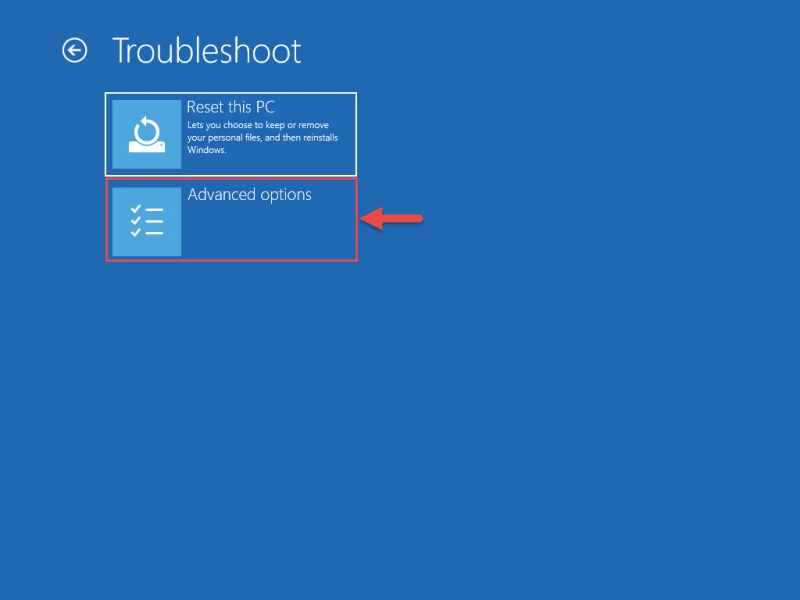
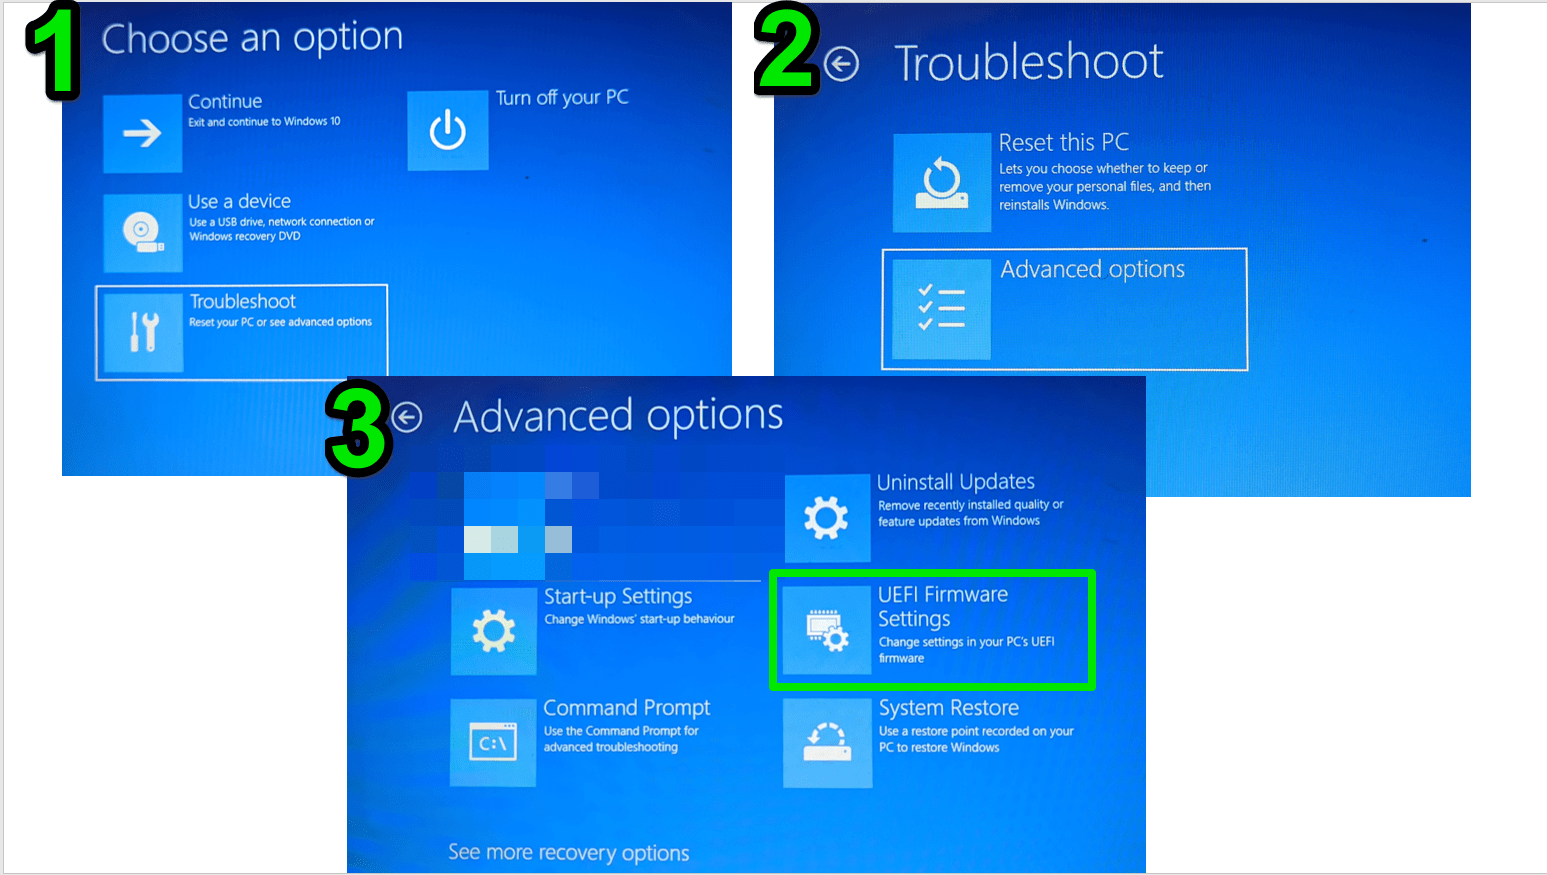
- Click Troubleshoot in the Choose an option screen.
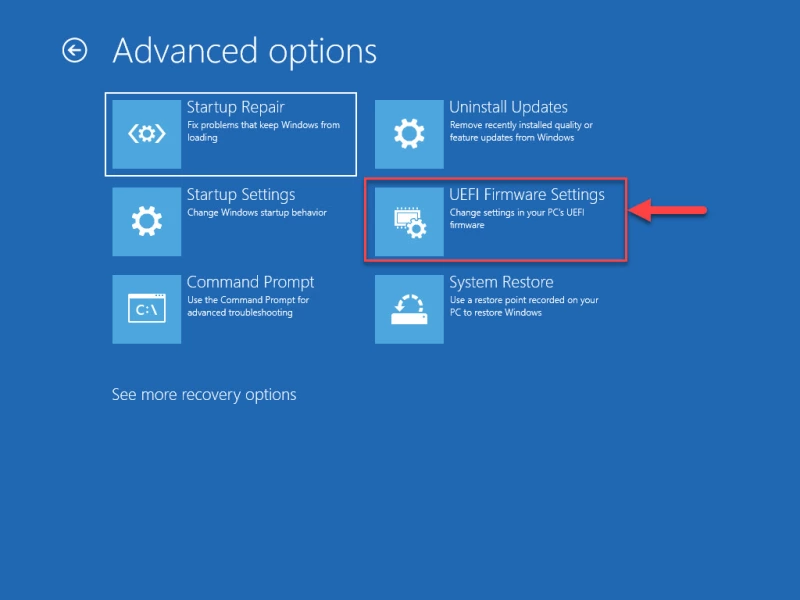
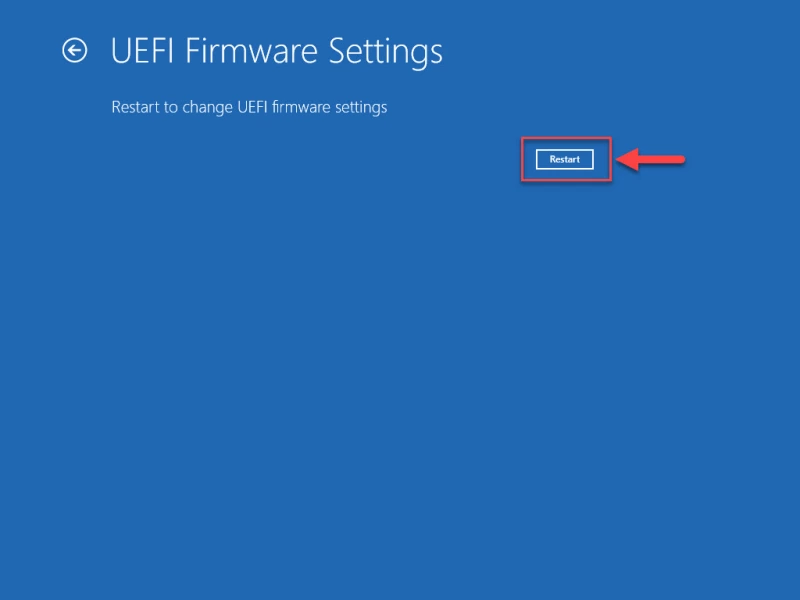
- Select Advanced options on the next page and click UEFI Firmware Settings .
- You will now be taken to the BIOS environment.
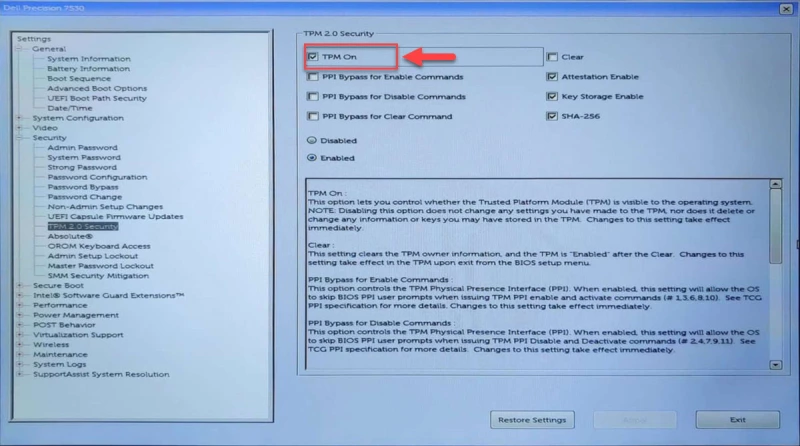
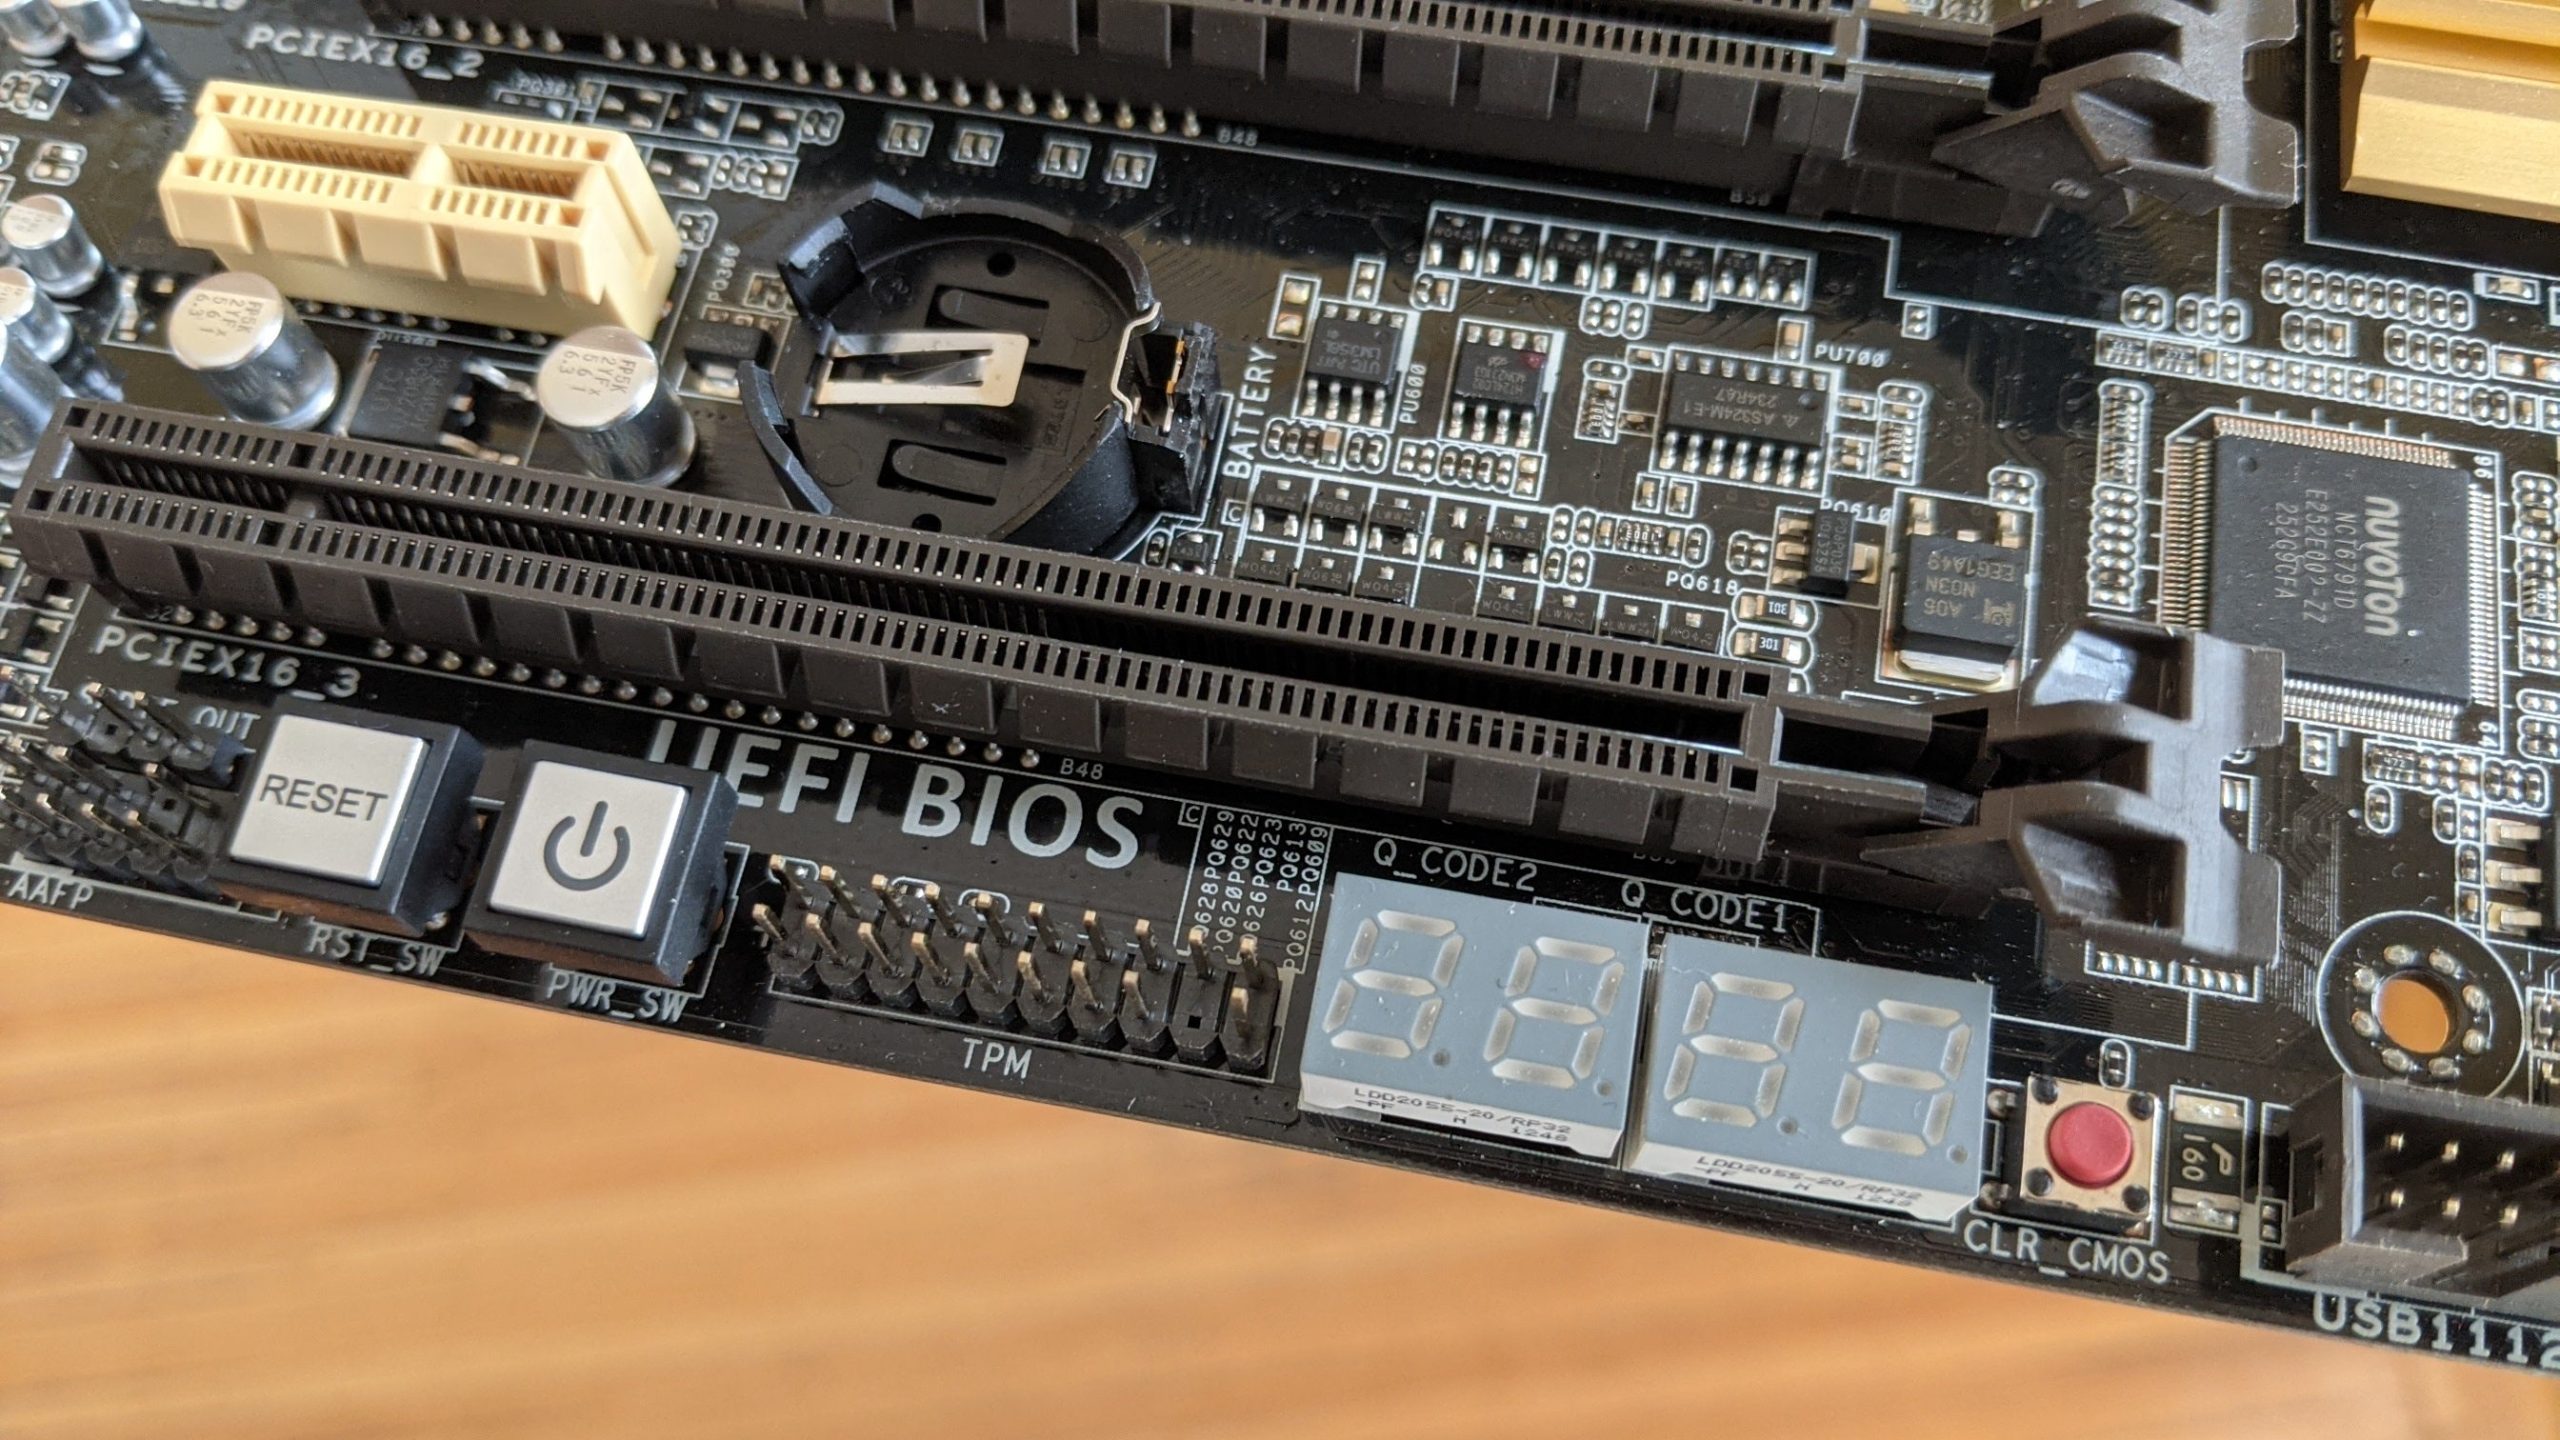
Once in the BIOS, you can go to the Security or Advanced tab to find the TPM option and enable it. For example, some MSI motherboards have the option under Trusted Computing in the Advanced tab. Lenovo and Dell systems have the TPM toggle in their Security tabs.
The option might go by a different name, such as Security chip, Security device, Trusted computing, or TPM.
Fix 2: Shutdown your laptop and turn it on with battery power
This method works for almost every Dell laptop with a TPM module, as shown in this Reddit thread . While it mostly works on Dell laptops , users have reported success with other brands. It’s quite simple:
- Turn off your laptop and unplug its charger.
- Wait for about 3 minutes.
- Restart the laptop without plugging it in. Ensure you don’t plug in the charger.
- Head to the Command Prompt window and check for the “TPM not detected” error again (type tpm.msc and press
Enter ).
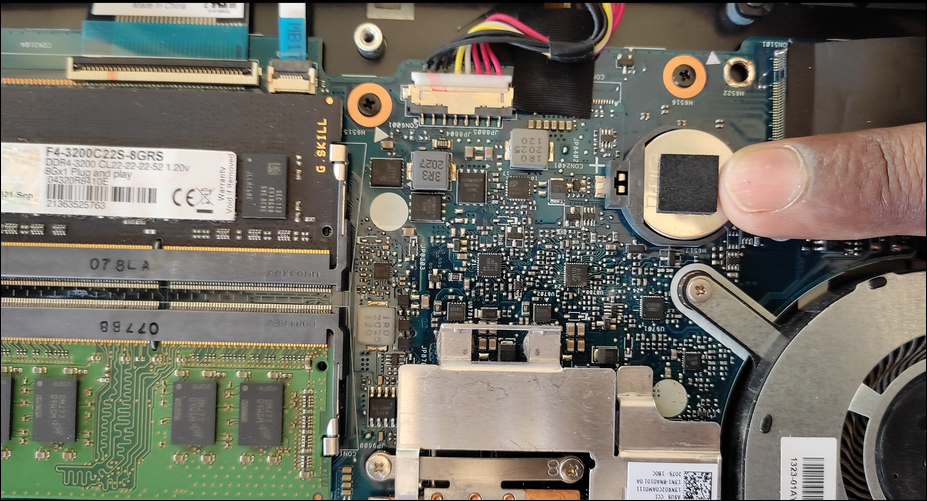
Fix 3: Disconnect your laptop battery
If the previous method did not fix the issue, consider disconnecting your laptop’s battery . This process may be too technical for some people, but most modern laptops are quite easy to open up. You can watch videos on YouTube to check out guides on accessing your computer’s in-built battery or have an expert help you. After removing the battery, discharge any static current by pressing and holding the power button for about 60 seconds. Now, try restarting the laptop with just its charger and check if the issue has been resolved.
Fix 4: Drain all system power (PCs)
This process also follows the same principle as disconnecting the battery and draining power, except that desktops don’t have batteries. Here are the steps you should follow:
- Turn off the computer and unplug its power supply cable.
- Disconnect peripherals.
- Now, press the power button for about 60 seconds to discharge static power.
- Connect the power supply cable, turn on the system, and check if the issue has been resolved.
Move on to the next fix if you still get the “Alert! TPM device is not detected” error.
Fix 5: Get the latest Windows updates
You’ll find further down this article that TPM driver and firmware issues are among the reasons for the detection problem. However, other software glitches and conflicts can also trigger the error message you’re seeing. Installing Windows updates is a potential fix for these issues since Microsoft deploys drivers and hotfixes through the client. Here’s how to check for updates:
- Type updates in the Start menu and click Check for updates .
- Ensure you have a working internet connection.
- The Windows Update client will now check for available updates.
- Allow the tool to download and install updates, and then restart your computer to complete the installation.
- Ensure you also download and install optional quality and feature updates.
You can select Advanced options > Optional updates > Driver updates to check for and download available updates in Windows 11. On Windows 10, click View optional updates > Driver updates .
Fix 6: Check for system file corruption
You should also check for and repair corrupted system files and configurations. Windows will fail to detect the module if the files and services responsible are missing or damaged. Finding and fixing corrupt Windows components involves using the System File Checker.
Here’s how to run the SFC scan:
- Open the Command Prompt with administrative privileges.
- Type the following command and press
Enter : sfc /scannow.
You can follow our guide on fixing corrupted Windows files to learn more about fixing corrupt system files.
Fix 7: Clear the TPM cache manually
Clearing the TPM cache can resolve the issue if:
- Windows fails to initialize the module.
- Certain software is unable to interact with it.
- The module flat out refuses to work.
You can easily clear the TPM cache through Windows Security regardless of the make or model of your computer.
While going through the BIOS/UEFI is an option, it should be your last resort. There are also numerous security warnings regarding clearing your TPM keys. For example, you may lose critical security data associated with those keys, such as smart card information and sign-in PINs.
However, it would help to back up your data before clearing your TPM. Still, Microsoft warns against clearing the TPM on devices you don’t own, such as a work or school computer.
Follow these steps to clear the TPM cache:
- Open the Start menu or click the search bar in your taskbar.
- Type device security and hit
Enter.
- Click Device security on the search result page.
- Click Security processor details when you see the Device security window.
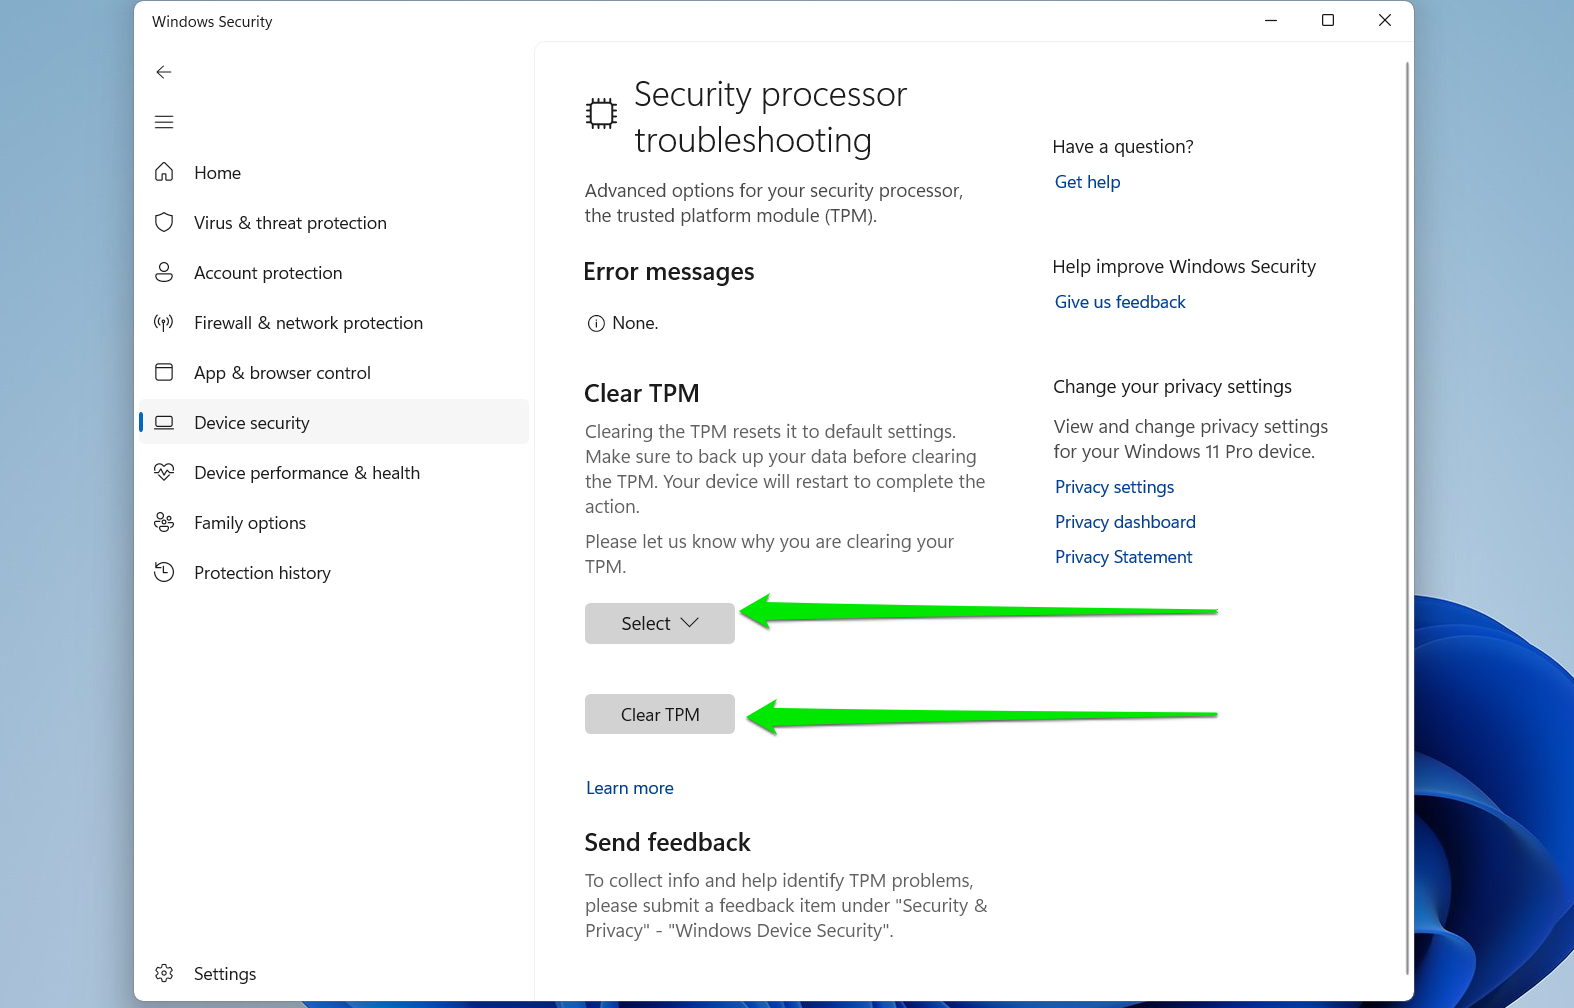
- Next, select Security processor troubleshooting under Status.
- When the Security processor troubleshooting page opens, go to the Clear TPM section, choose why you want to clear your TPM, and click Clear TPM .
You can now check whether the “TPM device not detected” issue has been resolved.
Fix 8: Reset the BIOS/UEFI to factory defaults
Resetting your BIOS/UEFI settings is another way to force your computer to detect the TPM chip. Certain changes you may have applied could be why Windows is throwing up the error.
To reset the BIOS/UEFI:
- Click the Restart button while holding your keyboard’s shift key to enter the Advanced Startup Options menu.
- From there, select Troubleshoot > Advanced options > UEFI Firmware Settings to enter your BIOS.
You should see the Reset button in the bottom corner (left or right) of your screen. In some cases, the key guides will be displayed at the top of the BIOS interface.
After resetting your BIOS, go to the Advanced or Security tab to check that your TPM is turned on. That is because some manufacturers turn the module off by default.
Fix 9: Change your TPM version
Older systems generally run TPM 1.2 out of the box, but manufacturers usually provide utilities that allow users to upgrade.
Microsoft and other software developers favor TPM 2.0 because it has more advanced hardware-based security features. As such, applications and certain system processes may trigger errors when dealing with version 1.2.
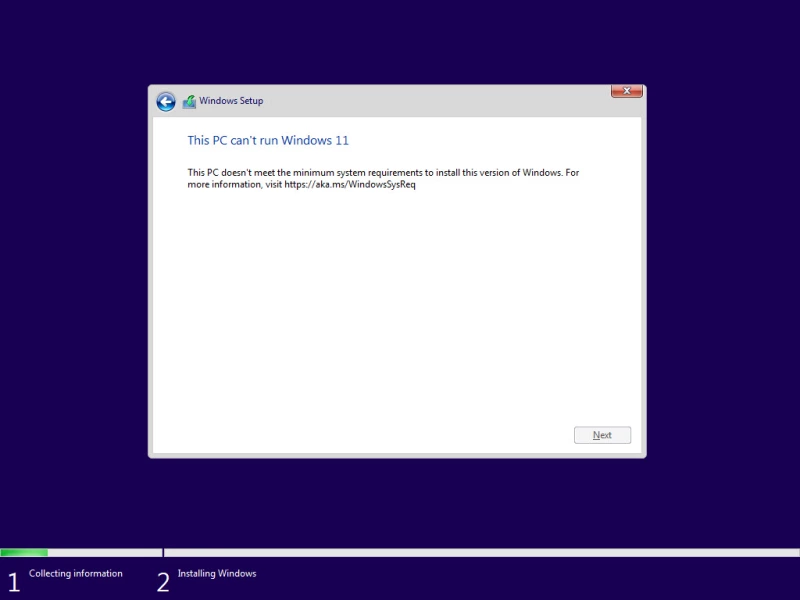
For instance, people who can’t install Windows 11 also see an error that reads, “ This PC must support TPM 2.0 .”
In most cases, Microsoft and your OEM will automatically upgrade your module, especially if you move to Windows 11. My TPM version was 1.2 the first time I installed Windows 11, but it has since changed to 2.0, and I never had to upgrade manually.
Installing the latest version of Windows through the Windows Update utility may be all you need to upgrade your TPM version. Sometimes, there are backlogs of Windows Update that do not install until you open the client and initiate the process.
That said, you can follow your computer manufacturer’s instructions on how to upgrade the security module on your system. You may be prompted to install a dedicated TPM upgrade utility. Ensure you follow instructions carefully and correctly.
How to change the TPM version on a Dell computer
Critical warning: Before you begin, ensure you disable BitLocker on your computer. Open Settings, go to Privacy & security > Device encryption , and turn off Device encryption . Also click BitLocker drive encryption on the same page and turn off BitLocker .
- Open Dell’s Support webpage .
- Scroll down and enter your product identifier. You can go to the right side and click Detect This PC to allow the website to automatically identify your computer. You can also:
- Select Browse All Products .
-
- Choose Computers and select your system’s version.
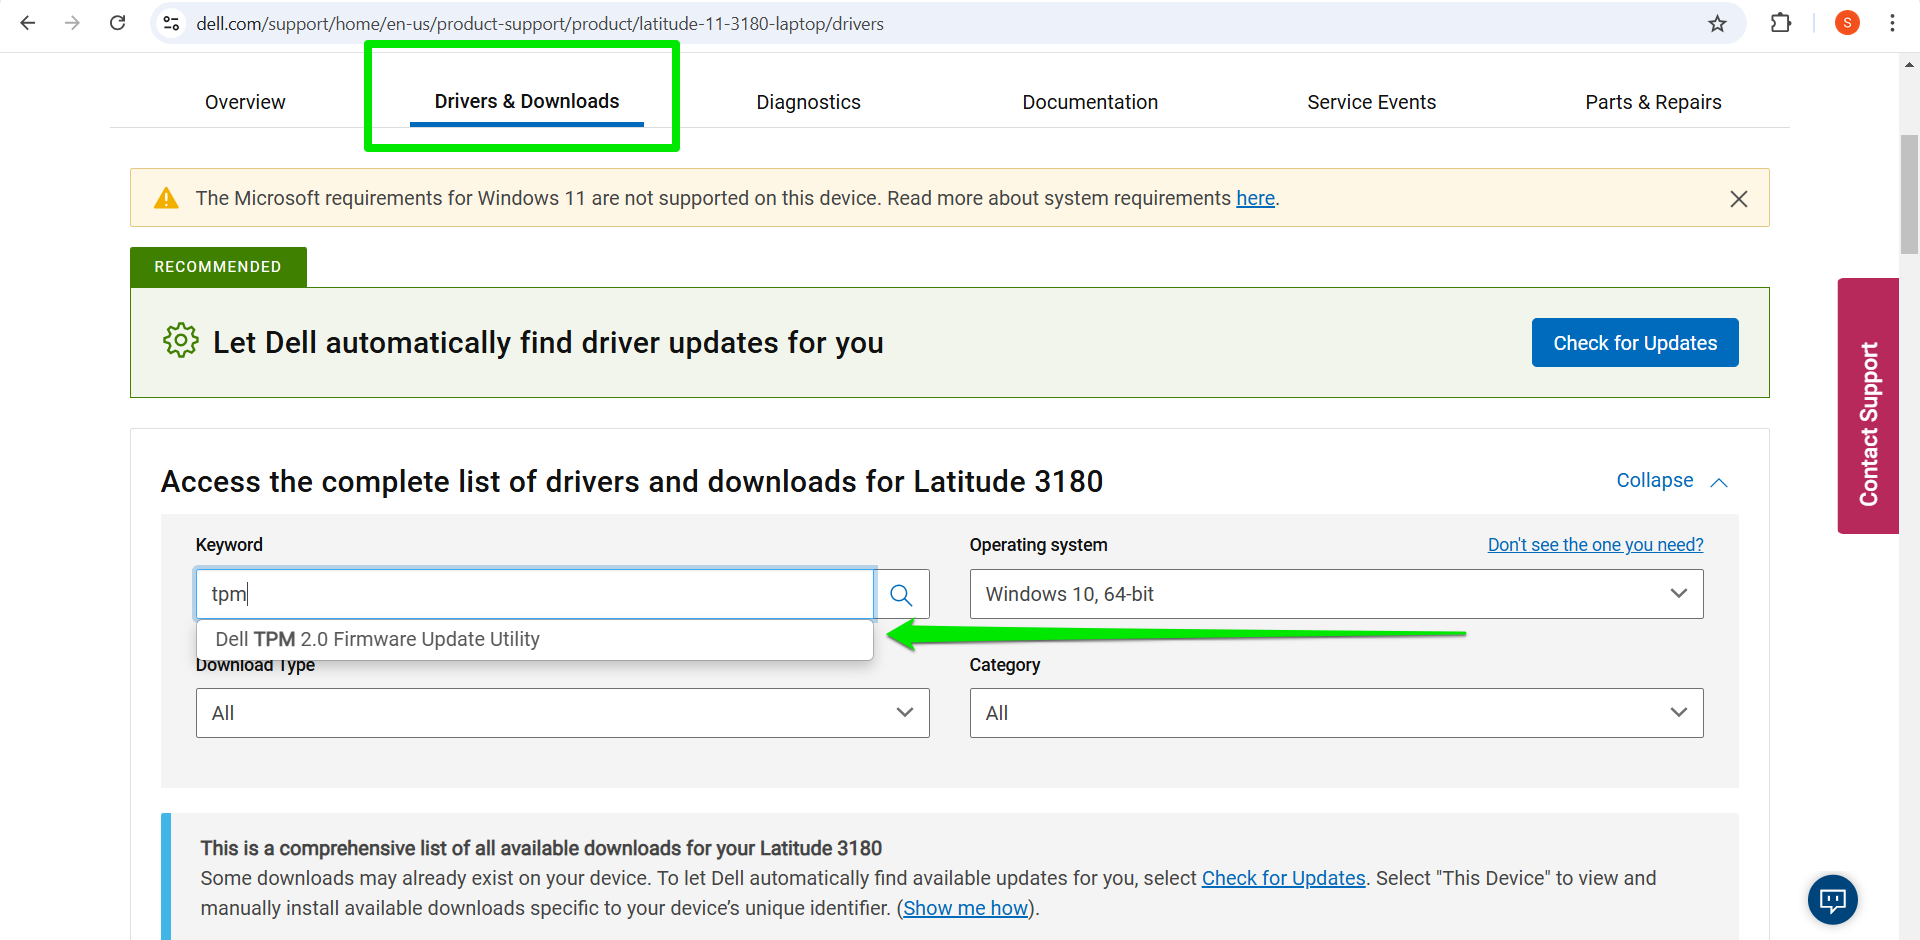
- Go to the Drivers & Downloads tab, select your operating system, and type tpm in the keyword box.
- Click Dell TPM 2.0 Firmware Update Utility in the suggestions.
- Scroll down and click Download next to the firmware update utility. You can also click the arrow next to the Download button to view more details.
- Once downloaded, double-click the file to run the update.
Fix 10: Update your BIOS
Manufacturers like Dell have acknowledged previous bugs that caused the “TPM device not detected” problem. The usual fix for these issues was BIOS firmware updates.
If your BIOS/UEFI has an available update, install it and check if that will resolve the problem. Microsoft often deploys BIOS updates through the Windows Update client, but you may have to go through your system manufacturer to get the latest version.
If you’re using a PC, go to the motherboard manufacturer’s website.
Warning!
Ensure you carefully follow your manufacturer’s instructions before installing firmware updates, as the methods vary by computer. In some cases, you may have to turn off BitLocker and the TPM chip before installing the firmware.
Here’s an example of how to update the BIOS on an MSI motherboard:
- The first step involves preparing a FAT32 USB flash drive. If you have a flash drive in that format, move on to the next step. If not, follow this guide:
-
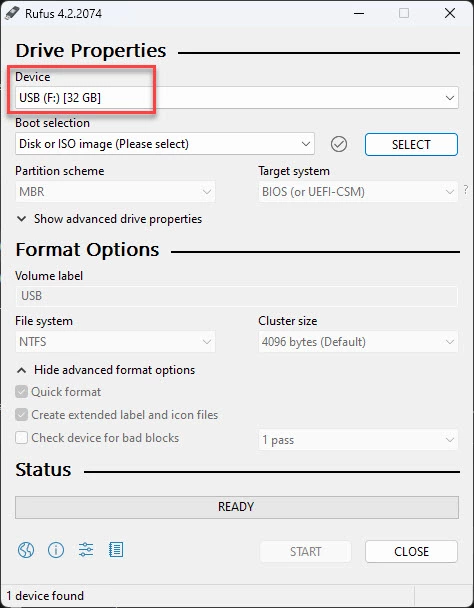
- Insert your USB flash drive.
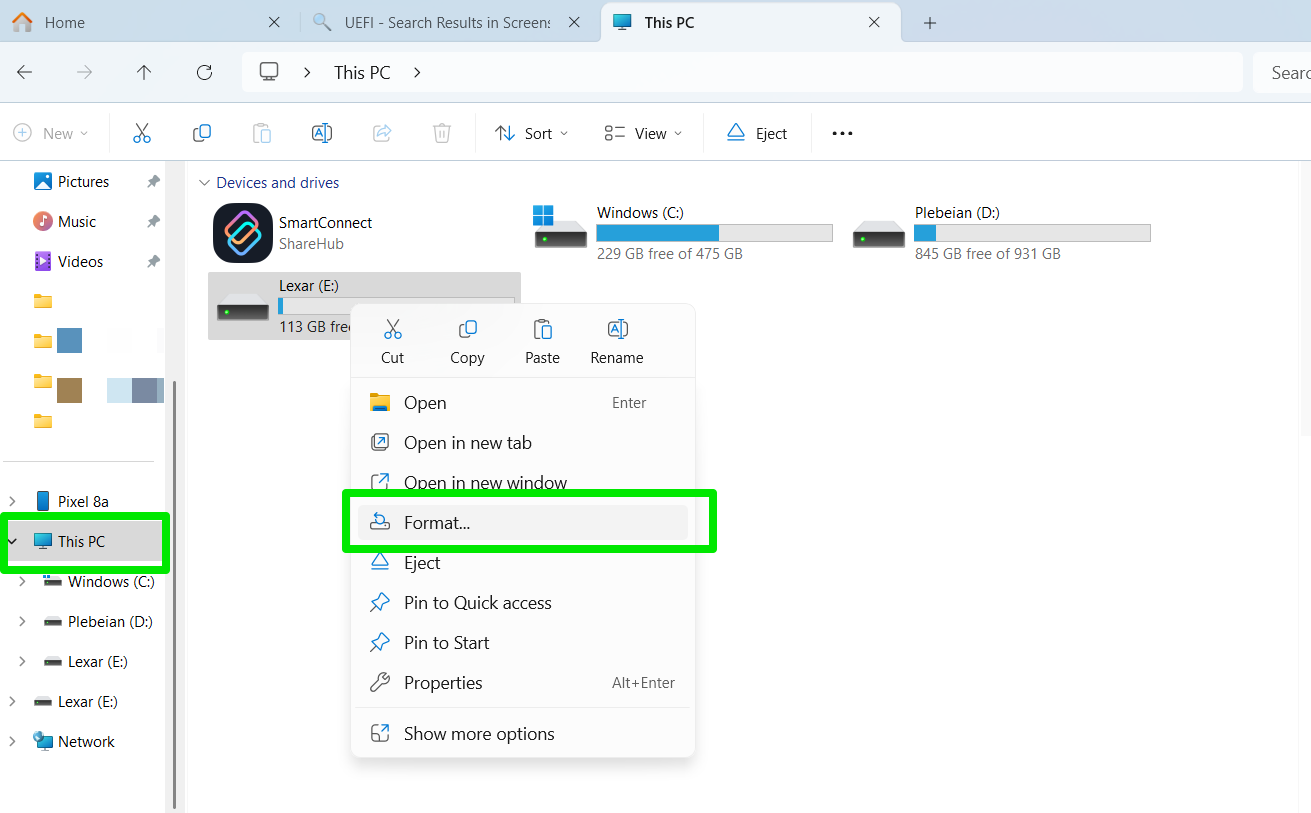
- Open File Explorer (
Win + E) and click This PC in the left pane.
- Right-click your USB drive and select Format.
- Once the Format Drive dialog opens, select FAT32 under File system and click the Start button.
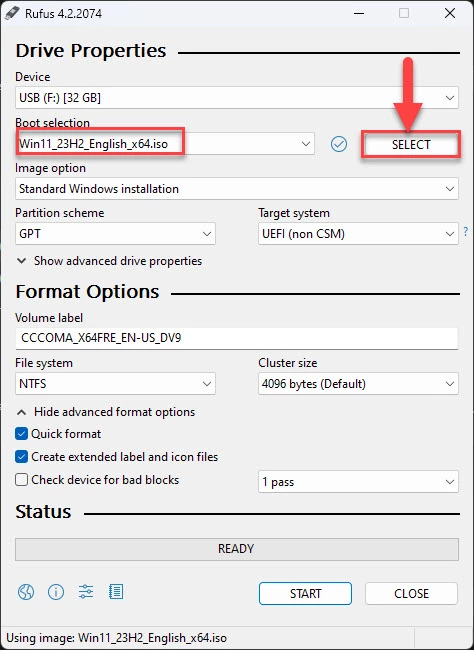
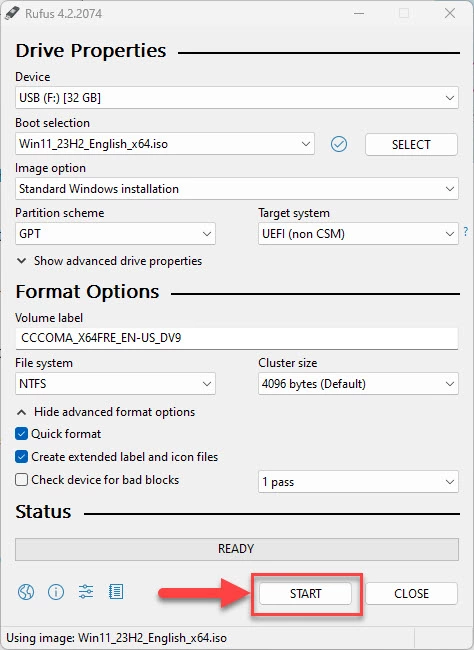
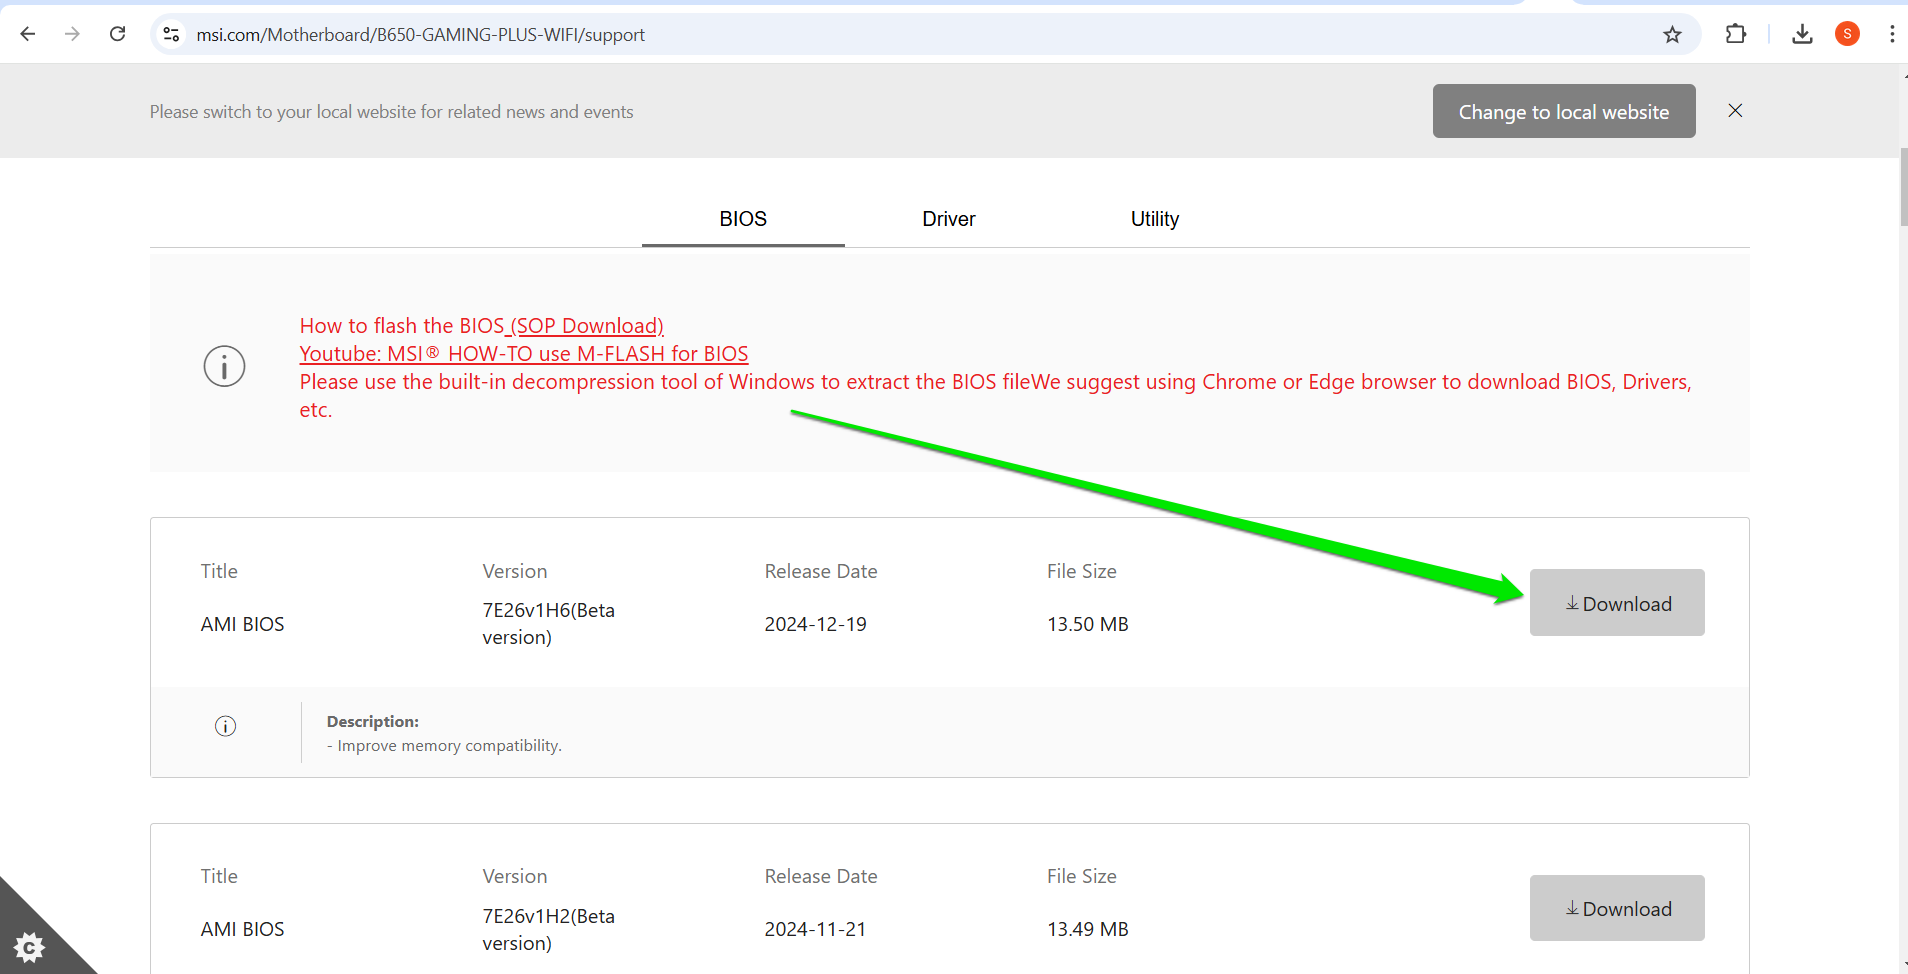
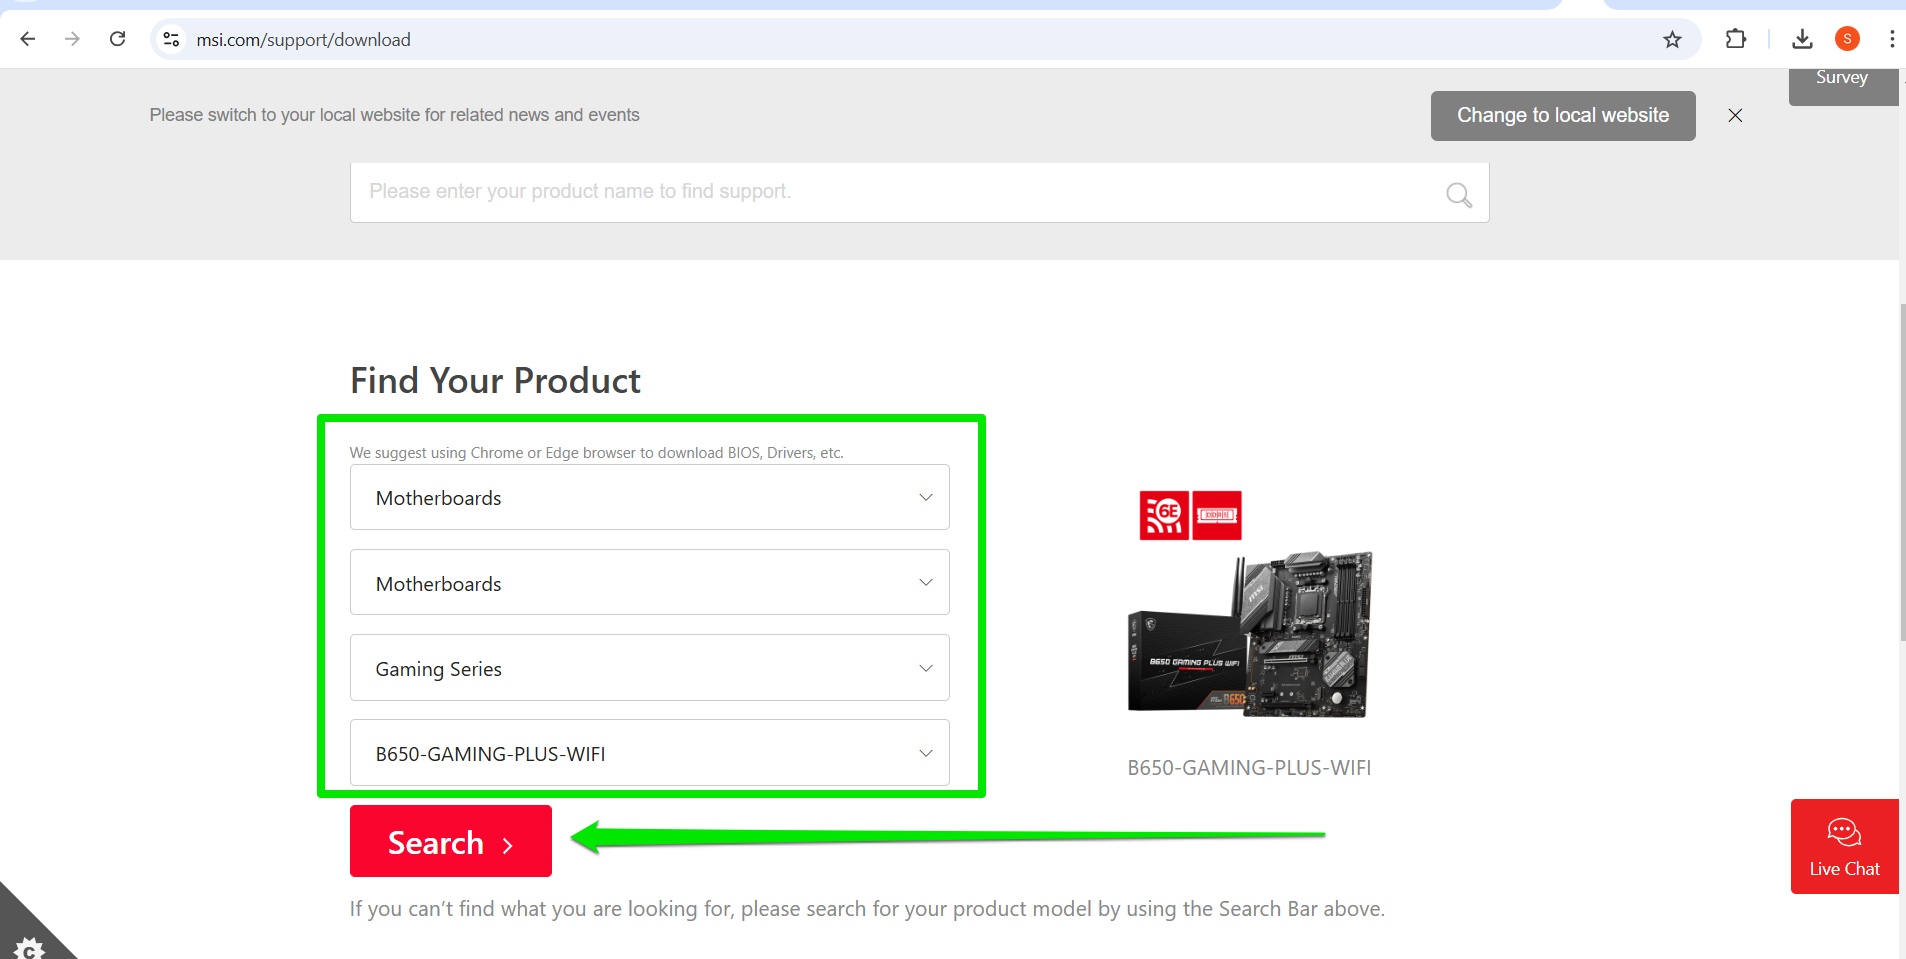
- Go to the MSI’s Download page .
- Choose your motherboard’s model and click the Search button.
- Now, select the BIOS tab and click the Download button next to the BIOS version you want to download.
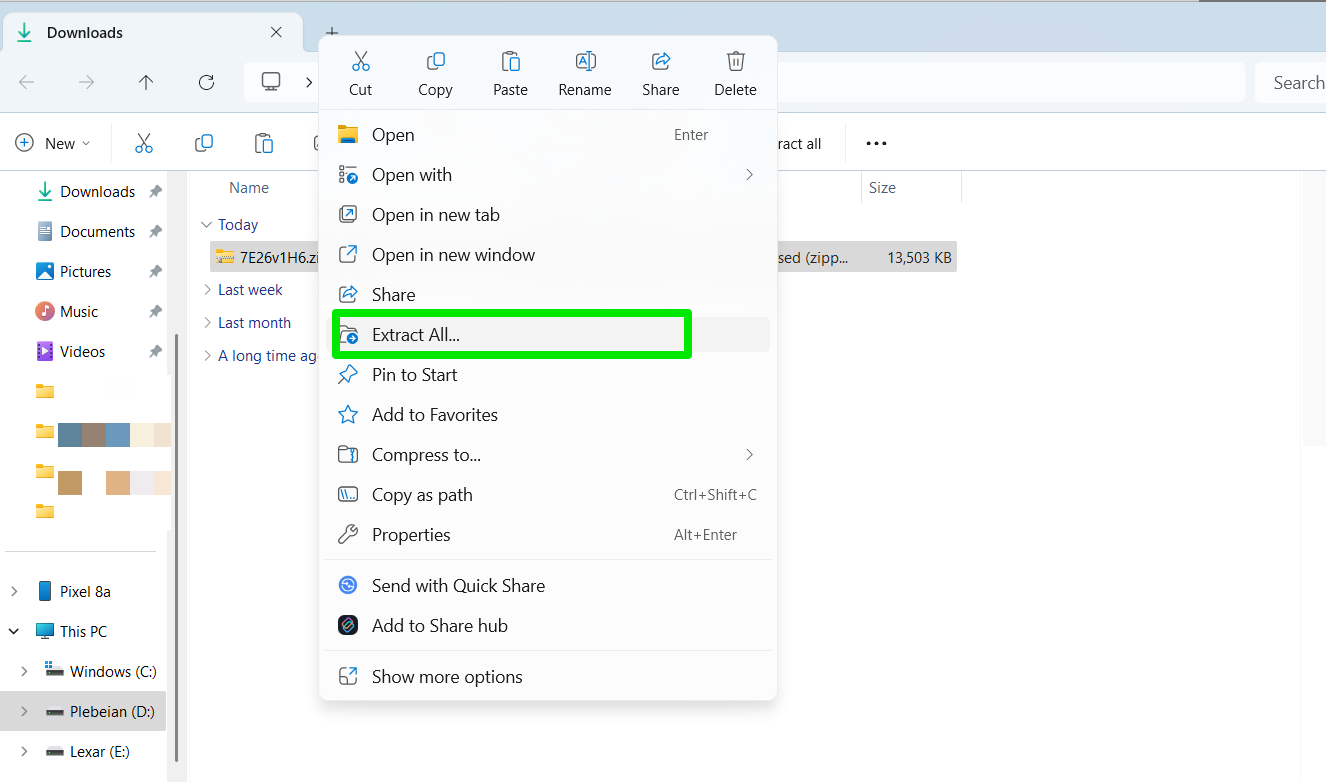
- Extract the ZIP file and save it to the root directory of your USB flash drive.
- Now, restart your computer.
- When you see the MSI logo, press the
Delete button on your keyboard to enter the BIOS environment.
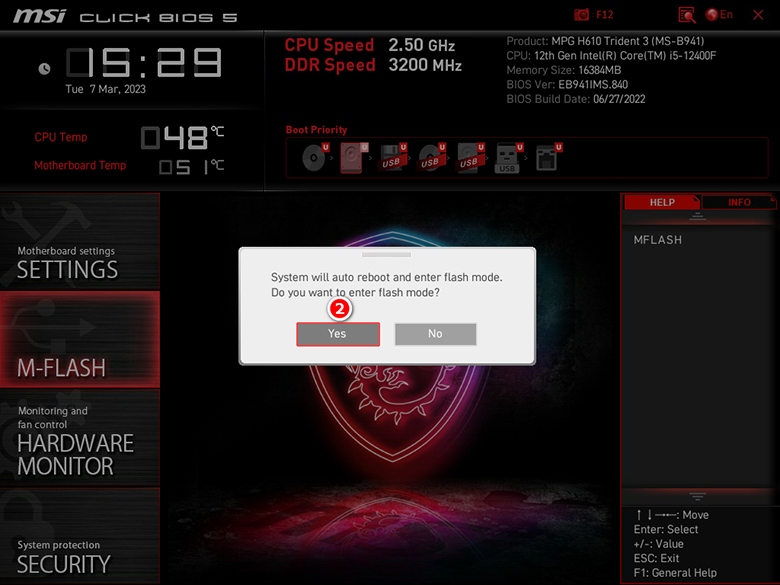
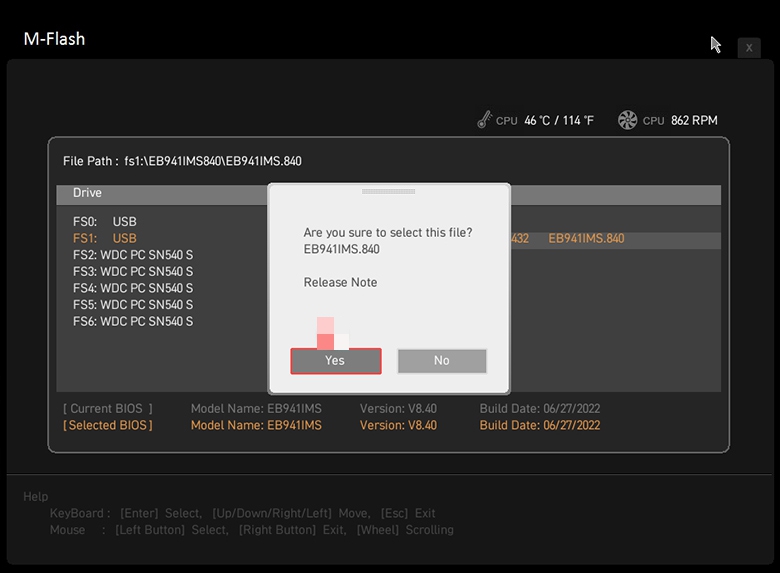
- Next, click M-FLASH and select Yes.
- Select the USB drive you prepared earlier and choose the BIOS folder you saved to it.
- Choose the BIOS update file and hit the
Enter key.
- Click Yes to start the process. Do not turn off your computer or disconnect the USB drive while the BIOS is updating.
- Your computer will restart after the update is complete. Hit the
Delete key when your system reboots to confirm the new BIOS version.
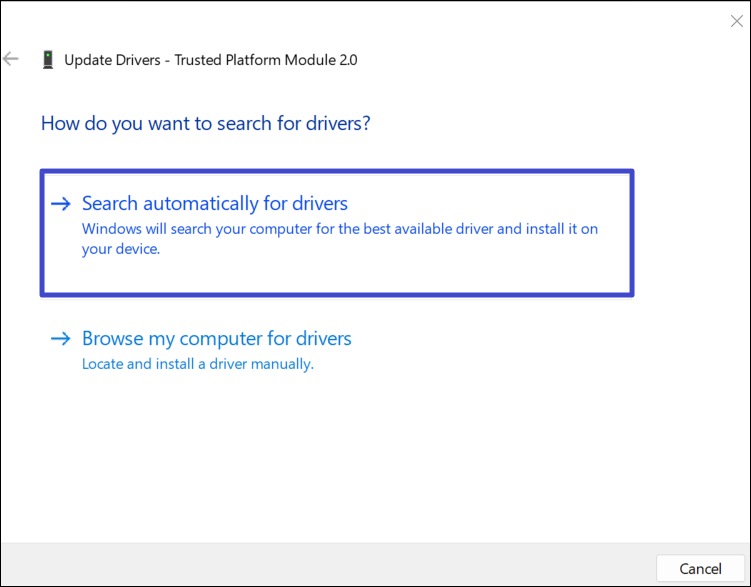
Fix 11: Update the TPM driver or firmware
Microsoft recommends using Microsoft TPM drivers, as third-party drivers may clash with Windows and prevent the OS from detecting the module. The best way to get TPM drivers is through Windows Update, as explained earlier.
However, you can still use the software component provided by your OEM or TPM manufacturer.
In most cases, the terms “driver” and “firmware” are used interchangeably for TPM. So, you may actually need to update your firmware to resolve the problem.
Updating the TPM firmware
Your TPM firmware is the software component that controls how the chip interacts with other hardware devices and your operating system. That is why it is one of the first suspects when things go wrong.
Outdated versions can become incompatible with Windows and cause the operating system to fail initialization operations. As such, you can fix numerous TPM-related issues, such as the “TPM not detected” problem, by installing your chip’s latest firmware.
To do that, head to your OEM’s website and search for TPM firmware guides and files. You’ll see detailed steps on how to update the software. Ensure you follow these guides correctly, as they can be quite lengthy and technical.
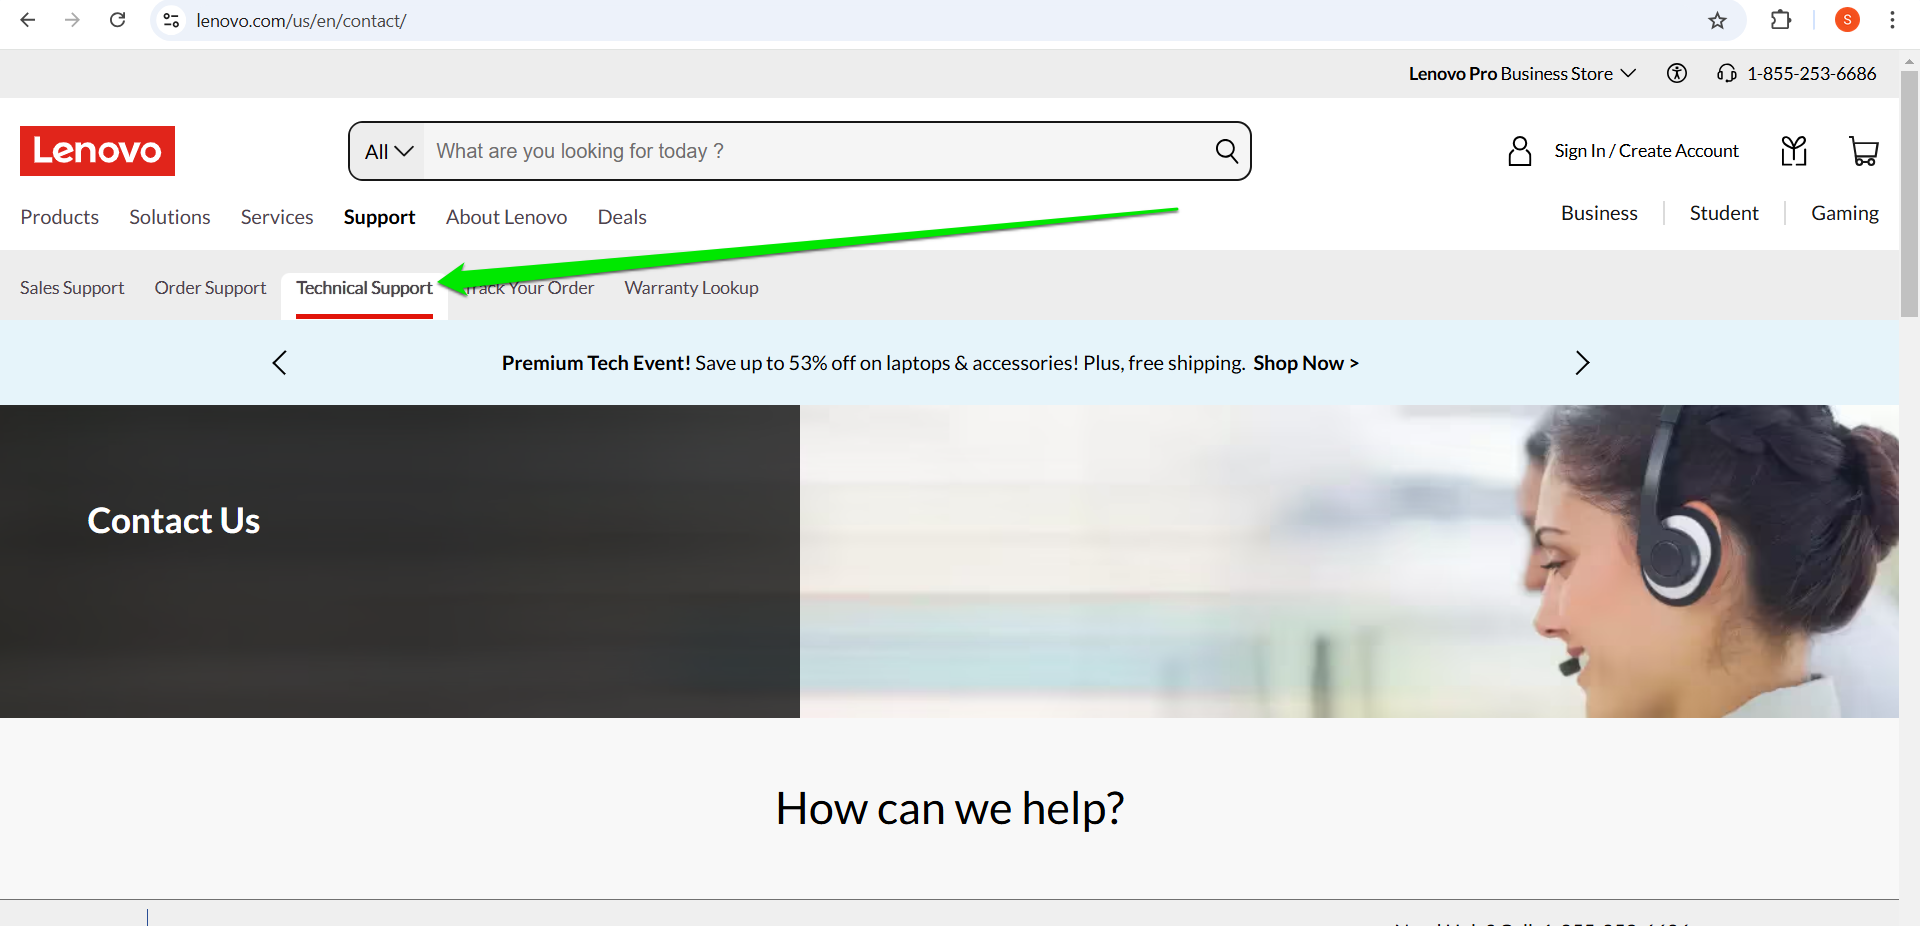
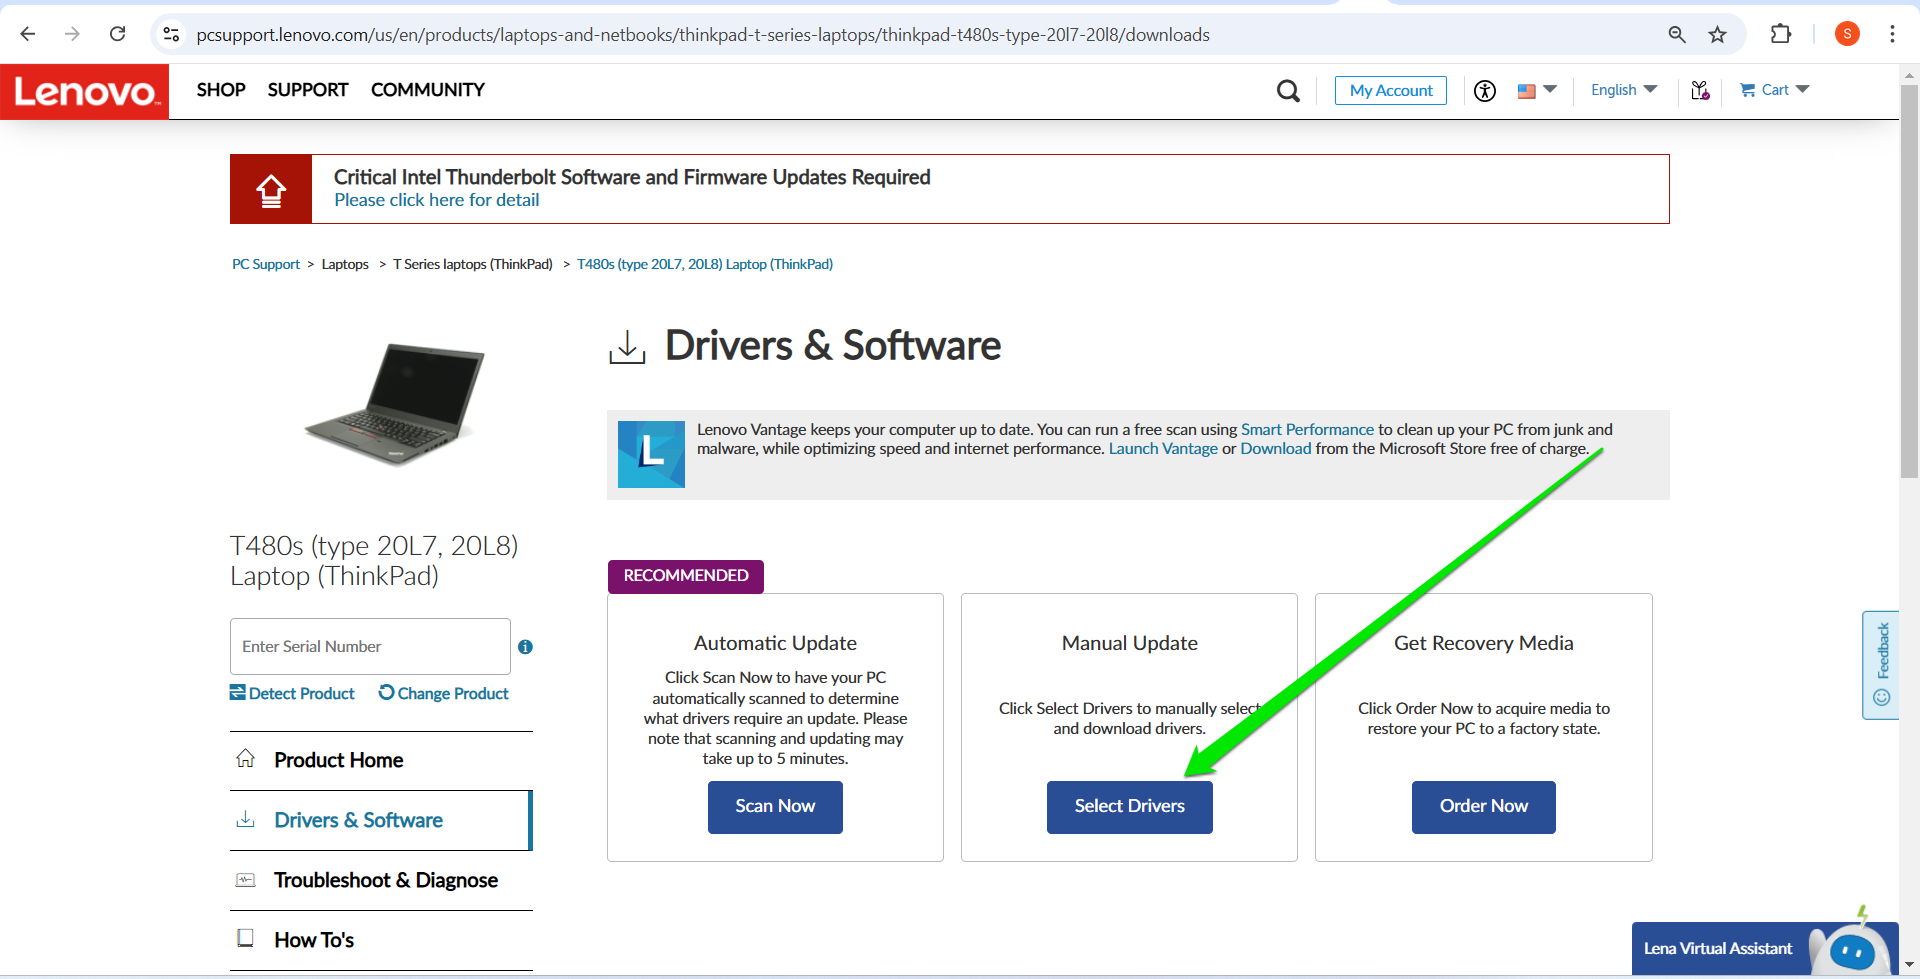
How to update the TPM firmware on a Lenovo computer
- Go to the Lenovo Contact Us webpage and select Technical Support .
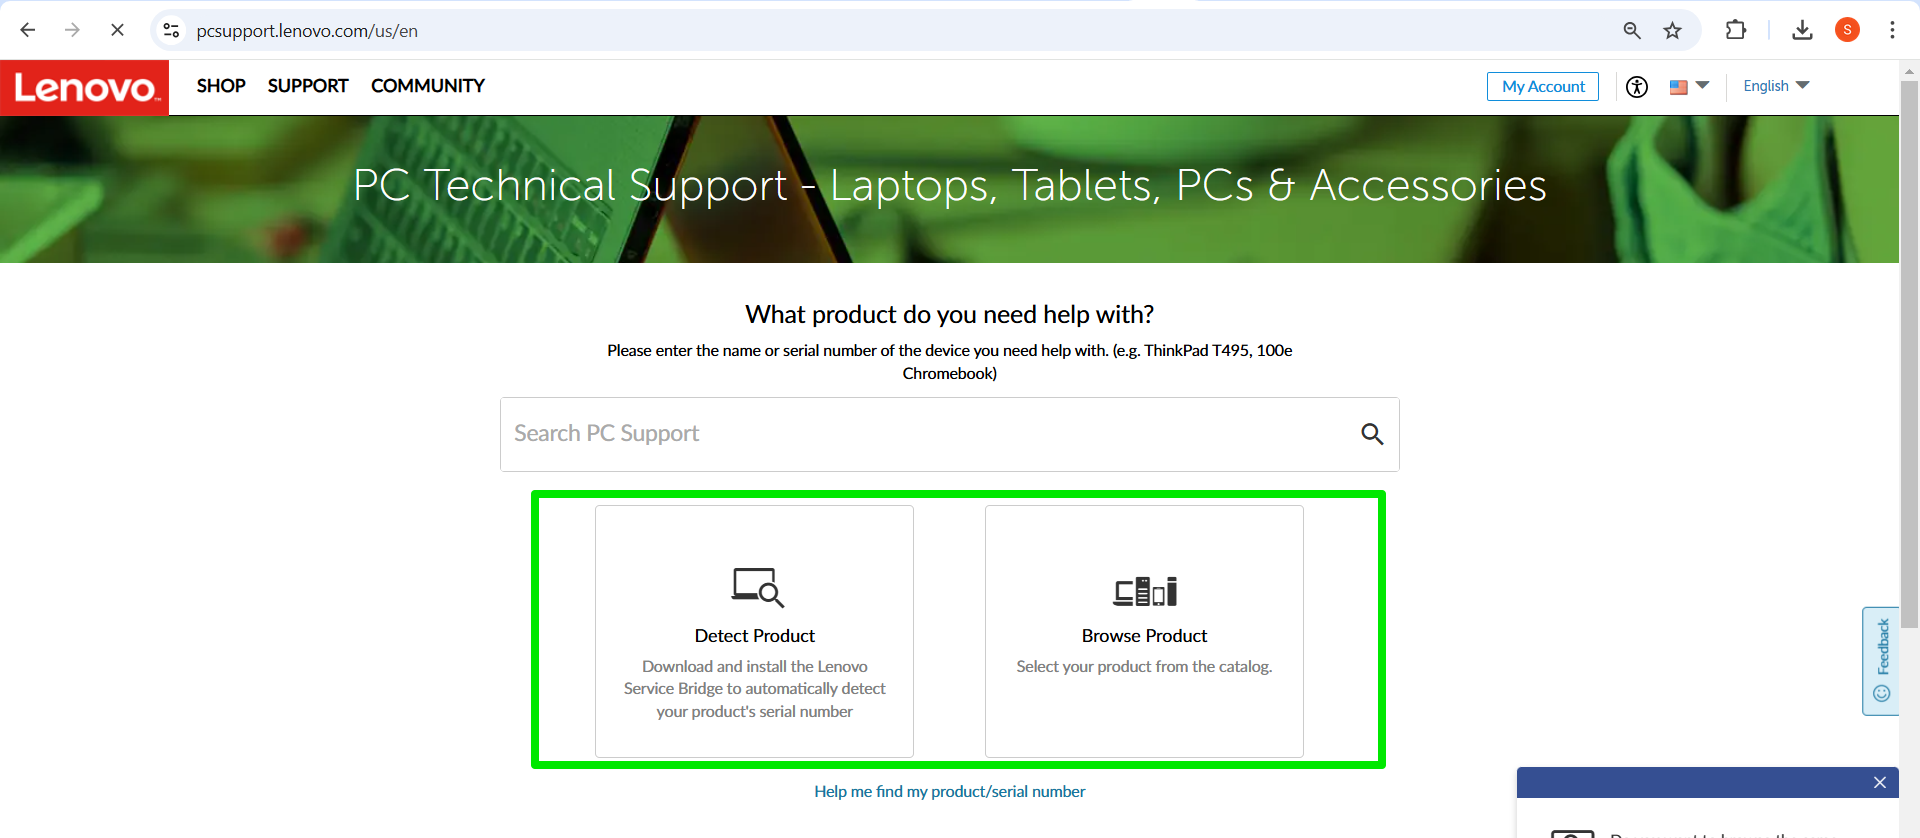
- Click PC and select Detect Product to allow the site to identify your computer. You can also click Browse Product to choose your system’s model manually.
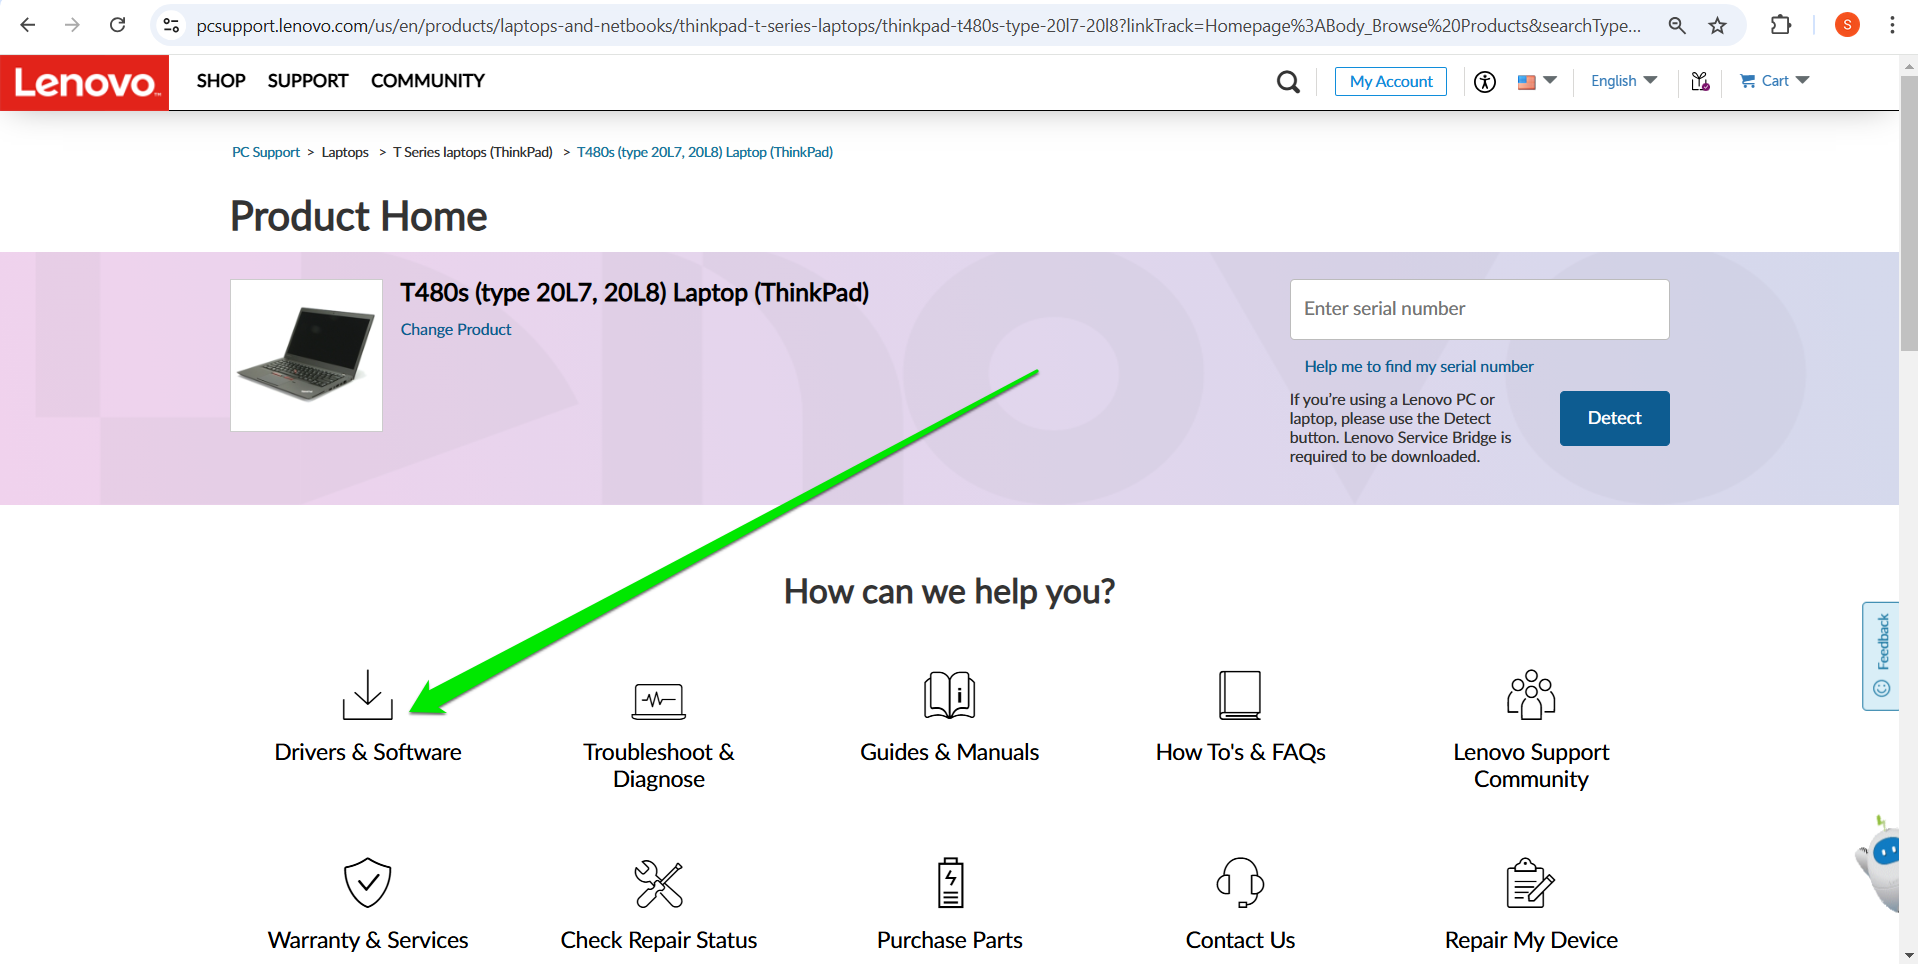
- Once you’ve chosen your device, click Drivers & Software .
- Once the product’s Drivers & Software page appears, you can select Scan Now to automatically display the drivers you need to download or click Select Drivers under Manual Update .
- If you click Select Drivers , type TPM in the Search by Keywords box.
- Click Security to reveal the TPM firmware update. Then, click Download next to TPM Firmware Update Utility to download the ZIP file.
Fix 12: Replace the TPM module
Replacing the TPM module means replacing your motherboard if you have an embedded chip. It should be your last resort after exhausting other options. You only get to this stage when you have confirmed that the module has been damaged, which is incredibly rare.
Replacing your motherboard is a technical undertaking that should be handled by an expert if you don’t know your way around your PC. It generally involves opening up your case and detaching all your components, from your power connector, CPU, and GPU to your cooling unit, RAM , SSD, and RGB headers. You can also return it to your manufacturer if it’s still under warranty.
Laptop motherboards are even more difficult to replace because their CPUs, GPUs, and other system components are soldered to the board.
Follow these steps if your desktop PC has a standalone TPM module:
- First, you have to purchase a module that is compatible with your motherboard, as TPMs are not cross-compatible. So, check your motherboard’s TPM header to confirm how many pins it requires. The header is usually marked TPM. However, you can locate it by consulting your motherboard manual.
- Open your PC case to access its motherboard.
- Locate the TPM module attached to the TPM header. You can undo the latch or unscrew the module, depending on the board.
- Now, insert your replacement and screw it in.
- Close up your PC case and restart the computer to check if the issue has been resolved.
Fix 13: Contact your OEM
Most OEMs have country- or region-specific support options. You can contact the branch dedicated to your region for assistance and guidance. If your motherboard’s warranty is still active, you can get a replacement once it’s confirmed that your TPM is damaged.
What Are the Causes of the Error “Alert! TPM Device Is Not Detected”?
The cause of the problem varies from system to system. If you’re on Windows 10 and using an older computer, you likely do not have a TPM device. However, if you’re seeing the error “TPM device not detected” in Windows 11 or are using a TPM-enabled Windows 10 device, some underlying glitches can explain the issue. Let’s go through those likely causes.
| Disabled TPM in the BIOS/UEFI |
The TPM can be activated and deactivated in the BIOS. In most cases where users see the error, the security setting is disabled, either by the user or a recent BIOS update. |
| BIOS version |
While BIOS updates are recommended software components that you should always install, they often cause problems. Sometimes, your update may change certain configurations or carry bugs that prevent your computer from interacting with your TPM component. |
| Driver or firmware issues |
Discrete TPM chips require drivers to interact with the operating system and other components, such as BitLocker. Firmware-based TPMs also work with special software. Windows can throw up the “Alert! TPM device is not detected” error if these drivers or firmware programs are outdated or corrupt. |
| System compatibility issues |
Microsoft recommends (and often demands) TPM 2.0 for users who want to migrate to Windows 11. The “Compatible TPM cannot be found” error may appear because you’re using an older module version. The good news for people with the firmware-based TPM is that they can update it. |
| System file corruption |
Windows can produce the error when system files related to cryptographic security features become damaged or missing. |
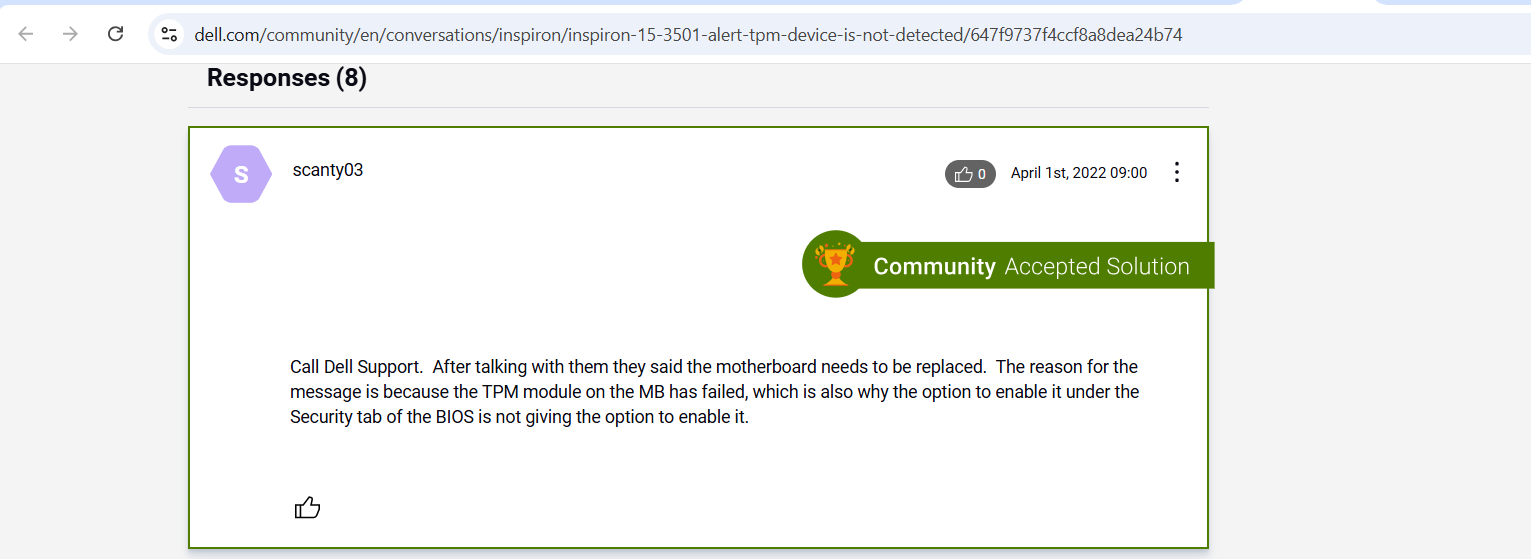
| Faulty TPM hardware |
Some users have been told by their OEM that their TPM modules were damaged after contacting support. While such cases are rare, they happen. However, it is advisable to exhaust other possible causes and allow your system’s manufacturer or an expert to reach that conclusion.
|
The “TPM Not Detected” Error: Fixed
The error “Compatible TPM Device not detected” is almost always fixable, as long as you have a TPM device. Damaged TPM chips are incredibly rare, and a simple update or reboot can resolve the issue. Ensure you consult your system specifications and product manual to confirm that your computer has the tech before you start troubleshooting.
Let us know which device you use and how you resolved the problem!
FAQ
You cannot use features like measured boot and hardware-based encryption that require TPM 1.2 or 2.0. You will also be unable to upgrade to Windows 11 unless you bypass the operating system requirements. However, bypassing Windows 11 will limit your computer’s access to the operating system’s suite of security offerings.
Yes, you can install a TPM module on your motherboard if it doesn’t already have one. Most modern motherboards include TPM headers consisting of around 14–20 pins. However, it is generally not possible to include a TPM chip in laptops that lack the technology, as you cannot modify such motherboards.
Yes. You can bypass Windows 11’s TPM and secure boot requirements to install the operating system on your computer. However, Microsoft recommends against such a move and warns users that they may not get critical security updates to keep their computers safe.
You may be unable to enable TPM in BIOS because your computer does not have the module, your system is failing to detect it, or your BIOS has a bug.