
Вариант 1: Кнопка «Пуск» и значки
В случае если вы хотите изменить расположение не самой панели задач (ПЗ), а только значков на ней (кнопка «Пуск», а также последующие за ней элементы и ярлыки), потребуется обратиться к параметрам персонализации операционной системы, отредактировать один из файлов в реестре или воспользоваться специализированным ПО от сторонних разработчиков. Любой из доступных методов приводит к одному и тому же результату – все значки смещаются влево, как это было в Windows 10 и предшествующих ей версиях ОС. Более детально все это ранее рассматривалось нами в отдельной статье, ссылка на которую дана ниже.
Подробнее: Как переместить кнопку «Пуск» влево в Виндовс 11
Вариант 2: Панель задач
Если же вы хотите изменить расположение всей панели задач, переместив ее из нижней части экрана в левую, потребуется отредактировать значение одного из параметров в системном реестре, но стоит иметь в виду следующее:
Обратите внимание! На момент написания настоящей статьи (сентябрь 2022 года) не существует никаких других способов перемещения ПЗ влево или вправо, кроме рассмотренного далее. Однако и он работает некорректно – с панели пропадают все значки, кроме тех, что по умолчанию находятся справа (трей, индикатор языковой раскладки, сетевое соединение, параметры громкости, время и дата), а большинство привычных функций становятся недоступными либо работают некорректно. Возможно, это баг, который исправят в одном из обновлений.
Читайте также: Как переместить ПЗ вправо в Windows 11
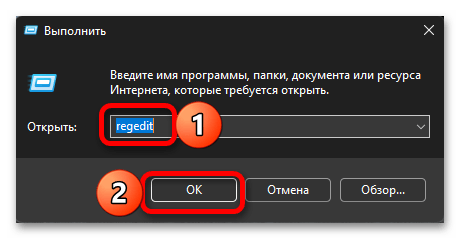
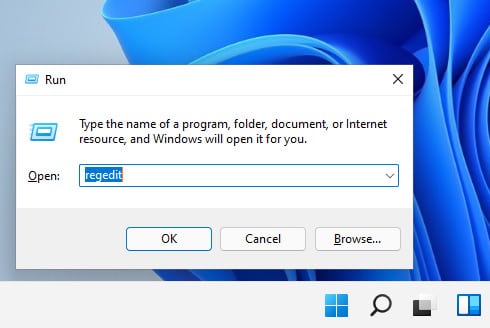
- Любым удобным способом откройте «Редактор реестра». Это можно сделать через поиск либо с помощью оснастки «Выполнить» (вызывается сочетанием клавиш «Win+R»), в которую нужно ввести представленный ниже запрос и затем нажать «ОК» или «Enter».
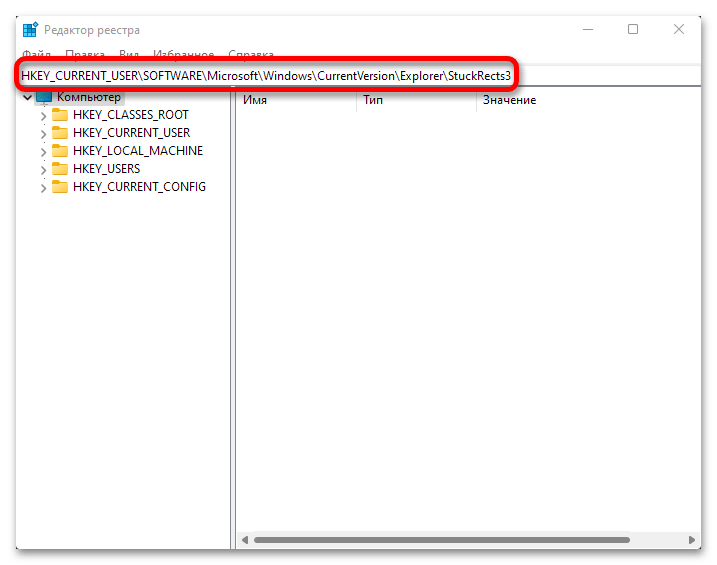
regedit - Перейдите к указанному ниже расположению. Это можно сделать как вручную, последовательно открывая папки, так и более быстро – достаточно скопировать этот путь, вставить его в адресную строку редактора и нажать «Enter».
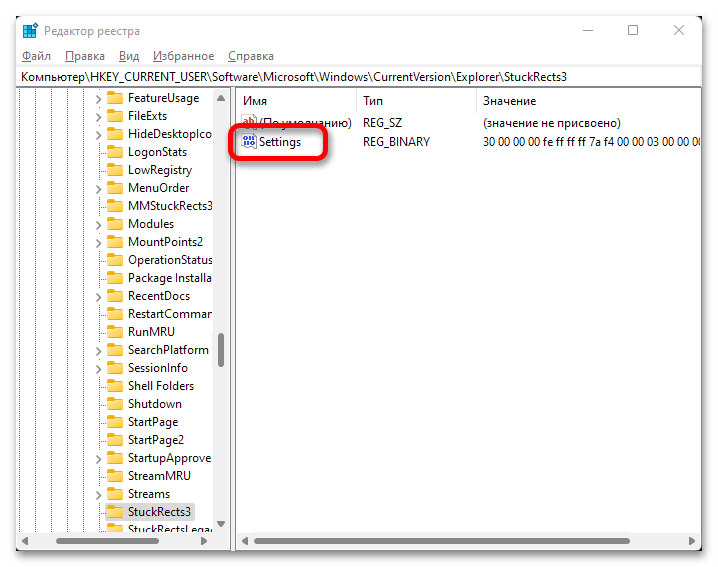
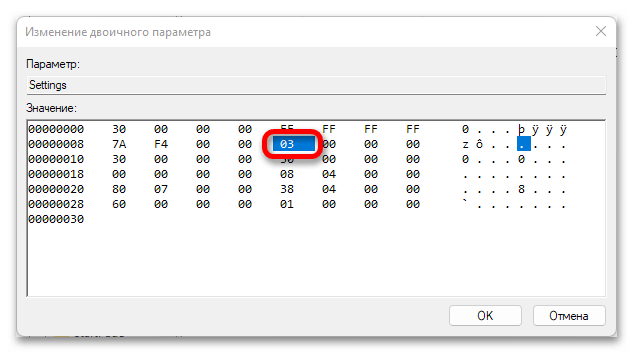
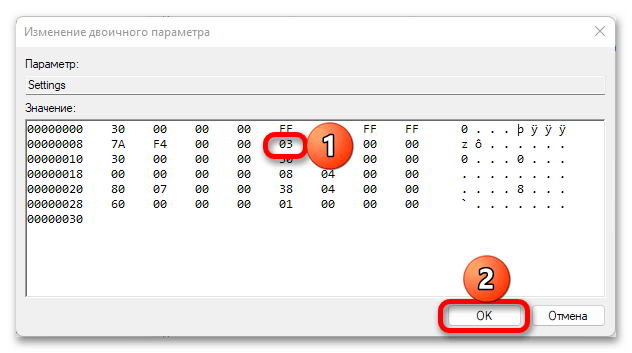
HKEY_CURRENT_USER\SOFTWARE\Microsoft\Windows\CurrentVersion\Explorer\StuckRects3 - Откройте параметр «Settings», дважды кликнув по нему левой кнопкой мышки (ЛКМ).
- Выделите значение, указанное в строке 00000008 и столбце FE – для этого дважды нажмите по нему ЛКМ.

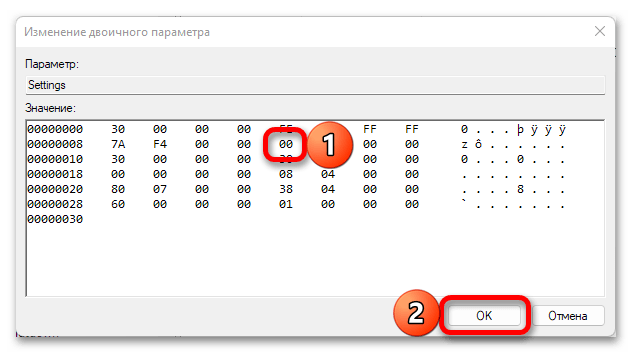
Измените заданное по умолчанию 03 на 00, после чего воспользуйтесь кнопкой «ОК» для подтверждения.
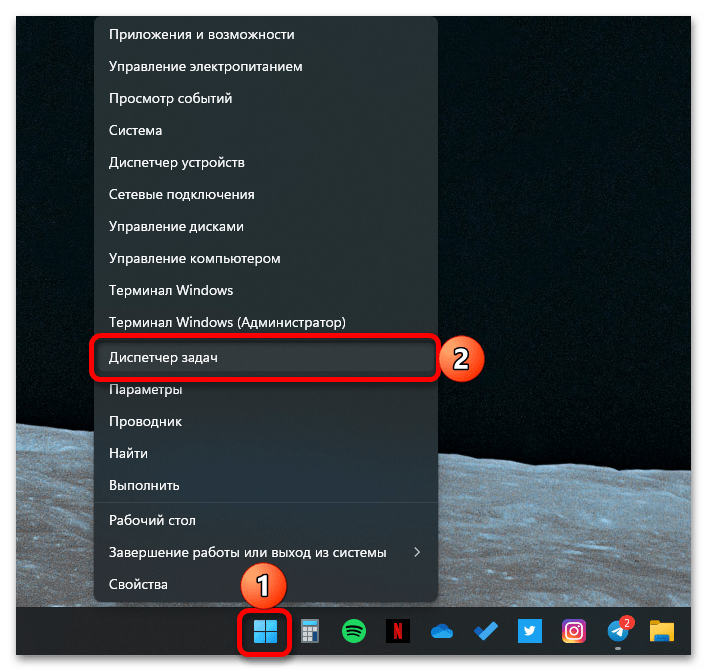
- Последнее, что требуется сделать для того, чтобы внесенные изменения вступили в силу – это перезапустить «Проводник». Откройте «Диспетчер задач» (сочетание клавиш «Ctrl+Shift+Esc» или контекстное меню кнопки «Пуск»).

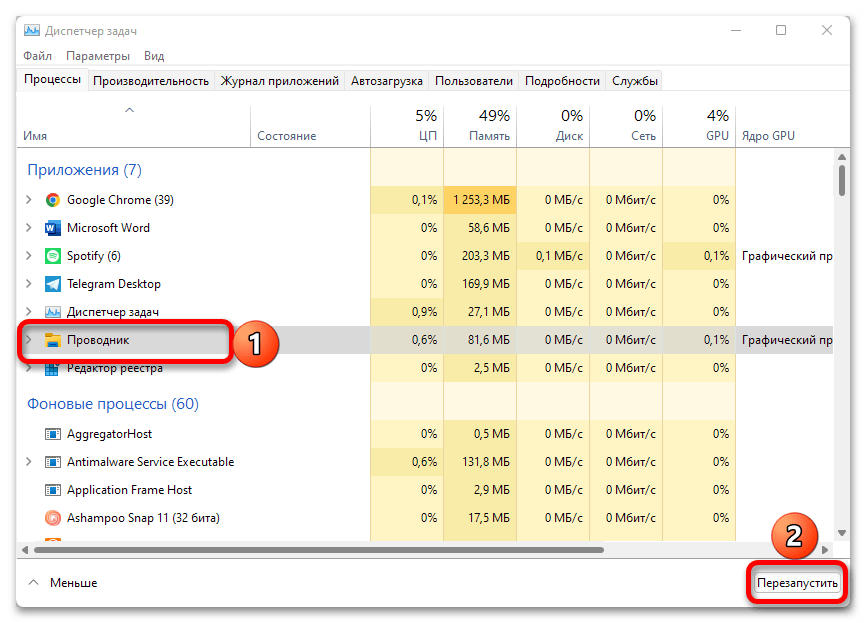
Отыщите в списке активных процессов «Проводник», выделите его и нажмите на кнопку «Перезапустить».

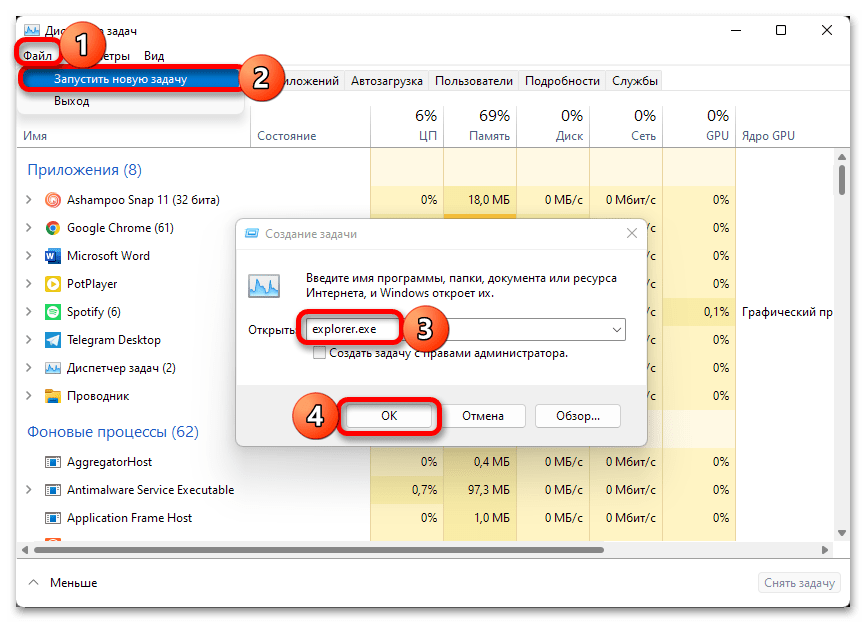
Примечание: Если «Проводник» отсутствует в списке, запустите его вручную – воспользуйтесь для этого сочетанием клавиш «Win+E» или пунктом «Запустить новую задачу» в меню «Файл», затем в появившемся окне потребуется ввести команду
explorer.exeи кликнуть «ОК» для подтверждения. После того как задача появится, снимите ее.
Практически сразу панель задач будет перемещена на левую границу экрана и, как уже было сказано, на ней будут отсутствовать все основные кнопки и ярлыки. То есть можно смело сказать, что в таком виде нормально пользоваться данным компонентом ОС невозможно.
Для того чтобы восстановить расположение ПЗ по умолчанию, повторите все действия из представленной выше инструкции с той лишь разницей, что в пункте №4 потребуется изменить значение, указанное в строке 00000008 и столбце FE на 03 вместо 00.
Читайте также: Как восстановить работоспособность панели задач в Windows 11
Наша группа в TelegramПолезные советы и помощь
In the latest version of Windows, Windows 11, Microsoft has introduced a new and refreshing user interface design. One of the noticeable changes is the centered taskbar, which is a departure from the traditional left-aligned taskbar in earlier versions of Windows. While the centered taskbar may be a preferred choice for some users, there are others who still prefer to have the taskbar on the left side of the screen.
If you are one of those users who prefer the left-aligned taskbar, you’re in luck! In this blog post, we will guide you through the steps on how to put the taskbar on the left side in Windows 11. We will explore different methods to achieve this, ensuring you have the flexibility to customize your Windows 11 experience according to your preferences.
Video Tutorial:
There are several reasons why you may want to put the taskbar on the left side in Windows 11. Here are a few:
1. Familiarity: If you have been using Windows for a long time and are used to the left-aligned taskbar, you may find it more comfortable and easier to navigate.
2. Space Optimization: Placing the taskbar on the left side can optimize the use of screen real estate, especially if you have a wide-screen monitor. It allows more vertical space for your applications and documents.
3. Multitasking: For users who frequently multitask, having the taskbar on the left side provides easier access to open applications, making it convenient to switch between them quickly.
Now, let’s explore different methods on how to put the taskbar on the left side in Windows 11.
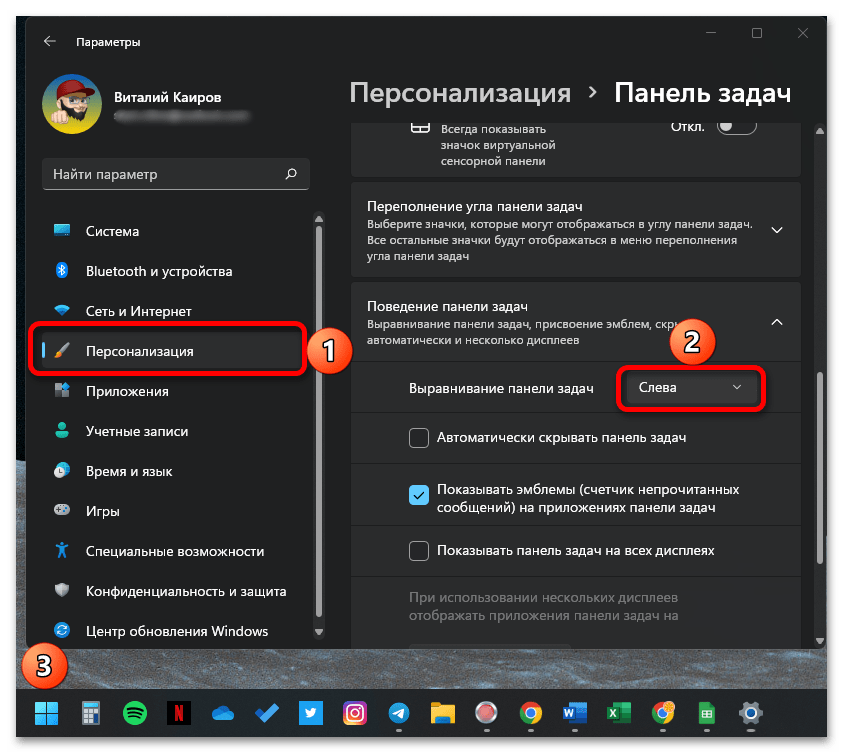
Method 1. How to Put Taskbar on Left Side Using Taskbar Settings
To put the taskbar on the left side by using the taskbar settings in Windows 11, follow these steps:
1. Right-click on an empty space on the taskbar.
2. From the context menu, click on «Taskbar settings.«
3. In the Taskbar settings window, navigate to the «Taskbar behaviors» section.
4. Under the «Taskbar alignment» dropdown, select «Left.«
5. The taskbar will now be moved to the left side of the screen.
Pros:
1. Easy and straightforward process to change the taskbar alignment.
2. Allows for quick customization of the taskbar position.
Cons:
1. May cause initial adjustment in terms of muscle memory and familiarity with the new position.
Method 2. How to Put Taskbar on Left Side via Windows Settings
Another method to put the taskbar on the left side is through the Windows Settings. Here’s how you can do it:
1. Open the Windows Settings by pressing the Windows key + I.
2. Click on «Personalization.«
3. In the left sidebar, click on «Taskbar.«
4. In the «Taskbar behaviors» section, find the «Taskbar alignment» dropdown menu.
5. Select «Left» to move the taskbar to the left side of the screen.
Pros:
1. Allows customization of taskbar position directly through Windows Settings.
2. Provides easy access to other taskbar-related settings.
Cons:
1. Requires navigating through the Windows Settings menu, which may not be as intuitive for some users.
Method 3. How to Put Taskbar on Left Side via Taskbar Dragging
If you prefer a more hands-on approach, you can also put the taskbar on the left side by simply dragging it. Here’s how:
1. Right-click on an empty space on the taskbar.
2. Ensure that the «Lock the taskbar» option is unchecked. If it’s checked, click on it to disable the lock.
3. Place your cursor on an empty space on the taskbar, click, and hold.
4. Drag the taskbar to the left side of the screen.
5. Release the mouse button to lock the taskbar in the new position.
Pros:
1. Provides a quick and intuitive way to move the taskbar.
2. Allows for real-time adjustment and positioning.
Cons:
1. May inadvertently move the taskbar if not careful with mouse movements.
Method 4. How to Put Taskbar on Left Side via Registry Editor
For advanced users who are comfortable working with the Registry Editor, another method to put the taskbar on the left side involves modifying the registry. Here’s how you can do it:
1. Press the Windows key + R to open the Run dialog box.
2. Type «regedit» and press Enter to open the Registry Editor.
3. Navigate to the following key:
HKEY_CURRENT_USER\Software\Microsoft\Windows\CurrentVersion\Explorer\StuckRects3
4. Double-click on «Settings» in the right pane to open the binary editor.
5. Look for the following values:
– 03 00 00 00 0C 00 00 00 22 00 00 00 01 00 00 00
– 03 00 00 00 0C 00 00 00 22 00 00 00 00 00 00 00
6. Change both values to:
– 03 00 00 00 0C 00 00 00 22 00 00 00 02 00 00 00
– 03 00 00 00 0C 00 00 00 22 00 00 00 02 00 00 00
7. Close the Registry Editor and restart your computer for the changes to take effect.
Pros:
1. Provides a method for advanced users to modify the taskbar placement.
2. Offers precise control over the taskbar alignment.
Cons:
1. Inappropriate modifications to the registry can cause system instability, so caution is advised.
2. May require additional steps and a system restart.
What to Do If You Can’t Put Taskbar on Left Side
If you encounter any issues or are unable to put the taskbar on the left side using the methods mentioned earlier, here are a few fixes you can try:
1. Restart Windows: Sometimes, a simple restart can resolve temporary glitches or conflicts that may prevent taskbar customization.
2. Update Windows: Make sure you have the latest Windows updates installed, as these updates often include bug fixes and improvements.
3. Check for Driver Updates: Update your graphics card drivers to the latest version, as outdated drivers can cause compatibility issues with Windows 11.
With these fixes, you should be able to overcome any obstacles preventing you from putting the taskbar on the left side in Windows 11.
Bonus Tips
Here are a few bonus tips to enhance your taskbar experience in Windows 11:
1. Customize Taskbar Icons: Right-click on an icon in the taskbar, go to «More options,» and select «Pin to taskbar» to add frequently used applications for easy access.
2. Taskbar Auto-Hide: If you prefer a clutter-free desktop, you can enable the «Auto-hide» feature in the Taskbar settings. This will make the taskbar disappear when not in use and reappear when you move your cursor to the bottom of the screen.
3. Resize Taskbar: Click and drag the top edge of the taskbar to resize it according to your preference.
These tips will help you make the most out of your taskbar in Windows 11, making it a personalized and efficient part of your workflow.
5 FAQs
Q1: Can I revert the taskbar to the centered position in Windows 11?
A: Yes, you can revert the taskbar to the centered position by following the same steps mentioned in Method 1 or Method 2, but selecting «Center» instead of «Left» in the taskbar alignment dropdown menu.
Q2: Will putting taskbar on the left side affect the functionality of Windows 11?
A: No, putting the taskbar on the left side will not affect the functionality of Windows 11. It is purely a visual customization option.
Q3: Can I move the taskbar to the right side or top of the screen?
A: Yes, you can move the taskbar to the right side or top of the screen by following the same methods mentioned earlier and selecting the corresponding alignment option.
Q4: Are there any other ways to customize the taskbar in Windows 11?
A: Yes, aside from changing the taskbar position, you can also customize the taskbar appearance, choose which icons to display, enable or disable system icons, and more through the Taskbar settings.
Q5: Is it safe to modify the registry to change the taskbar alignment?
A: Modifying the registry can be risky if done incorrectly. It’s always recommended to create a backup of your registry before making any changes. Proceed with caution and only make modifications if you are comfortable working with the Registry Editor.
Final Thoughts
Customizing the taskbar position can greatly enhance your Windows 11 experience. Whether you prefer the centered or left-aligned taskbar, the flexibility to customize to your preferences is one of the many advantages of Windows 11. We have explored different methods to put the taskbar on the left side, along with bonus tips and fixes in case you encounter any issues. By following the steps outlined in this blog post, you can easily customize and tailor your taskbar in Windows 11 to suit your workflow and preferences.
Through the decades of Windows, we always had the ability to move the taskbar at our whim. You could right-click on the taskbar, untick the lock the taskbar button, and drag it to place it on the other three sides of the screen.
Some prefer the classic left side or right side, similar to distros like Ubuntu. It often helped in taking full advantage of the wide-screen monitors that have become commonplace.
You cannot do that on the latest Windows installment, and then lock the taskbar option has disappeared from the taskbar menu.
To our luck, there is a registry tweak that can help you move the taskbar in Windows 11 on either of the sides of the screen. It takes under five minutes for a beginner to do and is straightforward when you follow the steps.
Before moving forward with the tutorial, remember that Windows 11 is still in development and has several underlying bugs.
It often breaks the user interface and the taskbar in this case. You will get the gist as we move the taskbar to the left or right of the screen.
Table Of Contents
- How To Move the Taskbar in Windows 11
- Move or Align The Taskbar Icons to the left
How To Move the Taskbar in Windows 11
1. We head to the Registry editor first. Press Ctrl+R together on the keyboard to open the RUN prompt. Type in regedit and press ENTER. A prompt asking for administrator permission may appear. Accept it from a primary account or ask the administrator to allow it.
The alternative and the standard way is to search for it from the Start Menu by typing regedit and selecting the first app result.
2. Now we are inside the Registry editor. Paste this in address in the address bar and press ENTER as denoted by A. The other way is to manually browse to the address.
HKEY_CURRENT_USER\Software\Microsoft\Windows\CurrentVersion\Explorer\StuckRects3
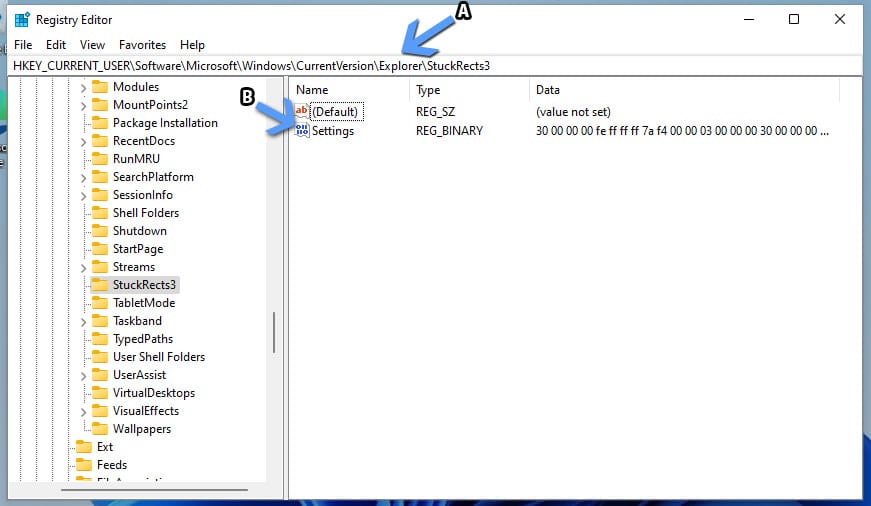
3. You will land in the StuckRect3 registry. Open the settings, denoted by B, through a double-click. A table of binary numbers in different rows will appear.
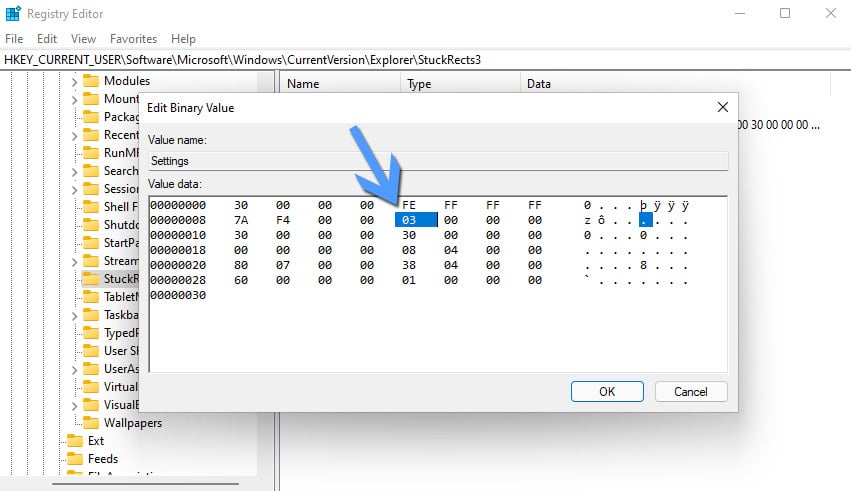
In here, head to the second row and the fifth column as denoted by the arrow. Double click on the number and change it from 03 to 01 by simply typing the numbers. Press OK (or ENTER on the keyboard) to save the settings.
Press the pause button – You can move the taskbar in Windows 11 to any of the compass directions. Replace the numbers with reference to the table.
| Number | Taskbar Position |
| 00 | Left |
| 01 | Top |
| 02 | Right |
| 03 | Bottom (default) |
Before moving to the left or the right position, we must tell you that it will break the taskbar with no icons or time-date appearing. The only usable thing is the volume-rocker laden quick-access bar which barely functions.
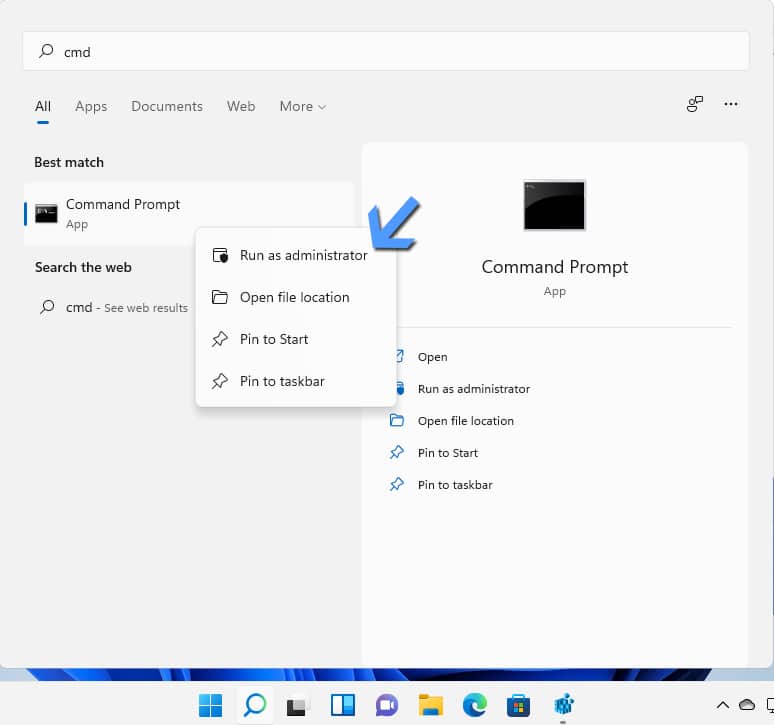
4. The first part is done, now head to the command prompt for restarting the explorer process.
Head to start menu search and search for command prompt or the acronym “cmd“—Right-click on the Command Prompt icon and select Run as Administrator to run it with full powers.
5. This step will be in two sub-parts. First, we will kill the explorer process and then restart it to the change in effect.
Here at FIRST, we will kill the explorer.exe process to stop the entire process tree. Type in the follow and press ENTER.
taskkill /f /im explorer.exe
Entering this command will make your desktop, wallpaper, and taskbar disappear. There is no need to panic; keep the seatbelt on, and keep going.
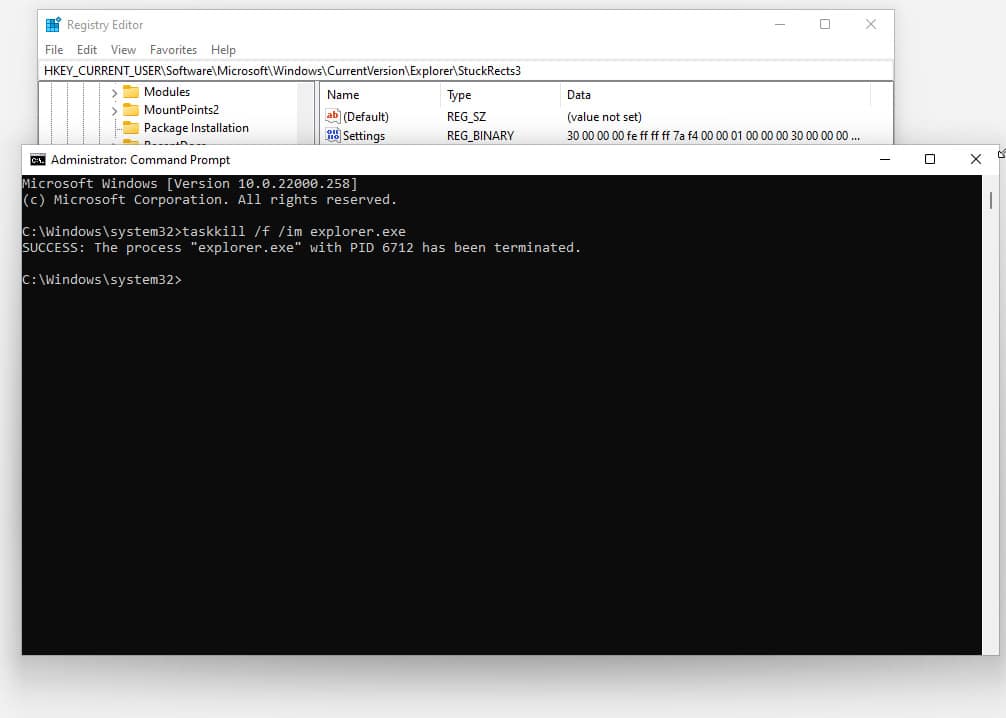
Now comes the SECOND part, where will restart the explore process and bring the taskbar in the new position. Type the following command and press ENTER.
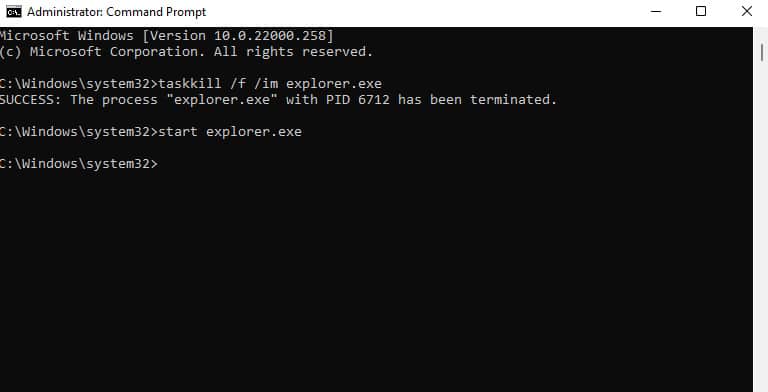
This will move the task on Windows 11 to the top, and the icons will be centered as there were in the default position.
You Must Know – You can always revert to the Default bottom taskbar by changing the value back to 03 from 01 of the settings in the registry we discussed above.
Also Read – Best Windows 11 Themes and Skins to Download
Move or Align The Taskbar Icons to the left
The macOS-inspired center taskbar icons are an eyesore to the religious Windows users who have been used to seeing it on the left or close to the start menu button. You can bring some normalcy back by moving the icons to the left.
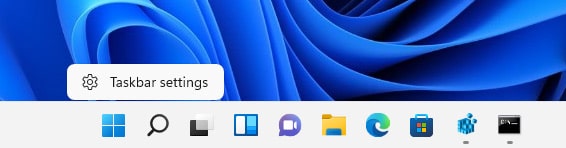
1. Right-click anywhere on the empty taskbar space and head to the taskbar settings.
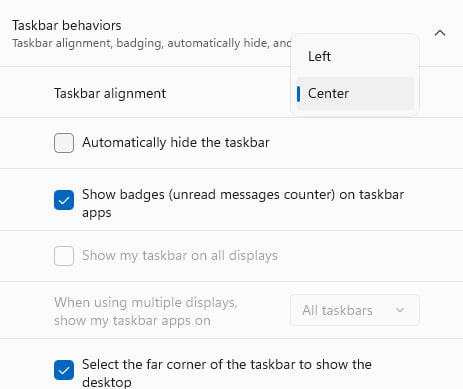
2. Now, expand the Taskbar Behaviors section by clicking on it.

3. Find the Taskbar Alignment column and click on the drop-drop menu with center set by default. Select the Left option from there to apply.
The taskbar icons will be aligned to the left side of the screen, resembling the old look for now.
Over to You
This is how you move the taskbar in Windows 11 using a simple registry tweak. A paid third-party app is already available in the market that can bring the old taskbar to Windows 11. You can give it a try or wait like most of us and let Microsoft bring more changes to it.
It will be a couple of months before even the features promised at the official unveiling make it the official version. Let us keep our fingers crossed and wait for Microsoft to move the taskbar back or, at a bare minimum, provide an option for veteran users.

Amaan Rizwan
Anything and everything because titles should not define us. A non-fiction lover. Khalid Hosseini and Ruskin Bond fan. Aspiring to be better than yesterday.
Windows 11, the latest operating system from Microsoft, introduces a fresh and modern design that includes a centered taskbar by default. However, if you prefer a more traditional layout with the taskbar aligned to the left side of the screen, you’ll be pleased to know that it’s still possible to customize the taskbar’s position. In this article, we will guide you through the steps to align the Windows 11 taskbar to the left, providing you with a more familiar and efficient desktop experience.
Step 1: Accessing the Taskbar Settings
The first step to aligning the Windows 11 taskbar to the left is to access the taskbar settings. To do this, right-click on any empty space on the taskbar itself. A context menu will appear, and you should select the “Taskbar settings” option.
Step 2: Changing the Taskbar Alignment
Once you have opened the taskbar settings, you will see various customization options. Look for the “Taskbar behaviors” section, and within it, you will find the “Taskbar alignment” option. By default, it is set to “Center.” Click on the drop-down menu next to it and select “Left.”
After selecting “Left,” you will notice that the taskbar immediately moves to the left side of the screen. You can also experiment with other alignment options, such as “Center” or “Right,” to find the layout that suits your preferences best.
Step 3: Customizing Taskbar Size and Appearance
Now that you have aligned the taskbar to the left, you may want to further customize its size and appearance. Windows 11 offers several options to personalize the taskbar to your liking.
Taskbar Size
To adjust the size of the taskbar, go back to the taskbar settings. Look for the “Taskbar behaviors” section again, and this time, find the “Taskbar size” option. By default, it is set to “Small.” Click on the drop-down menu next to it and select “Small” or “Medium” to change the size accordingly. You can also choose “Auto” to let Windows automatically adjust the taskbar size based on your screen resolution and other factors.
Taskbar Alignment
While we have already covered how to align the taskbar to the left, it’s worth mentioning that you can also change its alignment to the center or right if you prefer. Simply follow the steps outlined in Step 2 and select the desired alignment option.
Taskbar Behaviors
Windows 11 introduces new taskbar behaviors that allow you to customize how the taskbar behaves in different scenarios. For example, you can choose to show or hide the taskbar when in tablet mode or when using specific apps. To access these options, go back to the taskbar settings and look for the “Taskbar behaviors” section. Explore the available options and adjust them according to your preferences.

Taskbar Colors and Transparency
Windows 11 offers a range of customization options for the taskbar’s appearance, including colors and transparency. To change the taskbar color, go to the “Personalization” settings by right-clicking on the desktop and selecting “Personalize.” From there, navigate to the “Colors” section and choose a color that suits your taste. You can also enable or disable transparency effects by toggling the “Transparency effects” switch.
FAQs
Can I align the taskbar to the left in previous versions of Windows?
Yes, you can align the taskbar to the left in previous versions of Windows, such as Windows 10. The process may vary slightly, but generally, you can right-click on the taskbar, go to “Taskbar settings,” and look for the option to change the taskbar alignment.
Why would I want to align the taskbar to the left?
Aligning the taskbar to the left can provide a more familiar and efficient desktop experience for users who are accustomed to this layout. It allows for easier access to frequently used applications and provides a consistent workflow for those transitioning from previous versions of Windows.
Can I revert back to the centered taskbar layout?
Yes, you can easily revert back to the centered taskbar layout in Windows 11. Simply follow the steps outlined in Step 2 and select “Center” from the taskbar alignment options.
Are there any performance implications of aligning the taskbar to the left?
No, aligning the taskbar to the left does not have any significant performance implications. It is purely a visual customization that does not impact the overall performance or functionality of the operating system.
Can I align the taskbar to the left on multiple monitors?
Yes, you can align the taskbar to the left on multiple monitors in Windows 11. Each monitor will have its own taskbar, and you can customize the alignment and appearance of each taskbar individually.
Summary
Aligning the Windows 11 taskbar to the left is a simple process that can provide a more familiar and efficient desktop experience. By following the steps outlined in this article, you can easily customize the taskbar alignment, size, and appearance to suit your preferences. Whether you prefer the centered layout or the more traditional left-aligned taskbar, Windows 11 offers the flexibility to personalize your desktop environment.
Remember to explore the various customization options available in the taskbar settings, such as taskbar behaviors, colors, and transparency, to further enhance your Windows 11 experience. With these customization options, you can create a desktop layout that is both visually appealing and tailored to your workflow.
Moving the Windows 11 taskbar to the left might seem like a small change, but it can greatly impact your workflow and productivity. In just a few simple steps, you can reposition your taskbar to suit your preferences better. Let’s dive into how you can accomplish this task efficiently and effortlessly.
Moving the Windows 11 taskbar to the left will make it look more like the classic Windows layout. This can be especially useful if you’re more comfortable with that setup or if you want to maximize your screen space. Follow these steps to reposition your taskbar:
Step 1: Right-click on the Taskbar
First, you need to right-click on the taskbar itself to open the taskbar settings menu.
When you right-click on the taskbar, a menu will appear with several options. This is where you’ll access the taskbar settings.
Step 2: Click on Taskbar Settings
On the menu that pops up, find and click on the option labeled “Taskbar settings.”
This will open the Settings window, specifically focusing on the taskbar configurations. Here you will find various settings related to the taskbar’s appearance and behavior.
Step 3: Scroll Down to Taskbar Behaviors
In the taskbar settings window, scroll down until you find a section called “Taskbar behaviors.”
The “Taskbar behaviors” section contains options for customizing how your taskbar functions, including its alignment on the screen.
Step 4: Change Taskbar Alignment to Left
In the “Taskbar behaviors” section, locate the dropdown menu next to “Taskbar alignment.” Click on it and select “Left.”
By choosing “Left,” you’re telling Windows to align your taskbar icons to the left side of the screen, similar to how it was in previous versions of Windows.
Step 5: Confirm the Change
Once you’ve selected “Left,” the taskbar icons will automatically move to the left side of the screen. You can now close the Settings window.
After confirming this change, your taskbar will be aligned to the left, making it easier to access your pinned apps and open windows.
Once you’ve completed these steps, your Windows 11 taskbar will be positioned to the left side of the screen, resembling the classic Windows layout. This can improve your efficiency and make the desktop more familiar, especially if you’re transitioning from an older version of Windows.
Tips for Moving Windows 11 Taskbar to Left
-
Resetting to Default: If you ever want to revert the taskbar back to its original centered position, you can follow the same steps and select “Center” in the “Taskbar alignment” dropdown menu.
-
Customizing Icons: While you’re in the taskbar settings, take a moment to customize which system icons appear on the taskbar, as this can further improve your workflow.
-
Hiding the Taskbar: You can also choose to automatically hide the taskbar when it’s not in use by toggling the “Automatically hide the taskbar” option in the same settings window.
-
Taskbar Size: If you find the taskbar too large or too small, you can change its size under the “Taskbar behaviors” section by selecting the “Taskbar size” dropdown.
-
Shortcut Keys: Familiarize yourself with Windows shortcut keys like
Win + Tto quickly navigate the taskbar items, improving your productivity even more.
Frequently Asked Questions
How do I reset the taskbar to the default position?
To reset the taskbar to its default centered position, follow the same steps but select “Center” instead of “Left” in the “Taskbar alignment” dropdown menu.
Can I move the taskbar to the top or right side?
Currently, Windows 11 does not support moving the taskbar to the top or right side of the screen. It can only be aligned to the left or center.
Will moving the taskbar delete my pinned apps?
No, moving the taskbar to the left will not delete your pinned apps. They will remain pinned and just shift to the left side.
Can I change the taskbar color?
Yes, you can customize the taskbar color by going to Settings > Personalization > Colors, and then selecting your desired color.
Is it possible to make the taskbar transparent?
Yes, you can enable transparency effects by going to Settings > Personalization > Colors and toggling the “Transparency effects” option.
Summary
- Right-click on the Taskbar.
- Click on Taskbar Settings.
- Scroll Down to Taskbar Behaviors.
- Change Taskbar Alignment to Left.
- Confirm the Change.
Conclusion
Moving the Windows 11 taskbar to the left is a straightforward process that can significantly enhance your desktop experience. By following the simple steps outlined, you can quickly make this adjustment and enjoy a more familiar or functional layout. Remember, customization is key to making your computer work best for you, so don’t hesitate to tweak other settings while you’re at it.
Feel free to explore additional personalization options in the Settings menu to further enhance your user experience. If you run into any issues or have other questions, there are plenty of online resources and communities ready to help.
By taking control of these small but impactful settings, you’re making your digital workspace truly your own. Happy customizing!
Matthew Burleigh has been writing tech tutorials since 2008. His writing has appeared on dozens of different websites and been read over 50 million times.
After receiving his Bachelor’s and Master’s degrees in Computer Science he spent several years working in IT management for small businesses. However, he now works full time writing content online and creating websites.
His main writing topics include iPhones, Microsoft Office, Google Apps, Android, and Photoshop, but he has also written about many other tech topics as well.
Read his full bio here.