In Windows 10/11, the Start menu is represented by two folders. One folder is for all users, and the other is only for the currently logged-in user.
The Start Menu folder for all users is C:\ProgramData\Microsoft\Windows\Start Menu\Programs.
The Start Menu folder location specific to your account is C:\Users\your-user-name\AppData\Roaming\Microsoft\Windows\Start Menu\Programs.
To access these locations quickly, we can use the following run commands (to open the Run dialog box, press Windows key + R).
Run the following command to open the location containing start menu programs available to all users:
shell:Common Programs
The following run command opens the start menu folder contains programs specific to your account:
Shell:Programs
And this is how we locate the Start menu folder in Windows 10/Windows 11 operating system.
A little organization goes a long way. When you edit your Start menu in Windows 11 to group apps into folders, you can save time and effort in your day-to-day. Do you want all the apps for creative projects in one place? How about keeping your work apps separate from your entertainment apps? Whatever organization or order you want, follow these tips to create, move, and remove Windows 11 Start menu folders and add a little more organization to your digital day.
Create, name, and move a Start menu folder
Follow these steps below to start organizing your Start menu apps into folders:
- Open the Start menu by selecting the Windows icon (four squares) on your taskbar or keyboard.
- If you don’t see the app you want to add to a folder, select All apps. When you find the app you want, right-click to select Pin to Start.
- Select any app icon in the Start menu, drag it and hover over another app icon. Both app icons will shrink, signaling that they are being put into a folder together.
- Drop the app, and you’ll see that a folder has been created.
- Add more apps to the folder by dragging and dropping.
- To name the folder, select it. You can now see all the apps inside it and change the folder title.
- Create as many folders as you like, drag and drop to move folders to new positions within the Start menu.
Remove apps from a Start menu folder
If you want to move apps between folders or remove apps from folders altogether, it just takes a few quick steps:
- Open the Start menu by selecting the Windows icon (four squares) on your taskbar or keyboard.
- Select the folder with the apps you want to remove.
- Select the app that you want and drag it out of the folder.
- Drop the app anywhere you’d like it within the Start menu.
Three ways to organize your Start menu apps into folders
Need some quick organization ideas? Here are a few ways you might organize your Start menu apps into folders.
- Work-life balance. Separate your personal and professional lives by keeping work-only apps in their own folder.
- Like with like. Put similar apps together. You might place language-focused apps, like Microsoft Word, with related apps, like your favorite digital reader. Perhaps you use Excel for finances and want it grouped with the Calculator app, or you want your Photos app with your favorite graphic design software.
- By user. If you share your device, you might create folders for apps specific to any one user. That way, you don’t have to sift through each other’s apps to find what you need.
Pin Start menu folders to your taskbar
Now that you’ve edited the Start menu to group apps into folders, you can extend that organization to your taskbar. Here’s how to pin Start menu folders to the taskbar at the bottom of your desktop for easy access.
- Open the Start menu by selecting the Windows icon (four squares) on your taskbar or keyboard.
- Right-click the folder you want to pin to your taskbar.
- Select Pin to taskbar. The folder will appear on your taskbar.
- Drag and drop to move the folder to a new position on the taskbar.
With these tips, you can edit your Start menu to work best for you. For more ways to stay organized and get the most out of Windows 11, head to the Windows Learning Center.
Microsoft Excel
With the release of Windows 11, Microsoft introduced a sleek and modern interface that many users love. However, some features, such as the Start Menu, took a while for users to adapt to. One feature that can enhance the organization and efficiency of using the Windows 11 Start Menu is the ability to create folders to group apps. This article will provide a comprehensive guide on how to create these folders, organize your apps effectively, and optimize your workflow using the Windows 11 Start Menu.
Understanding the Windows 11 Start Menu
Before diving into how to create folders, let’s first take a moment to understand the layout and functionality of the Windows 11 Start Menu. Unlike Windows 10, which had a traditional start menu, Windows 11 has a centered taskbar with a simplified Start Menu. The menu has two main sections: the pinned apps and the recommended section, which shows apps and documents you might want to access quickly.
Key Features of the Windows 11 Start Menu:
-
Centered Layout: By default, the Start Menu is centered, which provides a modern aesthetic but may take some getting used to for those accustomed to previous versions.
-
Pinned Apps: Users can pin their favorite applications for quick access.
-
Recommended Section: Shows recently used apps and files, providing quick access to your daily tasks.
-
Search Functionality: Easily search for apps, settings, and files right from the Start Menu.
-
Settings Access: Quick access to power settings, system settings, and shutdown options.
Creating folders within the pinned apps section allows for more efficient use of screen space and minimizes the clutter, making it easier to find the applications you need most.
Why Add Folders to the Start Menu?
-
Organization: With the ability to create folders, you can categorize apps based on usage, such as ‘Work’, ‘Games’, or ‘Media’.
-
Efficiency: Instead of scrolling endlessly through a long list of pinned apps, folders enable you to quickly find what you need.
-
Aesthetics: A well-organized Start Menu can significantly improve the visual appeal of your desktop environment.
-
Personalization: Making the Start Menu reflect your workflow can lead to improved productivity.
How to Create a Folder in the Windows 11 Start Menu
Creating folders in the Windows 11 Start Menu is straightforward. Follow these steps to efficiently create and manage folders:
Step 1: Access the Start Menu
- Click on the Start button, usually found at the center of the taskbar or press the Windows key on your keyboard.
Step 2: Pin Apps to the Start Menu
Before you can create folders, you need to have some apps pinned to your Start Menu. If you haven’t pinned any apps yet, here’s how to do it:
- Find the app you wish to pin. You can do this by searching for it in the Start Menu or locating it in the All Apps section.
- Right-click on the app icon.
- Select Pin to Start from the dropdown menu.
Step 3: Create a Folder
Once you have your desired apps pinned, follow these steps to create a folder:
- Drag and Drop: Click and hold the icon of one app and then drag it over another app that you want to group it with.
- Release the Mouse Button: When they overlap, release the mouse button. A folder will automatically be created with both apps inside.
- Name the Folder: Click on the title (usually defaults to Folder) to rename it. Type your preferred folder name (such as ‘Office’, ‘Games’, etc.) and press Enter.
Step 4: Add More Apps to the Folder
To add more apps to the folder you just created:
- Drag another app icon into the folder.
- You can open the folder by clicking once on it; this will display all the apps contained within it.
Step 5: Remove Apps from a Folder
If you want to remove an app from a folder:
- Open the folder by clicking on it.
- Click and hold the app you wish to remove.
- Drag it outside of the folder and release the mouse button; it will go back to the pinned section of the Start Menu.
Step 6: Delete a Folder
To delete a folder entirely:
- Open the folder.
- Remove all the apps within it using the method described above.
- Once no apps are left in the folder, the folder will disappear automatically.
Tips for Efficient Use of Start Menu Folders
While creating folders in the Start Menu is a straightforward task, here are some tips to make the best use of this feature:
-
Limit Folder Size: Aim for a balance; if a folder is getting too cluttered with many apps, consider creating multiple smaller folders.
-
Naming Conventions: Choose intuitive names for your folders to make it easy to remember what’s inside them.
-
Review Periodically: Regularly check and update your folders to adapt to any changes in your usage patterns.
-
Use Icons: If possible, personalize the application icons to have a visual distinction between different categories.
-
Accessibility: Place the most frequently used folders towards the top of the pinned section for quicker access.
Troubleshooting Common Issues
While using the Start Menu folders in Windows 11 is easy, you may encounter some issues. Here are solutions to frequent questions and problems users face:
-
Folder Not Creating: If dragging and dropping does not create a folder, ensure you are holding the application just long enough in place; try moving it over the other app icon smoothly without dropping too fast.
-
Folder Not Opening: If folders do not respond when clicked, check if there’s any Windows Update pending. Updating your Windows can often resolve minor bugs.
-
Lost Pinned Apps: In some cases, apps might unpin themselves. You can easily repin them by searching for them through the Start Menu or browsing the All Apps of your installation.
-
Customization Options Missing: Some personalization options might be limited depending on the Windows edition you’re using (Pro, Home, etc.). Always ensure your version supports the features you seek.
-
Updating the Layout: If you feel the layout is too cluttered, consider resetting it to the default and starting over to create a more streamlined experience.
Conclusion
The ability to create folders in the Windows 11 Start Menu is a powerful way to enhance productivity, improve organization, and customize your user interface. By following the simple steps outlined in this article, you can easily group your favorite apps, making them more accessible and streamlined for your daily tasks.
As with any feature, practice is key—take some time to play around with folder creation, experiment with different layouts, and find what best suits your workflow. Whether you’re a casual user or a power user, mastering the Start Menu will enhance your Windows 11 experience significantly.
In a rapidly evolving digital landscape, the tools we use daily can greatly benefit from mindful customization. Embrace the functionality that Windows 11 offers, and organize your Start Menu like a pro. Ultimately, a well-arranged desktop experience not only looks good but also plays a vital role in improving your overall efficiency and productivity.

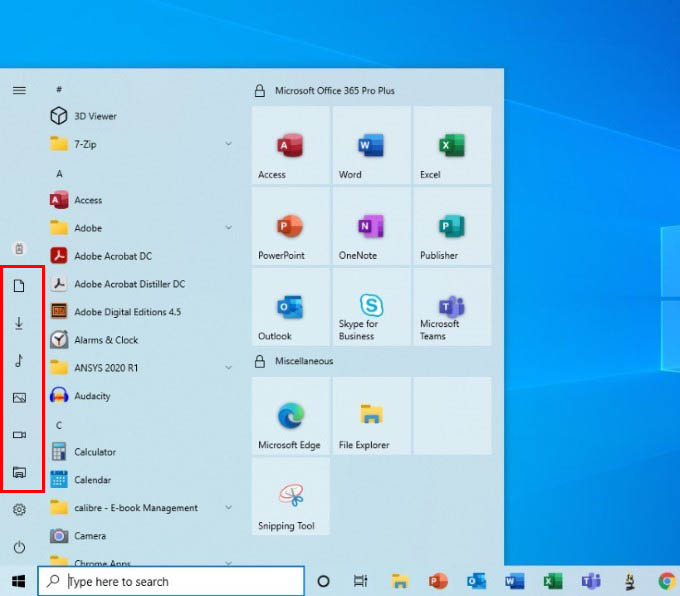
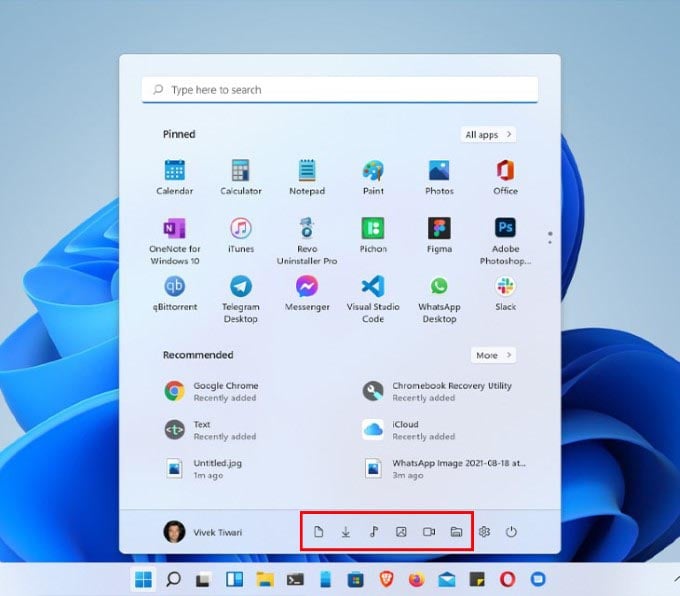
If you’re tired of the default layout of the Windows 11 Start Menu, there are plenty of customization options. One of these options is the ability to add system folders to the bottom of the Start Menu beside the power button.
Below, we’ll explain how to add system folders to the bottom of the Windows 11 Start Menu.
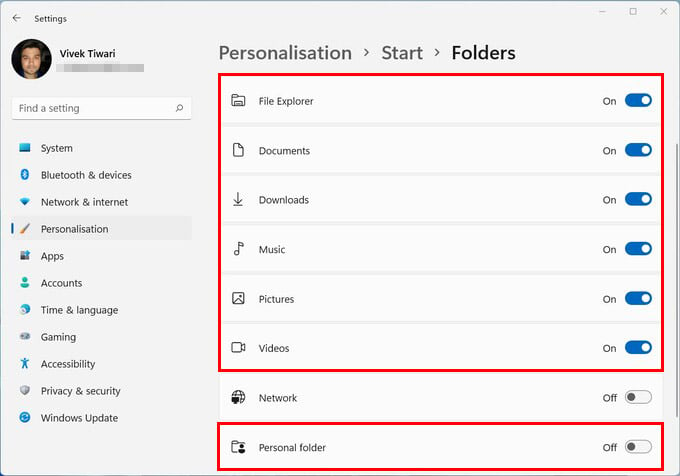
To add folders to the Start Menu, you need to access the personalization options in system settings. Here’s how:
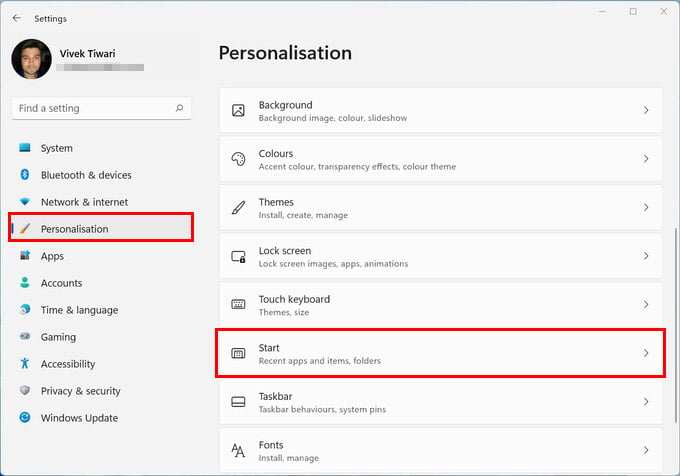
- Press the Windows key + I to open Settings.
- Select Personalization from the left-hand menu.
- Choose Start.

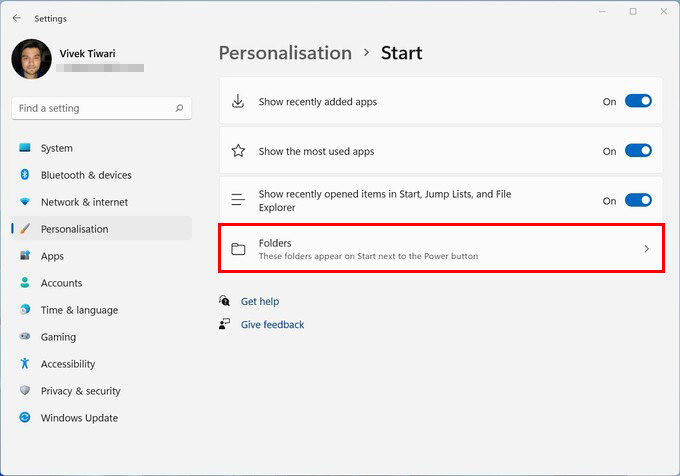
- Select the Folders option.

- Toggle on which system folders you want to appear next to the power button in the Start Menu. These include Settings, File Explorer, Documents, Downloads, Music, Pictures, Videos, Network, or your Personal folder.

Note: You’re also able to remove the Recommended section from the Start Menu. This section, while useful for some users, can be a privacy issue if multiple people use the same PC.
Customize Away
Hopefully, this article has helped you add system folders to your Start Menu. If you’d like to customize the menu further, don’t forget that you can add shortcuts to the Start Menu, too.
Related Posts
- How to Fix a “This file does not have an app associated with it” Error on Windows
- How to Add OneDrive to Windows File Explorer
- How to Fix an Update Error 0x800705b4 on Windows
- How to Resolve “A JavaScript error occured in the main process” Error on Windows
- How to Fix the Network Discovery Is Turned Off Error on Windows
Ready for the best newsletter in tech?
Get daily tips, tricks, guides, and special offers delivered right to your inbox.