
Switch the language of Windows 11 (single language) to en-us
Saturday, March 23, 2024
«For those seeking to switch to en-us, i’ve been able to do it without downloading anything, as it seems pre-installed.» — seeker_of_bacon
-
Was used:
- Windows 11 (
x64) - Windows PowerShell (
Admin mode)
- Windows 11 (
In your PowerShell(Admin mode):
- Run the command to change the language
  reg add HKLM\SYSTEM\CurrentControlSet\Control\Nls\Language /v InstallLanguage /t REG_SZ /d 0409 /f
  reg add HKLM\SYSTEM\CurrentControlSet\Control\Nls\Language /v Default /t REG_SZ /d 1033 /f
- Restart your computer
- That’s it, it’s done!
References
- Links:
- Thanks @seeker_of_bacon (Stack Exchange): How to Change Language of Windows 11 Single Language Without Format
Как сменить язык интерфейса в Windows 11 Single Language через PowerShell
Чтобы поменять язык будем использовать нестандартные (неофициальные) способы.
1. Для смены языка скачайте языковой пакет
2. Откройте от имени администратора программу PowerShell
3. Скопируйте путь к файлу Microsoft-Windows-Client-Language-Pack_x64_ru-ru.cab (Выделите Microsoft-Windows-Client-Language-Pack_x64_ru-ru и нажмите Ctrl+Shift+C) (или выберите «copy as path» в контекстном меню) ИМЕННО РАЗАРХИВИРОВАННОЙ ПАПКИ!!!
4. Выполните последовательно команды:
- dism.exe /online /Add-Package /PackagePath: путь до вашего файла.cab
- reg add HKLM\SYSTEM\CurrentControlSet\Control\Nls\Language /v InstallLanguage /t REG_SZ /d 0419 /f
- reg add HKLM\SYSTEM\CurrentControlSet\Control\Nls\Language /v Default /t REG_SZ /d 1049 /f
- cd
5. После этого перезагрузите систему и попробуйте изменить язык интерфейса стандартным способом.
Welcome everybody;
On this topic, you will learn a new and exclusive method in how to change display language in Windows 10 or Windows 11 single language to multi languages without formatting or losing activation.
Normally, if you have windows 10 or windows 11 home single language, you can’t change the display language to another language without upgrading your system into pro or enterprise, because your windows license only supports one display language.
So you will need to do the following steps in order to change your display language to any language:
- Upgrading windows from home single language to Pro multi language by changing product key
- Installing the desired language pack.
- Downgrading windows into home single language to restore windows activation.
How do I Change Windows 11 from Single Language to Multi Language?
To change display language from Single Language to Multi language in windows 11 or Windows 10, you have to change your product key by upgrading to professional or Enterprise edition as followings:
- Download Change-Display-Language-by-VMTechs.zip from this short link, or this direct link.
- Also download Fix-System-and-Update-Issues-by-VMTechs.zip file to repair your system files or Update Service if you encountered any error during upgrading process.
- Download windows 10 or windows 11 ISO file according to installed windows in your computer
- Select the desired language that you want to be the new display language in your computer
- The ISO file is required to downgrade your system back from pro to home in order to restore your windows activation. If the activation is not concern, you can skip downloading the ISO file of windows.
- Disconnect your computer from the internet
- Extract Change-Display-Language-by-VMTechs.zip file and then open the extracted folder
- Right click Change edition file and then select run as administrator
- Type two and then press enter to change your windows edition from Home Single Language to Professional multilanguage.
- You can upgrade into another edition if you want by typing the corresponding number, but you should not select any single language edition again.
- Type one and press Enter
- Type one again and press enter to start upgrading process.
- The system will restart automatically to complete upgrading process.
- If the process completed into 100% and then you get an error message like this, then you can ignore the error message and restart your system manually to complete the upgrading process.
- But if the process stacked in 20 or 40 % or if your system didn’t change to pro edition, then you have to repair your system and update services as you will see later.
- Let’s open settings to see if the upgrade done or not
- As you can see on the video below, the edition of windows changed from home single language into pro that supports multi languages without format. However, the new edition of windows is not activated after upgrading, but you can restore your home activation by downgrading into home single language edition after changing the display language as you will see later.
How to Change Single Language from English to Arabic in Windows 11 and Windows 10?
Note: I will show you How do I change my Windows 10 and windows 11 single language from English to Arabic, however, this method is applicable to change display into any language and vis versa.
To add Arabic or another display language, do the followings:
Right click on start icon and then select Settings option
Click on Time & Language option and then select Language & Region option
Click on add language option and then select the desired language.
Click Next to proceed
Make sure the Language pack option is checked and then check Set as my Windows display language option, after that, click on Install icon to start installing the selected language pack.
Click Sign out to apply your new display language.
As you can see, the display language changed from English into Arabic language successfully in windows 11, but in Windows 10, the display language did not change to Arabic completely. In such case, you have to downgrade windows using the ISO file of windows as you will see later.
How to Downgrade Windows 11 Pro to Home Without Reinstall?
To restore your windows activation, you have to downgrade your windows from professional to home single language.
If you want to keep the Pro edition or if the previous activation is not concern, you can purchase an activation key from Microsoft distribution agent in your city or from the official Microsoft website, or you can search Google for a free activation method if you can’t purchase the genuine activation key.
However, if display language doesn’t completely changed to the new language as happen in my windows 10, then you have to downgrade into home Single Language in order to get full display language in addition to restoring your previous activation key.
I will show you how do I downgrade from Windows 10 Pro to home single language as well as in windows 11, to confirm that the downgrading is possible in both editions.
Downgrading steps:
- To downgrade from Windows Pro to Windows Home single Home Language, do the followings:
- Open Change-Display-Language-by-VMTechs folder.
- Double click the Downgrade_to_Windows11-Home.reg file and then click Yes to add the registry key to your system.
- Double click the ISO file of installed windows to mount it, after that, double click the Setup.exe file to open upgrade wizard.
- Disable downloading updates online if you want, and then click Next
- Make sure that “Keep Personal Files and Installed apps” is the selected option and then click Next to continue.
- Accept the language change declaration and then select Update.
- Click Install to start downgrading process.
- This process may take up to one hour or more, so be patient.
- As you can see on the video below, both windows 10 and windows 11 were downgraded into Core Single Language successfully, and the activation status restored automatically after downgrading.
Troubleshooting Errors Related to System Files Corruption or Update Services Issues
If the computer failed to upgrade or to downgrade, then you can fix that issue by one of the following methods according to your situation.
How to Fix Windows Upgrade Failed Error Message?
If the windows upgrading failed after adding the new windows product key of Professional or Enterprise or any edition, then you can fix that by using DISM or SFC tools or by resetting the windows Update Service as followings:
- Download Fix-System-and-Update-Issues-by-VMTechs.zip file and extract it anywhere in your computer.
- Open the extracted folder and then right click the file called DISM-SFC-CHKDSK.bat and select Run as Administrator option
- Type 1 into the batch script console to run DISM command line
- once the DISM command completed successfully, close the batch windows and then run it as administrator again
- Type 2 to execute the SFC command line tool to check and repair system errors
- After that, try upgrading again
- If the problem not fixed, you can try to reset the Windows update service by running the file called FIX-WINDOWS-UPDATE.bat as administrator, and then restart your system. After that, try upgrading by running the “Change_Edition.cmd” file again.
How to fix This PC Doesn’t Currently Meet Windows 11 System Requirements?
If you have installed windows 11 in unsupported computer, the upgrade process will fail with an error message saying that “This pc doesn’t support windows 11″, or “This PC doesn’t currently meet Windows 11 System Requirements” due to “The processor isn’t supported for this version of Windows” To fix that, you have to modify registry as followings:
- Download Fix-System-and-Update-Issues-by-VMTechs.zip file and then extract it.
- Double click Allow-Upgrades-in-Unsupported-PC.bat file
- After that run the setup file again.
If you encountered “This PC doesn’t currently meet Windows 11 System Requirements” due to “The system disk needs to be 64 GB or larger“, or “The PC must support TPM 2.0” or “The PC must support Secure Boot” or any windows limitation, then you can bypass these limitations as followings:
- Copy the contents of ISO file into any folder inside your computer
- Navigate to the Sources folder inside the folder that you have copied the ISO contents into it
- Locate the file called appraiserres.dll and then edit it using Notepad or any text editor app.
- Press Ctrl + A keys from keyboard to select everything
- Delete the selected text and then save the file
- Back to the main folder and run Setup.exe file to start upgrading without errors.
VIDEO:
Watch this video to see how to change display language in Windows 10 or windows 11 Home Single Language easily and step by step:
Please follow and like us:
-
Home
-
News
- What Is Windows 11/10 Home Single Language?
What Is Windows 11/10 Home Single Language?
By Linda | Follow |
Last Updated
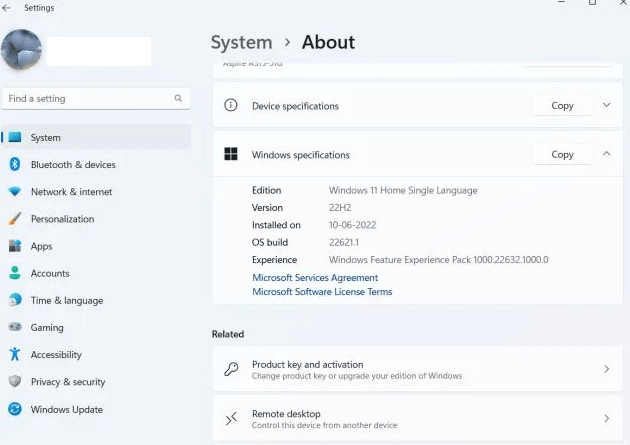
What is Windows 11 Home Single Language? What’s the difference between the Windows Home edition and the Windows Home Single Language edition? How to change language in Windows 11/10 Home Single Language edition? This post from MiniTool Partition Wizard will show you all.
Windows 11/10 Home Single Language
Those people who have bought PCs abroad may encounter the Windows 11/10 Home Single Language issue. When they try to change the system language to their mother language, they are told that “your Windows license supports only one display language.” This issue prevents them from changing the system language.
Why do PC manufacturers sell PCs with the Windows 11 Home Single Language edition or Windows 10 Home Single Language edition?
The fundamental reason is that the license of the Windows Home Single Language edition is cheaper than that of the regular Home edition. In addition, the Single Language edition is usually only offered to OEMs.
Windows 11/10 vs Windows 11/10 Home Single Language
What about Windows 10 vs Windows 10 Home Single Language or Windows 11 vs Windows 11 Home Single Language? Some people may wonder about this question.
The Windows 11/10 Home edition is the same as the Windows 11/10 Home Single Language, except that the Single Language edition doesn’t allow users to change the system language after the Out of Box Experience (they have chosen one language in this process).
Tips:
Some people may see the Windows 11 Home Single Language or Windows Home Insider Preview Single Language watermark in the right bottom corner of the PC screen. In most cases, the reason for this issue is that they have joined the Microsoft Insider Program. Leaving the insider build can solve the issue.
How to Solve the Windows 11/10 Home Single Language Issue
You can the following ways to solve the Windows 11/10 Home Single Language issue.
Way 1. Upgrade to the Pro Edition
To solve the Windows 11/10 Home Single Language issue, you need to purchase a Windows 11/10 Pro license and then activate Windows 11/10 using the new license. You can refer to the detailed steps in this post: How to Upgrade Windows 11 Home to Pro – 5 Steps.
Way 2. Use Commands
This way is offered by users of the Super User forum and many people say that it works for them. So, you can also have a try.
For Windows 11 Home Single Language Issue
Step 1: Press the Windows logo key + R to open the Run dialog box. Then, type “cmd” and press Enter to open Command Prompt.
Step 2: Run the command gotten on this page. For example, if you want to change the language to en-US, the command should be:
curl -o %TEMP%\Microsoft-Windows-Client-Language-Pack_x64_en-us.cab «https://filedn.com/lOX1R8Sv7vhpEG9Q77kMbn0/Windows11/LanguagePacks/Microsoft-Windows-Client-Language-Pack_x64_en-us.cab»
dism /online /Add-Package /PackagePath:%TEMP%\Microsoft-Windows-Client-Language-Pack_x64_en-us.cab
reg add HKLM\SYSTEM\CurrentControlSet\Control\Nls\Language /v InstallLanguage /t REG_SZ /d 0409 /f
reg add HKLM\SYSTEM\CurrentControlSet\Control\Nls\Language /v Default /t REG_SZ /d 1033 /f
cd
Tips:
You should replace %TEMP% in given commands to the full path to the Temp folder like C:\Users\Linda\AppData\Local\Temp.
For Windows 10 Home Single Language Issue
Tips:
Some people report that this way doesn’t work for Windows 11 PCs.
Step 1: You should first download and install the language pack by adding a language in Settings > Time & Language > Language.
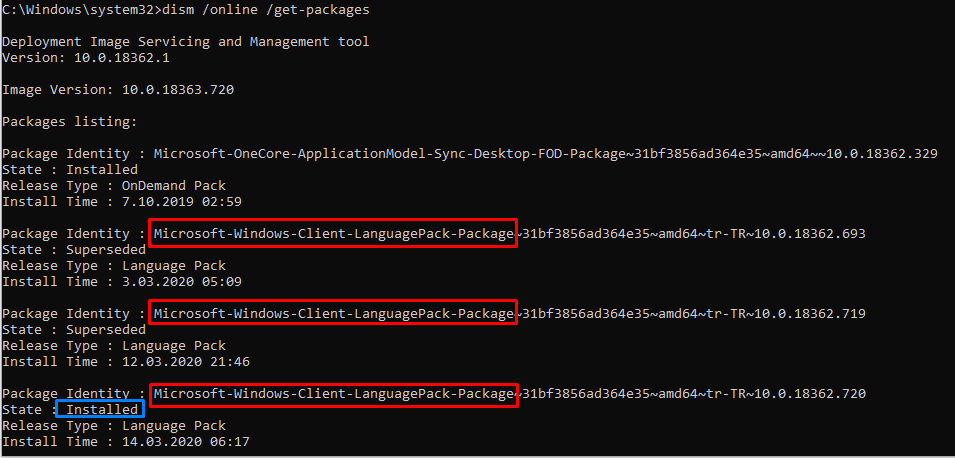
Step 2: Open Command Prompt with Administrator rights. Type dism /online /get-packages and press Enter. Look for Microsoft-Windows-Client-LanguagePack-Package as a start for Package Identity. And its State should be Installed. You can see the next 5 characters after ~ to understand which language it is (tr-TR for example).
Step 3: Press Win+R, type “regedit”, and then press Ctrl+Shift+Enter to open Registry Editor with Administrator rights. Go to \HKEY_LOCAL_MACHINE\SYSTEM\CurrentControlSet\Control\Nls\Language.
Step 4: Check the Language/region ID of the installed language in the Available languages for Windows page. Double-click the Default entry on Registry Editor and then change its Value data to the ID of the installed language. In some cases, you might need to change the InstallLanguage entry as well.
MiniTool Partition Wizard is a multifunctional tool that can migrate OS, clone disks, recover data, convert disks between MBR and GPT without data loss, etc. If you have these needs, you can try it.
MiniTool Partition Wizard DemoClick to Download100%Clean & Safe
About The Author
Position: Columnist
Linda has been working as an editor at MiniTool for 5 years. She is always curious about computer knowledge and learns it crazily. Her articles are simple and easy to understand. Even people who do not understand computer can gain something. By the way, her special focuses are disk management, data recovery and PDF editing.
By default, you cannot add more languages into Windows 11 Home Single Language. In settings page, you can only add text-to-speech, speech recognition and handwriting instead of display language.
1. First, download the favorite language from the below table.
2. Extract downloaded zip file into your computer.
3. Now, you’ve a folder contains a Cabinet File and a Windows Batch File. Let’s right click on the batch file then select Run as administrator.
4. New windows opens, the language is added into your Windows automatically. Once done, restart your computer to take the changes go into effect.