
The Windows 11 update introduced a streamlined right-click menu, hiding many familiar options under “Show more options.” This change reduces visible commands and slows down workflows for those accustomed to the classic menu from earlier Windows versions.

The minimalist design, while aiming for consistency, makes common commands like “Copy” and “Properties” harder to access, frustrating many users. As more people experience Windows 11, reactions vary—some feel nostalgic, while others are upset about these UI choices.
The new design also omits familiar options like “Refresh” and “New” on the desktop. Fortunately, the classic menu can be restored with a simple registry edit or pre-made registry files.
1. Disable ‘Show More Options’ from Registry Editor Using CMD
Changing the Registry Editor lets you directly adjust Windows settings, like the right-click menu. By tweaking registry values, you can turn off “Show More Options” to immediately return to the classic menu. It’s wise to back up the registry first so you can restore it if necessary.
If you don’t want to use commands, download the bat files, then run them as an administrator to enable or disable the old classic context menu.
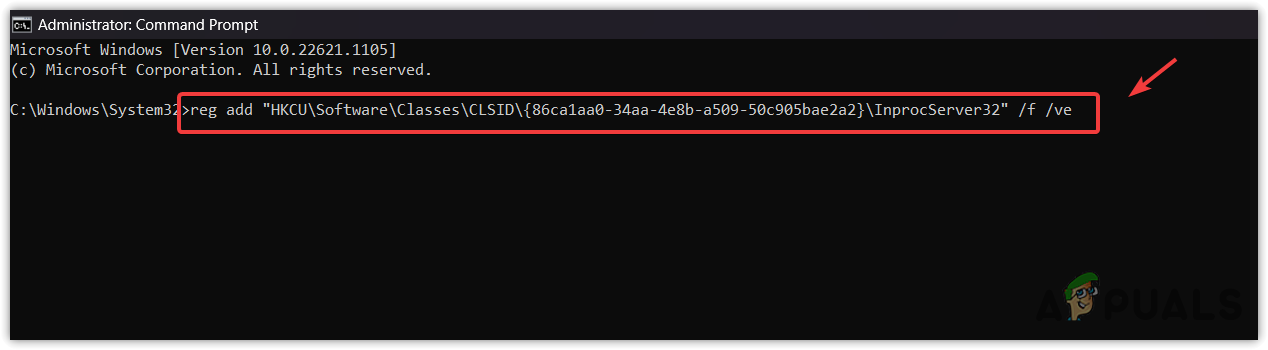
- Press the Windows key and type Command Prompt and run it as Administrator.

Opening Command Prompt - Enter this command and press Enter.
reg add "HKCU\Software\Classes\CLSID\{86ca1aa0-34aa-4e8b-a509-50c905bae2a2}\InprocServer32" /f /ve
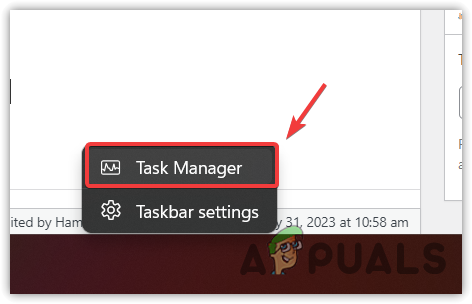
Adding a Registry Key to enable the old classic menu via command prompt - Right-click the taskbar and select Task Manager.

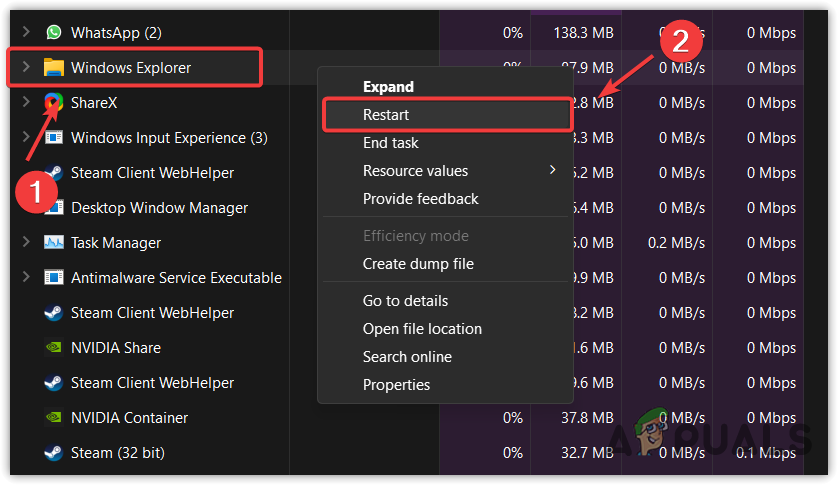
Opening Task Manager from the taskbar - In Task Manager, right-click Windows Explorer and click Restart.

Restarting Windows Explorer - After that, right-click the desktop to see the old menu.
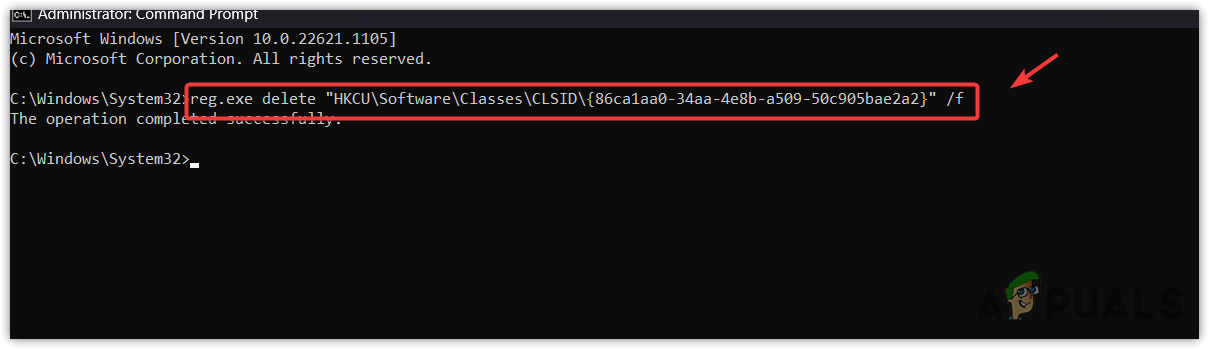
- If you want the Show More Options back, restore the registry backup or run this command to delete the registry entry:
reg.exe delete "HKCU\Software\Classes\CLSID\{86ca1aa0-34aa-4e8b-a509-50c905bae2a2}" /f
Enabling Show More Options context menu - Restart Windows Explorer.

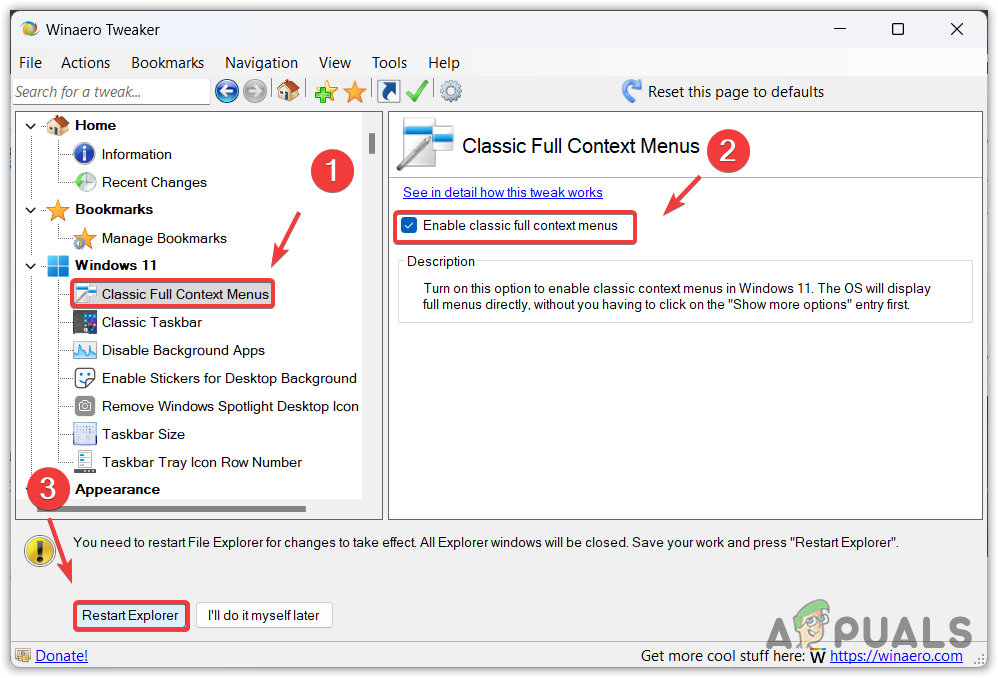
2. Disable ‘Show More Options’ Using WinAero Tweaker
WinAero Tweaker is a useful tool for Windows that helps you bring back the old right-click menu. It turns off the “Show More Options” feature, letting you see all the commands right away when you right-click, which makes it easier to navigate files.
- Download WinAero Tweaker.

Downloading WinAero Tweaker - Install it following the instructions.
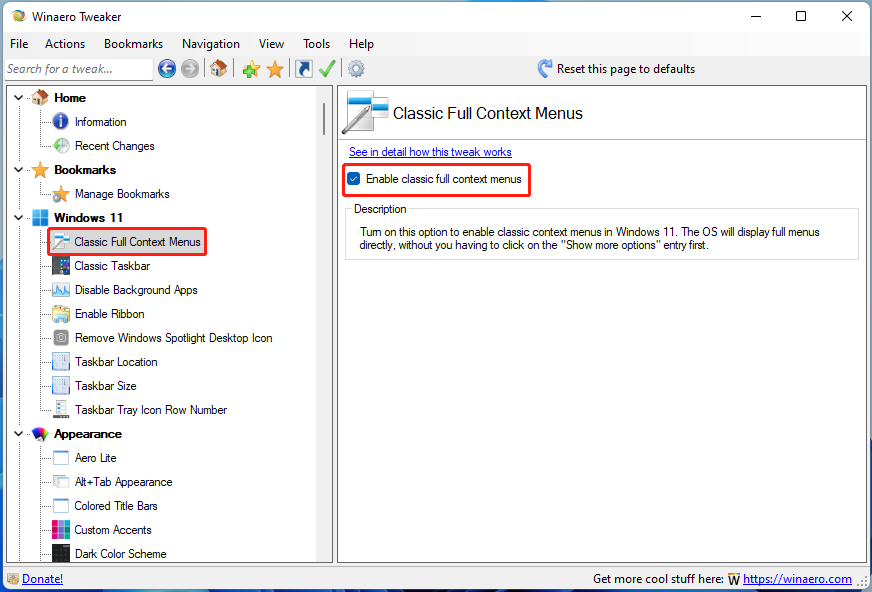
- Open it and select Classic Context Menus.
- Select Enable classic full context menus.
- Click Restart Explorer to activate the old menu.

Enabling the old classic context menu on Windows 11 - To revert, uncheck Enable classic full context menus and restart Explorer.

Kamil Anwar
Kamil is a certified MCITP, CCNA (W), CCNA (S) and a former British Computer Society Member with over 9 years of experience Configuring, Deploying and Managing Switches, Firewalls and Domain Controllers also an old-school still active on FreeNode.

This tutorial will show you how to enable or disable having to click on «Show more options» to see the full context menu for your account or all users in Windows 11.
When you right click on an item in Windows 11, you will see a new modern condensed context menu with Show more options (Shift+F10) at the bottom you have to click on to see all available options.
Reference:
If you use the context menu a lot, then you will most likely find having to click on Show more options annoying anytime you need more options.
Pressing the Shift + F10 keys while having something selected will open the «Show more options» context menu for that item.
Starting with Windows 11 build 22572, you can now also press Shift + right click in File Explorer and the Desktop to be the same as click/tap on the “Show more options” context menu item.
Starting with Windows 11 build 26058 (Canary and Dev), to make it easier to use the File Explorer context menu, labels have been added to previously unlabeled actions such as cut, copy, paste, rename, share, and delete.
If you like, you can disable this condensed Show more options context menu to always have it open too see the full context menu again when you right click on an item.
Contents
- Option One: Enable or Disable «Show more options» context menu for Current User using REG file
- Option Two: Enable or Disable «Show more options» context menu for Current User using Command
- Option Three: Enable or Disable «Show more options» context menu for All Users in Registry Editor
EXAMPLE: «Show more options» context menu enabled and disabled
Option One
Enable or Disable «Show more options» context menu for Current User using REG file
1 Do step 2 (enable) or step 3 (disable) below for what you would like to do.
2 Enable «Show more options» context menu for Current User
This is the default setting.
A) Click/tap on the Download button below to download the file below, and go to step 4 below.
Enable_Show_more_options_context_menu.reg
(Contents of REG file for reference)
Code:
Windows Registry Editor Version 5.00

[-HKEY_CURRENT_USER\Software\Classes\CLSID\{86ca1aa0-34aa-4e8b-a509-50c905bae2a2}]
3 Disable «Show more options» context menu for Current User
A) Click/tap on the Download button below to download the file below, and go to step 4 below.
Disable_Show_more_options_context_menu.reg
(Contents of REG file for reference)
Code:
Windows Registry Editor Version 5.00

[HKEY_CURRENT_USER\Software\Classes\CLSID\{86ca1aa0-34aa-4e8b-a509-50c905bae2a2}\InprocServer32]
@=""
4 Save the .reg file to your desktop.
5 Double click/tap on the downloaded .reg file to merge it.
6 When prompted, click/tap on Run, Yes (UAC), Yes, and OK to approve the merge.
7 You may need to either restart the explorer process, sign out and sign in, or restart the computer to apply.
8 You can now delete the downloaded .reg file if you like.
Option Two
Enable or Disable «Show more options» context menu for Current User using Command
1 Open Windows Terminal, and select Windows PowerShell or Command Prompt.
2 Copy and paste the command below you want into Windows Terminal, and press Enter.
(Disable)
reg add "HKCU\Software\Classes\CLSID\{86ca1aa0-34aa-4e8b-a509-50c905bae2a2}\InprocServer32" /f /ve
OR
(Enable)
reg delete "HKCU\Software\Classes\CLSID\{86ca1aa0-34aa-4e8b-a509-50c905bae2a2}" /f
3 Close Windows Terminal.
4 You may need to either restart the explorer process, sign out and sign in, or restart the computer to apply.
Option Three
Enable or Disable «Show more options» context menu for All Users in Registry Editor
You must be signed in as an administrator to use this option.
1 Open Registry Editor (regedit.exe).
2 Navigate to the key below in the left pane of Registry Editor. (see screenshot below)
HKEY_LOCAL_MACHINE\SOFTWARE\Classes\CLSID\{86ca1aa0-34aa-4e8b-a509-50c905bae2a2}

3 If you have not already, you will need to first change the owner of the {86ca1aa0-34aa-4e8b-a509-50c905bae2a2} registry key in the left pane to be the Administrators group, check the Replace owner on subcontainers and objects box, and click/tap on OK. (see screenshot below)

4 If you have not already, you will need to second set permissions of the {86ca1aa0-34aa-4e8b-a509-50c905bae2a2} registry key in the left pane to «Allow» the Administrators group «Full control». (see screenshot below)

5 You can now close Registry Editor.
6 Do step 7 (enable) or step 8 (disable) below for what you would like to do.
7 Enable «Show more options» context menu for All Users
This is the default setting to allow using Option One and Option Two.
A) Click/tap on the Download button below to download the file below, and go to step 9 below.
Enable_Show_more_options_context_menu.reg
(Contents of REG file for reference)
Code:
Windows Registry Editor Version 5.00

[HKEY_LOCAL_MACHINE\SOFTWARE\Classes\CLSID\{86ca1aa0-34aa-4e8b-a509-50c905bae2a2}]
@="File Explorer Context Menu"

[HKEY_LOCAL_MACHINE\SOFTWARE\Classes\CLSID\{86ca1aa0-34aa-4e8b-a509-50c905bae2a2}\InProcServer32]
@="C:\\Windows\\System32\\Windows.UI.FileExplorer.dll"
"ThreadingModel"="Apartment"
8 Disable «Show more options» context menu for All Users
This will override Option One and Option Two.
A) Click/tap on the Download button below to download the file below, and go to step 9 below.
Disable_Show_more_options_context_menu.reg
(Contents of REG file for reference)
Code:
Windows Registry Editor Version 5.00

[HKEY_LOCAL_MACHINE\SOFTWARE\Classes\CLSID\{86ca1aa0-34aa-4e8b-a509-50c905bae2a2}]
@="File Explorer Context Menu"

[-HKEY_LOCAL_MACHINE\SOFTWARE\Classes\CLSID\{86ca1aa0-34aa-4e8b-a509-50c905bae2a2}\InProcServer32]

[HKEY_LOCAL_MACHINE\SOFTWARE\Classes\CLSID\{86ca1aa0-34aa-4e8b-a509-50c905bae2a2}\InProcServer32]
@=""
9 Save the .reg file to your desktop.
10 Double click/tap on the downloaded .reg file to merge it.
11 When prompted, click/tap on Run, Yes (UAC), Yes, and OK to approve the merge.
12 You may need to either restart the explorer process, sign out and sign in, or restart the computer to apply.
13 You can now delete the downloaded .reg file if you like.
That’s it,
Shawn Brink
When Windows 11 was first launched in October 2021, many people loved shifting from the old Windows 7, 8, and 10 to the new operating system with many interesting features and design enhancements. But some would rather switch back to their old operating systems due to one reason or the other.
One of the distinguished new elements in Windows 11 is the new right-click (contextual) menu.
As you can observe from the image above, some options that were previously available in the older operating systems, such as “Give access to” and “Send to,” are missing from the menu. Moreover, the Copy, Paste, and Cut options have been shifted from the list view to tiny buttons at the top of the menu.
In Windows 11, if you want to view the complete options as you did in the older operating systems, you must either click on “Show more options” in the context menu or select an item and then use the Shift + F10 shortcut keys to open the complete menu.
That said, not everyone likes this additional step. You can now remove the “Show more options” button and access the old context menu (as in Windows 10) directly using the right-click button on your mouse.
In this article, we are going to show you multiple ways to restore the old content menu and set the “Show more options” menu as the default menu.
Table of Contents
Disable “Show More Options” using Windows Registry
Previously, you could eliminate the Show more options button using a third-party tool. Now, you can also achieve the same without having to download any external tools or utilities.
Perform the following steps to disable the “Show more options” option in the context menu and open the expanded menu by default using Windows Registry:
Note: This process involves manual manipulation of the Windows Registry. Misconfiguration of critical values in the system’s registry could be fatal for your operating system. Therefore, we insist that you create a system restore point before proceeding forward with the process.
You can also use our top selection of disk imaging and backup software so you never lose your data or operating system again.
-
Open the Registry Editor by typing in “regedit” in the Run Command box.
Open the Registry Editor -
Paste the following in the navigation bar for quick navigation:
Computer\HKEY_CURRENT_USER\Software\Classes\CLSID

Quick navigation to CLSID -
Right-click CLSID, expand New, and then click Key. Name this key “{86ca1aa0-34aa-4e8b-a509-50c905bae2a2}”.
Create new key -
Right-click the “{86ca1aa0-34aa-4e8b-a509-50c905bae2a2}”, and create a sub-key named “InprocServer32”.
Create new key -
Ensure that the “Default” value inside the “InprocServer32” key has no value.
Confirm no value has been set for Default -
Restart the computer for the changes to take effect.


When the computer restarts, you can now right-click on any item or the desktop to see that you have restored the old contextual menu.

If you ever feel like bringing back the default Windows 11 menu again, all you need to do is delete the “InprocServer32” key from the Windows Registry.

Disable “Show More Options” using Command Prompt
If you are not a fan of creating keys or playing inside the Windows Registry, you can also achieve the same task using the Command Prompt.
Perform the following steps to configure the “Show more options” menu as the default context menu using the command line:
-
Launch an elevated Command Prompt.
-
Paste the following cmdlet to add a Windows Registry and hit Enter.
reg add HKCU\Software\Classes\CLSID\{86ca1aa0-34aa-4e8b-a509-50c905bae2a2}\InprocServer32 /ve /d "" /f
Disable “Show more options” in Windows 11 context menu -
Restart the computer for the changes to take effect.

As the computer reboots, you can now right-click on any item or the desktop to see that you have restored the old contextual menu.
You now no longer need to click multiple buttons to reach the full-length context menu.
If you want to bring back the default Windows 11 context menu, all you need to do is run the following command in an elevated Command Prompt, which will delete the registry added, and then reboot the computer.
reg add HKCU\Software\Classes\CLSID\{86ca1aa0-34aa-4e8b-a509-50c905bae2a2}\InprocServer32When asked for a confirmation, enter Y for Yes.

Disable “Show More Options” using .REG File
If you are not a fan of the command line either, then all you need to do is download and run the Registry file from below and it will automatically create the necessary Registry keys and values to disable the “Show more option” in the Windows 11 context menu.
-
Download the .REG file by clicking on the link below:
Disable Show More Options In Windows11 Context Menu.zip (500 bytes, 400 hits)
-
Extract and run the downloaded Registry file.
-
On the confirmation dialog box, click Yes.
Confirm action -
When the task is executed successfully, click Ok.
Acknowledge -
Now restart the computer for the changes to take effect.


When the computer restarts, you will notice that the “Show more option” option has disappeared from the context menu, and the complete menu is now the default context menu.
If you wish to re-enable the “Show more option” option and bring back the Windows 11 default context menu, then you can choose either of the aforementioned methods to restore it (either from the Windows Registry or by running the cmdlet in the Command Prompt).
Final Thoughts
The older contextual menu, such as the one in Windows 10, was easier to use. Even if not, we had gotten used to it, and upgrading to Windows 11 had not made it easier. The design isn’t only different, but to access several options, an additional Show more options button needs to be clicked.
Therefore, we at Itechtics are sticking with the older ways for our Windows 11 PC.
That said, we came across another method to restore the old context menu in Windows 11. This involves selecting the “Launch folder windows in a separate process” in the Folder Options menu. However, after testing it out, we found that it does not work.
Therefore, the method discussed above, as well as the third-party tool are the only methods currently effective in restoring the old context menu.
Accessing the full context menu was simpler and straightforward in Windows 10. However, in Windows 11, it has become a bit complicated as it requires more clicks to open the entire context menu. Undoubtedly, Microsoft tried its best to declutter the context menu by adding additional context menu options in the “Show More Options” section. But surprisingly, many Windows 11 users didn’t like this new change.
They are continuously seeking to restore the classic context menu on their Windows 11 PC. Luckily, there are some ways to get rid of Show More Options in the new context menu. Here in this article, we have mentioned all the possible methods to disable “Show More Options” in Windows 11. Check out the below-mentioned ways to bring the traditional context menu into play on your Windows 11 PC.
Disable “Show More Options” in Windows 11
Here in this section, we have explained four working methods to disable “Show More Options” in Windows 11.
1. Using a Keyboard Shortcut
It would be surprising to know, but there is a way to open the long-form context menu without disabling the new context menu. You only need to press a keyboard shortcut for that. This method is perfect to follow if both context menus are used daily. Follow along to know the steps to do the same.
1. Select an item on the desktop by clicking once on it.
2. Press Shift + F10 simultaneously to open the full context menu.
3. You will now see the old context menu in front of you.
2. Using File Explorer
Rolling the File Explorer program back to the previous version can also bring back the full context menu on your Windows 11 PC. This will send the new context menu to its Windows 10 version. Follow the below-mentioned steps to complete the whole process.
1. Open the File Explorer program.

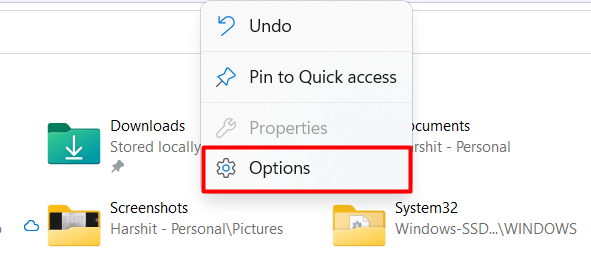
2. Click on Three Dots or See More in the ribbon menu at the top.

3. Click on Options from the context menu.
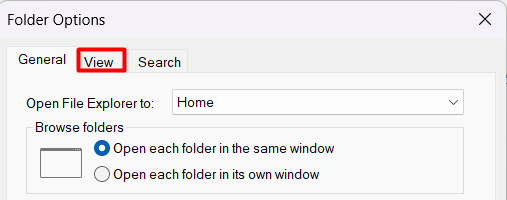
4. Head to the View tab.
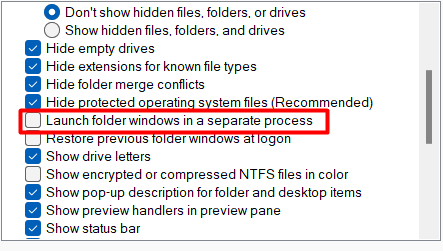
6. Uncheck the Launch folder windows in a separate process option to roll back the File Explorer to the previous version.
7. Lastly, click on OK to save all the changes and reboot the PC.

3. Via Terminal
Removing “Show More Options” on your Windows 11 PC is as simple as executing a command in the Terminal app. Thus, follow the below-mentioned steps and remove the “Show More Options” from your Windows 11’s context menu.
1. Right-click on the Search Icon and select Terminal (Admin).
2. Execute the mentioned command in the Command Prompt:
reg add "HKCU\Software\Classes\CLSID\{86ca1aa0-34aa-4e8b-a509-50c905bae2a2}\InprocServer32" /f /ve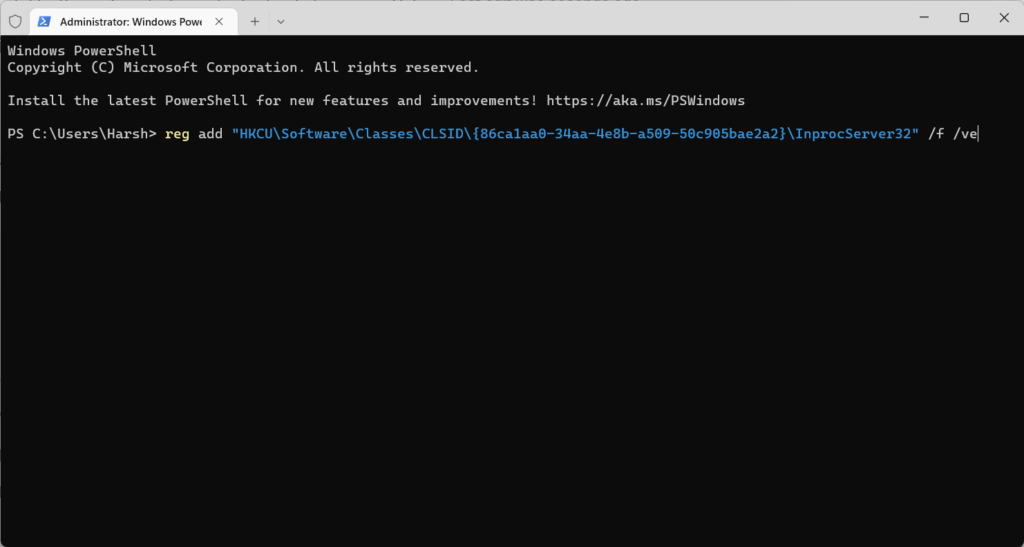
3. Once done, restart your PC.
4. Via Registry Editor
Registry Editor is another way to tweak the context menu settings and roll it back to the previous version. You need to create a new Registry key to disable the Show More Options in your Windows 11 PC. It might eems a bit tricky but don’t worry we have explained the entire process step by step.
1. Press the Windows Key and type Registry Editor in the Search Bar.
2. Navigate to the mentioned path by entering the location into the Location bar: HKEY_LOCAL_MACHINE\SOFTWARE\Microsoft\Windows\CurrentVersion\Shell\Update\Packages
3. Right-click in the empty space and select New > DWORD (32-bit) Value.

4. Name the new key as UndockingDisabled and hit the Enter key.

5. Once created, double click on the newly created registry key called UndockingDisabled.
6. Enter 1 in the Value data column.
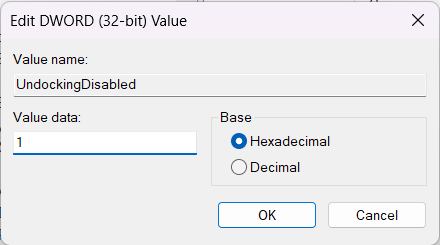
7. Click on the OK button and close all the tabs.
Frequently Asked Questions
Where Is Show More Options Windows 11?
Right-click on an item on the desktop. You will now see the new context menu with the Show More Options option. Click on the Show More Options to get the complete context menu.
How Do You Remove Right Click Options Windows 11?
To remove the right-click options, open the File Explorer and click on Three Dots in the top ribbon menu. Now, click on Options and move to the View tab. In the View tab, uncheck the Launch folder windows in a separate process and click on the OK to save the recently made changes.
How Do I Get Classic Context Menu in Windows 11?
To get the classic context menu, open the Terminal app with admin rights and execute the mentioned command.
reg add "HKCU\Software\Classes\CLSID\{86ca1aa0-34aa-4e8b-a509-50c905bae2a2}\InprocServer32" /f /veHow Do I Add or Remove Default New Context Menu Items in Windows 11?
Open the Terminal app, copy-paste the mentioned command, and press Enter to remove the new context menu items on your Windows 11 PC:
reg add "HKCU\Software\Classes\CLSID\{86ca1aa0-34aa-4e8b-a509-50c905bae2a2}\InprocServer32" /f /veUse the below-mentioned command to enable the “Show More Options” again on your Windows 11 PC:
reg delete "HKCU\Software\Classes\CLSID\{86ca1aa0-34aa-4e8b-a509-50c905bae2a2}" /fca1aa0-34aa-4e8b-a509-50c905bae2a2}" /fHow Do I Turn On Old Context Menu?
Open the Terminal app, enter the mentioned command, and press the Enter key on your keyboard: reg add “HKCU\Software\Classes\CLSID\{86ca1aa0-34aa-4e8b-a509-50c905bae2a2}\InprocServer32” /f /ve
Final Words
A set of Windows 11 users are appreciating the new change in the context menu as it makes the UI much cleaner and minimal. While some are disliking it as it is affecting their efficiency and productivity. Fortunately, Microsoft has provided different options to disable “Show More Options” in Windows 11. You can follow any of the above-mentioned methods to remove it on your Windows 11 PC.
-
Home
-
News
- How to Enable/Disable Show More Options on Windows 11?
By Daisy | Follow |
Last Updated
There are four different easy ways to disable the new context menu and get back to the old classic context menu of Windows 10 in Windows 11. This post from MiniTool will introduce how to disable Show More Options on Windows 11 one by one.
Windows 11 brings an all-new user interface with a greater focus on simplicity. It offers a clean and fresh design. One of the most subtle changes to Windows 11 concerns the new modern right-click or context menus for File Explorer and the desktop.
To enable show more options Windows 11, you need to right-click your desktop and choose Show more options or press the Shift + F10 keys together.
Way 1: Via Registry Editor
You can try to use Registry Editor to disable show more options Windows 11
Step 1: Type regedit in the Search box and click the OK button to open Registry Editor.
Step 2: Go to the following path:
HKEY_CURRENT_USER\SOFTWARE\CLASSES\CLSID
Step 3: Right-click the CLSID folder, expand New, and select DWORD (32-bit) Value. A new Key folder will be created.
Step 4: Rename the value as UndockingDisabled and press the Enter key.
Step 5: Double-click the newly created key and change the value data to 1 and click the OK button.
Step 6: Please remember to restart your PC to make the changes take effect.
If you decide to enable the “Show More Options” menu again, you need to repeat the same steps and expand the CLSID key. Then, right-click the UndockingDisabled key and select Delete. When the confirmation pop-up appears, Select Yes.
Way 2: Via Command Prompt
The second method for you to disable show more options Windows 11 is via Command Prompt.
Step 1: Type cmd in the Search box and choose the first result. Then, click Run as administrator.
Step 2: Once Command Prompt’s window opens you can put the following command and press Enter:
reg add “HKCU\Software\Classes\CLSID\{86ca1aa0-34aa-4e8b-a509-50c905bae2a2}\InprocServer32” /f /ve
Step 3: Restart your computer.
If want to enable the “Show more options” menu in Windows 11, you can enter the following command in Command Prompt and restart your PC.
reg delete “HKEY_CURRENT_USER\Software\Classes\CLSID\{86ca1aa0-34aa-4e8b-a509-50c905bae2a2}” /f
Way 3: Try Third-Party Program
If the above methods are not working, you can try the third-party program to disable Show More Options on Windows 11. Winaero Tweaker is one of the greats tools. You can download it from its official website and install it on your PC. After that, run it to enter its main interface. Under the Classic Full Context Menus part, check the Enable classic full context menus box. Then, restart the tool to make the changes take effect.
Final Words
Here is all information about how to disable Show More Options on Windows 11. I hope this post can be helpful to you.
About The Author
Position: Columnist
Having been an editor at MiniTool since graduating college as an English major, Daisy specializes in writing about data backups, disk cloning, and file syncing as well as general computer knowledge and issues. In her free time, Daisy enjoys running and going with friends to the amusement park.