
Applies ToWindows 10
Screen flickering in Windows 11 is usually caused by a display driver issue or incompatible app. To determine whether a display driver or app is causing the problem, check to see if Task Manager flickers. Then, based on that information, you’ll need to update, rollback, or uninstall your display driver or update or uninstall the app.
For more, select any of the following headings, and it’ll expand to show more information.
In some cases, pressing Windows logo Key + Ctrl + Shift + B to reset your graphics driver may fix your issue. If this does not work, see if restarting helps.
Press Ctrl + Alt + Delete to open Task Manager. If you don’t see Task Manager after pressing Ctrl + Alt + Delete, press Ctrl + Shift + Esc to open Task Manager.
-
If Task Manager flickers along with everything else on the screen, a display driver is probably causing the problem. In this scenario, see the Fix your display driver section.
-
If Task Manager doesn’t flicker while the rest of the screen is flickering, an incompatible app is probably causing the problem. In this scenario, see the Update or uninstall an incompatible app section.
If you’re having trouble seeing your screen properly, you may need to start your PC in safe mode to follow the steps below.
If Windows Update recently made updates to your device, roll back your display driver. Otherwise, try updating or uninstalling your display driver to fix the flickering or scrambling problem.
Roll back your display driver
-
In the search box on the taskbar, enter device manager, and then select it from the list of results.
-
Select the arrow to expand Display adapters.
-
Under Display adapters, right-click the adapter, then select Properties.
-
Select the Driver tab, and then select Roll Back Driver > Yes.
-
Restart your device.
Notes:
-
You must have administrator privileges to roll back or uninstall a device or driver package using Device Manager.
-
If the Roll Back Driver option is unavailable, Windows doesn’t have a previous driver to roll back to and won’t be able to complete this process.
Update your display driver
-
In the search box on the taskbar, enter device manager, and then select it from the list of results.
-
Select the arrow to expand Display adapters.
-
Under Display Adapters, right-click the adapter, then select Update driver.
Note: You may need to contact your PC or display adapter manufacturer to download the most recent driver for your system.
Uninstall your display driver
-
In the search box on the taskbar, enter device manager, and then select it from the list of results.
-
Select the arrow to expand Display adapters.
-
Under Display adapters, right-click the adapter, then select Properties.
-
Select the Driver tab, and then select Uninstall Device.
-
Select the Attempt to remove the driver for this device check box, and then select OK.
-
Restart your device and Windows will attempt to reinstall the driver.
Note: If you don’t see the Attempt to remove the driver for this device check box, make you started your PC in safe mode.
Update an app
-
If the app came from Microsoft Store, check updates for apps from Microsoft Store.
-
If the app didn’t come from Microsoft Store, check the manufacturer’s site for updates.
Uninstall an app
Some apps may not be compatible with Windows 11 and can cause a flickering or scrambled screen. Try uninstalling the app, here’s how:
-
Select the Start > Settings > Apps > Apps & features. It’ll take a moment for your apps to appear.
-
Scroll down the list and find the app you want to uninstall.
-
Select the app, and then select Uninstall > Uninstall. If you’re asked to confirm your choice, select Yes.
After you uninstall the first app, restart your device and check if the screen flickering or scrambled issue is resolved or not. If it’s not, uninstall each app one by one until the issue is resolved.
Reinstall an app
-
Select the Microsoft Store from the start menu.
-
Select Library.
-
Select the app you want to reinstall, and then select Install.
If your app isn’t in Microsoft Store, reinstall it from the manufacturer’s site.
Need more help?
Want more options?
Explore subscription benefits, browse training courses, learn how to secure your device, and more.
Microsoft has officially rolled out Windows 11 for eligible users. However, the new operating system is not exempted from encountering many issues. Some users have reported that they are experiencing a flickering screen in Windows 11. If you happen to be one of them, don’t worry. In this tutorial, we’ll show you how to fix the problem easily and quickly.
Try these fixes
Here are 7 fixes that have helped other users resolve the screen flickering issue. You don’t have to try them all, just work your way down the list until you find the one that works for you.
- Check your cables
- Update your display driver
- Change the refresh rate
- Update or uninstall incompatible apps
- Change Accent color and Background
- Disable animation effects
- Disable hardware acceleration
- Repair your system files
Fix 1: Check your cables
A loose or damaged monitor cable can cause your screen to flicker. Before you begin to troubleshoot the screen flickering issues, you should first check if your monitor cables are plugged in securely.
- Completely turn off your computer and monitor. Then unplug your monitor cable and plug it back in properly.
- If your monitor cable is damaged, replace it with a new one.
Once you’ve confirmed that your cables are not the problem, move on to troubleshoot the driver issues.
Fix 2: Update your display driver
One common cause of screen flickering is a corrupted or outdated display driver. To see if that’s the case, you should update your display driver to the latest version.
There are mainly two ways to update your display driver:
Manual driver update – You can update your display drivers manually by going to the manufacturer’s website (NVIDIA, AMD or Intel) for your display adapters, and searching for the most recent correct driver. Be sure to choose only drivers that are compatible with Windows 11.
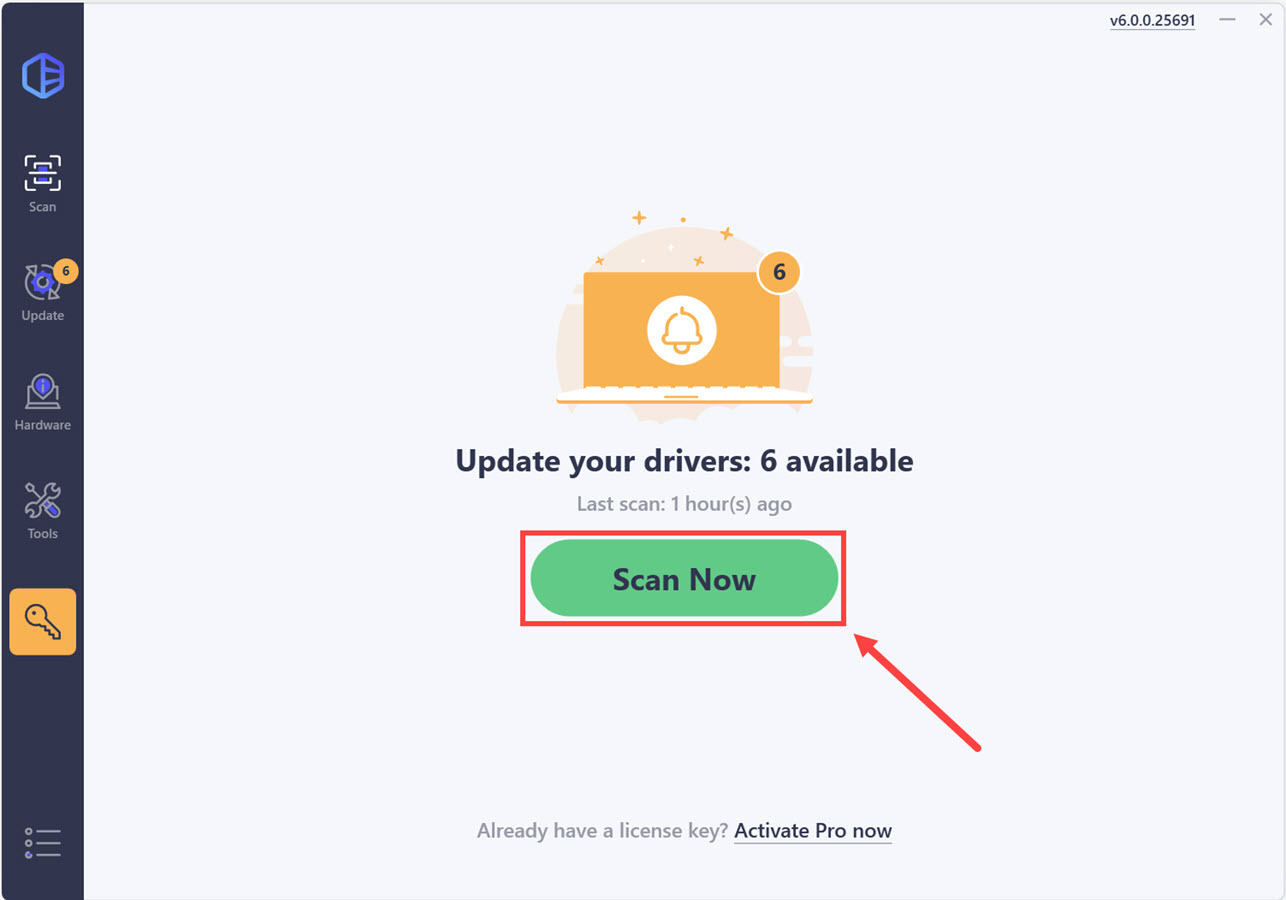
Automatic driver update – If you don’t have the time, patience or computer skills to update your display drivers manually, you can, instead, do it automatically with Driver Easy. Driver Easy will automatically recognize your system and find the correct drivers for your exact display adapter, and your Windows version, and it will download and install them correctly:
- Download and install Driver Easy.
- Run Driver Easy and click the Scan Now button. Driver Easy will then scan your computer and detect any problem drivers.

- Click Update All to automatically download and install the correct version of all the drivers that are missing or out of date on your system. (You’ll need the Pro version for this – when you select Update All, you’ll get a prompt to upgrade. If you’re not prepared to purchase the Pro version yet, Driver Easy provides a 7-day trial at no cost, granting access to all Pro features like fast downloads and easy installation. No charges will occur until after your 7-day trial period ends.)

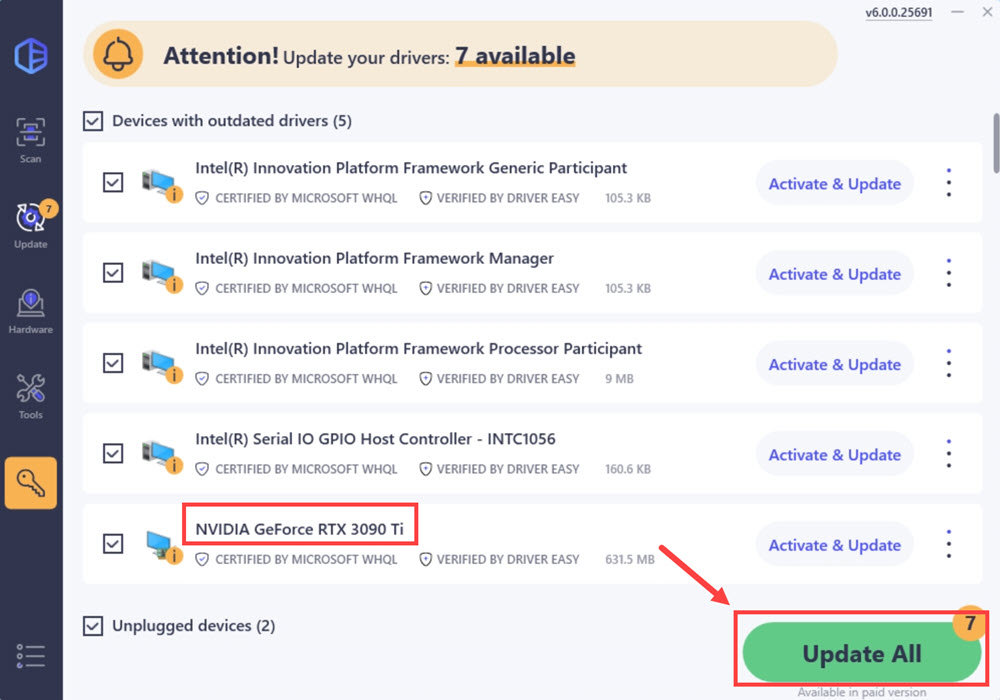
The Pro version of Driver Easy comes with full technical support. If you need assistance, please contact Driver Easy’s support team at support@drivereasy.com.
After updating your display driver, restart your device and check if the screen flickering issue is resolved or not.
If the issue remains, check out the next fix.
Fix 3: Change the refresh rate
The refresh rate of a display is the number of times per second that your monitor draws a new image. If your display refresh rate is not set properly, you may encounter screen flickering issues in Windows 11. To fix it, you can change the refresh rate. Here’s how:
- On your desktop, right-click an empty space and select Display settings.
- In the pop-up window, scroll down the page and select Advanced display.

- For Choose a refresh rate, select a different refresh rate.

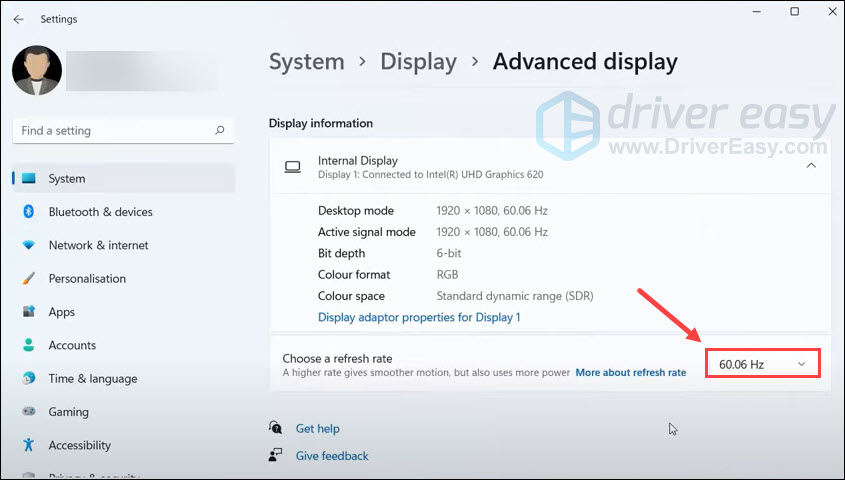
If changing the refresh rate doesn’t solve your problem, you may consider updating or uninstalling incompatible apps.
Fix 4: Update or uninstall incompatible apps
The app developers often release updates to tackle compatibility issues with the new operating system. If your apps are still running in an old version, you may encounter a flickering screen on your Windows 11 PC. To fix the potential problem, you need to update all your apps to the latest version.
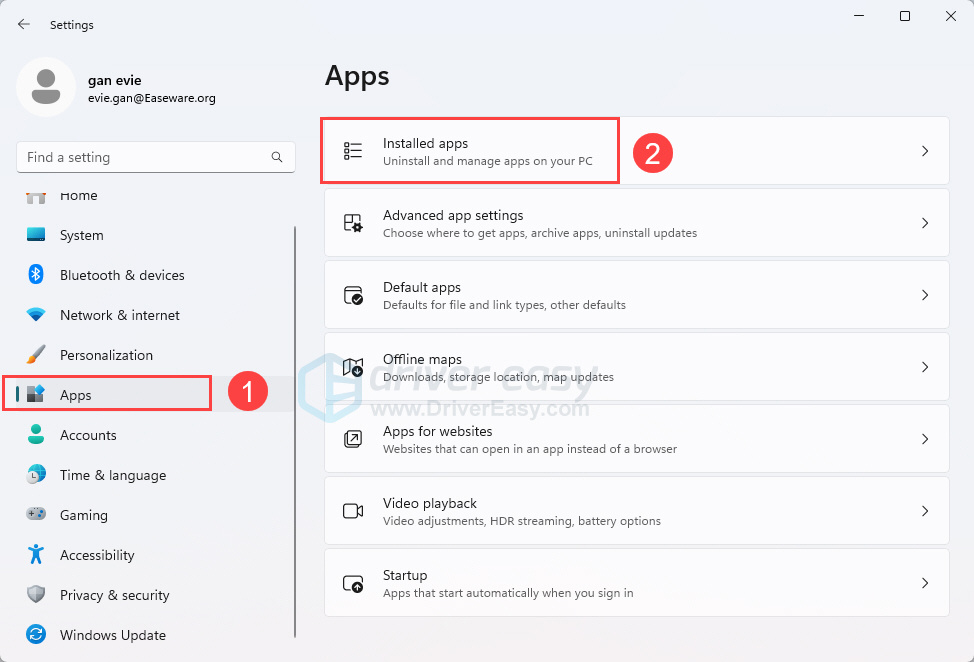
If updating apps doesn’t solve your flickering issues, consider uninstalling the recently installed apps, as they may not be compatible with Windows 11 and can cause a flickering screen. To uninstall an app:
- Click Start and select Settings.

- In the left panel, select Apps, then click Installed apps.

- Scroll down the list and find the app you want to uninstall. Then click the three dots icon and select Uninstall.
- Click Uninstall again to confirm your choice.
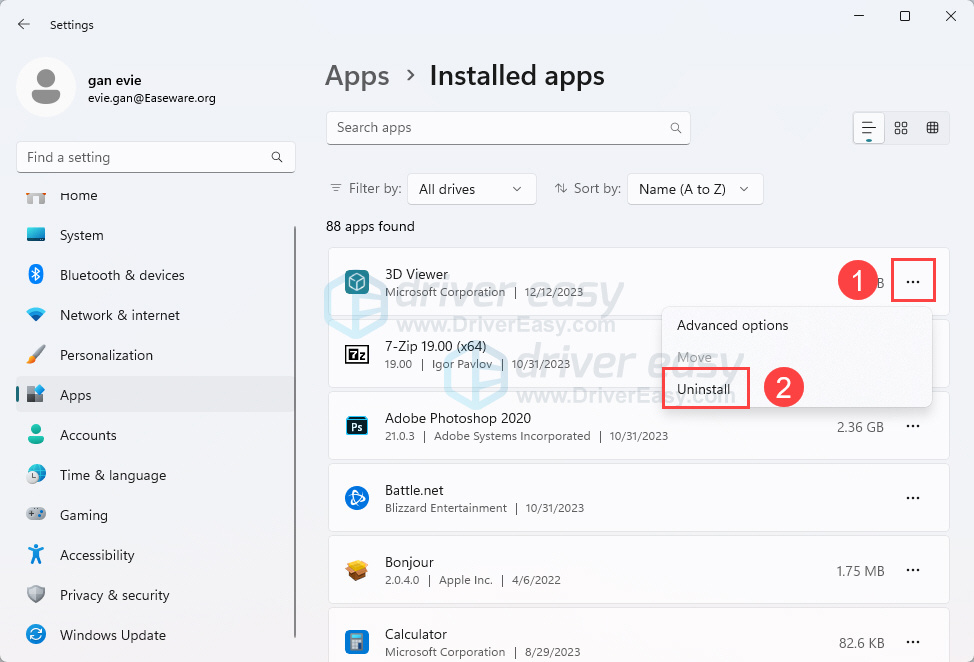
After uninstalling the first app, restart your computer and check if the flickering issue is resolved or not. If it’s not, uninstall each app one by one until the screen flickering issue is fixed.
Fix 5: Change Accent color and Background
Just like Windows 10, there is an option in Windows 11 that allows your system to automatically select an accent color from your background. However, there are many reports that this option turns out to be a culprit of screen flickering. So you can follow these steps to disable it:
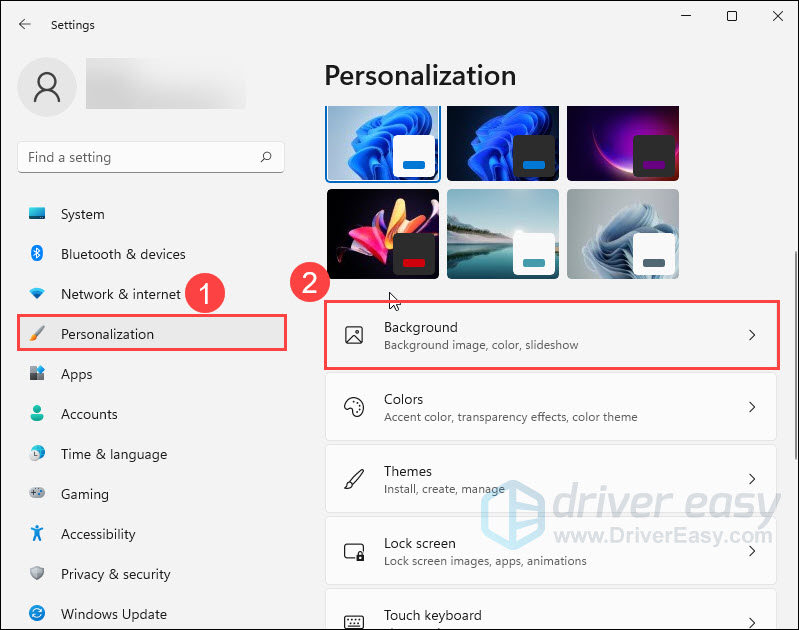
- On your keyboard, press the Windows logo key and I at the same time to open Windows Settings.
- In the left panel, select Personalization, then click Background.

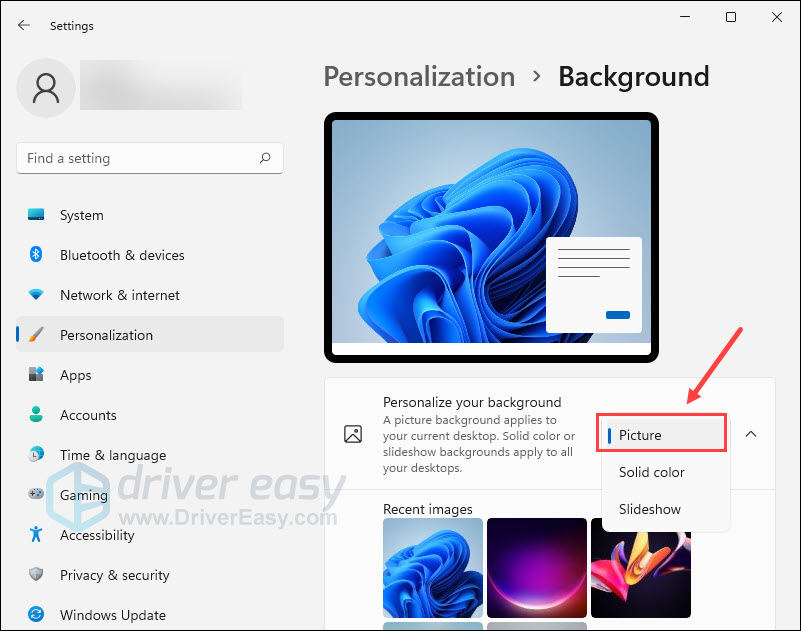
- To personalize your background, select Picture or Solid color. (You should avoid using the Slideshow option, which might cause your screen to flicker.)

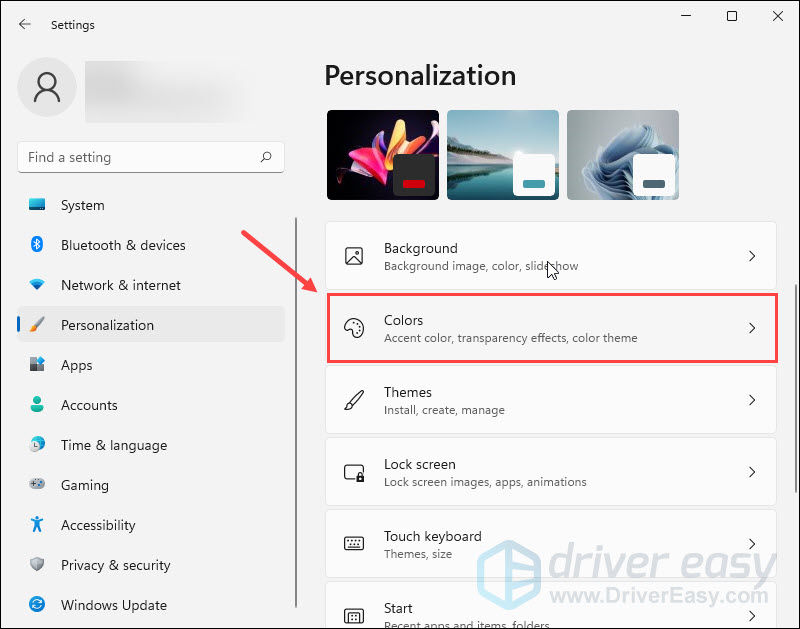
- Go back to Personalization window and select Colors.

- For Accent color, select Manual.

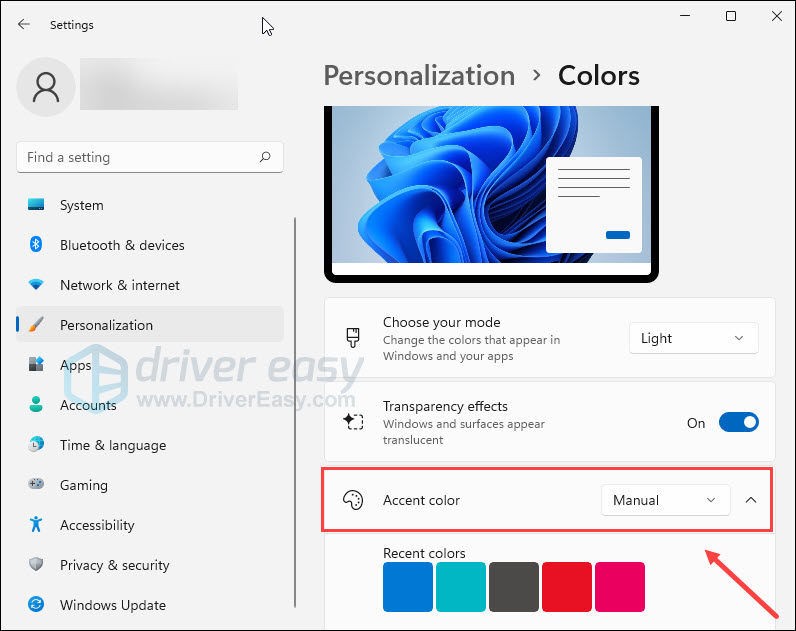
Once done, check if the screen flickering issue is resolved or not. If not, try the next fix below.
Fix 6: Disable animation effects
Some users reported that they fixed the screen flickering issue in Windows 11 by disabling animation effects. You can give this a try. Here’s how:
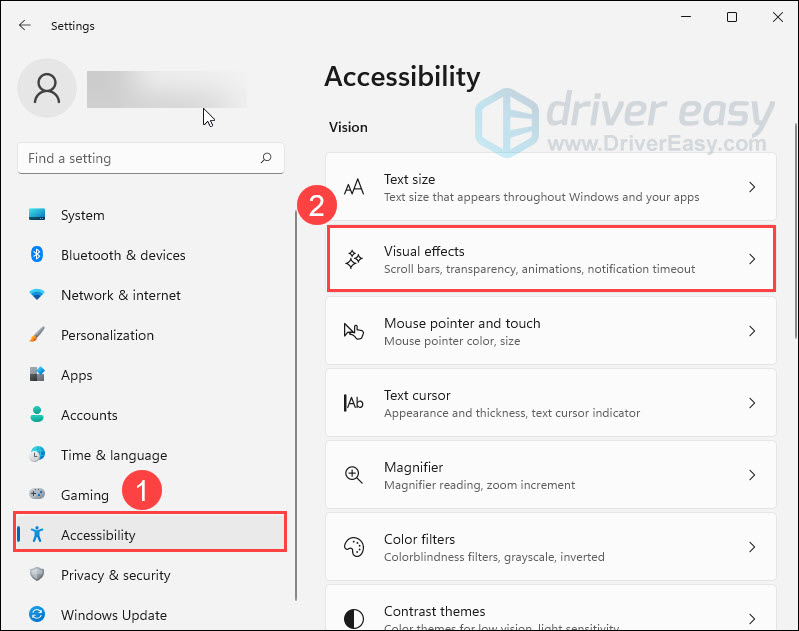
- On your keyboard, press the Windows logo key and I at the same time to open Windows Settings.
- In the left panel, select Accessibility, then click Visual effects.

- Turn off Animation effects.

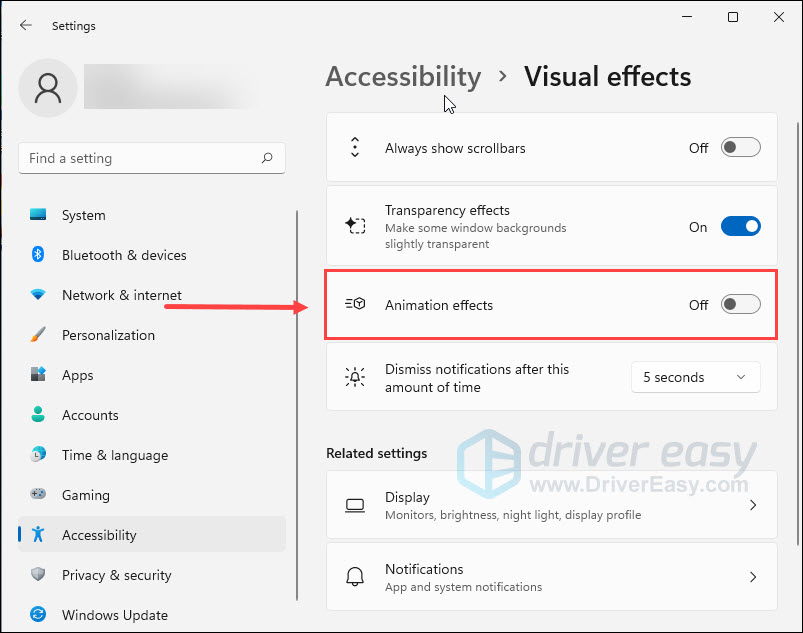
Check if you’re still facing a flickering screen.
If this fix doesn’t do the trick, try the next one below.
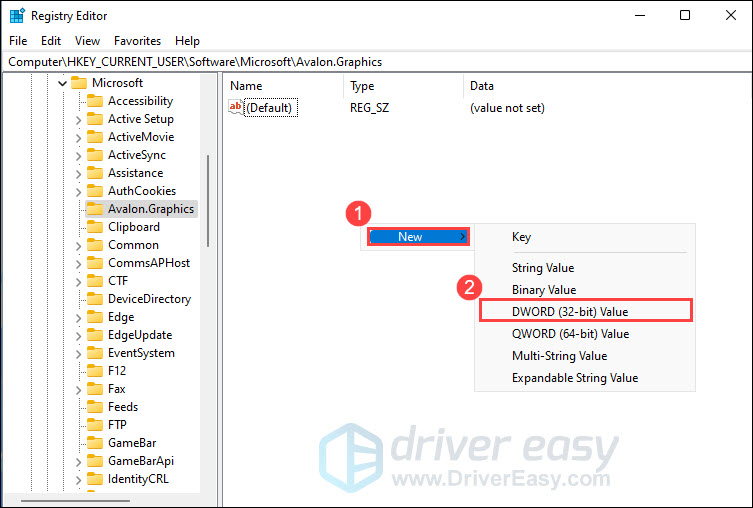
Fix 7: Disable hardware acceleration
The hardware acceleration feature is widely used to improve overall performance. But in some cases, it may also cause your screen to flicker. To fix the issue, you’ll need to disable hardware acceleration on your PC. Here’s how:
To disable hardware acceleration in Windows 11:
- On your keyboard, press the Windows logo key and R at the same time to invoke the Run dialog box. Then type regedit and click OK.
- In Registry Editor, navigate to HKEY_CURRENT_USER\SOFTWARE\Microsoft\Avalon.Graphics.
- Under Avalon.Graphics, on the right pane, check to see if there is a key named DisableHWAcceleration.
If there is, double-click on it and change the Value Data from 0 to 1. Click OK to save changes.
If there isn’t, right-click on empty space and select New > DWORD (32-bit) value.
Then rename the file as DisableHWAcceleration. Double-click on the file and change the Value Data from 0 to 1. Click OK to save changes.

- Close Registry Editor and restart your computer.

If the flickering issue occurs while using your browser, you’ll need to disable hardware acceleration in your browser as well. Here we’ll take Google Chrome for example.
To disable hardware acceleration in Google Chrome:
- On your computer, open Google Chrome.
- At the top right, click the vertical three dots icon and select Settings.
- In the search bar, type hardware. Find the Use hardware acceleration when available setting, toggle the switch to OFF(grey switch). Then click Relaunch.

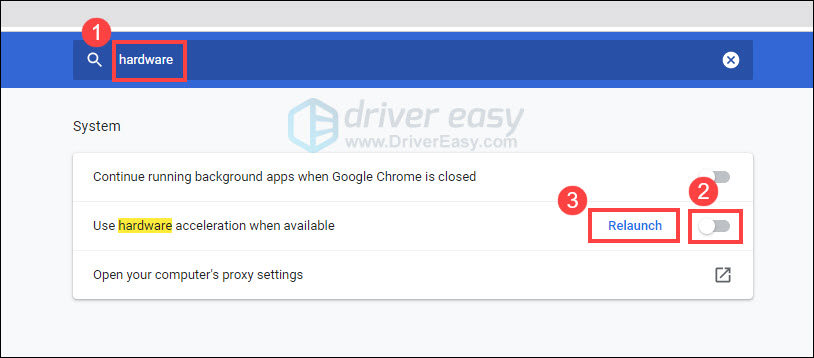
Now check if the screen flickers again. If the issue persists, check out the last fix below.
Fix 8: Repair your system files
If there are any missing or corrupted system files, you may see a flickering or flashing screen on your Windows 11 PC. To fix it, you can use System File Checker to scan and restore system files.
System File Checker is a built-in tool that allows users to scan for and restore corrupted Windows system files. To perform SFC scan and repair Windows image:
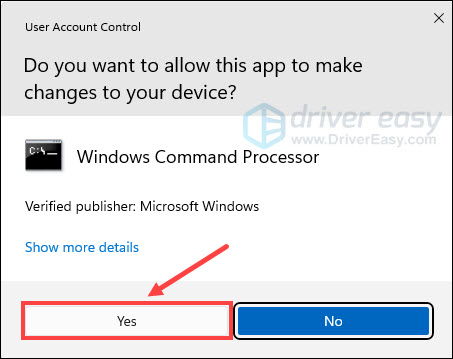
- On your keyboard, press the Windows logo key and R at the same time to open the Run dialog box. Type cmd and press Ctrl + Shift + Enter to run Command Prompt as administrator.
- If you are prompted for permission by User Account Control, click Yes to continue.

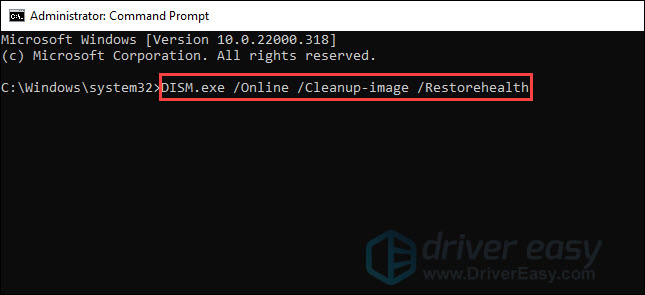
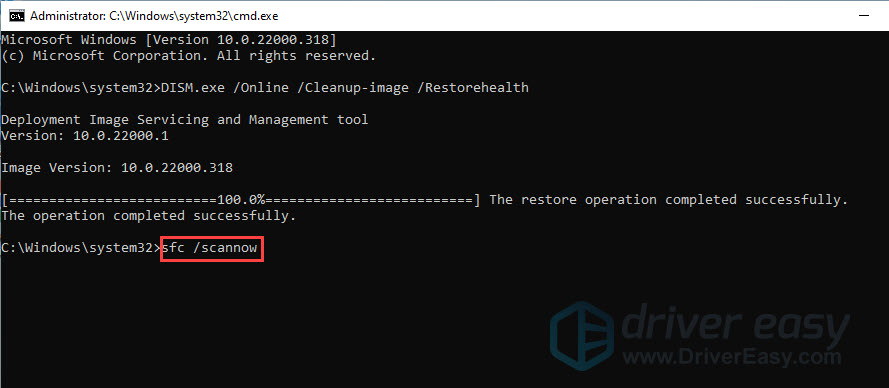
- At the command prompt, type the following command, and then press Enter. It may take several minutes for the Deployment Image Servicing and Management (DISM) tool to scan and restore corrupted system images.
DISM.exe /Online /Cleanup-image /Restorehealth
- After the process is complete, type the following command, and then press Enter.
sfc /scannow
- Wait a few minutes for the System File Checker tool to scan and repair damaged system files.
Once done, check if your problem has been resolved.
That’s it. Hopefully, this post helped you fix Windows 11 screen flickering issues. If you have any questions or suggestions, feel free to leave us a comment below.
36
36 people found this helpful
Have you come across the Windows 11 screen flickering problem? Now, you come to the right place. This post of MiniTool analyzes the possible causes of the issue and summarizes 6 effective troubleshooting methods.
Windows 11 is the next version of the Microsoft Windows 10 operating system that was revealed on June 24, 2021. However, many users encounter various problems after upgrading to the system like slow startup Windows 11, Go Back button not working, Valorant FPS Drops, and the one discussed here.
What Causes the Windows 11 Screen Flickering Problem
After investigating extensive user reports on forums, we find the Windows 11 screen flickering problem is often accompanied by a sudden black screen. The issue can be caused by many factors, including problematic graphics card drivers, incompatible programs, loose connections, hardware malfunction, and incorrect refresh rate. Don’t worry. We will provide corresponding solutions to Windows 11 screen flickering or flashing.
How to Fix Windows 11 Screen Flickering
How to fix Windows 11 screen flickering? There are 6 applicable solutions that you can try one by one until the issue gets solved.
Fix 1. Check for Loose Connections and Monitor
The first thing you should do is to check if the connections between your CPU and monitor are loose. To do so, you can disconnect the wire/cable and reconnect them to monitor properly. If the Windows 11 screen flashing still appears, it may indicate that the wire/cable may be damaged, then you need to replace the cable with a new one. In addition, you can connect the cable/wire to another monitor to ensure that it’s indeed faulty.
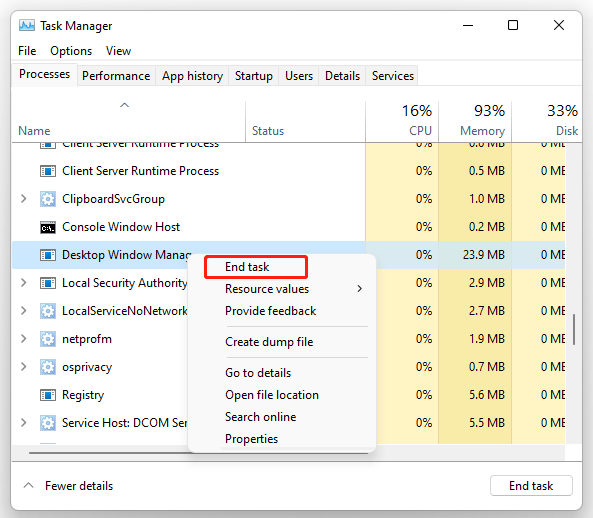
Fix 2. Disable the Dwm.exe Process in Task Manager
Desktop Window Manager (dwm.exe) is responsible for enabling visual effects on your desktop. However, some users report that this process sometimes freezes and starts working incorrectly, which can cause screen flickering in Windows 11. To fix the issue, you can try disabling dwm.exe in Task Manager.
Step 1. Press Ctrl + Shift + ESC keys to open Task Manager and click on More details.
Step 2. In the Processes tab, right-click Desktop Window Manager and select End task. Then you can refer to the steps to end other conflicting processes.
Fix 3. Lower the Refresh Rate of Your Monitor
Sometimes a high refresh rate can provoke the Windows 11 screen flickering or flashing problem. If this situation applies to you, you can try selecting a lower refresh rate. For that:
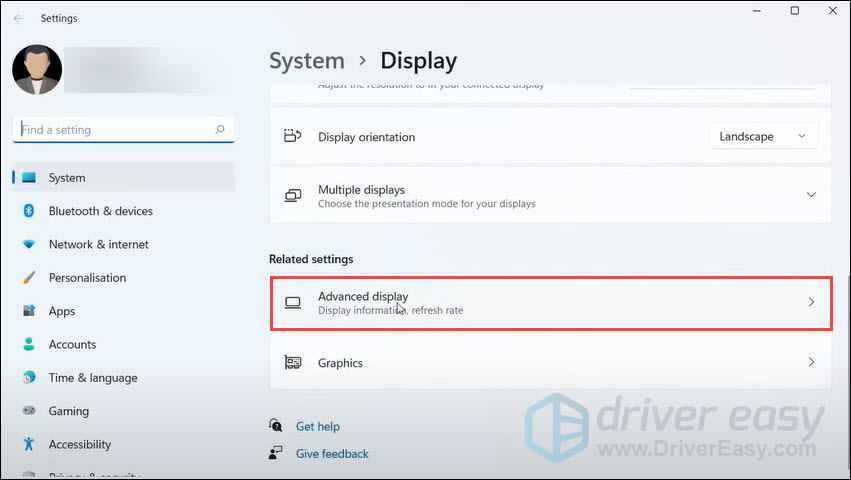
Step 1. Press Win + I keys to open the Settings app, and then go to System from the left pane and select Display from the right side.
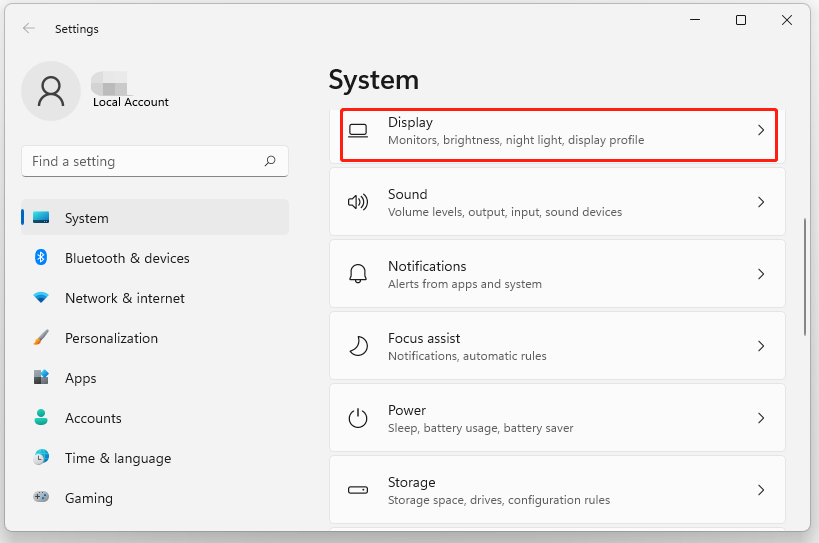
Step 2. Select Advanced display under the Related settings section.
Step 3. Go to the Choose a refresh rate section and click on the drop-down menu next to it, and select a lower refresh rate from the available options.
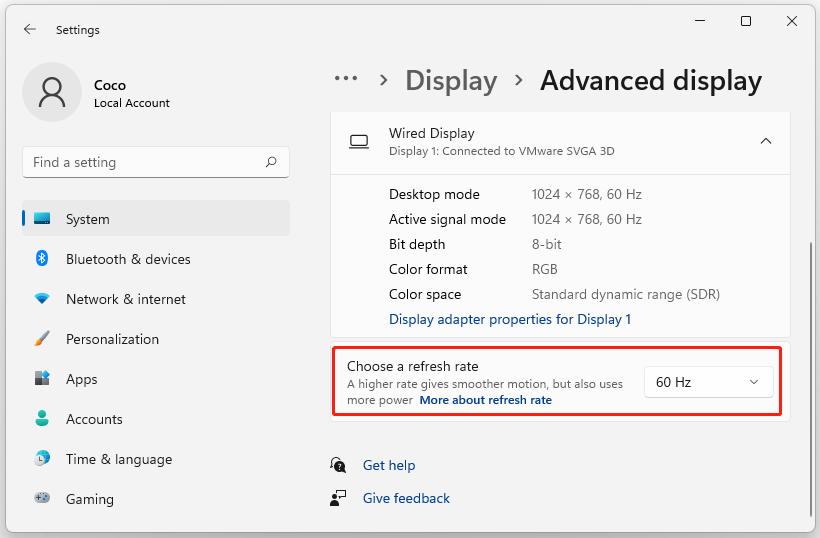
After that, you can reboot your computer and see if the Windows 11 screen flickers or not.
Fix 4. Update the Graphics Card Driver
Graphics card drivers play an important role in the performance of a computer. Once the display driver gets corrupted, outdated, or is missing, you may encounter various issues like screen flickering in Windows 11. Here we recommend you update the display driver timely.
Step 1. Press the Win + R key to open the Run dialog box, and then type devmgmt.msc in the box and hit Enter.
Step 2. Expand the Display adapters category, and then right-click the graphics card driver and select Properties.
Step 3. In the pop-up window, go to the Driver tab and click on Update Driver.
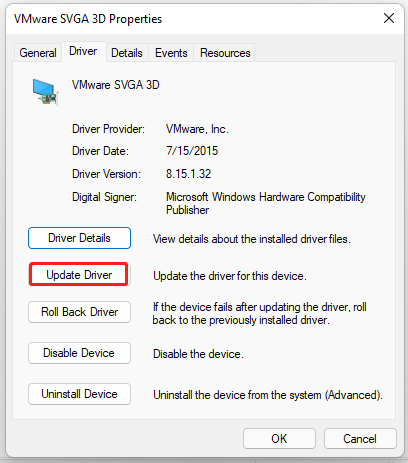
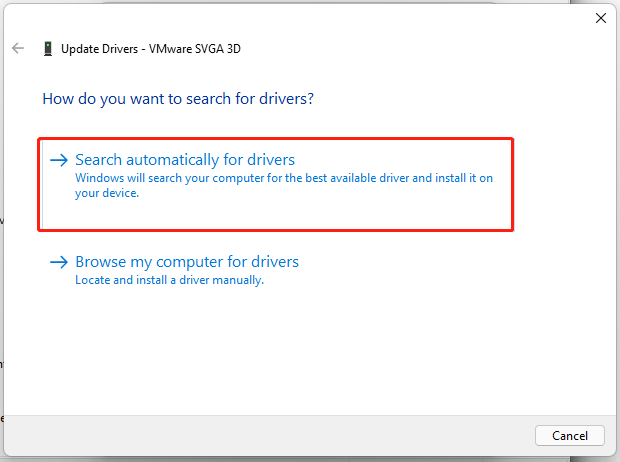
Step 4. Then you can select the Search automatically for drivers option and follow the on-screen instructions to update the driver automatically. Alternatively, you can download the updated graphics card driver from the manufacturer’s website like AMD, Intel, or NVidia, and then install it.
If the issue persists, you can try selecting Roll Back Driver or Uninstall Device in the Properties window and make sure you follow any prompts to complete the process.
Fix 5. Uninstall the Problematic Programs
Sometimes the Windows 11 screen flickering problem can be caused by a problematic application. If you recently installed any third-party apps, you can try uninstalling them and see if the issue is resolved.
Step 1. Open the Settings window, and then go to Apps from the left pane and select Apps & features.
Step 2. Locate the problematic program, and then click on the three-dot icon next to it and select Uninstall.
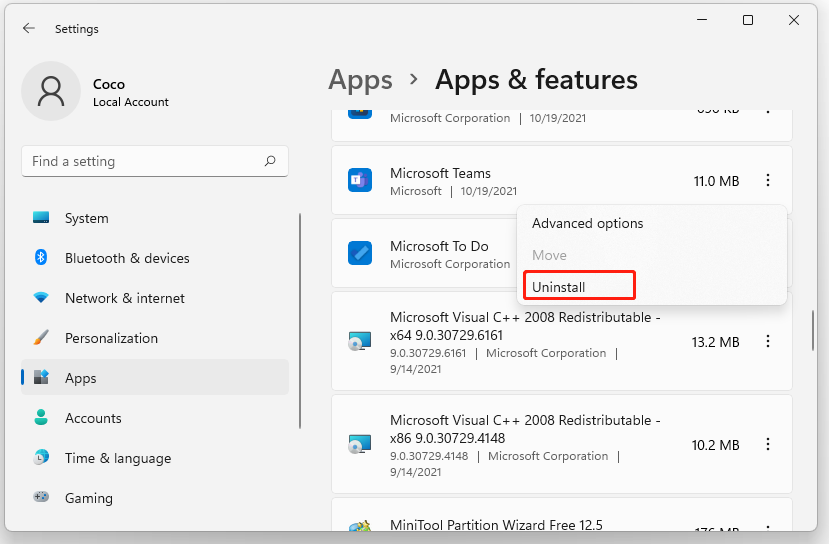
Step 3. Click on Uninstall in the pop-up confirmation window. Then you can uninstall other conflicting apps until the screen flickering issue gets fixed.
Fix 6. Perform a System Restore
If none of the above solutions works, you can revert your system to an earlier date where your Windows 11 computer runs normally.
Note: Make sure your system has a restore point at least. If there isn’t a restore point, you may consider resetting Windows 11.
Step 1. Type create a restore point in the Search box and select the best match from the results.
Step 2. Click on System Restore > Next.
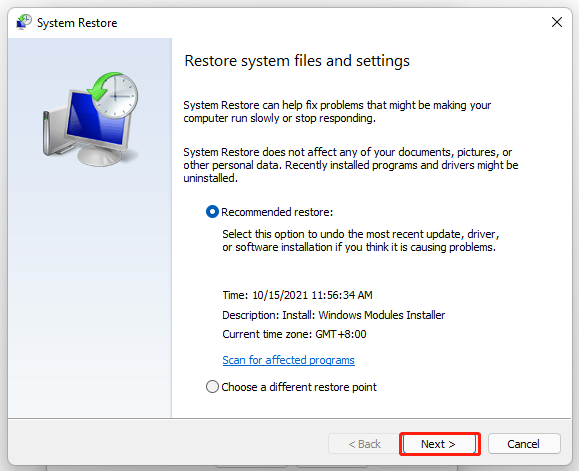
Step 3. Select a system restore point and click on Next.
Step 4. Review the settings you will restore and click on Finish to confirm.
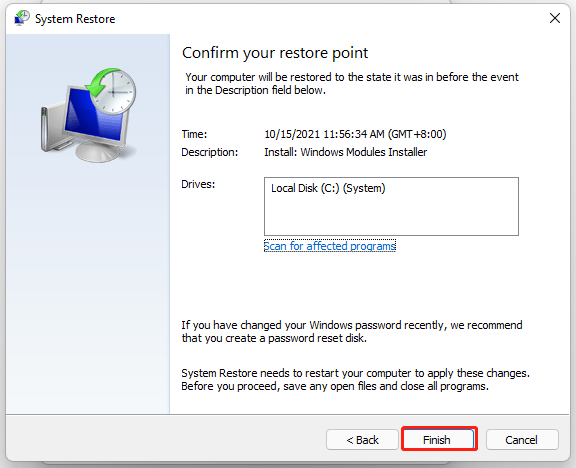
Wait for the process to complete and then restart your computer to see if the screen flickering issue is resolved.
Fixing Screen Flickering in Windows 11 can seem like a daunting task, but don’t worry—it’s manageable with a few simple steps. Essentially, screen flickering usually stems from an outdated or incompatible display driver or a buggy app. By updating your graphics driver, checking for faulty apps, and adjusting your display settings, you can get your screen back to normal in no time. Follow this guide to troubleshoot and resolve screen flickering issues effectively.
Before diving in, it’s good to understand the basics of what’s causing your screen to flicker. This guide will walk you through resolving the most common culprits to help restore your display to its regular, non-flickering state.
Step 1: Check Task Manager
Open Task Manager by pressing Ctrl + Shift + Esc to see if it flickers.
If Task Manager doesn’t flicker, then the problem is likely due to an app. If it does flicker, then it’s probably a driver issue.
Step 2: Update Your Graphics Driver
Head to Device Manager, find your display adapter, right-click, and choose ‘Update driver’.
Updating your graphics driver can often solve flickering issues, as outdated drivers might not be compatible with Windows 11.
Step 3: Uninstall Incompatible Apps
Identify any recently installed apps that might be causing issues and uninstall them.
Certain third-party apps can interfere with display settings, leading to flickering. Removing these can stabilize your screen.
Step 4: Change Display Settings
Go to Settings > System > Display and adjust the refresh rate.
Sometimes, an incorrect refresh rate can cause flickering. Selecting the recommended rate ensures compatibility.
Step 5: Roll Back Graphics Driver
In Device Manager, find your graphics driver, select properties, and then ‘Roll Back Driver’.
If a recent driver update is causing flickering, rolling back to a previous version can restore stability.
After completing these steps, you should notice a stable screen without flickering. If issues persist, further investigation or professional assistance may be necessary.
Tips for Fixing Screen Flickering in Windows 11
- Keep your system updated: Regular updates can prevent compatibility issues.
- Avoid sketchy apps: Download apps only from trusted sources.
- Create a restore point: This allows you to revert your system back if issues arise.
- Check for hardware issues: Sometimes, flickering can be a hardware problem.
- Consult a professional: If all else fails, a tech expert might be your best bet.
Frequently Asked Questions
How do I know if my screen flickering is due to an app or driver?
By checking Task Manager. If it flickers, it’s likely a driver issue; if not, it might be an app.
Can updating Windows fix screen flickering?
Yes, sometimes updates include patches for bugs that cause flickering.
What if my display isn’t listed in Device Manager?
This could point to a driver issue or hardware fault. Try restarting your computer.
Are all third-party apps bad for my display?
No, but some might be incompatible with your system, causing flickering.
Is screen flickering a hardware issue?
While it’s usually software-related, hardware faults can also cause flickering.
Summary
- Check Task Manager.
- Update your graphics driver.
- Uninstall incompatible apps.
- Change display settings.
- Roll back graphics driver.
Conclusion
Screen flickering in Windows 11 doesn’t have to be a persistent problem. With the right steps, you can usually resolve the issue quickly and restore your system’s peace of mind. By checking Task Manager, updating drivers, managing your apps, and adjusting display settings, you tackle the problem head-on.
Be proactive—keep your system and apps updated, and periodically check for any potential hardware issues. Don’t hesitate to reach out to a professional if the problem persists. Your screen’s health is crucial for your productivity and comfort, so don’t let flickering be a constant annoyance.
Hopefully, this guide helps you solve the screen flickering problem and gives you a little more peace of mind in your Windows 11 experience. Keep exploring and learning about your system—knowledge is power, and it can save you time and frustration down the line!
Matthew Burleigh has been writing tech tutorials since 2008. His writing has appeared on dozens of different websites and been read over 50 million times.
After receiving his Bachelor’s and Master’s degrees in Computer Science he spent several years working in IT management for small businesses. However, he now works full time writing content online and creating websites.
His main writing topics include iPhones, Microsoft Office, Google Apps, Android, and Photoshop, but he has also written about many other tech topics as well.
Read his full bio here.
How to Fix Screen Flickering and Flashing on Windows 10 and 11
Screen flickering and flashing can be a persistent issue for Windows 10 and 11 users, leading to frustration and decreased productivity. Whether it’s caused by hardware or software problems, understanding and addressing these issues is crucial for a smooth computing experience. This article will guide you through common causes of screen flickering and provide a comprehensive list of troubleshooting methods to resolve the problem.
Understanding Screen Flickering
Before diving into solutions, it’s essential to understand what screen flickering is. Screen flickering refers to the rapid and repeated changes in brightness that can affect the display on your monitor or laptop screen. It may appear as a series of horizontal lines, blinking, or a jittery image — and it can be particularly annoying during gaming, watching videos, or working on graphic-intensive tasks.
Common Causes of Screen Flickering
- Update Conflicts: Installation of new software or Windows updates can lead to conflicts, often resulting in flickering screens.
- Outdated Graphics Drivers: Drivers that control your graphics hardware can become outdated or corrupted, causing display issues.
- Display Settings Issues: Incorrect display settings or misconfigured resolutions might lead to instability in the graphical output.
- Hardware Problems: Malfunctions in the monitor, cables, or hardware components can also result in flickering.
- Third-Party Applications: Certain applications, especially those that affect display or graphics, can cause flickering.
- Faulty Display Refresh Rate: Mismatched refresh rates between the monitor and graphics card can lead to instability.
Steps to Diagnose and Fix Screen Flickering
Below are a variety of troubleshooting steps to help diagnose and resolve screen flickering and flashing issues on your Windows 10 and 11 devices.
Step 1: Check Your Monitor Connections
Start by inspecting the physical connections:
- Cable Check: Ensure that the video cable connecting your monitor to your computer is securely connected. If the cable is loose, it can cause instability.
- Replace Cables: Consider replacing the cable (HDMI, DisplayPort, etc.) to rule out any defects. Damaged cables can transmit data inconsistently, leading to flickering.
- Monitor Test: Connect your computer to a different monitor or use your monitor with another computer to see if the flickering persists. If it does, it might be a hardware issue with the monitor itself.
Step 2: Restart Your Computer
Sometimes, a simple restart can solve temporary issues arising from recent updates, application launches, or background processes that conflict with display functions. Reboot your computer and check if the flickering continues.
Step 3: Update Graphics Drivers
Keeping your graphics drivers up to date is critical for optimal performance. Here’s how to update them:
- Open Device Manager: Right-click on the Start button and select «Device Manager.»
- Locate Display Adapters: Expand the «Display adapters» section.
- Update Driver: Right-click on your graphics card and select «Update driver.» Choose «Search automatically for updated driver software.» Follow the prompts if an update is found.
- Reboot Your System: After updating, restart your computer to apply changes.
Alternatively, you can visit the manufacturer’s website for your graphics card (e.g., NVIDIA, AMD, Intel) and download the latest driver directly.
Step 4: Adjust Display Settings
Incorrect display settings can lead to flicker. Here’s how you can adjust them:
- Right-click on Desktop: Then click on «Display settings.»
- Verify the Resolution: Under «Display resolution,» ensure that the setting is marked as «Recommended.»
- Refresh Rate Adjustment: Scroll down and click on «Advanced display settings.» Here, check your refresh rate and ensure it matches your monitor’s specifications. For most monitors, 60Hz is typical; gaming monitors might allow up to 144Hz or higher.
- Scaling Options: Sometimes, incorrect scaling can also lead to flickering. Adjust the scaling settings under “Scale and layout” to 100% or the recommended setting.
Step 5: Disable Hardware Acceleration
Some applications use hardware acceleration to improve performance, but this feature may cause flickering. To disable hardware acceleration:
-
For Chrome:
- Open Chrome and click on the three dots in the upper right corner.
- Go to Settings > Advanced > System.
- Toggle off «Use hardware acceleration when available.»
-
For Other Software: Similar options can often be found in the settings of other applications like Discord, Microsoft Edge, and certain multimedia players.
Step 6: Check for Windows Updates
Ensuring your Windows OS is updated can eliminate bugs and issues that lead to display problems:
- Open Settings: Press
Windows + Ito open settings. - Go to Update & Security: Click on «Check for updates.»
- Install Available Updates: If updates are available, install them. Restart your computer after completion.
Step 7: Run the Windows Troubleshooter
Windows has built-in troubleshooters that can help detect display issues:
- Open Settings: Press
Windows + I. - Go to Update & Security > Troubleshoot.
- Run Troubleshooter: Select «Additional troubleshooters,» then choose «Hardware and Devices» and run the troubleshooter.
Step 8: Check for Third-Party Applications
Some third-party applications can cause interference with display functions. Programs that alter screen settings or graphics can have adverse effects and should be temporarily disabled to check for improvement:
- Boot your computer in Safe Mode:
- Hold down Shift and click the Restart button from the Start menu.
- Select Troubleshoot > Advanced options > Startup Settings > Restart.
- Choose Safe Mode with Networking once it reboots.
If the flickering goes away in Safe Mode, a third-party application is likely the culprit. Identify and uninstall or disable those applications one by one until the issue is resolved.
Step 9: Change Display Adapter Properties
- Right-click on Desktop: Choose “Display settings.”
- Advanced Display Settings: Scroll down and click «Advanced display settings.”
- Display Adapter Properties: Click on “Display adapter properties for Display 1.”
- Monitor Tab: Switch to the «Monitor» tab and ensure the refresh rate is appropriate.
Step 10: Reset Graphics Driver
Sometimes, resetting the graphics driver can solve flickering issues without requiring a full restart. Press Windows + Ctrl + Shift + B to refresh the graphics driver. You should hear a beep or see your screen flicker, indicating that the refresh has occurred.
Step 11: Adjust or Reinstall Display Drivers
If all else fails, uninstalling and reinstalling drivers may help:
- Open Device Manager: Right-click the Start button and select it.
- Display Adapters: Go to «Display adapters,» right-click on your graphics driver, and select «Uninstall device.»
- Reboot Your Computer: After uninstalling, restart your computer. Windows should automatically reinstall the necessary drivers.
Step 12: Hardware Diagnosis
If screen flickering continues after software troubleshooting:
- Test Hardware: Consult with your manufacturer’s website for diagnostic tools that come with your hardware. Diagnostics can often reveal issues with the GPU or system resources.
- Consider Professional Help: If potential hardware issues are detected, consider contacting a professional technician for further diagnosis and repair.
Step 13: System Restore
A System Restore may revert your system back to an earlier point before the flickering began:
- Search for System Restore in the Windows search bar and select “Create a restore point.”
- System Restore: Click on the “System Restore” button and select a restore point prior to the issue arising.
This process may take some time and can potentially resolve the flickering if it began after an update or installation.
Step 14: Perform a Full Upgrade or Reinstall
If the flickering persists despite all troubleshooting, a clean install of Windows 10 or Windows 11 might be your last resort. Make sure to back up all important data before proceeding, as this process will erase all existing data from your system. Follow Microsoft’s guidelines for upgrading or reinstalling your operating system.
Conclusion
Screen flickering and flashing on Windows 10 and 11 can stem from various issues, from minor software conflicts to significant hardware problems. Luckily, the steps mentioned above provide a comprehensive approach to diagnosing and rectifying these issues.
By methodically working through the potential causes and fixes, you can restore the reliability and performance of your display. Whether you choose to update your graphics drivers, adjust your display settings, or consult with a professional, you should be able to eliminate screen flickering and enjoy a smoother computing experience.