Безопасный режим позволяет запустить Windows 11 с ограниченным набором примененных параметров, системных служб и драйверов, что потенциально позволяет диагностировать причины проблем в работе системы и исправить некоторые из них. Некоторые процедуры по настройке оборудования или удалению программ также рекомендуется выполнять в безопасном режиме.
В этой пошаговой инструкции подробно о том, как зайти в безопасный режим Windows 11 различными способами, а также дополнительная информация, которая может быть полезной в контексте рассматриваемой темы.
Как запустить Windows 11 в безопасном режиме

В зависимости от ситуации: запускается ли система и возможен ли вход в неё, а также ряда других факторов, выполнить вход в безопасный режим Windows 11 можно по-разному. Сначала о способах, позволяющих зайти в безопасный режим в случае, если ОС запускается, а затем — об альтернативных вариантах, которые также могут пригодиться.
Как включить безопасный режим в окне «Конфигурация системы»
Если вход в Windows 11 возможен, то для того, чтобы в следующий запуск был произведён в безопасном режиме, можно выполнить следующие шаги:
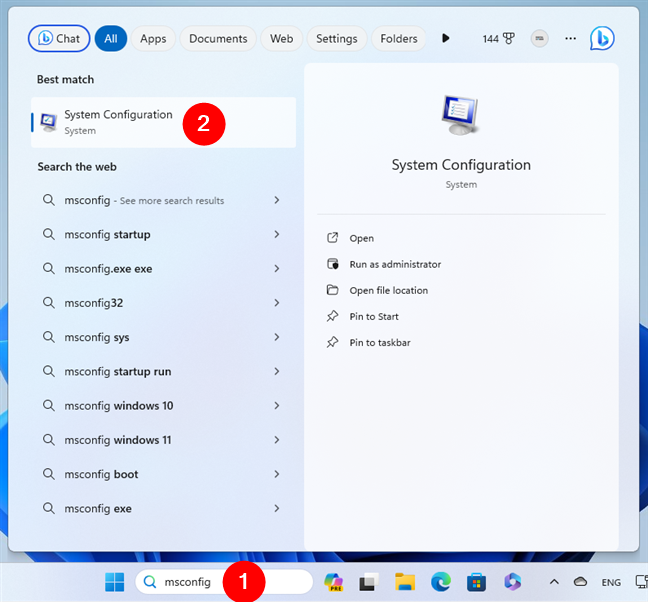
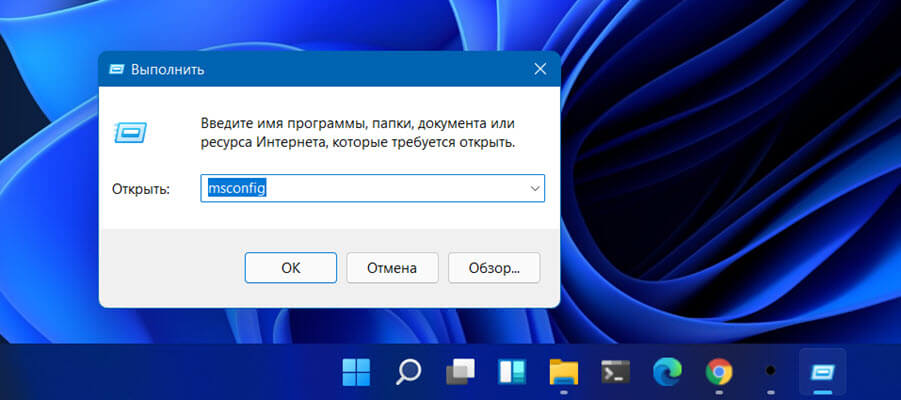
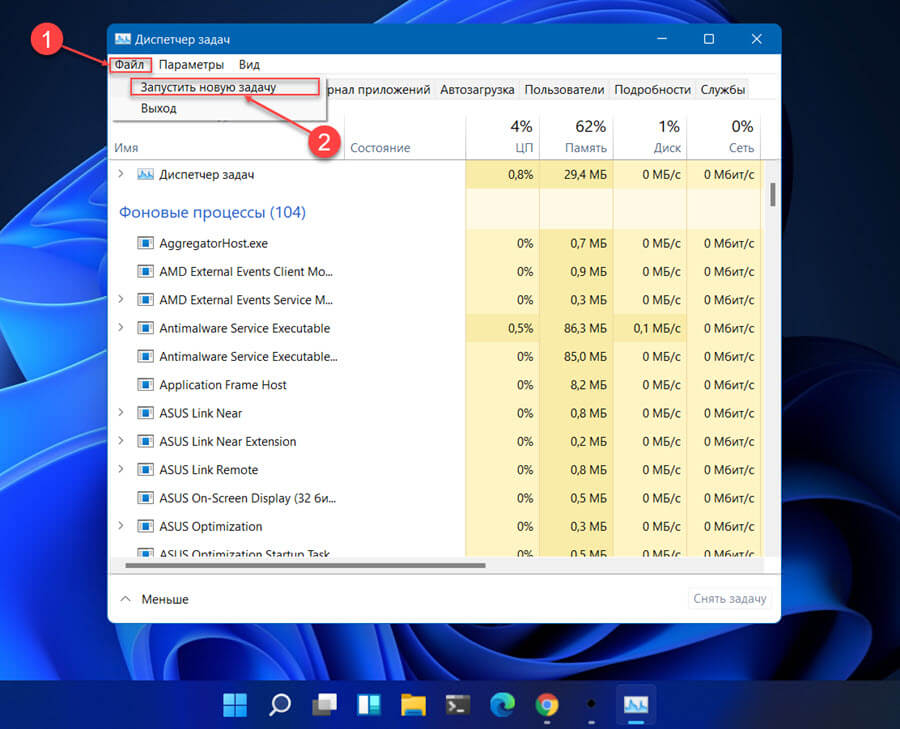
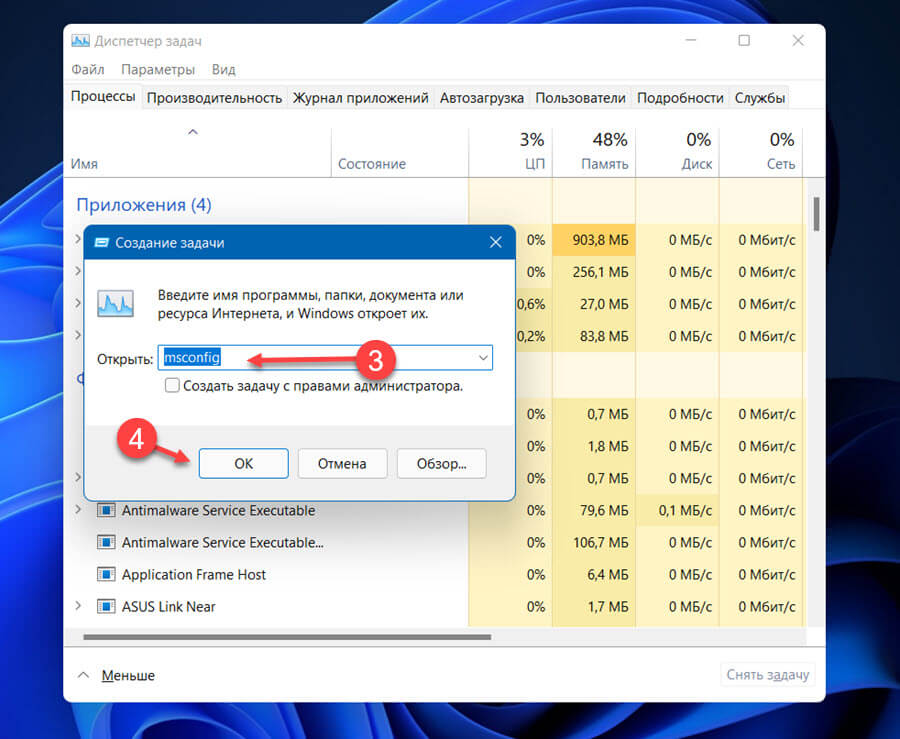
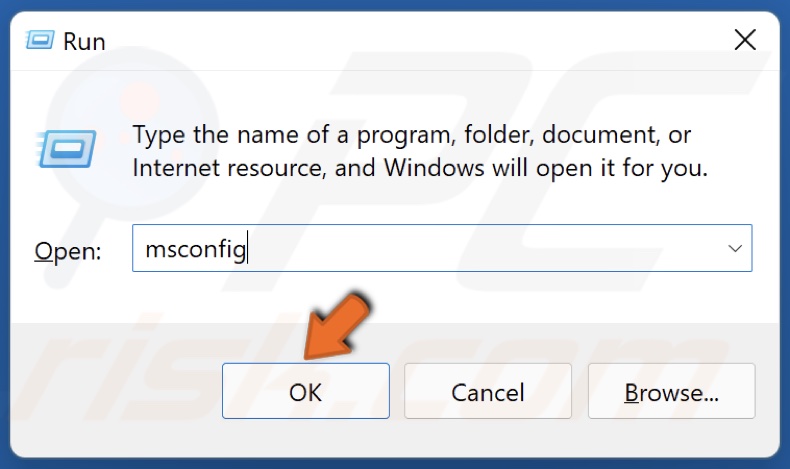
- Нажмите клавиши Win+R на клавиатуре или нажмите правой кнопкой мыши по кнопке «Пуск» и выберите пункт «Выполнить». Введите msconfig в диалоговое окно «Выполнить» и нажмите Enter.

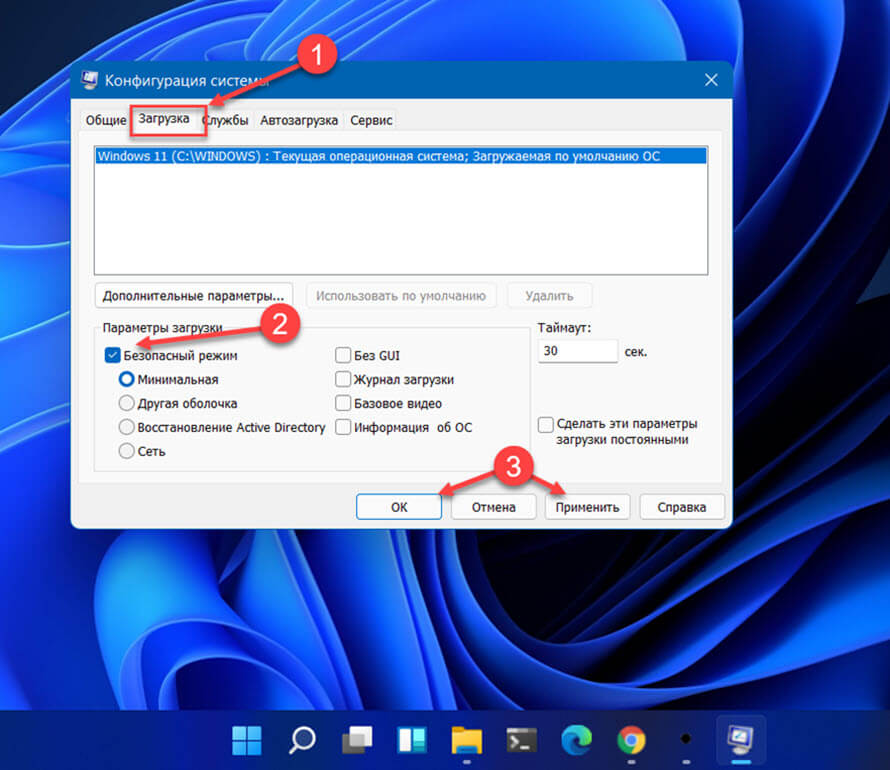
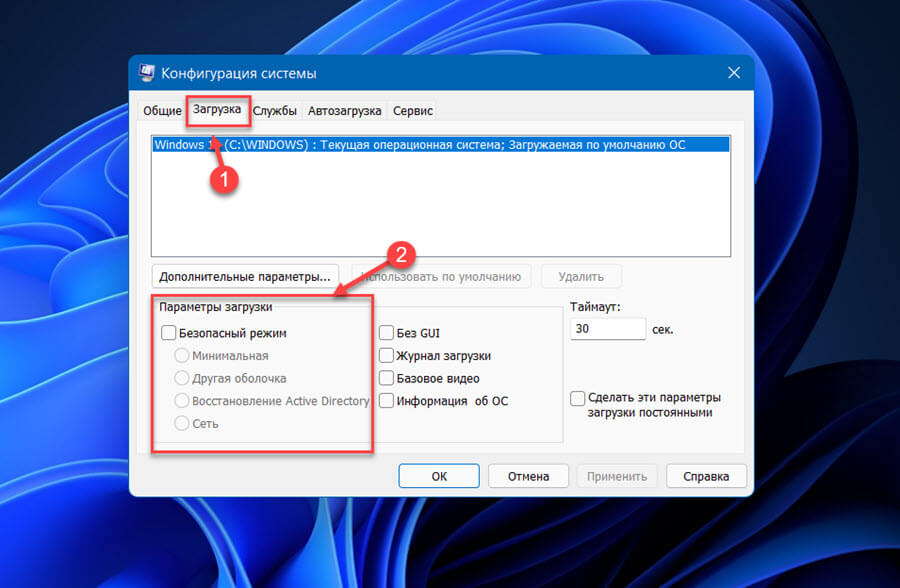
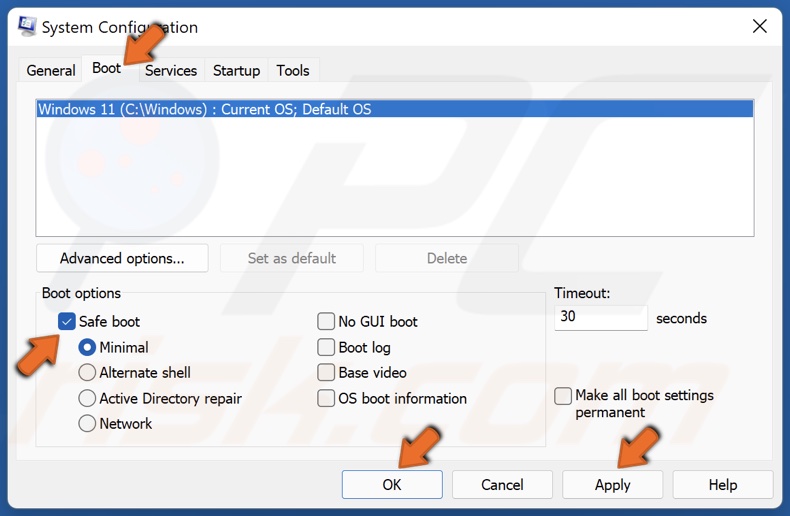
- В открывшемся окне «Конфигурация системы» перейдите на вкладку «Загрузка».
- В разделе «Параметры загрузки» отметьте «Безопасный режим». Если вам требуется поддержка сети в безопасном режиме, включите пункт «Сеть» (в остальных случаях обычно подойдет выбор по умолчанию — «Минимальная»).

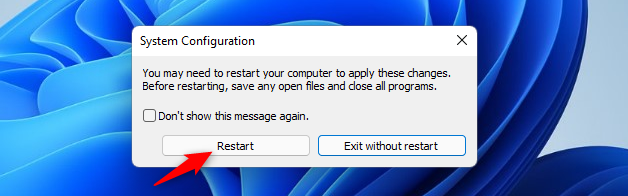
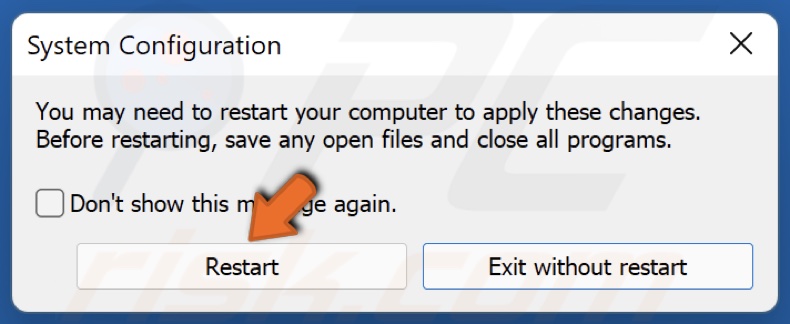
- Примените настройки и перезагрузите ваш компьютер или ноутбук.


В результате система будет загружена в безопасном режиме. В дальнейшем, чтобы отключить безопасный режим, выполните те же шаги, но снимите отметку «Безопасный режим».
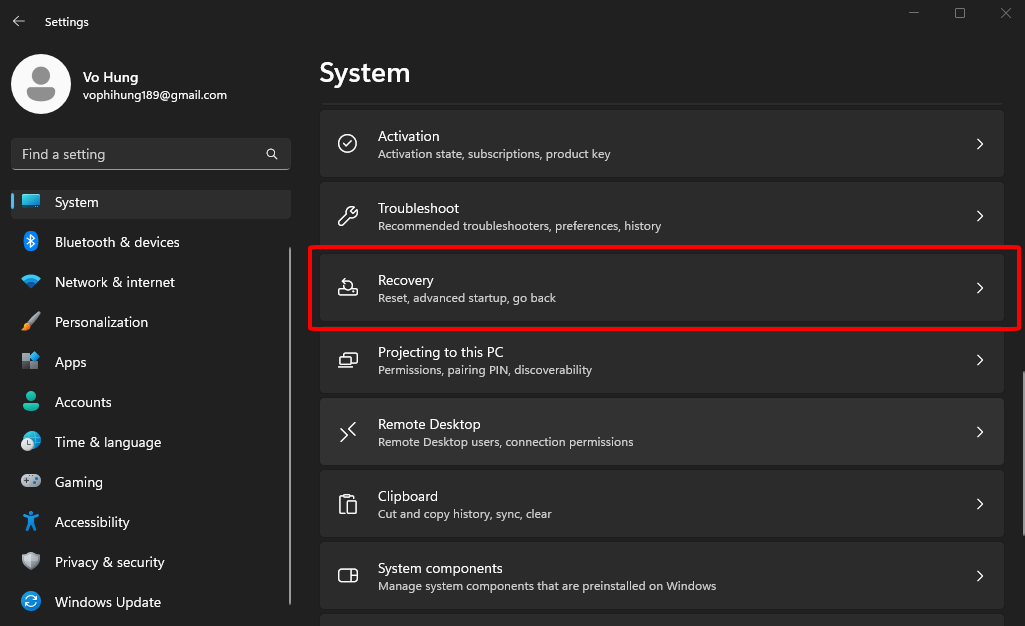
Безопасный режим через Параметры
Следующий способ — использовать «Расширенные параметры запуска» в Параметрах Windows 11. Шаги будут следующими:
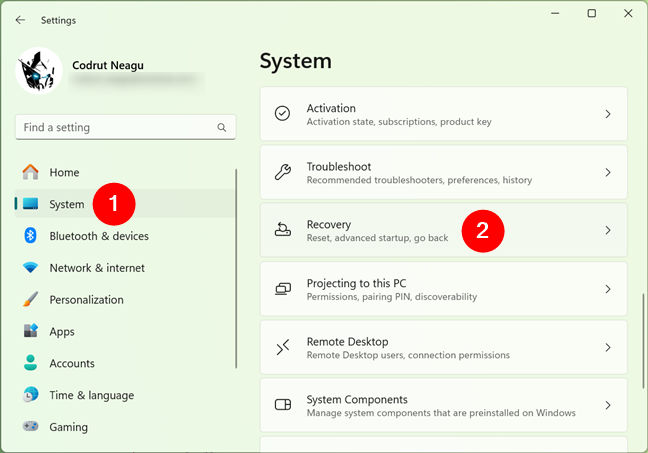
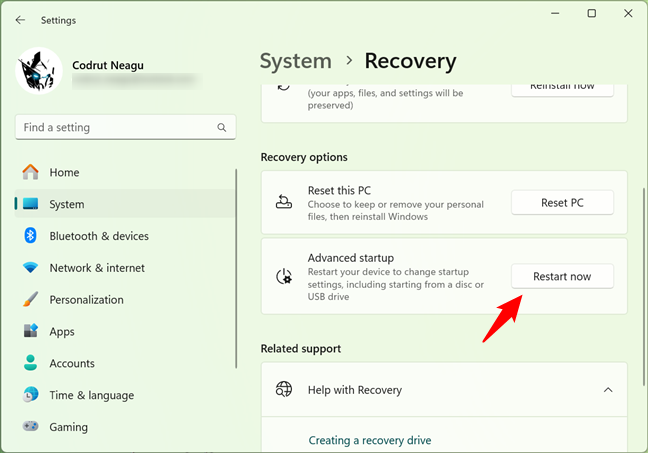
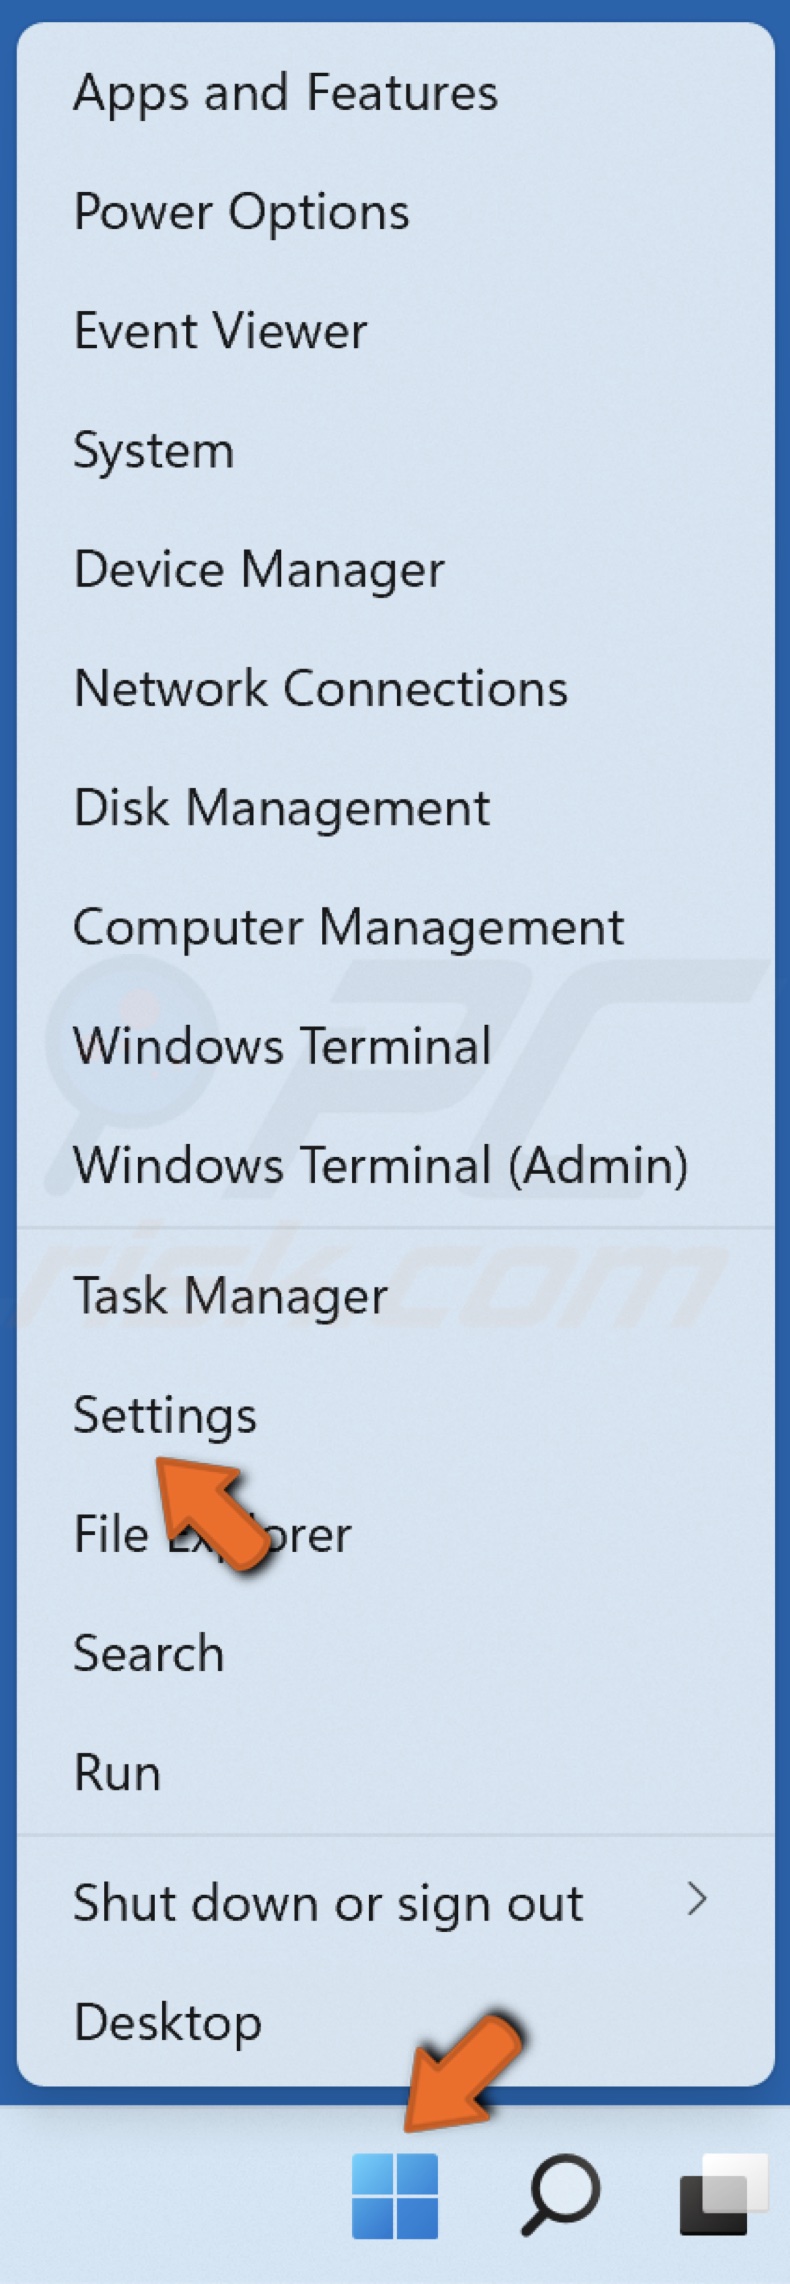
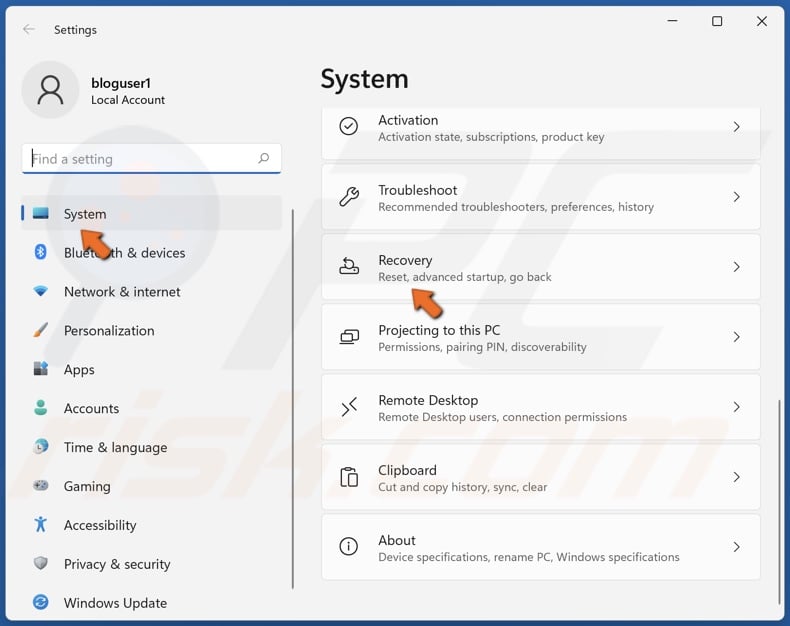
- Откройте «Параметры», для этого можно использовать соответствующий пункт в меню Пуск или нажать клавиши Win+I на клавиатуре.
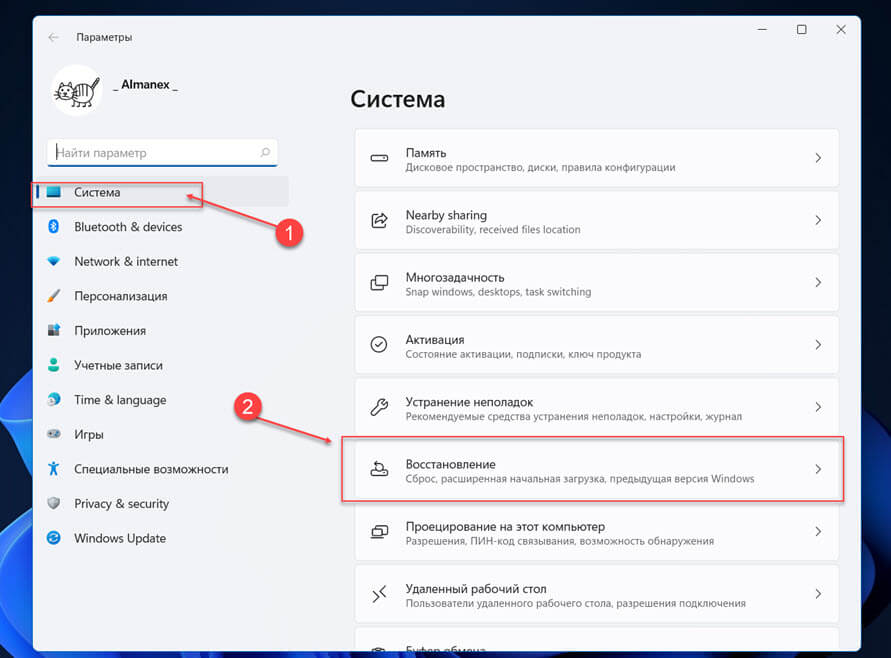
- В разделе «Система» откройте пункт «Восстановление».

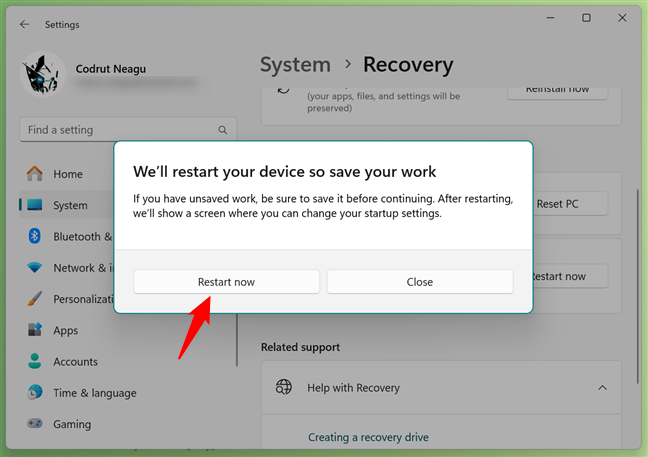
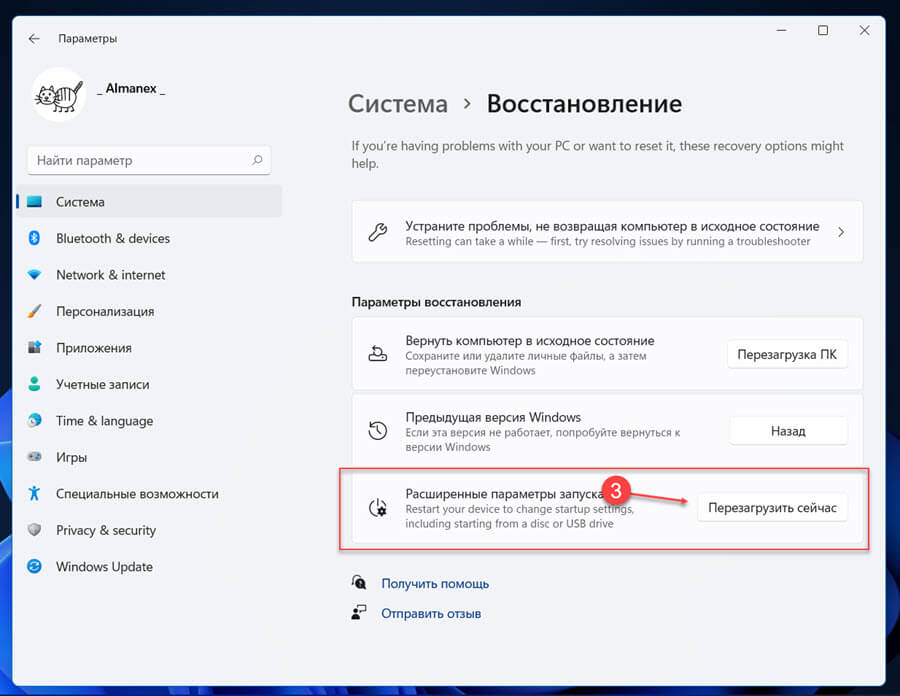
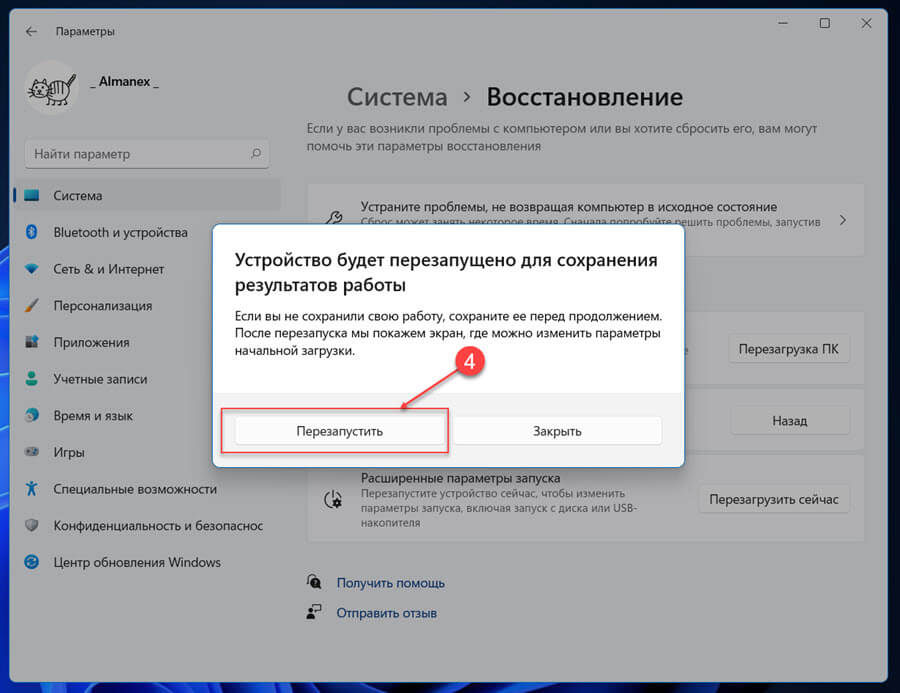
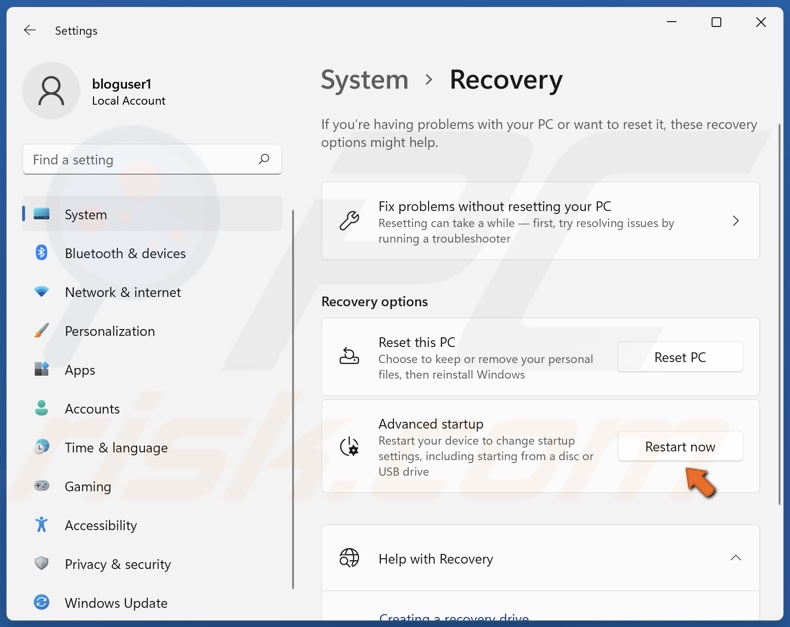
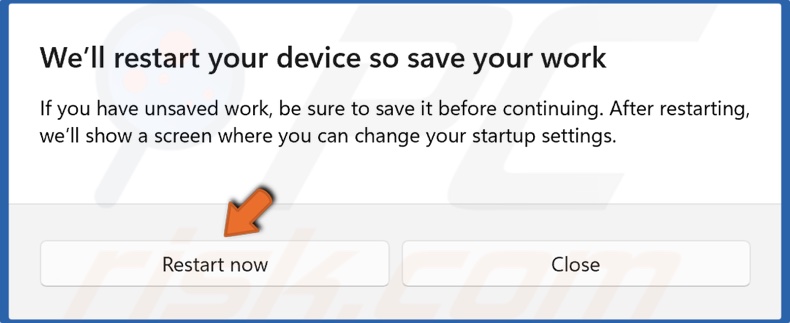
- В разделе «Параметры восстановления» в пункте «Расширенные параметры запуска» нажмите кнопку «Перезагрузить сейчас» и подтвердите перезапуск устройства.

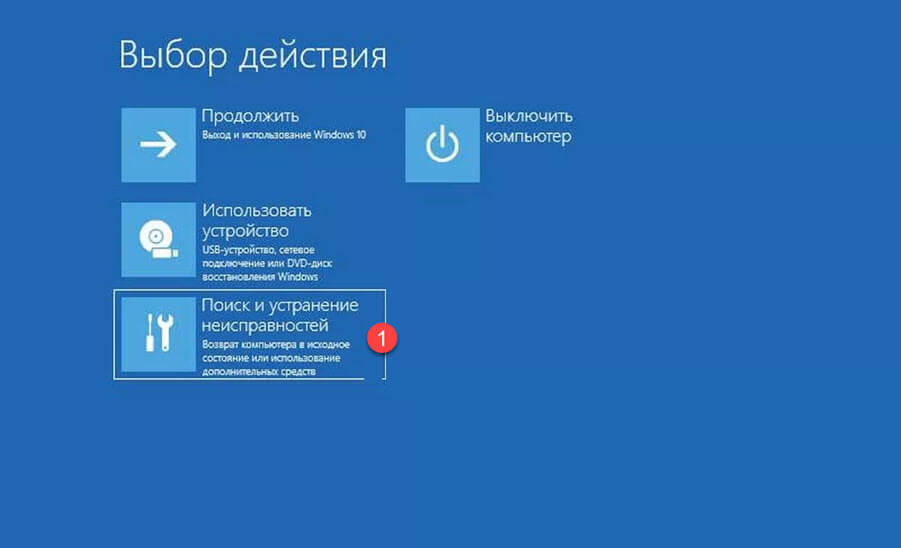
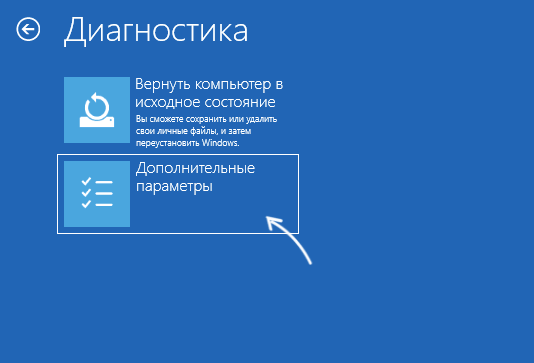
- Откроется среда восстановления Windows 11. Нажмите «Поиск и устранение неисправностей».

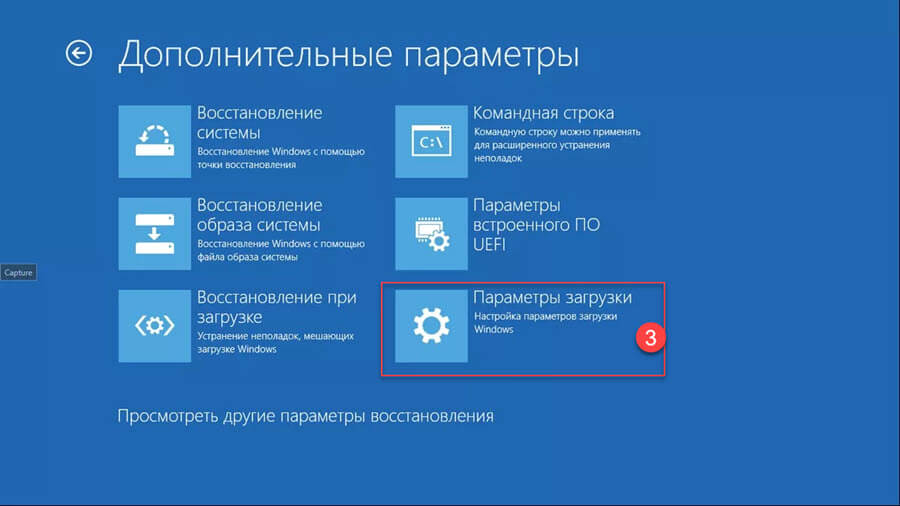
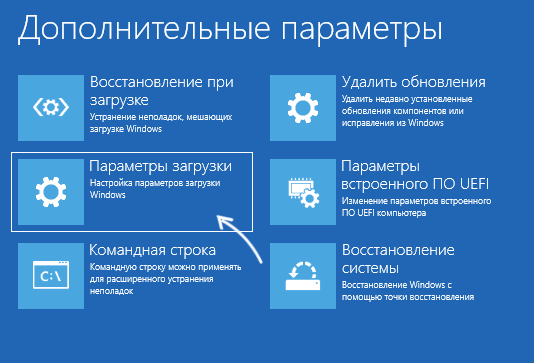
- Откройте «Дополнительные параметры».
- Нажмите «Параметры загрузки», а затем — кнопку «Перезагрузить».
- После перезагрузки появится окно выбора режима загрузки. Нажмите клавишу F4 (Fn+F4 на некоторых ноутбуках) для запуска Windows 11 в безопасном режиме. Простое нажатие клавиши 4 также работает. При необходимости запуска безопасного режима с поддержкой сети используйте F5 (5).


Windows 11 будет загружена в выбранном вами варианте безопасного режима.
Безопасный режим с экрана блокировки Windows 11
Если по какой-то причине Windows 11 на загружается, но есть возможность попасть на экран блокировки системы, с него также можно попасть в безопасный режим:
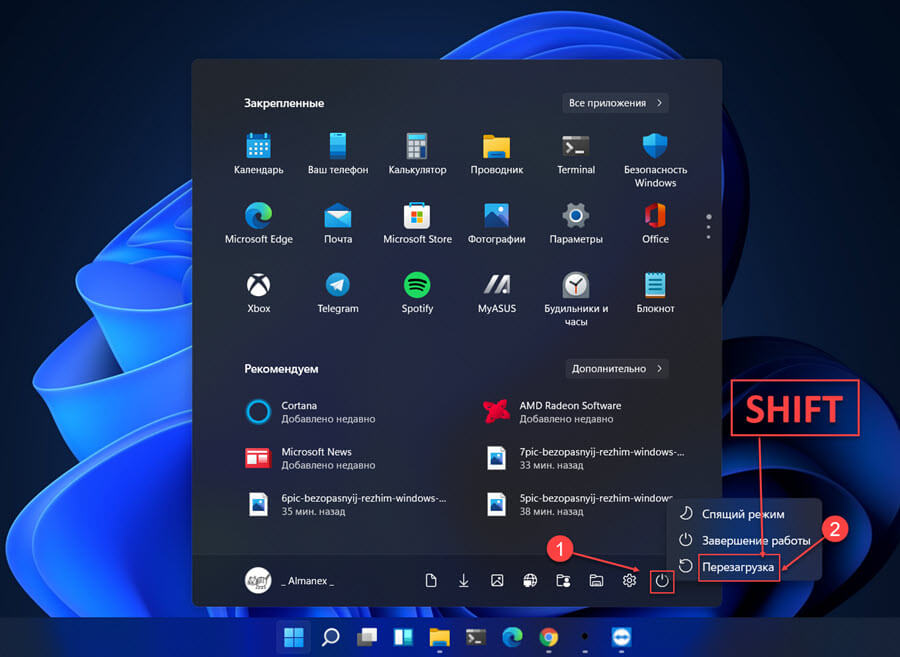
- Нажмите по кнопке питания в правом нижнем углу экрана блокировки.
- Удерживая клавишу Shift нажмите «Перезагрузка».
- Откроется среда восстановления. Перейдите в Поиск и устранение неисправностей — Дополнительные параметры — Параметры загрузки и подтвердите перезагрузку.
- Нажмите F4 или 4 для запуска Windows 11 в безопасном режиме.
В случае, если Windows 11 не запускается, например, вы наблюдаете черный экран при загрузке, возможны следующие варианты входа в безопасный режим:
- Если при загрузке Windows 11 возникает ошибка, при этом есть возможность открыть «Дополнительные параметры», зайдите в них, а затем перейдите в «Поиск и устранение неисправностей» — «Дополнительные параметры» — «Параметры загрузки», нажмите кнопку «Перезагрузить». После перезагрузки вы сможете запустить безопасный режим, нажав клавишу F4 или 4.

- Потенциально небезопасный для дисков метод, но рабочий. При начале загрузки Windows 11 выключаем компьютер или ноутбук долгим удержанием кнопки питания. После двух принудительных выключений, при третьем запуске будет произведена попытка автоматического восстановления, а затем вы увидите сообщение о том, что компьютер запущен некорректно. Если нажать «Дополнительные параметры», перейти в «Поиск и устранение неисправностей» — «Дополнительные параметры» — «Параметры загрузки» и нажать кнопку «Перезагрузить», вы сможете выбрать загрузку в безопасном режиме, нажав клавишу F4 или 4.
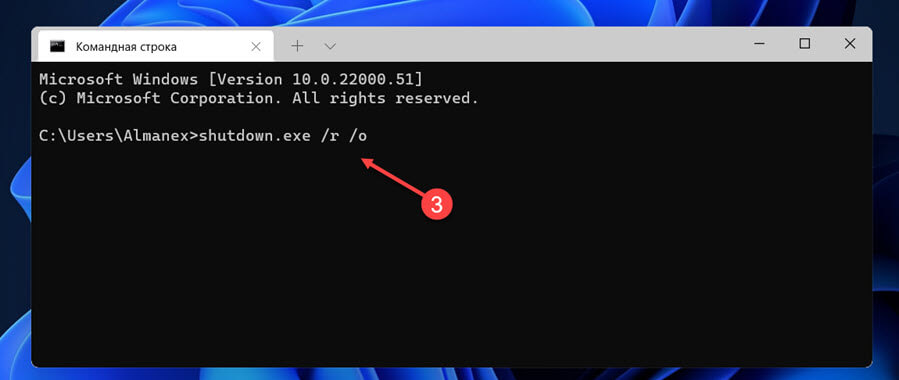
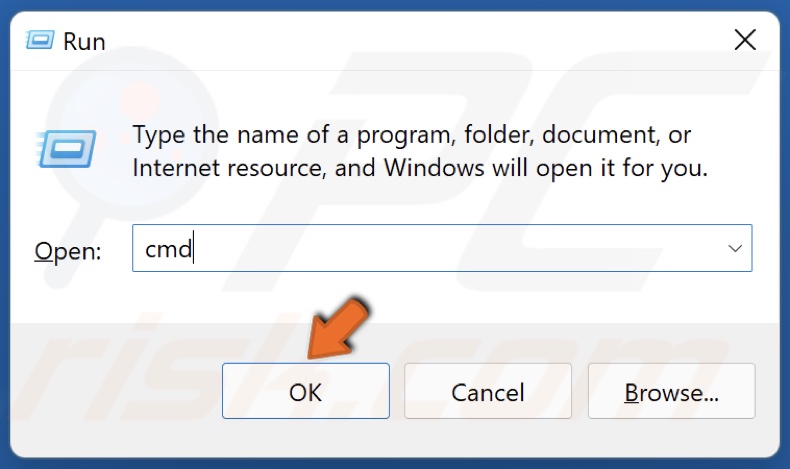
- Можно загрузить компьютер с загрузочной флешки Windows 11 (в том же режиме UEFI или Legacy, что и установленная система) и, после открытия программы установки нажать клавиши Shift+F10 (Shift+Fn+F10 на отдельных ноутбуках). Откроется командная строка. Введите команду
bcdedit /set {default} safeboot minimalи нажмите Enter.

После выполнения команды загрузите компьютер с жесткого диска — при условии, что система и её загрузчик исправны, запуск будет произведен в безопасном режиме. В дальнейшем отключить запуск в безопасном режиме можно используя вкладку «Загрузка» в окне Win+R — msconfig.


Если запуск безопасного режима требуется часто, вы можете добавить его в меню при загрузке Windows 11, для этого:
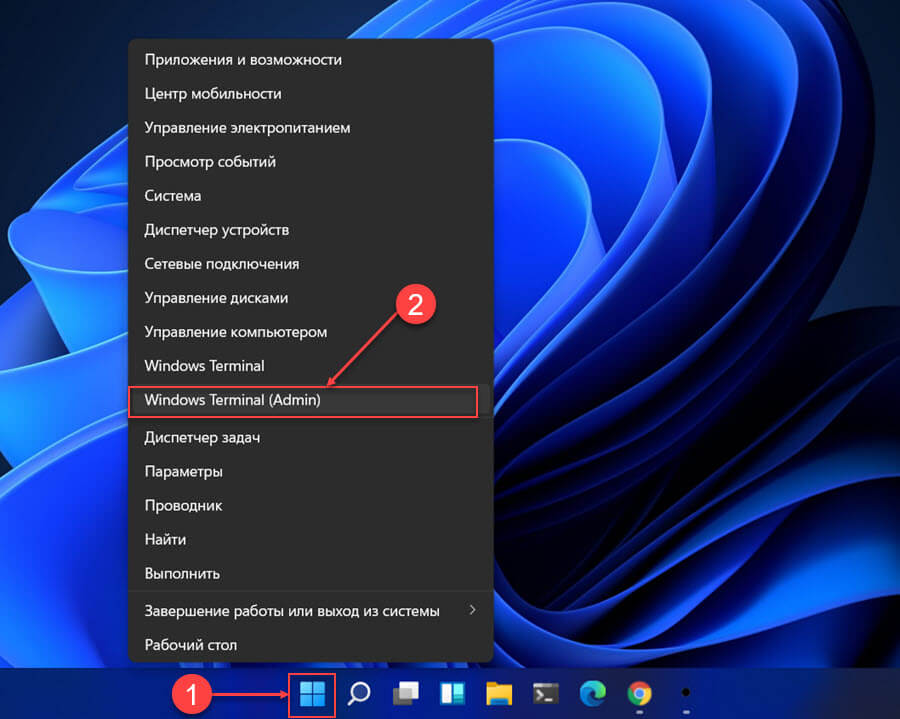
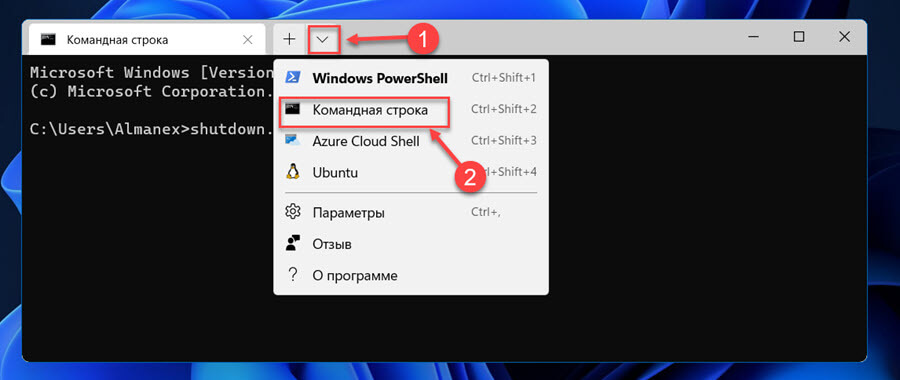
- Запустите командную строку от имени администратора.
- Введите команду
bcdedit /copy {current} /d "Безопасный режим" - После выполнения команды вы увидите сообщение о том, что запись скопирована с указанием её идентификатора в фигурных скобках. Используем этот идентификатор в следующей команде (скобки также должны присутствовать в команде):
bcdedit /set {идентификатор} safeboot minimal
- Вместо 3-го шага можно выполнить шаги 5 и 6, результат будет тем же.
- Нажмите клавиши Win+R на клавиатуре, введите msconfig и нажмите Enter.
- На вкладке «Загрузка» выберите пункт «Безопасный режим» в списке вверху, установите для него отметку «Безопасный режим» в разделе «Параметры загрузки» и примените настройки.

Как итог, при каждом включении или перезагрузке Windows 11 будет появляться следующее меню:

В нём можно выбрать обычную загрузку системы или запуск в безопасном режиме.
So, you have Windows 11 installed on your computer, but apps misbehave, and system features are constantly acting up, causing you headaches? If that’s the case, you’re probably looking for a way to troubleshoot and fix your system. Lucky for you, Windows 11 comes with a neat tool called Safe Mode that can help with the whole troubleshooting process. Now, you might be wondering, “How do I start Windows 11 in Safe Mode?” Well, I’ve got you covered! There are actually eight different ways to do it, and I’ve gathered them all for you in this guide:
NOTE: This tutorial is about booting into Safe Mode in Windows 11. If you got here looking for instructions on how to start Safe Mode on a Windows 10 computer, check this article instead: How to boot Windows 10 in Safe Mode.
What you get when you start Windows 11 in Safe Mode
Is this your first time hearing about Safe Mode in Windows 11? In that case, you must first understand what it is and what it does; I’ve covered this subject in detail here: What is Safe Mode on a Windows computer? The key takeaway is that Safe Mode is like a stripped-down version of the Windows 11 system that only loads the essentials, leaving out all the extra stuff that could be causing trouble. So, if your computer’s acting up, Safe Mode can be a lifesaver for troubleshooting.

Windows 11 Safe Mode
Unfortunately, old tricks for getting into Safe Mode, like pressing F8 or Shift + F8, don’t work anymore because Windows 11 requires UEFI BIOS. It’s also impossible to make Windows 11 enter Safe Mode from BIOS or boot Windows 11 in Safe Mode from a power-off state. Fear not, though! There are still plenty of ways to get there — eight to my count — and I’m about to walk you through all of them.
In the first part of this guide, sections 1 through 4, I’ll show you how to boot into Safe Mode in Windows 11 when you’re locked out of your system. And if you can actually log in, you may prefer the later methods, from 5 to 8. Having said that, let’s get into it!
How to boot into Safe Mode when you can’t sign in to Windows 11
If you want to start your computer into Safe Mode but can’t log in to Windows 11, here are the ways and steps you should take:
1. How to enter Windows 11’s Safe Mode by stopping the PC from booting normally
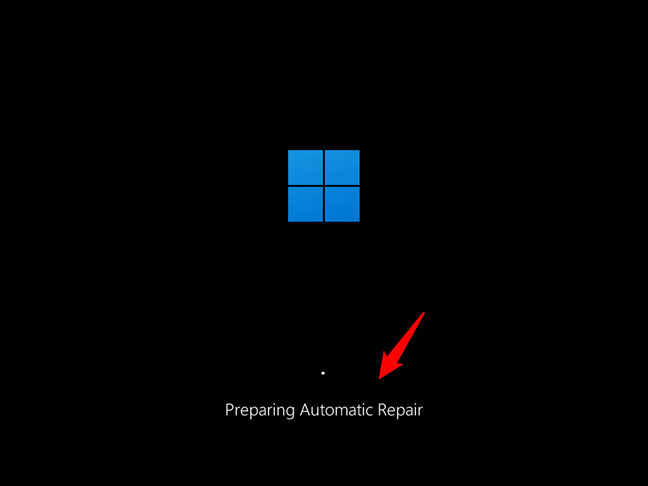
Windows 11 has a built-in failsafe switch that triggers when it fails to start normally. The fourth time it tries to boot after three failed attempts, Windows 11 automatically loads its Automatic Repair mode. So, all you have to do is interrupt Windows 11’s normal boot process three consecutive times. Press the physical Restart or Power button on your Windows 11 computer or device to stop it during its startup process. Note that if you press the Power button, you must hold it down for about 4 seconds to enforce the power off. If you succeed in doing it, Windows 11 loads its Automatic Repair mode.
How to start Windows 11 in Safe Mode using automatic repair
Wait for a few moments until Windows 11 diagnoses your PC.
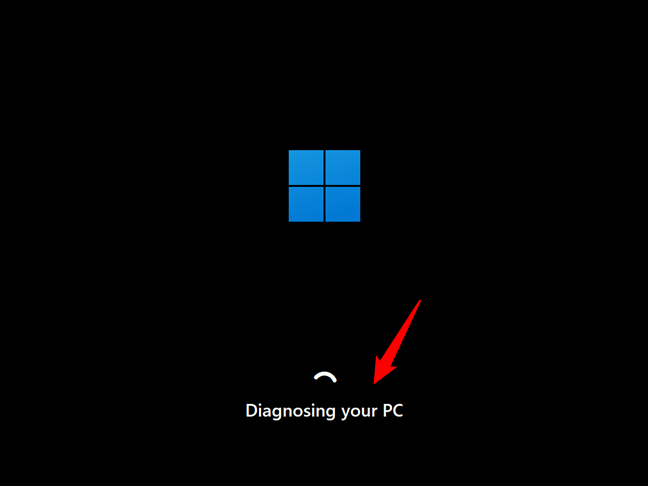
Windows 11 is diagnosing your PC
Then, it loads the Automatic Repair screen. On it, press the Advanced options button.
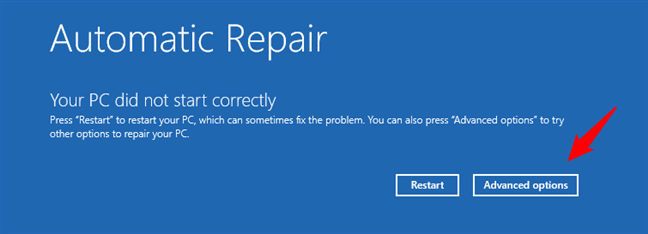
Click or tap Advanced options
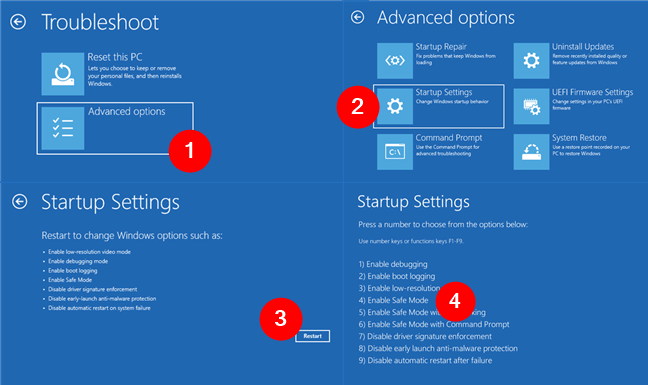
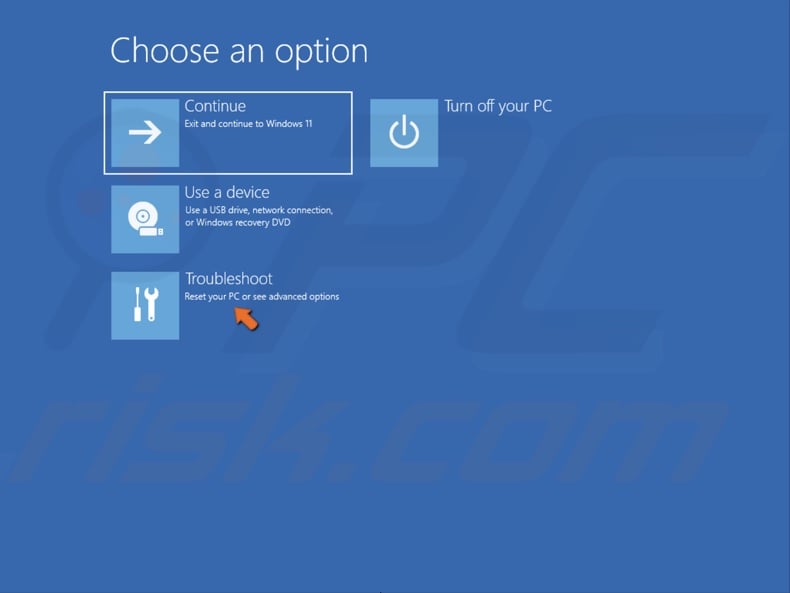
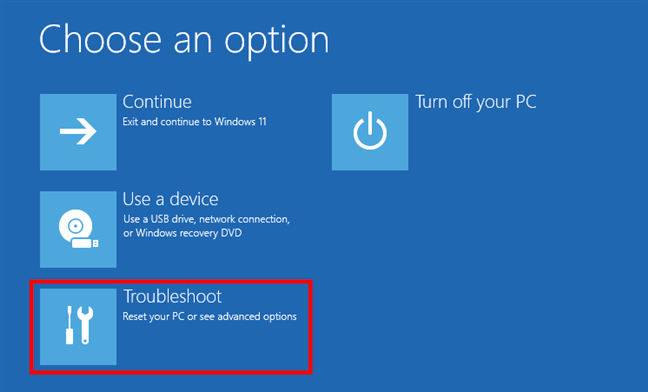
On the “Choose an option” screen, select Troubleshoot.

Troubleshoot Windows 11
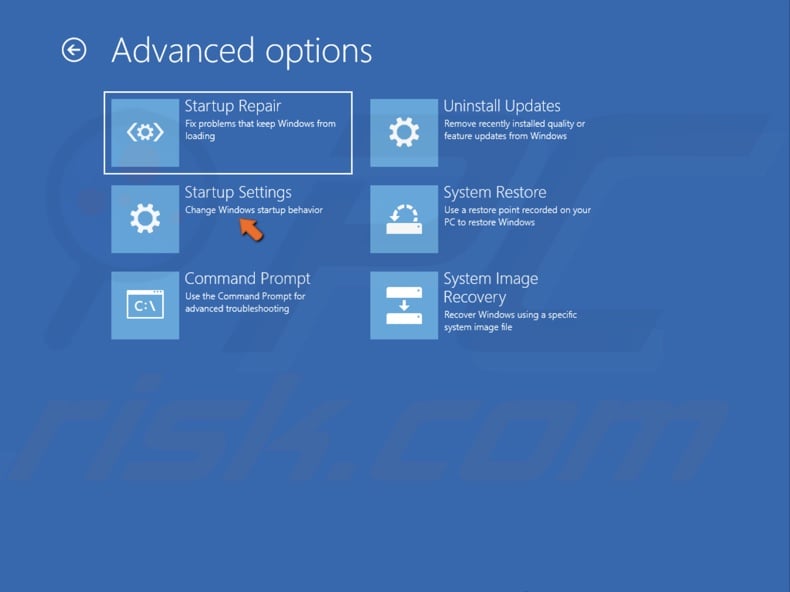
On the Troubleshoot screen, click or tap on Advanced options.

Accessing the advanced troubleshooting options
Next, the Advanced options screen loads. On it, select Startup Settings. If you don’t have this option on the screen, use the “See more recovery options” link at the bottom to get to it. Then, click or tap on Startup Settings.
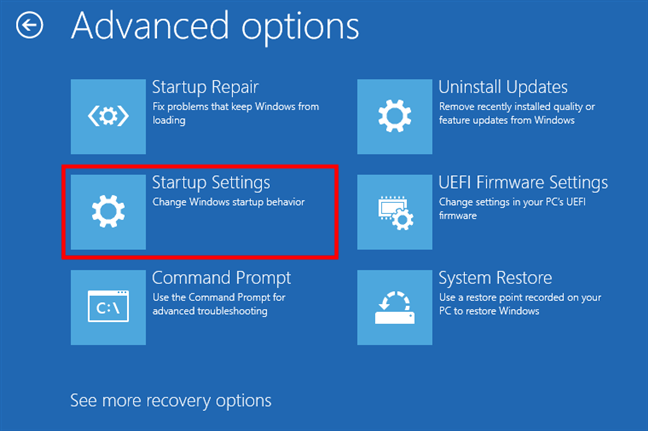
Choose Startup Settings
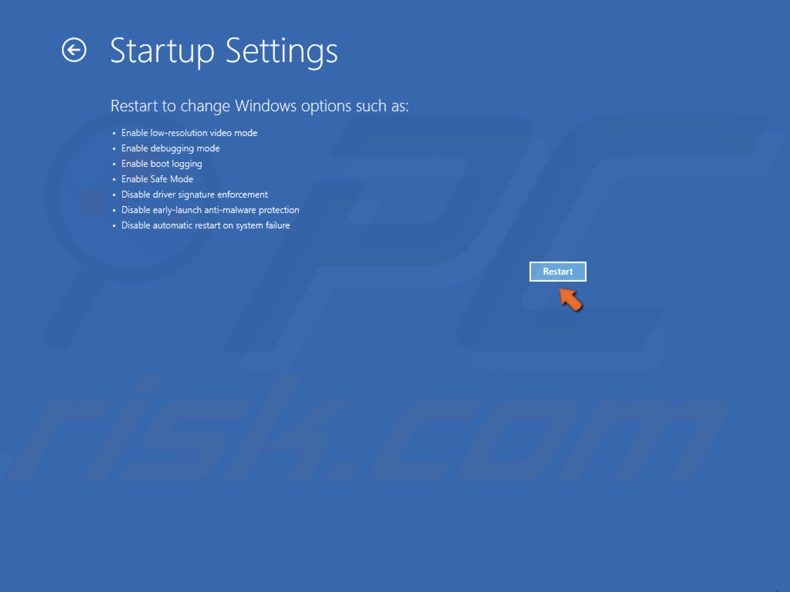
Windows 11 then loads another screen called Startup Settings. It informs you that after restarting your PC, you can change Windows options. One of them is that you can Enable Safe Mode. Click or tap on the Restart button.
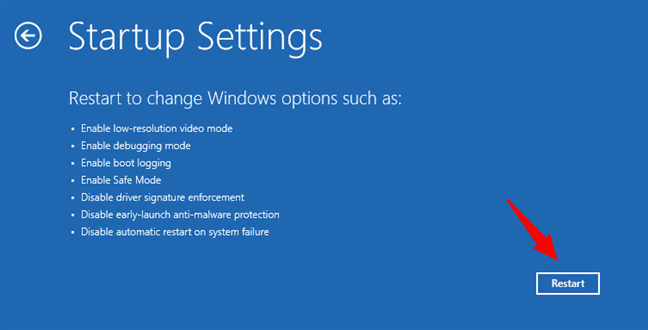
Startup Settings: Choose Restart for Windows 11 Safe Mode options
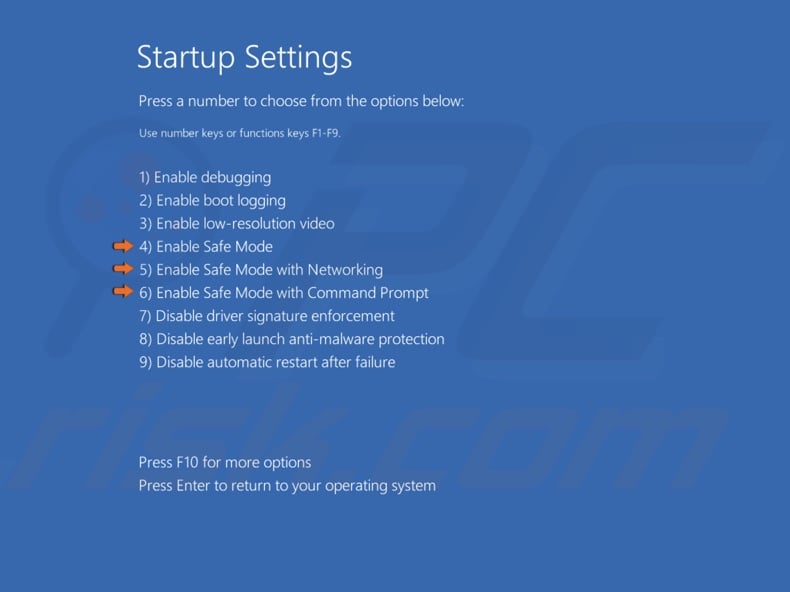
Once Windows 11 restarts, you can select the Startup Settings you want to enable. To enter Windows 11’s Safe Mode, there are three options you can choose from:
- Safe Mode — press 4 or F4 on your keyboard to start Windows 11 in the standard Safe Mode.
- Safe Mode with Networking — press 5 or F5 to enter Safe Mode and load networking drivers and services.
- Safe Mode with Command Prompt — press 6 or F6 to get into Safe Mode and automatically load Command Prompt.

Choose one of the three Safe Mode options for Windows 11
Then, Windows 11 starts in its Safe Mode, and you can log into it using an admin account and start troubleshooting.
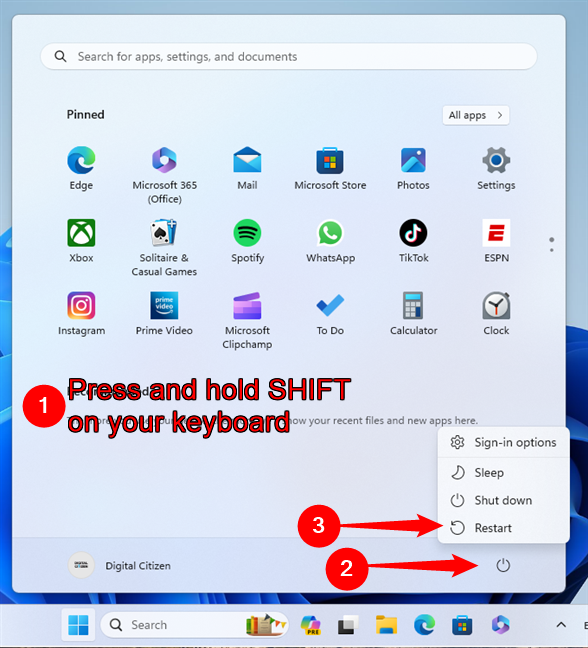
2. How to start Safe Mode in Windows 11 by pressing “Shift + Restart” on the sign-in screen
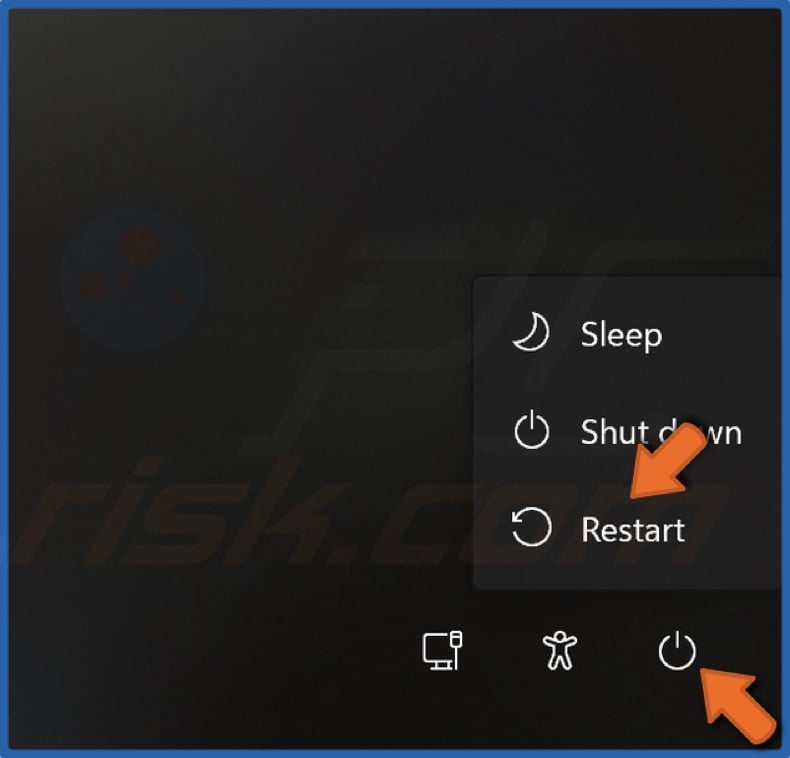
If you can’t log into Windows 11 but your computer or device can reach the sign-in screen, press and hold Shift on your keyboard. While holding down the Shift key, click or tap on the Power button and select Restart in the menu.

How to start Windows 11 in Safe Mode from the Sign In screen
Windows 11 immediately reboots. Then, when it asks you to Choose an option, select Troubleshoot.
Choose Troubleshoot
From here on, follow the same steps as I’ve shown in the first method of this guide. Go to “Advanced options > Startup Settings > Restart” and press 4 or F4 on your keyboard to boot into minimal Safe Mode, 5 or F5 to activate Windows 11’s “Safe Mode with Networking,” and 6 or F6 to enter “Safe Mode with Command Prompt.”

Go to Advanced options > Startup Settings > Restart > Enable Safe Mode
TIP: When you’re done troubleshooting Windows 11, here’s how to exit Safe Mode and boot your PC normally.
3. How to start Windows 11 in Safe Mode using a DVD or USB installation drive and Command Prompt
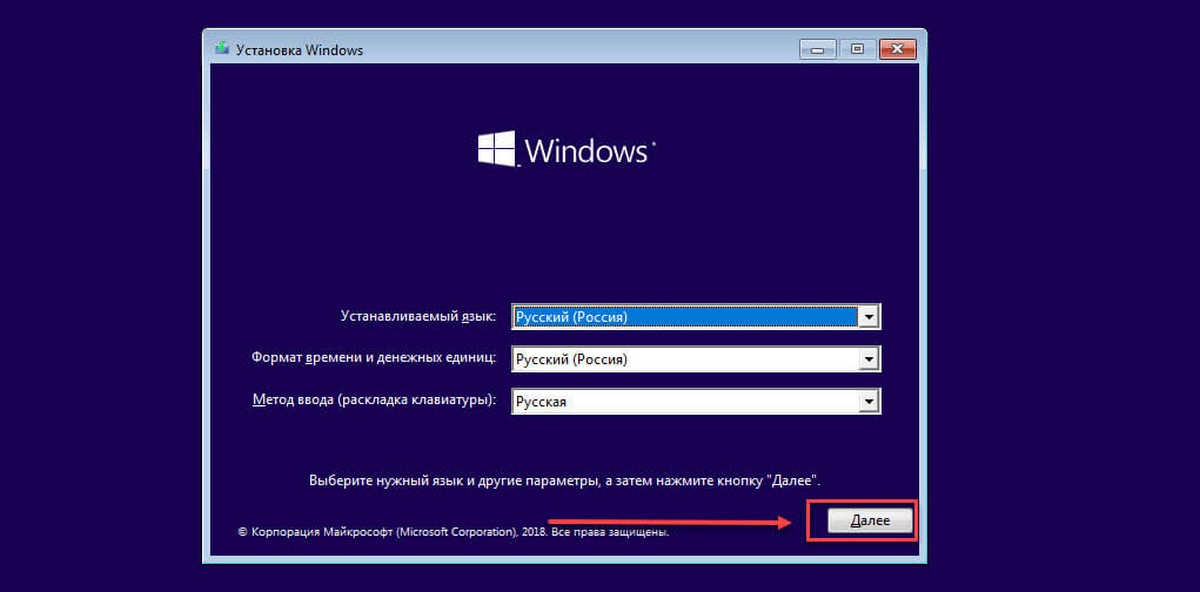
Another way to enter Safe Mode in Windows 11 is by using a USB stick or DVD with the Windows 11 setup. Use the one you already have, or make one now if you can, on another computer. Then, use it to boot your PC, select the language and keyboard layout you prefer, and click or tap Next.
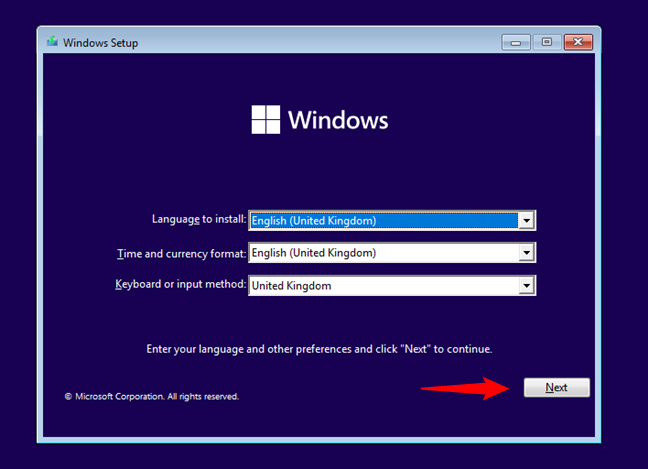
In the Windows 11 Setup, press Next
Next, click or tap the “Repair your computer” link from the bottom-left corner of the Windows Setup window.
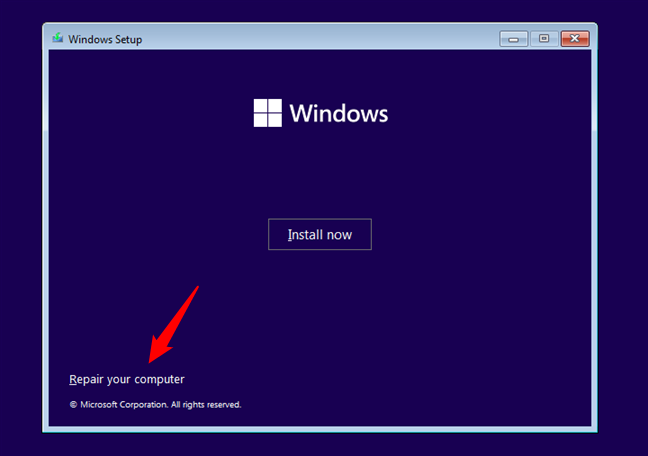
Click or tap Repair your computer
On the “Choose an option” screen, select Troubleshoot.
To get to Windows 11 Safe Mode, select Troubleshoot
On the “Advanced options” screen, choose “Command Prompt (Use the Command Prompt for advanced troubleshooting).”
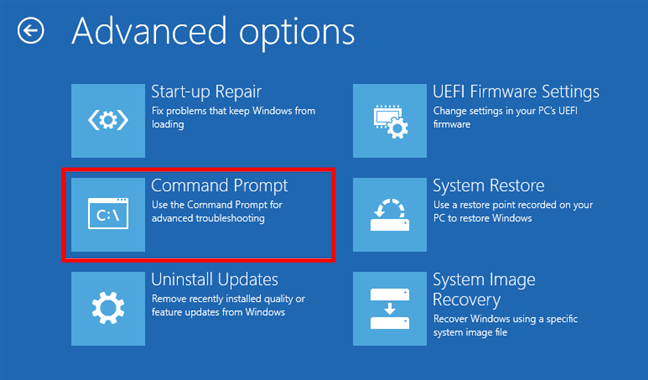
Starting the Command Prompt
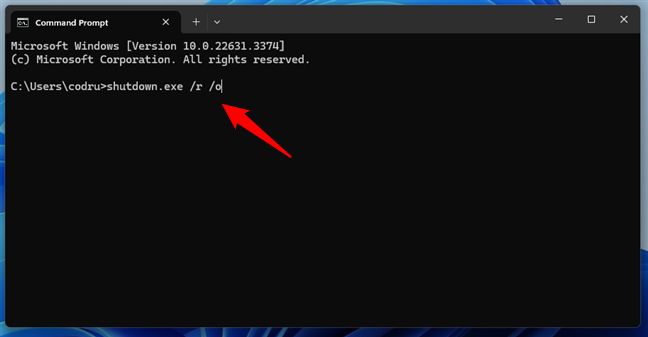
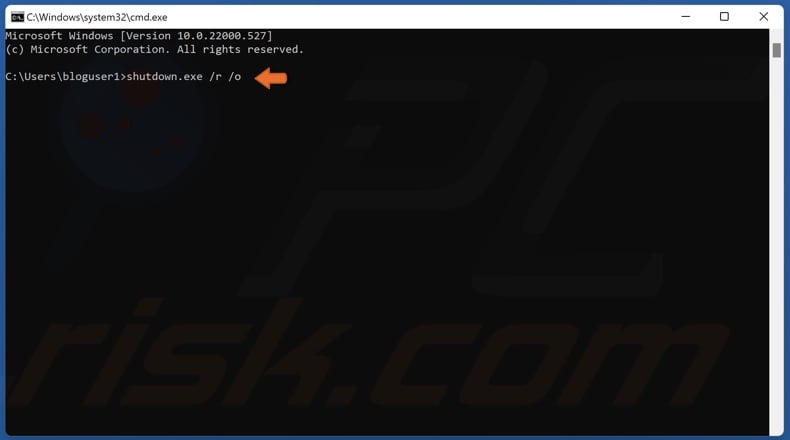
Now comes the most important part: in Command Prompt, run the command:
bcdedit /set {default} safeboot minimal
Press Enter on the keyboard and wait to see the message that “The operation completed successfully.”
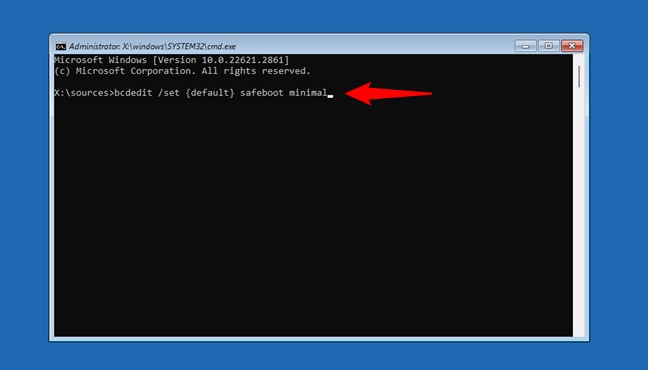
How to boot Windows 11 in Safe Mode from the Command Prompt
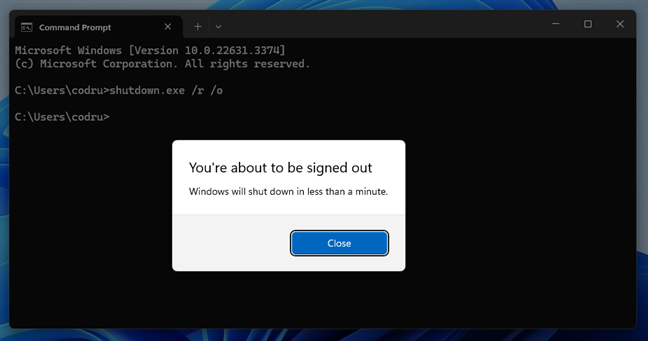
Close the Command Prompt and click or tap the Continue button on the next screen.
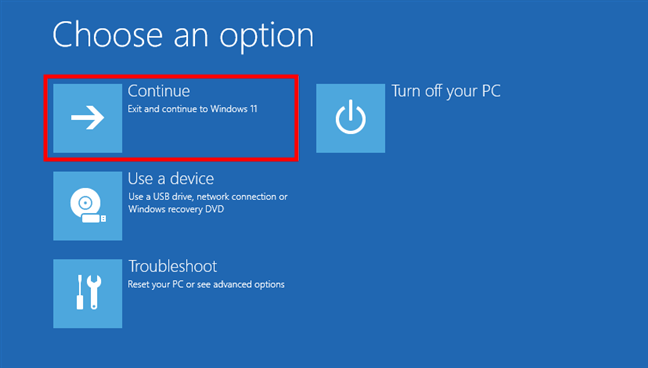
Choose Continue to start Windows 11 in Safe Mode
Wait for your computer or device to restart and watch Windows 11 enter Safe Mode.
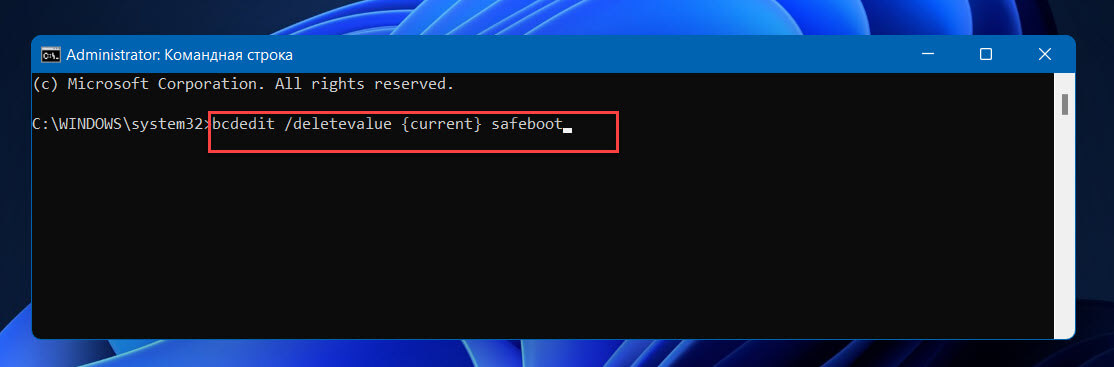
IMPORTANT: If you use this method, Windows 11 will go into Safe Mode each and every time it starts. If you want it to start normally again, you must disable this setting by running this command:
bcdedit /deletevalue {default} safeboot
You can execute it from Windows 11’s Safe Mode, or you can run it following the same steps from this chapter.
4. How to start Windows 11 in Safe Mode from a recovery drive
You can also enter Windows 11’s Safe Mode from a system recovery USB drive. Either use one that you already made or create a USB recovery drive on another Windows 11 PC.
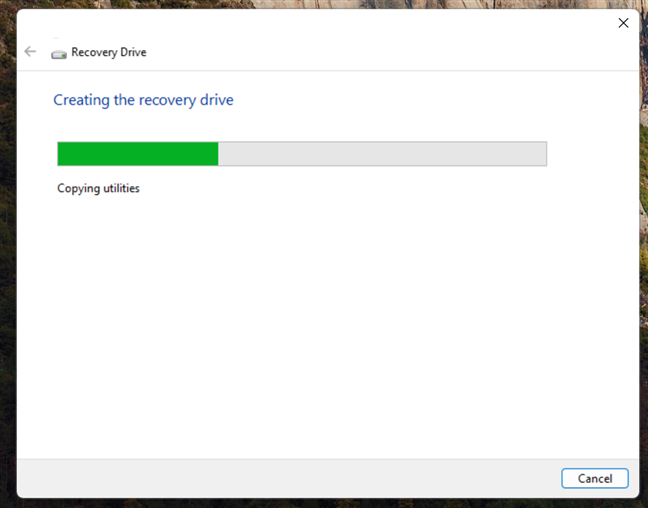
Creating a Windows 11 Recovery Drive
Boot your Windows 11 PC from the USB recovery drive and select the layout for your keyboard.

Choosing the keyboard layout for the recovery drive
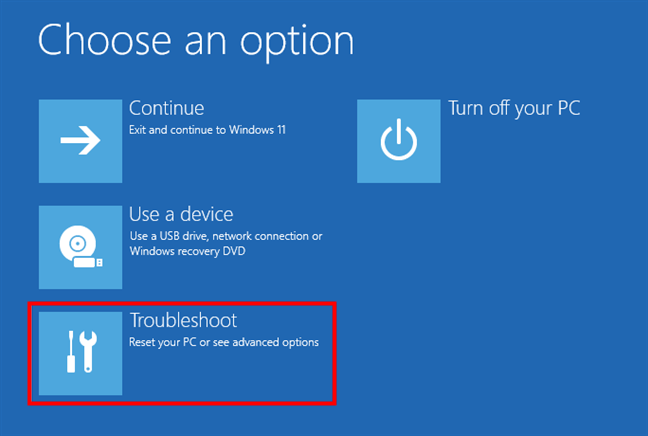
Then, the already familiar “Choose an option” screen loads. On it, click or tap Troubleshoot.

Choose Troubleshoot to get to the Windows 11 Safe Mode options
The next steps are the same ones I presented in the first method from this guide. In short, you have to go to “Advanced options > Startup Settings > Restart” and then press the 4 (F4) key to boot into minimal Safe Mode, 5 (F5) to access “Safe Mode with Networking,” or 6 (F6) to activate Windows 11’s “Safe Mode with Command Prompt.”

Go to Advanced options > Startup Settings > Restart > Enable Safe Mode
How to boot into Safe Mode when you can log in to Windows 11
Do you want to start your Windows 11 in Safe Mode and you’re already logged in with your user account? Just follow the simple steps in any of the next methods, and you’ll be on your way to troubleshooting your PC in no time:
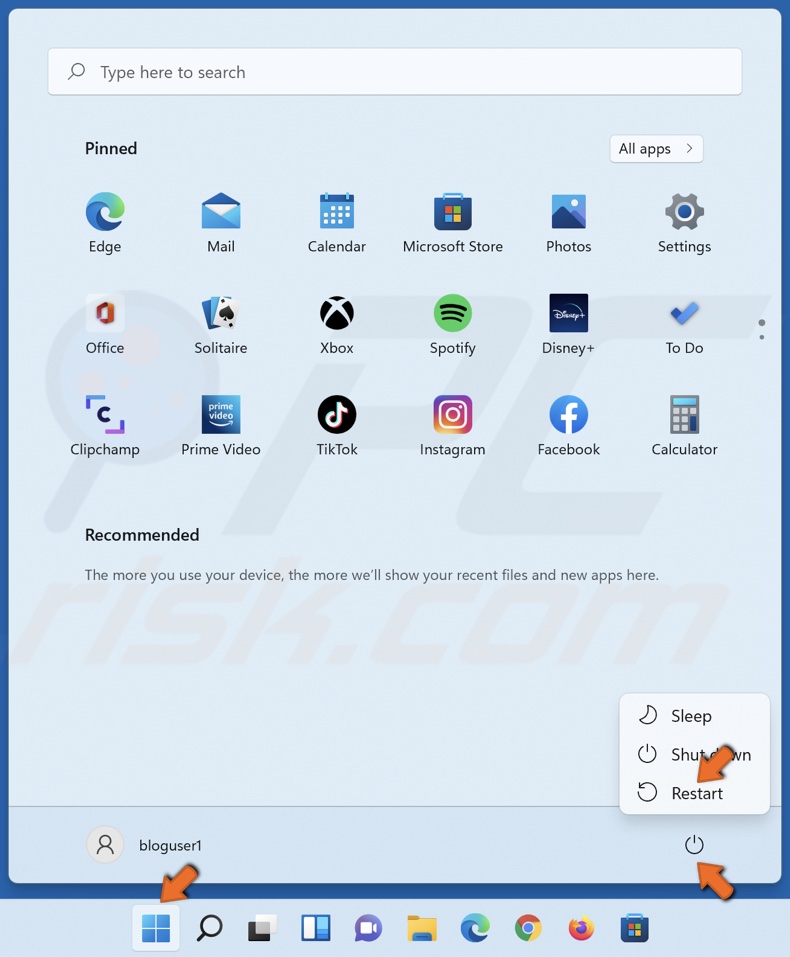
5. How to start Windows 11 in Safe Mode by pressing “Shift + Restart” on the Start Menu
One other way to enter Safe Mode in Windows 11 is available from the Start Menu. While pressing the Shift key on your keyboard, click the Start button, then Power, and then Restart.
How to start Windows 11 in Safe Mode from the Start Menu
Windows 11 restarts and loads the “Choose an option” screen. Select Troubleshoot.
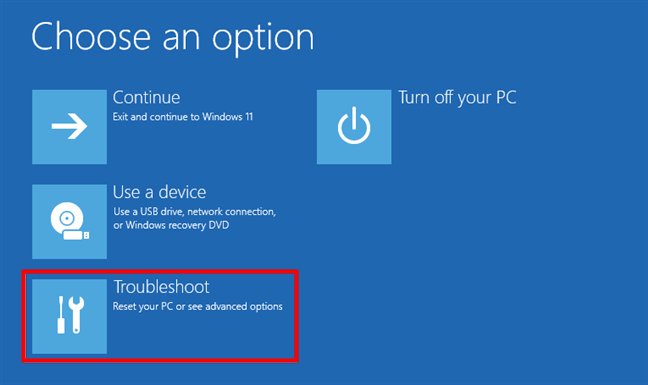
Click or tap on Troubleshoot to get to the Safe Mode settings
Next, take the same steps shown in this guide’s first method. Go to “Advanced options -> Startup Settings -> Restart,” and press 4/F4 on your keyboard to start in Safe Mode, 5/F5 to boot into “Safe Mode with Networking,” or 6/F6 to go into “Safe Mode with Command Prompt.”