
Для установки Windows 11 (или при обновлении с Windows 10), ваш компьютер должен соответствовать определённом минимальным системам требованиям: наличие чипа TPM 2.0 (Trusted Platform Module), режим UEFI + Secure Boot, 4 Гб RAM, 64 Гб диск и совместимый двухъядерный процессор 1 ГГц (не все процессоры поддерживаются!). Microsoft ограничивает установку Windows 11 на несовместимые компьютеры, выполняя проверку на соответствие системным требования перед началом установки Windows. В этой статье мы покажем, как установить Windows 11 на несовместимые устройства без проверки требований к CPU, TPM, Secure Boot (и т.д.)
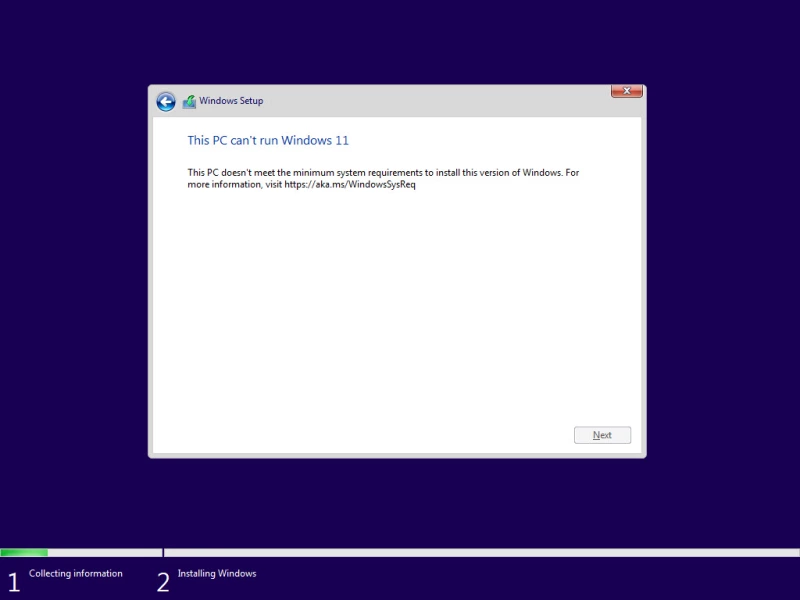
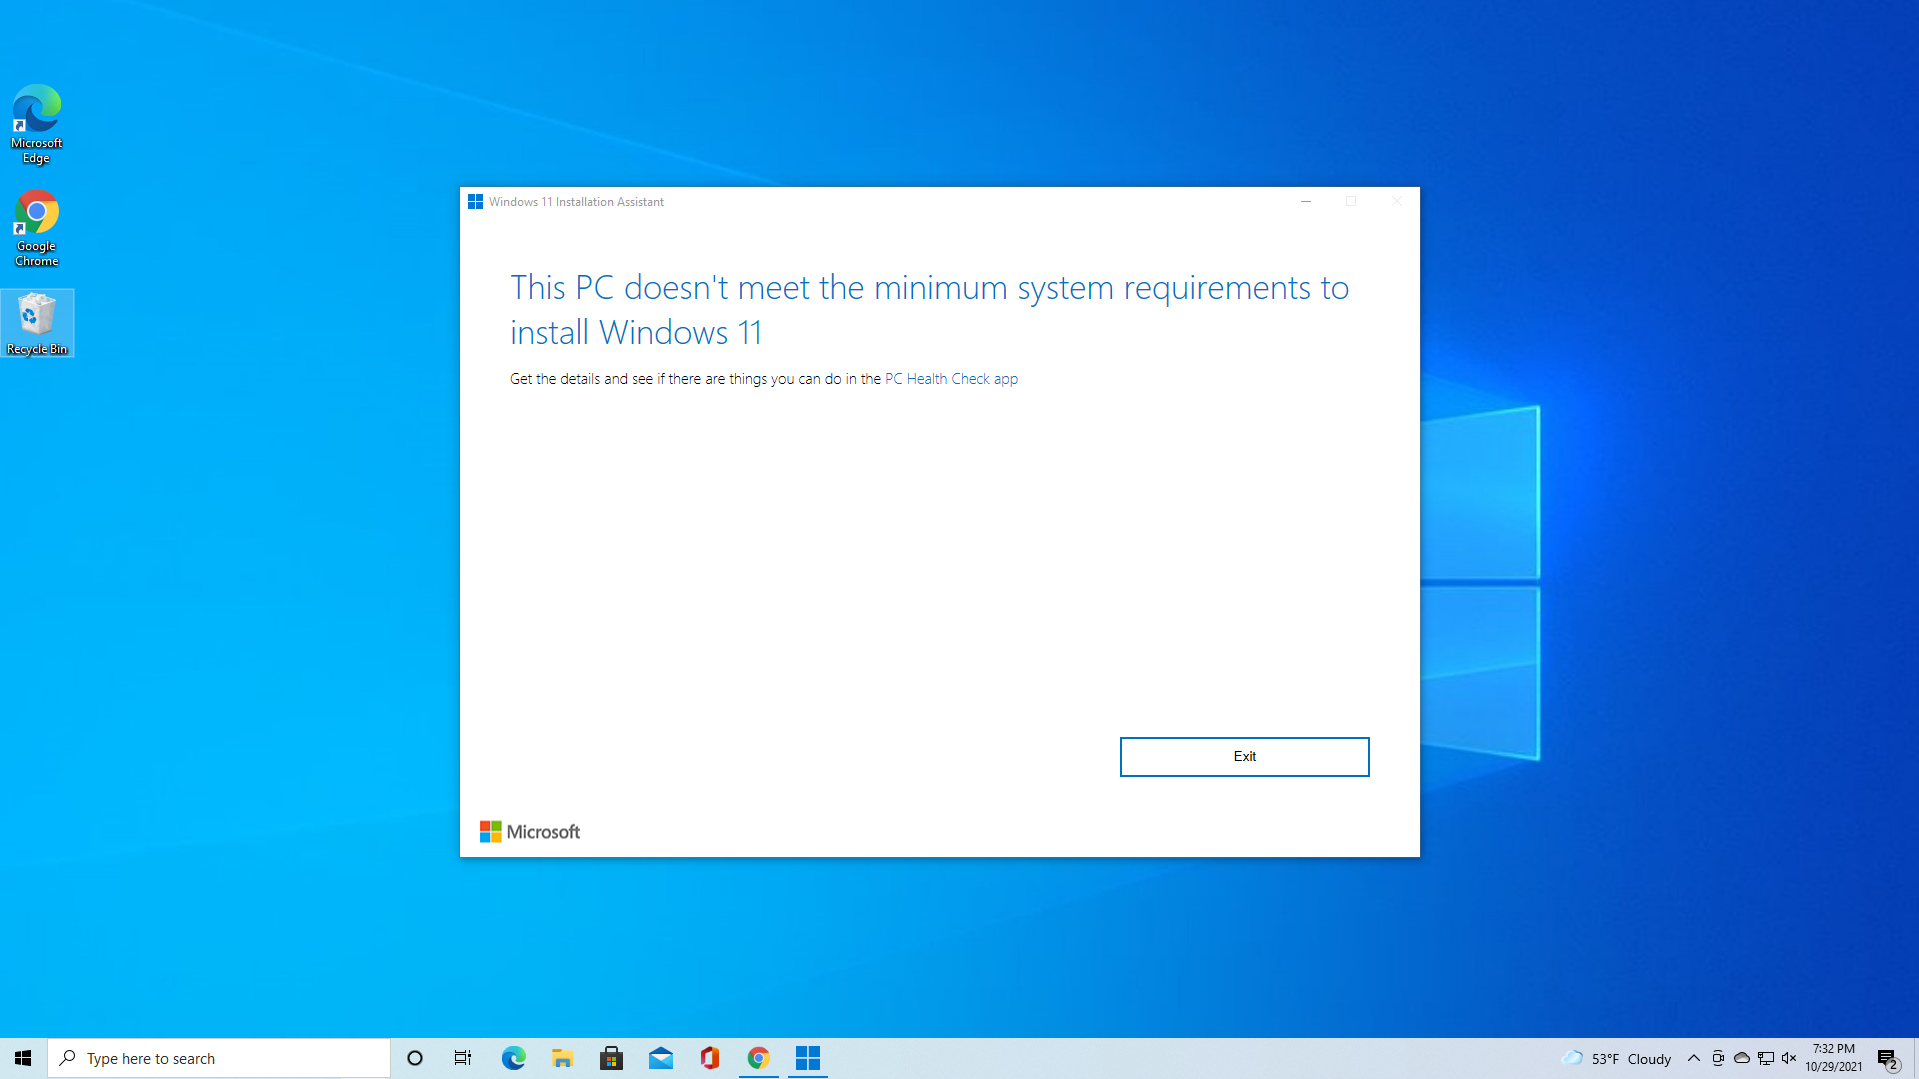
Если компьютер не соответствует минимальным требованиям для Windows 11, то при установке ОС появится ошибка:
Запуск Windows 11 на этом компьютере не возможен
. Этот компьютер не соответствует минимальным требованиям к системе для установки этой версии Windows. Дополнительные сведения см. на сайте aka.ms/WindowsSysReq
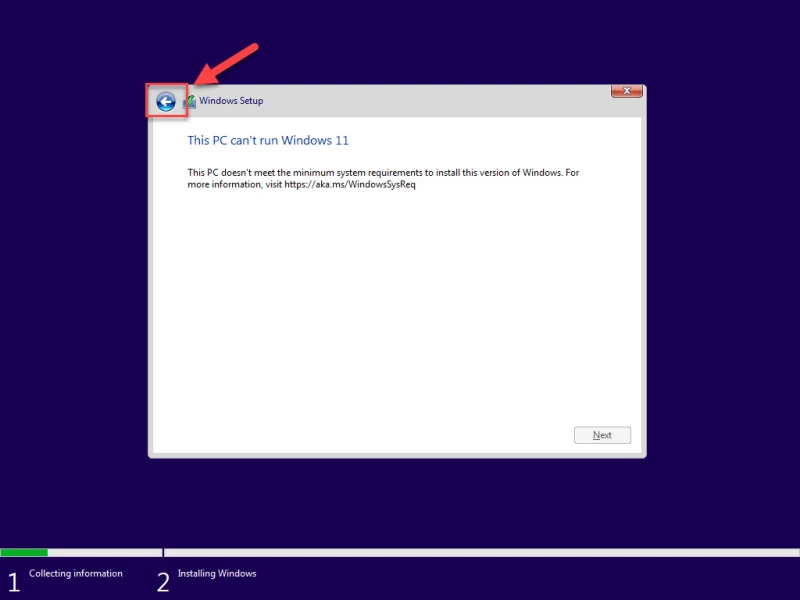
This PC can’t run Windows 11
. This PC doesn’t meet the minimum system requirements to install this version of Windows. For more information, visit aka.ms/WindowsSysReq<
Чтобы понять, каким конкретно требованиям не соответствует вашим компьютер, нужно изучить лог ошибок установки Windows 11 setuperr.log. В этом файле содержаться только ошибки установки Windows (полный лог установки находится в файле setupact.log, но изучать его сложно из-за большого объема).
Чтобы открыть файл лога ошибок установки Windows, откройте командную строку прямо на экране установки, нажав
Shift + F10
и выполните команду:
notepad x:\windows\panther\setuperr.log
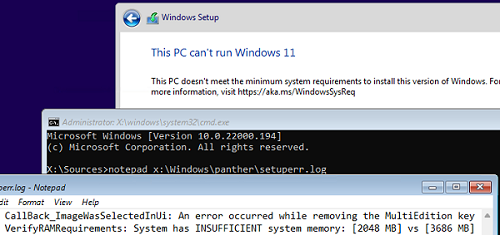
В нашем случае ошибка говорит, что на компьютере недостаточно оперативной памяти (всего 2 Гб вместо 3).
2021-11-11 10:57:51, Error VerifyRAMRequirements: System has INSUFFICIENT system memory: [2048 MB] vs [3686 MB]
Обратите внимание, что если ваш компьютер не соответствует нескольким системным требованиям для установки Windows, то в логе будет указана только первая из причин. Т.е. если вы исправили (или пропустили) одну из ошибок несовместимости, то при следующем запуске установки Windows 11 в логе будет содержаться следующая ошибка совместимости.
После того, как мы добавили RAM появилась другая ошибка:
2021-11-11 11:13:37, Error VerifyTPMSupported:Tbsi_GetDeviceInfo function failed - 0x8028400f[gle=0x0000007a]
Т.е. установщик определил, что на компьютере отсутствует TPM чип.
Если вы устанавливаете Windows 11 в виртуальную машину VMWare, вы можете добавить виртуальный TPM чип в соответствии с этой статьей. Для Hyper-V используется другая инструкция.
Однако вы можете продолжить установку Windows 11, просто игнорировал одно или все требования совместимости.
Для этого нужно в командной строке на экране установки Windows 11:
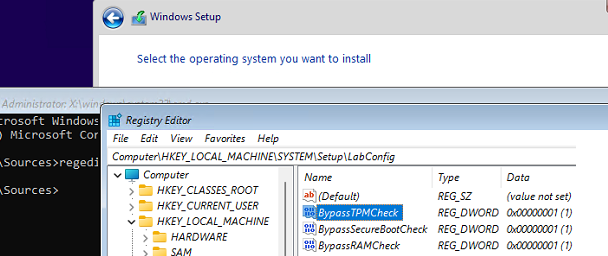
- Запустить редактор реестра
regedit.exe
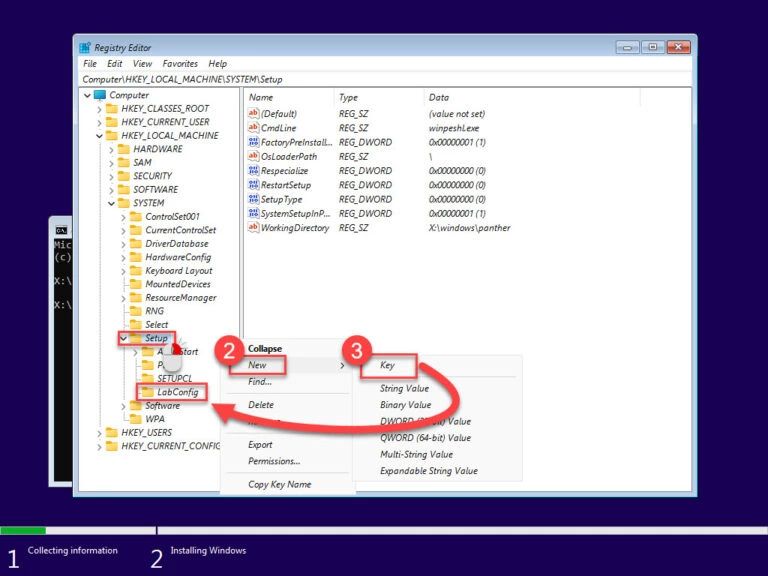
; - Перейти в раздел HKEY_LOCAL_MACHINE\SYSTEM\Setup и создать новую ветку с именем LabConfig;
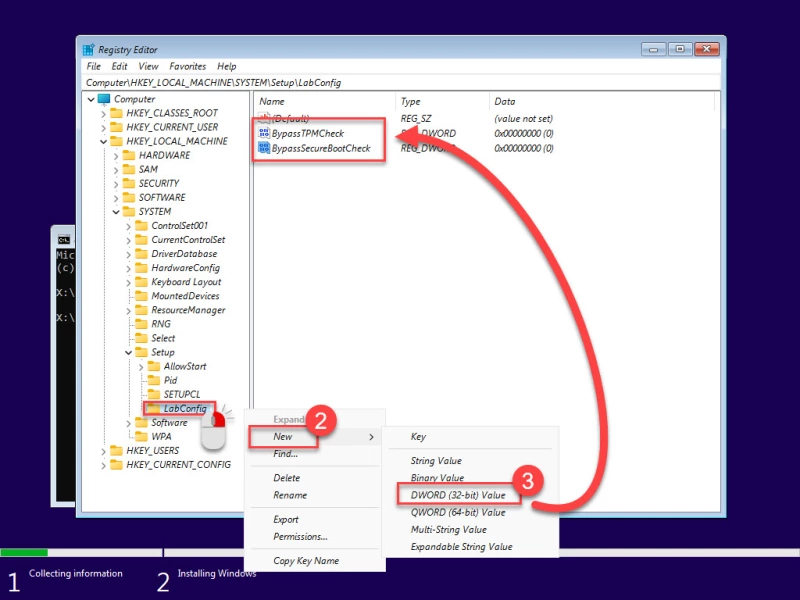
- В этой ветке нужно создать DWORD параметры со значением 1 для тех проверок совместимости, которые вы хотите пропустить при установке
Доступны следующие параметры, позволяющие установить Windows 11 на устройства:
-
BypassCPUCheck
– с несовместимыми процессорами; -
BypassTPMCheck
– без чипа TPM 2; -
BypassRAMCheck
– не проверять минимальное количество RAM -
BypassSecureBootCheck
–с Legacy BIOS (или UEFI с отключенным Secure Boot) -
BypassStorageCheck
– не проверять размер системного диска
Например, чтобы не проверять наличие TPM модуля при установке, нудно создать параметр реестра BypassTPMCheck со значением 1. Параметр можно создать с помощью графического редактора реестра или с помощью команды:
reg add HKLM\SYSTEM\Setup\LabConfig /v BypassTPMCheck /t REG_DWORD /d 1
Аналогичным образом нужно создать другие параметры для проверок, который вы хотите пропустить при установке Windows 11.
Затем вернитесь в окно установки Window 11, вернитесь на шаг назад и продолжите обычную установки без проверки совместимости.
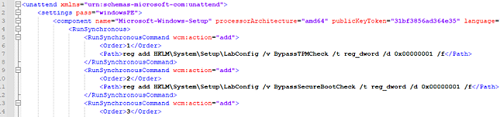
Вы можете модифицировать установочный ISO образ Windows 11, чтобы все эти проверки TPM, SecureBoot, диск, память, CPU) пропускались автоматически при установке ОС.
Для этого создайте текстовый файл AutoUnattend.xml со следующим содержимым:
<unattend xmlns="urn:schemas-microsoft-com:unattend">
<settings pass="windowsPE">
<component name="Microsoft-Windows-Setup" processorArchitecture="amd64" publicKeyToken="31bf3856ad364e35" language="neutral" versionScope="nonSxS" xmlns:wcm="http://schemas.microsoft.com/WMIConfig/2002/State" xmlns:xsi="http://www.w3.org/2001/XMLSchema-instance">
<RunSynchronous>
<RunSynchronousCommand wcm:action="add">
<Order>1</Order>
<Path>reg add HKLM\System\Setup\LabConfig /v BypassTPMCheck /t reg_dword /d 0x00000001 /f</Path>
</RunSynchronousCommand>
<RunSynchronousCommand wcm:action="add">
<Order>2</Order>
<Path>reg add HKLM\System\Setup\LabConfig /v BypassSecureBootCheck /t reg_dword /d 0x00000001 /f</Path>
</RunSynchronousCommand>
<RunSynchronousCommand wcm:action="add">
<Order>3</Order>
<Path>reg add HKLM\System\Setup\LabConfig /v BypassRAMCheck /t reg_dword /d 0x00000001 /f</Path>
</RunSynchronousCommand>
<RunSynchronousCommand wcm:action="add">
 <Order>5</Order>
<Path>reg add HKLM\System\Setup\LabConfig /v BypassCPUCheck /t reg_dword /d 0x00000001 /f</Path>
</RunSynchronousCommand>
<RunSynchronousCommand wcm:action="add">
<Order>4</Order>
<Path>reg add HKLM\System\Setup\LabConfig /v BypassStorageCheck /t reg_dword /d 0x00000001 /f</Path>
</RunSynchronousCommand>
</RunSynchronous>
<UserData>
<ProductKey>
<Key></Key>
</ProductKey>
</UserData>
</component>
</settings>
</unattend>
Если вы хотите отключить экран создания онлайн аккаунта Microsoft при установке Windows 11, добавьте в файл следующий секцию компонента:
<component name="Microsoft-Windows-Shell-Setup" processorArchitecture="amd64" publicKeyToken="31bf3856ad364e35" language="neutral" versionScope="nonSxS" xmlns:wcm="http://schemas.microsoft.com/WMIConfig/2002/State" xmlns:xsi="http://www.w3.org/2001/XMLSchema-instance">
<OOBE>
<HideOnlineAccountScreens>true</HideOnlineAccountScreens>
<HideWirelessSetupInOOBE>true</HideWirelessSetupInOOBE>
<ProtectYourPC>3</ProtectYourPC>
</OOBE>
</component>
Скопируйте данный файл в корень установочной USB флешки с Windows 11.
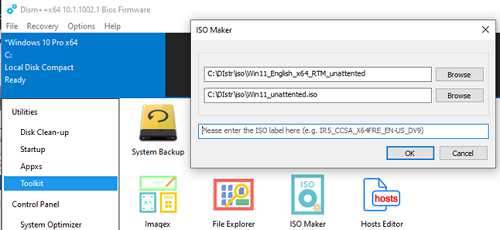
Если вам нужно добавить файл ответов в ISO образ Windows 11, распаккуйте его содержимое в любую папку на компьютере, скопируйте в этот каталог файл AutoUnattend.xml и пересоберите ISO образ.
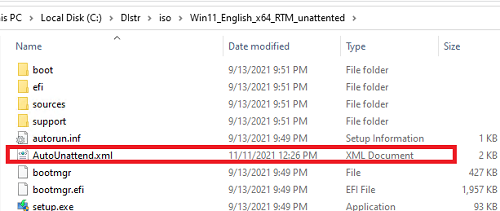
Я использовал для создания образа бесплатную утилиту DISM++ (Toolkit -> ISO maker).
Теперь никакие проверки совместимости не будут производится при установке Windows 11.
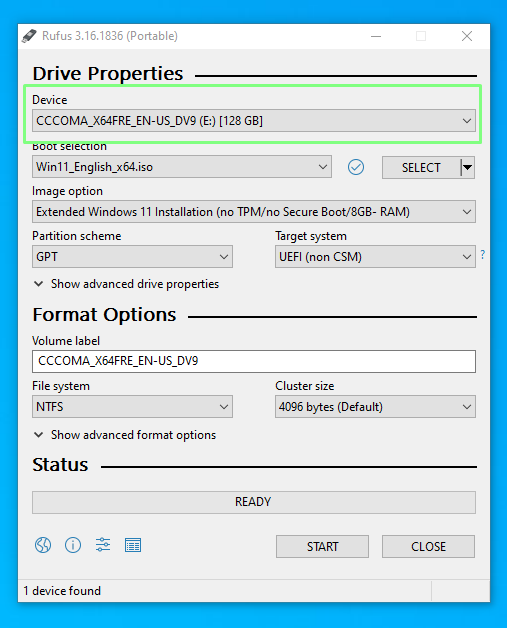
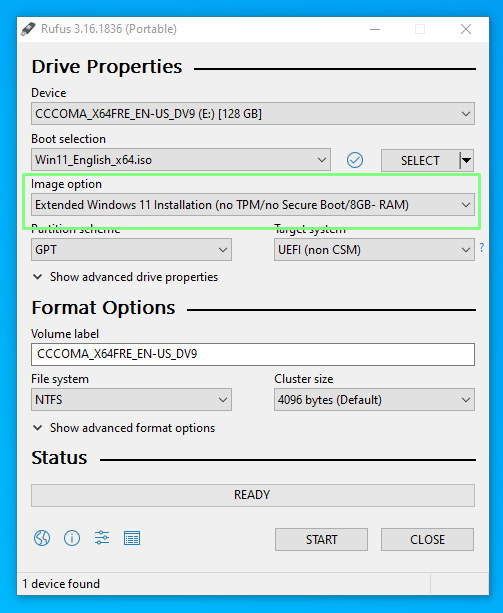
В новой версии утилиты Rufus, использующейся для создания загрузочных USB флешек, появилась специальная опция Extended Windows 11 Installation (no TPM/no Secure Boot/8Gb- RAM). Данная опция позволяет создать образ для установки Windows 11 без проверки TPM и Secure Boot:

При выпуске оригинальной версии Windows 11 компания Microsoft установила весьма специфические системные требования, которые должны быть выполнены для установки или обновления до Windows 11 с любой предыдущей ОС. Эти требования включают TPM 2.0, Secure Boot, 4 ГБ оперативной памяти, минимум 2 ядра процессора и т.д. Однако не каждый компьютер может соответствовать этим требованиям, особенно если вы ограничены в бюджете.
Бывают случаи, когда вы хотите установить последнюю версию Windows 11, например Windows 11 23H2, но не можете ее установить, поскольку ваше оборудование не соответствует требованиям ОС. Если вы столкнулись с подобной дилеммой, то сообщаем вам, что существуют методы установки Windows 11 версии 23H2 в обход специфических аппаратных требований Windows 11.
При этом новые требования к Windows призваны повысить безопасность систем в связи с участившимися кибератаками. Однако не каждый ПК можно или нужно модернизировать в соответствии с этими требованиями.
Интересно: Microsoft предлагает новый макет меню Пуск в Windows 11, вдохновленный библиотекой приложений iOS
Системные требования Windows 11 23H2
Windows 11 23H2 имеет те же системные требования, что и оригинальный выпуск. Прежде чем планировать обновление текущей ОС до Windows 11 23H2, рекомендуется проверить, поддерживает ли оборудование эту ОС по умолчанию, или необходимо обойти требования.
Ниже приведен список основных системных требований Windows 11 23H2:
- Процессор: 1 ГГц или более быстрый CPU или система на кристалле (SoC) с двумя и более ядрами.
- ОЗУ: Не менее 4 ГБ.
- Жесткий диск: 64 ГБ или более.
- Прошивка системы: UEFI, с поддержкой Secure Boot.
- ТПМ: Модуль доверенной платформы (TPM) версии 2.0.
- Графика: Совместимость с DirectX 12 или более поздней версией с драйвером WDDM 2.0.
- Разрешение экрана: Дисплей высокой четкости (720p) с диагональю более 9″, 8 бит на цветовой канал.
- Сеть: Учетная запись Microsoft и подключение к Интернету.
Эти спецификации означают, что не все компьютеры смогут установить Windows 11 23H2 в исходном виде. Придется либо перепрошивать ее, либо обновлять аппаратное обеспечение, либо обходить эти требования. Последний вариант представляется более предпочтительным, если у вас нет бюджета на модернизацию оборудования, а безопасность системы не является вашей главной заботой.
Проверка наличия TPM 2.0
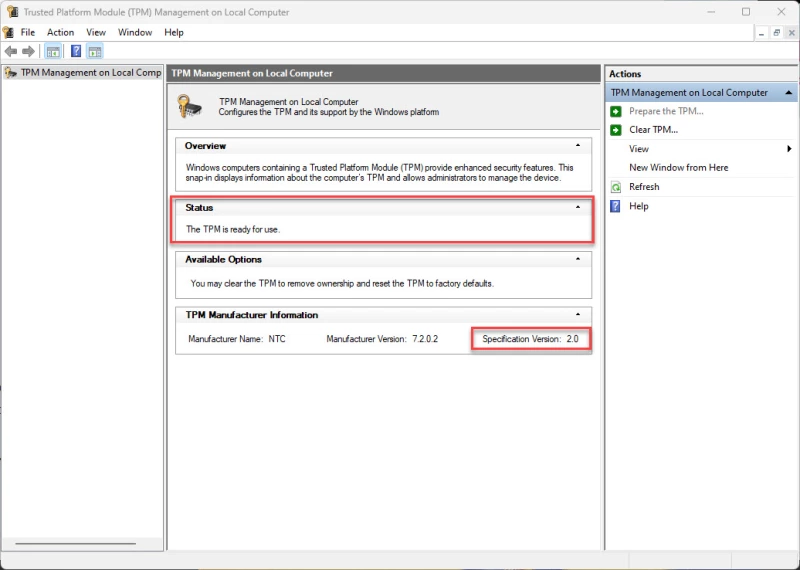
Начните с проверки наличия или отсутствия в компьютере чипсета TPM 2.0, выполнив следующие действия:
- Нажмите Win + R, чтобы открыть окно Run Command.
- Введите «tpm.msc» и нажмите Enter чтобы открыть консоль управления TPM.
- Здесь найдите статус TPM в разделе Status _. Вы также найдете его версию в разделе _TPM Manufacturer Information.

Если в Status написано «TPM готов к использованию», это означает, что он доступен и включен. Если же в Status написано «Compatible TPM cannot be found», это означает, что либо TPM недоступен, либо присутствует, но отключен в настройках BIOS/прошивки UEFI.
Узнайте другие способы проверк TPM.
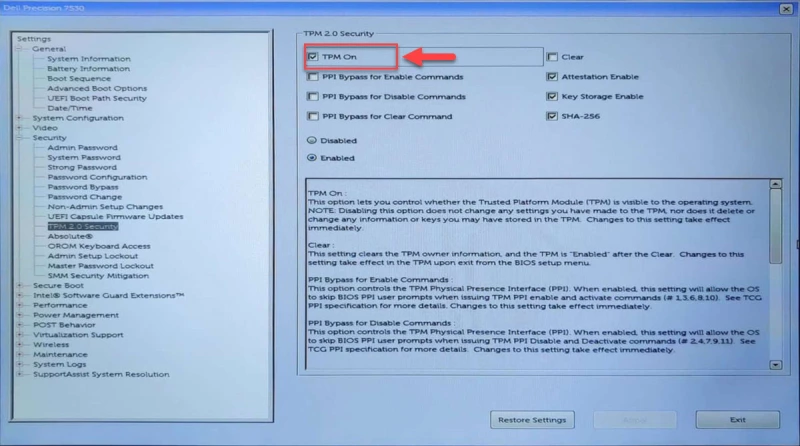
Включить TPM
Если TPM отключен, необходимо включить его в настройках UEFI. Вот как это делается:
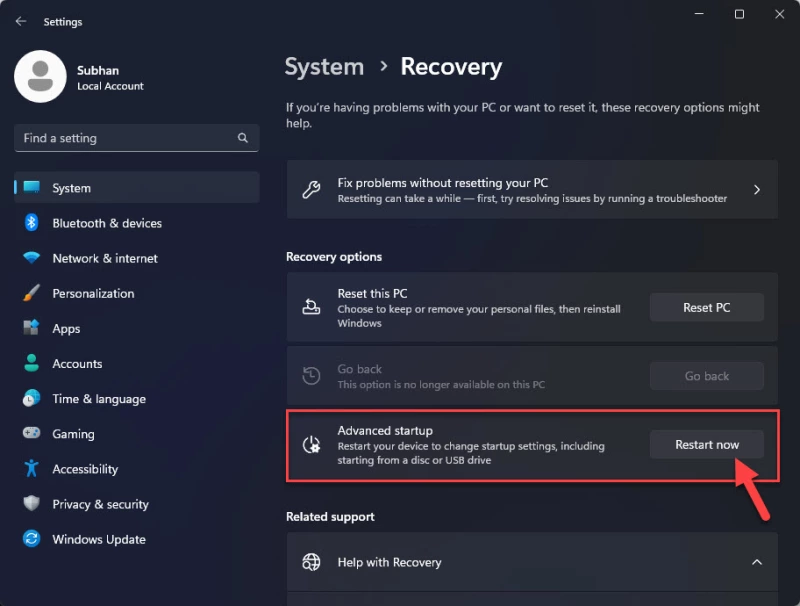
- Нажмите клавишу Win + i, чтобы открыть приложение настроек Windows.
- Перейдите к следующему:
System >> Recovery
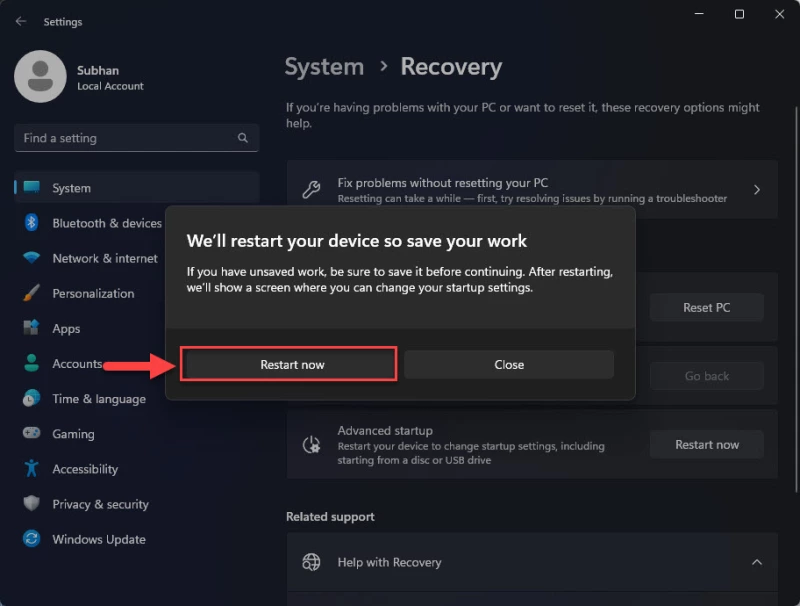
- Нажмите «Перезагрузить сейчас» перед «Дополнительный запуск».

- Во всплывающем окне подтверждения снова нажмите «Перезагрузить сейчас».
Компьютер включится и загрузится в среду восстановления Windows (WinRE).
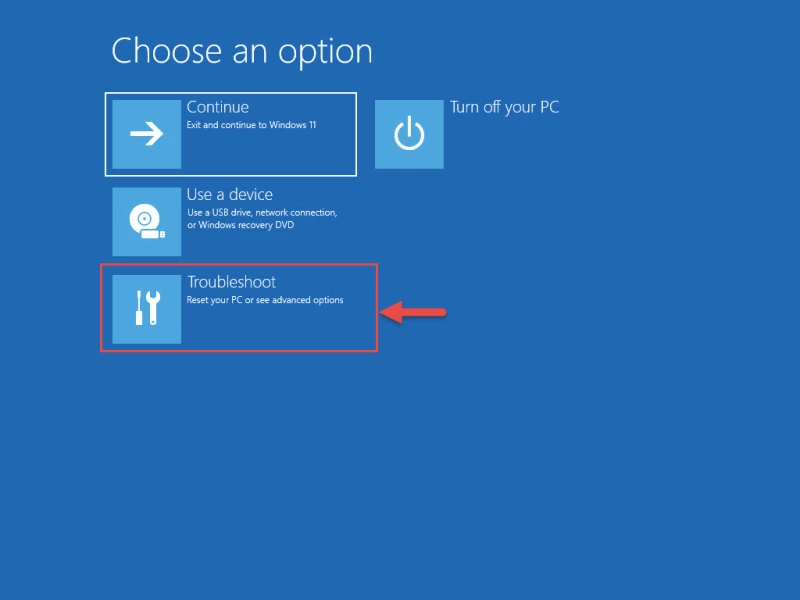
- Нажмите Troubleshoot.

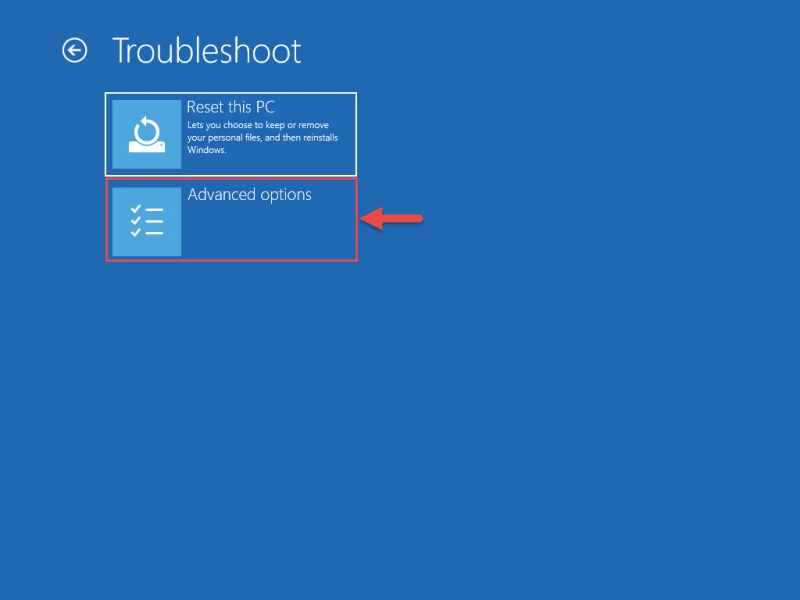
- Затем нажмите «Advanced options.»
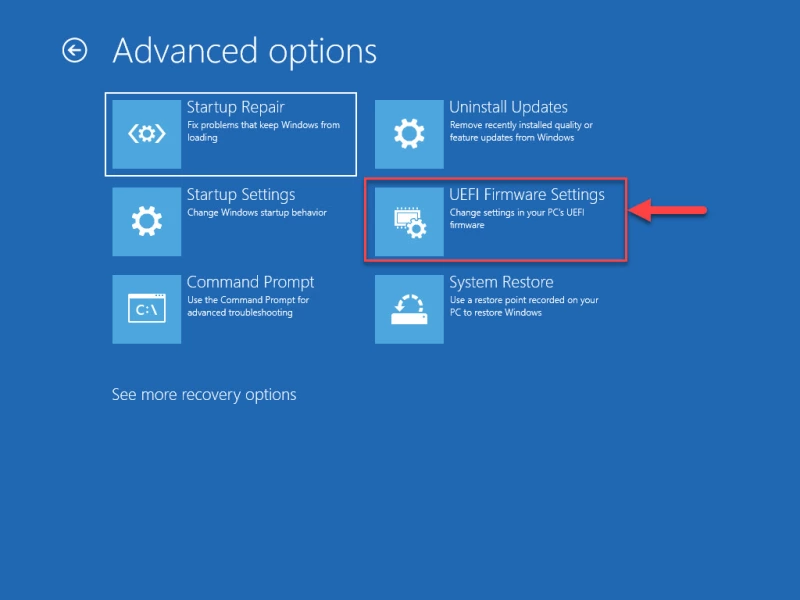
- Нажмите «UEFI Firmware Settings.»
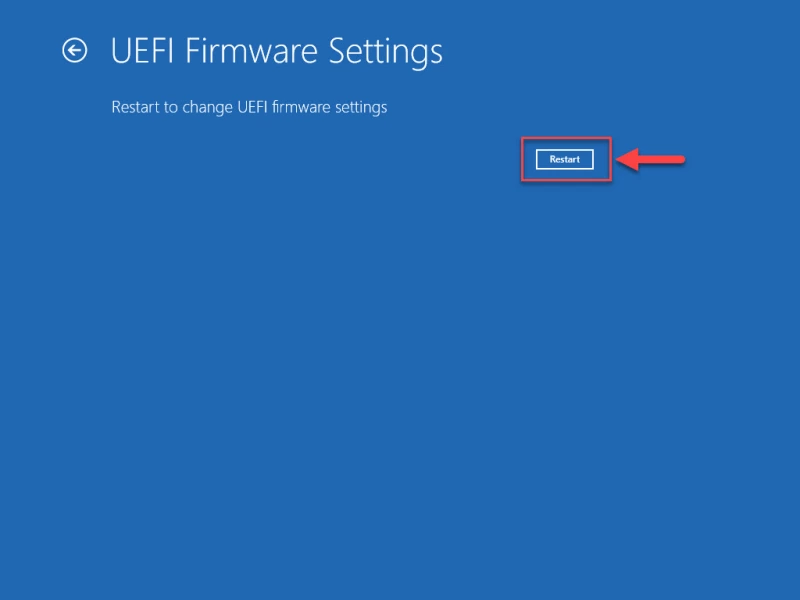
- Теперь нажмите Restart.
Компьютер снова перезагрузится.
- Теперь перейдите к настройкам Advanced, Security или Boot. Они зависят от типа материнской платы.
- Выберите опцию TPM 2.0 и выберите опции «Enabled» и «TPM On».

Если вы обнаружили, что опция TPM 2.0 отсутствует или не может быть включена, то, скорее всего, она недоступна на вашей материнской плате. Однако если проблема заключается в чем-то другом, попробуйте воспользоваться следующими методами устранения неисправностей TPM.
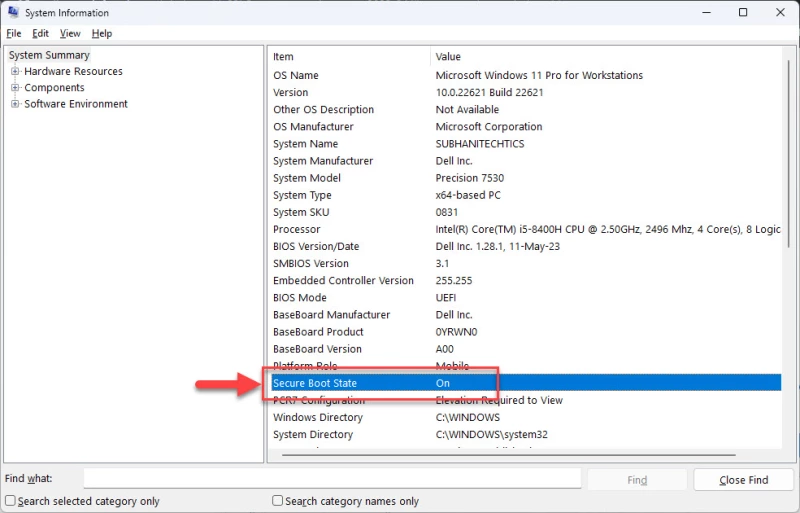
Проверка наличия Secure Boot
Другим обязательным требованием является Secure Boot. Проверьте, включена ли Secure Boot, выполнив следующие действия:
- Нажмите Win + R, чтобы открыть окно Run Command.
- Введите «msinfo23» и нажмите Enter.
- На вкладке System Summary проверьте наличие информации перед строкой «Secure Boot State».

Если Secure Boot выключен или отключен, его можно включить в настройках UEFI Firmware так же, как и TPM 2.0, описанным выше способом.
Если вы убедились, что и TPM 2.0, и Secure Boot доступны и включены, только тогда можно переходить к установке Windows 11 23H2 обычными методами. Если же ни одна из опций не доступна или не включена, то необходимо установить Windows 11 23H2 в обход системных требований, используя описанные ниже методы.
Установка Windows 11 23H2 на неподдерживаемое оборудование
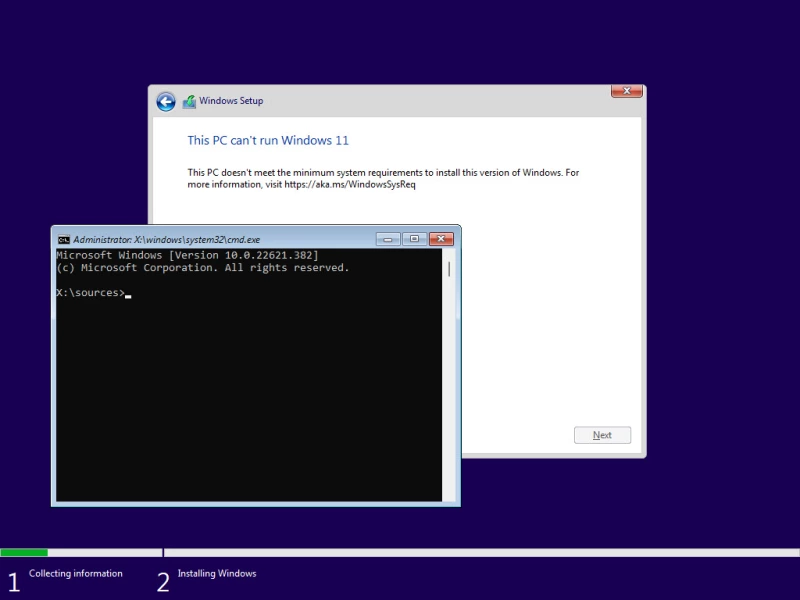
Если попытаться установить Windows 11 23H2 или любую другую версию Windows 11 на компьютер, не соответствующий системным требованиям, то установить или перейти на нее обычными методами не удастся. Вместо этого при попытке установки появится сообщение об ошибке, подобное следующему:
This PC can't run Windows 11 This PC doesn't meet the minimum system requirments to install this version of Windows.
В этом случае можно выполнить одно из следующих решений, чтобы обойти эти системные требования и продолжить установку Windows 11 23H2 без обновления оборудования
Обход ограничений на установку Windows 11 23H2
Обход требований TPM и Secure Boot из реестра Windows
Чтобы обойти системные требования TPM 2.0 и Secure Boot при установке Windows 11 23H2, выполните следующие действия:
- Начните с загрузки Windows 11 23H2 ISO.
- Продолжите создание загрузочного USB-накопителя или используйте Ventoy для создания мультизагрузочного USB-накопителя.
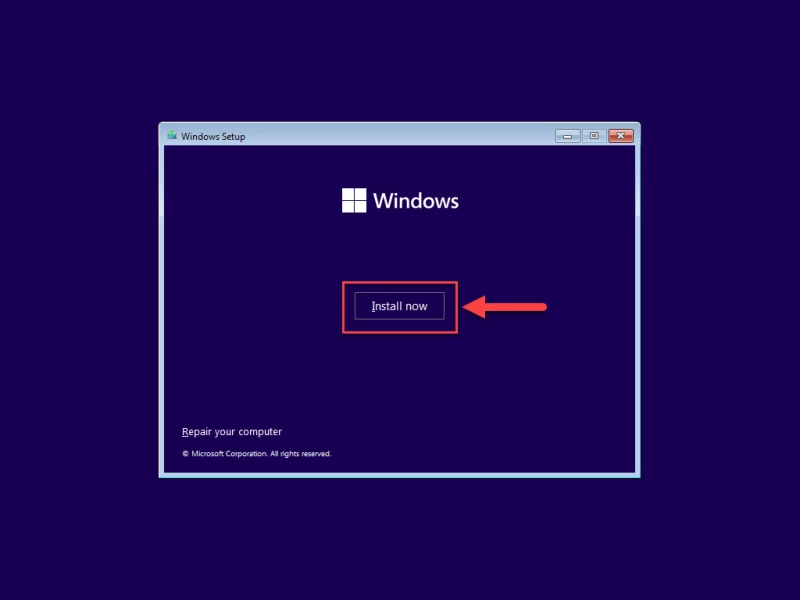
- Загрузитесь с загрузочного USB-накопителя и нажмите кнопку Next на первом экране установки Windows.
- Нажмите «Установить сейчас.»
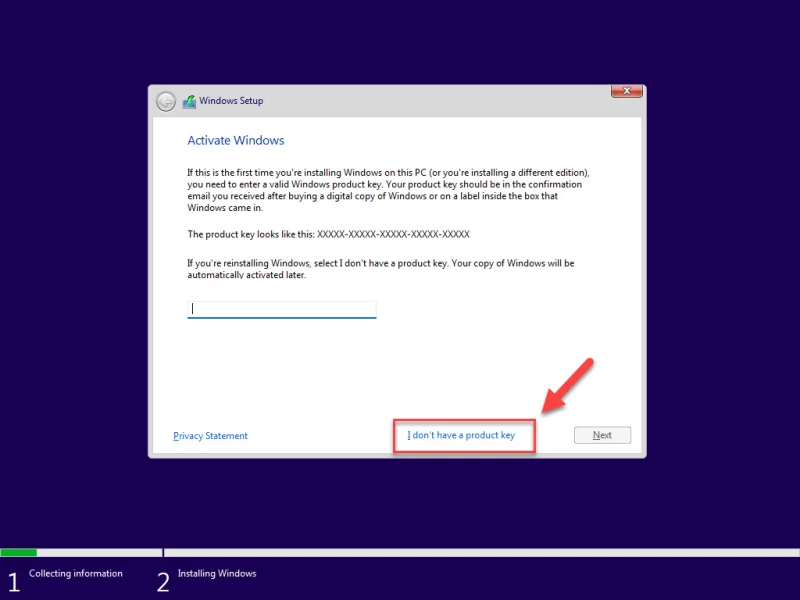
- Нажмите «У меня нет ключа продукта.«Даже если у вас есть ключ продукта, вы можете использовать его для активации Windows позже.
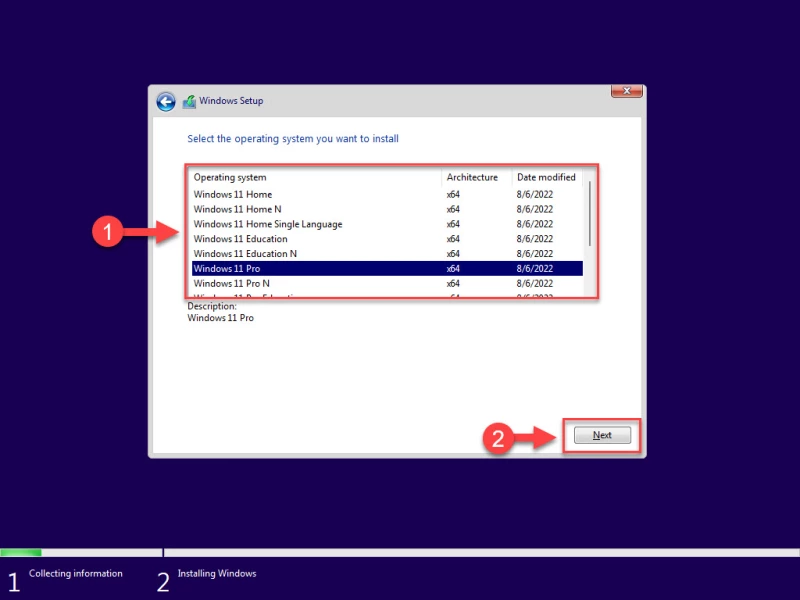
- Выберите одну из редакций Windows и нажмите Next.
- На экране ошибок одновременно нажмите клавиши Shift + F10, чтобы открыть Командную строку.
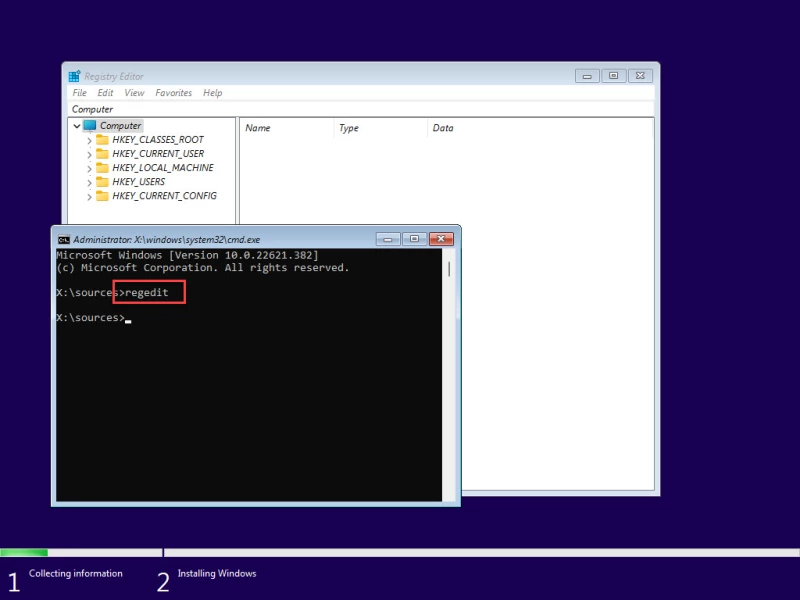
- Введите «regedit» и нажмите Enter, чтобы открыть редактор реестра.
- В редакторе реестра перейдите к следующему пути из левой панели:
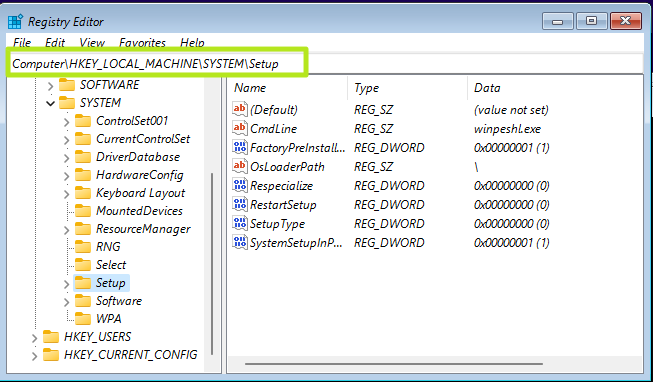
Computer\HKEY_LOCAL_MACHINE\SYSTEM\Setup
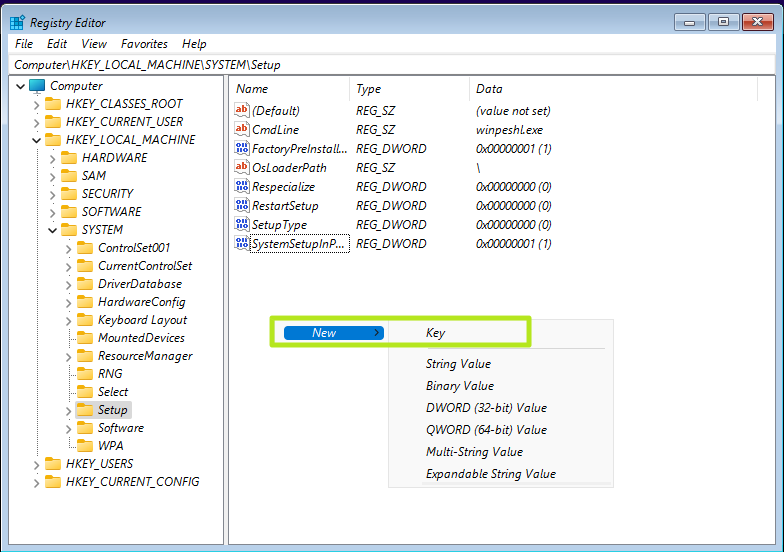
- Щелкните правой кнопкой мыши «Setup», разверните New и выберите Key. Назовите этот ключ «LabConfig.»

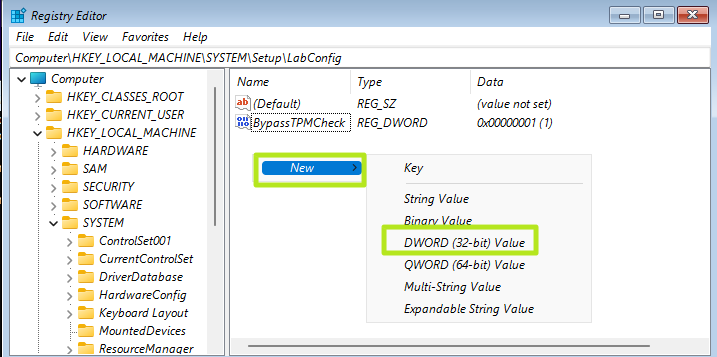
- Щелкните правой кнопкой мыши «LabConfig», разверните New и выберите «DWORD (32-bit) Value». Назовите этот DWORD «BypassTPMCheck».
- Повторите все действия еще раз и создайте еще один DWORD в ключе LabConfig с именем «BypassSecureBootCheck».
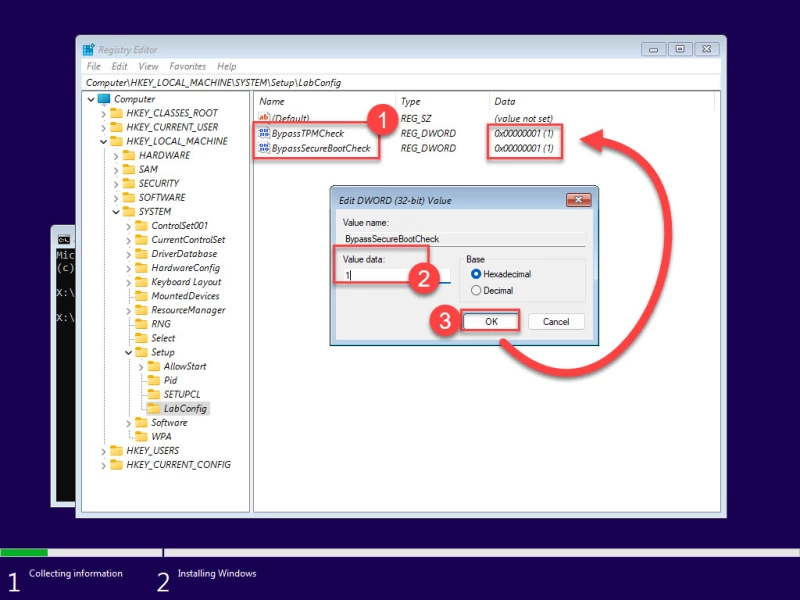
- Дважды щелкните оба этих DWORD и измените их Value Data на «1».
- Закройте редактор реестра и окно командной строки.
- Нажмите кнопку «Назад» в мастере установки Windows.
- Теперь снова выберите редакцию Windows и нажмите кнопку Next.

Теперь вы заметите, что подсказка об ошибке исчезла, а на ее месте появились правила и условия. Продолжайте выполнять оставшиеся шаги для успешной установки Windows 11 23H2 без соблюдения системных требований.
*Примечание: *Остальные шаги типичны для всех современных установок Windows.
Обход требований TPM и Secure Boot с помощью Rufus
Rufus, полное название которого «The *R*eliable *U*SB *F*ormatting *U*tility, with *S*ource», – это утилита с открытым исходным кодом для операционной системы Windows, позволяющая изменять и создавать ISO-файлы операционной системы Windows. Теперь эта утилита также включает в себя опции, которые можно выбрать, что позволит создать загрузочный USB-накопитель, на котором системные требования Windows 11 23H2 уже обойдены.
Для обхода требований TPMm Secure to и RAM с помощью Rufus выполните следующие действия:
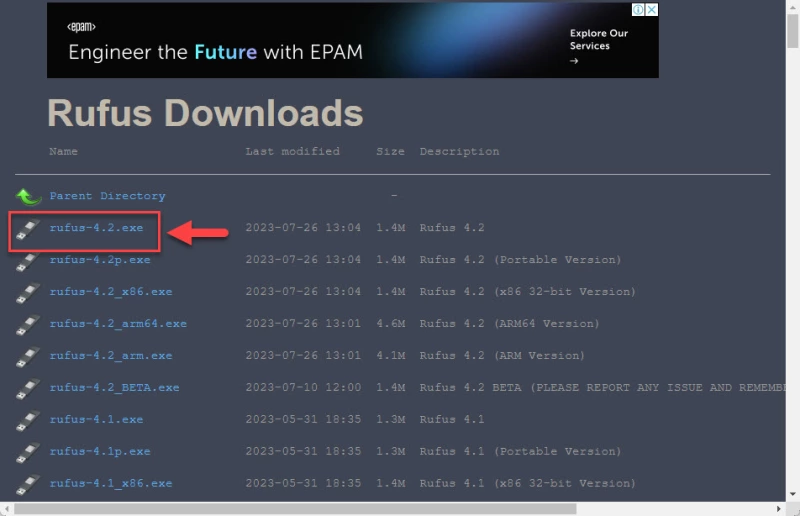
- Откройте Сайт Руфус и нажмите на последнюю версию Rufus, чтобы загрузить ее.

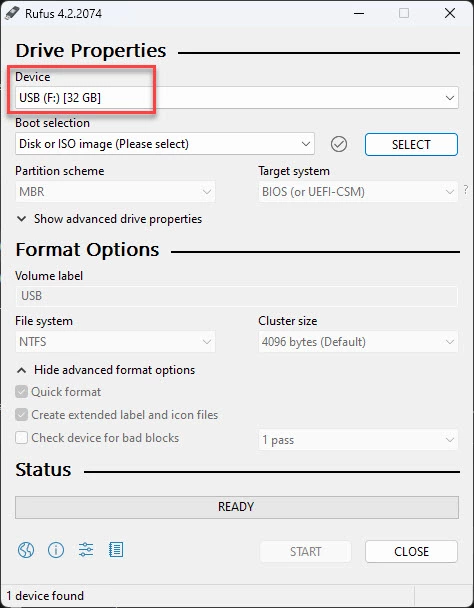
- Подключите USB-накопитель к компьютеру и запустите Rufus.
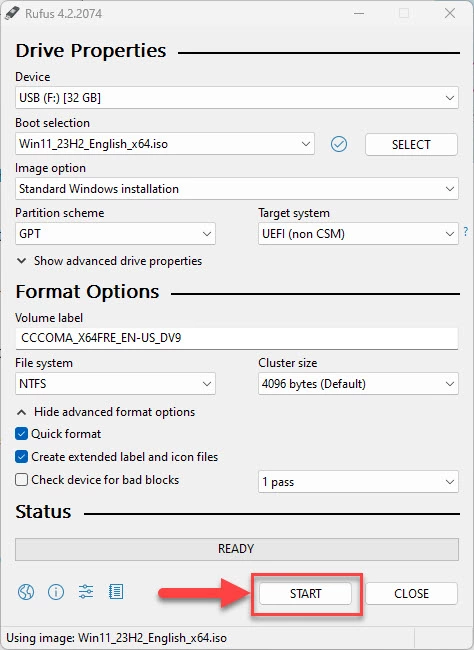
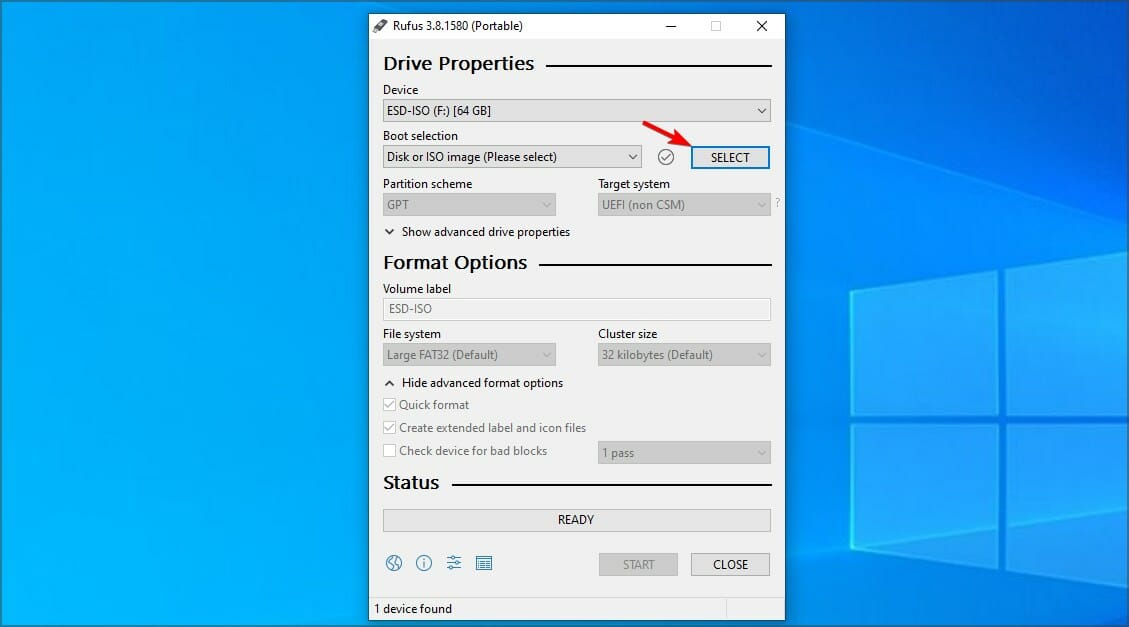
- В Rufus убедитесь, что USB-накопитель выбран в выпадающем меню Device.

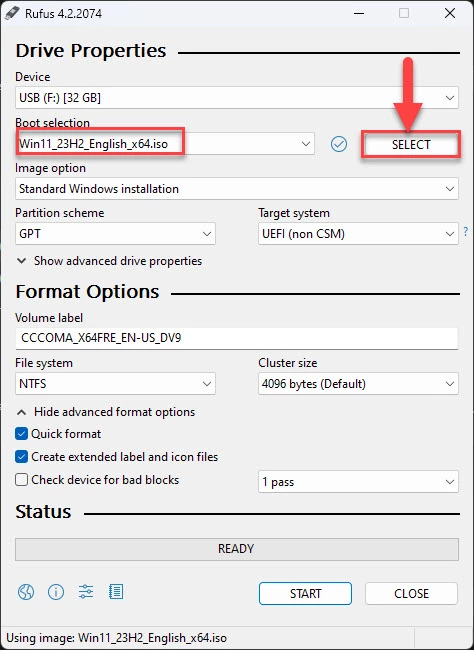
- Нажмите Select и выберите ISO-файл Windows 11 23H2.

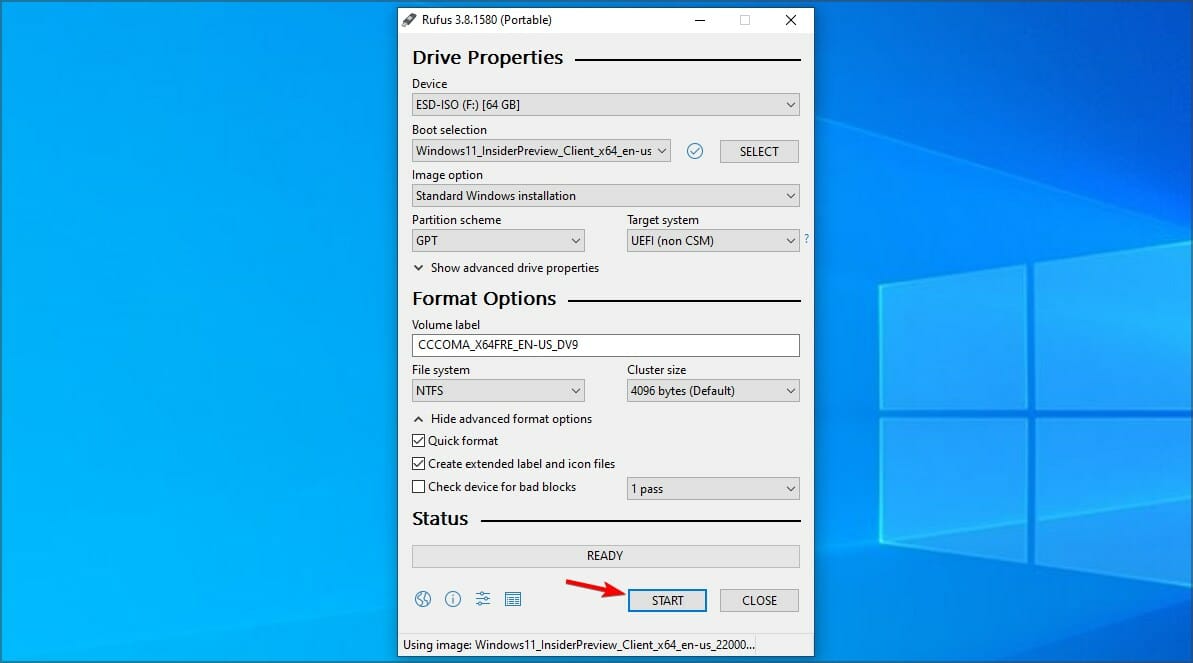
- Убедитесь, что остальные настройки соответствуют следующим:
- Опция образа: Стандартная установка Windows
- Схема разделов: GPT
- Целевая система: UEFI (не CSM)
- Филевая система: NTFS
- Размер кластера: значение по умолчанию
- Выберите: «Быстрое форматирование» и «Создать расширенные файлы меток и значков»
- Нажмите Старт.
- Во всплыающем окне выберите следующие опции и снимите все остальные:
- Снять требования к 4 Гб RAM, Secure Boot, и TPM 2.0
- Убрать требование к учетной записи Microsoft в Интернете
Выбрав эти опции, нажмите Ok.
- Во всплывающем окне с предупреждением нажмите Ok.

Rufus отформатирует USB-накопитель и создаст загрузочный диск Windows 11 23H2, который будет автоматически обходить требования к TPM 2.0, Secure Boot и RAM. При установке Windows с этого накопителя никаких дополнительных действий не потребуется.
Заключение
Хотя для нашего же блага мы гарантируем, что наши системы соответствуют минимальным требованиям к версиям Windows 11, это не всегда необходимо. Например, если у вас есть отдельный компьютер для тестирования, не подключенный к Интернету и не содержащий конфиденциальной информации, то нет необходимости вкладывать средства в модернизацию его аппаратного обеспечения только для тестирования под Windows 11.
Таким образом, вы можете спокойно обойти требования TPM 2.0 и Secure Boot, используя любой из двух рассмотренных выше методов. Обход минимальных требований Windows 11 с помощью реестра Windows позволяет обойти только требования Secure Boot и TPM, тогда как с помощью Rufus можно обойти оба этих требования, а также ограничения по минимальному объему оперативной памяти.
Microsoft has some strict hardware requirements that your PC must meet to install Windows 11, including TPM 2.0 support. This means that not only older computers, but virtual machines will refuse to upgrade from Windows 10, giving you a message that «this PC doesn’t currently meet Windows 11 system requirements.»
Fortunately, there are several simple ways you can get bypass Windows 11’s TPM, RAM and other requirements. If you’re doing a clean install with a Windows 11 ISO, you can edit the registry in the middle of the setup process and tell it to skip requirement checks. We’ll show you how to modify the registry in the first section below.
If you don’t want to have to modify the registry mid-install, you can create a Windows 11 USB install disk that will bypass Windows 11’s TPM requirement, and its need for 8GB of RAM and a supported CPU. Using a free tool called Rufus and at least a 16GB Flash drive, you can either perform an in-place upgrade of Windows 10 to 11 or a Windows 11 clean install while getting around these minimums. In the second section of our tutorial below, we’ll show you how to use Rufus to create a requirement-free Windows 11 install disc.
If you have Windows 10 or an earlier build of Windows 11 installed on a PC that didn’t meet the requirements (perhaps a VM), you try to update to a new build with Windows Update and you get the «doesn’t meet requirements» error message, there’s a workaround for that. As we’ll detail in the third section below, a script from AveYo’s Media Creation tool github page will allow you to bypass Windows 11’s TPM requirement even with Windows Update.
Note that Microsoft also has also created an official registry hack to bypass TPM 2.0 and CPU requirements for an in-place upgrade. However, this method still requires at least TPM 1.2 so, if you have no TPM at all, it’s worthless. We’ll talk about this at the bottom, in case you want to try it.
Also note that, by default, Microsoft’s OS wants you to set it up with a Microsoft account. However, we have another tutorial on how to install Windows 11 without a Microsoft Account by using a few tricks.
How to Bypass Windows 11’s TPM Requirement Using Registry Hacks
If you just have a regular Windows 11 install disk or ISO, you can bypass the Windows TPM and RAM requirements by making some registry changes during the install. Note that this method only works on a clean install and does not allow you to bypass the requirement for at least a dual-core CPU.
Get Tom’s Hardware’s best news and in-depth reviews, straight to your inbox.
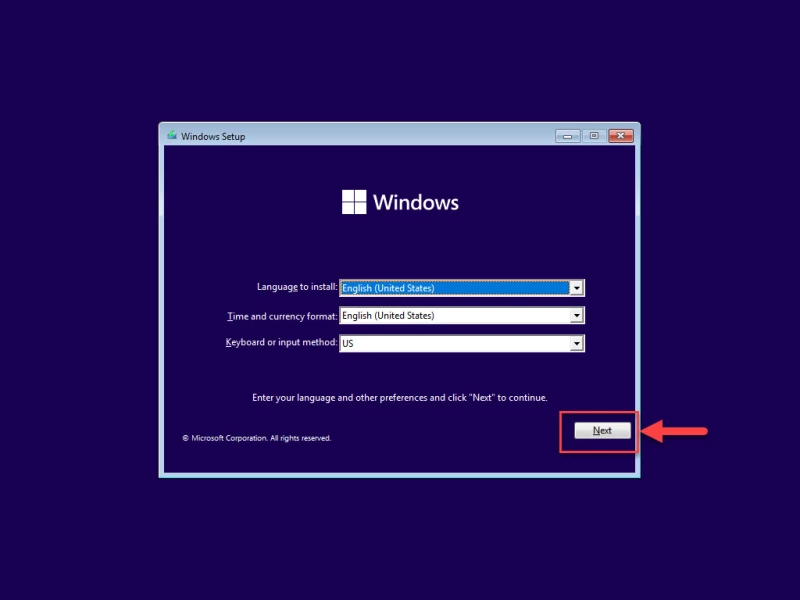
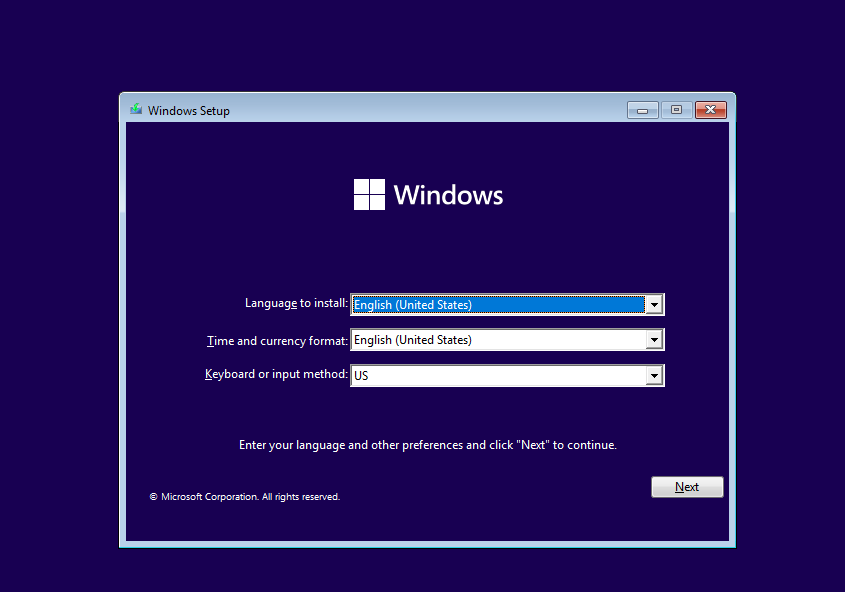
1. Boot off of your Windows 11 install disk. If you don’t have one, see our story on how to download Windows 11. The first screen should ask you to choose the language of your install (which will probably be correct).
2. Hit SHIFT + F10 to launch the command prompt.
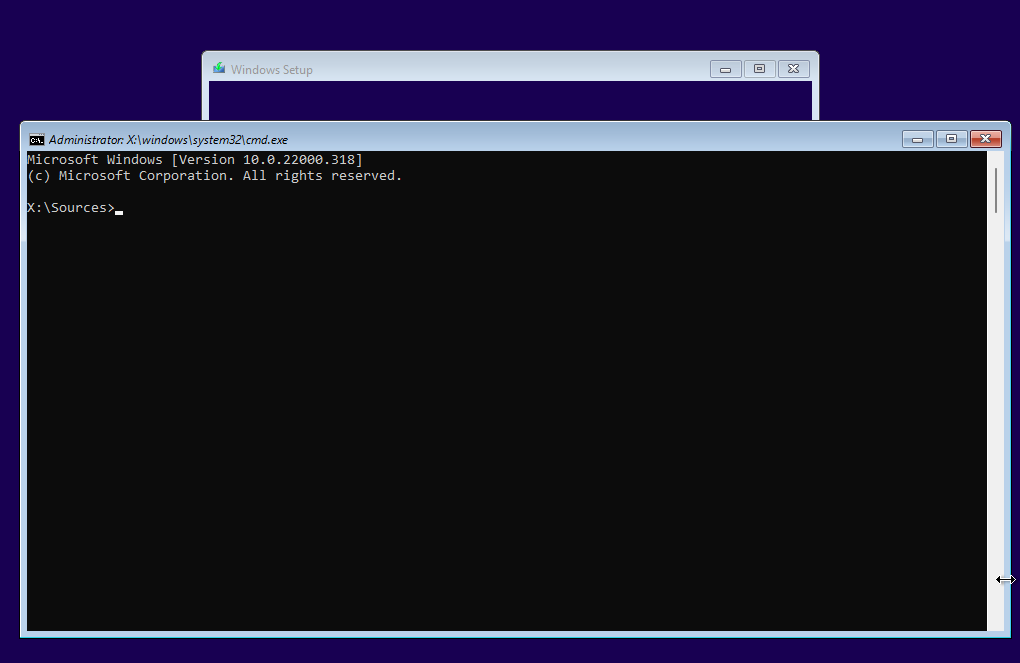
3. Type regedit and hit Enter to launch registry editor.

4. Navigate to HKEY_LOCAL_MACHINE\SYSTEM\Setup.
5. Create a new registry key under Setup and name it LabConfig. To create a registry key, right click in the right window pane and select New->Key. Then enter the key name.
6. Within LabConfig, create DWORDs values called BypassTPMCheck and BypassSecureBootCheck and set each to 1. To create a new DWORD value, right click in the right window and select new DWORD (32-bit) Value then name the key, double click to open it and set it to 1.
If you also want to bypass the RAM requirement, add a DWORD values for BypassRAMCheck.
7. Close regedit and the command prompt.
You should be able to continue with your Windows 11 installation as normal.
How to Bypass Windows 11’s TPM Requirement Using Rufus
With Rufus, a free utility, you can create a Windows 11 install disk on a USB Flash drive with settings that disable the TPM, RAM and CPU requirements. You can either boot off of this USB Flash drive to do a clean Windows 11 install or run the setup file off of the drive from within Windows 10 to do an in-place upgrade.
For most people, this method is ideal, but there are a couple of disadvantages. First, it requires a 16GB or larger USB Flash drive. Second, because it’s on a Flash drive, it’s more difficult to use for installing Windows 11 on a virtual machine where an ISO file would be ideal.
1. Download the latest version of Rufus and install it on your machine. At the time of writing the latest version is 3.19 which includes the Extended Windows 11 Image support.
2. Insert a blank 16GB or larger USB stick then open Rufus.
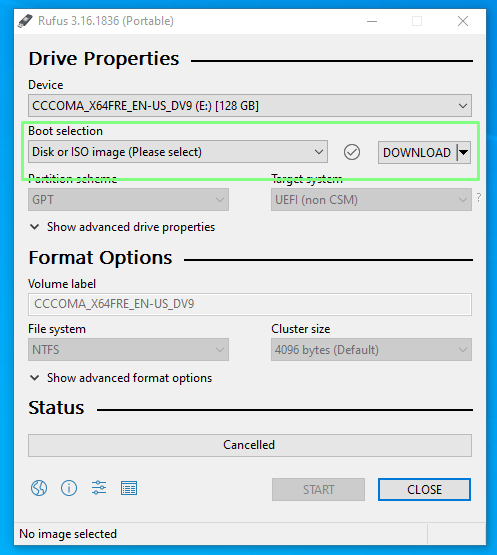
3. Select the USB device that you want to install Windows 11 to.
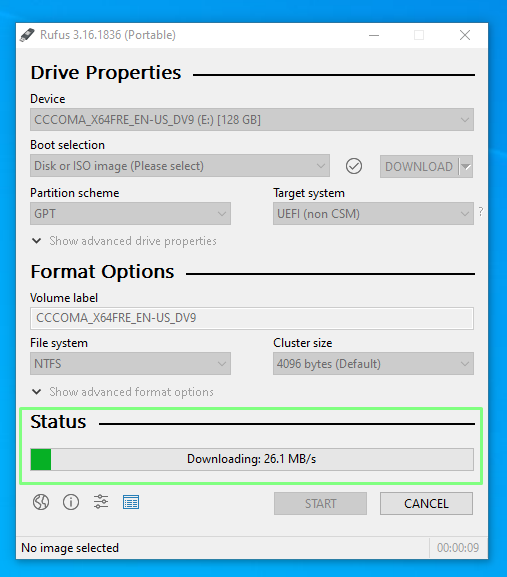
4. Ensure that Boot Selection shows “Disk or ISO image” and click DOWNLOAD.
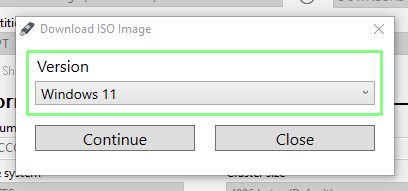
5. Select Windows 11 and click Continue.
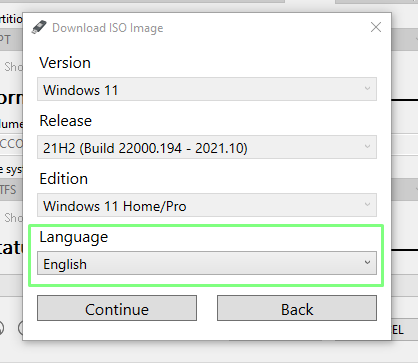
6. Select the latest release and click Continue.
7. Select the edition and click Continue.
8. Select your preferred language and click Continue.
9. Select the architecture (most likely x64) and click Download. A new window will open asking where to save the ISO image. Save it to your Downloads folder. You can also download the image using a browser if you wish.
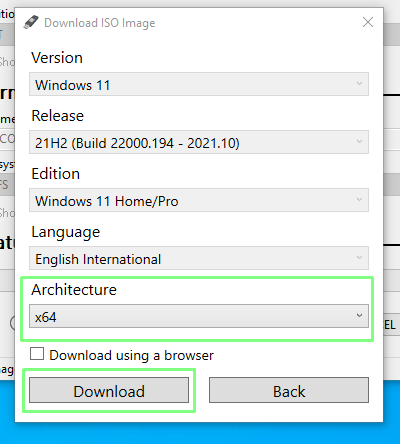
The download will take several minutes to complete.
10. Click on the Image option drop down and select Extended Windows 11 Installation to disable TPM, Secure Boot and the 8GB of RAM requirement.
11. Double check that the correct drive has been selected and click on Start to begin the installation.
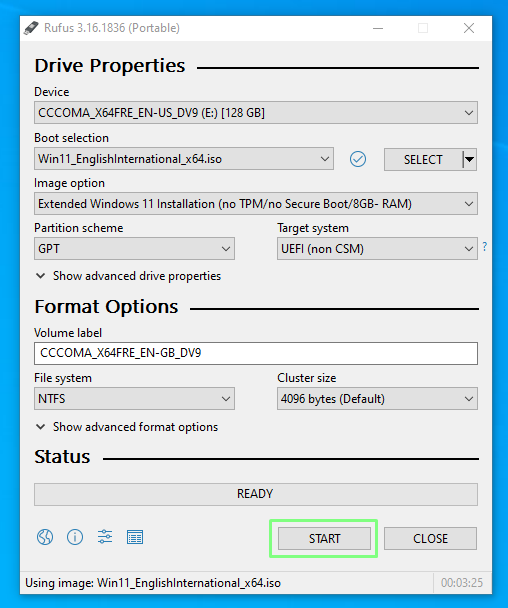
The write process can take some time, depending on the USB drive being used, but when done the drive can be removed and used to install Windows 11 on an older computer or even in a virtual machine.
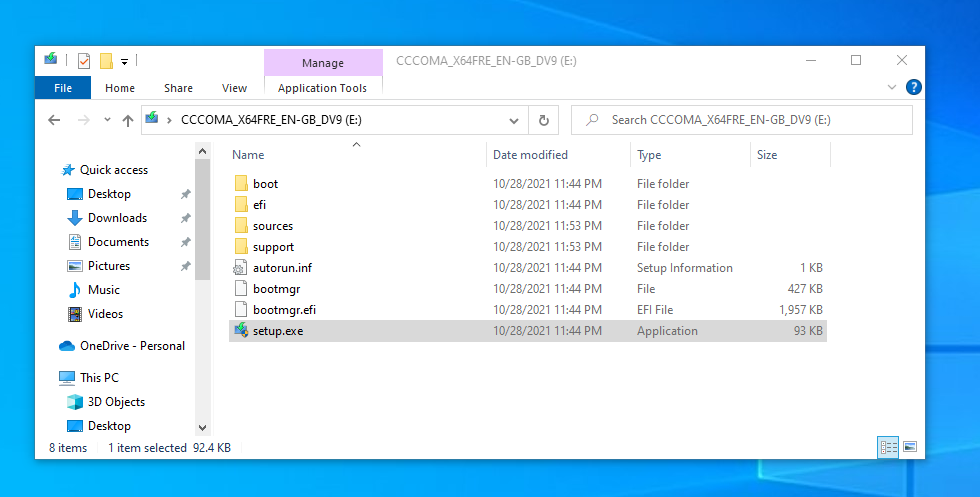
12. Install or upgrade to Windows 11. Run setup on the USB drive, if you ware doing an in-place install from an existing Windows 10 installation. Boot off of the drive if you are doing a clean install. Note that you may need to disable secure boot in your BIOS (see how to enter your BIOS) if it gives you a problem.
How to Bypass Windows 11 TPM Check From Windows Update
If you want to use Windows Update rather than creating an install disk, you’ll need a method that runs in Windows and fools the updater into thinking you meet the requirements. This may be more important if you are trying to use Windows Update to upgrade to a new build of Windows 11, perhaps an Insider Build, on a computer that already bypassed the requirement.
For example, when we joined the Windows Insider program on one of our Windows 11 VMs (which clearly did not have TPM), we got the dreaded «Your PC doesn’t meet the requirements» error. But using AveYo’s Media Creation Tool workaround script solved the problem. Here’s how to make it happen.
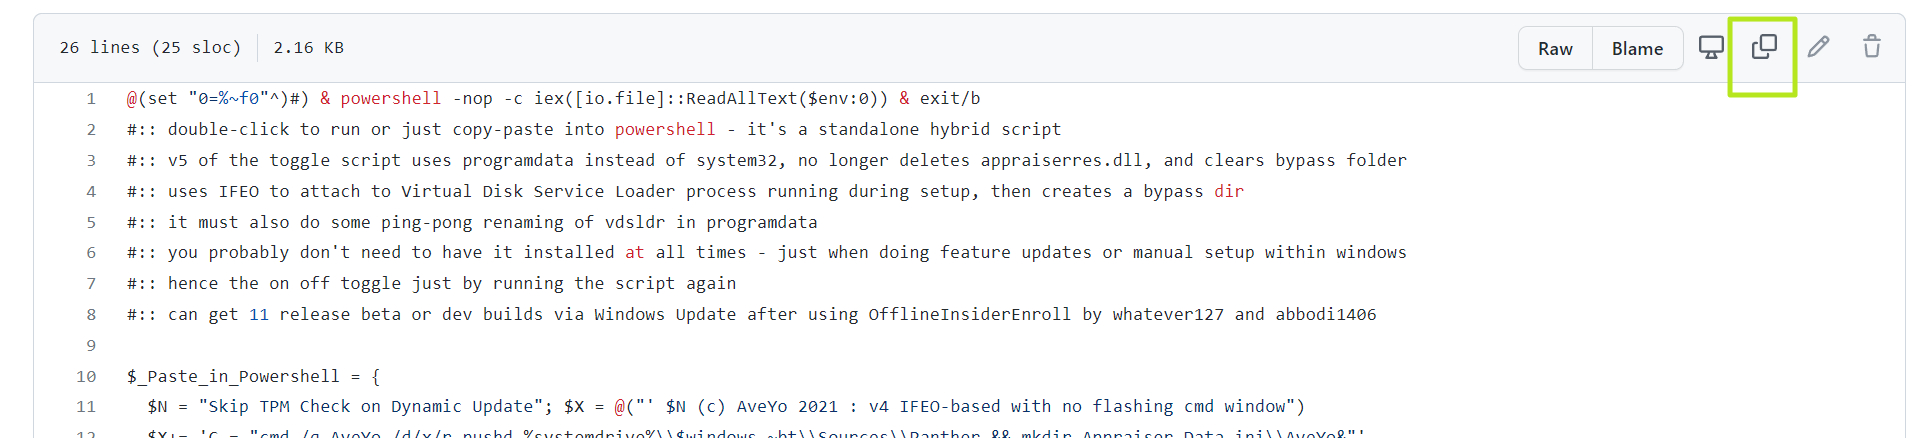
1. Navigate to the Skip_TPM_Check_on_Dynamic_Update.cmd source code on AveYo’s Media Creation Tool Github.
2. Click the «Copy raw contents» button in the upper right corner of the code box.
3. Create a new file on your desktop and name it skip_tpm_check.cmd. Make sure that you are able to view file extensions and the file extension is really .cmd, not .txt or else it won’t run.
4. Open skip_tpm.cmd for editing, using notepad or another text editor.
5. Paste in the code you copied from github.
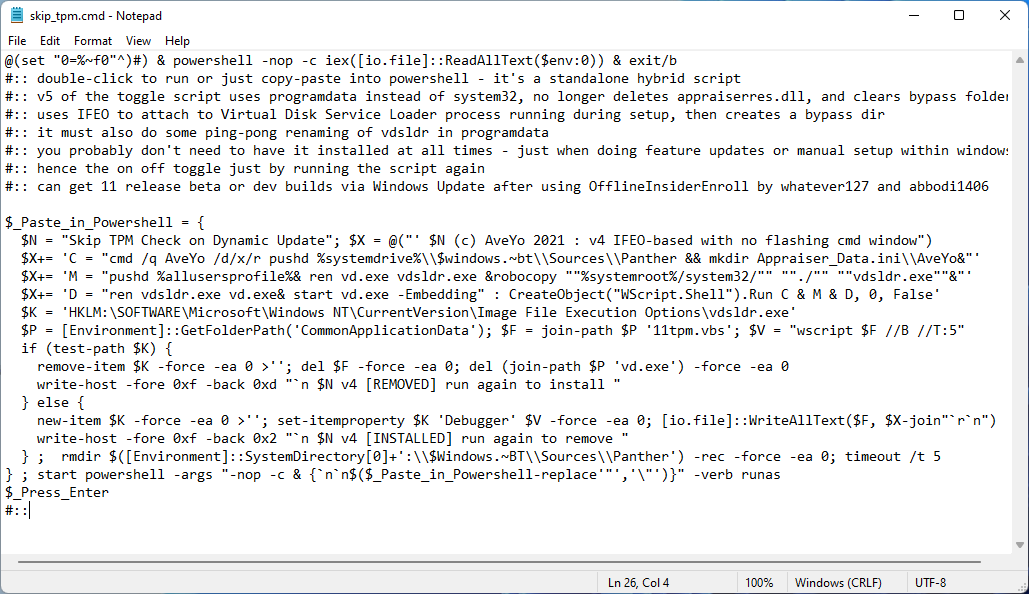
6. Save and run the skip_tpm.cmd file.
7. Click Yes if prompted by User Account Control.
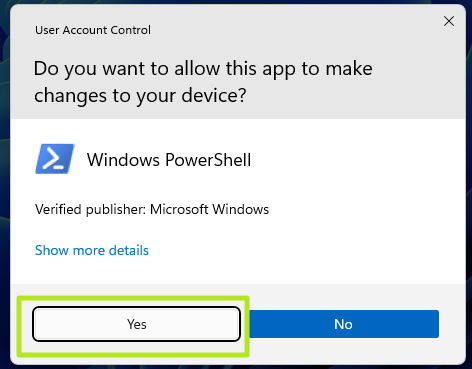
You will now see a message saying «Skip TPM on Dynamic Update» has been installed. If you run the program again, it will disable the utility.

Windows Update should now be able to either update your existing Windows 11 Build or even perhaps upgrade you from Windows 10 to 11.
How to Bypass Windows 11 TPM the Official Microsoft Way
Knowing that some users will want to install Windows 11 on systems that don’t meet all of its hardware requirements, Microsoft has provided a registry hack that loosens them up somewhat. Using this hack, you can install on a system that has at least TPM 1.2 and has an unsupported CPU. That said, we recommend the scripts above because they don’t require you to have TPM of any kind.
1. Open Regedit.
2. Navigate to HKEY_LOCAL_MACHINE\SYSTEM\Setup\MoSetup.
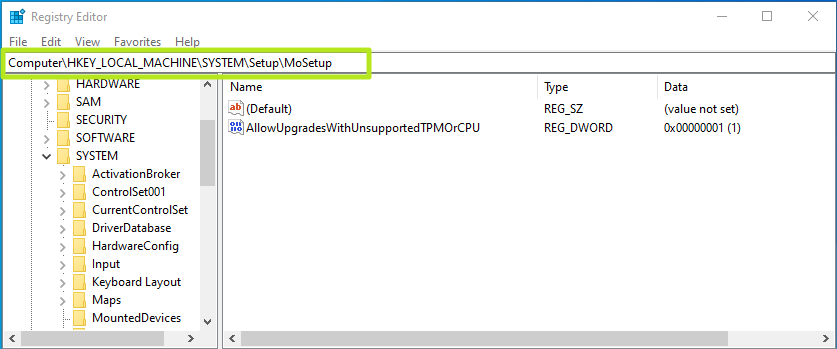
3. Create a DWORD (32-bit) Value called AllowUpgradesWithUnsupportedTPMOrCPU if it doesn’t already exist.
4. Set AllowUpgradesWithUnsupportedTPMOrCPU to 1.
5. Close regedit and restart your PC. You should now be able to upgrade to Windows 11 from within Windows 10 by using installation media (provided you created it).
More Windows 11 Tutorials:
- How to Get a Windows 11 ISO File and Do a Clean Install
- How to Enable God Mode in Windows 11 or 10
- How to Uninstall Windows 11 and Return to 10
- How to Clean Install Windows 11, No Product Key Required
- How to Install Windows 11 in a Virtual Machine
Readers help support Windows Report. We may get a commission if you buy through our links.
Read our disclosure page to find out how can you help Windows Report sustain the editorial team. Read more
Windows 11 was recently released, and according to the official hardware requirements, to use it, you’ll need to have a TPM chip.
As a result, this requirement has already caused many problems with early adopters, and many have reported TMP 2.0 errors when trying to install Windows 11.
Many users don’t have this feature available, especially on older computers, and don’t want to upgrade to try this OS.
However, there are ways to install Windows 11 without a TPM chip, and in this article, we’re going to show you how to do so on unsupported hardware.
What does TPM do?
Firstly, TPM stands for Trusted Platform Module, and it’s a small chip on your PC. This leads us to the next question, is TPM on the motherboard or CPU?
Secondly, there are several versions available, and some are on your motherboard. In contrast, others are integrated into your processor, as a physical chip, or in form of code that runs in a dedicated environment.
Moreover, for practical purposes, TPM is used for file encryption, such as BitLocker, for example, bootloader protection, and it can be used to protect your passwords against hackers.
Where can I buy a TPM chip?
If you’re looking to buy a TMP 2.0 chip, you should be able to get it from most major PC hardware retailers.
We expect the demand for TPM chips to go up soon, so you might have to hurry and get your TPM chip before others.
How can I install Windows 11 without TPM 2.0?
1. Create a new DWORD in the Registry
-
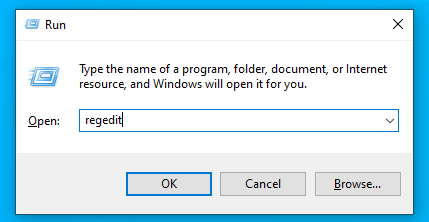
1. Press the Windows key + R to open the Run dialog.
-
2. Type regedit and press Enter o open the Registry Editor.

-
3. In the Registry Editor, navigate to the following path:
Computer\HKEY_LOCAL_MACHINE\SYSTEM\Setup\MoSetup
-
4. Right-click anywhere in the window and expand the New menu. Select DWORD 32-bit Value or QWORD (64-bit) Value depending on which system you have.
-
5. Enter AllowUpgradesWithUnsupportedTPMOrCPU as the name of the new value.
-
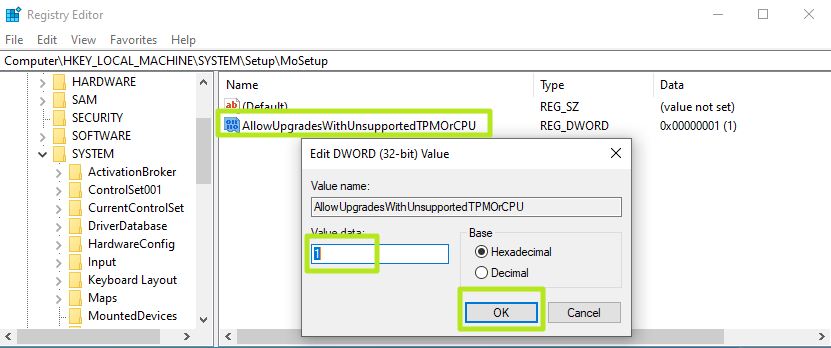
6. Double-click the value that you just created.
-
7. Set the Value data to 1 and click OK to save changes.


The first method we recommend to use to install Windows 11 without a TPM chip is to create a DWORD in the Registry Editor. This DWORD will allow you to allow upgrades with an unsupported TPM, thus fixing your issue.
NOTE
This method is approved by Microsoft, which makes it the best solution if you want to disable the TPM requirement.
2. Modify your registry from the installation media
- Start the Windows 11 installation and follow the installation steps until you reach This PC can’t run Windows 11 screen.
- Press Shift + F10 on your keyboard. That should open Command Prompt.
- When the Command Prompt starts, type regedit.exe, and press Enter.
- Navigate to the following location:
Computer\HKEY_LOCAL_MACHINE\SYSTEM\Setup
- Right-click on Setup, expand the New section, and select Key from the list. Name the new key LabConfig.
- Navigate to the LabConfig key that you just created. Right-click anywhere in the window, expand the New section, and click on DWORD (32-bit) Value or QWORD (64-bit) Value.
- Create three values:
- BypassTPMCheck
- BypassRAMCheck
- BypassSecureBootCheck
- Double-click the first value you created and set its Value data to 1. Now repeat the same steps for the other entries.
- Once you’ve made these changes, exit the Registry Editor, and the installation should continue without problems.


- FIX: Corrupt registry in Windows 10/11
- 5 best registry cleaner applications for Windows 11
- 7+ best registry cleaner tools for Windows [2022 Guide]
3. Use Rufus
- Download the Windows 11 ISO from Microsoft’s website.
- Download Rufus and run it.
- Select your USB flash drive and click the Select button.

- Choose the Windows 11 ISO file that you just created.
- Now click on Start and wait for the process to finish.

- Make sure you check Remove requirement for 4GB+ RAM, Secure Boot and TPM 2.0. Click OK and wait for the process to finish.

By completing the above procedure, you’ll have a Windows 11 ISO ready that won’t check for TPM during the installation.
What do I do if the PC Health Check app is bugged?
If the PC Health Check App is crashing, there might be an issue with the installation. You should be able to fix that by starting the installation again.
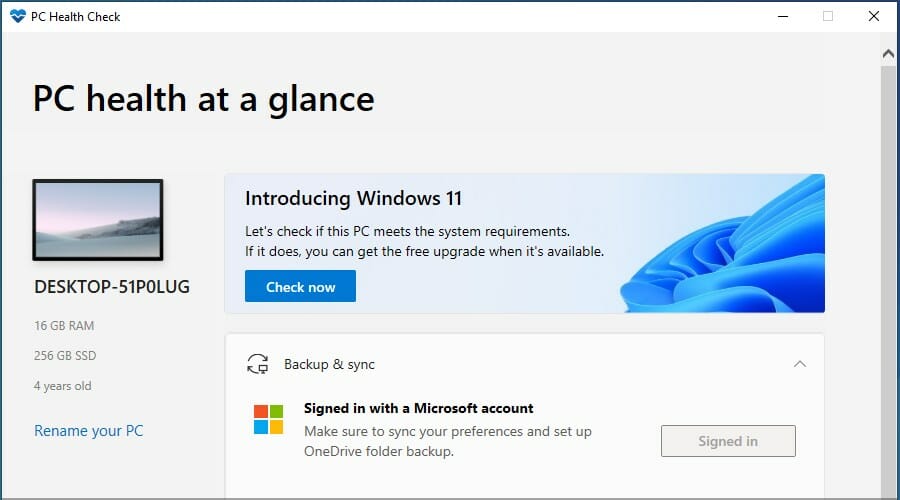
Alternatively, you can wait for Microsoft to release the updated version of the software. If this app isn’t working, you won’t be able to install Windows 11 on an unsupported PC.
What motherboards are Windows 11 ready?
Most newer motherboards support TPM, so if you’re looking for one having this feature, you should consider these gaming motherboards.
Moreover, it’s not mandatory to use a gaming motherboard, but since these are high-end models, they have all the latest features.
However, if you don’t want to buy a gaming motherboard, most newer motherboards have support for TPM, so feel free to pick any model that works for you.
Why should I use TPM?
Windows TPM provides a layer of hardware security to your device, and it can help you protect your login credentials from hackers.
This feature is also used for file encryption, so if you want to ensure that your files are safe from unauthorized access, you need to use it.
As you can see, it’s possible to install Windows 11 without TPM, but it might require that you modify the registry or modify the ISO file.
Furthermore, if you still plan to disable this feature, we recommend using the method approved by Microsoft since it will cause the least problems to your PC.
However, if you wish to buy a TPM 2.0 chip, look at our post on where to buy them and price comparisons.
Alternatively, check out the five best Windows 11 business laptops that won’t need to skip the TPM verification.
To learn more, we have an in-depth guide on TPM in Windows 11, so don’t miss it.
Have you found a different way to install Windows 11 on an unsupported device, or did you decide to buy a TMP 2.0 chip? Let us know in the comments below.
Milan Stanojevic
Windows Toubleshooting Expert
Milan has been enthusiastic about technology ever since his childhood days, and this led him to take interest in all PC-related technologies. He’s a PC enthusiast and he spends most of his time learning about computers and technology.
Before joining WindowsReport, he worked as a front-end web developer. Now, he’s one of the Troubleshooting experts in our worldwide team, specializing in Windows errors & software issues.
Всего лишь нужно немного отредактировать реестр во время установки
Microsoft многих удивила драконовскими требованиями для установки Windows 11. И ладно еще минимальный уровень оперативной памяти в 4 ГБ, но вот обязательная поддержка аппаратного шифрования TPM стала серьезным камнем преткновения. Процессоры, выпущенные за последние 5-6 лет, поддерживают функцию fTPM (firmware-based TPM), которую можно активировать в BIOS. Но если CPU старше, то придется либо устанавливать в систему аппаратный модуль TPM 2.0, либо менять платформу. В общем, это хлопотно. Но сейчас найден очень простой способ установки Windows 11 на любые компьютеры, которые не соответствуют официальным требованиям. Например, имеют меньше 4 ГБ оперативной памяти или лишены модуля TPM.
Для обхода этих ограничений нужно при установке Windows 11 (на этапе, когда ОС выдаст предупреждение о несовместимости), запустить редактор реестра (сочетанием клавиш Shift+F10 запускается командная строка, в которой нужно вписать regedit и нажать Enter). После этого нужно открыть ветку HKEY_LOCAL_MACHINESYSTEMSetup и создать в ней новый раздел под названием LabConfig (правая кнопка мыши Создать -> Раздел). В нем надо создать три 32-битных параметра DWORD под названиями BypassTPMCheck, BypassRAMCheck и BypassSecureBootCheck со значением 1 в каждом. В итоге, раздел LabConfig должен принять вид, как на изображении ниже.
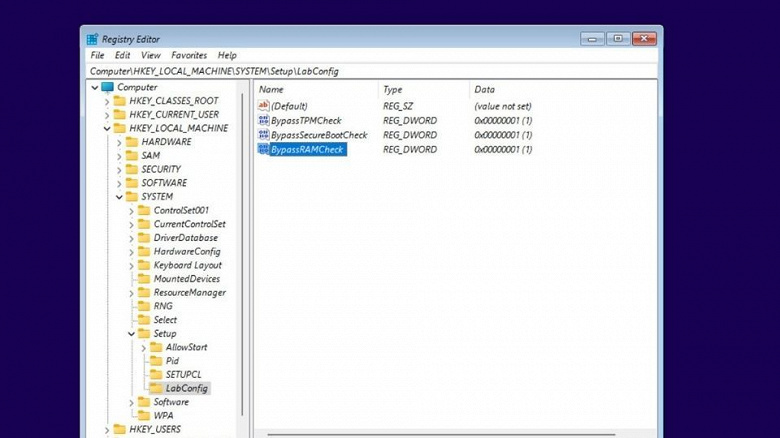
После этого нужно выйти из редактора реестра – на экране вновь отобразится предупреждение о совместимости. Нужно вернуться на один шаг назад… и появится традиционное окно установки ОС с выбором версии и диска.
9 июля 2021 в 21:23
| Теги: Windows, Microsoft
| Источник: Digit.in