
Текущие версии Windows 11 требуют обязательного подключения к Интернету во время установки и, оказавшись на экране «Давайте подключим вас к сети» у пользователя нет простых способов продолжить установку без Интернета, что иногда бывает необходимо: например, при отсутствии необходимых драйверов или доступа к сети.
В этой инструкции о способах пропустить экран «Давайте подключим вас к сети» при установке Windows 11, один из которых должен будет сработать.
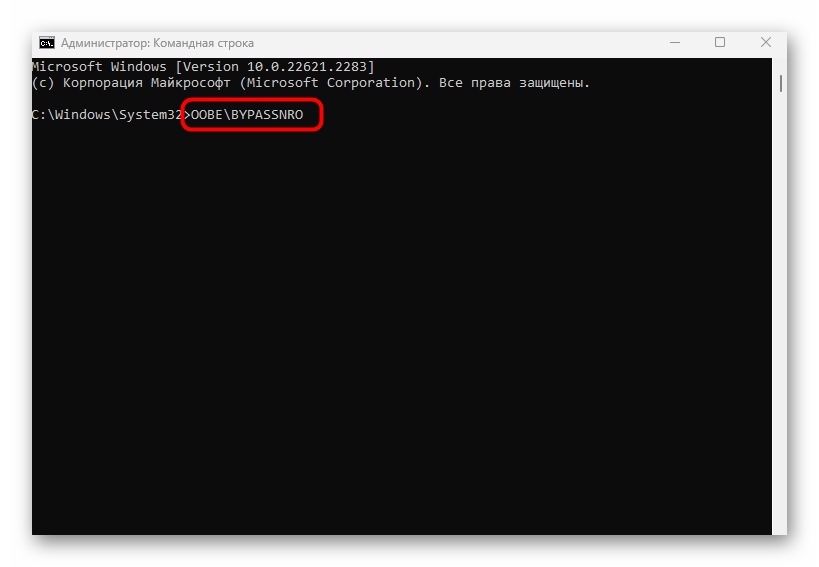
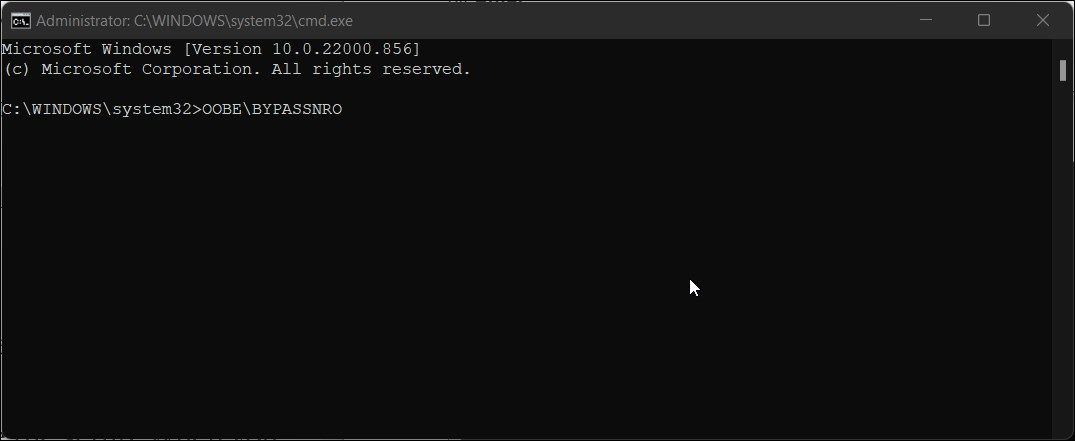
OOBE\BYPASSNRO

Первый способ продолжить установку Windows 11 — использовать команду обхода настройки сети и учетной записи Майкрософт в командной строке. Шаги будут следующими:
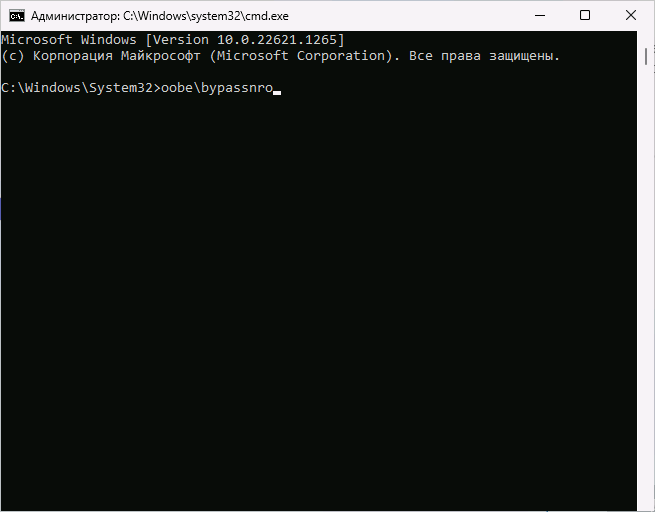
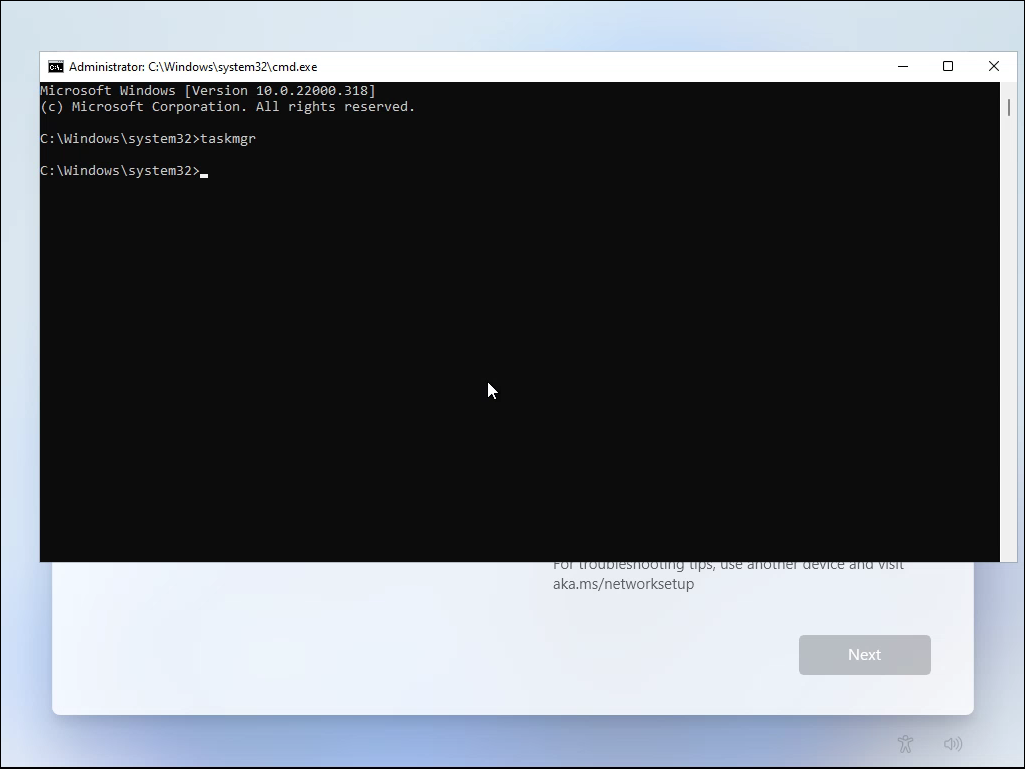
- На экране «Давайте подключим вас к сети» нажмите клавиши Shift+F10 (или Shift+Fn+F10 на некоторых ноутбуках).
- Нажмите мышкой по открывшемуся окну командной строки (по умолчанию оно не активно), используйте сочетание клавиш Alt+Shift для смены языка и введите команду
oobe\bypassnro
не перепутайте направление косой черты и не ставьте пробелов. Нажмите Enter.

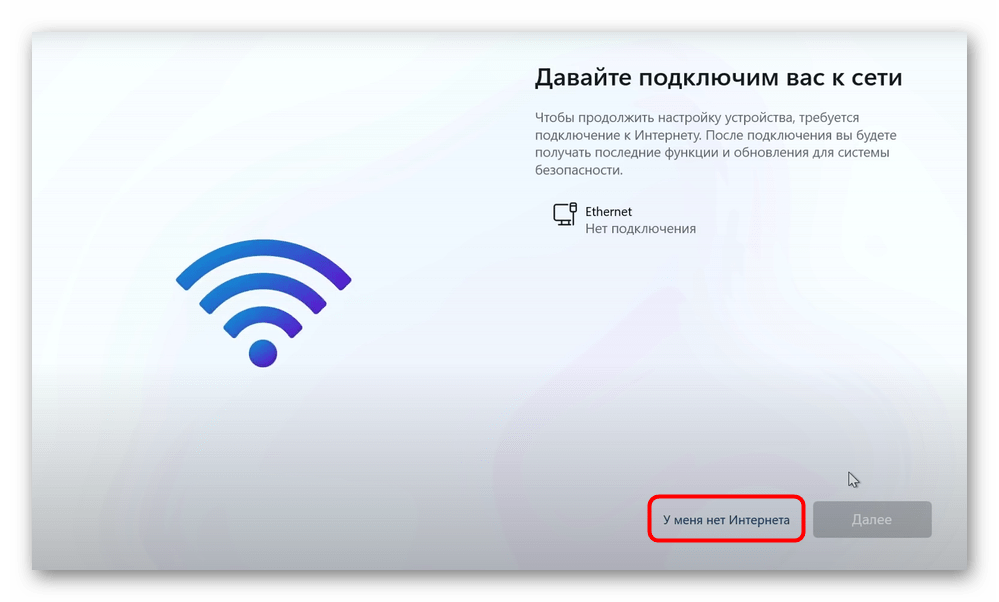
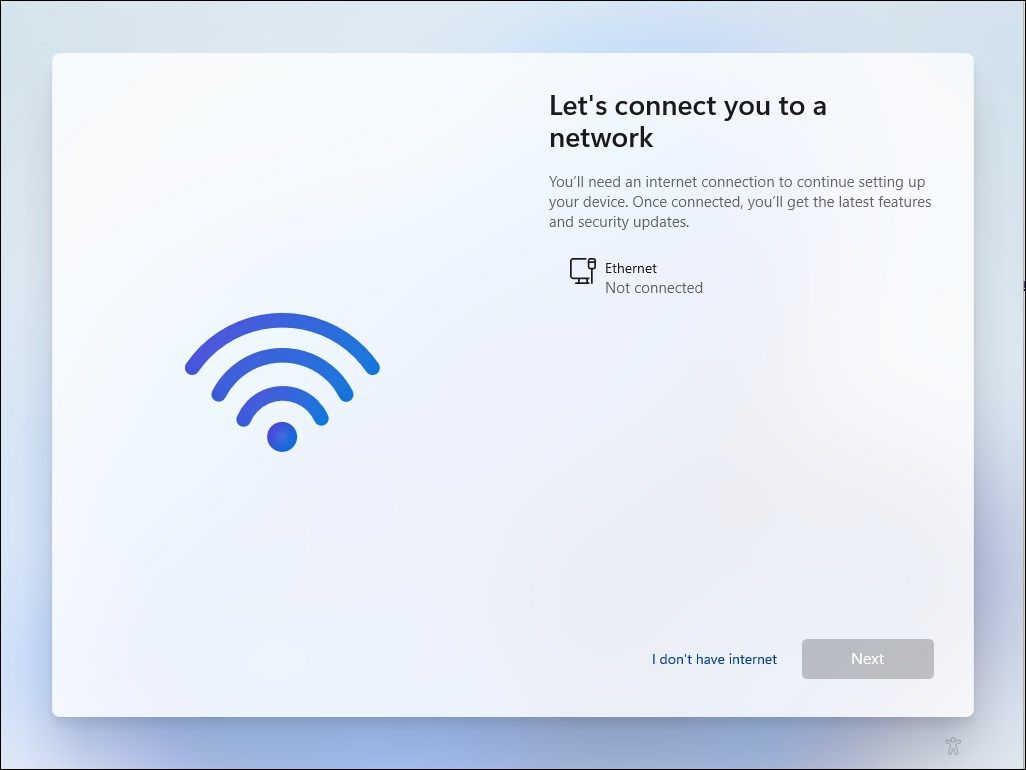
- Компьютер автоматически перезагрузится, и вам снова потребуется выполнит первоначальную настройку (выбор языка клавиатуры), после чего вы снова попадете на экран «Давайте подключим вас к сети», но теперь внизу будет отображаться ссылка «У меня нет Интернета», нажмите по ней.
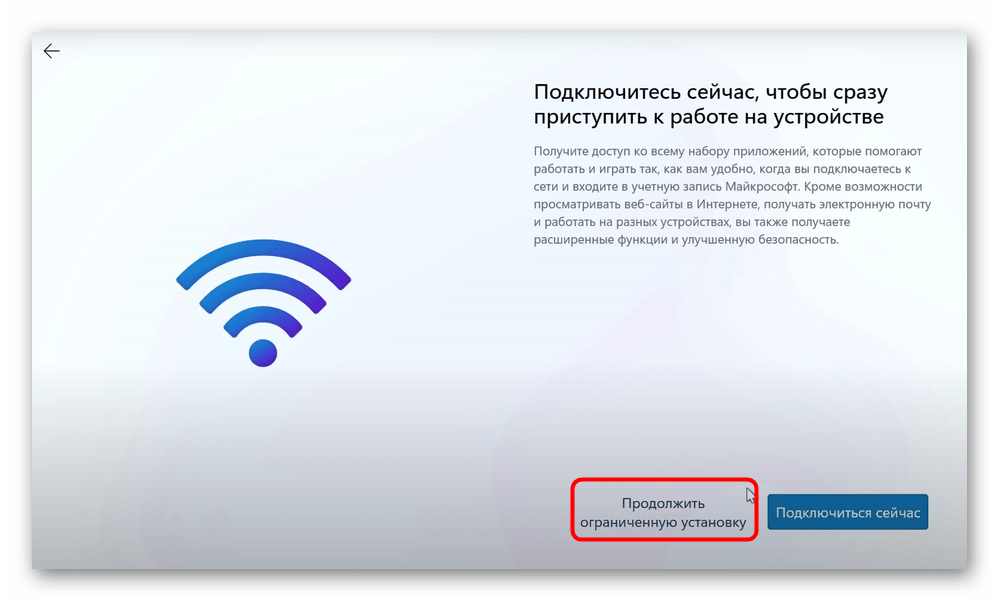
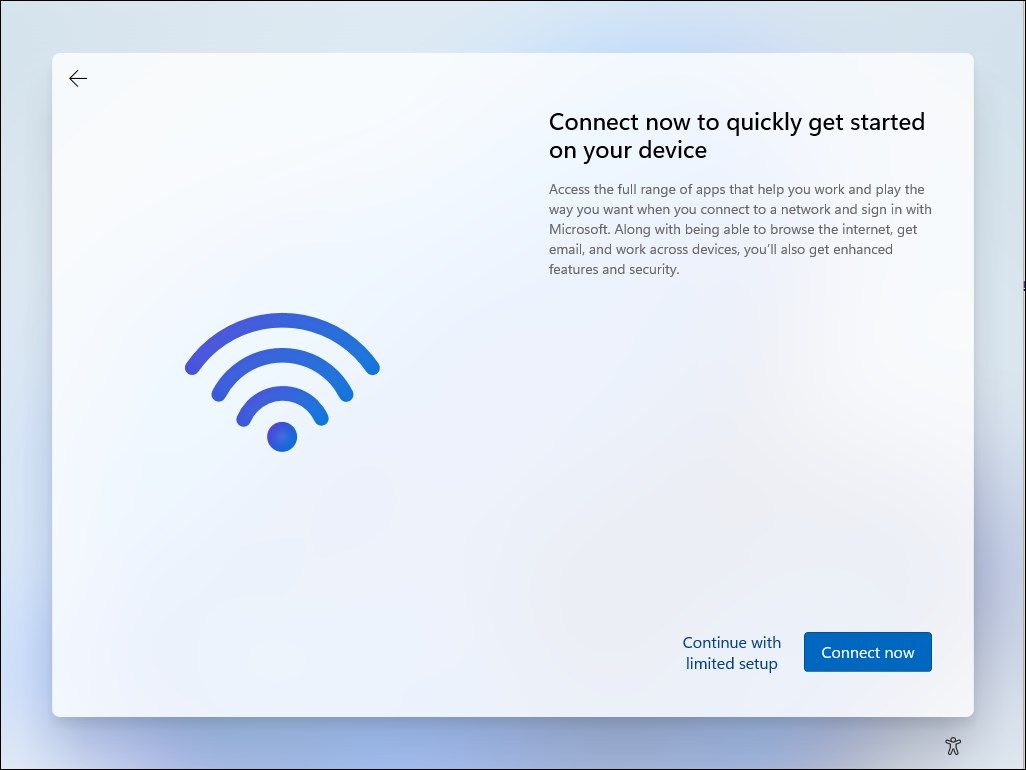
- Выберите пункт «Продолжить ограниченную установку» на следующем экране и продолжайте установку Windows 11, создав локальную учетную запись.


По отзывам пользователей этот способ всё ещё работает в Windows 11 и установку без Интернета удается выполнить успешно.
Однако, нет гарантий, что в будущем Майкрософт не «прикроет» такую возможность, а потому вам могут пригодиться и другие способы.
Создание локальной учетной записи вручную
На этапе появления экрана «Давайте подключим вас к сети. Чтобы продолжить настройку устройства, требуется подключение к Интернету» Windows 11 по факту уже установлена, не хватает лишь учётной записи. И мы можем создать её вручную в командной строке.
Для создания учетной записи выполните следующие шаги:
- Прямо на экране установки нажмите клавиши Shift+F10 (если не сработает — Shift+Fn+F10) и нажмите по открывшемуся окну командной строки.
- По порядку введите следующие команды («Администраторы» следует заменить на «Administrators» в англоязычной версии Windows 11)
net user "имя пользователя" /add
net localgroup Администраторы "имя пользователя" /add
cd oobe
msoobe.exe && shutdown.exe -r

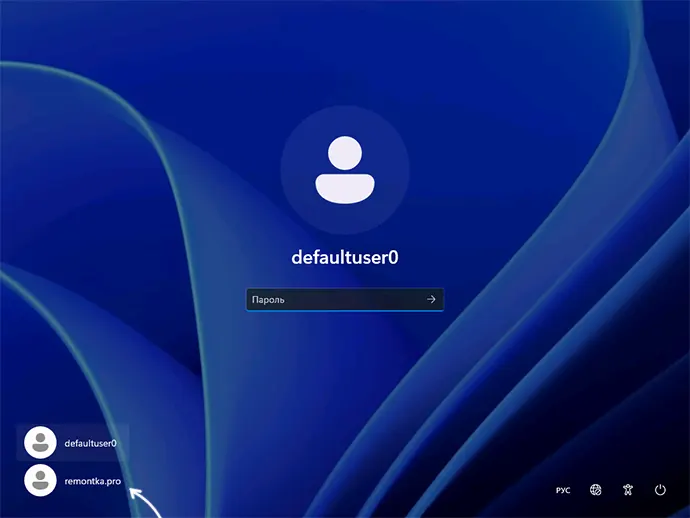
- Компьютер перезагрузится, и вы увидите сообщение «Неверное имя пользователя или пароль». Нажмите «Ок» и выберите правильное имя пользователя внизу слева.
- Через короткое время вы попадете в Windows 11 — установленную и работающую.
- Учитывайте, что после использования этого способа в системе будет один дополнительный пользователь — defaultuser0, его можно отключить в командной строке, запущенной от имени администратора, с помощью команды
net user defaultuser0 /active:no


Процесс Network Connection Flow
Ещё один способ, работоспособный, если судить по отзывам пользователей, но не сработавший в моём случае — завершение процесса Network Connection Flow при установке.
- На экране «Давайте подключим вас к сети» нажмите клавиши Shift+F10 (или Shift+Fn+F10), сделайте окно командной строки активным и введите команду
taskkill /F /IM oobenetworkconnectionflow.exe
это завершит указанный процесс.
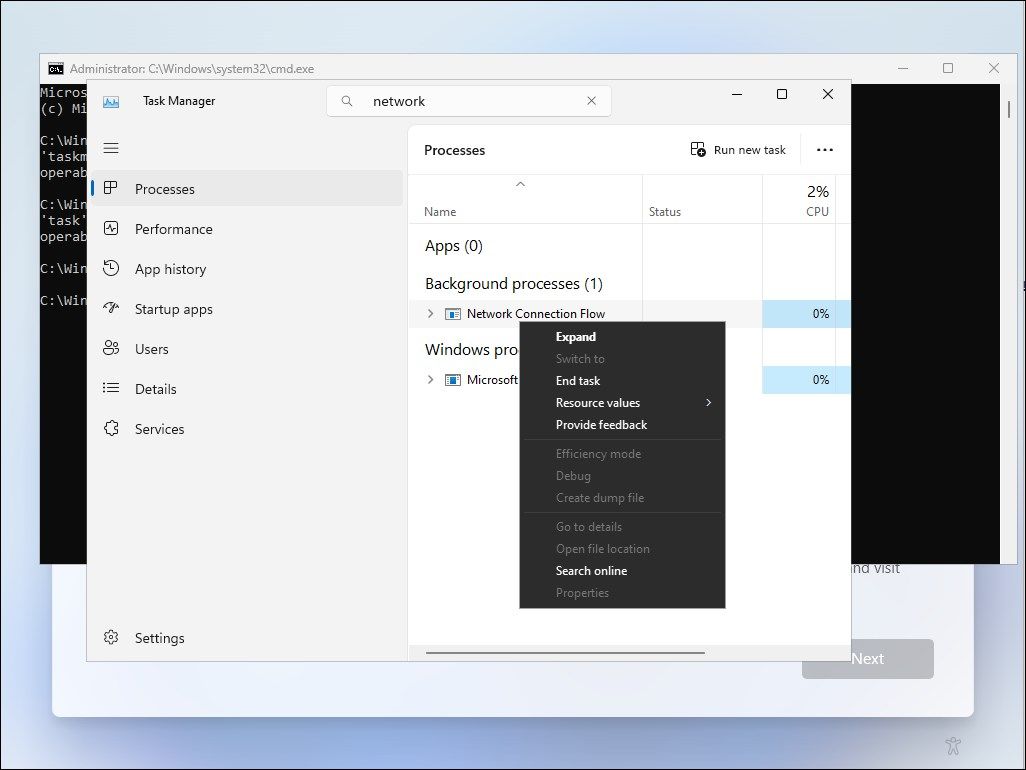
- Второй вариант — ввести команду taskmgr, перейти на вкладку «Сведения» в открывшемся диспетчере задач, завершить процесс oobenetworkconnectionflow.exe, нажав по нему правой кнопкой мыши.

- После завершения процесса и закрытия командной строки у вас должна появиться возможность продолжить установку без подключения к Интернету.

Отзывы говорят о том, что некоторым пользователям этот метод позволяет продолжить установку без перезагрузки, однако в моем тесте лишь появляется кнопка, предлагающая попробовать подключиться к сети снова.
Помимо описанных способов, вы можете включить обход требования наличия Интернет-подключения при создании загрузочной флешки Windows 11. Например, при записи установочного накопителя в Rufus последних версий после нажатия кнопки «Старт» вы увидите следующее окно (появляется только для образов Windows 11):

В нём вы можете отключить требование сетевой учетной записи и включить автоматическое создание локальной учетной записи, при этом установку можно будет продолжить и без наличия Интернет-подключения. Подробнее на тему: Создание загрузочной флешки в Rufus 4.
Как известно, при чистой установке операционной системы Windows 11 требуется подключение к интернету, в точнее – по Wi-Fi (в окне «Давайте подключим вас к сети»). Но есть способ, который позволяет пропустить этот шаг инсталляции, продолжив установку с локальной учетной записью:
- Начните установку операционной системы на компьютер, следуя пошаговым подсказкам инсталлятора. Кстати, у нас на сайте есть отдельная статья с руководством, как инсталлировать ОС с флеш-накопителя, — при необходимости можете ей воспользоваться.
Подробнее: Установка Windows 11 с флешки
На любом из этапов вызовите консоль (сделать это можно как на первых шагах, так и в ситуации, когда вы уже находитесь на шаге «Давайте подключим вас к сети»), отключите интернет, если само соединение активно, затем используйте сочетание клавиш «Shift + F10» на стационарных компьютерах и «Shift + Fn + F10» на ноутбуках, чтобы вызвать «Командую строку».
- В открывшемся окне «Командной строки» введите команду
OOBE\BYPASSNROи для ее выполнения нажмите на клавишу «Enter». - Произойдет перезагрузка системы, после чего процедура установки начнется сначала – пройдите все этапы инсталляции до окна «Давайте подключим вас к сети». Но теперь здесь появится новая кнопка – «У меня нет интернета». Кликните по ней.
- Останется нажать по варианту «Продолжить ограниченную установку» и завершить инсталляцию операционной системы.
В результате установка произойдет с локальной учетной записью. Причем вы получите вполне работоспособную систему, на которую можно установить все необходимые драйверы, создать учетную запись Microsoft и пользоваться любыми возможностями лицензионной копии операционной системы.
Наша группа в TelegramПолезные советы и помощь
how to skip wifi setup on windows 11
Windows 11’s setup process often insists on connecting to Wi-Fi, but there are ways to bypass this requirement. The easiest method involves using a command prompt to trick the setup into skipping the Wi-Fi step. This guide will walk you through each step to help you complete the installation without connecting to a network.
In this tutorial, you’ll learn how to skip the Wi-Fi setup during the Windows 11 installation process. This can be particularly useful if you want to set up the OS without an internet connection.
Step 1: Start the Windows 11 Installation
Boot your computer and begin the Windows 11 installation process.
As you navigate through the initial setup screens, you’ll reach the network setup page. Here, it typically requires you to connect to Wi-Fi. Don’t worry, you can bypass this step.
Step 2: Open the Command Prompt
On the Wi-Fi setup screen, press Shift + F10 to open the Command Prompt.
This step allows you to access a backend tool that will help trick the setup process. The Command Prompt is a powerful tool that lets you input specific commands to modify system settings.
Step 3: Enter the Command
Type taskkill /F /IM oobenetworkconnectionflow.exe and press Enter.
This command will terminate the network connection setup process. By killing this task, you essentially trick Windows into thinking that the network setup step is complete.
Step 4: Continue with Setup
Close the Command Prompt window and continue with the Windows 11 installation.
After the command has been executed, you should be able to proceed through the rest of the Windows 11 setup without needing to connect to Wi-Fi.
Step 5: Complete Installation
Follow the remaining on-screen instructions to finish installing Windows 11.
You can now complete the installation process, setting up your user account and other preferences. Once the installation is complete, you can connect to Wi-Fi from the desktop environment later.
Once you’ve completed these steps, you’ll be able to finish setting up Windows 11 without connecting to Wi-Fi during the installation process. You can always connect to the internet later through the settings menu.
Tips for Skipping Wi-Fi Setup on Windows 11
- Use the Shift + F10 shortcut to access the Command Prompt quickly.
- Ensure you type the command exactly as shown to avoid errors.
- If you’re not comfortable using the Command Prompt, consider using a wired Ethernet connection temporarily.
- This method works best on new installations; if you’re updating from a previous version, the steps may differ.
- Keep your device drivers handy; some features may need manual setup once you’re connected to the internet later.
Frequently Asked Questions
Can I skip the Wi-Fi setup without using the Command Prompt?
Yes, using a wired Ethernet connection can bypass the Wi-Fi setup, but it requires internet access.
Will this method work on all versions of Windows 11?
This method should work on most versions, but specific updates or patches could change this behavior.
Is it safe to use the Command Prompt during installation?
Yes, it is safe if you follow the instructions exactly. The Command Prompt is a trusted tool for advanced settings.
Do I need to repeat these steps if I reinstall Windows 11?
Yes, you’ll need to perform these steps each time you reinstall Windows 11 if you want to skip the Wi-Fi setup.
Can I connect to Wi-Fi after skipping the setup?
Absolutely. You can connect to Wi-Fi anytime through the settings menu once the installation is complete.
Summary
- Start the Windows 11 Installation
- Open the Command Prompt
- Enter the Command
- Continue with Setup
- Complete Installation
Conclusion
Skipping the Wi-Fi setup on Windows 11 may seem like a daunting task, but it’s quite straightforward if you follow the right steps. By using the Command Prompt to terminate the network connection flow, you can bypass this requirement and proceed with the installation smoothly. This guide aimed to simplify the process, making it accessible even if you’re not tech-savvy. Remember, you can always connect to the internet later through the desktop environment. If you found this guide helpful, consider sharing it with others who might benefit from it. For more tips and tricks on mastering Windows 11, stay tuned to our future articles!
Matt Jacobs has been working as an IT consultant for small businesses since receiving his Master’s degree in 2003. While he still does some consulting work, his primary focus now is on creating technology support content for SupportYourTech.com.
His work can be found on many websites and focuses on topics such as Microsoft Office, Apple devices, Android devices, Photoshop, and more.
Время на прочтение1 мин
Количество просмотров29K

Слева процесс установки Windows 11 Home без Интернета нельзя продолжить. Справа Windows 11 Pro, где можно выбрать «нет соединения с Интернетом» и продолжить установку с локальной учеткой.
По информации портала Neowin, чтобы установить утечку Windows 11 Home, нужно подключиться к Интернету и войти в учётную запись Microsoft. В версии Windows 11 Pro такого требования нет. Эксперты Neowin обнаружили простой способ, как установить 11 Home без входа в аккаунт Microsoft.
Если нажать комбинацию «Alt + F4» на диалоге с требованием войти в онлайн-учётку, то он просто закроется, а установка продолжится. Пользователя лишь попросят настроить локальную учётную запись.
Обход штатного требования Windows 11 Home подключения к Интернету для завершения установки.
Не факт, что этот трюк будет работать в официальном релизе Windows 11
В Windows 10 требование учётной записи Microsoft обходится иначе: при установке нужно отключить сетевой кабель или не настраивать Wi-Fi.
Появившаяся в Сети Windows 11 — настоящий продукт Microsoft. На это указывает то, что компания подала запрос на удаление копий операционки в связи с нарушением авторских прав и признала факт утечки.
Установочный образ Windows 11, скриншоты процесса её установки и интерфейса появились в Сети 15 июня.
Специалисты HotHardware провели сравнительное тестирование скорости работы двух ноутбуков на утекшей предрелизной сборке Windows 11 build 21996.1 и последней версии Windows 10. А эксперты портала XDA обнаружили, что до Windows 11 cмогут бесплатно обновиться пользователи лицензионных Windows 7 и 8/8.1.
24 июня Microsoft обещает провести конференцию, на которой представит «Windows следующего поколения»
Sign in to your MUO account
Summary
- You can use Command Prompt to bypass network setup in Windows 11 when you don’t have an internet connection or want to create a local account.
- Alternatively, you can open Task Manager during setup and end the Network Connection Flow process to skip the network setup in Windows 11.
Windows 11 requires you to sign in with a Microsoft account to finish setting up your new computer. However, if you don’t have an active internet connection or want to use a local user account, you can follow these methods to set up Windows 11.
1. Bypass Out-of-Box Experience (OOBE) Internet Requirement
You can bypass the Let’s connect you to a network screen using the OOBE \BYPASSNRO command in Command Prompt. When executed, it runs an existing CMD script, bypassnro.cmd, stored in the System32 folder to modify the Windows registry. This modification allows you to complete the Windows 11 setup without an internet connection. To do this:
- Boot your computer with the Windows installation media. Skip to Step 6 below if you are already on the Let’s connect you to a network screen.
-
When the Windows Setup dialog appears, select your preferred language, time, and keyboard input layout and click Next. Then, click Install Now.

-
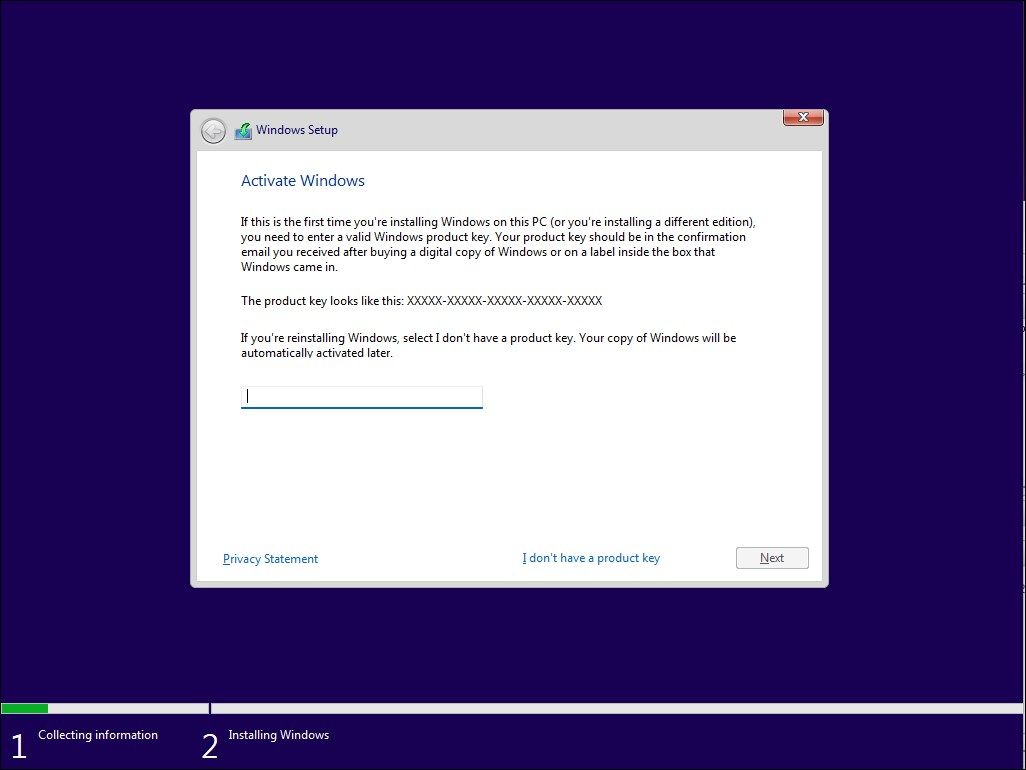
Enter your product key to activate Windows 11. If you don’t have a product key, click the I don’t have a product key link in the bottom-right corner. If you’re upgrading from Windows 10 or an older version of Windows 11, the OS will automatically recognize and validate the Windows product key linked to your computer’s hardware.
- Next, if prompted, select the edition of Windows 11 you want to install. Check the box to accept terms and click Next. Then, select Custom: Install Windows Only (Advanced).
-
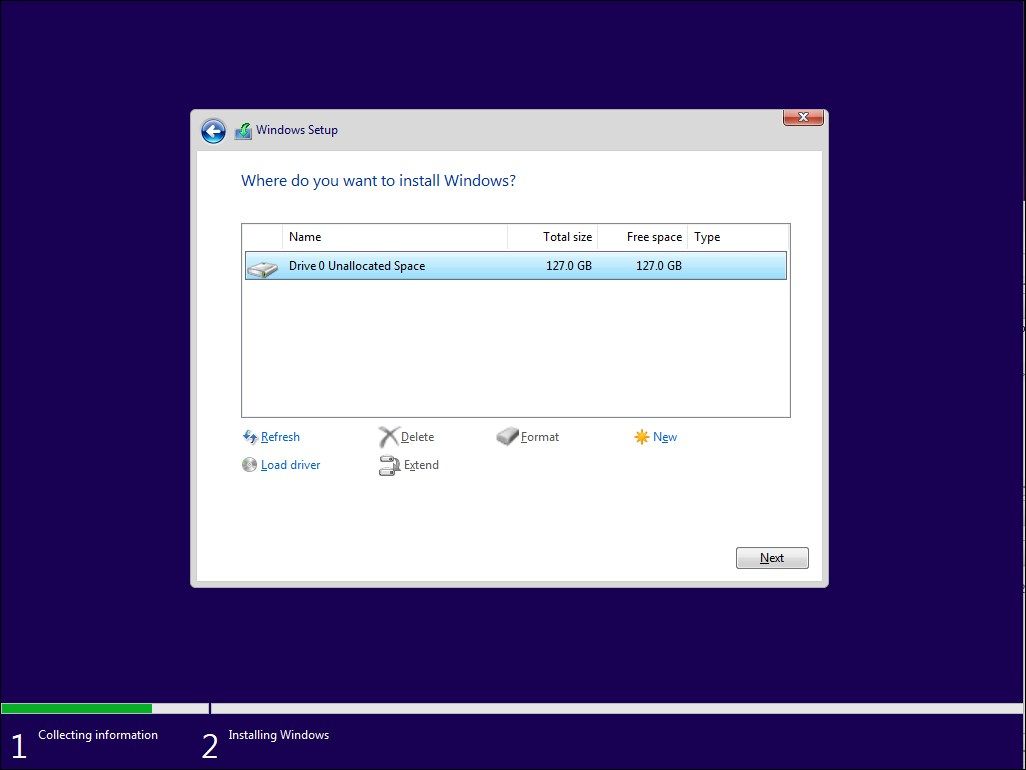
Select the installation drive and click Next. Wait for Windows to finish installation and restart your computer. In the setup screen, select your region and keyboard layout.
-
Once in the Let’s connect you to a network screen, press Shift + F10 to launch the Command Prompt.

-
In the Command Prompt window, type the following command and press Enter:
OOBE\BYPASSNRO -
Now, your system will restart and relaunch the OOBE dialog. Follow the on-screen instructions to complete the setup. When you reach the Let’s connect you to a network screen, click I don’t have Internet.
-
Next, click Continue with limited setup. Then, accept the license agreement and proceed to create your local user account.
Also, make sure to add security questions. This will help you recover your local user account in case you forget your password. Once done, follow the on-screen instructions to complete the setup.
2. End the Network Connection Flow Process Using Task Manager
You can bypass the «let’s connect you to a network» screen by ending the oobenetworkconnectionflow.exe process. Since you already have Windows 11 installed at this stage, you can launch the Task Manager on top of your setup wizard using Command Prompt and kill the process.
This method may not always work as new Windows updates often patch such workarounds.
To skip the Windows 11 network setup using Task Manager:
- Assuming you’re in the Let’s connect you to a network screen, press Shift + F10 to launch the Command Prompt.
-
In the Command Prompt window, type taskmgr and hit Enter to launch Task Manager. Alternatively, you can press Ctrl + Shift + Esc to launch it.

- Click More Details to open Task Manager in full view.
-
Head to the Processes tab and use the search bar in Task Manager to find the Network Connection Flow process.
- Select the Network Connection Flow process and then click the End task button. Wait for the process to end, and then close the Task Manager.
- Type exit in the Command Prompt and hit the Enter key.
The installation process will refresh, and you’ll be redirected to the setup wizard. It will show some loading animation and then proceed to the next step. Here, enter your name and password to create a local user account in Windows 11 and complete the setup.
Once you finish the setup, connect to the internet. Then, head to Settings > Windows Update and download all the critical security and feature updates. You may also notice a few missing icons after the initial setup. Windows will download these icons when you connect your PC to the internet.