
Все способы:
- Способ 1: Ручное редактирование реестра
- Способ 2: Создание и запуск REG-файла
- Способ 3: Winaero Tweaker
- Вопросы и ответы: 11
Способ 1: Ручное редактирование реестра
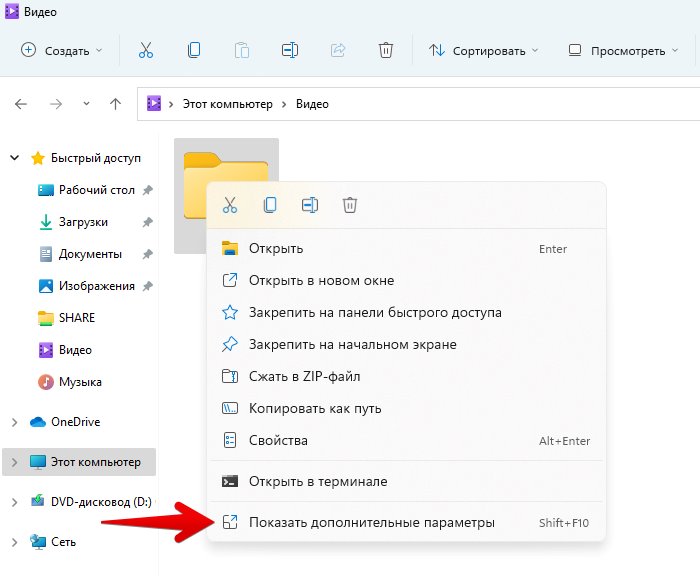
Постоянно нажимать кнопку «Показать дополнительные параметры» в Windows 11 для возвращения старого контекстного меню удобно далеко не всем пользователям. Специально для таких ситуаций, когда нужно отображать старую версию постоянно, мы и подготовили данную статью, и рассмотрим в ней все доступные методы изменения настроек. Начнем с ручного редактирования реестра, что не займет у вас много времени.
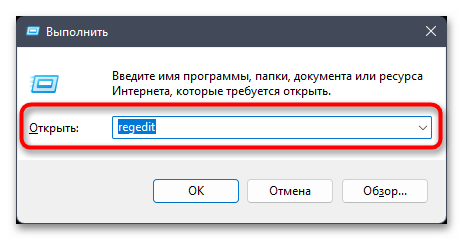
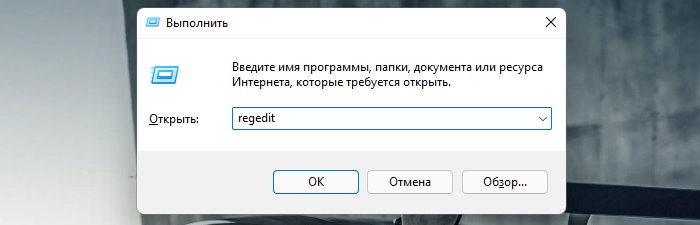
- Откройте утилиту «Выполнить», используя стандартное сочетание клавиш Win + R. В поле ввода укажите
regeditи нажмите Enter для перехода к «Редактору реестра». - В новом окне перейдите по пути
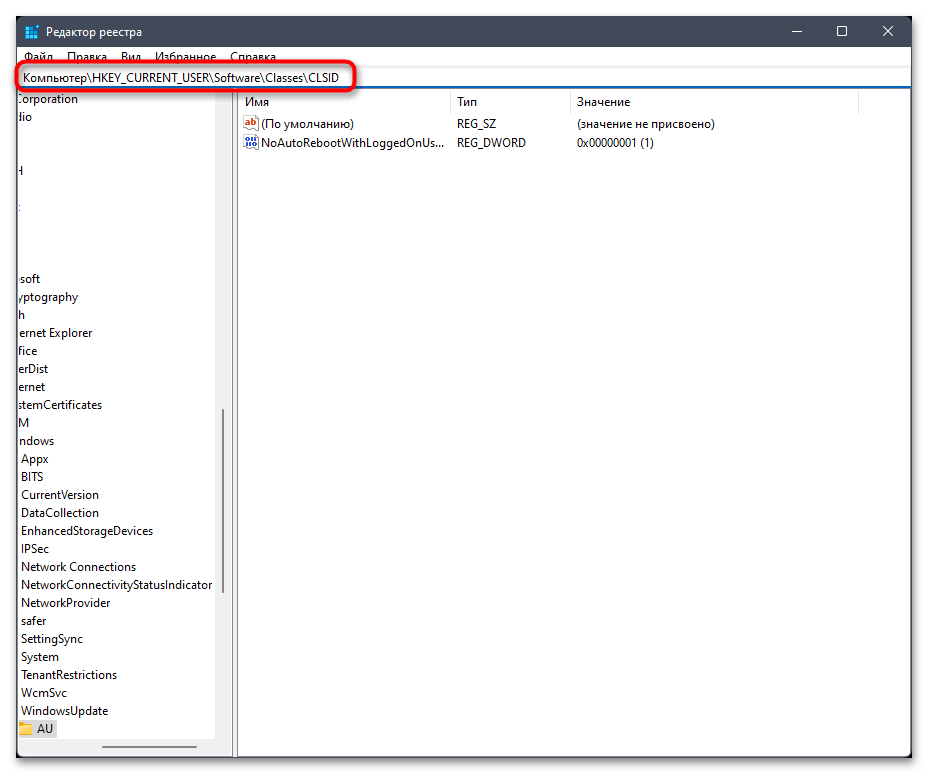
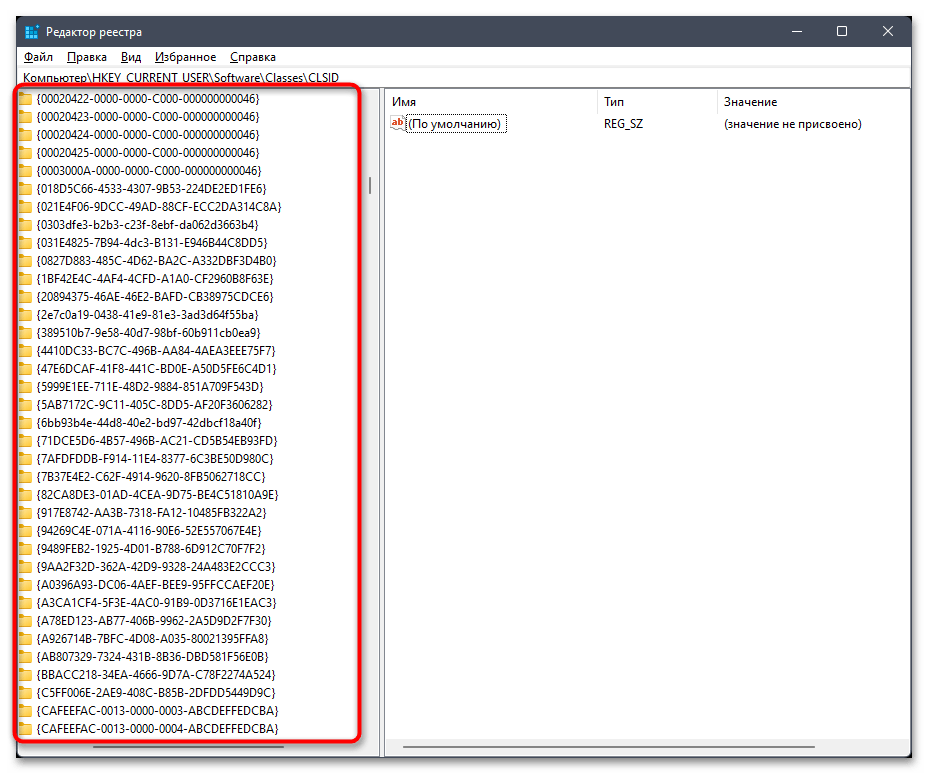
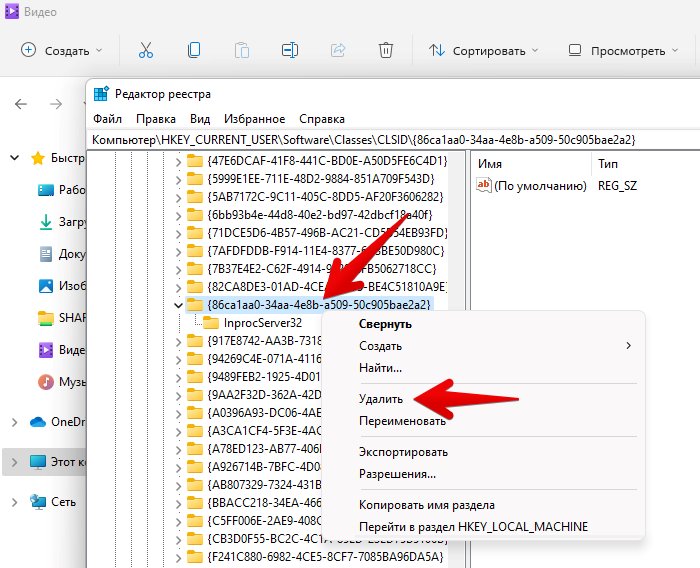
Компьютер\HKEY_CURRENT_USER\Software\Classes\CLSID, скопировав и вставив данный адрес в строку сверху. - Теперь вы увидите множество каталогов с разными идентификаторами. Среди них понадобится отыскать «{86ca1aa0-34aa-4e8b-a509-50c905bae2a2}».
- Если такая папка отсутствует, щелкните правой кнопкой мыши по последнему каталогу в данном пути, который называется «CLSID», в появившемся контекстном меню наведите курсор на «Создать» и выберите пункт «Раздел».
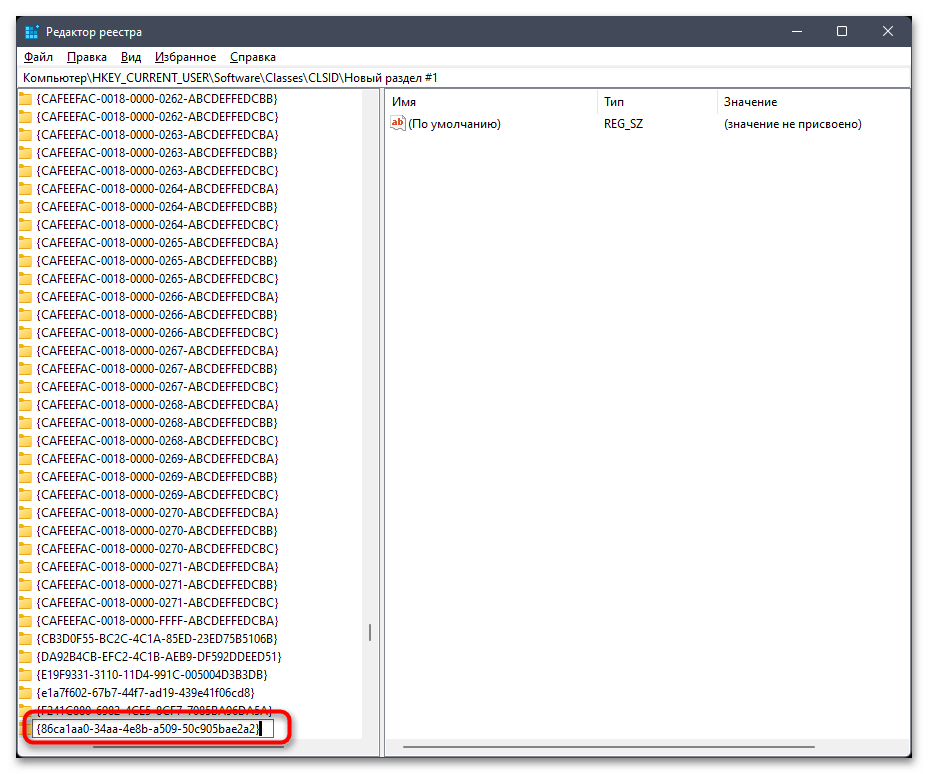
- Задайте для раздела то же самое название идентификатора, которое мы искали выше, а именно «{86ca1aa0-34aa-4e8b-a509-50c905bae2a2}».
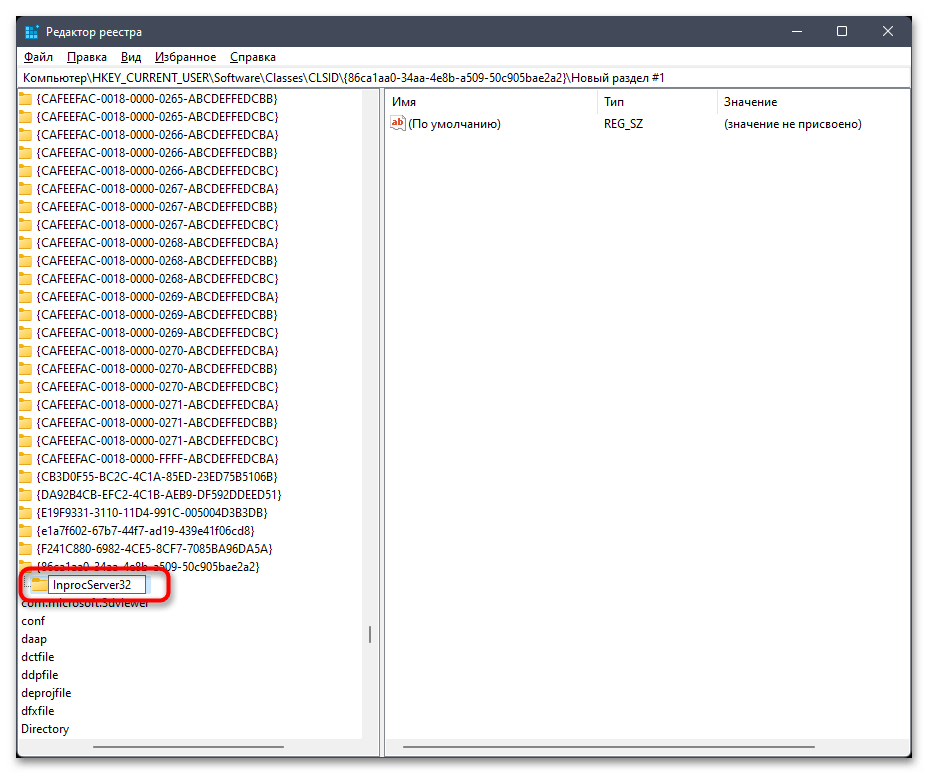
- Перейдите в данный раздел и создайте в нем новую папку с названием «InprocServer32», затем выберите ее для редактирования.
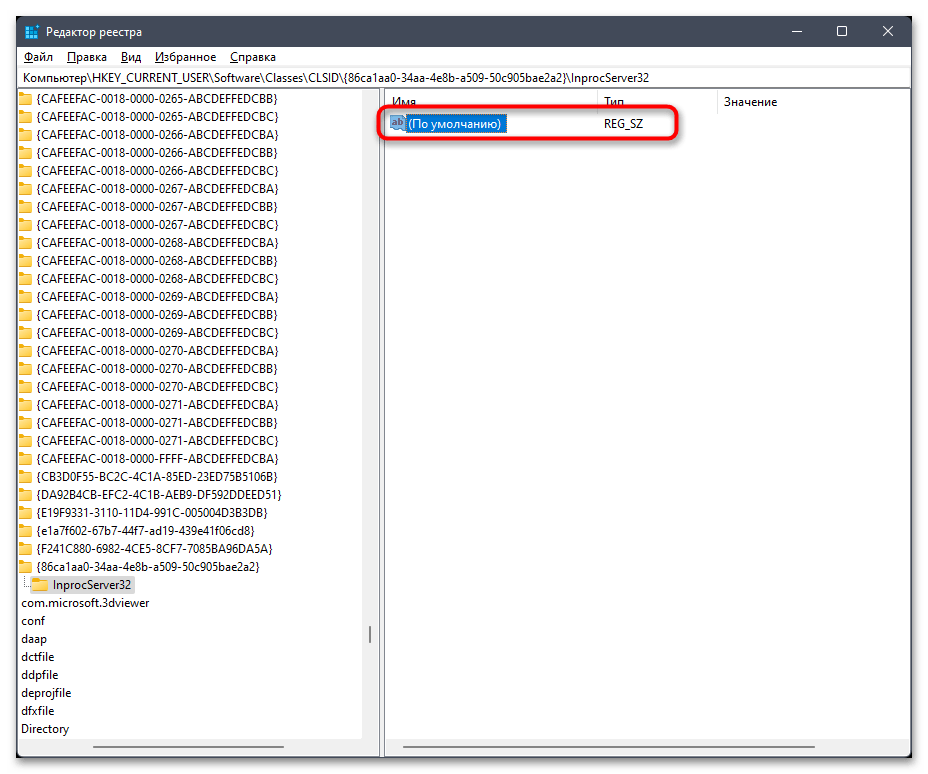
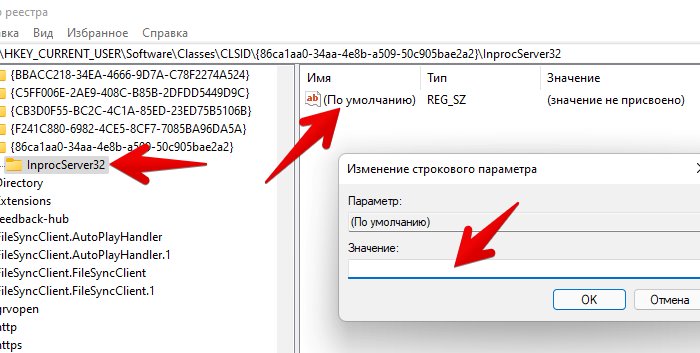
- По умолчанию в ней создается один параметр со значением «Не задано», но такой вариант нас не устраивает, поскольку значение должно быть пустым. Для этого дважды нажмите левой кнопкой мыши по параметру.
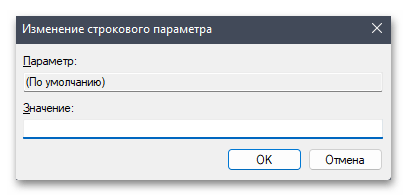
- В окне «Изменение строкового параметра» просто оставьте поле «Значение» пустым и примените изменения.
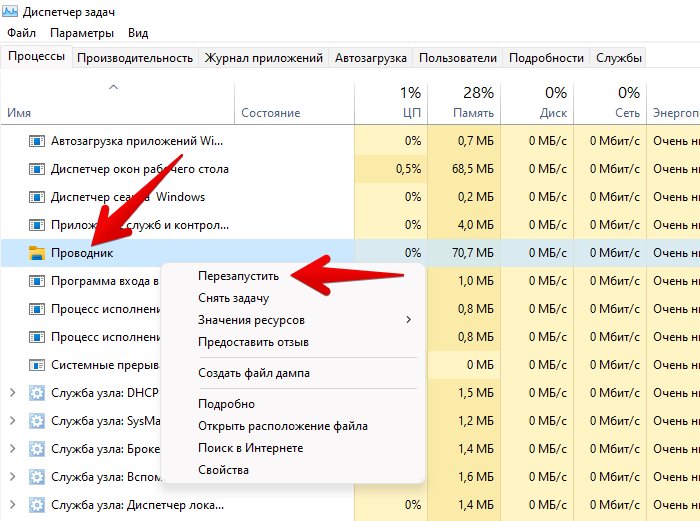
- Обязательно перезагрузите компьютер или перезапустите «Проводник», завершив и создав его процесс заново через «Диспетчер задач». Теперь, когда вы будете вызвать контекстное меню, оно сразу отобразится в своем старом виде.

Способ 2: Создание и запуск REG-файла
Все описанные выше действия можно автоматизировать, но для этого понадобится создать REG-файл. В него будет записан скрипт с необходимыми изменениями, которые вносятся в реестр при запуске этого самого файла. Мы предоставим код скрипта, поэтому вам понадобится только создать файл и запустить его, что осуществляется следующим образом:
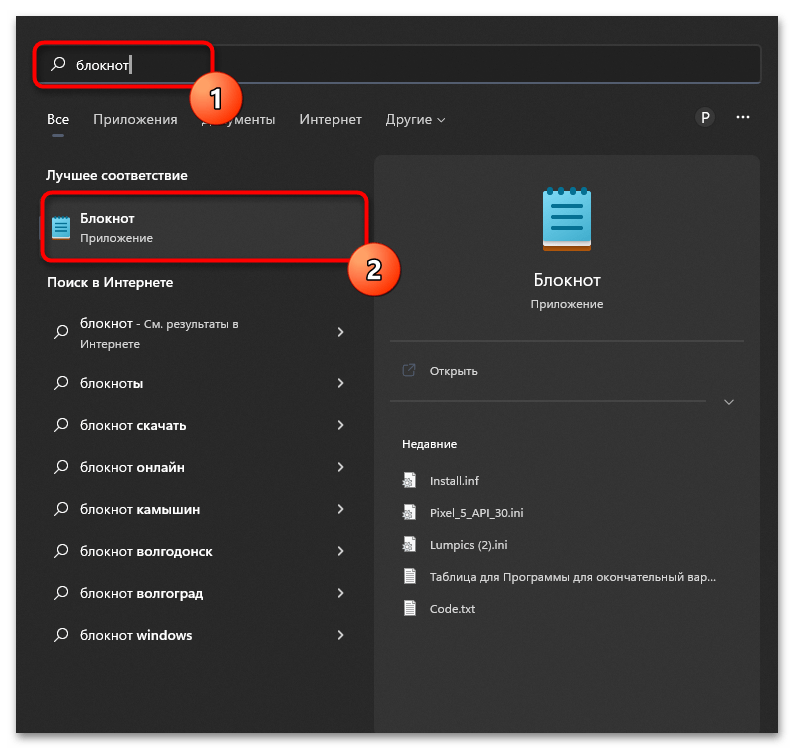
- Откройте «Пуск» и через поиск отыщите «Блокнот», после чего запустите данное приложение.
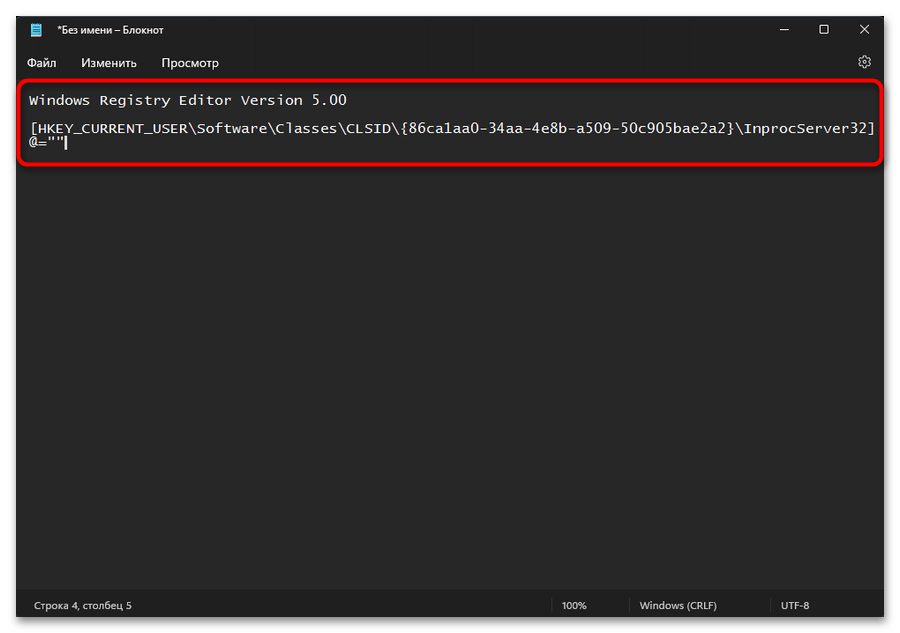
- Вставьте в него код:
Windows Registry Editor Version 5.00
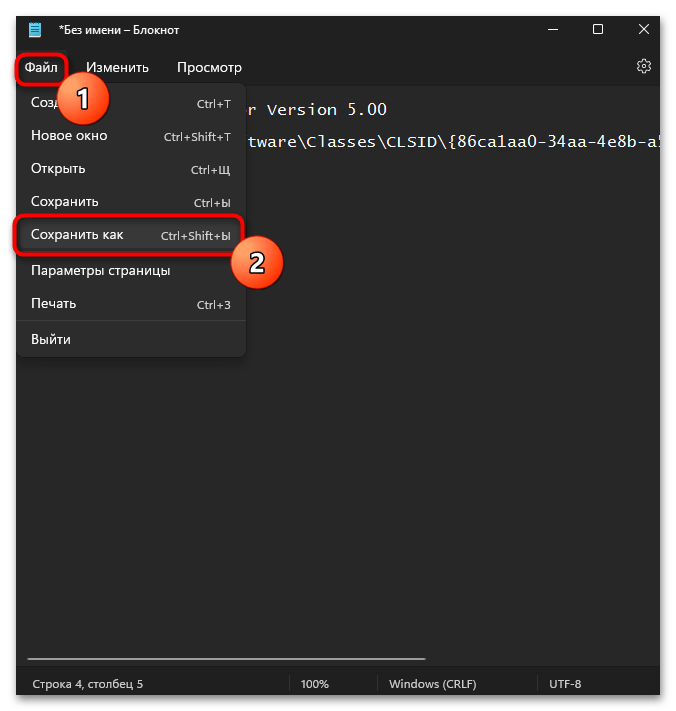
[HKEY_CURRENT_USER\Software\Classes\CLSID\{86ca1aa0-34aa-4e8b-a509-50c905bae2a2}\InprocServer32] - Это весь скрипт, поэтому можно переходить к сохранению, для чего разверните меню «Файл» и выберите пункт «Сохранить как».
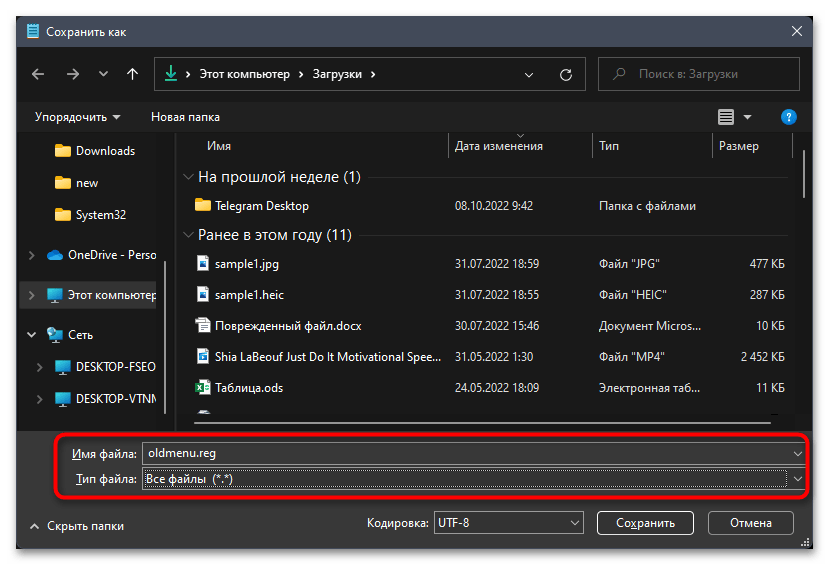
- В новом окне выберите место для сохранения скрипта, задайте для него любое название, но разрешение обязательно укажите как «.reg», а «Тип файла» выставьте как «Все файлы (*.*)».
- После сохранения остается только запустить данный файл, подтвердить внесение изменений и дождаться завершения. Обязательно перезагрузите «Проводник» или всю операционную систему, поскольку старое контекстное меню будет возвращено только после выполнения одного из этих действий.
Способ 3: Winaero Tweaker
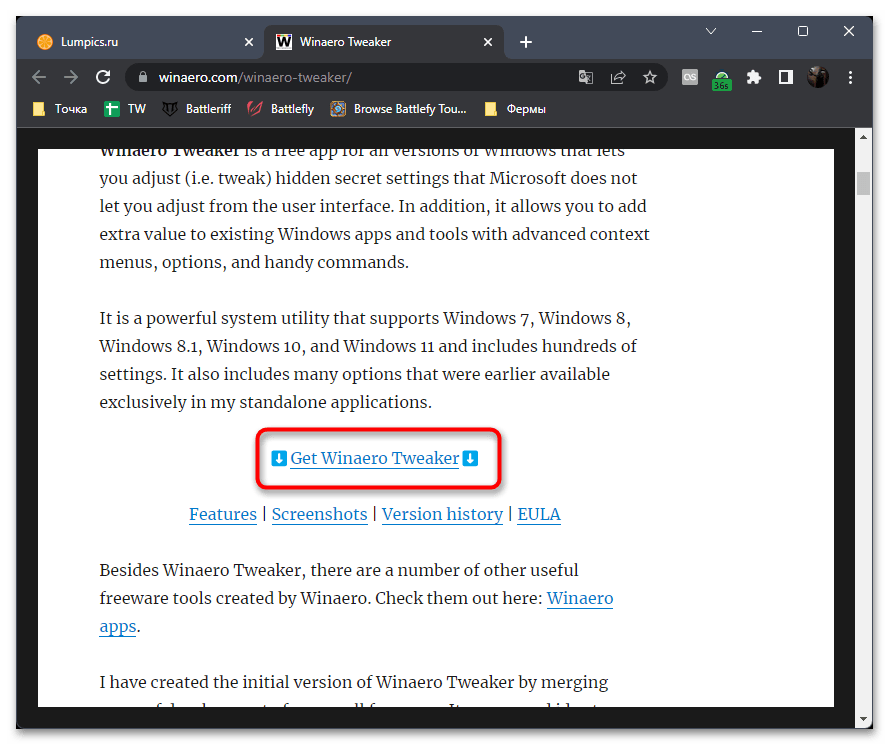
Существует много сторонних программ, которые позволяют упростить внесение изменений в систему до нажатия по одной кнопке. Winaero Tweaker является одним из таких решений. В функциональность софта включено много разных параметров, однако в рамках этой статьи остановимся только на одном, который и позволяет показывать дополнительные параметры в контекстном меню всегда.
Скачать Winaero Tweaker с официального сайта
- Winaero Tweaker распространяется бесплатно, поэтому на официальном сайте понадобится только нажать кнопку «Get Winaero Tweaker».
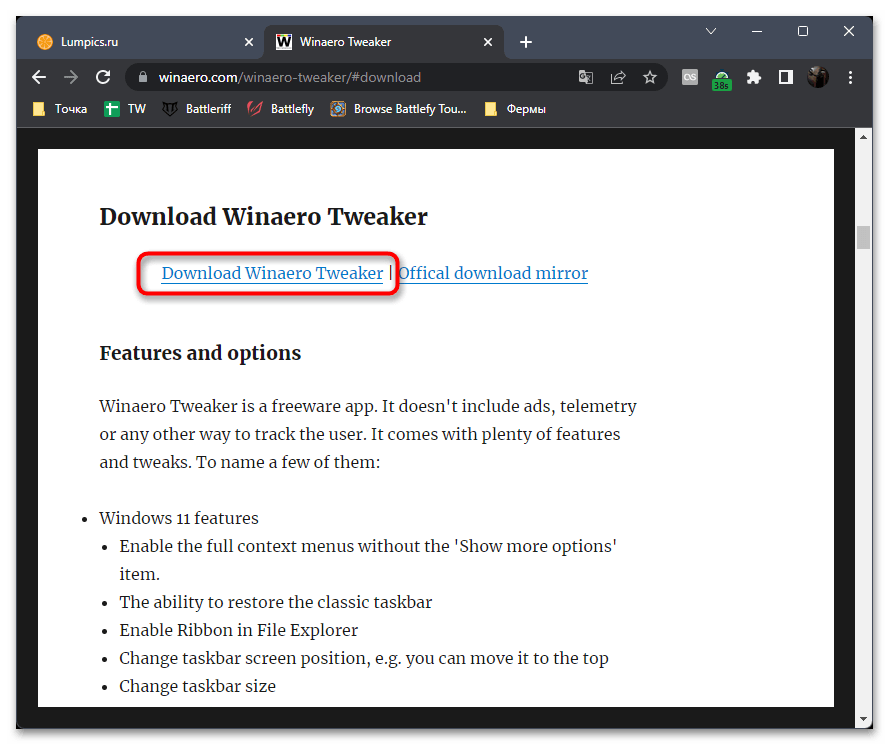
- Скачивайте программу с официального сервера, а если он по каким-то причинам будет недоступен, используйте предложенные зеркала.
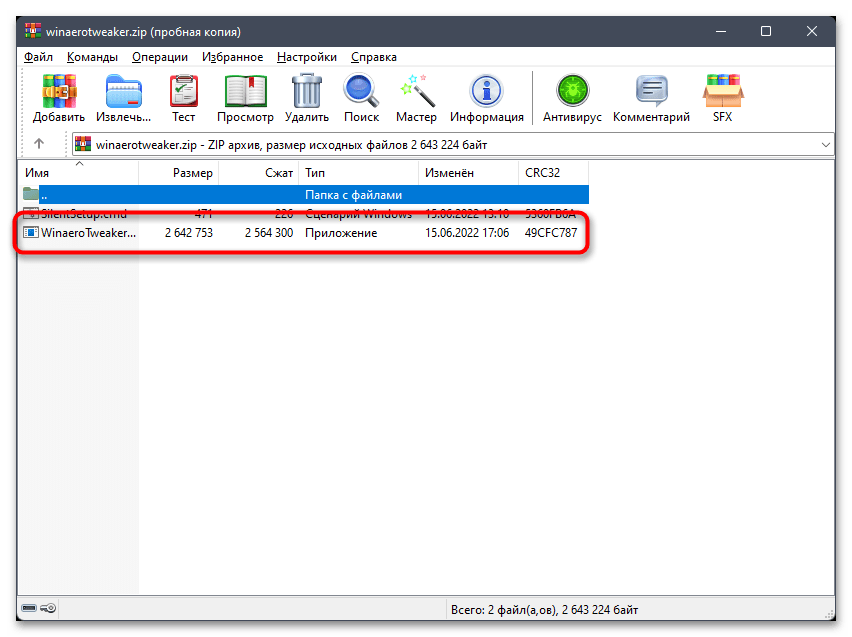
- Софт будет скачан в виде архива, где вы найдете исполняемый файл для запуска. Распакуйте его или запускайте прямо из архива.
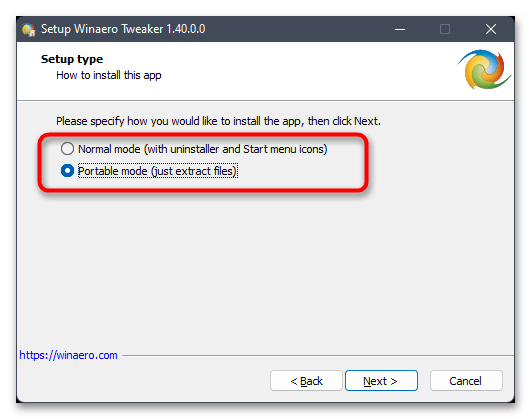
- В установщике вы можете выбрать, распаковать файлы для запуска Winaero Tweaker в портативном режиме, или установить полную версию со всеми необходимыми исполняемыми объектами и значками.
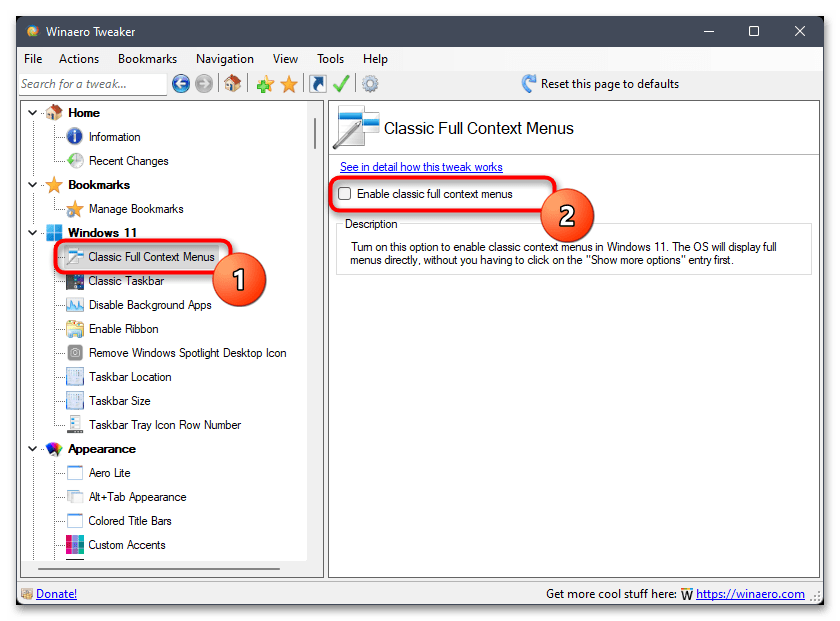
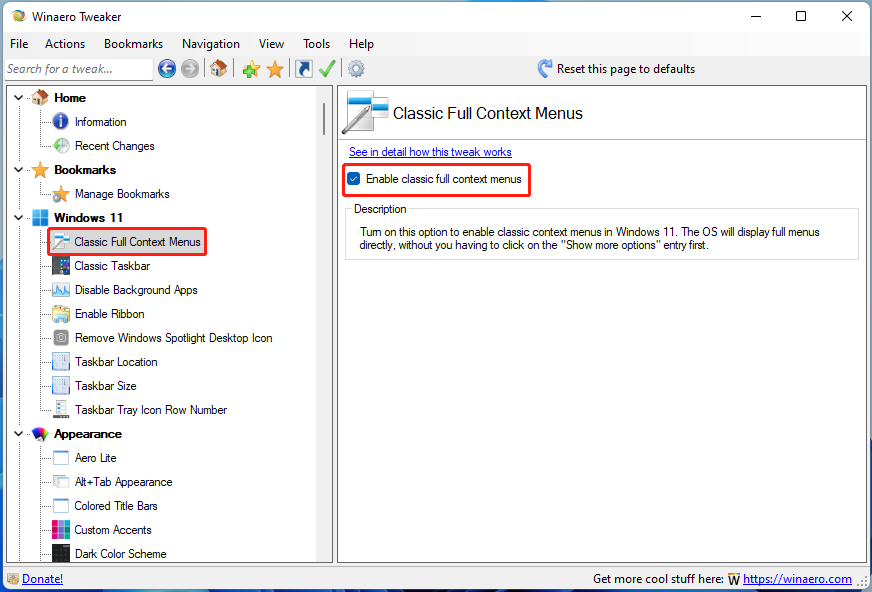
- По завершении инсталляции запустите программу и в разделе «Windows 11» выберите параметр «Classic Full Context Menu».
- Еще этот параметр можно выбрать в древовидном списке при развертывании категории. На панели справа появится строка для активации настройки, в которой нужно поставить галочку.
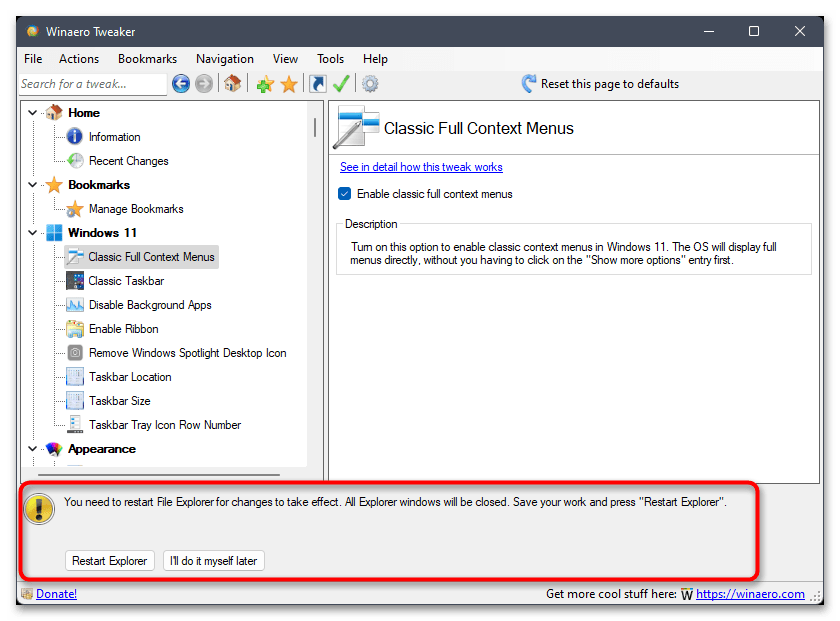
- Вы будете уведомлены, что изменения внесены, но вступят в силу только после перезапуска «Проводника». Сделать это можно прямо через Winaero Tweaker, щелкнув по «Restart Explorer».

Наша группа в TelegramПолезные советы и помощь
Readers help support Windows Report. We may get a commission if you buy through our links.
Read our disclosure page to find out how can you help Windows Report sustain the editorial team. Read more
More and more people are experiencing the new and improved Microsoft operating system, but it seems like some of them still prefer the old school design.
There is no doubt that the new context menu brings up impressive consistency to Windows 11.
If we think about Windows 10, the fact that each application had its own context menu elements created a serious mess for some people.
From the Windows 11 transparent taskbar to round corners, this OS is a masterpiece. In this matter, worldwide users are interested in discovering how to quickly disable the Windows 11 Show More Options menu.
The process is pretty simple, so if you’re in the same boat, make sure you check this guide entirely because it is dedicated only to you!
-
1. Hit the Windows key to open the Start Menu.
-
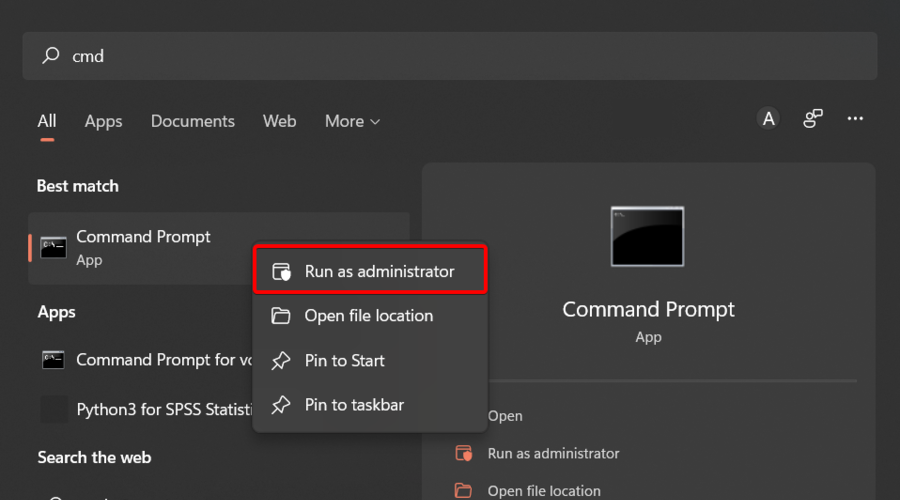
2. Type cmd in the search box to search for Command Prompt.
-
3. Right click on the first result and select Run as Administrator.

-
4. In the opened window, input the following command:
reg add HKCU\Software\Classes\CLSID\{86ca1aa0-34aa-4e8b-a509-50c905bae2a2}\InprocServer32 /ve /d "" /f -
5. Press Enter. Command Prompt will now execute your command.
-
6. Restart your PC.
Disable show more options using Command Prompt
Command Prompt is a very handy and helpful built-in app on your OS that helps you communicate with it. You can use cmd to disable the show more options menu on Windows 11 in just a few simple steps:
Revert File Explorer to the old look
- Use the following keyboard shortcut to open Windows 11 File Explorer: Windows + E.
- Click on the 3-dots menu at the top, then choose Options.

- Once you’re inside the Folder Options menu, navigate to the View tab.

- Now, scroll down through the options and check the box associated with Launch folder options in a separate process.
- Click Apply to save the changes, then on OK.
- Restart your PC for the changes to take effect.


So, these are the already tested methods you can try to disable the Windows 11 Show More Options menu. As you can see, both processes are pretty simple and don’t consume time.
Because it is always important to keep your system safe, we strongly recommend also checking the best security & privacy features in Windows 11.
Before you leave, don’t hesitate to check our guide on how to get back the old right-click menu in Windows 11.
- Recent Windows 11 update lets you disable profanity filter in voice typing
- Microsoft wants Windows 10 users to upgrade to Windows 11 or Copilot + PCs
- Windows 11 KB5055627 update makes File Explorer more fluid
Was this guide helpful for your situation? Make sure to share your experience by leaving a comment in the section below.
Radu Tyrsina
Radu Tyrsina has been a Windows fan ever since he got his first PC, a Pentium III (a monster at that time).
For most of the kids of his age, the Internet was an amazing way to play and communicate with others, but he was deeply impressed by the flow of information and how easily you can find anything on the web.
Prior to founding Windows Report, this particular curiosity about digital content enabled him to grow a number of sites that helped hundreds of millions reach faster the answer they’re looking for.
-
Home
-
News
- How to Enable/Disable Show More Options on Windows 11?
By Daisy | Follow |
Last Updated
There are four different easy ways to disable the new context menu and get back to the old classic context menu of Windows 10 in Windows 11. This post from MiniTool will introduce how to disable Show More Options on Windows 11 one by one.
Windows 11 brings an all-new user interface with a greater focus on simplicity. It offers a clean and fresh design. One of the most subtle changes to Windows 11 concerns the new modern right-click or context menus for File Explorer and the desktop.
To enable show more options Windows 11, you need to right-click your desktop and choose Show more options or press the Shift + F10 keys together.
Way 1: Via Registry Editor
You can try to use Registry Editor to disable show more options Windows 11
Step 1: Type regedit in the Search box and click the OK button to open Registry Editor.
Step 2: Go to the following path:
HKEY_CURRENT_USER\SOFTWARE\CLASSES\CLSID
Step 3: Right-click the CLSID folder, expand New, and select DWORD (32-bit) Value. A new Key folder will be created.
Step 4: Rename the value as UndockingDisabled and press the Enter key.
Step 5: Double-click the newly created key and change the value data to 1 and click the OK button.
Step 6: Please remember to restart your PC to make the changes take effect.
If you decide to enable the “Show More Options” menu again, you need to repeat the same steps and expand the CLSID key. Then, right-click the UndockingDisabled key and select Delete. When the confirmation pop-up appears, Select Yes.
Way 2: Via Command Prompt
The second method for you to disable show more options Windows 11 is via Command Prompt.
Step 1: Type cmd in the Search box and choose the first result. Then, click Run as administrator.
Step 2: Once Command Prompt’s window opens you can put the following command and press Enter:
reg add “HKCU\Software\Classes\CLSID\{86ca1aa0-34aa-4e8b-a509-50c905bae2a2}\InprocServer32” /f /ve
Step 3: Restart your computer.
If want to enable the “Show more options” menu in Windows 11, you can enter the following command in Command Prompt and restart your PC.
reg delete “HKEY_CURRENT_USER\Software\Classes\CLSID\{86ca1aa0-34aa-4e8b-a509-50c905bae2a2}” /f
Way 3: Try Third-Party Program
If the above methods are not working, you can try the third-party program to disable Show More Options on Windows 11. Winaero Tweaker is one of the greats tools. You can download it from its official website and install it on your PC. After that, run it to enter its main interface. Under the Classic Full Context Menus part, check the Enable classic full context menus box. Then, restart the tool to make the changes take effect.
Final Words
Here is all information about how to disable Show More Options on Windows 11. I hope this post can be helpful to you.
About The Author
Position: Columnist
Having been an editor at MiniTool since graduating college as an English major, Daisy specializes in writing about data backups, disk cloning, and file syncing as well as general computer knowledge and issues. In her free time, Daisy enjoys running and going with friends to the amusement park.
Windows 11 has come out with new and exciting features, including a few changes to the user interface. However, not all the tweaks have simplified things. For instance, the platform has now ditched the old classic context menu. To access the File Explorer context menu, right-click and navigate to “Show more options.” While the feature isn’t bad, it means more work for some users.
If you love a neat and condensed context menu, this article can help. You’ll learn how to disable the Windows 11 “Show more options” feature in several ways. You’ll also see how to enable it again if you change your mind. Keep reading to find out more.
Disabling Show More Options in Windows 11 using the Registry
Fortunately, Windows 11 doesn’t allow you to disable the “Show more options” menu; the process is part of the new simplistic design. Regardless, you can switch to the old Windows 10 Explorer right-click options by changing the Registry. Here’s how to go about it:
- In the “Search” box at the bottom, type “reg” to open search results, then click on “Run as administrator.”
- Navigate to “HKEY_CURRENT_USER\SOFTWARE\CLASSES\CLSID.”
- Right-click on the “CLSID” folder, choose “New,” then select “Key.”
- In the “New Key #1″ folder you created, right-click it and rename it to”
{86ca1aa0-34aa-4e8b-a509-50c905bae2a2}"and press “Enter.” - Right-click the newly named folder and choose “New -> Key” again.
- Change the name to”
InprocServer32“and press “Enter” to save it. - Launch ‘Task Manager” by pressing “Ctrl + Shift + Esc.”
- Right-click “Windows Explorer” under the “Apps” section at the top (NOT the one under “Windows processes” at the bottom) and choose “Restart.”
- Open “File Explorer” and test out the right-click option. You should see the original Windows 10 file/folder options now.
The process above instantly removes the “Show more options” menu and replaces it with the original Windows 10 file options classic menu. You won’t have to reboot to get the changes, and they’ll reappear after restarting or booting up your system, unlike other registry edits that revert to the previous settings.
Disabling Show More Options in Windows 11 using the Command Prompt
Alternatively, you can use the Command Prompt to make registry changes. Here’s how to do it.
- Type “cmd” in the “Search bar” at the bottom to open search results, then choose “Command Prompt.” Admin is not needed.
- Type the following command and press “Enter” to execute it.
reg add HKCU\Software\Classes\CLSID\{86ca1aa0-34aa-4e8b-a509-50c905bae2a2}\InprocServer32 /ve /d "" /f
- Restart “Windows Explorer” by typing the following two commands:
taskkill /f /im explorer.exestart explorer.exe - Open “File Explorer” and test out the right-click option. You should see the original Windows 10 file/folder options now.

If the “Show more options” context menu doesn’t disappear immediately, try restarting File Explorer again using the above commands, try running the prompt as Administrator, or redo the entire process. Windows 11 File Explorer now displays the classic Windows 10 right-click menu for files and folders. Unlike other select registry edits that return to the original state, the registry change stays when restarting or booting.
If you decide that the Windows 10 right-click menu is no longer desired in Windows 11, follow the instructions below to revert the changes to using “Show more options” once again.
- To restore defaults, type the following command to revert the changes, then press “Enter.” No restart is required for this step.
reg delete "HKEY_CURRENT_USER\Software\Classes\CLSID\{86ca1aa0-34aa-4e8b-a509-50c905bae2a2}" - Type “y” or “yes” in the confirmation prompt and press “Enter” to accept the deletion.
Windows 11 should now display the “Show more options” again in the context menu.
While Windows 11 has many excellent features, getting used to some of them can be quite a hassle. Fortunately, you can always revert to the old context menu using the Registry.
Have you tried disabling the “Show more options” context menu in Windows 11? Please let us know in the comments section below.
Disclaimer: Some pages on this site may include an affiliate link. This does not effect our editorial in any way.
Send To Someone
Missing Device
В данной статье рассмотрим несколько способов возвращения классического меню — меню, вызываемое щелчком правой кнопкой мыши в операционной системе Windows 11.
Компания Microsoft изменила дизайн и представила новое контекстное меню в последней версии ОС, теперь дополнительные параметры скрыты, а для того, чтобы отобразить их, приходится нажимать на пункт меню «Показать дополнительные параметры» (или клавиши «Shift+F10»).
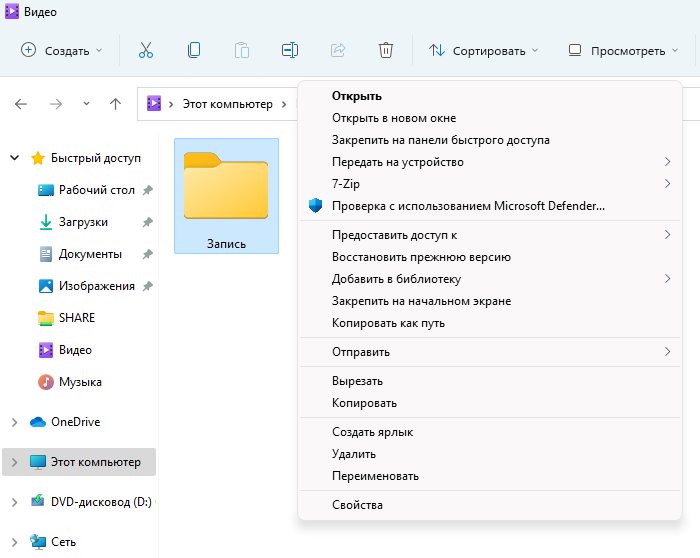
Хотя новое контекстное меню кажется проще и понятнее, многих пользователей по прежнему это сбивает с толку. Основные параметры, такие как копирование, вырезание, переименование и удаление, теперь представляют собой только значки, что затрудняет навигацию для новых пользователей ОС.
Итак, как же вернуть классическое (старое) меню? В Windows нет специального параметра, который вернет старое контекстное меню Windows 10 в Windows 11. Вместо этого нам придется внести изменения в редакторе реестра.
Способ 1. Настройка через редактор реестра
Нажимаем на клавиатуре «Win+R», вводим команду «regedit» и нажимаем «Enter».
Нажимаем «Да» в окне контроля учетных записей, чтобы разрешить вносить приложению изменения в системе.

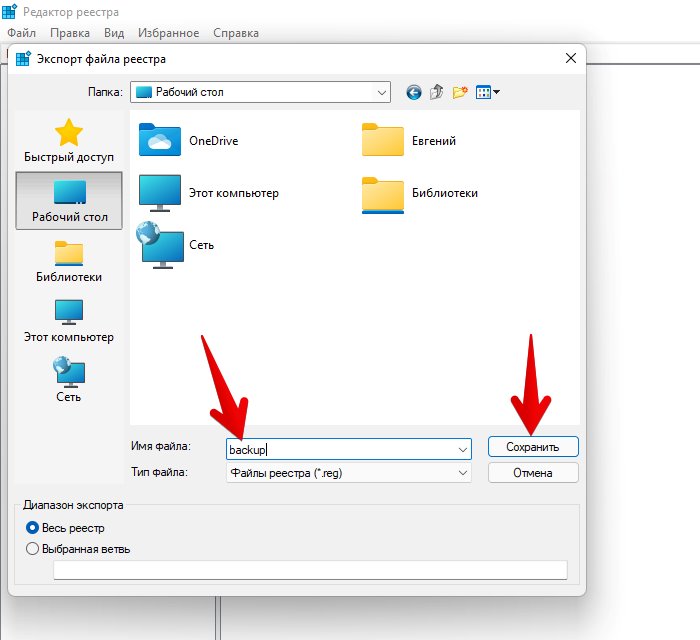
Но прежде, чем вносить изменения в реестр Windows 11, в качестве меры предосторожности следует создать резервную копию реестра. Если мы случайно изменим или удалим важные параметры реестра, мы всегда сможем восстановить их с помощью резервной копии.
В окне «Редактор реестра» Windows нажимаем в меню «Файл», щелкаем по разделу «Компьютер» правой кнопкой мыши и выбираем в меню пункт «Экспортировать».
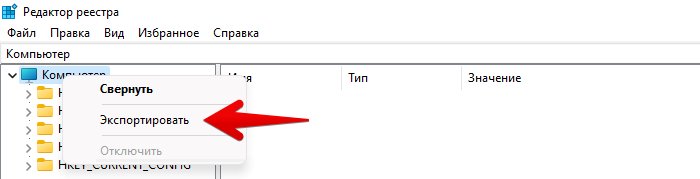
Появится окно «Экспорт файла реестра». Здесь выбираем путь, куда будем сохранять резервную копию (бэкап), указываем имя файла с расширением «.reg» и нажимаем кнопку «Сохранить».
В редакторе реестра перейдем в следующий раздел:
HKEY_CURRENT_USER\SOFTWARE\CLASSES\CLSID
Или можно просто скопировать и вставить указанный выше путь в адресной строке редактора реестра. После вставки нажимаем клавишу «Enter», чтобы перейти к разделу «CLSID».
Далее, щелкаем правой кнопкой мыши по разделу «CLSID» и в появившемся контекстном меню выбираем «Создать» — «Раздел», чтобы создать новый вложенный раздел.
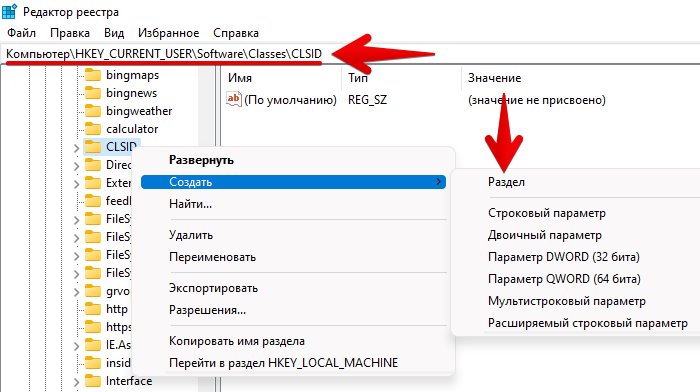
Называем новый раздел следующим именем:
{86ca1aa0-34aa-4e8b-a509-50c905bae2a2}
Готово, новый раздел раздел создан внутри «CLSID».

Теперь создаем еще один раздел «InprocServer32» внутри только что созданного раздела. Повторяем предыдущие действия с новым разделом (пункты меню
«Создать» — «Раздел»).
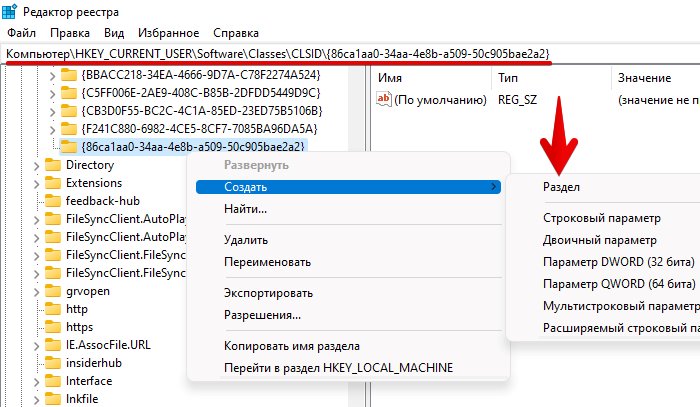
Должно получиться так (см. скриншот):
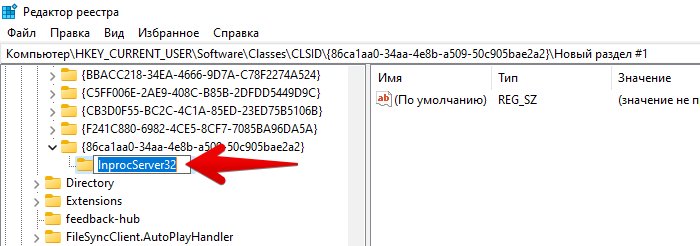
После создания «InprocServer32» мы увидим внутри строковый параметр с именем «По умолчанию». Дважды щелкаем по параметру «По умолчанию», чтобы открыть его. В открывшемся окне «Изменение строкового параметра» убеждаемся, что поле «Значение» пустое и нажимаем кнопку «ОК» или «Enter» на клавиатуре. Важно! Поле значение должно быть пустым, а не 0.
Настройки сделаны, можно закрывать редактор реестра, но это еще не конец. Для того, чтобы изменения вступили в силу, необходимо перезагрузить компьютер. Или вместо этого перезапустить проводник Windows 11 из диспетчера задач — нажимаем клавиши «Ctrl+Shift+Esc», чтобы запустить приложение «Диспетчер задач», находим во вкладке «Процессы» процесс «Проводник» и щелкаем по нему правой кнопкой мыши, затем выбираем в контекстном меню пункт «Перезапустить».
После этого щелкаем правой кнопкой мыши по папке или файлу, чтобы увидеть классическое контекстное меню.
Для того, чтобы вернуть все в исходное значение, переходим в редактор реестра и удаляем созданные разделы. Не забываем после этого перезапустить проводник.
Способ 2. Настройка через командную строку (cmd) или через Терминал Windows 11
Этот способ еще проще и быстрее, в отличие от первого способа, т.к. состоит из пары шагов.
Сначала копируем следующую команду:
reg add HKCU\Software\Classes\CLSID\{86ca1aa0-34aa-4e8b-a509-50c905bae2a2}\InprocServer32 /ve /d "" /f
Затем открываем командную строку или терминал Windows и вставляем скопированную команду, далее нажимаем клавишу «Enter», чтобы ее применить.
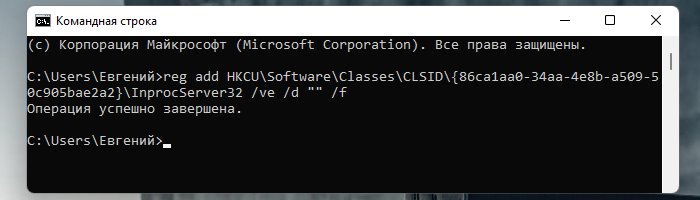
В окне «Командная строка» мы увидим фразу в новой строке «Операция успешно завершена», это означает, что настройки выполнены, т.е. все необходимы разделы в редакторе реестра созданы. Перезапускаем проводник и проверяем контекстное меню Windows 11.
Для отката изменений используем следующую команду:
reg.exe delete "HKCU\Software\Classes\CLSID\{86ca1aa0-34aa-4e8b-a509-50c905bae2a2}" /f
Способ 3. Настройка через файл реестра
Этот способ подразумевает создание файла реестра, который можно сохранить для использования в новой ОС или передачи на другой ПК. Для начала нам нужно открыть новый текстовый документ в любом редакторе, например в блокноте.
Вставляем в блокнот следующее содержимое:
Windows Registry Editor Version 5.00
[HKEY_CURRENT_USER\Software\Classes\CLSID\{86ca1aa0-34aa-4e8b-a509-50c905bae2a2}]
@=""
[HKEY_CURRENT_USER\Software\Classes\CLSID\{86ca1aa0-34aa-4e8b-a509-50c905bae2a2}\InprocServer32]
@=""
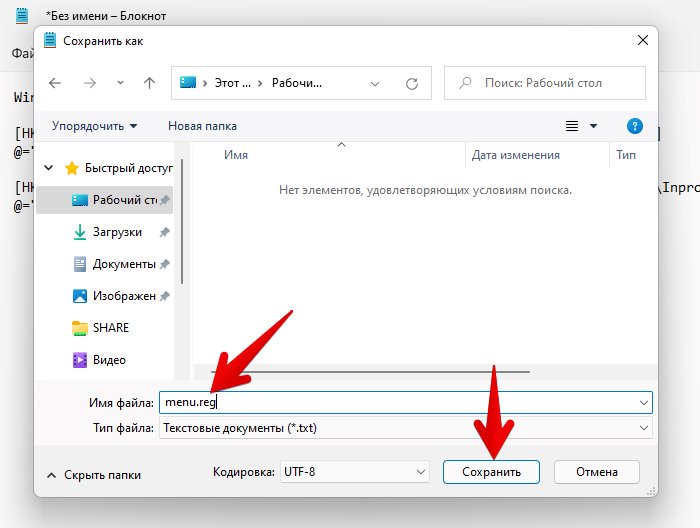
Затем нажимаем в меню «Файл» — «Сохранить как».
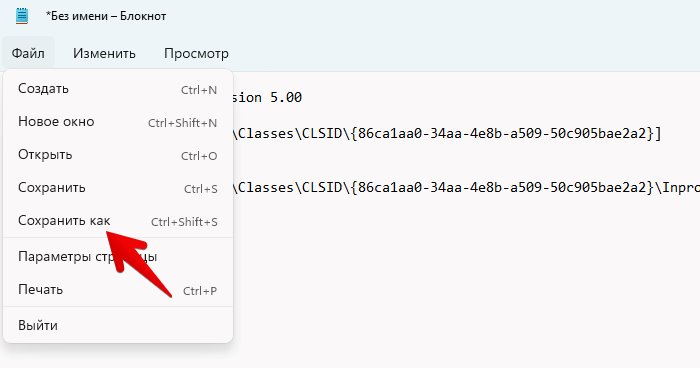
В появившемся окне «Сохранить как» выбираем путь для сохранения файла, указываем имя файла с расширением «.reg» и нажимаем кнопку «Сохранить».
Файл создан. Теперь, запускаем его двойным кликом, появится окно «Вы действительно хотите продолжить?», нажимаем «Да».
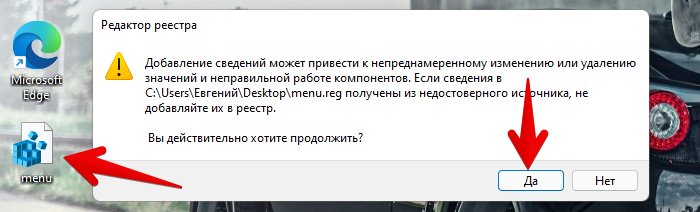
Остается перезапустить проводник.