
Все способы:
- Вариант 1: Wi-Fi
- Вариант 2: Ethernet-кабель
- Способ 1: Проверка подключения
- Способ 2: Использование средства устранения неполадок
- Способ 3: Включение сетевого адаптера
- Способ 4: Настройка электропитания сетевого адаптера
- Способ 5: Проверка сетевого драйвера
- Способ 6: Сброс сети
- Вопросы и ответы: 1
Вариант 1: Wi-Fi
Чаще всего проблемы с соединением появляются при использовании Wi-Fi, поскольку такой тип подключения зависит от большего числа разных настроек. На нашем сайте уже есть информация о том, как решить проблемы с подключением Windows 11 к интернету через Wi-Fi. Если вы как раз столкнулись с такой ошибкой, рекомендуем перейти по ссылке ниже, чтобы ознакомиться с предложенными способами и приступить к их выполнению по порядку, чтобы быстро найти оптимальное решение.
Подробнее: Windows 11 не подключается к Wi-Fi

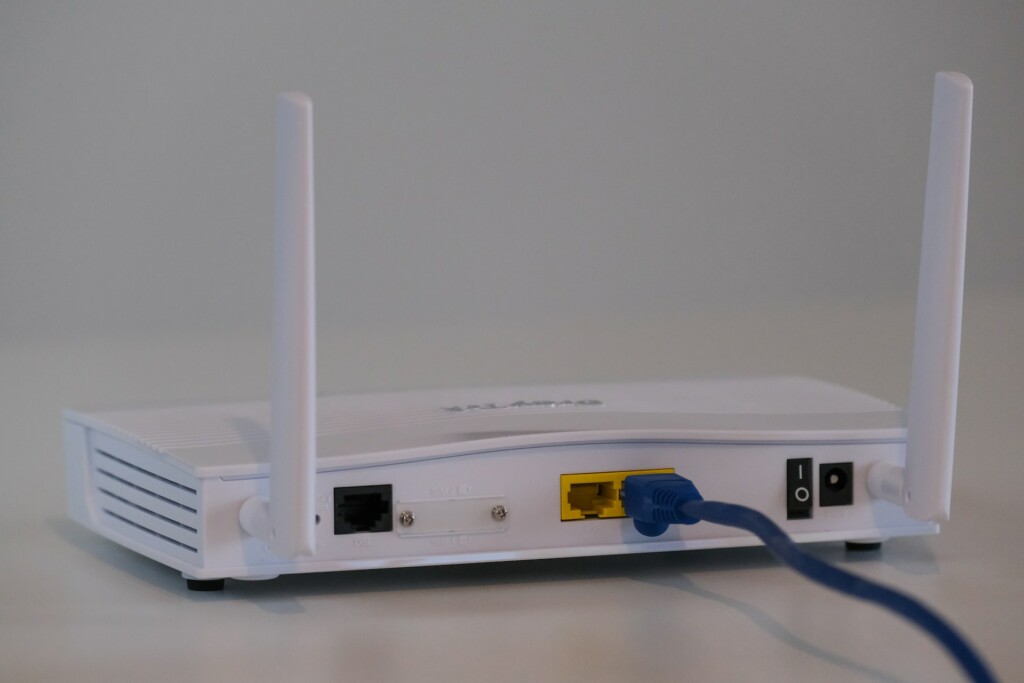
Вариант 2: Ethernet-кабель
Обычно при подключении Ethernet-кабеля к компьютеру интернет появляется сразу же, если настройки роутера выставлены корректно. Для этого даже не требуется отдельный драйвер или изменение каких-либо дополнительных параметров при первом соединении. Если же интернет не появился или кабель вовсе не отображается, придется заняться поиском исправления этой ситуации, с чем мы и предлагаем разобраться в следующих методах.
Способ 1: Проверка подключения
В первую очередь очень важно убедиться в том, что вы выполнили подключение правильно. Проверьте сам кабель на наличие физических повреждений, посмотрите, горит ли индикатор работы LAN-порта на роутере, а также мигает ли лампочка на самой сетевой карте компьютера, если такая присутствует. Это означает, что сигнал поступает.
Читайте также: Как подключить компьютер к интернету

При первом соединении тоже необходимо разобраться с настройками самого роутера, чтобы он получал данные от провайдера корректно. Этому процессу посвящено множество других статей на нашем сайте, поэтому в случае надобности можете воспользоваться поиском, введя название используемого маршрутизатора. Скорее всего, у вас получится найти соответствующую инструкцию по выбору параметров для конкретной модели.
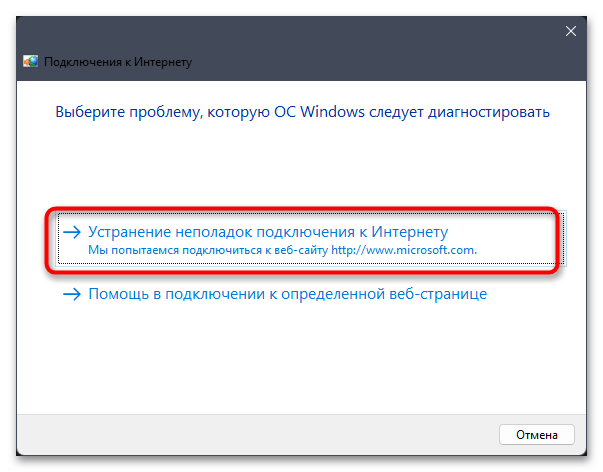
Способ 2: Использование средства устранения неполадок
Возможно, на компьютере возник небольшой сбой, из-за которого не получается получить данные сети или обнаружить сетевой кабель. Проверять основные моменты вручную не совсем удобно, поэтому для этого лучше использовать встроенное в Windows 11 средство устранения неполадок. Нужно лишь найти необходимое и запустить его, что выглядит следующим образом:
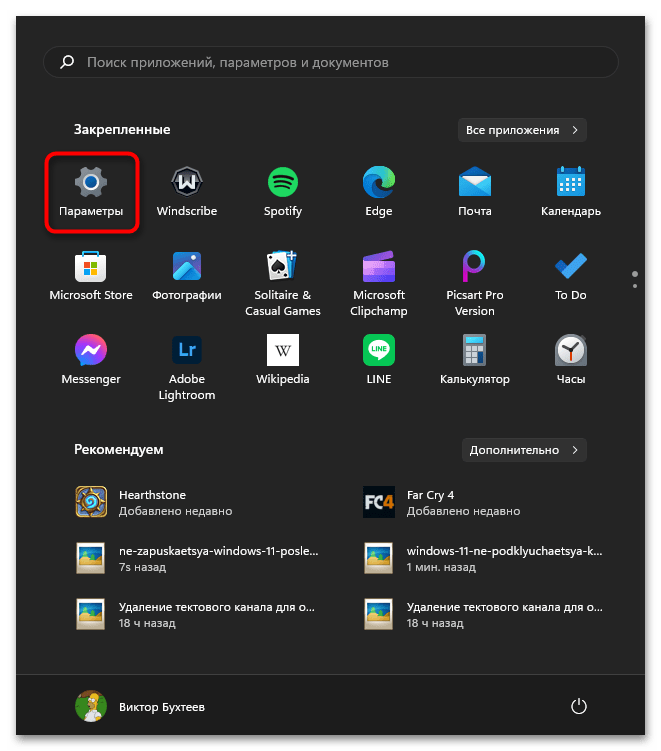
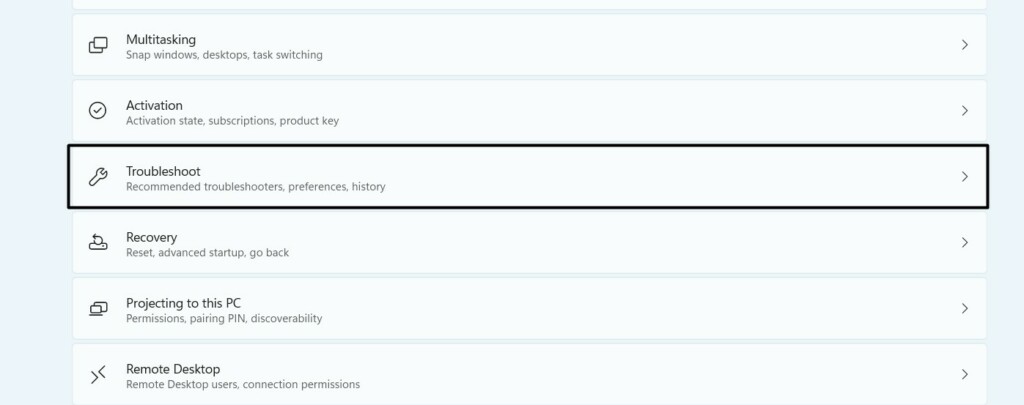
- Откройте «Пуск», нажмите по значку с шестеренкой, чтобы перейти в окно «Параметры».
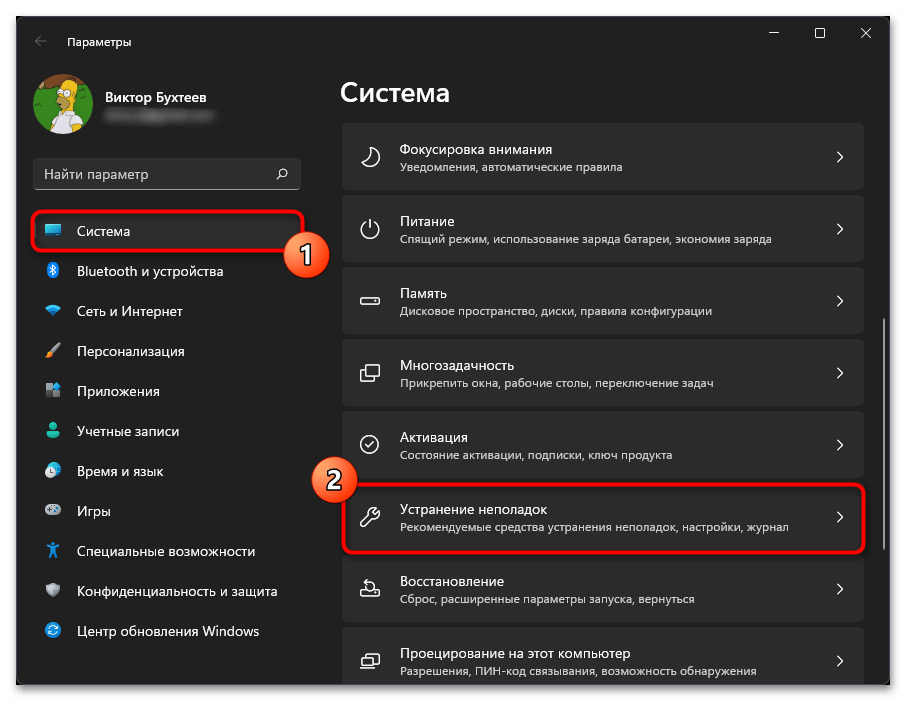
- В нем на панели слева выберите «Система» и категорию «Устранение неполадок».
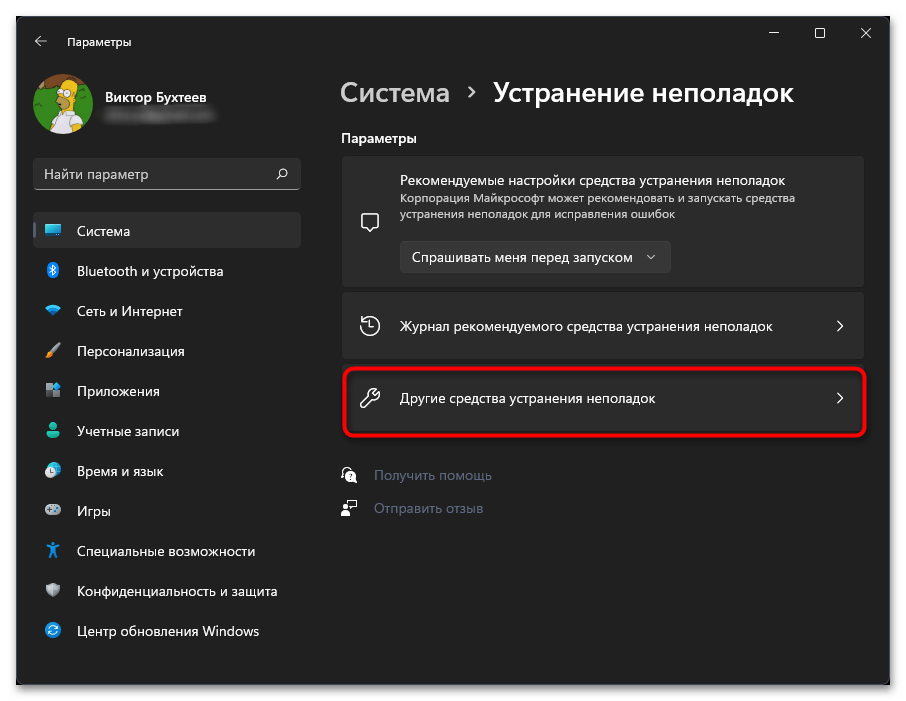
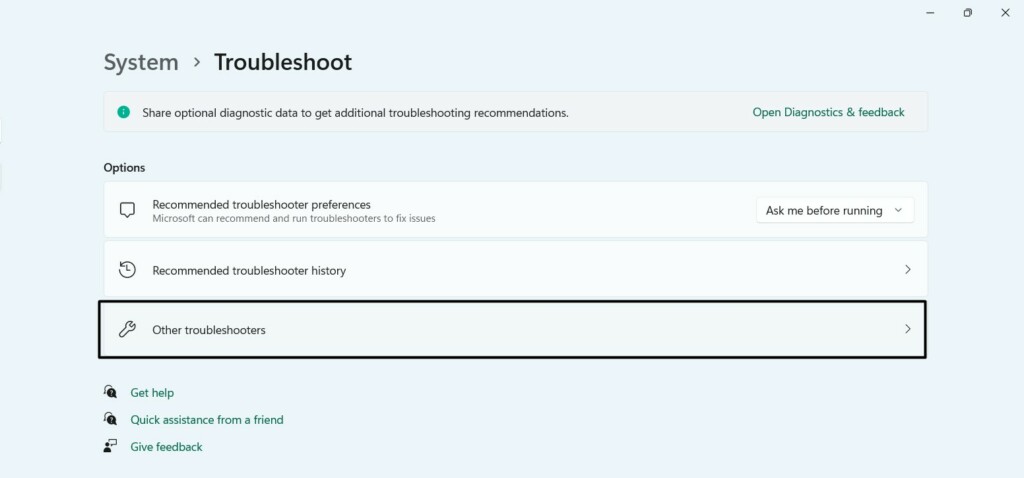
- Щелкните по плитке «Другие средства устранения неполадок».
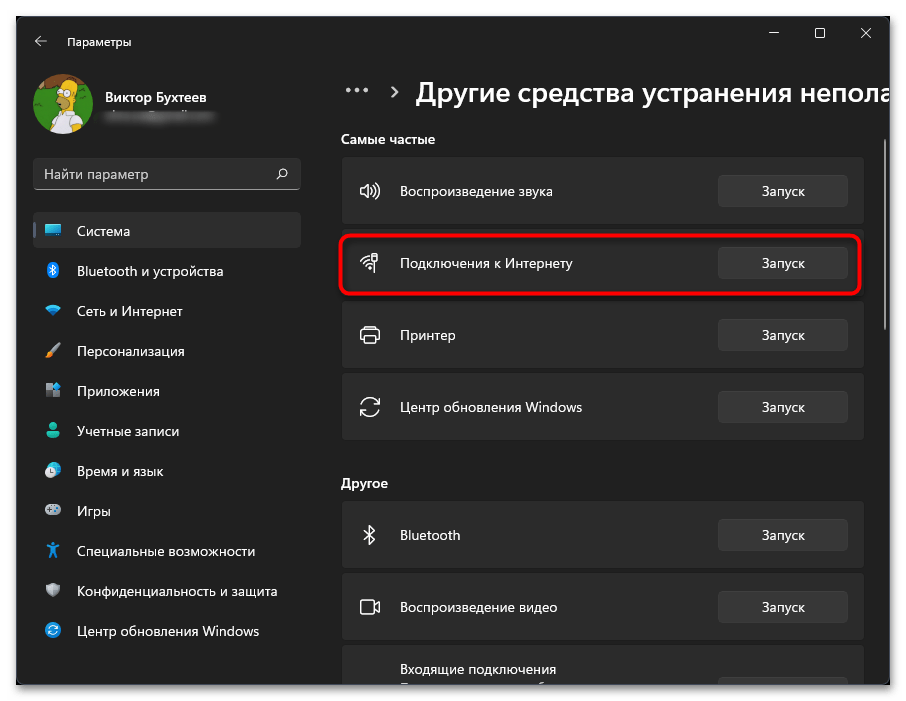
- В списке вас интересует «Подключение к Интернету», где справа нажмите по «Запуск».
- Ожидайте завершения первичного сканирования, затем нажмите по варианту «Устранение неполадок подключения к Интернету».
- Если модуль устранения неполадок выявил какие-то проблемы, они должны быть исправлены автоматически. Вместе с этим на экране появится соответствующее уведомление. Если проблемы не были обнаружены, вы тоже узнаете об этом, сможете закрыть окно и решить, к каким методам исправления переходить далее.

Способ 3: Включение сетевого адаптера
Отключение сетевого адаптера — одна из причин невозможности подключения интернета. Если это действительно так, то сетевой кабель даже не будет отображаться в операционной системе. Для исправления ситуации понадобится просмотреть список всех сетевых адаптеров и включить тот, который вы собираетесь использовать, если он по каким-то причинам деактивирован.
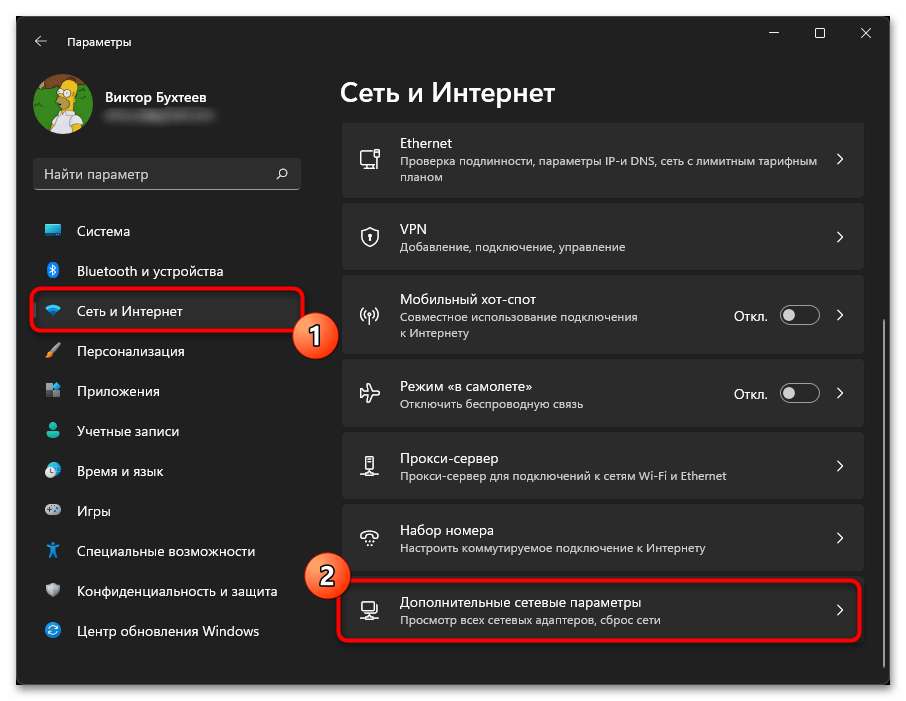
- Для этого в «Параметрах» выберите «Сеть и Интернет», прокрутите колесико вниз и справа щелкните по плитке «Дополнительные сетевые параметры».
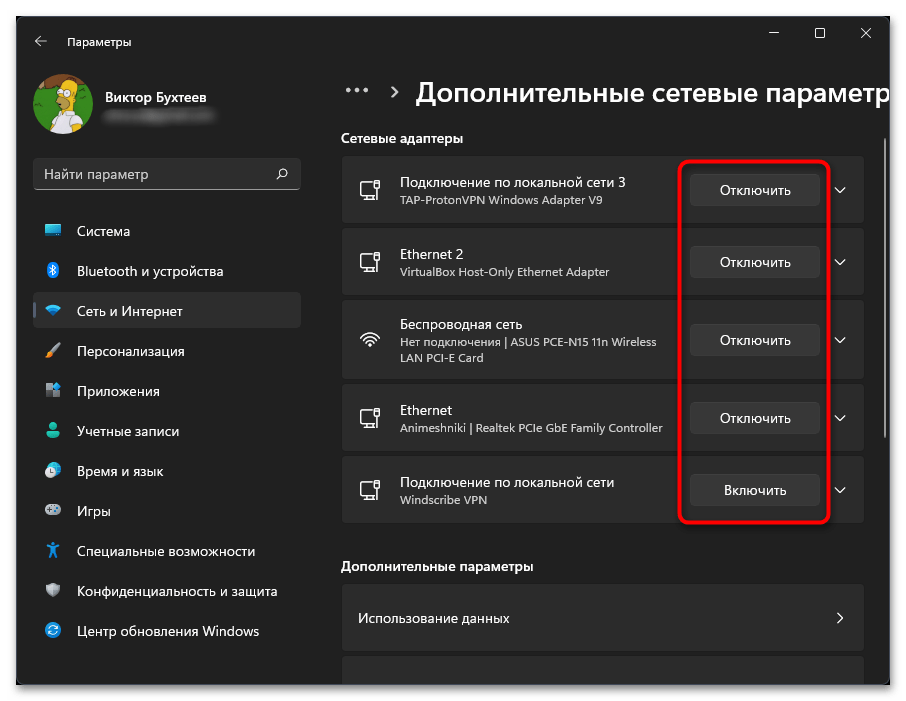
- Посмотрите состояние всех доступных сетевых адаптеров. Если предполагаемый отключен, то возле него будет кнопка «Включить», по которой и следует кликнуть для активации.
Редко, но случается так, что сетевые адаптеры не отображаются в данном списке. Обычно это связано с некорректной работой драйвера или сбоями в работе ОС. Тогда понадобится найти устройство через другое меню и там же его включить, используя соответствующую функцию.
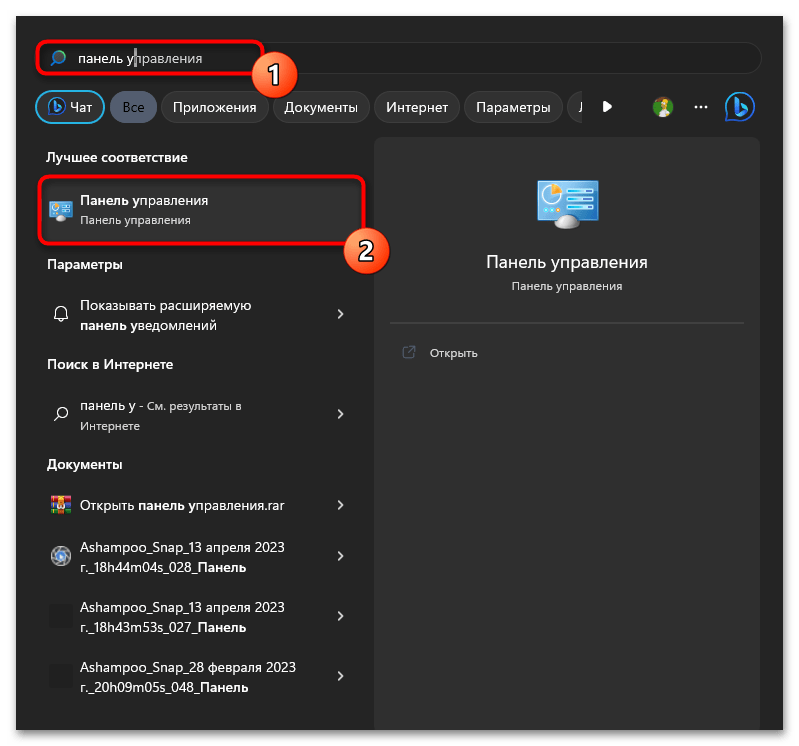
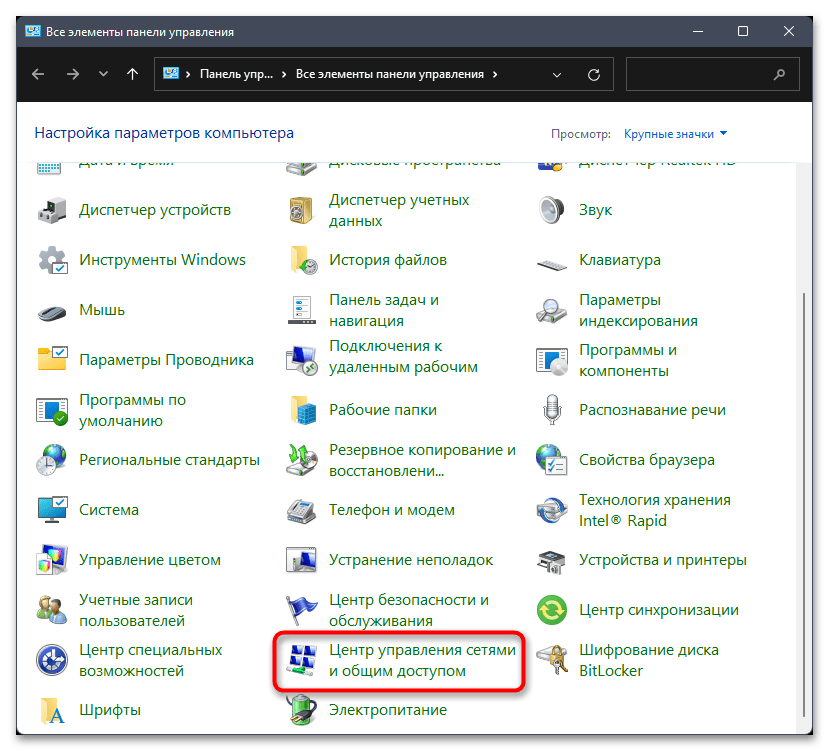
- Откройте «Пуск», через поиск отыщите «Панель управления» и запустите данный стандартный компонент.
- Среди значков отыщите «Центр управления сетями и общим доступом», затем щелкните по названию левой кнопкой мыши.
- В следующем окне слева нажмите по ссылке «Изменение параметров адаптера».
- Если какой-то сетевой адаптер отключен, то он будет подсвечен серым цветом. Понадобится щелкнуть по нему ПКМ и из появившегося контекстного меню выбрать пункт «Включить».


Способ 4: Настройка электропитания сетевого адаптера
Автоматическое отключение используемого сетевого адаптера также может быть причиной проблем с подключением к интернету. По умолчанию эта функция всегда активна, если поддерживается оборудованием, поэтому мы бы рекомендовали отключить данный параметр электропитания и проверить, поможет ли это восстановить корректное функционирование сетевого адаптера.
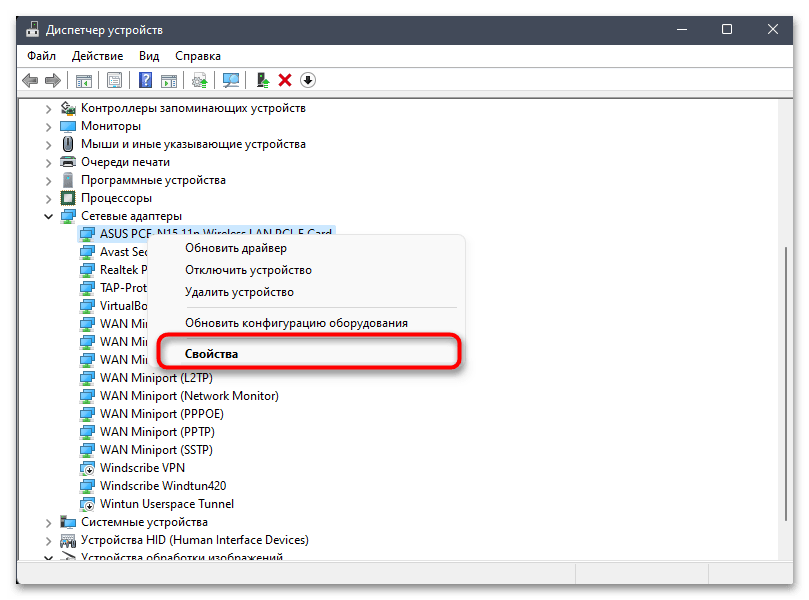
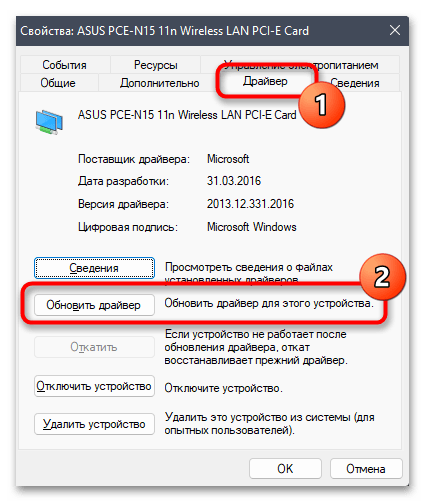
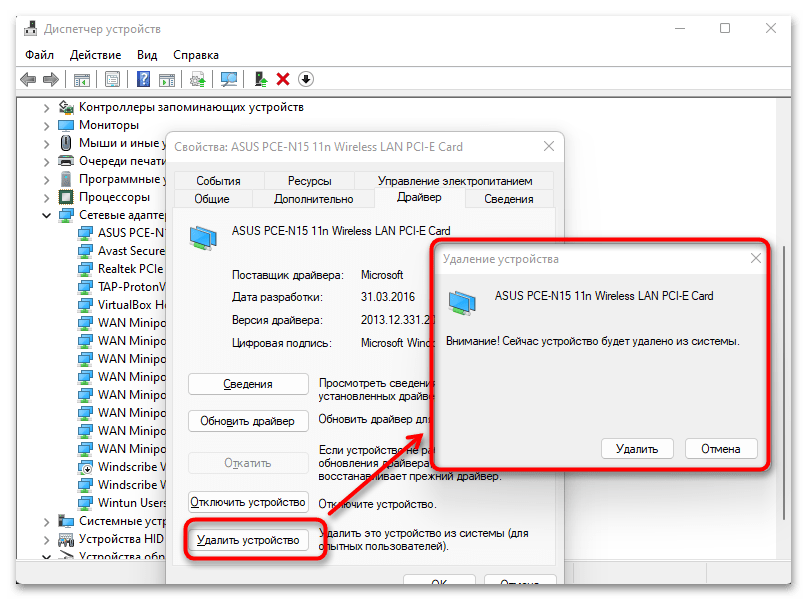
- Щелкните правой кнопкой мыши по «Пуску» и из появившегося контекстного меню выберите пункт «Диспетчер устройств».
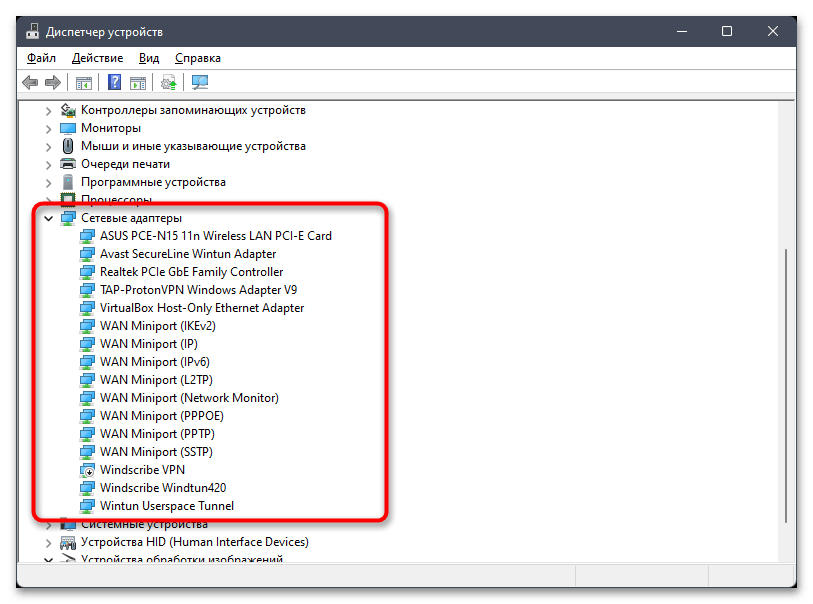
- Разверните список «Сетевые адаптеры», найдите там используемый, кликните по нему ПКМ и выберите из меню пункт «Свойства».
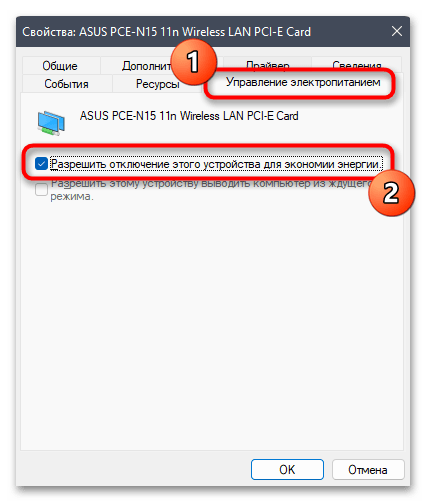
- Перейдите на вкладку «Управление электропитанием» и снимите галочку с пункта «Разрешить отключение этого устройства для экономии энергии».
Способ 5: Проверка сетевого драйвера
Довольно редко отсутствие драйвера сетевой карты или его неправильная версия приводит к неполадкам с соединением по кабелю. Однако такую ситуацию не стоит исключать, если вы до сих пор не нашли решения ситуации. В первую очередь следует выбрать рекомендованный драйвер для замены текущего, тем более для этого вам не нужно будет подключать ПК к интернету другими способами, чтобы скачать нужные файлы.
- В том же меню «Диспетчер устройств» найдите используемый сетевой адаптер и дважды щелкните по нему левой кнопкой мыши.
- Перейдите на вкладку «Драйвер» и выберите пункт «Обновить драйвер».
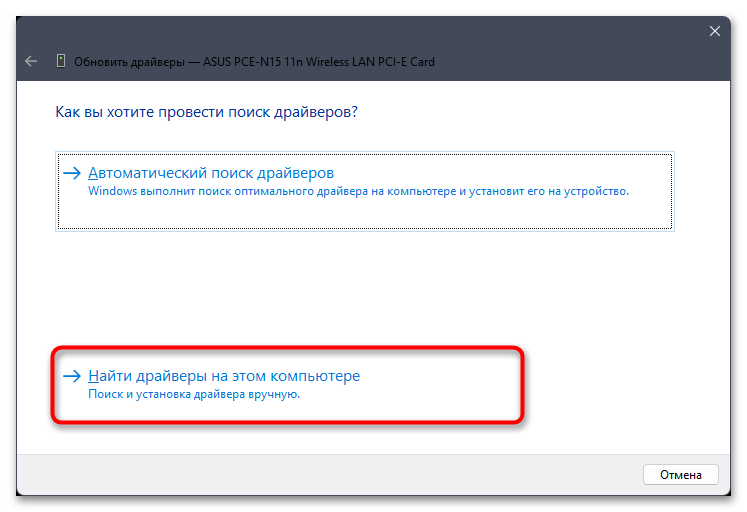
- В следующем окне нажмите на «Найти драйверы на этом компьютере».
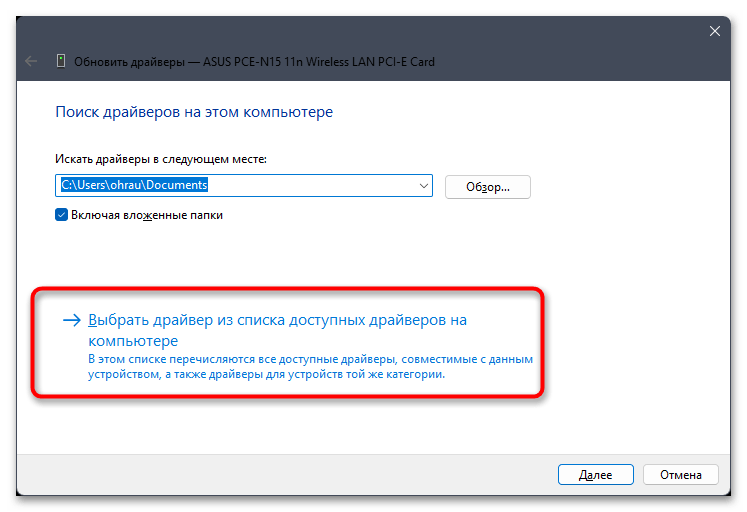
- Щелкните по надписи «Выбрать драйвер из списка доступных драйверов на этом компьютере».
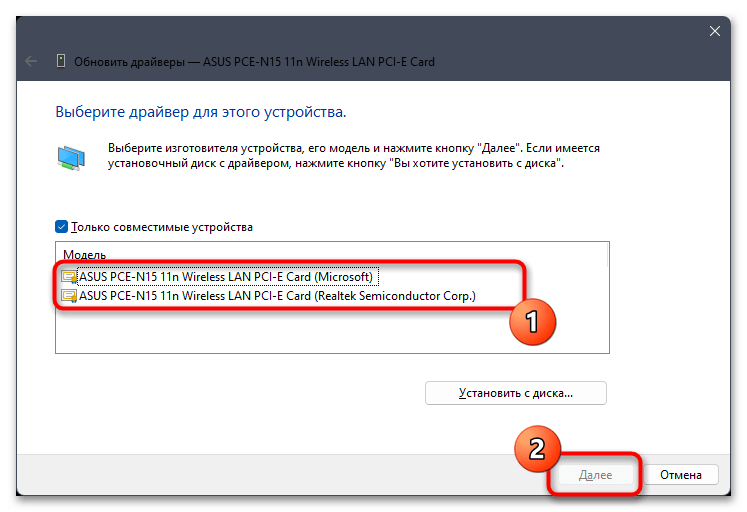
- Вам будут предложены один или два доступных драйвера для сетевого адаптера. Можете выбрать каждый по очереди, подтвердить установку и проверить, какой из них восстановит нормальную работу интернета.
Есть еще одна ситуация, когда установленный по умолчанию драйвер вовсе не подходит для сетевой карты, что и вызывает проблемы с сетевым доступом. Возможно, в этом случае поможет его полное удаление, после чего можно снова попробовать подключиться к интернету. Если это не поможет, попытайтесь самостоятельно установить сетевой драйвер с официального сайта производителя материнской платы или при помощи стороннего ПО, о чем более детально написано в статье ниже. Скорее всего, вам понадобится использовать другое устройство с доступом к интернету, чтобы загрузить необходимый файл, затем передать его на ПК и уже после этого произвести установку.
Подробнее: Поиск и инсталляция драйвера для сетевой карты
Способ 6: Сброс сети
Не исключено, что возникшая проблема связана с некорректной работой сетевых параметров, установленных в Windows 11. Специально для таких случаев разработчики предусмотрели функцию сброса сети, что позволяет вернуть все настройки в состояние по умолчанию. Запускается этот процесс нажатием всего одной кнопки, поэтому ее остается просто отыскать, чтобы далее воспользоваться.
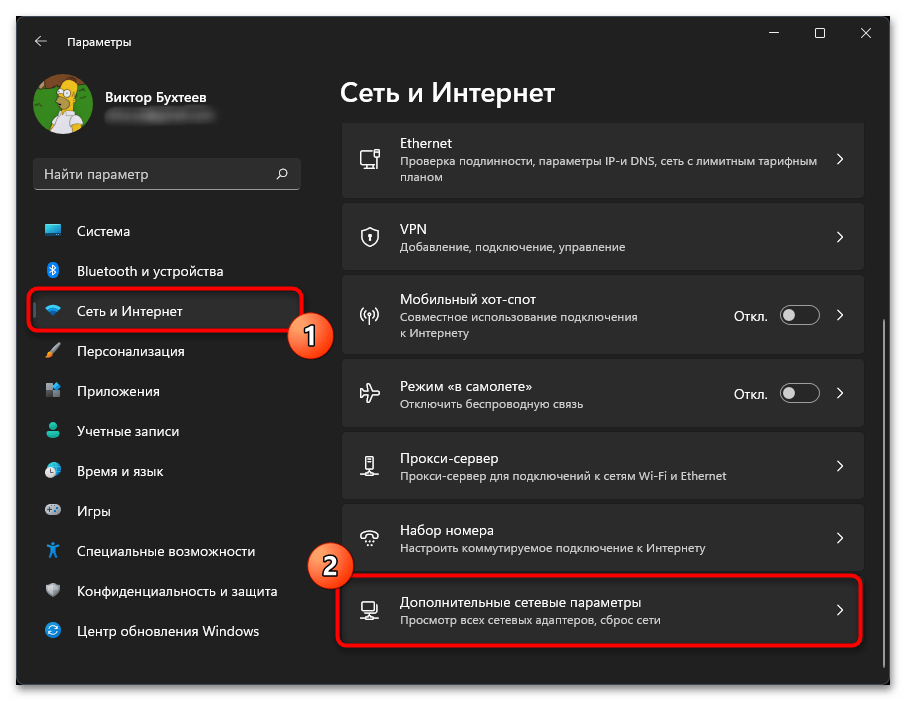
- Откройте «Параметры», на панели слева выберите раздел «Сеть и Интернет», а справа категорию «Дополнительные сетевые параметры».
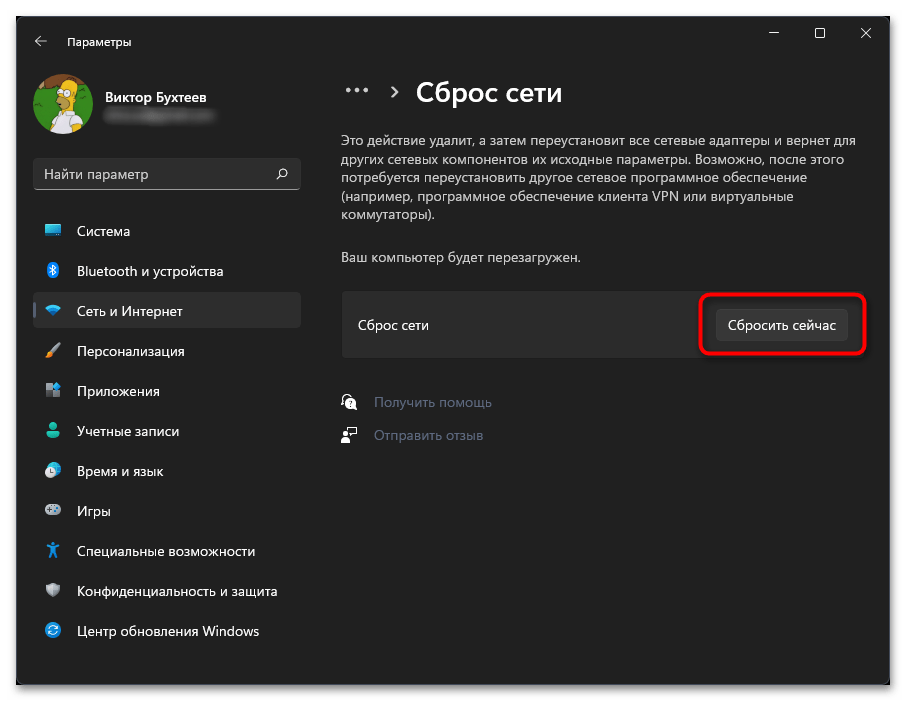
- Перейдите к «Сброс сети».
- Нажмите кнопку «Сбросить сейчас».
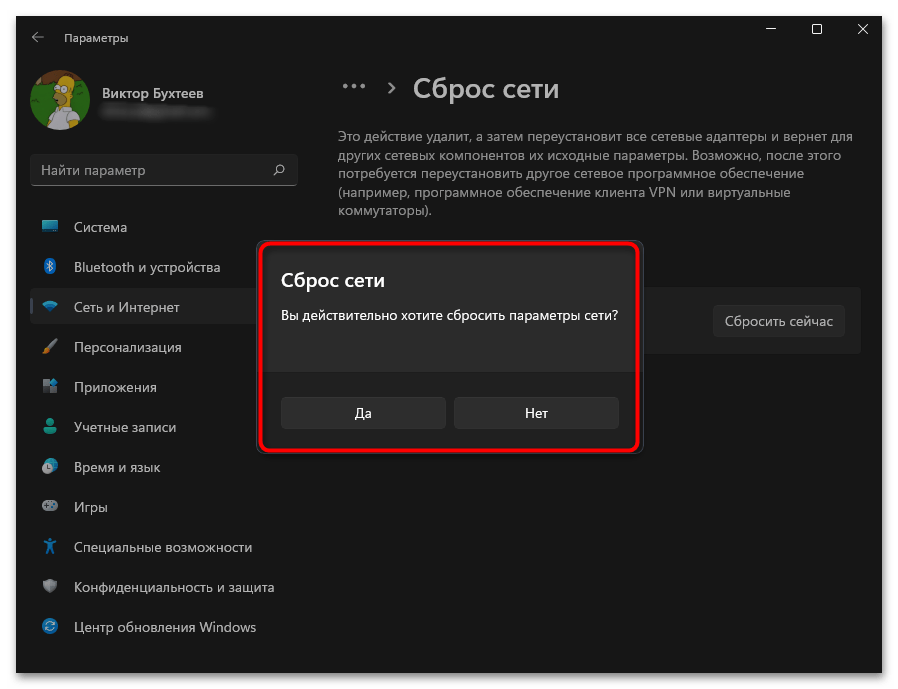
- В следующем окне остается только подтвердить действие. Вы будете уведомлены о том, что сеть успешно сброшена. После этого перезагрузите роутер и попробуйте снова вставить сетевой кабель для проверки подключения.

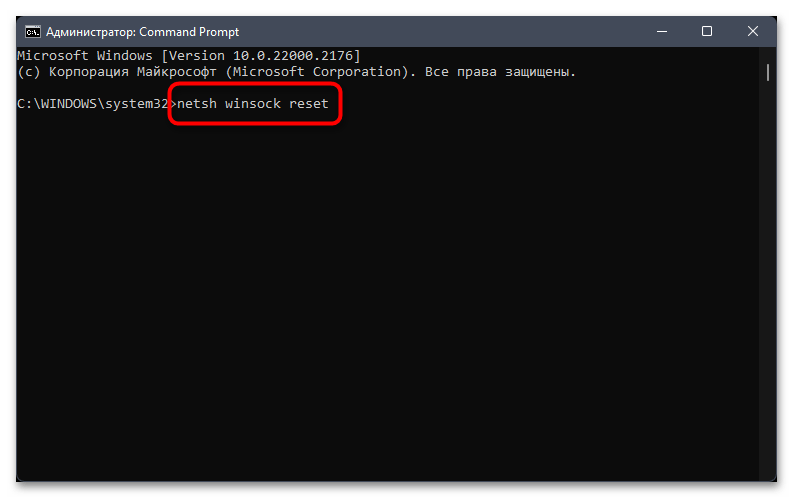
Дополнительно отметим, что в качестве альтернативы описанным выше действиям можно использовать ручной сброс сети путем поочередного ввода нужных команд. Иногда этот вариант даже более эффективный, поэтому можете проверить и его. Понадобится запустить «Командную строку» любым удобным для вас методом, после чего по очереди вписать и активировать оставленные ниже команды. По завершении перезагрузите ПК, роутер и попробуйте снова подключиться к интернету.
netsh winsock reset
netsh int ip reset
ipconfig /release
ipconfig /renew
ipconfig /flushdns
Наша группа в TelegramПолезные советы и помощь
142300
После подключения к Wi-Fi сети в Windows 11 может возникнуть проблема, когда подключение без доступа к интернету. Ноутбук или компьютер к беспроводной сети подключен, но интернет не работает. А возле самой сети отображается статус «Без подключения к Интернету». В этой статье вы найдете решения, с помощью которых сможете самостоятельно определить в чем причина и исправить эту проблему.
Сначала покажу, как выглядит эта проблема в Windows 11, чтобы вы понимали, что это именно ваш случай.
Если в двух словах, то подключение к сети (к роутеру) есть, а интернет не работает. В браузере будет ошибка, либо бесконечная загрузка. Программы, которым нужен интернет, работать не будут.
Почему нет интернета по Wi-Fi в Windows 11?
В этой статье мы рассмотрим случай, когда подключение именно по Wi-Fi. Такая же проблема может быть и при подключении по кабелю, но это уже тема для другой статьи.
В чем может быть причина?
- В Wi-Fi сети. Точнее в роутере (точке доступа), к которому подключен наш ноутбук. Если, например, есть проблемы на стороне интернет-провайдера, что-то с кабелем, которым роутер подключен к интернету, или роутер неправильно настроен, сломался и т. д., то подключение к Wi-Fi сети может быть без доступа к интернету. В этом случае проблему со стороны Windows 11 решить не получится.
- В Windows 11 (на стороне ноутбука, ПК). Возможно, интернет не работает из-за каких-то проблем в системе. Например, неправильно заданы сетевые настройки, ограничение доступа со стороны каких-то программ, антивируса и т. д. Проблемы с DNS.
Как выяснить в чем дело?
- Подключить к этой сети другие устройства (возможно, они уже подключены). Если интернет на них работает, значит с сетью (роутером) все в порядке и проблема скорее всего в компьютере.
- Подключить проблемный компьютер к другой Wi-Fi сети и проверить, есть ли доступ к интернету. Если все работает, то возможно проблема на стороне роутера, интернет-провайдера.
Бывают случаи, когда конкретный компьютер или ноутбук не дружит с конкретной Wi-Fi сетью. Так же возможна ситуация, когда ваш ноутбук добавлен в черный список роутера, на нем настроен родительский контроль, или он был автоматически заблокирован точкой доступа (особенно, если это общественная Wi-Fi сеть в кафе, ресторане, отеле и т. д.).
Что делать, если проблема в Wi-Fi сети (роутере)?
Если вы выяснили, что причина на стороне роутера (например, интернет не работает на всех устройствах), то сделайте следующее:
- Перезагрузите роутер. Просто отключите питание на минуту.
- Выясните, нет ли проблем со стороны интернет-провайдера. Оплачен ли интернет. Можно позвонить в поддержку.
- Посмотрите статью: роутер перестал раздавать интернет.
- Отдельная статья, если проблема возникала при настройке роутера: при настройке роутера пишет «Без доступа к интернету».
Дальше мы рассмотрим возможные решения со стороны компьютера.
Как исправить «Без подключения к Интернету» в Windows 11?
Перовым делом я советую выполнить эти простые действия:
- Перезагрузить компьютер. Так же не забываем перезагрузить роутер (если проблема с домашней сетью и у вас есть к нему доступ).
- Включить и выключить режим «в самолете».
- Попробуйте на время отключить антивирус, или удалить его совсем. Очень часто это помогает. Особенно, если у вас антивирус Avast, AVG, Comodo.
- Отключите или удалите VPN (если он у вас настроен/установлен).
- Если у вас ноутбук и он работает от батареи – попробуйте подключить питание от сети. Если это поможет, то нужно в диспетчере устройств, в свойствах беспроводного адаптера на вкладке «Электропитание» запретить отключение адаптера для экономии электроэнергии.
- Вспомните, возможно вы перед этим меняли какие-то настройки, или устанавливали приложения, антивирус. Если делали это – вернуть настройки обратно, удалить приложение.
- Можно попробовать забыть (удалить) Wi-Fi сеть и подключиться к ней заново.
- Если Windows 11 показывает плохой уровень Wi-Fi сети, попробуйте разместить ноутбук ближе к роутеру.
- Проверьте настройки и отключите прокси сервер.
Если вам не удалось исправить проблему и соединение в Windows 11 все еще без подключения к интернету, то попробуйте применить более серьезные решения.
1. Сброс настроек сети
Чтобы не проверять все сетевые настройки, не удалять Wi-Fi сеть вручную, я рекомендую выполнить сброс всех сетевых настроек. После этих действий, возможно, понадобиться заново выполнить подключение к Wi-Fi сети.
Откройте Параметры, перейдите в раздел «Сеть и Интернет», нажмите там на пункт «Дополнительные сетевые параметры» и «Сброс сети». Нажмите на кнопку «Сбросить сейчас» и подтвердите сброс нажав «Да».

Подробная инструкция: сброс настроек сети в Windows 11. По ссылке так же показан еще один способ – через командную строку.
Перезагрузите компьютер, подключитесь к Wi-Fi сети и проверьте, есть ли доступ к интернету.
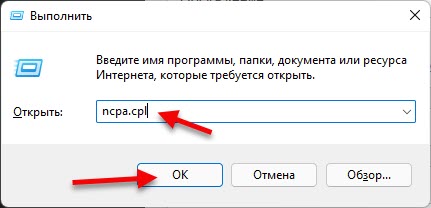
2. Измените DNS-серверы для адаптера «Беспроводная сеть»
По моим наблюдениям, очень часто интернет подключен но не работает именно из-за DNS-серверов. Такая проблема была на предыдущих версиях Windows. A Windows 11, я думаю, не исключение. Как правило, при подключении к роутеру система автоматически получает DNS-серверы. Либо от интернет-провайдера, либо от роутера (если они там изменены). Я рекомендую прописать DNS от Google. Можно прописать их в свойствах конкретной Wi-Fi сети, но лучше сделать это для всех беспроводных подключений (изменить адреса в свойствах адаптера Беспроводная сеть).
- Нам нужно открыть окно «Сетевые подключения». Самый простой способ в Windows 11: нажать сочетание клавиш Win+R, ввести (скопировать/вставить) команду ncpa.cpl и нажать Ok.

- Нужно нажать правой кнопкой мыши на адаптер «Беспроводная сеть» и выбрать «Свойства».

- Дальше выделяем пункт «IP версии 4 (TCP/IPv4)» и нажимаем на кнопку «Свойства». Откроется еще одно окно, в котором нужно поставить переключатель возле «Использовать следующие адреса DNS-серверов» и ввести следующие адреса: 8.8.8.8 и 8.8.4.4 (как на скриншоте ниже). Нажмите Ok.

Если интернет не появился, попробуйте перезагрузить компьютер.


Если у вас в этом окне уже изначально были прописаны какие-то адреса, то установите автоматическое получение IP и DNS.
Более подробно об этих DNS и как они работают вы можете почитать в отдельной статье: 8.8.8.8 – что за адрес? Как заменить DNS на Google Public DNS.
3. Включите режим совместимости FIPS
- Нажмите сочетание клавиш Win+R, введите команду ncpa.cpl и нажмите Ok. Или откройте окно «Сетевые подключения» другим удобным для вас способом.
- Нажмите на адаптер «Беспроводная сеть» правой кнопкой мыши и выберите «Состояние».

- Нажмите на кнопку «Свойства беспроводной сети», дальше на вкладку «Безопасность» и на кнопку «Дополнительные параметры». Установите галочку возле пункта «Включить для этой сети режим совместимости с Федеральным стандартом обработки информации (FIPS)». Нажмите «Ok».

Нажмите «Ok» в двух окнах. Перезагрузите компьютер.


4. Отключите IPv6 и другие компоненты
Нужно открыть окно «Сетевые подключения» (Win+R, команда ncpa.cpl), затем открыть свойства адаптера «Беспроводная сеть» (нажав на него правой кнопкой мыши) и убрать галочку возле компонента «IP версии 6 (TCP/IPv6)».
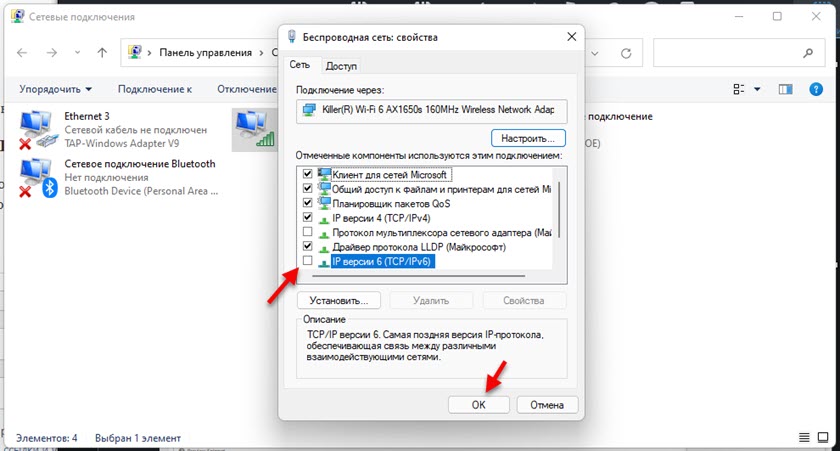
Важно: если там у вас есть другие компоненты (например, в названии которых есть «Avast», «Comodo», «NOD32»), которых нет у меня на скриншоте выше, то попробуйте их отключить. Оставьте только такой набор компонентов, как у меня (если прокрутить окно, там еще два компонента в самом низу должны быть включены, ну и IPv6 можете оставить) – все остальные отключите (снимите галочки).
Бывает, что разные программы и антивирусы добавляют в список компонентов данного подключения свои компоненты, и соединение в Windows 11 становится без подключения к интернету.
5. Переустанавливаем Wi-Fi адаптер
- Откройте диспетчер устройств. Его можно найти и открыть через поиск в меню Пуск, нажав на меню Пуск правой кнопкой мыши, или командой devmgmt.msc в окне «Выполнить» (открывается сочетанием клавиш Win+R).
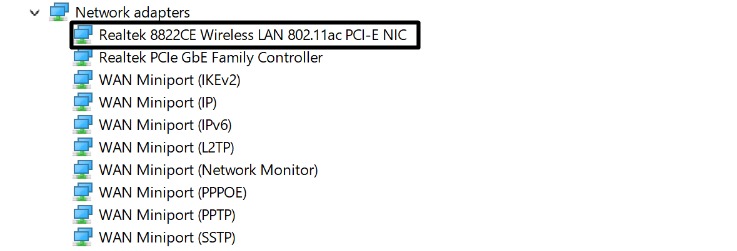
- Находим и открываем вкладку «Сетевые адаптеры». После чего находим там беспроводной адаптер (в его названии будет слово Wi-Fi, Wireless, WLAN, 802.11, AC, AX).
- Нажимаем на этот адаптер правой кнопкой мыши и выбираем «Удалить устройство».

Подтвердите удаление и перезагрузите Windows 11. После перезагрузки адаптер должен установиться автоматически.

6. Обновление или замена драйвера Wi-Fi адаптера
Бывает, что Wi-Fi подключен но интернет не работает из-за проблем с драйвером беспроводного адаптера. В Windows 11 такое тоже возможно. Поэтому, я рекомендую обновить драйвер. А если это не поможет – заменить его из списка уже установленных в системе.
Лучший способ обновить драйвер – вручную скачать его с сайта производителя ноутбука или адаптера, конкретно для модели которая у вас и под Windows 11, и запустить установку. Если в диспетчере устройств нажать правой кнопкой мыши на адаптер (как на скриншоте выше) и выбрать «Обновить драйвер» (Автоматический поиск драйверов), то система скорее всего сообщит вам, что наиболее подходящие драйверы для этого устройства уже установлены.
Чтобы заменить драйвер, делаем так:
- В диспетчере устройств нажимаем на Wi-Fi адаптер правой кнопкой мыши и выбираем «Обновить драйвер». Дальше – «Найти драйвер на этом компьютере».

- Нажмите на «Выбрать драйвер из списка доступных драйверов на компьютере». В следующем окне выделите в списке один из драйверов (по очереди можно проверить все) и нажмите «Далее».

После установки драйвера, возможно, интернет заработает.


Отдельная статья, в которой я показывал как обновить, заменить или откатить драйвер Wi-Fi адаптера в Windows 11.
На данный момент в статье собраны все известные мне решения этой проблемы в Windows 11. Если какое-то решение вам помогло – напишите в комментариях, какое именно решение сработало у вас. Если вам удалось исправить ошибку «Без подключения к Интернету» другим способом, которого нет в статье – буду благодарен, если поделитесь им. А я обязательно все оформлю и добавлю решение в статью.
Задавайте вопросы в комментариях, описывайте свою проблему, прикрепляйте скриншоты. Постараюсь подсказать и помочь разобраться конкретно в вашем случае.
Quick Fixes
- Disable VPN via Windows Settings or through the VPN app.
- Launch the Network Adapter troubleshooter from Windows Settings > System > Troubleshoot > Other troubleshooters > Network Adapter.
- Reset your network connection.
Common Fixes
Let’s begin with some basic solutions to fix the Wi-Fi connected but no internet issue on your Windows machine:
- Check your internet plan – If you have exceeded the allocated high-speed internet quota, your Wi-Fi stays connected without internet. Check your remaining data for the billing cycle.
- Disable VPN – If your VPN server faces an outage, connecting to its services will result in such issues. Disable the VPN and see if you can connect to the internet now.
- Restart the router – It will fix most configuration issues disrupting the internet connectivity. Also, install all pending firmware updates.
- Use a different port – If you’re using an external Wi-Fi adapter with your system, reconnect it to a different USB port.
Fix 1: Run the Network Adapter Troubleshooter
Windows 11 has a handy network connection troubleshooter to fix all network-related issues. Here’s how you can use it to resolve the error:
Step 1: Open the Windows Settings app, click System in the left sidebar, and press Troubleshoot on the right.

Step 2: Click Other troubleshooters and press Run next to Network Adapter.

Fix 2: Connect to 5GHz Wi-Fi Frequency
Working with a slow 2.4GHz frequency can lead to internet connection issues as it doesn’t have a long range. A physical obstruction like a wall or door can easily reduce its strength, resulting in poor or no internet connectivity. If you have a dual-band router, connect to a 5GHz Wi-Fi frequency and verify with the below steps:
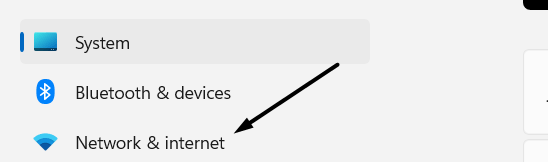
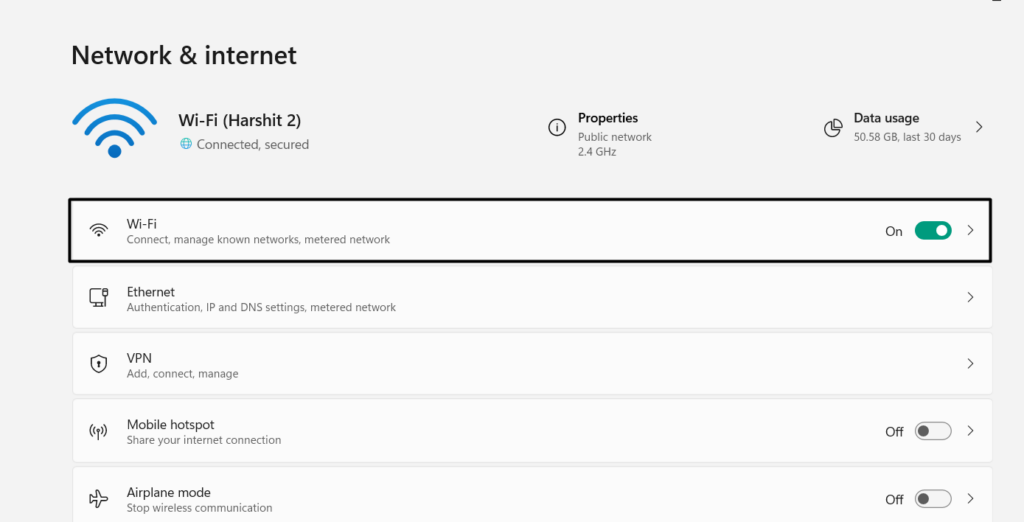
Step 1: Open the Windows Settings app and click Network & internet in the left sidebar.
Step 2: Confirm connecting to 5GHz frequency under the Properties menu.
Fix 3: Disable the Windows Defender
Are you facing a Wi-Fi connected but no internet issue on a public network? Microsoft Defender may block internet connection for security reasons. Here’s how to disable Defender Firewall on public networks.
Note: Disabling the Defender Firewall for public networks makes your system more vulnerable to unauthorized access. Once you resolve the error, we recommend turning it back on for your digital safety.
Step 1: Press the Windows key, search Windows Security, and open the app.
Step 2: Click Firewall & network protection in the left sidebar and press Public Network.

Step 3: Finally, disable the Microsoft Defender Firewall toggle.
Alternatively, you can completely disable Windows Defender on Windows 11.

Fix 4: Reset Your Network Connection
Resetting the network connection reinstalls all your network adapters and sets other networking components back to their original settings. It can be handy to fix the Wi-Fi connected, but no internet issue on Windows.
Step 1: Open Network & internet in Windows Settings and click Advanced network settings.

Step 2: Click Network reset and confirm your action by pressing Reset Now.

Was this helpful?
Thanks for your feedback!
The article above may contain affiliate links which help support Guiding Tech. The content remains unbiased and authentic and will never affect our editorial integrity.
Imagine this like every other day, you walk to your workspace and boot your Windows 11 PC. You connect it to your Wi-Fi, and it gets connected. But you suddenly realize that you can’t do anything online even if you’re connected to the internet.
Sadly, many users are facing this imaginary situation. If this has also become real for you, read this guide, as it’ll share some effective tips to easily fix the Wi-Fi connected but no internet issue on Windows 11.
Why Doesn’t the Net Work After Connecting to Wi-Fi?
Varied reasons can cause the Wi-Fi connection but no network issue on your Windows 11 PC. In this section, we’ve mentioned the most common reasons for this issue on Windows 11:
- Outdated Wi-Fi Adapter
- Faulty Wi-Fi Adapter
- Incorrect IP Address
- Faulty Wi-Fi Router
- Disabled IPv4
- Enabled Airplane Mode
- Conflicts by the Windows Defender Firewall
- Enabled VPN
- Issues With WLAN AutoConfig
Fix Wi-Fi Connected But No Internet on Windows 11
Below are some easy fixes to fix the Wi-Fi connected but no internet issue on Windows 11:
1. Restart the Wi-Fi Router or Modem
If all the phones, PCs, and other devices connected to the same Wi-Fi network as your PC are facing the no network issue, then it may be possible your Wi-Fi router has some issues.
Considering this, we suggest you reboot your router and then check if it fixes the Wi-Fi connection but no internet issue. You can take help of the below steps to do the same with ease:
1. To restart your Wi-Fi modem, simply remove the power and ethernet cables from it gently.
2. Once done, simply wait for 2 to 3 minutes to completely stop the power supply in all its components. Besides this, make sure all the lights on your Wi-Fi modem are turned off.
3. After waiting for the recommended time, plug the power and ethernet cables into the modem.
4. Once done, let the Wi-Fi router or modem power on by making sure all its lights are on now.
5. At last, connect your Windows 11 PC to the Wi-Fi network and check if the issue is still there.
2. Turn On IPv4
Sometimes, a wrong IP address also leads to these kinds of problems. This could be the same in your case. Thus, to check this, we suggest you turn on IPv4 on your Windows 11 PC and also make the below-mentioned changes. You can try the same and see if it fixes the issue:
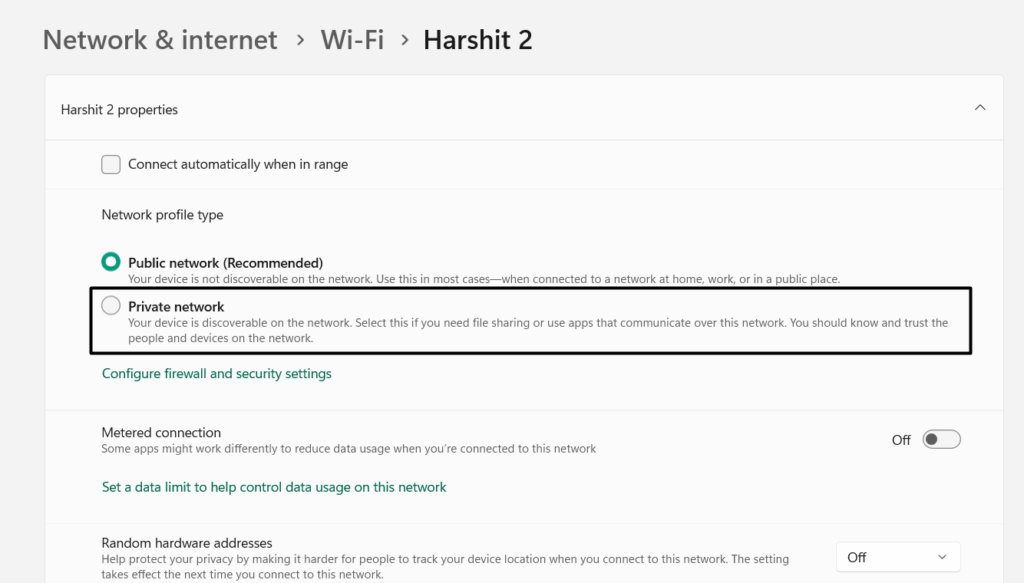
1. Press Windows + I to open Settings, and from the left pane of it, select Network & internet.
2. On the next screen, click Wi-Fi and then choose your Wi-Fi network you’re having issues with.
3. Under Network profile type, choose the Private radio button and move to IP assignment.
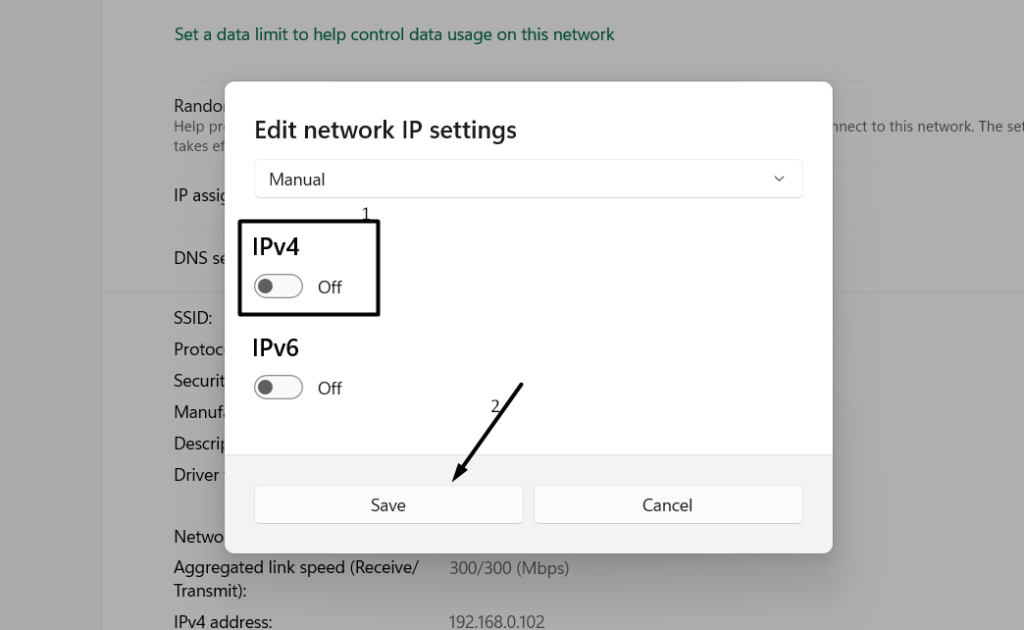
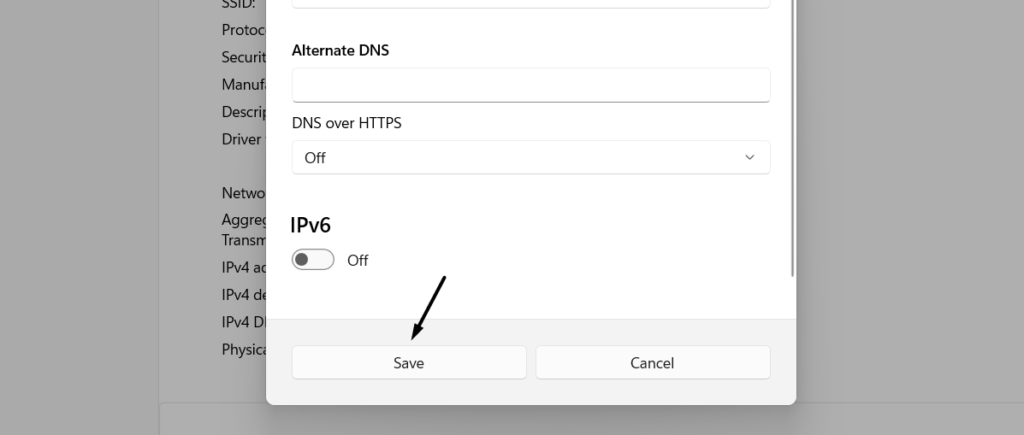
4. In the Edit network IP settings prompt, select the Manual option from the dropdown menu.
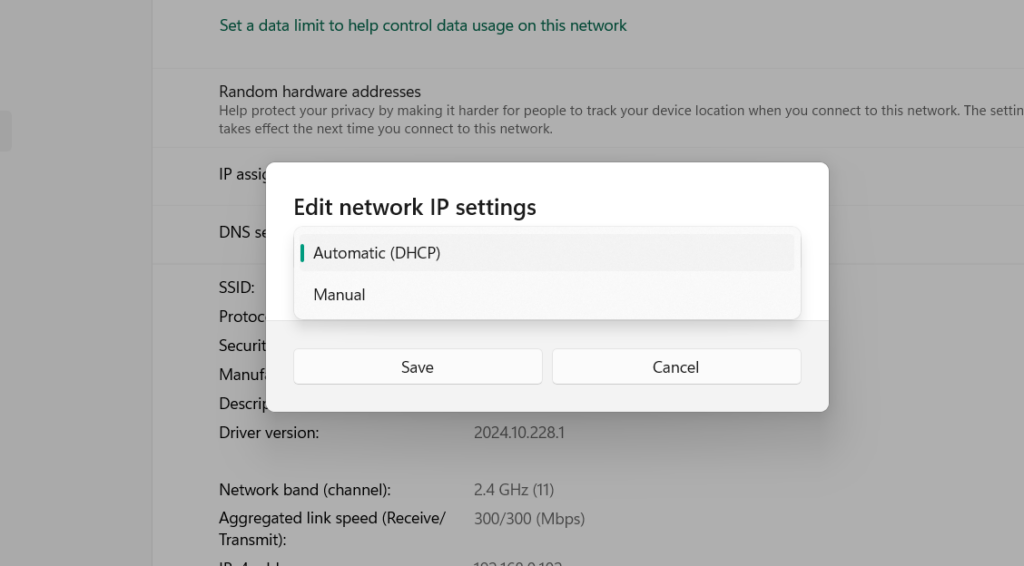
5. After selecting Manual, turn on the IPv4 toggle and then click Save to save the changes.
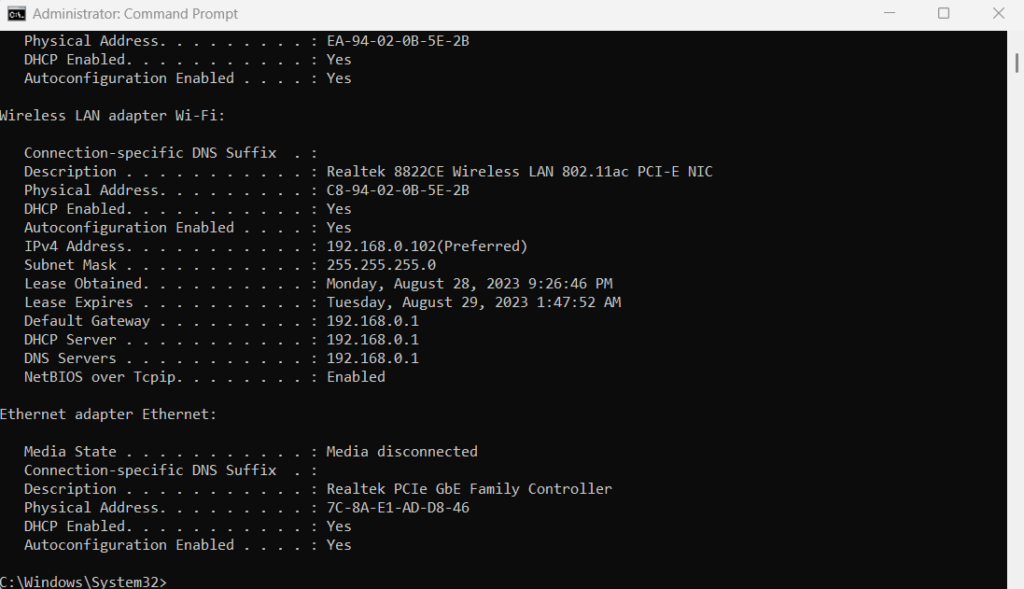
6. Once done, open the elevated console on your PC and execute the below-listed command:
ipconfig /all7. After executing the above-stated command, you’ll see your current IP address next to DHCP Server. You need to copy it and go back to the IP assignment section of the network.
8. In the Edit network IP settings prompt, paste your IP address in the IP address text field. Also, replace the last two digits of the pasted IP address with any number between 5-30.
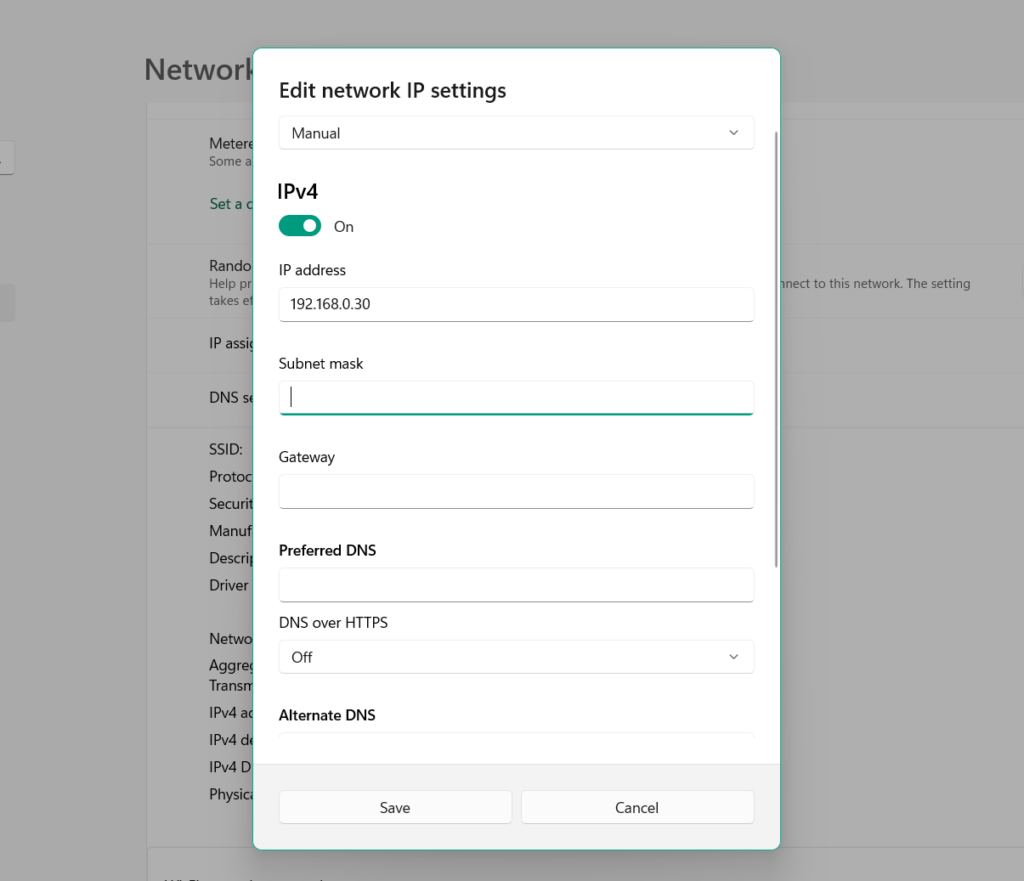
9. Once done, copy and paste 255.255.255.0 in the Subnet mask text field in the same prompt.
10. Then, paste the IP address you copied from the Command Prompt in the Gateway field.

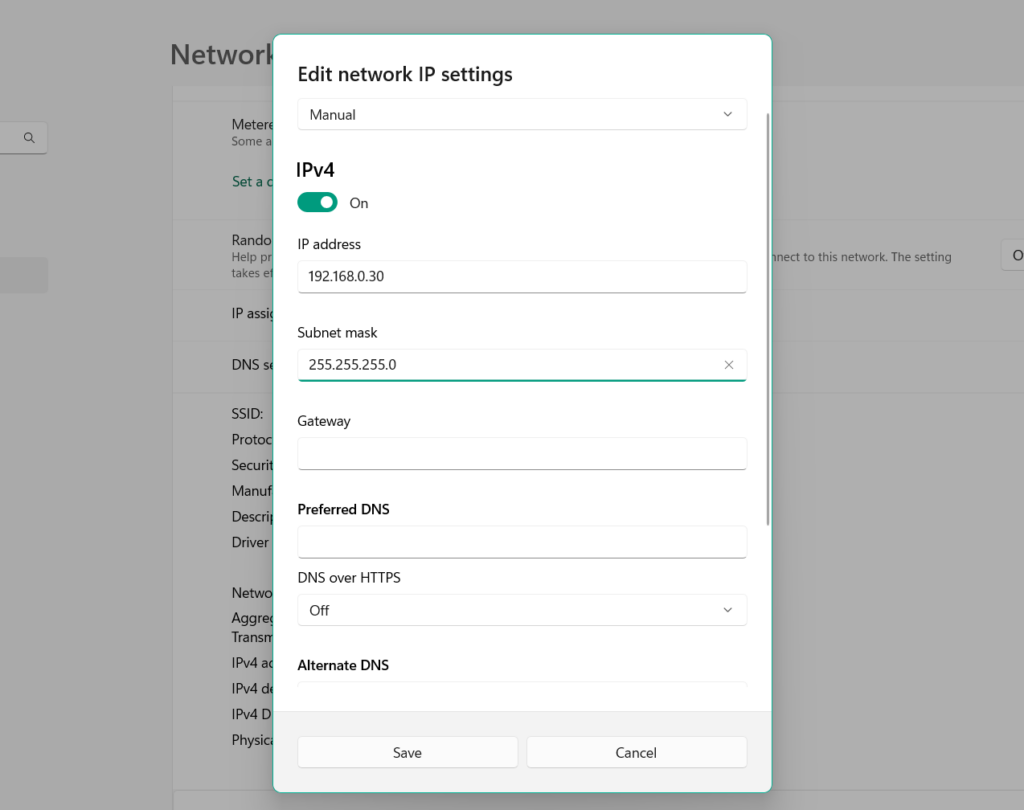
11. Paste 8.8.8.8. in the Preferred DNS text box and 8.8.8.4. in the Alternate DNS box.
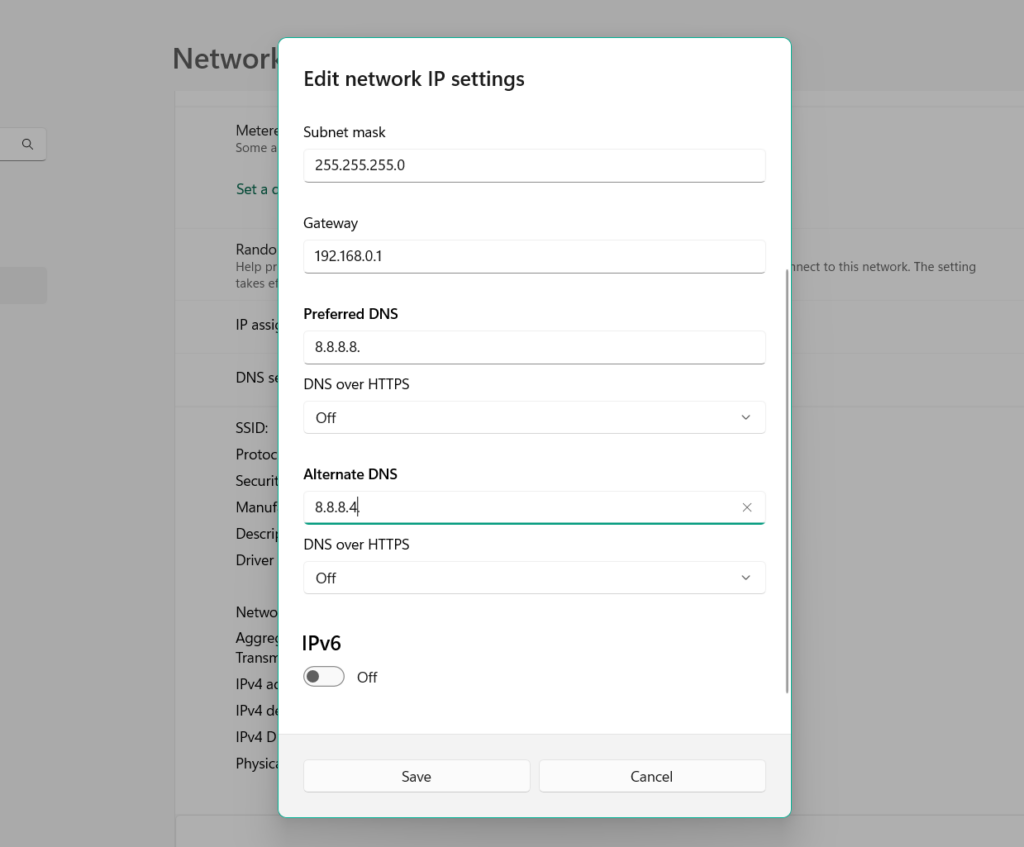
12. After doing all this, select the Save button and then check the issue’s status on your PC.
3. Reboot the PC
Sometimes, the computer’s Wi-Fi also behaves improperly because of temporary glitches in it. In most cases, restarting the Windows 11 PC easily fixes them. So try the same with your Windows 11 PC and check whether it fixes the problem.
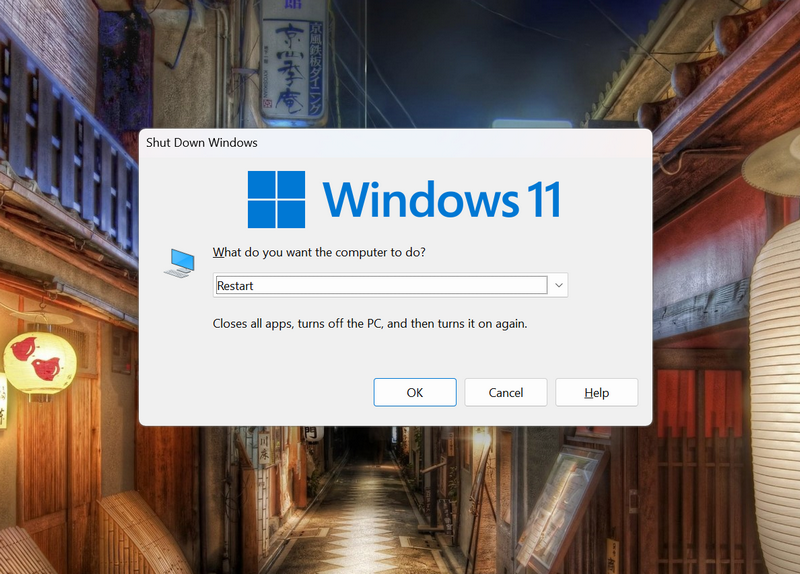
To restart your problem, press Alt + F4 to open the Shut Down Windows prompt and choose Restart from it. Once done, press the Enter key and check whether the issues with Wi-Fi are fixed now.
4. Switch Off Airplane Mode
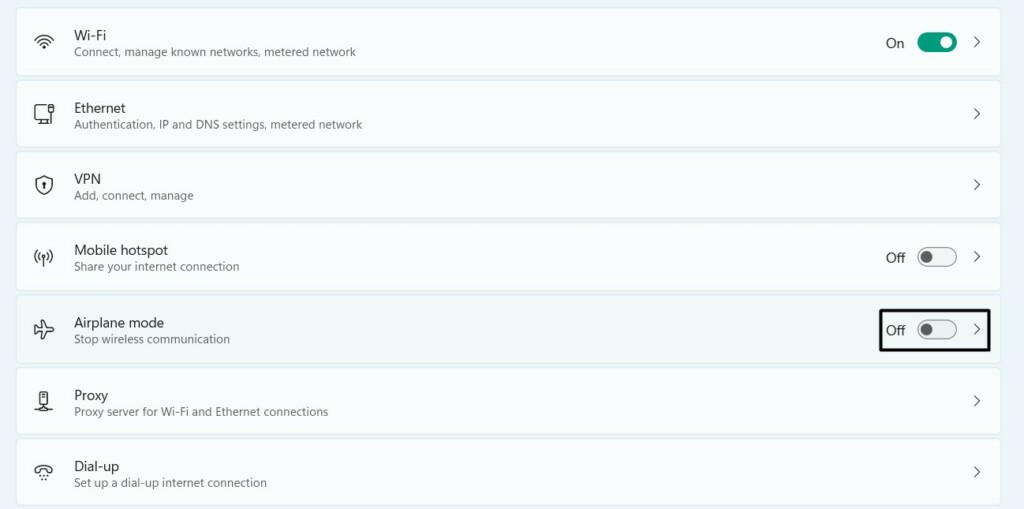
It could be possible that Airplane mode is enabled on your PC and causing network disruption. In that case, we suggest you disable it by following the below-mentioned steps:
1. Press the Windows + I keyboard shortcut on your keyboard to open Settings on your PC.

2. From its left sidebar, choose the Network & internet option to access network settings.
3. On the Network & internet screen, disable the toggle next to Airplane mode to get rid of this issue.
5. Turn Off the Firewall
If the Airplane mode isn’t a problem for this issue, then your PC’s Windows Defender Firewall could be. Thus, we suggest you disable it on your system to check if it’s the same.
If Wi-Fi works properly after switching off, keep it disabled until the issue gets fixed from the Microsoft side. But this will make your Windows 11 PC vulnerable, so keep this in mind. If you want to try this fix, simply follow the below-mentioned steps on your PC or laptop:
1. Open the Settings app on your system, and from the left pane of it, select Privacy & security.
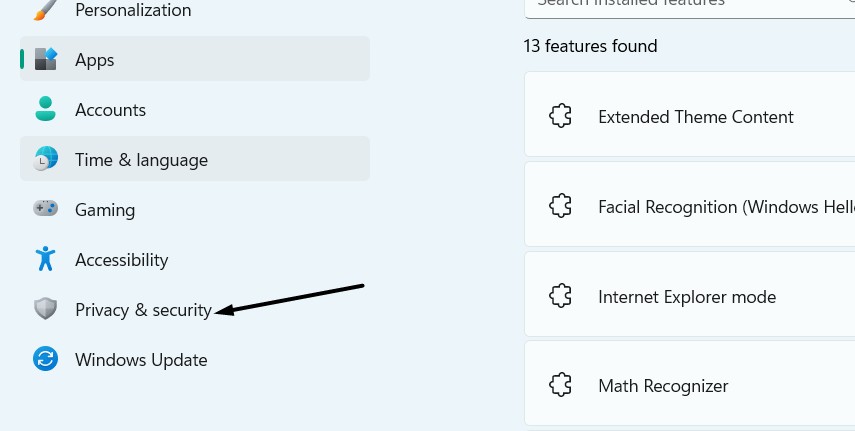
2. In the next window, choose Windows Security and then Firewall & network protection.
3. On the next screen, click Private network and then disable the toggle in the following screen.

4. Go back to the previous screen, choose Public network, and then again disable the toggle.

Once done, see if the Wi-Fi connected but no internet issue is fixed on your Windows 11 PC.
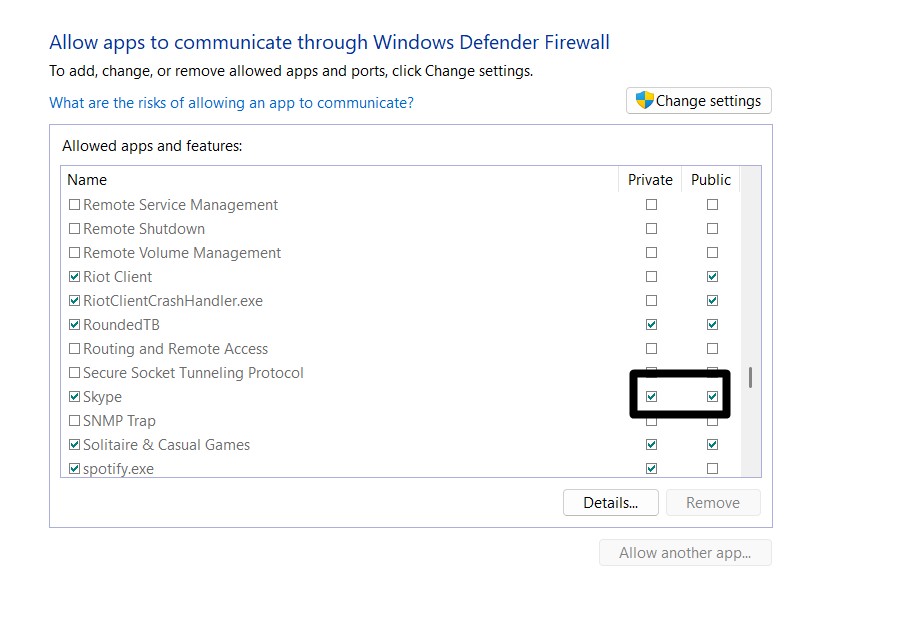
6. Check If Firewall Blocked Your Internet Access
It could be possible that your Windows 11 PC’s Windows Defender Firewall has blocked your internet access, which is why you can’t use the online programs on your Windows 11 PC. Thus, we suggest you check whether your system’s built-in firewall has blocked Wi-Fi. You can make sure the same by applying the below-listed steps on your PC:
1. Launch the Settings app on your system, and from the left bar of it, choose Privacy & security.
2. In the next window, choose Windows Security and then Firewall & network protection.
3. Choose Allow an app through firewall and click the Change settings button to go ahead.

4. In the Allowed apps and features box, make sure checkboxes next to both WLAN features are ticked. If not, tick them and click the OK button to save all the recent changes.
7. Disable VPN
Sometimes, using a VPN with Wi-Fi enabled could also cause this issue. So, if you’re using a third-party VPN on your Windows 11 PC, consider disabling it. In case you’re using Windows 11’s integrated VPN, follow the below-mentioned steps to learn to turn it off:
1. Open the Windows Search Box, type VPN settings in it, and select it from the search results.

2. Click the VPN connection that’s currently active and click the Disconnect button to turn it off.
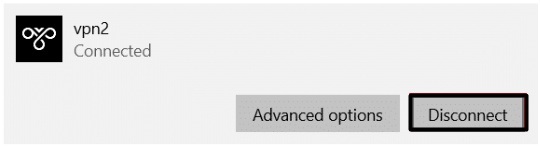
3. Turn off the Allow VPN over metered networks and Allow VPN while roaming toggles.
8. Run the Network and Internet Troubleshooter
Windows 11 has a Network & internet troubleshooter that finds and fixes issues with your system’s network. If you’re still facing the Wi-Fi connected but no internet issue on your Windows 11 PC, run the Network & Internet troubleshooter to see if it fixes it. If you want to know how to run and use this troubleshooter on Windows 11, follow the below steps:
1. Open the Settings app on your PC and go to the Troubleshoot section of the System category.
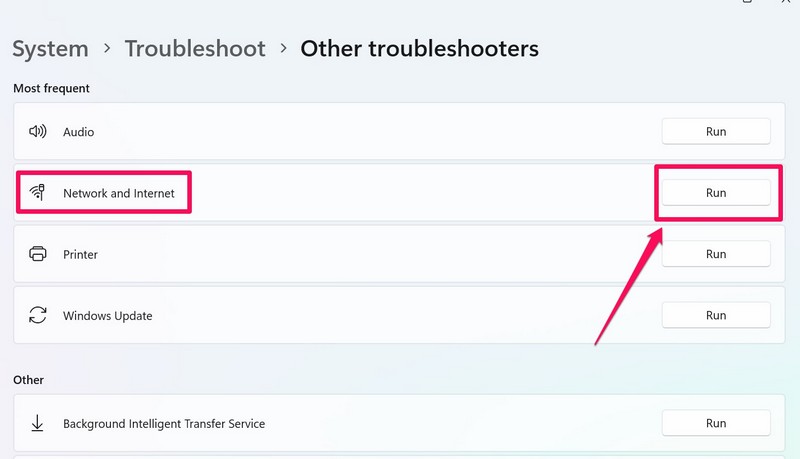
2. Click the Other troubleshooters option and then navigate to the Most Frequent section.
3. In the Most Frequent section, search for the Network and Internet and click Run next to it.
4. In the next window, in the Restart the Wi-Fi network adapter section, click Restart adapter.

5. Once done, check whether the Wi-Fi connected but no internet issue is fixed on your PC.
9. Update the Network Adapter
There may be a possibility that your Windows 11 computer’s network adapter has some bugs, which is why you can only connect your PC to the Wi-Fi but can’t use it. Windows usually gets new updates for the Wi-Fi or network adapters via optional Windows updates.
Thus, we suggest you search for new optional updates and install them on your PC or laptop. You can try the steps mentioned below to learn how to easily update the network adapter:
1. Open Settings on your Windows PC, and from the left sidebar of it, select Windows Update.

2. On the following screen, select Advanced options and then choose the Optional updates option.
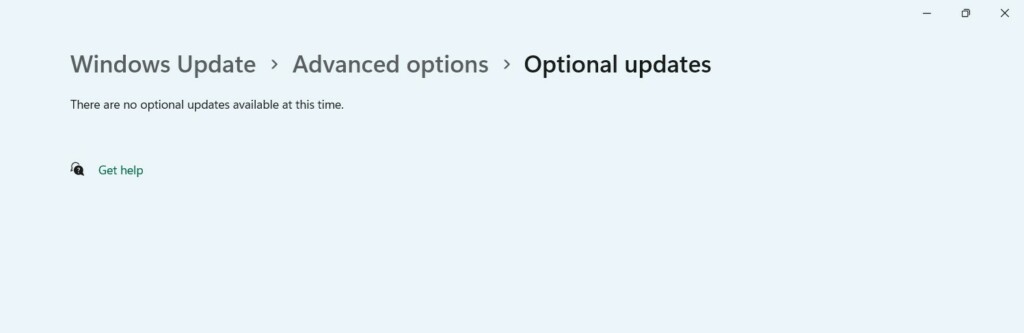
3. Click the Check for updates button at the top to search for new updates for the network adapter.
4. Click Download and install to install the pending updates for the Wi-Fi or network driver.
10. Reinstall the Network Adapter
If updating the network or Wi-Fi adapter doesn’t fix this issue, reinstall it. Doing so will remove the network driver from the system, which will also fix issues with them. To know how to do the same on your Windows 11 PC, simply follow the below-mentioned prompts:
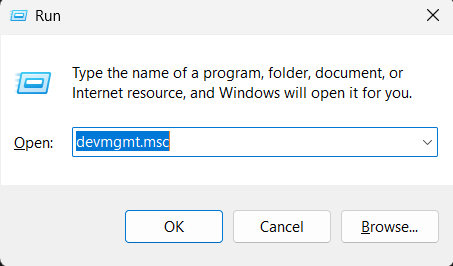
1. Press Windows + R to open the Run utility on your PC, and type devmgmt.msc its Open: text field.
2. In Device Manager, expand the Network adapters category and right-click on the network adapter.
3. Choose the Uninstall device option from the contextual menu to remove it from your PC.
4. Click the Action option at the top and choose Scan for hardware changes from the dropdown menu.

5. After doing so, the recently uninstalled Wi-Fi adapter will be reinstalled on your Windows 11 computer. Once done, check if the problems with the Wi-Fi function are fixed.
11. Reset the Network Adapter
One way to eliminate the Wi-Fi connected but no internet issue on your Windows 11 PC is to reset the network adapter. This will revert its settings to the default and, most probably, fix the issue. So follow the below steps to reset the network adapter on your PC:
1. To reset your Windows 11 PC’s network adapter, open the elevated Command Prompt utility on it.
2. In the Command Prompt window, run the mentioned commands below one by one:
netsh winsock resetipconfig /releasenetsh int ip resetipconfig /flushdnsipconfig /renew3. Once done, restart your Windows PC and check if the Wi-Fi connected but no internet issue is fixed.
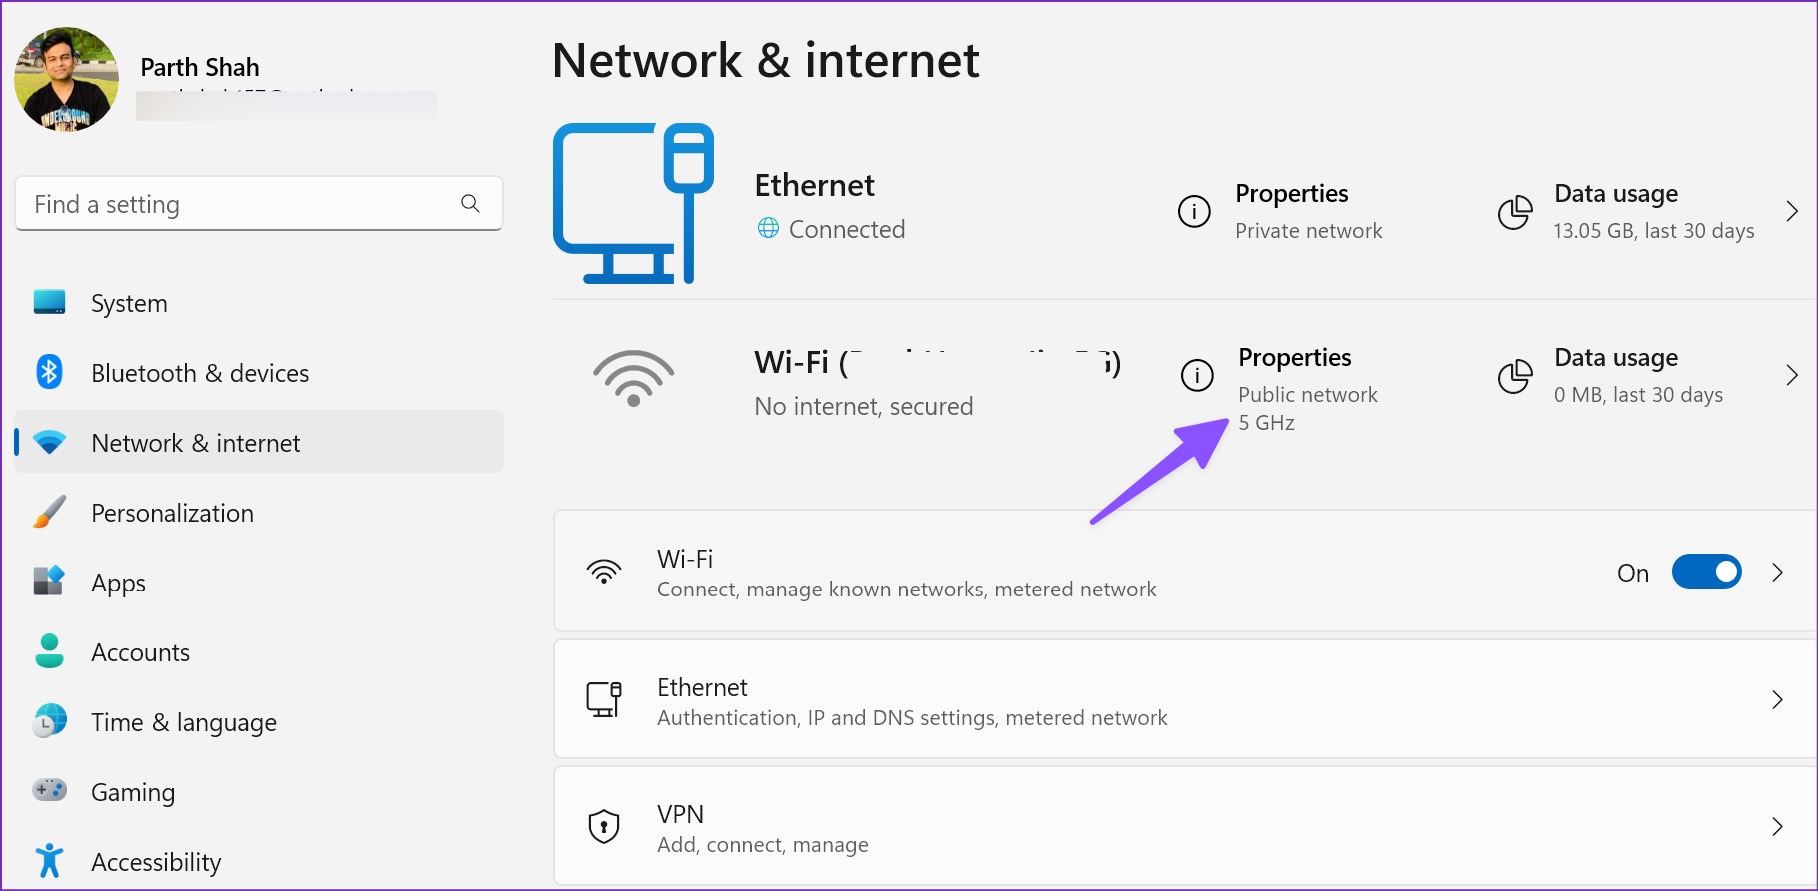
12. Connect to 5GHZ Wi-Fi Frequency
This type of issue also appears when the computer is connected to a 2.4GHz Wi-Fi network. So this could be the same in your case. To check if you’re connected to a 2.4GHz Wi-Fi network and take suggested actions, follow the below-mentioned steps. If it’s the same, you must consider connecting your Windows 11 PC to a 5GHz Wi-Fi network:
1. Go to the Settings app on your PC and select Network & internet from the left side of it.
2. In the Network & internet window, make sure 5GHz is written under Properties at the top.

3. If 2.4GHz is mentioned instead of 5GHz, open the Quick Action Center using Windows + A, click the arrow next to Wi-Fi, and connect to the 5GHz version of your Wi-Fi.
13. Restart WLAN AutoConfig
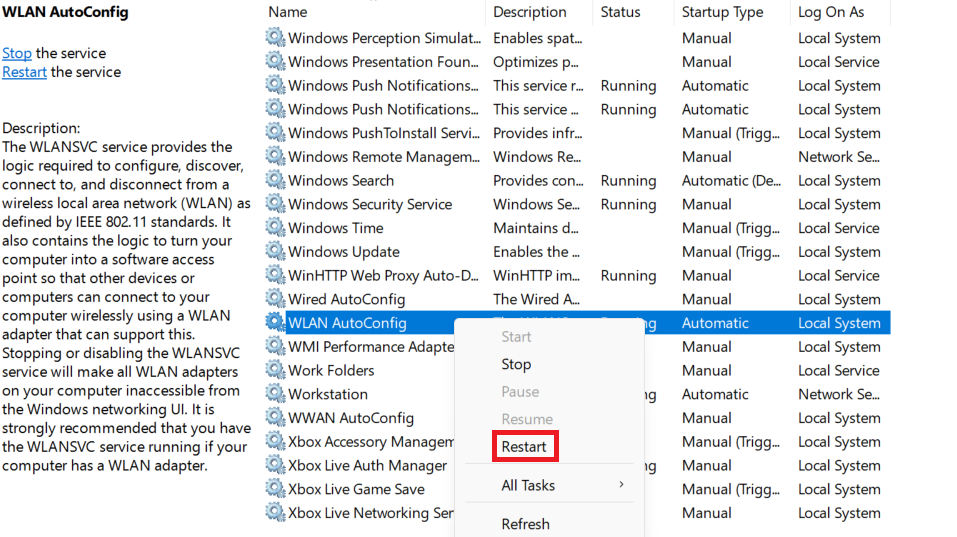
WLAN AutoConfig plays an integral role in the proper working of the Windows Wi-Fi service. There may be a possibility that this Windows service is having problems working, which is resulting in this issue. Due to this, we suggest you restart this Windows service to fix all the issues with it, if there are any. You can follow the steps to try this:
1. Open the Services utility on your Windows 11 PC or laptop using the Windows search.
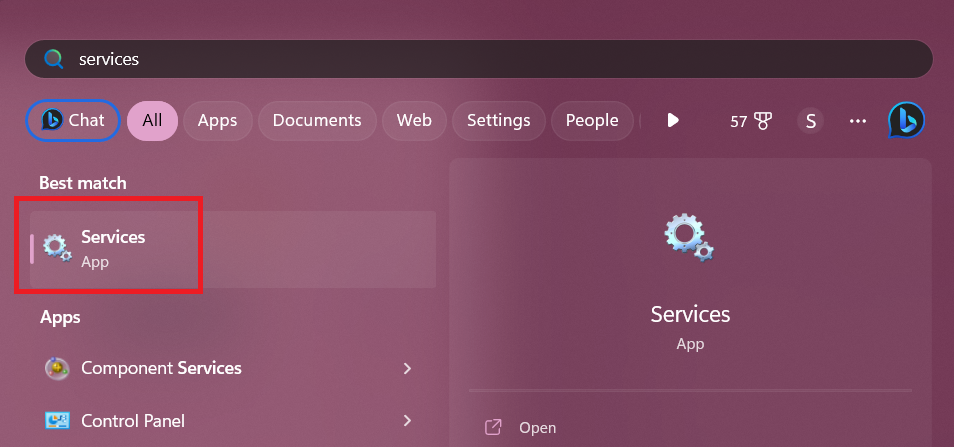
2. In the Services window, search for the WLAN AutoConfig service and right-click it to get the context menu.

3. Choose Restart from the contextual menu to restart this particular Windows service on your PC.
4. Lastly, check if the PC is now properly connecting to the Wi-Fi network and working too.
14. Disable MAC Address Filtering
Some users said that disabling MAC Address Filtering in their Wi-Fi router settings fixed the issue for them. So, if you’ve enabled it in your Wi-Fi router or modem settings, turn it off and check the issue status. We can’t mention the exact steps as they differ from ISP to ISP. To know the exact steps to disable, refer to your ISP’s detailed knowledge base.
15. Update the OS
There may be a possibility that your Windows 11 PC has some bugs and glitches which is resulting in this issue. In that case, we suggest you update your Windows 11 PC or laptop to the latest build and check if doing so fixes this issue.
You can check the stated steps to learn how to update your Windows 11 PC or laptop to the latest version with ease:
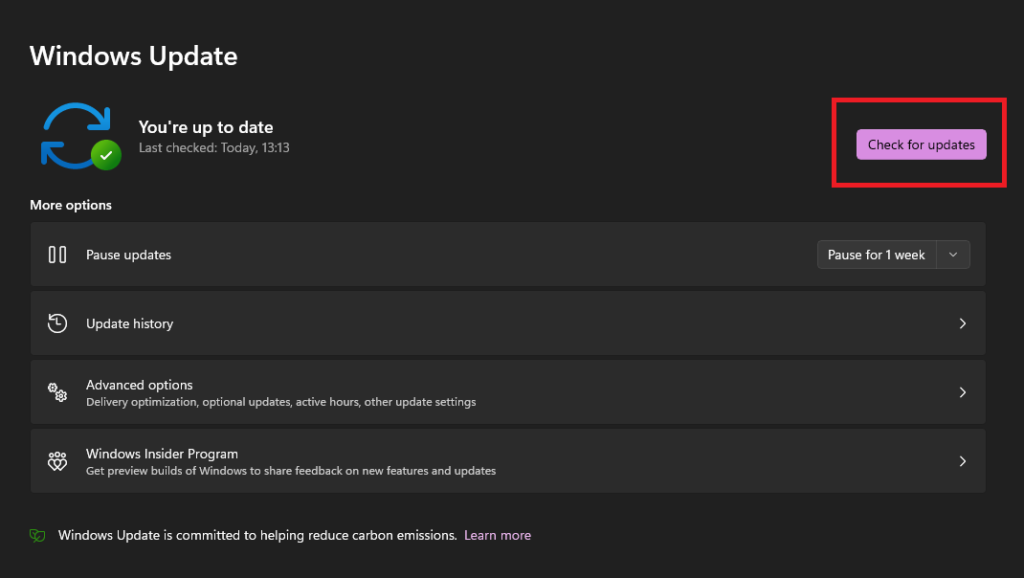
1. Launch Settings on your Windows 11 PC, and from its left menu, go to Windows Update.
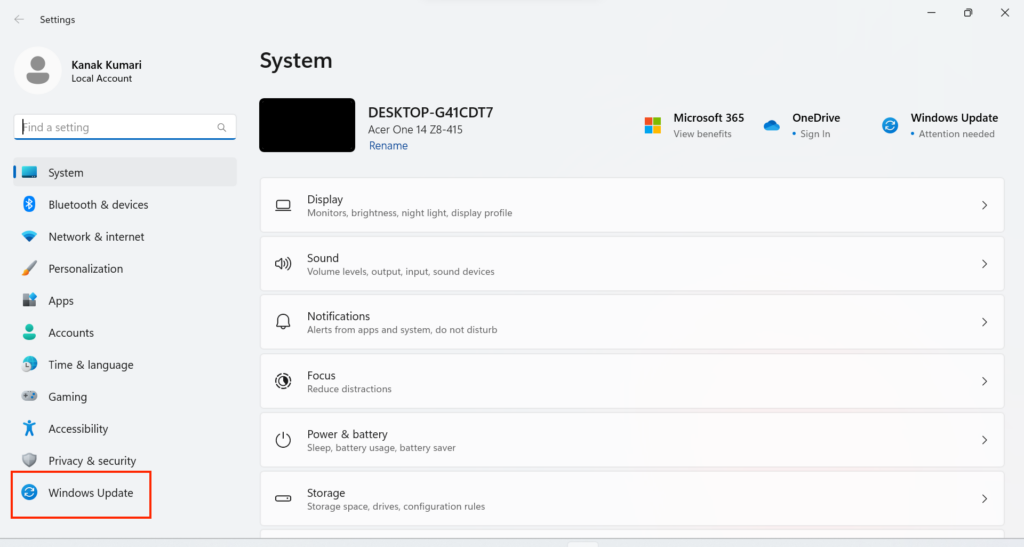
2. In the Windows Update window, click Check for updates to look for new available Windows updates.

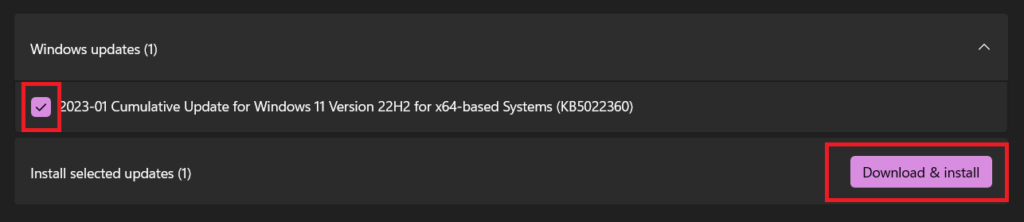
3. If you see the new Windows updates after clicking the Check for updates button, click the Download & install button to install those updates on your Windows 11 computer.

16. Clean Boot Your PC
One of Microsoft’s Independent advisors in the Microsoft forum suggested users clean boot the PC and disable the non-Microsoft services to check if a third-party service is the reason for this issue.
So you can try the same on your PC to find out the same. To clean boot your Windows 11 system, follow the below-mentioned steps on your PC or laptop:
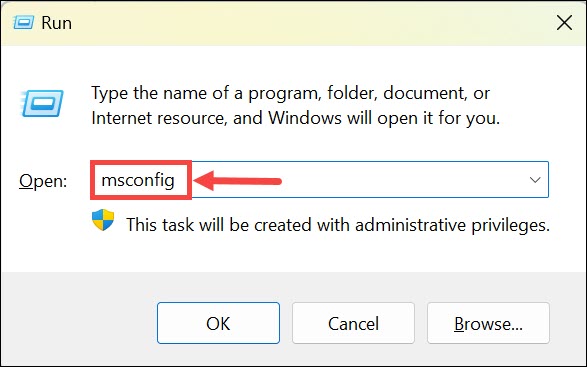
1. Press the Windows + R shortcut to open Run on your PC, type msconfig, and press Enter.
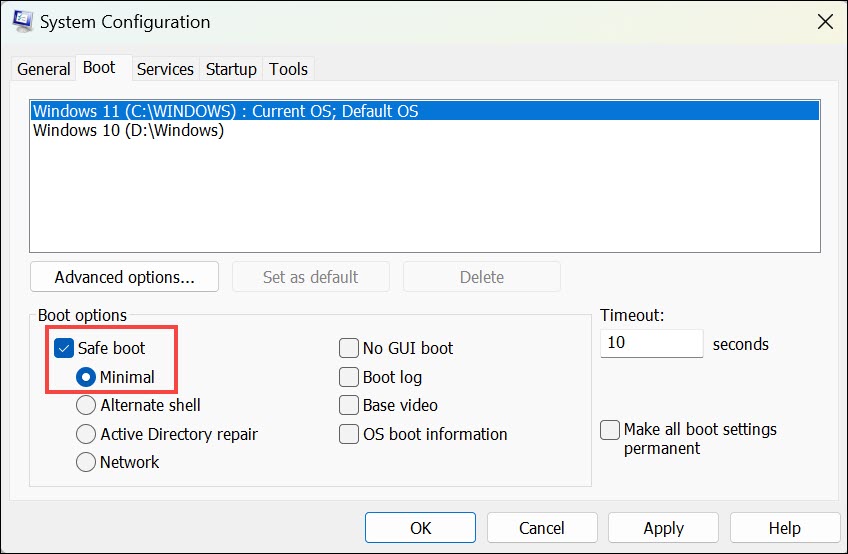
2. Go to the Boot tab in the next window and check mark Safe boot to turn on Safe on your Windows 11 PC.
3. Go to the Services tab, and in the same tab, check the Hide all Microsoft services checkbox.
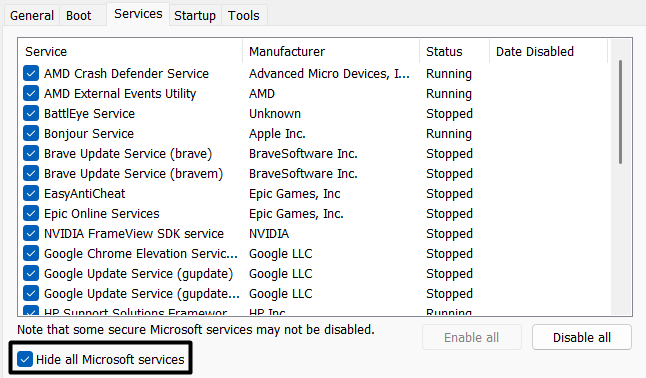
4. Click the Disable all button to disable all the non-Microsoft services on your Windows 11 computer.

5. After doing so, proceed to the Startup tab and click the Open Task Manager option to open Task Manager.

6. Right-click on a non-Microsoft service in the Processes section and choose End task to close it.
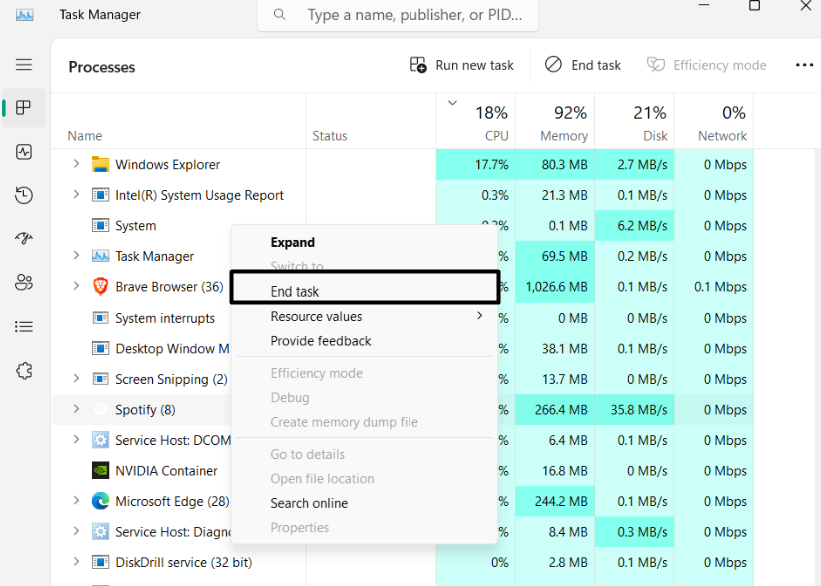
Do the same with other similar services, restart your PC, and check if the Wi-Fi works properly.
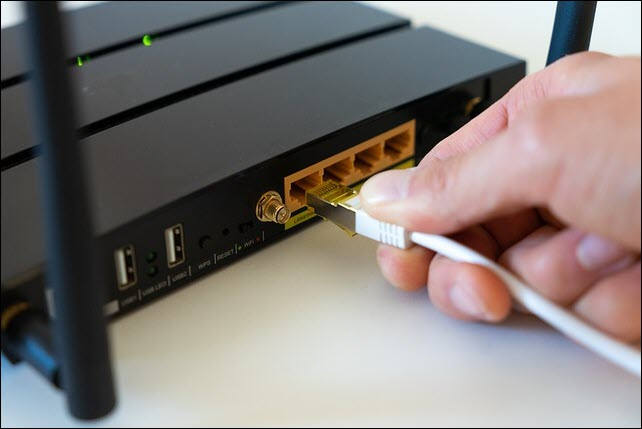
17. Try an Ethernet Connection
If none of the suggested fixes help you fix the issue on your PC, then it may be occurring because of some bugs and glitches in the OS. You need to wait for Microsoft to fix it. Until the issue gets fixed, you can use the internet on your PC by connecting it to your Wi-Fi via ethernet.
FAQs
How Do I Fix Windows 11 Connected but No Internet?
If you’re facing Wi-Fi connected but no internet on your Windows 11 PC, restart it. In case doing this doesn’t fix the issue, consider updating your Windows 11 system’s Wi-Fi adapter.
Why Is My Wi-Fi Connected but I Have No Internet?
There could be several reasons for the connected but no internet issue, like outdated wireless adapters, a faulty Wi-Fi adapter, security software preventing access, enabled VPN, etc.
How Do I Fix My Wi-Fi Driver on Windows 11?
To fix issues with your Windows 11 PC’s Wi-Fi adapter, update them through optional updates. If this doesn’t resolve the issue, try reinstalling them to fix all the issues with it with ease.
Why Is My Laptop Connecting to Wi-Fi but No Internet?
Varied reasons could cause this issue on your laptop, like outdated adapters, temporary glitches, etc.
Does Windows 11 Have Wi-Fi Issues?
Windows 11’s Wi-Fi function keeps getting new issues over and over again. Sometimes, the Wi-Fi options disappear from the Windows 11 PC. Whereas at times, it becomes unclickable.
Conclusion
Issues with Wi-Fi in the new Windows 11 are pretty common. Sometimes, the Wi-Fi option disappears for no reason. Whereas sometimes, it becomes unclickable. Users have now discovered a new issue with it where they can connect their Windows PC to a Wi-Fi network but can’t use any online apps using it.
If that was the same in your case, we hope the fixes we shared helped you fix the Wi-Fi connected but no internet issue. If yes, then do let us know which workaround helped you fix this issue with your Windows 11 PC’s Wi-Fi.
No Internet access on your Windows 11? A lot of reasons can cause unidentified networks on computers. But don’t worry. Here we have 7 proven fixes for tackling this problem.
How to fix an unidentified network on Windows 11?
- Restart your devices
- Turn off airplane mode
- Update network driver
- Renew IP address
- Diagnose your network
- Change DNS server
- Disable antivirus temporarily
You don’t have to try them all. Just work your way down the list until you find the one that fixes the unidentified network problem for you.
Fix 1 Restart your devices
Rebooting usually gets your devices back to an unaffected and normal status. So you can try to restart your devices to check for any improvements.
Just simply unplug the computer, router, and modem from the power supply. Shut down your PC completely. Then wait for about 10 minutes to plug them back.
Make sure that your devices’ physical connection works well. And then reconnect the network to see if the unidentified network disappears.
Fix 2 Turn off airplane mode
Airplane mode or flight mode doesn’t allow users to access the Internet. Sometimes you may accidentally turn it on, to figure it out:
Click the Internet icon on the right-bottom corner. Turn off the airplane mode.

If your airplane mode is off or turning it off doesn’t help, move on to try the next fix.
Fix 3 Update network driver
The unidentified network may occur if you use the wrong network driver or it’s outdated. So you should update your network driver to see if it fixes your problem. You can do it without Internet access.
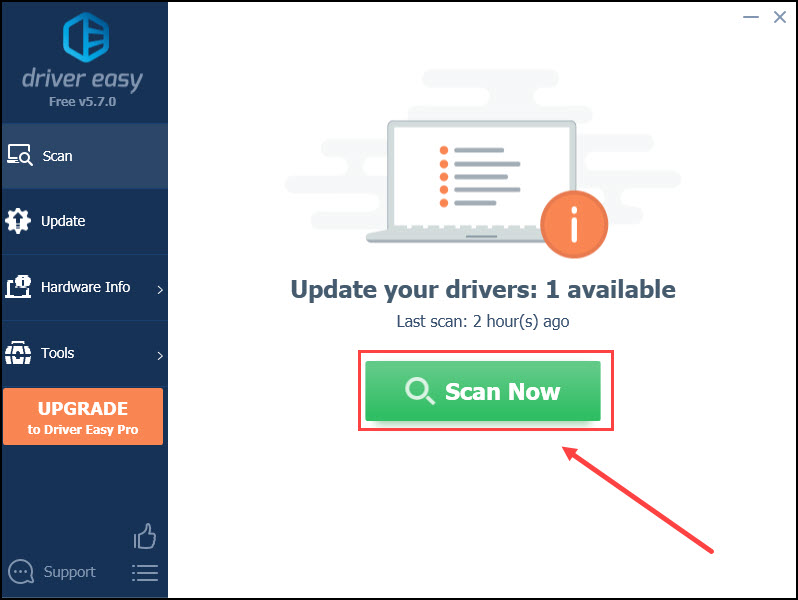
You can browse your manufacturer’s website to locate the correct driver and download it. But if you don’t have the time, patience, or skills to update the driver manually, you can do it automatically with Driver Easy.
Driver Easy will automatically recognize your system and find the correct drivers for it. You don’t need to know exactly what system your computer is running, you don’t need to be troubled by the wrong driver you would be downloading, and you don’t need to worry about making a mistake when installing.
You can update your drivers automatically with either the FREE or the Pro version of Driver Easy. But with the Pro version, it takes just 2 steps (and you get full support and a 30-day money-back guarantee).
- If your computer doesn’t have Internet access
- If your computer has Internet access
For computers without Internet access
You will need another Internet-accessible computer to help you finish the update process.
- Download Driver Easy on the computer with the Internet. Copy and paste the downloaded .exe file to your computer.
- Install Driver Easy on both computers and run it.
- Follow the instruction in this article.
For computers with Internet access
- Download and install Driver Easy.
- Run Driver Easy and click the Scan Now button. Driver Easy will then scan your computer and detect any problem drivers.

- Click Update All to automatically download and install the correct version of all the drivers that are missing or out of date on your system (this requires the Pro version – you’ll be prompted to upgrade when you click Update All).

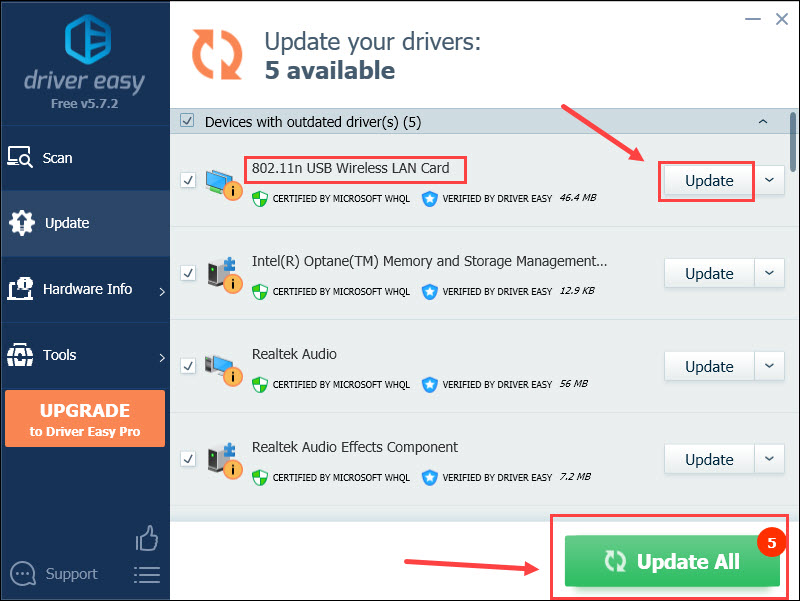
You can do it for free if you like, but it’s partly manual.
If you need assistance when using the Pro version, please contact Driver Easy’s support team at support@drivereasy.com.
Restart your computer to make changes apply. Reconnect your network to see if it works.
Fix 4 Renew IP address
Problematic IP addresses and DNS cache may cause an unidentified network on your computer. If your IP address is poorly configured, this method can help. To fix it:
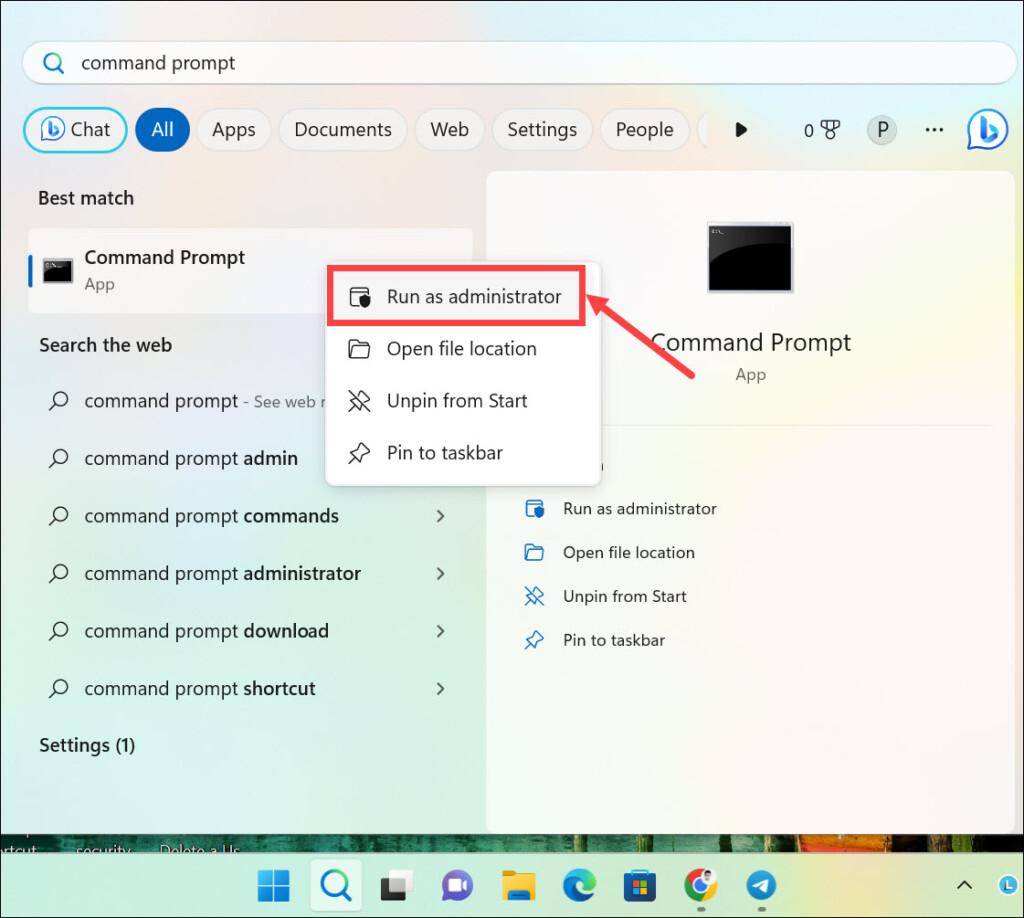
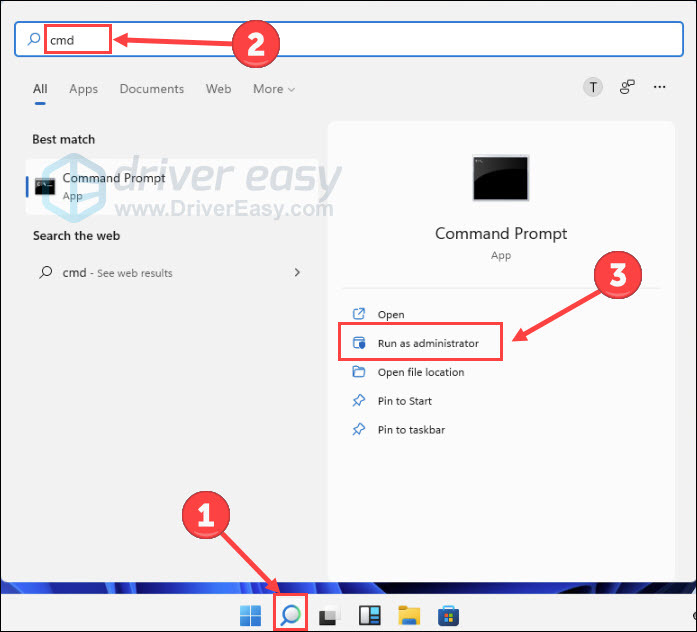
- Type cmd on the Windows search bar. Click Run as an administrator.

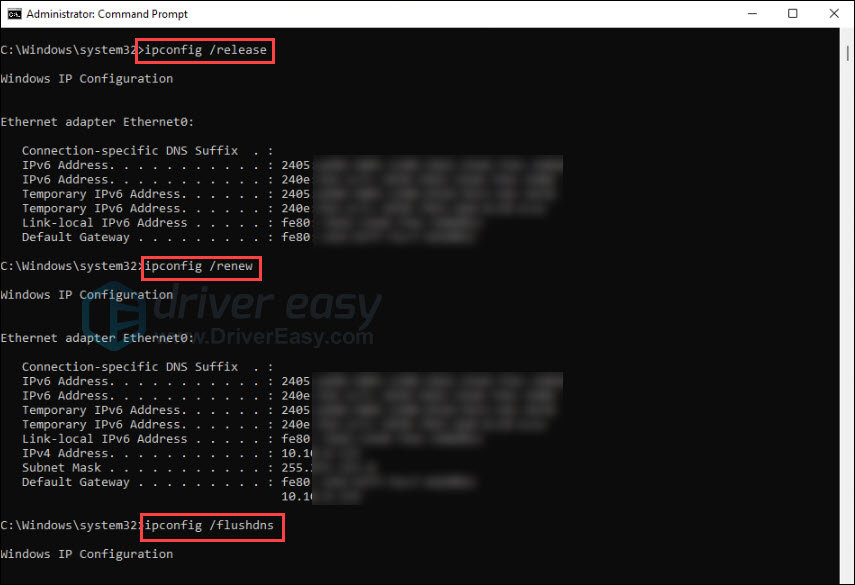
- Copy and paste the following commands. Hit Enter after each.
ipconfig /releaseipconfig /renewipconfig /flushdns
Try to connect the network again. If it fails to solve your problem, continue to try the next one.
Fix 5 Diagnose your network
Nowadays, most computers have built-in tools to scan and fix problems for you. If your computer has no Internet access, you can try to diagnose the network.
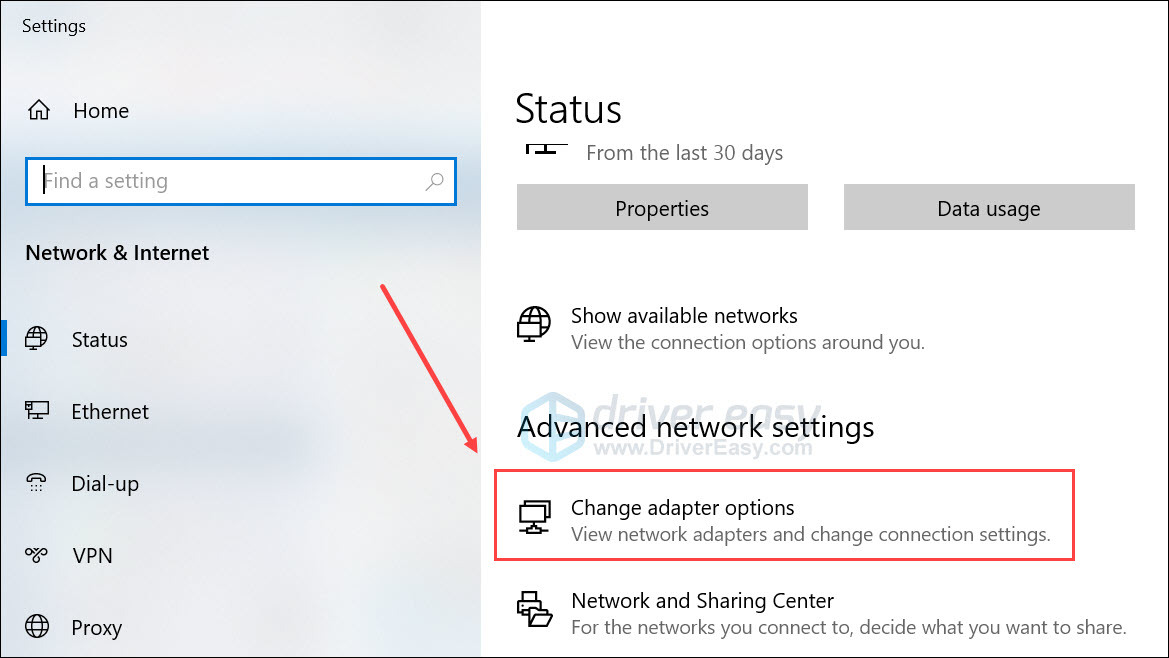
- Press the Windows logo key and X on the keyboard. And then click Network Connections.
- Click Change adapter options.

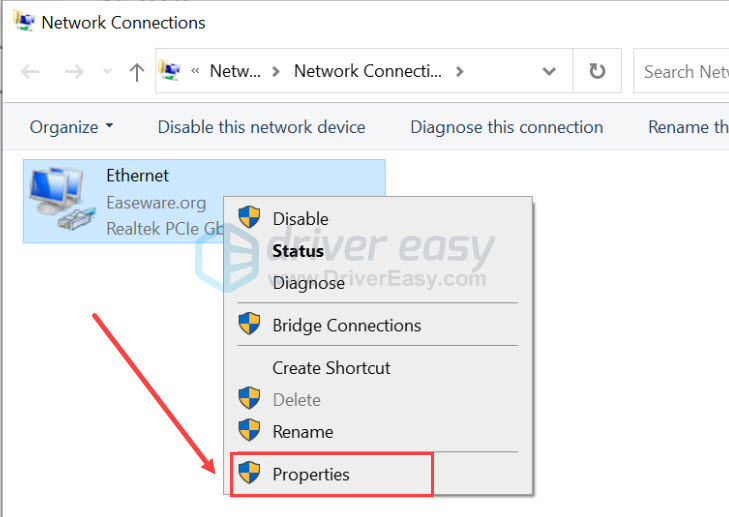
- Select your Internet and click Diagnose this connection.


Wait for the tools to diagnose the problem for you.
Besides, this move changes the network adapter from a static IP address to DHCP (Dynamic Host Configuration Protocol). DHCP allows hosts to obtain required TCP/IP configuration information from a DHCP server, which may also be helpful for the unidentified network woe.
Fix 6 Change DNS server
Generally, your Internet service provider chooses the DNS server automatically for you. But sometimes things may go wrong. A misconfigured DNS server can prevent your PC from connecting to the Internet. Therefore, you can try to change the DNS server manually.
- Press the Windows logo key and X on the keyboard. Click Network Connections.
- Click Change adapter options.
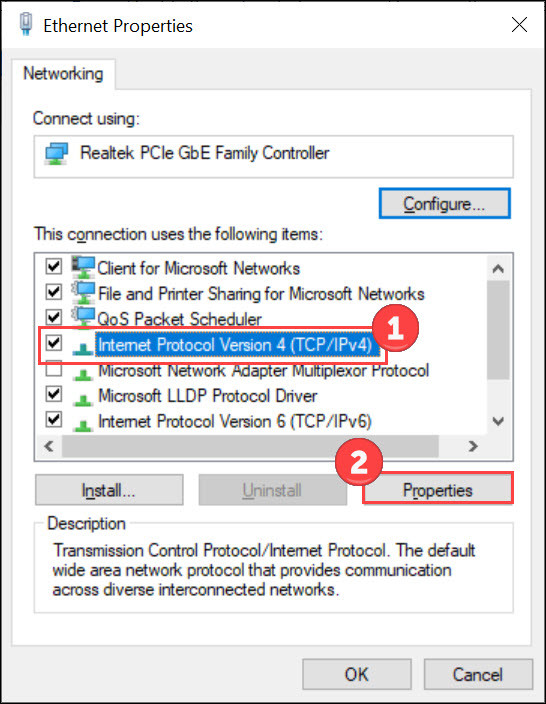
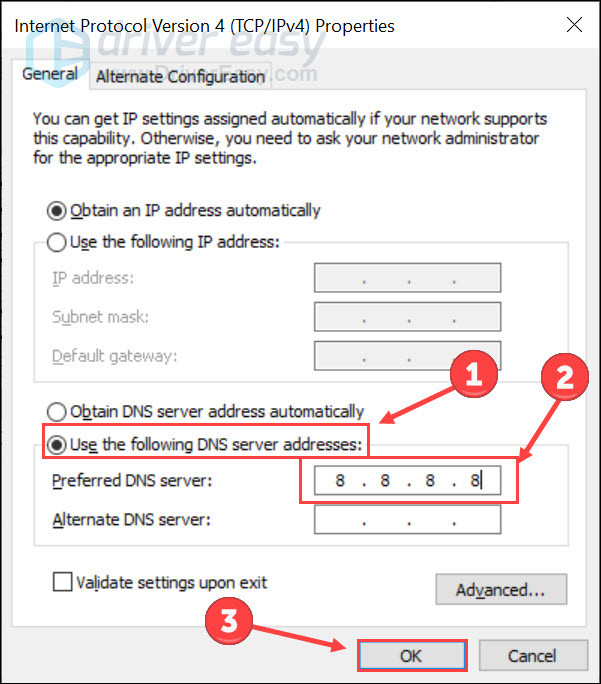
- Right-click your network and select Properties.

- Select Internet Protocol Version 4 (TCP/IPv4) and click Properties.

- Click Use the following DNS server addresses option. Then enter 8.8.8.8 or other public DNS server addresses (you can google it if you have a network). Click OK.

If you find it accessible to use the network, then you have solved this problem. If not, go ahead to try the next one.
Fix 7 Disable antivirus temporarily
Third-party antivirus protects your network connection all the time. It’s likely that they interfere with your setting and mess things up. To verify this issue, follow the steps below to disable your antivirus.
Don’t worry about the safety issue as Windows Defender will protect your PC. Just make sure you turn it on.
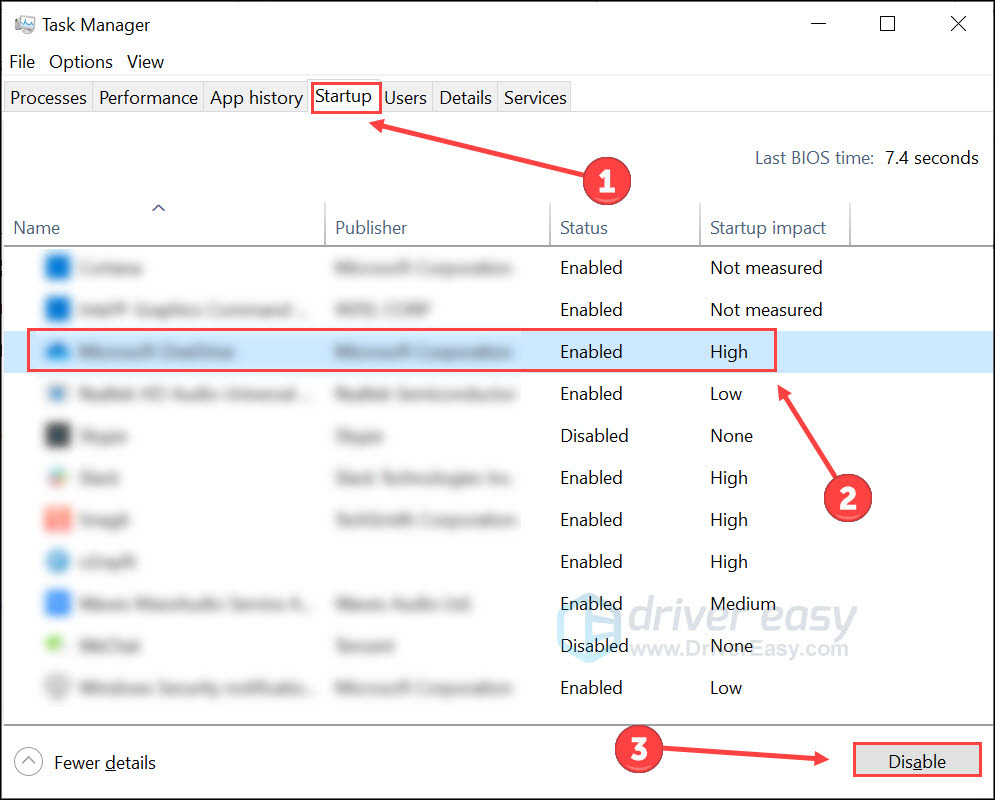
- Press Esc, Shift, and Ctrl on your keyboard to open Task manager.
- Select the Startup tab. Then select your antivirus and click Disable.

- Restart your computer and try the Internet connection again.
If you access the Internet successfully, replace your antivirus or consult their support team. If you want to undo the change, follow the steps above and click Enable rather than Disable.
That are all methods for solving the unidentified network problem in Windows 11. If you have any suggestions or questions, please don’t hesitate to leave a word below.
3
3 people found this helpful