
Для установки Windows 11 (или при обновлении с Windows 10), ваш компьютер должен соответствовать определённом минимальным системам требованиям: наличие чипа TPM 2.0 (Trusted Platform Module), режим UEFI + Secure Boot, 4 Гб RAM, 64 Гб диск и совместимый двухъядерный процессор 1 ГГц (не все процессоры поддерживаются!). Microsoft ограничивает установку Windows 11 на несовместимые компьютеры, выполняя проверку на соответствие системным требования перед началом установки Windows. В этой статье мы покажем, как установить Windows 11 на несовместимые устройства без проверки требований к CPU, TPM, Secure Boot (и т.д.)
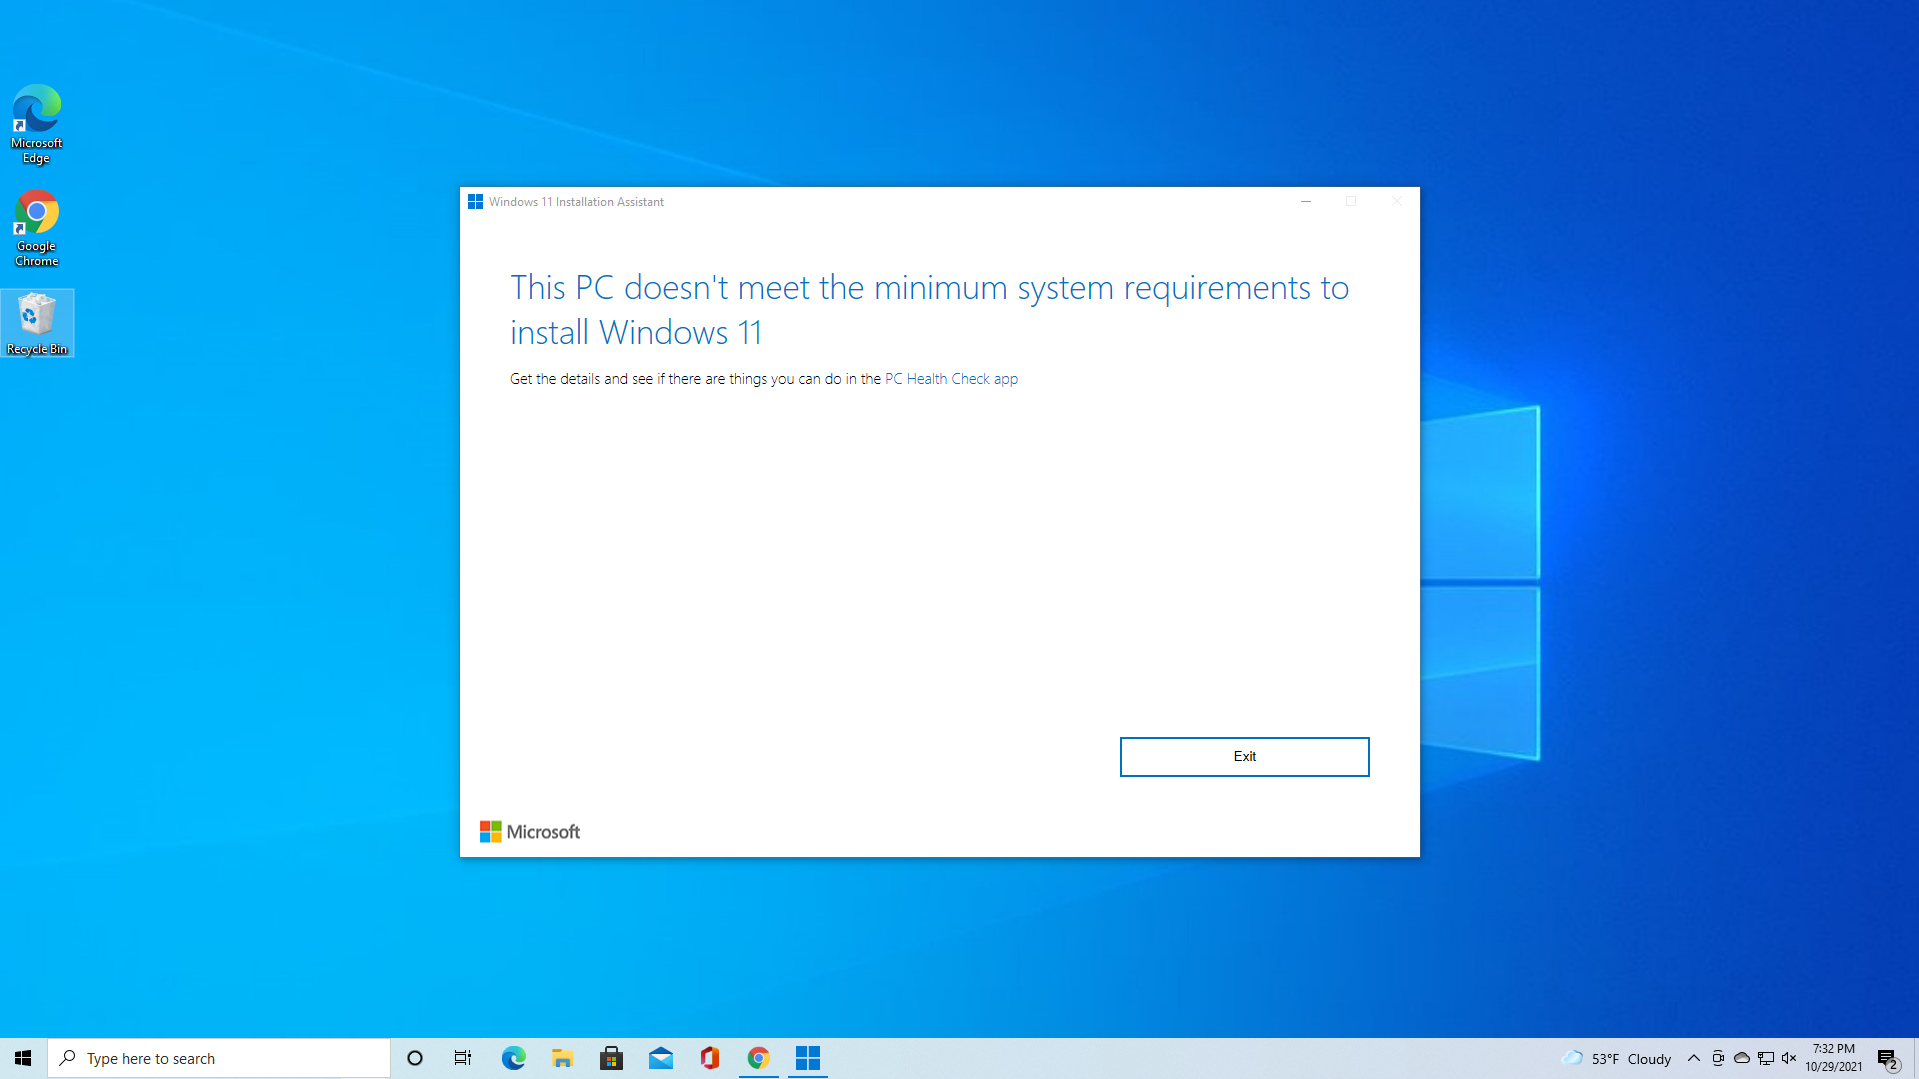
Если компьютер не соответствует минимальным требованиям для Windows 11, то при установке ОС появится ошибка:
Запуск Windows 11 на этом компьютере не возможен
. Этот компьютер не соответствует минимальным требованиям к системе для установки этой версии Windows. Дополнительные сведения см. на сайте aka.ms/WindowsSysReq
This PC can’t run Windows 11
. This PC doesn’t meet the minimum system requirements to install this version of Windows. For more information, visit aka.ms/WindowsSysReq<
Чтобы понять, каким конкретно требованиям не соответствует вашим компьютер, нужно изучить лог ошибок установки Windows 11 setuperr.log. В этом файле содержаться только ошибки установки Windows (полный лог установки находится в файле setupact.log, но изучать его сложно из-за большого объема).
Чтобы открыть файл лога ошибок установки Windows, откройте командную строку прямо на экране установки, нажав
Shift + F10
и выполните команду:
notepad x:\windows\panther\setuperr.log
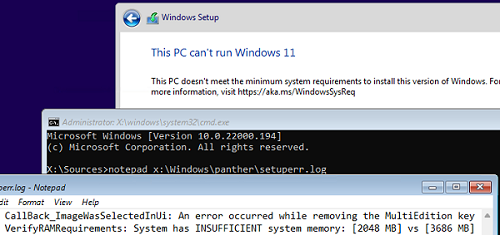
В нашем случае ошибка говорит, что на компьютере недостаточно оперативной памяти (всего 2 Гб вместо 3).
2021-11-11 10:57:51, Error VerifyRAMRequirements: System has INSUFFICIENT system memory: [2048 MB] vs [3686 MB]
Обратите внимание, что если ваш компьютер не соответствует нескольким системным требованиям для установки Windows, то в логе будет указана только первая из причин. Т.е. если вы исправили (или пропустили) одну из ошибок несовместимости, то при следующем запуске установки Windows 11 в логе будет содержаться следующая ошибка совместимости.
После того, как мы добавили RAM появилась другая ошибка:
2021-11-11 11:13:37, Error VerifyTPMSupported:Tbsi_GetDeviceInfo function failed - 0x8028400f[gle=0x0000007a]
Т.е. установщик определил, что на компьютере отсутствует TPM чип.
Если вы устанавливаете Windows 11 в виртуальную машину VMWare, вы можете добавить виртуальный TPM чип в соответствии с этой статьей. Для Hyper-V используется другая инструкция.
Однако вы можете продолжить установку Windows 11, просто игнорировал одно или все требования совместимости.
Для этого нужно в командной строке на экране установки Windows 11:
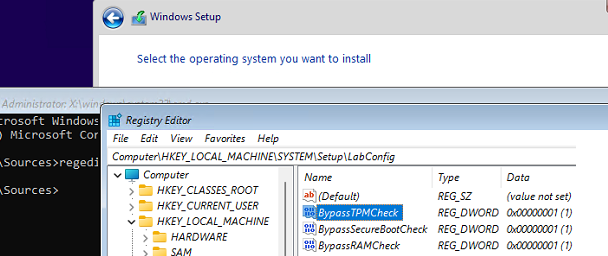
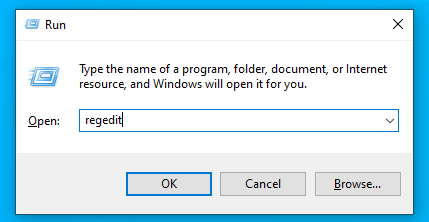
- Запустить редактор реестра
regedit.exe
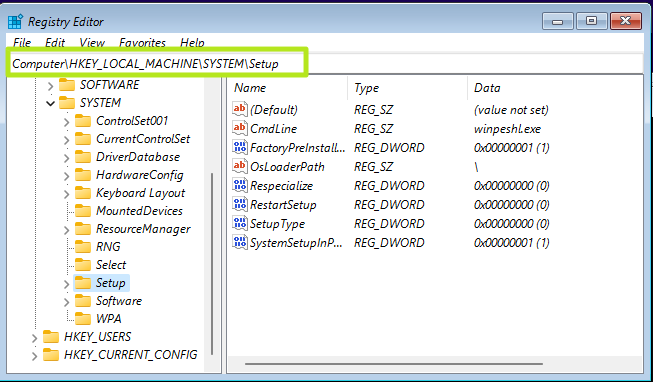
; - Перейти в раздел HKEY_LOCAL_MACHINE\SYSTEM\Setup и создать новую ветку с именем LabConfig;
- В этой ветке нужно создать DWORD параметры со значением 1 для тех проверок совместимости, которые вы хотите пропустить при установке
Доступны следующие параметры, позволяющие установить Windows 11 на устройства:
-
BypassCPUCheck
– с несовместимыми процессорами; -
BypassTPMCheck
– без чипа TPM 2; -
BypassRAMCheck
– не проверять минимальное количество RAM -
BypassSecureBootCheck
–с Legacy BIOS (или UEFI с отключенным Secure Boot) -
BypassStorageCheck
– не проверять размер системного диска
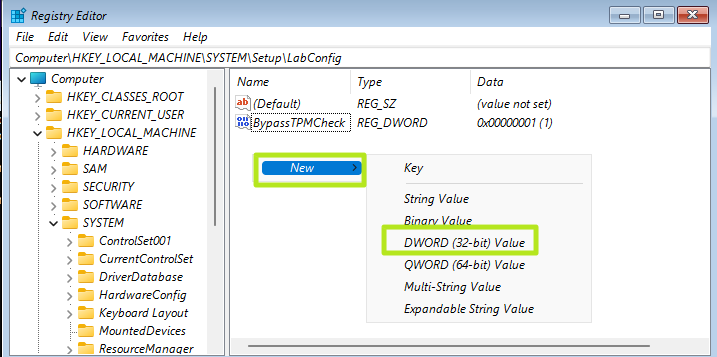
Например, чтобы не проверять наличие TPM модуля при установке, нудно создать параметр реестра BypassTPMCheck со значением 1. Параметр можно создать с помощью графического редактора реестра или с помощью команды:
reg add HKLM\SYSTEM\Setup\LabConfig /v BypassTPMCheck /t REG_DWORD /d 1
Аналогичным образом нужно создать другие параметры для проверок, который вы хотите пропустить при установке Windows 11.
Затем вернитесь в окно установки Window 11, вернитесь на шаг назад и продолжите обычную установки без проверки совместимости.
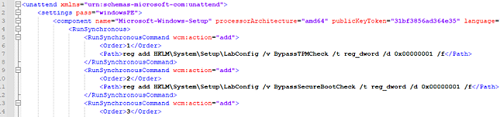
Вы можете модифицировать установочный ISO образ Windows 11, чтобы все эти проверки TPM, SecureBoot, диск, память, CPU) пропускались автоматически при установке ОС.
Для этого создайте текстовый файл AutoUnattend.xml со следующим содержимым:
<unattend xmlns="urn:schemas-microsoft-com:unattend">
<settings pass="windowsPE">
<component name="Microsoft-Windows-Setup" processorArchitecture="amd64" publicKeyToken="31bf3856ad364e35" language="neutral" versionScope="nonSxS" xmlns:wcm="http://schemas.microsoft.com/WMIConfig/2002/State" xmlns:xsi="http://www.w3.org/2001/XMLSchema-instance">
<RunSynchronous>
<RunSynchronousCommand wcm:action="add">
<Order>1</Order>
<Path>reg add HKLM\System\Setup\LabConfig /v BypassTPMCheck /t reg_dword /d 0x00000001 /f</Path>
</RunSynchronousCommand>
<RunSynchronousCommand wcm:action="add">
<Order>2</Order>
<Path>reg add HKLM\System\Setup\LabConfig /v BypassSecureBootCheck /t reg_dword /d 0x00000001 /f</Path>
</RunSynchronousCommand>
<RunSynchronousCommand wcm:action="add">
<Order>3</Order>
<Path>reg add HKLM\System\Setup\LabConfig /v BypassRAMCheck /t reg_dword /d 0x00000001 /f</Path>
</RunSynchronousCommand>
<RunSynchronousCommand wcm:action="add">
 <Order>5</Order>
<Path>reg add HKLM\System\Setup\LabConfig /v BypassCPUCheck /t reg_dword /d 0x00000001 /f</Path>
</RunSynchronousCommand>
<RunSynchronousCommand wcm:action="add">
<Order>4</Order>
<Path>reg add HKLM\System\Setup\LabConfig /v BypassStorageCheck /t reg_dword /d 0x00000001 /f</Path>
</RunSynchronousCommand>
</RunSynchronous>
<UserData>
<ProductKey>
<Key></Key>
</ProductKey>
</UserData>
</component>
</settings>
</unattend>
Если вы хотите отключить экран создания онлайн аккаунта Microsoft при установке Windows 11, добавьте в файл следующий секцию компонента:
<component name="Microsoft-Windows-Shell-Setup" processorArchitecture="amd64" publicKeyToken="31bf3856ad364e35" language="neutral" versionScope="nonSxS" xmlns:wcm="http://schemas.microsoft.com/WMIConfig/2002/State" xmlns:xsi="http://www.w3.org/2001/XMLSchema-instance">
<OOBE>
<HideOnlineAccountScreens>true</HideOnlineAccountScreens>
<HideWirelessSetupInOOBE>true</HideWirelessSetupInOOBE>
<ProtectYourPC>3</ProtectYourPC>
</OOBE>
</component>
Скопируйте данный файл в корень установочной USB флешки с Windows 11.
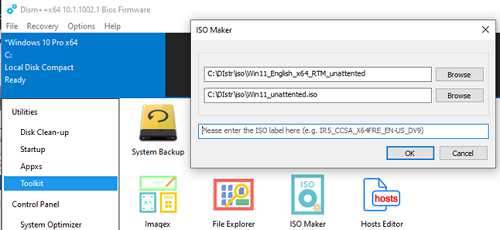
Если вам нужно добавить файл ответов в ISO образ Windows 11, распаккуйте его содержимое в любую папку на компьютере, скопируйте в этот каталог файл AutoUnattend.xml и пересоберите ISO образ.
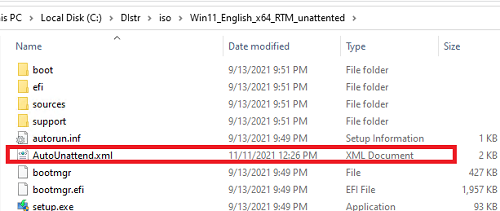
Я использовал для создания образа бесплатную утилиту DISM++ (Toolkit -> ISO maker).
Теперь никакие проверки совместимости не будут производится при установке Windows 11.
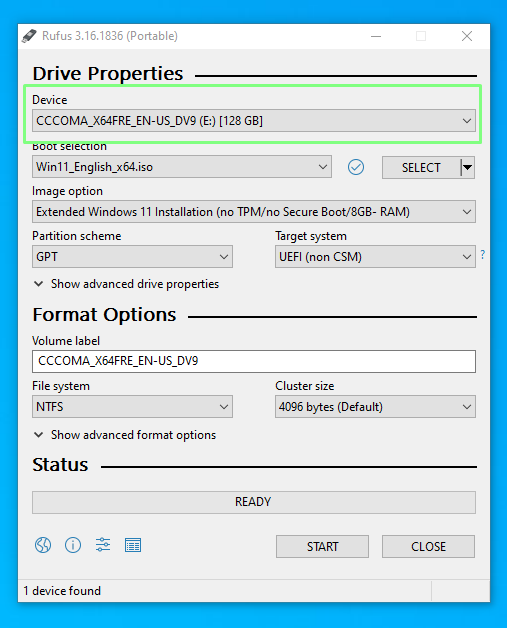
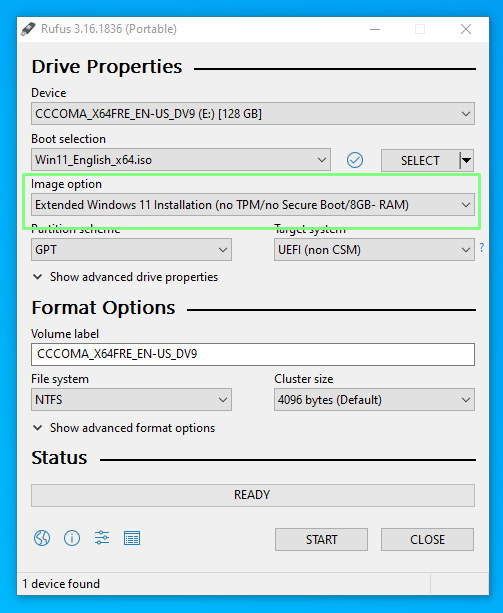
В новой версии утилиты Rufus, использующейся для создания загрузочных USB флешек, появилась специальная опция Extended Windows 11 Installation (no TPM/no Secure Boot/8Gb- RAM). Данная опция позволяет создать образ для установки Windows 11 без проверки TPM и Secure Boot:

Время на прочтение1 мин
Количество просмотров19K

Пользователи сообщили, что завышенные системные требования для ПК при установке Windows 11 по обязательному наличию TPM 2.0 и современного CPU можно обойти с помощью добавления единственной команды «/product server» к файлу setup.exe в каталоге установки Windows 11.

В этом случае не нужно самостоятельно вносить правки в реестр или искать сторонние сборки и инструменты (Rufus) для помощи в установке Windows 11, где можно отключить проверку на совместимость ПК.
Другие пользователи сообщили, что этот метод действительно работает, причём даже в последних тестовых инсайдерских сборках Windows 11.
Примечательно, что первое упоминание о добавлении «/product server» появилось в сети год назад, но эту тему никто особо не заметил, так как информацию разместил вьетнамский пользователь во внутреннем форуме.

Уже прошло два года после релиза Windows 11, а Windows 10 по-прежнему более популярна у пользователей. Microsoft советует купить новый современный настольный компьютер или ноутбук с Windows 11, если у пользователей не получается мигрировать с Windows 10 на новую ОС.
Microsoft поделилась инструкцией, в которой перечислены способы установки WIndows 11 и то, как можно обойти проверку поддерживаемой модели процессора и модуля TPM 2.0.
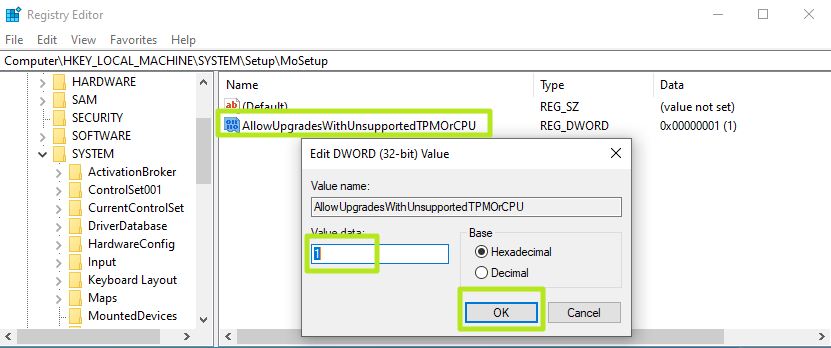
Для того, чтобы это осуществить пользователю необходимо открыть «Редактор реестра» и перейти в раздел HKEY_LOCAL_machine\system\Setup\MoSetup. В нём нужно создать параметр типа DWORD (32-бита) с именем AllowUpgradesWithUnsupportedTPMOrCPU и присвоить ему значение 1.
Если выполнить эти действия, проверки на модель процессора и наличия доверенного платформенного модуля TPM 2.0 при установке Windows 11 с использованием записанного на съёмный носитель ISO-образа системы выполняться не будут.
Однако на ПК необходима поддержка модуля TPM 1.2. Данная функция может быть отключена в настройках BIOS на некоторых компьютерах. Иногда активировать опцию можно в параметрах после обновления прошивки BIOS. Для проверки включённой версии TPM нужно запустить программу tpm.msc через утилиту «Выполнить» (Win + R).
В Microsoft предупредили, что некорректные изменения в данных реестра могут вызвать неполадки в работе компьютера, так что применять этот способ обхода не следует без рекомендации службы поддержки.
- Windows 11 доступна для установки: что нового и стоит ли обновиться?
- Новые тесты опровергли существенное падение производительности в играх на Windows 11
Операционная система Windows 11 имеет довольно суровые системные требования. В первую очередь многие компьютеры не подходят под требования к наличию доверенного платформенного модуля (TPM) версии 2.0. Это требование достаточно легко обойти всего за несколько минут.

Microsoft не очень хорошо справилась с информированием пользователей о системных требованиях Windows 11 и для чего те или иные компоненты нужны. Кроме того, за несколько месяцев предварительного тестирования условия ещё и менялись. Главная путаница связана с необходимостью модуля TPM 2.0, который прежде был нужен только в корпоративном окружении.
Microsoft хочет, чтобы Windows 11 получила дополнительный уровень безопасности, в котором модуль TPM 2.0 играет основную роль. Компанию не останавливает отсутствие этого модуля на многих компьютерах. Однако, это требование нетрудно обойти и для этого существует не один способ. Правда, после этого вы не сможете получать функциональные обновления и обновления безопасности Windows 11.

Один из методов требует наличия поддержки TPM 1.2. Если у вас процессор линейки AMD Ryzen 1000 или более современный и Intel Kaby Lake 7-го поколения или новее, на вашей материнской плате скорее всего есть TPM 1.2 или даже TPM 2.0.
Проверить это легко. Достаточно открыть диспетчер устройств в разделе «Устройства безопасности». Можно воспользоваться сочетанием клавиш Win + R и в открывшемся окне ввести tpm.msc. Откроется окно «Управление доверенным платформенным модулем (TPM) на локальном компьютере». Тут сказано, есть у вас этот модуль или нет.

Если нет, проверьте настройки UEFI. Обычно нужно открыть вкладку «Дополнительно» и включить опцию «PTT» для систем Intel и «PSP fTPM» для систем AMD. Эта настройка есть на большинстве потребительских ПК, где она чаще всего по умолчанию выключена.
После её изменения нужно добавить ключ в реестр. Нажмите на кнопку «Пуск» и введите regedit, нажмите ввод. В адресное поле скопируйте HKEY_LOCAL_MACHINE\SYSTEM\Setup\MoSetup и нажмите ввод. Нужно создать параметр DWORD с названием «AllowUpgradesWithUnsupportedTPMOrCPU», значение выставить на 1. Создайте загрузочную флешку или диск при помощи приложения Media Creation Tool, запустите с них программу установки Windows 11 и обновите свою систему.

Если вы желаете выполнить чистую установку на ещё более старым процессоре, можно обойти проверки процессора и TPM в процессе установки Windows. После этого появится сообщение «На этом компьютере не работает Windows 11». Нужно вернуться на шаг назад и нажать сочетание клавиш Shift + F10 для запуска окна командной строки. Снова откройте редактор реестра, нажав пуск и введя regedit. Перейдите по адресу HKEY_LOCAL_MACHINE\SYSTEM\Setup. Нажмите на Setup правой кнопкой мыши и создайте ключ с названием «LabConfig».
В этом ключе добавьте параметр DWORD под названием «BypassTPMCheck» со значением 1. Добавьте ещё один параметр «BypassCPUCheck» также со значением 1. Этот же процесс повторите с «BypassSecureBootCheck». Однако, если ваш компьютер не соответствует требованиям Windows 11 по объёму оперативной памяти или хранилища, лучше этим способом не пользоваться и оставаться на Windows 10.
Telegram-канал @overclockers_news — теперь в новом формате. Подписывайся, чтобы быть в курсе всех новостей!
Microsoft has some strict hardware requirements that your PC must meet to install Windows 11, including TPM 2.0 support. This means that not only older computers, but virtual machines will refuse to upgrade from Windows 10, giving you a message that «this PC doesn’t currently meet Windows 11 system requirements.»
Fortunately, there are several simple ways you can get bypass Windows 11’s TPM, RAM and other requirements. If you’re doing a clean install with a Windows 11 ISO, you can edit the registry in the middle of the setup process and tell it to skip requirement checks. We’ll show you how to modify the registry in the first section below.
If you don’t want to have to modify the registry mid-install, you can create a Windows 11 USB install disk that will bypass Windows 11’s TPM requirement, and its need for 8GB of RAM and a supported CPU. Using a free tool called Rufus and at least a 16GB Flash drive, you can either perform an in-place upgrade of Windows 10 to 11 or a Windows 11 clean install while getting around these minimums. In the second section of our tutorial below, we’ll show you how to use Rufus to create a requirement-free Windows 11 install disc.
If you have Windows 10 or an earlier build of Windows 11 installed on a PC that didn’t meet the requirements (perhaps a VM), you try to update to a new build with Windows Update and you get the «doesn’t meet requirements» error message, there’s a workaround for that. As we’ll detail in the third section below, a script from AveYo’s Media Creation tool github page will allow you to bypass Windows 11’s TPM requirement even with Windows Update.
Note that Microsoft also has also created an official registry hack to bypass TPM 2.0 and CPU requirements for an in-place upgrade. However, this method still requires at least TPM 1.2 so, if you have no TPM at all, it’s worthless. We’ll talk about this at the bottom, in case you want to try it.
Also note that, by default, Microsoft’s OS wants you to set it up with a Microsoft account. However, we have another tutorial on how to install Windows 11 without a Microsoft Account by using a few tricks.
How to Bypass Windows 11’s TPM Requirement Using Registry Hacks
If you just have a regular Windows 11 install disk or ISO, you can bypass the Windows TPM and RAM requirements by making some registry changes during the install. Note that this method only works on a clean install and does not allow you to bypass the requirement for at least a dual-core CPU.
Get Tom’s Hardware’s best news and in-depth reviews, straight to your inbox.
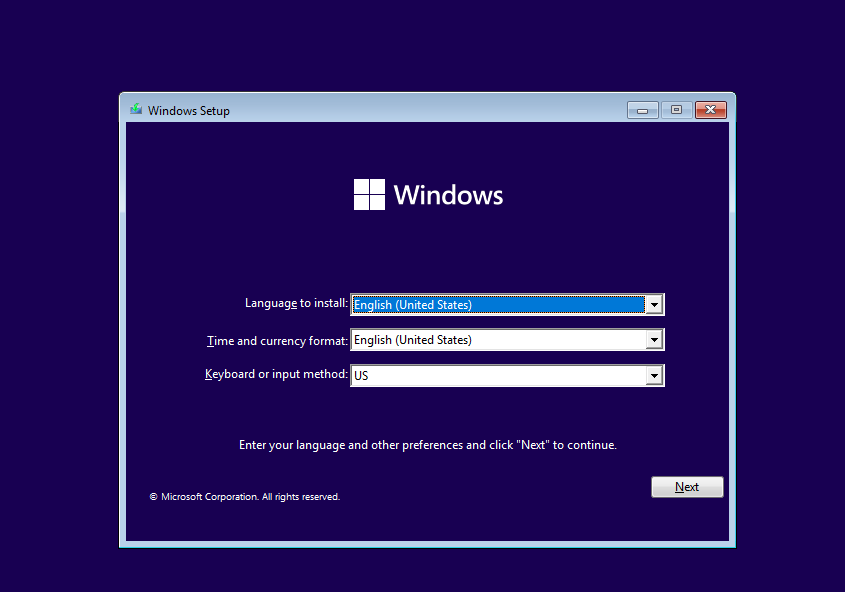
1. Boot off of your Windows 11 install disk. If you don’t have one, see our story on how to download Windows 11. The first screen should ask you to choose the language of your install (which will probably be correct).
2. Hit SHIFT + F10 to launch the command prompt.
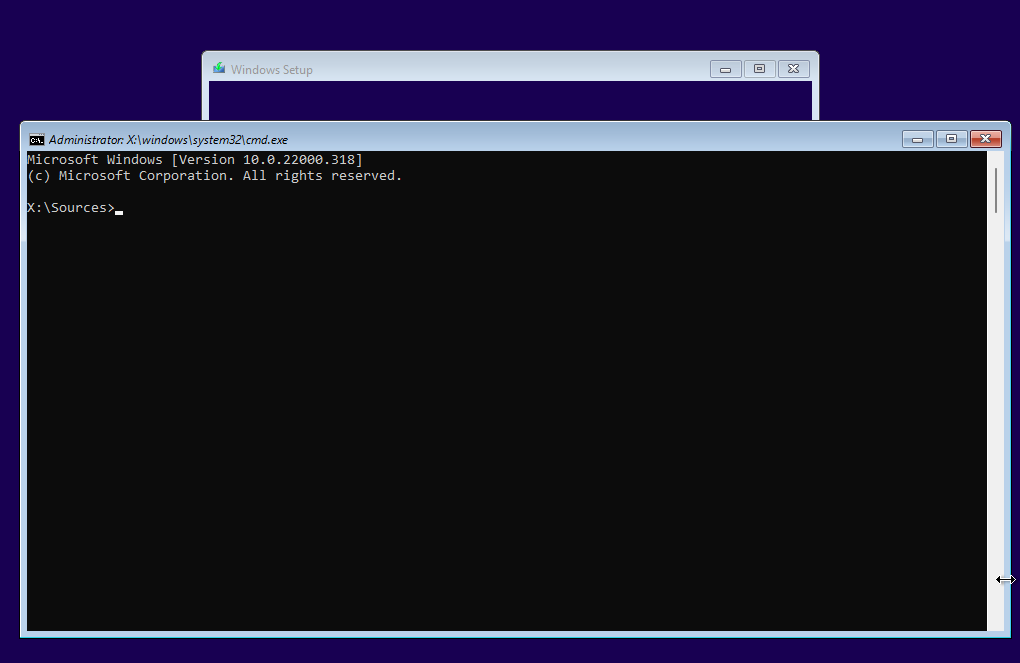
3. Type regedit and hit Enter to launch registry editor.

4. Navigate to HKEY_LOCAL_MACHINE\SYSTEM\Setup.
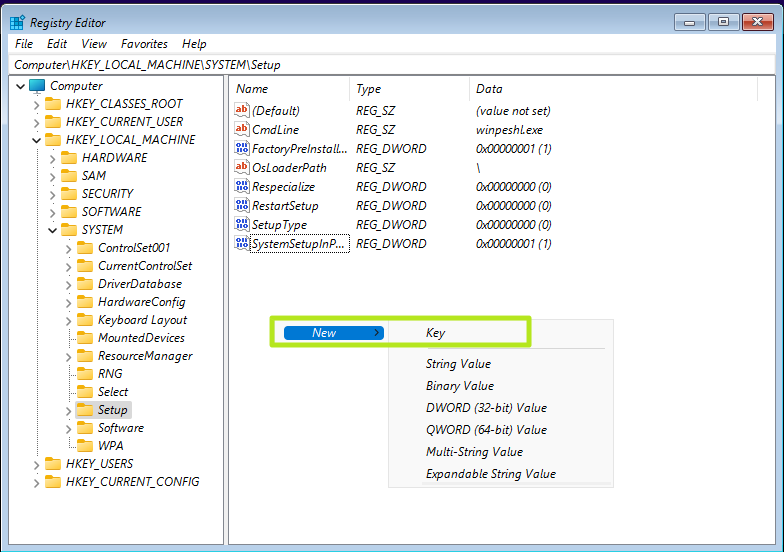
5. Create a new registry key under Setup and name it LabConfig. To create a registry key, right click in the right window pane and select New->Key. Then enter the key name.
6. Within LabConfig, create DWORDs values called BypassTPMCheck and BypassSecureBootCheck and set each to 1. To create a new DWORD value, right click in the right window and select new DWORD (32-bit) Value then name the key, double click to open it and set it to 1.
If you also want to bypass the RAM requirement, add a DWORD values for BypassRAMCheck.
7. Close regedit and the command prompt.
You should be able to continue with your Windows 11 installation as normal.
How to Bypass Windows 11’s TPM Requirement Using Rufus
With Rufus, a free utility, you can create a Windows 11 install disk on a USB Flash drive with settings that disable the TPM, RAM and CPU requirements. You can either boot off of this USB Flash drive to do a clean Windows 11 install or run the setup file off of the drive from within Windows 10 to do an in-place upgrade.
For most people, this method is ideal, but there are a couple of disadvantages. First, it requires a 16GB or larger USB Flash drive. Second, because it’s on a Flash drive, it’s more difficult to use for installing Windows 11 on a virtual machine where an ISO file would be ideal.
1. Download the latest version of Rufus and install it on your machine. At the time of writing the latest version is 3.19 which includes the Extended Windows 11 Image support.
2. Insert a blank 16GB or larger USB stick then open Rufus.
3. Select the USB device that you want to install Windows 11 to.
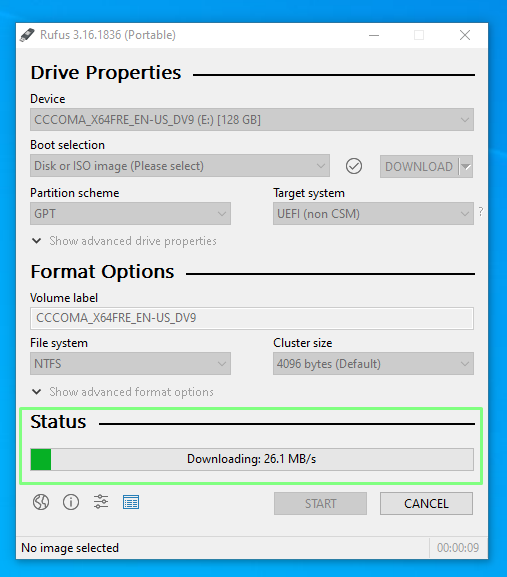
4. Ensure that Boot Selection shows “Disk or ISO image” and click DOWNLOAD.
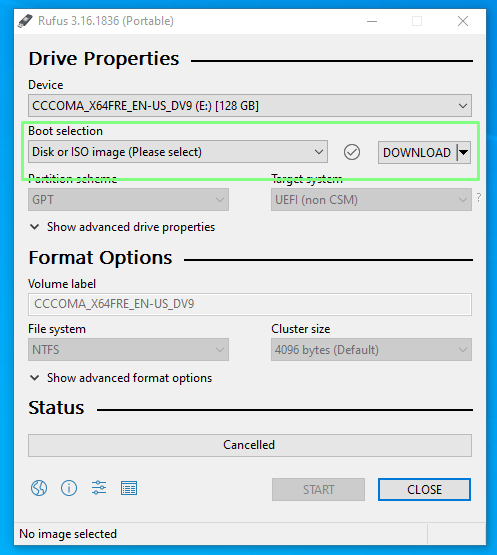
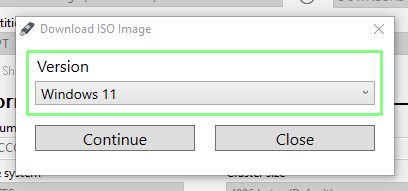
5. Select Windows 11 and click Continue.
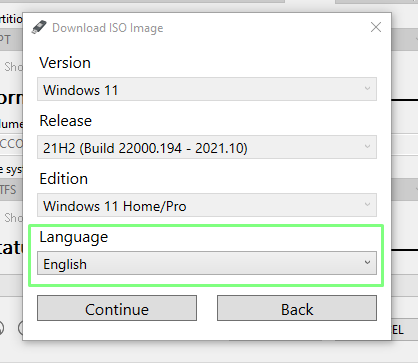
6. Select the latest release and click Continue.
7. Select the edition and click Continue.
8. Select your preferred language and click Continue.
9. Select the architecture (most likely x64) and click Download. A new window will open asking where to save the ISO image. Save it to your Downloads folder. You can also download the image using a browser if you wish.
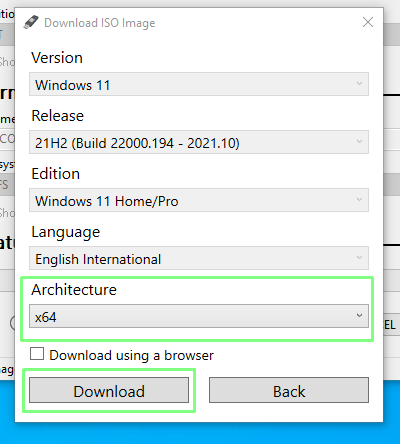
The download will take several minutes to complete.
10. Click on the Image option drop down and select Extended Windows 11 Installation to disable TPM, Secure Boot and the 8GB of RAM requirement.
11. Double check that the correct drive has been selected and click on Start to begin the installation.
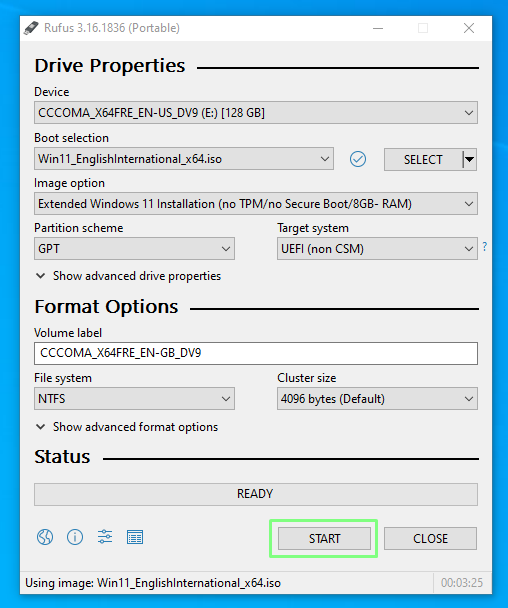
The write process can take some time, depending on the USB drive being used, but when done the drive can be removed and used to install Windows 11 on an older computer or even in a virtual machine.
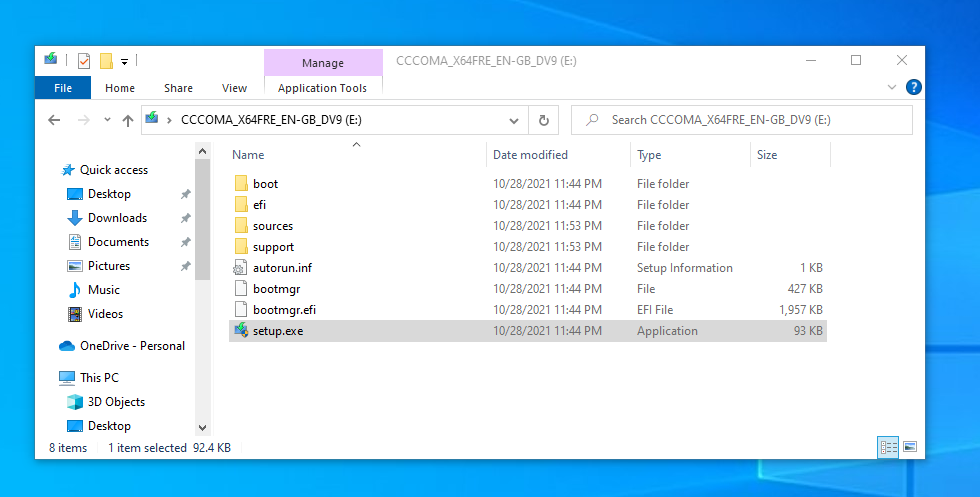
12. Install or upgrade to Windows 11. Run setup on the USB drive, if you ware doing an in-place install from an existing Windows 10 installation. Boot off of the drive if you are doing a clean install. Note that you may need to disable secure boot in your BIOS (see how to enter your BIOS) if it gives you a problem.
How to Bypass Windows 11 TPM Check From Windows Update
If you want to use Windows Update rather than creating an install disk, you’ll need a method that runs in Windows and fools the updater into thinking you meet the requirements. This may be more important if you are trying to use Windows Update to upgrade to a new build of Windows 11, perhaps an Insider Build, on a computer that already bypassed the requirement.
For example, when we joined the Windows Insider program on one of our Windows 11 VMs (which clearly did not have TPM), we got the dreaded «Your PC doesn’t meet the requirements» error. But using AveYo’s Media Creation Tool workaround script solved the problem. Here’s how to make it happen.
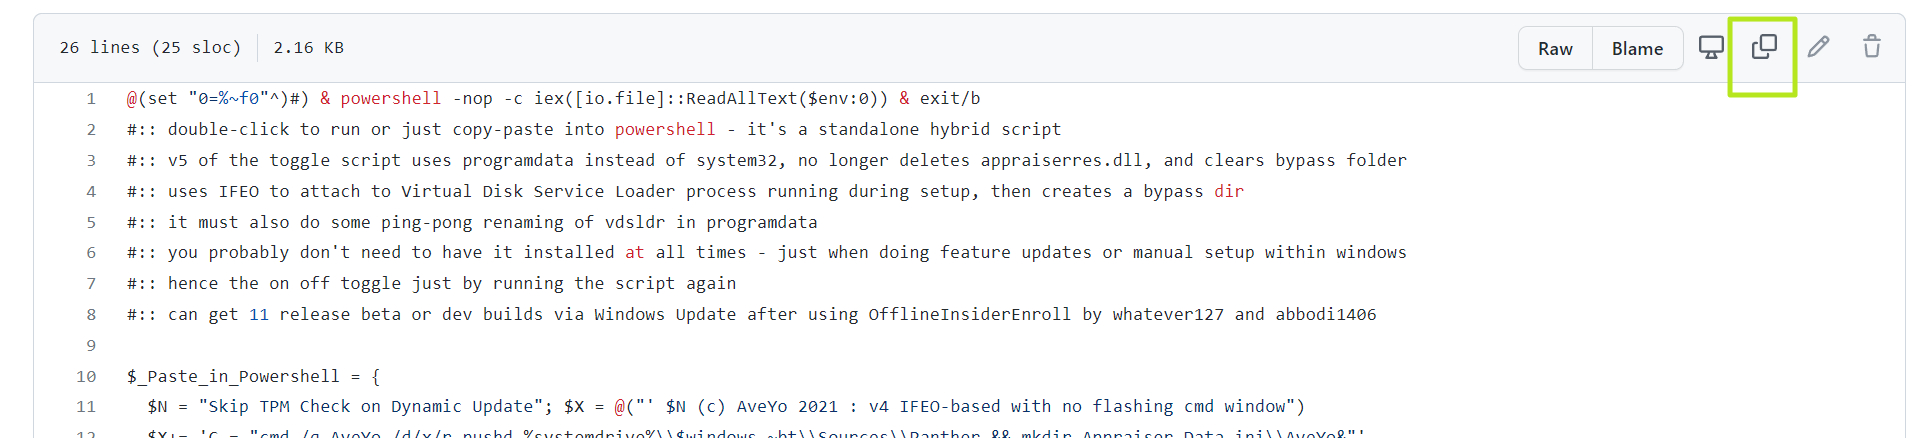
1. Navigate to the Skip_TPM_Check_on_Dynamic_Update.cmd source code on AveYo’s Media Creation Tool Github.
2. Click the «Copy raw contents» button in the upper right corner of the code box.
3. Create a new file on your desktop and name it skip_tpm_check.cmd. Make sure that you are able to view file extensions and the file extension is really .cmd, not .txt or else it won’t run.
4. Open skip_tpm.cmd for editing, using notepad or another text editor.
5. Paste in the code you copied from github.
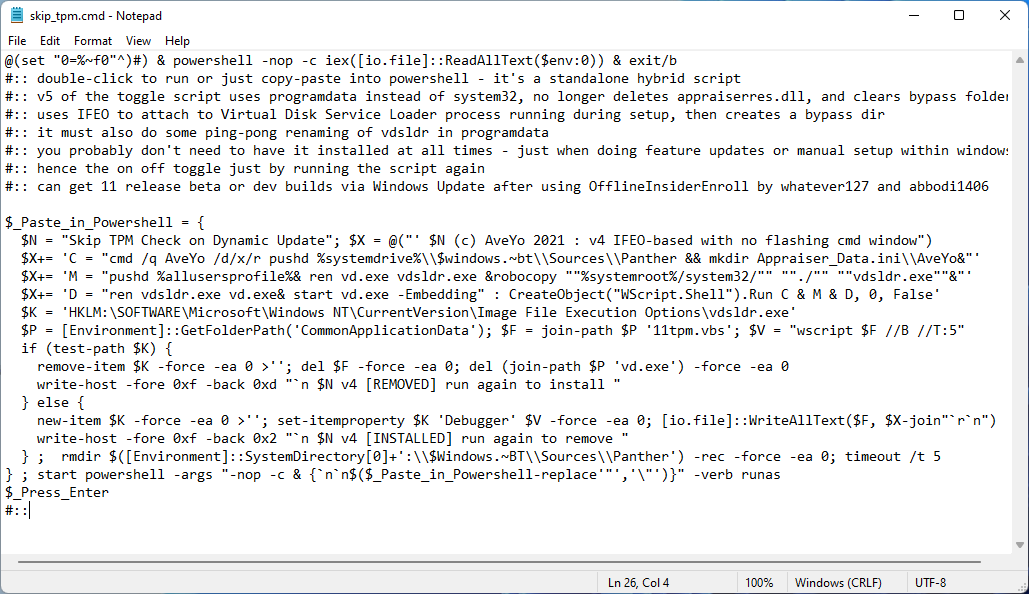
6. Save and run the skip_tpm.cmd file.
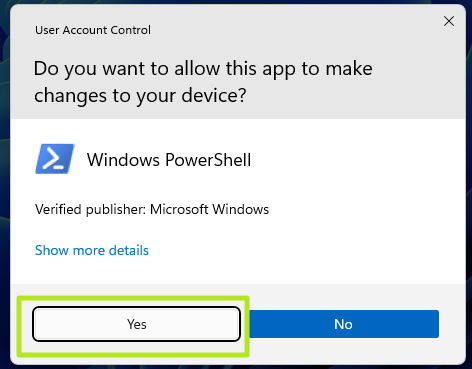
7. Click Yes if prompted by User Account Control.
You will now see a message saying «Skip TPM on Dynamic Update» has been installed. If you run the program again, it will disable the utility.

Windows Update should now be able to either update your existing Windows 11 Build or even perhaps upgrade you from Windows 10 to 11.
How to Bypass Windows 11 TPM the Official Microsoft Way
Knowing that some users will want to install Windows 11 on systems that don’t meet all of its hardware requirements, Microsoft has provided a registry hack that loosens them up somewhat. Using this hack, you can install on a system that has at least TPM 1.2 and has an unsupported CPU. That said, we recommend the scripts above because they don’t require you to have TPM of any kind.
1. Open Regedit.
2. Navigate to HKEY_LOCAL_MACHINE\SYSTEM\Setup\MoSetup.
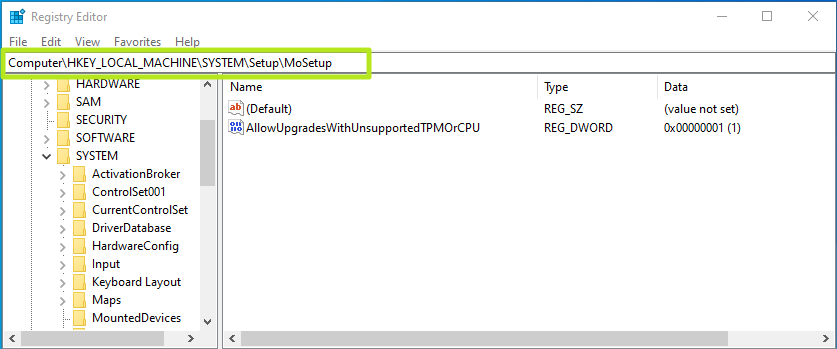
3. Create a DWORD (32-bit) Value called AllowUpgradesWithUnsupportedTPMOrCPU if it doesn’t already exist.
4. Set AllowUpgradesWithUnsupportedTPMOrCPU to 1.
5. Close regedit and restart your PC. You should now be able to upgrade to Windows 11 from within Windows 10 by using installation media (provided you created it).
More Windows 11 Tutorials:
- How to Get a Windows 11 ISO File and Do a Clean Install
- How to Enable God Mode in Windows 11 or 10
- How to Uninstall Windows 11 and Return to 10
- How to Clean Install Windows 11, No Product Key Required
- How to Install Windows 11 in a Virtual Machine