
Кликаю левой кнопкой на трей панели задач. Ничего не происходит. Если кликнуть парвой, то предлагается открыть настройки системы. Проверял систему, нашел битые файлы, докачивал и перезагружал ПК. Затем в реестре создавал запись на работу XML. Ничего не помогает.
Кто сталкивался с такой проблемой и как её решить?
-
Вопрос задан
-
9561 просмотр
Пригласить эксперта
Нашёл решение которое помогло мне:
1. Вызываем диалоговое окно «Выполнить» с помощью клавиш Windows key + R
2. Вводим «regedit» и нажимаем ок.
3. Идём по пути Computer\HKEY_CURRENT_USER\Software\Policies\Microsoft\Windows
4. Далее заходим в папку Expoler. Если её нет — создаём её (ПКМ по папке Windows New > Key)
5. Добавляем значения в папке Expoler (ПКМ > New > DWORD (32-bit)) и называем его DisableNotificationCenter
6. Далее двойной клик по нему и устанавливаем значение на 0.
7. Перезагружаем компьютер. Должно работать.
Я бы в первую очередь проверил бы жёсткий диск и оперативную память. Файлы сами по себе биться не должны. Может ещё быть вариант со зловредом.
Войдите, чтобы написать ответ
-
Показать ещё
Загружается…
Минуточку внимания
This article lists some effective fixes you can use if the WiFi, Sound, Battery icon, and panel are not working on your Windows 11/10 computer. According to reports, when users click on the panel or icons, it opens blank, or sometimes nothing happens. However, the right-click works fine.

Use these effective fixes if the WiFi, Sound, Battery icon and panel are not working on your Windows 11/10 computer. Before proceeding, check for Windows Update. If an update is available, download and install it.
- Restart Windows Explorer
- Repair your system image files
- Re-register the Settings app
- Create a new user account
- Restore your system or uninstall Windows Update
- Reset your PC
- Perform Repair Upgrade
All these fixes are explained below in detail:
1] Restart Windows Explorer
Restarting Windows Explorer fixes these types of problems in most cases. Follow these steps:

- Open the Task Manager.
- Select the Processes tab from the left side.
- Scroll down and find Windows Explorer. Right-click on it and select Restart.
Read: System Tray icons do not work in Windows
2] Repair your system image files

The issue may also occur due to the corrupt system image files. Use Windows 11 built-in System File Checker and DISM tools to repair the corrupt system image files. After the scanning completes, check if the issue persists.
Read: Bluetooth icon not showing in Windows Taskbar
3] Re-register Windows Settings
If the issue persists, re-register Windows Settings. You can do this through Windows PowerShell. Launch Windows PowerShell as an administrator and execute the following command:
Get-AppXPackage -AllUsers -Name windows.immersivecontrolpanel | Foreach {Add-AppxPackage -DisableDevelopmentMode -Register “$($_.InstallLocation)\AppXManifest.xml” -Verbose}
4] Create a new user account

Sometimes problems occur in a particular user account on Windows 11. This can be the case with you. Create a new user account and log in to it. If the issue does not occur in the new user account, you can keep using that user account and delete the previous one. Many free tools allow you to transfer your data from one Windows profile to another. You can use such software to transfer your profile data to the new account.
Read: Taskbar Volume Control not working in Windows
5] Restore your system or uninstall Windows Update
Sometimes, Windows Updates cause issues. If this problem started occurring after installing a recent Windows Update, you can uninstall that particular update. If you cannot uninstall a Windows Update, you can try the System Restore tool. This tool restores your computer to the previous working state, provided the restore point is available on your system.

Run System Restore and select the restore point created on the date after which you started encountering this problem.
6] Reset your PC

If for some reason, you cannot use the previous fix or the previous fix does not work for you, you can reset your PC. While performing this action, you will have two options, remove everything or keep your files. The latter option resets your PC without deleting your data.
7] Perform Repair Upgrade

If nothing helps, performing the Repair Upgrade is the last resort. You will need a bootable USB flash drive with Windows 11 installation media to perform the In-place or repair upgrade.
For this, you can use either Microsoft’s official Media Creation Tool or a third-party program, such as Rufus. This action does not delete your data, but it is always recommended that you back up your data before proceeding.
That’s it. I hope this helps.
How to fix the battery icon not showing in Windows 11?
If the battery icon is missing on the Windows 11 Taskbar, the issue may be with the battery driver. Check this in the Device Manager. The battery driver should show under the Batteries branch. If it is missing in the Task Manager, download and install it. If you cannot download the battery driver, perform a System Restore.
How to ungroup WiFi, Sound, and Battery charging taskbar icons in Windows 11?
Unfortunately, you cannot ungroup the WiFi, sound, and battery charging icons on the Taskbar in Windows 11. All three icons are grouped on the Taskbar, and there is no way to ungroup them.
Read next: Taskbar is hiding behind programs in Windows.
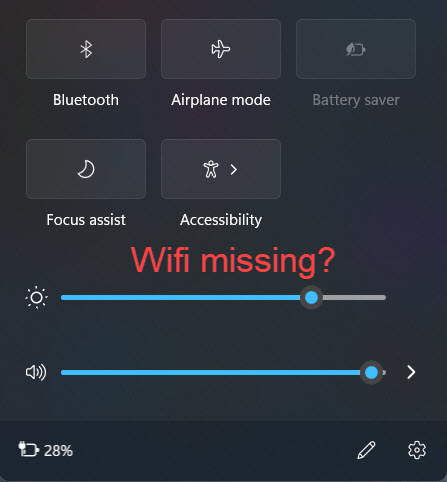
Is the Wi-Fi option missing from the system tray and Quick Settings pane in Windows 11? Do you also have trouble locating your Wi-Fi preferences within the Settings app? This problem can occur due to several factors, such as a malfunctioning Wi-Fi service, an inactive wireless adapter, or a corrupt Wi-Fi driver.
This troubleshooting guide will teach you how to address various underlying causes and restore access to Windows 11’s Wi-Fi connectivity options.

1. Restart the Wi-Fi Service
Begin by restarting the background service related to wireless internet connectivity in Windows 11. This action is highly effective at resolving technical problems behind Wi-Fi issues. Here’s how:
- Press Windows + R to open Run.
- Type services.msc and press Enter.
- Scroll down the list of services, right-click WLAN AutoConfig, and select Restart. If the option appears grayed out, choose Start.

Additionally, check if WLAN AutoConfig is configured to run automatically at system startup. To do that, double-click the service and ensure the Startup type drop-down is set to Automatic.
2. Restart Your PC
A system reboot plays a crucial role in clearing out numerous issues caused by unfinalized updates, obsolete temporary data, driver cache corruption, etc. Furthermore, a restart also addresses problems caused by Fast Startup.
If you haven’t already, open the Start menu and select Power > Restart (or Update and restart if you see it as an available option).

3. Enable the Wi-Fi Adapter
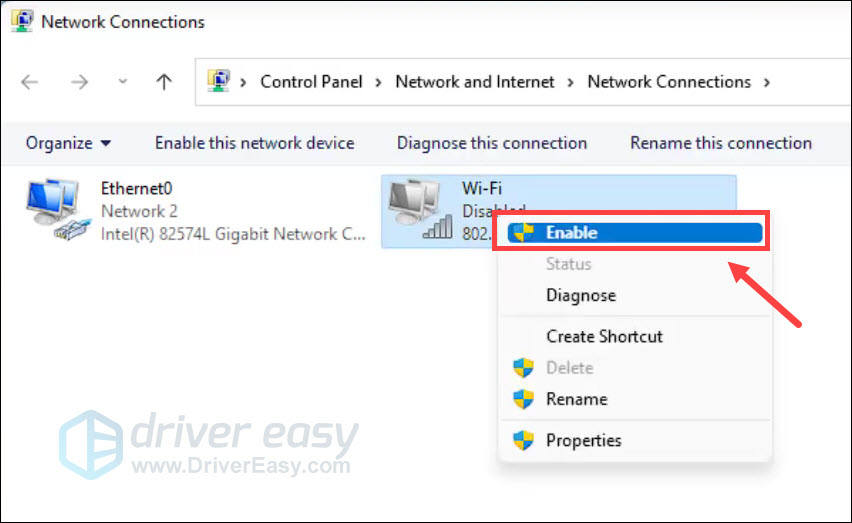
An inactive Wi-Fi adapter is a common reason preventing Windows 11’s Wi-Fi options from showing up. Use the Network Connections Control Panel applet to check and enable it. Here’s how:
- Open a Run box, type ncpa.cpl, and select OK.
- Right-click the Wi-Fi adapter setting if it’s grayed out.
- Select Enable.

Important: If you use a laptop device, it may have a physical switch—e.g., above the keyboard or the casing’s front or side—that you must turn on to activate the Wi-Fi adapter inside.
4. Check the Group Policy Editor
If you use the Pro edition of Windows 11, the Wi-Fi icon on the system tray and Quick Settings pane may not appear due to a specific policy setting. To check and disable it:
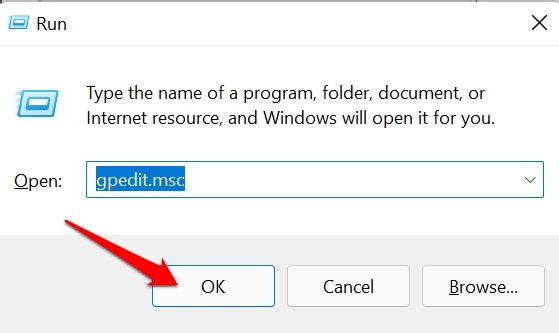
- Press Windows + R, type gpedit.msc, and select OK.
- Navigate to User Configuration > Administrative Templates > Start Menu and Taskbar on the Group Policy Editor’s sidebar.
- Right-click the Remove the network icon policy setting and choose Properties.
- Select Disabled.
- Select Apply > OK.
Note: If Wi-Fi is missing only from Windows 11’s Quick Settings pane (a.k.a. Action Center in Windows 10), you can get it back quickly—just select the pencil-shaped Edit quick settings icon, select Add, and pick Wi-Fi.
5. Run Network Adapter Troubleshooter
Windows 11 has a built-in troubleshooting utility that automatically scans and fixes issues with network adapters. To run it:
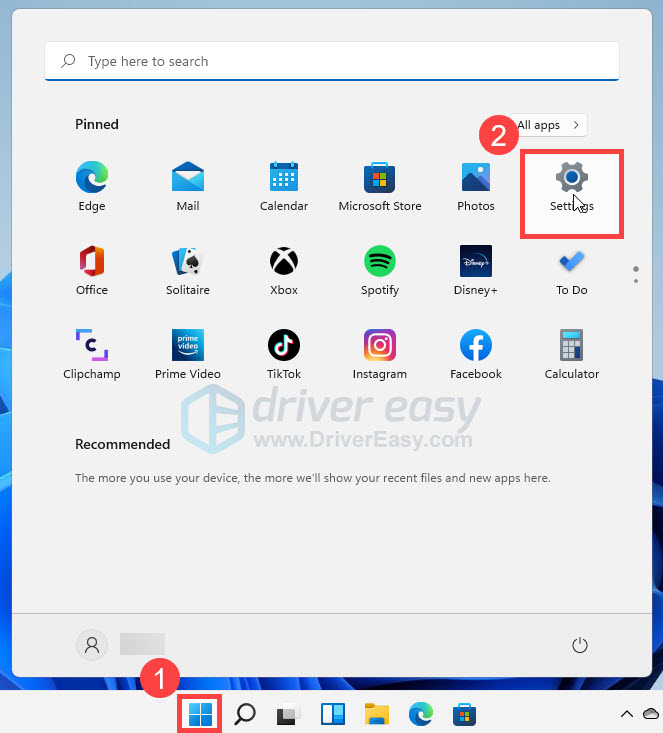
- Right-click the Start menu and select Settings.
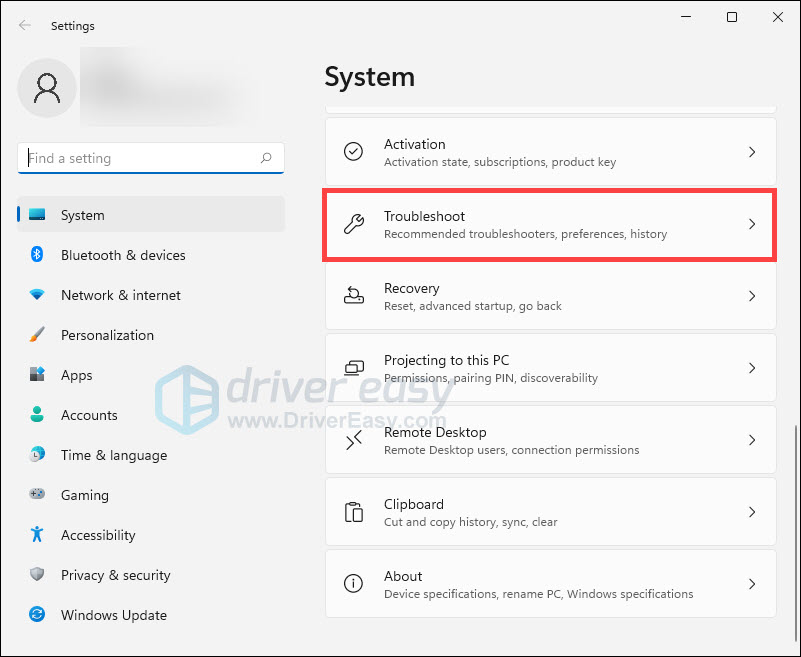
- Go to System > Troubleshoot.
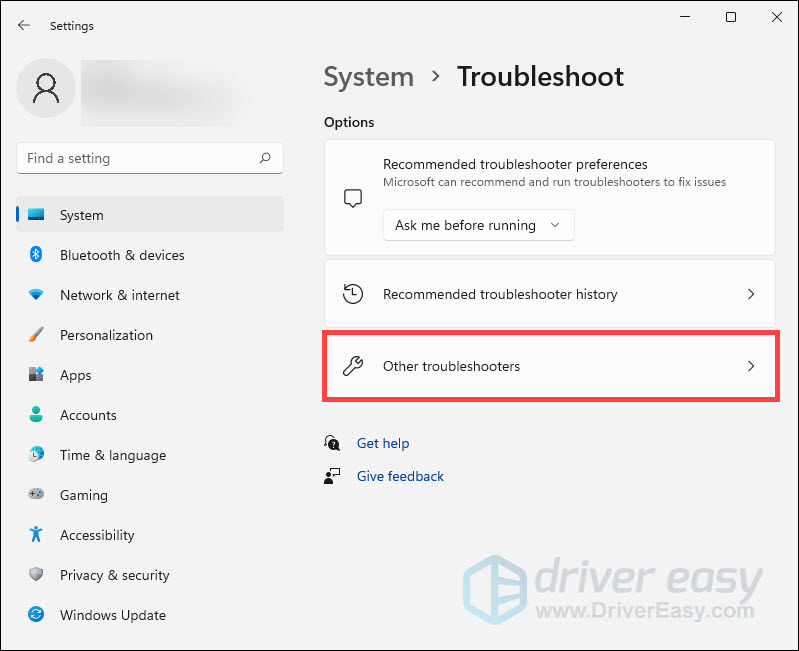
- Select Other troubleshooters.
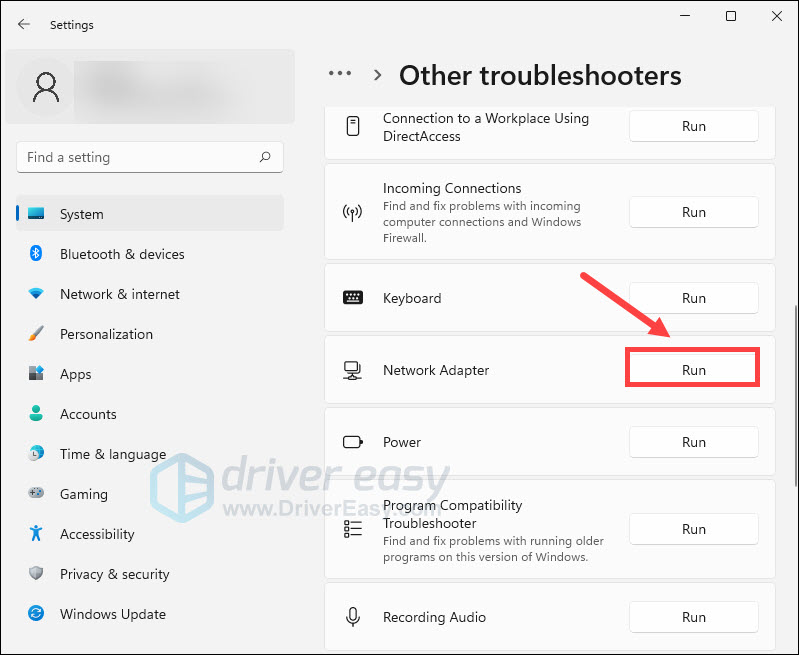
- Select Run next to Network Adapter.

- Follow the on-screen instructions to fix Wi-Fi issues the troubleshooter detects.
6. Update Wi-Fi Drivers and Windows
Next, visit your laptop/motherboard manufacturer’s website (HP, Dell, Acer, etc.), search for newer updates for your network adapter (you can find the model name via the Network Connections applet), and download and run the executable driver file.

Since your computer doesn’t have Wi-Fi connectivity to the internet, you must either:
- Set up a wired Ethernet connection.
- Tether your phone over USB.
- Download the driver file on another PC and transfer it via USB.
While you’re at it, we recommend you update Windows 11 to its latest version—go to Settings > Windows Update and select Check for updates. You can also use the Microsoft Update Catalog to download Windows updates on a device with internet access, copy them to a flash drive, and install the files offline.
7. Reinstall the Network Adapter Drivers
If the missing Wi-Fi problem in Windows 11 persists, remove and re-add the network adapter to rule out issues that stem from driver corruption. To do that:
- Right-click the Start button and select Device Manager.
- Expand Network adapters.
- Right-click the Wi-Fi adapter and select Uninstall device.

- Check the box next to Attempt to remove the driver for this device and select Uninstall.
- Restart your computer.
- Re-open the Device Manager and select Action > Scan for hardware changes on the menu bar.
8. Roll Back Wi-Fi Drivers
Roll back your PC’s wireless adapter software to an earlier version if the missing Wi-Fi issue occurs after a recent driver update. To do that:
- Open the Device Manager.
- Expand Network adapters, right-click your wireless adapter, and select Properties.
- Switch to the Driver tab and select Roll Back Driver.

9. Fix Windows File Corruption Issues
The following fix involves using the SFC (System File Checker) utility to scan the operating system for corruption and stability issues. You can run it through an elevated Command Prompt or Windows PowerShell console. Here’s how:
- Open the Start menu, select cmd, and choose Run as administrator. Or, right-click the Start button and select Windows Terminal (Admin).
- Select Yes on the User Account Control dialog.
- Execute the following command:
sfc /scannow

Follow up with a DISM (Deployment Image Servicing and Management) scan if the System File Checker encounters an issue it can’t repair.
10. Reset Your PC’s Networking Stack
The TCP/IP stack contains protocols for communication and data exchange between devices on a network. Reset it to its default settings and check if that restores Windows 11’s Wi-Fi options. Here’s how:
- Open an elevated Command Prompt or Windows PowerShell console.
- Execute the commands below in the following order:
ipconfig /flushdns
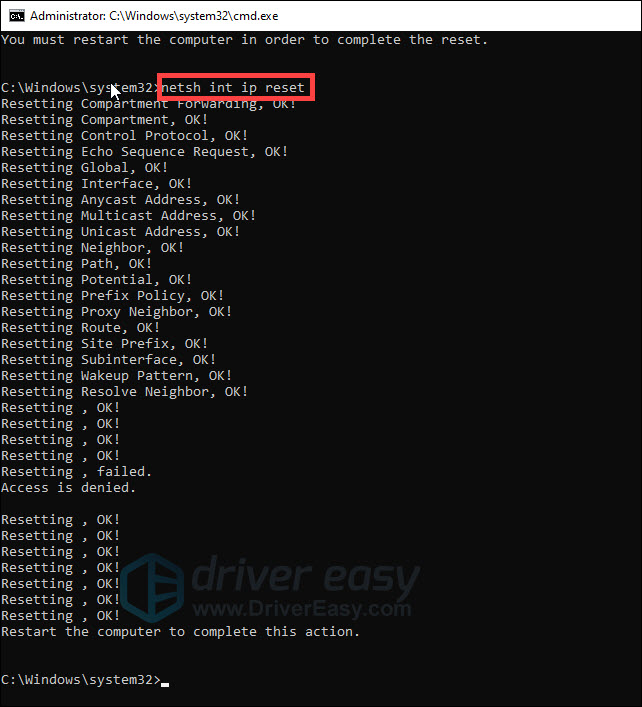
netsh winsock reset catalog
netsh int ip reset
- Exit the command line and restart your PC.
11. Reset the Network Settings
Resetting Windows 11’s network settings is a last-resort measure that resolves Wi-Fi issues caused by an error-prone networking configuration. The procedure reinstalls all network adapters and restores other wireless/wired components to their original settings.
However, it’s important to note that a network settings reset also removes previously saved wireless networks and passwords. If you want to go ahead:
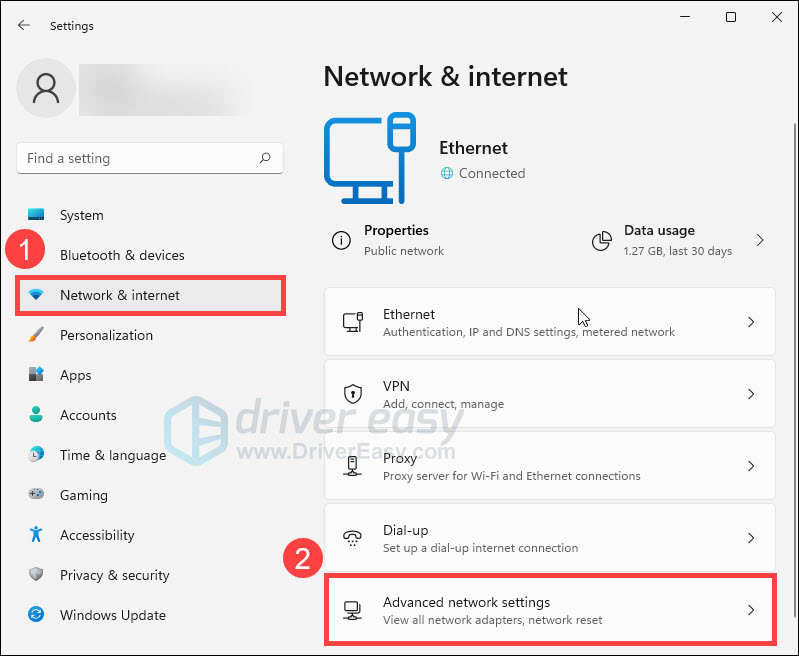
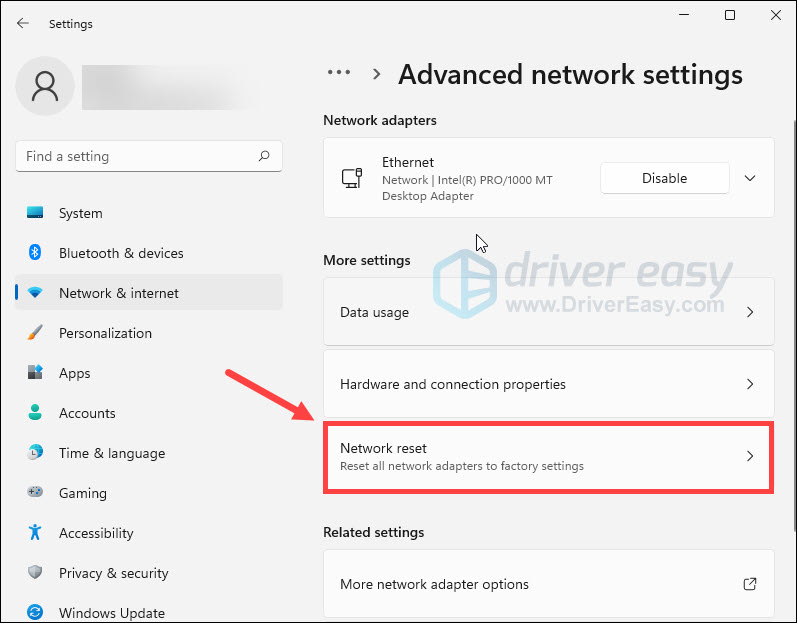
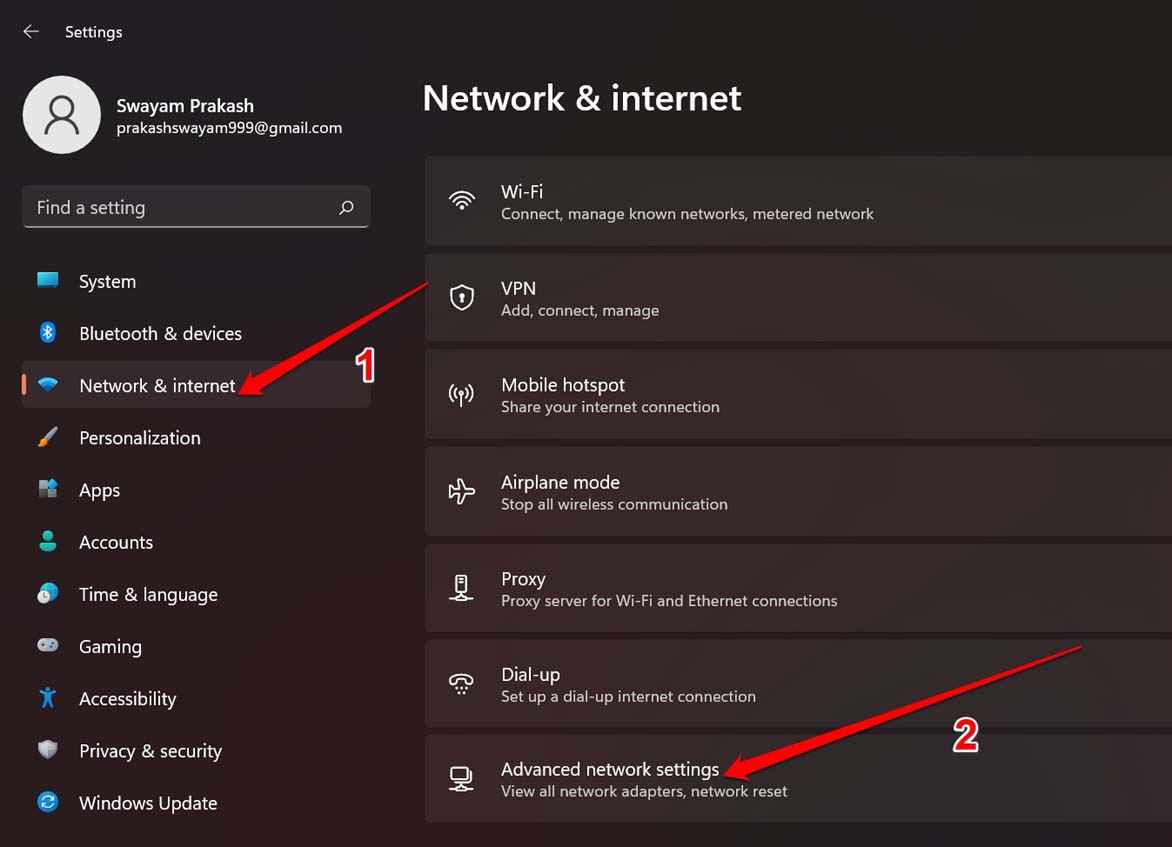
- Open the Settings app and go to Network and internet > Advanced network settings.
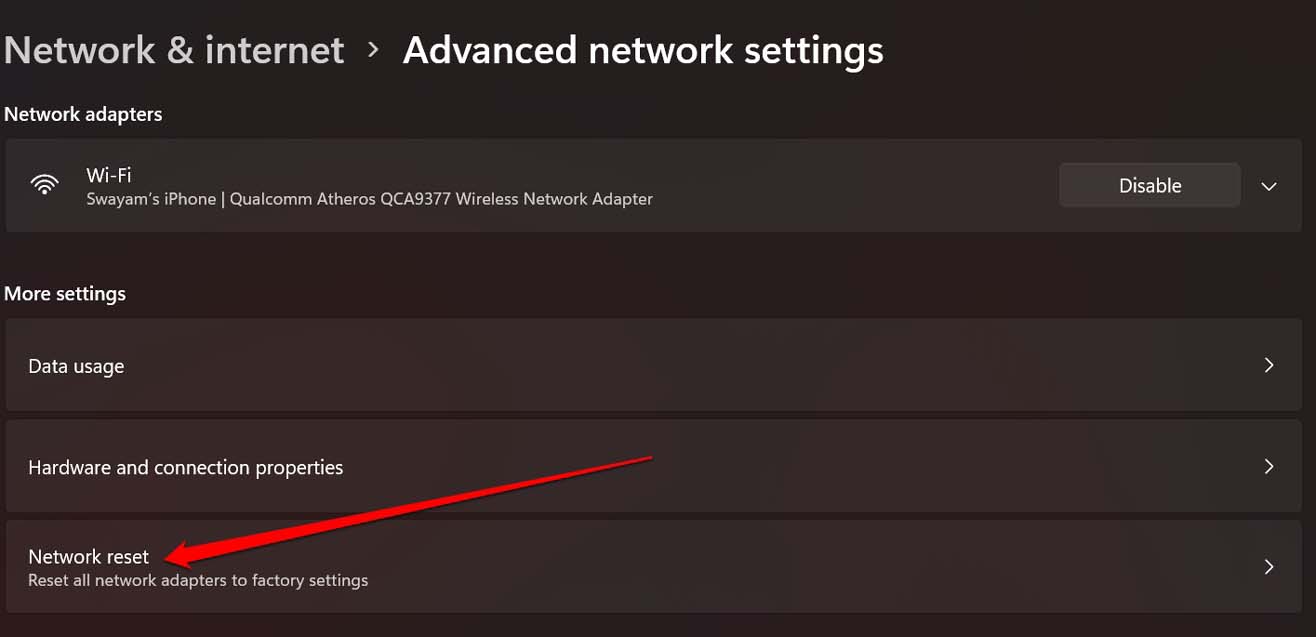
- Select Network reset.
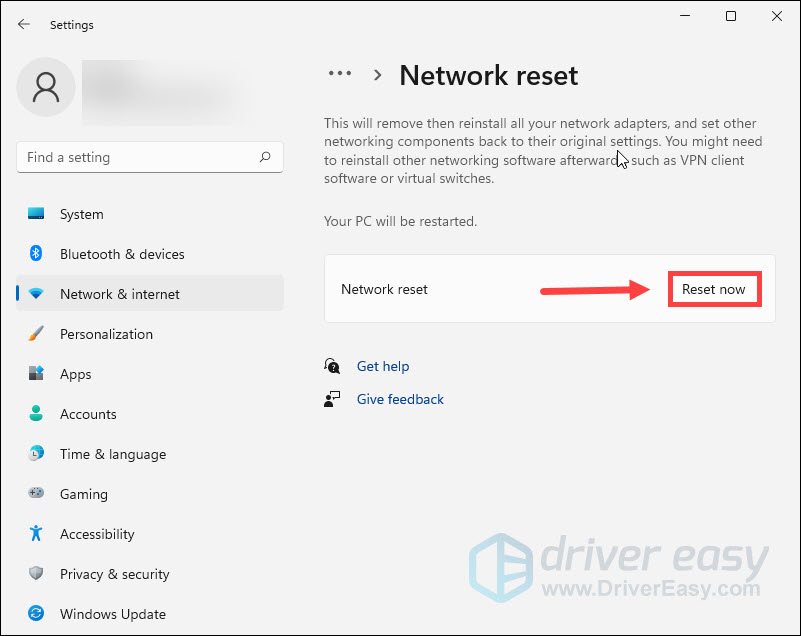
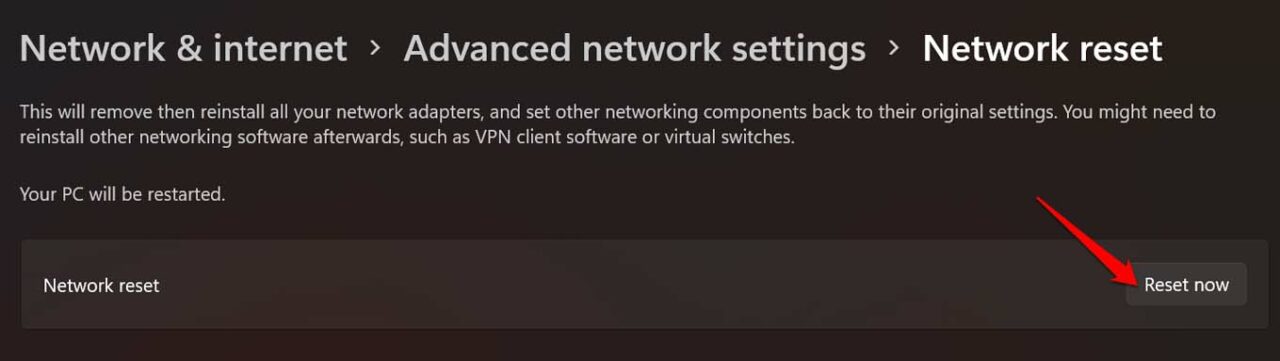
- Select Reset now.

Windows 11 should automatically restart after the reset procedure. If you regain access to your Wi-Fi options, join a Wi-Fi network to get your PC back online.
What Else Should You Do?
If none of the solutions above help restore Windows 11’s missing Wi-Fi options, continue troubleshooting by booting the operating system in Safe Mode. If that fails, back up your data and reset your PC to factory defaults—the process reverts all settings to their defaults and resolves severe issues with core system functionalities.
However, if a factory reset also fails to fix missing Wi-Fi issues, it could indicate defective wireless networking hardware. Seek assistance from a PC support specialist to diagnose the source of the problem.
Related Posts
- How to Fix When No Wi-Fi Networks Found on Windows 11 and 10
- How to Find Wi-Fi Password in Windows 11
- 13 Ways to Fix Windows 11 Not Connecting to Wi-Fi
- How to Share Wi-Fi Network Connections in Windows 11
- 13 Fixes When Windows 11 Wi-Fi Not Showing Up
Some Windows 11 users have reported that the Wi-Fi option is missing or not showing up in their taskbar. If you’re facing the same problem, don’t worry. Here are some troubleshooting steps you can try.
Try these fixes
You don’t have to try them all; simply work your way down the list until you find the one that does the trick.
- Power cycle your computer
- Enable the Wi-Fi adapter
- Update your Wi-Fi adapter driver
- Run the Network Adapter troubleshooter
- Turn on WLAN AutoConfig service
- Run network commands
- Reset your network
Fix1: Power cycle your computer
The Wi-Fi option missing issue could be caused by a random bug on your Windows 11 PC. To fix the problem, try to shut down your system, wait a few minutes, and then boot it again. It sounds simple but does work for many users.
If you haven’t tried this method before, give it a go.
Fix 2: Enable the Wi-Fi adapter
If your Wi-Fi adapter is disabled, the Wi-Fi option may not show up. To see if that’s the case, you can check your network settings. Here’s how:
- On your keyboard, press the Windows logo key and R at the same time to invoke the Run dialog. Then type ncpa.cpl and click OK.
- Check if your Wi-Fi adapter is disabled or greyed out. If it is, right-click on it and select Enable.

Once done, restart your computer and check if your Wi-Fi network shows up again.
If your Wi-Fi adapter is enabled and the issue remains, go ahead with the next fix.
Fix 3: Update your Wi-Fi adapter driver
One of the main causes of the Wi-Fi option not showing up is that you’re using a corrupted or outdated wireless adapter driver. To ensure your Wi-Fi network works properly, you need to update your Wi-Fi adapter driver to the latest version.
You can go to the manufacturer’s website, search for the latest driver for your wireless network adapter, and then download and install it manually. But if you don’t have the time, patience or computer skills to update the driver manually, you can do it automatically with Driver Easy.
Driver Easy will automatically recognize your system and find the correct drivers for it. You don’t need to know exactly what system your computer is running, you don’t need to risk downloading and installing the wrong driver, and you don’t need to worry about making a mistake when installing. Driver Easy handles it all.
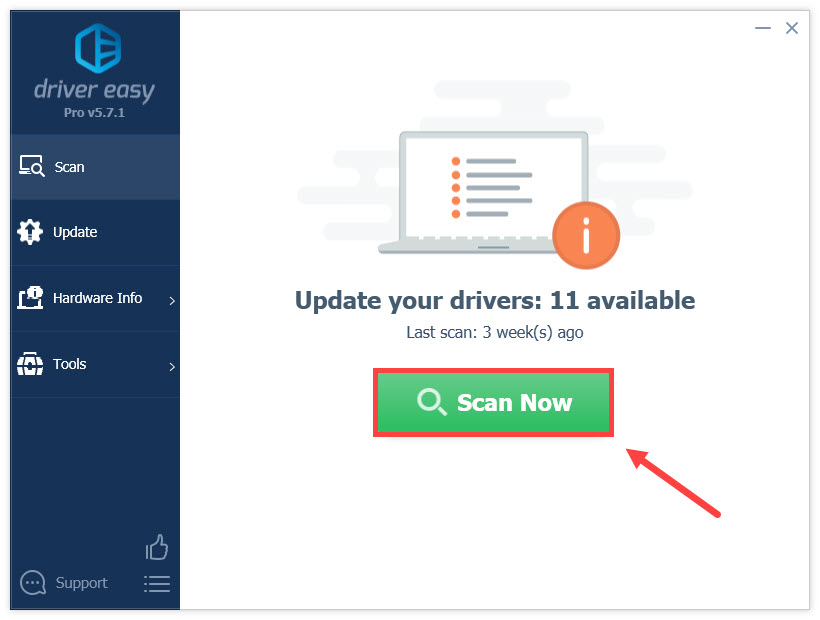
- Download and install Driver Easy.
- Run Driver Easy and click the Scan Now button. Driver Easy will then scan your computer and detect any problem drivers.

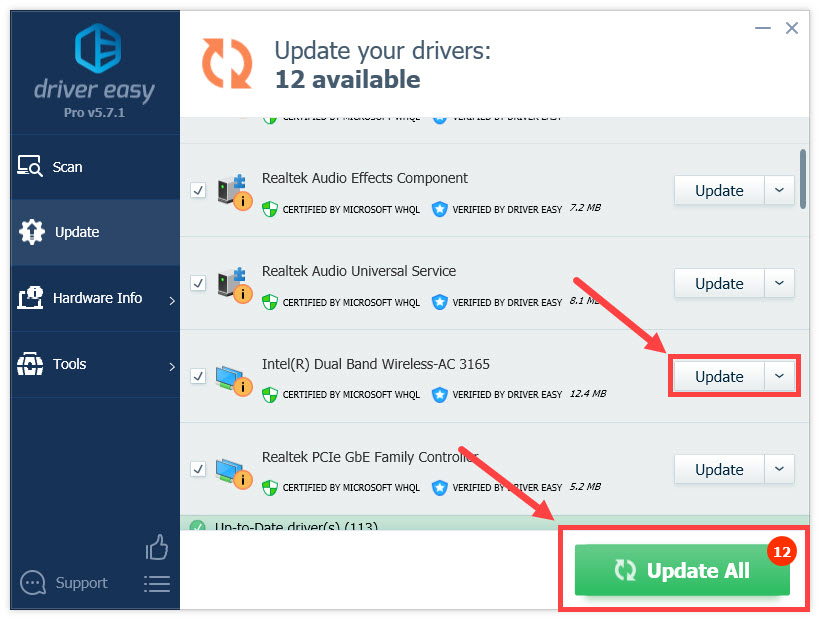
- Click Update All to automatically download and install the correct version of all the drivers that are missing or out of date on your system. (This requires the Pro version — you’ll be prompted to upgrade when you click Update All.)
Or click the Update button to download the latest wireless adapter driver, then you can manually install it (you can do this with the FREE version).
The Pro version of Driver Easy comes with full technical support. If you need assistance, please contact Driver Easy’s support team at support@drivereasy.com.
Once you’ve updated your Wi-Fi adapter driver, restart your computer.
Now check to see if your problem has been resolved. If not, move on to the next fix.
Fix 4: Run the Network Adapter troubleshooter
If updating the Wi-Fi adapter driver doesn’t help, try running the Network Adapter troubleshooter. This troubleshooter can help diagnose and fix problems with your wireless and other network adapters. To run the troubleshooter:
- On your taskbar, select the Start button and click Settings.

- Under System, select Troubleshoot.

- Click Other troubleshooters.

- Scroll down the page, locate Network Adapter and click Run.

- Follow the steps in the troubleshooter and see if that fixes the problem.
If your issue persists, check out the next fix.
Fix 5: Turn on WLAN AutoConfig service
WLAN AutoConfig is a Windows service that helps your computer to configure, discover, connect to, and disconnect from a wireless network. If this service is disabled, your Wi-Fi won’t work. So you should make sure the WLAN AutoConfig service is running automatically. Here’s how to do it:
- On your keyboard, press the Windows logo key and R together to invoke the Run dialog. Then type services.msc and click OK.
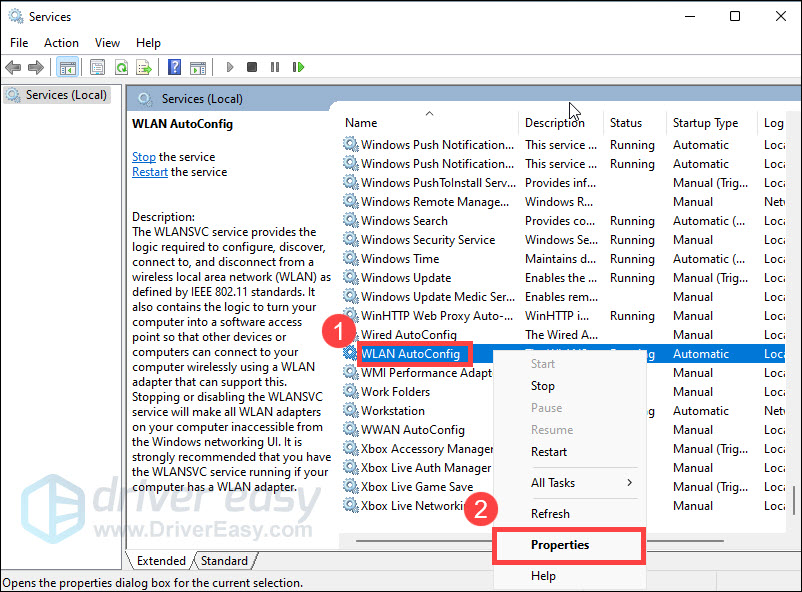
- Find WLAN AutoConfig in the list of services, right-click on it and select Properties.

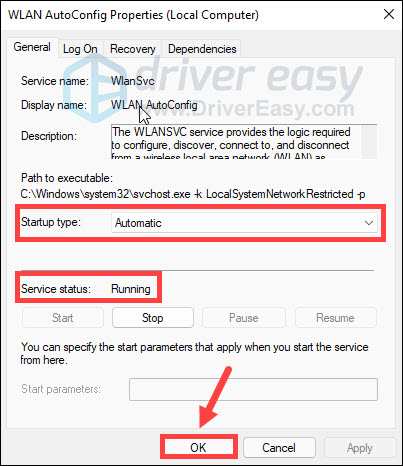
- Make sure Startup type is set to Automatic and Service status is Running. Then click OK to save changes.

Restart your PC and see if your Wi-Fi shows up.
If you still face the same issue, try the next fix.
Fix 6: Run network commands
When you’re having trouble with your wireless network, you can try running some network commands to manually reset the TCP/IP stack, release and renew the IP address, and flush and reset the DNS client resolver cache. Here is how to do it:
- On your keyboard, press the Windows logo key and R at the same time to open the Run dialog. Then type cmd and press Ctrl, Shift, and Enter simultaneously to run Command Prompt as administrator.
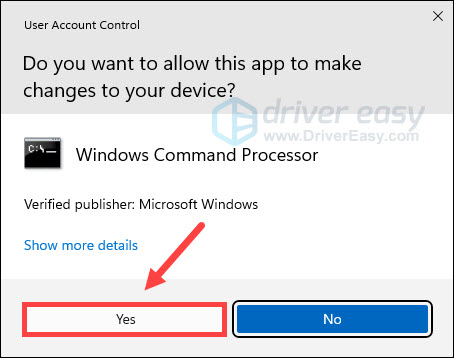
- If you are prompted for permission by User Account Control, click Yes.

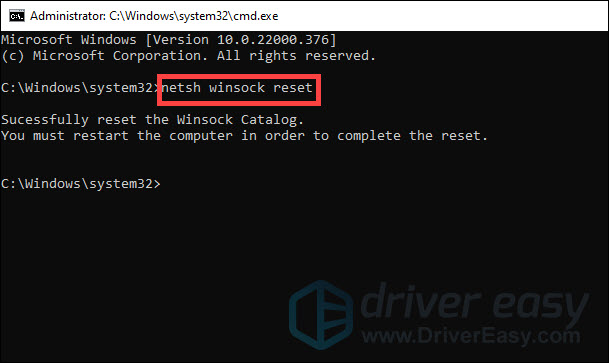
- At the command prompt, type netsh winsock reset and press Enter.

- Type netsh int ip reset and press Enter.

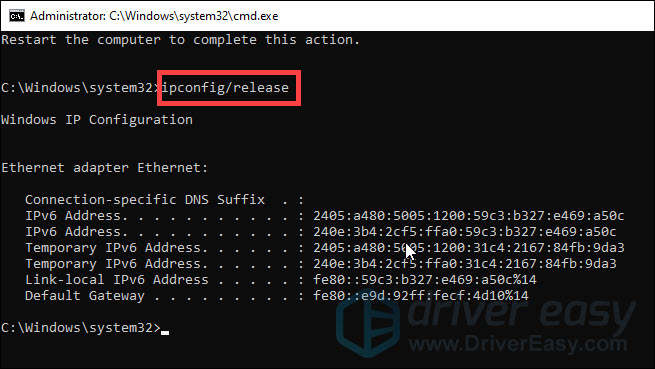
- Type ipconfig /release and press Enter.

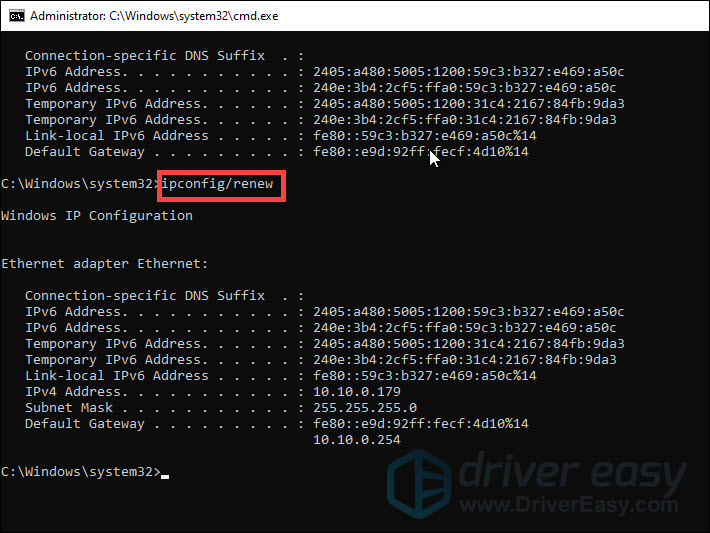
- Then type ipconfig /renew and press Enter.

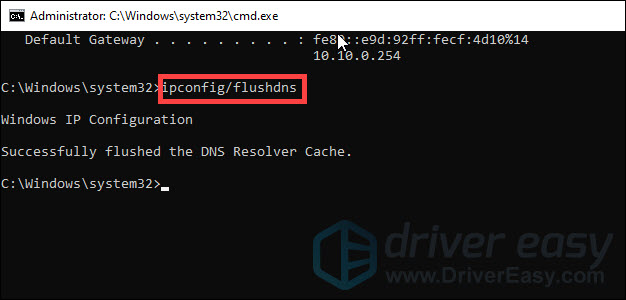
- Type ipconfig /flushdns and press Enter.

Once you’ve run all those commands, restart your computer and try to connect to the Wi-Fi network.
If this method doesn’t help, try the last fix below.
Fix 7: Reset your network
If you’ve tried all of the above steps and you still can’t get your Wi-Fi to work, the last thing you can try is to reset your network. This will remove and then reinstall all your network adapters and the settings for them will be set to the defaults. To do so:
- On your taskbar, select the Start button and click Settings.
- Select Network & internet, then click Advanced network settings.

- Under More settings, click Network reset.

- Click Reset now.

- Click Yes to confirm again.
Wait for your computer to restart, and see if that fixes the problem.
That’s all about it. Hopefully, this post helped. If you have any questions or suggestions, feel free to leave us a comment below.
10
10 people found this helpful
Is WiFi Option Missing or Disappered in Windows 11 Taskbar. Here are the Best Methods to Fix Wi-Fi Option Not Showing on Windows 11.
Are you not able to see the WiFi icon in the taskbar of Windows 11? Then, let me address the issue with some easy troubleshooting tips. I have also explained why this issue may have occurred. It may happen due to some bug in the Windows OS. This occurs randomly and any Windows OS user can come across a missing WiFi icon on Windows 11.
Another reason for the WiFi option not showing can be corrupted WiFi drivers and disabled WiFi adapters. Also, modifying any system application or service may affect the other system resources. Elements such as networks settings do get affected by such faulty changes. This may cause other attributes such as WiFi and related settings to go missing or get corrupted on Windows 11.
Changes in Group Policy Editor can also lead to the missing Wi-Fi option on Windows 11. Now that we know the various reasons possible for causing the WiFi option to not show on Windows OS, let us fix the same.
Best Ways to Fix Wi-Fi Not Showing on Windows 11
Try out all the troubleshooting tips mentioned below to bring the WiFi settings back on the taskbar of Windows 11.
Update Windows OS
Start by updating Windows OS to the latest version. Windows 11 is quite new so having bugs is quite common on new iterations of software versions released by Microsoft. Updating the OS regularly is the way to go.
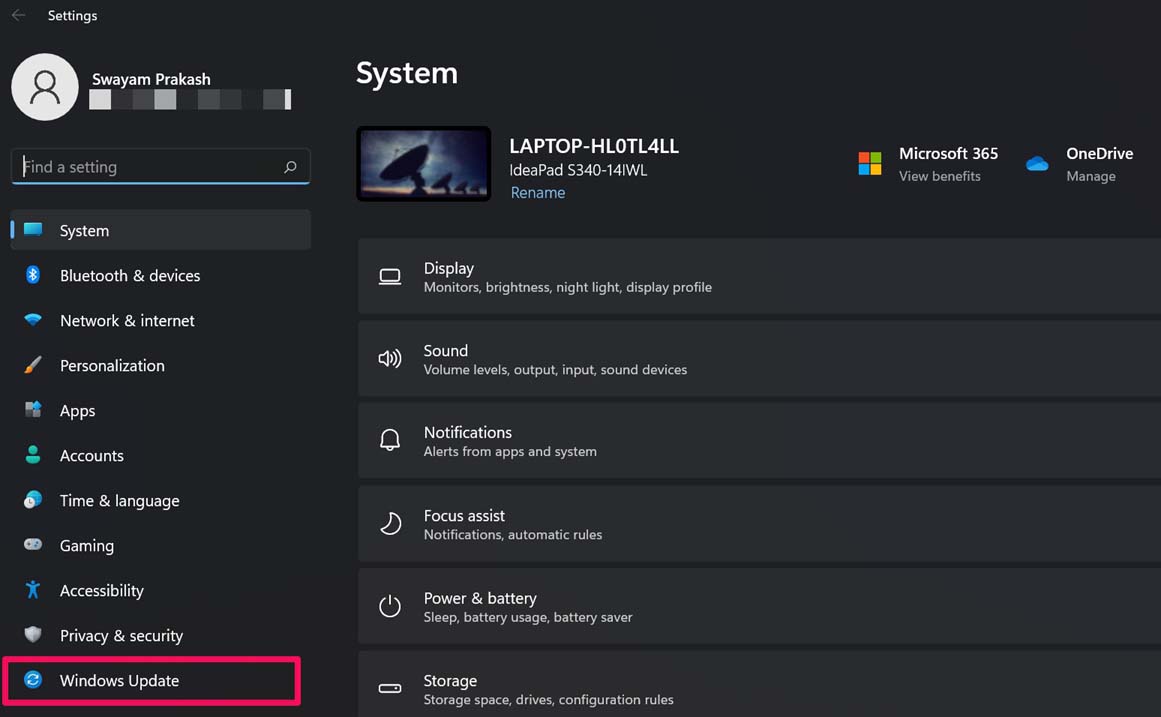
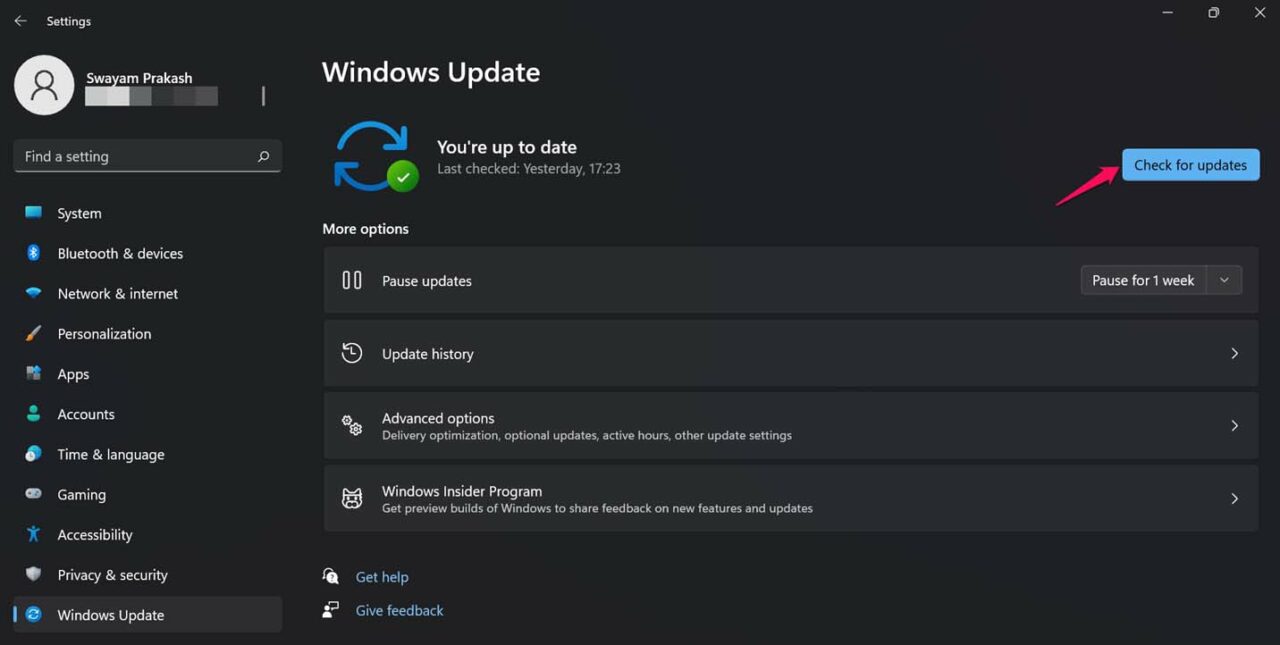
- Press Windows + I to open the Settings page.
- Then click on Windows Update.

- Next, click on Check for Updates.

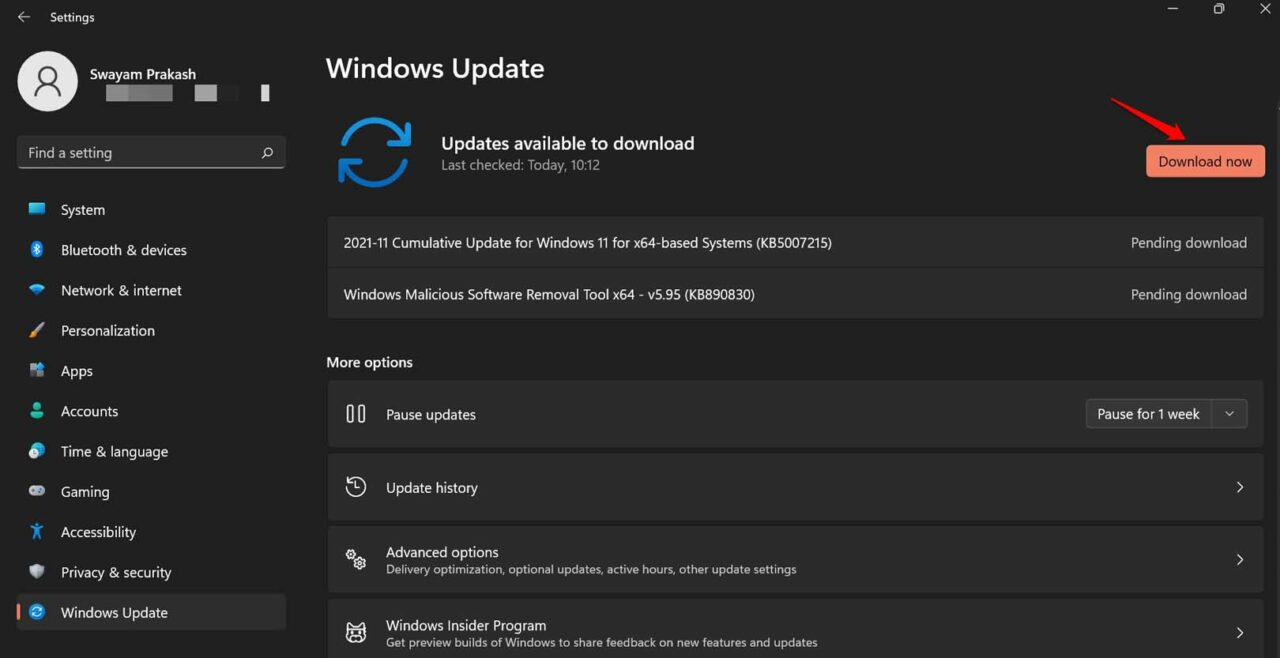
- If an update is available, you will see an option Download Now. Click on that to begin the update installation process.

- After installing the update the PC will reboot. After it restarts check if the WiFi option is appearing or not. If it is not showing, try the next troubleshooting methods.
Restart the Computer
It could be just a random bug that is appearing due to some issue in the start-up or any system file crashing while you are using some application. To fix this, a restart usually is enough.
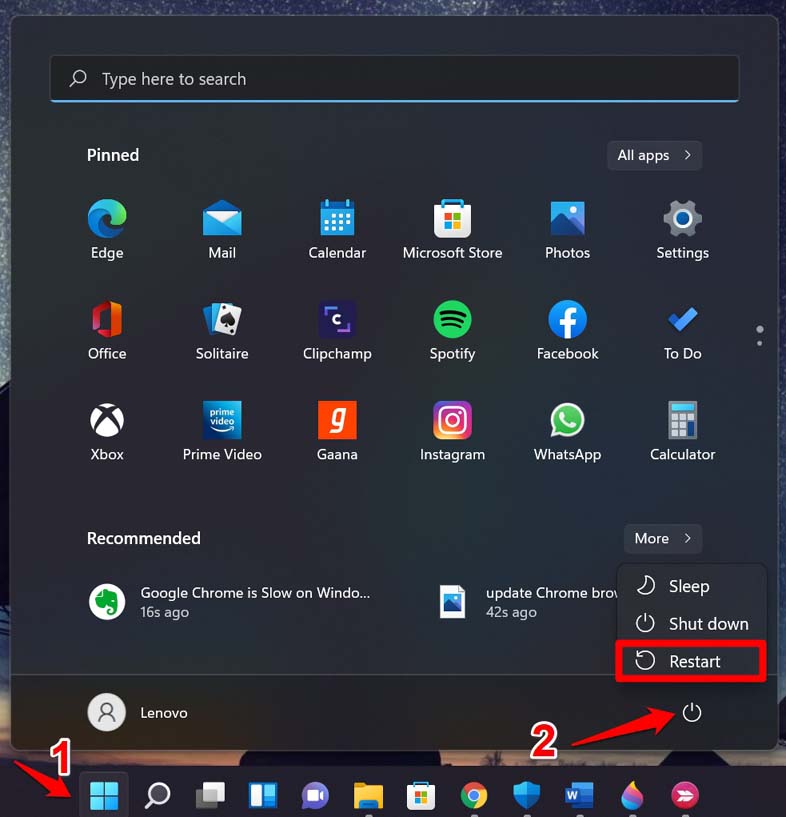
- Press the Windows key on the keyboard.
- Then from the Window search console, click on the Power Icon.
- From the menu select the restart option.

- Let the PC restart and after that check for the presence of the WiFi option. Had it been a random glitch the option should now be back on the taskbar.
Update or Reinstall the Driver of Network Adapter
You may also update the driver of the network adapter on your PC. These components get updated automatically but if there would be any technical issues in the current version for the driver, upgrading the driver to a newer version should fix the issues like the missing WiFi option from the home screen of Windows.
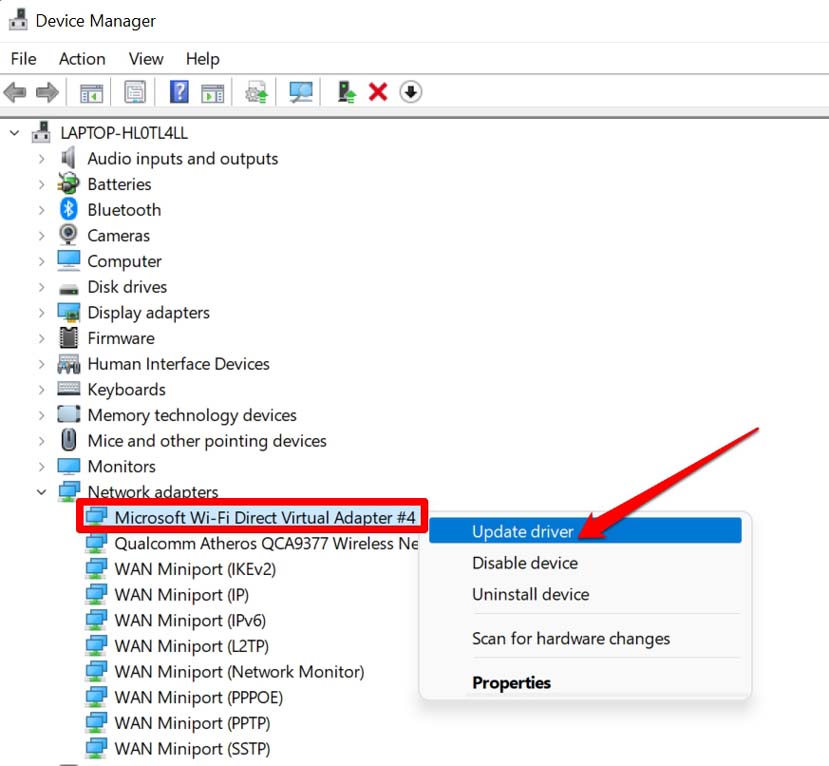
- Press Windows + X and choose Device Manager from the menu.
- Navigate to Network Adapters and click on it to expand.
- Then right-click on the WiFi adapter installed on your PC. It will differ from PC to PC.
- Select Update Drivers.

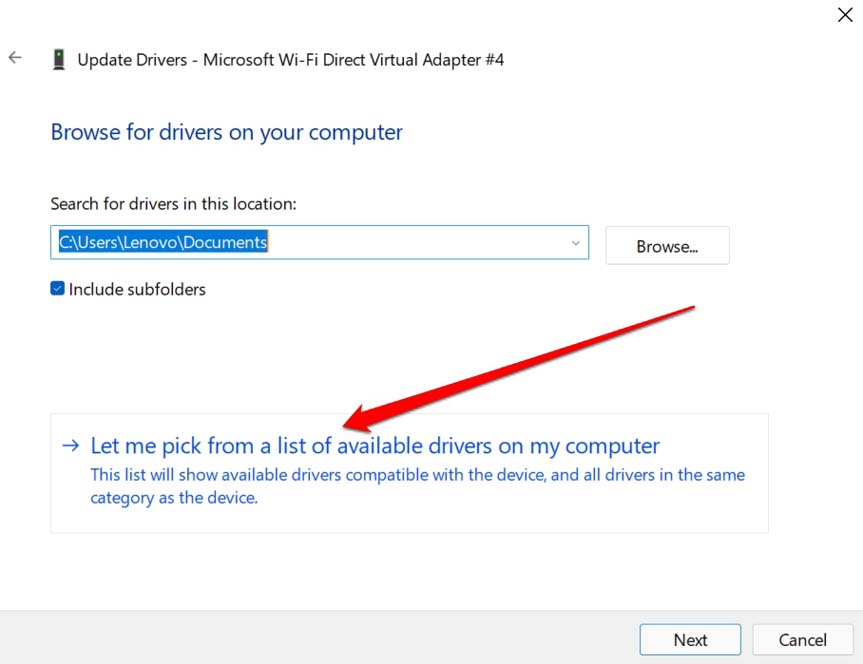
- As you cannot access the internet through WiFi you have to look for available drivers on your computer. So, select the option Browse My Computer for drivers.

- Next, click on Let Me Pick from A List of Available Drivers On My Computer.

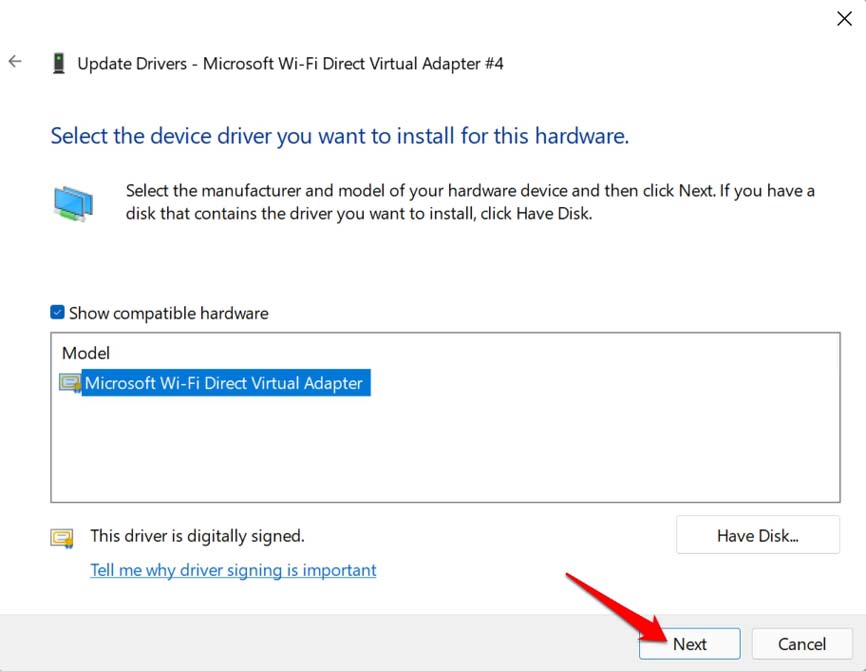
- On the next dialog box that opens up, under the Model tab, click on the available driver.
- Click on Next to install the driver.


If you wish to reinstall the driver, then in step number 4 instead of Updating the driver, you can click on Uninstall This Device. The concerned driver will be uninstalled. To reinstall it all you have to do is restart the computer. The Wi-Fi Not Showing on Windows 11 issue will be Fixed.
Use Windows Network Troubleshooter
You may also consider using the default network troubleshooter on Windows 11. Simply invoke the tool and it will look for problems with the internet connectivity and network-related elements and fix the same.
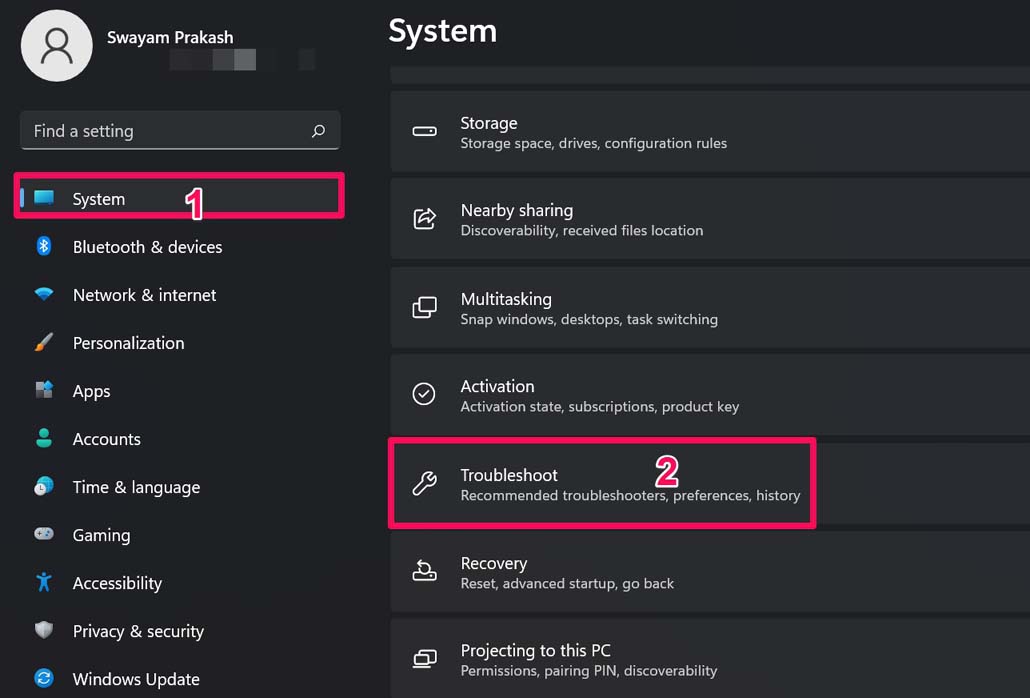
- Open the Windows settings by pressing Windows + I.
- Then click on System on the left-hand panel.
- Now, navigate to Troubleshoot and click on it.

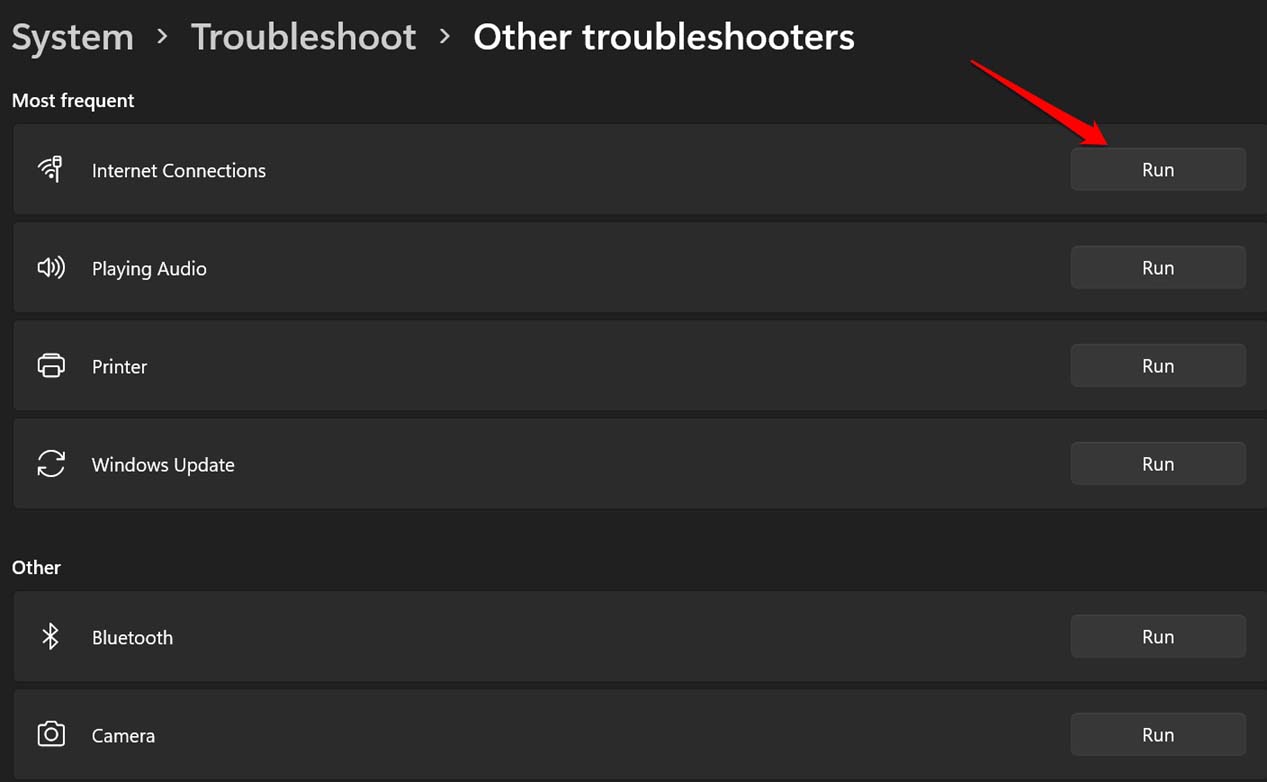
- Under that click on Other Troubleshooter.

- Next, click on the button Run beside the first option Internet Connections.


Check if Settings Have Been Changed in the Group Policy Editor
Group Policy Editor may have gone through some automatic changes due to the presence of corrupt system files, so you need to check that as well. You have to access the Group Policy Editor and enable the WiFi option viewability on the Windows home screen.
- Press Windows + R to bring up the Run dialog box.
- Type gpedit.msc and press enter.

- The Local Group Policy Editor will open up.
- On the left-hand panel click on the elements in this order.
User Configuration > Administartive Templates > Start Menu & taskbar. - On the right-hand side navigate to the option Remove Network Icon from Start Menu and double click on it.

- The concerned settings panel will open up in a new dialog box.
- Check if it is set to Enabled. Then set it to Disabled.

- If it is set to Disabled or Not Configured then no need to do anything. Simply exit the Local Group Policy Editor.
Make sure to restart the computer if you performed Step number 7 above. Then you should be able to view the Wifi option on the Windows 11 home screen and Wi-Fi Not Showing on Windows 11 is fixed.
Reset Network Settings of Windows OS
You can reset the current network settings on your computer. This process will uninstall all the internet adapters currently installed on your PC. Here are the steps to perform it.
- Invoke the Windows settings by pressing Windows + I keys.
- Then on the left-hand panel, click on Network & internet.
- Now, click on Advanced Network Settings.

- Go to More Settings and under that, you will find the option Network Reset.

- Click on Reset Now to confirm the resetting of the network adapters.

The computer will restart after the network resets. Then you should be able to find the WiFi option on the taskbar of the Windows home screen.
Perform A System Restore
Your last option to fix the missing WifI option on your windows home screen can be performing a system restore on your computer. Doing so will take you back to a point in time when the WiFi option was still available on the PC taskbar.
For that, you should have set a restore timeline otherwise there would be nothing to restore. Here are the steps for you to perform a system restore.
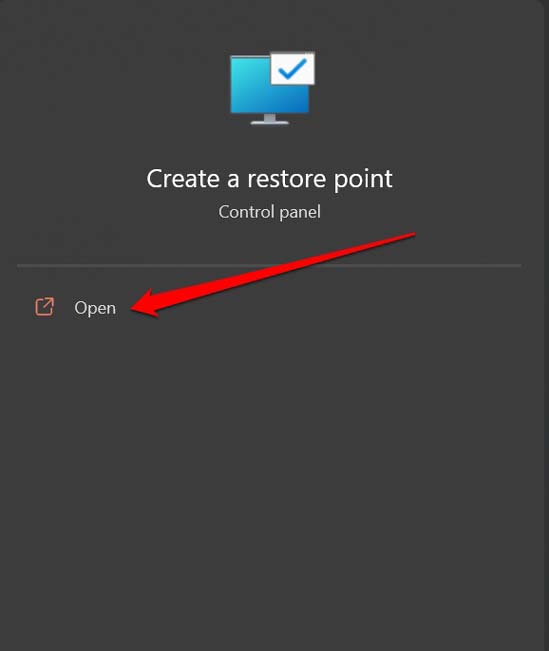
- Press the Windows key to bring up the windows search console.
- Type restore and immediately on the search result you will see Create a Restore Point.
- Click Open.

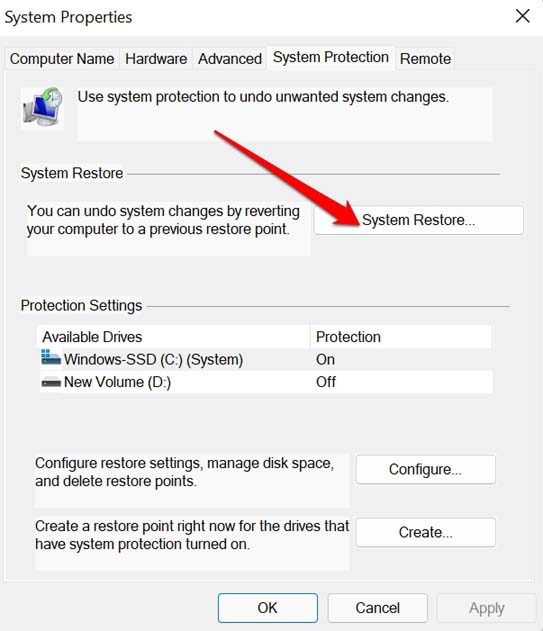
- Then click on the System Protection tab.
- Under that click on System Restore.

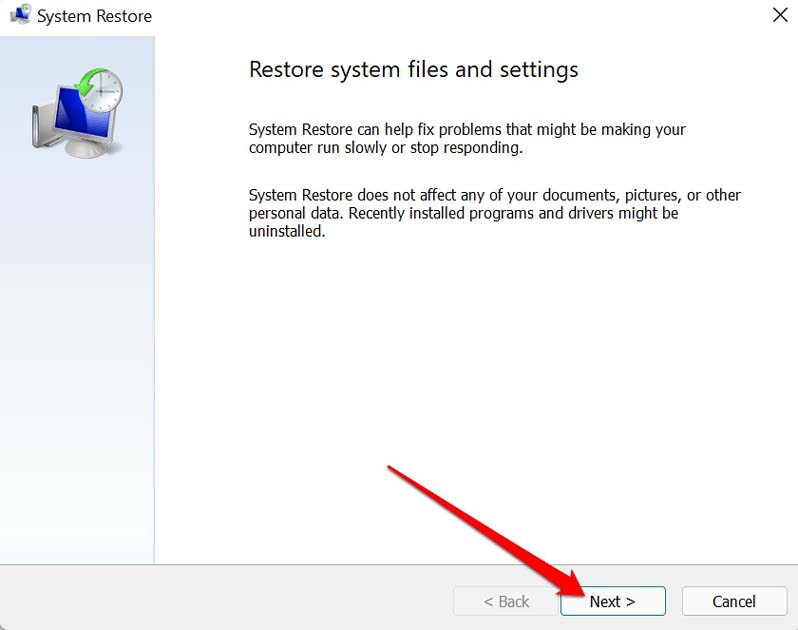
- Follow the on-screen instructions to perform a system restore by selecting an event or restore point you have set previously.

Once the restoration is complete, you can restart the computer, and then you should be able to find the WiFi option back on the Windows 11 home screen.
So, these are the various troubleshooting methods that you can use to fix the issue of the WiFi option not showing on your Windows 11 computer.
If you’ve any thoughts on How to Fix WiFi Option Missing on Windows 11?, then feel free to drop in below comment box. Also, please subscribe to our DigitBin YouTube channel for videos tutorials. Cheers!