
[Guide] How to Customize the Windows 11 Start Menu
Windows 11 has introduced a redesigned Start Menu that serves as the gateway to your applications, settings, and notifications. Its fresh, modern aesthetic not only enhances your Windows experience but also provides new functionalities that allow for significant customization. This guide will walk you through various ways to tailor the Windows 11 Start Menu to reflect your personal style and preferences, ensuring that you get the most out of your computing experience.
Understanding the New Start Menu
The Start Menu in Windows 11 differs from its predecessor in both appearance and functionality. Gone is the traditional, layered layout of Windows 10. The new Start Menu is centered on the screen, with a minimalist design that features pinned applications, a recommended section, and a quick access area for your account and settings. Familiarizing yourself with its components will help you appreciate the customization options available.
Components of the Windows 11 Start Menu
-
Pinned Apps: The top section of the Start Menu is designated for pinned applications. You can quickly access your most-used programs here.
-
Recommended Section: The middle section displays recently used files and applications, giving you quick access to what you need most.
-
All Apps: By clicking the «All apps» button at the top-right corner, you can view a complete list of installed applications.
-
User Profile & Power Options: Your account picture and a power button are located in the bottom corner, providing easy access to account settings and options for shutting down or restarting your computer.
Preparing to Customize
Before diving into customization, it’s essential to take a moment to consider what you want to achieve with your Start Menu. Do you want to prioritize productivity by organizing applications effectively, or do you simply want to give it a personal touch? Knowing your objectives will guide your customization process.
Customizing the Start Menu: Step-by-Step Guide
1. Pinning and Unpinning Applications
One of the simplest ways to customize your Start Menu is by managing your pinned applications.
Pinning Apps
To pin an application to the Start Menu:
-
Use the Search Bar: Click on the Start button and start typing the name of the application you want to pin. Right-click on the application in the results, and choose “Pin to Start.”
-
From the All Apps List: Click on “All apps,” locate the application, right-click on it, and select “Pin to Start.”
Unpinning Apps
If you want to remove an application from the pinned section:
- Find the application in the Pinned Apps area, right-click on it, and select “Unpin from Start.”
Customizing which applications are visible is a straightforward way to ensure easy access to your most-used tools.
2. Organizing Pinned Apps into Folders
Windows 11 allows you to create folders on the Start Menu for better organization.
Creating a Folder
-
Drag and Drop: Simply click and hold an application icon, then drag it over another application icon. Release it to create a folder.
-
Naming the Folder: Click on the folder you created to open it, and you’ll see an option to name the folder. Choose a name that reflects the contents.
Folders can significantly reduce clutter and make finding applications faster.
3. Rearranging Pinned Apps
To further customize your Start Menu’s layout, you can easily rearrange pinned applications:
- Simply click and hold an app icon, then drag it to your desired position in the Pinned Apps section. Release it to drop it in place.
4. Accessing the Recommended Section
The Recommended section automatically suggests files and applications based on your routine usage. While you can’t control the items shown directly, there are ways to influence this section:
Removing Items
To remove an item from the Recommended section:
- Hover over the item you want to remove, click on the three-dot button (ellipsis), and select “Remove from list.”
This action helps maintain a relevant and tidy Recommended section.
5. Customizing Start Menu Settings
Windows 11 also allows some additional customization through its settings.
Access Settings
-
Open the Start Menu and select “Settings” (the gear icon) or press Windows + I to open Settings directly.
-
Navigate to “Personalization” and then click on “Start.”
-
Here, you will see options to control what folders appear on the Start Menu and options for the Recommended section, such as “Show recently added apps,” “Show most used apps,” and “Show recently opened items in Start, Jump Lists, and File Explorer.”
6. Using Folders for Better App Management
Creating folders not only saves space but also allows categorization based on your needs—be it productivity, entertainment, or utilities. Here’s how you create and manage folders in more detail:
Steps to Use Folders
-
Creating Folders: As mentioned, drag one app over another to form a folder.
-
Adding More Apps: You can add more applications to an existing folder by dragging them into it.
-
Renaming Folders: To rename a folder, open it and click on the name to edit it.
7. Personalizing Start Menu Colors and Themes
The visual aspect of the Start Menu is significant for personal expression. Windows 11 lets you customize its colors and themes to align with your personal aesthetic.
Adjusting Colors
-
Open Settings: Access Settings from the Start Menu or by pressing Windows + I.
-
Go to Personalization: Click on “Colors.”
-
Pick Your Color: You can select a light, dark, or custom theme. You can also choose accent colors that impact the Start Menu’s appearance.
8. Using Transparency Effects
For those who want a sleek look, Windows 11 provides options for transparency.
- In the Colors settings, toggle the “Transparency effects” option to on or off based on your preference.
This setting gives the Start Menu a more refined appearance, blending it with your desktop background.
9. Utilizing Widgets for Quick Information
While widgets are not directly part of the Start Menu, they can complement your experience by providing quick access to information and apps.
Accessing Widgets
-
Click the widget icon on the taskbar (next to the Start button) to explore widgets relevant to your interests—news, weather, calendar, and more.
-
You can personalize your widgets based on the information you find helpful, further enhancing the utility of your Start Menu usage.
10. Implementing Group Policy for Advanced Users
For users comfortable with technical configurations, the Group Policy Editor allows deeper customization options for the Start Menu, particularly in a professional setting.
Accessing the Group Policy Editor
-
Press Windows + R to open the Run dialog box, type
gpedit.mscand hit Enter. -
Navigate to the User Configuration section: User Configuration > Administrative Templates > Start Menu and Taskbar.
-
Here, you can configure various settings related to the Start Menu’s functionality, such as disabling specific features, customizing user interfaces, and more.
Note: Group Policy Editor is available in Windows 11 Pro, Enterprise, and Education editions.
11. Backup and Restore Customizations
As you personalize your Start Menu, consider backing up your settings.
Using the Registry Editor
-
Press Windows + R to bring up the Run dialog, type
regedit, and hit Enter to open the Registry Editor. -
Navigate to
HKEY_CURRENT_USERSoftwareMicrosoftWindowsCurrentVersionExplorerStartPage. -
Here, you can export the current settings for later restoration. Right-click on the StartPage folder to select “Export” and save it safely on your drive.
12. Troubleshooting Start Menu Issues
Customization might sometimes lead to unforeseen issues. If you encounter problems with the Start Menu after making changes, try the following:
-
Restart your computer: A simple restart can fix many glitches.
-
Run Windows Troubleshooter: Go to Settings > Update & Security > Troubleshoot. Here you can select the appropriate troubleshooter that may help with Start Menu issues.
-
Reset Start Menu settings: If all else fails, reset your Start Menu customizations by removing unnecessary folders and pinned items, returning to default settings.
Conclusion
Customizing the Windows 11 Start Menu is an engaging process that allows you to create a workspace tailored to your needs. Whether you’re looking for a functional layout, a personalized aesthetic, or improved access to your most-used applications, the options available to you are vast and versatile. By following the steps outlined in this guide, you can enhance your efficiency and enjoyment of Windows 11, making the Start Menu not just a gateway to your applications and files, but a reflection of your unique style and workflow.
Embrace the ability to customize and let your personality shine through your digital environment! As Windows evolves, so too will the possibilities of personalization—stay tuned to future updates for more innovative features.
Новость с портала Community
Несколько недель назад в инсайдерских сборках Windows 11 появился новый макет меню «Пуск» — «Категории». Как следует из названия, новый макет предполагает классификацию приложений по определённым категориям, что напоминает реализацию в iOS. Функция по-прежнему находится на ранней стадии разработки и по умолчанию отключена. Официального анонса со стороны Microsoft пока тоже не было.
Как заметил пользователь phantomofearth, в сборке Windows 11 Build 22635.4082 для канала Beta макет «Категории» начал приобретать более-менее законченный вид.
Например, появились всплывающие подсказки, отображающие названия приложений при наведении курсора, что особенно важно, учитывая отсутствие подписей под иконками. А список категорий теперь соответствует 29 категориям Microsoft Store, среди которых «Игры», «Путешествия», «Безопасность», «Социальная сфера», «Музыка» и другие.
Тем не менее до сих пор не понятно, как Windows 11 будет классифицировать приложения, установленные из сторонних источников, а не из Microsoft Store.
Важно отметить, что функция «Категория» находится на стадии разработки и имеет некоторые недоработки. Например, пока невозможно открыть каждую категорию для доступа ко всем приложениям из списка. Эти недочёты будут устранены в будущих сборках.
Если вы хотите более подробно изучить изменения, то можете вручную включить функции с помощью утилиты ViVeTool по этой инструкции:
- Скачайте утилиту ViVeTool по этой ссылке. Это новая версия ViveTool 0.3.3, подробности о которой мы рассказали в нашем материале.
- Распакуйте скачанный архив в любое место на вашем компьютере (например, можно создать папку ViVeTool в корне диска C: и поместить файлы туда).
- Откройте командную строку от имени администратора (например, набрав CMD в поиске и выбрав соответствующий пункт).
- В командной строке перейдите в папку с ViVeTool с помощью команды cd /d <путь к папке>, после чего нажмите Enter. Например: cd /d «C:\ViVeTool»
- Введите команду vivetool /enable /id:47205210,49221331,48433719 и нажмите Enter.
- Убедитесь, что в командной строке появилось сообщение «Successfully set feature configuration»
- Перезагрузите компьютер для применения изменений.
Для отключения функции воспользуйтесь командой:
- vivetool /disable /id:47205210,49221331
Спасибо за наводку порталу Winaero!
Дизайнеры дали волю своему воображению.
В этом месяце Microsoft планирует представить обновлённое меню «Пуск» в Windows 11 — с более широким окном и возможностью отключения блока рекомендаций. В преддверии запуска корпорация несколько концепций, от которых отказались.
Одна из них включает более закруглённую панель с функциональностью, напоминающей виджет, и отдельный раздел «Для вас» со списком недавно использованных файлов и различными элементами. В другой концепции главное меню сосредоточено на категориях приложений.
Ещё один прототип представляет целевую страницу с ярлыками, приложениями, файлами и отдельными разделами для доступа к Android-телефону, персонализированным спискам приложений и инструментам, вроде Designer и PowerPoint.

1 / 0

2 / 0

3 / 0

4 / 0
Есть даже меню «Пуск», которое занимает практически всё вертикальное пространство экрана, с отдельными прокручивающимися разделами. «Мы набросали множество макетов, позволив воображению разгуляться», — отметила команда дизайнеров Windows.
Microsoft протестировала различные прототипы меню «Пуск» с более чем 300 поклонниками Windows 11. Специалисты отслеживали движение их глаз, подсчитывали количество прокруток и фиксировали восторженные восклицания «О!», чтобы понять, где дизайнеры попали в точку.
Итоговый вариант «Пуска» сосредоточен на удобстве просмотра приложений, возможности настройки и скорости. Панель для смартфонов полностью интегрирована в меню, обеспечивая быстрый доступ к недавним звонкам, сообщениям и файлам. Это обновление станет доступно всем пользователям Windows 11 в ближайшие месяцы.
The Windows 11 start menu styling guide
Table of contents
- Introduction
- Finding targets
- Missing customizations
- Contributing
- Themes
- Custom Acrylic background
- Remove the search box
- Move pinned app lists
- Remove the Recommended section
- Remove the user profile button
- Move the power button
- Force light/dark mode
- Semantic zoom (navigation)
- Transforms
- Translate
- Rotate
- Scale
- Skew
- Other properties
- Search menu
- Search menu WebView styles
- Hide the back button
- Hide the Copilot button
- Change the background color of search type headers
- Hide the search type headers
- Hide the search type header scroll buttons
- Hide the quick settings panel
- Hide the top result title
- Change the background color of all search results
- Hide left-side pill of the selected search result
- Change the width of the preview panel
- Change the background color of the preview panel
- Change the text font
- Change the icons font
- Colors
- Solid color
- Accent colors
- Clear transparent background
- Acrylic effect as color
- Mica effect as color
- Gradient as color
- Image as color
- Reveal as color
Introduction
This is a collection of commonly requested start menu styling customizations for
Windows 11. It is intended to be used with the Windows 11 Start Menu
Styler Windhawk mod.
If you’re not familiar with Windhawk, here are the steps for installing the mod:
- Download Windhawk from windhawk.net and install it.
- Go to «Mods» in the upper right menu.
- Find and install the «Windows 11 Start Menu Styler» mod.
After installing the mod, open its Settings tab and adjust the styles according
to your preferences.
Some customizations are best to be adjusted with other Windhawk mods. Links to
those mods are provided where applicable.
See also: The Windows 11 taskbar styling
guide,
The Windows 11 notification center styling
guide.
Finding targets
How to find targets using UWPSpy.
Missing customizations
If you’re looking for a customization that is not listed here, please open an
issue.
Contributing
If you have a start menu styling customization or theme that you would like to
share, please submit a pull request.
Themes
Themes are collections of styles that can be imported into the Windows 11
Start Menu Styler mod. The following themes are available:
| Link | Screenshot |
|---|---|
| NoRecommendedSection | |
| SideBySide | |
| SideBySide2 | |
| SideBySideMinimal | |
| Windows10 | Windows10 Minimal | |
| TranslucentStartMenu | |
| Windows11_Metro10 | |
| Fluent2Inspired | |
| RosePine | |
| Windows11_Metro10Minimal | |
| Everblush | |
| 21996 | |
| Down Aero | |
| UniMenu | |
| LegacyFluent |
Custom Acrylic background
Target Border#AcrylicBorder and set Background with an AcrylicBrush object, for example:
Background:=<AcrylicBrush BackgroundSource="Backdrop" TintColor="Pink" TintOpacity="0.25" />
The AcrylicBrush properties
can be adjusted as needed.
Remove the search box
Target StartDocked.SearchBoxToggleButton with Height=0, Margin=0,0,0,24.
Move pinned app lists
Target StartMenu.PinnedList with Margin=0,0,0,0.
Adjust values as needed.
Remove the Recommended section
Target the following elements:
Windows.UI.Xaml.Controls.Grid#TopLevelSuggestionsListHeaderWindows.UI.Xaml.Controls.Grid#NoTopLevelSuggestionsTextWindows.UI.Xaml.Controls.Grid#TopLevelSuggestionsContainerWindows.UI.Xaml.Controls.Grid#ShowMoreSuggestions
Set the style of each to:
Visibility=Collapsed
In addition, the pinned items can be adjusted to
occupy the whole height by targeting StartMenu.PinnedList and setting
Height=504.
Remove the user profile button
Target StartDocked.UserTileView with Visibility=Collapsed.
Move the power button
Target StartDocked.PowerOptionsView with Margin=-580,-1330,0,0.
Adjust values as needed.
Force light/dark mode
Sets light/dark mode independently of what is set in Windows.
RequestedTheme=1
1 = Light Mode
2 = Dark mode
Semantic zoom (navigation)
Semantic zoom is the feature that allows us to navigate the apps list using the alpha-numeric headers in the list. This lets you jump to a particular letter or number in the apps list quickly.
For themes that have the apps list visible in the main start menu view, this feature does not work. As an optional work around, you may enable the hidden zoom button. This button allows you to access the alpha-numeric navigation view. This is the zoomed out view, which is why this is called semantic zoom.
Target:
Windows.UI.Xaml.Controls.SemanticZoom#ZoomControl
Styles:
IsZoomOutButtonEnabled=True
Target:
Windows.UI.Xaml.Controls.Button#ZoomOutButton
Styles:
Target:
Windows.UI.Xaml.Controls.Button#ZoomOutButton > Windows.UI.Xaml.Controls.ContentPresenter#ContentPresenter > Windows.UI.Xaml.Controls.TextBlock
Styles:
You may replace Text= with any other character. Use Character Map to find, copy, and paste the character into the style box.
Transforms
You can use transformation styles to translate, rotate, scale, or skew elements.
Tip
Should I use RenderTransform or Transform3D?
For 2D transformations, it is best to stick to RenderTransform in most cases. Using Transform3D for 2D transformations can cause elements to become blurry. For 3D transformations, you must use Transform3D.
Tip
You can mix and match transformations when using Transform3D! You can also use RenderTransform and Transform3D together.
For example: Transform3D:=<CompositeTransform3D TranslateY="-15" RotationZ="15" ScaleX="1.5" />
Translate
RenderTransform:=<TranslateTransform Y="-15" X="15" />
— or —
Transform3D:=<CompositeTransform3D TranslateY="-15" TranslateX="15" TranslateZ="-15" />
Rotate
RenderTransform:=<RotateTransform Angle="15" />
— or —
Transform3D:=<CompositeTransform3D RotationX="-15" RotationY="15" RotationZ="-15" />
X: 3D vertical rotation.Y: 3D horizontal rotation.Z: 2D rotation.
Scale
RenderTransform:=<ScaleTransform ScaleX="1.5" ScaleY="-1.5" />
— or —
Transform3D:=<CompositeTransform3D ScaleX="-1.5" ScaleY="1.5" ScaleZ="-1.5" />
Skew
RenderTransform:=<SkewTransform AngleX="-15" AngleY="15" />
Other properties
- Rotate, Scale and Skew:
CenterX: Offsets the transform’s origin on the X axis.CenterY: Offsets the transform’s origin on the Y axis.CenterZ: Offsets the transform’s origin on the Z axis. (Only forTransform3D)
Search menu
The search menu may also be included in your custom theme, and some of the built-in themes already support this as well. The search menu has some of its own unique targets, but does share some targets with the start menu. This means that some start menu styles will automatically be inherited and applied to search as well, but some elements may need to specifically targeted.
Versions 1.2 and newer of Windows 11 Start Menu Styler automatically apply the styles to the search menu. In order to include search in your theme in older versions:
- Go to the
Advancedtab at the top in the Start Menu Styler mod. - In the custom process inclusion list below, enter
SearchHost.exe. - Click save.
Search menu WebView styles
While the start menu uses WinUI for its user interface, most of the search content (all but the top search bar) is a WebView element. To style the search WebView, CSS targets and styles can be used. For example, to set a red background, the target body and the style background: red !important can be used.
Hide the back button
Target:
.scope-with-background__backButton
Style:
Hide the Copilot button
Target:
Style:
Change the background color of search type headers
Target:
Style:
background-color: Black !important
Hide the search type headers
Target:
Style:
Hide the search type header scroll buttons
Target:
.scope-with-background__rightCaret, .scope-with-background__leftCaret
Style:
Hide the quick settings panel
Target:
Style:
Hide the top result title
Target:
Style:
Change the background color of all search results
Target:
Style:
background-color: Black !important
Hide left-side pill of the selected search result
Target:
Style:
Change the width of the preview panel
Target:
Style:
min-width: 300px !important
Change the background color of the preview panel
Target:
Style:
background-color: Black !important
Change the text font
Target:
h4, .suggContainer, .groupTitle, .suggsListContainer, .title, .details, .secondaryText, .scope-tile > div, .menu-item_details
Style:
font-family: 'Inter' !important
Change the icons font
Target:
.cortanaFontIcon, .iconContent
Style:
font-family: 'Segoe MDL2 Assets' !important
Colors
In the following examples, we will use Background as our style, but this
also works for other properties that accept colors, such as Fill.
Solid color
Replace <color> with the desired color.
A color can be a name (e.g. Red) or a hex code (e.g. #FF0000).
The color can be semi-transparent (e.g. #80FF0000). To have a fully
transparent background, use Transparent or #00000000.
Accent colors
A Color can also be a ThemeResource or StaticResource. There are many such
styles built into Windows.
Background:=<SolidColorBrush Color="{ThemeResource SystemAccentColor}" Opacity="0.8" />
Accent colors come as part of an accent color palette. This means that for any color you pick as your system accent color, 3 additional shades are part of that color’s palette. For example: SystemAccentColorLight2 or SystemAccentColorDark1.
The word Light or Dark is appended at end with
a number ranging from 1-3. See the official Microsoft
docs
for more information.
Background:=<SolidColorBrush Color="{ThemeResource SystemAccentColorDark2}" Opacity="0.5" />
Clear Transparent Background
To have a fully transparent background:
Style:
Acrylic effect as color
In order to use the acrylic effect (a blurred background) you can use the
AcrylicBrush.
Background:=<AcrylicBrush TintColor="Black" TintOpacity="0.8" />
TintColor — Required. Defines what color to use.
TintOpacity — Defines the strength of the chosen color.
TintLuminosityOpacity — Defines the brightness of the acrylic effect.
BackgroundSource — Defines what should be considered the background of the acrylic effect. Set to «Backdrop» to use the desktop wallpaper.
Opacity — Defines how transparent the brush effect itself is. If set to less than 1, it blends the AcrylicBrush with clear transparency.
You can also set Acrylic to use an accent color for a more dynamic look, that fits current theme.
Background:=<AcrylicBrush TintColor="{ThemeResource SystemAccentColorDark2}" TintOpacity="0.3" />
Mica effect as color
Note
Unfortunately, it is not possible to set a Mica effect at this time with any of Windhawk’s styler mods.
Gradient as color
The background can also be a gradient. For example, to have a gradient from
yellow to red to blue to lime green, use the following style:
Background:=<LinearGradientBrush StartPoint="0,0.5" EndPoint="1,0.5"><GradientStop Color="Yellow" Offset="0.0" /><GradientStop Color="Red" Offset="0.25" /><GradientStop Color="Blue" Offset="0.75" /><GradientStop Color="LimeGreen" Offset="1.0" /></LinearGradientBrush>
Image as color
The background can also be an image:
Background:=<ImageBrush Stretch="UniformToFill" ImageSource="<image>" />
Replace <image> with your own image, a URL or a local file path.
If you only see a fully transparent background when using a local file path, you must set a URL instead.
Images can be jpg, jpg XR, png, bmp, svg, tiff, gif, or ico.
Stretch can be set to the following values:
None — Image is rendered at its native resolution and aspect ratio.
Fill — Image is stretched or squished to fill the size of the element.
Uniform — Image is resized to fit the element dimensions, while it preserves its native aspect ratio.
UniformToFill — Image is resized to fill the destination dimensions while it preserves its native aspect ratio. Crops to fit element.
Reveal as color
Note
Reveal is a deprecated XAML feature. It may have issues
or stop working at any time.
Reveal is the cursor-based illumination effect from Windows 10.
Background:=<RevealBorderBrush Color="Transparent" TargetTheme="1" Opacity="1" />
BorderBrush:=<RevealBorderBrush Color="Transparent" TargetTheme="1" Opacity="1" />
Only RevealBorderBrush should be used, RevealBackgroundBrush does not work correctly in most scenarios.
Opacity can be changed to increase or decrease the intensity of the effect.
Вопросы, связанные с изменением оформления меню «Пуск» в Windows 11 и предыдущих версиях ОС — одни из самых часто задаваемых и в большинстве случаев для этого используются сторонние программы, заменяющие стандартное меню собственным интерфейсом.
Модификация Start Menu Styler из твикера Windhawk реализует то же самое слегка иначе: путём изменения параметров отображения элементов «родного» меню Пуск Windows 11, об этой модификации и пойдёт речь далее в статье.
Установка и использование Start Menu Styler
Start Menu Styler устанавливается как модификация модульного твикера Windhawk. Если он не установлен на вашем компьютере, полный список шагов будет выглядеть следующим образом:
- Скачайте и установите Windhawk с официального сайта или GitHub.
- В запущенном твикере Windhawk используйте поиск, чтобы найти модуль Start Menu Styler и установить его (кнопка установки доступна, если открыть описание найденного модуля).


На этом всё, можно приступать к использованию установленной модификации.
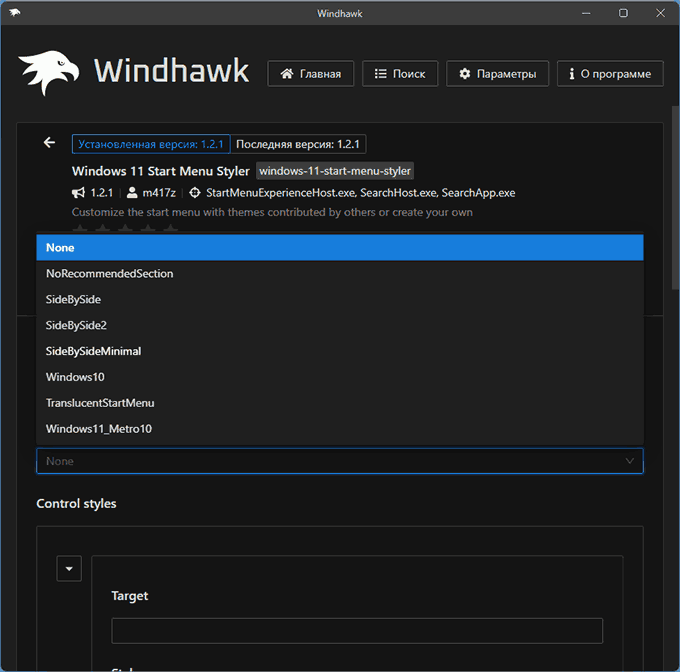
Самый простой вариант — выбрать одну из готовых тем оформления меню «Пуск» на вкладке «Настройки»:
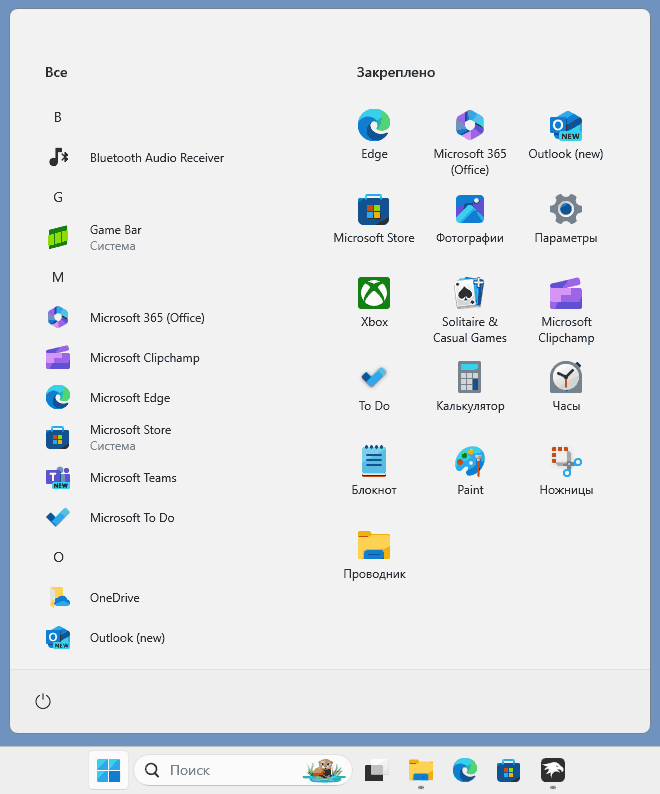
Сразу после сохранения настроек начинает отображаться новый вариант оформления меню (в примере ниже цветовая схема остаётся та же, что была выбрана в Windows):
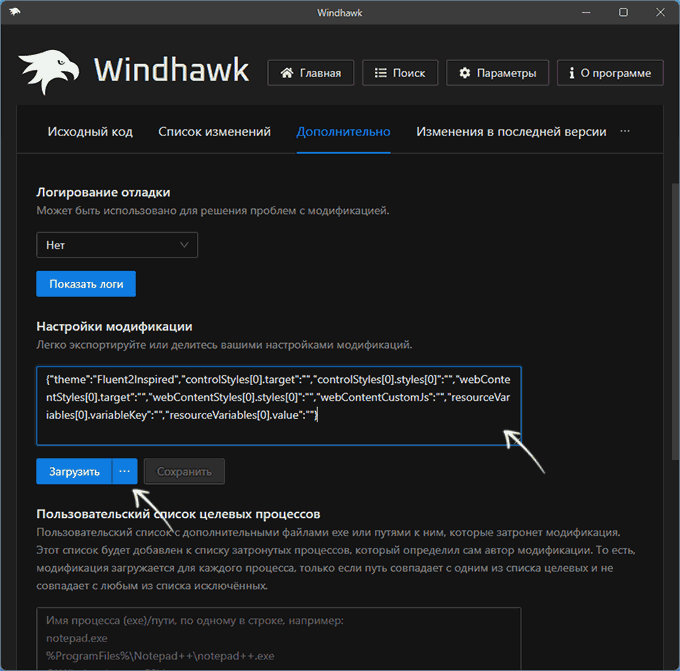
Если вы знакомы с CSS, вы можете вручную настроить желаемый вид вашего меню «Пуск» либо прописав значения для нужных объектов в настройках Start Menu Styler в разделе «Control Styles», либо вручную создав файл, описывающий все стили и импортировав его содержимое на вкладке «Дополнительно»:
Чтобы разобраться в том, как именно изменить имеющиеся или настроить собственные темы оформления меню «Пуск», будут полезны материалы:
- Примеры имён и свойств для изменения стилей объектов меню «Пуск»
- Полные наборы переопределённых стилей для тем, предустановленных Start Menu Styler — на странице выше переходим по ссылке понравившейся темы в разделе Themes и открываем раздел «Content to import»:

- Информация по поиску имён объектов UWP приложений с помощью UWPSpy

Итоговый результат может быть очень разнообразным, всё зависит от вашей фантазии:
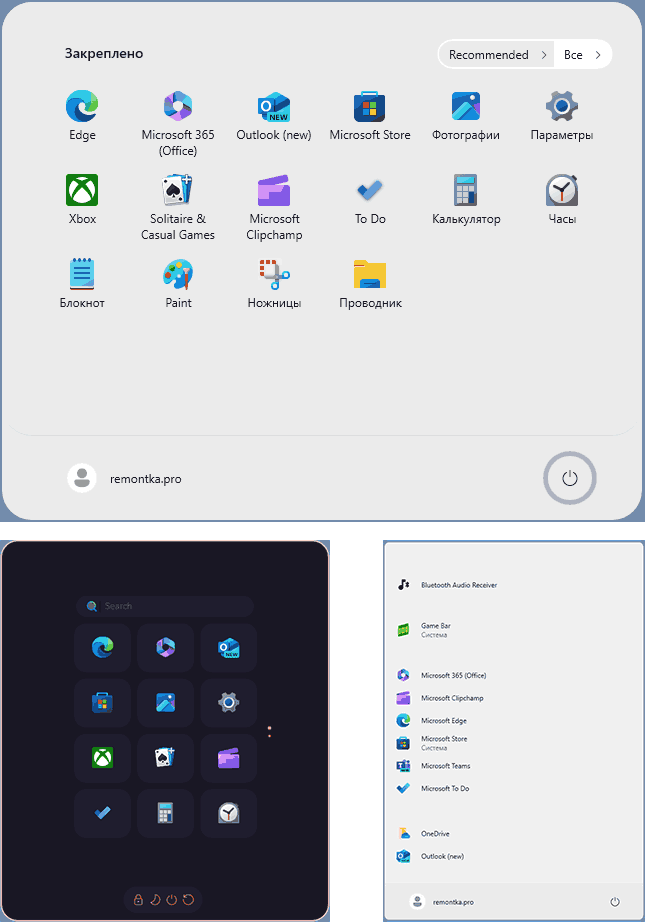
При этом это всё так же собственное меню «Пуск» Windows 11, всё что меняется — это параметры отображения (координаты, цвет, видимость, прозрачность) его элементов.