
При чистой установке Windows 11 создание локальной учетной записи затруднено, особенно если речь идёт о Windows 11 Домашняя, однако это возможно. Также, если вы уже установили систему с учетной записью Майкрософт, сравнительно легко можно переключиться на использование локальной учетной записи.
В этой инструкции подробно о том, как установить Windows 11 Домашняя и Pro с локальной учетной записью или переключиться с аккаунта Майкрософт на локальную учетную запись в уже установленной системе. Процесс установки систему пошагово описан в отдельном руководстве Как установить Windows 11 с флешки.
Локальная учетная запись Windows 11 Pro и Домашняя при установке
В первых версиях Windows 11 для Pro версии существовала возможность установки без Интернета или использовать пункт «Параметры входа» для создания локальной учетной записи (описано далее, но для Windows 11 22H2 уже не работает), однако в новых образах наличие Интернета и учетной записи Майкрософт стало обязательным. Чтобы обойти необходимость подключения к Интернету и включить возможность создания локальной учетной записи, вы можете использовать один из следующих методов:
- Использовать командную строку при установке и команду oobe\bypassnro для установки с локальной учётной записью. Подробно способ описан в отдельной инструкции: Простая установка Windows 11 без Интернета с локальной учетной записью.
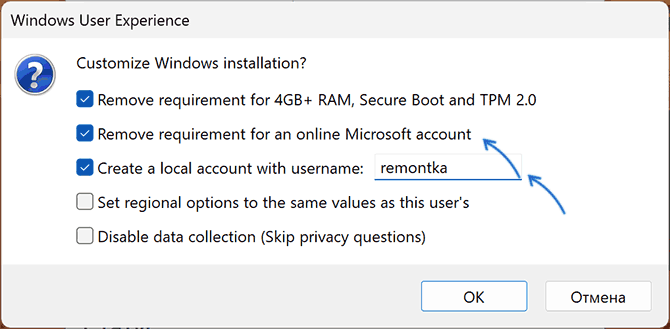
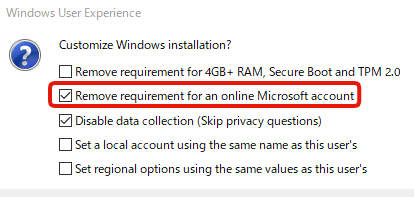
- Использовать последнюю версию Rufus для создания загрузочной установочной флешки Windows 11. При запуске записи установочного накопителя вы увидите следующее окно, в котором можно как отключить требование наличия Интернет-подключения при установке (вторая отметка), так и включить автоматическое создание локальной учетной записи с заданным именем (третья отметка).

- Аналогично, последняя версия программы для создания мультизагрузочной флешки Ventoy, отключает требование использования учетной записи Майкрософт при установке и делает это по умолчанию. Подробно об использовании Ventoy для создания загрузочной флешки.
Установка без доступа в Интернет или опция «Параметры входа» (только Windows 11 Pro)
Этот способ работает только в ранних релизах Windows 11 или при отключении требования наличия Интернет-подключения и учетной записи Майкрософт при установке. Возможные варианты действий для создания локальной учетной записи:
- Производить установку без подключения к Интернету и нажать «У меня нет Интернета» на этапе подключения — в этом случае вы сразу перейдете к созданию локальной учетной записи.
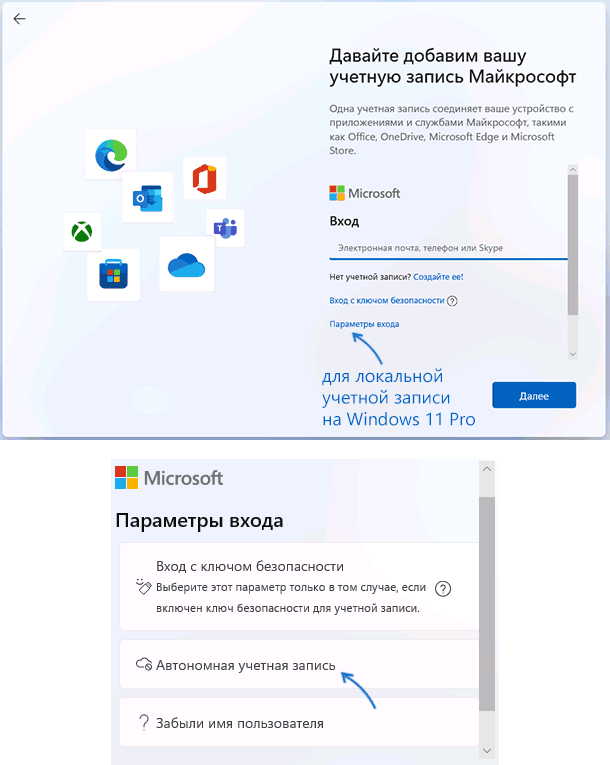
- На экране с запросом ввода адреса почты учетной записи Майкрософт нажать «Параметры входа», а затем выбрать «Автономная учетная запись». На экране с описанием достоинств учетной записи Майкрософт нажмите «Пока пропустить» и откроется окно создания локального пользователя.

Ввод неправильного E-mail и пароля при установке для разблокировки возможности создания локального аккаунта
При установке Windows 11 Домашняя описанный выше способ не сработает: подключение к Интернету обязательно (но есть способ установить без Интернета), а вариант создания автономной учетной записи в Параметрах входа недоступен.
Чтобы создать локальную учетную запись во время установки Windows 11 Домашняя (работает и для Windows 11 Pro) можно использовать следующий способ:
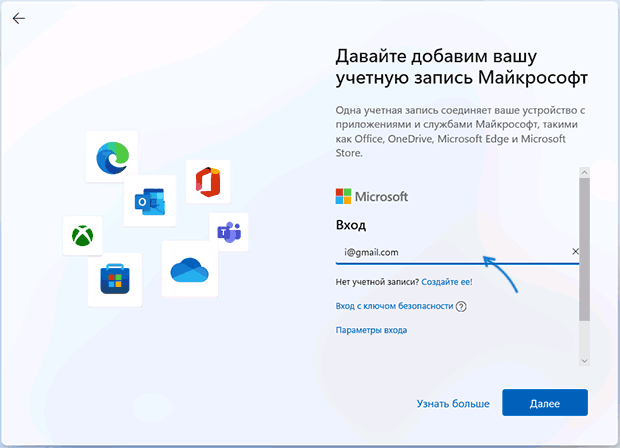
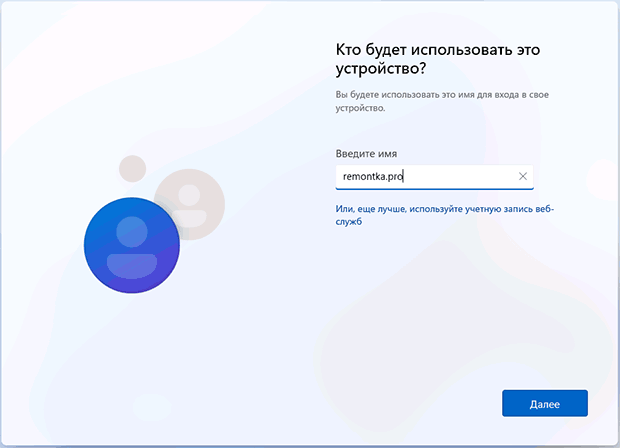
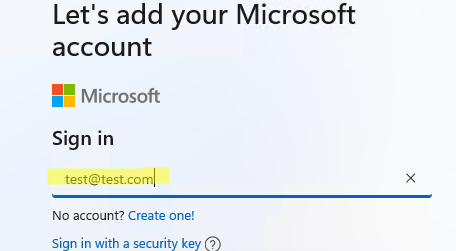
- На экране входа в учетную запись Майкрософт введите не свой настоящий E-mail, а такой адрес, к которому с большой вероятностью многие пробовали подобрать пароль, можно использовать адрес с изображения ниже, с ним это сработает. Нажмите «Далее».

- Введите любой случайный пароль.
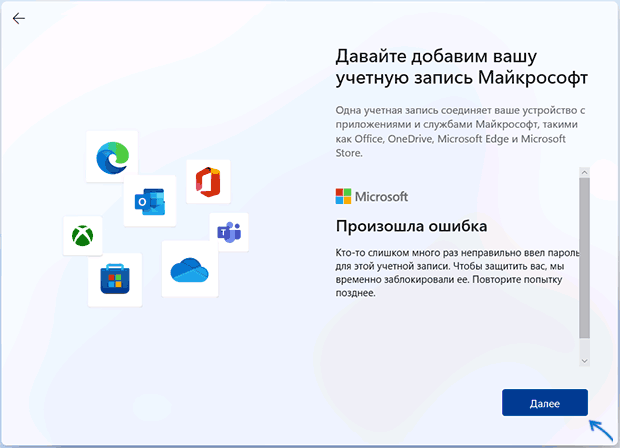
- Вы увидите сообщение о блокировке этой учетной записи Майкрософт: «Произошла ошибка. Кто-то слишком много раз неправильно ввел пароль для этой учетной записи».
- Нажмите кнопку «Далее» и, уже в следующем окне можно будет создать локальную учетную запись.
Переключение на локальную учетную запись в установленной Windows 11
Если вы уже установили систему с учетной записью Майкрософт, можно переключиться на использование локальной учетной записи. Сделать это можно в «Параметрах», причем как в Windows 11 Домашняя, так и в Pro-версии.
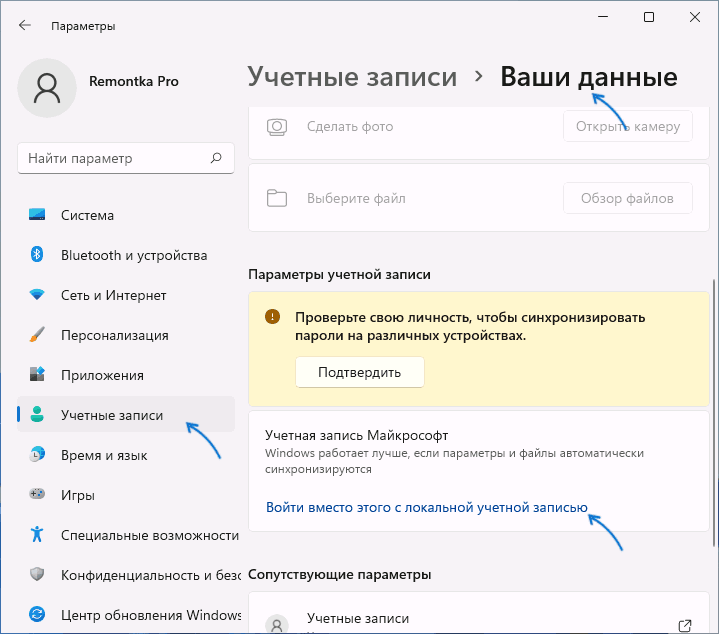
- Зайдите в Параметры — Учетные записи — Ваши данные.
- В разделе «Параметры учетной записи» нажмите «Войти вместо этого с локальной учетной записью».

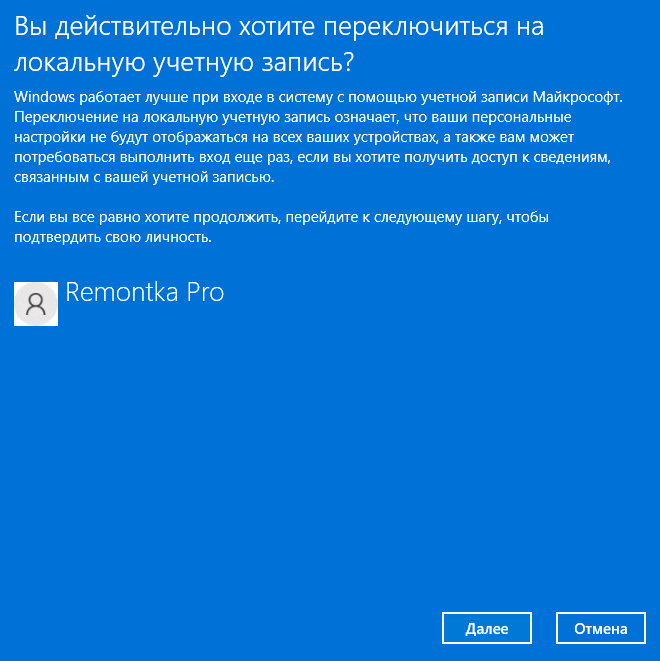
- Прочитайте предупреждение и нажмите «Далее».

- В следующем окне потребуется ввести желаемое имя локальной учетной записи и пароль (необязательно, если требуется вход без пароля).
- После подтверждения произойдет выход из системы, а уже следующий вход будет осуществляться в локальную учетную запись. Все данные из предшествовавшей учетной записи Майкрософт будут сохранены.
Создание отдельной локальной учетной записи Windows 11
Ещё один вариант переключения на локальную учетную запись — создание такой учетной записи и «переезд» в неё:
- Создайте локальную учетную запись Администратора. Сделать это можно в командной строке, по порядку используя следующие команды (замените имя_пользователя на нужное вам имя пользователя, но не используйте слово Администратор; а пароль — на нужный пароль, если его не указывать, то вход будет выполняться без пароля):
net user имя_пользователя пароль /add
net localgroup Администраторы имя_пользователя /add
- Зайти под вновь созданной локальной учетной записью (можно нажать по имени текущего пользователя в меню «Пуск», выйти, а затем зайти под новой учетной записью). И подготовьте её к работе — убедитесь в работе программ, переместите нужные файлы из учетной записи Майкрософт, особенно из системных папок, таких как Рабочий стол, Документы, Изображения.
- Если вам более не требуется учетная запись Майкрософт, удалите её, находясь в локальной учётной записи. Для этого зайдите в Параметры — Учетные записи — Семья и другие пользователи и удалите ненужный аккаунт в разделе «Другие пользователи».
В обоих случаях будет достигнут нужный результат: использование автономной учетной записи вместо учетной записи Майкрософт.
При чистой установке Windows 11 и последних билдов Windows 10 на компьютер, мастер настройки предлагает вам использовать облачную учётную запись Microsoft (Microsoft account) для входа в систему. Если ваш компьютер находится в изолированной от Интернета сети, у вас нет учетной записи Microsoft, или вы не хотите ее использовать, вы просто не сможете войти в компьютер.
В Windows 11 21H2 использование Microsoft account было обязательно только для Home редакции Windows (в системных требованиях этой редакции явно указано наличие интернет подключения и аккаунта Microsoft). Но уже в Windows 11 22H2 диалоговое окно для создания локальной учетной записи теперь отсутствует уже и в редакции Pro. В этой статье мы покажем, как установить Windows 11 версии 22H2 с локальной учетной записью (без учётной записи Microsoft).
Локальная учетная запись – классический тип учетной записи в Windows, которая не требует доступа в Интернет. Хэши паролей таких пользователей хранятся локальной в локальной базе данных SAM (Security Accounts Manager).
Если на вашем компьютере доступно интернет подключение, но вы хотите использовать локальную учетную запись Windows 11:
-
- Когда установщик Windows 11 попросит вас указать учетную запись Microsoft, укажите адрес [email protected]. На следующем шаге укажите пароль test;

- Должна появиться ошибка:
Кто-то слишком много раз неправильно ввел пароль для этой учетной записи. Чтобы защитить вас, мы временно заблокировали ее. Повторите попытку позднее.
Oops, something went wrong
Someone has entered an incorrect password for this this account too many times. To help protect you, we’ve temporarily locked your account – please try again later.
- Когда установщик Windows 11 попросит вас указать учетную запись Microsoft, укажите адрес [email protected]. На следующем шаге укажите пароль test;
- Нажмите Next и появится окно, в котором вам будет предложено создать локального пользователя Windows
- Это способ позволяет пропустить этап создания учетной записи Microsoft как в Home, так и в Pro редакциях Windows 11.
Если ваш компьютер находится в изолированном сегменте (без подключения к Интернету), вы можете пропустить окно ввода параметров учетной записи Microsoft и сразу перейти к созданию локального пользователя Windows:
- Если ваш компьютер не подключен к интернету, то мастер первоначальной настройки Windows (Out Of Box Experience, OOBE) не позволит завершить установку Windows 11 22H2 без подключения к сети;

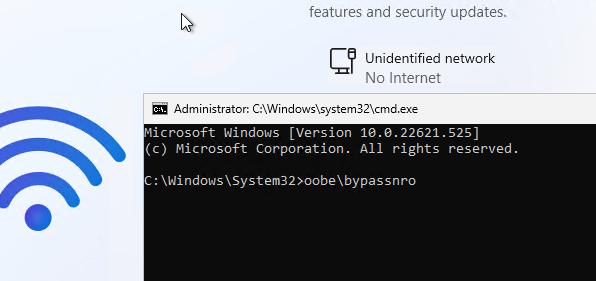
- Чтобы пропустить этот экран, нужно нажать сочетание клавиш Shift+F10, чтобы открыть окно командной строки;
- Выполните команду
oobe\bypassnro
и ваш компьютер автоматически перезагрузиться;
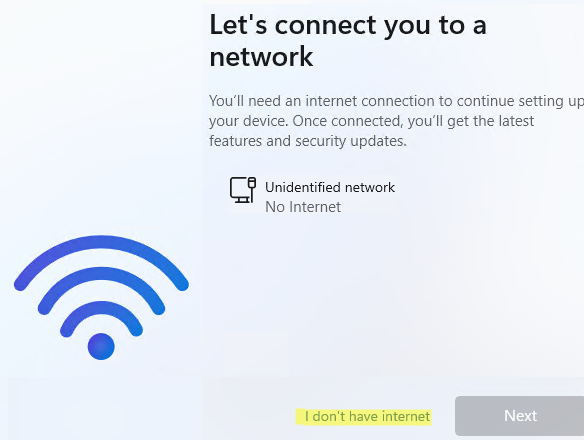
- Теперь в OOBE появится кнопка «I don’t have Internet». Нажмите ее, нажмите “Continue with limited setup” и вы сможете создать локального пользователя Windows.

Если вы создаете установочную USB флешку с Windows 11 с помощью утилиту Rufus, вы можете сразу отметить опцию Remove requirements for an online Microsoft account. В этом случае вы сразу сможете установить Windows 11 с локальной учетной записью.
Также вы можете создать файл ответов autounattend.xml и поместить его в корень установочного носителя Windows 11.
<?xml version="1.0" encoding="utf-8"?>
<unattend xmlns="urn:schemas-microsoft-com:unattend">
<settings pass="specialize">
<component name="Microsoft-Windows-Deployment" processorArchitecture="amd64" language="neutral" xmlns:wcm="http://schemas.microsoft.com/WMIConfig/2002/State" xmlns:xsi="http://www.w3.org/2001/XMLSchema-instance" publicKeyToken="31bf3856ad364e35" versionScope="nonSxS">
<RunSynchronous>
<RunSynchronousCommand wcm:action="add">
<Order>1</Order>
<Path>reg add HKLM\SOFTWARE\Microsoft\Windows\CurrentVersion\OOBE /v BypassNRO /t REG_DWORD /d 1 /f</Path>
</RunSynchronousCommand>
</RunSynchronous>
</component>
</settings>
</unattend>
Установщик применит такой файл ответов и сразу предложит создать локального пользователя Windows.
Windows 11 is an extremely powerful OS, but Microsoft has made it very difficult to set up a Windows 11 local account without forcing a Microsoft login. This frustrates many people, including me, who value privacy and don’t want our activity to be tracked 24/7, so that we aren’t bombarded with targeted ads 24/7.
Although logging in with Microsoft’s account has many benefits, like seamless integration with OneDrive and Microsoft Office 365. However, despite these advantages, people who value privacy prefer to have a local account.
But Microsoft has recently removed the option to bypass the online account requirement. For some time, users were able to make do without the online account requirement, but now Microsoft has started closing all the gaps, and I’m sure you’re finding it hard to find the right information to work around this.
However, no matter how many roadblocks Microsoft might put up, there are still ways to get around them, and that is exactly what I will be helping you with in this step-by-step, beginner-friendly guide.
How to Set Up a Local Account During Windows 11 Installation (3 Easy Methods)
Microsoft may want to make it difficult, but you can still set up your Windows 11 local account setup with a local account. In this section, I’ll walk you through three reliable methods to bypass the online account setup and create a local account instead.
These methods are arranged from easiest to most advanced. If one doesn’t work on your Windows build, try the next.
Method 1: Disconnect from the Internet (Recommended and Easiest)
This is hands down the easiest method to activate the offline setup.
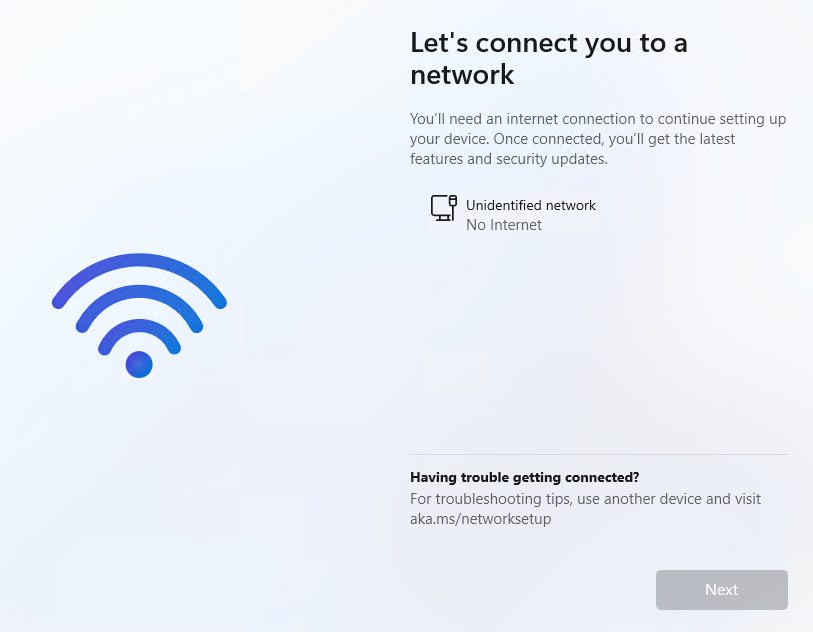
Just start installing Windows 11 like you normally would. When you hit the “Let’s connect you to a network” screen, here’s what to do:
Step 1: If you’re using Wi-Fi, click the Wi-Fi icon and choose «I don’t have internet», or if you’re on Ethernet, just unplug the cable.

Step 2: After skipping the network, you’ll see the option to “Continue with limited setup”. Click it, then click Next.
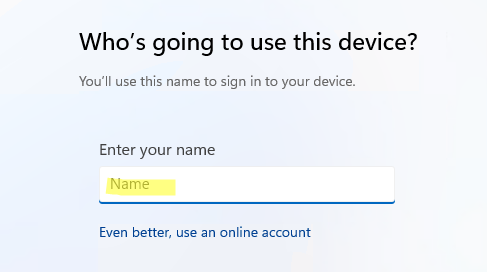
Step 3: Enter the username you’d like to use for your local account, then click Next.

Step 4: If you want to add a password, type it in now and click Next.

Step 5: Choose and answer three security questions. These help you recover your account if you forget your password. Click Next when you’re done.

Step 6: Review your privacy settings. Choose what you’re comfortable with, then click Accept and Next to finish setup.

Tip: This method works best on most versions. Be sure to note your username for future login.
Method 2: Use a Fake Email and Password to Trigger an Error
When you’re at the Microsoft account sign-in screen, just type in a fake email (something like nope@noway.com) and throw in any random password.
Windows will get confused and show you an error. From there, you will be redirected to an offline account setup.
Note: This trick may not work on newer builds of Windows 11, but it’s worth a quick try.
Method 3: Use Command Prompt to Bypass Online Requirement (Advanced)
For the latest version of Windows 11, there’s a simple method of setting up a local account. It works by utilizing the command prompt (cmd). Let’s look at this advanced version.
Step 1: When you’re at the network connection screen or stuck on the Microsoft account sign-in screen, press Shift + F10 on your keyboard. This opens up the Command Prompt window.

Step 2: In the Command Prompt, type the following command exactly: “OOBE\BYPASSNRO”. Then press Enter.

Step 3: Your computer will automatically restart and bring you back to the setup screen.
Step 4: This time, you should see the “I don’t have internet” option. Click it to move forward.
Step 5: Next, select “Continue with limited setup”.

Step 6: From here, go ahead and create your local account by entering a username, password (optional), setting your security questions, and choosing your privacy settings.
Tip: This method gives you the most control over the setup process, especially if other options fail.
Enhance Privacy with Your Windows 11 Local Account
When you log in to your device using your Microsoft account, you are automatically connected to Microsoft OneDrive, which syncs your settings, active history, files, and everything else. While this is convenient, that your data is automatically being stored also means that more of your data is being collected and sent to Microsoft, which can later use this data to send targeted ads based on your Microsoft profile.
A windows 11 local account prevents all this; it doesn’t allow any of your activity to be tracked, but this also means that you will have to backup everything important manually, configure settings on new devices from scratch, and enter passwords manually. However, if you are someone who prefers privacy, then this should be perfect for you.
This part will cover everything about how you can maximize your privacy and make your local account as secure as possible.
1. Minimize Telemetry:
Step 1: Turn off tailored experiences and delete diagnostic data. In the “Diagnostics & feedback” settings, toggle off “Tailored experiences” and click “Delete” under “Delete diagnostic data” to enhance privacy.

Step 2: Next, scroll down to Diagnostics & Feedback. Here, turn off “Send optional diagnostic data”. This limits how much info your device shares with Microsoft about how you use your PC.

Tip: Review privacy settings after major Windows updates for new options
2. Skip Cloud Services:
Step 1: During setup, if Windows asks you to sign in or set up OneDrive, just skip it. If it’s already installed and you’re not using it, open Settings, go to Apps, then Installed Apps.

Step 2: Find OneDrive or search for it and uninstall it.

Step 3: For backing up files, stick with local options. Use your PC’s internal storage or plug in an external drive. This way, your files stay with you and don’t get synced to the cloud automatically.
Tip: Local accounts don’t sync settings across devices, so document preferences manually.
3. Secure Your Local Account:
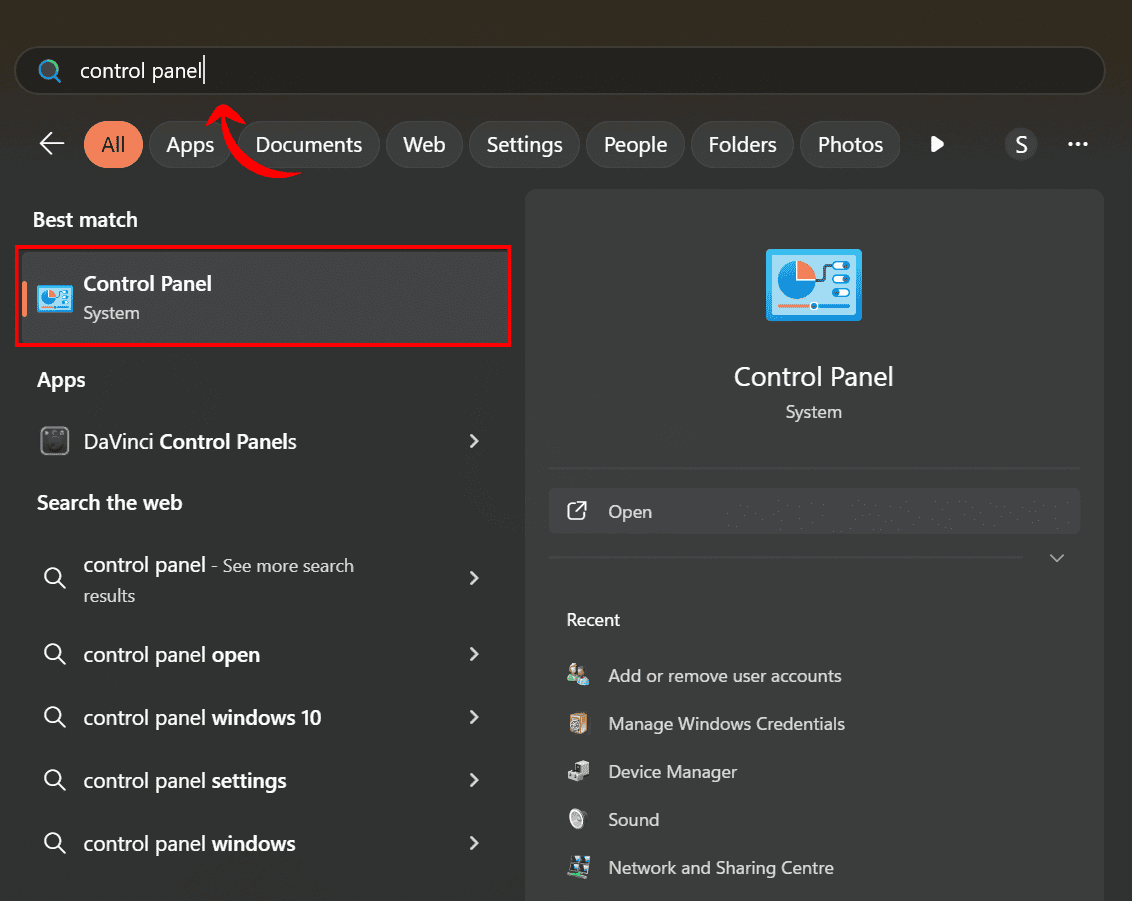
Step 1: Start by searching for “Control Panel” from the Start menu and click on it to open.
Step 2: Inside the Control Panel, go to “User Accounts” to manage your login options and account settings.

Step 3: Now, head to “Credential Manager” if you want to manage saved passwords. While you’re here, it’s a good idea to set a strong password for security.

Step 4: Set a strong password for your security in the credential manager.

Even if you’re using a local account, it’s important to keep Windows updated to stay protected from security threats. Here’s how you can do it:
Step 1: Click on the Start menu in the bottom-left corner of your screen, then select the gear icon to open up Settings.

Step 2: On the left-hand side, search and select “Windows Update settings”. This is where you’ll be able to check if your system needs any updates.

Step 3: Click on “Check for updates”. If there are any available, Windows will begin downloading and installing them automatically.

Tip: Consider a password manager for complex credentials if used.
Note: While using a local account significantly reduces data sharing and background tracking, it doesn’t completely eliminate telemetry. Some system-level data may still be collected by Windows for diagnostics and performance improvements.
Boost Productivity with WPS Office After Setting Up Your Local Account
Now that you’ve taken back control of your system by setting up a Windows 11 local account, you’re already on track for a more private life. So why not carry that same mindset into the tools you use every day?

The next step is choosing software without unnecessary complexity and expensive subscriptions. Now, although MS Office is a powerful tool, it comes with a pricey subscription and isn’t always installed on your device, which means you need to buy a license before even using it.
WPS Office is an all-in-one alternative that includes everything you need: Writer, Spreadsheets, Presentation, and a built-in PDF Editor, and it’s available for free. Most features come at no cost, making it a smart choice for users who want immediate access to essential tools without the financial burden of a Microsoft Office subscription.
1. Works with Microsoft Office Files
You won’t run into trouble opening documents created in Microsoft Word, Excel, or PowerPoint. WPS supports those file formats out of the box, so you can view and edit them without needing to convert anything or worry about compatibility issues.
2. Light on System Resources
WPS Office installs quickly and runs well, even on older or lower-powered machines. If you’ve recently upgraded from an older version of Windows, or you’re working with limited hardware, it can be a good match.
3. AI-integrated Software
One of the most notable advantages WPS Office has over Microsoft Office is its smooth integration of AI features. Whether you’re creating a presentation or translating a document, WPS can complete the task quickly. Its AI tools help with formatting, editing, and generating content, making your workflow more efficient and reducing repetitive or time-consuming work.
FAQs
Q1: Is Windows 11 forcing me to add a Microsoft account?
Yes, especially on the Home edition. Microsoft pushes online accounts during setup, but with certain steps, like disconnecting from the internet, you can still create a local account.
Q2: How to set up Windows 11 without the internet?
Disconnect from Wi-Fi or unplug Ethernet during setup. This triggers the option for an offline account. You can then proceed with a local account setup.
Q3: Will a local account receive Windows 11 updates?
Yes, local accounts still get system and security updates. As long as Windows Update is enabled, your PC stays up to date regardless of the account type.
Build a Smarter, Simpler Windows Experience
Setting up a local account in Windows 11 is simpler than it seems, and it gives you more control over your system with fewer cloud ties. You can bypass Microsoft account Windows 11 requirements using some of the methods we covered. Once that’s done, the next step is finding tools that match that clean and efficient setup.
WPS Office is a practical choice for everyday productivity. It includes all the essentials like word processing, spreadsheets, presentations, and PDFs without the need for a subscription. It is lightweight, easy to use, and even includes helpful AI features for tasks such as formatting and document editing which can make routine work faster without getting in your way.
Quick Links
Summary
- To create a local user account, head into Settings > Accounts > Other Users, click «Add Account,» choose «I Don’t Have This Person’s Sign-In Information,» select «Add a User Without a Microsoft Account,» and enter the account details.
- Make an account from Command Prompt by running the «net user NewUser NewPassword /add» command.
- You can turn the account into an admin account using all these methods.
Creating a local user account on Windows 11 is as easy as clicking a few options in Settings or running a command. I’ll show you multiple ways to add standard or admin users to your computer.
Using Settings
The easiest graphical way to make a local user account in Windows 11 is by using the Settings app. You can choose whether you want to make an admin account or a standard account with this method.
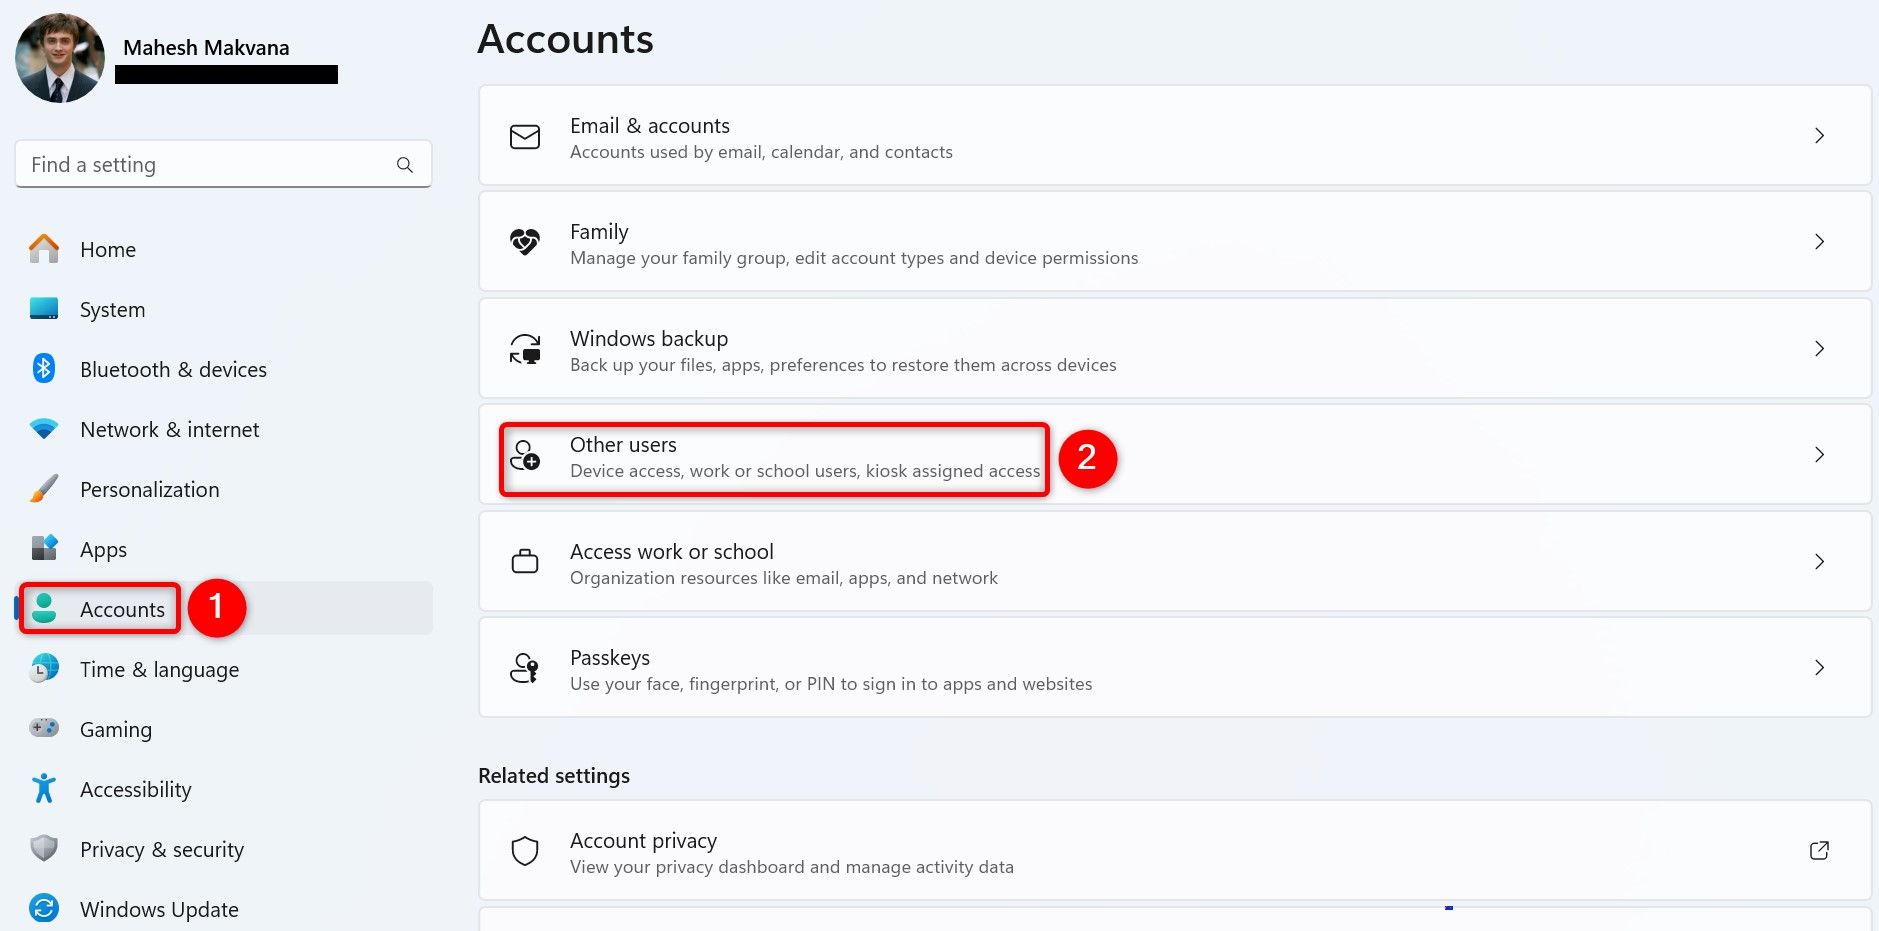
Start by launching Settings using Windows+i. From the left sidebar, select «Accounts.» On the right pane, scroll down and choose «Other Users.»
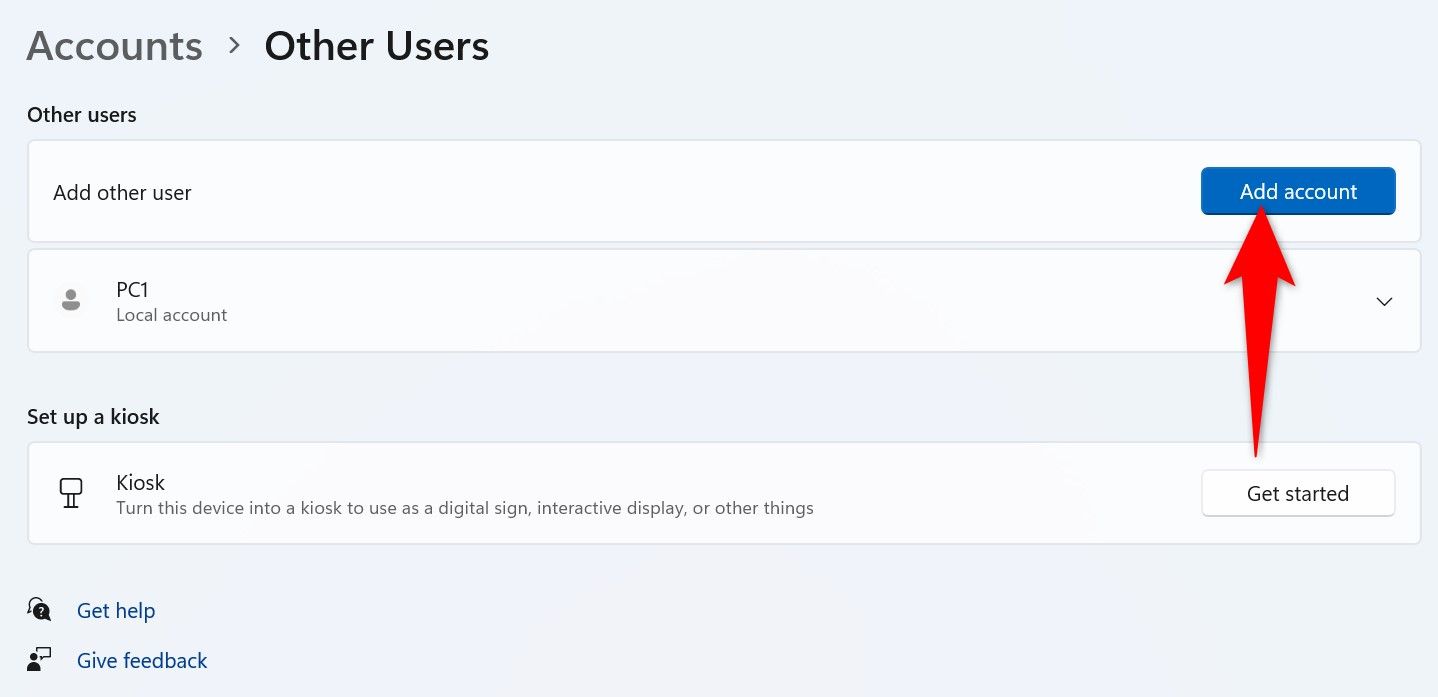
On the following page, next to Add Other User, click «Add Account.»
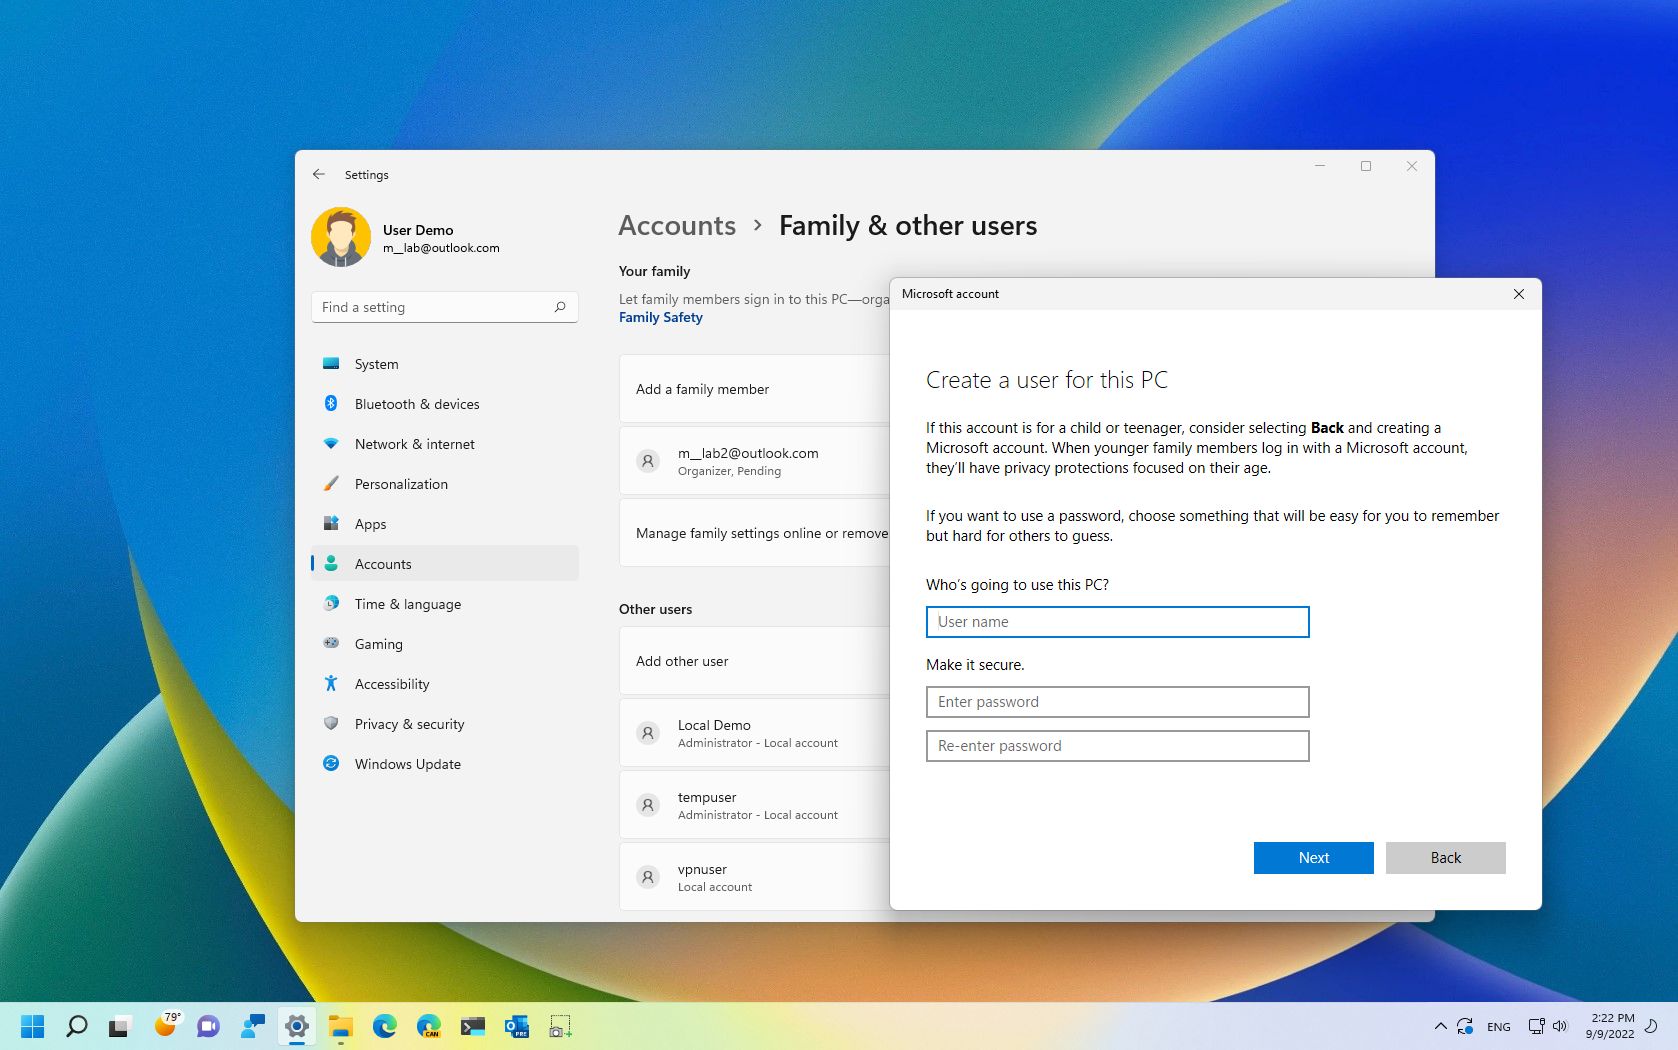
You’ll see a Microsoft Account window. Since you want to create a local account, on the open window, click «I Don’t Have This Person’s Sign-In Information.» Then, on the following page, choose «Add a User Without a Microsoft Account.»
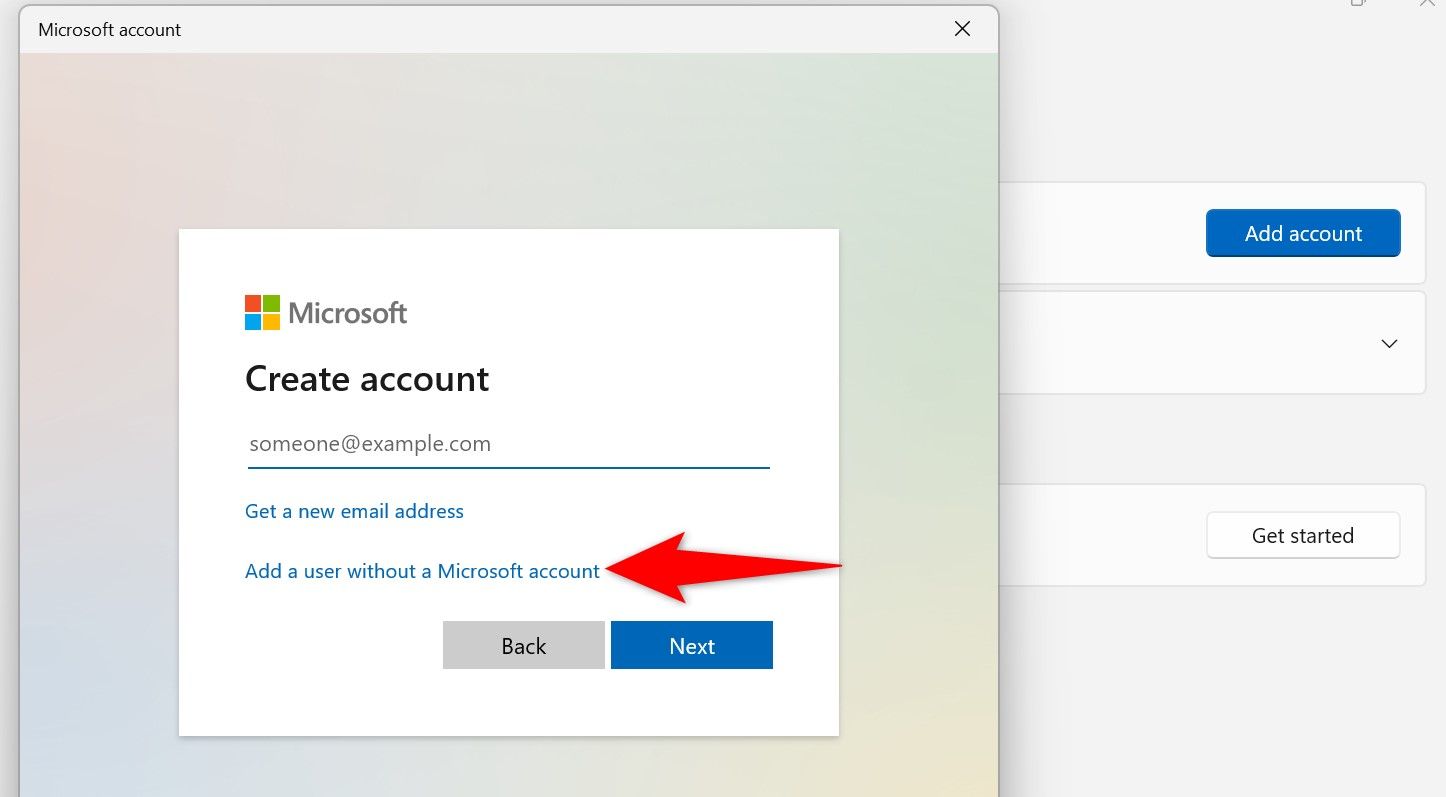
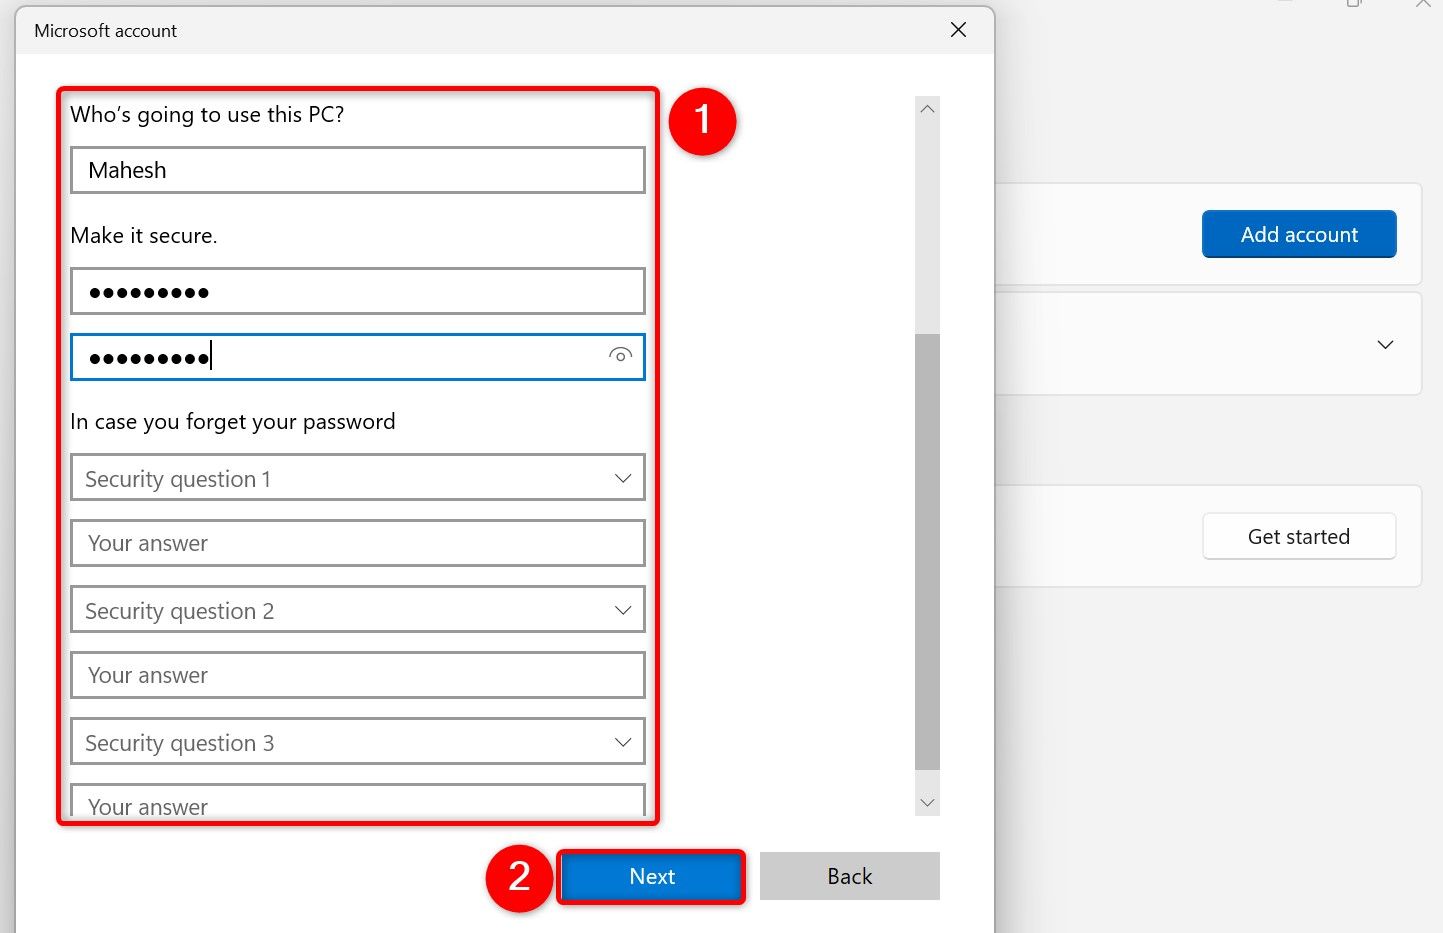
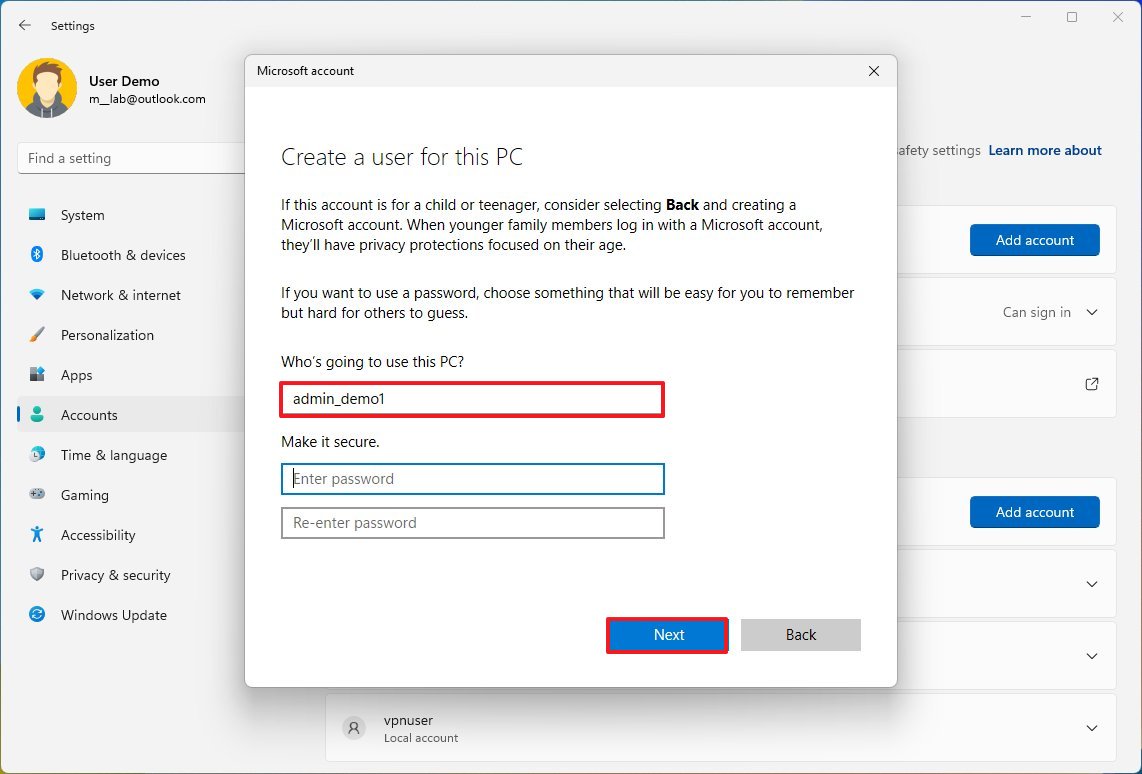
Click the «Who’s Going to Use This PC?» field and type the username for the new account. In the «Make It Secure» section, select the first field and type the password for the new account. Click the second field and re-type the same password. In the «In Case You Forget Your Password» section, select the security questions and provide their answers. These questions will help you reset your password when you’ve forgotten it.
Then, choose «Next.»
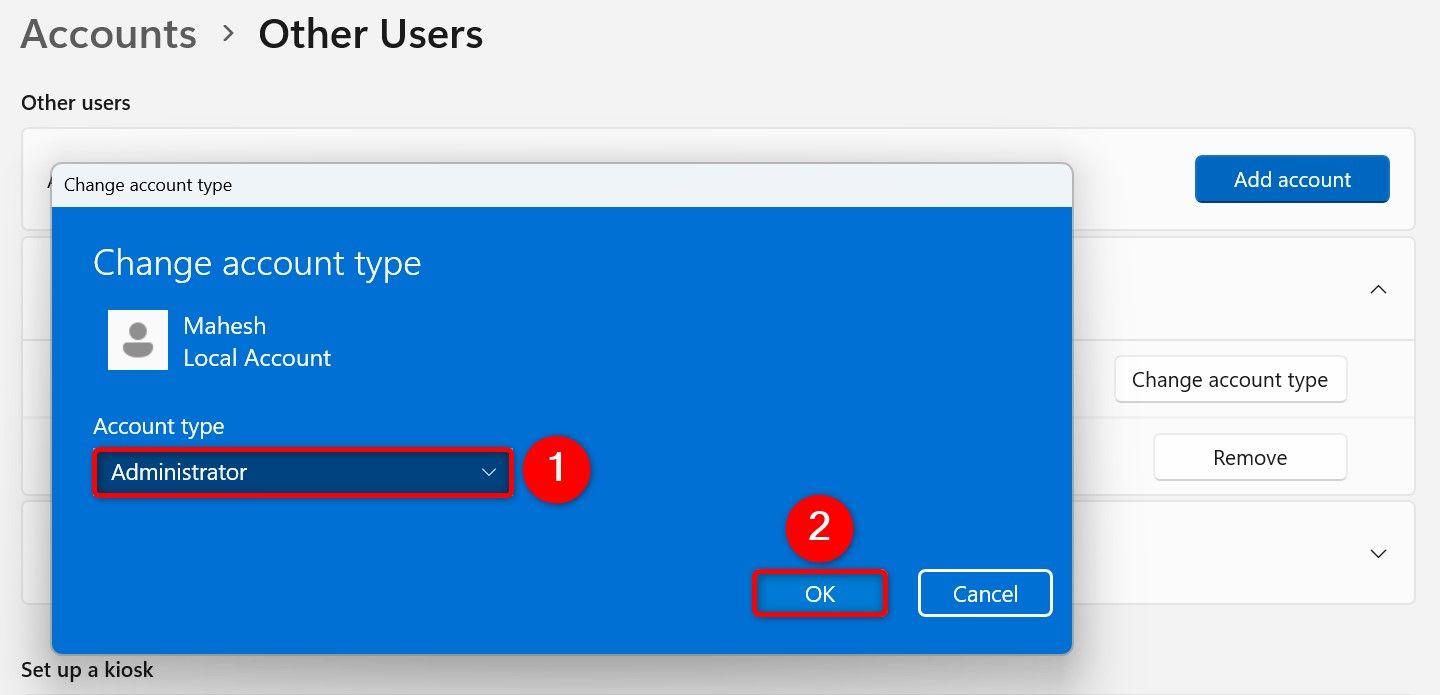
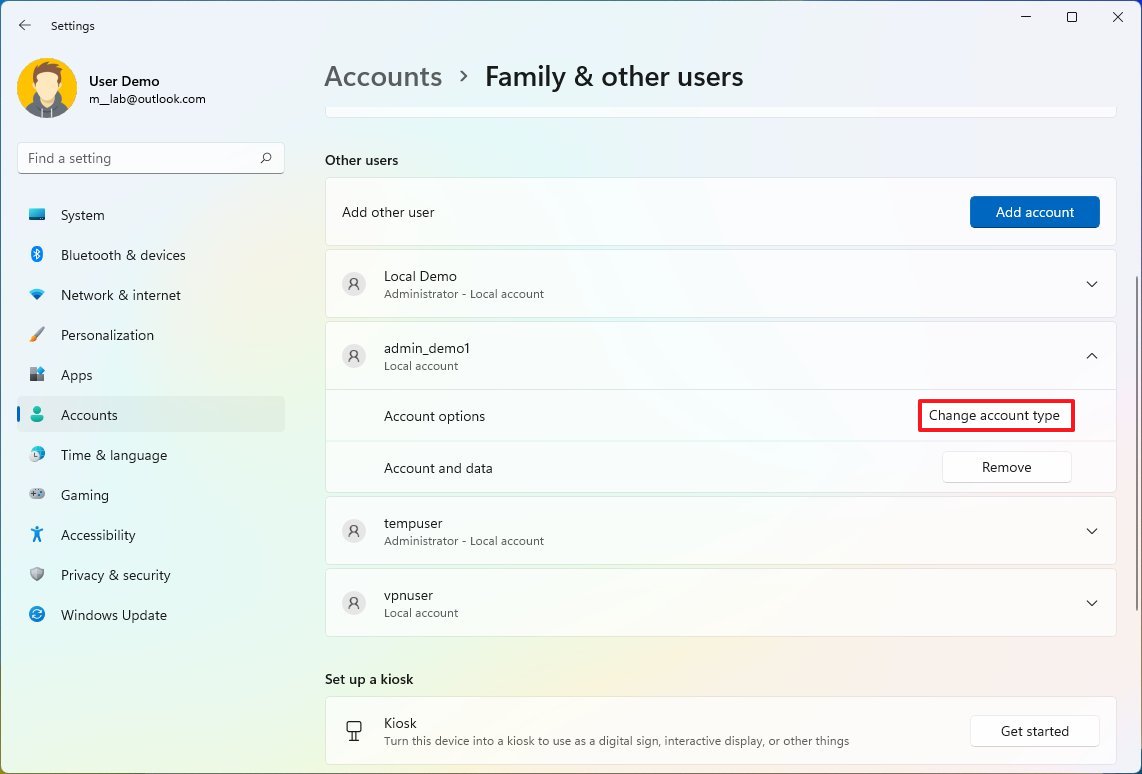
Settings has created the account, and you’ll see it on your screen. It’s a standard account, but you can turn it into an admin account. To do that, select the account, choose «Change Account Type,» click the «Account Type» drop-down menu, select «Administrator,» and click «OK.»
That’s it. You can now log out of your current user account and log in to the newly created account.
From Command Prompt
To add a local user account using the command line, open Windows Search (by pressing Windows+S), type Command Prompt, and select «Run as Administrator.» In the User Account Control prompt, select «Yes.»
On the Command Prompt window, type the following command. Replace NewUser with the username for the new account and NewPassword with the password to use for the new account. Then, press Enter.
net user NewUser NewPassword /add

The above command will create a standard user account. To turn the account into an admin one, run the following command. Here, replace NewUser with the username of the account you created.
net localgroup Administrators NewUser /add
This command adds the specified user to the Administrators group, which makes the account an admin account.
Using PowerShell
PowerShell is another command-line method to create local accounts on Windows 11. To use it, open Windows Search, type PowerShell, and select «Run as Administrator.» In the User Account Control prompt, choose «Yes.»
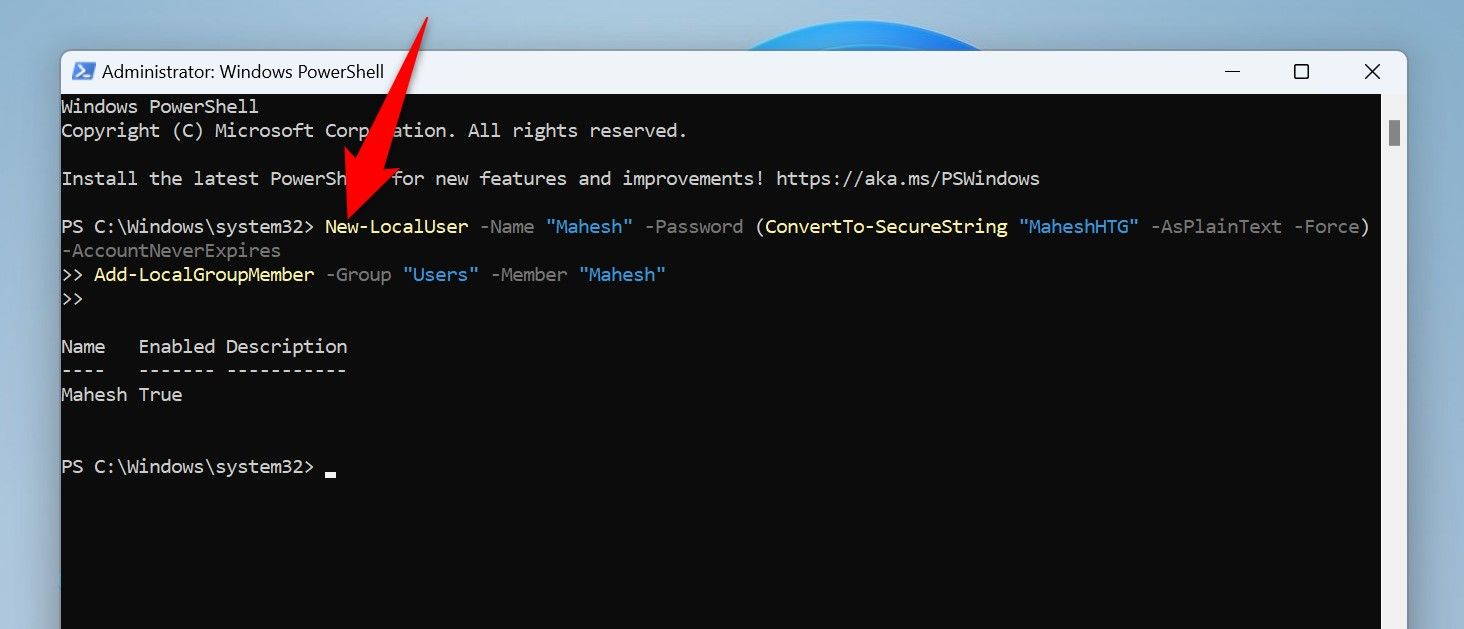
In PowerShell, type the following command (called a cmdlet). Replace NewUser with the username you want for the new account and NewPassword with the password you want to use. Then, press Enter.
        New-LocalUser -Name "NewUser" -Password (ConvertTo-SecureString "NewPassword" -AsPlainText -Force) -AccountNeverExpires
Add-LocalGroupMember -Group "Users" -Member "NewUser"
The above cmdlet has created a standard account. To make the account an admin one, use the following command. Replace NewUser with the username of the account you created above.
Add-LocalGroupMember -Group "Administrators" -Member "NewUser"
You’re done.
From Computer Management
Computer Management is a built-in graphical utility that you can use to list user accounts, manage accounts, and even add new accounts. Note that you can only use this utility to add accounts on Windows 11’s Pro edition; you won’t see the option to add accounts if you’re running the Home edition.
To use it, launch Windows Search, type Computer Management, and launch the tool. From the left sidebar, select System Tools > Local Users and Groups > Users. On the right pane, right-click anywhere blank and choose «New User.»

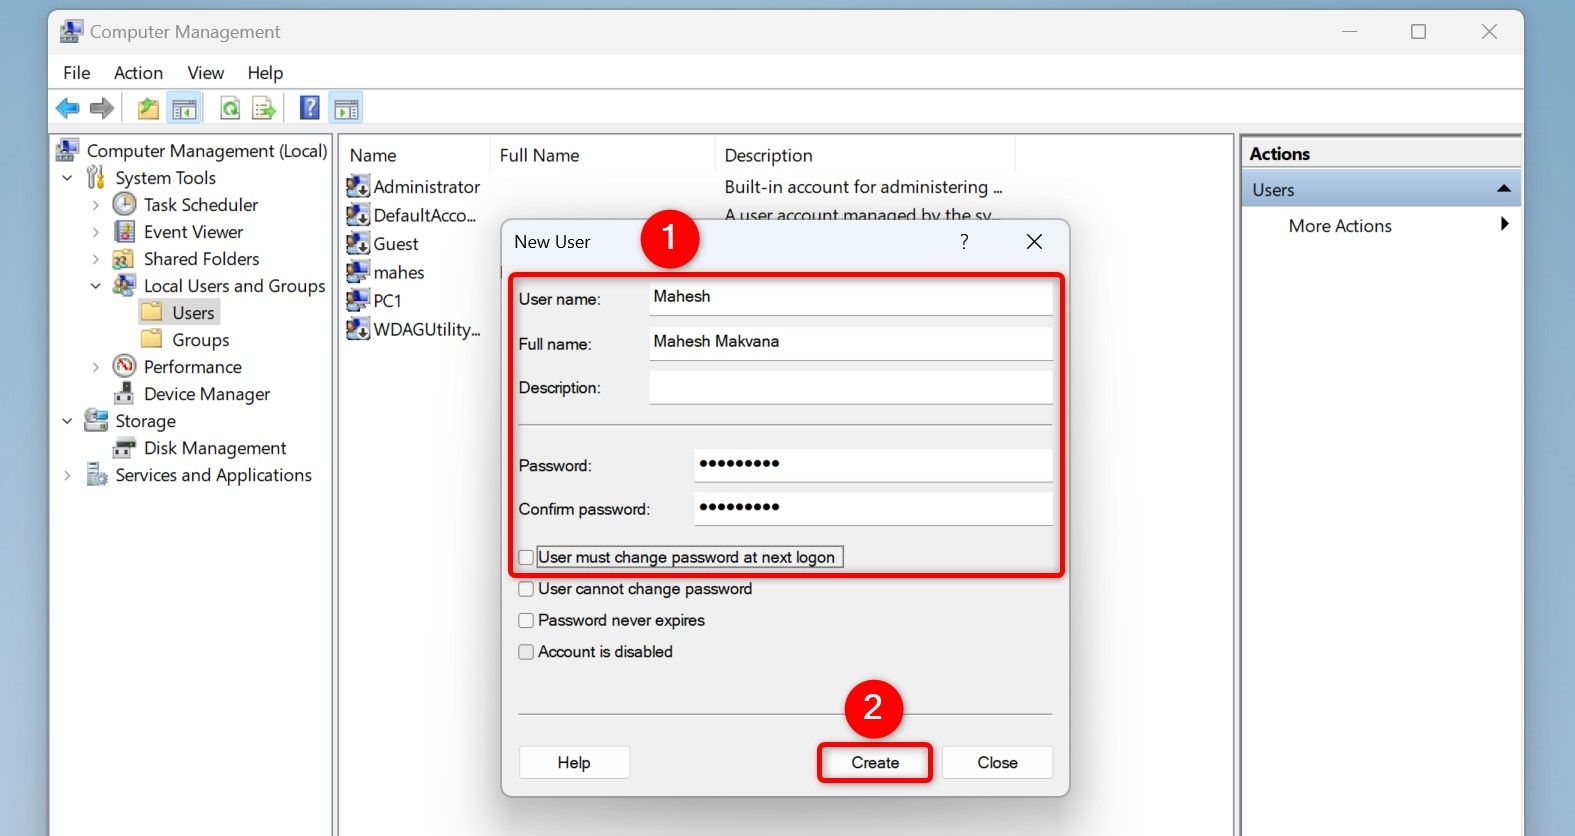
On the New User window, click the «User Name» field and type the username for the new account you want to create. Optionally, fill in the details in the «Full Name» and the «Description» fields. Click the «Password» field and type a password for the account. Select the «Confirm Password» field and re-type the password. Turn off the «User Must Change Password at Next Logon» option, and click «Create.»
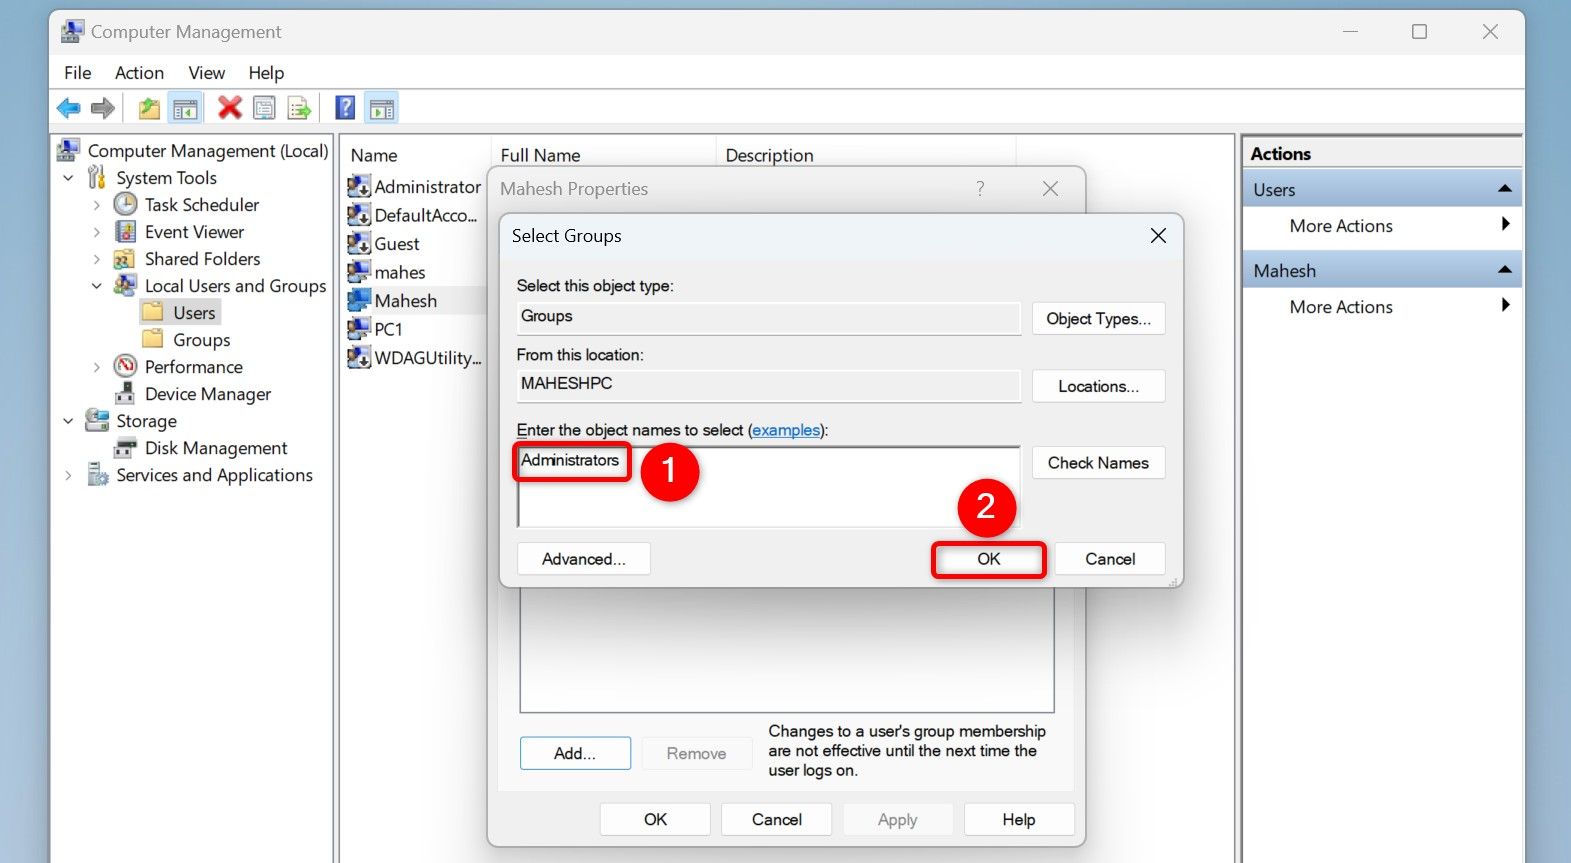
The account is now created. To make it an admin account, right-click the account and choose «Properties.» Access the «Member Of» tab, click «Add,» select the «Enter the Object Names to Select» field, type Administrators, and choose «OK.» Then, select «Apply» followed by «OK.»
You’re all set.
Using Netplwiz
Netplwiz is a handy utility to view all user accounts on your PC. You can use this utility to create accounts as well. To do that, open Run by pressing Windows+R, type the following in the open box, and select «OK» or press Enter.
netplwiz
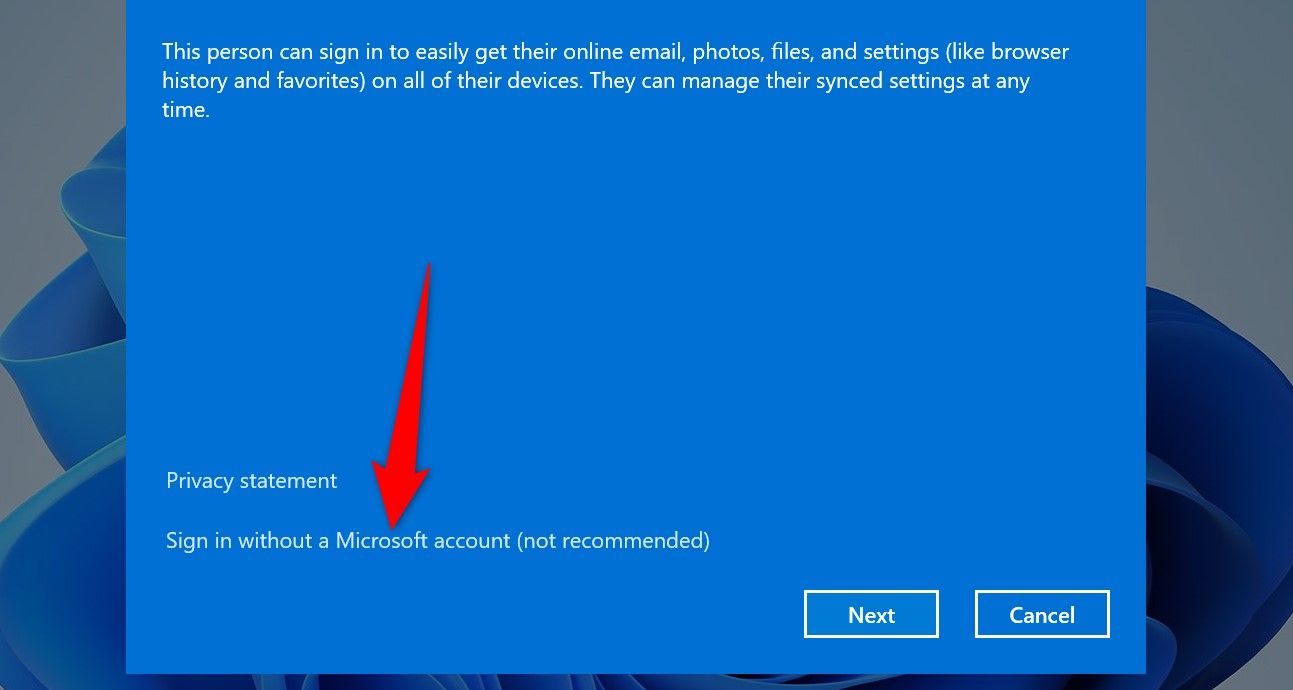
On the User Accounts window that opens, choose «Add.» Then, select «Sign In Without a Microsoft Account (Not Recommended).»
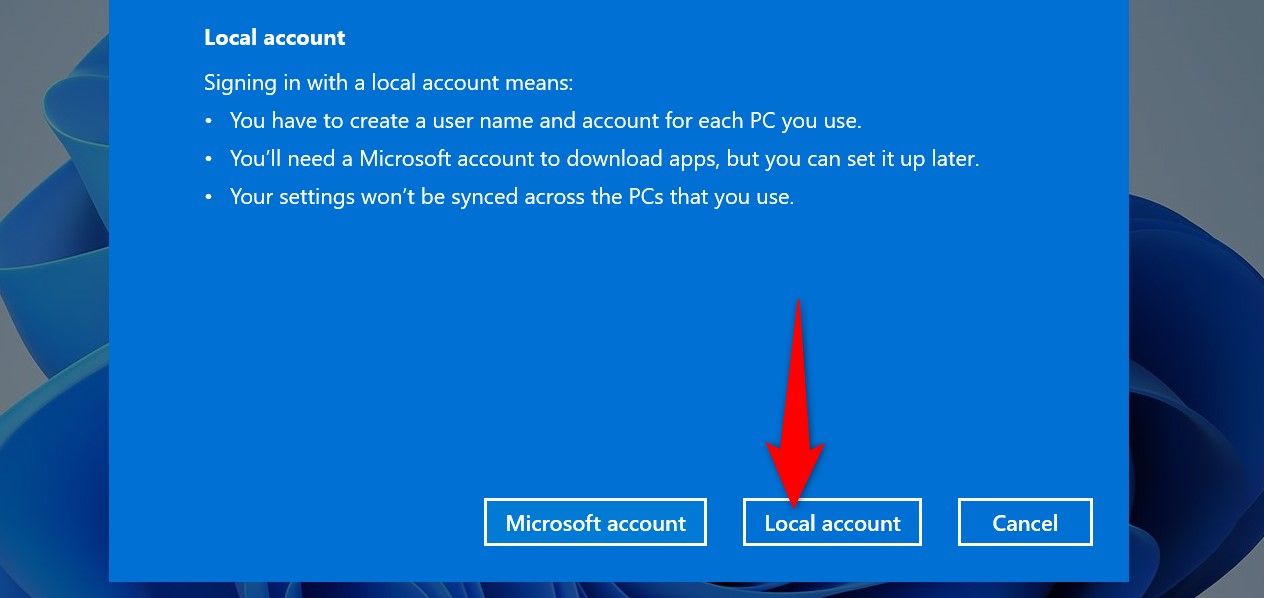
Select «Local Account» since you want to add a new local user account.
Select the «User Name» field and type a username for the account. Choose the «Password» field and type a password for the account. Click the «Confirm Password» field and re-type the password. Select the «Password Hint» field and type a hint that helps you recall your password.
Then, select «Next» and choose «Finish» on the following screen to finish creating the account.
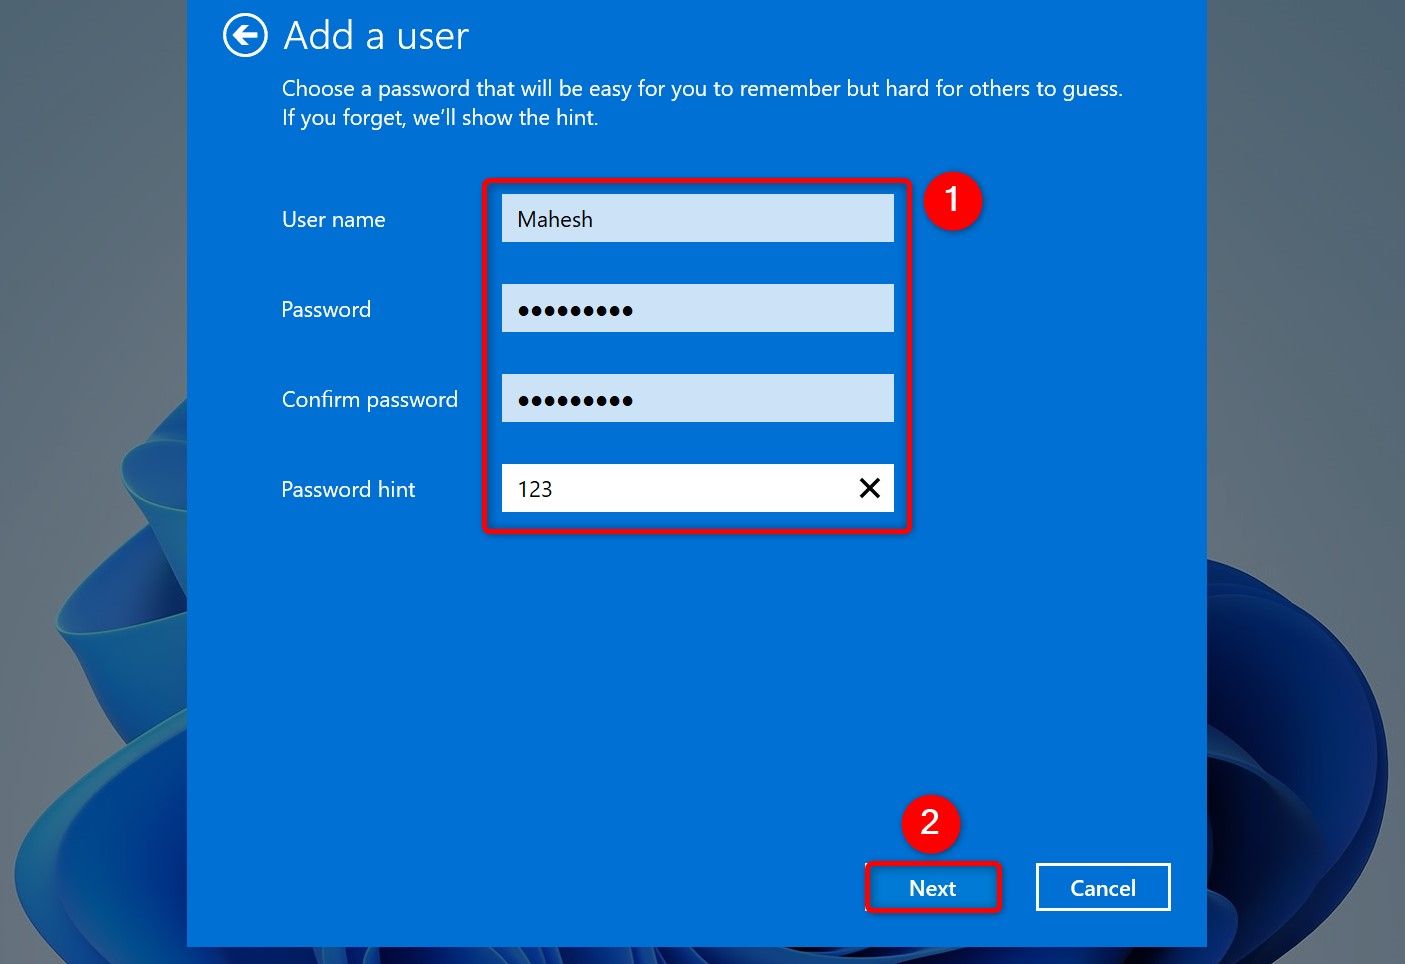
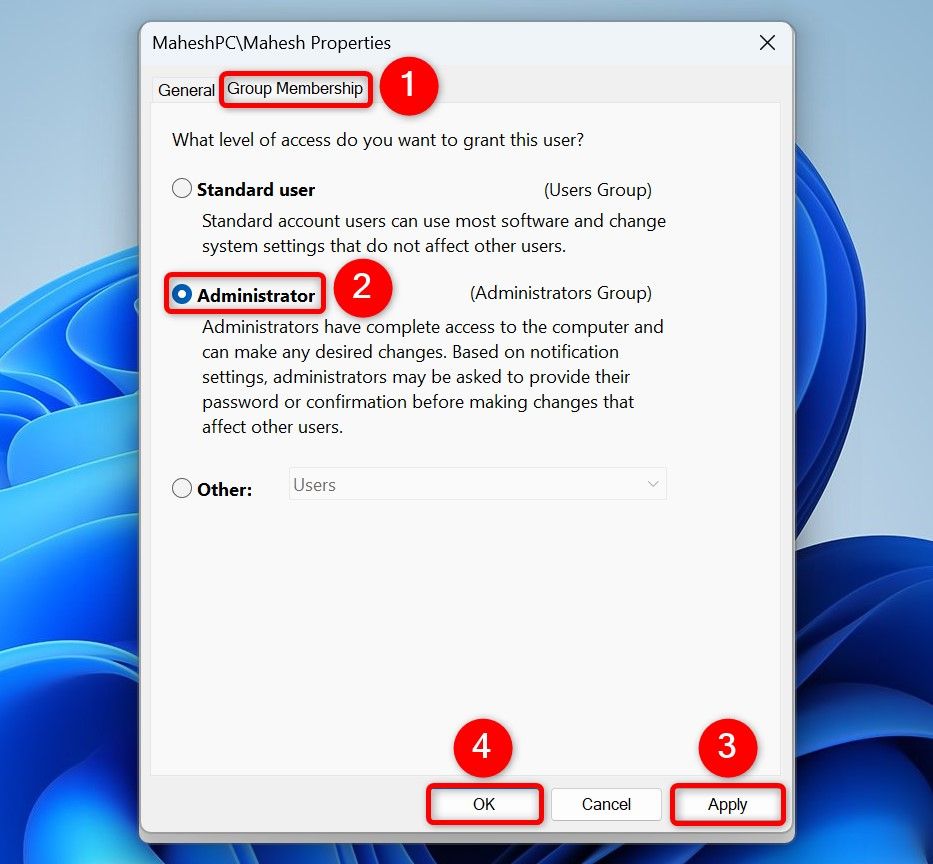
If you want to turn the account into an admin account, select the account on the list, choose «Properties,» access the «Group Membership» tab, select «Administrator,» and choose «Apply» followed by «OK.»
You’re all done.
And that’s how you make local user accounts to allow other people to use your computer. These other users can tweak their account settings, change their personalization options, and so on, without affecting your account. Happy using your computer!
(Image credit: Future)
On Windows 11, no matter how careful you may be, at some point, you will run across problems. You may come across errors while downloading or applying system updates. You may unexpectedly lose access to apps, and features like the Start menu, File Explorer, Windows Search, and others may stop working.
Although you may be able to find troubleshooting steps for each unique situation, you can also use a local account to determine if the problem is related to something is happening on your current account as part of the process. If the issue happens to be because of corruption or something going wrong in the account, moving your files and settings to a new account may resolve the problem quickly.
This guide will walk you through the steps to create a local account to troubleshoot and resolve issues on your computer.
How to create a local account on Windows 11
On Windows 11, you can still create a local account without needing a Microsoft account (also called an offline account), which you can use to determine whether the problem is related to the account.
To create a local account (from the old account) on Windows 11, use these steps:
- Open Settings.
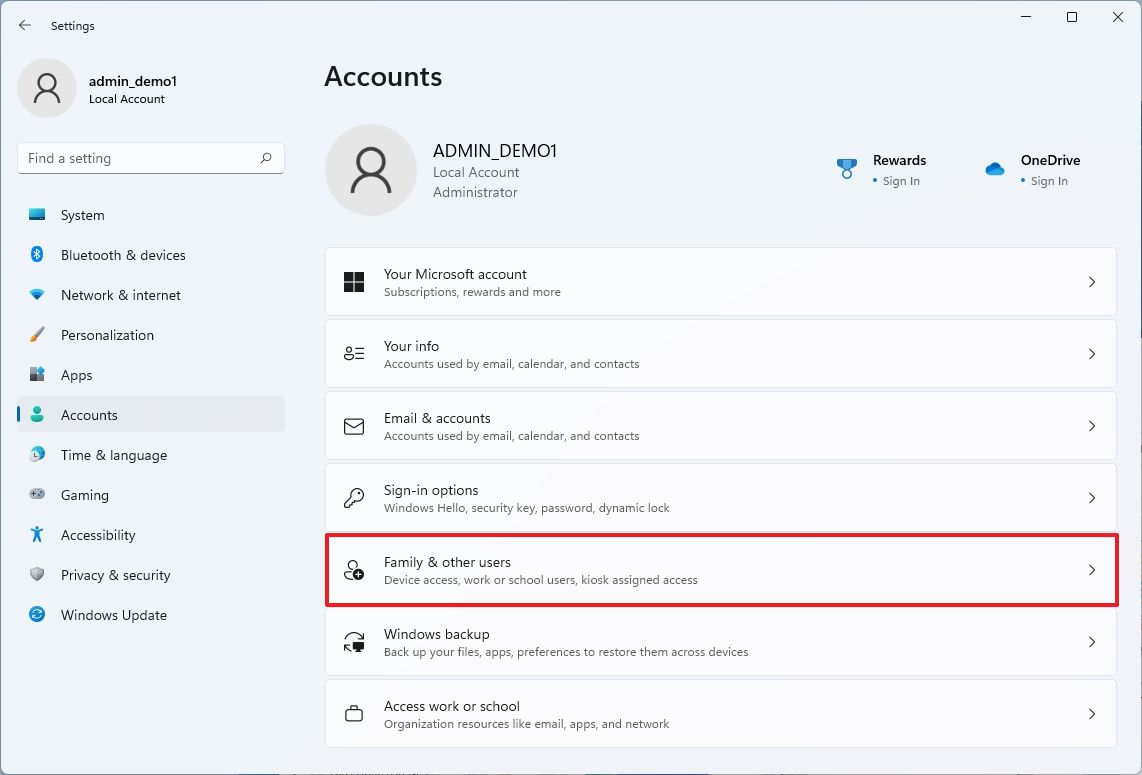
- Click on Accounts.
- Click the Family & other users page on the right side.
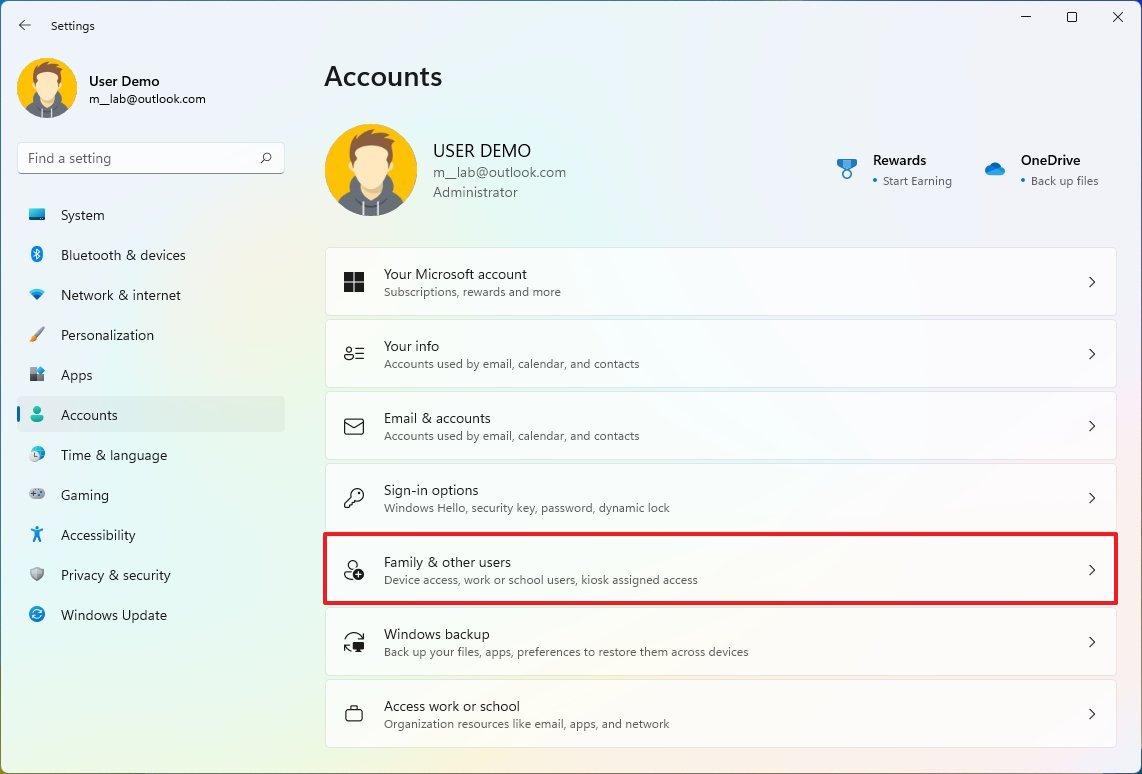
- Under the «Other users» section, click the Add account button for the «Add other user» setting.

- Click the «I don’t have this person’s sign-in information» option.
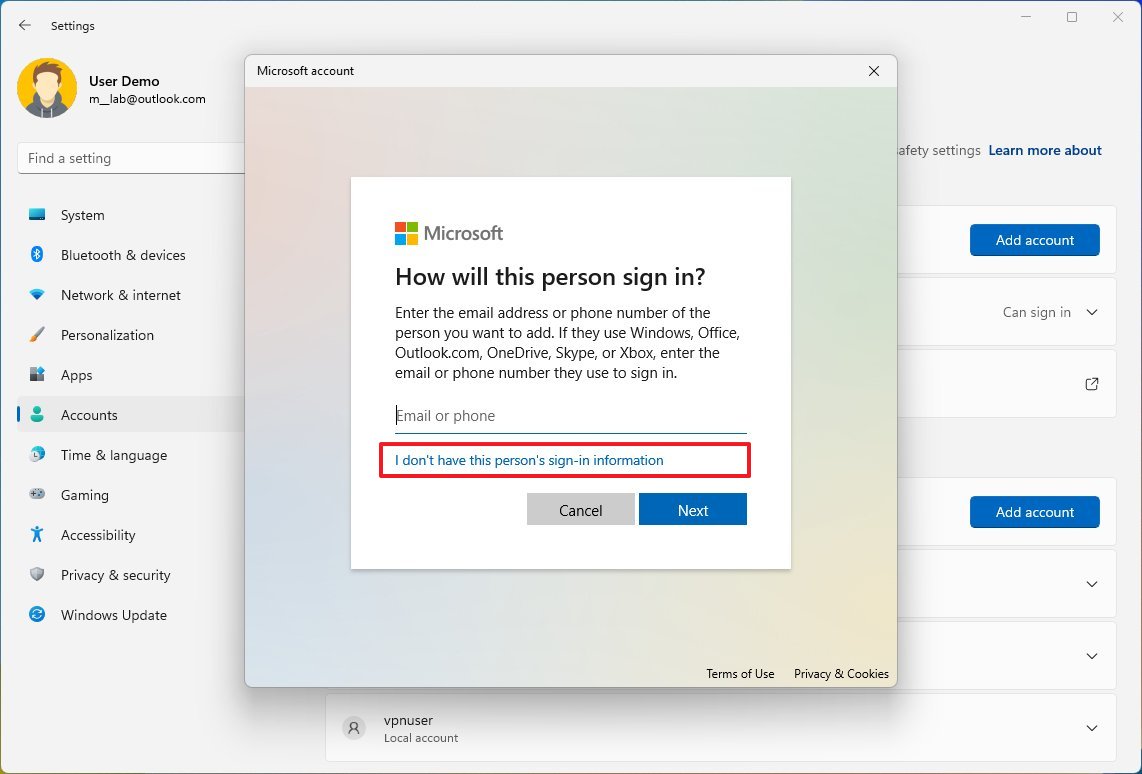
- Click the «Add a user without a Microsoft account» option.

- Confirm the username.
- Skip the password creation.
- Click the Next button.
- Under the «Other users» section, select the new account.
- Click the «Change account type» button.
- Use the «Account type» drop-down menu and select the Administrator option.
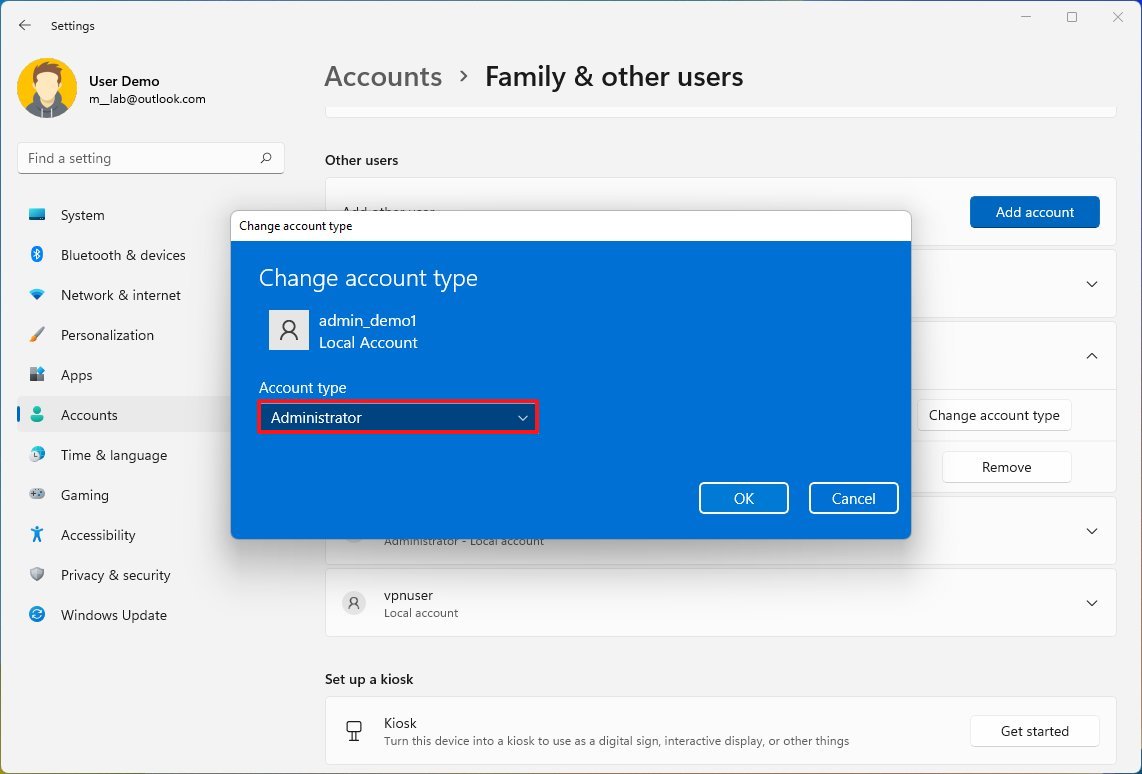
- Click the OK button.
- Restart the computer.
Once you complete the steps, you can continue with the new account to confirm if the old account has problems.
How to use a local account to diagnose problems on Windows 11
To find out if your current profile is broken, use these steps:
All the latest news, reviews, and guides for Windows and Xbox diehards.
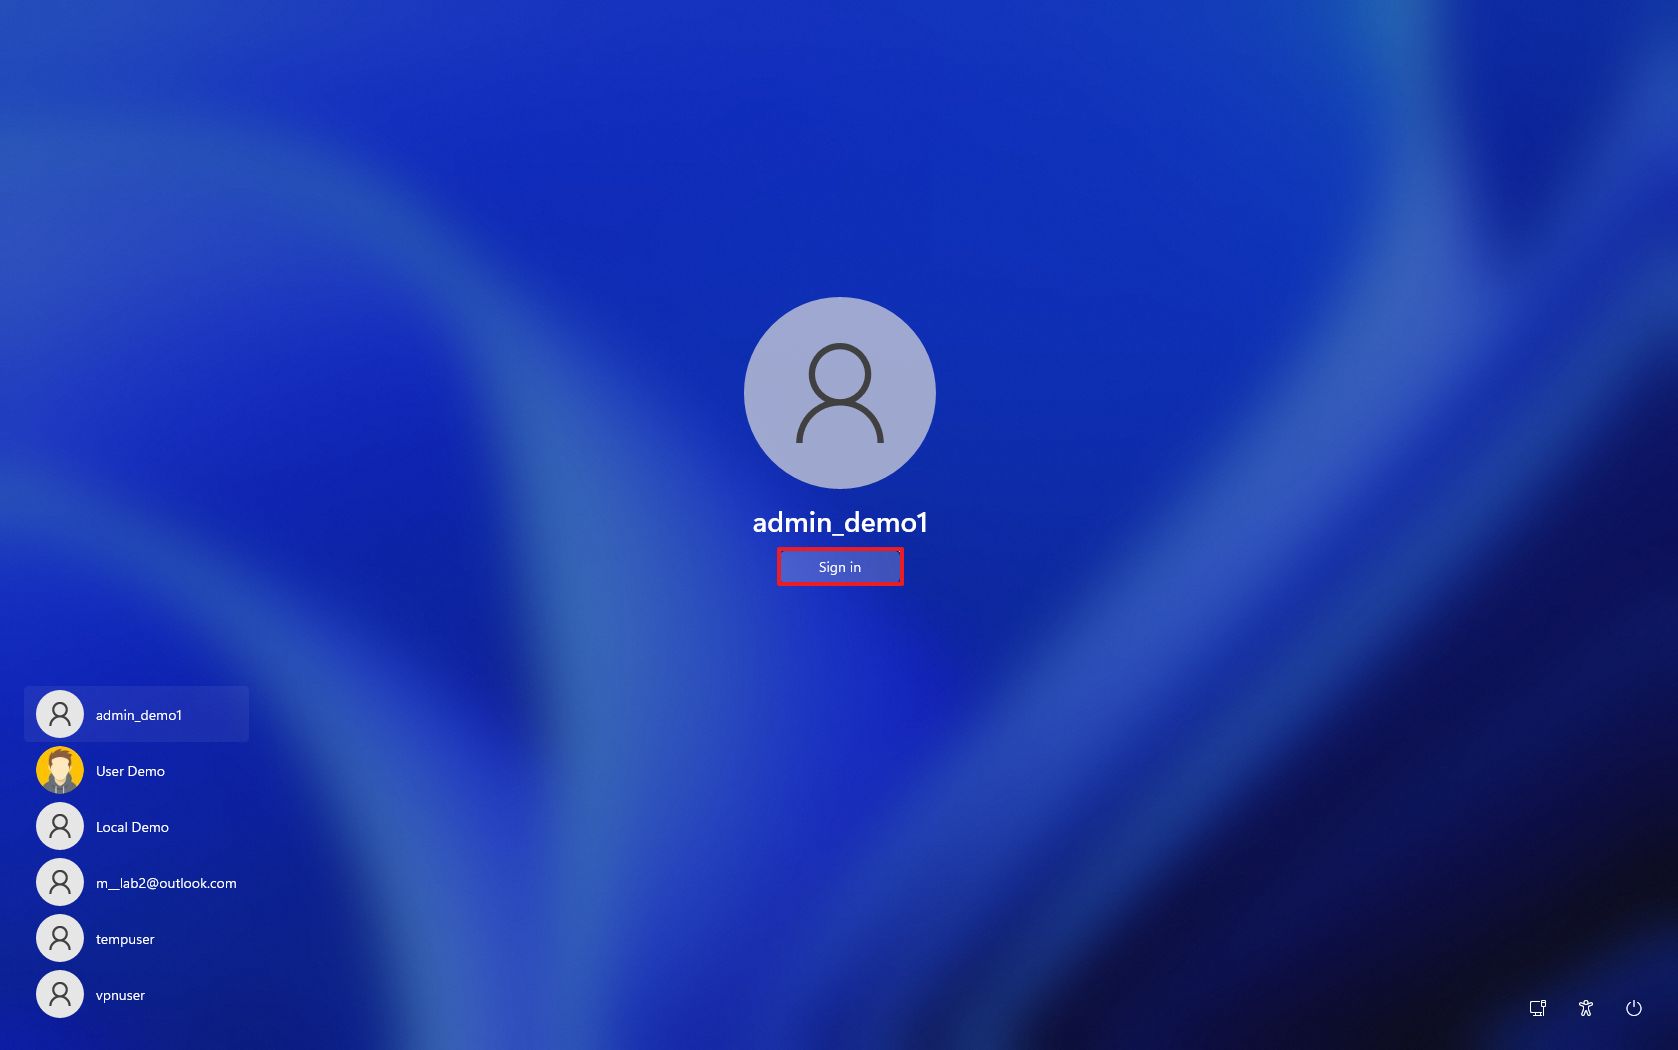
- Select the new administrator account from the Lock screen.
- Click the Sign-in button.
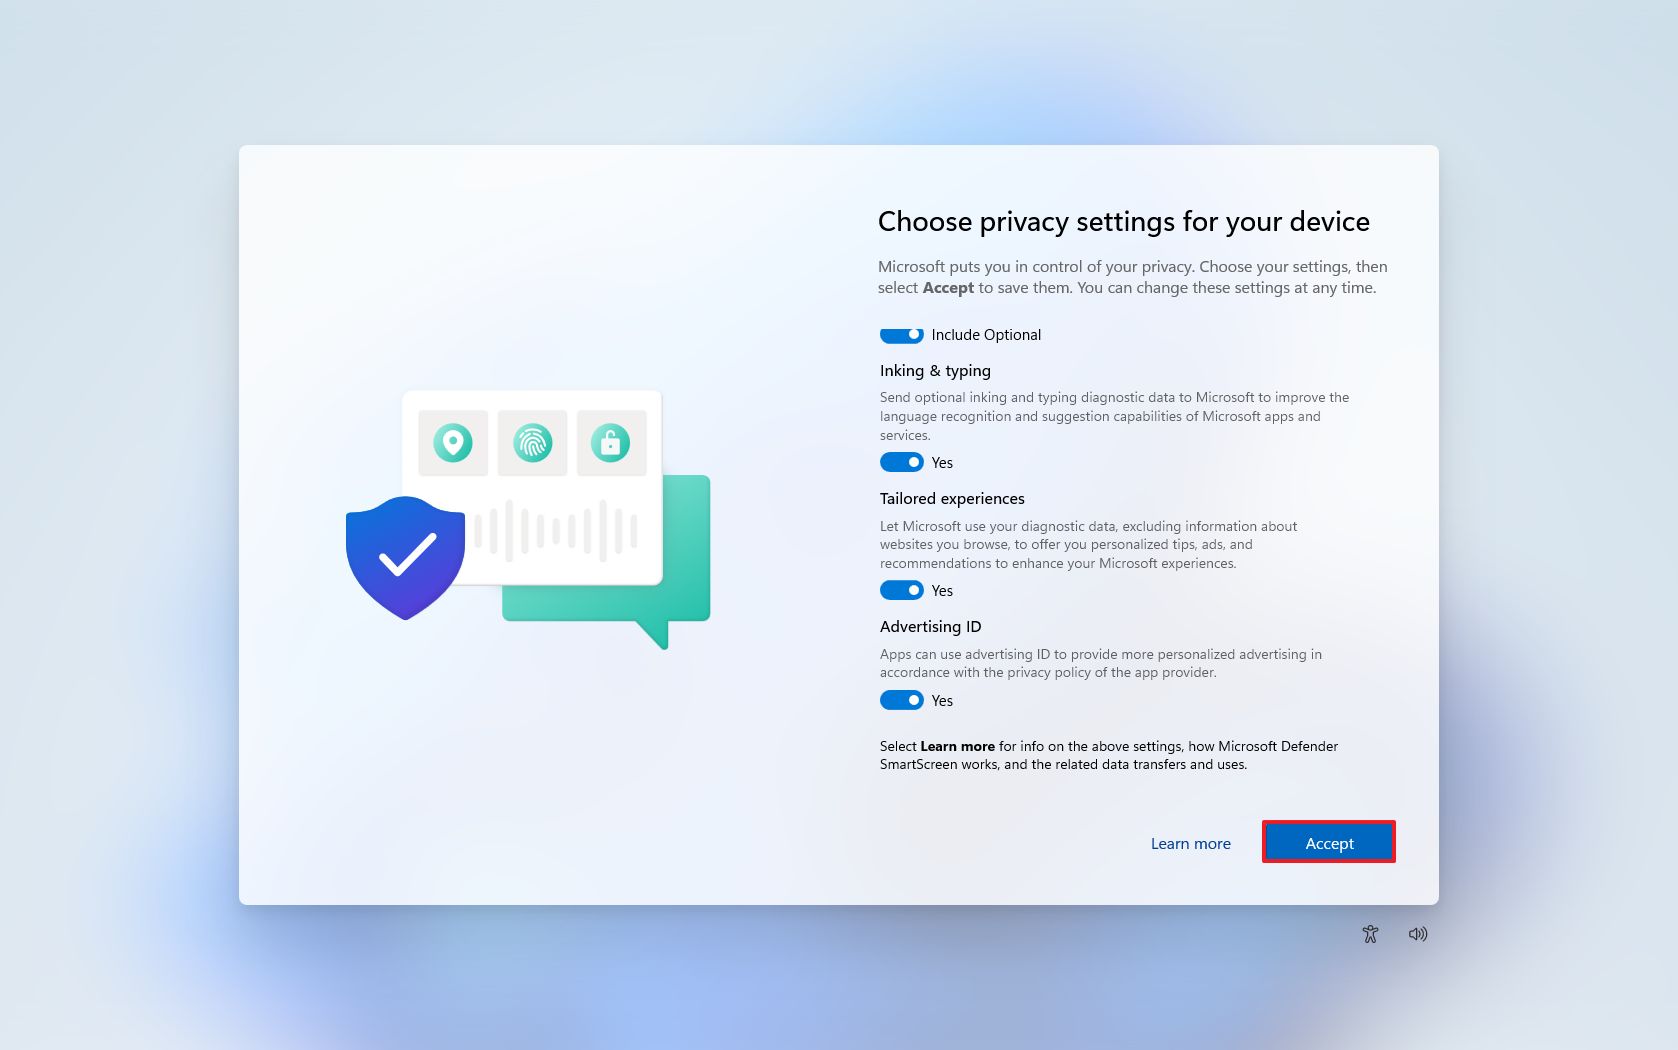
- Choose your privacy settings.
- Click the Accept button.
- Confirm if the problem is still happening.
Once you complete the steps, try and recreate the problem. For example, perform the exact action causing trouble in the other account. If this was an application, try running it to see if the problem appears again. If the problem was a black screen, try using the new account for some time to see if the problem re-occurs.
If the problem is no longer present in the new account, then the issue is likely related to a misconfiguration or something that broke in your previous profile.
If this is the case, you now know that it’s not a bug on the system, and you can continue with other troubleshooting steps.
If the same problem persists, it could be something happening on the installation, a device driver, or an app. If you didn’t find a solution, the best action would be to start fresh with a clean installation of Windows 11.
How to transfer to a new account to fix issues on Windows 11
You should consider transferring your files and switching accounts if you don’t see a problem using the new account.
Transfer files to the new account
To transfer your files to the new Windows 11 account, from the new account, use these steps:
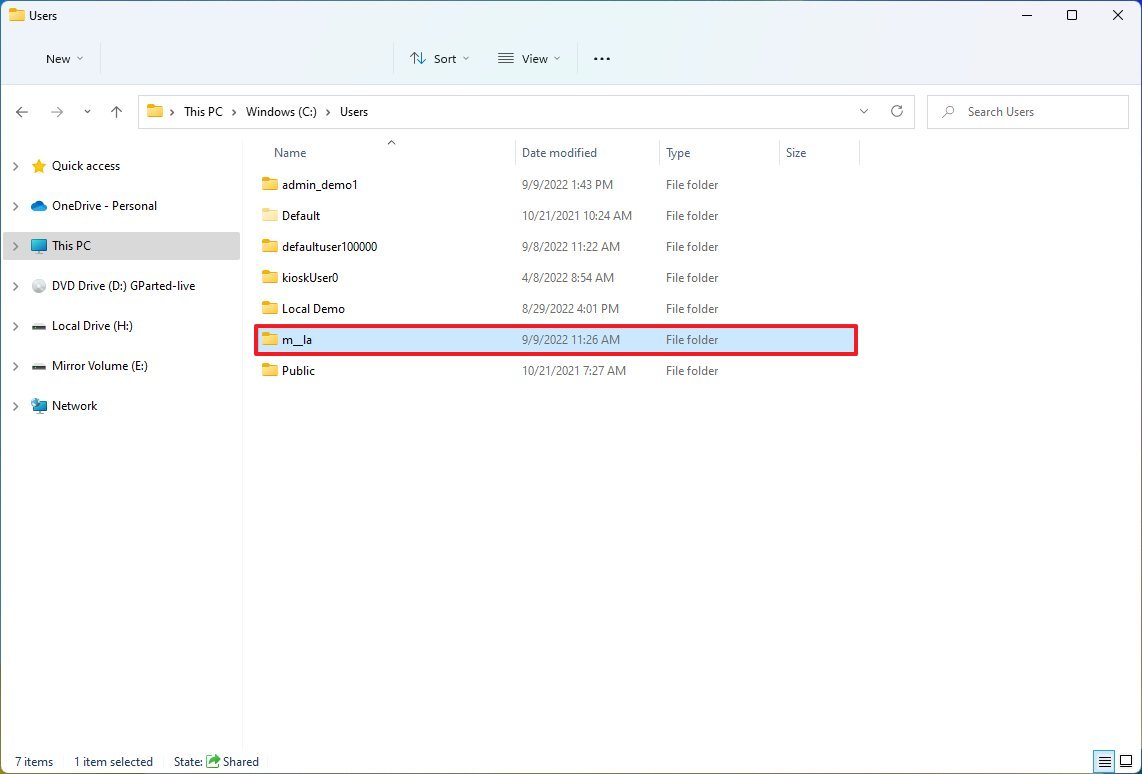
- Open File Explorer.
- In the address bar, enter the following path and press Enter: C:\Users
- Double-click the folder containing your account files.
- Click the Continue button if you see the «You don’t currently have permission to access this folder» message.
- Grab the window and snap it to the left side (or use the Windows key + Left arrow keyboard shortcut).
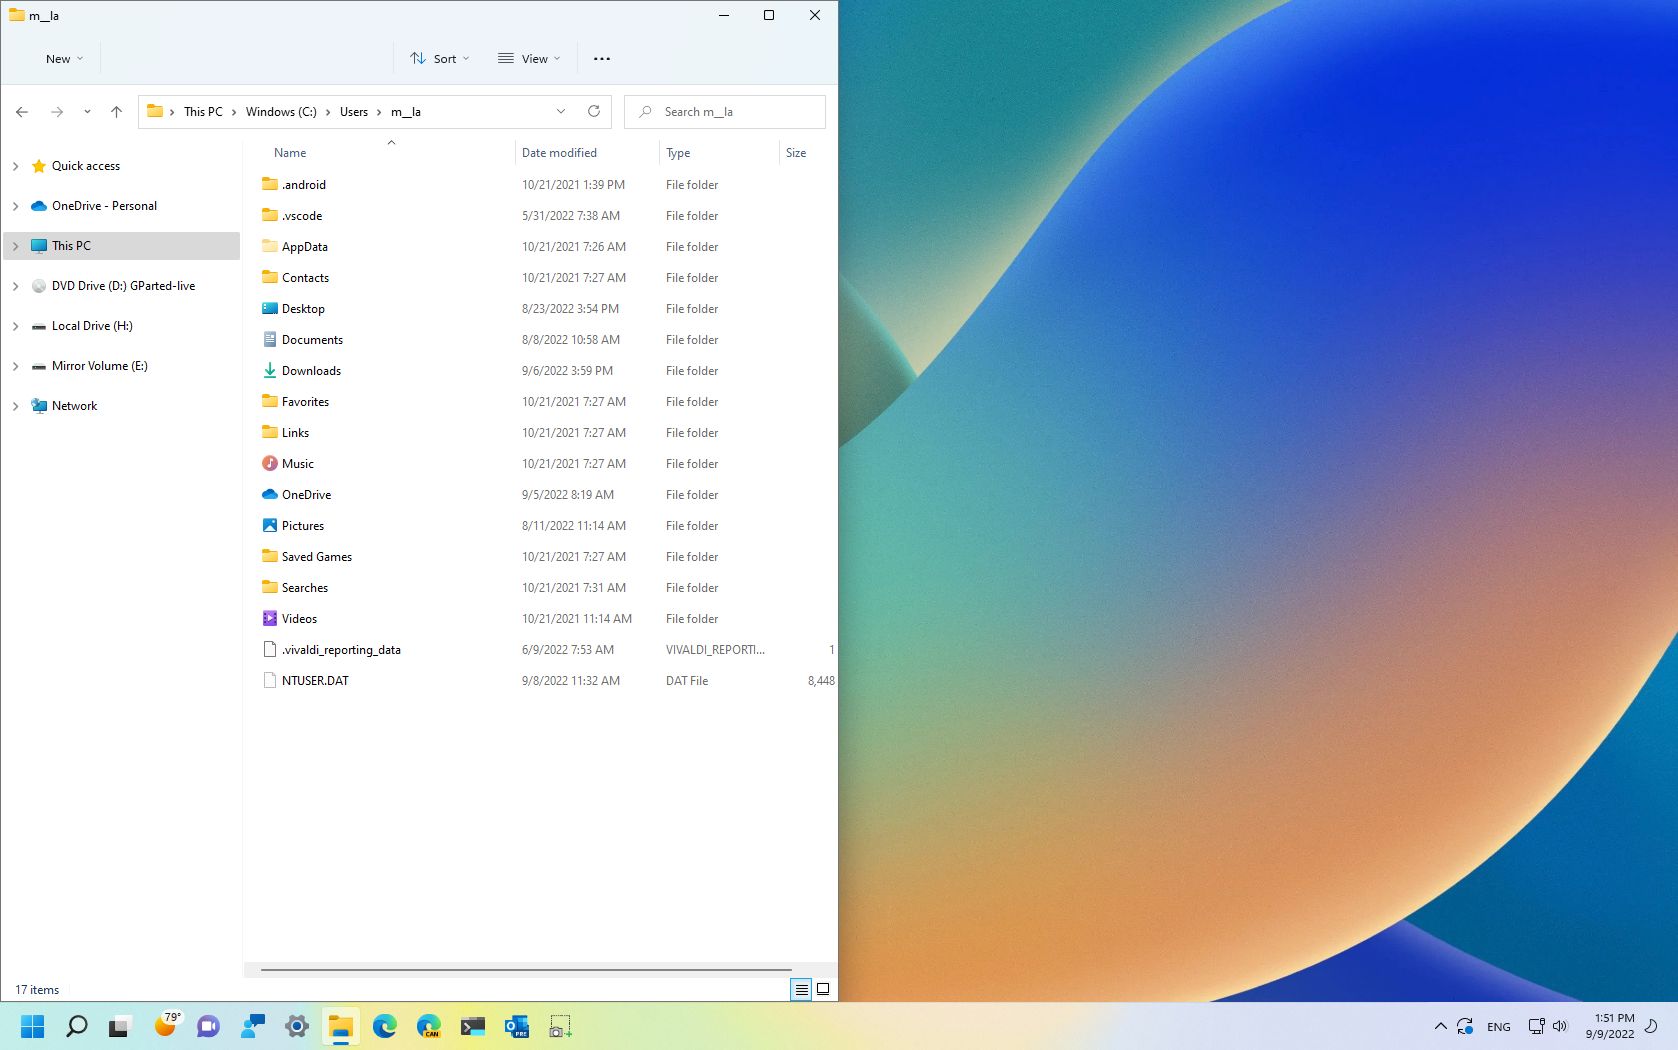
- Open the Run command (Windows key + R shortcut).
- Type the following command and click the OK button: %homepath%
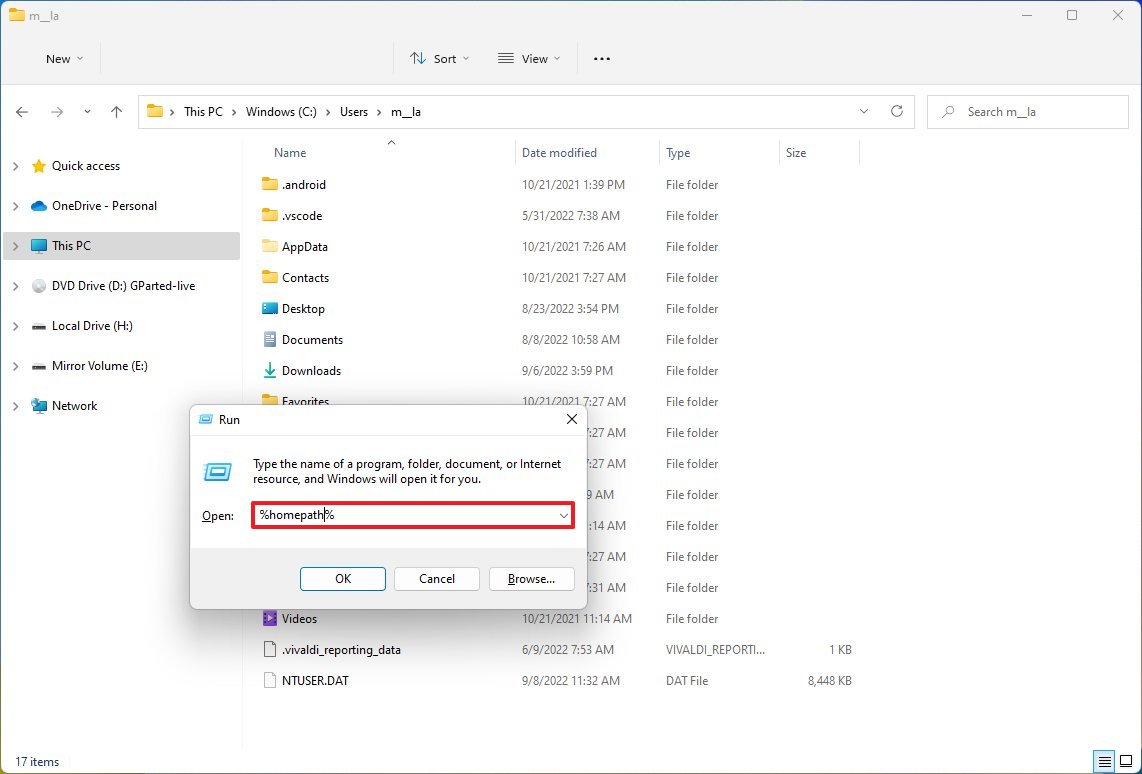
- Grap the window and snap it to the right side (Windows key + Right arrow shortcut)
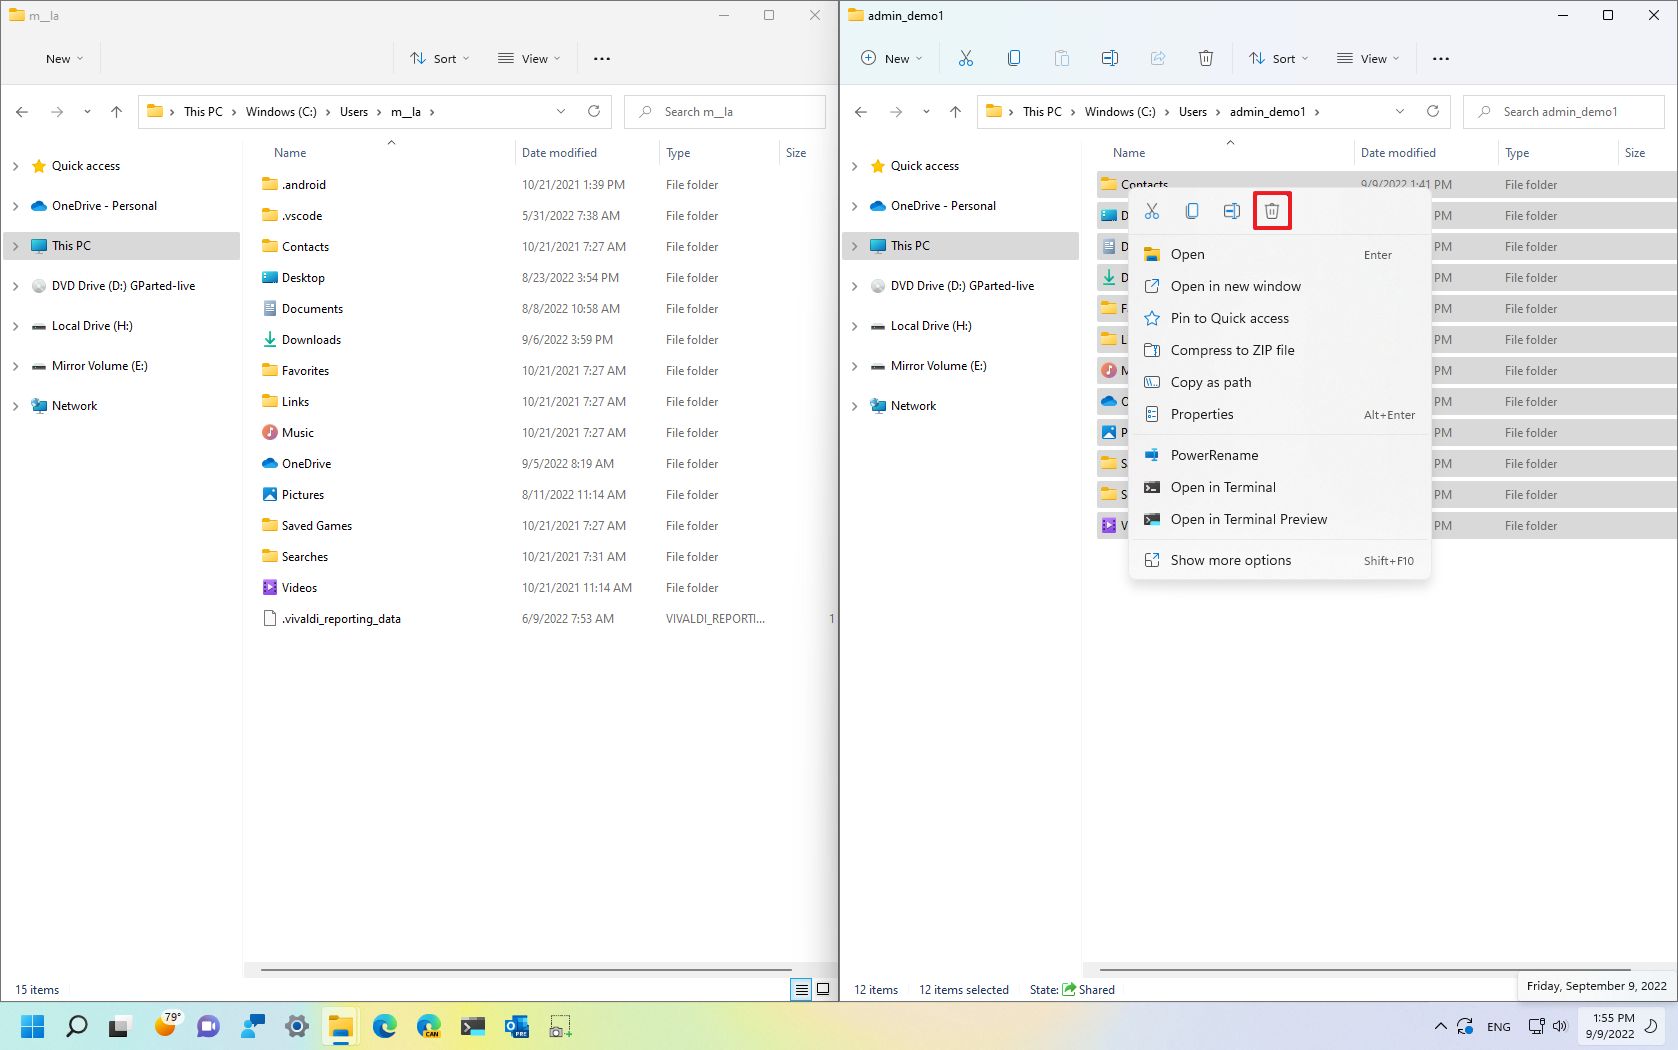
- Select all the folders (Crt + A shortcut) from the new profile (right).
- Right-click the selection and select the Delete option to clean the folder.
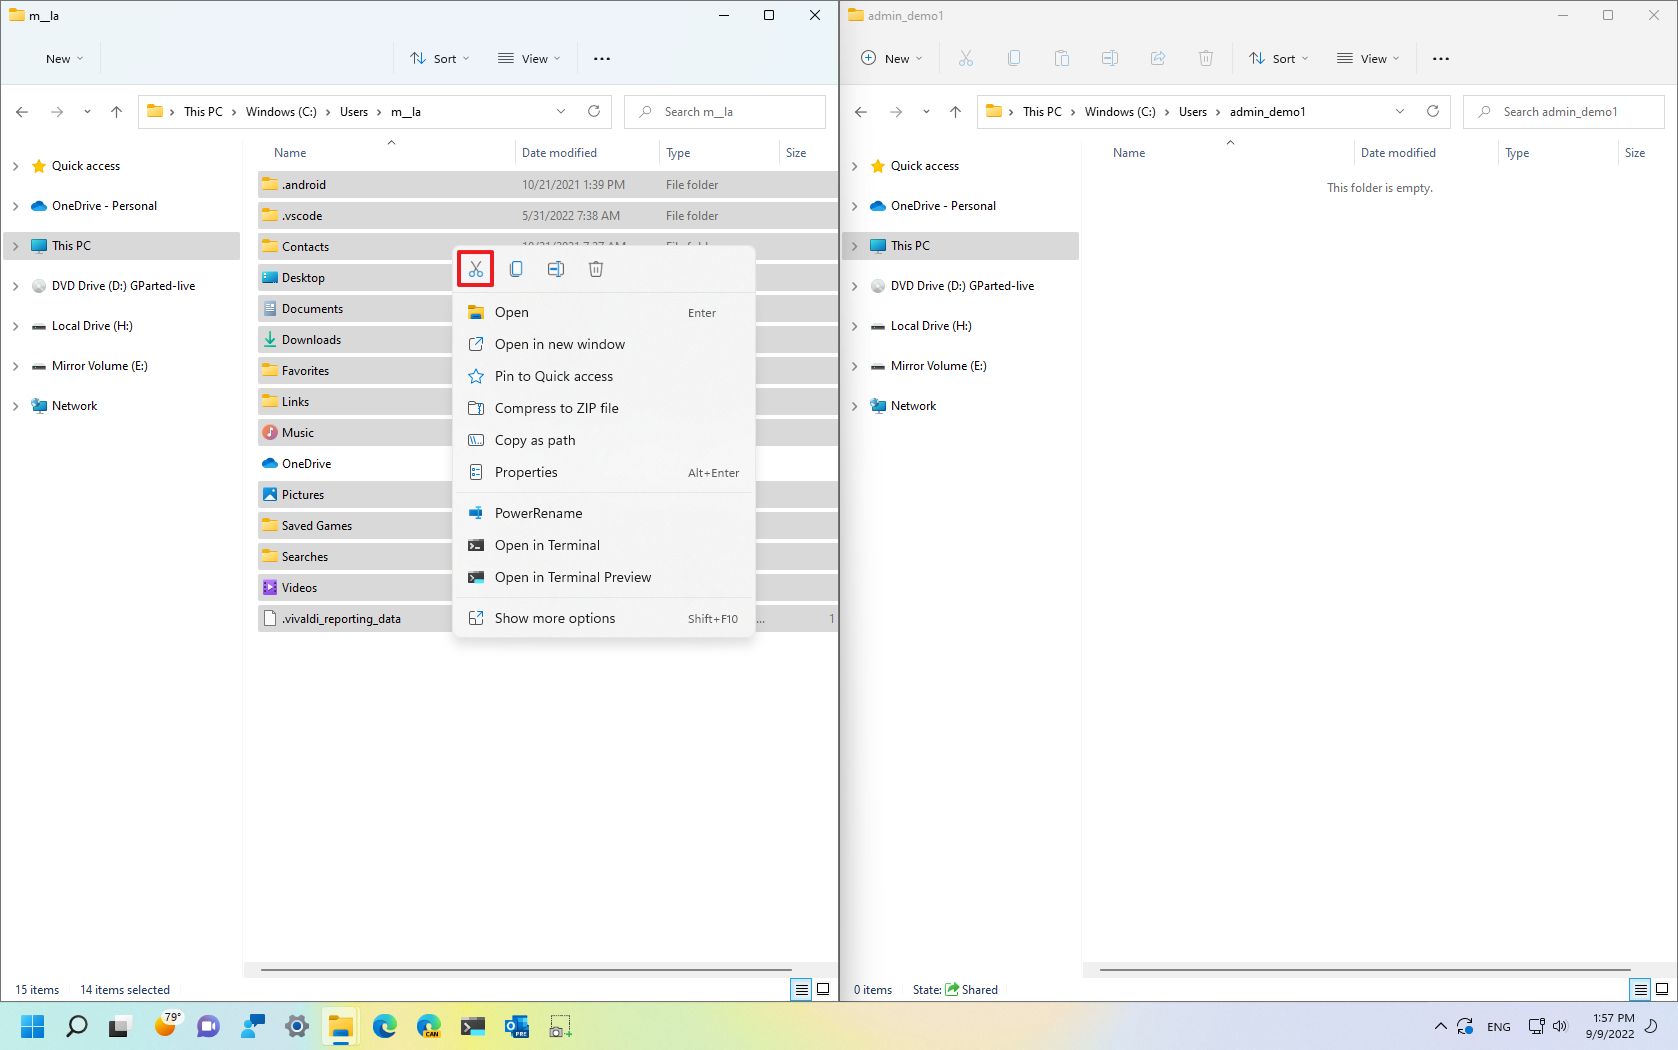
- Select all the folders (Crt + A shortcut) from the old profile (left).
- Clear the «OneDrive» folder checkbox if you use the service.
- Right-click the selection and select the Cut option to move the files.
- Right-click the empty folder in the new profile (right) and select the Paste option.
Once you complete the steps, the files will transfer to the new account.
In addition to moving the files, you want to check that you have access to your applications from the Start menu. Some apps only work on a specific account, so you may need to reinstall, reactivate, or reconfigure some applications in the new account.
Also, if you have some custom configurations, you will need to reapply those in the new account. For example, themes, sync settings, Taskbar and Start menu pins, and others.
If you use OneDrive, remember to set it up after linking the local account to your Microsoft account to access your files.
Delete old account
After moving your files and settings to the new account, you will still need to remove the old profile and then link the local account with your Microsoft account.
To delete the corrupted account from the Windows 11 installation, use these steps:
- Open Settings.
- Click on Accounts.
- Click the Family & other users page on the right side.
- Under the «Other users» section, select the old account, and click the Remove button.
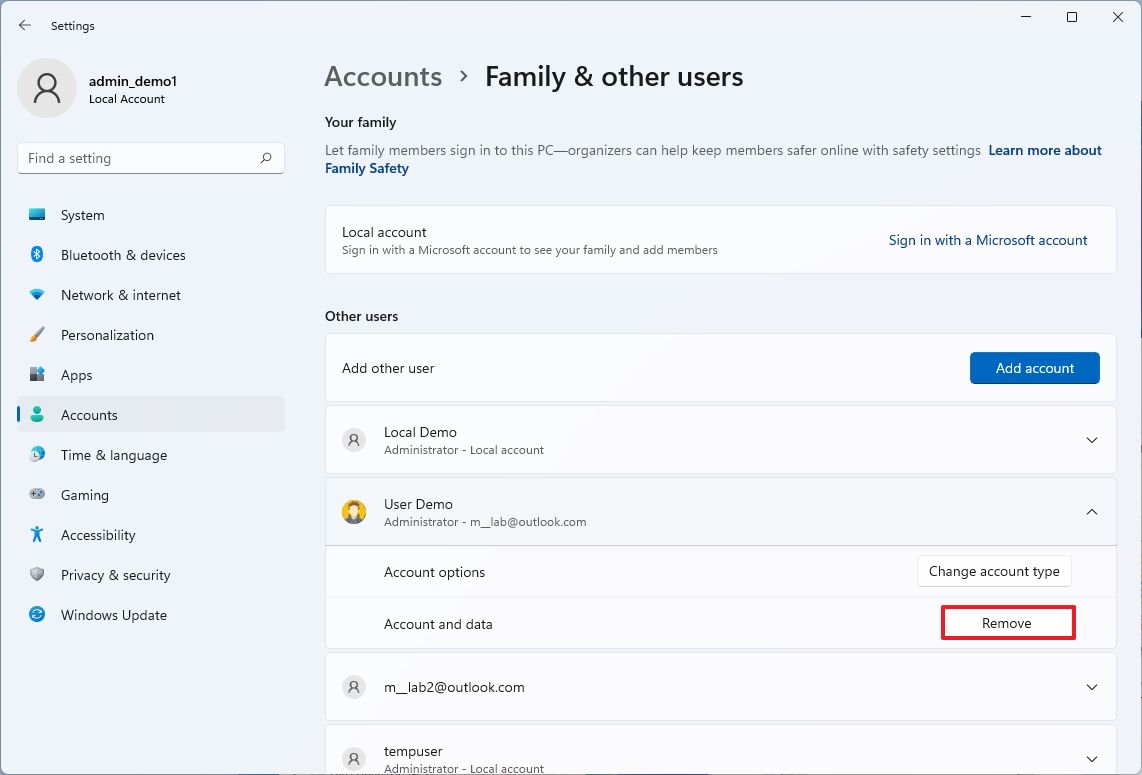
- Click the Delete account and data button.
After you complete the steps, the old account and data will be removed from the computer.
Switch local to Microsoft account
Once you remove the old account with the problem, you must link your new local account with your Microsoft account to regain access to features and services like OneDrive, Microsoft Store, settings syncing, and others.
To switch from a local to a Microsoft account on Windows 11, use these steps:
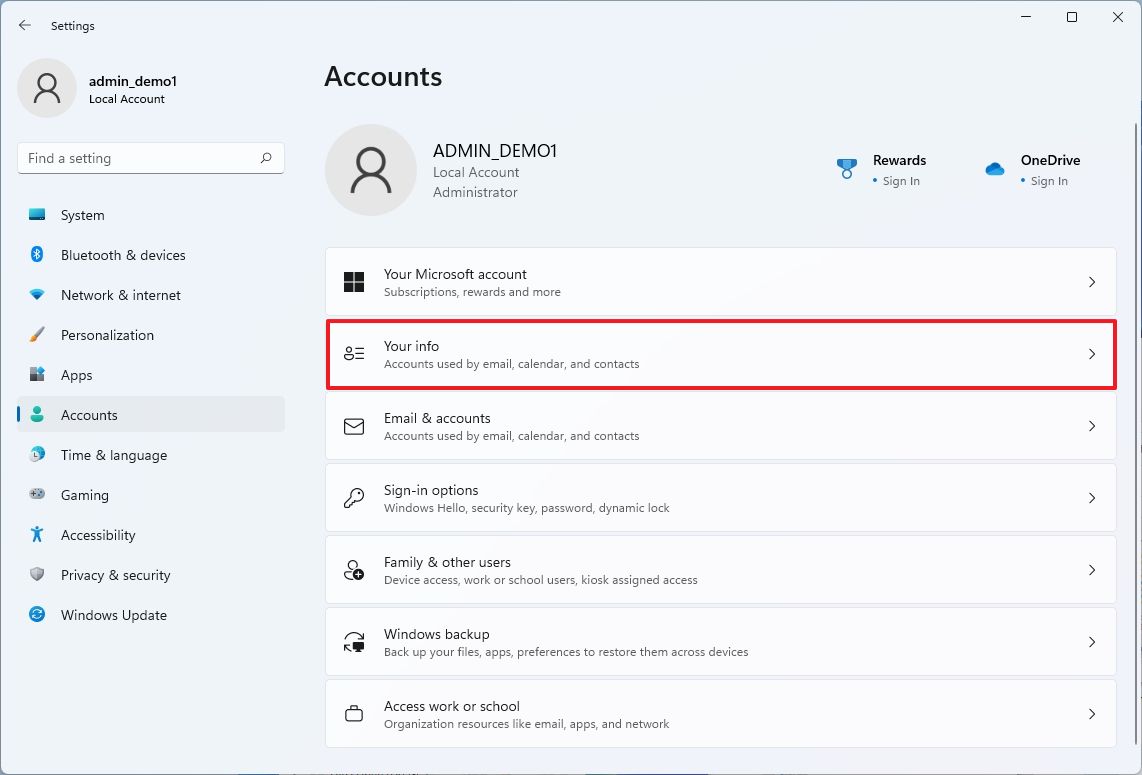
- Open Settings.
- Click on Accounts.
- Click the Your info page on the right side.
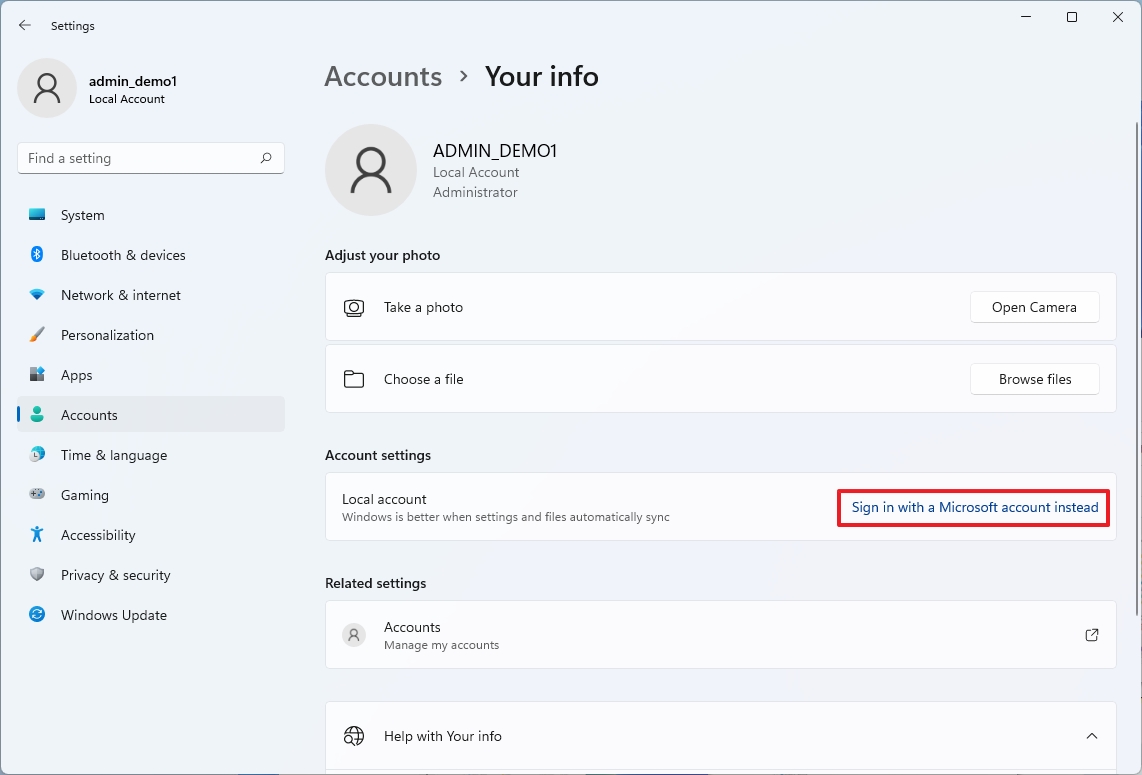
- Under the «Account settings» section, click the «Sign in with a Microsoft account instead» option.
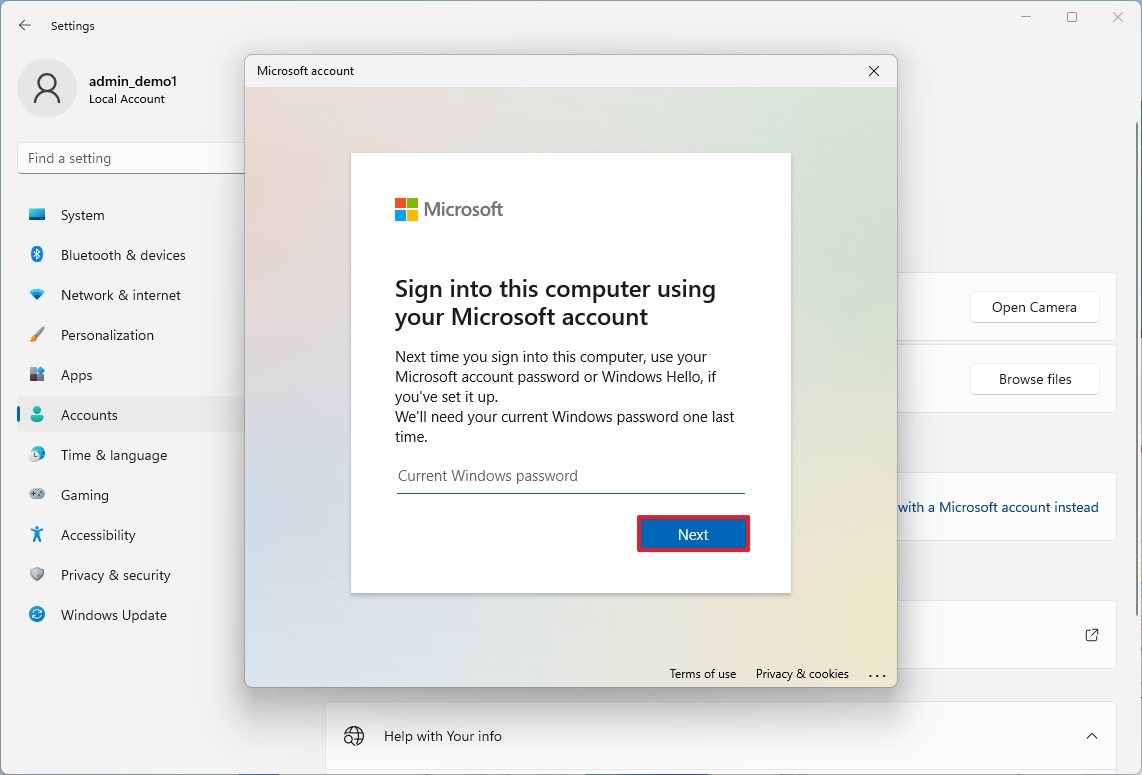
- Confirm your Microsoft account information.

- Click the Next button, as you didn’t specify a password for the local account.
- Click the Next button to set up a PIN.
- Create a new PIN.
- Click the OK button.
- Click the Verify option on the «Your Info» page (if applicable).
- Continue with the on-screen directions (if applicable).
Once you complete the steps, you can start using the new account on Windows 11.
More resources
For more helpful articles, coverage, and answers to common questions about Windows 10 and Windows 11, visit the following resources:
- Windows 11 on Windows Central — All you need to know
- Windows 10 on Windows Central — All you need to know
Mauro Huculak has been a Windows How-To Expert contributor for WindowsCentral.com for nearly a decade and has over 15 years of experience writing comprehensive guides. He also has an IT background and has achieved different professional certifications from Microsoft, Cisco, VMware, and CompTIA. He has been recognized as a Microsoft MVP for many years.