
Когда языковая панель пропадает, обычно переключение раскладки продолжает работать. Конечно, многим пользователям этого недостаточно, и проблему требуется исправить. Определенные способы решения есть, но прежде чем переходить к ним, перезагрузите систему, так как этот универсальный метод часто помогает устранить разного рода ошибки.
Способ 1: Проверка настроек ввода
У языковой панели есть свои настройки, с помощью которых она и может быть скрыта, поэтому в первую очередь проверим, все ли у нас там в порядке.
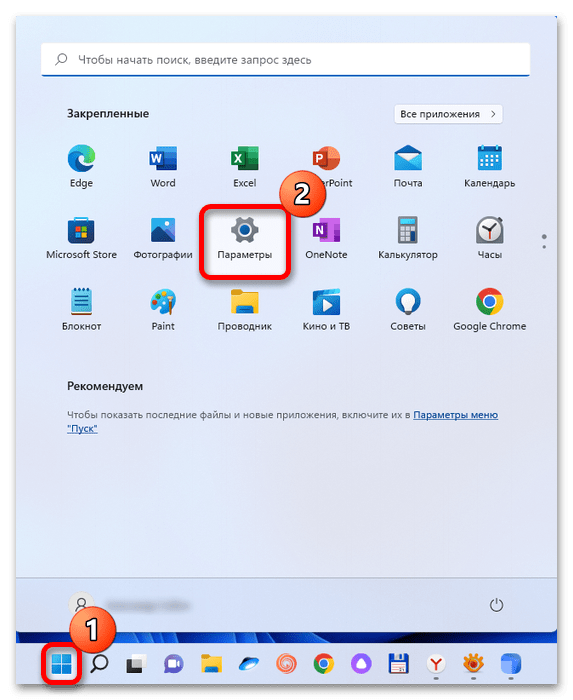
- Открываем меню «Пуск» и вызываем окно с параметрами Windows 11.
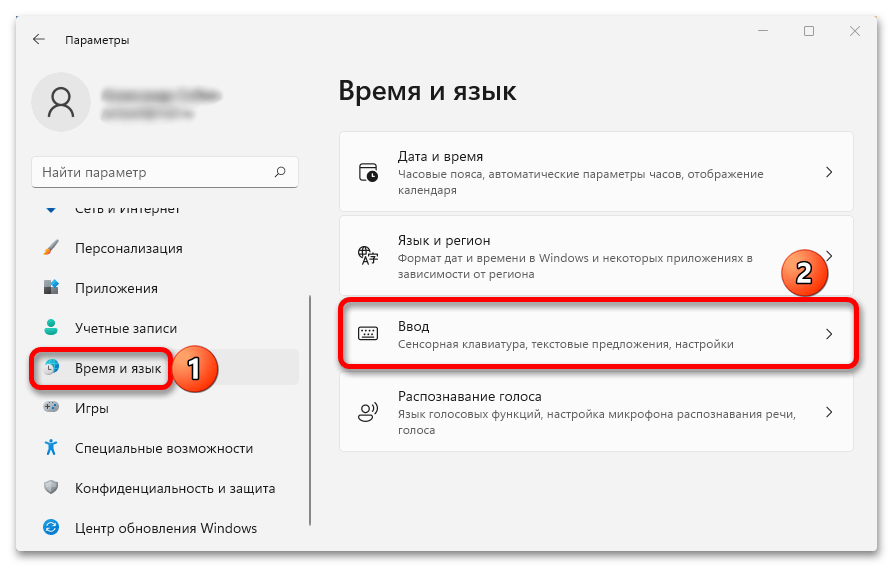
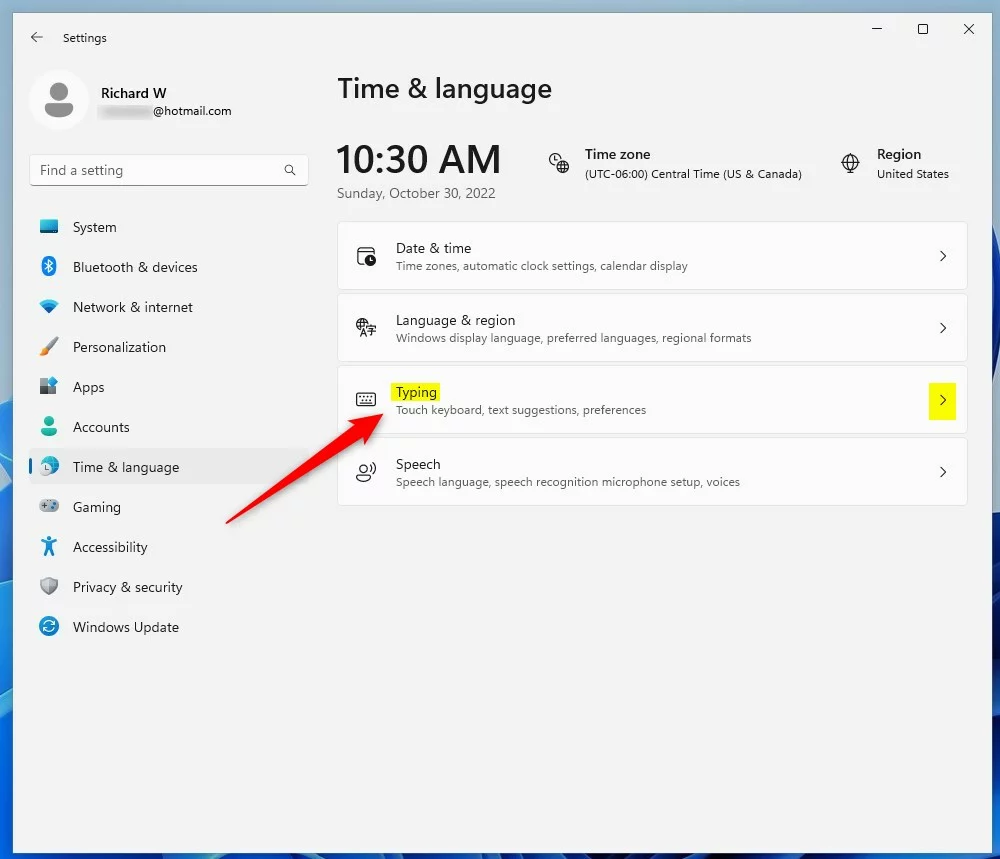
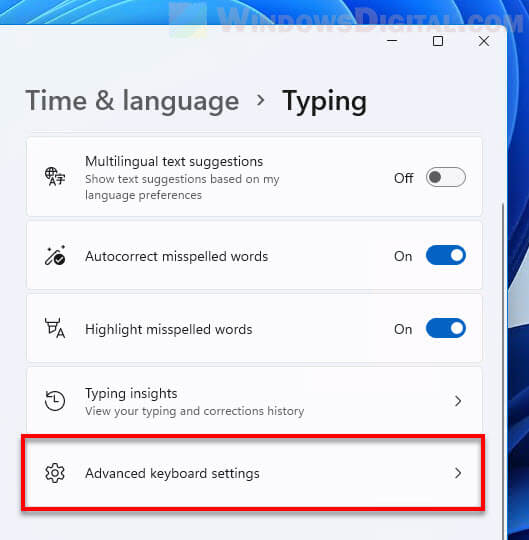
- В разделе «Время и язык» переходим в блок «Ввод»,

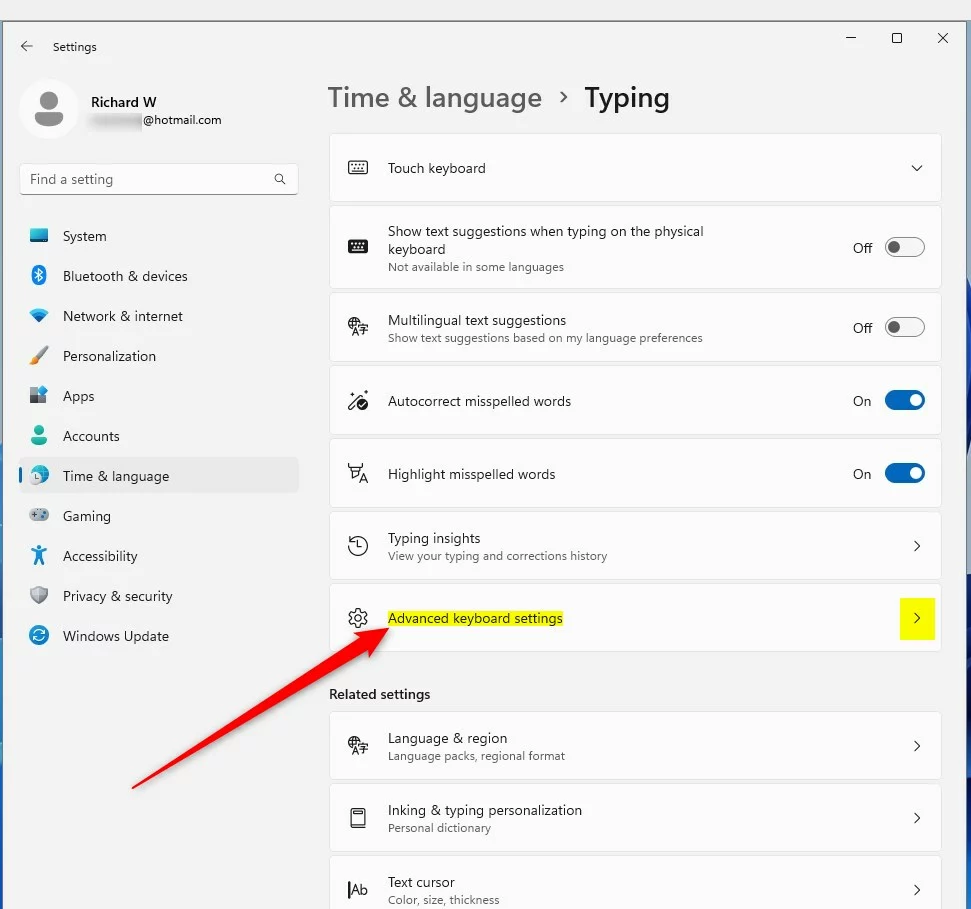
а затем жмем «Дополнительные параметры клавиатуры».
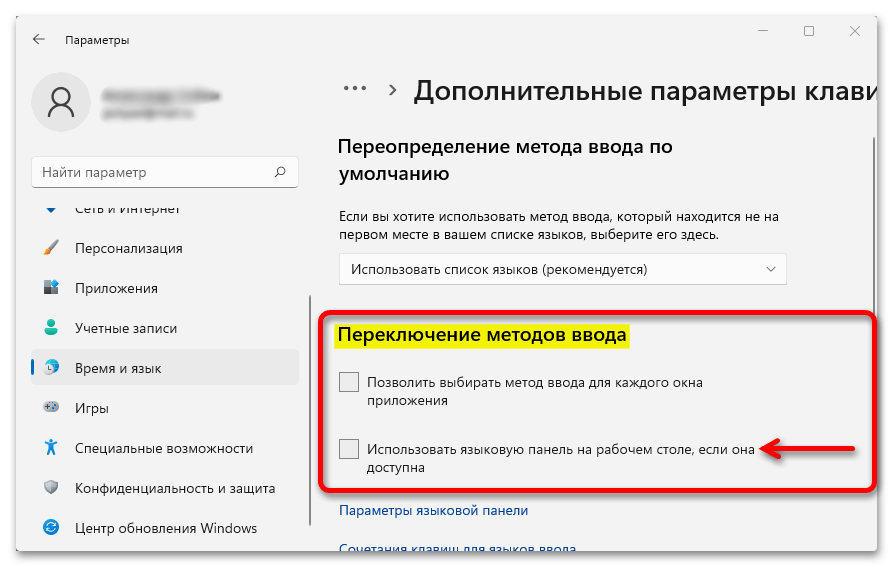
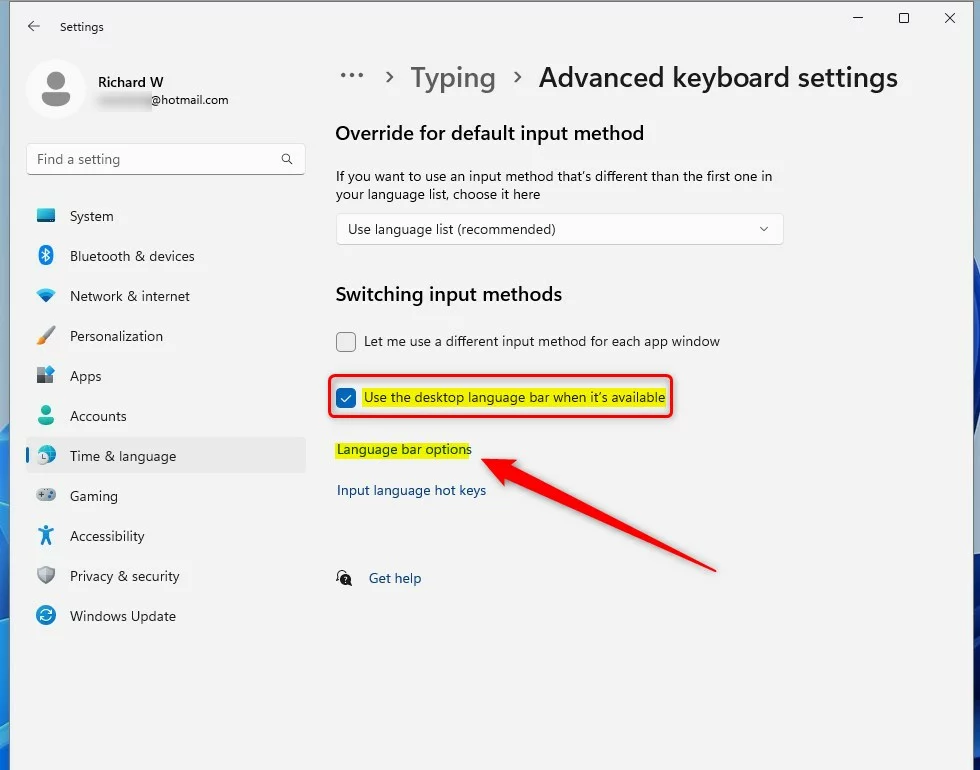
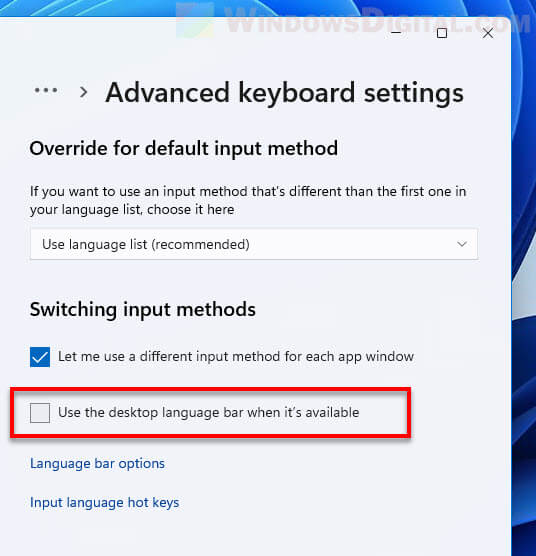
- Убеждаемся, что в блоке «Переключение методов ввода» отключено использование языковой панели на рабочем столе.
Потому что, если этот параметр включен, то ЯП должна пропасть с панели задач и появиться где-то на экране поверх других окон в виде маленького плавающего элемента, как это показано на скриншоте ниже.
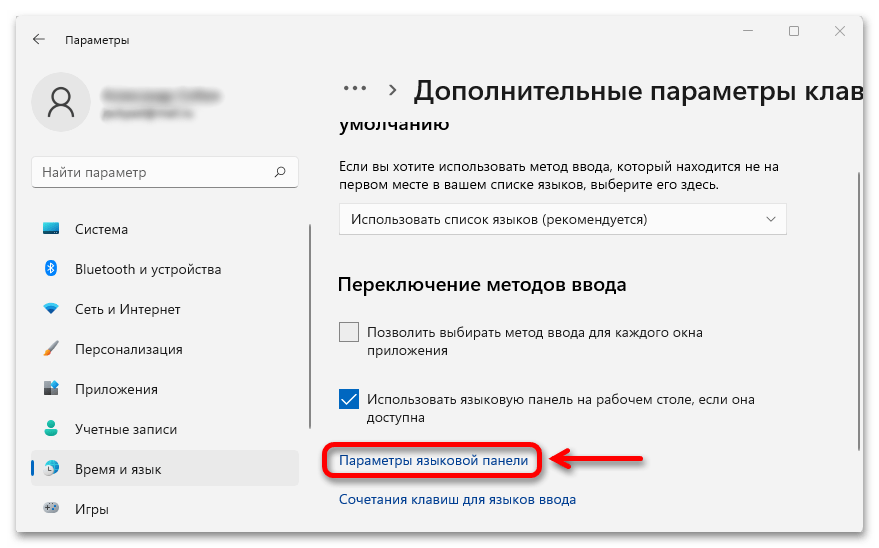
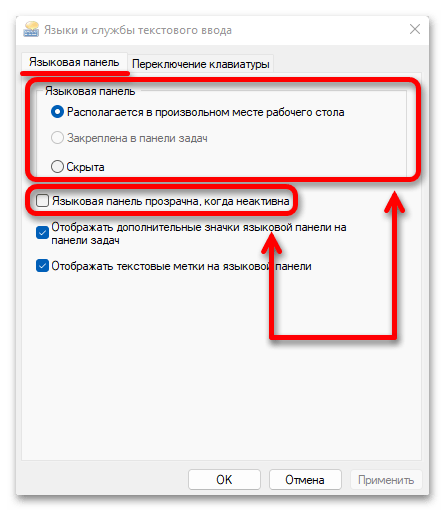
- С другой стороны, если нас устраивает такой вид ЯП, но мы все равно не видим ее на рабочем столе, то кликаем «Параметры языковой панели»

и в открывшемся окне проверяем, чтобы она не была скрыта или не находилась в режиме прозрачности. В общем, соответствующие пункты в ее настройках явно должны быть отключены, как это видно на скриншоте ниже.

Способ 2: Запуск процесса
Все функции операционной системы Виндовс связаны с определенными процессами и службами. В данном случае речь идет о «ctfmon.exe» – системном фоновом процессе, который, помимо прочего, влияет на отображение языковой панели. Обычно он запускается автоматически, но, возможно, сейчас мы ее не видим, потому что с этим возникли проблемы.
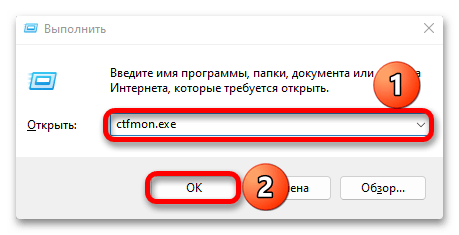
- В первую очередь просто попробуем запустить упомянутый выше процесс. Так мы сможем убедиться, что дело именно в нем. Сочетанием клавиш «Windows+R» вызываем окно «Выполнить», вводим команду
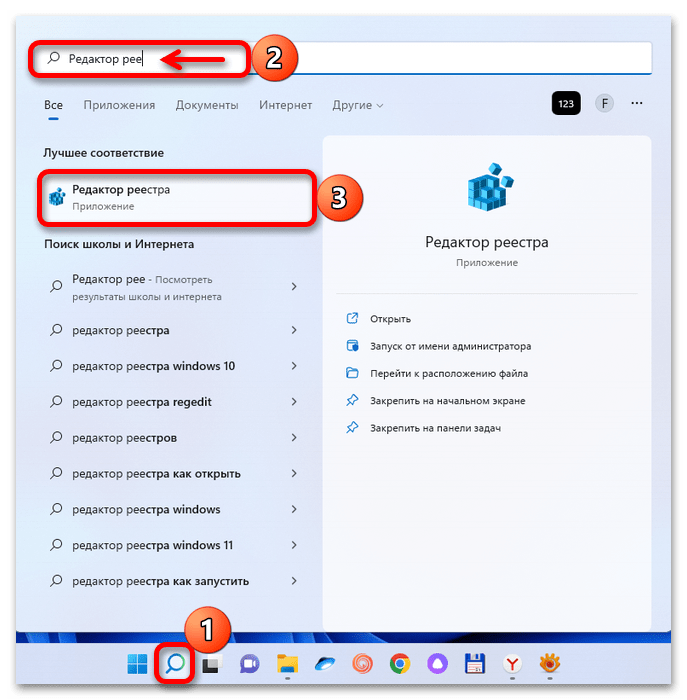
ctfmon.exeи нажимаем «OK». - Если ЯП появилась, значит, процесс был отключен, но проблема в том, что после следующей загрузки системы его могут снова не запустить. В этом случае мы добавим его в автозагрузку. Для этого в поиске Виндовс 11 находим редактор реестра и запускаем его.
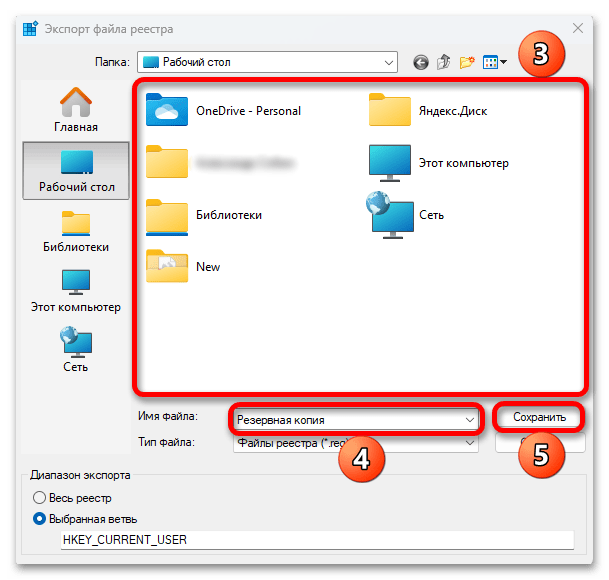
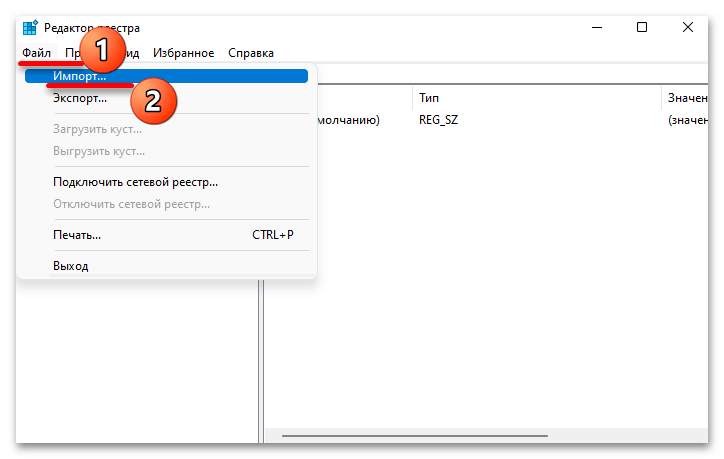
- Нас интересует ветка «HKEY_CURRENT_USER», поэтому на всякий сделаем ее резервную копию. Выделяем раздел, затем открываем вкладку «Файл», выбираем «Экспорт»,

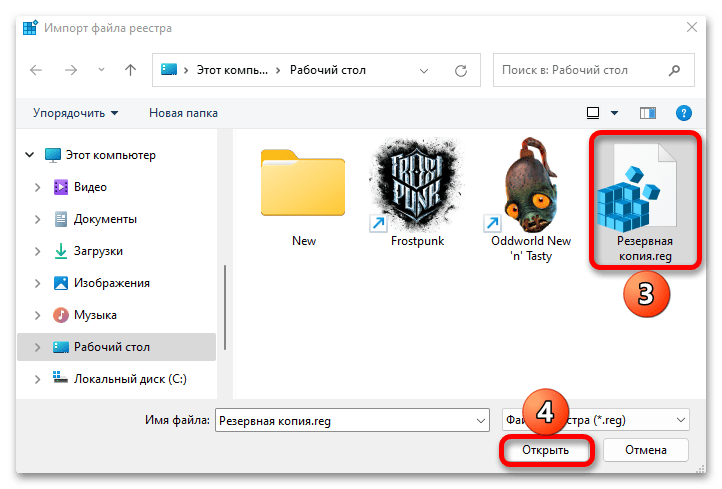
открываем каталог, в котором будет лежать резервная копия, даем ей имя и сохраняем.

Теперь, если с реестром что-то случится, мы сможем открыть раздел импорта,

найти на компьютере РК и загрузить ее.
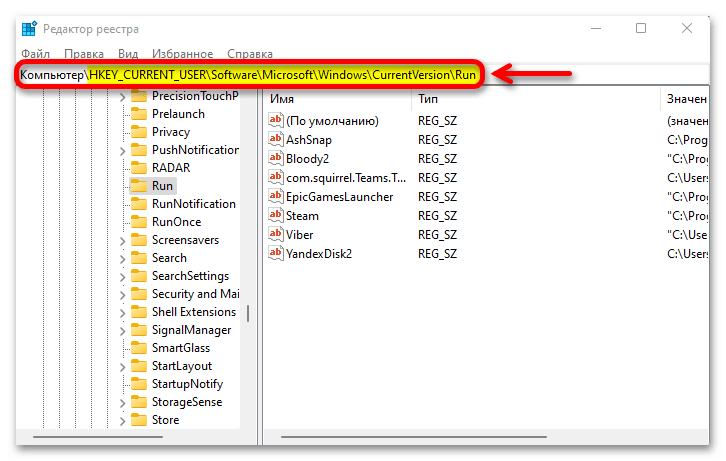
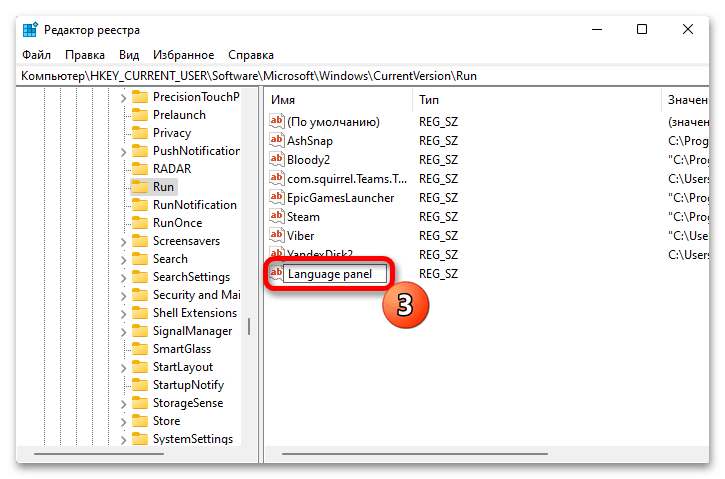
- В редакторе переходим по следующему пути:
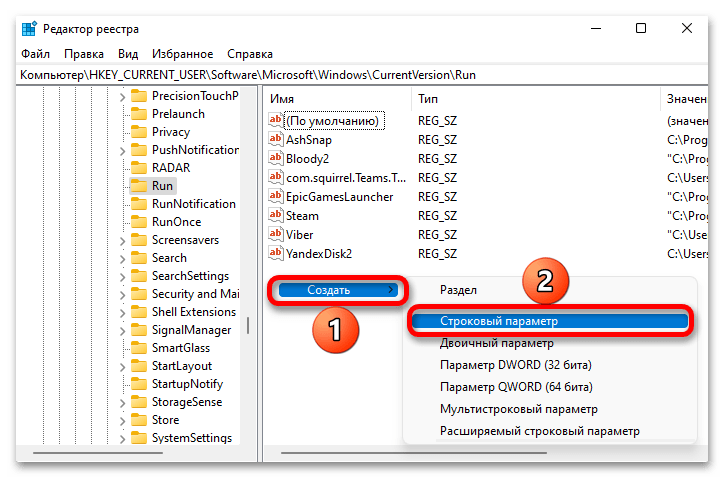
HKEY_CURRENT_USER\Software\Microsoft\Windows\CurrentVersion\Run - Правой кнопкой мышки кликаем по пустой области справа, создаем строковый параметр

и присваиваем ему любое имя, например «Language panel».
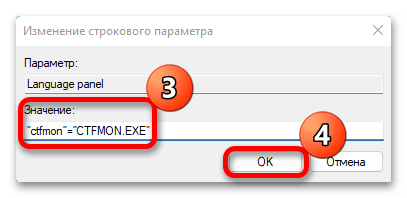
- Открываем контекстное меню параметра, выбираем «Изменить»,

в поле «Значение» вводим ”ctfmon”=”CTFMON.EXE” вместе с кавычками и подтверждаем настройку. После этого закрываем реестр и перезагружаем компьютер.


Способ 3: Включение служб
Вспомните, когда впервые вы заметили проблему с отображением ЯП. Возможно, в этот период вы работали с системными службами и, например случайно отключили ту, что связана с процессом «ctfmon.exe». В общем, проверка ее текущего статуса лишней не будет.
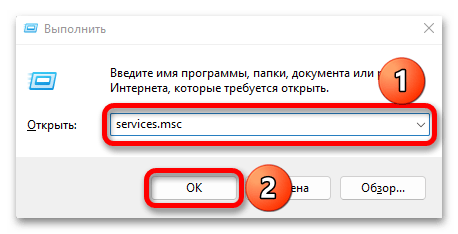
- Снова вызываем окно «Выполнить», как это описано в предыдущем способе, вводим команду
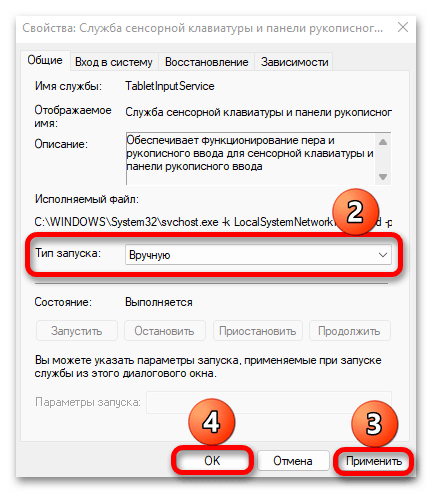
services.mscи подтверждаем ее. - В списке находим службу сенсорной клавиатуры и панели рукописного ввода, дважды щелкаем по ней,

в открывшемся окне, если служба отключена, ставим тип запуска – «Вручную», применяем изменения и закрываем окно.
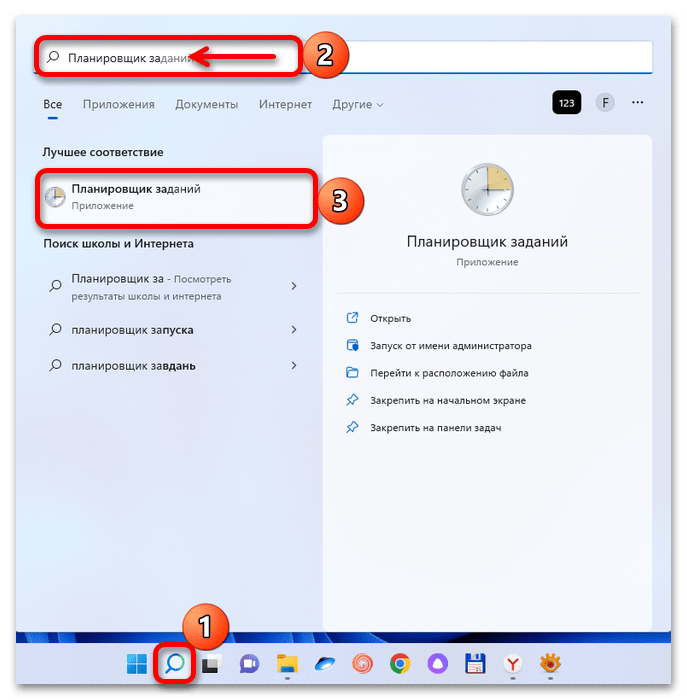
- Теперь убедимся, что в планировщике активна задача, запускающая текстовые службы. С помощью поиска Windows находим и запускаем «Планировщик заданий».
- В библиотеке слева по очереди открываем разделы – «Microsoft», «Windows», «TextServicesFramework», а затем в списке задач справа находим «MsCtfMonitor» и, если она отключена, кликаем по ней правой кнопкой и активируем.


Не стоит забывать о том, что ЯП располагается на панели задач и известны случаи, когда с нее пропадали ярлыки приложений и значки функций. Поэтому если вам не помогли способы, описанные выше, возможно, решение проблемы вы найдете в другой статье, опубликованной на нашем сайте.
Подробнее: Восстановление работы панели задач в Windows 11
Наша группа в TelegramПолезные советы и помощь
In this article, you will get to know how you can easily show the Language bar on Desktop or Taskbar in Windows 11 in no time.
On your Windows 11 PC, you can effortlessly change the keyboard layout to choose the language of input as per your liking. The characters that display on your screen as you type are determined by the language of your keyboard layout. You can not only change the language of your keyboard layout but also Add a new language as your preference.
You can change your keyboard language through the Language bar. So here, you will know how you can easily display the Language bar on the Desktop or the Taskbar on your Windows 11 PC.
Show Language Bar on Desktop or Taskbar in Windows 11
At a Glance:
- Go to the Settings
- Select Time & Language
- Choose Typing option( Right Side)
- Click on Advanced Keyboard options
- Check/ Uncheck the box next to Use the Desktop language bar when it’s available
- Tap Language Bar Options
- Select Floating on the desktop
- Check Show additional language bar icons in the taskbar
- Tick Show text labels on the Language Bar
Now, you will be walked you the steps to display the language bar on your desktop or taskbar. Let’s get started:
- Go to the System Settings on your Windows 11 PC. To go to Settings, press the Windows+I key on your keyboard. Alternatively, you can also opt to go to Settings from the Start Menu. Just click on the windows icon on the taskbar and tap-open the Settings app from the Start Menu.
- Now, click on Time & Language on the left pane.
- Then, click on the Typing tile on the Right pane.
- Further, select the Advanced Keyboard Settings option from the Right side as given below.
- Now, check the box next to Use the Desktop language bar when it’s available.
- if it is already checked then uncheck it and see if it makes the language bar appear on the taskbar.
- Click on Language Bar options available just below the Use the Desktop Language bar when it’s available option.
- Select Floating on the desktop and Check Show additional language bar icons in the taskbar as well as Show text labels on the Language Bar as shown below in the screenshot.
- Click on Apply and then tap OK at the bottom.
- Now, Close the Settings and you are done.
So, this way you can easily display the language bar on the taskbar or desktop on your Windows 11 PC in no time. However, you face any problems while doing so, please let us know in the Comment Section.
Also Read: Touch Screen Gestures Windows 11- Ultimate Guide
Remove Language Bar from the Taskbar
Now, let us discuss how to remove Language Bar or Switcher from the taskbar in a few easy steps:
- Open the Settings on your Windows 11 PC( Windows+I Key combination)
- Then, select Time & Language option from the left pane.
- Click on Typing option on the Right Side.
- Select the option of Advanced keyboards settings from the Right-pane.
- You’ll now notice a Use the desktop language bar when it’s an available option in the Switching input methods section. Choose that option.
Congratulations! You have successfully removed the language bar or Language switcher from the taskbar. Further, we will discuss how you can add a new keyboard language to the Language bar (taskbar).
Also Read: How To Remove Language In Windows 11
Adding a Keyboard language to Taskbar in Windows 11
As already mentioned, you can easily add another language to the Language bar. It will change the Keyboard layout to the added language. You can even attach language-specific keyboards to fully utilize this feature of the keyboard layout. Now, you will be walked through the steps to add another language to the taskbar in Windows 11:
- Open the Settings on your device and click on Time & Language on the left-pane.
- Select Language & Region on the right side.
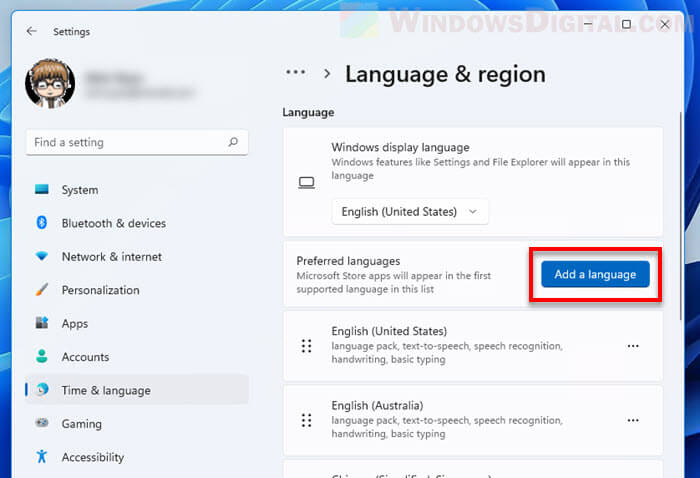
- Click on Add a language option next to Preferred language as given below in the screenshot.
- Now, Choose a language pop-up that will appear on the screen. Select your preferred language from the list of languages displayed on the screen.
- After selecting your preferred language, click on Next.
- Next, choose whether you wish to install the optional language features or keep them as is. To continue, click Install.
- Installation of the new language and the features related to it may take some time. So be patient.
- Further, You will be prompted to sign out of Windows after the installation is complete for the changes to take effect. To do so, sign out of Windows by clicking the “Sign out” button, then sign back in.
- Upon successful installation, its keyboard layout will be added by default.
Hurray! You have successfully added a new keyboard language to the taskbar. So, you can easily switch different keyboard layouts and type in your preferred language. You can do this by just going to the language switcher in the taskbar.
Also Read: How To Change Display Language in Windows 11
Winding Up
So, that’s all for now. we have mentioned various steps to show the language bar on the taskbar as well as a desktop in your Windows 11 PC. Moreover, the steps to remove the language switcher from the taskbar are also discussed in this guide. Additionally, this article also walks you through the steps to easily add a new language to the language switcher on the taskbar. If you face any problems while performing these steps, kindly let us know in the comment section. We would love to help you solve your tech-related problems.
-
-
#2
hi
sadly there is not an utility to change language pack from the tray icon, is there?
thanks
-
- OS
- Windows 11 pro 64bit
-
-
#3
hi
sadly there is not an utility to change language pack from the tray icon, is there?
thanks
Hello,
If you mean for changing the Display Language, then no. You can create a shortcut using a PowerShell command link in option two below to use for this purpose though.

Change Display Language in Windows 11
This tutorial will show you how to change the display language for your account in Windows 11. Installing the language pack of an added language will add the language to your list of Windows display languages. The display language you select changes the default language used by Windows…
www.elevenforum.com
-
- OS
- Windows 11 Pro for Workstations
- Computer type
- PC/Desktop
- Manufacturer/Model
- Custom self build
- CPU
- Intel i7-8700K 5 GHz
- Motherboard
- ASUS ROG Maximus XI Formula Z390
- Memory
- 64 GB (4x16GB) G.SKILL TridentZ RGB DDR4 3600 MHz (F4-3600C18D-32GTZR)
- Graphics Card(s)
- ASUS ROG-STRIX-GTX1080TI-O11G-GAMING (11GB GDDR5X)
- Sound Card
- Integrated Digital Audio (S/PDIF)
- Monitor(s) Displays
- 2 x Samsung Odyssey G75 27″
- Screen Resolution
- 2560×1440
- Hard Drives
- 1TB Samsung 990 PRO M.2,
4TB Samsung 990 PRO M.2,
8TB WD MyCloudEX2Ultra NAS
- PSU
- Seasonic Prime Titanium 850W
- Case
- Thermaltake Core P3 wall mounted
- Cooling
- Corsair Hydro H115i
- Keyboard
- Logitech wireless K800
- Mouse
- Logitech MX Master 3
- Internet Speed
- 1 Gbps Download and 35 Mbps Upload
- Browser
- Google Chrome
- Antivirus
- Microsoft Defender and Malwarebytes Premium
- Other Info
- Logitech Z625 speaker system,
Logitech BRIO 4K Pro webcam,
HP Color LaserJet Pro MFP M477fdn,
CyberPower CP1500PFCLCD
Galaxy S23 Plus phone
-
- Operating System
- Windows 11 Pro
- Computer type
- Laptop
- Manufacturer/Model
- Surface Laptop 7 Copilot+ PC
- CPU
- Snapdragon X Elite (12 core) 3.42 GHz
- Memory
- 16 GB LPDDR5x-7467 MHz
- Monitor(s) Displays
- 15″ HDR
- Screen Resolution
- 2496 x 1664
- Hard Drives
- 1 TB SSD
- Internet Speed
- Wi-Fi 7 and Bluetooth 5.4
- Browser
- Chrome and Edge
- Antivirus
- Windows Defender
-
-
#4
Hello,
If you mean for changing the Display Language, then no. You can create a shortcut using a PowerShell command link in option two below to use for this purpose though.

Change Display Language in Windows 11
This tutorial will show you how to change the display language for your account in Windows 11. Installing the language pack of an added language will add the language to your list of Windows display languages. The display language you select changes the default language used by Windows…
www.elevenforum.com
hi
yes would be nice AutoHotkey or AutoIt little software in system tray to change language
thanks
-
- OS
- Windows 11 pro 64bit
-
-
#5
Got this to work via regedit.
[HKEY_CURRENT_USER\Control Panel\Desktop]
«UserPreferencesMask»=hex:9e,1e,07,80,12,01,00,00
[HKEY_CURRENT_USER\Software\Microsoft\CTF\LangBar]
«ShowStatus»=dword:00000003
-
- OS
- Windows 11
- Computer type
- PC/Desktop
This article describes steps to display or hide the Language Bar in Windows 11 when multiple languages and keyboard layouts are available.
Windows allows you to install a preferred language for features like Settings and File Explorer. A default keyboard layout for the language will also be installed with your preferred language.
Windows will add a language bar on the right of the taskbar and the sign-in screen by default when you have more than one language and keyboard layout installed.
Users can then easily switch between languages and keyboard layouts using the language bar.
Below is how to add or remove the language bar in Windows 11.
How to add or remove language bar in Windows 11
As described above, when you have more than one language and keyboard layout installed, Windows will add a language bar on the right of the taskbar and the sign-in screen by default.
Below is how to display or hide the language bar in Windows 11.
Windows 11 has a centralized location for the majority of its settings. Everything can be done, from system configurations to creating new users and updating Windows from its System Settings pane.
To get to System Settings, you can use the Windows key + I shortcut or click on Start menu ==> Settings as shown in the image below:

Alternatively, you can use the search box on the taskbar and search for Settings. Then select to open it.
Windows Settings pane should look similar to the image below. Within the Windows Settings app, click Time & language on the left.
On the right, select the Typing tile to expand.
Select the Advanced keyboard tile to expand on the System -> Time & language -> Typing settings pane.
On the Time & language -> Typing -> Advanced keyboard settings pane, under Switching input methods, check the box next to “Use the desktop language bar when it’s available.”
Then click the Language bar options link below it.
On the Text Services and Input Languages pop-up window, under Language Bar, choose the display option:
- Floating On Desktop – displays a floating language bar.
- Hidden – removes the language bar.

When you choose Floating On Desktop, the language bar will show when you have installed multiple languages and keyboard layouts.
You can use the bar to switch between languages as needed quickly.
When you select Hidden, the language bar will be hidden.
That should do it!
Conclusion:
- To add or remove the language bar in Windows 11, access the System Settings through the Windows key + I shortcut or the Start menu.
- In the System Settings, navigate to Time & Language and choose the Typing section.
- Under Advanced keyboard settings, check the box next to “Use the desktop language bar when it’s available” and click the Language bar options link to set the display option as Floating on Desktop or Hidden.
- When multiple options are installed, the language bar facilitates easy switching between languages and keyboard layouts.
The language icon, or more often known as the language bar, is an indicator on the taskbar that shows you what keyboard language or layout you are using at the moment. It also allows you to change to a different keyboard layout when you click on it. If the language icon suddenly disappeared from the taskbar, this guide will show you how to show the language bar on the taskbar again in Windows 11.
Also see: How to Show Hidden Icons on Taskbar in Windows 11
Fix: Taskbar language icon missing in Windows 11
The language icon or language bar would disappear from the taskbar if a specific option in the keyboard settings is accidentally (or intentionally) enabled. This particular setting controls if the language bar can appear on the taskbar or not. Follow the steps below to disable the said setting to show the missing language icon on the taskbar again in Windows 11.
- Press Win + i to open Settings in Windows 11.
- Select Time & language from the left pane. Then, select Typing from the right.

- Next, select Advanced keyboard settings.

- Under “Switching input methods”, disable the checkbox for “Use the desktop language bar when it’s available“.
- When this option is enabled, the language bar will disappear from the taskbar but instead appearing as a floating bar on your desktop, which you can move around.
- When this option is disabled, the language bar will return to the taskbar corner and appear as a language icon instead.

The screenshot below shows how the language bar looks like when the “Use the desktop language bar when it’s available” option is enabled which makes the language bar to appear as a floating bar on the desktop.
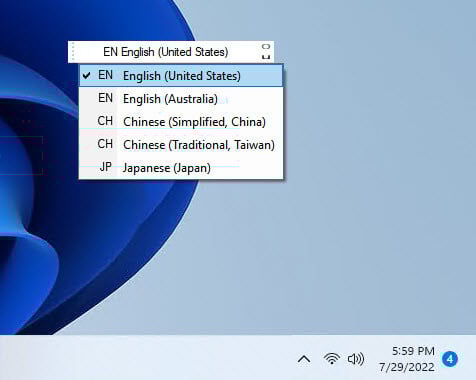
If this particular option is disabled, the language bar will appear as an icon on the taskbar corner instead, which is how it’s supposed to look like by default. This option is disabled by default.
Related: How to Remove Keyboard Layout From Windows 11
Language bar missing because you have only one keyboard language
If you have only one keyboard language in Windows 11, the language bar or icon may not appear on the taskbar since there is no other keyboard layout you can choose from. If that’s the case, you can add a language via the “Language & region” settings in Windows 11. You can also check the said settings to see if you have more than one keyboard languages added.
Suggested Guide: How to Add Keyboard Language to Taskbar in Windows 11
To add a language in Windows 11, open Settings (Win + i) and navigate to Time & language > Language & region. From there, click the Add a language button and follow the on-screen instructions to add any language you want.
Other tips about keyboard language settings in Windows 11
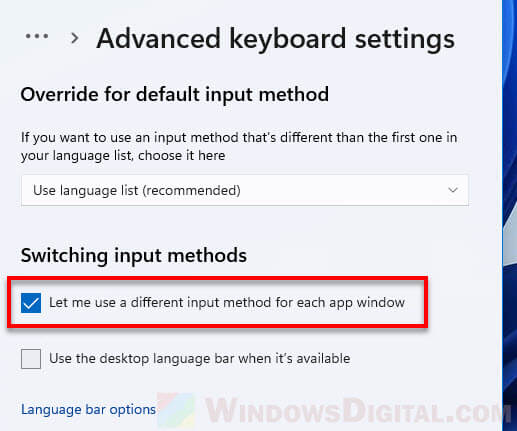
In the Advanced keyboard settings as shown in the instruction above, under “Switching input methods”, you can enable the “Let me use a different input method for each app window” to allow different input method to be used on each app window. This way, you don’t have to change your keyboard language every time you want to switch to a different window, for example, for a game to a chatting app.
If you have been clicking the language icon just to change the keyboard layout, know that you can actually quickly change the keyboard language by simply pressing Left Alt + Shift keys – a keyboard shortcut to switch between input languages. Alternatively, you can also press the Windows + Spacebar keys instead which does just the same thing.
Optionally, you can change the keyboard shortcut to other keys instead of the default by going to Settings > Time & language > Typing > Advanced keyboard settings > Language bar options > Advanced Key Settings.
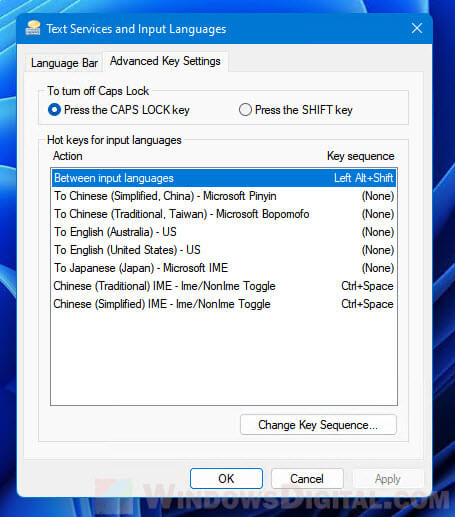
From there, you can change the hotkey for switching between input languages in Windows 11. Or, you can also set a keyboard shortcut for different keyboard languages so that you can switch directly to a certain keyboard language when the hotkey is pressed.