
Все способы:
- Способ 1: Горячие клавиши
- Способ 2: Функция «Свернуть все окна»
- Способ 3: Контекстное меню «Пуска»
- Способ 4: Кнопка переключения рабочих столов
- Способ 5: Пользовательский ярлык
- Способ 6: Жесты на сенсорной панели
- Способ 7: WinXCorners
- Вопросы и ответы: 0
Способ 1: Горячие клавиши
Горячие клавиши — самый быстрый и доступный метод отображения рабочего стола в Windows 11. Они позволяют быстро сворачивать все окна или переключаться на рабочий стол в одно нажатие. Есть и сочетания, которые пригодятся пользователям с несколькими рабочими столами на одном компьютере. Однако начать стоит с основной клавиши, которая как раз и отвечает за показ текущего рабочего стола. Для ее активации вам нужно нажать Win + D, после чего вы переключитесь на рабочий стол.
Примерно по такому же сценарию работает горячая клавиша Win + M, однако она отвечает за сворачивание всех активных окон. Таким образом, все они будут убраны, а на экране отобразится только рабочий стол. Кардинальной разницы между двумя описанными горячими клавишами нет, поэтому можете использовать их по своему усмотрению, что будет удобнее.
Сочетание Win + < или Win + > подходит преимущественно для тех пользователей, кто создал несколько рабочих столов и желает быстро переключаться между ними. Соответственно, каждая стрелочка отвечает за переключение в указанном направлении. Однако даже если рабочий стол всего один, можете использовать любое сочетание, и все окна будут автоматически свернуты.
Если вас заинтересовала тема создания нескольких рабочих столов в Windows 11, рекомендуем ознакомиться с отдельной статьей на нашем сайте. В ней вы узнаете о доступных вариантах создания дополнительных рабочий стол и принципе их использования.
Подробнее: Создание виртуального рабочего стола в Windows 11
Способ 2: Функция «Свернуть все окна»
Рассмотрим еще один быстрый метод отображения рабочего стола в Windows 11. Он заключается в использовании функции «Свернуть все окна». Если она включена по умолчанию, вам нужно довести курсор в правый угол панели задач для отображения характерной полоски и кликнуть по нему левой кнопкой мыши. В результате все окна будут свернуты, а на экране отобразятся исключительно ярлыки и папки на вашем рабочем столе.
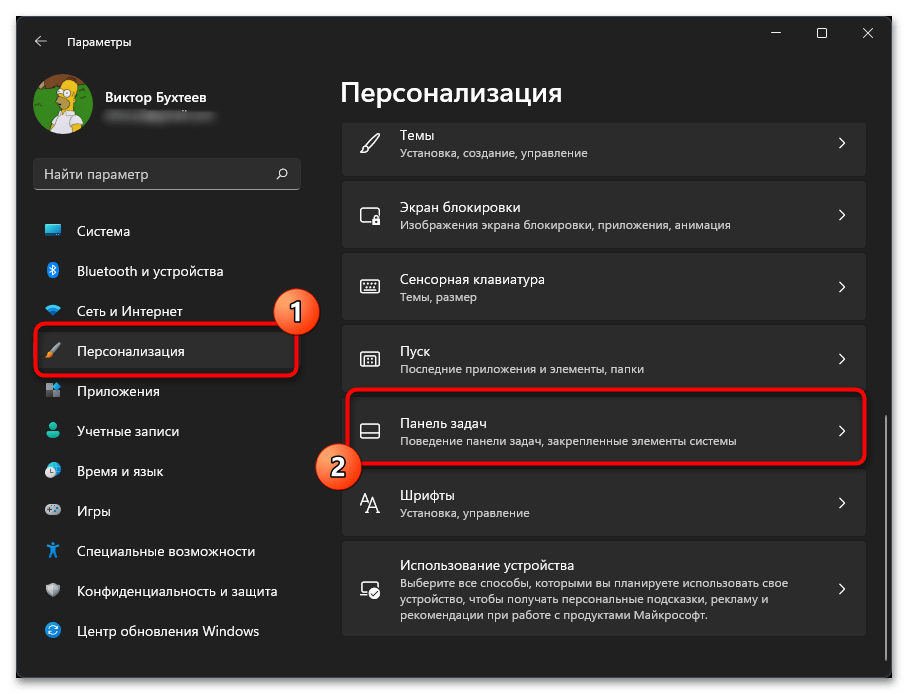
Если при наведении курсора вы не видите никаких уведомлений, а также нажатие по панели не дает нужного результата, скорее всего, рассматриваемая функция просто отключена в параметрах персонализации операционной системы. Понадобится внести изменения вручную.
- Для этого вызовите меню «Пуск» и перейдите в «Параметры», кликнув по значку с шестеренкой.
- На панели слева выберите раздел «Персонализация» и откройте категорию «Панель задач».
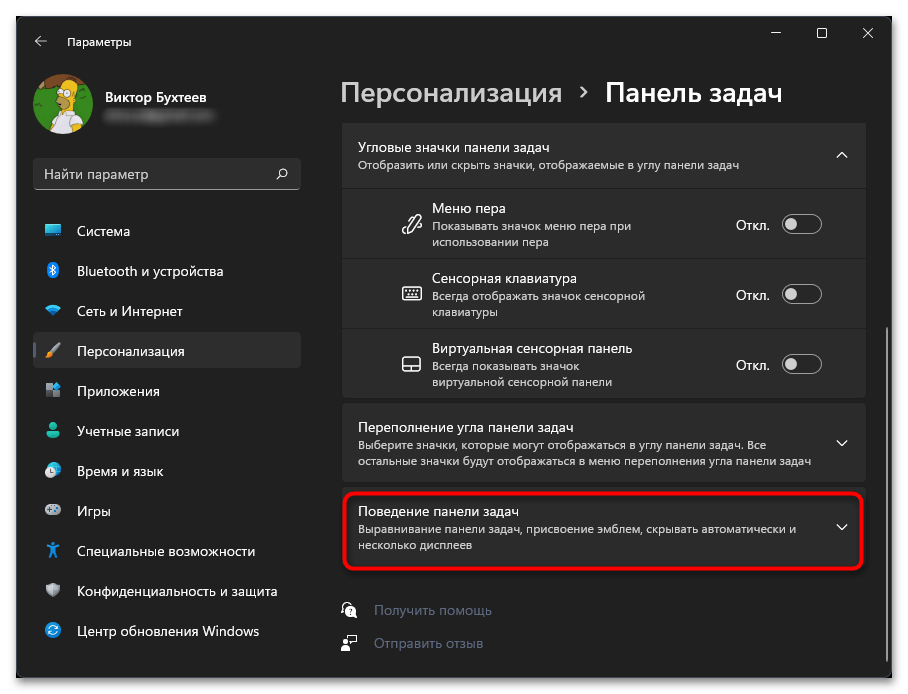
- Разверните список настроек «Поведение панели задач».
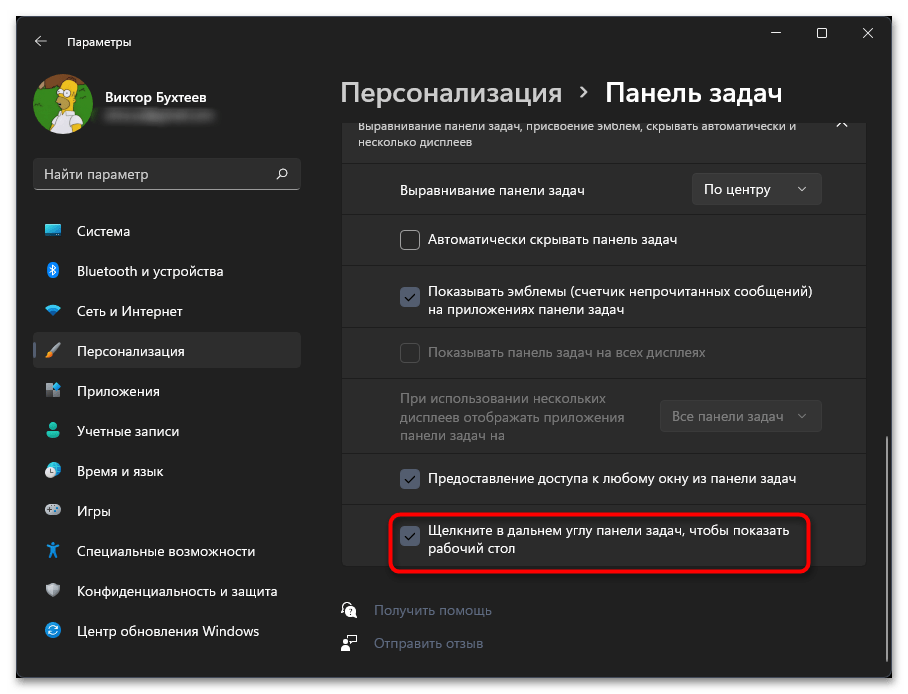
- Установите галочку возле пункта «Щелкните в дальнем углу панели задач, чтобы показать рабочий стол». После этого можете проверить, стала ли эта возможность доступной для использования.
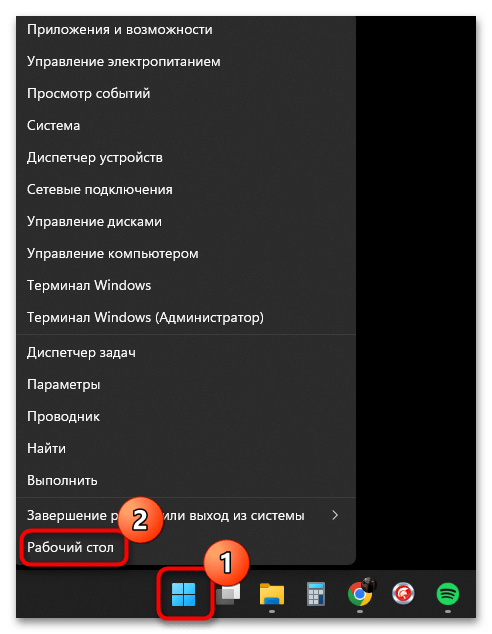
Способ 3: Контекстное меню «Пуска»
В контекстном меню «Пуска», которое вызывается нажатием правой кнопкой мыши по самому значку, есть много разных пунктов для вызова окон или запуска стандартных приложений. Однако сейчас нас интересует исключительно последняя строка с названием «Рабочий стол». Соответственно, при нажатии по данной ссылке все окна будут свернуты и на экране отобразится только рабочий стол, что и решает поставленную задачу.
Способ 4: Кнопка переключения рабочих столов
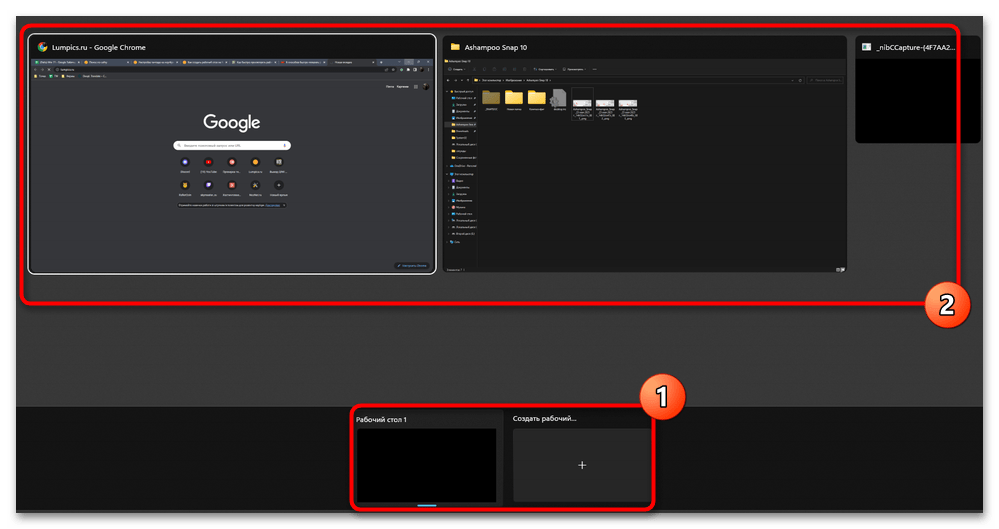
Если вы обратите внимание на панель задач, то рядом с кнопкой «Пуска» можете увидеть другую, наведение курсора на которую покажет вам все существующие виртуальные рабочие столы на вашем компьютере. Вы сможете выбрать любой из них для переключения. Однако если нужно получить больше информации, сначала нажмите по данной кнопке ЛКМ.
На экране отобразится целое окно с существующими окнами текущего рабочего стола. Отсюда же осуществляется создание новых виртуальных столов и переключение между ними. Данный метод в преимущественном большинстве случаев будет удобен, если вы как раз создали виртуальные рабочие столы, о чем мы уже упоминали при разборе горячих клавиш.
Способ 5: Пользовательский ярлык
В Windows 11 предусмотрена возможность создавать практически любые пользовательские ярлыки и добавлять для них путь, чтобы запускать различные программы и процессы. Можете создать такой пользовательский ярлык и добавить в него команду, которая отвечает за показ рабочего стола. Файл останется поместить в любую папку или закрепить на панели задач для удобства. Это позволит показывать рабочий стол всего одним кликом, без использования горячих клавиш и дополнительных меню.
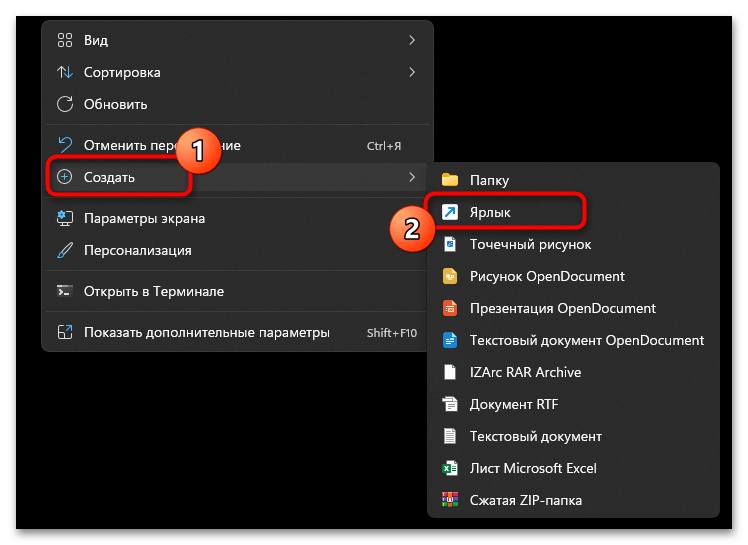
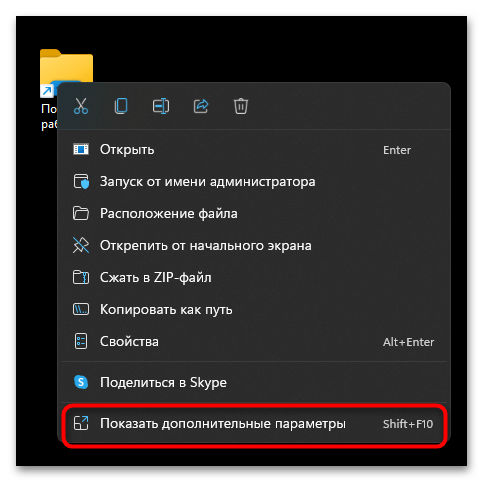
- Сначала создайте обычный ярлык, для чего нужно кликнуть ПКМ по пустому месту на рабочем столе, навести курсор на «Создать» и выбрать пункт «Ярлык».
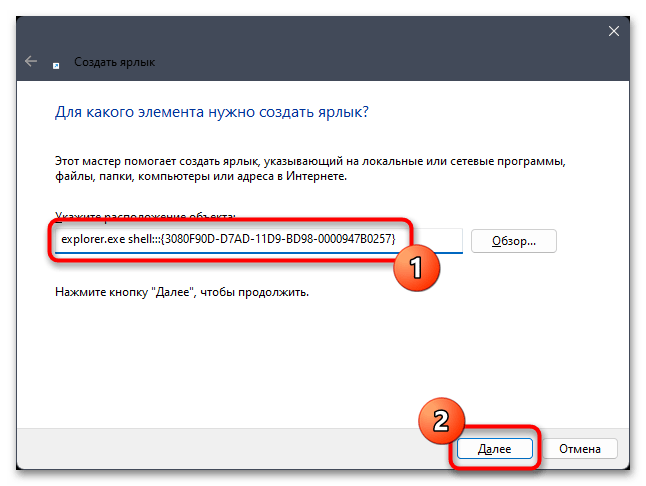
- В качестве расположения объекта укажите
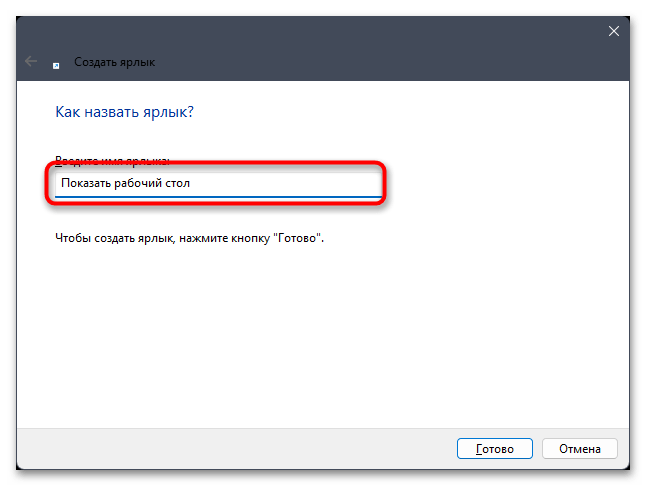
explorer.exe shell:::{3080F90D-D7AD-11D9-BD98-0000947B0257}и нажмите кнопку «Далее». - Название ярлыка задайте удобное для себя, чтобы он ассоциировался с показом рабочего стола. На этом моменте завершите его создание.
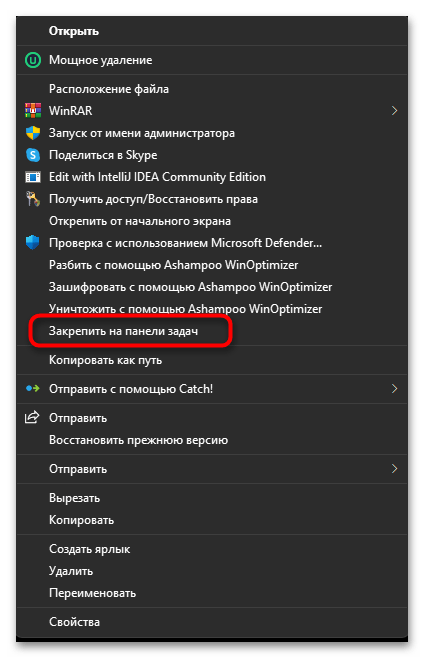
- Давайте сразу добавим ярлык на панель задач, чтобы протестировать его. Щелкните по нему правой кнопкой мыши и выберите «Показать дополнительные параметры».
- Из расширенного контекстного меню воспользуйтесь пунктом «Закрепить на панели задач».
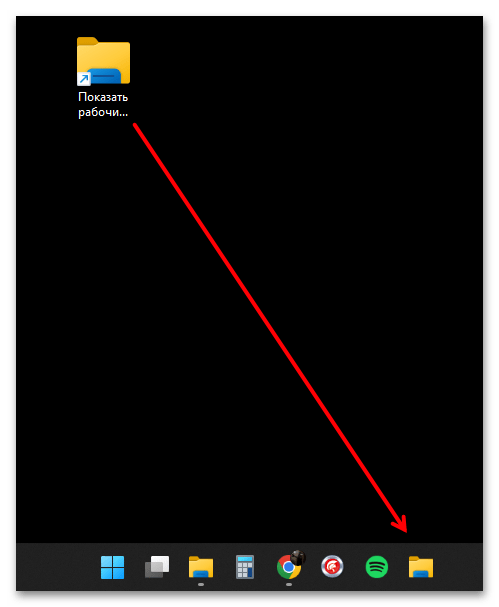
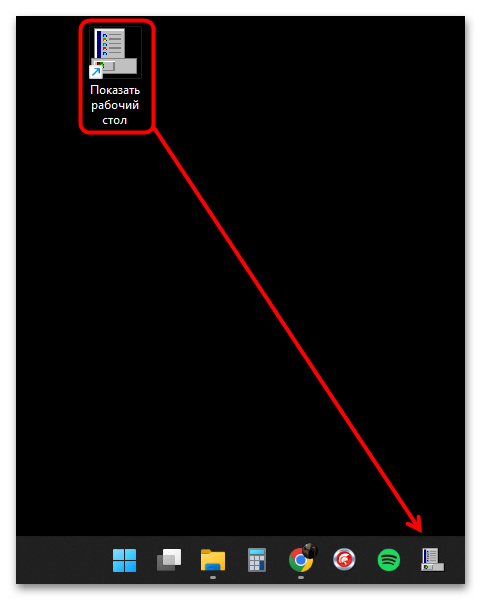
- Теперь вы видите, как ярлык (по умолчанию ему будет задан такой же значок, как у «Проводника») добавлен на панель задач. Разверните несколько окон, а затем нажмите по нему и проверьте, как он переключит вас на рабочий стол.
Для удобства значок ярлыка можно будет поменять на другой из стандартных или даже свой собственный, если вы предварительно скачаете его из интернета. Это позволит не запутаться между ним и стандартным «Проводником», который тоже может быть добавлен на панель задач.
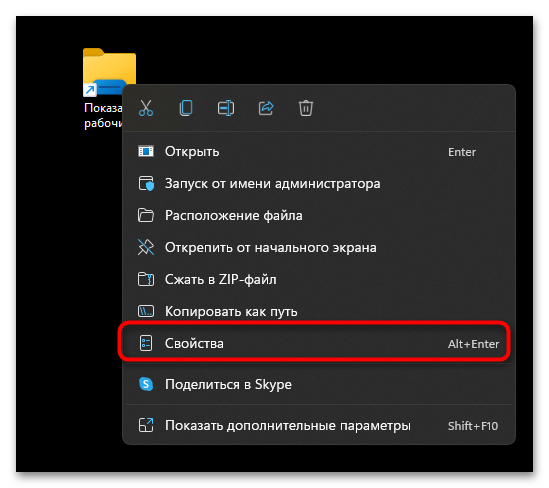
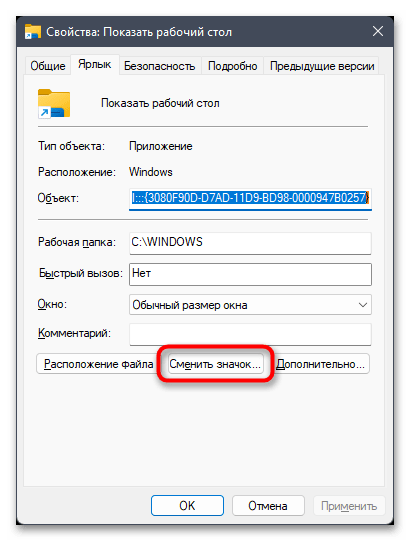
- Для смены иконки ярлыка нажмите по нему правой кнопкой мыши и выберите пункт «Свойства».
- В открывшемся окне кликните по кнопке «Сменить значок».
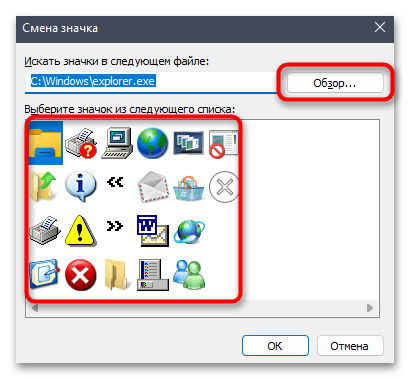
- Нажмите «Обзор» для выбора пользовательской иконки или выберите одну из стандартных среди предложенных.
- Далее вам нужно будет повторно закрепить ярлык на панели задач, чтобы его иконка была обновлена. После этого приступайте к его использованию, когда нужно будет показать рабочий стол.
Способ 6: Жесты на сенсорной панели
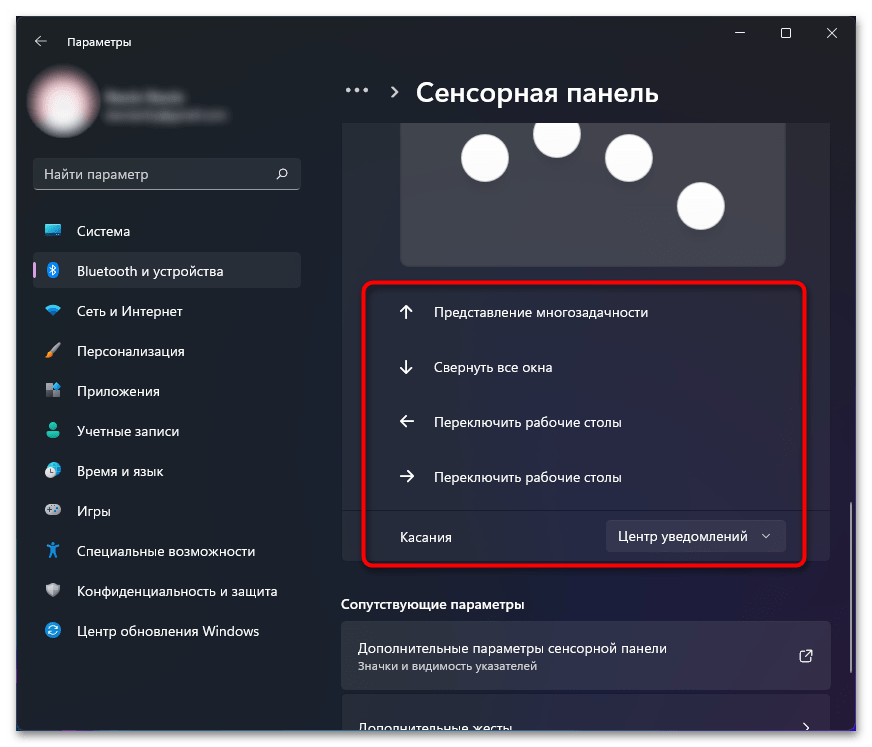
Данный метод отображения рабочего стола в Windows 11 подойдет только обладателям ноутбуков, которые поддерживают жесты на сенсорной панели (тачпаде). Список стандартных жестов и их действия можно найти через «Параметры» в разделе с настройками. Там же они изменяются под требования пользователя, что позволит определить для вас оптимальный жест, который бы отвечал за сворачивание всех окон. Более детально об этом читайте в другой статье от нашего автора по ссылке ниже.
Подробнее: Настройка тачпада на ноутбуке в Windows 11
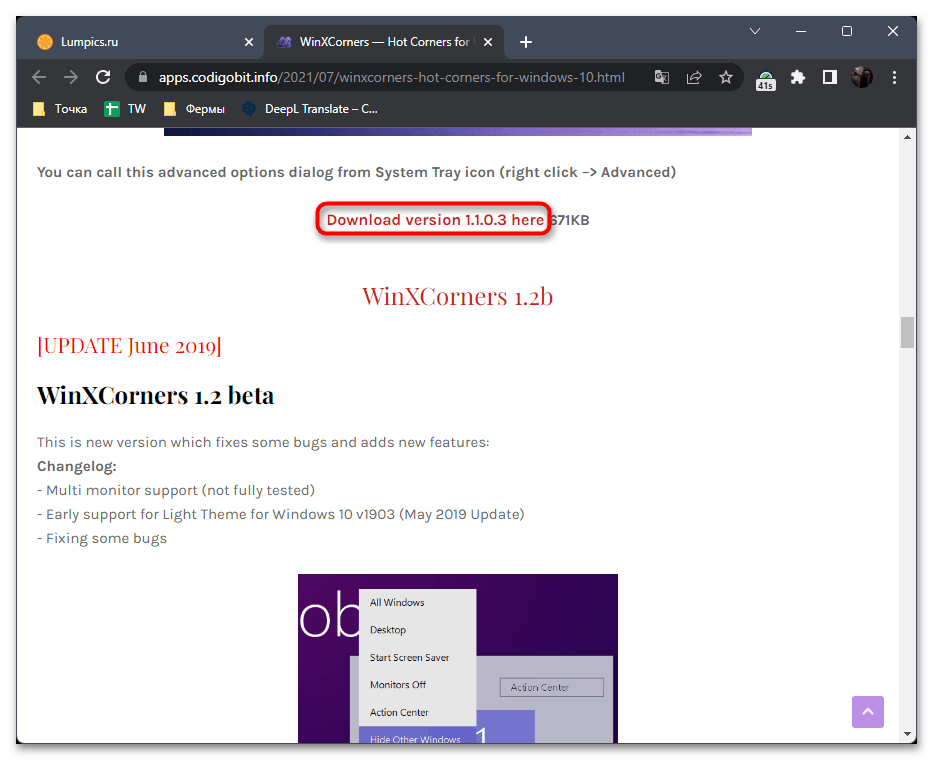
Способ 7: WinXCorners
WinXCorners — узконаправленное программное обеспечение, которое призвано перенести некоторые функции из MacOS в Windows. Относится это к действиям при наведении курсора в один из углов на экране. Если сейчас в Виндовс 11 работает только сворачивание всех окон при нажатии по правому углу панели задач, то программа позволяет настроить действия на каждый из углов, которое будет срабатывать автоматически при наведении, без дополнительных нажатий.
Скачать WinXCorners с официального сайта
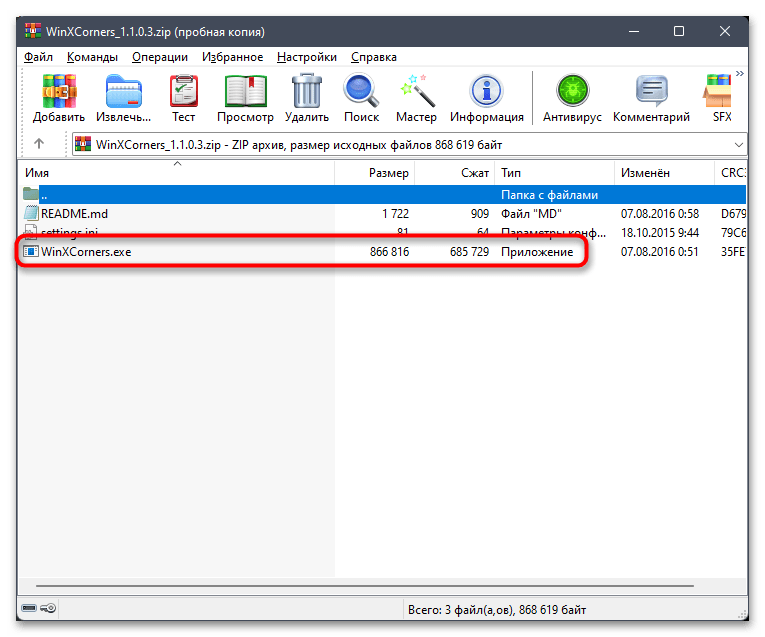
- Давайте вкратце разберемся с настройкой и использованием WinXCorners. Сначала скачайте архив с официального сайта.
- Распакуйте его в удобное место на компьютере и запускайте исполняемый файл для старта программы. Предварительная установка не требуется.
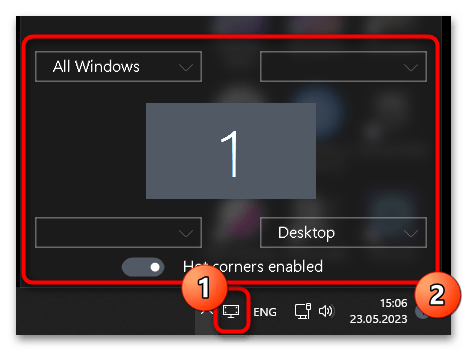
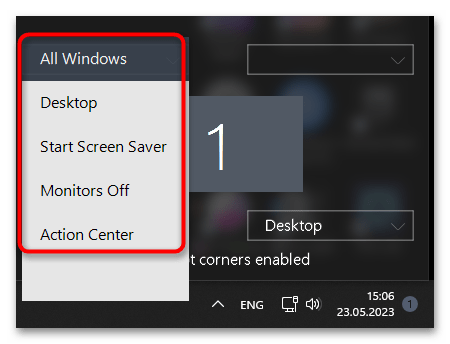
- На панели задач должен появиться значок WinXCorners, при нажатии по которому отобразится панель с настройками.
- Разверните список для каждого угла и подберите подходящее действие. Вы можете выбрать отображение рабочего стола, переход на стартовое окно, выключение мониторов или отобразить центр действий (окно настройки громкости, управление интернетом, Bluetooth и прочее).
- Если не хотите каждый раз запускать WinXCorners, через контекстное меню включите автозагрузку программы, после чего она будет включаться вместе с операционной системой. Через это же контекстное меню осуществляется и выход, что актуально в тех случаях, когда вы хотите быстро отключить все действия.
Наша группа в TelegramПолезные советы и помощь
Время на прочтение1 мин
Количество просмотров10K
Microsoft отключает показ кнопки «Показать рабочий стол» (Show desktop), чтобы освободить место для ИИ-помощника Copilot на панели задач. Это изменение внедрили с обязательным обновлением Windows 11 от февраля 2024 года.

После установки KB5034765 значок Windows Copilot рядом с панелью поиска переместился в правую часть панели задач.
Нововведение заметят пользователи в США, Великобритании и других странах, кроме Европейского Союза.
Microsoft не отключает функцию «Показать рабочий стол», но она недоступна по умолчанию.
Как восстановить кнопку «Показать рабочий стол» на панели задач:
-
открыть «Настройки Windows» > «Персонализация» > «Панель задач»,
-
в настройках панели задач развернуть раздел «Поведение панели задач» (Taskbar behaviours) и включить «Выбрать дальний угол панели задач, чтобы отобразить рабочий стол» (Select the far corner of the taskbar to show desktop).

Также можно открыть настройки панели задач, чтобы скрыть значок Copilot.
Microsoft также планирует открывать Windows Copilot при запуске системы, но только на широкоэкранных устройствах более 27 дюймов. Нововведение тестируется в предварительных сборках Windows 11. Однако компания пообещала разрешить пользователям отключать все функции, связанные с Copilot, через «Настройки» > «Персонализация».
В Windows 11 Build 26052 Microsoft добавила функцию, которая позволяет наводить указатель мыши на значок Copilot, чтобы суммировать выбранные тексты или просматривать контент с помощью искусственного интеллекта.
Компания также предупредила, что с откатом сборки Windows 11 26052 с ПК удаляется большой объём данных. Пользователям рекомендуют создать резервную копию содержимого Dev Drives.
(Image credit: Mauro Huculak)
On Windows 11, getting lost in a sea of open windows and cluttered desktops is easy, and with multiple apps and files open at the same time, it can be frustrating to find what you need quickly. That’s why the option to show the desktop is so practical.
Using a few clicks, you can minimize all your open windows and quickly access your desktop icons and files. In addition, it’s a lifesaver feature that allows you to hide everything on the screen quickly when reviewing sensitive information and someone walks on you.
In this how-to guide, I will show you the easy ways to show the desktop on Windows 11 quickly.
Three ways to show the Windows 11 desktop
On Windows 11, there are several ways to show the desktop, including using a keyboard shortcut, the Taskbar option, and the desktop settings.
Keyboard shortcut
The operating system offers at least two keyboard shortcuts to show the desktop:
- Windows key + D: If you press this key combo, the system will minimize everything on the screen to give you access to the desktop. You can repeat the same shortcut to restore your windows. (The «D» is for desktop.)
- Windows key + M: If you press this key combo, the system will minimize all the windows. Unlike the show desktop shortcut, in this case, you have to use the «Windows key + Shift + M» keyboard shortcut to restore the windows on the screen. (The «M» is for «minimize.»)
Taskbar button
On Windows 11, you can also click the button located in the bottom-right corner, next to the Copilot (or notification) icon.
If the option isn’t working, it’s probably not enabled, in which case, you have to follow these steps:
All the latest news, reviews, and guides for Windows and Xbox diehards.
- Open Settings.
- Click tone Personalization.
- Click the Taskbar page on the right side.
- Click the Taskbar behaviors setting.
- Check the «Select the far corner of the taskbar to show the desktop» option.

- (Optional) Clear the option to disable the feature.
Once you complete the steps, click the button in the bottom-right corner of the Taskbar, which will show the desktop.
It’s important to note that when Microsoft relocated the Copilot icon to the System Tray, the company disabled the option to show the desktop, but it didn’t remove it. However, after feedback, the original behavior is back.
Hide desktop icons
Alternatively, if you want to show the desktop without the icons, you must hide them. Here’s how:
- Use the «Windows key + D» keyboard shortcut.
- Right-click the desktop, select «View,» and choose the «Show desktop icons» option to turn off the feature (if checked).
After you complete the steps, you will have access to the desktop and a desktop without any icons.
You can show the icons again by right-clicking the desktop, accessing the «View» menu, and choosing the «Show desktop icons» option to turn on the feature.
More resources
For more helpful articles, coverage, and answers to common questions about Windows 10 and Windows 11, visit the following resources:
- Windows 11 on Windows Central — All you need to know
- Windows 10 on Windows Central — All you need to know
Mauro Huculak has been a Windows How-To Expert contributor for WindowsCentral.com for nearly a decade and has over 15 years of experience writing comprehensive guides. He also has an IT background and has achieved different professional certifications from Microsoft, Cisco, VMware, and CompTIA. He has been recognized as a Microsoft MVP for many years.
-
Home
-
News
- How to Show the Desktop in Windows 11?
By Stella | Follow |
Last Updated
If you want to show the desktop in Windows 11, you can use the select show the desktop button in the taskbar or use the shortcut. However, where is the show the desktop button in Windows 11, and how to show the desktop in Windows 11 using it? In this post, MiniTool Software will show you the answers.
How to Show the Desktop in Windows 11?
The first Windows 11 Insider preview build has been released. Are you using it smoothly? Yes, there are many new features and improvements in this Windows operating system. It may take a while for you to get used to operating in this new operating system.
Some operating habits need to be changed because Microsoft has simplifies the taskbar (and the Start menu). In Windows 10, if you want to show the desktop using one click, you just need to move your mouse cursor to the right side of the taskbar and click the Show the desktop button (the rightmost button) to do it.
However, in Windows 11, the form of the taskbar is changed. At the first sight, you can’t find the Show desktop button on the right side of the taskbar. The following image is an example.
Where is the show desktop button in Windows 11? It is still in the taskbar, but it is hidden by default. It is a form of a 1px line which is not showing up unless you move your mouse curse to that place. On the other hand, you can also find the show the desktop option after right-clicking the system tray arrow.
Now, you know the location of the show the desktop button. In the following content, we will show you how to show the desktop in Windows 11 using different methods.
How to Show the Desktop in Windows 11?
- Click the show desktop button in the taskbar
- Right-click the system tray in the taskbar
- Use the show desktop shortcut
Method 1: Click the Show Desktop Button in the Taskbar
Move your mouse cursor to the right side of the date and time area and you can see a thin line. You can click it to make Windows 11 show the desktop.

You see it is difficult to find and click that button. But you can use alternative ways to show the desktop in Windows 11. Two more methods will be show as follows.
Method 2: Right-Click the System Tray Arrow
You can’t find the show the desktop option after right-clicking the taskbar. But Microsoft arranges a place for it in the taskbar. You can right-click the system tray arrow and then you can find Show the desktop. Next, you can click it to minimize all the opened windows and show the desktop in Windows 11.

Method 3: Use the Show Desktop Shortcut
You can also use the show desktop shortcut to make your Windows 11 computer show the desktop immediately. You can press the Windows + D keys at the same time to do the job.
How to show desktop in Windows 11? After you read this post, you should know the answer. You can choose a convenient method to help you solve the problem. Should you have other Windows 11-related issues, you can let us know in the comment.
About The Author
Position: Columnist
Stella has been working in MiniTool Software as an English Editor for more than 8 years. Her articles mainly cover the fields of data recovery including storage media data recovery, phone data recovery, and photo recovery, videos download, partition management, and video & audio format conversions.
Home
Windows
By
Bhishu Acharya
Most of us place our quick-access items on the desktop such that we can use them whenever needed. Therefore, we constantly need to show our Desktop when multitasking.
You have probably faced a situation where you open tons of files and want to view your Desktop quickly. Indeed, minimizing or closing each one will take a lot of time.
But what if we tell you there are tons of shortcuts to do this? Here, we introduce some easy techniques to show Desktop on Windows 11.
Open Desktop From The Taskbar
Using the taskbar is probably the simplest way to show the Desktop on Windows 11. However, if you’re unaware of this, you can go through the following steps:
- Navigate to the Windows taskbar.
- Drag your cursor to the bottom-right corner of the screen.

- Once you do so, a button pops up. If you hover over the icon, it says Show Desktop. So, simply click on it.
- Now, all your documents get hidden, and you can view your Desktop. But, if you wish to toggle back to your old window, click on the button again.

If the feature isn’t working, you need to change some settings. Here’s how you can do that:
- Visit Settings and go to Personalization.

- Click on the Taskbar option and navigate to Taskbar behaviors.

- Tick the Select the far corner of the taskbar to show the desktop option.
- Now, take your cursor to the bottom-right corner of the taskbar again. This time, the technique should work just fine.


From Start Menu
Well, the Start Button on our taskbar is the gateway to everything on our PCs. Hence, it’s possible to show the desktop via Start Menu.
- First of all, right-click on the Start button.
- select the option, Desktop. Upon clicking the button, you’ll be directed to your desktop.
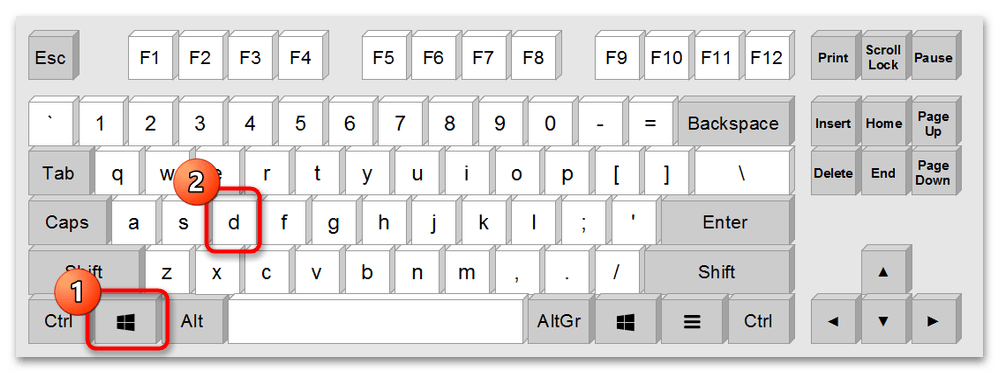
Press Windows Key and D
Pressing the Windows key and D is an alternative method to hide the running files to access the Desktop. Interestingly, you can use this keyboard shortcut even if the Select taskbar to show the desktop option is disabled.

To get back to your old document, use the same keys again. However, if you perform any action after entering Desktop, you won’t be able to get back where you were.
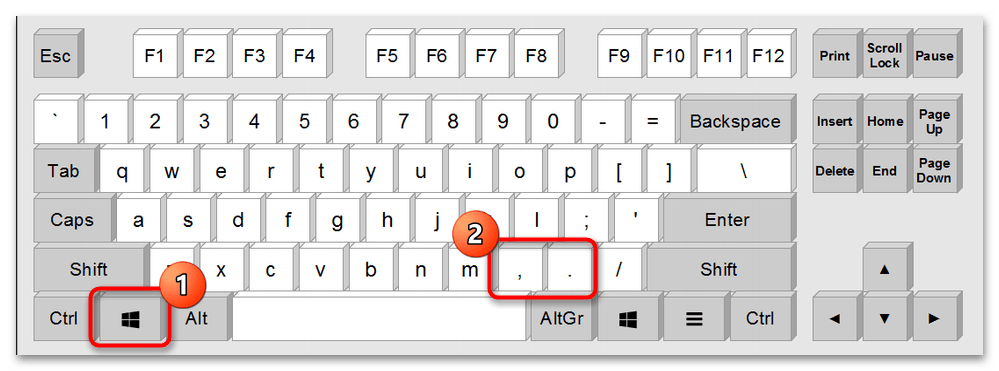
Use Windows Key and Comma
Are you trying to quickly view your Desktop without making any changes to it? Well, this is possible using Windows and Comma keys.

Once you press these keyboard/keypad buttons, your desktop is shown at a glance. However, releasing them will toggle back to the previous window.
Therefore, you should use this keyboard shortcut only when trying to see what’s on the Desktop. For example, you can check your Desktop when changing the background to see how it looks.
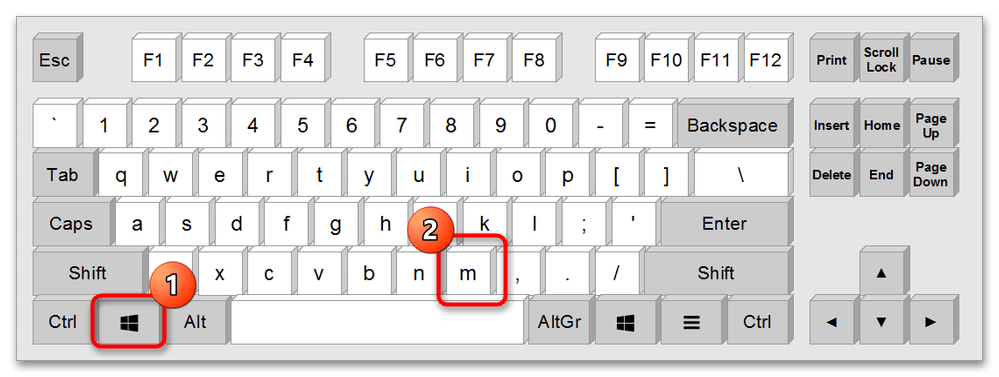
Press Windows Key and M
Generally, we use Windows and M keys to minimize multiple windows all at once to view the Desktop content. But, if you press these keys again, none of your old files get restored.

If you wish to return to your old program, use Windows + Shift + M keys. This will not only restore your earlier window but also maximize all the other previously opened documents.
Create a Shortcut That Shows Desktop
Not many users are aware of creating shortcuts to show the Desktop. Using this method, you can simply create a taskbar icon that lets you view your desktop from time to time.
So, here’s a basic idea on how you can create a shortcut that leads to Desktop on Windows 11:
- Navigate to your Desktop and right-click anywhere on the window.
Go to New and select Shortcut.
- Then, enter the following location once the dialogue box appears and click on Next.
explorer.exe shell:::{3080F90D-D7AD-11D9-BD98-0000947B0257}

- Now, type your desired name for the shortcut and choose Finish.

- Next, go back to Desktop and right-click on the recently created Shortcut.
- Choose Show More Options and select Pin to taskbar. This will create a shortcut icon on your Windows taskbar.

- Finally, test whether the shortcut is working or not. First, open multiple files. Then, press the shortcut icon on your taskbar. Certainly, this should take you to the Desktop.


Interestingly, you can press the icon again to return to the previous window. Indeed, this is much more convenient than the other techniques.
Well, the shortcut icon you created has a default File Explorer icon. So, to make it look more appealing, learn how to change icons from our other article.
Quickly View Desktop Items in File Explorer
If you do not wish to view your Desktop but rather work on the items, you can do so in File Explorer. Follow these general steps to get an idea of how you can quickly show Desktop items:
- Open File Explorer from your Windows taskbar.
- On your left side, navigate to This PC.
- Next, select Desktop. This will show all your Desktop files in a window rather than opening the actual desktop.