
Aug. 16, 2022 / Updated by
Vivi to
Windows 11

Many Windows 10 users have received the message «Something went wrong. Select Try again, and if that doesn’t work, contact Microsoft support for help. Error code 0x8007007f » when manually upgrading the operating system to Windows 11 with the Windows 11 Installation Assistant tool. This error can be caused by many factors, such as outdated drivers, corrupted system files, or insufficient administrator permission. It may seem complicated, but it’s not very difficult to fix. This article will introduce 5 effective solutions to the Error code 0x8007007f appeared in the Windows 11 Installation Assistant.
Contents:
Fix 1. Run Windows 11 Installation Assistant as administrator
Fix 2. Update the graphics drivers
Fix 3. Free up storage space
Fix 4. Disable third-party antivirus
Fix 5. Perform SFC scan
Fix 1. Run Windows 11 Installation Assistant as administrator
When the Installation Assistant cannot rewrite or download the Windows 11 files to the system directory, the Error code 0x8007007f may occur for the reason that the current operating system blocks the access. Admin access is required if you want to open any files. Thus, you can run Windows 11 Installation Assistant as administrator to make sure that Installation Assistant is able to open the system files.
To do so:
Step 1. Right-click on the Windows11InstallationAssistant.exe file, and choose Run as administrator.
Step 2. Select Yes.
Step 3. Follow the on-screen instructions to complete the installation process.
Check if the Windows 11 update error code 0x8007007f is fixed. If not, try next solution.
Fix 2. Update the graphics drivers
An out-of-date or incompatible graphics driver can be the culprit of the Windows 11 installation error 0x8007007f. Graphics card manufacturers, such as Intel, AMD and NVIDIA, have released graphics drivers for Windows 11. To resolve the Error code 0x8007007f problem, you can try updating your graphics drivers.
As for how to update drivers, we’d recommend Driver Talent to you. Driver Talent is a free driver updater software having access to millions of drivers for various devices. It can find out the problematic drivers on the computer, and then fix the issues by updating drivers, restoring drivers, uninstalling drivers or backing up drivers.
Now click the download button to use DriverTalent to resolve the code 0x8007007f problem.
Download Driver Talent
Simple steps to update graphics drivers.
Step 1. Check all drivers on your PC with one click.

Step 2. Update the graphics driver with one click.
Note: You can also click Update All to update multiple device drivers all at once.

Step 3. Reboot your PC.
This should be able to fix the Windows 11 installation error 0x8007007f issue.
Fix 3. Free up storage space
Lack of adequate disk space may also lead to error 0x8007007f in Windows 11 Installation Assistant during the upgrading process. Enough disk space is required to download and install Windows 11 files, as well as save Windows system files temporarily. In this case, you need to free up space on the Windows installation drive.
Steps to free up storage space are as follows:
Step 1. Click on Start, and then type Disk Cleanup in the search box.
Step 2. Select the temporary files that you don’t need, and then click on OK to delete them.
Step 3. When it is completed, try running Windows 11 Installation Assistant to see if it can work properly.
Fix 4. Disable third-party antivirus
It is reported that many people have fixed the Windows 11 Installation Assistant error code 0x8007007f by disabling installed third-party antivirus software as they may interfere with the functioning of the Installation Assistant. So you can give it a try.
Instructions on how to uninstall third-party antivirus software are as follows:
Step 1. Click on Start, and then choose Settings.
Step 2. Go to the Apps section, and then select Apps & features.

Step 3. Find the antivirus software, right-click on it, and select Uninstall.
Step 4. Uninstall all third-party antivirus software, and then run the Installation Assistant again to see if the problem is resolved.
Fix 5. Perform SFC scan
The System File Checker (SFC) or sfc.exe is a Windows in-built utility that can help to scan for and restore corrupted Windows system files. If the solutions listed above didn’t solve the problem, you should run the SFC tool to check the system files on your computer and repair the corrupted files.
Step 1. Press Win + R altogether on your keyboard.
Step 2. Type cmd, and press Shift + Ctrl + Enter altogether.
Step 3. In the prompt window, type SFC/scannow, and then press Enter.
SFC will then check the system files and fix the system file corruption.
When it is over, install Windows 11 again to check if the Error code 0x8007007f problem still occurs.
Hope these 5 solutions can help you fix the Windows 11 Installation Assistant Error code 0x8007007f issue. If you still have any ideas or questions, please contact us in the comments section below.
Read more:
1. How to Fix «Radeon software and driver versions do not match» in Windows 11
2. How to Fix 0xc1900101 Error during Windows 11 Installation
3. How to Fix SYSTEM_SERVICE_EXCEPTION (dxgkrnl.sys) Blue Screen in Windows 11
4. How to Fix This Device Is Not Configured Correctly (Code 1)
5. How to Fix Bluetooth driver errors (Code 43) in Windows 11
Recommended Download
|
ExplorerMax |
Driver Talent for Network Card | |||
| Smart and advanced file explorer tool for Windows platforms | Download & Install Network Drivers without Internet Connection | |||
|
30-day Free Trial |
Free Download |
willk7
Copper Contributor
Nov 20, 2021
Window 11 upgrade has failed error code 0x8007007f
Resources
Microsoft’s newest operating system, Windows 11, has generated plenty of buzz in the tech world Windows 11 Installation Assistant.
With its improved performance and sleek user interface, it’s no wonder why so many people are eagerly awaiting its release.
And while installing a new operating system may seem daunting, Windows 11 Installation Assistant makes the process smooth and hassle-free.
This simple tool guides users through each step of the installation process.
Ensuring that their device is ready to run the new operating system with minimal interruptions.
Whether you’re a seasoned tech expert or a novice user, Windows 11 Installation Assistant is a valuable tool for installing Windows 11.
The launch of Windows 11 has brought a lot of excitement among users worldwide.
One of the most notable features of this new operating system is the Windows 11 Installation Assistant, which is a game-changer in many ways.
First and foremost, it streamlines the installation process and makes it much easier for users to upgrade to Windows 11.
The Installation Assistant guides users through the entire process, ensuring that everything is correctly set up and that there are no errors during installation.
This is a significant improvement over previous versions of Windows, where the process was more complex and time-consuming.
With the Windows 11 Installation Assistant, users can get up and running on the new operating system with just a few clicks, saving them time and hassle.
How to fix windows 11 installation assistant
- Check System Requirements: Make sure your system meets the minimum requirements for Windows 11. Check factors like processor compatibility, RAM, storage, and TPM version. If your hardware doesn’t meet the requirements, you won’t be able to install Windows 11.
- Run Windows Update: Ensure that your current version of Windows is up to date. Sometimes, updates can resolve compatibility issues that might be causing the installation assistant to malfunction.

- Restart Your Computer: A simple restart can sometimes clear temporary glitches that might be causing the installation assistant to fail.

- Run Installation Assistant as Administrator: Right-click on the Installation Assistant and choose “Run as administrator.” This can provide the necessary permissions and privileges for the installation process to run smoothly.
- Disable Third-Party Antivirus or Security Software: Sometimes, third-party security software can interfere with installation processes. Temporarily disable your antivirus or security software and see if that resolves the issue.
- Check Network Connection: Ensure that you have a stable internet connection. The installation assistant might require a reliable connection to download necessary files and updates.

- Use Media Creation Tool: Instead of using the Installation Assistant, you can create a bootable USB drive using the official Media Creation Tool provided by Microsoft. This tool is more versatile and can help you perform a clean installation of Windows 11.
- Update Drivers: Outdated or incompatible drivers can cause installation issues. Make sure you have the latest drivers for your hardware components, especially graphics and network drivers.

- Check for Known Issues: Search online for any known issues related to the Windows 11 installation assistant. Microsoft often provides information and solutions for common problems on their official support website.
- Try Safe Mode: Boot your computer into Safe Mode and then try running the installation assistant. Safe Mode loads only essential drivers and can help determine if a third-party application is causing the issue.

- Perform a Clean Boot: A clean boot starts Windows with a minimal set of drivers and startup programs. This can help identify if a background application is interfering with the installation process.
- Contact Microsoft Support: If none of the above solutions work, you might need to contact Microsoft Support for more specific assistance with your issue.
2.CMD
- Reagentc /info
- Reagentc /enable
- Sfc /scannow
other methods
Windows 11 is the latest and highly anticipated operating system released by Microsoft.
However, during the installation process, some users might encounter issues with the Windows 11 Installation Assistant.
If you are facing difficulties in installing Windows 11 or experiencing errors with the installation assistant, don’t worry! There are several troubleshooting steps you can take to resolve these issues and ensure a smooth installation process.
First and foremost, ensure that your system meets the minimum requirements for Windows 11, including compatible hardware specifications and sufficient disk space.
If your system meets the requirements, try restarting your computer and running the installation assistant again.
It is also advisable to disable any third-party antivirus or firewall software temporarily, as they can sometimes interfere with the installation process.
Additionally, make sure your internet connection is stable and reliable to prevent any interruptions during the installation.
If the problems persist, consider downloading the Windows 11 ISO file and creating a bootable USB drive using the Media Creation Tool.
This method can offer a more reliable installation process and help bypass any issues with the installation assistant.
Finally, if none of these solutions work, it might be worth reaching out to Microsoft support for further assistance in troubleshooting the Windows 11 Installation Assistant.
Remember, patience and diligence are key in resolving any technical challenges, and with these steps, you can overcome any installation issues and experience the exciting features that Windows 11 has to offer.
conclusion
In conclusion, Windows 11 installation assistant is an indispensable tool for users looking to upgrade their operating system.
With its user-friendly interface and step-by-step guidance, the assistant ensures a smooth and hassle-free installation process.
By automatically checking system requirements and offering compatibility suggestions, it saves users time and effort in researching their PC specifications.
Moreover, the assistant includes useful features like data migration options and system optimization recommendations, enhancing the overall user experience.
Windows 11 installation assistant proves to be crucial in seamlessly transitioning to the latest Windows version, providing users with an efficient and reliable upgrade solution.
Read More:
- how to fix corrupted files windows 11
- inaccessible boot device windows 11 fix
- How to Troubleshoot and Resolve srttrail.txt Errors in Windows 11
Upgrading to Windows 11 should be an exciting step forward, but for some, it halts when faced with error code 0x8007007f. This error can be a significant roadblock when using Windows 11 Installation Assistant, which is a tool designed to facilitate a smooth operating system upgrade. The error code suggests something is preventing the Installation Assistant from running its course which might be related to system files or settings.

Experiencing an installation error can be disheartening, but understanding it is the first step in troubleshooting. Error code 0x8007007f often arises due to insufficient system storage, incorrect permissions, or corrupted system files. These types of issues can generally be resolved through a series of systematic steps.
Our goal is to take away the frustration associated with technical glitches. By addressing the error head-on with precise fixes, we aim to get your Windows 11 installation back on track. Be assured, with the correct approach, overcoming error code 0x8007007f is often a task we can achieve relatively easily.
Contents
- 1 Understanding the Error 0x8007007f
- 1.1 Common Causes of the Error
- 1.2 Error Message and Symptoms
- 2 Preparatory Steps Before Troubleshooting
- 2.1 Checking System Requirements
- 2.2 Verifying Storage Space
- 2.3 Ensuring Necessary Permissions
- 3 Troubleshooting Methods
- 3.1 Running the System File Checker
- 3.2 Updating Drivers and Windows
- 3.3 Disabling Third-Party Antivirus Software
- 3.4 Performing Disk Cleanup and Updates
- 4 Advanced Solutions and Considerations
- 4.1 Manually Updating Drivers via Device Manager
- 4.2 Using Windows 11 Media Creation Tool
- 4.3 Seeking Further Technical Support
Understanding the Error 0x8007007f
Error 0x8007007f can disrupt the Windows 11 installation process, often linked to system and drivers issues. Let’s explore its typical causes and what the error message entails.

Common Causes of the Error
Corrupted system files: One of the primary culprits for this error is corruption within system files. This can occur due to incomplete installations, unexpected shutdowns, or virus infections affecting the integrity of the operating system.
Driver incompatibility: Outdated or incompatible drivers can also lead to installation failures. Windows 11 has strict requirements for drivers, and any mismatch can trigger errors, including 0x8007007f.
Error Message and Symptoms
Error Message: When encountering error 0x8007007f, you’ll typically see a message stating “Something went wrong” during the use of Windows 11 Installation Assistant. This error prevents the installation process from progressing.
Symptoms: Aside from the error message, other symptoms may include the installation assistant freezing or crashing, or your system behaving erratically due to the failed installation attempt.
Preparatory Steps Before Troubleshooting
Before diving into troubleshooting the Windows 11 Installation Assistant error 0x8007007f, we need to ensure that our system meets the essential criteria. This preparatory phase is crucial for a hassle-free resolution process.
Checking System Requirements
In our experience, confirming that our computer meets Windows 11’s system requirements is a critical first step. An incompatible device may halt the upgrade, causing errors like 0x8007007f. The fundamental requirements are:
| Component | Requirement |
| Processor | 1 gigahertz (GHz) or faster with 2 or more cores on a compatible 64-bit processor |
| RAM | 4 GB or more |
| Storage | 64 GB or larger storage device |
| System Firmware | UEFI, Secure Boot capable |
| TPM | Version 2.0 |
| Graphics Card | DirectX 12 compatible or later with WDDM 2.0 driver |
| Display | High definition (720p) display, 9″ or larger monitor, 8 bits per color channel |
Verifying Storage Space
Insufficient storage space can result in error 0x8007007f when trying to upgrade to Windows 11. We must make sure there is enough space for the new operating system:
To free up storage space, consider:
- Using the Disk Cleanup utility to remove temporary files and system files.
- Uninstalling apps and programs that are no longer needed.
- Moving files to an external drive or cloud storage.
Ensuring Necessary Permissions
Errors during the upgrade process often stem from permission issues. We should be logged in as an administrator to ensure the Installation Assistant can perform necessary tasks. Running the program as an administrator also avoids permission-related errors:
Steps to run Windows 11 Installation Assistant as an administrator:
- Locate the program’s icon or executable file.
- Right-click and select ‘Run as administrator.’
- Confirm the action if prompted by User Account Control (UAC).
Troubleshooting Methods
We often experience glitches when upgrading our systems, but with the right steps, these can be resolved efficiently. Focusing on the Windows 11 Installation Assistant error 0x8007007f, we outline practical solutions to get past this hurdle.
Running the System File Checker
The System File Checker (SFC) is a utility in Windows that allows us to scan for and restore corruptions in Windows system files. To run the SFC, open the Command Prompt as administrator and type sfc /scannow. The process will scan all protected system files, and replace corrupted files with a cached copy.
Updating Drivers and Windows
It’s crucial to ensure that all system drivers are updated. Outdated or incompatible drivers can cause installation errors. We also need to keep Windows updates current, ensuring that the latest features and fixes are applied. Check for updates by going to Settings > Update & Security > Windows Update and install any available updates.
Disabling Third-Party Antivirus Software
At times, third-party antivirus software can interfere with system updates. We should temporarily disable these applications to prevent any conflicts. Remember to turn them back on once the installation is complete.
Performing Disk Cleanup and Updates
Finally, performing a disk cleanup can remove unnecessary files and free up space, which can prevent errors during the installation. Make sure to also run Windows Update to apply any pending updates before retrying the installation. This approach ensures the system is optimally prepared for the Windows 11 upgrade.
Advanced Solutions and Considerations
For those encountering the Windows 11 Installation Assistant error 0x8007007f, we will explore some thorough fixes. These steps are aimed at more experienced users confident in navigating the intricacies of their operating system.
Manually Updating Drivers via Device Manager
Outdated or corrupted drivers can cause installation issues. Here’s how we ensure they’re up to date:
Step 1: Open Device Manager by right-clicking on the Start button and selecting it from the menu.
Step 2: Expand each category and right-click on each device, selecting ‘Update driver’.
Step 3: Choose ‘Search automatically for updated driver software’ and follow the prompts.
Using Windows 11 Media Creation Tool
If direct installation fails, the Media Creation Tool is a reliable alternative:
| Action | Benefit | Note |
| Download the Media Creation Tool from Microsoft’s website. | Ensures you’re using the official and latest version. | Requires a stable internet connection. |
| Create installation media for another PC. | Allows for a clean installation of Windows 11. | Ensure you have a backup of your files. |
Seeking Further Technical Support
If the aforementioned steps do not resolve the issue, professional assistance may be required. We recommend:
Visit Microsoft Support online for tailored help.
Contact official support for any persistent error messages specifically related to Windows 10 or Windows 11.
For assistance with hardware from manufacturers like NVIDIA or AMD, refer to their specific customer support teams.
Some users reported that when they are trying to upgrade to Windows 11 to a newer version they encounter a 0xc000409 error. This error message suggests that something is going wrong during the installation process but it is not known what is the reason for this issue in the message itself. In this article, you will understand the reason for this error and see how to fix Windows 11 Installation Assistant Error Code 0xc000409.

The Installation Assistant error code 0xc0000409 mostly appears when the antivirus is blocking the assistant either from accessing some of the files or from doing its job. However, it is not the only factor that can cause this error, if some of the Windows Update files or components are corrupted or missing, there is a high chance that said error. In order to remedy the situation, adhere to the solutions mentioned hereinafter.
If you see Windows 11 Installation Assistant error 0xc0000409, follow the prescribed solutions.
- Disable Antivirus Temporarily
- Run the Windows Update Troubleshooter
- Reset Windows Update Components
- Upgrade to Windows 11 22H2 From ISO File
- Clean Install Windows 11
Let’s solve this error by using these methods.
1] Disable Antivirus Temporarily
As you know Antivirus protect our system from malware and virus but this software can also be the reason for this error. It has been seen that it also blocks update installers. You can resolve this issue by temporarily disabling the antivirus. Using this method you can disable Microsoft defender or any antivirus. If you have a third-party antivirus, make sure to disable it as well before running the Windows Update. Hopefully, this trick will work for you.
2] Run the Windows Update Troubleshooter
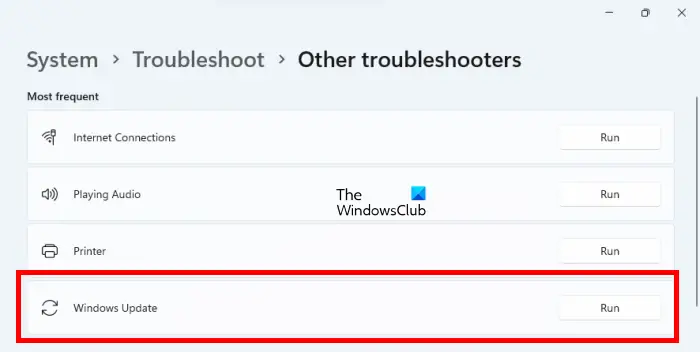
During the update of your system, you can encounter update-related errors on your system. In this scenario, you will use a Microsoft Windows Update troubleshooter to scan your system, to know the exact error cause, and to resolve it. To fix this said error you can run the Windows update troubleshooter from the Settings app
Let’s use these steps to resolve this issue in Windows 11.
- Press Windows+ I to open Windows Settings.
- Click on System > Troubleshooter.
- Now, hit on the Other troubleshooters option.
- In this window, there are multiple options. Search the Windows Update troubleshooter and click on Run.
If you want to run Windows Update Troubleshooter in Windows 10 then you can use the following steps to resolve your issue.
- Press Windows + I
- Click on Update & Security
- Click on the Troubleshooter tab.
- Select Windows Update and then click on Run the troubleshooter.
Now troubleshooter will start scanning the system for errors. Wait for a while to complete this process. When scanning is completed, see the results. If the troubleshooter has identified any solution, click on Apply, to implement the solution suggested by the Windows Update troubleshooter. If this utility fails to find the problem, close it and move to the next solution.
3] Reset Windows Update Components
Installing a new update on your system requires an update service and cache file. Corruption of these files may lead to a problem. To fix the said error, reset Windows Update Component. Hopefully, after resetting this service, your issue will be resolved.
Similar: Fix 0xc0000409, Exception unknown software exception error
4] Upgrade to Windows 11 22H2 From ISO File
A new release of Microsoft known as Windows 11 22H2 adds interesting features to Microsoft’s desktop OS. These features are updated File Explorer with tabs, enhanced search functionality, improved security, and many more. If you are unable to update to windows 11 22H2 by using Installation assistant or Windows settings, go to Microsoft.com and install the ISO file of Windows 11 22H2. Then, you need to go to the Download folder in File Explorer and run the ISO file. Finally, follow the onscreen instructions to complete the process. Hopefully, after implementing this idea your said error will be resolved.
Read: Fix Windows Update Error Code 0x80246017 on Windows 11/10
5] Clean Install Windows 11
If the above solutions have not worked for you, then you can perform a clean installation of Windows 11. All software that you have in your system will be removed in the clean installation, so, you need to take a backup of all data before performing this procedure.
Hopefully, you are able to resolve the issue using the solutions mentioned in this post.
If you are not able to upgrade Windows 11, first of all, check if your computer is compatible with that version of Windows 11. In case, your system is not compatible with the newer version of Windows 11, there is no way, you won’t be able to update your system to it.
Read: Windows 11 Feature Update not installing.