
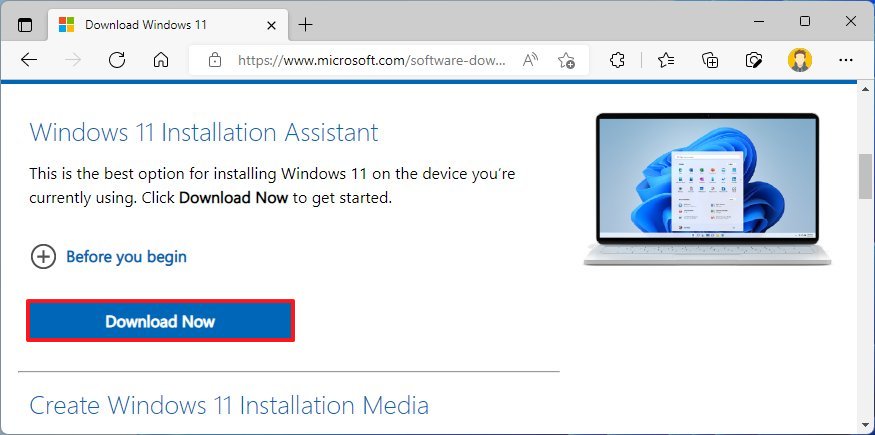
Windows 11 Installation Assistant
This is the best option for installing Windows 11 on the device you’re currently using. Click Download Now to get started.
Note: Windows 11 Installation Assistant doesn’t run on Arm-based PCs; it only works for x64 processors.
-
Before you begin, check to see if the following conditions apply to you:
- You have a Windows 10/11 license.
- Your PC must have Windows 10, version 2004 or higher installed to run Installation Assistant.
- Your PC must have 9 GB of free disk space to download Windows 11.
Note: Your PC meets the Windows 11 device specifications for upgrade requirements and supported features. Certain features require additional hardware. We also recommend that you visit your PC’s manufacturer’s website for information about updated drivers and hardware compatibility.
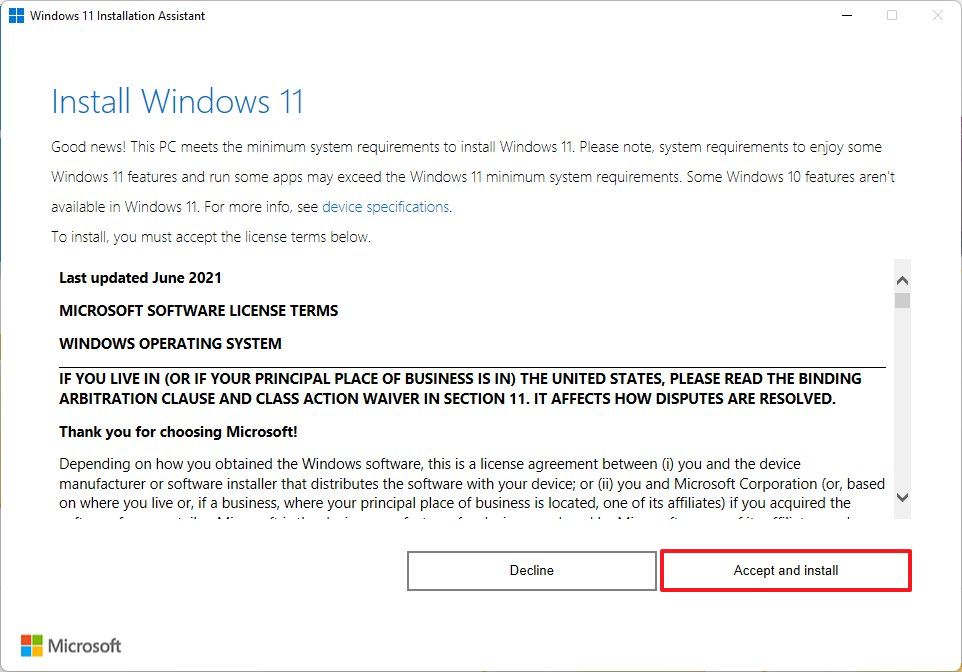
After you download the Installation Assistant:- Select Run. You need to be an administrator to run this tool.
- Once the tool confirms the device hardware is compatible, you will be presented with the license terms. Select Accept and Install.
- Once the tool is ready, click the Restart Now button to complete installation on your computer.
- It might take some time to install Windows 11, and your PC will restart a few times. Make sure you don’t turn off your PC.
Note: Windows 11 Installation Assistant doesn’t run on Arm-based PCs. It’s only supported for PCs using x64 processors. If you need installation media to install Windows 11 on a different PC, see Create Windows 11 Installation Media.
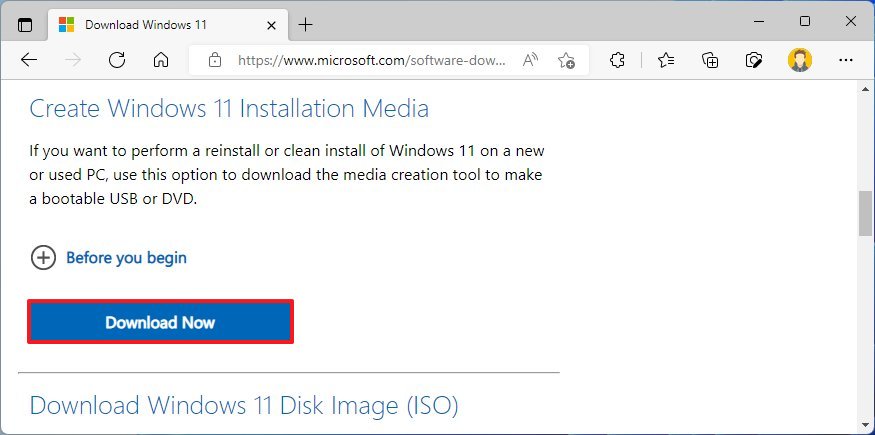
Create Windows 11 Installation Media
If you want to perform a reinstall or clean install of Windows 11 on a new or used PC, use this option to download the media creation tool to make a bootable USB or DVD.
Note: Windows 11 media creation tool cannot be used to create installation media for Arm-based PCs; it can only create media for x64 processors.
-
To get started you first need a license to install Windows 11 or have a Windows 10 device that qualifies for an upgrade to Windows 11.
Make sure you have:
- An internet connection (internet service provider fees may apply).
- Sufficient data storage available on the computer, USB, or external drive you are downloading the .iso file to.
- A blank DVD disc with at least 8GB (and DVD burner) to create a bootable disc. We recommend using a blank USB or blank DVD, because any content on it will be deleted during installation.
- If you receive a “disc image file is too large” message while attempting to burn a DVD bootable disc from an ISO file, consider using a higher capacity Dual Layer DVD.
Ensure the PC you want to install Windows 11:
- Has a 64-bit CPU: Windows 11 can only run on 64-bit CPUs. To see if your PC has one, go to Settings > System > About, or search “System Information” in Windows and look under “System Type.”
- Windows 11 Media Creation Tool creates installation media only for x64 processors. For Arm-based PCs, you should wait until you are notified through Windows Update that the upgrade is ready for your PC.
- Meets system requirements: Not all devices running Windows 10 are eligible to receive a Windows 11 upgrade. See the Note below with the link to: Windows 11 device specifications for upgrade requirements and supported features. Certain features required for additional hardware.
- WARNING: Installing Windows 11 media on a PC that does not meet the Windows 11 minimum system requirements is not recommended and may result in compatibility issues. If you proceed with installing Windows 11 on a PC that does not meet the requirements, that PC will no longer be supported and won’t be entitled to receive updates. Damages to the PC due to lack of compatibility aren’t covered under the manufacturer warranty.
- Matches your current language: You’ll need to choose the same language when you install Windows 11. To see what language you’re currently using, go to Time & language in PC settings or Region in the Control Panel.
Note: See the Windows 11 device specifications for upgrade requirements and supported features. Certain features require additional hardware. We also recommend that you visit your PC’s manufacturer website for information about updated drivers and hardware compatibility.
Using the Media Creation Tool to create installation media:
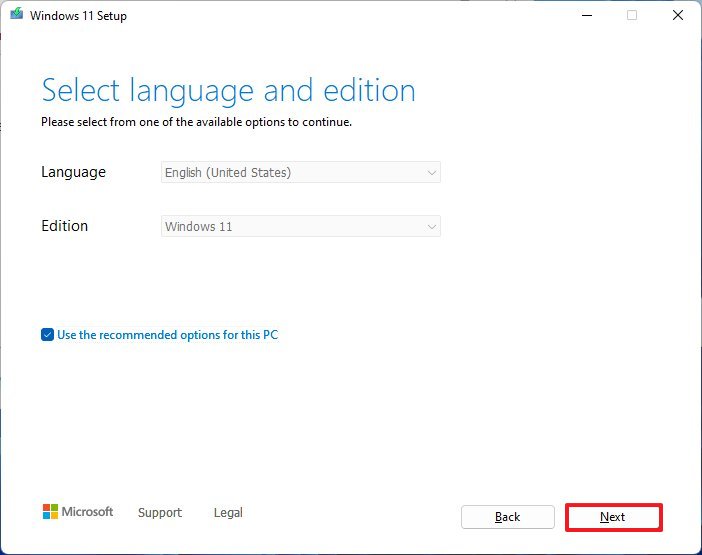
- After downloading, run the media creation tool. You need to be an administrator to run this tool.
- If you agree to the license terms, select Accept.
- On the What do you want to do? page, select Create installation media for another PC, and then select Next.
- Select the language, edition, and architecture (64-bit) for Windows 11.
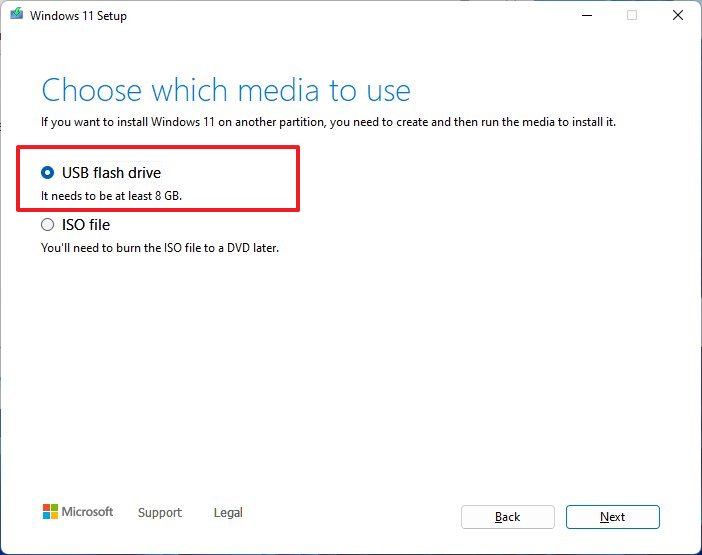
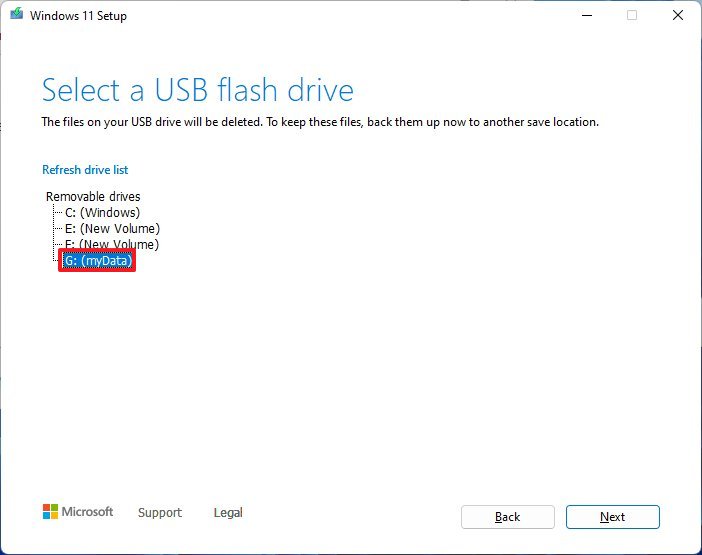
- Select which media you want to use:
- USB flash drive: Attach a blank USB flash drive with at least 8GB of space. Any content on the flash drive will be deleted.
- ISO file: Save an ISO file to your PC. This can be used to create a bootable DVD. After the file is downloaded, you can go to location where the file is saved, or select Open DVD burner, and follow the instructions to burn the file to a DVD.
After the installation media is created, follow the steps below to use it.
- To check for updates now, select the Start button, and then go to Settings > Windows Update, and select Check for updates. You may also wish to visit your device manufacturer’s support site for any additional drivers that may be needed.
Note: Drivers for Surface devices may be found on the Download drivers and firmware for Surface page.
Before you install Windows 11, it’s a good idea to save any work and back up your PC before you start. If you used the Media Creation Tool to download an ISO file for Windows 11, remember to burn it to a DVD before following these steps:
- Attach the USB flash drive or insert the DVD on the PC where you want to install Windows 11.
- Restart your PC.
- If your PC does not automatically boot to the USB or DVD media, you might have to open a boot menu or change the boot order in your PC’s BIOS or UEFI settings.
- To open a boot menu or change the boot order, you’ll typically need to press a key (such as F2, F12, Delete, or Esc) immediately after you turn on your PC. For instructions on accessing the boot menu or changing the boot order for your PC, check the documentation that came with your PC or go to the manufacturer’s website.
- If you do not see the USB or DVD media device listed within the boot options, you may need to reach out to the PC manufacturer for instructions for temporarily disabling Secure Boot in your BIOS settings.
- If changing the boot menu or order doesn’t work, and your PC immediately boots into the OS you want to replace, it is possible the PC had not fully shut down. To ensure the PC fully shuts down, select the power button on the sign-in screen or on the Start menu and select Shut down.
- On the Install Windows page, select your language, time, and keyboard preferences, and then select Next.
- Select Install Windows.
Important Note: If you made changes to the boot order in step 2, you may face a scenario where the initial Install Windows page will display after the installation process is complete. To resolve this, you will need to revert the changes you made to the boot order. This ensures that the internal drive you just installed Windows on will boot normally.
Download Windows 11 Disk Image (ISO) for x64 devices
This option is for users that want to create a bootable installation media (USB flash drive, DVD) or create a virtual machine (.ISO file) to install Windows 11. This download is a multi-edition ISO which uses your product key to unlock the correct edition.
Windows 11 ISOs for Arm64 devices are available here.
Select an edition from the drop down menu.
-
- An internet connection (internet service provider fees may apply).
- Sufficient data storage available on the computer, USB, or external drive you are downloading the .iso file to.
- A blank DVD disc with at least 8GB (and DVD burner) to create a bootable disc. We recommend using a blank USB or blank DVD, because any content on it will be deleted during installation.
- If you receive a “disc image file is too large” message while attempting to burn a DVD bootable disc from an ISO file, consider using a higher capacity Dual Layer DVD.
Ensure the PC you want to install Windows 11:
- Has a 64-bit CPU: Windows 11 can only run on 64-bit CPUs. To see if your PC has one, go to Settings > System > About , or search “System Information” in Windows and look under “System Type.”
- Meets system requirements:
Not all devices running Windows 10 are eligible to receive a Windows 11 upgrade. See the Note below for details.- WARNING: Installing Windows 11 media on a PC that does not meet the Windows 11 minimum system requirements is not recommended and may result in compatibility issues. If you proceed with installing Windows 11 on a PC that does not meet the requirements, that PC will no longer be supported and won’t be entitled to receive updates. Damages to the PC due to lack of compatibility aren’t covered under the manufacturer warranty.
Once the download completes you can use the Verify your download option to ensure the integrity of the file.
Note: See the Windows 11 device specifications for upgrade requirements and supported features. Certain features require additional hardware. We also recommend that you visit your PC’s manufacturer website for information about updated drivers and hardware compatibility.
Installation instructions (DVD):
- Locate the folder where you downloaded the Windows 11 ISO to.
- To use Windows Disk Image Burner to create the installation DVD, right-click on the ISO file and select Properties . Under the «General tab», click «Change…» where it says, «Opens with:» and select Windows Explorer. Select Apply . This will enable the Burn disc image to display when you right-click on the ISO file.
- To use a third-party DVD burning program, you can right-click on the ISO file and select Open with .
Installation instructions (ISO):
- If you want to install Windows 11 directly from the ISO file without using a DVD or USB flash drive, you can do so by mounting the ISO file. This will perform an upgrade of your current operating system to Windows 11.
- To mount the ISO file:
- Go to the location where you downloaded the ISO file. Then, right-click the ISO file and select Properties .
- On the «General» tab, click »Change…» where it says, “Opens with:» and select Windows Explorer for the program you would like to use to open ISO files and select Apply .
- Right-click the ISO file and select Mount .
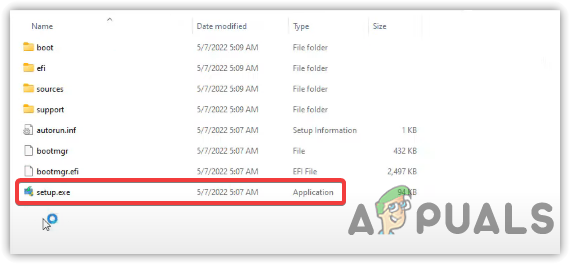
- This will create a “virtual” bootable disc. Double-click on it to view the files within. Double-click setup.exe to start Windows 11 setup.
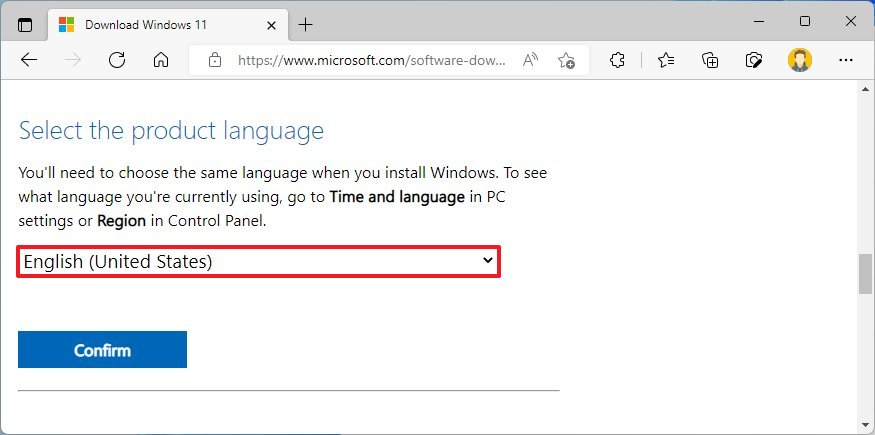
Select the product language
You’ll need to choose the same language when you install Windows. To see what language you’re currently using, go to Time and language in PC settings or Region in Control Panel.
Select a language from the drop down menu.
Error
We encountered a problem processing your request. Please try again later.
Download — {{GetProductDownloadLinksBySku.ProductDownloadOptions.0.LocalizedProductDisplayName}}
-
If you would like to verify the data integrity and authenticity of your download, you can follow these steps:
- Download the desired product ISO file and follow the installation guidelines.
- Launch Windows PowerShell. If you need help finding the location of PowerShell for your operating system, get help in finding the location of PowerShell here: Get Help in finding the location of PowerShell.
- In PowerShell, compute the hash value for the ISO file you downloaded using the Get-FileHash cmdlet. For example:
Get-FileHash C:\Users\user1\Downloads\Contoso8_1_ENT.iso
- If the SHA256 output matches the value in the below table, for the product that you downloaded, this confirms that the file has not been corrupted, tampered with or altered from the original.
Get additional information on the Get-FileHash command.
Hash values for the ISO files for Each Language
Hash values for the ISO files for Each Language
Country Locale Hash Code Arabic 64-bit 97ED2DF27DEBE5A8E94FB37BE4383EB8516D5C24117793BDA5C1E13568D3F754 Bulgarian 64-bit 1C1BD6E96290521B7E4F814ACA30C2CC4C7FAB1E3076439418673B90954A1FFC Chinese Simplified 64-bit BD1ECBA89BC59B7B62EF12C88C4E70D456EDAC10B969ECB3299EBD458B1F0FB3 Chinese Traditional 64-bit B92C3D6D428D12CF78A8D287B8FB28FFBC44D4A36B74C1B121C3CF443DC67ED2 Croatian 64-bit 95C7008AB1B0BA65212A36FB728AC93B9D7611400A78393FE7B319ED5B74AC5C Czech 64-bit 76120E535DB895D0EA69F47D55B836940821352A010DEDFCBCFC1E22E619FC4B Danish 64-bit D5D34DFFE45BA557581ADA14AC025DB8AA58989D054706061B7D0E5B47F5FDB9 Dutch 64-bit EE9BC545673D8F954A1EDAC691D749438D3E4DFA10A75D2519F79E3708D79FDC English 64-bit B56B911BF18A2CEAEB3904D87E7C770BDF92D3099599D61AC2497B91BF190B11 English International 64-bit D5A4C97C3E835C43B1B9A31933327C001766CE314608BA912F2FFFC876044309 Estonian 64-bit D12DC03FA15A7F436A800692E9BA30DBDDAA4CD6122DD71719A2898E953B5407 Finnish 64-bit D6057E058021A9DF8A02B7BB16331D88C38E8BB63D5AD897D094E0DF6C6ADB5A French 64-bit B73AA55DB50D2AD348F61C6537DA05C0D6DED78A143763454E977BE85B444119 French Canadian 64-bit 3CA47351DAD16BD3F7AFA27CDEB321DD726B79859DE8D2769359C7621DE38EC4 German 64-bit 96E036F1219F9EE59F96312CE43EC7DF093E768383A77132750271940926A013 Greek 64-bit 92248F9F5A8735337D4B0DCCE4DD13348F8718858590FD9D1EB00020B5AFB33A Hebrew 64-bit 27D8090B9266A2DAC04E403FE63E46ADE661A5661BF26CA5EBB1A2F13245E86F Hungarian 64-bit 7B58807592AEB2FC5DDF5AF9749FA023CE9165AA4A1BF4F4741709F8AA2EE9D3 Italian 64-bit D95EC65EC06B4036835C7571FE0108159848D2883EF5DA3A67E480130B1F5862 Japanese 64-bit A1E1BCB6C014F39E4A324EC24DB1B745EE62617D29A450BF7B2596A3DCCECD7D Korean 64-bit 63ED86ADFC53F464649478F931EAE39A42DB3FD86C266C9B5AF7F8E19D318C51 Latvian 64-bit F4C2BF7C16576E6D631070D7B7CF6F55E8359D0729B571C570DC6F39D77D9EA6 Lithuanian 64-bit 23B14643B0AD6FDD0231EA201C5E1B000912EE3A0542F1B1F6907DB470AE7D7B Norwegian 64-bit 6CBD6C3FED9CE08AF85420F19D01C287FC58EC0C42DC7409D1D5C341CEB6492B Polish 64-bit 654273603A945EBA3B185FD5D2C22207A0EB788B5E3402F71E6D0839B3026943 Brazilian Portuguese 64-bit 1BC63E9C62FE3EB7E46778F24C790933770FA7430304583BBDF96B47A5D61F1F Portuguese 64-bit FAAFEDFC301A381B0712FC8DB9F0A16ADE2716B998DD4855D0A38172A9A87AB4 Romanian 64-bit 8B23AD43DF35EB75FADDFDFC85D616A001A4D72C757E5286011E3DC9452A5862 Russian 64-bit D0FBDB93864BF6C8ADE844473C9600EBB031C8BB656A272C736E45DFBD9B3BC9 Serbian Latin 64-bit 566047460EEA2F0E0D36E7A378DCFEEA79D7D3C0328227646BE4AB9AC39A9E36 Slovak 64-bit 5B77F2B5F7C77ABF68E628AC37A8841BB1058B7173C1C76DC5A5F6C5BBA855FD Slovenian 64-bit 73F0DC7CC15885F565C76D78D54E4E4D9934720FFE583B52EFDDA2E2457402D7 Spanish 64-bit 708AF7C9AC63B7EB045CA9B196568758B6C1749E8D13CADE61FAACBC7C66D142 Spanish (Mexico) 64-bit BA7A9B9A2052DEF8C24BCB88C76A47B2E6A6C6EE547EED226B9702C5C63AFC69 Swedish 64-bit F3674D377253E2D12635FDEAB76193E80BD80C56A41D10AB9CCEFDB0CDF1AD82 Thai 64-bit CAD5590347376103E369D7E04941B94C037F4CC6C75D81DC50E194FFA87C8CF8 Turkish 64-bit A47E054FE0B762F5B48D08E2B6F768F4B1CA0BC6DB831A76E829F92E578483AF Ukrainian 64-bit 68BABB954E4BFDF8A03ABC188D5120CF12D4DCA3CAE68EB1BFD4B64F872826E2
Links valid for 24 hours from time of creation.
Links expire: {{GetProductDownloadLinksBySku.DownloadExpirationDatetime}} UTC
Error
We encountered a problem processing your request. Please try again later.
*Your use of the media creation tools on this site is governed by the Microsoft Terms of Use for this website.

If you already have the original release of Windows 11 or the latest version of Windows 10, you can use the “Installation Assistant” to upgrade to Windows 11 22H2 if your computer isn’t getting the update through Windows Update.
The tool was designed to update devices to the new version of Windows 11 when they aren’t automatically receiving the feature update because of problems with the Windows Update or another unknown reason, but when the hardware and software configuration is compatible. However, anyone can use the “Installation Assistant” to force (in this case) the Windows 11 2022 Update installation.
It is never a good idea to upgrade a computer during the early days of the rollout or when the computer doesn’t receive the notification to upgrade manually through Windows Update because it might indicate that the hardware isn’t fully compatible. However, if you cannot wait, you can use the steps below to upgrade:
-
Download the Installation Assistant from the “Windows 11 Installation Assistant” section by clicking the “Download Now” button from the Microsoft software support download page.
-
Double-click the Windows11InstallationAssistant.exe file to launch the tool.
-
Click the “Accept and install” button to begin the installation.

-
Once the tool confirms that the hardware and software configuration are compatible, the Windows 11 22H2 files will download to the computer. Then click the Restart button to complete the installation.

The Installation Assistant should take less than an hour to complete the process on your computer.
Also, before proceeding, use this guide to avoid problems and errors during the upgrade process. In addition, while the tool offers a non-destructive installation process, creating a full backup before making system changes is recommended.
Mauro Huculak is a
Windows How-To Expert and founder of
Pureinfotech
(est. 2010). With over 21 years as a technology writer and IT Specialist,
Mauro specializes in Windows, software, and cross-platform systems such as Linux, Android, and macOS.
Certifications:
Microsoft Certified Solutions Associate (MCSA),
Cisco Certified Network Professional (CCNP),
VMware Certified Professional (VCP),
and
CompTIA A+ and Network+.
Mauro is a recognized Microsoft MVP and has also been a long-time contributor to Windows Central.
You can follow him on
YouTube,
Threads,
BlueSky,
X (Twitter),
LinkedIn and
About.me.
Email him at [email protected].
Windows 11 22H2 is officially released on September 20, 2022, and if you are here to upgrade your Windows, then the following steps will help. There are three ways to download and install Windows 11 version 22H2 as soon as it releases to eliminate bugs and errors. One of the best ways is to use an official disk image to upgrade your Windows version to 22H2. If you plan to upgrade the Windows version via Windows update from settings, you might need to wait until the upgrade is ready for your PC. However, you will be able to install version 22H2 by using the methods below.
Below we have mentioned the Four Ways of upgrading Windows 11 to version 22H2:
- Upgrade To Windows 11 22H2 Via ISO File
- Upgrade To Windows 11 22H2 Via Installation Assistant
- Upgrade To Windows 11 22H2 Via Insider Program
- Upgrade To Windows 11 22H2 Via Windows Update
1. Upgrade to Windows 11 22H2 Via ISO File
ISO file will allow you to download and install Windows 11 version 22H2. Follow the steps to download and run the official ISO file to upgrade Windows 11 to version 22H2:
- Download the ISO file from the Official Microsoft Website
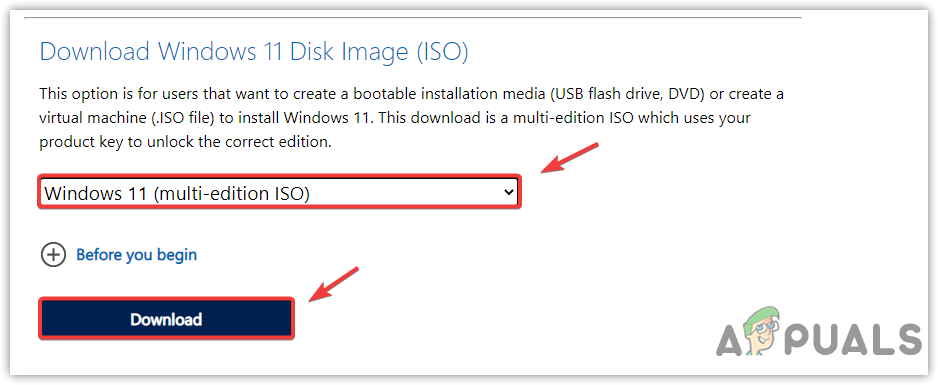
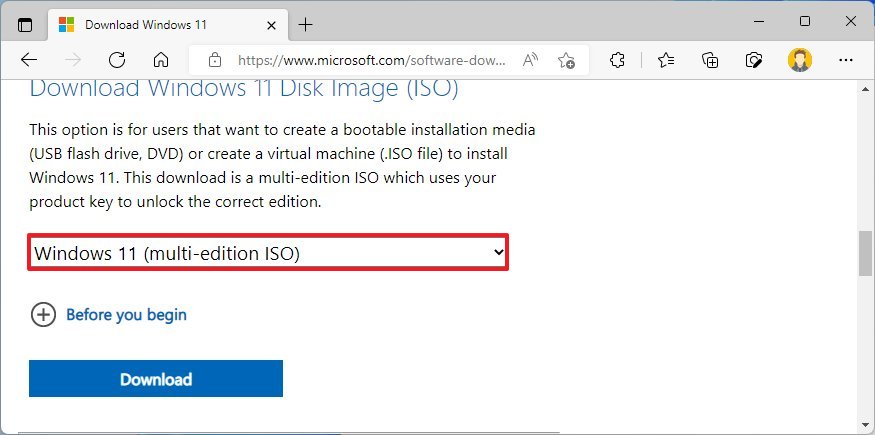
Note: You will be able to see the current version on top, which should be the Windows 11 2022 Update Version 22H2 - Scroll down to the Download Windows 11 Disk Image (ISO)
- Select Windows 11 (multi-edition ISO)
- Click Download
Note: It might take some time, depending on your internet connection
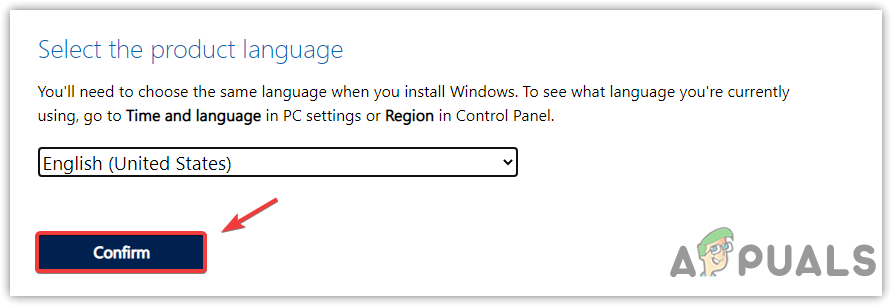
Selecting Windows 11 Multi Edition ISO - Then, select your language and click Confirm

Selecting Product Language - Again wait for the loading to complete and click 64-Bit Download
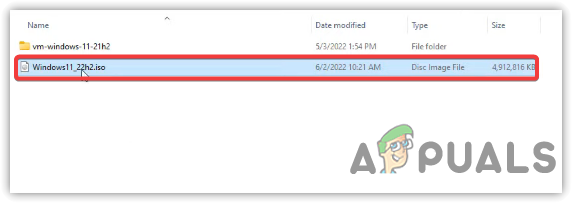
- It will take you to the download directory; click Save, and just wait for the downloading to complete
- Once done, double-click in the Disk Image File to mounted on File Explorer

Mount Disk Image File - Double-click the Setup.exe file to run it

Opening Windows Setup file - Click Open when Security Warning pop-ups
- Uncheck I Want To Help Make This Installation Better
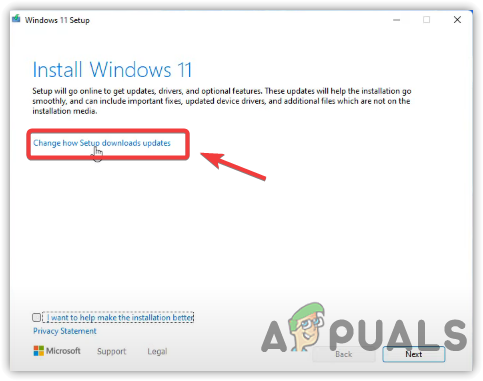
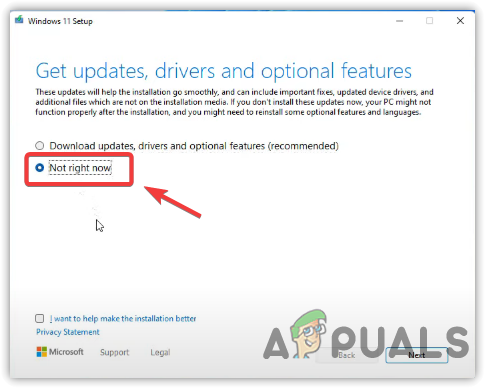
- Additionally, you can change how setup download updates by clicking on the option

Changing How Setup Downloads Windows Updates - Select Not Right Now to speed up the upgrade process

Selecting Not Right Now - Then, click Next and finally click Accept to proceed
- Once done, now at the next Window, ensure that the Install Windows 11 Pro and Keep Personal Files And Apps are checked. In case one of them is unchecked, click Change What To Keep and select both options to continue
- Once done, click the Install button

Clicking Install - After that, the installation will start; just wait for it to install completely as it might take some time
- Once all is finished, check your Windows version by navigating to the following settings
Settings > System > About

2. Upgrade To Windows 11 22H2 Via Windows 11 Installation Assistant
Another method to upgrade your Windows 11 version to 22H2 is to use Windows 11 installation assistant. Below are the steps to upgrade via Windows 11 Installation Assistant:
- Download the Windows 11 Installation Assistant from the official Microsoft Website
- Once the downloading is finished, run the Windows11InstallationAssistant by double-click on it
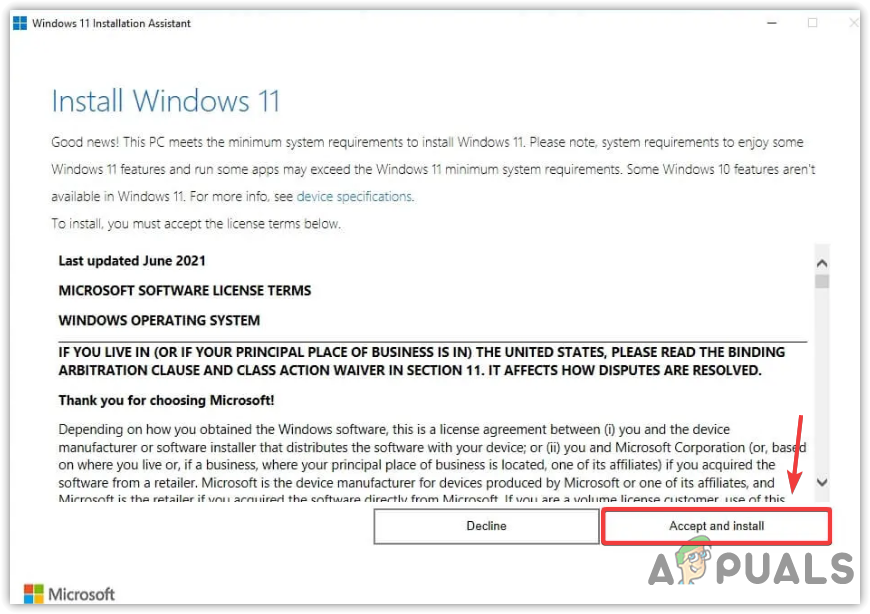
- Click Accept And Install to start the upgrade to Windows 11 22H2

Accepting License Agreement - Once done, go to Settings > System > About and check your Windows version.
3. Upgrade To Windows 11 22H2 Via Insider Program
Another way of upgrading Windows 11 to 22H2 is using the Windows Inside Program. To do so:
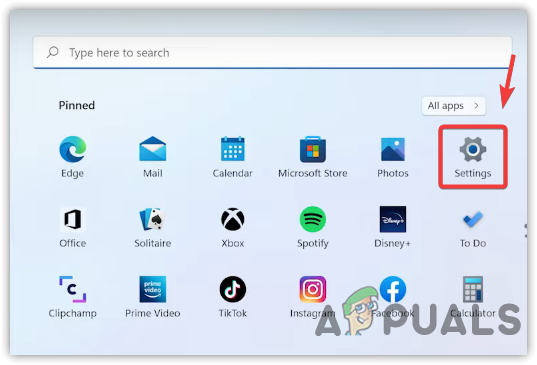
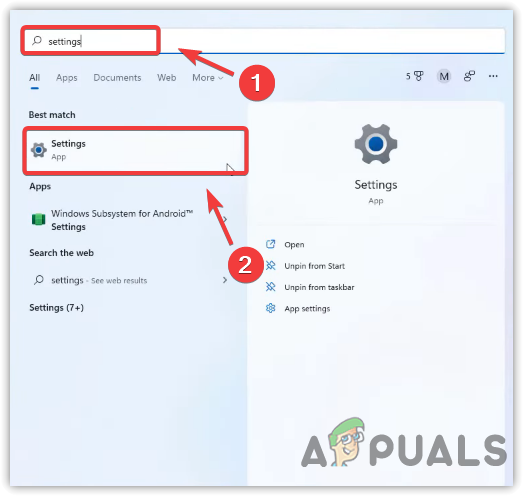
- Press the Windows key on the keyboard and select Settings

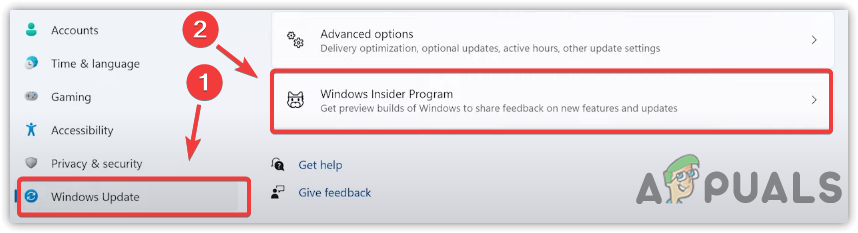
Opening Windows Settings - Now at the bottom of the left panel, select Windows Update
- Click on Windows Insider Program on the left pane

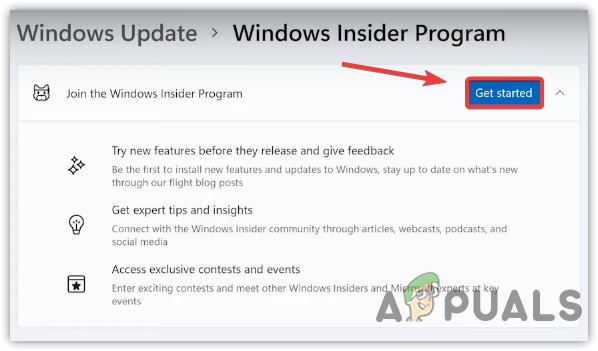
Navigating to Windows Insider Program Settings - Click Get Started to join the Windows Insider Program

Joining Windows Insider Program - Click Link An Account sign-in with your Microsoft Account
Linking Microsoft Account - Then, select Release Preview Channel
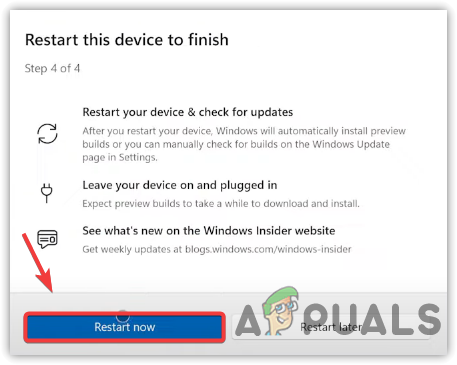
- Click Continue and then click Restart Now

Restarting Windows - After restarting, Windows will automatically upgrade your version to 22H2
- To check the Windows version, click the Start Menu and select Settings
- Go to Windows Update from the left pane
- Click Windows Insider Program
Navigating to Windows Insider Program Settings - Then, click Open Windows Update
- Once the updates are installed, go to Windows Insider Program settings and scroll down to Stop Getting Preview Builds, then turn off the toggle button under stop getting preview builds.
4. Upgrade To Windows 11 22H2 Via Windows Update
If the upgrade is ready for your computer, you can download and install it from the Windows update settings. For that, follow the steps:
- Click Start Menu and type Settings

Opening System Settings - Open the Setting App
- Go to Windows Update
Navigating to Windows Update Settings - If Windows 11 version 22H2 is available, click the Download and Install button. Otherwise, click Check For Updates
- If the update is found, click Download And Install

Downloading and Installing Windows 11 Version 22H2 - After that, restart your computer and go to Settings > System > About to check your Windows version.
Hamza Mohammad Anwar
Hamza Mohammad Anwar is an intermediate JavaScript web developer with a focus on developing high-performance applications using MERN technologies. His skill set includes expertise in ReactJS, MongoDB, Express NodeJS, and other related technologies. Hamza is also a Google IT Certified professional, which highlights his competence in IT support. As an avid problem-solver, he recreates errors on his computer to troubleshoot and find solutions to various technical issues.
(Image credit: Future)
Microsoft has started the gradual rollout of the Windows 11 2022 Update (version 22H2) to devices known to have a good upgrade experience. This is the first feature update since the original release, and it’s a significant update with many design improvements and several new features.
Since this is technically a new version, this release will require complete reinstallation regardless of your current setup. Similar to previous releases, the company will deploy the latest version of Windows 11 slowly and in stages, starting with compatible devices that will have a smooth transition experience. Once the feature update has been tested further, it will be available more broadly.
Usually, if you have a device with no compatibility issues, the option to update will be available within the first weeks of the release date. However, it will take some time until version 22H2 reaches every desktop computer, laptop, and tablet.
If you don’t want to wait until the feature update is offered to you automatically, it’s possible to trigger the upgrade manually in at least four ways, including using Windows Update, Installation Assistant, Media Creation Tool, and the direct download of the ISO file.
This guide will walk you through the steps to install the Windows 11 2022 Update on your computer.
Important: This is a non-destructive process, but there is always a chance of something going wrong during and after the upgrade. You should consider creating a temporary backup before proceeding. You’ve been warned.
How to install Windows 11 2022 Update via Windows Update
To install the Windows 11 2022 Update through Windows Update, use these steps:
All the latest news, reviews, and guides for Windows and Xbox diehards.
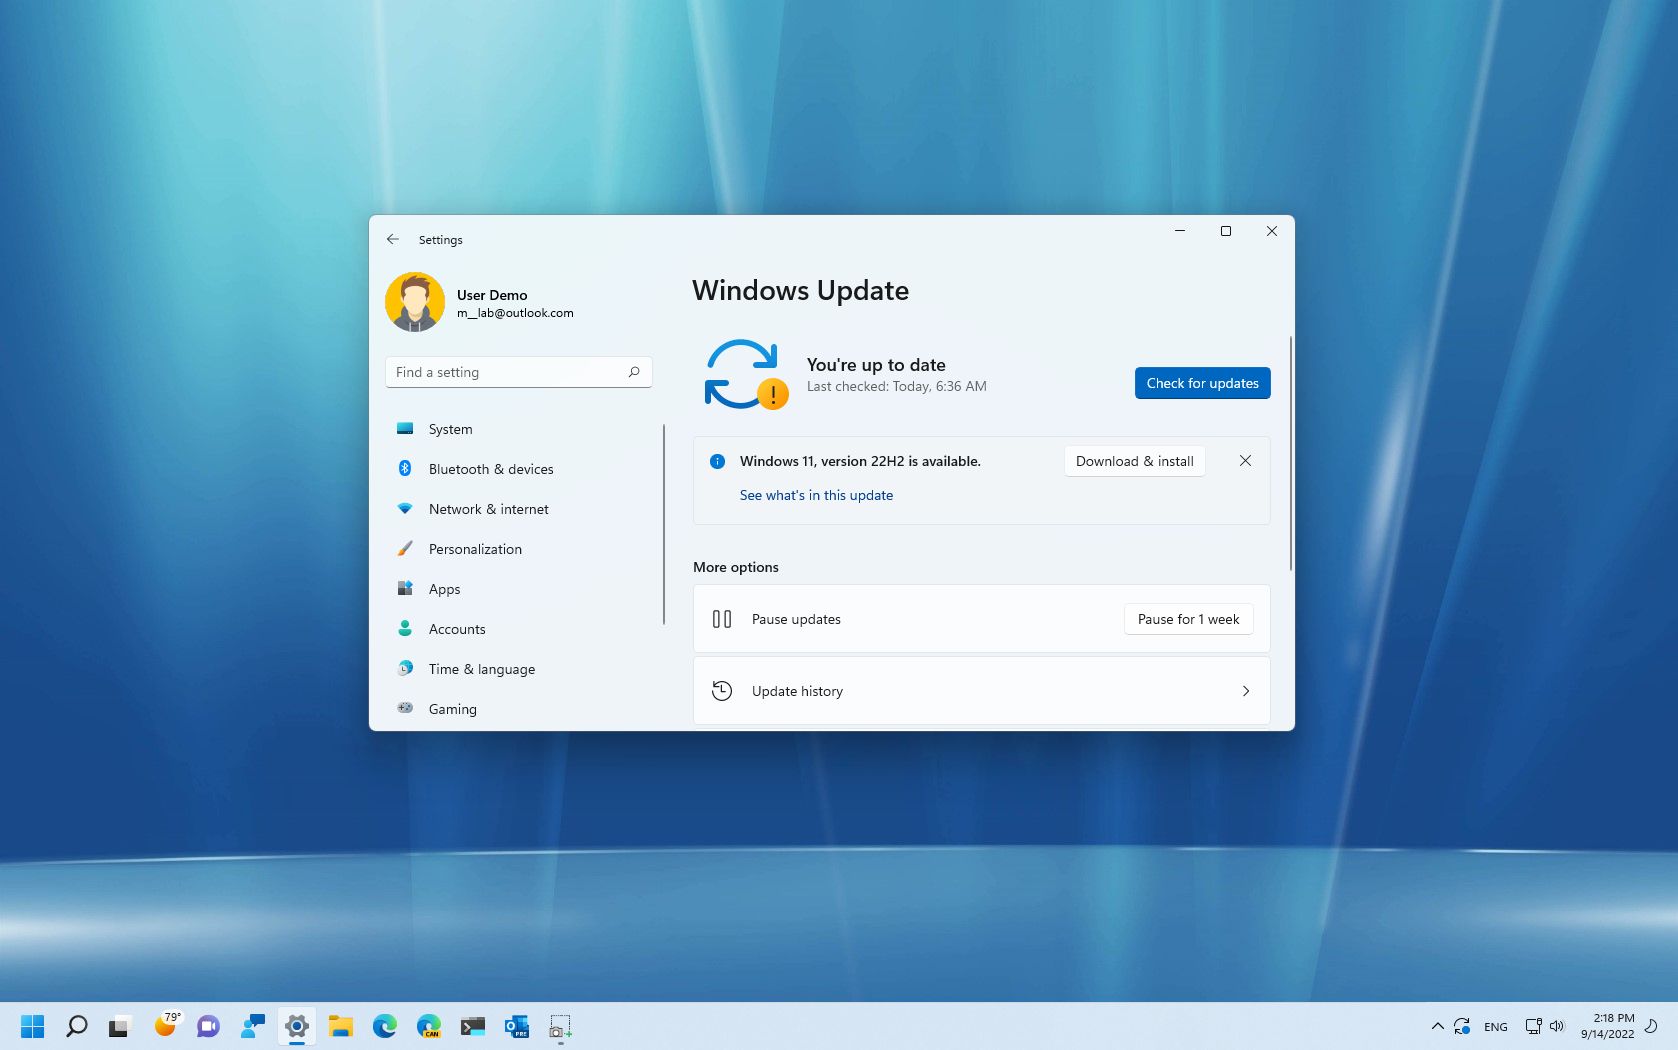
- Open Settings.
- Click on Windows Update.
- Click the Check for updates button.
- Click the «Download and install now» button.
- Click the Restart now button.
Once you complete the steps, the installation process will proceed to apply the 2022 Update on your computer. Since this is a new version of Windows 11, the installation may take some time.
In the case that the new version isn’t available, it’s probably because of a compatibility problem that is blocking the installation. If there’s a compatibility problem, using a different method to update is not recommended as you may run into issues.
How to install Windows 11 2022 Update via Installation Assistant
To upgrade the system to the Windows 11 2022 Update with the Installation Assistant tool, use these steps:
- Open Microsoft support website.
- Under the «Windows 11 Installation Assistant» section, click the Download Now button.
- Double-click the Windows11InstallationAssistant.exe file to launch the tool.
- Click the Accept and install button.
After you complete the steps, the tool will download the files to install the new version of Windows 11, preserving your files, settings, and apps.
How to install Windows 11 2022 Update via Media Creation Tool
On Windows 11, you can no longer use the Media Creation Tool to perform an in-place upgrade, but you can create a USB bootable media that you can then use to upgrade to version 22H2.
To use the Media Creation Tool to create a USB media to upgrade a device to Windows 11 2022 Update, use these steps:
- Open Microsoft support website.
- Under the «Create Windows 11 installation media» section, click the Download Now button.
- Double-click the MediaCrationToolW11.exe file to launch the tool.
- Click the Accept button.
- Click the Next button.
- Select the USB flash drive option.
- Quick note: You will need to connect a USB flash drive with at least 8GB of storage. Any data in the flash drive will be erased through this process, as such make sure to backup any important information on it.
- Click the Next button.
- Select the USB flash drive from the list.
- Click the Next button.
- Click the Finish button.
- Open File Explorer.
- Click on This PC from the left pane.
- Open the USB drive with the Windows 11 2022 Update setup.
- Double-click the setup.exe file.

- Click the Next button.
- Click the Accept button to agree to the terms.
- Click the Install button.

Once you complete the steps, the setup will proceed with the in-place upgrade to the Windows 11 2022 Update.
How to install Windows 11 2022 Update via ISO file
Instead of using the Media Creation Tool, you can directly download the Windows 11 2022 Update ISO file to upgrade the system to the latest version.
To upgrade to the Windows 11 2022 Update using the official ISO file, use these steps:
- Open Microsoft support website.
- Under the «Download Windows 11 Disk Image (ISO)» section, select the Windows 11 option.
- Click the Download button.
- Select the ISO language.
- Click the Confirm button.
- Click the 64-bit Download button to save the ISO file to the computer.

- Right-click the image file and select the Mount option.
- Select the virtual drive from the left navigation pane (if applicable).
- Double-click the setup.exe file to launch the setup manually.
- Click the Next button.
- Click the Accept button to agree to the terms.
- Click the Install button.
After you complete the steps, the upgrade to version 22H2 will begin preserving your files, settings, and applications.
More resources
For more helpful articles, coverage, and answers to common questions about Windows 10 and Windows 11, visit the following resources:
- Windows 11 on Windows Central — All you need to know
- Windows 10 on Windows Central — All you need to know
Mauro Huculak has been a Windows How-To Expert contributor for WindowsCentral.com for nearly a decade and has over 15 years of experience writing comprehensive guides. He also has an IT background and has achieved different professional certifications from Microsoft, Cisco, VMware, and CompTIA. He has been recognized as a Microsoft MVP for many years.
Windows 11 22H2, which will now be known as “Windows 11 version 2022,” is now officially beginning to roll out. This is the first feature update for the Windows 11 OS since it was first released on 5th October 2021.
This release includes a plethora of new features and fixes for the Windows 11 operating system, which are highlighted below. Furthermore, you can also download and install Windows 11 22H2 using the direct download link or the other 2 methods shared below.
Up until last year, Microsoft released two major updates to Windows 10; each in the first and second half of the year. Since the release of Windows 11, Microsoft has shifted to a single major release per year, hence the name “version 2022.”
With that, people are expecting great things from this new operating system. Some are even saying that this release might be “a new era for the computer world.”
Table of Contents
Download Windows 11 Version 2022 (22H2)
There are 4 ways to download and install Windows 11 on your computer:
- Download Windows 11 version 2022 ISO directly from Microsoft’s download links.
- Install Windows 11 version 2022 through Windows Update.
- Download Windows 11 version 2022 ISO using the Media Creation Tool.
- Install Windows 11 version 2022 using Windows 11 Installation Assistant.
Download Windows 11 Version 2022 ISO (Direct Download Links)
Click on the given links below to download Windows 11 version 2022 (22H2) ISO in your preferred language. If you wish to download it in another language, you can use the other methods shared below.
You can then use the ISO file to create bootable media and install the OS.
Windows 11 22H2 English 64-bit.ISO (5.2 GiB, 22,357 hits)
Windows 11 22H2 German 64-bit.ISO (5.2 GiB, 1,314 hits)
Windows 11 22H2 French 64-bit.ISO (5.2 GiB, 1,061 hits)
Windows 11 22H2 Chinese 64-bit.ISO (5.2 GiB, 1,111 hits)
Update to Windows 11 Version 2022 (22H2) from Windows Update
If you want to upgrade your current operating system to Windows 11 version 2022, you can simply update it through Windows Update. Here are the methods:
From Windows 11
If you are currently running Windows 11, then it means that your system already meets the minimum hardware requirements to run Windows 11 version 2022. Thus, you can install the update seamlessly using these steps:
Check if your PC is compatible with Windows 11 version 2022.
-
Navigate to the following:
Settings app >> Windows Update
-
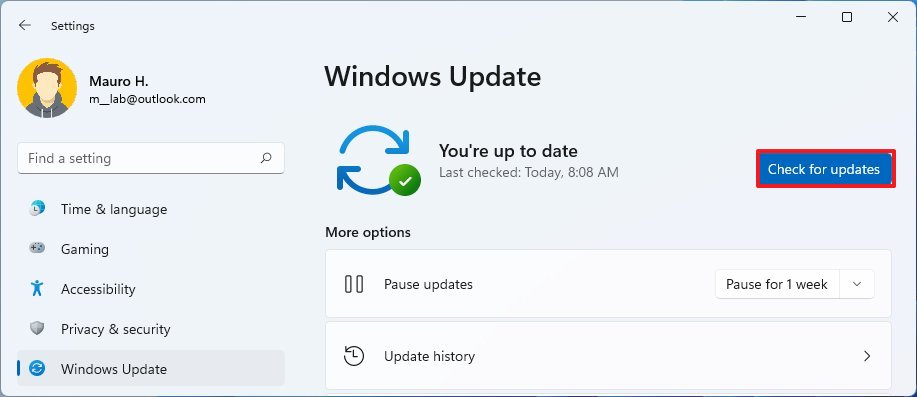
Click Check for updates.
 5")
Check for pending updates -
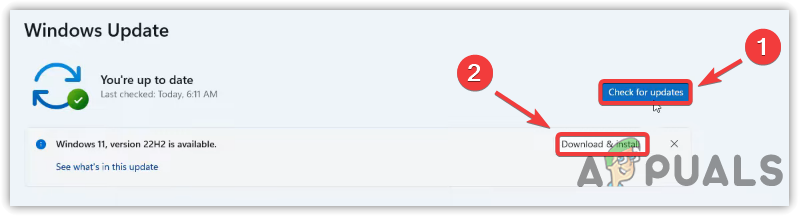
You will now see the following available:
Windows 11, version 22H2 is available.
Click Download & install in front of it.
 6")
Download and install. Source: Microsoft -
The update will now begin to download and then install. When it completes, click Restart now to finalize the installation.
 5")
 6")
When rebooted, you can confirm that your OS has upgraded to version 22H2 by typing in winver in the Run Command box.
 7")
From Windows 10
If you are running Windows 10 on your computer, then you must first check the minimum hardware requirements to run Windows 11. If you satisfy the checks, then you can proceed with the following steps to upgrade to Windows 11 v22H2:
Note: If your computer is not eligible to install Windows 11, then you can bypass the requirements and still install Windows 11.
-
Navigate to the following:
Settings app >> Update & Security >> Windows Update
-
Click Check for updates.
 8")
Check for pending updates -
When the scan completes, you should see the following update available:
Windows 11, version 22H2 is ready - and it's free!
Click Download and install under it.
Update to Windows 11 v22H2 from Windows 10 -
When it installs, click Restart now to finalize the installation.
 8")
 9")
When it reboots, you can confirm that your OS has upgraded to version 22H2 by typing in winver in the Run Command box.
Download Windows 11 v22H2 using Media Creation Tool
Another way to download Windows 11 version 2022 ISO is through the Media Creation Tool. Microsoft’s Media Creation Tool (MCT) allows you to create bootable devices as well as download standalone ISO images of their operating systems. Follow these steps to learn how to use this tool:
-
Download the Windows 11 Media Creation tool and then run the file.
-
You will now see a new window for MCT. Accept the license terms.
 11")
Accept licensing terms -
Before proceeding further, verify the pre-determined details for the machine you are downloading the ISO for. If you are downloading the ISO file to another computer, we suggest that you uncheck the box next to “Use the recommended options for this PC” and select the language you wish to download Windows 11 version 2022 in.
When done, click Next.
Proceed by clicking Next -
Now select the ISO file radio button to download the file and then click Next.
Select ISO and proceed -
You will now need to choose where you wish to download the ISO image. Select a volume with ample free/available space and click Save. The Media Creation Tool will now begin your download.
ISO downloading -
Once the download finishes, click Finish to close the tool. You may find that the software then performs a setup cleanup. You can ignore this and let it run in the background.
Close the tool
 11")
 12")
 13")
 14")
 15")
Now that you have downloaded the Windows 11 v22H2 ISO file, you may proceed to the next phase: Creating a bootable device and performing a clean install.
Download Windows 11 v22H2 using Installation Assistant
The Windows 11 Installation Assistant is a tool designed to upgrade the PC you are using to Windows 11 version 2022. If you need to upgrade your current PC, this is the way to go. Follow these steps to use Installation Assistant to upgrade to Windows 11 22H2:
-
Download Windows 11 Installation Assistant and execute the package.
-
First, you will need to download and install the PC Health Check app regardless if you are already running Windows 11. Click Get PC Health Check app.
 16")
Get PC Health Check app -
The app will now download. Install the PC Health Check app and see if your system meets the requirements.
-
When done, return to the Installation Assistant and click Refresh.
Refresh -
Now click Accept and install.
Accept terms and begin download -
The tool will now begin to download Windows 11 version 22H2. When finished, restart your computer so it can upgrade to version 2022.
 16")
 17")
 18")
If you are planning to download the ISO for Windows 11 v22H2, then you can surely use the guide given below to create a bootable USB drive to perform a clean installation.
Create Bootable Windows 11 22H2 Drive
Creating a bootable device out of an ISO image is relatively easy. You can create a bootable USB drive as well as a DVD. However, we suggest that you create a USB drive as it is more convenient.
You can use Rufus or Ventoy to create a bootable USB flash drive using the ISO image that you have downloaded for Windows 11 version 2022 in the steps above. Now let us show you how to create a bootable USB drive using Rufus:
Learn how to create a multi-boot USB flash drive with multiple ISO files using Ventoy.
-
To begin, plug in your USB flash drive (at least 8GB) to your computer and make sure that all your data on the USB is backed up since it requires formatting where all previous data is lost.
-
Now, download Rufus from their website and install it on your computer. Alternatively, you can also download the portable version which does not need any installation.
 19")
Download Rufus -
Once downloaded, run Rufus. Select the USB flash drive from the drop-down menu under Device. Then, click Select under Boot selection and navigate to the downloaded Windows 11 version 22H2 ISO file. Leave the rest of the settings to their default values and click Start.
 20")
Configure Rufus and create bootable USB drive -
Your Windows 11 22H2 bootable USB drive will now be in the making. This step may take a few minutes. Once it is finished, Ready will be displayed with a green bar. You may then close the app.
 19")
 20")
Your bootable drive is now ready and you may proceed to the installation phase using the guide given below.
Install Windows 11 22H2 using ISO Image File
You can now begin installing Windows 11 using the bootable USB drive. Here is how:
-
First, ensure that your system meets all hardware requirements for Windows 11.
-
Once ensured, connect the Windows 11 22H2 bootable USB drive to the computer you want to install it on. Then turn on/reboot the computer and open its One Time Boot Menu (Usually through the F12, F10, or Esc button).
-
From there, select External USB drive to boot from the bootable USB.
-
You will now see a menu such as the one below. Click Next.
 21")
Proceed with installation -
Now click Install Now.
 22")
Install Windows -
On the next screen, click “I don’t have a product key.” Even if you do have one, you can activate the product later after installation.
 23")
Proceed without entering key -
Now, select the edition that you want to install on this device. When selected, click Next.
 24")
Select edition to install -
On the next window, check the box to accept the license agreement and click Next.
 25")
Accept terms -
You will now be asked whether you want to upgrade the existing OS or perform a custom installation. Since this is a clean and fresh Windows 11 22H2 installation, we will be selecting Custom.
Custom installation -
Next, you need to create the partitions on your hard drive. Once done, select the volume you wish to install the operating system on and click Next.
 27")
Begin installation -
Windows 11 will now begin installing on your device. This step may take a few minutes and your device may reboot a few times.
Further ahead in the process, you will be asked to configure your PC through several Out Of Box Experience (OOBE) screens. Proceed with the on-screen instructions, configure your PC, and you will have successfully installed Windows 11 version 22H2.
 21")
 22")
 23")
 24")
 25")
 26")
 27")
You can now begin installing the relevant software and customizing it according to your liking.
These are the methods to download and install Windows 11 22H2 today! If you are interested to know what new features and improvements this release holds, continue reading below.
New in Windows 11 22H2
Let us now discuss the new features and improvements made to the Windows 11 operating system that are included in this release.
Improved Start Menu and Taskbar
Users can now customize the Taskbar as well as the Start Menu according to their preferences. In Windows 11 22H2, you can drag and drop items in and out of the Taskbar, and make folders of pinned apps in the Start Menu.
Also, you can now view 3 categories of applications in the Start Menu:
- Recently-added apps
- Most-used apps
- Recently-accessed apps
 28")
 29")
Other improvements have also been made. For example, Microsoft has added the ability to view the date and time on all Taskbars if multiple monitors are connected. A weather widget has also been added to the Taskbar with improved widgets.
Another useful feature is that you can now mute or unmute Microsoft Teams calls directly from the Taskbar.
Spotlight Collection for Desktop
Previously, Spotlight Collection was only available for the lock screen. Microsoft has now also introduced it to your desktop in Windows 11 22H2. Once the Spotlight Collection is enabled, the desktop background will now automatically change up to 5 times in 24 hours. These images will also provide textual information about the image and the things in it, which can be expanded by clicking on them.
Navigate to the following to check out the new Spotlight collection:
Settings app >> Personalization >> Background
Now select Windows Spotlight from the drop-down menu in front of “Personalize your background.” This will immediately change your wallpaper.
 31")
New Media Player
A new media player has been added to the operating system which will replace the legacy Groove Music application. The new Windows Media Player supports both audio and video files, centralizing your entertainment needs with a single app.
 32")
Improvements to the Settings App
Plenty of changes and improvements have been made over several Windows flights for Windows 11. We will try to cover all changes made to the Settings app since the official release of Windows 11.
User Interface (UI) changes have been made to round off the corners of the screens if multiple monitors are connected to the Display page. This change has been made to keep the app more in tune with Windows 11.
 33")
The Storage Space and then Disks & Volumes pages have been redesigned to make them look more appealing and user-friendly. Moreover, the Apps & Features page has now been divided into Install apps and Advanced App Settings to segregate the different types of settings for the applications installed on your computer.
 34")
A new page by the name “Your Microsoft Account” has also been introduced on the app that allows you to manage your Microsoft account directly from the app.
 35")
A lot of other changes have also been made to the Settings app to give you more control over your OS with even more convenience.
Redesign and UI Improvements
Microsoft has also improved some other things that usually go neglected. This includes the general look and feel of various windows and options in the operating system.
Microsoft has now improved the snap layouts even more. You can now drag a window to the top of the screen and adjust how the window is displayed from the snap layouts.
 36")
Media controls in the corner of the lock screen have also been redesigned to keep them more in tone with Windows 11.
The “Open With” dialog box has also been updated and redesigned so it does not look exactly like it has been for the last decade.
 38")
Microsoft has made several major improvements to the “Your Phone” application. They now want their users to stop switching between the computer and their phone when both of them can be managed directly from the computer.
They have redesigned the Calls section of the app and made it much easier to access the recently-used Android apps directly from the Quick Access menu. Microsoft has also added the ability to link your phone directly from the Out Of Box Experience (OOBE) screen when setting up the OS.
 39")
The flyouts for the hardware indicators for brightness, volume, airplane mode, camera on/off, etc. have also been updated to have a modern look.
 40")
The Notepad application has been updated in accordance with Windows 11. It now also supports dark mode. By default, Notepad will adapt to the OS theme.
 41")
Live Captions
Microsoft has introduced a “Live Captions” feature that will show captions for audio files automatically. The captions are automatically generated at the top or bottom of the window, or in a separate floating window, which can be resized.
You can enable this feature using the Windows Key + CTRL + L shortcut keys, or from the Accessibility flyout under Quick Settings.
Improved Narrator
The narrator is an integral part of the OS for people with disabilities. Microsoft has been working on the Narrator for quite some time and has made visible progress.
It has been integrated with Microsoft Edge to give a better, smoother online browsing experience. Moreover, new natural voices have also been added so you can now choose which voice you wish to hear.
Other than that, many improvements have also been made so that the Narrator now functions more smoothly, and reads out as much text on the screen as possible.
Improved Voice Access
Voice Access allows you to perform tasks on your computer using your voice. Significant improvements have been made to this tool to assist you in performing specified actions, as well as new commands that have also been integrated.
Furthermore, you can now control the on-screen keyboard with Voice Access as well. Voice Access also allows you to convert voice-to-text and dictate in many different languages.
File Explorer
File Explorer is another integral part of the Windows operating system. Some improvements have also been made to this component.
You can now pin files to the Quick Access menu in Explorer. Moreover, OneDrive has been integrated into Explorer. Users will now no longer need to navigate back and forth from different windows to move their files and folders from the OneDrive cloud storage service.
 43")
Windows Subsystem for Android (WSA)
Microsoft has introduced Windows Subsystem for Android (WSA). Just like Windows Subsystem for Linux (WSL), WSA also requires virtualization technology to run the applications. Therefore, one of the requirements to run Android apps is that virtualization is enabled.
Using this technology, you can now run Android applications natively on your computer. That said, this feature is still in its early development stage, and thus only supports a handful of Android applications right now.
System Changes
Windows 11 version 22H2 will support Windows Hello Facial recognition from an external monitor with a camera.
Microsoft has also made changes to the Emoji Panel (Windows Key + .) which enhances your personalization experience. You can now customize the faces and skin tones of the emojis in the Emoji Panel to match those around you. This feature is specific to the emojis that include more than one person/face, such as family members, couples with hearts, kissing, and people holding hands.
Another significant change to observe is the acrylic title bar for File Explorer and other windows you open. This has been done to keep the overall look of the UI more in tone with the Windows 11 theme.
Power Consumption
In a recent Insider release, Microsoft targeted the “Go Green” slogan to download and install updates only when renewable energy is available in your area. This feature is still relatively new (even for Insiders), so it may be too early to say if this feature will roll out to Windows 11 22H2.
Another power-related feature introduced to the OS is the power recommendations. The Settings application will now give you suggestions on configuring your computer for less power consumption, hence fewer carbon emissions.
Task Manager Efficiency Mode
Previously known as the “Eco mode,” Microsoft has re-introduced the “Efficiency mode” in the Task Manager which allows you to reduce the resource consumption of an individual or a group of processes.
This feature will help you preserve your system’s resources, such as RAM and processor, for the more critical and time-critical tasks.
 44")
Roll Back Windows 11 22H2 Update
If you do not wish to keep the installed update for some reason, you can always roll back to the previous build of the OS. However, this can only be performed within the next 10 days after installing the new update.
To roll back after 10 days, you will need to apply this trick before the 10 days are over.
Frequently Asked Questions (FAQs)
When was Windows 11 22H2 released?
Windows 11 version 2022 (22H2) was released on 20th September 2022.
Is Windows 11 any good?
Microsoft is aiming to make its Windows operating system as user-friendly as possible, whilst making an effort to support more devices, i.e. being able to answer your calls and messages on your phone directly from the computer. Windows 11 has evolved much superior to Windows 10, which is why our verdict would be yes; Windows 11 is worth every penny.
Can Windows 11 PC be upgraded to Windows 11 22H2?
How much does Windows 11 22H2 cost?
The price for standalone OEM PCs is $139.99 for Windows 11 Home Edition and $199.99 for Windows 11 Professional Edition. However, if you upgrade from a Windows 10 licensed PC, the upgrade will be free.
This is the same cost for Windows 11, which was initially released in October 2021, as Microsoft does not charge for new versions.