
Applies ToWindows 11 Windows 10
Important:
Updated February 04, 2025
This support article was originally published on September 30, 2021, when Windows 11 was first released to the public. At the time of publication and still today, the intention behind this support page is to detail ways of installing Windows 11 on devices that meet system requirements for Windows 11. If you installed Windows 11 on a device not meeting Windows 11 system requirements, Microsoft recommends you roll back to Windows 10 immediately.
Windows 11 minimum system requirements remain unchanged and can be found in the article Windows 11 specs, features, and computer requirements.
Before installing Windows 11, make sure the device where Windows 11 is being installed meets the minimum system requirements. If the device is currently running Windows 10, Microsoft recommends verifying the minimum system requirements using the PC Health Check app. It isn’t recommended to install Windows 11 on a device that doesn’t meet requirements. For more information, see Installing Windows 11 on devices that don’t meet minimum system requirements.
Recommended method to install Windows 11
If upgrading from Windows 10 to Windows 11, Microsoft recommends waiting until Windows Update notifies that the upgrade is ready for the device. To check if Windows 11 is ready for a device using Windows Update, follow these steps:
-
Right-click on the Start menu and then select Settings > Update & Security > Windows Update .
Or
Select the following Windows Update shortcut:
Open Windows Update
-
In the Windows Update window that opens, select the Check for updates button.
Note: If there are updates available for the current version of Windows, the Windows 11 upgrade might not be made available until those updates are installed. Install any updates for the current version of Windows, restart the device, and then try checking for the Windows 11 upgrade again.
-
If Windows 11 is ready to be installed on the device, a message is displayed in the Windows Update window showing that Windows 11 is ready. Select the Download and install button to start the Windows 11 upgrade.
-
In the Software License Terms window that opens, select the Accept and install button.
-
The Windows Update window refreshes and Status: shows the progress of the Windows 11 upgrade downloading and installing.
-
Once the installation portion of the Windows 11 upgrade is done in Windows 10:
-
The Windows Update window refreshes and changes to Restart required. The Status: also updates to Pending restart.
-
A Windows Update notification is displayed in the notification area with the message Restart to install the newest Windows feature update.
To continue the Windows 11 upgrade, restart the device by selecting the Restart now button in the Windows Update window or Restart now in the Windows Update notification.
-
-
The device restarts and the Windows 11 upgrade process continues. The device restarts automatically a few more times to finish installing Windows 11.
-
The Windows sign-on screen is displayed once the Windows 11 upgrade is done. Sign into the device to complete the upgrade.
If a message isn’t displayed in the Windows Update window that Windows 11 is ready, it could be for one of the following reasons:
-
The device meets the hardware requirements for Windows 11, but the Windows 11 upgrade isn’t ready to install yet.
-
The device meets the hardware requirements for Windows 11, but there might be a known compatibility issue with the device and Windows 11. The Windows 11 upgrade is eventually offered if the compatibility issue is resolved. For more information, see The notification «What needs your attention» displays during a Windows upgrade.
-
The device doesn’t meet the hardware requirements for Windows 11. To check the device’s Windows 11 hardware compatibility, use the PC Health Check app available at the following link:
How to use the PC Health Check app
The Windows Update window might also instead display the following message:
-
Get ready for Windows 11
To see if this PC can run Windows 11, check the hardware requirements or visit your PC manufacturer’ website.
Other methods to install Windows 11
The Windows 11 Installation Assistant is an app that provides assistance with upgrading to Windows 11. Microsoft recommends waiting until a device is offered the Windows 11 upgrade via Windows Update before using the Windows 11 Installation Assistant app. However, the Windows 11 Installation Assistance app can be used before Windows Update offers the Windows 11 upgrade.
When the Windows 11 Installation Assistant is run, one of the following options is displayed in the Windows 11 Installation Assistant window:
-
Install Windows 11 — If the Windows 11 Installation Assistant determines that the device meets the hardware requirements for Windows 11, it offers to install it. To proceed with the install, in the Windows 11 Installation Assistant window:
-
Select the Accept and install button to start the upgrade to Windows 11.
-
When the Windows 11 upgrade process prompts to restart, select the Restart now button.
-
The device restarts and the Windows 11 upgrade process continues. The device restarts automatically a few more times to finish installing Windows 11.
-
The Windows sign-on screen is displayed once the Windows 11 upgrade is done. Sign into the device to complete the upgrade.
-
-
Use the PC Health Check app to check compatibility — The Windows 11 Installation Assistant needs more information to determine if the device meets the hardware requirements for Windows 11. Run the PC Health Check app to check if the device meets the minimum hardware requirements. For more information, see How to use the PC Health Check app.
After running the PC Health Check app, select the Refresh button in the Windows 11 Installation Assistant window to update status. The updated status should show if Windows 11 is available for install or if the device doesn’t meet the minimum hardware requirements to install Windows 11.
-
This PC doesn’t meet the minimum system requirements to install Windows 11 — The device doesn’t meet the hardware requirements to upgrade to Windows 11. Microsoft recommends leaving the device on Windows 10.
Support for Windows 10 will end in October 2025
After October 14, 2025, Microsoft will no longer provide free software updates from Windows Update, technical assistance, or security fixes for Windows 10. Your PC will still work, but we recommend moving to Windows 11.
Learn more
The Windows 11 installation media is an alternate method of installing Windows 11. Installation media is normally used to install Windows 11 on a device that doesn’t already have Windows installed on it. However, it can also be used to upgrade existing installations of Windows to Windows 11.
For details on where to obtain the Windows 11 installation media and how to create it, see the article Create installation media for Windows.
Once the installation media is created, it can be used to upgrade an existing installation of Windows to Windows 11 using one of the following two methods:
-
Run the installation media in the current version of Windows.
-
Boot from the installation media to install a fresh copy of Windows 11.
Run the installation media in the current version of Windows
Windows 11 installation media can be used in the current version of Windows, for example Windows 10, to upgrade to Windows 11:
-
Sign into Windows on the device being upgrade to Windows 11.
-
Insert the Windows 11 installation media into the Windows device. For example, if the Windows 11 installation media was created on a USB flash drive, attach the USB flash drive to the Windows device.
-
A pop-up notification window should appear asking what to do with the inserted media. Select Run setup.exe.
If a pop-up notification doesn’t appear:
-
Right-click on the Start menu and then select File Explorer .
-
When File Explorer opens, in the navigation bar, select This PC.
-
In the results pane under Devices and drives, right-click on the Windows 11 installation media and select Install or run program from your media.
Note: If the User Account Control window appears, select the Yes button. If the User Account Control window asks for an admin user name and password, enter a user name and password of an account that has administrator privileges. Once the user name and password are entered, select the Yes button.
-
-
The Windows 11 Setup window opens. Step through the Windows 11 Setup pages, following instructions at each step.
-
At the Ready to install page, the default is to Keep personal files and apps. However, selecting the Change what to keep link gives the following options:
-
Keep personal files and apps — Personal files, apps, and Windows settings are all kept and migrated to the new Windows 11 install. This option is the default option.
-
Keep personal files only — Personal files are kept and migrated to the new Windows 11 install, but apps and Windows settings are deleted.
-
Nothing — Everything is deleted, including personal files, apps, and Windows settings. If this option is selected and personal files are needed, they should first be backed up, for example to OneDrive or an external backup device.
Select the desired option or accept the default of Keep personal files and apps. To start the upgrade, finish stepping through the Windows 11 Setup pages.
-
-
The device is upgraded to Windows 11.
Boot from the installation media to install a fresh copy of Windows 11
Windows 11 installation media can be booted from on an existing Windows device to upgrade to Windows 11:
Warning:
-
This method completely wipes the contents of the hard drive and the existing installation of Windows and installs a fresh copy of Windows 11. All files and installed apps on the device are lost. Make sure that any necessary files are backed up before proceeding, for example to OneDrive or to an external backup device.
-
Although this method does check to make sure the device meets some of the minimum system requirements for Windows 11, it isn’t as thorough as the PC Health Check app or using Windows Update. Microsoft recommends running the PC Health App in the current installation of Windows to verify that the device meets all requirements to run Windows 11. Running the PC Health App should be done before attempting to use the installation media to install a fresh copy of Windows 11. For more information on how to use the PC Health App to check if the device meets the minimum requirements for Windows 11, see How to check if your device meets Windows 11 system requirements after changing device hardware.
-
Insert the Windows 11 installation media into the Windows device. For example, if the Windows 11 installation media was created on a USB flash drive, attach the USB flash drive to the Windows device.
-
Turn on the device that is being upgraded to Windows 11 and then initiate the device’s boot menu. The boot menu is initiated by selecting an appropriate key on the keyboard when the device first boots. This key varies by device manufacturer and model but is usually one of the function keys (F1 — F12) at the top of the keyboard or the DEL key. For more information, see the device’s documentation or the device manufacturer’s website.
-
From the device’s boot menu, select the Windows 11 installation media.
-
Once the device boots from the Windows 11 installation media, the Windows 11 Setup window appears. Step through the Windows 11 Setup and follow the on-screen instructions.
-
The device is upgraded to Windows 11 and a fresh copy of Windows is installed.
Related articles
-
Can I upgrade to Windows 11?
-
Getting ready for the Windows 11 upgrade.
-
Create installation media for Windows.
-
Upgrade to Windows 11: FAQ.
-
Installing Windows 11 on devices that don’t meet minimum system requirements.
-
How to check if your device meets Windows 11 system requirements after changing device hardware.
-
The notification «What needs your attention» displays during a Windows upgrade.
Need more help?
Want more options?
Explore subscription benefits, browse training courses, learn how to secure your device, and more.
Looking to give your computer a fresh start with Windows 11? We’ve got you covered! A fresh install of Windows 11 can help improve your PC’s performance and give it a new lease on life. In just a few easy steps, you’ll have a clean, speedy, and secure operating system. Ready to dive in? Let’s get started!
In this section, we’ll walk you through the steps to fresh install Windows 11 on your computer. Following these instructions will erase all data on your device, so make sure to back up any important files before you begin.
Step 1: Create a Bootable USB Drive
First, download the Windows 11 installation media tool and follow the on-screen instructions to create a bootable USB drive.
This tool is available on Microsoft’s official website. Ensure you have a USB drive with at least 8GB of space. The process might take a few minutes, so be patient.
Step 2: Backup Your Data
Before you proceed, backup all your important data to an external drive or cloud storage.
Installing a new OS will erase all your personal files and applications on your computer. You don’t want to lose any important photos, documents, or software.
Step 3: Boot from the USB Drive
Restart your computer and press the key to enter the BIOS or Boot Menu (commonly F2, F12, Del, or Esc) and select the USB drive as the boot device.
This step can vary depending on your computer’s manufacturer. Check the specific instructions for your device if you’re unsure.
Step 4: Start the Windows 11 Installation
Once you boot from the USB drive, follow the on-screen instructions to begin the Windows 11 installation process.
You’ll be prompted to select your language, time, and keyboard preferences. Once done, click “Next” and then “Install now.”
Step 5: Enter Your Product Key
Enter your Windows 11 product key when prompted. If you don’t have one, you can skip this step and activate Windows later.
This key is essential for verifying your copy of Windows. If you don’t have it handy, don’t worry—you can add it later via the Settings menu.
Step 6: Choose Custom Installation
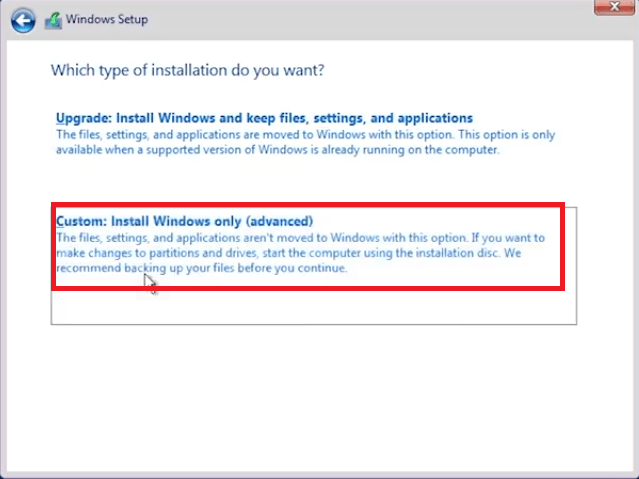
When asked to choose the type of installation, select “Custom: Install Windows only (advanced).”
This ensures a clean installation, erasing any previous versions of Windows and starting fresh.
Step 7: Select Your Hard Drive
Select the drive where you want to install Windows 11 and click “Next.”
If there are multiple partitions, it’s best to delete them for a truly fresh install. Just be sure you’re deleting the correct data.
Step 8: Complete the Installation
Windows 11 will now start installing. This process might take some time, and your PC will restart several times.
Sit back and relax while Windows installs. Make sure your computer is plugged in to avoid any interruption.
After completing these steps, your computer will restart and boot into a fresh copy of Windows 11.
Tips for Fresh Installing Windows 11
- Back Up Everything: Before starting, ensure all your important files are backed up to avoid data loss.
- Use the Right USB Drive: Make sure your USB drive is at least 8GB and is formatted correctly.
- Check System Requirements: Ensure your PC meets the minimum requirements for Windows 11 to avoid compatibility issues.
- Have Your Product Key Ready: Keep your Windows 11 product key handy to activate your software without delays.
- Stay Connected to Power: Keep your laptop plugged in during the installation to prevent any power-related interruptions.
Frequently Asked Questions
Do I need a product key for Windows 11?
Yes, you need a product key to activate Windows 11. If you don’t have one during installation, you can skip this step and activate it later.
Can I install Windows 11 without losing my files?
A fresh install will erase all your files. To keep your data, back up your files before starting the installation process.
What are the minimum system requirements for Windows 11?
Windows 11 requires a compatible 64-bit processor, 4GB RAM, 64GB storage, UEFI firmware with Secure Boot capability, and TPM version 2.0.
How long does it take to install Windows 11?
The installation process varies but generally takes around 30 minutes to an hour, depending on your system’s speed.
Can I revert to my old operating system after installing Windows 11?
If you backed up your previous OS, you could revert. However, without a backup, you would need to reinstall your old OS from scratch.
Summary
- Create a bootable USB drive.
- Backup your data.
- Boot from the USB drive.
- Start the Windows 11 installation.
- Enter your product key.
- Choose custom installation.
- Select your hard drive.
- Complete the installation.
Conclusion
Congratulations! Now you know how to fresh install Windows 11 on your computer. Whether you’re revamping an old PC or just prefer a clean slate, these steps will help you get there smoothly. Remember, always back up your data before such a significant change.
Installing a new operating system might seem daunting, but with a little preparation, it’s entirely manageable. For further reading, check out Microsoft’s official documentation. Ready to give your PC that fresh start? Get going and enjoy the new features and improved performance that Windows 11 has to offer!
Matthew Burleigh has been writing tech tutorials since 2008. His writing has appeared on dozens of different websites and been read over 50 million times.
After receiving his Bachelor’s and Master’s degrees in Computer Science he spent several years working in IT management for small businesses. However, he now works full time writing content online and creating websites.
His main writing topics include iPhones, Microsoft Office, Google Apps, Android, and Photoshop, but he has also written about many other tech topics as well.
Read his full bio here.
Doing a fresh install of Windows 11 is like giving your computer a brand new start. You’ll wipe everything clean and start from scratch, with a shiny new operating system to play with. It’s perfect if your computer is acting up, you’re selling it, or you just want a clean slate. Don’t worry, it’s not as scary as it sounds. Just make sure to back up your important files first, and you’ll be good to go!
Before diving into the steps, let’s get a clear picture: a fresh install means wiping your hard drive clean and installing a new copy of Windows 11. This process will erase all your files, so it’s crucial to back them up. Doing this will help your computer run smoothly and feel brand new.
Step 1: Create a Windows 11 Installation Media
Grab a USB drive with at least 8GB of space and turn it into an installation wizard.
You’ll need to visit the Microsoft website and download the Media Creation Tool. It’s a straightforward process: just follow the prompts, select «Create installation media for another PC,» and choose USB flash drive as your media type. This tool will download Windows 11 and prepare your USB drive to install it on your computer.
Step 2: Boot from the Installation Media
Restart your computer and make it start up from the USB drive.
When your computer starts, you’ll need to press a key (often F2, F12, Del, or Esc) to enter the boot menu. Every computer is a bit different, so if you’re not sure, check your computer’s manual or do a quick online search. Once in the boot menu, select your USB drive to start the installation process.
Step 3: Install Windows 11
Follow the on-screen instructions to get Windows 11 onto your computer.
The Windows Setup will guide you through the process. You’ll need to accept the license terms, choose «Custom: Install Windows only (advanced),» and select the hard drive you want to install Windows 11 on. If you have multiple partitions, you may want to delete them to start fresh. Just be absolutely sure you’ve backed up your files!
Step 4: Set Up Windows 11
Once the installation is complete, it’s time to personalize your new operating system.
After the installation, your computer will restart, and you’ll be greeted with the Windows setup screen. This is where you’ll choose your region, language, and keyboard settings. You’ll also set up a user account, password, and, if you wish, link your Microsoft account.
After completing the installation, your computer will boot up with a fresh copy of Windows 11, ready for you to reinstall your apps, restore your files, and customize your settings. It’ll feel like a brand new machine!
Tips for a Fresh Install of Windows 11
- Always back up your files before starting the fresh install process. Better safe than sorry!
- Make sure your computer meets the system requirements for Windows 11 to avoid any compatibility issues.
- Keep your Windows 11 product key handy; you might need it during the installation.
- Disconnect any unnecessary peripherals during the install to avoid potential conflicts.
- Update all your drivers once the installation is complete to ensure everything works smoothly.
Frequently Asked Questions
Will I lose all my files if I do a fresh install of Windows 11?
Yes, a fresh install will erase everything on your hard drive, so back up your files first!
Can I install Windows 11 on an older computer?
Your computer needs to meet specific system requirements to run Windows 11, so check those before attempting an install.
How long does the fresh install process take?
It depends on your computer, but generally, it can take an hour or two.
Do I need a USB drive to do a fresh install of Windows 11?
Yes, you’ll need a USB drive with at least 8GB of space to create the installation media.
Can I use the computer while Windows 11 is installing?
No, you won’t be able to use your computer during the installation process.
Summary
- Create a Windows 11 Installation Media
- Boot from the Installation Media
- Install Windows 11
- Set Up Windows 11
Conclusion
There you have it, folks – a fresh install of Windows 11 is not as daunting as it seems. Whether you’re looking to declutter your system, resolve existing issues, or simply enjoy the benefits of a clean state, following the steps outlined above will set you on the right path. Remember, the key to a successful fresh installation is preparation. Back up your data, make sure you have the necessary tools and software, and take your time with the process.
Once you’ve completed the install, you’ll have a clean slate to work with – a prime opportunity to organize your files, customize your settings, and download only the essential apps and programs. This not only optimizes your system’s performance but also gives you a sense of control and a fresh start with your tech life.
A fresh install of Windows 11 can breathe new life into an old machine or ensure that your new device is set up precisely the way you want it. So go ahead, give it a try, and who knows? You might just fall in love with your computer all over again.
Matt Jacobs has been working as an IT consultant for small businesses since receiving his Master’s degree in 2003. While he still does some consulting work, his primary focus now is on creating technology support content for SupportYourTech.com.
His work can be found on many websites and focuses on topics such as Microsoft Office, Apple devices, Android devices, Photoshop, and more.
Microsoft has released Windows 11 for everyone thus offering an opportunity to get first-hand experience of their next generation operating system. However, there are some limitations, like you can only upgrade an existing Windows 10 OS which has a valid product key. Therefore, users who don’t want to upgrade their existing Windows 10 OS, but still want to try the new Windows 11 are left in the dark by Microsoft. Well, not anymore. In this guide, we will describe in detail how to install Windows 11 fresh installation on a computer.
Why Perform Windows 11 Clean Install?
One logical question is why perform a clean install of Windows 11, when Microsoft recommends upgrading to Windows 10? Well, there are many reasons, but two reasons are more important.
- Better Experience: If you upgrade your existing Windows 10 to Windows 11, then all the files, settings and programs of your existing installation will be preserved in Windows 11 as well. This means that several broken registry entries, junk files, etc. will be transferred to Windows 11. Therefore, when you perform a clean install of the latest Windows, then you will be able to judge its performance in a much better way.
- Questionable Reliability: Since Windows 11 is a new operating system its reliability is under doubt and untested. Therefore, it’s better to perform fresh installation of Windows 11 instead of upgrading the existing Windows 10 operating system. This way you can continue to work on a reliable Windows 10 OS and also test Windows 11 on a different computer or hard drive.
Now that you know the benefits of fresh installation of Windows 11, let’s see how to perform this task.
As mentioned before, Microsoft has only provided access to Windows 11 in the Windows Insiders program to upgrade to Windows 10. Therefore, to successfully complete the clean installation of Windows 11 we will have to follow a three step method.
Step 1: Download Windows 11 ISO file
Step 2: Create Windows 11 bootable USB drive
Step 3: Perform Clean Install of Windows 11
Although, Microsoft doesn’t give direct access to Windows 11 ISO files, there are ways to get those files directly from Microsoft servers. You can learn about this below. So, let’s start.
Steps
Before you start the installation of Windows 11 you should make sure that the computer where you want to install Windows 11 fulfills the minimum requirements for this operating system. Once you are sure about this, then start the installation method given below. Don’t miss any step and follow the instructions carefully in the correct order.
Step 1: Download Windows 11 ISO File
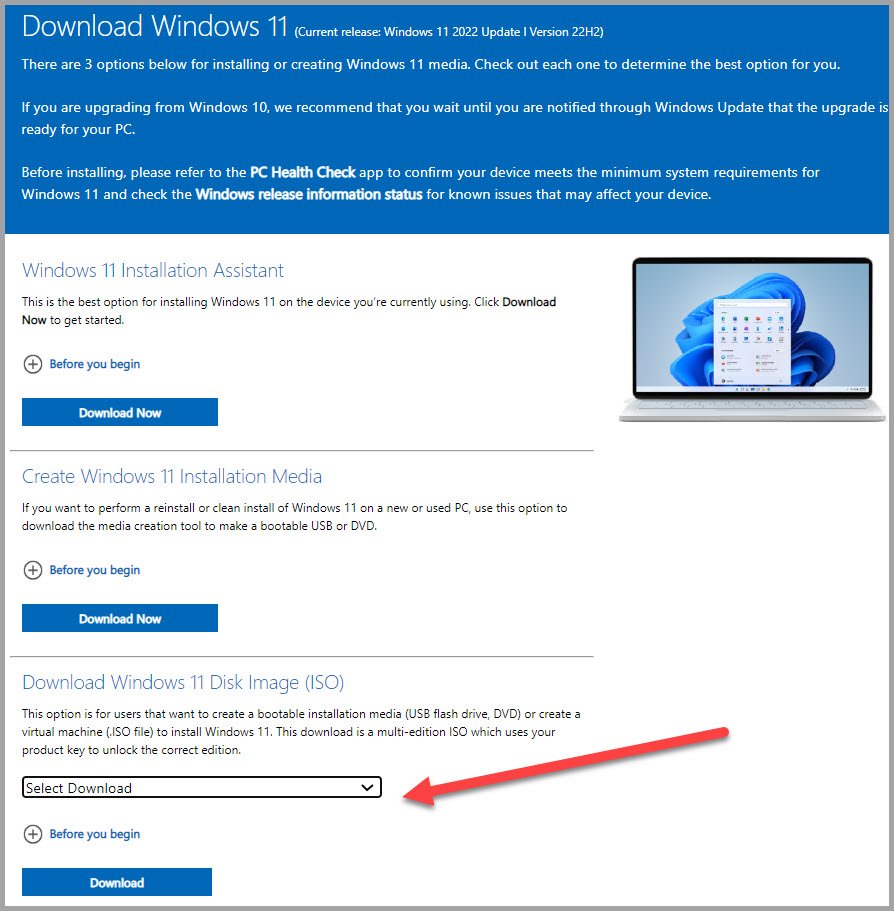
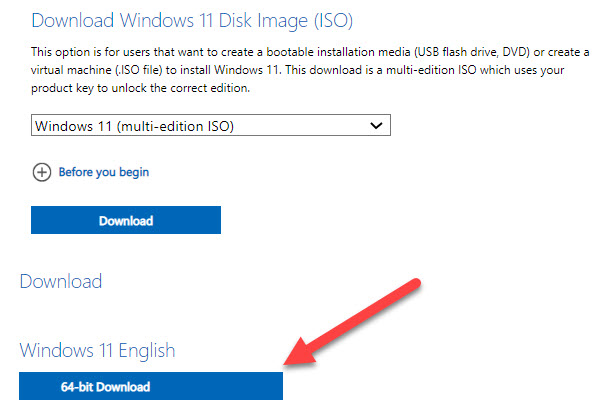
If you want to download the Windows 11 ISO file for clean installation of this OS, then you will have to use the services of a third-party website. UU Dump is one such site that is trustworthy, safe and doesn’t require you to register for the download of the windows 11 ISO file.
- Visit this page and click on download Windows 11 ISO file to download the Windows 11.
- Go to 3rd option and download the Windows 11 Disk Image.

- After that select which bit do you want to download. Click on 64bit-download.

- That’s it, the Windows 11 ISO file will be downloaded successfully.
Step 2: Create Windows 11 bootable USB drive
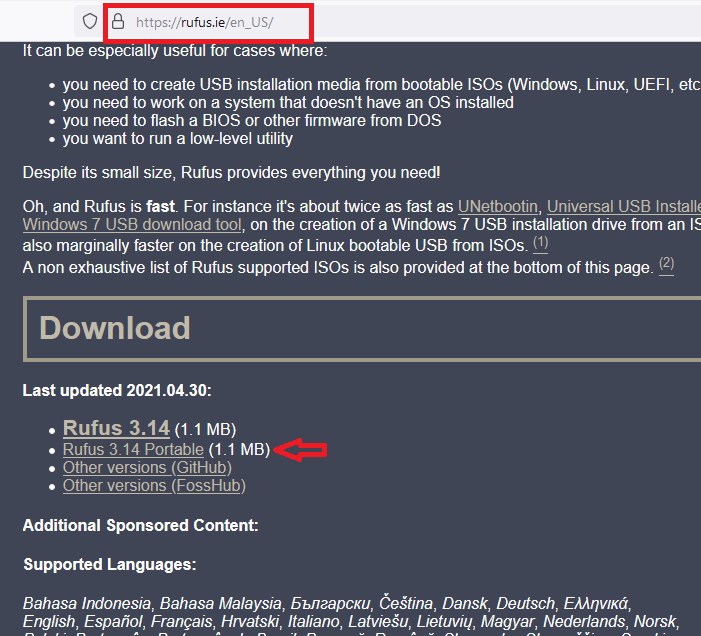
For creating the Windows 11 bootable USB drive you need a USB pen drive of at least 8 GB capacity. To complete this step you will have to download a completely free software, named Rufus. Using this small-sized software you can create the USB bootable drive in a few clicks.
- Visit Rufus Website to download the software. Since, you want to create a USB bootable driver, you should scroll down on the website home page and click on the ‘Rufus Portable’ link to download the version of this software designed for portable drives, like USB pen drives.

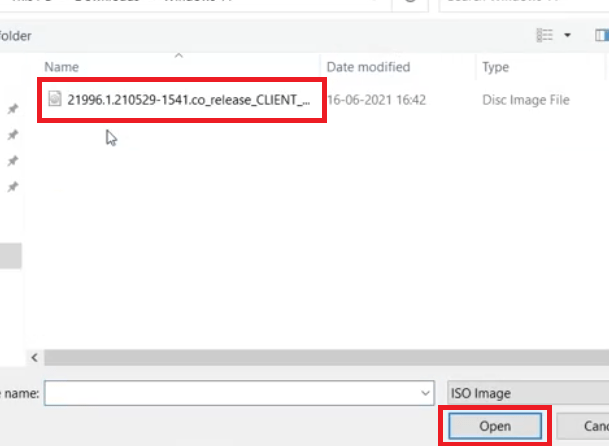
- After downloading the software connect your USB drive with your computer. Now, run the Rufus executable file and click on the ‘Select’ button to load the Windows 11 ISO file.
- Browse to the folder where Windows 11 ISO file is saved. Select the Windows 11 ISO file and click on the ‘Open’ button.

- Make sure that Partition scheme is ‘GPT’, Target system is ‘UEFI’ and File system is ‘FAT 32’. Finally, click the ‘Start’ button.
- You will be warned that all the data from the drive will be destroyed. Click on the ‘OK’ button to proceed.
- Wait for the software to create the bootable drive.
- When the Windows 11 bootable USB drive has been created you will see ‘READY’ in the Status. Click on the ‘Close’ button to close the software.
That’s it, now you have Windows 11 bootable drive and it’s time to start the fresh installation of Windows 11 on your computer.
Step 3: Install Windows 11
Although Windows 11 haven’t been installed on your target computer yet, but trust us the difficult part of this installation method is over. You should connect your Windows 11 bootable drive to the computer where you want to install Windows 11, then follow the steps given below to start the installation of Windows.
- Start/restart your computer and press the relevant key to make it boot from the USB drive. Usually, you have to press F2, F10, F12 or Esc key depending upon your motherboard or computer manufacturer. When the Windows will boot from the USB drive you will see the Windows 11 logo.
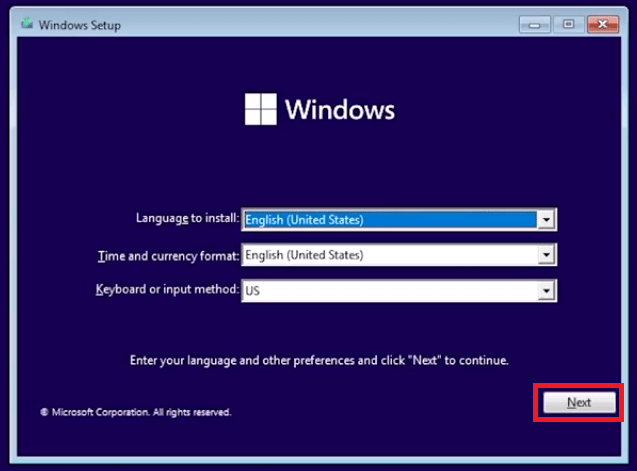
- Select your preferences and click on the ‘Next’ button to proceed.

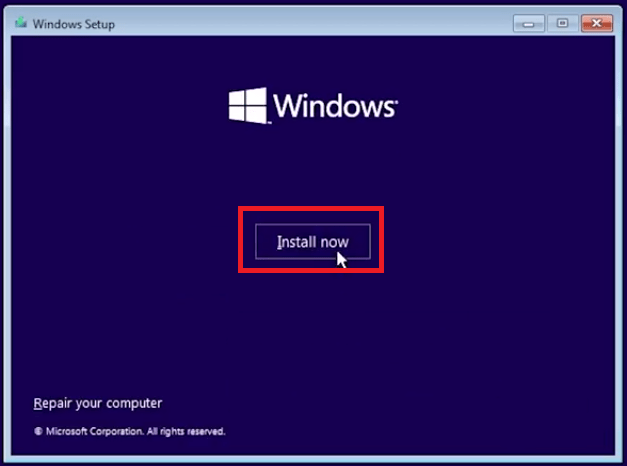
- Click on the ‘Install now’ button to begin the OS installation.

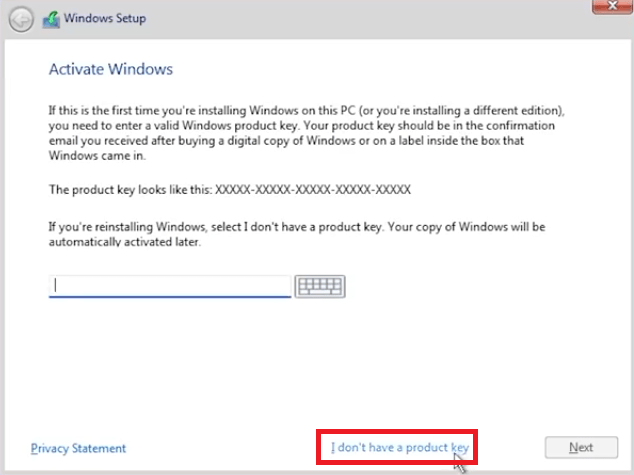
- Skip this step by clicking on ‘I don’t have a product key’ link.

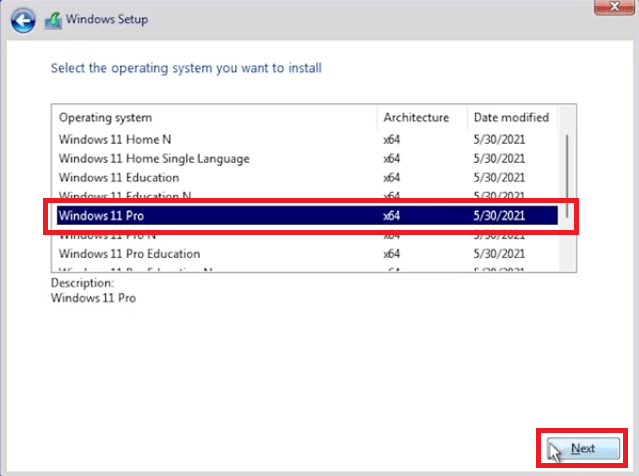
- Select the Windows version you want to install. We have selected ‘Windows 11 Pro’. Then, click on the ‘Next’ button to proceed.

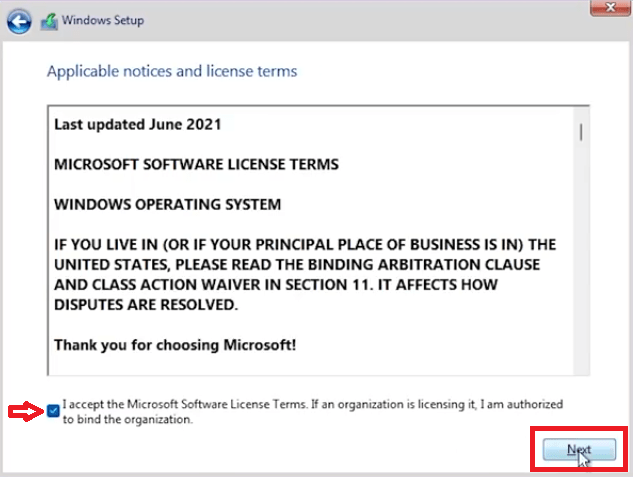
- Accept the license agreement by selecting the checkbox, then click on the ‘Next’ button.

- Choose ‘Custom Install Windows only’ option to continue.

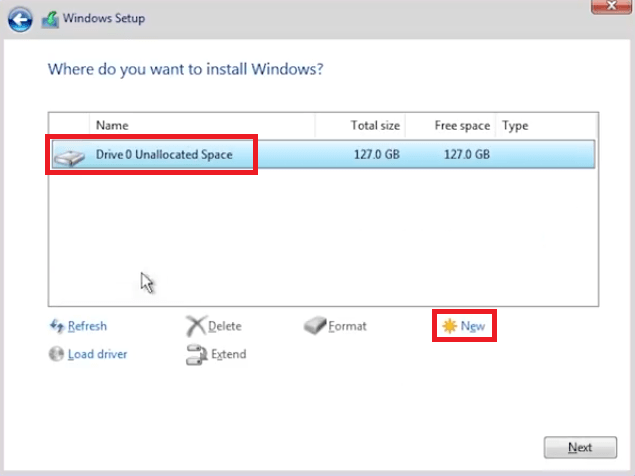
- Now you must create disk partition. For that, choose the disk drive and click on the ‘New’ link. If your drive is already partitioned, then choose the ‘Primary’ partition and proceed accordingly.

- Enter the Size of your primary partition and click on the ‘Apply’ button.

- Click on ‘OK’ button to give the permission for creating additional partitions.
- New disk partitions have been created. Select the ‘Primary’ partition and click on the ‘Next’ button.

- Wait for the installation files to be copied and let the installer finish the installation. This may take a few minutes.

- Click on the ‘Restart now’ button to reboot your computer.

- Wait for the Windows 11 to restart and perform the necessary steps. Finally, you will get the option to choose your country, just make your selection and click on the ‘Yes’ button.
- Choose the keyboard layout method and click on the ‘Yes’ button.
- If you want to add another keyboard, then click on ‘Add layout’, otherwise, click on the ‘Skip’ button.
- Choose ‘Set up for personal use’ option, then click on the ‘Next’ button.
- If you have Microsoft account, then you can use it to login. Otherwise, you can click on the ‘Sign-in options’ link.
- Click on the ‘Offline account’ option.
- If you install offline mode, then you will be unable to use some Microsoft applications, but Windows 11 features will be fully active. So, click on the ‘Limited experience’ to proceed.
- Enter the name for your computer, then click on the ‘Next’ button.
- Enter the password for your computer, then click on the ‘Next’ button.
- Choose your privacy settings and click on the ‘Accept’ button.
- When you see ‘Hi’ on your screen it’s a sign that your Windows 11 is welcoming you.
- Wait for the Windows 11 to setup your computer for use.

- Finally, Windows 11 installation is completed and you will see the Windows 11 Home Screen.


That’s it, you have successfully performed the fresh installation of Windows 11 on your computer.
Also check: Install Windows 11 on unsupported device
Windows 11 is available now, but only as an upgrade to the Windows 10 users. Therefore, many users want to know how to install Windows 11 fresh installation without any product key. To help you solve this problem we have described an installation procedure which you can use to easily install Windows 11 on any computer without creating any account, not even Microsoft’s login account. Our installation method not only helps you bypass the Windows Insider Program, but also allows you to perform clean installation of Windows 11.
Installing a fresh copy of Windows 11 can seem like a daunting task if you haven’t done it before, but it’s actually a straightforward process when approached step by step. Whether you are looking to upgrade your system, give your computer a fresh start, or troubleshoot persistent issues, a clean installation of Windows 11 can help achieve that. In this comprehensive guide, we will walk you through the entire process of installing Windows 11 from scratch, ensuring you have all the information necessary to complete this task smoothly and efficiently.
Why Fresh Install Windows 11?
A fresh installation of Windows 11 offers many benefits. First and foremost, it can resolve various performance issues, such as sluggishness or crashes, which might be caused by accumulated software clutter over time. It can also remove malware infections or unwanted programs, giving your computer a fresh slate. Additionally, a fresh install can help you take advantage of Windows 11’s new features without worrying about legacy software or settings.
Preparing for a Fresh Windows 11 Installation
1. Check System Requirements
Before proceeding with the installation, it’s crucial to confirm that your computer meets the minimum system requirements for Windows 11. According to Microsoft, the following are required:
- Processor: 1 GHz or faster with at least 2 cores on a compatible 64-bit processor or System on a Chip (SoC).
- RAM: 4 GB or more.
- Storage: 64 GB or larger storage device.
- System firmware: UEFI, Secure Boot capable.
- TPM: Trusted Platform Module (TPM) version 2.0.
- Graphics card: DirectX 12 compatible graphic / WDDM 2.x.
- Display: >9” with HD Resolution (720p).
- Internet connection: Internet connectivity is necessary for updates and to download certain features.
2. Backup Important Data
Before you initiate a clean install, it’s essential to back up anything important on your computer, as this process will erase all existing files and applications:
- Files: Transfer documents, photos, music, and videos to an external hard drive or a cloud storage service.
- Applications: Make a list of applications you currently use and gather installation media or download links for them.
- Settings and Preferences: It’s advisable to note down settings, configurations, or any critical data.
3. Prepare Installation Media
To install Windows 11, you need a bootable USB drive or DVD containing the installation files. Here’s how to create one using a USB drive:
Requirements
- A USB flash drive with at least 8 GB of space.
- Windows 10/11 PC with internet access.
Steps to Create Installation Media
-
Download the Media Creation Tool:
- Visit the official Microsoft Windows 11 download page.
- Click on the “Download Now” button under the «Create Windows 11 Installation Media» section.
-
Run the Tool:
- Open the Media Creation Tool you downloaded.
- Accept the license terms.
-
Choose Your Task:
- Select “Create installation media (USB flash drive, DVD, or ISO file) for another PC” and click Next.
-
Select Language and Edition:
- Choose your preferred language, edition, and architecture (64-bit) for Windows 11, and click Next.
-
Choose USB Drive:
- Connect the USB flash drive. Select “USB flash drive” option when prompted.
- Choose your USB drive from the list and click Next to begin the download and installation process.
-
Complete the Process:
- Once the download is complete, the tool will write the installation files to the USB drive. This may take some time, depending on your internet speed and the USB drive’s write speed.
4. Change Boot Order in BIOS/UEFI
To install Windows 11 from the USB drive, you may need to change the boot order in your computer’s BIOS/UEFI settings:
-
Access BIOS/UEFI:
- Restart your computer and press the key designated to enter BIOS/UEFI settings (usually displayed on the screen during startup; common keys are F2, F10, DEL, or ESC).
-
Navigate to Boot Menu:
- Look for a menu labeled «Boot,» «Boot Order,» or similar.
-
Set USB as Primary Boot Device:
- Move your USB drive to the top of the boot order list using the provided keys (typically + and – or arrow keys).
-
Save and Exit:
- Save the changes and exit the BIOS/UEFI settings (usually F10).
Performing the Fresh Install
1. Boot from USB Drive
-
Insert the USB Drive: Plug the USB drive where you created the installation media.
-
Start the PC: Power on or restart the computer. It should boot from the USB drive if the BIOS settings were configured correctly.
2. Begin Windows 11 Installation
-
Windows Setup Screen: You will see the Windows Setup screen after a moment. Choose your language, time, and keyboard preferences. Click Next.
-
Install Now: Click on «Install now» to begin the installation process.
3. Enter Product Key
You will be prompted to enter your Windows 11 product key. If you have one, enter it. If you are upgrading from a previous version, you can choose «I don’t have a product key» to proceed and activate later.
4. Choose Installation Type
When prompted to select the type of installation you want, choose:
- Custom: Install Windows only (advanced): This allows you to perform a fresh installation.
5. Select the Installation Drive
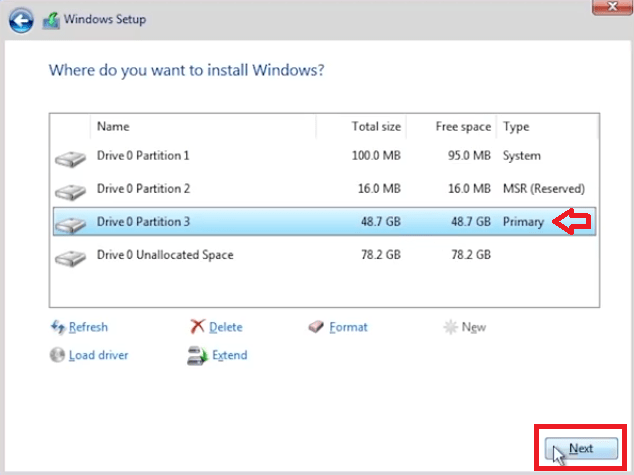
-
Drive Options: You’ll see a list of existing partitions on your drives.
-
Delete Old Partitions: If you want a clean installation, select each partition relating to your previous Windows installation (usually the largest partition) and delete them one by one. Be extremely careful; deleting the wrong partition can result in data loss.
- If you wish, you can create new partitions by clicking on “New” and specifying the size you want.
-
Select Unallocated Space: Once old partitions are deleted, select the unallocated space where you wish to install Windows 11 and click Next.
6. Installation Process
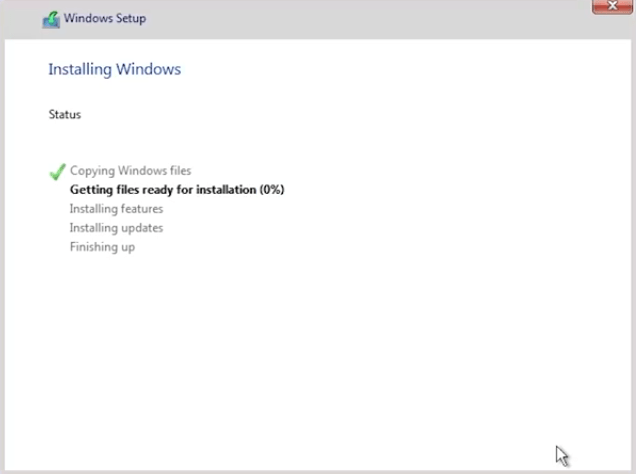
Windows 11 will begin installing. This process consists of several phases:
- Copying Files: Windows files will be copied to your PC.
- Installing Features: Windows features will be installed.
- Installing Updates: Necessary updates will be applied.
This process will take some time, and your system may restart several times.
7. Personalizing Your Windows 11 Installation
Once the installation is complete, you will be taken through several setup phases:
-
Region and Keyboard Layout: Select your region and preferred keyboard layout, then click Next.
-
Connect to a Network: If prompted, connect to your Wi-Fi or Ethernet network. This step may vary based on the installation method.
-
Sign In with Microsoft Account: Microsoft encourages using a Microsoft account to sign in. If you prefer local users, choose the option at the bottom to create a local account.
-
Set Up PIN: You’ll have the option to set up a Windows Hello PIN for easier access.
-
Privacy Settings: You will see various privacy settings that you can adjust according to your preference.
-
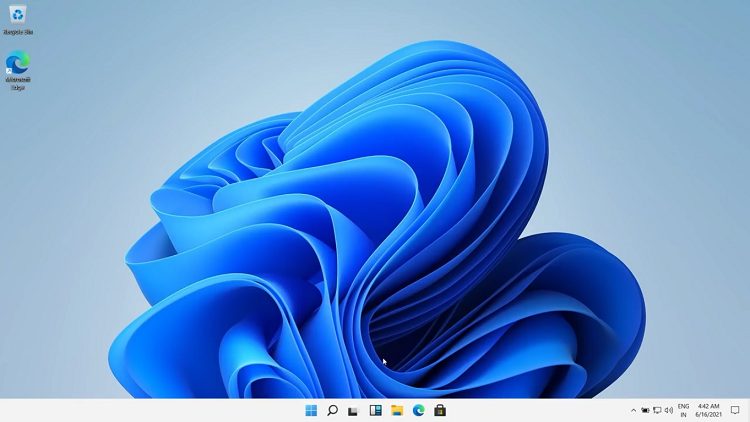
Customizing Features: Windows 11 will finalize your settings, adding features like optional diagnostic data, location services, and more.
-
Get Ready: After a brief loading time, your Windows 11 desktop will appear, indicating that the installation was successful.
Post-Installation Setup
1. Install Drivers
Once the installation is complete, it’s essential to install any drivers your hardware may need to function optimally. Windows 11 will automatically install many drivers, but you might need to check:
- Graphics Drivers: Install the latest drivers from your GPU manufacturer’s website (NVIDIA, AMD, Intel).
- Motherboard Drivers: Check the manufacturer’s website for any specific drivers you may need.
2. Install Windows Updates
After everything is set up, check for Windows Updates:
- Go to Settings > Windows Update.
- Click on Check for updates to ensure you have the latest patches and system improvements.
3. Restore Your Data
After confirming that Windows 11 is stable and running smoothly, restore your backed-up files and reinstall any programs you need. It’s essential to install applications one at a time, ensuring that your system can handle them without any performance impact.
4. Customize Windows Experience
Finally, take time to personalize your Windows 11 experience:
- Start Menu: Pin your most-used applications for quicker access.
- Taskbar Settings: Adjust the taskbar according to your preferences.
- Theme and Background: Choose a theme and desktop background that suit your style.
Troubleshooting Common Issues
While installing Windows 11 is typically straightforward, issues can arise. Here are some common problems and tips to address them:
1. Installation Hangs or Fails
If the installation process hangs or fails to complete:
- Check BIOS Settings: Make sure your USB drive is set as the primary boot device.
- Check USB Drive: Ensure the USB drive is correctly created using the Media Creation Tool.
- Try Another USB Port: Use a different USB port, especially if USB 3.0 ports are involved during boot.
2. Missing Drivers
If you find that certain hardware isn’t functioning as expected post-installation:
- Visit the manufacturer’s site for specific hardware to download and install the latest drivers.
- Utilize Windows Device Manager to identify missing or outdated drivers.
3. Activation Issues
If you encounter activation problems:
- Ensure that the product key entered is correct, or use the troubleshooting feature in Windows to resolve issues.
4. Performance Issues
If your system seems slow post-installation:
- Check for updates again.
- Ensure that the background processes aren’t overloading your CPU/RAM.
- Revisit any programs installed, as some may not be optimized for Windows 11.
Conclusion
Performing a fresh installation of Windows 11 can revitalize your computer, giving it a new lease on life. By preparing appropriately, following each set of instructions carefully, and performing post-installation tasks, you can ensure a smooth and successful installation experience.
Over time, maintaining good computer hygiene and periodically re-evaluating your system’s performance will help keep it running optimally. Enjoy your new Windows 11 setup, and explore the numerous features it has to offer!