
Quick Tips
- To change the thumbnail for a folder, open its properties and go to Customize > choose file.
- You can also reset the folder thumbnail to have Windows automatically set it for you.
- To disable folder thumbnails on Windows, go to the View tab in File Explorer Options and check the box for Always show icons, never thumbnails.
By default, Windows picks a folder thumbnail or picture automatically based on the folder’s content. Windows may update the folder thumbnail to reflect the changes as you add or remove items from the folder.
If you want a specific thumbnail image for your folder that doesn’t change, you can set the folder thumbnail manually.
Step 1: Press the Windows key + E to open File Explorer.
Step 2: Locate the folder to change the thumbnail. Right-click on it and select Properties from the context menu.

Step 3: In the Properties window, switch to the Customize tab and click the Choose File button.

Step 4: Locate and select the picture you want to use as a thumbnail and click Open.

Step 5: Hit Apply > OK.

For folder thumbnails, Windows supports all the popular file types, including JPG, JPEG, PNG, TIF, GIF, and more.
If the folder thumbnail change does not reflect immediately, press F5 to refresh the folder. Note that File Explorer will only show folder thumbnails if the view type is set to medium, large, or extra large icons.
How to Reset Folder Thumbnail in Windows
Windows also lets you reset the folder thumbnail if you change your mind later. Here are the steps for the same.
Step 1: Press the Windows + E keyboard shortcut to launch File Explorer and navigate to the folder to reset the folder picture.
Step 2: Right-click on the folder and select Properties.
Step 3: Under the Customize tab, click the Restore Default button. Then, click Apply > OK.

How to Disable Folder Thumbnails in Windows
Although Windows makes it simple to change folder thumbnails, doing so for each folder separately can be time-consuming. If you don’t see the need for folder thumbnails, you can disable them completely. Here’s how to do it.
Step 1: Click the magnifying icon on the taskbar to access the search menu. Type file explorer options in the search box and select the first result.

Step 2: Switch to the View tab and check the Always show icons, never thumbnails box.

Step 3: Click Apply and then OK.
It’s worth noting that the above process will disable thumbnail previews for files. To undo this change later, repeat the above steps and clear the Always show icons, never thumbnails checkbox.
Was this helpful?
Thanks for your feedback!
The article above may contain affiliate links which help support Guiding Tech. The content remains unbiased and authentic and will never affect our editorial integrity.
Folders in Windows 11 show a preview of the files they contain when certain folder views are enabled. This is the case for the medium, large, and extra large icon views, as well as the views tiles and content.
Windows 11 displays a cut-off preview of one of the files, which you may dislike because it may get harder to identify files.

The operating system comes without options to change this. Good news is that third-party apps come to the rescue to modify the default view.
Restore folder thumbnails in Windows 11

FolderThumbnailFix is an open source tool that changes a single file in Windows 11. This file is responsible for cutting off the thumbnails that folders show in the operating system.
Word of warning: While we did not notice any issues using the program, it is recommended to either backup the original file in question or create a system restore point or system backup before using the application. The developer notes furthermore that some antivirus apps may falsely flag the app as malicious.
Here is what happens behind the scenes. The file C:\Windows\SystemResources\imageres.dll.mun is responsible for cutting off thumbnails displayed in folder icons. The application in question modifies the file to add transparency to the folder icon. With transparency in place, folder thumbnails are shown in full.
It uses the excellent Resource Hacker for that.
Installation
Installation is straightforward and requires just a few steps:
- Download the latest version of FolderThumbnailFix.zip from the GitHub repository.
- Extract the archive to the local system.
- Right-click on FolderThumbnaiFix.exe after extraction and select properties from the context menu.
- Check the «unblock» box under security.
- Click on apply and then ok.
- Double-click on the executable file to run it.
- Select the full thumbnail style.
- Confirm the action in the security prompt by selecting yes.
- Restart the PC.
- Repeat the steps from 7, but without the restart in the end, if you do not see any change.
The application makes the modification mentioned above. You can undo the change at any time by running the application again and selecting the default view when prompted to make a choice.
FolderThumbnailFix can’t make the change when the Windows file imageres.dll.mun is in use. The developer suggests to retry the process in that case.
Closing Words
Whether the application is useful or not depends largely on the view modes that you use in File Explorer and whether you prefer a full preview of files in folders.
What is your preference? Do you display files and folders as icons in File Explorer, or prefer a different view? Let us know in the comments. (via Deskmodder)
Summary
Article Name
Windows 11: how to display full folder thumbnails
Description
Find out how to change the preview of files inside folders in Windows 11 so that a full preview is displayed instead of a cut thumbnail.
Author
Martin Brinkmann
Publisher
Ghacks Technology News
Logo
Advertisement
Some users may not be able to see thumbnail previews on a Windows 11 computer.
And, the old method of enabling thumbnail previews may not be working on the Windows 11 computer. In other words, thumbnails may be missing from your Windows 11 computer. But, this issue can be resolved with a quick configuration change on the Windows 11 computer.
(This post has been updated on June 20, 2024, please leave a feedback if the instructions do not work)
To enable image previews or thumbnails on Windows 11 folder, please follow the instructions below:
- Open the folder for which you need image thumbnails
- Right click within the folder to bring up the context menu
- Choose ‘Properties’ from the context menu
- Choose ‘Customize’ from the tab options
- Choose ‘Optimize this folder for’ and choose ‘Pictures’ from the drop down menu.
For your benefit, all the steps have been performed and displayed in the screenshots below.
We will use the Windows file explorer to bring up the folder and its context menu.
For the purpose of this example, we will enable thumbnails for the default ‘Pictures’ folder.
- Press the Win Key + X + E to launch the file explorer on a Windows 11 computer. An alternate way to open the file explorer would be through the task manager. Open the task manager, and load the file explorer on the Windows 11 computer.
- We want to generate image thumbnails for the ‘Pictures’ folder. So, we choose the ‘Pictures’ folder. Remember, this is the default ‘Pictures’ folder. Double-click on the folder name or icon to open the ‘Pictures’ folder.
- Right click within the folder to bring up the context menu. You will load the context menu popup on the screen. A screenshot of the context menu is given below. Move to the ‘Properties’ tab of the ‘Folder Options’.
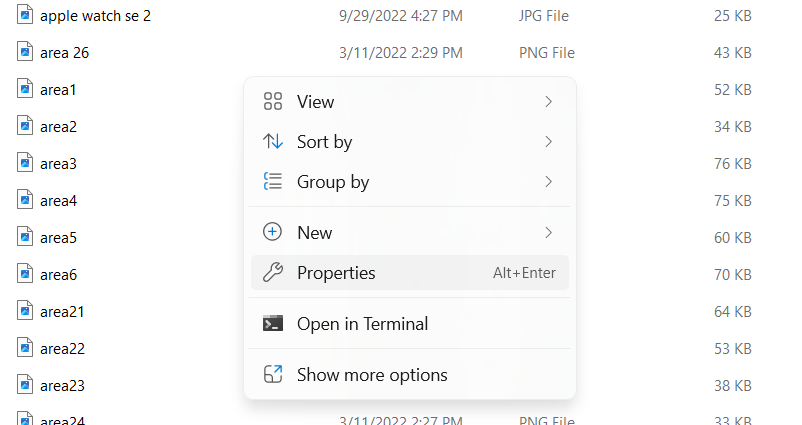
- From the context menu, choose ‘Properties’. It will take you to the screen displayed below.
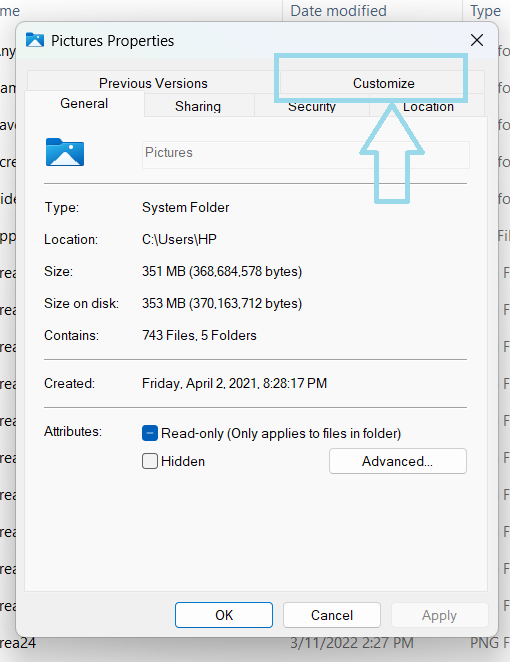
- Now, select the ‘Customize’ option from the available tab options. The same has been highlighted in the screen displayed above.
- Once you are in the Customize tab, you will see a screen displayed below. Choose the option of ‘Pictures’ under the ‘Optimize this folder’ dropdown.
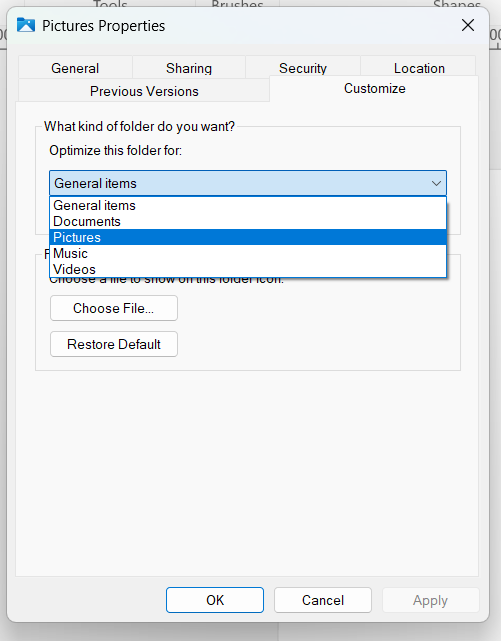
- Click on ‘Apply’ to apply your changes.
- The ‘Pictures’ folder will show the image thumbnails now.
If you need image thumbnails to be enabled for any folder, repeat the same process in the folder:
- Click the folder name
- Right-click within the folder to bring up the context menu
- From the context menu, choose ‘Properties’.
- Within the ‘Properties’ panel, choose the ‘Customize’ tab.
- Now, choose the option that states – ‘Optimize this folder for’ – ‘Pictures’. The ‘Pictures’ option will be in the drop down menu.
If you do it the first time, the entire exercise may take 5 minutes. The process has been simplified by Microsoft over the past couple of years. And, the revised process is more user-friendly.
Summary
You can enable thumbnails on a Windows 11 computer using the following preferred method:
- You can enable the thumbnails through the folder options.
You could any of these methods to enable thumbnails on a Windows 11 computer for a specific folder or for the entire computer.
You may also like to read the following content related to Windows 11:
- Add Gamebar performance on the Windows 11 taskbar
- Undoing changes made to your computer on Windows 11 computer
- Notepad in Dark mode in Windows 11
- Desktop Window Manager is using a lot of memory on Windows 11
- Ungroup Taskbar icons on Windows 11
- Improve File Explorer speed on Windows 11
Rajesh Dhawan is a technology professional who loves to write about Cyber-security events and stories, Cloud computing and Microsoft technologies. He loves to break complex problems into manageable chunks of meaningful information.
This post will show you how to enable and disable thumbnail previews, as well as, display Thumbnail Previews on Network folders in File Explorer of Windows 11/10, using Registry Editor, Group Policy Editor, File Explorer Options, Control Panel and Performance Options.
In Windows, the File Explorer shows tiny previews of videos and images stored on the system’s hard disk. Most of us are accustomed to browsing through our collection by looking at the thumbnail previews.
This is because these thumbnails give us a quick walk through the contents of the file explorer, and we do not need to open every single file that may have confusing file names. Thumbnail previews make the navigation process notably fast, but it comes with its own set of troubles that may encourage you to disable Thumbnails in Explorer on your Windows 11/10 system.
Thumbnail previews can be useful as they let you view Windows files without opening them. The content of the File Explorer can be set to extra-large icons, large icons, medium icons, and details/tiles view, it is great for those who like to be organized. But as I said it brings its own set of troubles. Creating thumbnails for quick navigation/previewing of files slows down the other file operations, affects system performance, and causes UI clutter. In such a case, disabling the feature is a good idea.
If your images or other files display a generic Windows icon, such as a mountain and lake scene for images or a media player icon for video files, the Thumbnail Previews feature is probably disabled. On the other hand, if you can view a small snapshot of the file’s content, the feature is enabled.
Here are different processes to enable and disable the thumbnail display feature in Windows 11/10 Explorer:
- Via File Explorer Options
- Using Control Panel
- Using the Registry Editor
- Via Performance options
- Using the Group Policy Editor.
These processes are described in more detail below.
1] Enable or disable thumbnail via File Explorer Options
To disable follow these steps:
- Go the ‘File Explorer’ and click on the ‘File’
- In the ‘File Menu’ options, click on ‘Change folder and Search options’
- The above action will open the ‘Folder Options’ dialog box, here hit the ‘View’ tab.
- Now check the ‘Always show icons, never thumbnails’ option appearing under ‘Advanced Settings’.
- Click ‘Ok’ and ‘Apply’ settings.
To enable, follow the same aforementioned process until step ‘3’, and then uncheck the ‘Always show icons, never thumbnails’ option.
2] Show Thumbnails via Control Panel
To enable follow these steps:
- From the ‘Start Menu’ go to the ‘Control Panel’
- Click on ‘System and Security’ and hit ‘System’.
- Select ‘Advance System Settings’ appearing on the left-side panel.
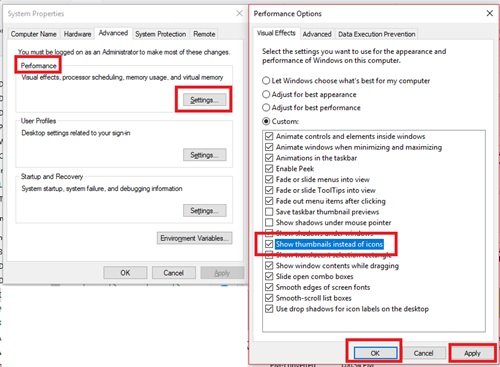
- In the ‘System Properties’ window, click ‘Settings’ under the ‘Performance’ heading.
- Now in the ‘Performance Options’ dialog, click the ‘Visual Effects’ tab
- Check the ‘Show thumbnails instead of icons’ under the ‘Custom:’ heading.
- Press ‘OK’ and ‘Apply’ to save changes.
To disable thumbnail previews via Control Panel, uncheck the ‘Show thumbnails instead of icons’ under the ‘Custom:’ heading.
Related: Enable or disable Taskbar Thumbnail Preview in Windows
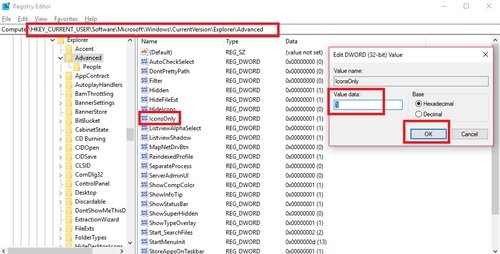
3] Using Registry Editor to turn off Thumbnails in Windows 11/10
1] Press the ‘Windows key + R’ to open the ‘Run’ dialog.
2] Type ‘regedit’ and press ‘Enter’.
3] Navigate to the below path:
HKEY_CURRENT_USER\Software\Microsoft\Windows\CurrentVersion\Explorer\Advanced
4] On the right side of the Window, search for ‘IconsOnly’ and double-click on it.
5] Change values to Enable/Disable:
- ‘0’ to show thumbnails
- ‘1’ to hide thumbnails
6] Click ‘OK’ to save changes.
4] Via Performance options
Follow these steps:
- Press the ‘Windows Key + R’ to open the ‘Run’ dialog.
- Type ‘SystemPropertiesPerformance.exe’ and press ‘Enter’.
- Now, check or uncheck the ‘Show thumbnails instead of icons’ options to enable or disable thumbnail previews in Windows 10.
5] Using Group Policy Editor
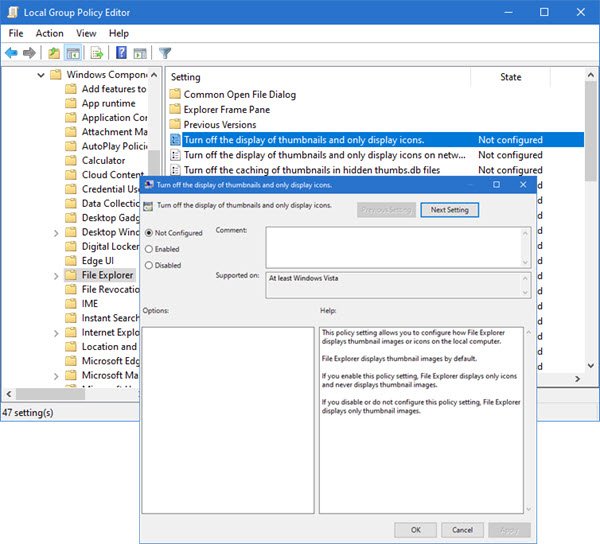
You can use the Group Policy Editor to enable/disable this feature. Follow these steps:
1] Press ‘Win + R’ keys to open the ‘Run’ dialog.
2] Now, type ‘gpedit.msc’ and press ‘Enter’.
3] When the window opens the browser to the following path:
User Configuration > Administrative Templates > Windows Components > File Explorer
4] Now, on the right-hand side of the window, double click on ‘Turn off the display of thumbnails and only display icons’
5] Click on ‘Enabled’ or ‘Disabled’ to turn the feature on/off.
You should now be able to enable the thumbnail previews easily.
How to display Thumbnail Previews on Network folders in File Explorer
File Explorer in Windows 11/10 never displays thumbnail previews (or images) on network files and folders by default. Only the icon of the default app is visible on a file thumbnail. However, we can change this behavior and show thumbnail previews (instead of icons) on network files and folders when using medium icons, large icons, tiles, and extra large icons. We can also disable thumbnail previews on network files/folders without turning off thumbnail previews on local files and folders. It can be done using Group Policy or Registry Editor.
1] Using Group Policy Editor

The steps are as follows:
- Open the Local Group Policy Editor window
- Navigate to the following path:
User Configuration > Administrative Templates > Windows Components > File Explorer
- Double-click on the Turn off the display of thumbnails and only display icons on network folders setting to open it
- Select the Disabled option to enable showing thumbnail previews on network folders. Otherwise, select the Not configured/Enabled option if you want to display only icons
- Press the Apply button and OK button
- Sign out and sign in to your PC or restart your system.
Now you can see thumbnail previews on network folders (including sub-folders and files). Make sure that the Folder Layout View is not set to Details, List, or Small icons.
2] Using Registry Editor

It is recommended to back up the Windows Registry before making any changes. Once done, use the following steps:
- Type regedit in the Search box and hit Enter to open the Registry Editor
- Access the Explorer key using this path:
HKEY_CURRENT_USER\Software\Microsoft\Windows\CurrentVersion\Policies\Explorer
- To enable showing thumbnail previews on network files and folders, create a new DWORD (32-bit) Value on the right part
- Rename the new value to DisableThumbnailsOnNetworkFolders
- Now restart your PC to apply the new setting.
To show only icons and turn off the display of thumbnails on network files and folders, repeat the above steps, and delete the DisableThumbnailsOnNetworkFolders DWORD (32-bit) Value. Restart your PC.
How to enable or disable Preview pane in File Explorer on Windows?
Open Windows 11/10 File Explorer, click on the View menu, and select the Preview pane option. A Preview pane sidebar will open on the right part to preview a selected file. A Preview button also appears on the top right part of File Explorer to show or hide the preview pane. To completely disable the Preview pane in File Explorer, access the Turn off Preview Pane setting in the Group Policy Editor, and enable that setting.
Read: How to show or hide file icon on thumbnails in Windows 11
Thumbnails not showing in File Explorer
The thumbnail preview on Windows normally uses thumbnail cache. Hence, if the thumbnail cache gets corrupted this issue may occur, and clearing the thumbnail cache becomes imperative. This post will show what to do if the Video or Picture Thumbnails are not showing in Explorer.
Do let us know if it was a smooth experience.
Related:
- How to make Taskbar Thumbnail Previews appear faster
- How to increase Taskbar Thumbnail Preview size.
Change the Windows 11 folder view style, free up disk space, and scan for errors
Updated on October 18, 2023
Windows 11 image thumbnails not showing instead of the default file icons is a common problem experienced by desktop, laptop, and tablet users. This guide will explain why your image thumbnails aren’t displaying correctly and will walk you through the steps to turn on thumbnails in Windows 11 if you have them disabled or turned off.
Why Are My Image Thumbnails Not Showing?
Image thumbnails not showing in Windows 11 is usually caused by incorrect settings being selected, missing or corrupted system files, or a lack of sufficient free space. Fortunately, the causes of this common Windows 11 bug aren’t anything to worry about, as the issue can usually be fixed by applying one or two of the below solutions.
How to Fix Windows 11 Thumbnails Not Showing
There are several solutions for fixing Windows 11 thumbnail and file icon problems. All the thumbnail fixes below are listed from easiest and fastest to more advanced and time-consuming, so work through them in the order presented.
-
Refresh your Windows 11 desktop. Right-click anywhere on your desktop and select Refresh.
-
Change the Windows 11 file icon size. File icons won’t display a thumbnail preview when their size is set to Small. Right-click the desktop and select View, and then make sure Medium icons or Large icons is selected.
-
Change the Windows 11 folder view style. Right-click within a folder and select View > Tiles or Content to enable icon thumbnails.
Avoid the List and Details options as they’ll shrink your icons to a size that’s too small for Windows 11 thumbnails to work.
-
Enable Windows 11 thumbnails. Open File Explorer, select the three-dot menu at the top of the window, then go to Options > View, and make sure Always show icons, never thumbnails is deselected. Having this option enabled will turn off thumbnails and replace them with generic file type icons.
-
Restore File Explorer default settings. From a File Explorer window, select the three-dot menu at the top, then go to Options > View > Restore Defaults > Apply to undo any system changes that could be affecting thumbnails.
-
Restart File Explorer. Open Task Manager by pressing Ctrl+Shift+Esc. Then, in the Processes tab, right-click Windows Explorer and choose Restart.
-
Restart Windows 11. A quick system restart can fix a number of issues and improve performance in general.
-
Perform a Windows update. The Windows operating system update process not only downloads and installs the latest security updates and features but it can also fix a variety of bugs and glitches.
-
Update your Windows 11 apps. An out-of-date app can affect how file icons are displayed.
-
Remove junk files from Windows 11. Deleting unneeded files can improve system performance and help everything run better.
-
Check how much free space you have left. If your Windows 11 device is running out of free space, the loading of media like thumbnails and icons can be affected. Consider deleting common items that take up lots of space.
-
Run a Windows troubleshooter. Open Settings and select System > Troubleshoot. If a troubleshooter is recommended, select Run.
-
Change the Windows 11 default apps. If the thumbnail images aren’t showing for specific file types, changing the program that’s assigned to open them could get them to display properly.
When in doubt, choose a related app that’s made by Microsoft or one that came pre-installed on your Windows 11 device.
-
Check Windows’ advanced system settings to ensure that thumbnails are showing.
Open the Start menu, type View advanced system settings, then select that result from the list. Under Performance, select Settings and make sure Save taskbar thumbnail previews and Show thumbnails instead of icons are checked.
Select Apply followed by OK to save any changes made.
-
Run the sfc /scannow command. This process will scan your device for any missing or corrupted system files which could be affecting the appearance of file icons and thumbnails, and attempt a repair.
FAQ
-
The easiest way to turn on thumbnail previews in Windows 10 is through File Explorer settings. Go to View > Options, and then select the View tab and uncheck the box next to Always show icons, never thumbnails.
-
Windows has kept thumbnail image data in a specific location since Vista. This cache lets Windows find and use the images regardless of which folder they’re in, which helps the system work a little faster.
Thanks for letting us know!
Get the Latest Tech News Delivered Every Day
Subscribe