
Force-Windows-11-Install
Please note: If you plan to make a bootable USB with the Windows 11 installer, please consider using Rufus instead. It will handle patching the installer, and it gets updated more often.
Win11-TPM-RegistryBypass
This tool creates a modified Windows 11 installer ISO using an existing one, containing a registry hack that bypasses the setup-time compatibility checks, as well as an experimental patch that forces feature updates and in-place upgrades to install, ignoring incompatibilities.
Looking for Windows 11 ISOs? Head over to UUP Dump to download the latest Dev build of Windows 11 and create a bootable ISO. Need help? You can start here.
I am also developing a command-line interface tool for UUP Dump, so that you can download the latest update package for a given channel, and generate an installable ISO for use with this script. Using just a single command. Requires Python 3 and the requests module. You can check out the project here.
Extras:
Looking for some Windows 11 hacks? I have some mod scripts on another repository, Windows11_Mods.
Please note that this tool does not allow Windows 11 to be installed on 32-bit (x86) platforms.
Windows 11 is a 64-bit-only OS, and therefore will not work at all on older architectures such as 32-bit (x86). If you are unsure what architecture your system is, press Win+R, type cmd, and press Enter. Then copy and paste the following command in command prompt: wmic cpu get DataWidth. If you get 64, you have a 64-bit processor, and can run Windows 11.
How it works:
This workaround injects three keys into the registry of the Windows Setup environment in the boot.wim file in the Windows 11 ISO that force the installer to skip TPM, Secure Boot, memory and CPU checks, allowing the user to install Windows 11 using the original installer. There are extra switches that can be passed for more in-depth patching, such as one that allows for forcing Windows Updates and in-place upgrades to skip compatibility checks; see extra switches for more.
A Windows 10 ISO is not required for this method.
Why?
The installer for Windows 11 checks for both TPM and Secure Boot, and will not install on «unsupported» processors. However, many of the devices that don’t have TPM, Secure Boot, or a compatible processor, are perfectly capable of running Windows 11.
Usage
TIP: It’s recommended to copy or move the Windows 11 ISO image to the same directory as the script to make things easy, as there can be some bugs with images located outside of the directory. If you have any issues with the script, please do not hesitate to open an issue.
NOTE: There is an issue with reading and writing files on external drives.
- In the repository directory, run
env.bat. This will open up a new elevated PowerShell window in the repository. You may be prompted by UAC (User Account Control) to grant administrative privileges to PowerShell. Click Yes. - Type
.\Win11-TPM-RegBypass.ps1in the PowerShell window, but don’t hit Enter just yet. - Follow up with
-Source. This is where you’re going to define the location of the Windows 11 ISO you want to use.
TIP: If your Windows 11 ISO is not in the same directory as the script, you can locate the ISO with File Explorer, select it, then click «Copy path» in the File Explorer ribbon, or hold down Shift and right-click the file, the click «Copy as path» in the context menu. (Windows 10)
- Lastly, we need to define
-Destination; the output ISO. You can make it short and sweet, and it doesn’t need to be a full path (the new ISO would be created in the repository directory in that case). - Make sure all file paths are surrounded with quotation marks to avoid potential issues.
Your final command should look something like this:
.\Win11-TPM-RegBypass.ps1 -Source "22000.100.210719-2150.CO_RELEASE_SVC_PROD2_CLIENTPRO_OEMRET_X64FRE_EN-US.ISO" -Destination "Win11-New.iso"
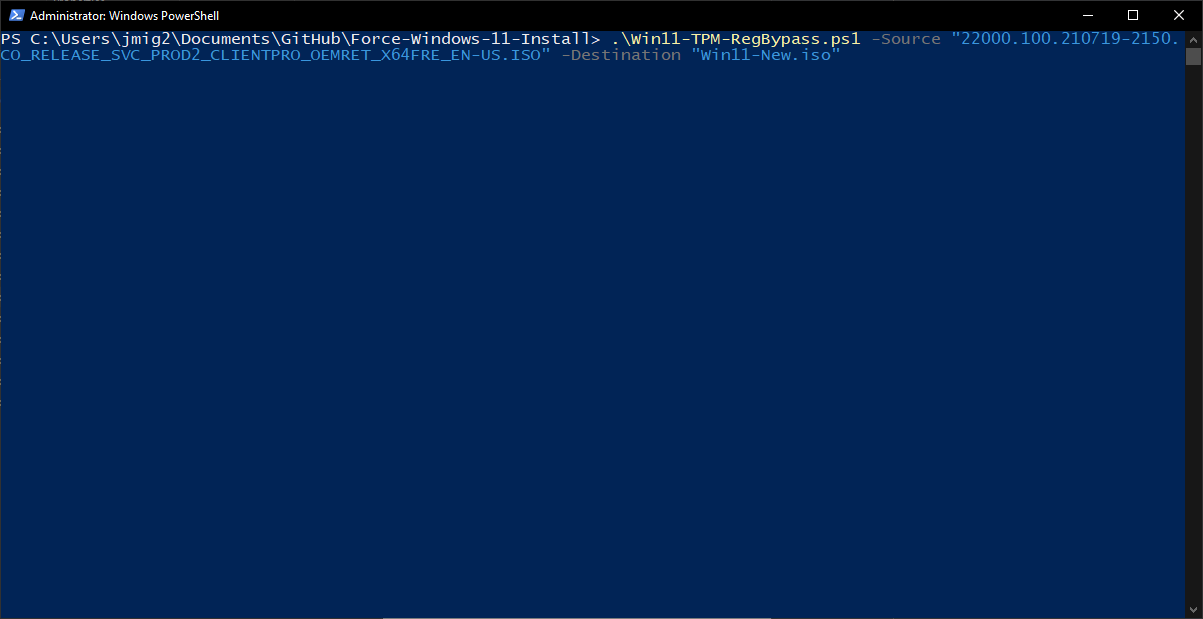
- Now you can press Enter. The script should start running, and provided everything works correctly, you should now have a new bootable Windows 11 ISO image without the TPM or Secure Boot restrictions during install. However, if you also want to inject a patch into the
Extra switches
Note that any options that modify install.wim may result in the process taking longer. If the Windows image contains more than one edition, you will be asked to select one or more editions to modify. Any editions not selected will not be included in the final image.
Modifications
-InjectVMwareTools— Injects the VMware tools installer into the install.wim image to run when the system boots for the first time. VMware needs to be installed on your system, and the VMware Tools ISO needs to exist in its application folder.-InjectPostPatch— (EXPERIMENTAL) Injects a script into the install.wim image to run when Windows 11 boots for the first time. The modifications that the script makes are intended to force upgrades that are done through Windows Update, as well as in-place upgrades, to succeed regardless of compatibility status. It does this by forcing the upgrade tool to bypass the compatibility checks that would otherwise cause the installation/upgrade to fail.-PrepareUpgrade— (EXPERIMENTAL) Modify the current system to bypass compatibility checks to allow in-place upgrades using the modified ISO. Can be called on its own (no other parameters), or otherwise run after generating the ISO. See below for more information.
Note: If doing an in-place upgrade usingsetup.exefrom a Windows 11 ISO image, do NOT disable the downloading of updates. This seems to result in a TPM error. The reason is currently unknown.-UndoPrepareUpgrade— (EXPERIMENTAL) Undo the changes made by-PrepareUpgrade, if there are any. Can only be called by itself.
Other switches
-VerboseMode— Enable verbose output, which isn’t much-GuiSelectMode— Shows a GUI for selecting multiple editions to modify as opposed to the CLI-based selection method-HideTimestamps— Disable printing the amount of time it took to complete a process
Prepare Upgrade feature (required for in-place upgrades on unsupported systems)
.\Win11-TPM-RegBypass.ps1 -PrepareUpgrade will only modify the current Windows installation.
.\Win11-TPM-RegBypass.ps1 -Source [source] -Destination [destination] <Other parameters> -PrepareUpgrade is a one-liner that will perform modifications to the current Windows installation after generating the ISO.
Set-WindowsInsiderRing.ps1
Forcibly change the Windows Insider ring (and enable Windows Insider if it is disabled). The script needs to be run as an administrator.
Options
-Dev— Set ring to Dev-Beta— Set ring to Beta-ReleasePreview— Set ring to ReleasePreview
Win11-ImageBuilder (Obsolete)
Win11-ImageBuilder has been marked obsolete, and is no longer maintained. For the documentation on the tool, navigate here.
Background
Following the announcement of Windows 11, many users were rather discouraged to discover the new TPM, CPU and Secure Boot restrictions imposed by Microsoft for Windows 11 in an attempt to block devices lacking these features from installing and running it, and encouraging them to buy newer, and possibly more locked-down/restrictive devices. This has left a lot of otherwise enthusiastic users in the dark, with virtually no way to upgrade without buying a new machine sporting a CPU newer than 2018, as well as the aforementioned features. However, it’s been proven time and time again that on many devices that Microsoft considers unsupported, the Windows 11 experience was comparatively normal, with few to no issues. Microsoft claims that their reasons for enforcing these restrictions have to do with both compatibility and security. Additionally, they claim that many of the older devices that Windows 11 was tested on tended to have issues resulting in BSoD (Blue Screen of Death) errors, and other instabilities and issues. However, many people running Windows 11 on these so-called incompatible devices didn’t report any major issues at the time of writing despite some missing features such as virtualization. While it’s not exactly recommended to run Windows 11 on an incompatible device (especially if it’s a daily driver), it certainly is possible to bypass Microsoft’s restrictions to allow installing or upgrading to Windows 11.
Included binaries
| Binary name | Description | Source |
|---|---|---|
| 7z.exe | 7-Zip CLI interface | Source |
| oscdimg.exe | OSCDIMG — Used for rebuilding ISO images after processing (Pulled from the Windows 10 ADK) | Source |
You may receive an error when downloading the Windows 11 ISO file online from Microsoft. Why can’t you download the Windows 11 ISO? How to properly download Windows 11 from an ISO file? You can find possible factors and solutions from this post collected by EaseUS. Now let’s get an overview of the problem:
| ⚙️Complex Level | Low, easy for beginners |
| 🕰️Duration | 3-8 minutes |
| 💡Fixes |
|
| 🔧Causes |
Insufficient disk space, internet connection, antivirus programs, etc. |
| 🖥️Applies to |
|
Let’s read this article and learn how to fix this error.
Usually, we will download Windows 11 ISO files from Microsoft’s official website because this way is the safest and free of viruses and advertisements. Download links are valid for 24 hours after they are created.
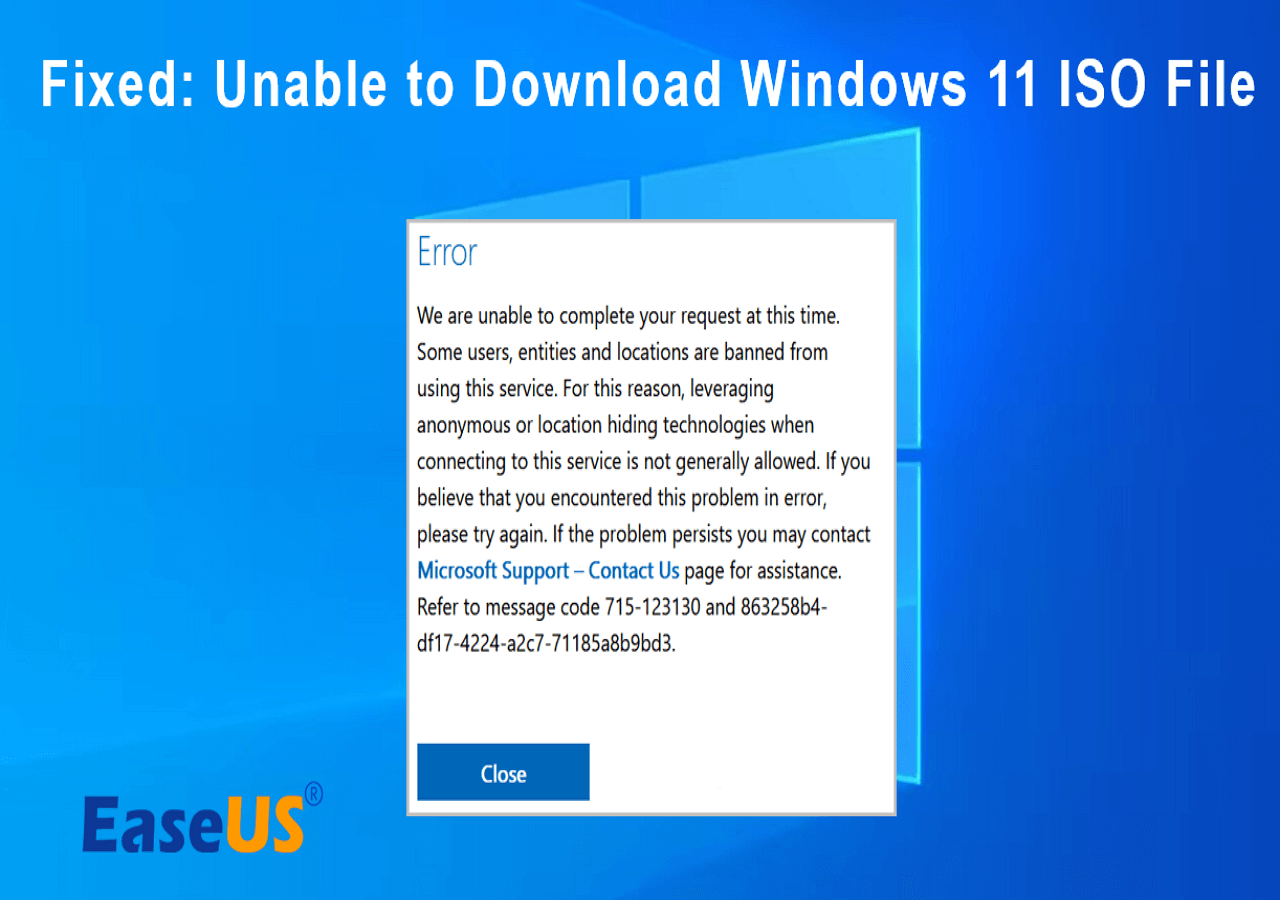
Unfortunately, sometimes download errors occur unexpectedly, and we get an error message, «We are unable to complete your request at this time; certain users, entities, and locations are prohibited from using this service.» Why can’t I download the Windows 11 ISO from Microsoft to a PC? There are multiple reasons behind it, for example, insufficient disk space, internet connection, antivirus programs, etc.
Fortunately, we’ve researched and found a fix that works, so if you’re having download issues, take it easy and try the fixes below.
Six Fixes for Unable to Download Windows 11 ISO File Error
Based on tests, we list six fixes here to help you download Windows 11 ISO file and avoid the download error during the process. Check them below:
Fix 1. Recheck Windows 11 System Requirements
Before downloading Windows 11 ISO, you need to check the Windows 11 requirements to avoid the error above. To do this, visit the official Windows 11 download page and click the Download Windows 11 Disk Image (ISO) section, then click Check system requirements before you begin.
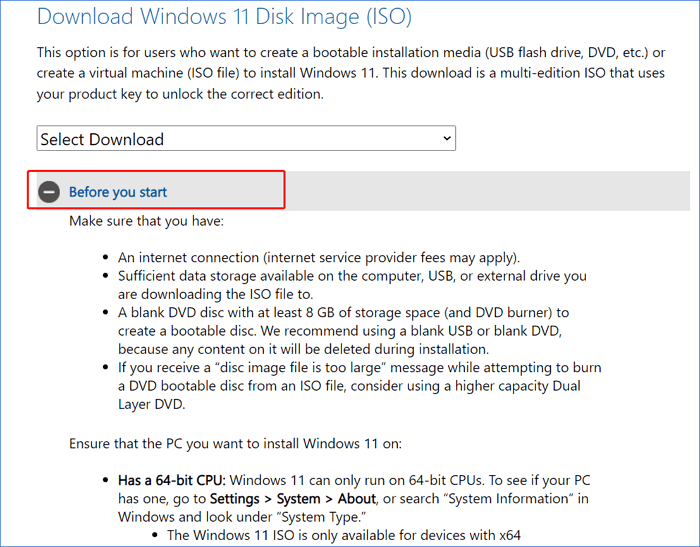
As shown, there are a few things you should be aware of:
- 💡A stable internet connection.
- 💡DVD or USB drive with at least 8GB of disk space.
- 💡To download the Windows 11 ISO file, ensure enough data storage space on your PC, USB, or other external drive.
Read Also: How to Boot From USB on Windows 11
Fix 2. Disable Third-Party Antivirus Software
Sometimes, your third-party antivirus program may prevent you from downloading the Windows 11 ISO from Microsoft. To resolve this issue, try uninstalling or disabling your antivirus tool:
Step 1. Hit the Windows key in the taskbar and enter «Settings.»
Step 2. Choose Apps and then go to the Apps & Features tab.
Step 3. Locate the antivirus tool in the Apps section and right-click on it.
Step 4. Select Uninstall from the options and confirm the uninstall.
Note that: Depending on the product, the method of disabling it varies. You can search for the corresponding method on the Internet.
Fix 3. Disable VPN
A VPN is a useful tool for accessing the Internet through a virtual IP. But because some VPN services can be seriously abused by some users, Microsoft will ban the IP or service from accessing its content. To successfully download the Windows 11 ISO file, disable the VPN and try downloading the ISO file again.
Step 1. Launch the Settings feature on Windows.
Step 2. Click the Network and Internet option.
Step 3. Select the VPN category in the left menu.
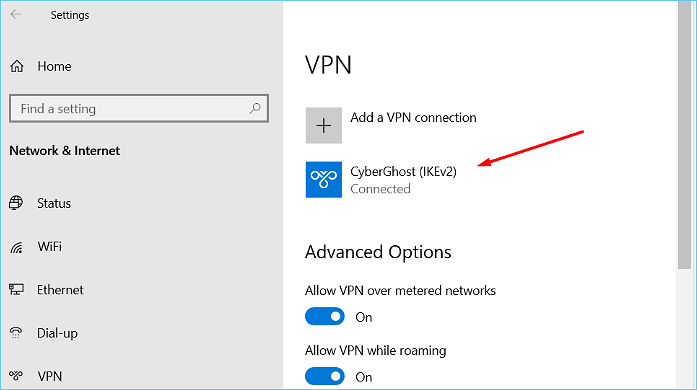
Step 4. Select the VPN connection to disable it.
Step 5. Click Disconnect or Remove it based on your needs.
- Disconnect — Disconnect
- Remove — Delete
Fix 4. Prepare a USB with Enough Space
As mentioned above, you should make sure the target USB or external hard drive has more than 8GB of space to hold the Windows 11 ISO file. For USB flash drives, we recommend you use blank ones. Also, you need to ensure the USB drive file system is NTFS instead of FAT32. FAT32 does not support a single file larger than 4GB. To do this, we recommend you use EaseUS Partition Master. It can format a USB to NTFS and wipe all the files on the USB for free disk storage without charging any fee.
Step 1. Launch EaseUS Partition Master, right-click the partition you intend to format and choose «Format».
Step 2. In the new window, enter the Partition label if you prefer to rename it, choose the FAT32/EXT2/EXT3/EXT4 file system, and set the cluster size according to your needs, then click «OK».
Step 3. Then you will see a warning window, click «Yes» in it to continue.
Step 4. Click the «Execute 1 Task(s)» button in the top-left corner to review the changes, then click «Apply» to start formatting the partition to FAT32/EXT2/EXT3/EXT4.
This tool can do a lot to manage a USB, such as:
Fix 5. Try Another Web Browser
Some web browsers have very strict policies regarding online activities such as downloads. Suppose you encounter a download error while downloading the Windows 11 ISO from Microsoft. You can try another web browser to download the Windows 11 ISO file.
Fix 6. Disable Browser Extensions
Sometimes extensions can cause Windows 11 ISO download errors. You can try temporarily disabling your extensions and start downloading the ISO file. Once done, re-enable them in your browser.
You can share this article to help others who are also unable to download Windows 11 ISO files.
Conclusion
These are possible solutions to fix Windows 11 ISO files that cannot be downloaded. If you can’t download the Windows 11 ISO to your PC, try these solutions to fix it. Afterward, you can create a bootable Windows 11 drive and use it to install the new operating system on your computer. EaseUS Partition Master can help you burn ISO to USB and make a bootable USB. Don’t miss it if you just need such a tool.
Unable to Download Windows 11 ISO File FAQs
You may have fixed your issue and downloaded the Windows 11 ISO file to a USB. Here, I list some other issues you may like to learn about. Check them below:
1. Create Windows 11 Installation Media VS download Windows 11 disk image? Which is easier?
The two ways are different and have their pros and cons. Creating Windows 11 Installation Media is suitable for users who will reinstall or clean-install Windows 11 on a new/used PC. Download ISO is better for whoever wants to create a bootable installation media (USB or DVD) or whoever wants to create a virtual machine (.ISO file) to install Windows 11.
2. Why can’t I download Windows 11 ISO file?
You must check your VPN settings, low disk space errors, USB file system, and other factors. For example, the Windows 11 ISO file requires an NTFS-formatted USB with more than 8 GB of disk space. And VPN or other antivirus software may also lead to Windows 11 ISO file download failure.
3. How do I download Windows 11 from an ISO file?
Right-click the Windows 11 ISO file and choose Mount. Mounting the ISO file will create a «virtual» bootable disc. Double-click on the disk to view the files within. Double-click setup.exe to start installing Windows 11.
При выпуске оригинальной версии Windows 11 компания Microsoft установила весьма специфические системные требования, которые должны быть выполнены для установки или обновления до Windows 11 с любой предыдущей ОС. Эти требования включают TPM 2.0, Secure Boot, 4 ГБ оперативной памяти, минимум 2 ядра процессора и т.д. Однако не каждый компьютер может соответствовать этим требованиям, особенно если вы ограничены в бюджете.
Бывают случаи, когда вы хотите установить последнюю версию Windows 11, например Windows 11 23H2, но не можете ее установить, поскольку ваше оборудование не соответствует требованиям ОС. Если вы столкнулись с подобной дилеммой, то сообщаем вам, что существуют методы установки Windows 11 версии 23H2 в обход специфических аппаратных требований Windows 11.
При этом новые требования к Windows призваны повысить безопасность систем в связи с участившимися кибератаками. Однако не каждый ПК можно или нужно модернизировать в соответствии с этими требованиями.
Интересно: Как отключить надоедливую рекламу в меню Пуск в Windows 11
Системные требования Windows 11 23H2
Windows 11 23H2 имеет те же системные требования, что и оригинальный выпуск. Прежде чем планировать обновление текущей ОС до Windows 11 23H2, рекомендуется проверить, поддерживает ли оборудование эту ОС по умолчанию, или необходимо обойти требования.
Ниже приведен список основных системных требований Windows 11 23H2:
- Процессор: 1 ГГц или более быстрый CPU или система на кристалле (SoC) с двумя и более ядрами.
- ОЗУ: Не менее 4 ГБ.
- Жесткий диск: 64 ГБ или более.
- Прошивка системы: UEFI, с поддержкой Secure Boot.
- ТПМ: Модуль доверенной платформы (TPM) версии 2.0.
- Графика: Совместимость с DirectX 12 или более поздней версией с драйвером WDDM 2.0.
- Разрешение экрана: Дисплей высокой четкости (720p) с диагональю более 9″, 8 бит на цветовой канал.
- Сеть: Учетная запись Microsoft и подключение к Интернету.
Эти спецификации означают, что не все компьютеры смогут установить Windows 11 23H2 в исходном виде. Придется либо перепрошивать ее, либо обновлять аппаратное обеспечение, либо обходить эти требования. Последний вариант представляется более предпочтительным, если у вас нет бюджета на модернизацию оборудования, а безопасность системы не является вашей главной заботой.
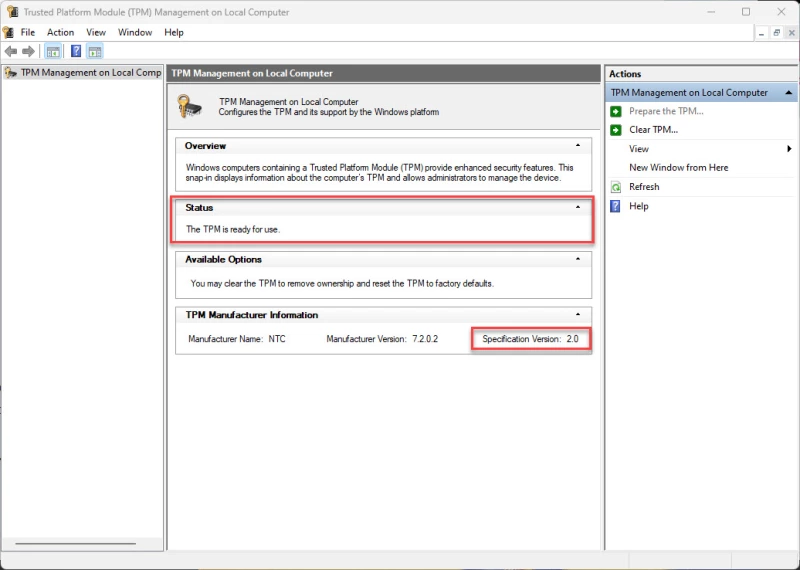
Проверка наличия TPM 2.0
Начните с проверки наличия или отсутствия в компьютере чипсета TPM 2.0, выполнив следующие действия:
- Нажмите Win + R, чтобы открыть окно Run Command.
- Введите «tpm.msc» и нажмите Enter чтобы открыть консоль управления TPM.
- Здесь найдите статус TPM в разделе Status _. Вы также найдете его версию в разделе _TPM Manufacturer Information.

Если в Status написано «TPM готов к использованию», это означает, что он доступен и включен. Если же в Status написано «Compatible TPM cannot be found», это означает, что либо TPM недоступен, либо присутствует, но отключен в настройках BIOS/прошивки UEFI.
Узнайте другие способы проверк TPM.
Включить TPM
Если TPM отключен, необходимо включить его в настройках UEFI. Вот как это делается:
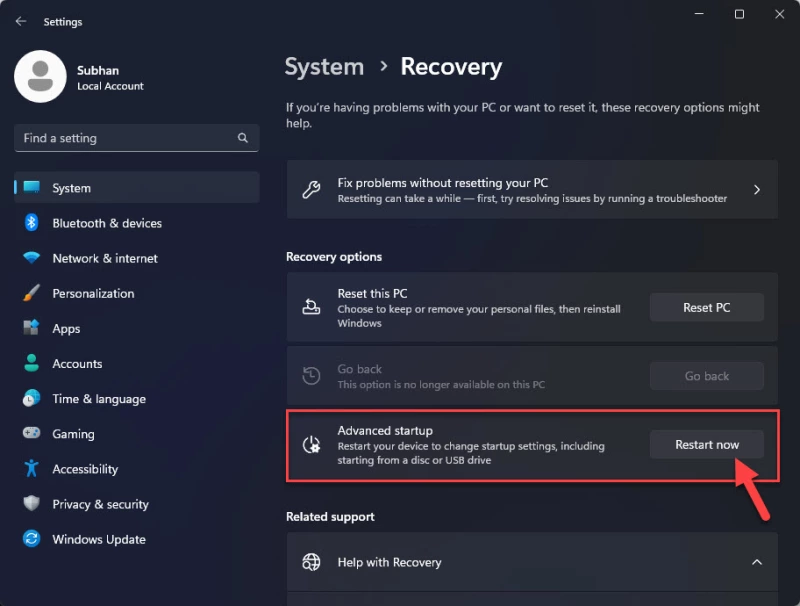
- Нажмите клавишу Win + i, чтобы открыть приложение настроек Windows.
- Перейдите к следующему:
System >> Recovery
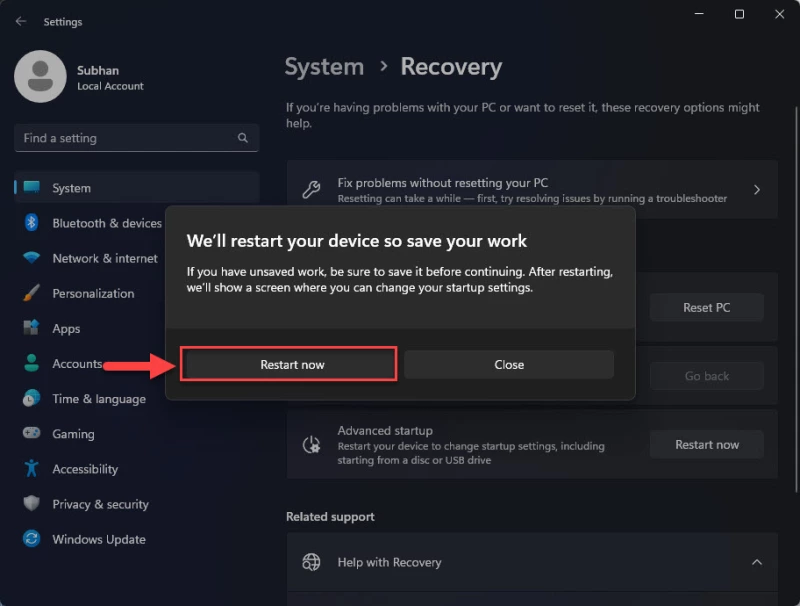
- Нажмите «Перезагрузить сейчас» перед «Дополнительный запуск».

- Во всплывающем окне подтверждения снова нажмите «Перезагрузить сейчас».
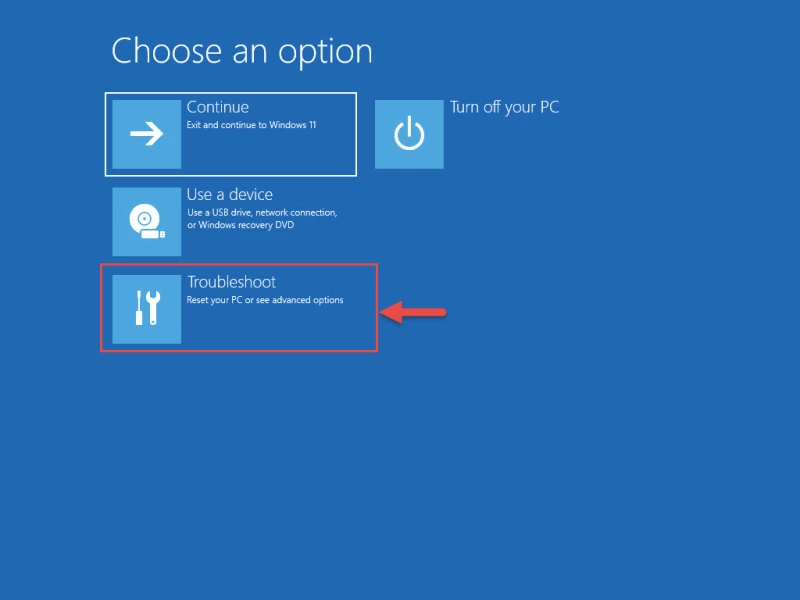
Компьютер включится и загрузится в среду восстановления Windows (WinRE).
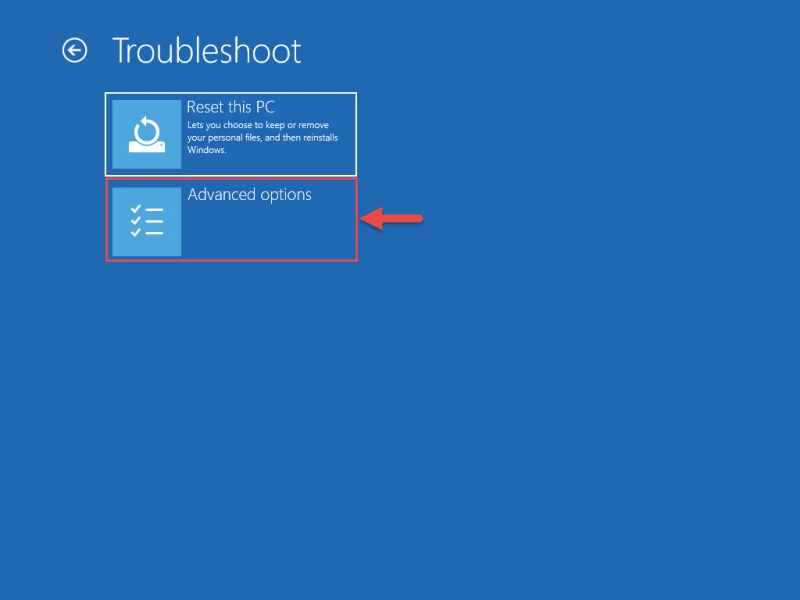
- Нажмите Troubleshoot.

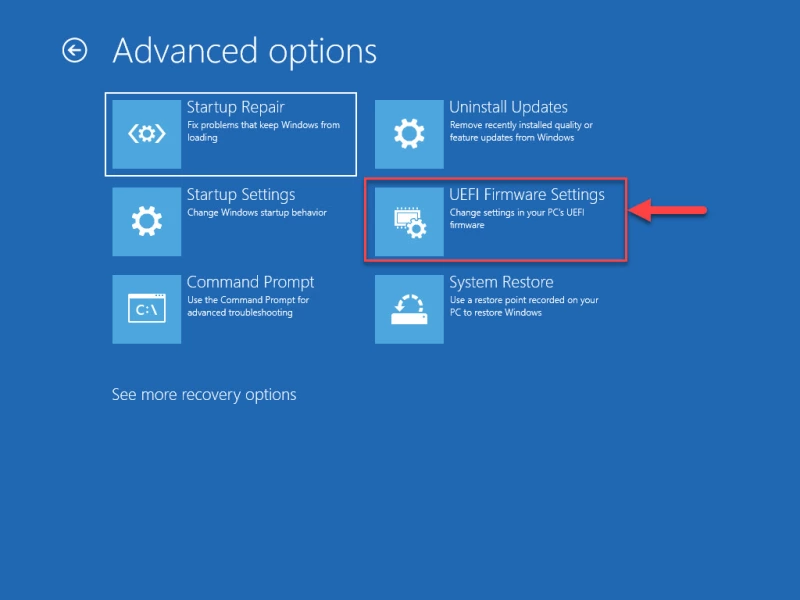
- Затем нажмите «Advanced options.»
- Нажмите «UEFI Firmware Settings.»
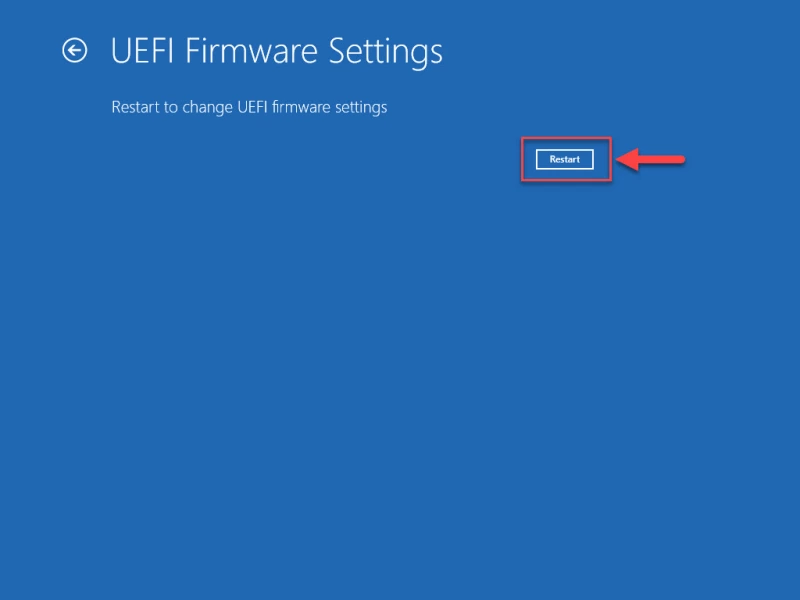
- Теперь нажмите Restart.
Компьютер снова перезагрузится.
- Теперь перейдите к настройкам Advanced, Security или Boot. Они зависят от типа материнской платы.
- Выберите опцию TPM 2.0 и выберите опции «Enabled» и «TPM On».

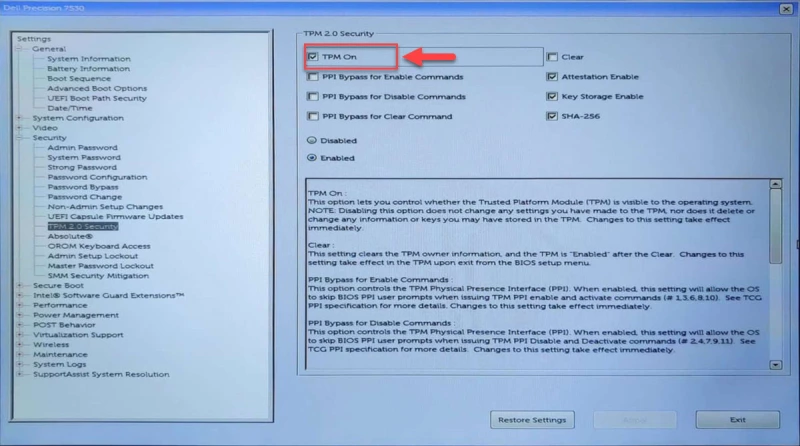
Если вы обнаружили, что опция TPM 2.0 отсутствует или не может быть включена, то, скорее всего, она недоступна на вашей материнской плате. Однако если проблема заключается в чем-то другом, попробуйте воспользоваться следующими методами устранения неисправностей TPM.
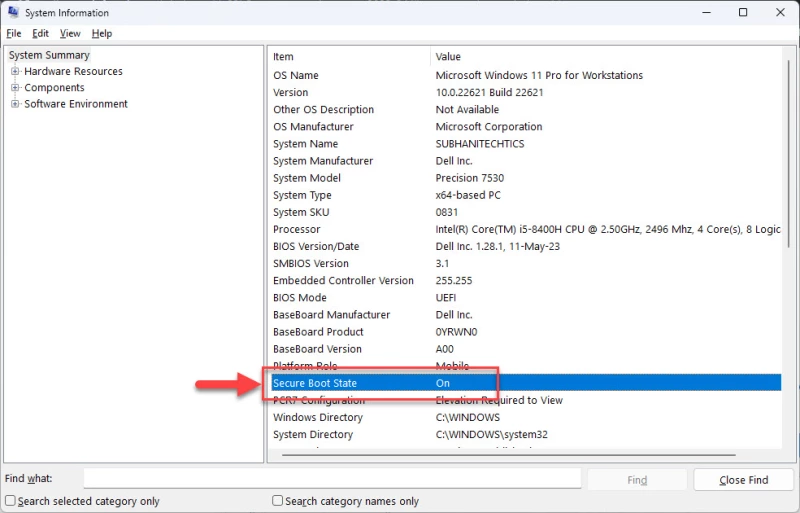
Проверка наличия Secure Boot
Другим обязательным требованием является Secure Boot. Проверьте, включена ли Secure Boot, выполнив следующие действия:
- Нажмите Win + R, чтобы открыть окно Run Command.
- Введите «msinfo23» и нажмите Enter.
- На вкладке System Summary проверьте наличие информации перед строкой «Secure Boot State».

Если Secure Boot выключен или отключен, его можно включить в настройках UEFI Firmware так же, как и TPM 2.0, описанным выше способом.
Если вы убедились, что и TPM 2.0, и Secure Boot доступны и включены, только тогда можно переходить к установке Windows 11 23H2 обычными методами. Если же ни одна из опций не доступна или не включена, то необходимо установить Windows 11 23H2 в обход системных требований, используя описанные ниже методы.
Установка Windows 11 23H2 на неподдерживаемое оборудование
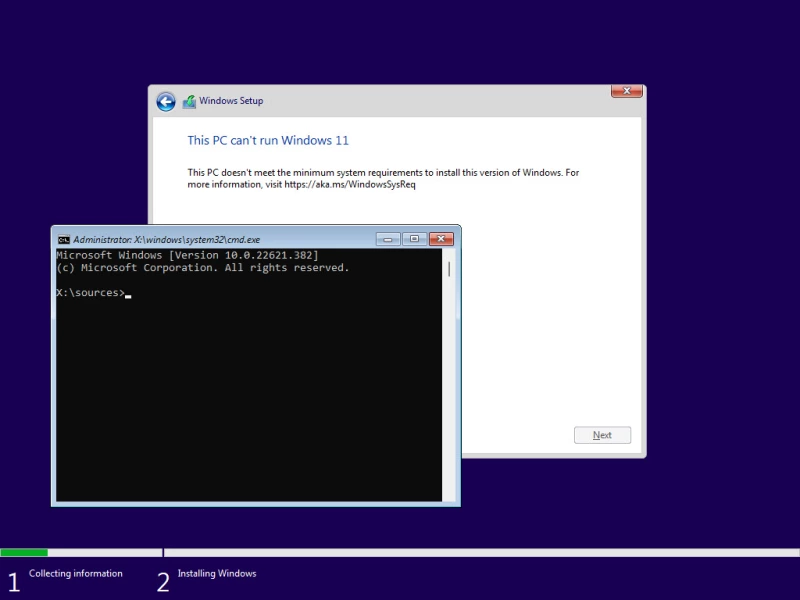
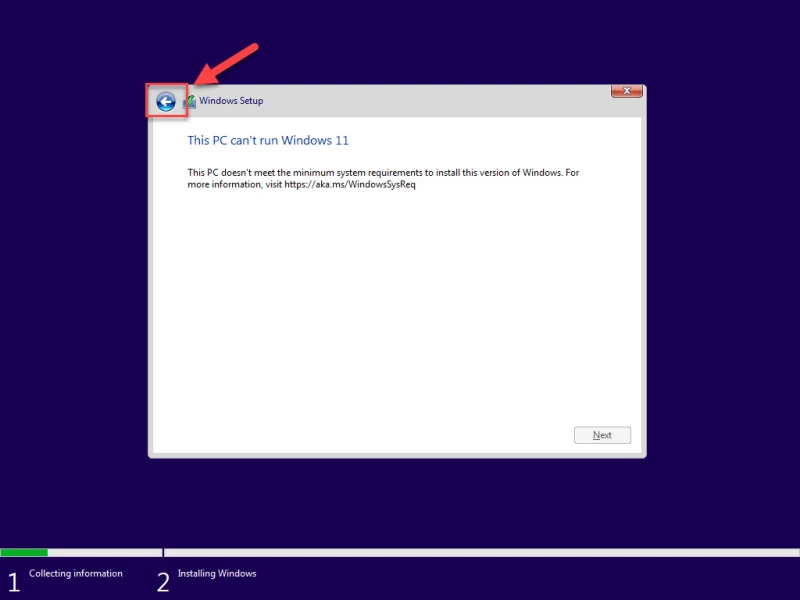
Если попытаться установить Windows 11 23H2 или любую другую версию Windows 11 на компьютер, не соответствующий системным требованиям, то установить или перейти на нее обычными методами не удастся. Вместо этого при попытке установки появится сообщение об ошибке, подобное следующему:
This PC can't run Windows 11 This PC doesn't meet the minimum system requirments to install this version of Windows.
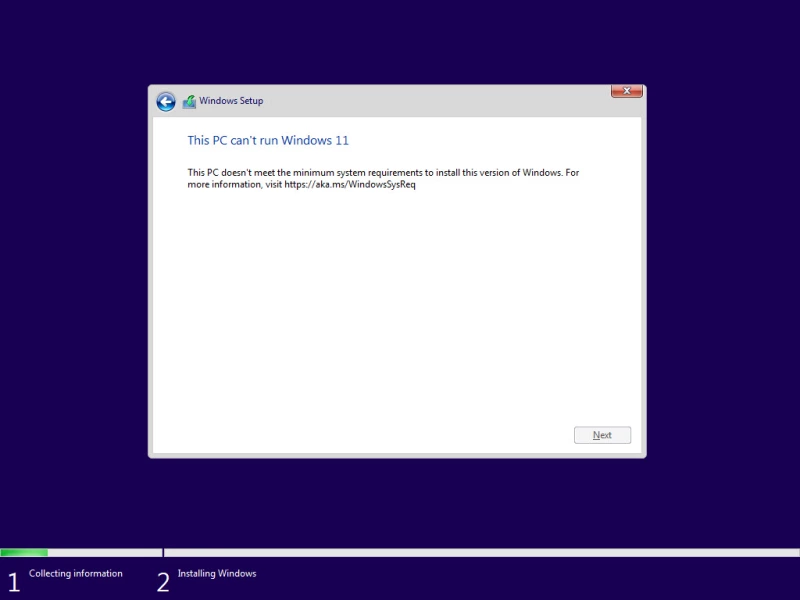
В этом случае можно выполнить одно из следующих решений, чтобы обойти эти системные требования и продолжить установку Windows 11 23H2 без обновления оборудования
Обход ограничений на установку Windows 11 23H2
Обход требований TPM и Secure Boot из реестра Windows
Чтобы обойти системные требования TPM 2.0 и Secure Boot при установке Windows 11 23H2, выполните следующие действия:
- Начните с загрузки Windows 11 23H2 ISO.
- Продолжите создание загрузочного USB-накопителя или используйте Ventoy для создания мультизагрузочного USB-накопителя.
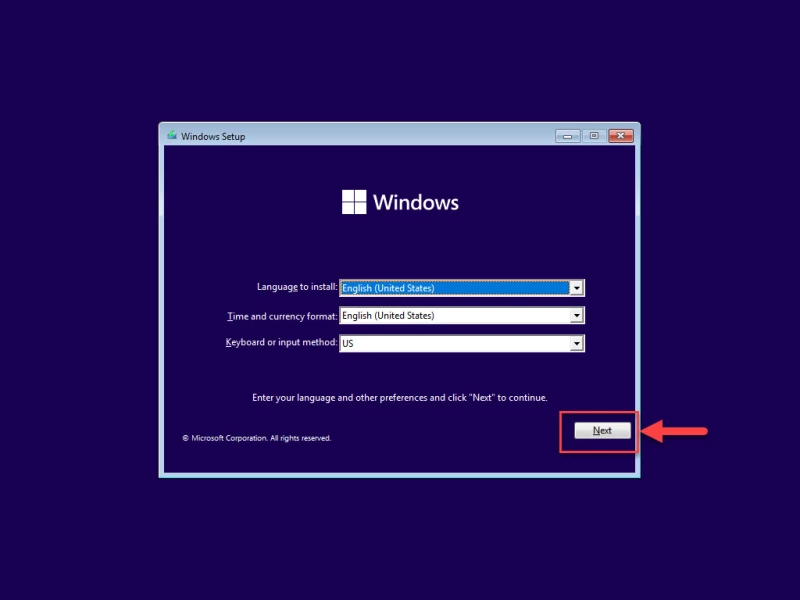
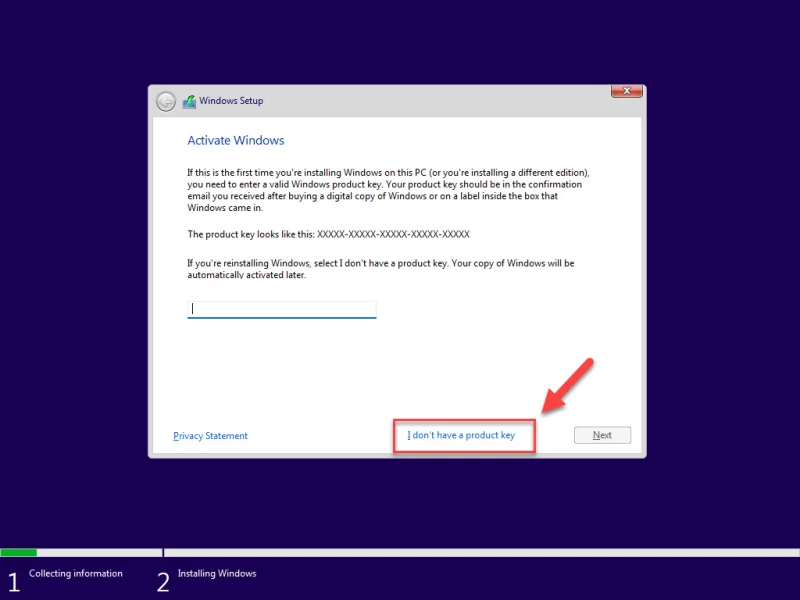
- Загрузитесь с загрузочного USB-накопителя и нажмите кнопку Next на первом экране установки Windows.
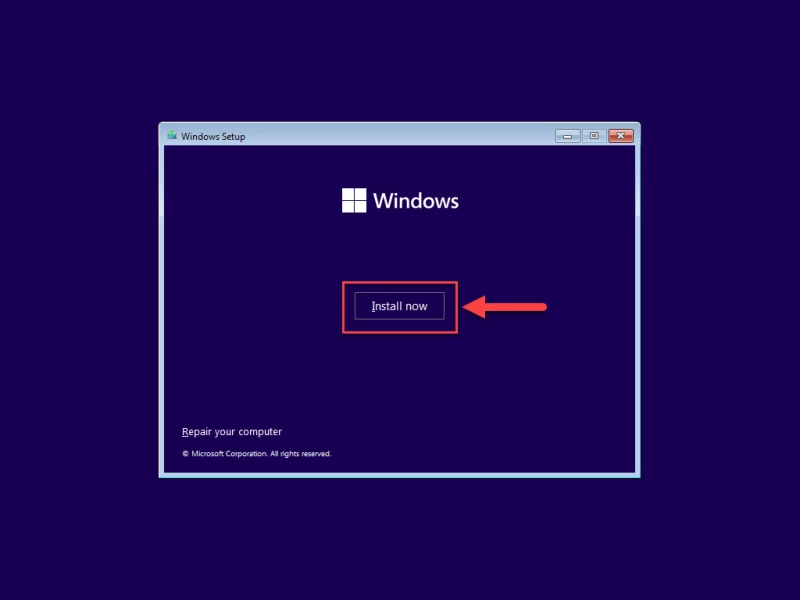
- Нажмите «Установить сейчас.»
- Нажмите «У меня нет ключа продукта.«Даже если у вас есть ключ продукта, вы можете использовать его для активации Windows позже.
- Выберите одну из редакций Windows и нажмите Next.
- На экране ошибок одновременно нажмите клавиши Shift + F10, чтобы открыть Командную строку.
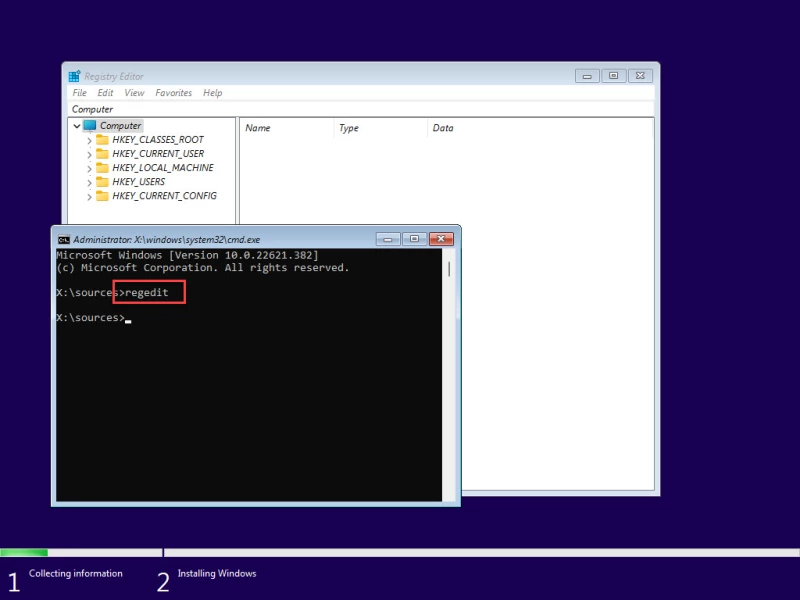
- Введите «regedit» и нажмите Enter, чтобы открыть редактор реестра.
- В редакторе реестра перейдите к следующему пути из левой панели:
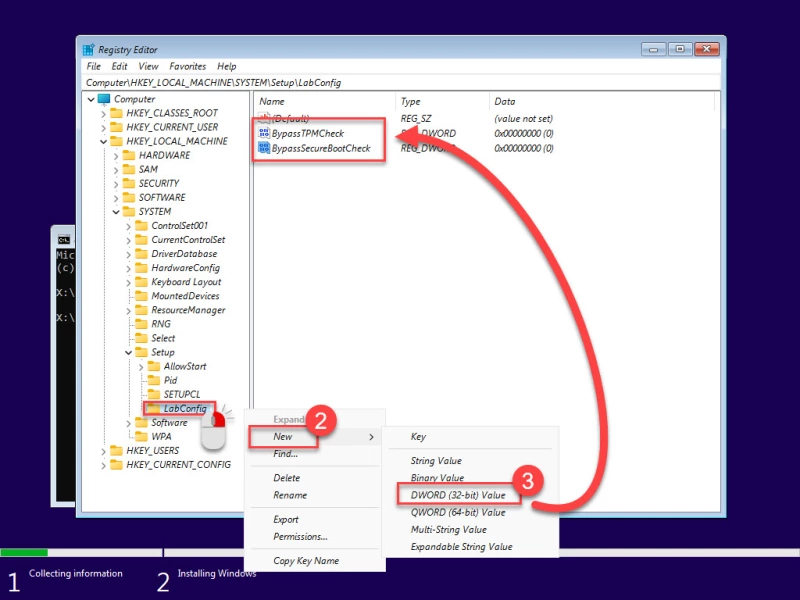
Computer\HKEY_LOCAL_MACHINE\SYSTEM\Setup
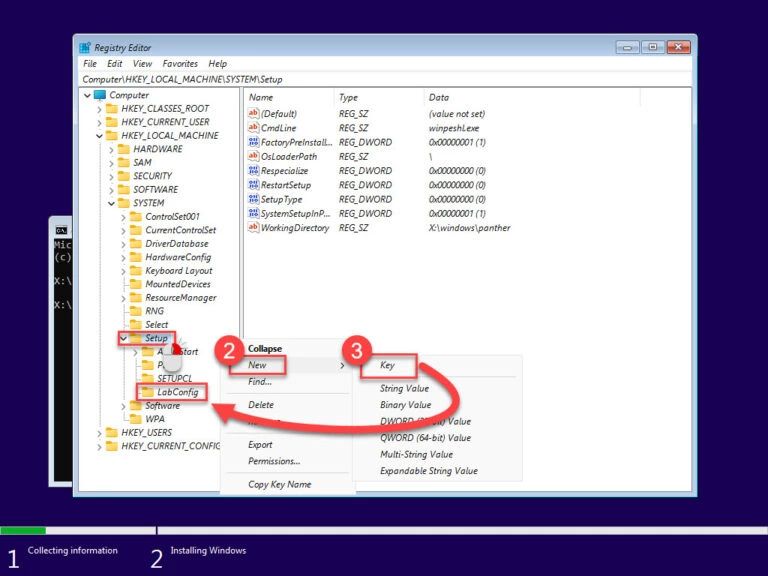
- Щелкните правой кнопкой мыши «Setup», разверните New и выберите Key. Назовите этот ключ «LabConfig.»

- Щелкните правой кнопкой мыши «LabConfig», разверните New и выберите «DWORD (32-bit) Value». Назовите этот DWORD «BypassTPMCheck».
- Повторите все действия еще раз и создайте еще один DWORD в ключе LabConfig с именем «BypassSecureBootCheck».
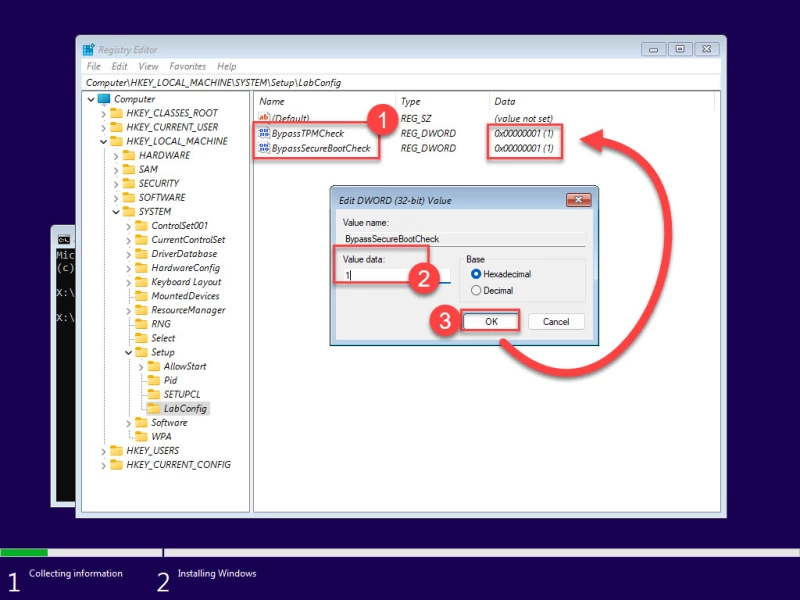
- Дважды щелкните оба этих DWORD и измените их Value Data на «1».
- Закройте редактор реестра и окно командной строки.
- Нажмите кнопку «Назад» в мастере установки Windows.
- Теперь снова выберите редакцию Windows и нажмите кнопку Next.

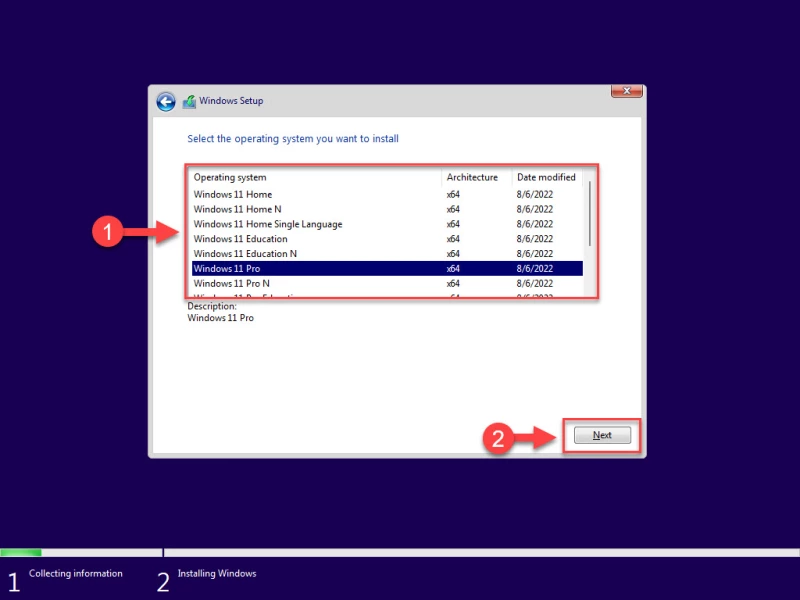
Теперь вы заметите, что подсказка об ошибке исчезла, а на ее месте появились правила и условия. Продолжайте выполнять оставшиеся шаги для успешной установки Windows 11 23H2 без соблюдения системных требований.
*Примечание: *Остальные шаги типичны для всех современных установок Windows.
Обход требований TPM и Secure Boot с помощью Rufus
Rufus, полное название которого «The *R*eliable *U*SB *F*ormatting *U*tility, with *S*ource», – это утилита с открытым исходным кодом для операционной системы Windows, позволяющая изменять и создавать ISO-файлы операционной системы Windows. Теперь эта утилита также включает в себя опции, которые можно выбрать, что позволит создать загрузочный USB-накопитель, на котором системные требования Windows 11 23H2 уже обойдены.
Для обхода требований TPMm Secure to и RAM с помощью Rufus выполните следующие действия:
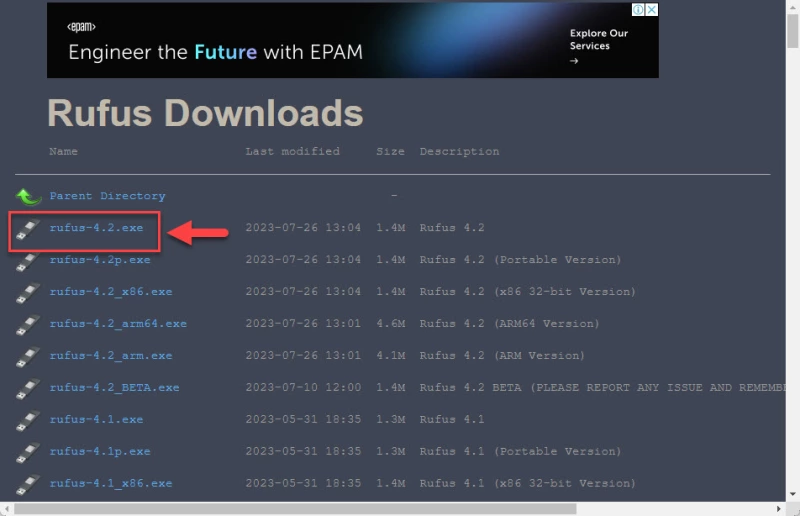
- Откройте Сайт Руфус и нажмите на последнюю версию Rufus, чтобы загрузить ее.

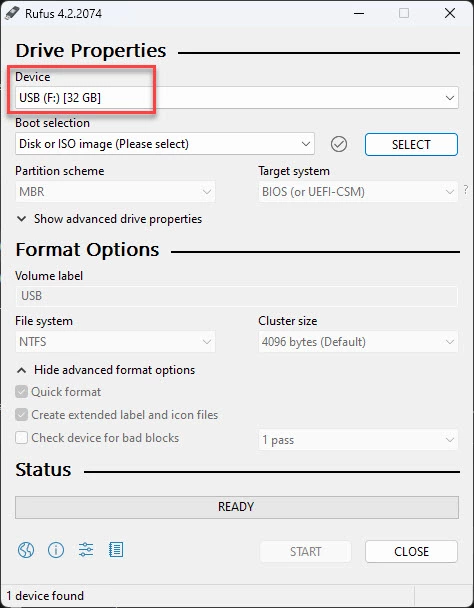
- Подключите USB-накопитель к компьютеру и запустите Rufus.
- В Rufus убедитесь, что USB-накопитель выбран в выпадающем меню Device.

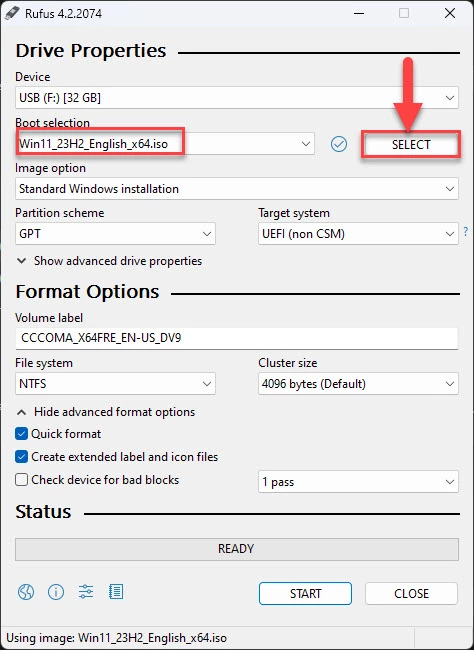
- Нажмите Select и выберите ISO-файл Windows 11 23H2.

- Убедитесь, что остальные настройки соответствуют следующим:
- Опция образа: Стандартная установка Windows
- Схема разделов: GPT
- Целевая система: UEFI (не CSM)
- Филевая система: NTFS
- Размер кластера: значение по умолчанию
- Выберите: «Быстрое форматирование» и «Создать расширенные файлы меток и значков»
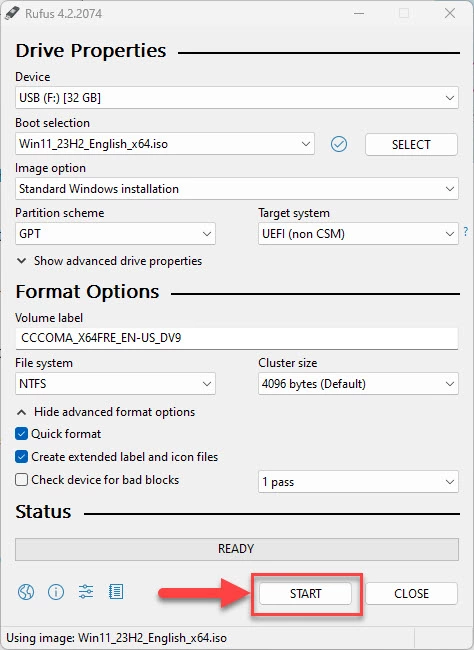
- Нажмите Старт.
- Во всплыающем окне выберите следующие опции и снимите все остальные:
- Снять требования к 4 Гб RAM, Secure Boot, и TPM 2.0
- Убрать требование к учетной записи Microsoft в Интернете
Выбрав эти опции, нажмите Ok.
- Во всплывающем окне с предупреждением нажмите Ok.

Rufus отформатирует USB-накопитель и создаст загрузочный диск Windows 11 23H2, который будет автоматически обходить требования к TPM 2.0, Secure Boot и RAM. При установке Windows с этого накопителя никаких дополнительных действий не потребуется.
Заключение
Хотя для нашего же блага мы гарантируем, что наши системы соответствуют минимальным требованиям к версиям Windows 11, это не всегда необходимо. Например, если у вас есть отдельный компьютер для тестирования, не подключенный к Интернету и не содержащий конфиденциальной информации, то нет необходимости вкладывать средства в модернизацию его аппаратного обеспечения только для тестирования под Windows 11.
Таким образом, вы можете спокойно обойти требования TPM 2.0 и Secure Boot, используя любой из двух рассмотренных выше методов. Обход минимальных требований Windows 11 с помощью реестра Windows позволяет обойти только требования Secure Boot и TPM, тогда как с помощью Rufus можно обойти оба этих требования, а также ограничения по минимальному объему оперативной памяти.
Readers help support Windows Report. We may get a commission if you buy through our links.
Read our disclosure page to find out how can you help Windows Report sustain the editorial team. Read more
Obtaining a legal Windows 10 ISO was difficult, but Microsoft appears to have learned its lesson by releasing Windows 11. Today, we will show you how to fix any Windows 11 ISO error that can occur during the process.
Suppose you require an ISO for installation or maintenance purposes. In that case, obtaining a legal and up-to-date copy of Windows 11 is straightforward and quick, as it is possible to download an ISO image directly from Microsoft’s website or use the Media Creation Tool.
Follow along as we will show you how to troubleshoot any Windows 11 ISO error that pops up right after we see what a disk image is and does in more detail. Keep up with us!
What does a disk image do?
A disk image is a single huge file that accurately reproduces the contents and capabilities of a hard disk, optical disk, or other storage devices on a computer’s hard drive.
Numerous file extensions can be used to identify the file size, which ranges from a few megabytes to several gigabytes.
The file will conclude with one of several endings, such as .iso, .cue, .bin, or .img. As a note, modern image files for Macintosh machines will have an extension of.dmg.
This concept of making a disk image on a hard drive is undoubtedly already recognizable to everyone who has cloned his or her favorite music CDs or DVDs or downloaded an OS. Although this is not the only method of making duplicates, it is the most convenient.
How can I fix Windows 11’s ISO error?
1. Check your Internet connection
Let’s start with the easier solutions and causes. The Media Creation Tool, which allows you to download the Windows 10 ISO file, will, of course, necessitate the use of an Internet connection to function.
What matters is that you have a steady connection that supports direct downloads from the Microsoft servers, regardless of how slow your bandwidth is.
In light of this, we recommend you inspect your network and troubleshoot any potential problems. Don’t hesitate to use one of the following links to solve the Internet problem. This will also fix the We are unable to complete your request at this time error.
2. Run Disk Cleanup
- Press Windows and R to open a Run box and enter the following command:
cleanmgr /VERYLOWDISK
- The completion of the command will result in a report outlining the amount of space you have managed to clear up.
- In order to pick and choose which files to clean, type the following command into the Run search box and press Enter to begin the cleaning process:
cleanmgr /LOWDISK
- While the following command will wipe less data from your disk than the command provided in our previous stages, it is an alternative method of cleaning up your disk:
cleanmgr /sageset:1


However, it will start with the very minimum of settings selected, and you will be able to customize the application after it has been launched by selecting the choices you want from the menu.
If you are interested in creating a WinPE bootable disk for Windows 11, read this guide to learn the detailed steps.
- Fix Can’t connect to this network error in Windows 11
- Wi-Fi disappeared in Windows 11? Try these fixes
- How to update network drivers in Windows 11
3. Use another method to install Windows 11
The Windows 11 ISO option is intended for users who want to generate a bootable installation medium (USB flash drive, DVD) or a virtual machine to install Windows 11 on a computer or a laptop.
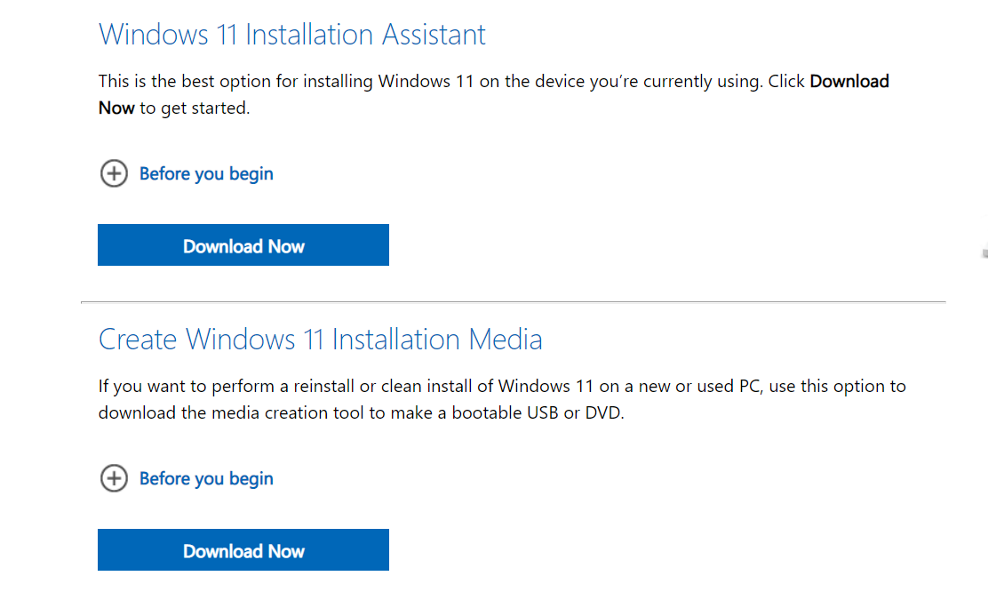
However, there are other ways in which you can install the operating system, such as using the Installation Assistant. Thus, we recommend that you check our article on how to upgrade to Windows 11 using the Installation Assistant.
Alternatively, you can use Media Creation Tool to install Windows 11, and don’t miss out on our guide to make sure that you follow the correct order of the steps involved.
For further information and potential solutions to this error, you should take a look at our post on Windows 11 ISO download failure and continue with the troubleshooting process.
Alternatively, another article on Windows 10 ISO file download issues might save you some time and tears.
Let us know in the comments section below if this guide was helpful for you and whether you have any more solutions in mind.
Radu Tyrsina
Radu Tyrsina has been a Windows fan ever since he got his first PC, a Pentium III (a monster at that time).
For most of the kids of his age, the Internet was an amazing way to play and communicate with others, but he was deeply impressed by the flow of information and how easily you can find anything on the web.
Prior to founding Windows Report, this particular curiosity about digital content enabled him to grow a number of sites that helped hundreds of millions reach faster the answer they’re looking for.
Article
3 of 3
Part of:
Windows 11 ISO basics
While wiping and reinstalling via a clean install is the simplest way to fix a broken Windows 11 desktop, an ISO file repair can help save some of the desktop’s settings and files.
Windows 11 desktops may experience problems to the point that IT has little choice but to reinstall Windows, and sometimes, an ISO file is the best option.
Determining how and when to use the ISO repair can be a bit more complicated. As a Windows administrator, you should learn about the benefits of using an ISO file to repair a desktop and how to properly apply the ISO install.
Why use an ISO file to repair a Windows desktop?
There are numerous options for repairing a Windows 11 installation. Enterprise IT departments often resort to automatically reimaging the OS rather than attempting to repair it. Large organizations find this approach to be quicker and more cost-effective than repairing an ailing Windows system. However, if an organization lacks the infrastructure required to push a deployment image to a Windows 11 machine, repairing Windows 11 may be the best option.
It’s possible to repair a Windows 11 installation without having to resort to using an ISO file. To do so, click on Settings in the local desktop, and then make sure that the System option is selected. Next, click on Recovery, and then click the Reset PC button. From there, you can follow the prompts to complete the Windows reset process.
Although this is often the preferred technique for repairing Windows 11, it does have one major shortcoming. If the problems that are occurring within the Windows 11 OS are happening as a result of hard disk corruption, it’s entirely possible that the files used to reset and repair Windows might also be corrupt. The same also holds true if the system was damaged by a malware attack. In these cases, there are no guarantees that the files needed to repair the OS are still functioning.
Using an ISO file to repair Windows enables you to fix the problem using known-functional copies of the Windows system files.
Regardless of whether you are installing Windows 11 from a physical DVD or from an ISO file, there is a significant difference between a normal installation and a repair installation.
How does an ISO repair install differ from a normal install?
An ISO file is essentially just a DVD image file. At one time, it was common practice to install Windows from an installation DVD. However, it’s now somewhat rare for PCs to be equipped with DVD drives. An ISO file can take the place of a DVD, thereby negating the need for physical installation media. To use an ISO file to repair Windows 11, the faulty machine must be at least somewhat functional. In extreme cases where the desktop’s issues prevent you from completing the repair process, you may be able to boot Windows 11 into Safe Mode prior to attempting the repair.
Regardless of whether you are installing Windows 11 from a physical DVD or from an ISO file, there is a significant difference between a normal installation and a repair installation. Typically, installing Windows results in a clean installation. Unless you are upgrading a prior version of Windows, the new Windows installation runs a default installation.
In contrast, performing a repair installation reinstalls Windows 11 without overwriting anything important in the process. In other words, the Setup program does not format the system’s hard disk. Windows 11 Setup also makes a concerted effort to preserve all of the files, applications and settings that are present on the system. You should keep in mind that existing files, applications or settings could be what’s causing the problem, so a repair install from an ISO file is not guaranteed to fix the problem.
Using an ISO file to repair Windows 11
The first step of using an ISO file to repair Windows 11 is to find an ISO file that meets your requirements. Many organizations maintain a collection of ISO files that are readily available for such situations. However, if you do not have an ISO file at your disposal, then you can download a Windows 11 ISO file directly from Microsoft. The nice thing about using the Windows 11 download site is that the ISO is based on the current Windows 11 release, meaning there probably aren’t many updates that you need to install when you finish repairing Windows.
As a best practice, it’s a good idea to create a backup before attempting to repair Windows. Even though Windows 11 Setup is designed to preserve files, settings and applications, things can and occasionally do go wrong. It’s also possible that the Setup process could end up deactivating your Windows license or other software licenses. As such, you may have to perform various cleanup tasks, such as entering a product key, when you are done.
To get started, copy the ISO file to an empty folder on the computer that needs to be repaired. Next, right-click on the ISO file, and select the Mount command from the resulting shortcut menu. This causes the ISO file to be mounted as a virtual DVD drive. Windows assigns a drive letter to the virtual DVD drive, and all of the files contained within the ISO file are accessible through the drive mapping.
With the ISO file mounted, double-click on the Setup.exe file. This causes Windows to launch Windows 11 Setup. Click Next, and Setup performs a quick update check. When this check is completed, you are prompted to accept the Windows 11 licensing terms. At this point, there is often another, more time-consuming update check that occurs.
It’s possible to skip the update check to save time, but skipping the update check is generally a bad idea. If you do so, you can end up in a situation in which the ISO file is older than the version of Windows that is installed on the PC. When that happens, the only option is to either restart Setup and download the updates or to perform a clean Windows installation rather than repair the system.
At this point, you see a screen, similar to the one shown in Figure 1, confirming the action that Setup is about to take.
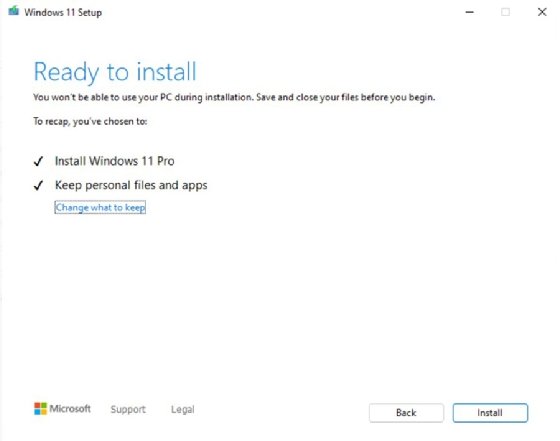
Notice that Setup is indicating that it installs Windows 11 Pro and keeps personal files and apps. This means that Setup is going to attempt to repair the Windows OS, but it is also going to try to preserve all of the files, settings and applications that presently exist. If you decide that you don’t want to preserve anything and you simply want to overwrite the old copy of Windows with a clean install, then you can click on the Change what to keep link and then tell Windows that you don’t want to keep anything.
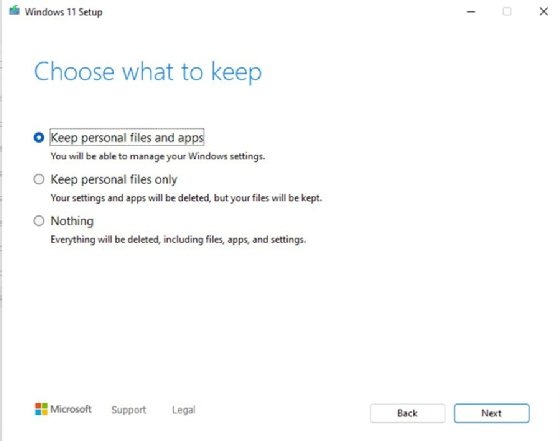
Incidentally, there is also an option to keep only personal files but not applications or settings, as shown in Figure 2. All you have to do is to make your selection and click Next, followed by Install. Setup does the rest.
Brien Posey is a former 22-time Microsoft MVP and a commercial astronaut candidate. In his more than 30 years in IT, he has served as a lead network engineer for the U.S. Department of Defense and a network administrator for some of the largest insurance companies in America.
Next Steps
Troubleshooting the most common issues with Windows 11
Dig Deeper on Windows OS and management
-

What is Microsoft Windows Assessment and Deployment Kit (Windows ADK)?
By: Rahul Awati
-
How to perform a factory reset on a Windows 11 desktop
By: Ed Tittel
-
7 steps to fix a black screen in Windows 11
By: Robert Sheldon
-
How to create a custom Windows 11 ISO file
By: Ed Tittel


Part of: Windows 11 ISO basics
Article 3 of 3