
Удаленные пользователи могут подключаться к своим компьютерам Windows 10 или 11 через службу удаленных рабочих столов (RDP). Достаточно включить удаленный рабочий стол (Remote Desktop), разрешить RDP доступ для пользователя и подключиться к компьютеру с помощью любого клиента удаленного рабочего стола. Однако в десктопных версия Windows есть ограничение на количество одновременных RDP сессии. Разрешается только один активный Remote Desktop сеанс пользователя.
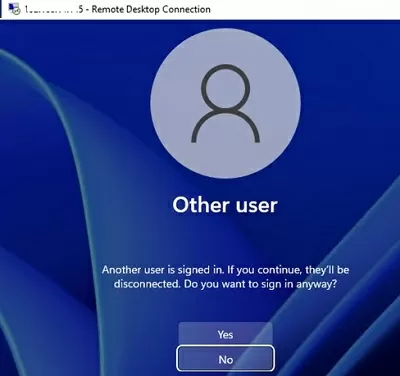
Если вы попробуете открыть вторую RDP сессию, появится предупреждение с запросом отключить сеанс первого пользователя.
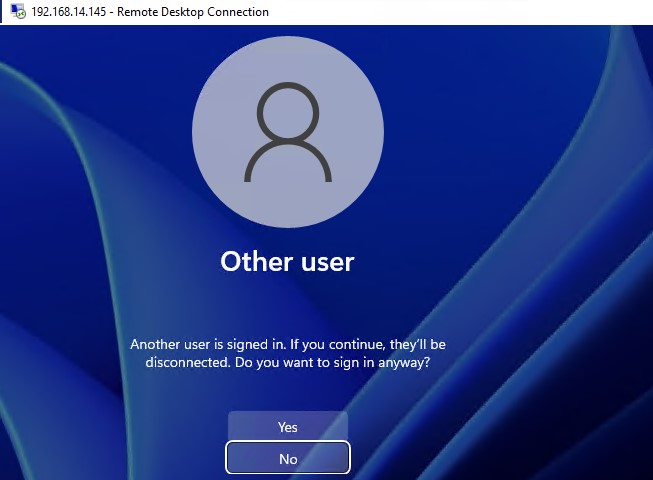
В систему вошел другой пользователь. Если вы продолжите, он будет отключен. Вы все равно хотите войти в систему?
В английской версии предупреждение такое:
Another user is signed in. If you continue, they’ll be disconnected. Do you want to sign in anyway?
Содержание:
- Ограничения на количество RDP сессий в Windows
- RDP Wrapper: разрешить несколько RDP сеансов в Windows
- Не работает RDP Wrapper в Windows
- Модификация файла termsrv.dll для снятия ограничений RDP в Windows 10 и 11
- Встроенная поддержка нескольких RDP сессий в редакции Windows 10 Enterprise Multi-session
Ограничения на количество RDP сессий в Windows
Во всех десктопных версиях Windows 10 и 11 есть ряд ограничений на использование служб удаленного рабочего стола
- Разрешено удаленно подключаться по RDP только к редакциям Windows Professional и Enterprise. В домашних редакциях (Home/Single Language) RDP доступ запрещен;
- Поддерживается только одно одновременное RDP подключение. При попытке запустить вторую RDP-сессию, пользователю будет предложено завершить активный сеанс;
- Если пользователь работает за консолью компьютера (локально), то при удаленном подключении по RDP, его локальный сеанс будет отключен (заблокирован). Также завершается и удаленный RDP сеанс, если пользователь входит в Windows через консоль компьютера.
Ограничение на количество одновременных RDP подключений в Windows является не техническим, но программным и лицензионным. Таким образом Microsoft запрещает создавать терминальный RDP сервер на базе рабочей станции для одновременной работы нескольких пользователей.
Если ваши задачи требуют развертывание терминального сервера, Microsoft предлагает пробрести Windows Server (по умолчанию разрешает 2 активных RDP подключения). Если вам нужно большее количество одновременных сессий пользователей, нужно приобрести лицензии RDS CAL, установить и настроить роль Remote Desktop Session Host (RDSH) или полноценную RDS ферму.
Технически любая редакция Windows при наличии достаточного ресурсов оперативной памяти и CPU может обслуживать одновременную работу нескольких десятков удаленных пользователей. В среднем на одну RDP сессию пользователя требуется 150-200 Мб памяти (без учета запускаемых приложений). Т.е. максимальное количество одновременных RDP сессий в теории ограничивается только ресурсами компьютера.
В этой статье мы покажем три способа убрать ограничение на количество одновременных RDP подключений в Windows 10 и 11:
- Использование RDP Wrapper
- Модификации системного файла termsrv.dll
- Апгрейд до редакции Windows 10/11 Enterprise for virtual desktops (multi-session)
Примечание. Все модификации операционной системы, описанные в этой статье, считаются нарушением лицензионного соглашения Windows, и вы можете использовать их на свой страх и риск.
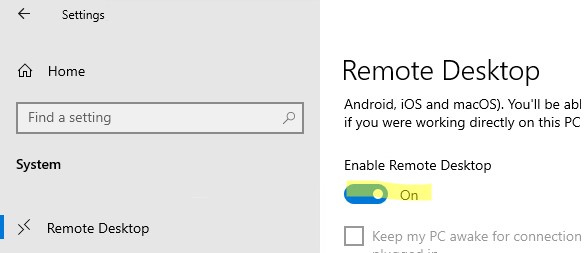
Прежде, чем продолжить, проверьте что в настройках Windows включен протокол Remote Desktop.
- Откройте панель Settings -> System —> Remote Desktop -> включите опцию Enable Remote Desktop;

- Либо воспользуйтесь классической панель управления: выполните команду SystemPropertiesRemote -> Перейдите на вкладку Remote Settings (Удаленный доступ), включите опцию Allow remote connection to this computer (Разрешить удалённые подключения к этому компьютеру).
RDP Wrapper: разрешить несколько RDP сеансов в Windows
Open-source утилита RDP Wrapper Library позволяет разрешить конкурентные RDP сессии в Windows 10/11 без замены системного файла termsrv.dll.
RDP Wrapper работает в качестве прослойки между менеджером управления службами Service Control Manager, SCM) и службой терминалов (Remote Desktop Services). RDP Wrapper не вносит никаких изменений в файл termsrv.dll, просто загружая termsrv с изменёнными параметрами.
Важно. Перед установкой RDP Wrapper важно убедится, чтобы у вас использовалась оригинальная (непропатченная) версия файл termsrv.dll. Иначе RDP Wrapper может работать не стабильно, или вообще не запускаться.
Вы можете скачать RDP Wrapper из репозитория GitHub: https://github.com/binarymaster/rdpwrap/releases (последняя доступная версия RDP Wrapper Library v1.6.2). Утилита не обновляется с 2017 года, но ее можно использовать на всех билдах Windows 10 и 11. Для работы утилиты в современных версиях Windows достаточно обновить конфигурационный файл rdpwrap.ini.
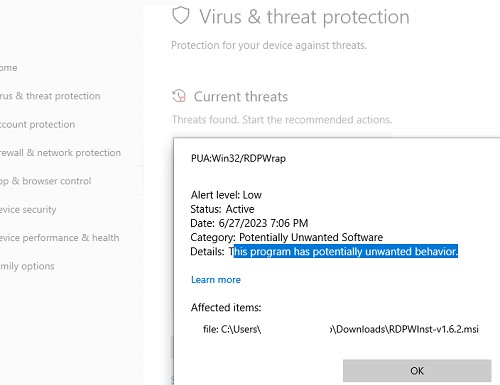
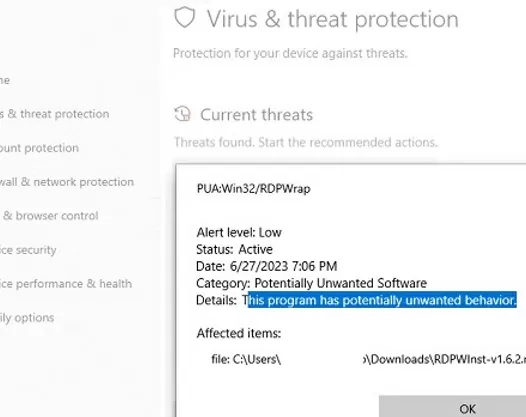
Большинство антивирусов определяют RDP Wrapper как потенциально опасную программу. Например, встроенный Microsoft Defender антивирус классифицирует программу как PUA:Win32/RDPWrap (Potentially Unwanted Software) с низким уровнем угрозы. Если настройки вашего антивируса блокируют запуск RDP Wrapper, нужно добавить его в исключения.
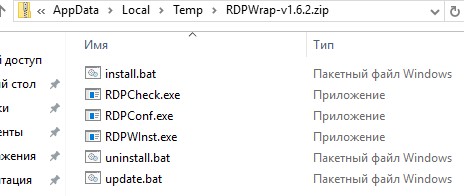
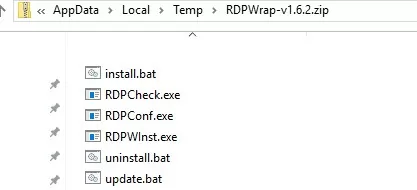
Архив RDPWrap-v1.6.2.zip содержит несколько файлов:
- RDPWinst.exe —программа установки/удаления RDP Wrapper Library;
- RDPConf.exe — утилита настройки RDP Wrapper;
- RDPCheck.exe — Local RDP Checker — утилита для проверки RDP доступа;
- install.bat, uninstall.bat, update.bat — пакетные файлы для установки, удаления и обновления RDP Wrapper.
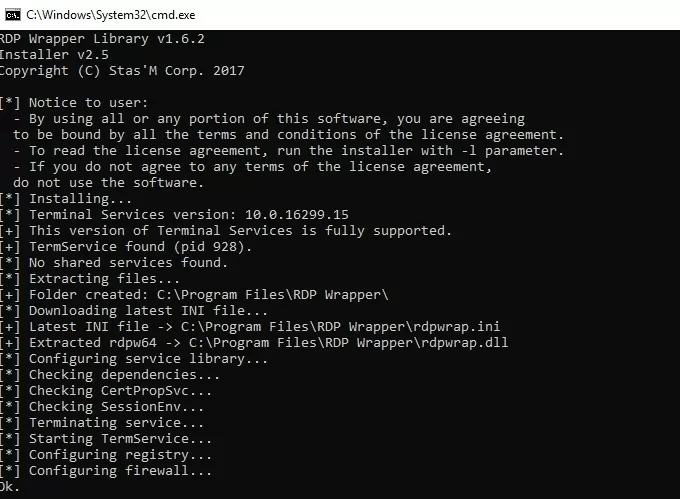
Чтобы установить RDPWrap, запустите файл
install.bat
с правами администратора.
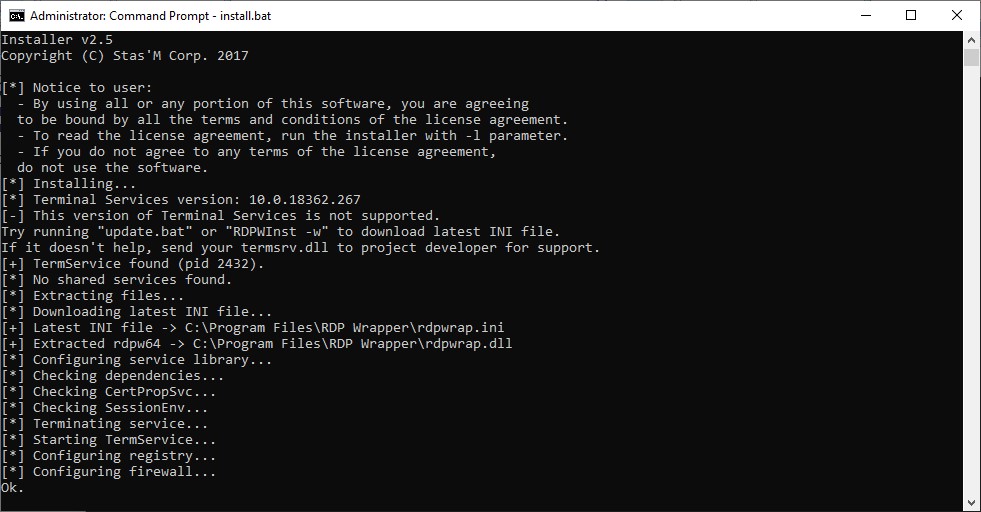
После окончания установки запустите RDPConfig.exe.
![rdp-wrapper: красная надпись не поддерживается [not supported]](https://winitpro.ru/wp-content/uploads/2015/09/rdp-wrapper-ne-podderzhivaetsya.jpg)
Скорее всего сразу после установки утилита покажет, что RDP wrapper запущен (Installed, Running, Listening), но не работает. Обратите внимание на красную надпись. Она сообщает, что данная версий Windows 10 (ver. 10.0.19041.1949) не поддерживается ([not supported]).
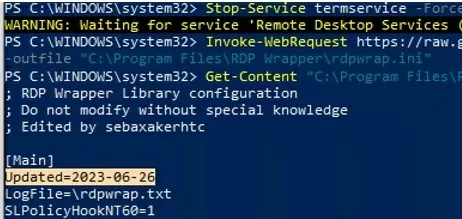
Причина в том, что в конфигурационном файле rdpwrap.ini отсутствует секция с настройками для вашего версии (билда) Windows. Актуальную версию файла rdpwrap.ini можно скачать здесь https://raw.githubusercontent.com/sebaxakerhtc/rdpwrap.ini/master/rdpwrap.ini
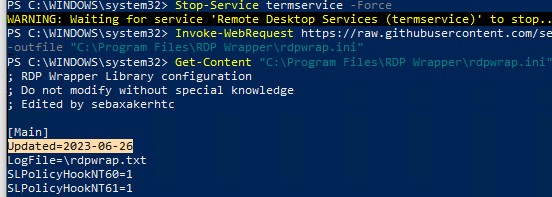
Вручную скопируйте содержимое данной страницы в файл «C:\Program Files\RDP Wrapper\rdpwrap.ini». Или скачайте файл с помощью PowerShell командлета Invoke-WebRequest (предварительно нужно остановить службу Remote Desktop):
Stop-Service termservice -Force
Invoke-WebRequest https://raw.githubusercontent.com/sebaxakerhtc/rdpwrap.ini/master/rdpwrap.ini -outfile "C:\Program Files\RDP Wrapper\rdpwrap.ini"
alert] Можно создать задание планировщика для проверки изменений в файле rdpwrap.ini и его автоматического обновления [/alert]
На данном скриншоте видно, что на компьютере установлена свежая версия файла rdpwrap.ini (Updated=2023-06-26).
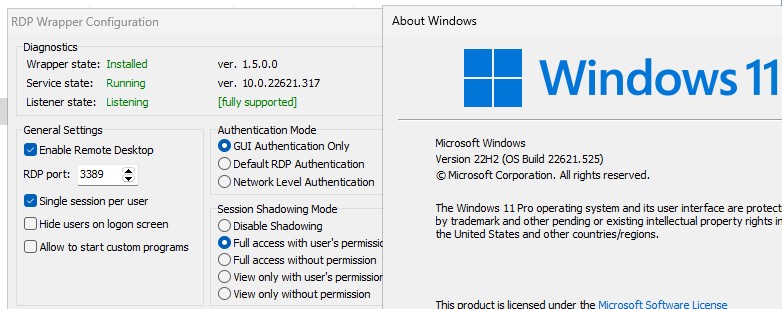
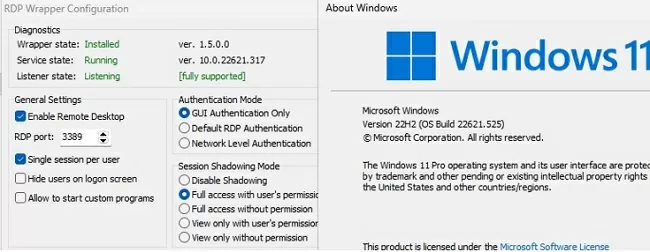
Перезагрузите компьютер, запустите утилиту RDPConfig.exe. Проверьте, что в секции Diagnostics все элементы окрашены в зеленый цвет, и появилось сообщение [Fully supported]. На скриншоте ниже показано, что RDP Wrapper с данным конфигом успешно запущен в Windows 11 22H2.
Теперь попробуйте установить несколько одновременных RDP сессий с этим компьютером под разными пользователями (воспользуйтесь любым RDP клиентом: mstsc.exe, RDCMan, mRemoteNG и т.д.).
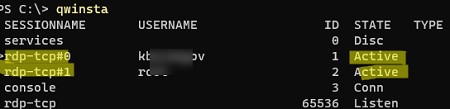
Можете проверить что на компьютере активны одновременно две RDP сессии (или более) с помощью команды:
qwinsta
rdp-tcp#0         user1                 1  Active
rdp-tcp#1         user2                 2  Active

Утилита RDPWrap поддерживается во версиях Windows (включая домашние редакции Windows Home), таким образом из любой клиентской версии Windows можно сделать полноценный сервер терминалов.
В интерфейсе RDP Wrapper доступны следующие опции:
- Enable Remote Desktop — включить/отключить Remote Desktop в Windows доступ
- RDP Port — можно изменить стандартный номера порта удаленного рабочего стола TCP 3389
- Опция Hide users on logon screen позволяет скрыть список пользователей на экране приветствия;
- Single session per user —разрешить несколько одновременных RDP сессий под одной учетной записью пользователя. Эта опция устанавливает параметр реестра fSingleSessionPerUser = 0 в ветке HKLM\SYSTEM\CurrentControlSet\Control\Terminal Server). Также этот параметр настраивается через опцию GPO Restrict Remote Desktop Services to a single Remote Desktop Services session в разделе Computer Configuration > Administrative Templates > Windows Components > Remote Desktop Services > Remote Desktop Session Host > Connections.
- В секции Session Shadowing Mode вы можете настроить режим теневого подключения к рабочему столу пользователей Windows .
Не работает RDP Wrapper в Windows
В некоторых случая утилита RDP Wrapper не работает как ожидается, и вы не можете использовать несколько RDP подключений.
Во время установки обновлений Windows может обновиться версия файла termsrv.dll. Если в файле rdpwrap.ini отсутствует описание для вашей версии Windows, значит RDP Wrapper не может применить необходимые настройки. В этом случае в окне RDP Wrapper Configuration будет указан статус [not supported].
В этом случае нужно обновить файл rdpwrap.ini как описано выше.
Если RDP Wrapper не работает после обновления файла rdpwrap.ini, попробуйте открыть файл rdpwrap.ini и найти в нем описание для вашей версии Windows.
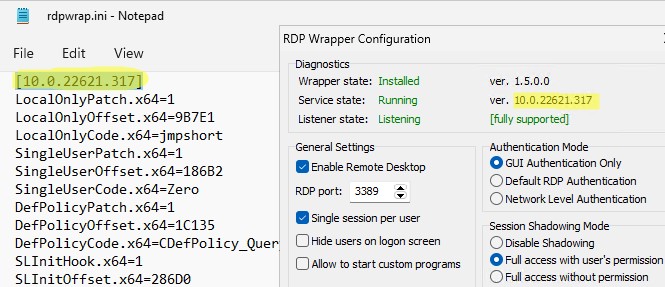
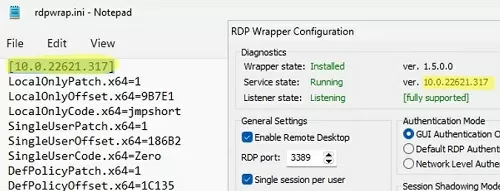
Как понять, есть ли поддержка вашей версии Windows в конфиг файле rdpwrapper?
На скриншоте ниже показано, что для моей версии Windows 11 (10.0.22621.317) есть две секции с описаниями:
[10.0.22621.317]
...
[10.0.22621.317-SLInit]
...
Если в конфигурационном файле rdpwrap соответствующая секция отсутствует для вашей версии Windows, попробуйте поискать в сети строки rdpwrap.ini для вашего билда. Добавьте найденные строки в самый конец файла.
Если после установки обновлений безопасности или после апгрейда билда Windows 10, RDP Wrapper не работает, проверьте, возможно в секции Diagnostics присутствует надпись Listener state: Not listening.
Попробуйте обновить ini файл, и затем переустановить службу:
rdpwinst.exe -u
rdpwinst.exe -i
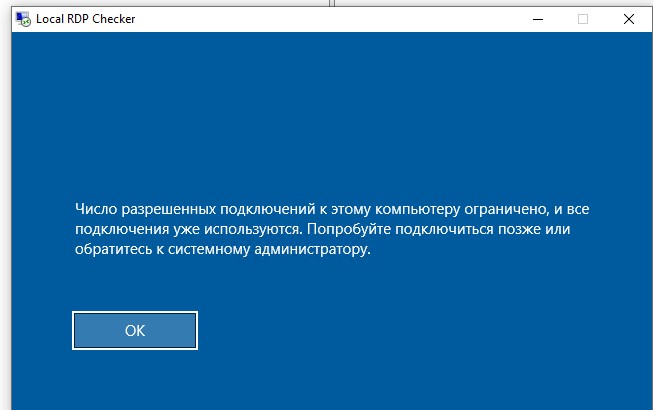
Бывает, что при попытке второго RDP подключения под другим пользователем у вас появляется надпись:
Число разрешенных подключений к этому компьютеру ограничено и все подключений уже используются. Попробуйте подключиться позже или обратитесь к системному администратору.
The number of connections to this computer is limited and all connections are in use right now. Try connecting later or contact your system administrator.
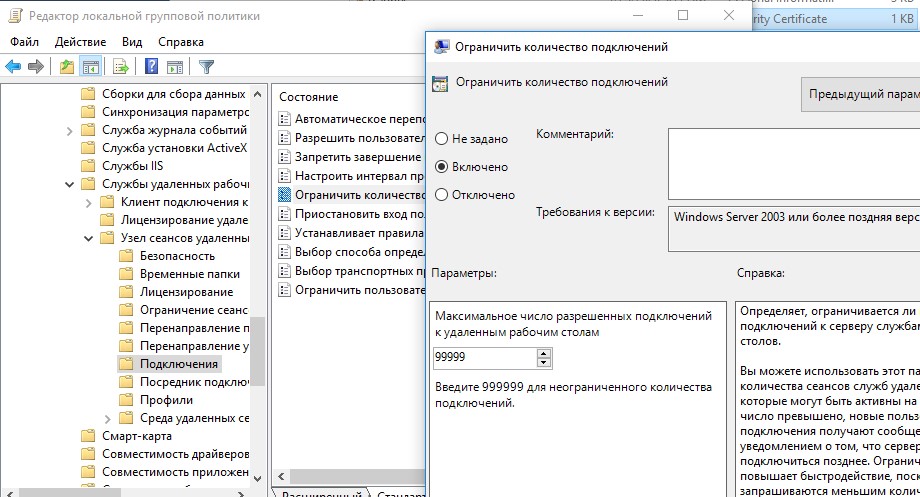
В этом случае нужно с помощью редактора групповых политики gpedit.msc в секции Конфигурация компьютера –> Административные шаблоны -> Компоненты Windows -> Службы удаленных рабочих столов -> Узел сеансов удаленных рабочих столов -> Подключения включить политику “Ограничить количество подключений” и изменить ее значение на 999999 (Computer Configuration -> Administrative Templates -> Windows Components ->Remote Desktop Services ->Remote Desktop Session Host -> Connections-> Limit number of connections).
Перезагрузите компьютер для обновления настроек GPO и применения новых параметров.
Модификация файла termsrv.dll для снятия ограничений RDP в Windows 10 и 11
Чтобы убрать ограничение на количество RDP подключений пользователей в Windows без использования rdpwrapper нужно заменить файл termsrv.dll. Это файл библиотеки, которая используется службой Remote Desktop Services. Файл находится в каталоге C:\Windows\System32.
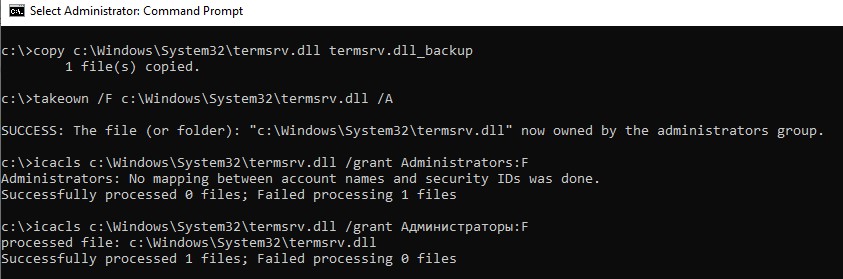
Прежде, чем править или заменять файл termsrv.dll желательно создать его резервную копию. Это поможет вам в случае необходимости можно будет вернуться к исходной версии файла. Запустите командную строку с правами администратора и выполните команду:
copy c:\Windows\System32\termsrv.dll termsrv.dll_backup
Затем нужно стать владельцем файла. Проще всего это сделать из командной строки. Чтобы сменить владельца файла с TrustedInstaller на группу локальных администраторов с помощью команды:
takeown /F c:\Windows\System32\termsrv.dll /A
Должно появится сообщение: «SUCCESS: The file (or folder): «c:\Windows\System32\termsrv.dll» now owned by the administrators group».
Теперь с помощью icacls.exe предоставьте группе локальных администраторов полные права на файл termsrv.dll (Full Control):
icacls c:\Windows\System32\termsrv.dll /grant Administrators:F
(или
Администраторы
в русской версии Windows).
Должно появится сообщение: «processed file: c:\Windows\System32\termsrv.dll Successfully processed 1 files; Failed processing 0 files«.
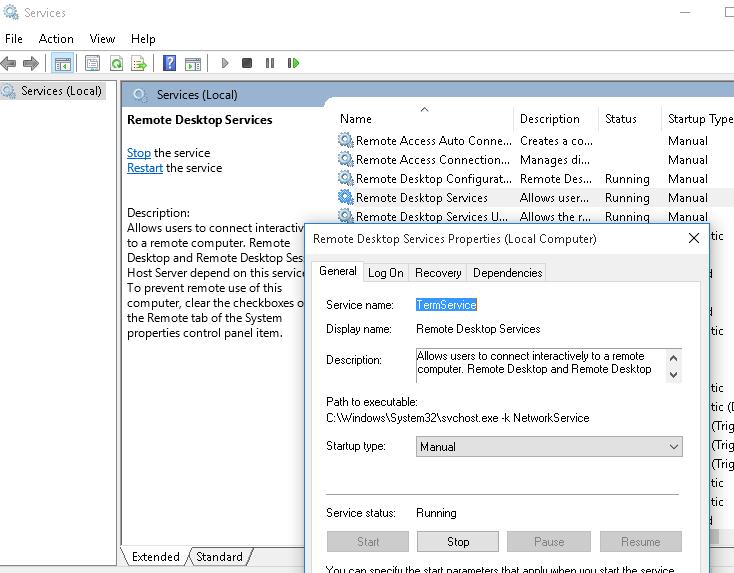
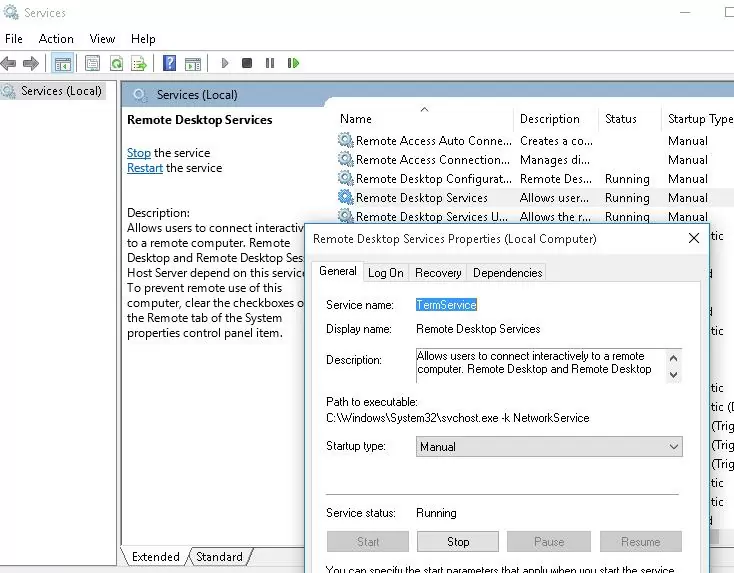
Теперь нужно остановить службу Remote Desktop Service (TermService) из консоли services.msc или из командной строки:
Net stop TermService
Вместе с ней останавливается служба Remote Desktop Services UserMode Port Redirector.
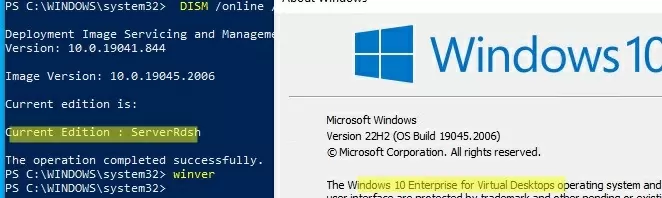
Чтобы узнать номер билда вашей Windows, выполните команду winver или следующую команды PowerShell:
Get-ComputerInfo | select WindowsProductName, WindowsVersion
В моем случае установлена Windows 10 билд 22H2.
Затем откройте файл termsrv.dll с помощью любого HEX редактора (к примеру, Tiny Hexer). В зависимости от билда нужно найти и заменить строку:
| Версия Windows | Найти строку | Заменить на |
| Windows 11 22H2 | 39 81 3C 06 00 00 0F 84 75 7A 01 00 |
B8 00 01 00 00 89 81 38 06 00 00 90 |
| Windows 10 22H2 | 39 81 3C 06 00 00 0F 84 85 45 01 00 | |
| Windows 11 RTM ( 21H2 22000.258) | 39 81 3C 06 00 00 0F 84 4F 68 01 00 | |
| Windows 10 x64 21H2 | 39 81 3C 06 00 00 0F 84 DB 61 01 00 | |
| Windows 10 x64 21H1 | 39 81 3C 06 00 00 0F 84 2B 5F 01 00 | |
| Windows 10 x64 20H2 | 39 81 3C 06 00 00 0F 84 21 68 01 00 | |
| Windows 10 x64 2004 | 39 81 3C 06 00 00 0F 84 D9 51 01 00 | |
| Windows 10 x64 1909 | 39 81 3C 06 00 00 0F 84 5D 61 01 00 | |
| Windows 10 x64 1903 | 39 81 3C 06 00 00 0F 84 5D 61 01 00 | |
| Windows 10 x64 1809 | 39 81 3C 06 00 00 0F 84 3B 2B 01 00 | |
| Windows 10 x64 1803 | 8B 99 3C 06 00 00 8B B9 38 06 00 00 | |
| Windows 10 x64 1709 | 39 81 3C 06 00 00 0F 84 B1 7D 02 00 |
Редактор Tiny Hexer не позволяет редактировать файл termsvr.dll напрямую из папки system32. Скопируйте его на рабочий стол, а после модификации замените исходный файл.
Например, для самой редакции Windows 10 x64 22H2 19045.2006 (версия файла termsrv.dll — 10.0.19041.1949) нужно открыть файл termsrv.dll в Tiny Hexer. Затем найдите строку:
39 81 3C 06 00 00 0F 84 85 45 01 00
И замените ее на:
B8 00 01 00 00 89 81 38 06 00 00 90
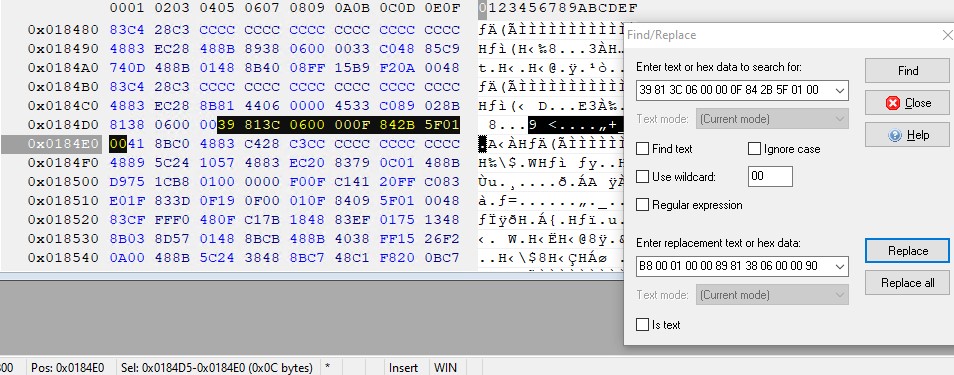
Сохраните файл и запустите службу TermService.
Если что-то пошло не так, и у вас возникнут проблемы со службой RDP, остановите службу и замените модифицированный файл termsrv.dll исходной версией:
copy termsrv.dll_backup c:\Windows\System32\termsrv.dll
Преимущество способа отключения ограничения на количество RDP сессий в Windows путем замены файла termsrv.dll в том, что на него не реагируют антивирусы. В отличии от утилиты RDPWrap, которую многие антивирусов считают Malware/HackTool/Trojan. Основной недостаток — вам придется вручную править файл после каждого обновления билда Windows (или при обновлении версии файла termsrv.dll в рамках ежемесячных кумулятивных обновлений).
Встроенная поддержка нескольких RDP сессий в редакции Windows 10 Enterprise Multi-session
Недавно Microsoft выпустило специальные Enterprise редакции Windows multi-session (ранее назывались Windows 10 Enterprise for Remote Sessions и Windows 10 Enterprise for Virtual Desktops).
Редакция Enterprise multi-session доступна как для Windows 10, так и для Windows 11.
Главная особенность этой редакции – она поддерживает множественные одновременные RDP сессии пользователей прямо из коробки. Несмотря на то, что редакцию Windows multi-session разрешено запускать только в виртуальных машинах Azure, вы можете вам установить эту редакцию в on-premises сети и использовать данный компьютер терминальный сервер (хотоя это будет нарушением лицензионной политики Microsoft).
Далее мы покажем, как обновить компьютер с Windows 10 Pro до Windows 10 Enterprise for Virtual Desktop и использовать его для одновременного подключения нескольких пользователей.
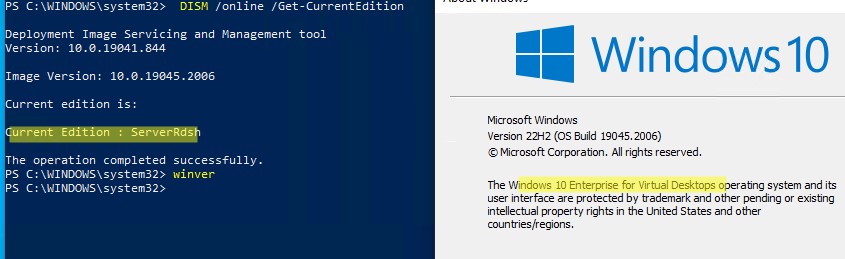
Откройте командную строку и проверьте текущую редакцию Windows (Professional в этом примере):
DISM /online /Get-CurrentEdition
Обновите вашу редакцию Windows с Pro до Enterprise:
Changepk.exe /ProductKey NPPR9-FWDCX-D2C8J-H872K-2YT43
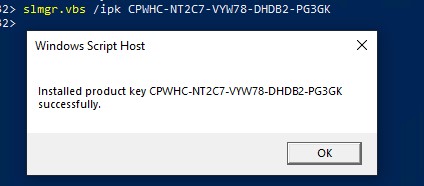
Теперь установить GVLK ключ для Windows 10 Enterprise for Remote Sessions:
slmgr.vbs /ipk CPWHC-NT2C7-VYW78-DHDB2-PG3GK
Проверьте, что теперь ваша редакция Windows 10 изменилась на
ServerRdsh
(Windows 10 Enterprise for Virtual Desktops).
Активируйте вашу копию Windows Enterprise Multi-Session на вашем KMS сервере:
slmgr /skms msk-man02.winitpro.local:1688
slmgr /ato
Откройте редактор локальной GPO
(gpedit.msc
) и включите Per-User режим лицензирования в параметре Set the Remote Desktop licensing mode (Computer Configuration -> Policies -> Administrative Templates -> Windows Components -> Remote Desktop Services -> Remote Desktop Session Host -> Licensing).
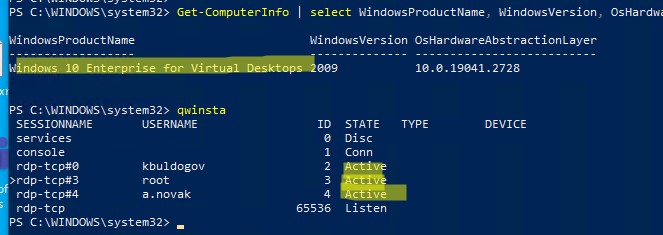
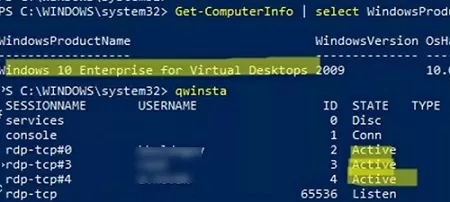
После активации нужно перезагрузить Windows. Теперь попробуйте подключиться к компьютеру по RDP под несколькими пользованиями. Как вы видите, Windows 10 Enterprise multi-session одновременные RDP подключения поддерживаются прямо из коробки.
Get-ComputerInfo | select WindowsProductName, WindowsVersion, OsHardwareAbstractionLayer
Windows 10 Enterprise for Virtual Desktops 2009 10.0.19041.2728
qwinsta
В этой статье мы рассмотрели способы, позволяющие снять ограничение на количество одновременных RDP подключений пользователей, и запустить бесплатный терминальный сервер на клиентской Windows 10 или 11. У каждого из этих способов есть свои преимущества и недостатки. Какой из них использовать — решать вам.
June 30, 2023
Remote users can connect to their Windows 10 and 11 computers through the Remote Desktop Services (RDP). All you need to do is enable Remote Desktop, grant the user RDP access permissions, and connect to the computer using any remote desktop client. However, the number of concurrent RDP sessions is limited in desktop versions of Windows. Only one active Remote Desktop user session is allowed.
A warning will appear asking you to disconnect the first user’s session if you try to establish a second RDP connection.
Another user is signed in. If you continue, they’ll be disconnected. Do you want to sign in anyway?
Contents:
- Number of Concurrent RDP Connections on Windows
- RDP Wrapper: Enable Multiple RDP Sessions on Windows
- RDP Wrapper Not Working on Windows
- Patch the Termsrv.dll to Enable Multiple Remote Desktop Sessions
- Multiple Concurrent RDP Connections in Windows 10 Enterprise Multi-session
Number of Concurrent RDP Connections on Windows
There are a number of restrictions on the use of Remote Desktop Services in all desktop versions of Windows 10 and 11:
- Only Windows Professional and Enterprise editions can accept remote desktop connections. RDP access is not allowed to Home/Single Language Windows editions;
- Only one simultaneous RDP connection is available. Attempting to start a second RDP session will prompt the user to end the active session;
- If the user is working at the computer console (locally), their local session is disconnected (locked) when they make a remote RDP connection. The remote RDP session will also be terminated if the user logs into Windows from the computer’s console.
The number of concurrent RDP connections on Windows is actually a license limitation. Microsoft prohibits the creation of a workstation-based Terminal RDP server for multiple users to work simultaneously.
If your tasks require the deployment of a terminal server, Microsoft suggests purchasing Windows Server (allows two simultaneous RDP connections by default). If you need more concurrent user sessions, you will need to purchase RDS CALs, install, and configure the Remote Desktop Session Host (RDSH) role or deploy an RDS farm.
Technically, any version of Windows with sufficient RAM and CPU resources can support dozens of remote user sessions simultaneously. On average, an RDP user session requires 150-200MB of memory (excluding running apps). This means that the maximum number of concurrent RDP sessions is limited only by the available resources of the computer.
In this article, we are going to show you three ways to remove the limit on the number of concurrent RDP connections in Windows 10 and 11:
- RDP Wrapper
- Modifying the termsrv.dll file
- Upgrading Windows 10/11 edition to Enterprise for virtual desktops (multi-session)
Note. Any modifications to the operating system that are described in this article are considered a violation of the Windows License Agreement and may be used at your own risk.
Before you proceed, make sure that the Remote Desktop protocol is enabled in Windows.
- Go to Settings -> System —> Remote Desktop -> Enable Remote Desktop;
- Or use the classic Control Panel: run the command
SystemPropertiesRemoteand check the option Allow remote connection to this computer.
Find out how to enable and configure Remote Desktop on Windows.
RDP Wrapper: Enable Multiple RDP Sessions on Windows
The RDP Wrapper Library OpenSource project allows you to enable multiple RDP sessions on Windows 10/11 without replacing the termsrv.dll file. This tool acts as a layer between SCM (Service Control Manager) and the Remote Desktop Services. The RDP wrapper doesn’t make any changes to the termsrv.dll file, it simply loads the termsrv with the modified settings.
Thus, the RDPWrap will work even in the case of termsrv.dll file update. It allows you not to be afraid of Windows updates.
Important. Before installing the RDP Wrapper, it is important to make that you are using the original (unpatched) version of the termsrv.dll file. Otherwise, RDP Wrapper may become unstable or not start at all.
You can download the RDP Wrapper from the GitHub repository https://github.com/binarymaster/rdpwrap/releases (the latest available version of the RDP Wrapper Library is v1.6.2). The project hasn’t been updated since 2017, but it can be used in all new builds of Windows 10 and 11. To use the wrapper on modern versions of Windows, simply update the rdpwrap.ini configuration file.
RDP Wrapper is detected as a potentially dangerous program by most antivirus scanners. For example, it is classified as PUA:Win32/RDPWrap (Potentially Unwanted Software) with a low threat level by the built-in Microsoft Defender antivirus. If your antivirus settings are blocking the RDP Wrapper from starting, you will need to add it to the exceptions.
The RDPWrap-v1.6.2.zip archive contains some files:
- RDPWinst.exe — used to install/uninstall an RDP wrapper library;
- RDPConf.exe — RDP Wrapper configuration tool;
- RDPCheck.exe —an RDP check tool (Local RDP Checker);
- install.bat, uninstall.bat, update.bat — batch files to install, uninstall, and update RDP Wrapper.
To install RDPWrap, run the install.bat file as an administrator. The program is installed in the C:\Program Files\RDP Wrapper directory.
Run RDPConfig.exe when the installation is complete.
Most likely, immediately after installation, the tool will show that the RDP wrapper is running (Installed, Running, Listening), but not working. Note the red [not supported] warning. It reports that this version of Windows 10 22H2 (ver. 10.0.19041.1949) is not supported by the RDPWrapper.
This is because the rdpwrap.ini configuration file does not contain settings for your Windows version (build). +
✅ Download the latest version of rdpwrap.ini here https://raw.githubusercontent.com/sebaxakerhtc/rdpwrap.ini/master/rdpwrap.ini
Manually copy the contents of this page into the C:\Program Files\RDP Wrapper\rdpwrap.ini file. Or download the INI file using the PowerShell cmdlet Invoke-WebRequest (you must first stop the Remote Desktop service):
Stop-Service termservice -Force
Invoke-WebRequest https://raw.githubusercontent.com/sebaxakerhtc/rdpwrap.ini/master/rdpwrap.ini -outfile "C:\Program Files\RDP Wrapper\rdpwrap.ini"
You can create a scheduled task to check for changes to rdpwrap.ini and update it automatically.
This screenshot shows that the latest version of the rdpwrap.ini file (Updated=2023-06-26) is used on the computer.
Restart your computer and run the RDPConfig.exe tool. Check that all items in the Diagnostics section are green and that the [Fully supported] message is displayed. The RDP wrapper started successfully on Windows 11 22H2 in my case.
Now try to establish several concurrent RDP sessions with this computer under different user accounts (use your favorite RDP client: mstsc.exe, RDCMan, mRemoteNG, etc).
You can use saved RDP credentials to connect to a remote computer.
You can check that two (or more) RDP sessions are active on the computer at the same time by using the command:
qwinsta
rdp-tcp#0         user1                 1  Active
rdp-tcp#1         user2                 2  Active
The RDPWrap tool is supported in all Windows editions, so you can build your own terminal (RDS) server on any Windows device. So you can turn any version of Windows client into a full-featured terminal server.
The following options are available in the RDP Wrapper:
- Enable Remote Desktop
- RDP Port —change the default remote desktop port number (TCP 3389)
- Hide users on logon screen – allow hide the list of users from the Windows Logon Screen;
- Single session per user — allow several concurrent RDP sessions under the same user account. This option sets the fSingleSessionPerUser registry value to 0 (
HKLM\SYSTEM\ CurrentControlSet\Control\Terminal Server\fSingleSessionPerUser). This parameter is also configured through the GPO option Restrict Remote Desktop Services to a single Remote Desktop Services session under Computer Configuration > Administrative Templates > Windows Components > Remote Desktop Services > Remote Desktop Session Host > Connections; - The Session Shadowing Mode allows you to configure the remote control (shadow) connection mode to the RDP users’ desktops
You can set limits on the duration of RDP user sessions using the Group Policy. This allows idle user sessions to be automatically disconnected.
RDP Wrapper Not Working on Windows
In some cases, the RDP Wrapper may not work as you expect it to and you may not be able to use more than one RDP connection on Windows.
The termsrv.dll file version can be updated during Windows Updates installation. If the description for your version of Windows is missing from the rdpwrap.ini file, then the RDP Wrapper will not be able to apply the necessary settings. In this case, the status [not supported]. will be displayed in the RDP Wrapper Configuration window.
✅ In this case, you must update the rdpwrap.ini file as described above.
If RDP Wrapper does not work after updating the rdpwrap.ini file, try to open the rdpwrap.ini file and look for the section for your version of Windows.
How to understand if your Windows version is supported in rdpwrapper config?
The screenshot below shows that for my version of Windows 11 (10.0.22621.317) there are two sections of settings:
[10.0.22621.317]
...
[10.0.22621.317-SLInit]
...
If there is no section in the rdpwrap configuration file for your version of Windows, try searching the web for the rdpwrap.ini file. Add the configuration settings you found to the end of the file.
If RDP Wrapper does not work after you install security updates or upgrade the Windows build, check that there is no Listener state: Not listening warning in the RDPWrap Diagnostics section.
Try updating the rdpwrap.ini file, and then reinstalling the rdpwrapper service:
rdpwinst.exe -u
rdpwinst.exe -i
It can happen that when you try to make a second RDP connection as a different user, you will get an error message:
The number of connections to this computer is limited and all connections are in use right now. Try connecting later or contact your system administrator.

In this case, you can use the local Group Policy Editor (gpedit.msc) to enable the “Limit number of connections” option under Computer Configuration -> Administrative Templates -> Windows Components -> Remote Desktop Services -> Remote Desktop Session Host -> Connections section. Increase the ‘RD maximum connection allowed’ value to 999999.
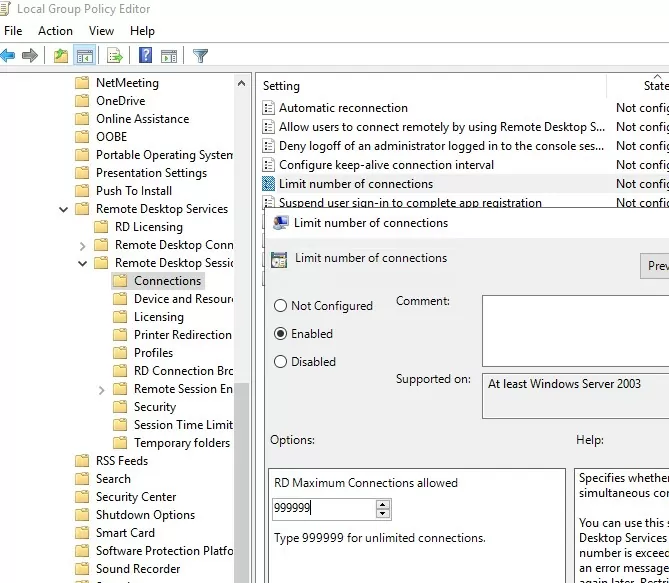
Restart your computer to update the local Group Policy and apply the settings.
Patch the Termsrv.dll to Enable Multiple Remote Desktop Sessions
To remove the limit on the number of concurrent RDP user connections in Windows without using rdpwrapper, you can replace the original termsrv.dll file. This is the main library file used by the Remote Desktop Service. The file is located in the C:\Windows\System32 directory.
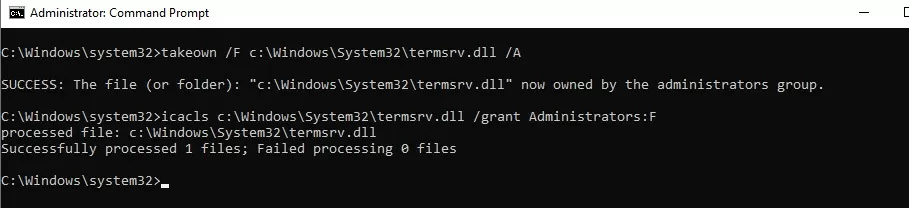
It is advisable to make a backup copy of the termsrv.dll file before editing or replacing it. This will help you to revert to the original version of the file if necessary. Open an elevated command prompt and run the command:
copy c:\Windows\System32\termsrv.dll termsrv.dll_backup
Then you need to take ownership of the termsrv.dll file. To change a file’s owner from TrustedInstaller to the local Administrators group, use the command:
takeown /F c:\Windows\System32\termsrv.dll /A
SUCCESS: The file (or folder): c:\Windows\System32\termsrv.dll now owned by the administrators group
Now use the icacls.exe tool to grant Full Control permissions to the termsrv.dll file for the local Administrators group:
icacls c:\Windows\System32\termsrv.dll /grant Administrators:F
processed file: c:\Windows\System32\termsrv.dll Successfully processed 1 files; Failed processing 0 files.
Now you need to stop the Remote Desktop service (TermService) using the services.msc console or with the command:
net stop TermService
It also stops the Remote Desktop Services UserMode Port Redirector service.
Run the winver command or the following PowerShell command to find your Windows build number:
Get-ComputerInfo | select WindowsProductName, WindowsVersion
In my case, Windows 10 build 22H2 is installed.
Then open the termsrv.dll file using any HEX editor (for example, Tiny Hexer). Depending on the build of Windows you are using, you will need to find and replace the string according to the table below:
| Windows build | Find the string | Replace with |
| Windows 11 22H2 | 39 81 3C 06 00 00 0F 84 75 7A 01 00 | B8 00 01 00 00 89 81 38 06 00 00 90 |
| Windows 10 22H2 | 39 81 3C 06 00 00 0F 84 85 45 01 00 | |
| Windows 11 21H2 (RTM) | 39 81 3C 06 00 00 0F 84 4F 68 01 00 | |
| Windows 10 x64 21H2 | 39 81 3C 06 00 00 0F 84 DB 61 01 00 | |
| Windows 10 x64 21H1 | 39 81 3C 06 00 00 0F 84 2B 5F 01 00 | |
| Windows 10 x64 20H2 | 39 81 3C 06 00 00 0F 84 21 68 01 00 | |
| Windows 10 x64 2004 | 39 81 3C 06 00 00 0F 84 D9 51 01 00 | |
| Windows 10 x64 1909 | 39 81 3C 06 00 00 0F 84 5D 61 01 00 | |
| Windows 10 x64 1903 | 39 81 3C 06 00 00 0F 84 5D 61 01 00 | |
| Windows 10 x64 1809 | 39 81 3C 06 00 00 0F 84 3B 2B 01 00 | |
| Windows 10 x64 1803 | 8B 99 3C 06 00 00 8B B9 38 06 00 00 | |
| Windows 10 x64 1709 | 39 81 3C 06 00 00 0F 84 B1 7D 02 00 |
Tiny Hexer cannot edit termsvr.dll file directly from the system32 folder. Copy it to your desktop and replace the original file after modifying it.
For example, my build of Windows 10 x64 is 22H2 19045.2006 (termsrv.dll file version is 10.0.19041.1949). Open the termsrv.dll file in Tiny Hexer, then find the text:
39 81 3C 06 00 00 0F 84 75 7A 01 00
and replace it with:
B8 00 01 00 00 89 81 38 06 00 00 90

Save the file and start the TermService.
If something goes wrong and you experience some problems with the Remote Desktop service, stop the service and replace the modified termsrv.dll file with the original version:
copy termsrv.dll_backup c:\Windows\System32\termsrv.dll
To avoid manually editing the termsrv.dll file with a HEX editor, you can use the following PowerShell script to automatically patch the termsrv.dll file. The PowerShell script code is available in my GitHub repository at the following link:
https://github.com/maxbakhub/winposh/blob/main/termsrv_rdp_patch.ps1
This script was written for the Windows PowerShell version and does not work in modern PowerShell Core.
👍 The advantage of the method of enabling multiple RDP sessions in Windows 10 or 11 by replacing the termsrv.dll file is that antivirus software will not react to it (unlike RDPWrap, which is detected by many antivirus products as a malware/hack tool/trojan).
👎The disadvantage of this is that you will have to manually edit the file each time you update the Windows build (or if the monthly cumulative patches update the version of termsrv.dll).
Multiple Concurrent RDP Connections in Windows 10 Enterprise Multi-session
Microsoft has recently released a special edition of the operating system called Windows Enterprise Multi-Session (Previously known as Windows 10 Enterprise for Remote Sessions and Windows 10 Enterprise for Virtual Desktops)
The key feature of this edition is that it supports multiple concurrent RDP user sessions out of the box. Although the Windows multi-session edition is only allowed to be run in Azure VMs, you can install this edition on an on-premises network and use that computer as a terminal server (even though this would be against Microsoft’s licensing policies).
The Enterprise Multi-Session edition is available for both Windows 10 and Windows 11.
Next up, we’re going to show you how to upgrade a Windows 10 Pro edition to Windows 10 Enterprise for Virtual Desktop and use it for multiple RDP users simultaneously.
Open a command prompt and check your current edition of Windows (Professional in this example):
DISM /online /Get-CurrentEdition
Upgrade your edition of Windows 10 from Pro to Enterprise with the command:
changepk.exe /ProductKey NPPR9-FWDCX-D2C8J-H872K-2YT43
Now install the GVLK key for Windows 10 Enterprise for Remote Sessions:
slmgr.vbs /ipk CPWHC-NT2C7-VYW78-DHDB2-PG3GK
Check that your edition of Windows 10 has now changed to ServerRdsh (Windows 10 Enterprise for Virtual Desktops).
Activate your copy of Windows 10 Enterprise Multi-Session edition on your KMS server:
slmgr /skms kms-srv.woshub.local:1688
slmgr /ato
See the Key Management Service (KMS) Activation FAQ.
Open the Local GPO Editor (gpedit.msc) and enable Per-User licensing mode in the Set the Remote Desktop licensing mode (Computer Configuration -> Policies -> Administrative Templates -> Windows Components -> Remote Desktop Services -> Remote Desktop Session Host -> Licensing).
You must restart Windows after activation. Now try connecting to the computer using RDP with different user accounts. As you can see, Windows 10 Enterprise multi-session supports simultaneous RDP connections right out of the box.
Get-ComputerInfo | select WindowsProductName, WindowsVersion, OsHardwareAbstractionLayer
Windows 10 Enterprise for Virtual Desktops 2009 10.0.19041.2728
qwinsta
In this article, we have looked at a number of ways to get rid of the limit on the number of concurrent RDP user connections and run a free terminal server on desktop versions of Windows 10/11. Each method has its own advantages and disadvantages. Which one you choose is up to you.
Source :
https://woshub.com/how-to-allow-multiple-rdp-sessions-in-windows-10/
Замена файлов лицензии ServerRdsh (Enterprise multi-session)
Вначале нужно получить права на все файлы в каталоге
Код:
C:\Windows\System32\spp\tokens\skus\ServerRdsh
ПКМ по каталогу ServerRdsh —> свойства —> Безопасность —> Дополнительно —> Изменить (справа от имени владельца, вверху).
В открывшемся окне вводим своё имя пользователя, например «Администратор», а не группу администраторов. Ставим галочки о рекурсивной замене владельца и разрешений.
После получения прав заменяем файлы как обычно: копировать —> вставить —> да, заменить файлы.
Для того, чтобы изменённый SKU вступил в силу нужно сделать дополнительные действия:
0. Убедиться, что в системе задан адрес KMS сервера.
1. Изменить ключ продукта на обычный GVLK от Enterprise через параметры (и согласиться на активацию), при этом НЕ перезагружать компьютер!!!
2. Изменить ключ на GVLK от Enterprise multi-session через параметры (и согласиться на активацию), при этом игнорировать ошибку активации.
3. Дважды перезагрузить Windows. Между перезагрузками лучше делать перерыв в несколько минут.
Задача:
На ПК установлена ОС Microsoft Windows 10 или 11 Professional. Необходимо обеспечить одновременную работу в терминальном сеансе на этом ПК для нескольких пользователей.
Как известно, в десктопных версия Windows есть ограничение на количество одновременных RDP сессии. Разрешается только один активный Remote Desktop сеанс пользователя. При попытке запустить вторую RDP-сессию, пользователю будет предложено завершить активный сеанс.
Если пользователь работает за консолью компьютера (локально), то при удаленном подключении по RDP, его локальный сеанс будет отключен (заблокирован). Также завершается и удаленный RDP сеанс, если пользователь входит в Windows через консоль компьютера.
Решение:
На мой взгляд самым лучшим решением этой задачи является обновление редакции операционной системы с Professional до Enterprise for virtual desktops (multi-session).
Примечание: Все модификации операционной системы считаются нарушением лицензионного соглашения Windows, поэтому для легальной работы необходимо также приобрести лицензию на соответствующую редакцию ОС.
Для обновления редакции с Professional до Enterprise for virtual desktops (multi-session) выполняем шаги:
-
Открываем командную строку от имени Администратора и обновляем редакцию Windows:
Код: Выделить всё
Changepk.exe /ProductKey NPPR9-FWDCX-D2C8J-H872K-2YT43 -
Устанавливаем GVLK ключ для Windows 10 Enterprise for Remote Sessions:
Код: Выделить всё
slmgr.vbs /ipk CPWHC-NT2C7-VYW78-DHDB2-PG3GK -
Проверяем, что теперь редакция Windows 10 изменилась на ServerRdsh (Windows 10 Enterprise for Virtual Desktops):
-
Активируем свою копию Windows Enterprise Multi-Session:
-
В редакторе локальной политики gpedit.msc «Конфигурация компьютера» -> «Административные шаблоны» -> «Компоненты Windows» -> «Службы удаленных рабочих столов» -> «Узел сеансов удаленных рабочих столов» -> «Лицензирование» -> включаем режим лицензирования «На пользователя»:
-
-
Перезагружаем компьютер.
 515 просмотров")
Разрешить несколько одновременных RDP сеансов в Windows 10 и 11
-
New posts
-
Search forums
Log in
Register
Follow along with the video below to see how to install our site as a web app on your home screen.
Note: This feature may not be available in some browsers.
Style variation
System
Light
Dark
-
Windows Support Forums
-
General Support
You should upgrade or use an alternative browser.
Windows 11 multi-session Enterprise Edition
-
Thread starter
Thread starterNavyLCDR
-
Start date
Start date
NavyLCDR
Well-known member
- Local time
- 3:53 PM
- Posts
- 1,777
- OS
- Windows 11
-
-
#1
- Windows Build/Version
- 22621.1 Windows 11 Enterprise multi-session
My Computers
System One
System Two
-
- OS
- Windows 11
- Computer type
- PC/Desktop
- Manufacturer/Model
- Homebuilt
- CPU
- AMD Ryzen 7 3800XT
- Motherboard
- ASUS ROG Crosshair VII Hero (WiFi)
- Memory
- 32GB
- Graphics Card(s)
- EVGA GeForce GTX 1080 Ti
-
- Operating System
- Windows 11 Education
- Computer type
- Laptop
- Manufacturer/Model
- Dell Inspiron 7773
- CPU
- Intel i7-8550U
- Memory
- 32GB
- Graphics card(s)
- Nvidia Geforce MX150
- Sound Card
- Realtek
- Monitor(s) Displays
- 17″
- Screen Resolution
- 1920 x 1080
- Hard Drives
- Toshiba 512GB NVMe SSD
SK Hynix 512GB SATA SSD
- Internet Speed
- Fast!
You must log in or register to reply here.
Similar threads
I
Windows 11 multilanguage image creation
- ijalabs
- Installation, Updates and Activation
- Replies
- 9
- Views
- 461
spapakons
A
MSIX Packaging Tool Driver W11 multi-session 22621.1 cab file
- anpo9598
- Apps and Software
- Replies
- 2
- Views
- 1K
garlin
G
5
Any way to download Enterprise Multi-Session ISO without Azure?
- 5uck3d
- Installation, Updates and Activation
- Replies
- 2
- Views
- 15K
NavyLCDR
-
Article
Article
Insider
KB5012432 Cumulative Update Windows 11 Insider Dev Build 22567.200 — March 7
- Brink
- Windows 11 News
9
10
11
- Replies
- 200
- Views
- 34K
CornishRattler
-
Article
Article
Insider
Windows 11 Insider Dev Build 22557.1 (ni_release) — Feb. 16
- Brink
- Windows 11 News
7
8
9
- Replies
- 160
- Views
- 40K
Winuser
Latest Support Threads
-
T
Custom scale for different monitors- Started by toshiki2
- Replies: 3
Devices and Drivers -
Cannot play movies purchased through Microsoft Store with Movies & TV or Media Player Error code 0xC00D36C4
- Started by Tink009
- Replies: 13
Apps and Software -
T
AOC E1759FWU 17.3” Not Working- Started by Trebo58
- Replies: 2
Devices and Drivers -
X
best way to do clean install with 2 NVMe drives, multiple partitions- Started by x509
- Replies: 12
Installation, Updates and Activation -
Can an ssh key be used as password alternative
- Started by Helmuuth
- Replies: 1
AntiVirus, Firewalls and System Security
Latest Tutorials
-
Browsers and Mail Add or Remove Words for Spellcheck Dictionary in Microsoft Edge
- Started by Brink
- Replies: 0
Tutorials -
Browsers and Mail Enable or Disable Grammar and Spellcheck Assistance in Microsoft Edge
- Started by Brink
- Replies: 1
Tutorials -
Phone Pin and Unpin Mobile Notifications in Phone Link app on Windows 11
- Started by Brink
- Replies: 0
Tutorials -
Phone Clear Mobile Notifications in Phone Link app on Windows 11
- Started by Brink
- Replies: 0
Tutorials -
Phone Add or Remove Android Apps as Favorites in Phone Link app on Windows 11
- Started by Brink
- Replies: 0
Tutorials
-
Windows Support Forums
-
General Support
Bottom