
Для установки Windows 11 (или при обновлении с Windows 10), ваш компьютер должен соответствовать определённом минимальным системам требованиям: наличие чипа TPM 2.0 (Trusted Platform Module), режим UEFI + Secure Boot, 4 Гб RAM, 64 Гб диск и совместимый двухъядерный процессор 1 ГГц (не все процессоры поддерживаются!). Microsoft ограничивает установку Windows 11 на несовместимые компьютеры, выполняя проверку на соответствие системным требования перед началом установки Windows. В этой статье мы покажем, как установить Windows 11 на несовместимые устройства без проверки требований к CPU, TPM, Secure Boot (и т.д.)
Если компьютер не соответствует минимальным требованиям для Windows 11, то при установке ОС появится ошибка:
Запуск Windows 11 на этом компьютере не возможен
. Этот компьютер не соответствует минимальным требованиям к системе для установки этой версии Windows. Дополнительные сведения см. на сайте aka.ms/WindowsSysReq
This PC can’t run Windows 11
. This PC doesn’t meet the minimum system requirements to install this version of Windows. For more information, visit aka.ms/WindowsSysReq<
Чтобы понять, каким конкретно требованиям не соответствует вашим компьютер, нужно изучить лог ошибок установки Windows 11 setuperr.log. В этом файле содержаться только ошибки установки Windows (полный лог установки находится в файле setupact.log, но изучать его сложно из-за большого объема).
Чтобы открыть файл лога ошибок установки Windows, откройте командную строку прямо на экране установки, нажав
Shift + F10
и выполните команду:
notepad x:\windows\panther\setuperr.log
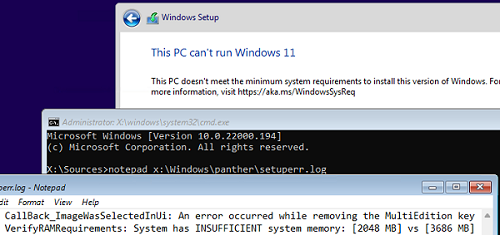
В нашем случае ошибка говорит, что на компьютере недостаточно оперативной памяти (всего 2 Гб вместо 3).
2021-11-11 10:57:51, Error VerifyRAMRequirements: System has INSUFFICIENT system memory: [2048 MB] vs [3686 MB]
Обратите внимание, что если ваш компьютер не соответствует нескольким системным требованиям для установки Windows, то в логе будет указана только первая из причин. Т.е. если вы исправили (или пропустили) одну из ошибок несовместимости, то при следующем запуске установки Windows 11 в логе будет содержаться следующая ошибка совместимости.
После того, как мы добавили RAM появилась другая ошибка:
2021-11-11 11:13:37, Error VerifyTPMSupported:Tbsi_GetDeviceInfo function failed - 0x8028400f[gle=0x0000007a]
Т.е. установщик определил, что на компьютере отсутствует TPM чип.
Если вы устанавливаете Windows 11 в виртуальную машину VMWare, вы можете добавить виртуальный TPM чип в соответствии с этой статьей. Для Hyper-V используется другая инструкция.
Однако вы можете продолжить установку Windows 11, просто игнорировал одно или все требования совместимости.
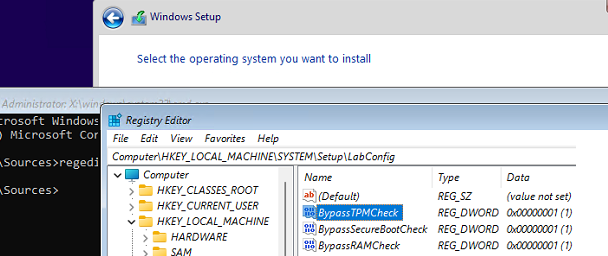
Для этого нужно в командной строке на экране установки Windows 11:
- Запустить редактор реестра
regedit.exe
; - Перейти в раздел HKEY_LOCAL_MACHINE\SYSTEM\Setup и создать новую ветку с именем LabConfig;
- В этой ветке нужно создать DWORD параметры со значением 1 для тех проверок совместимости, которые вы хотите пропустить при установке
Доступны следующие параметры, позволяющие установить Windows 11 на устройства:
-
BypassCPUCheck
– с несовместимыми процессорами; -
BypassTPMCheck
– без чипа TPM 2; -
BypassRAMCheck
– не проверять минимальное количество RAM -
BypassSecureBootCheck
–с Legacy BIOS (или UEFI с отключенным Secure Boot) -
BypassStorageCheck
– не проверять размер системного диска
Например, чтобы не проверять наличие TPM модуля при установке, нудно создать параметр реестра BypassTPMCheck со значением 1. Параметр можно создать с помощью графического редактора реестра или с помощью команды:
reg add HKLM\SYSTEM\Setup\LabConfig /v BypassTPMCheck /t REG_DWORD /d 1
Аналогичным образом нужно создать другие параметры для проверок, который вы хотите пропустить при установке Windows 11.
Затем вернитесь в окно установки Window 11, вернитесь на шаг назад и продолжите обычную установки без проверки совместимости.
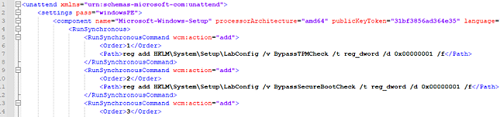
Вы можете модифицировать установочный ISO образ Windows 11, чтобы все эти проверки TPM, SecureBoot, диск, память, CPU) пропускались автоматически при установке ОС.
Для этого создайте текстовый файл AutoUnattend.xml со следующим содержимым:
<unattend xmlns="urn:schemas-microsoft-com:unattend">
<settings pass="windowsPE">
<component name="Microsoft-Windows-Setup" processorArchitecture="amd64" publicKeyToken="31bf3856ad364e35" language="neutral" versionScope="nonSxS" xmlns:wcm="http://schemas.microsoft.com/WMIConfig/2002/State" xmlns:xsi="http://www.w3.org/2001/XMLSchema-instance">
<RunSynchronous>
<RunSynchronousCommand wcm:action="add">
<Order>1</Order>
<Path>reg add HKLM\System\Setup\LabConfig /v BypassTPMCheck /t reg_dword /d 0x00000001 /f</Path>
</RunSynchronousCommand>
<RunSynchronousCommand wcm:action="add">
<Order>2</Order>
<Path>reg add HKLM\System\Setup\LabConfig /v BypassSecureBootCheck /t reg_dword /d 0x00000001 /f</Path>
</RunSynchronousCommand>
<RunSynchronousCommand wcm:action="add">
<Order>3</Order>
<Path>reg add HKLM\System\Setup\LabConfig /v BypassRAMCheck /t reg_dword /d 0x00000001 /f</Path>
</RunSynchronousCommand>
<RunSynchronousCommand wcm:action="add">
 <Order>5</Order>
<Path>reg add HKLM\System\Setup\LabConfig /v BypassCPUCheck /t reg_dword /d 0x00000001 /f</Path>
</RunSynchronousCommand>
<RunSynchronousCommand wcm:action="add">
<Order>4</Order>
<Path>reg add HKLM\System\Setup\LabConfig /v BypassStorageCheck /t reg_dword /d 0x00000001 /f</Path>
</RunSynchronousCommand>
</RunSynchronous>
<UserData>
<ProductKey>
<Key></Key>
</ProductKey>
</UserData>
</component>
</settings>
</unattend>
Если вы хотите отключить экран создания онлайн аккаунта Microsoft при установке Windows 11, добавьте в файл следующий секцию компонента:
<component name="Microsoft-Windows-Shell-Setup" processorArchitecture="amd64" publicKeyToken="31bf3856ad364e35" language="neutral" versionScope="nonSxS" xmlns:wcm="http://schemas.microsoft.com/WMIConfig/2002/State" xmlns:xsi="http://www.w3.org/2001/XMLSchema-instance">
<OOBE>
<HideOnlineAccountScreens>true</HideOnlineAccountScreens>
<HideWirelessSetupInOOBE>true</HideWirelessSetupInOOBE>
<ProtectYourPC>3</ProtectYourPC>
</OOBE>
</component>
Скопируйте данный файл в корень установочной USB флешки с Windows 11.
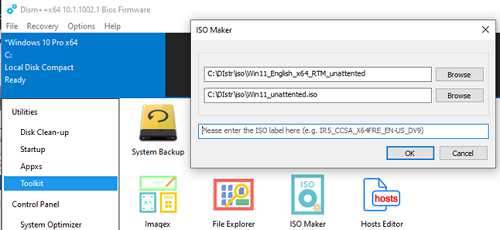
Если вам нужно добавить файл ответов в ISO образ Windows 11, распаккуйте его содержимое в любую папку на компьютере, скопируйте в этот каталог файл AutoUnattend.xml и пересоберите ISO образ.
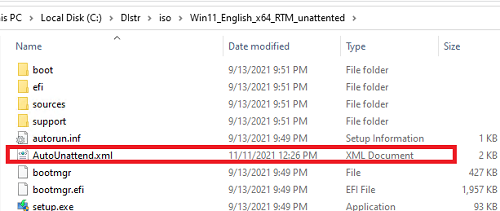
Я использовал для создания образа бесплатную утилиту DISM++ (Toolkit -> ISO maker).
Теперь никакие проверки совместимости не будут производится при установке Windows 11.
В новой версии утилиты Rufus, использующейся для создания загрузочных USB флешек, появилась специальная опция Extended Windows 11 Installation (no TPM/no Secure Boot/8Gb- RAM). Данная опция позволяет создать образ для установки Windows 11 без проверки TPM и Secure Boot:

Disabling TPM (Trusted Platform Module) in Windows 11 may seem a bit technical, but it’s actually a straightforward process. TPM is a security feature that helps protect sensitive data, but there are times when you might need to disable it, like when troubleshooting or setting up a new operating system. To disable TPM, you would need to access your computer’s BIOS or UEFI settings, locate the TPM option, and then turn it off. This task requires you to restart your computer and enter the BIOS/UEFI setup menu, where you can navigate to the relevant section and make the necessary changes.
Disabling TPM in Windows 11 requires accessing your computer’s BIOS or UEFI settings. Follow these steps to safely turn off TPM, ensuring you know what each step entails.
Step 1: Restart Your Computer
To begin, restart your computer, initiating the boot process.
When your computer starts up, you’ll have a short window of time to access the BIOS or UEFI settings. This is usually done by pressing a specific key like F2, F10, DEL, or ESC. The exact key depends on your computer’s manufacturer, so be sure to look for a quick message on the screen right as your computer is restarting to know which key to press.
Step 2: Enter BIOS/UEFI Settings
Press the designated key during the boot process to enter BIOS/UEFI settings.
Once you’ve pressed the correct key, you’ll enter a text-based interface. This is your BIOS or UEFI setup utility. Use your keyboard to navigate through the options, as your mouse may not work in this environment. Be careful as you make selections, as this area controls critical system settings.
Step 3: Locate Security or Advanced Settings
Find the section labeled “Security” or “Advanced” within the BIOS/UEFI menu.
You might have to explore a bit to find the TPM setting. It’s often located under “Security” or “Advanced” menus, but this can vary. If you’re unsure, consult your computer’s manual or the manufacturer’s website for guidance.
Step 4: Disable TPM
Locate the TPM option and select the option to disable it.
Once you’ve found the TPM setting, you’ll typically see an option to enable or disable it. Use the arrows on your keyboard to select “Disable” and change the setting. Be sure to save your changes before exiting the BIOS/UEFI setup.
Step 5: Save and Exit
Save your changes and exit BIOS/UEFI to continue booting into Windows 11.
After making changes, look for an option to save and exit, usually found near the bottom of the menu. Your computer will restart after you exit, and the TPM will now be disabled. This will ensure that the changes take effect and Windows 11 will boot up without TPM.
After completing these steps, your computer should boot back up with TPM disabled. This means Windows 11 will run without using TPM functionalities, which could affect certain security features. If you encounter any problems, you can repeat these steps to enable TPM again.
Tips for Disabling TPM Windows 11
Here are some additional tips to consider when disabling TPM in Windows 11:
- Ensure that you have a backup of your data before making changes to the BIOS/UEFI settings to prevent accidental data loss.
- Double-check your computer’s documentation to ensure you’re using the correct key to enter BIOS/UEFI.
- If you’re unfamiliar with BIOS/UEFI settings, consider seeking help from someone experienced to avoid misconfiguring other settings.
- Remember that disabling TPM might affect security features, so re-enable it if your situation changes.
- Keep your computer’s BIOS/UEFI updated to ensure compatibility with Windows 11 and other software.
Frequently Asked Questions
What is TPM in Windows 11?
TPM, or Trusted Platform Module, is a security feature in Windows 11 that helps protect sensitive data by enabling encryption and secure boot processes.
Why would I need to disable TPM?
Disabling TPM might be necessary for troubleshooting issues, installing certain operating systems, or when TPM is causing compatibility problems with other software.
Will disabling TPM affect my system’s performance?
Disabling TPM won’t majorly affect system performance, but it might disable certain security features, making your system potentially more vulnerable.
Can I re-enable TPM after disabling it?
Yes, you can re-enable TPM by following the same steps to access BIOS/UEFI and switching the TPM setting back to “Enabled.”
Do all computers have TPM?
Not all computers have TPM, especially older models. Newer devices, especially those sold with Windows 11 preinstalled, are more likely to have TPM.
Summary
- Restart your computer.
- Enter BIOS/UEFI settings.
- Locate Security or Advanced Settings.
- Disable TPM.
- Save and exit.
Conclusion
Disabling TPM in Windows 11 is a relatively simple process once you get the hang of accessing your BIOS or UEFI settings. While TPM serves as a robust layer of protection for your system, there might be situations where turning it off is necessary. Whether you’re troubleshooting, setting up a new system, or dealing with compatibility issues, knowing how to disable TPM can be a valuable skill.
Remember, though, that TPM helps protect your data, and disabling it can leave your system vulnerable. Always weigh the risks and benefits, and ensure you have backups of your important data. If you ever need to re-enable TPM, just follow the same steps outlined here.
For further assistance, don’t hesitate to consult your computer’s manual or reach out to a tech-savvy friend. Technology is like a puzzle, and each piece counts. If you’re curious about exploring more Windows 11 features or security settings, there are plenty of resources available online to guide you. So keep learning, stay curious, and happy computing!
Matthew Burleigh has been writing tech tutorials since 2008. His writing has appeared on dozens of different websites and been read over 50 million times.
After receiving his Bachelor’s and Master’s degrees in Computer Science he spent several years working in IT management for small businesses. However, he now works full time writing content online and creating websites.
His main writing topics include iPhones, Microsoft Office, Google Apps, Android, and Photoshop, but he has also written about many other tech topics as well.
Read his full bio here.
Trusted Platform Module (TPM) 2.0 has become a cornerstone of security for modern operating systems, especially with the launch of Windows 11. This feature provides hardware-based security, which helps to protect sensitive data and ensure system integrity. However, there may be scenarios where users might want to disable TPM 2.0. This can be due to compatibility issues with specific applications, or perhaps due to individual preferences in managing system security.
Disabling TPM 2.0 is not universally recommended as it could leave your system vulnerable. However, if you have made the decision to proceed, this guide will provide you with a comprehensive understanding of how to disable TPM 2.0 in Windows 11.
Understanding TPM 2.0
Before diving into the steps for disabling TPM 2.0, it’s essential to grasp what TPM is and why it’s crucial.
TPM is a hardware-based security feature that’s integrated into many modern devices. It primarily generates random numbers and cryptographic keys and can securely store them. With Windows 11 mandating TPM 2.0, this feature helps in various security functions, including:
- BitLocker Drive Encryption: This protects your data by encrypting whole disk volumes.
- Windows Hello: This is a biometric sign-in option that uses TPM to verify your identity.
- Secure Boot: This verifies that your system firmware boots using only trusted software.
- Platform Integrity: Helps ensure that the system functions haven’t been tampered with.
Why Disable TPM 2.0?
Here are some reasons why you might want to disable TPM 2.0 on your Windows 11 device:
- Software Compatibility: Certain applications may not run correctly with TPM enabled.
- Avoiding Unnecessary Complexities: Some users prefer managing their security independently without the involvement of hardware solutions.
- Testing and Development Environments: For developers or those troubleshooting systems, disabling TPM could be a necessary step.
Prerequisites for Disabling TPM 2.0
Before proceeding with the disabling instructions, ensure that you:
- Have administrative permissions on the Windows 11 device.
- Understand the implications of disabling TPM on your system security.
- Back up important data in case any issues arise during the process.
Disabling TPM 2.0 Through BIOS/UEFI Firmware
TPM 2.0 is primarily managed at the firmware level. Thus, to disable it, you will typically need to access your system’s BIOS/UEFI settings. Here’s how to do that:
Step 1: Access BIOS/UEFI
- Restart Your Computer: Turn off your device and turn it back on.
- Enter BIOS/UEFI: As your system starts, press the appropriate key to enter BIOS/UEFI settings. This key varies depending on your hardware manufacturer. Common keys include F2, F10, Delete, or Esc. A message during startup usually indicates the specific key.
- Navigate the Menu: Once in the BIOS/UEFI, use keyboard arrows to navigate through menus.
Step 2: Locate TPM Settings
- Find Security Settings: Look for a tab or section named «Security» or «Advanced». The exact naming can depend on your motherboard or system manufacturer.
- Locate TPM Device: Under the Security settings, you should find something like «TPM Device», «TPM Configuration», or “Trusted Computing”.
Step 3: Disable TPM 2.0
- Select TPM: Highlight the TPM configuration option using arrow keys.
- Disable TPM: Change the setting from “Enabled” to “Disabled”. Confirm the changes if prompted.
Step 4: Save and Exit
- Save Changes: Navigate to the “Save & Exit” option in the BIOS/UEFI menu.
- Reboot: Allow the system to reboot normally.
Your TPM 2.0 is now disabled at the firmware level.
Disabling TPM 2.0 via Windows Settings
Although BIOS/UEFI is the primary method for disabling TPM, you can also manage some security features through Windows 11 settings.
Step 1: Open Windows Settings
- Press Win + I: This opens the Windows Settings window.
Step 2: Navigate to Privacy & Security
- Select Privacy & security: On the left pane of the Settings app.
- Click on Windows Security: This will take you to the Windows Security settings.
Step 3: Device Security
- Device Security: In Windows Security, navigate to «Device Security».
- Security Processor Details: Here, you will see information about the TPM. Click on “Security processor details” to view TPM settings.
Step 4: Clear TPM (if necessary)
While you cannot directly disable TPM from Windows Settings, you can clear it:
- Select Clear TPM: Be aware that this action will remove all keys stored in the TPM.
- Follow On-Screen Instructions: Confirm the prompts to proceed.
This action effectively “disables” many TPM functionalities but does not turn it off at the firmware level.
Important Considerations
- Impacts on System Security: Disabling TPM can expose your system to potential security threats. Ensure you have other security measures in place.
- Re-enabling TPM: If you later decide to re-enable TPM, you will need to repeat the BIOS/UEFI access steps.
- Backing Up Data: Always back up your important files before making substantial system changes, especially concerning security features.
Troubleshooting Common Issues
If you encounter problems with disabling TPM or have compatibility issues after disabling it, consider the following:
- System Fails to Boot: If your system does not boot after disabling TPM, re-enter BIOS/UEFI settings and re-enable TPM.
- BitLocker Issues: If you were using BitLocker, it may require you to reconfigure encryption settings after disabling TPM.
- Peripheral Compatibility: Some peripherals may require TPM for proper functionality. Ensure that you check device documentation.
Conclusion
Disabling TPM 2.0 in Windows 11 can be a straightforward process but should be approached with caution. By accessing BIOS/UEFI and managing your security settings, you can easily turn off TPM and resolve specific application compatibility issues.
Before proceeding to disable this crucial feature, weigh the benefits and risks involved. Ensure you have all necessary backups and are aware of the implications this could have on your overall system security.
While hardware-based security solutions like TPM provide several benefits, the best choice for your particular situation should balance functionality and security. Always prioritize understanding the impact of system-level changes, and when in doubt, consult with professional IT support.
In recent years, Windows 11 has changed the landscape of personal computing, with its enhanced security features garnering both praise and criticism. One integral component of Windows 11’s security infrastructure is the Trusted Platform Module (TPM). Although TPM offers various benefits, such as improved encryption and secure boot processes, there may be instances where users want or need to disable this feature. Whether you are troubleshooting, configuring virtual machines, or simply prefer not to use TPM, here’s how to disable TPM on Windows 11 in detail.
Understanding TPM
Before diving into the steps for disabling TPM, it’s essential to understand what TPM is and its significance to the Windows 11 operating system. TPM is a hardware-based security feature embedded in the motherboard of many computers. It plays a crucial role in various security-related functions:
-
Data Encryption: TPM provides hardware-level protection for sensitive data through encryption. Windows BitLocker, for instance, uses TPM to facilitate full-disk encryption.
-
Secure Boot: This prevents unauthorized operating systems from loading during the boot process by verifying the integrity of the operating system against a set of trusted keys.
-
Storing Cryptographic Keys: TPM can securely store cryptographic keys and passwords, reducing the risk of exposure.
-
Platform Integrity: TPM helps ensure that the PC has not been compromised by malware by measuring the integrity of the system at each boot cycle.
Given these functions, it’s clear that disabling TPM can potentially expose your system to risks. Ensure you’re aware of the implications before proceeding.
Why Disable TPM?
There are several reasons users may wish to disable TPM on their Windows 11 systems:
-
Compatibility Issues: Certain applications or legacy software may not function correctly in the presence of TPM.
-
Virtualization Scenarios: Users running virtual machines may not need TPM and may find it easier to work without it.
-
Troubleshooting: Issues with dual-boot configurations or Windows installation can sometimes necessitate disabling TPM.
-
User Preference: Some users may prefer to manage their security settings without relying on TPM.
Prerequisites
Before you begin the process of disabling TPM, there are specific requirements and precautions to be aware of:
-
Admin Rights: You must have administrative privileges on your Windows 11 machine to make changes to system settings.
-
Backup Data: Be sure to back up any important data. While disabling TPM itself shouldn’t cause data loss, alterations to security settings can lead to unforeseen issues.
-
Understand Impact: Familiarize yourself with the implications of disabling TPM as it may affect features like BitLocker, Windows Hello, and more.
Steps to Disable TPM in Windows 11
The process of disabling TPM can be accomplished through different methods. Below, we’ll outline the commonly used methods: using Windows Settings, Device Manager, and BIOS.
Method 1: Disable TPM via Windows Settings
-
Open Windows Settings:
- Press
Windows + Ito open the Settings app.
- Press
-
Navigate to Privacy & Security:
- Click on «Privacy & security» in the sidebar.
-
Access Windows Security:
- Select «Windows Security» and then click on «Device security.»
-
Manage Security Processor:
- Under the «Security processor» section, click on “Security processor details.” Here, you will find information about your TPM.
-
Disable TPM:
- Note: Windows does not provide a direct toggle to disable TPM via the Settings interface. However, this information is essential before moving to the BIOS method.
Method 2: Disable TPM via Device Manager
-
Open Device Manager:
- Right-click the Start button or press
Windows + Xand select «Device Manager.»
- Right-click the Start button or press
-
Locate Security Devices:
- In Device Manager, scroll down and expand the section labeled «Security devices.»
-
Disable TPM:
- Right-click on «Trusted Platform Module 2.0» (or similar) and select «Disable device.» Confirm the action in the prompt that appears.
-
Restart Your Computer:
- Restart your machine for the changes to take effect. Note that while this method disables the TPM driver, it may not fully disable the hardware TPM.
Method 3: Disable TPM via BIOS/UEFI
For a complete and more effective disablement of TPM, the best practice is to access the BIOS or UEFI settings:
-
Restart Your Computer:
- Reboot your device and enter the BIOS/UEFI setup by repeatedly pressing a specific key during the boot process. This key varies by manufacturer but is often
F2,F10,Delete, orEsc.
- Reboot your device and enter the BIOS/UEFI setup by repeatedly pressing a specific key during the boot process. This key varies by manufacturer but is often
-
Locate the Trusted Computing Section:
- Once in the BIOS/UEFI menu, locate the “Security” tab or a section labeled “Trusted Computing” or “TPM Configuration.” Navigate through using your keyboard arrow keys.
-
Disable TPM:
- Select the option to disable TPM. The specific wording can vary, but it may read as «TPM Device,» «TPM Functionality,» or similar. Change the setting to «Disabled.»
-
Save Changes:
- After making changes, find the option to save and exit the BIOS/UEFI. This is often accomplished by pressing
F10or through the on-screen menu options.
- After making changes, find the option to save and exit the BIOS/UEFI. This is often accomplished by pressing
-
Boot into Windows:
- Your computer will reboot. Once back in Windows 11, you can confirm that TPM is disabled by following the steps in Method 1.
Verifying TPM Status
After completing the process, you may want to verify that TPM is indeed disabled:
-
Open Windows Security:
- Use the
Windows + Ishortcut to access the Settings app. Navigate to «Privacy & security» > «Windows Security» > «Device security.»
- Use the
-
Check Security Processor:
- Under the «Security processor» section, the status should indicate that the TPM is not present.
Troubleshooting Common Issues
Disabling TPM can be straightforward, but if you encounter challenges, consider the following troubleshooting tips:
-
Unable to Access BIOS: If you cannot enter the BIOS/UEFI settings, ensure you are pressing the correct key immediately after you turn on your computer. Consult your device manufacturer’s documentation if you are unsure.
-
Settings Revert After Restart: If you notice that TPM settings revert after a reboot, ensure you are saving the changes in BIOS/UEFI. Sometimes, disabling certain features may require an additional layer of confirmation.
-
Compatibility Problems: After disabling TPM, some applications, especially those relying on encryption, may not function properly. Re-enable TPM if you face significant compatibility issues.
Re-Enabling TPM
If you find that you need to re-enable TPM, the steps are essentially the reverse of what you’ve done:
-
Via BIOS/UEFI: Follow the steps outlined earlier to enter BIOS, navigate to the TPM setting, and enable it.
-
Via Device Manager: Navigate back to Device Manager, and under «Security devices,» right-click on «Trusted Platform Module 2.0» and select «Enable device.»
-
Update Settings: For settings accessed through Windows Security, confirm that TPM is active.
Conclusion
Disabling TPM on Windows 11 is a straightforward process, but it’s essential to weigh the pros and cons of doing so. Given its significant role in enhancing the security of Windows 11, consider the long-term implications on system security and the overall functionality of your computing environment. If you’re well-informed and prepared, disabling TPM can be a beneficial procedure for compatibility or troubleshooting reasons. Whenever possible, maintain backups and keep yourself informed about updates and features that may impact your security posture.
Want to use Rufus to disable TPM in Windows 11?
Windows 11 installation requires your PC to meet certain requirements such as Secure Boot, TPM 2.0, and more. So, unless your computer is compatible, you won’t be able to install the new version of the OS.
On the contrary, you can always avoid the system check by utilizing the registry hack and deleting the appraiserres.dll files from the Windows 11 ISO. This will allow you to download and install Windows 11 on any system that was not supported otherwise.
If you don’t want to spend too much time manually deleting the appraiserres.dll files, Rufus is a great tool available on GitHub for free. It supports bypassing the requirements to create a bootable USB flash drive. To learn how to use Rufus to disable TPM in Windows 11, this guide is all you need.
So without further ado, let’s get right to it!
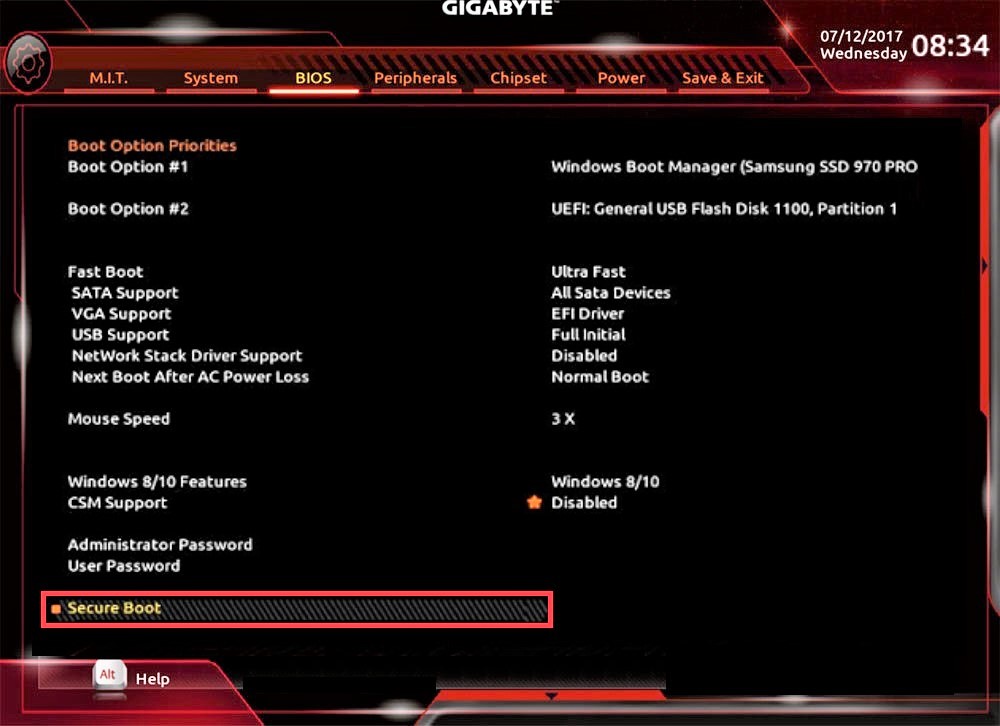
1. Disable the Secure Boot.
If, during the Windows 11 installation, your system detects the Secure Boot, it will continue to look for TPM 2.0 as well. This will fail the entire process, which would have been otherwise possible.
Therefore, prior to downloading Rufus to disable TPM in Windows 11, you need to check whether Secure Boot is enabled on your computer. If it is, use the BIOS menu to disable it. The BIOS menu differs for each manufacturer, so check their official webpage for a detailed guide.
2. Download the Latest Version of Rufus.
The bootable media creation tool, Rufus, was recently updated. The latest version allows you to disable TPM, Secure Boot, as well as RAM for a smooth and unhindered Windows 11 installation.
Here’s how to install Rufus on your computer:
- Either visit the Official Rufus Website or from the GitHub Page.
- Then, scroll down to find the latest version of Rufus available and click on it to download the file.
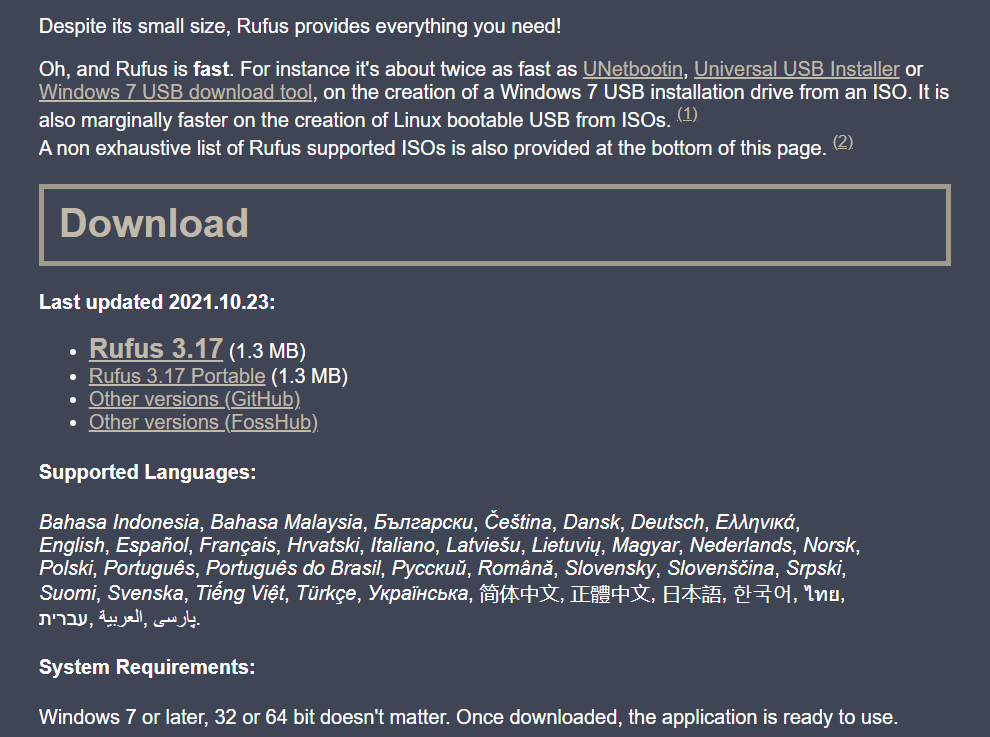
For this method to work, make sure you download version 3.17 or higher, although it was first available in version 3.16 Beta2.
3. Download Windows 11 ISO File.
Next, you need to download the Windows 11 ISO file from Microsoft. You can skip this step if you have already downloaded it before. Otherwise, follow the instructions below:
- First, launch the Microsoft Official ISO Download Page.
- Scroll down to where it says Download Windows 11 Disc Image (ISO).
- Then, click on the drop-down arrow next to Select Download and choose Windows 11 (multi-edition ISO) from the list.

- Now, click on the Download button.
- After that, choose a language by clicking on the drop-down arrow next to Choose one under Select the product language.
- Next, click on Confirm.
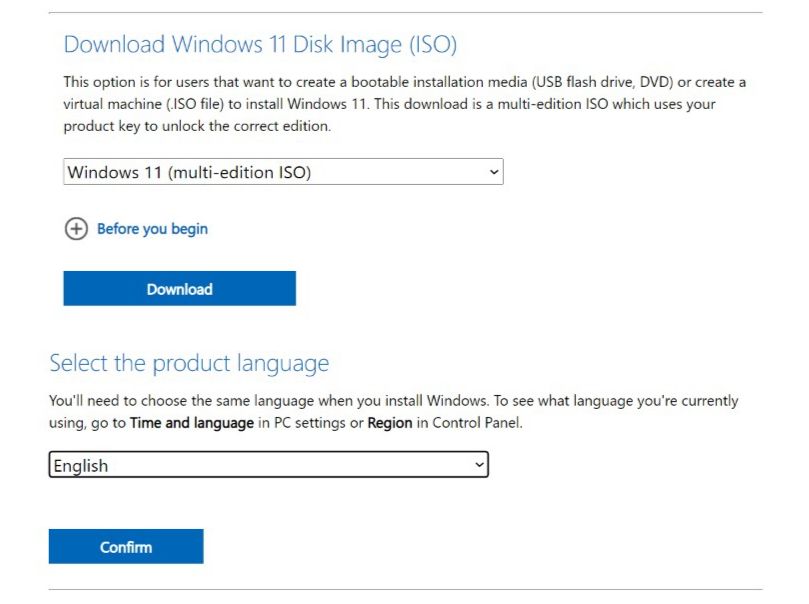
- Finally, click on 64-bit Download.
This will begin the download for Windows 11. Remember that the link will only be available for the next 24 hours and will expire afterward, so make sure to do it under this limited time, or else you’ll have to start over.
4. Plugin a USB Pen Drive and Run Rufus.
Once everything is downloaded, connect a USB flash drive of at least 8 GB free storage or more to your PC. While doing this, all the data on your flash drive will be erased, so make sure to back it up before proceeding. After that, follow the steps below:
- Begin by clicking on File Explorer and going to Downloads.
- Then, run Rufus by double-clicking on its executable file. As Rufus is a portable program, you won’t need to install it.
- When the pop-up box appears, grant admin access to Rufus.
- Rufus will now automatically detect the inserted USB flash drive, and its GUI interface will open. However, if you have more than one attached to your PC, click on the drop-down menu for Device and choose manually.
- Next, to insert the Windows 11 ISO file, click on Select under Boot selection.
- A File Explorer window will pop up. Navigate to Downloads where the Windows 11 ISO file is saved, select it, then click Open.
- After that, Rufus will detect the file inserted and give you two options in the drop-down menu for the Image option. Click on it and choose Extended Windows 11 Installation (no TPM / no Secure Boot) since we’re running it in non-supported hardware.
- Make sure to select GPT as the Partition scheme.
- Also, your Target system should be set to UEFI (non CSM).
- If you like, you can change the name of your USB pen drive under the Volume label.
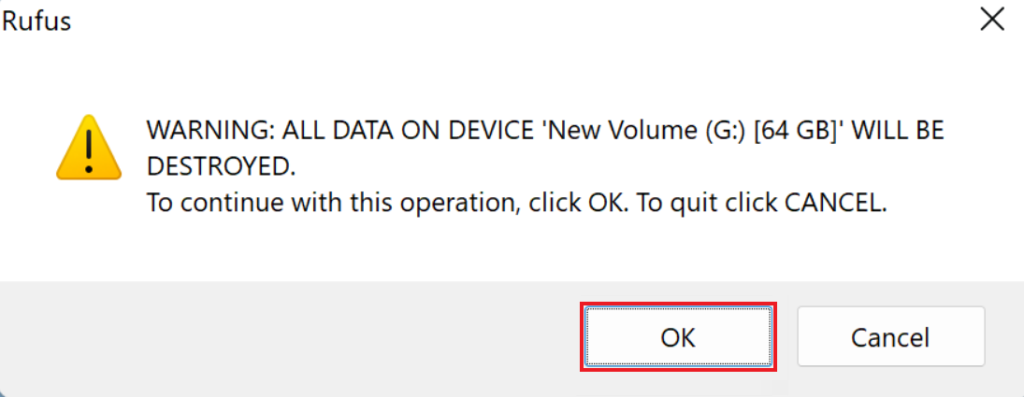
- When you’re ready to create the bootable USB drive to disable TPM, Secure Boot, and RAM, click on the Start button. Rufus will then ask to format the drive. Grant the permission by clicking on the OK button.
- Now, wait for the process to finish, as it will take some time. After that, an Important notice about Secure Boot will display on your screen. Click the Close button.
Now, you’ll notice the bar for Status will turn green, indicating that it is ready. You can then remove the USB pen drive from your PC and install Windows 11 on it.
5. Install Windows 11.
To install Windows 11, you first need to boot your computer into Safe Mode. Before doing so, save any unsaved task. Then, follow these simple steps:
- To shut down your PC, click on the Start menu, then click on the Power icon and choose Shut Down.
- Press the Power button to turn it back on.
- To enter the Boot Mode, press the F8 key at the boot screen.
- When the Choose an option blue screen appears, click on Use a device.
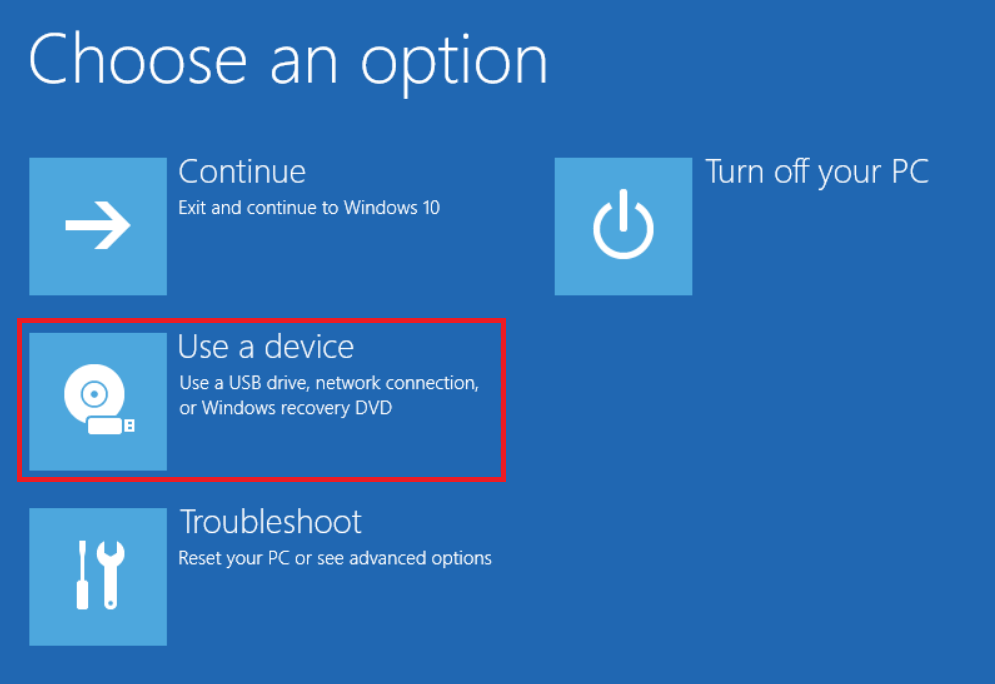
- Then, choose your USB drive.
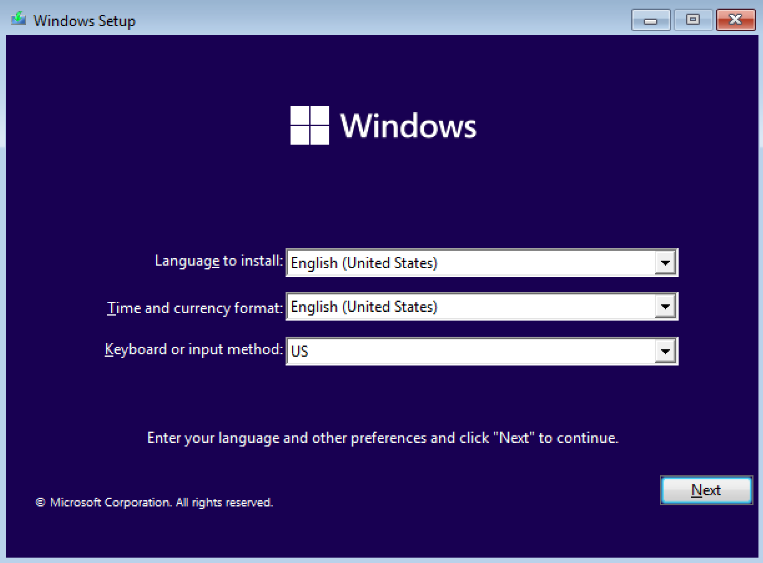
- This will take you to the Windows Setup wizard. Click on Next after selecting a language to proceed.
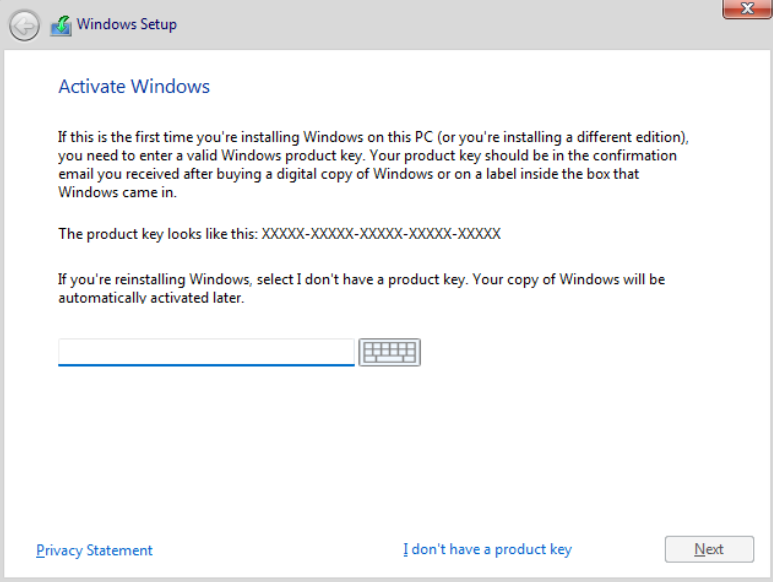
- Next, click on the Install Now button and enter your product key. If you don’t have it, click on I don’t have a product key at the bottom.
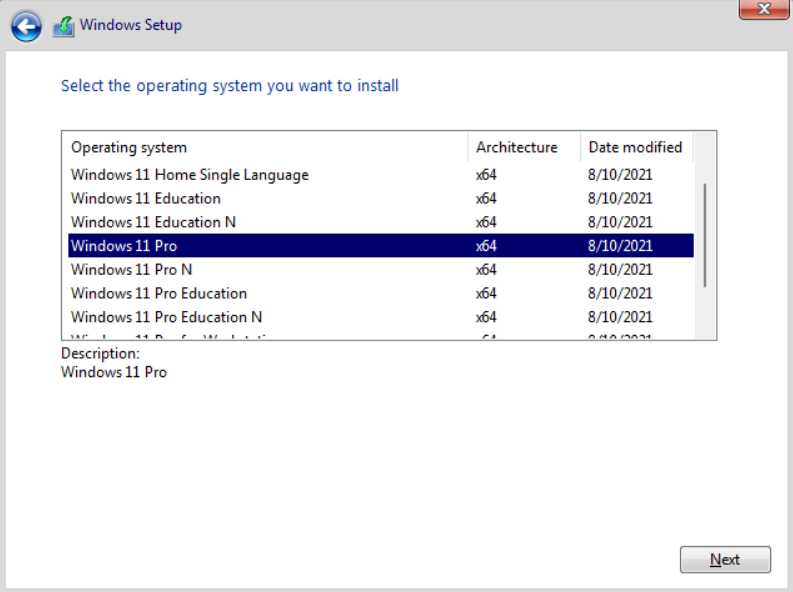
- Now, choose the Windows version you’d like to install on your PC and click on Next.
- After reading the Terms and Conditions, click on Next.
- You’ll then be prompted to either upgrade the Windows OS or start fresh. For the latter option, select Custom: Install Windows only, select the partition, and click on Next.
- Now, choose your country and click on Yes.

- Then, select the input method and click on Yes.
- Then, type a name for your PC and choose Next.
- After that, link your PC with your Microsoft account and click on Next.

- Continue following all the on-screen instructions until you come to the final installation screen with steps remaining with the percentage of their completion.
Once done, your PC will automatically restart, and you’ll have successfully Windows 11 running.
That’s it! Now you know how to use Rufus to disable TPM in Windows 11. If you’re still confused about anything, let us know through the comment section below. We’ll be happy to assist you further.
If this guide helped you, please share it. 🙂
-
Aimen Choudhry is an architecture student who has always been fascinated by science. She now finds her therapy researching and writing about the latest technology and the issues that come alongside. Otherwise, you’ll find her playing video games, listening to music, or watching fantasy/sci-fi movies.
View all posts