
Applies ToWindows 10
Мерцание экрана в Windows 11 обычно вызвано проблемой драйвера дисплея или несовместимыми приложениями. Чтобы определить, является ли драйвер отображения или приложение причиной проблемы, проверка, чтобы узнать, мерцает ли диспетчер задач. Затем, основываясь на этой информации, вам потребуется обновить, откатить или удалить драйвер дисплея, а также обновить или удалить приложение.
Для получения дополнительных сведений выберите любой из следующих заголовков, и он будет развернут, чтобы отобразить дополнительные сведения.
В некоторых случаях для сброса графического драйвера можно сбросить графический драйвер с помощью клавиш Windows + CTRL + SHIFT + B. Если это не поможет, попробуйте перезапустить устройство.
Нажмите клавиши CTRL + ALT + DELETE , чтобы открыть диспетчер задач. Если после нажатия Ctrl + Alt + Delete диспетчер задач не отображается, нажмите Ctrl + Shift + Esc, чтобы открыть диспетчер задач.
-
Если диспетчер задач мерцает и остальные элементы на экране тоже, возможно, причиной проблемы является видеодрайвер. В этом случае см. раздел Устранение неполадок с видеодрайвером.
-
Если диспетчер задач не мерцает, а остальная часть экрана мерцает, возможно, причиной проблемы является несовместимое приложение. В этом случае см. раздел Обновление или удаление несовместимого приложения.
Если возникают проблемы при просмотре изображения на экране, может потребоваться запустить компьютер в безопасном режиме и выполнить действия, описанные ниже.
Если из Центра обновления Windows недавно были установлены обновления на ваше устройство, откатите видеодрайвер до предыдущей версии. Либо попробуйте обновить или удалить видеодрайвер, чтобы устранить проблему с мерцанием экрана или искажением изображения на экране.
Откат видеодрайвера
-
В поле поиска на панели задач введите диспетчер устройств, а затем выберите его в списке результатов.
-
Щелкните стрелку, чтобы развернуть раздел Видеоадаптеры.
-
В разделе Видеоадаптеры щелкните правой кнопкой мыши адаптер и выберите пункт Свойства.
-
Перейдите на вкладку Драйвер и выберите Откатить > Да.
-
Перезагрузите устройство.
Примечания:
-
Чтобы выполнить откат или удалить пакет драйверов через диспетчер устройств, у вас должны быть права администратора.
-
Если пункт Откатить недоступен, это значит, что в Windows отсутствует предыдущая версия драйвера, к которой требуется вернуться, и вы не сможете завершить этот процесс.
Обновление видеодрайвера
-
В поле поиска на панели задач введите диспетчер устройств, а затем выберите его в списке результатов.
-
Щелкните стрелку, чтобы развернуть раздел Видеоадаптеры.
-
В разделе Видеоадаптеры щелкните адаптер правой кнопкой мыши и выберите Обновить драйвер.
Примечание: Чтобы скачать последнюю версию драйвера на устройство, возможно, вам придется связаться с производителем компьютера или видеоадаптера.
Удаление видеодрайвера
-
В поле поиска на панели задач введите диспетчер устройств, а затем выберите его в списке результатов.
-
Щелкните стрелку, чтобы развернуть раздел Видеоадаптеры.
-
В разделе Видеоадаптеры щелкните правой кнопкой мыши адаптер и выберите пункт Свойства.
-
Перейдите на вкладку Драйвер и выберите Удалить устройство.
-
Установите флажок Попытка удаления драйвера для этого устройства проверка и нажмите кнопку ОК.
-
Перезапустите устройство, и Windows попробует снова установить драйвер.
Примечание: Если вы не видите флажок Попытка удаления драйвера для этого устройства проверка, переведите компьютер в безопасном режиме.
Обновление приложения
-
Если приложение было приобретено в Microsoft Store, проверьте наличие обновлений для приложения в Microsoft Store.
-
Если приложение было получено не из Microsoft Store, проверьте наличие обновлений на сайте разработчика.
Удаление приложения
Некоторые приложения могут быть несовместимы с Windows 11 и могут вызвать мерцание или схватку экрана. Попробуйте удалить приложение, выполнив следующие действия.
-
Выберите Параметры начального > > Приложения > приложения & функции. Через несколько минут отобразятся установленные приложения.
-
Прокрутите список и найдите приложение, которое нужно удалить.
-
Выберите его, затем нажмите Удалить > Удалить. Если вам будет предложено подтвердить выбор, выберите Да.
После удаления первого приложения перезапустите устройство и проверьте, мерцает ли экран и искажено ли изображение на экране. Если проблема сохраняется, удалите все приложения одно за другим, пока проблема не будет устранена.
Повторная установка приложения
-
Выберите Microsoft Store в меню «Пуск».
-
Выберите Библиотека.
-
Выберите приложение, которое нужно переустановить, а затем выберите Установить.
Если приложение было скачано не из Microsoft Store, переустановите его с сайта разработчика.
Нужна дополнительная помощь?
Нужны дополнительные параметры?
Изучите преимущества подписки, просмотрите учебные курсы, узнайте, как защитить свое устройство и т. д.
How to Fix Screen Flickering and Flashing on Windows 10 and 11
Screen flickering and flashing can be a persistent issue for Windows 10 and 11 users, leading to frustration and decreased productivity. Whether it’s caused by hardware or software problems, understanding and addressing these issues is crucial for a smooth computing experience. This article will guide you through common causes of screen flickering and provide a comprehensive list of troubleshooting methods to resolve the problem.
Understanding Screen Flickering
Before diving into solutions, it’s essential to understand what screen flickering is. Screen flickering refers to the rapid and repeated changes in brightness that can affect the display on your monitor or laptop screen. It may appear as a series of horizontal lines, blinking, or a jittery image — and it can be particularly annoying during gaming, watching videos, or working on graphic-intensive tasks.
Common Causes of Screen Flickering
- Update Conflicts: Installation of new software or Windows updates can lead to conflicts, often resulting in flickering screens.
- Outdated Graphics Drivers: Drivers that control your graphics hardware can become outdated or corrupted, causing display issues.
- Display Settings Issues: Incorrect display settings or misconfigured resolutions might lead to instability in the graphical output.
- Hardware Problems: Malfunctions in the monitor, cables, or hardware components can also result in flickering.
- Third-Party Applications: Certain applications, especially those that affect display or graphics, can cause flickering.
- Faulty Display Refresh Rate: Mismatched refresh rates between the monitor and graphics card can lead to instability.
Steps to Diagnose and Fix Screen Flickering
Below are a variety of troubleshooting steps to help diagnose and resolve screen flickering and flashing issues on your Windows 10 and 11 devices.
Step 1: Check Your Monitor Connections
Start by inspecting the physical connections:
- Cable Check: Ensure that the video cable connecting your monitor to your computer is securely connected. If the cable is loose, it can cause instability.
- Replace Cables: Consider replacing the cable (HDMI, DisplayPort, etc.) to rule out any defects. Damaged cables can transmit data inconsistently, leading to flickering.
- Monitor Test: Connect your computer to a different monitor or use your monitor with another computer to see if the flickering persists. If it does, it might be a hardware issue with the monitor itself.
Step 2: Restart Your Computer
Sometimes, a simple restart can solve temporary issues arising from recent updates, application launches, or background processes that conflict with display functions. Reboot your computer and check if the flickering continues.
Step 3: Update Graphics Drivers
Keeping your graphics drivers up to date is critical for optimal performance. Here’s how to update them:
- Open Device Manager: Right-click on the Start button and select «Device Manager.»
- Locate Display Adapters: Expand the «Display adapters» section.
- Update Driver: Right-click on your graphics card and select «Update driver.» Choose «Search automatically for updated driver software.» Follow the prompts if an update is found.
- Reboot Your System: After updating, restart your computer to apply changes.
Alternatively, you can visit the manufacturer’s website for your graphics card (e.g., NVIDIA, AMD, Intel) and download the latest driver directly.
Step 4: Adjust Display Settings
Incorrect display settings can lead to flicker. Here’s how you can adjust them:
- Right-click on Desktop: Then click on «Display settings.»
- Verify the Resolution: Under «Display resolution,» ensure that the setting is marked as «Recommended.»
- Refresh Rate Adjustment: Scroll down and click on «Advanced display settings.» Here, check your refresh rate and ensure it matches your monitor’s specifications. For most monitors, 60Hz is typical; gaming monitors might allow up to 144Hz or higher.
- Scaling Options: Sometimes, incorrect scaling can also lead to flickering. Adjust the scaling settings under “Scale and layout” to 100% or the recommended setting.
Step 5: Disable Hardware Acceleration
Some applications use hardware acceleration to improve performance, but this feature may cause flickering. To disable hardware acceleration:
-
For Chrome:
- Open Chrome and click on the three dots in the upper right corner.
- Go to Settings > Advanced > System.
- Toggle off «Use hardware acceleration when available.»
-
For Other Software: Similar options can often be found in the settings of other applications like Discord, Microsoft Edge, and certain multimedia players.
Step 6: Check for Windows Updates
Ensuring your Windows OS is updated can eliminate bugs and issues that lead to display problems:
- Open Settings: Press
Windows + Ito open settings. - Go to Update & Security: Click on «Check for updates.»
- Install Available Updates: If updates are available, install them. Restart your computer after completion.
Step 7: Run the Windows Troubleshooter
Windows has built-in troubleshooters that can help detect display issues:
- Open Settings: Press
Windows + I. - Go to Update & Security > Troubleshoot.
- Run Troubleshooter: Select «Additional troubleshooters,» then choose «Hardware and Devices» and run the troubleshooter.
Step 8: Check for Third-Party Applications
Some third-party applications can cause interference with display functions. Programs that alter screen settings or graphics can have adverse effects and should be temporarily disabled to check for improvement:
- Boot your computer in Safe Mode:
- Hold down Shift and click the Restart button from the Start menu.
- Select Troubleshoot > Advanced options > Startup Settings > Restart.
- Choose Safe Mode with Networking once it reboots.
If the flickering goes away in Safe Mode, a third-party application is likely the culprit. Identify and uninstall or disable those applications one by one until the issue is resolved.
Step 9: Change Display Adapter Properties
- Right-click on Desktop: Choose “Display settings.”
- Advanced Display Settings: Scroll down and click «Advanced display settings.”
- Display Adapter Properties: Click on “Display adapter properties for Display 1.”
- Monitor Tab: Switch to the «Monitor» tab and ensure the refresh rate is appropriate.
Step 10: Reset Graphics Driver
Sometimes, resetting the graphics driver can solve flickering issues without requiring a full restart. Press Windows + Ctrl + Shift + B to refresh the graphics driver. You should hear a beep or see your screen flicker, indicating that the refresh has occurred.
Step 11: Adjust or Reinstall Display Drivers
If all else fails, uninstalling and reinstalling drivers may help:
- Open Device Manager: Right-click the Start button and select it.
- Display Adapters: Go to «Display adapters,» right-click on your graphics driver, and select «Uninstall device.»
- Reboot Your Computer: After uninstalling, restart your computer. Windows should automatically reinstall the necessary drivers.
Step 12: Hardware Diagnosis
If screen flickering continues after software troubleshooting:
- Test Hardware: Consult with your manufacturer’s website for diagnostic tools that come with your hardware. Diagnostics can often reveal issues with the GPU or system resources.
- Consider Professional Help: If potential hardware issues are detected, consider contacting a professional technician for further diagnosis and repair.
Step 13: System Restore
A System Restore may revert your system back to an earlier point before the flickering began:
- Search for System Restore in the Windows search bar and select “Create a restore point.”
- System Restore: Click on the “System Restore” button and select a restore point prior to the issue arising.
This process may take some time and can potentially resolve the flickering if it began after an update or installation.
Step 14: Perform a Full Upgrade or Reinstall
If the flickering persists despite all troubleshooting, a clean install of Windows 10 or Windows 11 might be your last resort. Make sure to back up all important data before proceeding, as this process will erase all existing data from your system. Follow Microsoft’s guidelines for upgrading or reinstalling your operating system.
Conclusion
Screen flickering and flashing on Windows 10 and 11 can stem from various issues, from minor software conflicts to significant hardware problems. Luckily, the steps mentioned above provide a comprehensive approach to diagnosing and rectifying these issues.
By methodically working through the potential causes and fixes, you can restore the reliability and performance of your display. Whether you choose to update your graphics drivers, adjust your display settings, or consult with a professional, you should be able to eliminate screen flickering and enjoy a smoother computing experience.
Все способы:
- Способ 1: Проверка проводов и подключения монитора
- Способ 2: Перезапуск «Диспетчера окон рабочего стола»
- Способ 3: Решение проблем с драйвером графического адаптера
- Вариант 1: Использование фирменного софта
- Вариант 2: Использование предустановленного ПО
- Вариант 3: Удаление драйвера
- Способ 4: Установка ПО для монитора
- Способ 5: Смена герцовки монитора
- Способ 6: Удаление последнего обновления
- Вопросы и ответы: 1
Способ 1: Проверка проводов и подключения монитора
Если вы используете персональный компьютер и отдельный монитор, то есть смысл сначала проверить корректность подключения устройств. Попробуйте отсоединить кабель HDMI, Display Port или VGA как от экрана, так и от видеокарты ПК, затем снова плотно соединить.
Читайте также: Подключение монитора к компьютеру
Для проверки можете использовать и другой монитор, если есть такая возможность. Кроме того, осмотрите сам провод на наличие заломов и механических повреждений – нередко проблема с мигающим экраном связана с неисправным шнуром, а по случайности дисплей начал мигать именно после обновления операционной системы, хотя на самом деле причина совсем не в апдейтах.
Если с проводами и подключением монитора ПК все в порядке, переходите к следующим способам, где описаны методы решения программных проблем.
Способ 2: Перезапуск «Диспетчера окон рабочего стола»
После обновления Windows 11 может сбиться работа «Диспетчера окон рабочего стола», отвечающего за визуализацию в системе. Когда служба работает нестабильно, тогда и могут начаться проблемы с отображением графики, в том числе мерцания или мигания экрана. Попробуйте перезапустить «Диспетчер окон рабочего стола» — достаточно просто завершить фоновый процесс, после чего служба снова автоматически запустится.
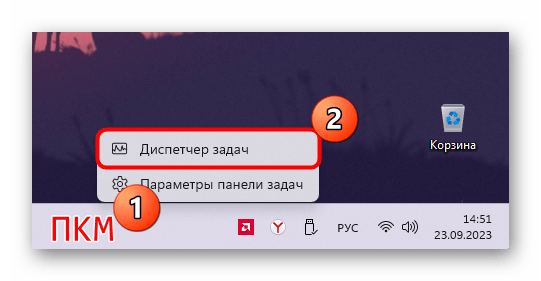
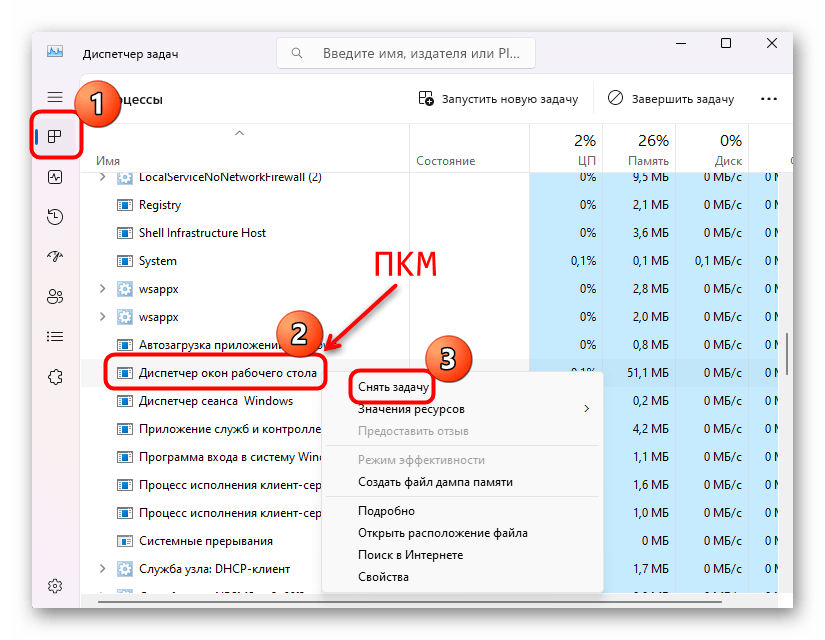
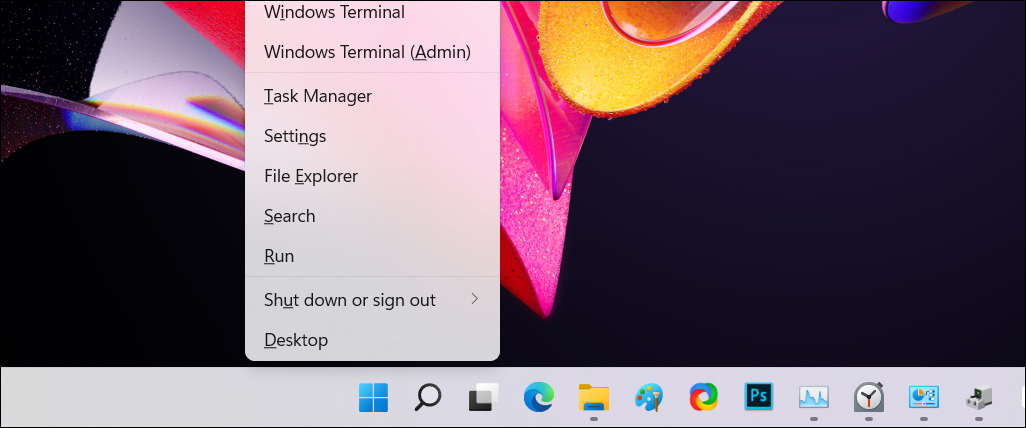
- Откройте «Диспетчер задач», кликнув по рабочей панели Windows 11 правой кнопкой мыши и выбрав соответствующий пункт из контекстного меню.
- На вкладке «Процессы» в разделе «Фоновые процессы» найдите строку «dwm.exe» или «Диспетчер окон рабочего стола», нажмите правой кнопкой мыши по ней и выберите «Снять задачу».
- Подтвердите действие.
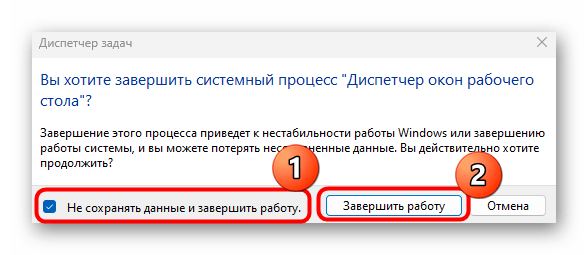
При подтверждении не забудьте отметить опцию «Не сохранять данные и завершить работу». Таким образом, вы сбросите возможные ошибки в работе службы.
Способ 3: Решение проблем с драйвером графического адаптера
Большинство неисправностей, связанных с графическим отображением после установки обновлений в Windows 11, связано с программным обеспечением видеокарты. Вероятно, после установки системных апдейтов было сброшено состояние драйверов или ОС перешла на те, которые были предложены по умолчанию. Есть несколько способов исправить ситуацию с драйверами графического адаптера.
Вариант 1: Использование фирменного софта
Большинство проблем с отображением графики и работой монитора решаются после ручного обновления драйвера для видеоадаптера. Как правило, для этого используется фирменное программное обеспечение от производителей AMD или NVIDIA. Также может потребоваться вручную найти нужный софт или использовать сторонние приложения для обновления драйверов. Обо всех способах мы писали в отдельном материале на сайте.
Подробнее: Обновление драйвера видеокарты в Windows 11

Вариант 2: Использование предустановленного ПО
Можете попробовать установить рекомендуемой системой программное обеспечение для видеокарты. Как правило, в Windows 11 такой драйвер уже готов для инсталляции.
Кстати, также этот метод поможет избежать конфликтов программного обеспечения при последующей установке драйверов вручную или с помощью фирменного софта. Стандартный драйвер также можно использовать в качестве основного тем людям, кто не нуждается в дополнительном ПО от производителя видеокарты, или временно, например при несовместимости обновленной операционной системы с последней версией ПО от производителя видеокарты (то есть для ожидания исправления ошибки или поиска предыдущей, совместимой версии драйвера).
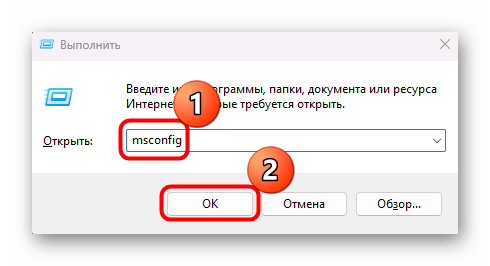
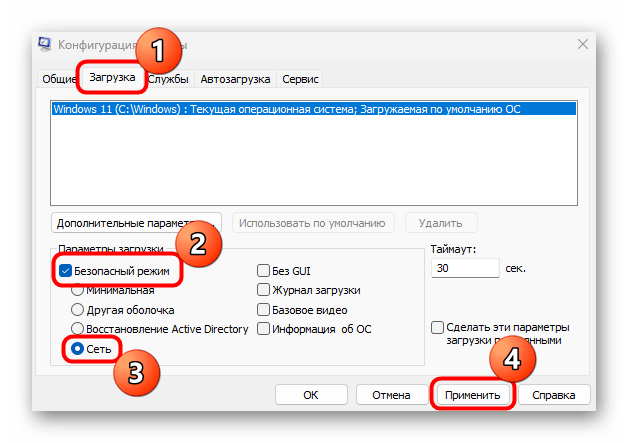
- Запустите Windows 11 в «Безопасном режиме». Для этого откройте оснастку «Конфигурация системы» — нажмите одновременно на клавиши «Win + R», затем в текстовом поле введите
msconfigи нажмите на кнопку «ОК». - На вкладке «Загрузка» отметьте пункт «Безопасный режим» и установите маркер у «Сеть», чтобы в «Безопасном режиме» были активны сетевые драйверы. Кликните по «Применить» и подтвердите перезагрузку системы.
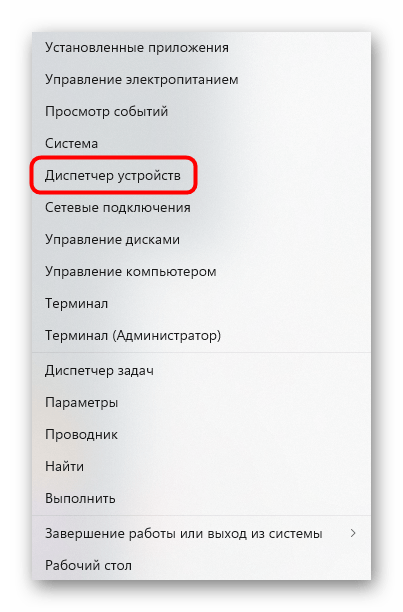
- Находясь в «Безопасном режиме», запустите «Диспетчер устройств». Для этого кликните по «Пуску» правой кнопкой мыши и выберите нужное.
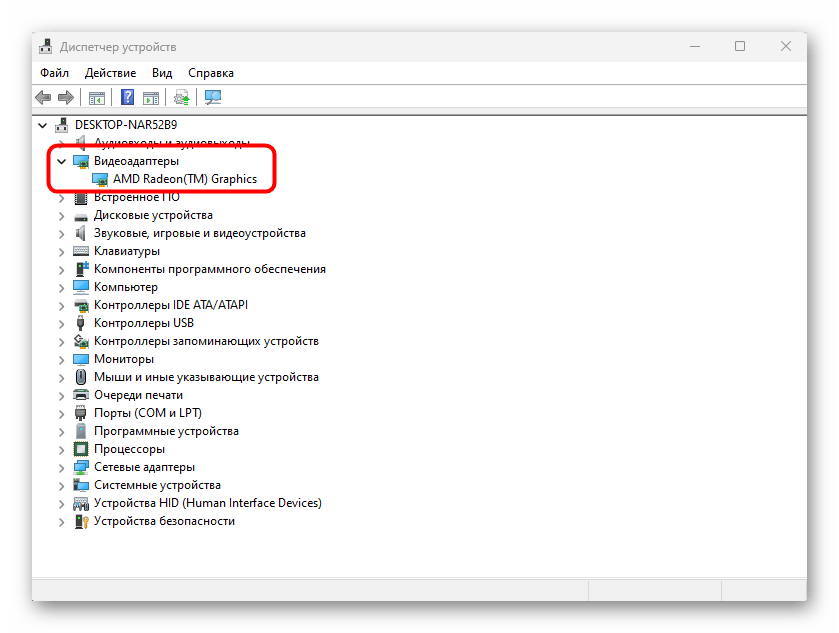
- Разверните меню «Видеоадаптеры» и дважды кликните по названию используемого устройства.
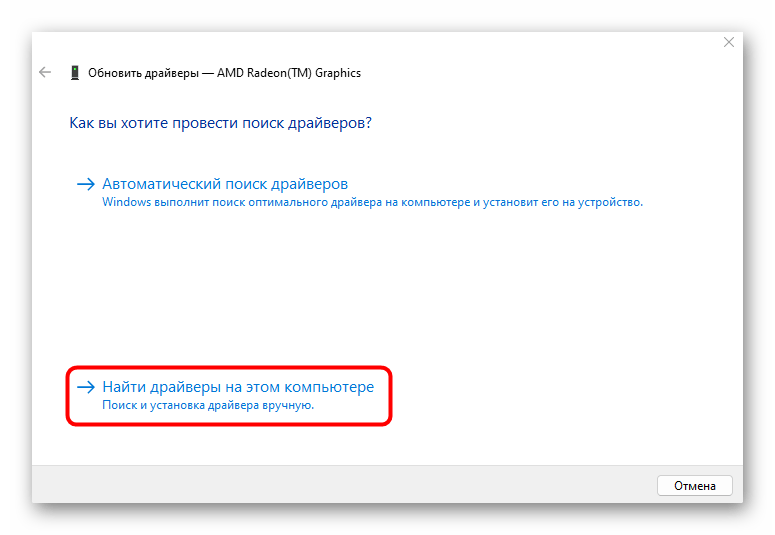
- Перейдите на вкладку «Драйвер» и выберите кнопку «Обновить драйвер».
- В новом окне кликните по строке «Найти драйверы на этом компьютере».
- На следующем шаге нажмите на «Выбрать драйвер из списка доступных драйверов на компьютере».
- Мастер установки драйвера предложит несколько версий ПО, одна из которых является фирменной, а другая – стандартной. Сначала выберите первую, перезагрузите ПК и проверьте, не ушла ли проблема с экраном.

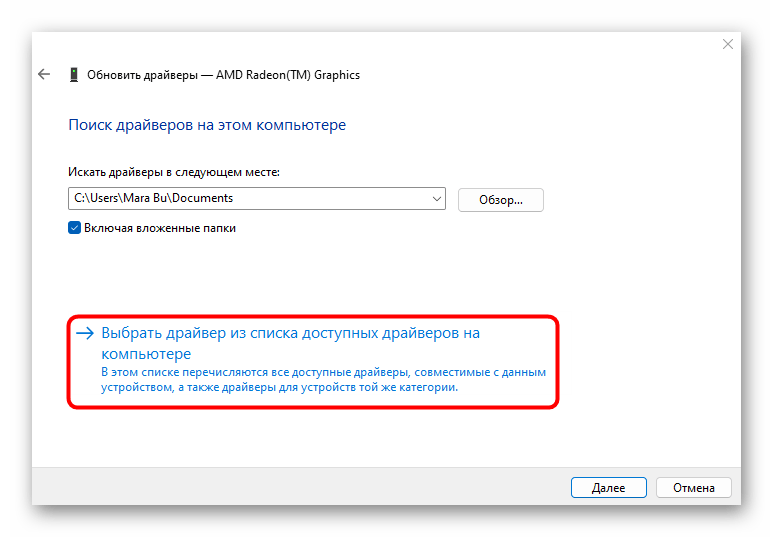

Если экран продолжает мигать, тогда может потребоваться проделать то же самое, но установить при этом стандартное программное обеспечение – «Базовый видеоадаптер (Майкрософт)».
Читайте также: Как выйти из безопасного режима в Windows 11
Вариант 3: Удаление драйвера
Еще один метод, который может помочь исправить программную ошибку с отображением графики, — это удаление драйвера для видеоадаптера. Если проблема пропала после установки базового программного обеспечения для компонента, то почти наверняка дело в фирменном софте. Попробуйте поэкспериментировать, удаляя версии ПО и устанавливая новые/прошлые. Вероятно, дело в самих драйверах, а, например, предыдущая версия исключит различные конфликты в системе и позволит компьютеру работать стабильно.
Чтобы удалить драйвер видеоадаптера, так же, как и в предыдущем варианте, загрузитесь в «Безопасном режиме», затем откройте «Диспетчер устройств» и кликните правой кнопкой мыши по компоненту. Из контекстного меню выберите пункт удаления и подтвердите действие.
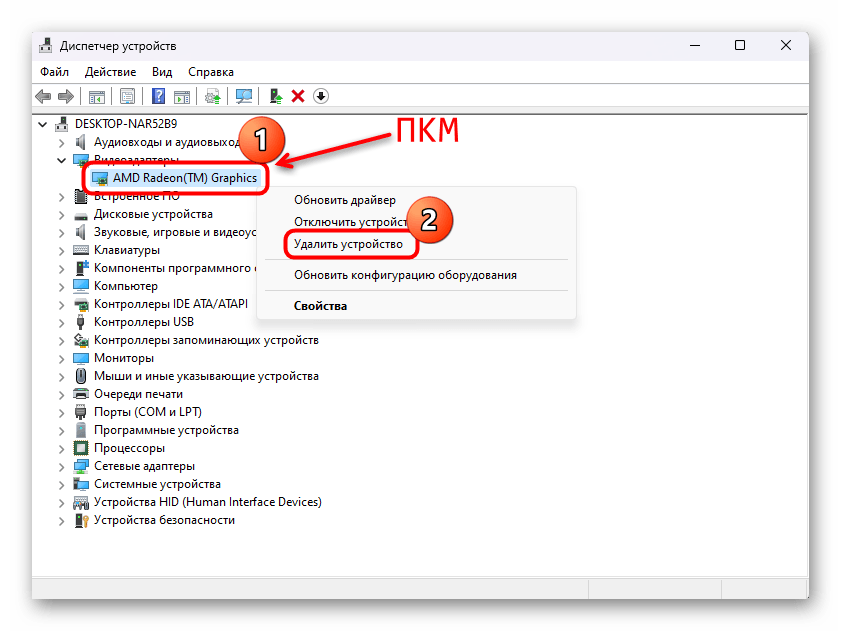
Базовый видеодрайвер установится автоматически, а сторонний лучше всего загрузить с сайта производителя комплектующего.
Читайте также:
Удаление / переустановка драйвера видеокарты
Как найти предыдущую версию драйвера по ID оборудования
Способ 4: Установка ПО для монитора
То же самое касается и монитора в случае с персональным компьютером. Все современные устройства автоматически устанавливают драйверы в систему, но иногда после обновления Windows 11 какие-то файлы могли повредиться.
Алгоритм действий похож на инструкции по установке драйверов для видеокарты, в особенности встроенной. Попробуйте воспользоваться «Диспетчером устройств» и функцией обновления драйвера у устройства, которое располагается в меню «Мониторы».
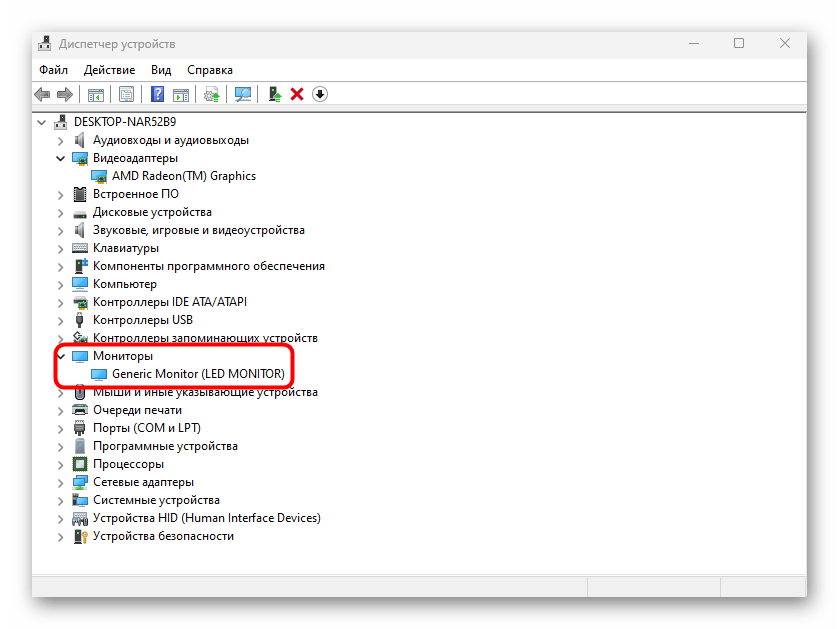
Если это не помогло, попытайтесь удалить устройство из «Диспетчера устройств», затем перезагрузить компьютер. Как правило, после перезапуска все необходимое программное обеспечение будет установлено автоматически.
Способ 5: Смена герцовки монитора
Моргание экрана могут вызывать разогнанные или даже просто повышенные частоты обновления экрана. Соответственно, если вы пробовали разогнать частоту развертки, для проверки этой теории измените значение до стандартного, поддерживаемого монитором. Даже если вы не пробовали заниматься ничем подобным, все равно проверьте текущее значение и при необходимости понизьте его, поскольку некоторые устройства могут работать на максимальных значениях уже с завода. Делается это через раздел с настройками системы:
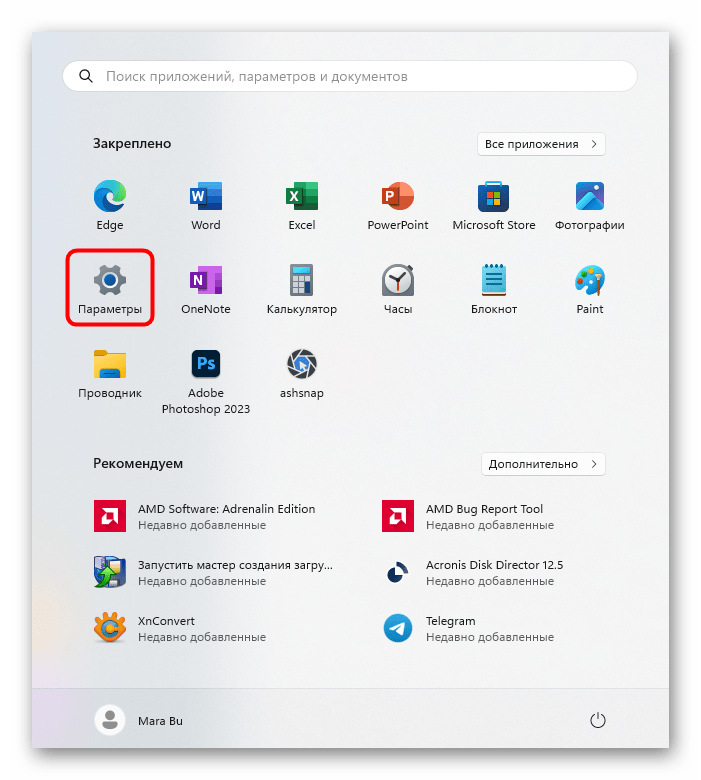
- Нажмите на кнопку «Пуск» и вызовите приложение «Параметры».
- На вкладке «Система» кликните по строке «Дисплей», расположенной в центральной части окна.
- Пролистайте меню до блока «Сопутствующие параметры» и выберите пункт «Расширенные параметры дисплея».
- В строке «Выберите частоту обновления» можно вызвать выпадающее меню и нажать на иное значение.
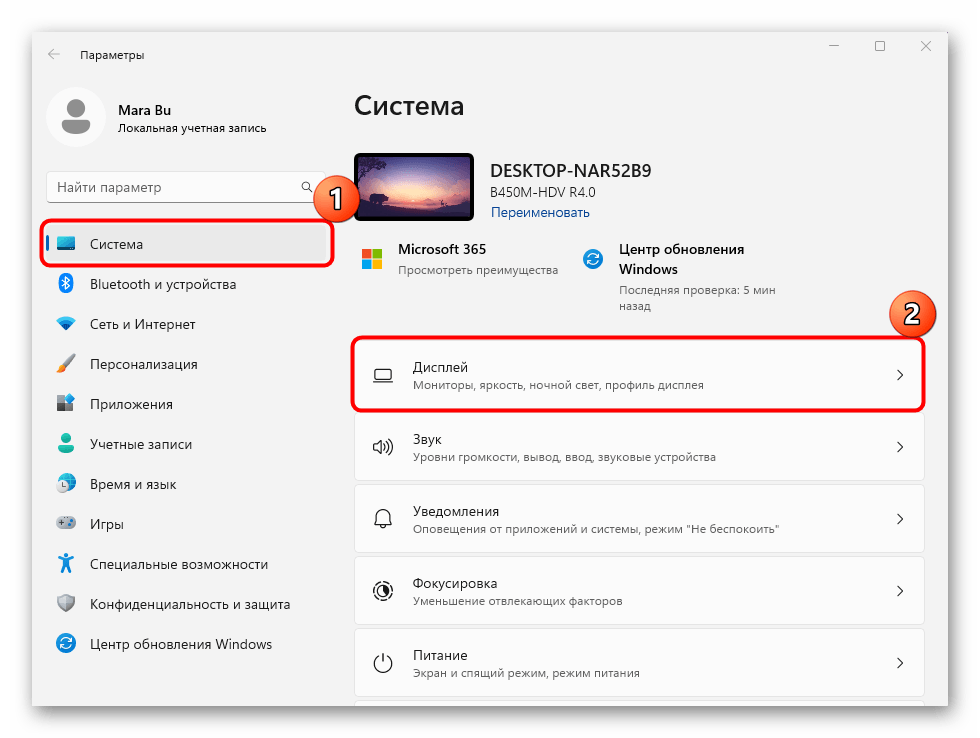
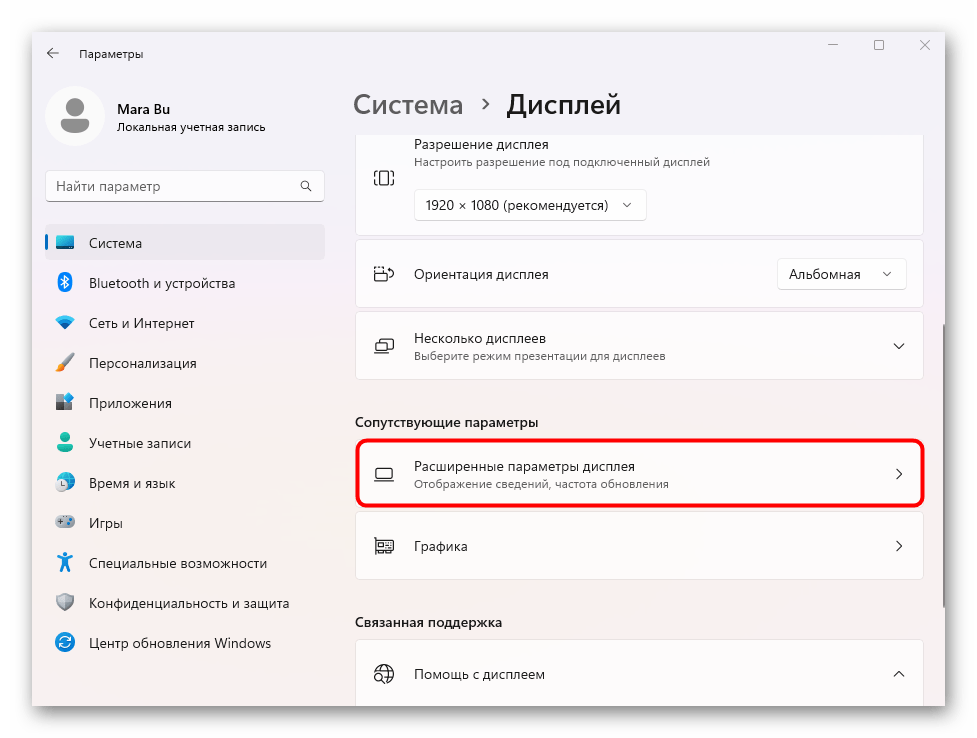

Если такой функции у вас нет, значит, монитор не поддерживает смену герцовки. В случае когда такая возможность есть, попробуйте изменить ее (уменьшить или увеличить), затем проверить, ушла ли проблема.
Способ 6: Удаление последнего обновления
Как ни банально, но причиной моргающего экрана может стать и само недавно установленное обновление. Если ничего из вышеперечисленного вам не помогло и кажется, что дело не в системе и программных компонентах, можете попробовать удалить апдейт. Вероятно, он установился некорректно, или же проблема на стороне разработчика, из-за чего придется ждать исправления или новой версии Windows 11.
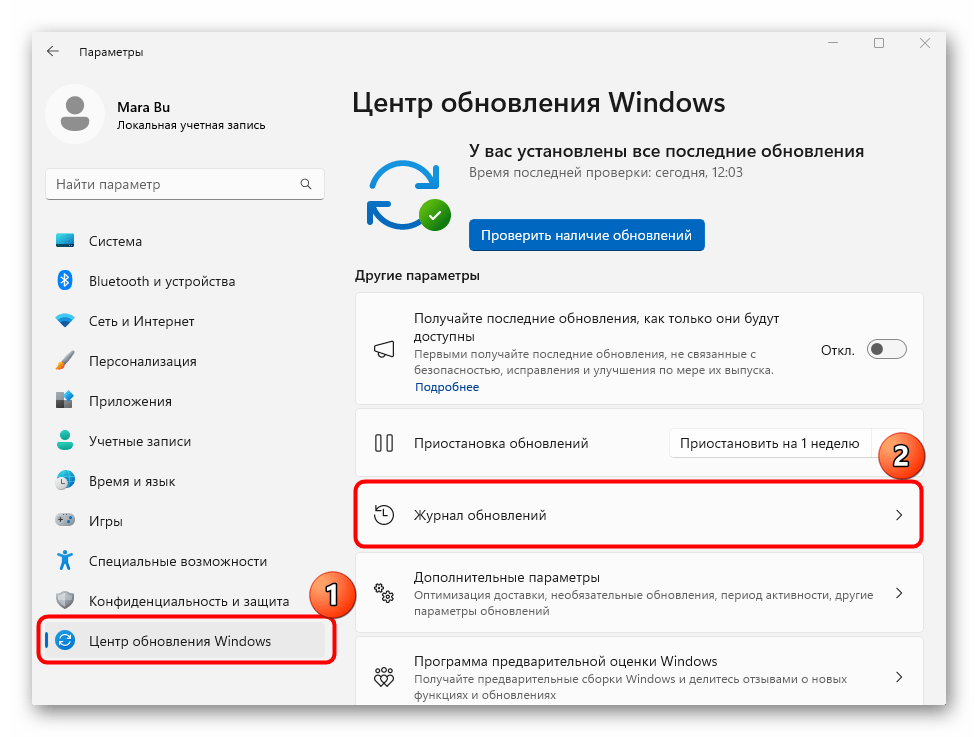
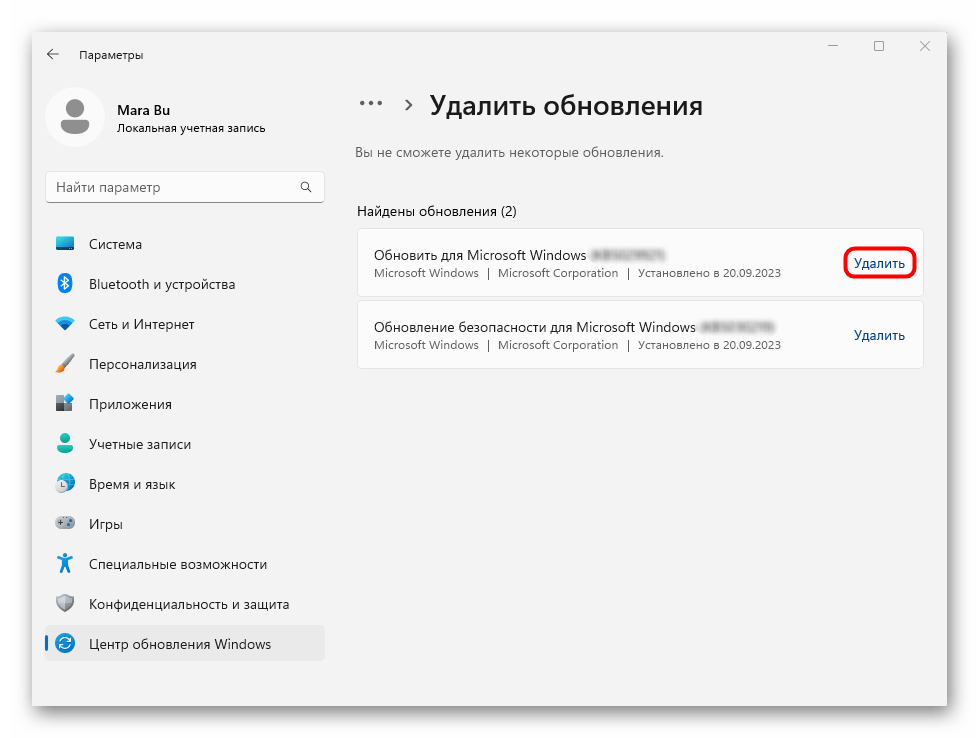
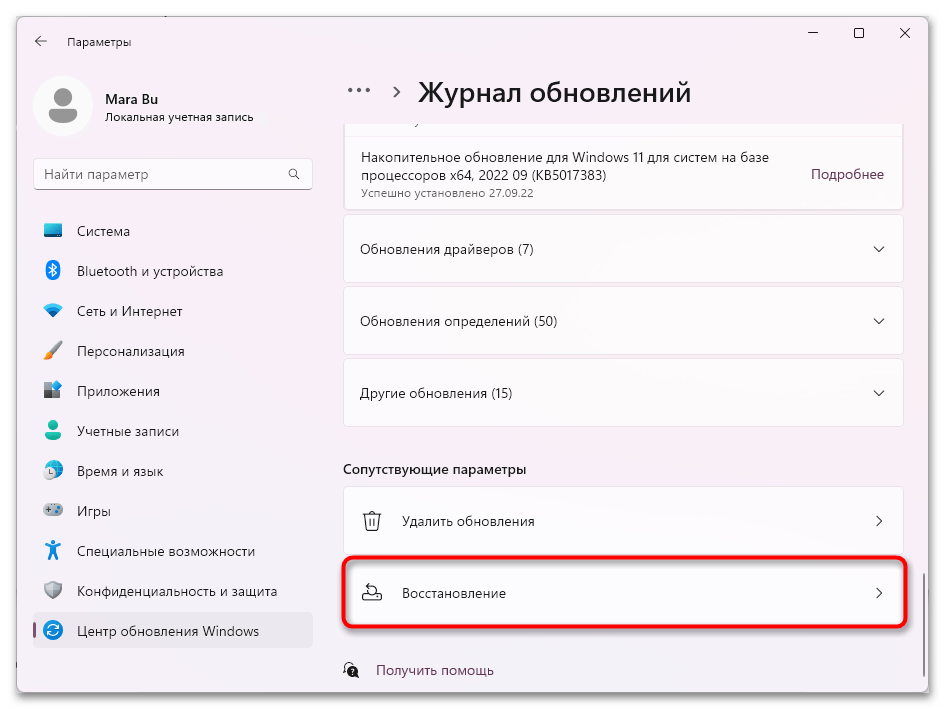
- Через системные «Параметры» перейдите на вкладку «Центр обновления Windows». Нажмите на строку «Журнал обновлений».
- Пролистайте список апдейтов и в блоке «Сопутствующие параметры» кликните по строке «Удалить обновления».
- Посмотрите, какое обновление было установлено недавно (около названия указывается дата), затем нажмите на кнопку «Удалить».
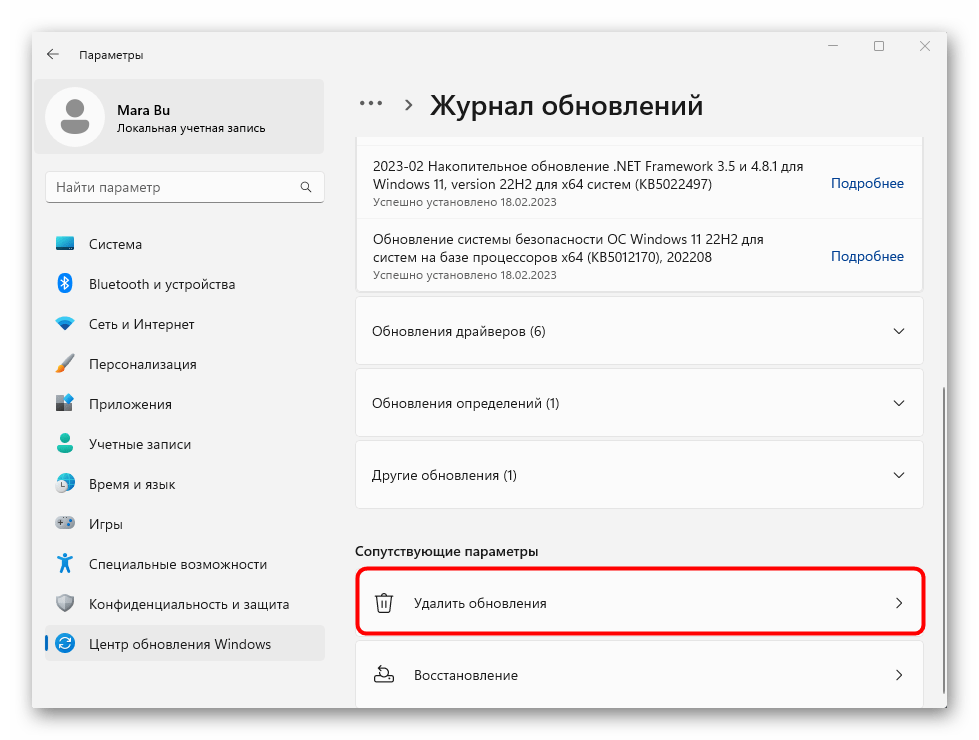
Останется дождаться завершения деинсталляции, перезагрузить компьютер и проверить работу системы, в частности экрана. Если все в порядке, значит, проблема была в апдейтах.
При установке крупного обновления вместо рассмотренных выше действий нужно произвести немного другие:
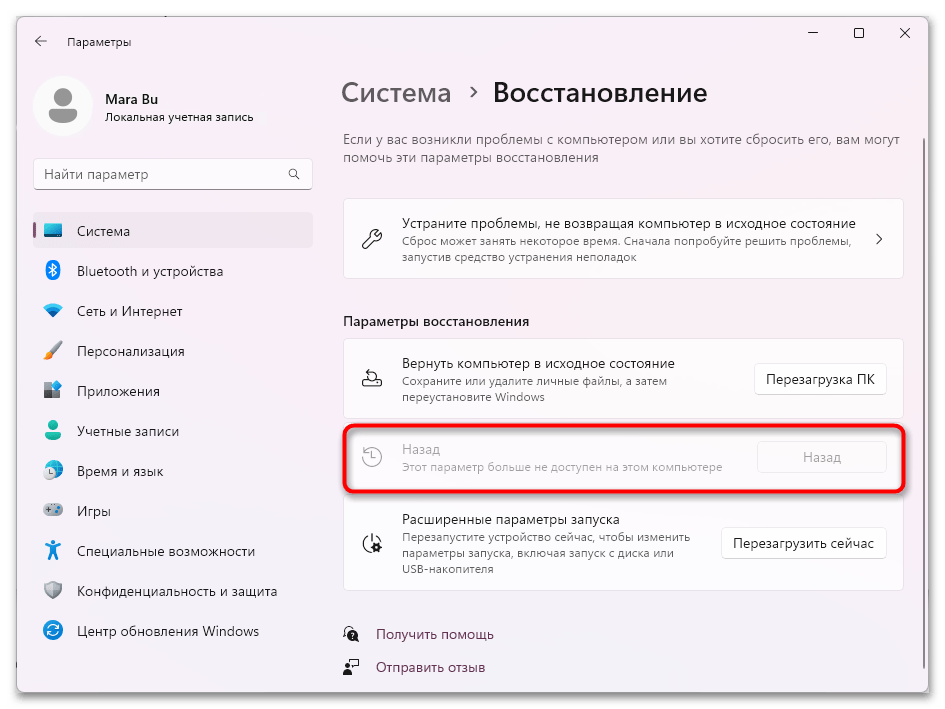
- Находясь в «Параметры» > «Центр обновления Windows» > «Журнал обновлений» перейдите в «Восстановление».
- Если тут доступна кнопка «Назад», нажмите ее и выполните все дальнейшие действия, которые рекомендует ОС. При условии, что кнопка неактивна, значит, было установлено не крупное обновление ОС или с момента установки обновления прошло 10-15 дней, после которых откат становится невозможным.

Наша группа в TelegramПолезные советы и помощь
Steps to fix windows 11 screen flickering in some apps
Fix 1. Check for Loose Connections and Monitor
The first thing you should do is to check if the connections between your CPU and monitor are loose. To do so, you can disconnect the wire/cable and reconnect them to monitor properly. If the Windows 11 screen flashing still appears, it may indicate that the wire/cable may be damaged, then you need to replace the cable with a new one. In addition, you can connect the cable/wire to another monitor to ensure that it’s indeed faulty.
Fix 2. Disable the Dwm.exe Process in Task Manager
Desktop Window Manager (dwm.exe) is responsible for enabling visual effects on your desktop. However, some users report that this process sometimes freezes and starts working incorrectly, which can cause screen flickering in Windows 11. To fix the issue, you can try disabling dwm.exe in Task Manager.
Step 1. Press Ctrl + Shift + ESC keys to open Task Manager and click on More details.
Step 2. In the Processes tab, right-click Desktop Window Manager and select End task. Then you can refer to the steps to end other conflicting processes.
Greeting,
Rachel Gomez
A bad display driver or an incompatible app in Windows 11 can cause an annoying screen flickering issue. You may notice this effect more often when you drag an app or work with the taskbar.
Fortunately, fixing the issue is relatively straightforward and you can do it by yourself. Let’s explore how to troubleshoot the screen flickering issue in Windows 11.
1. Check If the Task Manager Flickers
To determine whether the problem lies with a drive or an app, you can use the Task Manager to perform a little diagnostic. If it does flicker, you can use this information to better identify what’s causing the issue on your system.
To open Task Manager:
- Press Win + X to open the WinX menu.
- Select Task Manager from the context menu.
Now, see if the Task Manager flickers like everything else on the screen. If yes, you may have a bad display driver to fix. However, if the Task Manager is not flickering, an incompatible app is probably causing the flickering display issue.
2. Install Windows and Firmware Updates
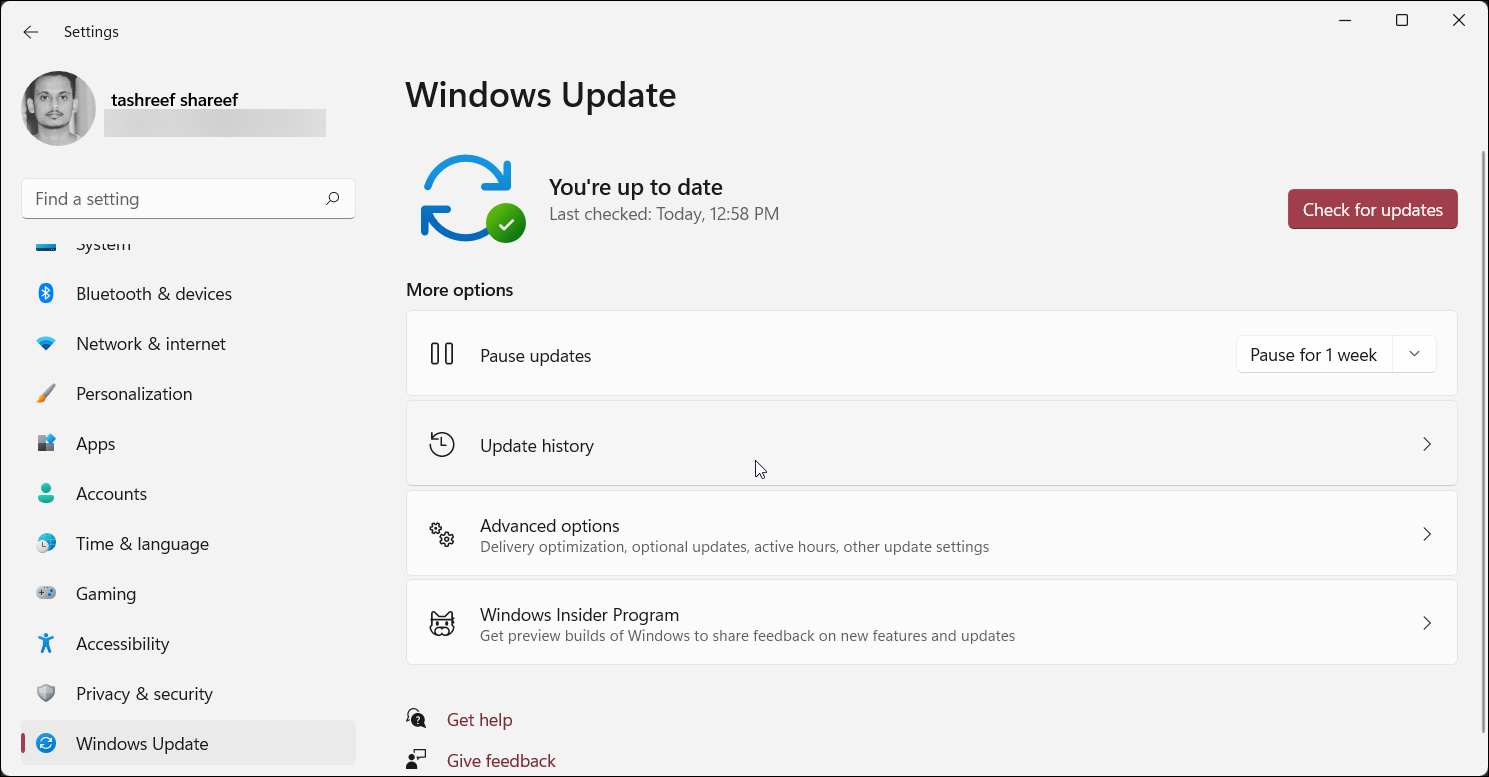
Display-related issues are a common issue on newly-installed Windows systems. When you perform a clean install, your system might require additional updates from your laptop or hardware manufacturer before it works properly.
If your PC is brand new, installing pending updates is one of the many things to do before using a new computer.
To update Windows 11:
- Press the Win + I to open Settings.
- In the left pane, open the Windows Update tab.
- Click the Check for updates button. If available, download and install all the important updates, including the firmware updates from your computer manufacturer.
- Restart your PC to finish installing the update and check for any improvements.
3. Roll Back Your Display Driver
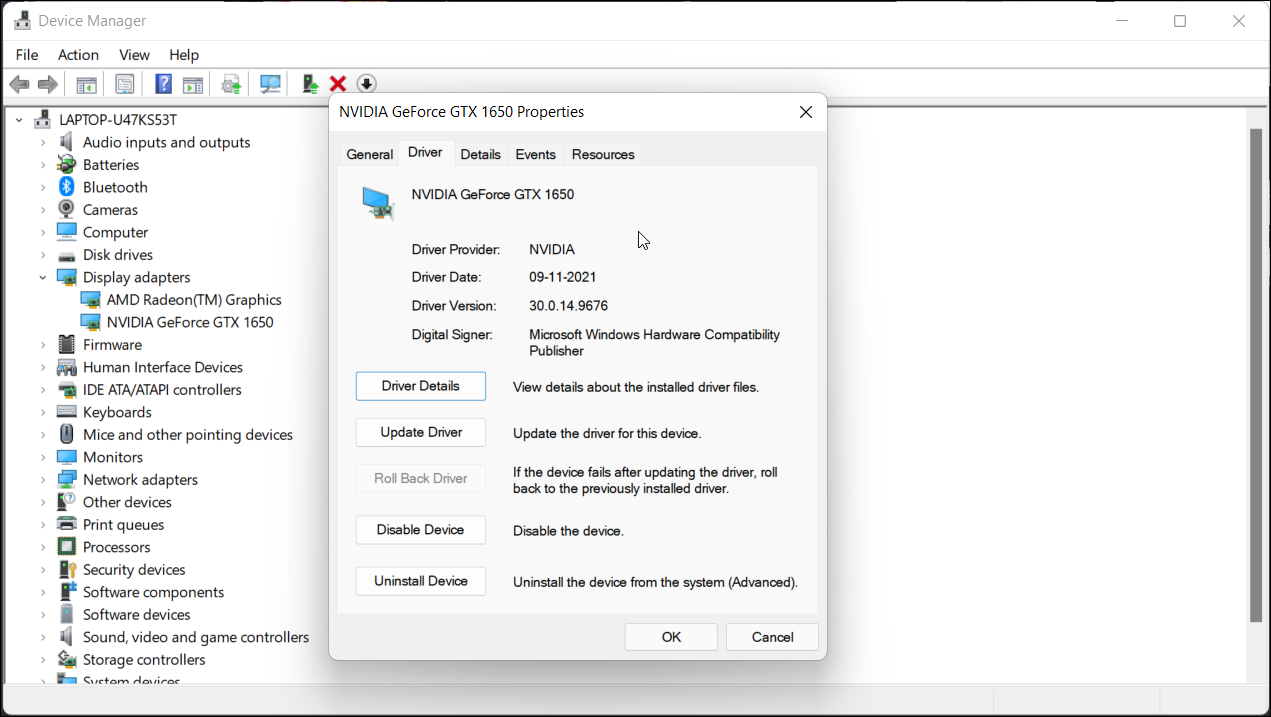
If you have recently installed new drivers for your graphics card, roll back your display driver. This will undo the changes and restore the previous version of the driver.
To roll back display driver:
- Press the Win + R to open Run.
- Type devmgmt.msc and click OK to open Device Manager.
- In Device Manager, expand the Display adapters section.
- Right-click on your display adapter (GPU name) and select Properties.
- In the Properties window, open the Driver tab.
- Click on the Roll Back Driver button.
- Click Yes to confirm the action.
Restart your PC once the rollback is complete and check for any improvements.
If the Roll Back Driver button is grayed out, Windows doesn’t display driver’s previous version ready, and you cannot perform a rollback at the moment. However, you can try updating the display driver to see if that helps fix the issue.
4. Update Display Drivers

Updating to the latest version of the display driver can help if the existing driver is corrupt or buggy. To update your display driver, do the following:
- Open the Winx menu by pressing Win + X.
- Click on Device Manager to open the app.
- Expand the Display adapters section.
- Right-click on your Display adapter and select Update Driver.
- Select Search automatically for driver option.
Windows will search for new drivers and install them if available. If not, look for driver updates through Windows update or on your GPU OEM’s website. For information, explore our guide on how to upgrade graphics drivers in Windows.
5. Uninstall the Display Driver
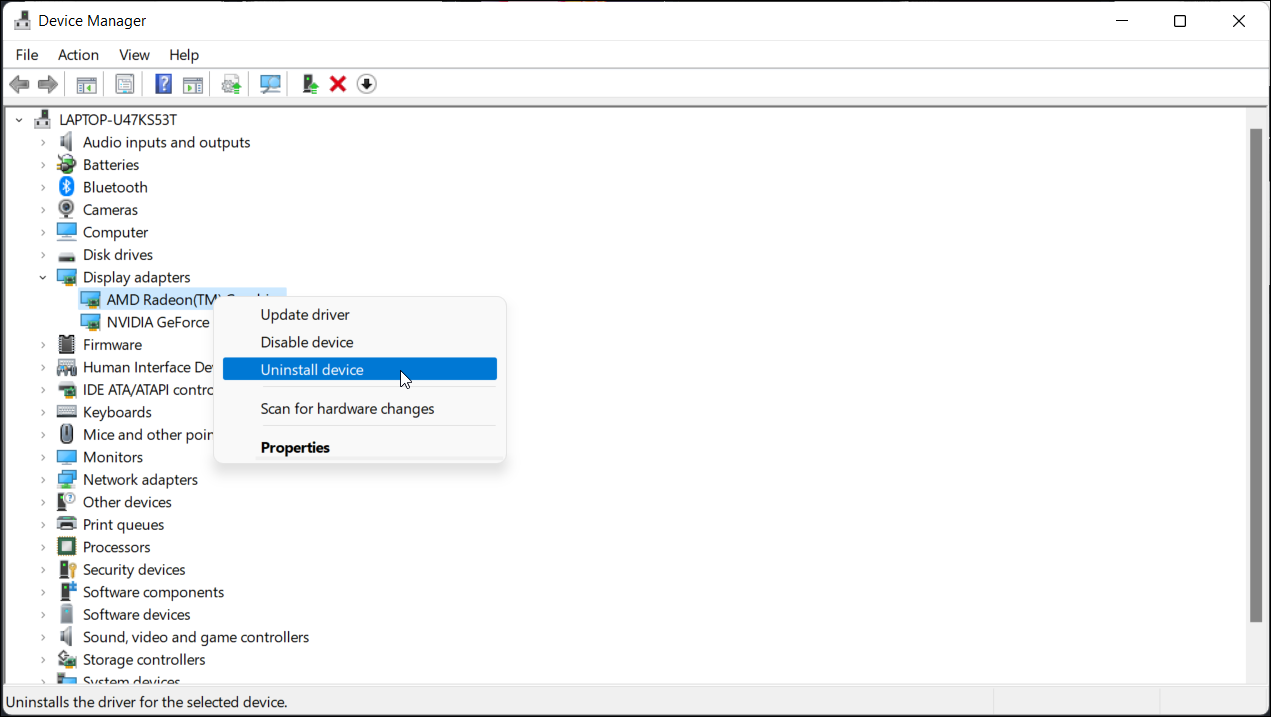
If the display flickering issue occurs due to a corrupt driver, you can uninstall the display driver from your system and see if that does the trick. To uninstall the display driver, do the following:
- Press Win + R to open the Run dialog.
- Type devmgmt.msc and click OK to open the device manager.
- Next, expand the Display adapter section.
- Right-click on your graphics device and select Uninstall Device.
- Click Uninstall to confirm the action.
- Restart your PC, and Windows will automatically scan and install the missing display driver.
6. Tweak Your Personalization Settings
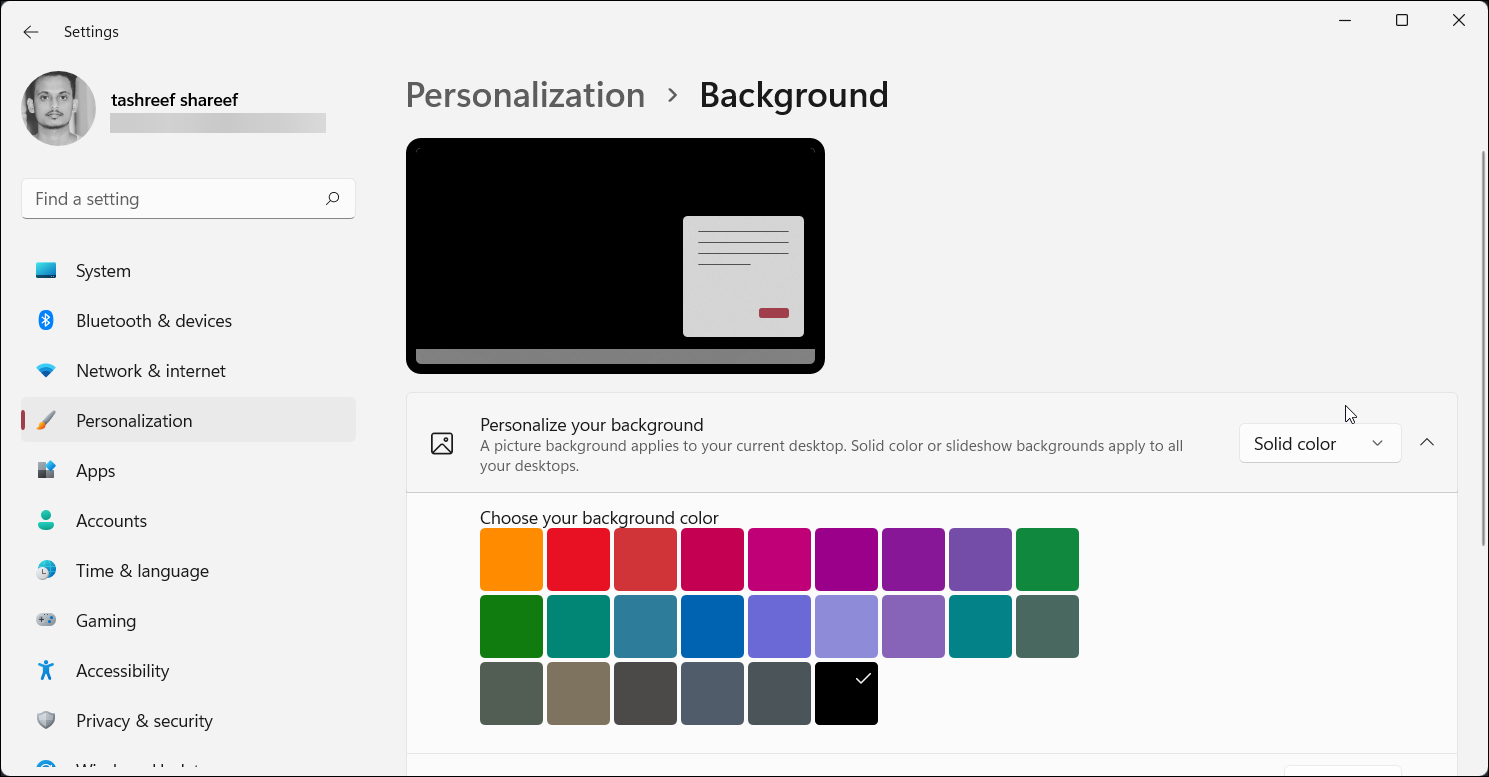
Another way to fix the screen flickering issue in Windows 11 is to set the background to Solid color instead of Slideshow. While this is more of a workaround than a fix, it should help you to ward off the problem temporarily.
To change your personalization settings:
- Press Win + I to open the Settings app.
- Navigate to Personalization > Background.
- Click the drop-down for Personalize your background and select Solid color. You can also select Picture if you prefer an image as a background.
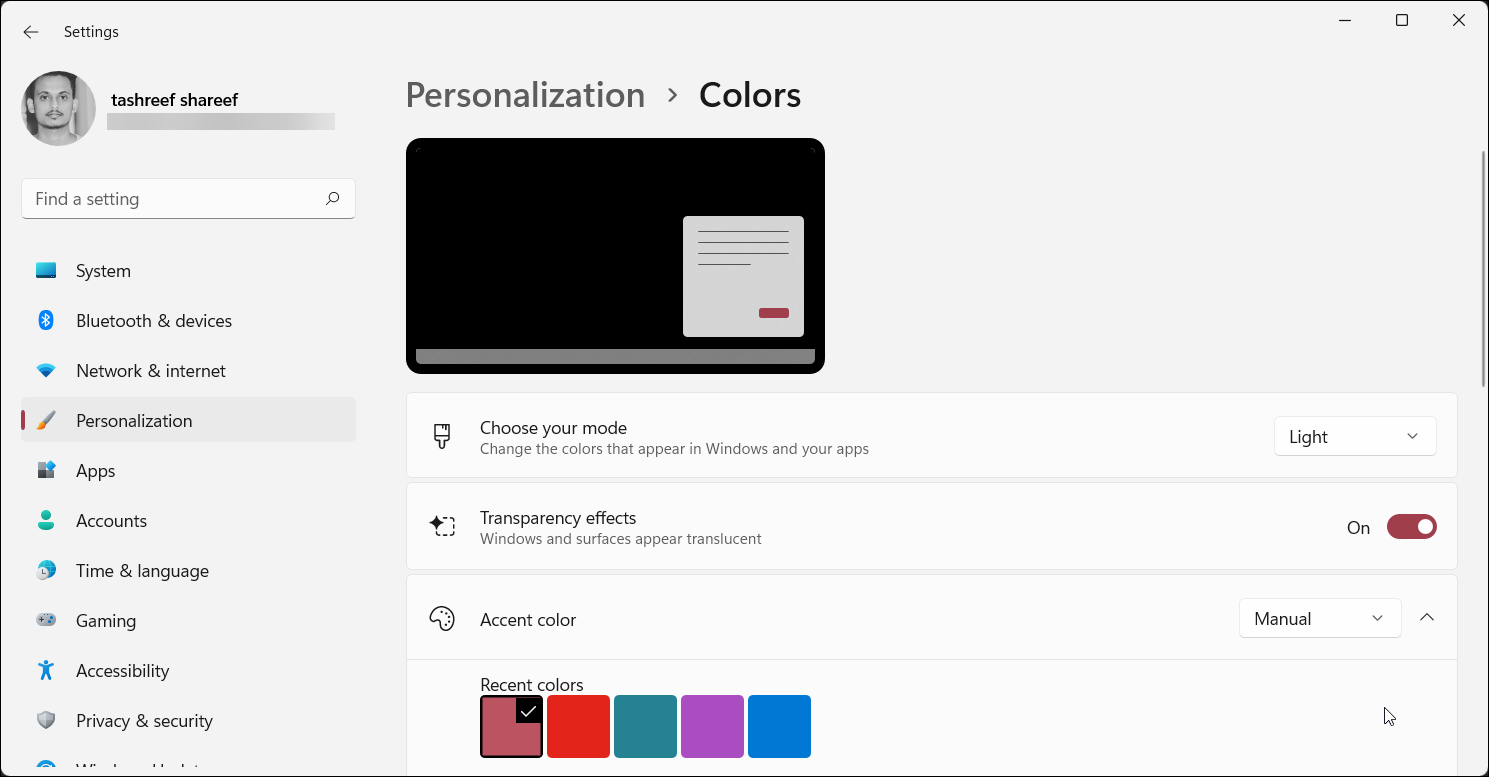
-
Next, go to Personalization > Colors.

- Click the drop-down for Accent color and select Manual.
That’s it. Monitor your system to see if the screen flickering problem in Windows 11 is resolved.
7. Turn Off Animation Effects
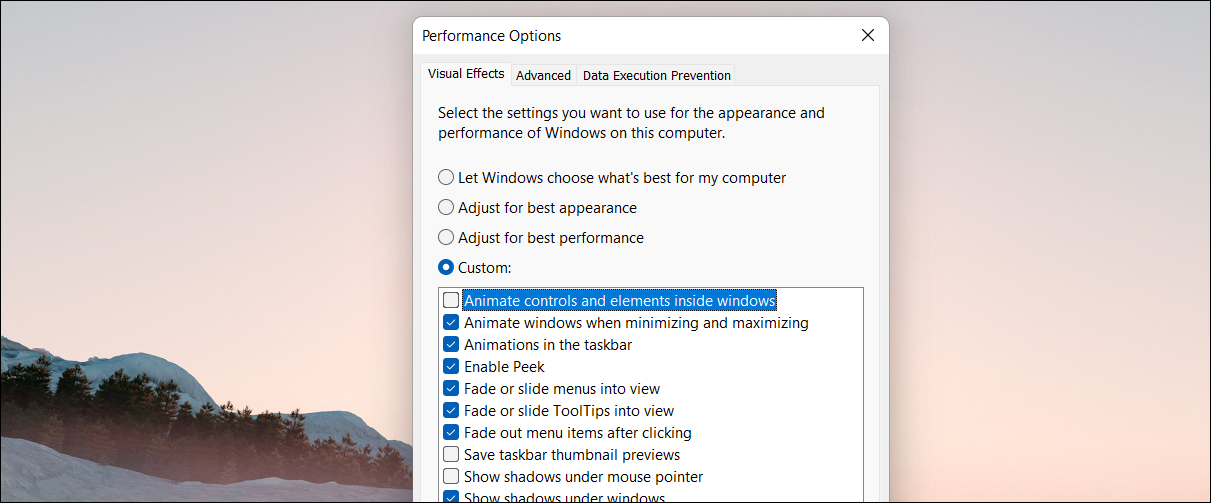
You can also temporarily fix the screen flickering issue by turning off animation effects in Windows 11. Since the Animation effects is part of the new design language, this is again more of a workaround than a fix.
To turn off Animations effects, navigate to Settings > Accessibility > Visual Effects > Animation effects. This will turn off every animation effect on your system.
If you don’t want to turn off every animation effect, do the following:
- Press the Win + S to open the search bar.
- Type adjust performance and then click on Adjust the Appearance and Performance of Windows.
- In the Performance Options window, select the Custom option.
- Next, uncheck Animate controls and elements inside windows. Leave other options as it is.
- Click Apply and then click OK to save the changes.
This will turn off animation effects for control and other elements. But retain other animations, including minimizing and maximizing and taskbar animation effects.
8. Check for App Incompatibility
App incompatibility is a common cause of screen flickering issues. Uninstalling the incompatible app may fix this problem for good. However, how do you determine if an app is causing your issues, and which app is the troublemaker?
To fix this, you can perform a clean boot in Windows 11 to determine if an issue is triggered due to a third-party app. In clean boot mode, Windows restarts the system with only the necessary drivers and services to get Windows running.
If the flickering screen problem does not occur in clean boot mode, a third-party app is likely the culprit here. Make sure to turn off the clean boot mode and restart your PC.
To identify the problematic app:
- Sort through the recently installed apps under Settings > Apps > Apps & features.
- Here, try to determine if a recently installed app may have caused the problem and uninstall the ones you suspect may cause the issue.
- Also, scan the startup apps list in the Task Manager and disable any suspicious startup app to see if they’re causing troubles.
Fixing the Screen Flickering Problem in Windows 11
You can often fix your flickering screen through a display driver update, reinstalling your drivers, or performing a driver rollback. However, if it is a glitch in the OS, look for available hotfixes in the Windows update section.
Third-party apps are another common cause, so removing any such tricky app can help you resolve the problem. If nothing works, tweak your accessibility and personalization settings to see if that helps.