
While the default option in Windows is to display Time in 12-Hour (AM/PM) format, it also provides the option to change the Time format on your computer to 24-Hour Military Time.
In general, the standard 12-Hour Time format that reports the time in Day/Night or AM/PM segments suits most users and industries that work during the day and remain closed at night.
However, those who work in Travel Industry, Airports, Sea Ports, Railways, Military, Navy, Public Safety and Public transport follow a 24-Hour Time Format.
Depending on your preference, you can make your computer to display time in either 12-Hour or 24-Hour Military Clock Format using the following steps.
Advertisement
1. Change 12-Hour Clock to 24-Hour
The easiest way to change the time format on a Windows computer from 12-Hour to 24-Hour or from 24 to 12-Hour format is by going to the “Time and Language” Settings on your computer.
1. Click on the Start button > click on Settings Icon in the Start menu.
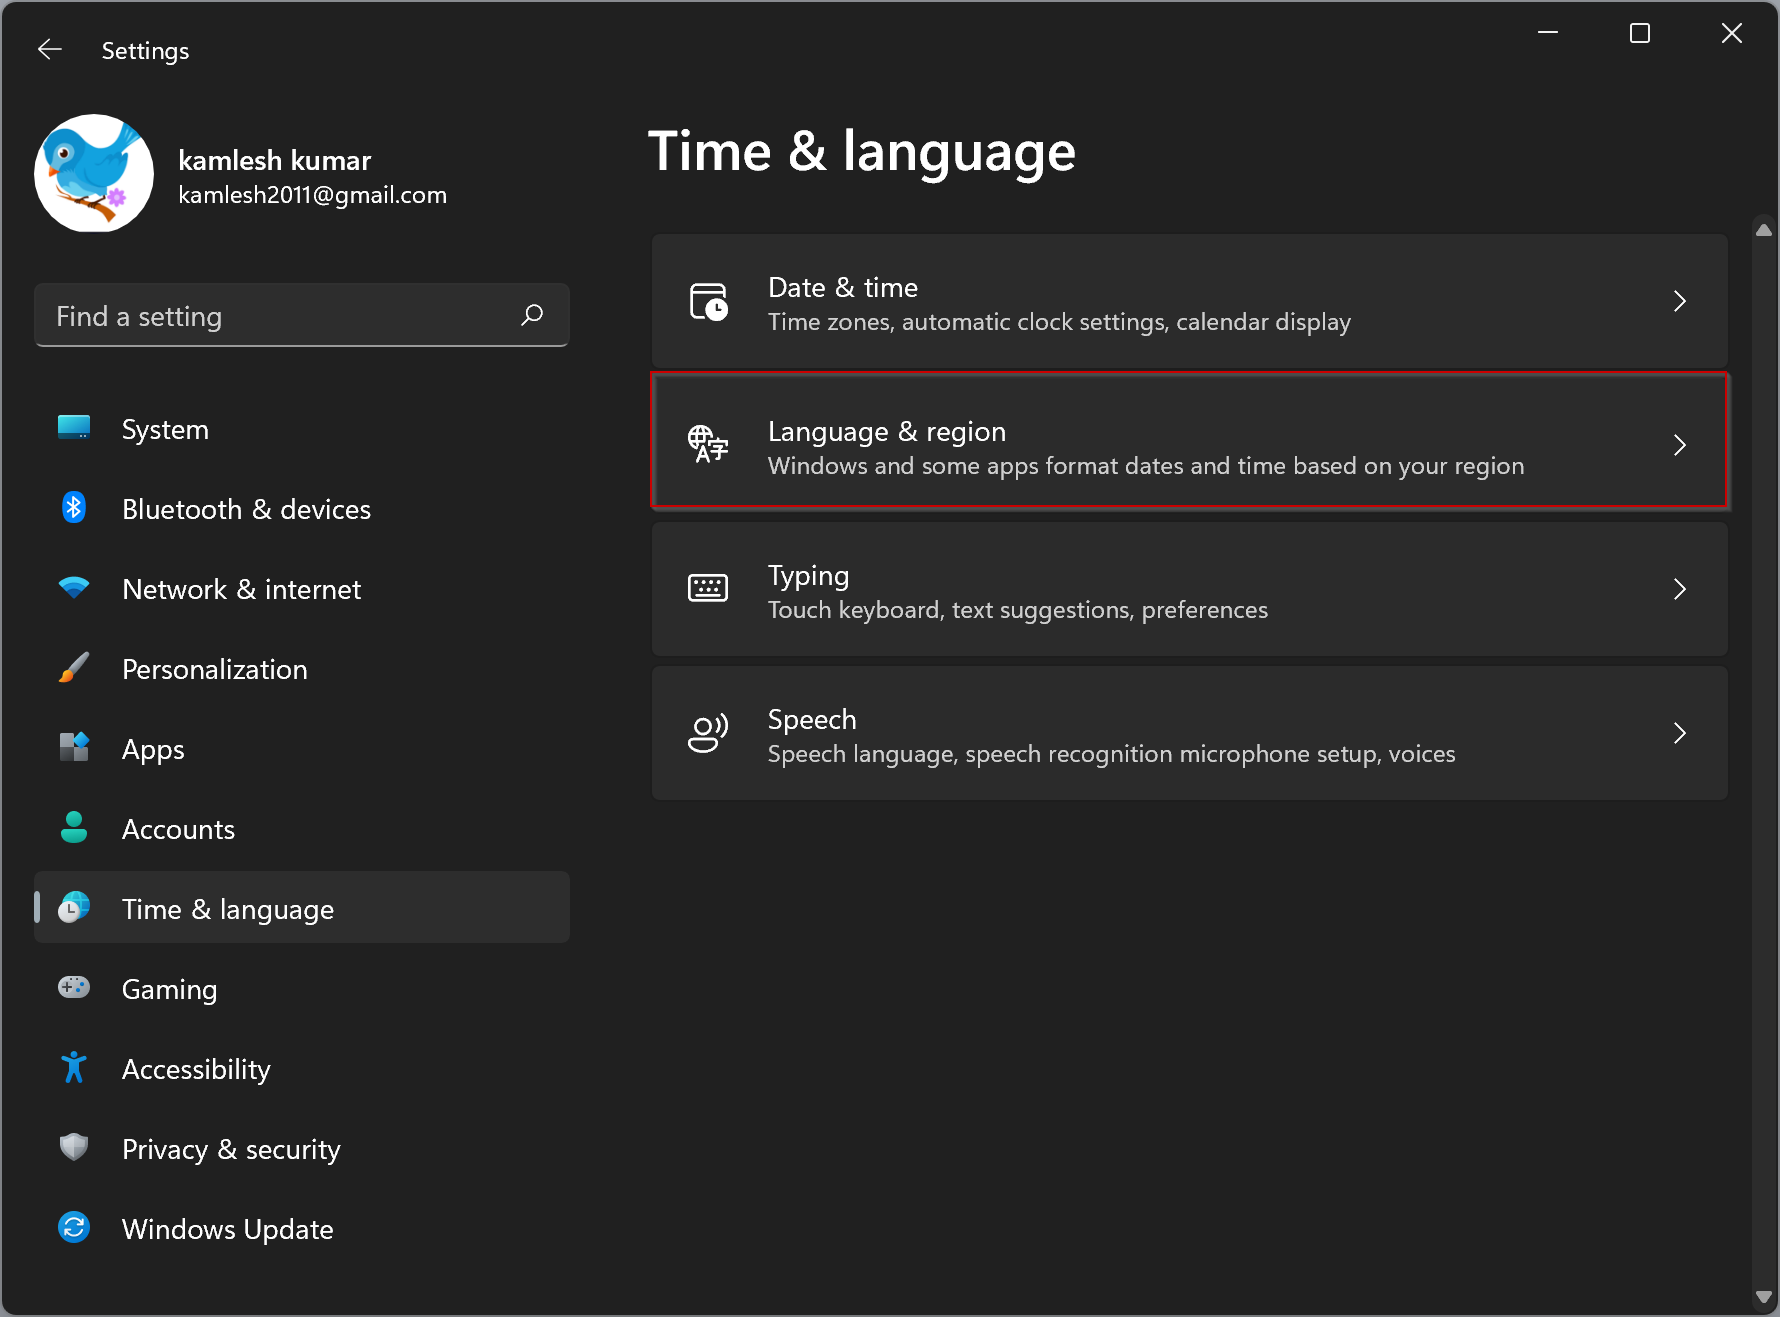
2. On the next screen, select Time and Language in the left-pane and click on the Language & Region card in the right-pane.

3. Scroll down in the right-pane, click on Regional Format and then click on Change Formats button in the drop-down.

4. On the next screen, use the Down-Arrow to select time without AM/PM suffix for both Long Time and Short Time.

The change in the time format will be immediate and you should now find your computer displaying time in 24-Hour format, without the usual AM/PM Suffix.
2. Change 24-Hour Clock to 12-Hour Clock
If for some reason, your computer is showing time in 24-hour format, you can find below the steps to change 24-Hour Clock to the default 12-Hour Clock Format.
1. Click on the Start button > click on Settings Icon in the Start menu.
Advertisement
2. On the next screen, select Time and Language in the left-pane and click on the Language & Region card in the right-pane.
3. Scroll down in the right-pane, click on Regional Format and then click on Change Formats button in the drop-down.
4. On the next screen, use the Down-Arrow to select time with AM/PM suffix for both Long Time and Short Time.

The change in the time format will be immediate and you should now find your computer displaying the time in 12-Hour format, with the regular AM/PM Suffix.
3. Change Time Format Using Control Panel
The option to change Date and Time Format is still available in the Control Panel in Windows 11.
1. Type Control Panel in the search bar and click on Control Panel App in the Search results.

2. On Control Panel screen, switch to Category view and click on Change date, time or number formats link.

3. On the next screen, switch to Formats tab and select your desired Time Format (12-Hour or 24-Hour) by using the down arrow in Short Time and Long Time entries.

4. To set 12-Hour Time Format, select any entry with AM/PM Suffix in the drop-down. If you want to switch to 24-Hour Time Format, select any entry without AM/PM Suffix.
Make sure you click on Apply and OK to save this change in Time Display Format on your computer.
4. Display Time in “Hours:Minutes:Seconds” Format in Windows 11
Many users coming from Windows 10 are looking for a way to change the Taskbar Time Display on a Windows 11 computer from Short Time (Hours:Minutes) to Long Time Format (Hours:Minutes:Seconds).
However, the bad news is that Windows 11 does not provide any option to change the default Short Time Format display in the Taskbar to Long Time Format.
In Windows 10, users could view the Long-Time Format in the Calendar by clicking on Date/Time in the Taskbar. Also, it was possible to change the Taskbar Time Display to Long-Time Format by editing the registry.
However, in Windows 11 the Calendar does not display Time and Microsoft has also removed the optional registry hack that could add seconds to the Time Display in the Taskbar.
Windows 11, like its predecessors, allows users to customize how dates and times are displayed on their system. By default, Windows 11 displays dates and times in a specific format based on the language and region settings of your computer. However, you may prefer a different format that better suits your needs or preferences. In this article, we will explain how you can change the dates and times format in Windows 11 and customize it to your liking.
Changing the dates and times format in Windows 11 is a simple process that can be done through the settings menu. By changing the format, you can choose how you want the dates and times to appear on your system, including the order of the day, month, and year, as well as the time format. This is especially useful for users who work with international clients or colleagues and need to display dates and times in a different format than their default system settings. Additionally, changing the format can make it easier for users with visual impairments or dyslexia to read and interpret dates and times.
To change the date format on your PC, do the following steps:-
Step 1. Open the Settings app by pressing the Windows + I keys from the keyboard or any other method that you like to use.
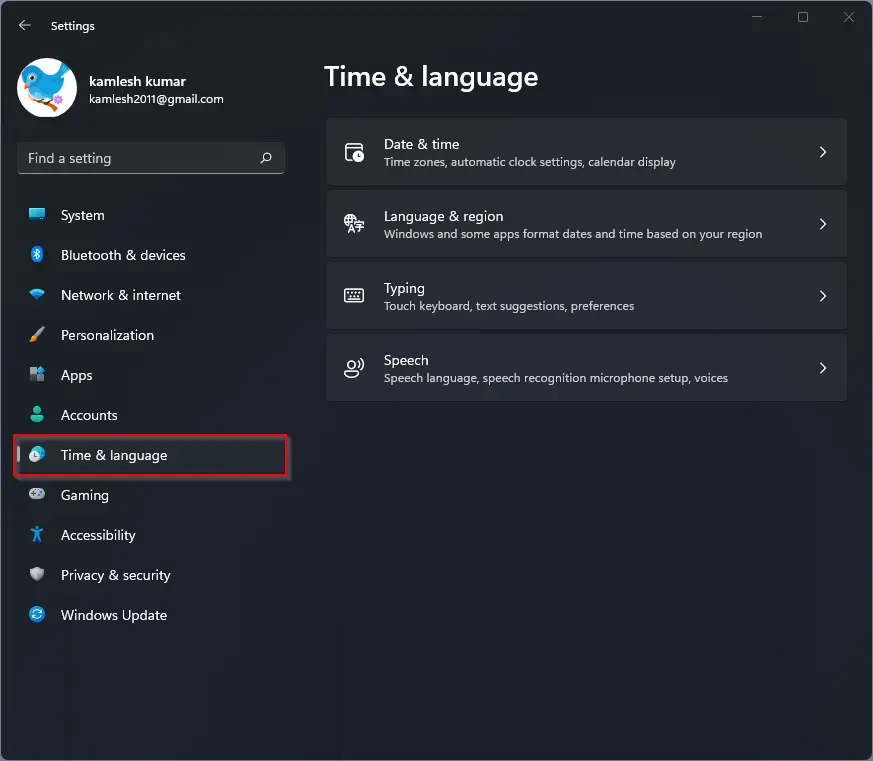
Step 2. When Windows Settings opens, select the Time & language category from the left side pane.
Step 3. On the right side pane, click the Language & region.
Step 4. On the Language & region settings page, scroll down to find the Related settings section.
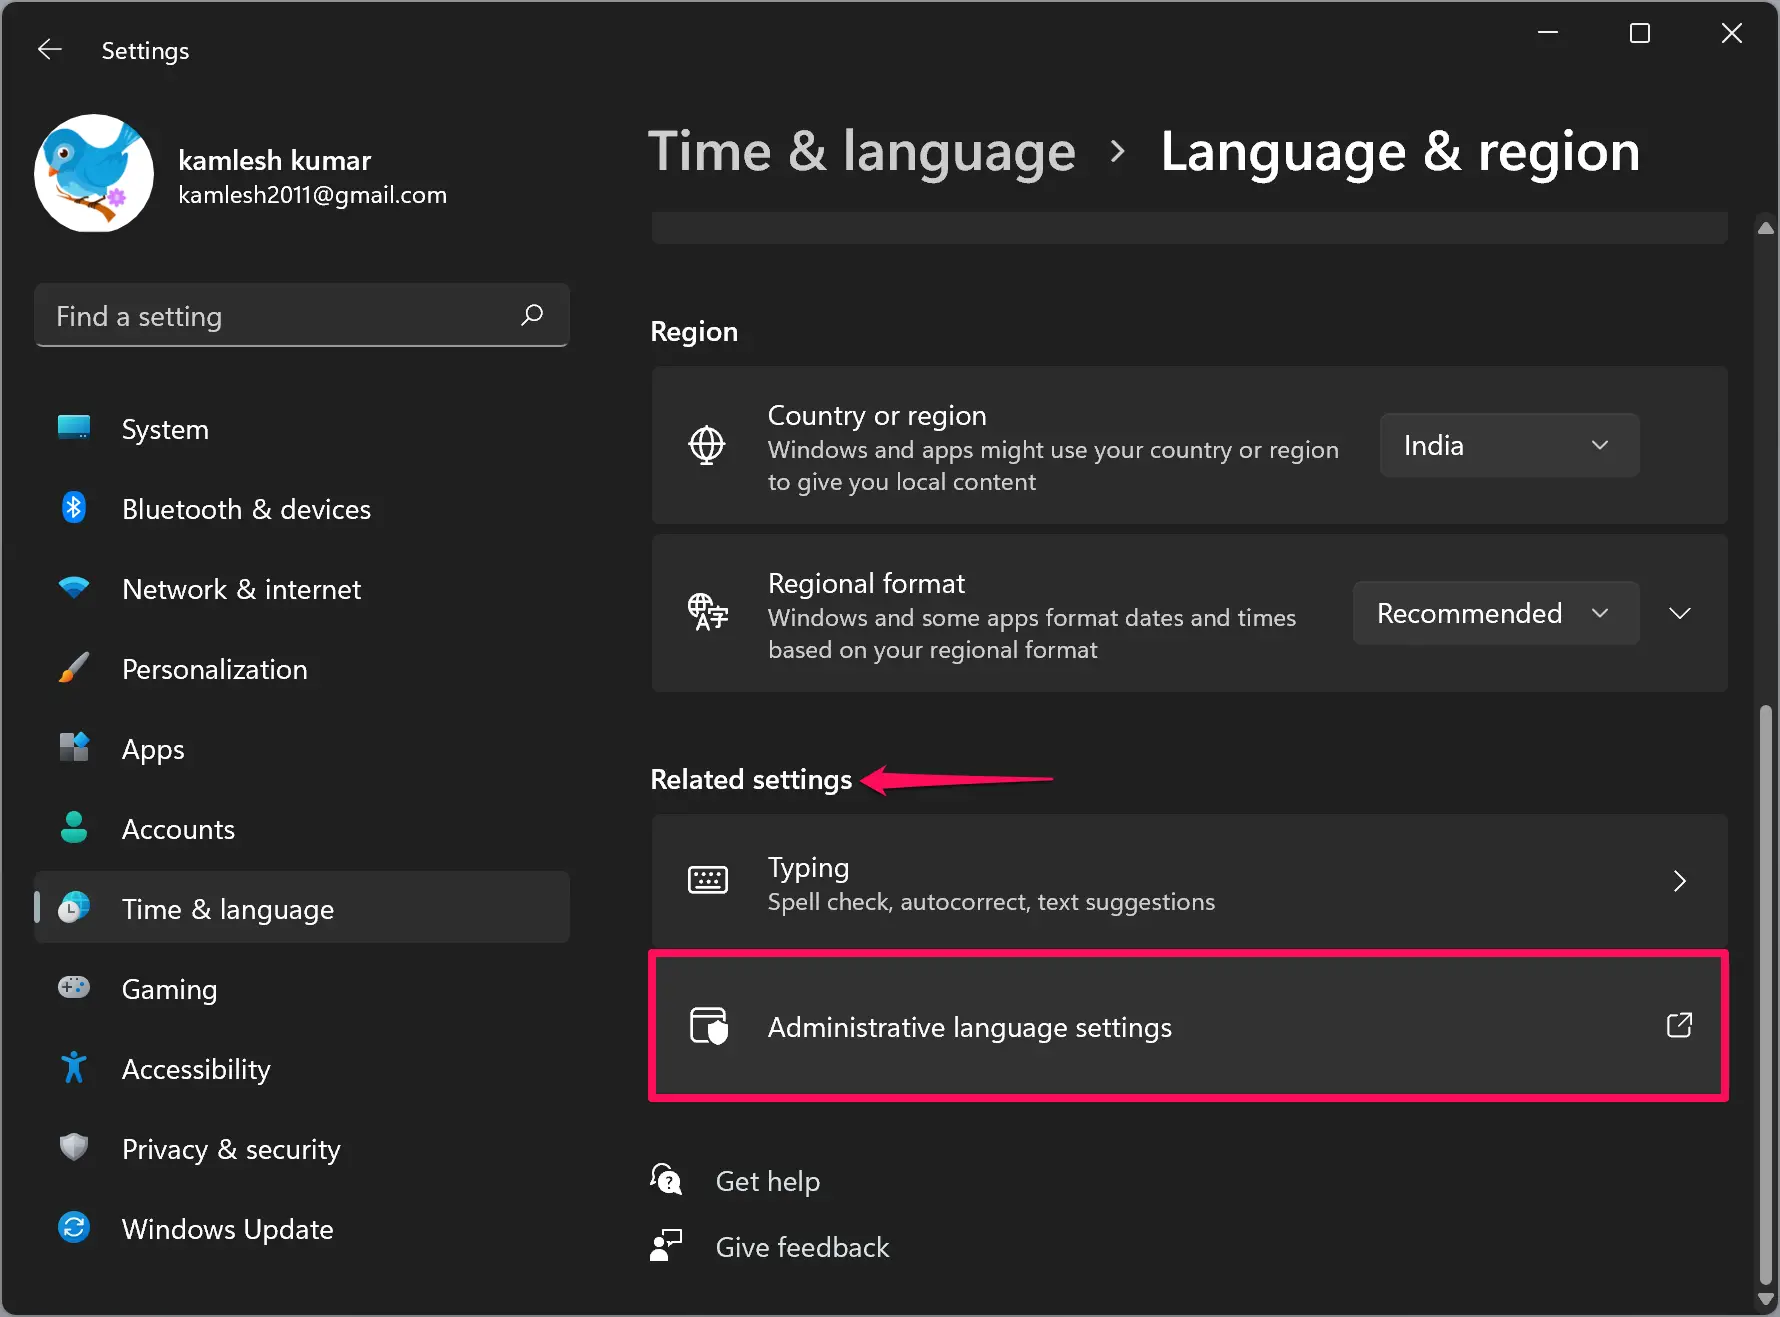
Step 5. Then click the option Administrative language settings.
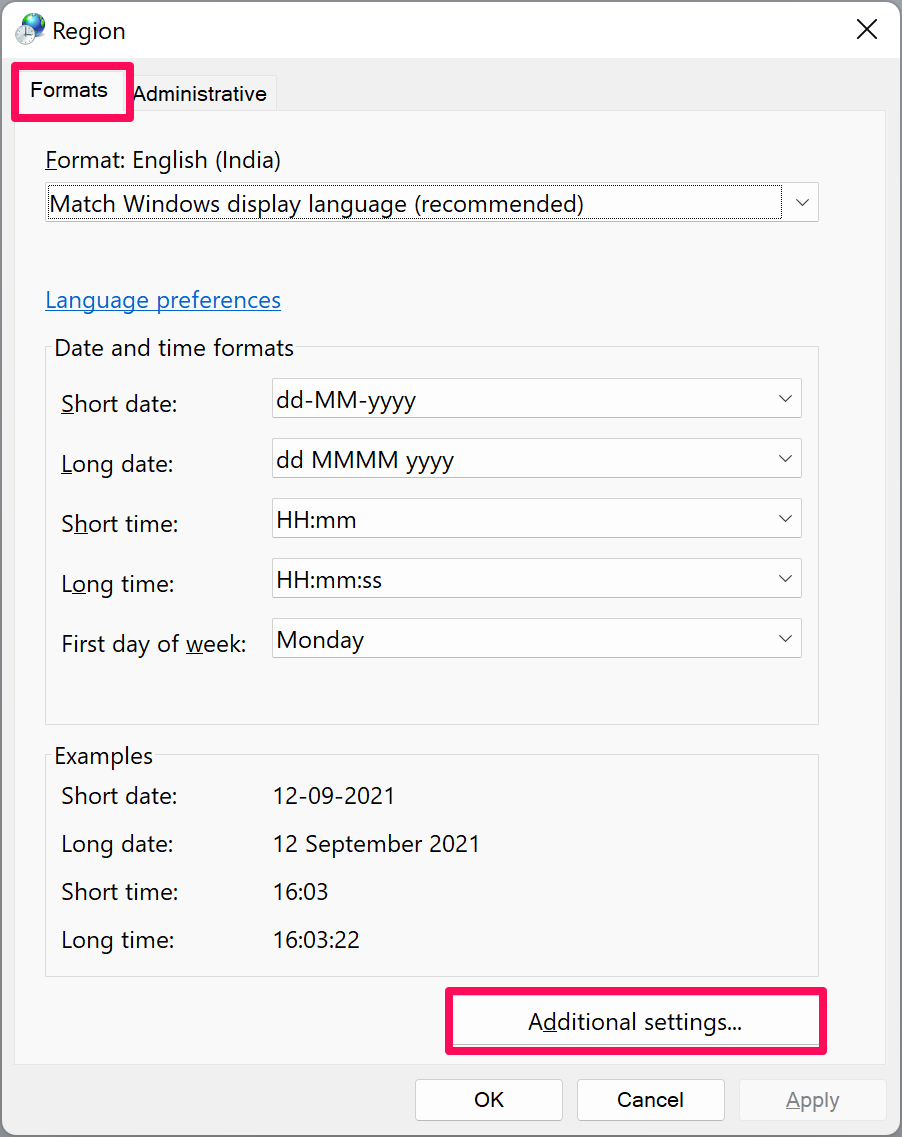
Step 6. A new pop-up window will open. Navigate to the Formats tab. Here, if you wish, you can select a built-in date and time format. For a custom format, click the Additional settings button.
Step 7. On the Customize Format dialog, select the Date tab.
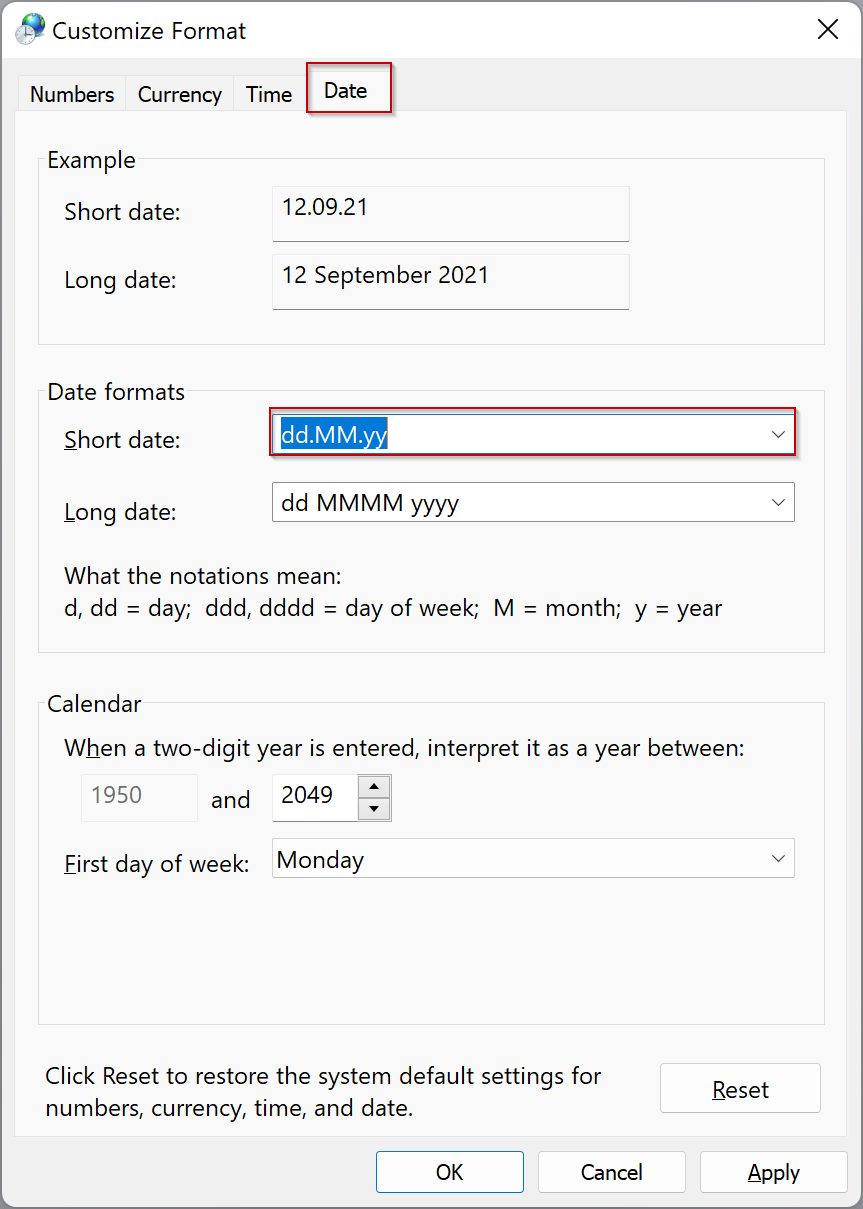
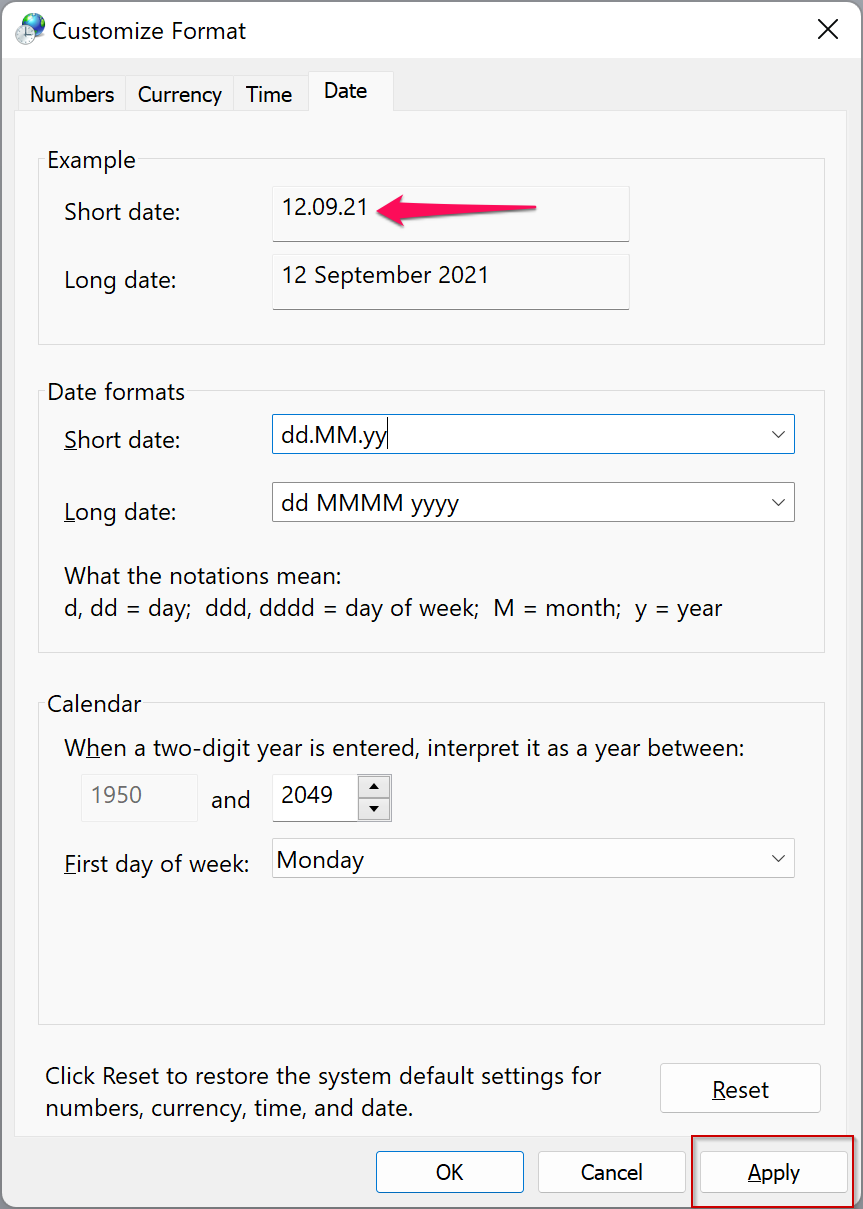
Step 8. Under the Date formats section, select any Short date and edit them according to your choice. For instance, we have used dots (dd.mm.yy) for the date format.
When done, click the Apply button to see the preview under the Example section.
Step 9. Similarly, to change the time format, navigate to the Time tab and edit the Short time format that you want to see in the taskbar.
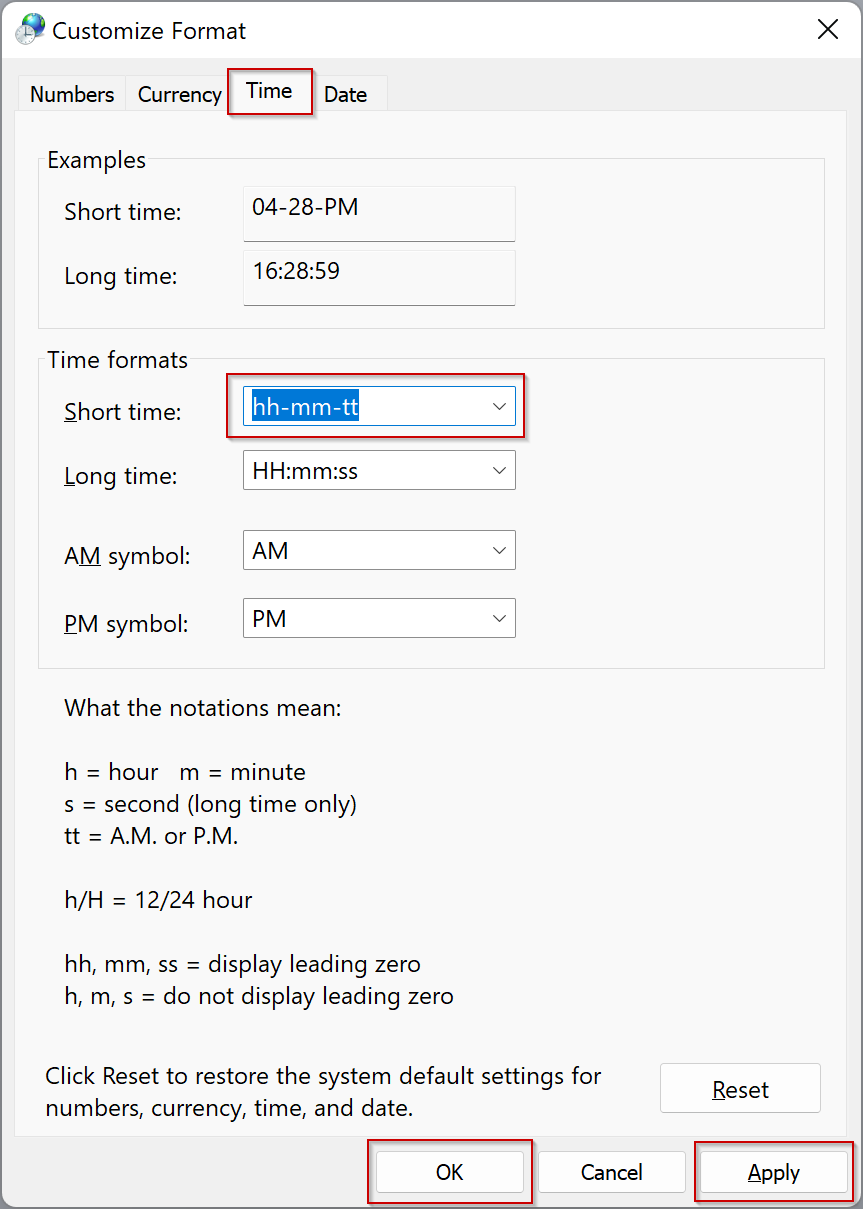
Step 10. Click Apply.
Step 11. Click OK.
Step 12. Click Apply.
Step 13. Click OK.
Now, you can close the Settings app. All the settings are stored automatically.
Conclusion
In conclusion, customizing the date and time format in Windows 11 is a simple and convenient way to personalize your system and make it more accessible for your needs. With just a few clicks in the Settings app, users can change the order and format of dates and times, including the time format, making it easier to read and interpret. This is especially useful for users who work internationally or have visual impairments or dyslexia. Overall, Windows 11 continues to provide users with the ability to customize their experience and improve their productivity.
Also Read:
How to Change or Sync Time in Windows 11?
You should upgrade or use an alternative browser.
-
#1
Possibilities:
Unpacking and packing partitions: System, Vendor, Product, ODM, SOCKO, ELABLE (RAW, SPARSE)
Unpacking and packing partitions with extension: * .img; * .fex; * .Partition; * .new.dat; * .new.dat.br; * .lz4; * .exT4; * .tar; * .md5
Unpacking and packaging logo partition: logo.img, logo.partition
Unpacking and Packaging: _aml_dtb.partition (Single, Multi, Multi / Gzipped)
Extract from the PAYLOAD.BIN file sections file
Removing from the Super.img file partitions
Unpacking and packaging of resource partition: resource.img
Unpacking and packaging SOC Amlogic firmware, Rockchip and Allwinner
Unpacking and assembling Service Package: * .zip (Update.zip)
Decompiling and compile applications (* .apk)
Github: https://github.com/CryptoNickSoft/MIK
Attachments
-
#6
Edit: Nevermind, I’ve managed to change the language
-
#7
Mine’s in Russian
Edit: Nevermind, I’ve managed to change the language
So do something wrong.
-
#8
-
#9
Amazing, I was finally able to extract the system.fex. Originally I have a super.fex, which contained 3 other files: product.fex, system.fex and vendor.fex
Out of the 3 fex-files only 2 were automatically extracted after the initial split: system.fex and vendor.fex. The 3rd file product.fex could be manually extracted with your tool.
System.fex etc. can be created after modification, but how do I re-pack the 3 sub-files into the single super.fex again?
Last edited:
-
#10
-
#11
Download link not working for me
yes , not working
-
#12
Everything is excellent friend
-
#18
-
#19
Halo sir,can this tool solve Samsung devices that fail to flash with odin in the system.img section, after editing system.img with the other tool ?
Hey! Try. I did not test, since this functionality is not interesting to me.
-
#20
[7920] Failed to execute script ‘imgextractor’ due to unhandled exception!
Traceback (most recent call last):
File «imgextractor.py», line 374, in <module>
File «imgextractor.py», line 368, in main
File «imgextractor.py», line 261, in __ext4extractor
File «ext4.py», line 484, in __init__
ext4.MagicError: Invalid magic value in superblock: 0x0000 (expected 0xEF53)
I would really appreciate help as I’m really desperate by now.
Similar threads
Unpacker Kitchen for Android (UKA) v.5.27
✓Версия 5.27
•Поправил бекап образов из текущей прошивки с файловой системой erofs.
•Поправил сборку в RO с shared_blocks.
✓Версия 5.26
•Багфиксы в коде
✓Версия 5.25
• Добавлена сборка ext4 в ro с «shared_blocks».
• При выборе выходной папки, добавлена возможность чтения путей из файла /data/local/binary/path_list.txt при вводе 0. Т.е в этот файл можно записать свои пути и UKA при вводе 0 будет брать их оттуда.
/data/local/UnpackerSystem и /data/local/UnpackerSystem/uka_backup будут отображаться в списке автоматически.
✓Тестовая версия 5.24
• Добавлена сборка erofs в erofs.
✓Тестовая версия 5.23
• В «Прочие инструменты» добавлен пункт: Разделение super.img на части», будет работать только на 64-битных прошивках.
Касается тех super.img, для которых не используется файл .xml для склейки.
==================================
✓Version 5.27
• Corrected backup images from the current firmware with the erofs file system.
• Corrected the assembly in RO with shared_blocks.
✓Version 5.26
•Bugfixes in the code
✓Version 5.25
• Added ext4 build to ro with «shared_blocks».
• When selecting an output folder, the ability to read paths from the file /data/local/binary/path_list.txt when entering 0 has been added. That is, you can write your paths to this file and UKA will take them from there when you enter 0.
/data/local/UnpackerSystem and /data/local/UnpackerSystem/uka_backup will appear in the list automatically.
✓Test version 5.24
• Added erofs assembly to erofs.
✓Test version 5.23
• In «Other tools» an item has been added: Splitting super.img into parts» will only work on 64-bit firmware.
Applies to those super.img for which an .xml file is not used for gluing.
Unpacker Kitchen for Android (UKA) v.5.22
✓Версия 5.22:
Обновлён Python
Исправлены ошибки при распаковке *.ofs и *.ops
✓Версия 5.21:
Извлечение payload.bin должно извлекаться быстрее.
Если будет ошибка, и будет использоваться старый метод извлечения, то пишите на каком андроиде и прошивке это произошло.
✓Версия 5.20:
Исправлено создание бекапа разделов, находящихся в super.
Добавлен выбор патча в пункте «Патч vbmeta»
Добавлена возможность распаковки образов с расширением .PARTITION в AIK-mobile.
✓Version 5.22:
Updated Python
Fixed bugs when unpacking *.ofs and *.ops
✓Version 5.21:
Extracting payload.bin should extract faster.
If there is an error, and the old extraction method is used, then write on which android and firmware this happened.
✓Version 5.20:
Fixed backup of partitions in super.
Added patch selection in «Patch vbmeta»
Added the ability to unpack images with the .PARTITION extension in AIK-mobile.
Unpacker Kitchen for Android (UKA) v.5.19
✓Версия 5.19:
В пункт «Распаковка .br», добавлено «Распаковать все образы»
В пункт «Собрать .img с размером папки для сборки -> .br», добавлено «Собрать все образы»
Исправлена сборка vendor_boot.img.
Добавлена возможность замены публичного ключа в любом образе со структурой AVB, если он был подписан.
При сборке .img будет сохраняться, тот публичный ключ, которым был подписан образ на момент распаковки.
Добавлена возможность сборки erofs -> ext4 на 32 битных прошивках.
Добавлена возможность распаковки образов с расширением .win.
=========================================================
✓Version 5.19:
In the item «Unpacking .br», added «Unpack all images»
In the item «Build .img with build folder size -> .br», added «Build all images»
Fixed assembly vendor_boot.img.
Added the ability to replace the public key in any image with the AVB structure, if it has been signed.
When assembling .img, the public key that was used to sign the image at the time of unpacking will be saved.
Added ability to build erofs -> ext4 on 32 bit firmware.
Added the ability to unpack images with the .win extension.
Unpacker Kitchen for Android (UKA) v.5.18
✓Тестовая версия 5.18:
Исправлены ошибки, найденные в версии 5.17.
Добавлена поддержка форматов .lzma, .xz, .zst к пункту 11 -> 3 (Конвертация .lz4)
✓Tested version 5.18:
Fixed bugs found in version 5.17.
Added support for .lzma, .xz, .zst formats to item 11 -> 3 (.lz4 conversion)
Unpacker Kitchen for Android (UKA) v.5.17
✓Тестовая версия 5.17:
Добавлен пункт замены публичного ключа в boot/recovery/vbmeta(11 -> 1 -> 5).
Т.е можно,, извлечь публичный ключ AVB, например, из стокового boot.img, это будет стоковый ключ.
Потом, используя пункт замены ключа, можно внедрить в ранее перепакованный boot.img, этот стоковый ключ.
Будет актуально для тех образов, у которых в vbmeta проверяется только public key.
Также при перепаковке boot/recovery автоматически будет сохранятся тот публичный ключ, который был в образе на момент распаковки.
✓Тестовая версия 5.16:
Добавлена распаковка super.img сжатого в .zst.
Исправил найденные ошибки.
Unpacker Kitchen for Android (UKA) v.5.15
В пункт «Распаковка .img» добавлена распаковка из папки /data/local/UnpackerQfil.
В пункт «Собрать .img с размером папки для сборки» добавлена сборка всех образов. Введённое свободное место примениться ко всем образам.
Изменения в коде сборки super.img.
Исправление при создании структуры AVB у образов не имеющих «partition name».
При использовании пункта «Извлечение образов из раздела «super» текущей прошивки», образы будут извлекаться из активного слота.
Unpacker Kitchen for Android (UKA) v.5.14
Unpacker Kitchen for Android (UKA) v. 5.14
В середине 2023 года в Windows 11 была добавлена встроенная возможность распаковки архивов Z-Zip, RAR, и TAR в дополнение к ZIP. Последняя версия системы добавила и новые поддерживаемые форматы архивов для сжатия, помимо давно присутствовавшего ZIP, также появилась возможность настройки архивации.
В этой простой инструкции о том, как архивировать файлы с использованием различных форматов архивации в Windows 11 и о доступных настройках архивации.
Добавление папок и файлов в архив
Подход к архивации не изменился в последней Windows 11 по сравнению с предыдущими версиями системы, но появились дополнительные опции и выбор форматов. Для того, чтобы сжать папку, файл или набор файлов в архив, достаточно выполнить следующие действия:
- Выберите нужные элементы, нажмите по ним правой кнопкой мыши, откройте пункт «Сжать до», а затем — либо нажмите по формату архива: ZIP, 7z (7-Zip) или TAR для быстрой архивации с параметрами по умолчанию, либо нажмите «Дополнительные параметры».

- В дополнительных параметрах вы можете выбрать место и имя сохранения архива, его формат, уровень сжатия, а также метод сжатия (если вы в них не разбираетесь, рекомендую оставить метод сжатия по умолчанию). Также можно включить сохранение символических ссылок и жестких ссылок.

- Для различных типов архивов список методов сжатия и опций сохранения символических и жестких ссылок будет отличаться:
- Выбрав необходимые параметры, нажмите «Создать» и дождитесь завершения процесса архивации.


Созданные файлы архивов могут быть открыты и распакованы как в Проводнике Windows 11 (для ZIP — и в Windows 10), так и в любом стороннем архиваторе.
Некоторые нюансы, касающиеся архивации средствами системы:
- Несмотря на появление новых параметров, некоторых востребованных настроек нет: например, установки пароля на архив или создания многотомных архивов.
- Если необходимо добавить новые файлы к уже созданному архиву (ограничившись инструментами Windows 11), вы можете легко сделать это для ZIP-архивов, просто перетащив новые файлы на него, но это не сработает для архивов 7z и TAR.
- На момент написания этого материала опция «Сжать до» доступна только в новом контекстном меню файлов и папок. Если использовать классическое контекстное меню или меню действий в Проводнике, присутствует лишь опция сжатия в ZIP-файл (отправки в сжатую ZIP-папку).
- Команда Compress-Archive для PowerShell всё так же поддерживает лишь ZIP-архивы.
Несмотря на перечисленные нюансы и то, что я продолжаю рекомендовать 7-Zip или WinRAR, нововведения в части работы с архивами — это отлично и не исключено, что в будущих версиях системы функциональность будет расширяться.